

Page 1

Print Status Notifier
User’s Guide
Page 2

Contents
1Introduction
1.1 Operating environment .................................................................... 1-1
1.2 Main functions .................................................................................. 1-1
2 Installing Print Status Notifier
2.1 Installation ......................................................................................... 2-1
To install ......................................................................................... 2-1
2.2 Uninstallation .................................................................................... 2-1
To uninstall ..................................................................................... 2-1
3 Using Print Status Notifier
3.1 Starting and quiting Print Status Notifier ....................................... 3-1
3.1.1 To start ........................................................................................... 3-1
3.1.2 To quit ............................................................................................ 3-1
Operating procedure ...................................................................... 3-1
3.2 About the menu ................................................................................ 3-2
3.3 Job information notification flow .................................................... 3-3
PC Jobs ......................................................................................... 3-3
Device Job (when User Authentication is enabled) ........................ 3-4
Device Jobs (when User Authentication is disabled) ..................... 3-5
3.4 Setting flow ....................................................................................... 3-7
Setting procedure .......................................................................... 3-7
3.5 Setting method ................................................................................. 3-8
3.5.1 About the Settings dialog box ....................................................... 3-8
Device List tab ............................................................................... 3-9
System tab ................................................................................... 3-10
3.5.2 Editing the device list ................................................................... 3-11
Checking the device to be monitored .......................................... 3-11
Adding devices to the device list ................................................. 3-12
Changing the setting information of the device ........................... 3-13
Deleting devices from the device list ........................................... 3-15
3.5.3 Specifying the job to be monitored .............................................. 3-16
Operating procedure .................................................................... 3-16
Print Status Notifier i
Page 3

3.5.4 Specifying the User Authentication settings .................................3-19
Operating procedure .....................................................................3-19
3.5.5 Specifying the notification method and the address of your
computer .......................................................................................3-22
Operating procedure .....................................................................3-22
3.6 Checking the job information .........................................................3-25
3.6.1 Viewing the job information ..........................................................3-26
Dialog box of when a job is completed normally ..........................3-27
Dialog box of when a job is stopped ............................................3-27
Dialog box of when a job is abort .................................................3-27
3.6.2 Viewing the job history ..................................................................3-28
Detailed history dialog box ...........................................................3-29
3.7 Checking the device status ............................................................3-30
3.8 Checking the job information manually ........................................3-32
3.8.1 Starting the monitor ......................................................................3-32
Operating procedure .....................................................................3-32
3.8.2 Canceling the monitor ...................................................................3-34
Operating procedure .....................................................................3-34
3.9 Displaying PageScope Web Connection .......................................3-36
Clicking the registered device name on the menu .......................3-36
Clicking the device name in the Job Information dialog box ........3-36
Clicking the device in the Device Status dialog box .....................3-37
4 Troubleshooting
ii Print Status Notifier
Page 4

About this Product
Print Status Notifier is a program that is located on the taskbar and that notifies the user of the job status (job information) by monitoring the jobs, such
as print and fax jobs that are executed from a device (printer or MFP).
With Print Status Notifier, not only can you monitor the jobs (PC Jobs) that
are executed from a computer, but you can also monitor the jobs (Device
Jobs) that are executed from the operation panel on the device.
Trademarks and registered trademarks
Trademark acknowledgements
KONICA MINOLTA and the KONICA MINOLTA logo are either registered
trademarks or trademarks of KONICA MINOLTA HOLDINGS, INC.
Microsoft
Microsoft Corporation in the United States and/or other countries.
All other company and product names are either trademarks or registered
trademarks of their respective companies.
Dialog boxes
The dialog boxes shown in this manual are those that appear in Windows XP.
®
and Windows® are either registered trademarks or trademarks of
2
Note
The dialog boxes that appear in this document may differ from those that
appear on your computer, depending on the installed devices and specified settings.
2
Note
Unauthorized reproduction, translation or duplication of this document
whether in its entirety or in part, is strictly prohibited.
The content of this document is subject to change without notice.
Copyright © 2005 KONICA MINOLTA BUSINESS TECHNOLOGIES, INC. All
rights reserved.
Print Status Notifier iii
Page 5

iv Print Status Notifier
Page 6
Introduction
1 Introduction
1.1 Operating environment
The operating environment of Print Status Notifier is described below.
1
Supported operating
system
Used protocol TCP/IP
1.2 Main functions
The main functions of Print Status Notifier are described below.
- Notifies the job information.
If a job such as a print job is monitored and there is a change in the status
of that job, the job information is notified to Print Status Notifier.
The two types of jobs that can be monitored are described below.
–PC Jobs
Jobs output by instructions executed from a computer
– Device Jobs
Jobs output by instructions executed on the operation panel of the device
- Displays the job history.
The history of the job being monitored can be checked.
- Resumes the job monitor automatically.
If Print Status Notifier is quit while a job is being monitored, the monitored
job that was terminated is automatically resumed when Print Status Notifier is restarted.
- Displays the device status.
The status of the device registered in Print Status Notifier can be
checked.
- Link to PageScope Web Connection
The Web page (PageScope Web Connection) that is embedded into the
device can be displayed.
• Windows NT Workstation 4.0 (service pack 6a or later)
•Windows 98
•Windows Me
• Windows 2000 Professional (service pack 4 or later)
• Windows 2000 Server (service pack 4 or later)
• Windows XP Home/Professional Edition (service pack 2 or later)
• Windows Server 2003
Print Status Notifier 1-1
Page 7

1
Introduction
1-2 Print Status Notifier
Page 8

Installing Print Status Notifier
2 Installing Print Status Notifier
2.1 Installation
Install Print Status Notifier on your computer.
2
Note
The authorization of the Windows administrator is required to install Print
Status Notifier.
Be sure to quit all the programs (including virus check programs) that are
running.
To install
1 Double-click Setup.exe to start the installation program.
2 Follow the on-screen instructions to install.
2.2 Uninstallation
2
To uninstall
If Print Status Notifier is no longer going to be used, uninstall Print Status Notifier from your computer.
1 Quit the Print Status Notifier program.
– For quitting the program, refer to “To quit” on page 3-1.
2 Double-click Add or Remove Programs (for Windows NT 4.0/98/Me/
2000, Add/Remove Programs) to uninstall the program.
Print Status Notifier 2-1
Page 9

2
Installing Print Status Notifier
2-2 Print Status Notifier
Page 10
Using Print Status Notifier
3 Using Print Status Notifier
3.1 Starting and quiting Print Status Notifier
3.1.1 To start
To start Print Status Notifier, select Start – All Programs (or Programs) –
KONICA MINOLTA – Print Status Notifier Ver2 – Print Status Notifier.
3.1.2 To quit
To quit monitoring jobs, follow the procedure described below to quit the
Print Status Notifier program.
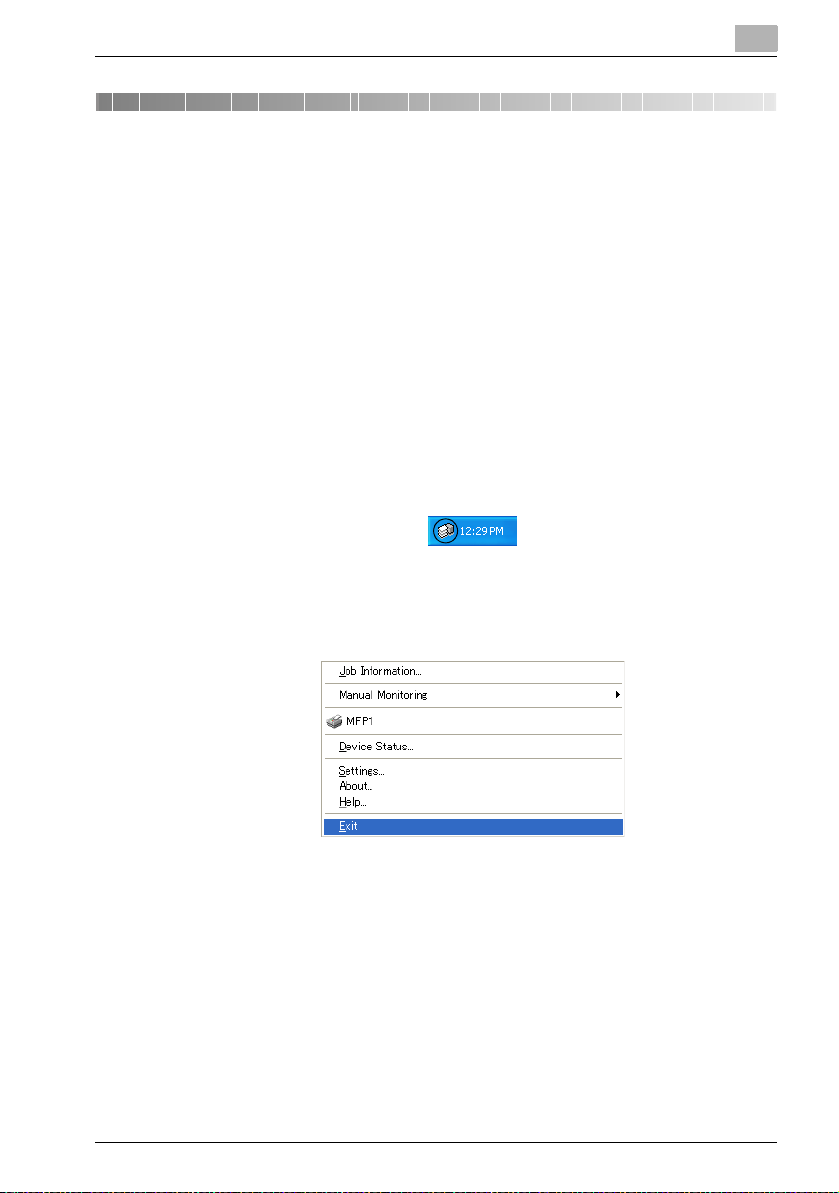
Operating procedure
1 Right-click the Print Status Notifier icon on the taskbar.
A menu appears.
3
2 Select Exit.
This quits the Print Status Notifier program.
Print Status Notifier 3-1
Page 11

3
3.2 About the menu
By right-clicking the Print Status Notifier icon on the taskbar, a menu appears.
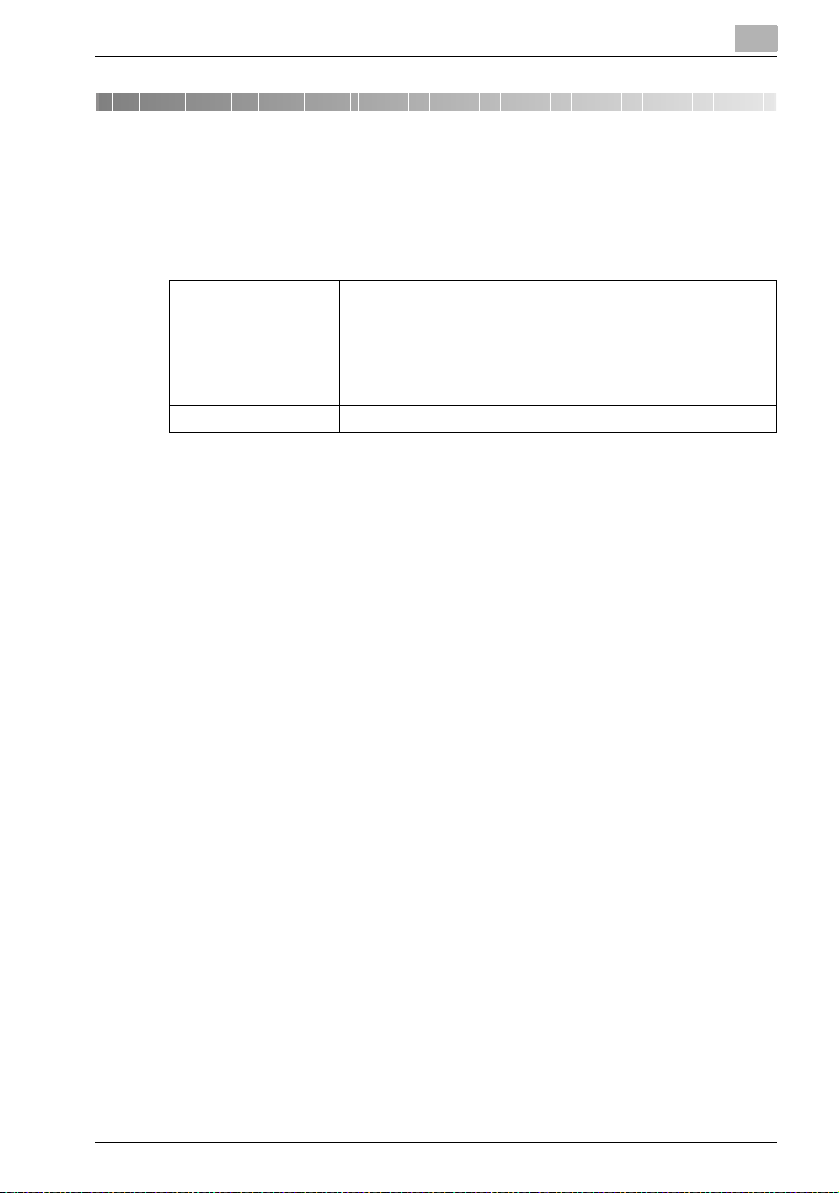
Menu Description
Job Information Displays the Job Information dialog box, and the job in-
Manual
Monitoring
Name of registered device Displays the name of the registered device.
Device Status Displays the Device Status dialog box, and the condi-
Settings Displays the Settings dialog box, and a device can be
About Displays the Version Information dialog box.
Help Displays the online Help.
Exit Quits Print Status Notifier.
Registration of Job No. Displays the dialog box for starting the monitoring of a
Cancel Monitoring Displays the Cancel Monitoring dialog box, and the job
Using Print Status Notifier
formation (job status and job type) can be checked.
% Refer to “Checking the job information” on
page 3-25.
job manually, and the Device Job to be monitored can
be specified.
% Refer to “Starting the monitor” on page 3-32.
monitor that was started manually can be cancelled.
% Refer to “Canceling the monitor” on page 3-34.
When selected, displays the Web page that is stored in
the selected device, and the detailed information of the
device can be checked.
% Refer to “Displaying PageScope Web Connection”
on page 3-36.
tion of the device can be checked.
% Refer to “Checking the device status” on page 3-30.
added or deleted and the notification method can be
specified.
% Refer to “Setting method” on page 3-8.
% Refer to “To quit” on page 3-1.
3-2 Print Status Notifier
Page 12

Using Print Status Notifier
3.3 Job information notification flow
This section describes how the job information is notified to the user.
For Device Jobs, the notification flow of the job information may vary depending on the User Authentication settings on the device. This section describes when User Authentication is enabled and when it is disabled on a
device.
% For specifying the User Authentication settings on a device, refer to the
user’s guide of the device.
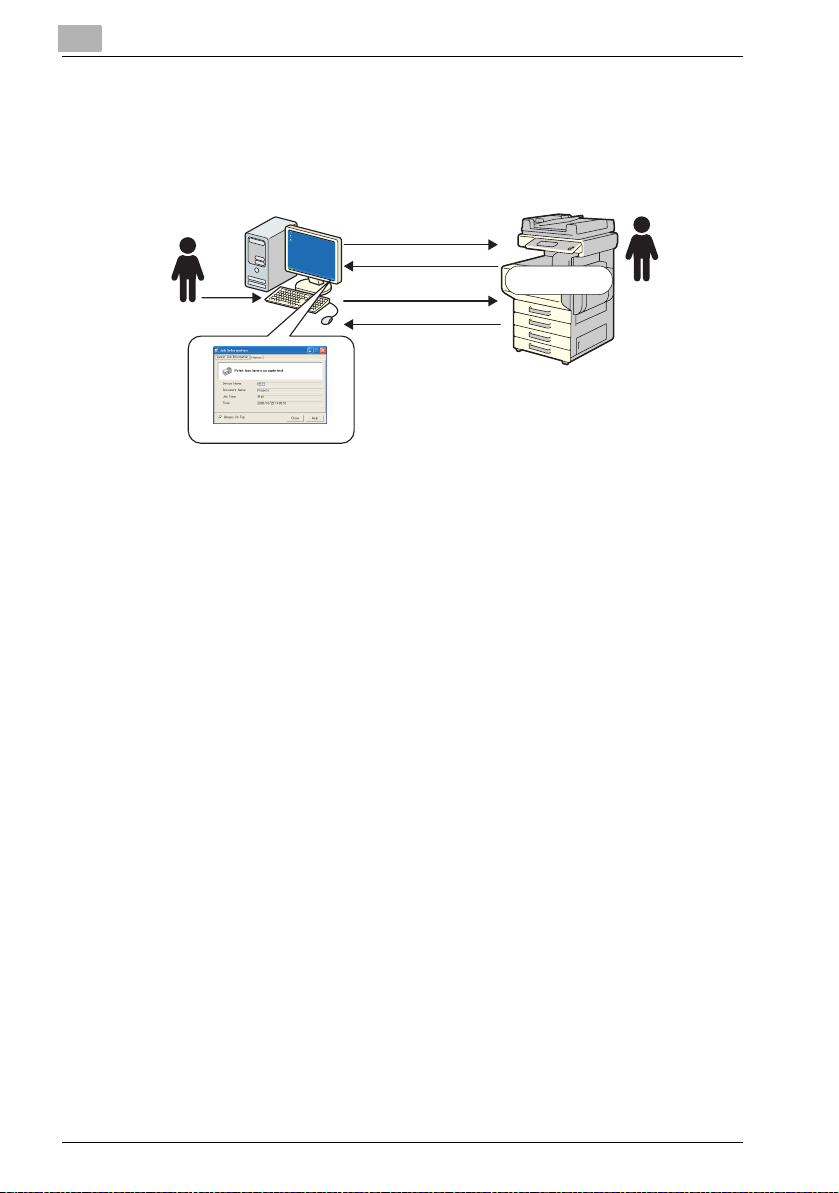
PC Jobs
2. Sends the job
3. Reserves the job information
notification
1. Executes a job
6. Displays the job infor mation
5. Notifies the job information
3
4. Executes the job
1 The user executes a job such as a print job from a computer.
2 The job is sent to the device by the printer driver.
3 The job number is reserved so that the job status can be notified by
Print Status Notifier.
4 The job is executed by the device.
5 The job information is notified to Print Status Notifier.
6 The user can check the job information in the Job Information dialog
box.
Print Status Notifier 3-3
Page 13
3
Using Print Status Notifier
Device Job (when User Authentication is enabled)
If User Authentication is enabled on a device, the information of the job executed from the operation panel of the device is automatically notified to Print
Status Notifier.
2. Registers the notification
destination
4. Notifies the job number
1. Starts Print Status
Notifier
8. Displays the job infor mation
5. Reserves the job information
notification
7. Notifies the job information
6. Executes the job
3. Executes a job
after logging in
1 The user starts Print Status Notifier.
2 The notification destination for notifying the job information is regis-
tered in the device by Print Status Notifier.
3 The user executes a job after logging in (User Authentication) on the
operation panel of the device.
4 The job number of the job that was executed is notified to the regis-
tered notification destination.
5 The job number is reserved so that the job status can be notified by
Print Status Notifier.
6 The job is executed by the device.
7 The job information is notified to Print Status Notifier.
8 The user can check the job information in the Job Information dialog
box.
3-4 Print Status Notifier
Page 14
Using Print Status Notifier
2
Note
The job information of a job that was executed by a public user is not automatically notified. The jobs must be monitored manually.
% For information on public users, refer to the user’s guide of the device.
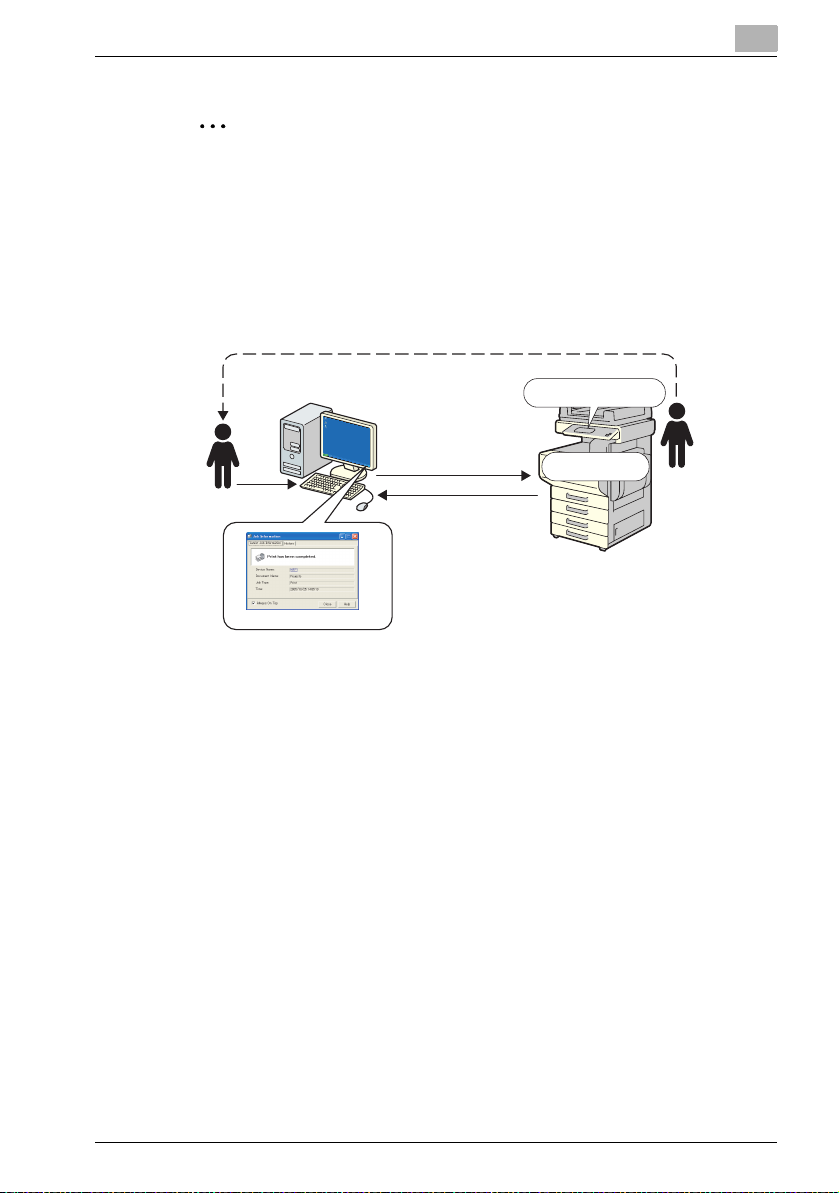
Device Jobs (when User Authentication is disabled)
If User Authentication is disabled on a device, the jobs must be monitored
manually.
3
3. Returns to desk
2. Displays the job number
4. Manually monitors
the job
8. Displays the job infor mation
5. Reserves the job information
notification
7. Notifies the job information
6. Executes the job
1. Executes a job
1 The user executes a job on the operation panel of the device.
2 The job number of the job that was executed is displayed on the oper-
ation panel.
3 The user memorizes or notes the displayed job number and then re-
turns to computer on which Print Status Notifier is installed.
4 The user enters the job number that was noted and starts monitoring
the job manually.
5 The job number is reserved so that the job status can be notified by
Print Status Notifier.
6 The job is executed by the device.
7 The job information is notified to Print Status Notifier.
Print Status Notifier 3-5
Page 15

3
Using Print Status Notifier
8 The user can check the job information in the Job Information dialog
box.
3-6 Print Status Notifier
Page 16

Using Print Status Notifier
3.4 Setting flow
To notify the user of the job information, the settings described below are required.
Setting procedure
1 Check that the device to be monitored is registered in the device list.
– If it is not registered, add the device to be monitored to the device
list.
% Refer to “Editing the device list” on page 3-11.
2 Check that the job to be monitored is specified.
– % Refer to “Specifying the job to be monitored” on page 3-16.
3 Specify the notification method of the job information and the address
of your computer.
– Refer to “Specifying the notification method and the address of
your computer” on page 3-22.
2
Note
If User Authentication is enabled on a device, the authentication setting
for logging in to the device must be specified.
% Refer to “Specifying the User Authentication settings” on page 3-19.
3
Print Status Notifier 3-7
Page 17

3
3.5 Setting method
3.5.1 About the Settings dialog box
Right-click the Print Status Notifier icon on the taskbar, and then select Set-
tings from the menu that appears. The Settings dialog box appears.
The Device List tab and System tab are located in the Settings dialog box.
Using Print Status Notifier
On the Device List tab, you can check, add, edit, or delete the device to be
monitored.
On the System tab, you can specify the notification method of the job information and the address of your computer.
3-8 Print Status Notifier
Page 18

Using Print Status Notifier
Device List tab
1
3
2
4
3
5
No Name Description
1 Device List The printer object using the supported printer drive is automati-
Device Name Displays the device name.
PC Job Displays Enable if a PC Job is specified to be monitored. Dis-
Device Job Displays Enable if a Device Job is specified to be monitored.
IP Address Displays the IP address of the device.
2 [Add] button Click to add the devices to be monitored to the device list.
3 [Modify] button Click to change the IP address or change the settings of the reg-
4 [Delete] button Click to delete registered devices from the device list.
5 [OK] button Click to apply the changed settings.
6 [Cancel] button Click to cancel changed settings and to close the dialog box.
7 [Help] button Click to display the online Help.
cally registered.
If a printer driver is not installed on the computer, the device is
added manually.
plays Disable if not specified.
Displays Disable if not specified.
% Refer to “Editing the device list” on page 3-11.
istered device.
% Refer to “Editing the device list” on page 3-11.
% Refer to “Editing the device list” on page 3-11.
67
Print Status Notifier 3-9
Page 19

3
Using Print Status Notifier
System tab
1
2
3
4
567
No Name Description
1 How to Notify Specifies the notification method of the job information notified
2 PC Address Specifies the address of your computer.
3 Always On Top Select to always display the Job Information dialog box on top.
4 Register shortcut file
to startup.
5 [OK] button Click to apply the settings.
6 [Cancel] button Click to cancel changed settings and to close the dialog box.
7 [Help] button Click to display the online Help.
from a device.
% Refer to “Specifying the notification method and the address
of your computer” on page 3-22.
% Refer to “Specifying the notification method and the address
of your computer” on page 3-22.
Select to register the shortcut file of Print Status Notifier on the
Startup menu so that Print Status Notifier is automa tically started
when the computer is started.
3-10 Print Status Notifier
Page 20

Using Print Status Notifier
3.5.2 Editing the device list
Since the job information is notified to the user, the device to be monitored
must be registered in the device list.
The printer object using the supported printer driver is automatically registered.
If a printer driver is not installed on the computer, add the device manually.
This section describes the editing of the device list such as the method for
checking the devices to be monitored, the method for adding devices to the
list, the method for changing the setting information of the registered devices, and the method for deleting devices from the list.
Checking the device to be monitored
1 Display the Settings dialog box (Device List tab).
– For displaying the Settings dialog box, refer to “About the Settings
dialog box” on page 3-8.
The device to be monitored is displayed.
3
2 Check that the device to be monitored is displayed in the device list.
3 After checking, click the [OK] button.
This closes the Settings dialog box.
Print Status Notifier 3-11
Page 21

3
Using Print Status Notifier
Adding devices to the device list
1 Click the [Add] button in the Settings dialog box (Device List tab).
– For displaying the Settings dialog box, refer to “About the Settings
dialog box” on page 3-8.
The Device Setting dialog box appears.
2 Enter the device name and IP address.
If you do not know the device name and IP address, consult the system
administrator.
– For specifying the job (PC Job or Device Job) to be monitored, refer
to “Specifying the job to be monitored” on page 3-16, and for specifying the User Authentication settings, refer to “Specifying the User
Authentication settings” on page 3-19.
3-12 Print Status Notifier
Page 22

Using Print Status Notifier
3 After specifying the settings, click the [OK] button.
– The device that was added is displayed in bold-italic characters in
the device list.
This applies the settings and closes the Settings dialog box.
Changing the setting information of the device
1 Select the device for which the setting information is to be changed in
the Settings dialog box (Device List tab).
– For displaying the Settings dialog box, refer to “About the Settings
dialog box” on page 3-8.
3
2 Click the [Modify] button.
The Device Setting dialog appears.
Print Status Notifier 3-13
Page 23

3
Using Print Status Notifier
3 Change the setting information.
– For specifying the job (PC Job or Device Job) to be monitored, refer
to “Specifying the job to be monitored” on page 3-16, and for specifying the User Authentication settings, refer to “Specifying the User
Authentication settings” on page 3-19.
4 After specifying the settings, click the [OK] button.
This applies the settings and closes the Settings dialog box.
3-14 Print Status Notifier
Page 24

Using Print Status Notifier
Deleting devices from the device list
Only devices that were added manually can be deleted.
Devices that were automatically registered cannot be deleted.
1 Select the device to be deleted in the Settings dialog box (Device List
tab).
– For displaying the Settings dialog box, refer to “About the Settings
dialog box” on page 3-8.
3
2 Click the [Delete] button.
This deletes the selected device.
Print Status Notifier 3-15
Page 25

3
3.5.3 Specifying the job to be monitored
You can specify the job (PC Job or Device Job) to be monitored.
Operating procedure
1 Display the Settings dialog box (Device List tab).
– For displaying the Settings dialog box, refer to “About the Settings
dialog box” on page 3-8.
The device to be monitored is displayed in the device list.
Using Print Status Notifier
2 Select the device to be specified.
3-16 Print Status Notifier
Page 26

Using Print Status Notifier
3 Click the [Modify] button.
– If a device was added manually, the Device Setting dialog box ap-
pears and the settings can also be specified.
The Device Setting dialog box appears.
3
Print Status Notifier 3-17
Page 27

3
Using Print Status Notifier
4 If monitoring a PC Job, select “Monitoring for PC Job.”, if monitoring
a Device Job, select “Monitoring for Device Job.”.
– Both PC Jobs and Device Jobs can be specified for one device.
– For devices that were added manually, PC Jobs to be monitored
cannot be specified.
– If the IP address of a device has not been specified, the job cannot
be specified.
5 Click the [OK] button.
This applies the settings and closes the Settings dialog box.
This specifies the settings for the job to be monitored.
3-18 Print Status Notifier
Page 28

Using Print Status Notifier
3.5.4 Specifying the User Authentication settings
If User Authentication is enabled on the device that is to be monitored, the
authentication settings for logging in to the device must be specified.
Operating procedure
1 Displays the Settings dialog box (Device List tab).
– For displaying the Settings dialog box, refer to “About the Settings
dialog box” on page 3-8.
3
2 Select the device to be specified.
Print Status Notifier 3-19
Page 29

3
Using Print Status Notifier
3 Click the [Modify] button.
– If a device was newly added, the Device Setting dialog box appears
and the settings can also be specified.
The Device Setting dialog box appears.
3-20 Print Status Notifier
Page 30

Using Print Status Notifier
4 Select “User Authentication”, and then enter the user name and pass-
word.
– To allow public users, select “Public User”.
% For information on public users, refer to the user’s guide of the
device.
5 Click the [OK] button.
This applies the settings and closes the Settings dialog box.
This specifies the User Authentication settings.
3
Print Status Notifier 3-21
Page 31

3
Using Print Status Notifier
3.5.5 Specifying the notification method and the address of your computer
You can specify the notification method for notifying the job information and
the address of your computer.
Operating procedure
1 Display the Settings dialog box.
– For displaying the Settings dialog box, refer to “About the Settings
dialog box” on page 3-8.
2 Click the System tab.
The System tab is displayed.
3-22 Print Status Notifier
Page 32

Using Print Status Notifier
3 Specify the notification method.
– For the notification method, you can select “Notify me by popup
Job Information.”, “Notify me by changing the icon in tasktray.”, or “Play sound”.
–If “Notify me by changing the icon in tasktray.” is selected, the
icon on the taskbar is changed, it blinks, and is notified according
to the status of the device being monitored.
( Completed normally, Stopped, Abort)
–If “Play sound.” is selected, click the [Browse] button and select
the file to play sound during notification. The only sound file that
can be selected is the wav file.
–“Notify me by popup Job Information.” and “Notify me by
changing the icon in tasktray.” cannot be specified at the same
time.
3
Print Status Notifier 3-23
Page 33

3
Using Print Status Notifier
4 Specify the address of your computer.
–If “Auto Setting” is selected, the IP address of your computer can
be automatically obtained.
Use with “Auto Setting” always selected.
To edit the IP address, clear the “Auto Setting” check box first.
5 Click the [OK] button.
This applies the settings and closes the Settings dialog box.
This specifies the notification method and the address of your computer.
3-24 Print Status Notifier
Page 34

Using Print Status Notifier
3.6 Checking the job information
You can check the job information that is notified from the device in the Job
Information dialog box.
If “Notify me by popup Job Information.” is specified as the notification
method of the job information, the status of the job being monitored is displayed in the pop-up dialog box.
- For specifying the notification method, refer to “Specifying the notification method and the address of your computer” on page 3-22.
If “Notify me by popup Job Information.” has not been specified as the no-
tification method, right-click the Print Status Notifier icon on the taskbar, and
then select Job Information from the menu that appears.
3
The Latest Job Information tab and History tab are located in the Job Information dialog box.
On the Latest Job Information tab, you can check the job information that
is notified from the device.
On the History tab, you can check the history of the job being monitored.
Print Status Notifier 3-25
Page 35

3
3.6.1 Viewing the job information
You can check the job information that is notified from the device on the Lat-
est Job Information tab.
1
6
No Name Description
1 Message area Displays the message and icon that notify the job status.
Completed normally Displays that the job was completed normally.
Stopped Displays that a job was stopped when an error, such as a
Abort Displays that a job was canceled and not executed when a
2 Device Name Displays the device name.
3 Document Name Displays the names of the documents that have been proc-
4 Job Type Displays job types such as Print and Fax.
5 Time (when completed nor-
mally or abort)
Troubleshooting (when
stopped)
6 Always On Top Select to always display the Job Information dialog box on
7 [Close] button Click to close the Job Information dialog box.
8 [Help] button Click to display the online Help.
paper jam, occurs. When the error is canceled, the job can
continue.
transmission error or timeout occurs.
Click the link of the device name to go to the Web page that
is embedded into the device and to check the detailed information of the device.
% Refer to “Displaying PageScope Web Connection” on
page 3-36.
essed.
For Device Jobs, the job number is displayed.
Displays the time that the job was completed normally or
abort.
Displays the troubleshooting method when an error occurs.
% For the specific troubleshooting methods, refer to the
user’s guide of the device.
top.
Using Print Status Notifier
2
3
4
5
7
8
3-26 Print Status Notifier
Page 36

Using Print Status Notifier
Dialog box of when a job is completed normally
Dialog box of when a job is stopped
3
Dialog box of when a job is abort
Print Status Notifier 3-27
Page 37

3
3.6.2 Viewing the job history
You can check the history of the job information on the History tab.
1
6
No Name Description
1 Document Name Displays the names of documents that have been processed.
2 Status Displays the job status.
3 Type Displays the job type such as Print and Fax.
4 Time Displays the time that the job was executed.
5 Detail>> Click to display the details on the History tab.
6 Always On Top Select to always display the Job Information dialog box on top.
7 [Delete All] button Click to delete all of the job history.
8 [Close] button Click to close the Job Information dialog box.
9 [Help] button Click to display the online Help.
Using Print Status Notifier
234
5
987
3-28 Print Status Notifier
Page 38

Using Print Status Notifier
Detailed history dialog box
No Name Description
1 Copy Number Displays the number of sheets printed.
2 Original Number Displays the number of sheets for the original.
3 Device Name Displays the name of the device that executes the job.
4 Detail << Click to close the details on the History tab.
3
12 3
4
Print Status Notifier 3-29
Page 39

3
3.7 Checking the device status
The device status can be checked in the Device Status dialog box.
Right-click the Print Status Notifier icon on the taskbar, and then select De-
vice Status from the menu that appears.
The Device Status dialog box appears.
1
Using Print Status Notifier
234
3-30 Print Status Notifier
Page 40

Using Print Status Notifier
No Name Description
1Toolbar
2 Device Name Displays the icon that shows the device
3 Status Displays the device status.
4 IP Address Displays the IP address of the device.
[View] button
[Refresh] button
[PageScope Web Connection] button
[Settings] button
[Connect] button
Click to switch between the “Icon” and
“Details” displays.The display can also be
switched from the displayed menu by clicking [,,,,] next to this button. A black circle is
added next to the display method that is
currently displayed.
Click to update the latest device status.
Displays the Web page that is embedded
into the device, and the detailed information of the device can be checked when the
device is selected and this button is
clicked.
If a device has not been selected, this button is dimmed and cannot be clicked.
Click to display the Settings dialog box.
Click to connect the selected device that is
to be monitored.
name and device status.
Displays only the device to be monitored.
Displays the Web page that is stored in the
device, and the detailed information of the
device can be checked when the icon is
double-clicked.
% Refer to “Displaying PageScope Web
Connection” on page 3-36.
3
Print Status Notifier 3-31
Page 41

3
Using Print Status Notifier
3.8 Checking the job information manually
If User Authentication is disabled on the device, register the job number
manually and start the monitor to monitor the Device Job.
2
Note
To start monitoring a job manually, the job number that is displayed on
the operation panel of the device is required. After a job is executed, be
sure to note the job number that is displayed on the operation panel.
3.8.1 Starting the monitor
The job monitor can be started manually by following the procedure described below.
Operating procedure
1 Right-click the Print Status Notifier icon on the taskbar, and then select
Manual Monitoring – Registration of Job No. from the menus that
appears.
– The Manual Monitoring dialog box can also be displayed by left-
clicking the Print Status Notifier icon on the taskbar.
The Manual Monitoring dialog box appears.
3-32 Print Status Notifier
Page 42

Using Print Status Notifier
3
2 Click [,
,], and then select the device that is to monitor the job.
,,
– Only the device specified in the Device Job that is to be monitored
is displayed.
3 Enter the job number.
– Enter the job number that is displayed on the operation panel of the
device.
To display the job executed from the selected device in “Active Job
List”, click the Get Active Job button.
When selecting a job to be monitored from the list, the selected job
number is displayed in the “Job No.” box.
4 Click the [Start] button.
–If the [Cancel] button is clicked, the monitoring of the job is not
started and the Manual Monitoring dialog box is closed.
This completes specifying the settings for monitoring jobs manually.
This starts the monitoring of the job and the job information is notified.
Print Status Notifier 3-33
Page 43

3
3.8.2 Canceling the monitor
You can cancel the monitoring of a job that was performed manually.
2
Note
To cancel the monitor, the job number is required as it is required when
starting the monitor.
Operating procedure
1 Right-click the Print Status Notifier icon on the taskbar, and then select
Manual Monitoring – Cancel Monitoring from the menus that appear.
The Cancel Monitoring dialog box appears.
Using Print Status Notifier
2 Click [,
3 Click [,
3-34 Print Status Notifier
,], and then select the device of the monitored job that you want
,,
to cancel.
,], and then select the job number of the monitored job that is to
,,
be canceled.
– Only the job number of a job that is not completed is displayed.
Page 44

Using Print Status Notifier
4 Click the [OK] button.
–If the [Cancel] button is clicked, the monitored job is not canceled
and the Cancel Monitoring dialog box is closed.
This cancels the manually monitored job.
The monitored job of the selected job number is canceled.
3
Print Status Notifier 3-35
Page 45

3
Using Print Status Notifier
3.9 Displaying PageScope Web Connection
In Print Status Notifier, the PageScope Web Connection that is embedded
into a device can be displayed, and the detailed information of the device can
be checked.
2
Note
PageScope Web Connection is displayed by using the IP address information of the specified device. If the IP address is not specified correctly,
PageScope Web Connection will not be displayed.
The display methods consist of the three methods described below.
Clicking the registered device name on the menu
Right-click the Print Status Notifier icon on the taskbar, and then click the
registered device name from the menu that appears.
Clicking the device name in the Job Information dialog box
If “Notify me by popup Job Information.” is specified as the notification
method of the job information, the status of the job being monitored is displayed in the pop-up dialog box.
- For setting the notification method, refer to “Specifying the notification
method and the address of your computer” on page 3-22.
If “Notify me by popup Job Information.” has not been specified as the no-
tification method, right-click the Print Status Notifier icon on the taskbar, and
then select Job Information from the menu that appears. The Job Information dialog box appears.
Click the device name on the Latest Job Information tab in the Job Information dialog box.
3-36 Print Status Notifier
Page 46

Using Print Status Notifier
Clicking the device in the Device Status dialog box
Right-click the Print Status Notifier icon on the taskbar, and then select Device Status from the menu that appears. The Device Status dialog box appears.
Select the device in the Device Status dialog box, and then click the [Page-
Scope Web Connection] button ( ) on the toolbar or double-click the icon
( etc.) that shows the status of the device.
3
Print Status Notifier 3-37
Page 47

3
Using Print Status Notifier
3-38 Print Status Notifier
Page 48

Troubleshooting
4 Troubleshooting
This chapter describes the possible problems that may occur when operating Print Status Notifier and the remedies to solve the problem.
Symptoms Probable cause Remedy
The job information is not notified.
The device that
you want to
check the job information of is
not displayed in
the device list.
An error for connecting to the device is displayed.
Print Status Notifier was quit while
a job was being
monitored.
The device that you want to check
the job information of has not
been specified to be monitored.
Print Status Notifier has not been
started.
The executed job is not specified
to be monitored.
The printer driver that supports
Print Status Notifier has not been
installed.
The TCP/IP protocol is not used
for connecting to the device.
The computer or the device is not
connected to the network.
The TCP/IP protocol is not used
for connecting to the device.
The IP address of the device that
you want to check the job information of is specified incorrectly.
If Print Status Notifier is quit while a job is being monitored, the monitored
job that was terminated is automatically resumed when Print Status Notifier
is restarted.
Add the device that you want to check
the job information of to the device list.
% Refer to “Editing the device list” on
page 3-11.
Start Print Status Notifier.
% Refer to “Starting and quiting Print
Status Notifier” on page 3-1.
Specify the job you want to monitor as
the target monitored job.
% Refer to “Specifying the job to be
monitored” on page 3-16.
Install a printer driver that supports
Print Status Notifier.
Specify the TCP/IP protocol in the network setting of the device.
For details, consult the systems administrator.
Connect the computer or the device to
the network.
Specify the TCP/IP setting in the network setting of the device.
For details, consult the systems administrator.
Check that the IP address of the device that you want to check the job information of has not been specified
incorrectly.
% Refer to“Editing the device list” on
page 3-11.
4
Print Status Notifier 4-1
Page 49

4
Troubleshooting
4-2 Print Status Notifier
Page 50

2005
http://konicaminolta.com
Copyright
2005.114343-PS178-01
 Loading...