

Page 1

p
User Manual
Di152f/Di183f PageScope Light
www.minoltaeuro
e.com
The essentials of imaging
Page 2

Page 3

Foreword
Welcome
PageScope Light is a device control utility program provided by the
HTTP serverbuilt into the Internet Fax & Network scan kit. This utility
can be used with any standard Web browser, and the internet fax and
network scanning functions can be set from a computer.
Trademark Acknowledgements
Minolta is a registered trademark of MINOLTA CO., LTD.
PageScope is a trademark of MINOLTA CO., LTD.
Ethernet is a registered trademark of Xerox Corporation.
Microsoft, Windows, and Windows NT are either registered
trademarks or trademarks of Microsoft Corporation in the United
States and/or other countries.
Netscape and the Netscape N and Ship’s Wheel logos are registered
trademarks of Netscape Communications Corporation in the U.S. and
other countries. Netscape Navigator is also a trademark of Netscape
Communications Corporation and may be registered outside the U.S.
All other product names are trademarks or registered trademarks of
their respective holders.
Copyright 2002 MINOLTA CO., LTD.
Screen images shown in this manual may differ slightly from
actual ones. In addition, the explanations are given using Internet
Explorer as the Web browser.
Specifications are subject to change without prior notice.
i
Page 4

Contents
CONTENTS
1 System Requirements .............................. 1
2 Access ........................................................ 1
2.1 Operation .......................................................... 2
2.2 Entering the Password .................................... 2
2.3 Selecting the Display Language ..................... 2
3 Screen Configuration ................................ 3
4 Description of Each Page .......................... 4
4.1 System Tab ....................................................... 4
4.2 Fax Tab .............................................................. 6
4.3 Scanner Tab .................................................... 10
4.4 Network tab .................................................... 11
ii
Page 5

Contents
5 Specifying Fax Settings ........................... 14
5.1 One-Touch Dial Settings ............................... 14
5.1.1 To program a new one-touch dial
number .................................................. 15
5.1.2 To change the one-touch dial
setting .................................................... 19
5.1.3 To delete the one-touch dial setting ... 20
5.2 Speed Dial Settings ....................................... 21
5.2.1 To program a new speed dial
number .................................................. 21
5.2.2 To change the speed dial setting . ....... 23
5.2.3 To delete the speed dial setting .......... 24
5.3 Group Dial Settings ....................................... 25
5.3.1 Group dial recipient settings ............... 26
5.4 File Transmission Settings ........................... 28
5.4.1 File destination settings ...................... 29
iii
Page 6

Contents
iv
Page 7

1 System Requirements
1 System Requirements
The following items are required to use this utility.
Computer
•Software
Operation System Web Browser
Windows 95/98/Me/NT 4.0/
2000
Internet Explorer 4 or higher
Netscape Navigator 4 or higher
Digital Copier
• Di152f, Di152 with the fax unit installed, Di183f, or Di183 with
the fax unit installed
• Internet Fax & Network scan kit SU-1
Network
• Ethernet 10/100BaseT
• TCP/IP Protocol
2 Access
PageScope Light can be accessed directly from a Web browser.
1. Start the W eb browser.
2. In the Address Bar, enter the IP address of the Digital Copier as
shown below.
http:// <IP address of the Digital Copier>/
(Example) When the IP address of the Digital Copier is
192.9.200.200:
http://192.9.200.200/
3. This causes PageScope Light screen to appear.
1
Page 8
2 Access
2.1 Operation
PageScope Light operation is identical to that for Internet Web pages.
Clicking a hot link jumps to the link destination, and the
Forward buttons scroll through pages backwards and forward.
Back and
If an error message appears due to an incorrect setting, click the
Back
button to return to the previous page, and then try specifying the setting
again.
In addition, if the Minolta PageScope Light logo in the top-left corner
of the page is clicked, the Minolta Web site opens up in the browser.
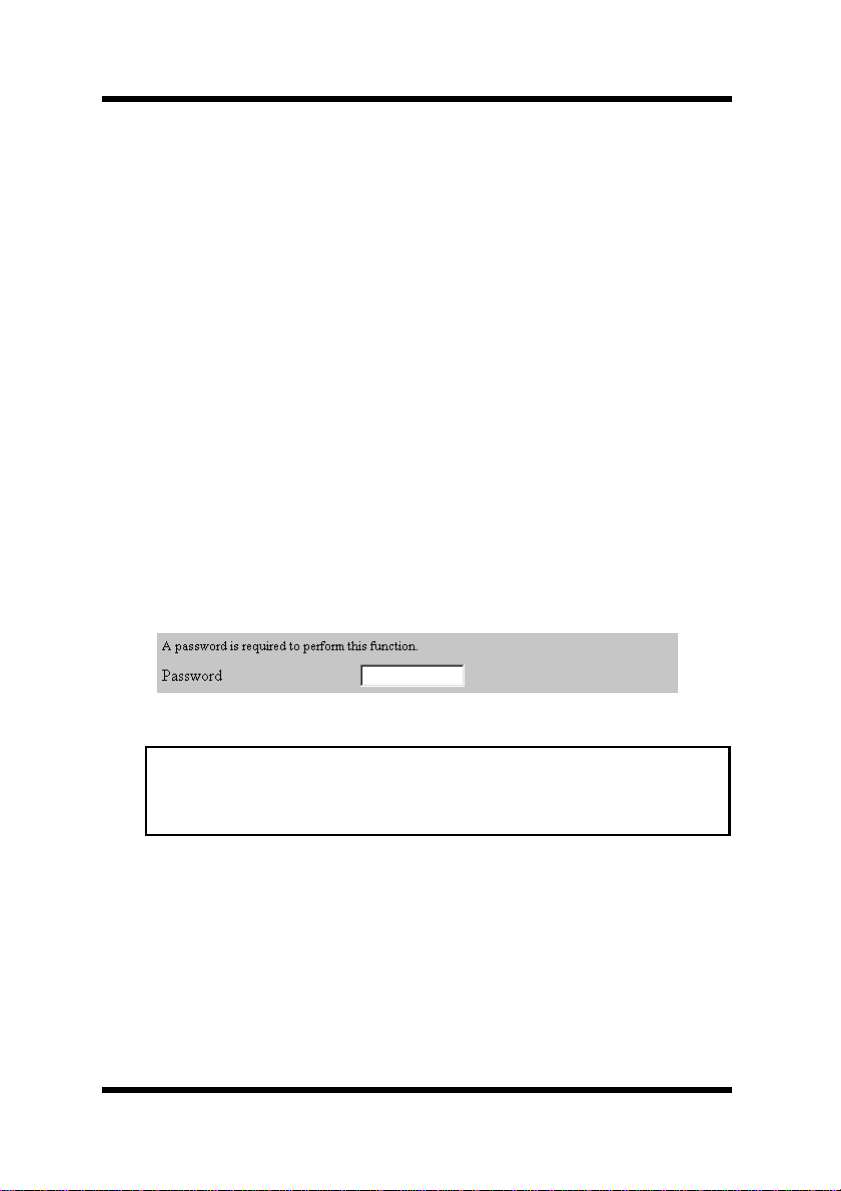
2.2 Entering the Password
The Password input box appears in the page where PageScope Light
settings can be changed.
The password is required in order to specify PageScope Light settings.
Once the password is entered, it is valid until PageScope Light is
closed.
Note
• The initial default administrator password is sysadm.
• Change the password using the
tab.
Preference menu on the System
2.3 Selecting the Display Language
If necessary, the display language of PageScope Light can be changed
to match the operating environment.
Start up PageScope Light, click the
screen, and then select the desired setting under
This setting only applies to the display language of PageScope Light.
2
Preference menu at the left of the
Display Language.
Page 9
3 Screen Configuration
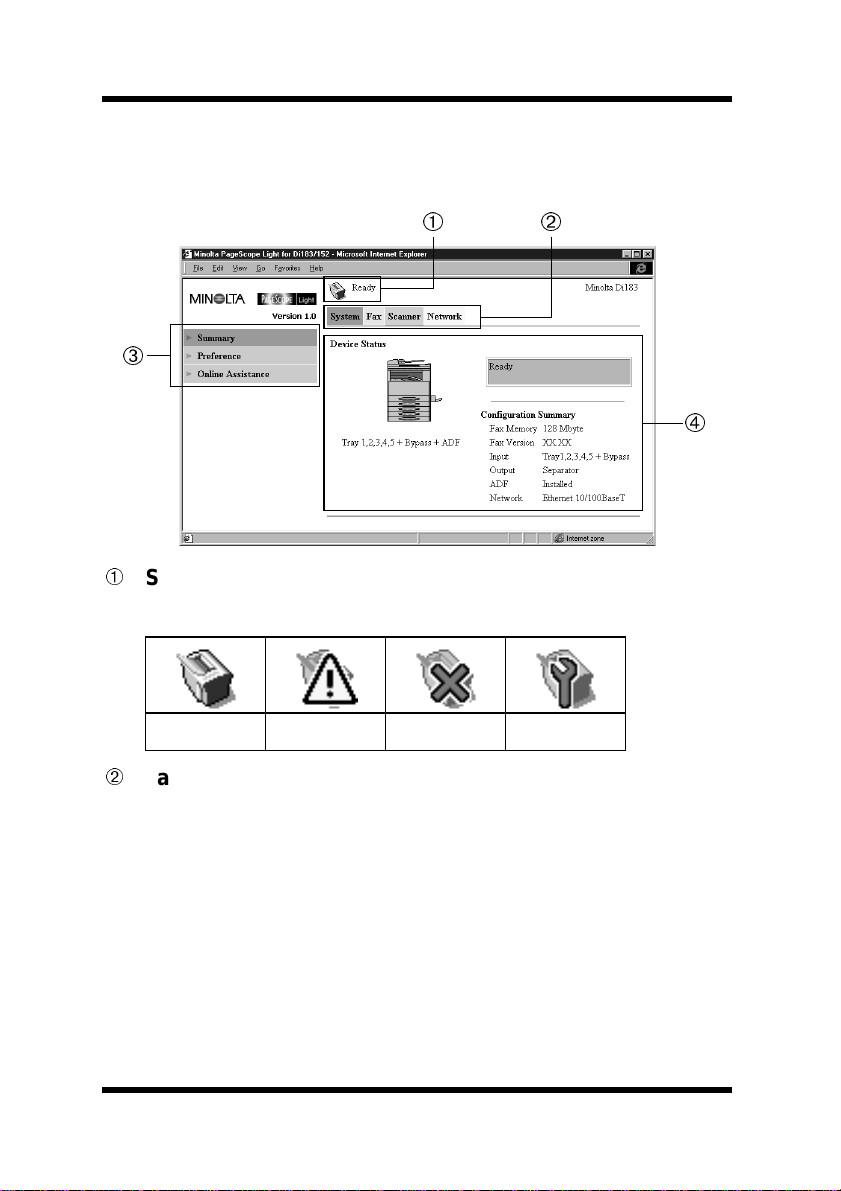
3 Screen Configuration
The configuration of the PageScope Light screen is shown below.
Status display section
The status of the system is shown with icons and text.
Ready Attention Error T rouble
Tabs
The categories that can be controlled by PageScope Light are
displayed.
• System Used to control and set the system structure for the
Digital Copier
• Fax Used to specify settings for the fax function of the
Digital Copier
• Scanner Used to specify settings for the scanning function
of the Digital Copier
• Network Used to specify network settings
3
Page 10
4 Descriptionof Each Page
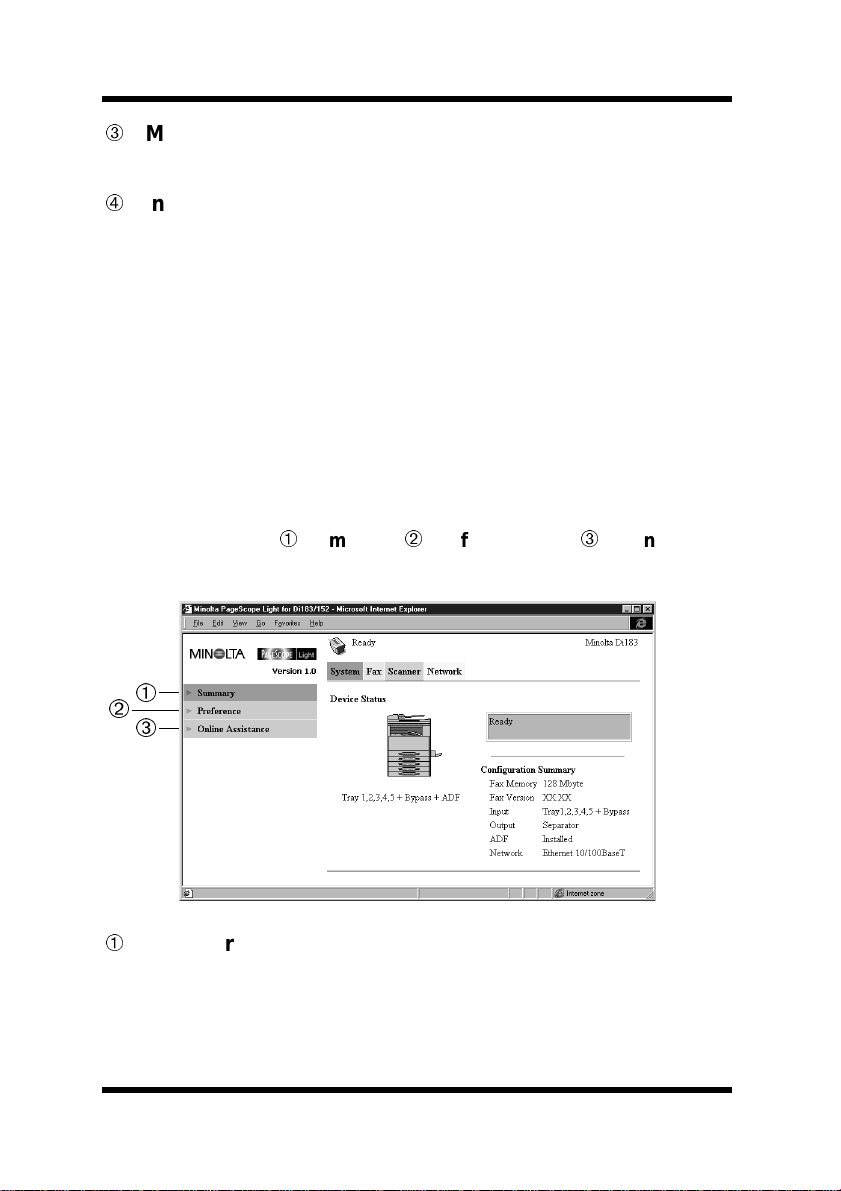
Menus
The information and settings for the selected tab are displayed.
Information and setting details
The details of the selected menu are displayed.
4 Description of Each Page
This section contains descriptions of the information and settings that
are displayed when each tab is clicked.
4.1 System Tab
On the System tab, information concerning the system structure for
the Digital Copier can be checked and set. Checking and setting can be
performed with the
Assistance
menus.
Summary,Preference,andOnline
Summary
A summary of the status and the system structure of the Digital
Copier is displayed.
4
Page 11
4 Description of Each Page
Preference
The password for PageScope Light can be changed, and
environment settings such as the page update int erval time and the
display language can be specified.
The initial default password is
Note
• When changing the password, enter a new password that is more
than 4 characters long, less than 8 characters, and case-sensitive.
Online Assistance
Enter information concerning product support and check it when
necessary.
sysadm.
5
Page 12

4 Descriptionof Each Page
4.2 Fax Tab
On the Fax tab, settings concerning the fax function of the Digital
Copier can be set. Checking and setting can be performed with the
One-Touch Dial Setting,Speed Dial Setting,Group Dial
,and
Setting
Fax Configuration menus.
One-Touch Dial Setting
The one-touch dial settings available with this Digital Copier can
be specified. For details on their operation, refer to “5.1 OneTouch Dial Settings”.
Speed Dial Setting
The speed dial settings available with this Digital Copier can be
specified. For details on their operation, refer to “5.2 Speed Dial
Settings”.
6
Page 13

4 Description of Each Page
Group Dial Setting
The group dial settings available with this Digital Copier can be
specified. For details on their operation, refer to “5.3 Group Dial
Settings”.
Fax Configuration
The fax settings available with this Digital Copier can be set.
User Name Enter the user name, which is the name that will appear
in the header of faxes sent from this machine.
(maximum 32 characters)
Fax Number Enter the fax number of t he sender, which will appear
in the header of faxes sent from this machine.
(maximum 20 characters)
Scan Contrast Set the default scanning contrast levelto one of five
settings between -2 and +2. For dark-colored paper,
select a setting toward the - side. For faint or colored
text, select a setting toward the + side.
Resolution Select the default scanning resolution (image quality).
Halftone Checkthis option if the documents contain objectswith
varying shades, such as photos.
Default TX Set the default transmission mode to
ADF TX.
Header Check this option to add the header (date sent, sender's
name and fax number, etc.) when sending faxes.
One-Touch Dial Check this option to enable sending using one-touch
dial keys during Copy mode.
Memory RX Mode
Check this option to enable memory reception.
In cases when confidentialfaxesarebeing received, the
received document can be stored in the memory and
printedata specifiedtime or when memory receptionis
set to OFF.
On Time Enter the time for memory reception to begin when
Memory RX Mode is enabled.
Off Time Enter the time for memory reception to end when
Memory RX Mode is enabled.
Memory TX or
7
Page 14

4 Descriptionof Each Page
Password Enter the 4-digit password used to set memory
reception.
Auto RX Mode
Number of Rings
Footer Enable Check this option to print the reception information
Reduction RX Select how the document is printed if it is longer than
PrintatReceiving
Forward Mode Set whether or not the received fax document is
Check this option to set the reception mode to automatic
reception (“ Auto RX”). This mode automatically begins
receiving after the set number of rings.
Select how many rings there must be before the
machine automatically begins receiving the fax
(between 1 and 16).
(date received, number of pages, etc.) at the footer of
each received document.
the paper.
On: Reduced and printed on a single page.
Off: Without being reduced, it is divided
and printed on two pages.
Cut: Without being reduced, only the first
page is printed.
Select whether the fax is only printed after all
document pages have been received (
printing begins as soon as the first page of the
document is received (
forwarded. (You cannot forward any received Internet
fax documents.)
Print only: The fax document is not forwarded.
Forward: The received fax document is
Print & Forward:
Immediate).
forwarded to the specifiedfax number
or e-mail address.
The received fax document is printed
by this machine at the same time that
itisforwardedtothespecifiedfax
number or e-mail address.
Complete)or
8
Page 15

4 Description of Each Page
Forward Address
Enter the forwarding address (either fax number or email address) when
selected for the
(fax number: maximum 30 characters, e-mail address:
maximum 64 characters)
Tone/Pulse Selectthe dialing system used by your telephone line.
Line Monitor Volume
Specify the volume when monitoring communication.
PSTN/PBX Set whether the connected telephone wiring is a public
switchedtelephone network (
exchange (
outside line access number.
Activity Report Check the option to print the transmission/reception
report automatically when the 60th transmission/
reception is reached.
ReservationReport
If multiple recipients are specified for transmission,
such as with broadcast transmissionand polling
reception, check this option to print a report to show
specified settings.
TX Result Report
Check this option to print the report showing the result
of a transmission after the transmission is finished.
RX Result Report
Check this option to print the report showing the result
of a reception after the reception is finished.
Tray Lock section
Put check marks for any trays that you do not want to
use.
Text Insert Check this option to add a message when sending scan
data as e-mail attachments.
Header Print Check this option to print the header information of
“subject”, “from”, and “cc” when printing e-mails.
PBX). When selecting PBX,enterthe
Forward or Print & Forward is
Forward Mode.
PSTN)oraprivatebranch
9
Page 16

4 Descriptionof Each Page
4.3 Scanner Tab
On the Scanner tab, settings for transmitting files created with the
scanner of this Digital Copier can be specified. For details on
specifying settings, refer to “5.4 File Transmission Settings”.
File Destination Setting
No. File Destination number
Name Name of the File Destination.
Address FTP Server address
delete button Click this button to delete the registered File
Destination.
10
Page 17

4 Description of Each Page
4.4 Network tab
Use the Network tab for configuring the network settings when using
the internet fax and network scanning functions. Checking and setting
can be performed with the
SMTP & POP3 Config.,FTP & DNS Conf ig.,Reset,and
Maintenance menus.
Summary,TCP/IP Configuration,
Summary
Use this to view a summery of the network interface.
TCP/IP Configuration
It lets you change the TCP/IP settings for the Digital Copier.
IP Address Input the IP address you want to assign to the Digital
Copier.
Subnet Mask Input the network subnet mask.
Default Gateway
If the network has a router, input the IP address of the
router.
DHCP Select this option when a DHCP server is used to
automatically assign the IP address.
IP Address in NVRAM
Select this option when a static IP address is used.
Note
• The TCP/IP settings should be specified by the network
administrator.
• If no IP address is specified while
selected,a DHCP request will be sent.
IP Address in NVRAM is
11
Page 18

4 Descriptionof Each Page
SMTP & POP3 Config.
It lets you change the SMTP and POP3 server settings.
SMTP Server Address
Enter the IP address or host name of the SMTP server.
(maximum 64 characters)
Default Subject for E-mail Attachment
Enter the default subject when distributing scan data as
e-mail attachments. (maximum 20 characters)
Sender Name Enter the sender name when sending scan data as e-
mail attachments. (maximum 20 characters)
E-Mail Address Enter the e-mail address of the sender when sending
scan data as e-mail attachments. (maximum 64
characters)
The e-mail address is not set with the Digital Copier.
Be sure to enter the e-mail address of the sender.
POP3 Server Address
Enter the IP address or host name of the SMTP server.
(maximum 64 characters)
Account Name Enter the account name for logging in to the POP3
server. (maximum 64 characters)
Password Enter the password for logging in to the POP3 server.
(maximum 32 characters)
Auto Reception Enter the interval(in minutes) at which mail is checked
for during automatic reception. (1 to 60 minutes)
If set to “0”, Auto Reception is turned off.
Reply Address Enter the mail address for a mail replay showing the
error message when an error is generated. (maximum
64 characters)
Normally, the e-mail address of the administrator is
entered.
Server Timeout
Inputtheserver connectiontimeout in seconds. You can
input a value from 5 to 120 seconds.
12
Page 19

4 Description of Each Page
FTP & DNS Config.
It lets you change the FTP and DNS server settings.
FTP Proxy Server Address
Enter the proxy server’s IP address when a proxy is
used to access FTP sites.
Remote Port Number of Proxy
Enter the proxy port number (1 through 65535).
Enable DNS Server
Check this option when domain name addressing is
enabled.
DNS Server Address
Enter the DNS server’s IP address when
Server above is checked.
Reset
Use this menu to reset the network interface so new settings can
take effect. Click the
Maintenance
Use this menu to restore the network settings (only for the
tab and the Network tab) to its initial factory default settings.
Click the
Restore button.
Reset button.
Enable DNS
System
13
Page 20

5 Specifying Fax Settings
5 Specifying Fax Settings
The fax function settings for one-touch dialing, speed dialing and
group dialing, and the scanner function settings for file transmission
with this Digital Copier can be specified from PageScope Light. The
procedure for specifying these settings is described below.
5.1 One-Touch Dial Settings
From the One-Touch Dial Setting menu on the Fax tab, the one-touch
dial settings available with this Digital Copier can be specified.
With PageScope Light, only the fax number, e-mail address and group
dialing can be set. Program dialing and combination dialing settings
must be specified with the Digital Copier.
No. One-touch dial number (01-27)
Name Name of the recipient programmed for the one-touch
dial number
Address Address of the recipientprogrammedfor the one-touch
dial number
Depending on the type of recipient specified, either a
fax number or an e-mail address is displayed.
14
Page 21

5 Specifying Fax Settings
Batch With one-touch dial settings programmed for batch
transmission, the transmission time is displayed.
delete button
Click to delete the programmed one-touch dial settings.
5.1.1 To program a new one-touch dial number
A recipient can be programmed for a one-touch dial number that has
not been programmed yet.
1. Click the
One-Touch Dial Setting menu on the Fax tab.
The One-Touch Dial List screen appears.
2. Click a one-touch dial number (
No.) that has not yet been pro-
grammed with a recipient.
The One-Touch Registration screen appears.
3. From the drop-down list, select the type of recipient that will be
programmed for the one-touch dial number.
The types of recipients that are available are: Fax, E-mail or
Group Dial.
4. Click the
Apply button.
Dependingon the type of recipient that will be programmed,the
screen that appears is different. See the page indicated belowfor
details on the type of recipient that you wish to program.
• Fax:
• E-mail:
• Group dial:
Programming fax numbers (p.16)
Programming e-mail addresses (p.16)
Programming Group Dials (p.17)
15
Page 22

5 Specifying Fax Settings
Programming fax numbers
If
Fax waschosenintheOne-TouchRegistrationscreen,theFax
Destination screen shown below appears.
DestinationName
Enter the name of the recipient to be programmed for
the one-touch dial number. (maximum 20 characters)
Destination Number
Enter the fax number to be programmed. (maximum 30
characters)
This must be entered.
FCode Enter the F code sub-address (SUB) if it is required.
(maximum 20 characters)
F Code Password
Enter the F code password (SID) if it is required.
(maximum 20 characters)
Speed Select the modem transmission speed.
Batch Time For a batch transmission, enter the transmission time.
Programming e-mail addresses
If
E-mail waschosenintheOne-TouchRegistrationscreen,theE-
mail Destination screen shown below appears.
16
Page 23

5 Specifying Fax Settings
DestinationName
Enter the name of the recipient to be programmed for
the one-touch dial number. (maximum 20 characters)
Destination Address
Enter the mail address to be programmed. (maximum
64 characters)
This must be entered.
Programming Group Dials
If
Group Dial waschosenintheOne-TouchRegistrationscreen,
the Group Dial Destination screen shown below appears.
For recipients (up to 50) to be programmed for group dialing,
select from the recipients already programmed for one-touch
dialing and speed dialing. Toselect a recipient, click the box to the
left of the name to put a check mark in the box.
17
Page 24

5 Specifying Fax Settings
Group Dial Name
One-Touch Dial Index
Speed Dial Index
18
Enter the name of the recipient to be programmed for
the one-touch dial number. (maximum 20 characters)
Clicking an index number jumps to the one-touch dial
list
Clicking an index number jumps to the corresponding
speed dial list
Page 25

5 Specifying Fax Settings
5.1.2 To change the one-touch dial set ting
The settings for a one-touch dial number already programmed with a
recipient can be changed.
1. Click the
One-Touch Dial Setting menu on the Fax tab.
The One-Touch Dial List screen appears.
2. Click the one-touch dial number (
No.) whose settings you wish to
change.
A screen showing the programmed recipients appears.
Depending on the type of recipient that has been programmed,
the screen that appears is different. See the page indicated below
for details on the type of recipient that has been programmed.
• Fax:
• E-mail:
• Group Dial:
Programming fax numbers (p.16)
Programming e-mail addresses (p.16)
Changing group dialing (p.17)
Note
• If the one-touch dial number whose settings will be changed has
been programmed for group dialing, the settings that apply to
group dialing w ill also be changed.
• If the type of recipient will be changed, first delete the one-touch
dial settings, and then reprogram it.
Changing group dialing
From the
one-touch dial number (
One-Touch Dial Setting menu on the Fax tab, click the
No.)programmedforgroupdialingto
display a list of recipients available for group dialing.
19
Page 26

5 Specifying Fax Settings
Now, programmed recipients can be deleted. For details on
changing the group dial name, or adding or c hanging recipients,
refer to “5.3 Group Dial Settings”.
Name Name of recipient
Address Fax number or e-mail address of recipient
No. One-touch dial or speed dial number
delete button Click to delete that recipient from the group dial
settings.
5.1.3 To delete the one-touch dial setting
The settings for a one-touch dial number already programmed with a
recipient can be deleted.
1. Click the
One-Touch Dial Setting menu on the Fax tab.
The One-Touch Dial List screen appears.
2. Click the
delete button to the right of the one-touch dial setting
that you wish to delete.
In the confirmation message that appears, click the
to delete the settings.
Note
• If the one-touch dial number whose settings will be deleted has
been programmed for group dialing, the settings that apply to
group dialing w ill also be deleted.
20
Yes button
Page 27

5 Specifying Fax Settings
5.2 Speed Dial Settings
From the Speed Di al Setting menu on the Fax tab, the speed dial
settings available with this Digital Copier can be specified.
Index Clicking an index number jumps to the corresponding
speed dial list
No. Speed dial number (001-100)
Name Name of the recipient programmed for the speed dial
number
Address Address of the recipient programmed for the speed dial
number
Depending on the type of recipient specified, either a
fax number or an e-mail address is displayed.
delete button Click to delete the programmed speed dial settings.
5.2.1 To program a new speed dial number
A recipient can be programmed for a speed dial number that has not
been programmed yet.
1. Click the
Speed Dial Setting menu on the Fax tab.
21
Page 28

5 Specifying Fax Settings
The Speed Dial List screen appears.
2. Click a speed dial number (
No.) that has not yet been programmed
with a recipient.
The Speed Dial Registration screen appears.
3. From the drop-down list, select the type of recipient that will be
programmed for the speed dial number.
The types of recipients that are available are: Fax or E-mail.
4. Click the
Apply button.
Dependingon the type of recipient that will be programmed,the
screen that appears is different. See the page indicated belowfor
details on the type of recipient that you wish to program.
• Fax:
• E-mail:
Programming fax numbers
If
Fax was chosen in the Speed Dial Registration screen, the Fax
Programming fax numbers (p.22)
Programming e-mail addresses (p.23)
Destination screen shown below appears.
DestinationName
22
Enter the name of the recipient to be programmed for
the speed dial number. (maximum 20 characters)
Page 29

5 Specifying Fax Settings
Destination Number
Enter the fax number to be programmed. (maximum 30
characters)
This must be entered.
FCode Enter the F code sub-address (SUB) if it is required.
(maximum 20 characters)
F Code Password
Enter the F code password (SID) if it is required.
(maximum 20 characters)
Speed Select the modem transmission speed.
Programming e-mail addresses
If
E-mail was chosen in the Speed Dial Registration screen, the E-
mail Destination screen shown below appears.
DestinationName
Enter the name of the recipient to be programmed for
the one-touch dial number. (maximum 20 characters)
Destination Address
Enter the mail address to be programmed. (maximum
64 characters)
This must be entered.
5.2.2 To change the speed dial setting
The settings for a speed dial number already programmed with a
recipient can be changed.
1. Click the
The Speed Dial List screen appears.
2. Click the speed dial number (
change.
Speed Dial Setting menu on the Fax tab.
No.) whose settings you wish to
23
Page 30

5 Specifying Fax Settings
A screen showing the programmed recipients appears.
Depending on the type of recipient that has been programmed,
the screen that appears is different. The rest of the operation is
the same as for a new program. See the page indicatedbelowfor
details on the type of recipient that has been programmed.
• Fax:
• E-mail:
Programming fax numbers (p.22)
Programming e-mail addresses (p.23)
Note
• If the speed dial number whose settings will be changed has been
programmed for group dialing, the settings that apply to group
dialing will also be changed.
• If the type of recipient will be changed, first delete the speed dial
settings, and then reprogram it.
5.2.3 To delete the speed dial setting
The settings for a speed dial number already programmed with a
recipient can be deleted.
1. Click the
Speed Dial Setting menu on the Fax tab.
The Speed Dial List screen appears.
2. Click the
delete button to the right of the speed dial setting that
youwishtodelete.
In the confirmation message that appears, click the
to delete the settings.
Note
• If the speed dial number whose settings will be deleted has been
programmed for group dialing, the settings that apply to group
dialing will also be deleted.
24
Yes button
Page 31

5 Specifying Fax Settings
5.3 Group Dial Settings
From the Group Di al Setting menu on the Fax tab, the group dial
settings available with this Digital Copier can be specified.
The settings that appear are almost the same as those on the
Touch Dial Setting
menu; however, these can only be used to set
group dialing.
No. One-touch dial number (01-27)
Name Withone-touch dial settings programmed for group
dialing, the group name is displayed.
Address Withone-touch dial settings programmed for group
dialing, “
delete button Click to delete the one-touch dial setting programmed
for group dialing.
(Group Dial)”isdisplayed.
One-
Specifying a new group dial setting
From the list, click a one-touch dial number that has not yet been
programmed. The Group Dial Destination screen appears. (For
more details, refer to “5.3.1 Group dial recipient settings”.)
25
Page 32

5 Specifying Fax Settings
Changing a group dial setting
Click a group dial number that has already been programmed. The
settings are displayed and can be changed. (For more details, refer
to “5.3.1 Group dial recipient settings”.)
Deleting a group dial setting
Click the
set for group dialing. In the confirmation message that appears,
click the
delete button to the right of the one-touch dial number
Yes button to delete the settings.
5.3.1 Group dial recipient settings
The settings in the screens for programming new group dial settings
and for changing them are described here.
For recipients (up to 50) to be programmed for group dialing, select
from the recipients already programmed for one-touch dialing and
speed dialing. To select a recipient, click the box to the left of the name
to put a check mark in the box.
26
Page 33

5 Specifying Fax Settings
Group Dial Name
Enter the name of the recipient to be programmed for
the one-touch dial number. (maximum 20 characters)
One-Touch Dial Index
Clicking an index number jumps to the one-touch dial
list
Speed Dial Index
Clicking an index number jumps to the corresponding
speed dial list
27
Page 34

5 Specifying Fax Settings
5.4 File Transmission Settings
From the File Destination Setting menu on the Scanner tab,
recipients of scanned data can be set.
No. File Destination number
The 10 file destinations between 101 and 110 are
displayed.
Name File Destination name
Address FTP server address
delete button Click this button to delete the registered File
Destination.
Specifying a new file destination setting
From the list, click a file destination number t hat has not yet been
programmed. The File Destination screen appears. (For more
details, refer to “5.4.1 File destination settings”.)
Changing a file destination setting
Click a file destination number that has already been programmed.
The settings are displayed and can be changed. (For more details,
refer to “5.4.1 File destination settings”.)
28
Page 35

5 Specifying Fax Settings
Deleting a file destination setting
Click the
delete button to the right of the file destination number
that you wish to delete.
5.4.1 File destination settings
The settings in the screens for programming new file destination
settings and for changing them are described here.
File Destination section
DestinationName
Enter the name of the File Destination. (maximum 20
characters)
Ftp Server Address
Enter the IP address or the host name of the FTP site
where the scan data will be sent. (maximum 64
characters)
Directory Enter the name of the directory on t he FTP site where
the scan data will be saved. (maximum 128 characters)
29
Page 36

5 Specifying Fax Settings
Use Proxy Check this option to enable access of the FTP site via a
proxy. (For proxy settings, refer to “
Config.” on p.13.)
Remote Port Number
When a proxy is not used, enter the remote host port
number (1 through 65535).
E-mail Notification section
Enable Notification
Check this option to notify by e-mail when the scan
data is sent.
Notification Address
Enter the e-mail address of the recipient for e-mail
notification. (maximum 64 characters)
Account Information section
Anonymous Select when the FTP site of the recipient is an
anonymous FTP server.
Private Site Selectwhen the FTP site of the recipient requires user
authentication, and then specify the following.
User Nam e: Enter the user name for logging in to
the FTP site. (maximum 20
characters)
Password: Enter the password for logging in to
the FTP site. (maximum 20
characters)
Confirm: Re-input the password to confirm it.
FTP & DNS
30
 Loading...