

Page 1

0IE0OST3CRIPT
___________________________________________________________________________
!DVANCED)NFORMATION3CANNER-ODE
Page 2

Page 3

Contents
Contents
1 Introduction
1.1 Welcome ........................................................................................1-1
Trademark Acknowledgements ..................................................1-1
1.2 Precautions....................................................................................1-2
1.2.1 General precautions ...................................................................1-2
1.2.2 User Instructions.........................................................................1-3
For the U.S.A. Users ..................................................................1-3
For Canada Users ......................................................................1-3
For European Users ...................................................................1-4
For Users of the Class B regulation’s countries .........................1-4
For Users except the Class B regulation’s countries..................1-4
Precautions for using network applications ................................1-5
Functions that cannot use network applications.........................1-5
1.3 Check for Enclosed Accessories ................................................1-7
2Overview
2.1 Scan to E-mail ...............................................................................2-1
2.2 Scan to Server (FTP).....................................................................2-2
2.3 Scan to PC (FTP)...........................................................................2-4
2.4 Scan to HDD ..................................................................................2-5
2.5 Internet Faxing ..............................................................................2-6
2.6 IP Address FAX (LAN-FAX)..........................................................2-7
2.7 Scan to PC (SMTP)........................................................................2-8
2.8 IP Scanner......................................................................................2-9
2.9 Document Forwording/Archive Distribution ............................2-10
2.10 Network Fax Transmission ........................................................2-11
2.11 Environments for Transmitting Scan Data ...............................2-12
Required environment ..............................................................2-12
Scanner Mode i
Page 4

3 Preparation
3.1 LAN Connection ........................................................................... 3-1
Connecting the LAN cable ......................................................... 3-1
3.2 Network Settings .......................................................................... 3-3
3.2.1 List of Network Settings ............................................................. 3-3
Copier domain name and registering with a DNS server........... 3-6
3.2.2 Specifying Network Settings ...................................................... 3-7
Displaying the Network Settings screen .................................... 3-7
Basic Settings screen ................................................................ 3-9
DNS Settings screen................................................................ 3-10
Specifying the device name ..................................................... 3-11
SMTP Settings screen ............................................................. 3-12
POP3 Settings screen.............................................................. 3-13
Mail/Scan Setting (E-mail Mode) screen.................................. 3-14
Mail/Scan Setting (Scan Mode) screen.................................... 3-16
Scanner Settings screen.......................................................... 3-18
Registering an FTP site ........................................................... 3-20
Specifying a proxy.................................................................... 3-24
LDAP Setting screens.............................................................. 3-25
Frame Type Setting ................................................................. 3-26
Ping.......................................................................................... 3-26
3.2.3 Using PageScope Light ........................................................... 3-28
Accessing PageScope Light .................................................... 3-28
Operation ................................................................................. 3-29
Logging in Administrator mode ................................................ 3-30
Selecting the Display Language .............................................. 3-31
Penalty for Incorrect Attempts to Access Administrator
Mode ........................................................................................ 3-32
Allowing Administrator mode to be accessed again ................ 3-32
3.2.4 Using the Domain Name Buttons............................................. 3-33
Programming a domain name button....................................... 3-33
Using the domain name buttons .............................................. 3-35
3.2.5 Installing the Utilities ................................................................ 3-36
Utilities disk .............................................................................. 3-36
Installing IP Scanner (Windows Me, 98/95, XP, 2000 and
NT4.0) ...................................................................................... 3-36
Uninstalling (Windows Me, 98/95 and NT4.0).......................... 3-41
Uninstalling (Windows XP and 2000)....................................... 3-42
Contents
ii Scanner Mode
Page 5

Contents
4 Performing a Scan to E-Mail Operation
4.1 Basic Transmission ......................................................................4-1
If the transmission could not be completed ................................4-3
4.2 Selecting a Recipient From the List on the One-Touch
Screen ............................................................................................4-5
4.3 Selecting a Recipient by Searching for It by Name ...................4-6
4.4 Selecting a Recipient Through an LDAP Search .......................4-8
When typing in directly ...............................................................4-8
When registering one-touch keys.............................................4-11
4.5 Typing In the Number of the One-Touch Key for the
Recipient......................................................................................4-15
4.6 Registering a Recipient ..............................................................4-16
Registering indexes..................................................................4-16
Registering one-touch keys ......................................................4-19
4.7 Changing/Deleting Recipients ...................................................4-22
4.8 Copying a One-Touch Key .........................................................4-23
4.9 Specifying the Scanning Options..............................................4-25
4.9.1 Quality & Reduction Screen .....................................................4-25
Quality tab ................................................................................4-25
Contrast tab..............................................................................4-25
Reduction/Area tab...................................................................4-26
4.9.2 FAX Menu Screen ....................................................................4-27
Network tab ..............................................................................4-27
4.10 Inserting Text Into a Transmission Document.........................4-29
5 Performing a Scan to Server (FTP) Operation
5.1 Basic Transmission ......................................................................5-1
5.2 Registering a Recipient ................................................................5-3
5.3 Changing/Deleting Recipients .....................................................5-7
5.4 Specifying the Scanning Options................................................5-8
5.4.1 Quality & Reduction Screen .......................................................5-8
Quality tab ..................................................................................5-8
Contrast tab................................................................................5-8
Reduction/Area tab.....................................................................5-9
5.4.2 FAX Menu Screen ....................................................................5-10
Network tab ..............................................................................5-10
5.5 URL Report ..................................................................................5-11
Scanner Mode iii
Page 6

6 Performing a Scan to PC (FTP) Operation
6.1 Basic Transmission...................................................................... 6-1
6.2 Registering a Recipient................................................................ 6-3
6.3 Changing/Deleting Recipients..................................................... 6-6
6.4 Specifying the Scanning Options ............................................... 6-7
6.4.1 Quality/Reduction Screen .......................................................... 6-7
Quality tab.................................................................................. 6-7
Contrast tab ...............................................................................6-7
Reduction/Area tab ....................................................................6-8
6.4.2 FAX Menu Screen...................................................................... 6-9
7 Performing a Scan to HDD Operation
7.1 Basic Transmission...................................................................... 7-1
7.2 Registering a Recipient................................................................ 7-3
Creating a mail box (PageScope Light) ..................................... 7-3
7.3 Changing/Deleting Recipients..................................................... 7-7
7.4 Specifying the Scanning Options ............................................... 7-8
7.4.1 [Quality&Reduction Screen]....................................................... 7-8
Quality tab.................................................................................. 7-8
Contrast tab ...............................................................................7-8
Reduction/Area tab ....................................................................7-9
7.4.2 FAX Menu Screen.................................................................... 7-10
Network tab.............................................................................. 7-10
7.4.3 Specifying the File Storage Life ............................................... 7-11
7.5 Retrieving Scan Data.................................................................. 7-12
Retrieving Scan Data Using PageScope Light ........................ 7-12
Retrieving Scan Data by TWAIN.............................................. 7-13
Installing the TWAIN driver ...................................................... 7-13
Retrieving scan data ................................................................ 7-14
7.6 URL Report.................................................................................. 7-16
7.7 Penalty for Incorrect Attempts to Access a Mail Box ............. 7-17
Allowing a mail box to be accessed again ............................... 7-17
Contents
iv Scanner Mode
Page 7

Contents
8 Performing an Internet Fax/IP Address FAX Operation
8.1 Basic Transmission ......................................................................8-1
8.2 Selecting a Fax Program ..............................................................8-4
8.3 Registering a Recipient ................................................................8-5
8.3.1 Registering as a One-Touch Key ...............................................8-5
For an Internet fax ......................................................................8-5
For an IP address fax .................................................................8-8
8.3.2 Registering as a Fax Program..................................................8-11
8.4 Changing/Deleting Recipients ...................................................8-15
8.5 Specifying the Scanning Options..............................................8-16
8.5.1 Quality&Reduction Screen .......................................................8-16
Quality tab ................................................................................8-16
Contrast tab..............................................................................8-16
Reduction/Area tab...................................................................8-17
8.5.2 FAX Menu Screen ....................................................................8-19
Functions that can be specified from the FAX Menu screen....8-19
Specifying FAX Menu settings..................................................8-22
Specifying the transmission source name................................8-23
Specifying whether the destination name is inserted ..............8-24
Specifying the setting for the “TX Report” parameter...............8-24
Specifying the 2in1 transmission setting ..................................8-25
Specifying double-sided transmission settings.........................8-26
Specifying the rotation transmission setting .............................8-27
Specifying the priority transmission setting ..............................8-27
Specifying the timer transmission setting .................................8-28
Specifying TX Marker (optional) ...............................................8-29
Specifying the Subject setting ..................................................8-29
Specifying the Reply setting .....................................................8-30
Specifying the file name setting................................................8-31
8.6 Transmitting to Multiple Recipients
(Broadcast Transmission)..........................................................8-32
Specifying using the one-touch keys........................................8-32
Specifying using 10-key Dialing screen....................................8-32
Specifying using a fax program ................................................8-33
Checking the results of the broadcast transmission.................8-34
8.7 Transmitting Using a Combination of One-Touch Keys and
Manual Input (Chain Dialing)......................................................8-35
Using the one-touch keys.........................................................8-35
By typing in the address ...........................................................8-36
8.8 Inserting Text Into a Transmission Document .........................8-37
Registering text.........................................................................8-39
Scanner Mode v
Page 8

8.9 Checking Transmission Results............................................... 8-40
If an error e-mail message is received..................................... 8-41
Checking the operating functions............................................. 8-42
Checking Transmission Results............................................... 8-43
Checking Reception Results.................................................... 8-44
8.10 Receiving Documents (POP3 Reception)................................. 8-45
Receiving Internet faxes .......................................................... 8-45
Manually receiving faxes.......................................................... 8-45
Receiving an IP address fax .................................................... 8-46
8.11 Requesting/Returning the Activity Report ............................... 8-47
Conditions for sending a result notification .............................. 8-47
Full mode compatibility ............................................................ 8-47
8.12 Printing the Header Information in the Received Document.. 8-48
9 Performing a Scan to PC (SMTP) Operation
9.1 Basic Transmission...................................................................... 9-1
9.2 Registering a Recipient................................................................ 9-3
9.3 Changing/Deleting Recipients..................................................... 9-6
9.4 Specifying the Scanning Options ............................................... 9-6
9.4.1 Quality & Reduction Screen....................................................... 9-6
Quality tab.................................................................................. 9-6
Contrast tab ...............................................................................9-7
Reduction/Area tab ....................................................................9-7
9.4.2 FAX Menu Screen...................................................................... 9-9
Network tab................................................................................ 9-9
Contents
10 Using IP Scanner
10.1 IP Scanner ................................................................................... 10-1
Using a dial-up router............................................................... 10-2
Using a modem or terminal adapter......................................... 10-2
10.2 IP Scanner Window and Dialog Boxes ..................................... 10-3
Main window ............................................................................ 10-3
Main window (menu bar).......................................................... 10-5
Scanner Settings dialog box .................................................... 10-8
Sort Settings dialog box......................................................... 10-11
Divided Settings dialog box.................................................... 10-14
Notify Settings dialog box ...................................................... 10-17
ViewWindow .......................................................................... 10-20
vi Scanner Mode
Page 9

Contents
10.3 Basic Transmission ..................................................................10-21
Programming the scanner button (from the computer)...........10-21
Scanning documents (from the copier)...................................10-24
Viewing the scanned image (from the computer)...................10-25
11 Distribution of Fax Documents
11.1 Specifying the Setting ................................................................11-1
F codes.....................................................................................11-1
11.2 Forwarding a Received Fax to IP Scanner................................11-3
11.3 Forwarding to IP Scanner...........................................................11-4
11.4 Sending a Fax to a Recipient .....................................................11-5
12 Network Fax Transmission
12.1 Network FAX Utility.....................................................................12-1
12.2 Operation .....................................................................................12-1
13 Specifying Management Settings
13.1 Specifying the Initial Screen ......................................................13-1
Specifying the setting ...............................................................13-4
13.2 Specifying the Initial Recipient Selection Screen....................13-5
Specifying the setting ...............................................................13-7
13.3 Viewing Counters (“Meter Count” Function)..........................13-10
“Meter Count” Function...........................................................13-10
Viewing counters ....................................................................13-11
13.4 Displaying the Administrator Management screen ...............13-12
Displaying the Administrator Management screen.................13-12
13.5 Specifying the Date and Time..................................................13-13
Setting the date and time........................................................13-13
Setting the time zone..............................................................13-14
Setting the Daylight Saving Time ...........................................13-16
13.6 Specifying the Language of the Reports and the
Transmission Source Name.....................................................13-17
Specifying the setting .............................................................13-17
13.7 Programming the Transmission Source Name......................13-18
Registering the transmission source name ............................13-18
13.8 Specifying Network Settings for Accounts ............................13-20
Specifying the setting .............................................................13-21
Scanner Mode vii
Page 10

Contents
13.9 Specifying Transmission Settings.......................................... 13-22
13.9.1 Transmission Settings............................................................ 13-22
13.9.2 Specifying Transmission Settings .......................................... 13-23
Specify the default resolution................................................. 13-23
Specify the default contrast.................................................... 13-24
Specifying the default communication mode ......................... 13-24
Specifying the default transmission mode ............................. 13-25
Specifying the default method for attaching the transmission
source name .......................................................................... 13-26
Specifying the default transmission source name.................. 13-27
Specifying the default rotation transmission setting............... 13-28
Specifying double-sided transmission settings ...................... 13-29
13.10 Specifying that Received Documents Not Be Printed
(“Memory Lock” Function) ...................................................... 13-30
Specifying the time to stop printing........................................ 13-30
Specifying the password to restrict printing ........................... 13-32
Starting printing manually ..................................................... 13-33
13.11 Specifying the procedure for received documents
(“Doc. Manage.” function) ....................................................... 13-34
For documents classified with “Public Document” ................. 13-35
For documents classified with “F-Code” ................................ 13-37
For documents classified with “Port”...................................... 13-40
13.12 Specifying Report Output Settings......................................... 13-42
Report settings....................................................................... 13-42
Specifying the setting for the “TX Report” parameter ............ 13-42
Specifying the setting for the “Activity Report” parameter...... 13-43
13.13 Specifying Software Switch Settings
(Machine Functions)................................................................. 13-44
13.13.1 Specifying Software Switch Settings...................................... 13-45
Specifying functions with [Bit Selection]................................. 13-45
Specifying functions with [HEX Selection] ............................. 13-46
13.13.2 Specifying Settings Concerning the Confirmation Screen
13.13.3 Specifying Settings Concerning Whether or Not There Is a
For Broadcast Transmissions (Mode 014)............................. 13-48
Setting during production ....................................................... 13-48
Specifying the setting............................................................. 13-48
Connected Telephone or a Received Date Report and Their
Formats (Mode 016) .............................................................. 13-49
Setting during production ....................................................... 13-49
Specifying the setting............................................................. 13-49
viii Scanner Mode
Page 11

Contents
13.13.4 Specifies Settings Concerning Internet Faxing (Mode 350) ...13-50
Setting during production........................................................13-50
Specifying the setting .............................................................13-50
13.13.5 Specifying Settings Concerning the SMTP Transmission
13.13.6 Specifying Settings Concerning the SMTP Reception
13.13.7 Specifying Settings Concerning the POP3 Reception
13.13.8 Specifying Settings Concerning the Default Address Input
13.13.9 Specifying Settings Concerning the Timeout for a
13.13.10 Specifying Settings Concerning the Transmission Interval
13.13.11 Specifies Settings Concerning Full Mode Functions
Timeout (Mode 356) ...............................................................13-51
Setting during production........................................................13-51
Specifying the setting .............................................................13-51
Timeout (Mode 357) ...............................................................13-52
Setting during production........................................................13-52
Specifying the setting .............................................................13-52
Timeout (Mode 358) ...............................................................13-53
Setting during production........................................................13-53
Specifying the setting .............................................................13-53
Screen and the From Information for Accounts (Mode 366) ..13-54
Setting during production........................................................13-54
Specifying the setting .............................................................13-54
DNS Inquiry (Mode 367).........................................................13-55
Setting during production........................................................13-55
Specifying the setting .............................................................13-55
for Divided E-Mail Messages (Mode 372) ..............................13-56
Setting during production........................................................13-56
Specifying the setting .............................................................13-56
With Internet Faxing (Mode 373)............................................13-57
Setting during production........................................................13-57
Specifying the setting .............................................................13-57
14 Reports and lists
14.1 Checking the Transmission Status (Activity Report (TX)) ......14-1
Outputting the Transmission Activity Report ............................14-1
14.2 Checking the Reception Status (Activity Report (RX))............14-4
Outputting the Reception Activity Report..................................14-4
14.3 Checking the Registered One-Touch Keys
(One-Touch Key List)..................................................................14-7
Outputting the one-touch key list..............................................14-7
Scanner Mode ix
Page 12

14.4 Checking the Details of Registered Fax Programs
(Fax Program List)...................................................................... 14-9
Outputting a fax program list.................................................... 14-9
14.5 Checking Account Information (Account List)...................... 14-11
Outputting an account list ...................................................... 14-11
14.6 Checking Secured Information for Each Account
(Account List (Security)).......................................................... 14-13
Outputting an account list (security)....................................... 14-13
14.7 Checking the Settings For Each Function (Settings List) .... 14-15
Outputting the settings list...................................................... 14-15
14.8 Checking the Forwarding Settings (Forwarding List)........... 14-17
Outputting the forwarding list ................................................. 14-17
15 Troubleshooting
15.1 When Certain Displays Appear ................................................. 15-1
15.1.1 Icons ........................................................................................15-1
POP reception.......................................................................... 15-1
POP3 reception error............................................................... 15-1
15.1.2 Administrator login ................................................................... 15-2
While registering the network................................................... 15-2
15.2 Transmission Results Error Codes .......................................... 15-3
Scan to Server (FTP) transmissions ........................................ 15-3
Scan to PC (FTP) transmissions.............................................. 15-4
Scan to HDD transmissions..................................................... 15-4
URL notification (with Scan to Server (FTP) and Scan to
HDD transmissions)................................................................. 15-4
Internet fax transmissions/Scan to E-mail transmissions......... 15-5
Internet fax receptions ............................................................. 15-6
Scan to PC (SMTP) transmissions .......................................... 15-7
IP Scanner ............................................................................... 15-8
Network FAX (Gateway TX)..................................................... 15-8
15.3 Troubleshooting ......................................................................... 15-9
Internet fax transmissions/Scan to E-mail transmissions......... 15-9
IP address faxing ................................................................... 15-10
Internet fax receptions ........................................................... 15-10
Distribution of Fax Documents............................................... 15-12
Scan to PC (SMTP) transmissions ........................................ 15-12
IP Scanner ............................................................................. 15-13
Network FAX (Gateway TX)................................................... 15-17
PageScope Light.................................................................... 15-18
Others .................................................................................... 15-19
Contents
x Scanner Mode
Page 13

Introduction
1 Introduction
1.1 Welcome
This manual provides descriptions on the use of network application
functions used with the Internet or on an intranet.
For precautions concerning the use and safety of the main device, refer to
the User Manual provided with the device.
Store the User Manual and utilities disk in a safe place.
Trademark Acknowledgements
Windows®, Windows NT®, Microsoft® and its logo are registered
trademarks of Microsoft Corporation in the United States and other
countries.
IBM and PC/AT are registered trademarks of International Business
Machines Corporation in the United States and other countries.
Ethernet is a registered trademark of Xerox Corporation.
Netscape Navigator is a trademark of Netscape Communications
Corporation.
Adobe® and Acrobat® are trademarks of Adobe Systems Incorporated.
Network FAX is a registered trademark of Comuse Co., Ltd.
KONICA MINOLTA and KONICA MINOLTA logo are trademarks or
registered trademarks of KONICA MINOLTA HOLDINGS, INC.
PageScope is a trademark or a registered trademark of KONICA
MINOLTA BUSINESS TECHNOLOGIES, INC.
1
All other company names and product names mentioned in this manual
are trademarks or registered trademarks of their respective companies.
This product uses the Software Development Kit developed by Peerless
Systems Corporation.
Copyright© 2001 Peerless Systems Corporation. All rights reserved.
This product uses the NEST Office SDK developed by Novell, Inc.
Copyright© 1999 Novell, Inc. NEST is a trademark of Novell, Inc. in the
United States and other countries.
Scanner Mode 1-1
Page 14

1
1.2 Precautions
1.2.1 General precautions
1. The reproduction of the content of this manual, either partially or in full,
is prohibited without prior permission.
2. The content of this manual is subject to change without notice.
3. Unauthorized duplication or modification is strictly prohibited.
4. This manual was created with careful attention to content; however, if
inaccuracies, errors or omissions are noticed, please contact your
sales or service representative.
5. Some network application functions may not be supported, depending
on the operating environment or other software.
The actual performance of network application functions is determined
by various factors, such as the system configuration, customer data
and operator controls.
Since the operating environment of network application functions
differs depending on the customer, the configuration of specific
products and the suitability of the application software should be
determined specifically for the customer.
6. We assume no responsibility for consequences arising from use,
regardless of items 4 and 5 mentioned above.
7. The software provided with the device, the software included on the
CD-ROM and information such as the design of and materials related
to this manual are the sole property of NEC Corporation, NEC Access
Technica and their licensors.
NEC Corporation, NEC Access Technica and their licensors own all
patents, copyrights and titles to this manual, from the design,
production and duplication to the use and marketing rights. However,
these limitations do not apply if written permission to transfer the
above-mentioned rights to another company is received.
8. The touch panel screens and computer windows and dialog boxes
shown in this manual may differ slightly from the actual products.
Introduction
1-2 Scanner Mode
Page 15
Introduction
1.2.2 User Instructions
For the U.S.A. Users
FCC Part 15-Radio Frequency Devices
This device complies with Part 15 of the FCC Rules. Operation is subject to the following two
conditions: (1) This device may not cause harmful interference, and (2) this device must
accept any interference received, including interference that may cause undesired operation.
NOTE
This equipment has been tested and found to comply with the limits for a Class A digital
device, pursuant to Part 15 of the FCC Rules. These limits are designed to provide
reasonable protection against harmful interference when the equipment is operated in a
commercial environment. This equipment generates, uses, and radiate radio frequency
energy and if not installed and used in accordance with the instruction manual, may cause
harmful interference to radio communications.
Operation of this equipment in a residential area is likely to cause harmful interference in
which case the user will be required to correct the interference at his own expense.
WARNING
The design and production of this unit conform to FCC Regulations, and any changes or
modifications must be registered with the FCC and are subject to FCC control. Any changes
made by purchaser or user without first contacting the manufacturer will be subject to penalty
under FCC regulations.
FCC-F02
This device must be used with shielded interface cables. The use of non-shielded cables is
likely to result in interference with radio communications and is prohibited under FCC rules.
1
For Canada Users
Interference-Causing Equipment Standard (ICES-003 Issue 3)
This Class A digital apparatus complied with Canadian ICES-003
Cet appareil numérique de la classe A est conforme à la norme NMB-003 du Canada.
IC-F03
Scanner Mode 1-3
Page 16

1
Introduction
For European Users
CE Marking (Declaration of Conformity)
This product complies with the following EU directives:
89/336/EEC, 73/23/EEC and 93/68/EEC directives.
This declaration is valid for the area of the European Union.
This device must be used with shielded interface cables. The use of non-shielded cables is
likely to result in interference with radio communications and is prohibited under EU
directives.
For Users of the Class B regulation’s countries
This device must be used with shielded interface cables. The use of non-shielded cables is
likely to result in interference with radio communications and is prohibited under CISPR 22
rules and local rules.
For Users except the Class B regulation’s countries
WARNING
This is a Class A product. In a domestic environment this product may cause radio
interference in which case the user may be required to take adequate measures.
This device must be used with shielded interface cables. The use of non-shielded cables is
likely to result in interference with radio communications and is prohibited under CISPR 22
rules and local rules.
1-4 Scanner Mode
Page 17

Introduction
Precautions for using network applications
G Internet faxes and Scan to E-mail transmissions are sent and received
G If transmission from the mail server to the recipient is not possible for
G For some reason, the e-mail describing the error may not be received.
G Since the privacy of transmissions through the Internet or an intranet
G Telephones on a LAN cannot be used.
G It may take some time for a transmission to be sent due to Internet/
G Depending on the mail servers, it may not be possible to send
1
with the help of a mail server; they are not sent directly to the recipient
or received directly from the sender. In addition, as soon as
transmission with the server is finished correctly, the transmission is
considered complete.
some reason, an e-mail describing the error will be received from the
server.
If confirmation of the transmission is required, call the recipient after
transmission to confirm reception.
is limited, we recommend sending important documents directly to the
recipient through a common telephone line.
intranet traffic.
documents with a large number of pages or a large amount of image
data.
Functions that cannot use network applications
The following functions can be used with normal fax transmissions using
a common telephone line, but cannot be used with network applications.
G Batch transmission
G Polling transmission
G Real-Time transmission
G Password transmission
G Remote copying
G Confidential box
G Bulletin board registration
G On-hook
G Remote retrieval of bulletin board
✎
Note
Password transmission and remote copying can be specified in the
operation, but they will not function.
Scanner Mode 1-5
Page 18

1
Introduction
The following functions can be used with network applications.
G Image quality specification
G Density specification
G Non-reduction mode
G Scan area specification
G 2in1
G 2-sided transmission
G TX marker stamp (optional)
G TSI
G Destination insert
G Forward the received facsimile ducuments (Document Management)
G Priority transmission
G Timer transmission
G Rotation transmission
1-6 Scanner Mode
Page 19

Introduction
1.3 Check for Enclosed Accessories
Check that all of the following are included.
If anything is missing or damaged, contact your service representative.
Network Scan Kit (SU-2)
G TWAIN driver CD-ROM containing electronic manuals
This CD-ROM contains the TWAIN driver, the Scanner Mode User
Manual and the PageScope Light User Manual.
Internet Fax & Network Scan Kit (SU-3)
G TWAIN driver CD-ROM containing electronic manuals
This CD-ROM contains the TWAIN driver, the Scanner Mode User
Manual and the PageScope Light User Manual.
G Utility Disk (CD-ROM)
The Utility Disk contains the utilities (e.g., IP Scanner and Network
FAX), the IP Scanner User Manual and the Network FAX User
Manual.
✎
Tip
In order to use the Network Scan Kit or the Internet FAX & Network
Scan Kit, the Printer Controller (Pi3505e or Pi3505e/PS) and the
Network Interface Card must be installed.
1
✎
Note
The LAN cable (cable for Fast Ethernet 100BASE-TX) is not included.
CAUTION
Only use the CD-ROM in a player that is CD-ROM-compatible.
➜ If a player not compatible with the CD-ROM format is used, your ears
or speakers may be damaged by the loud noise produced.
Scanner Mode 1-7
Page 20

1
Introduction
1-8 Scanner Mode
Page 21
Overview
2Overview
Paper documents can easily be converted to electronic data and used, for
example, with electronic filing. Scanned image data (scan data) can be
sent to other computers through a network as either a TIFF file or a PDF
file.
The scanned image can be sent using any of the following methods.
Choose the appropriate method according on the network environment
and purpose.
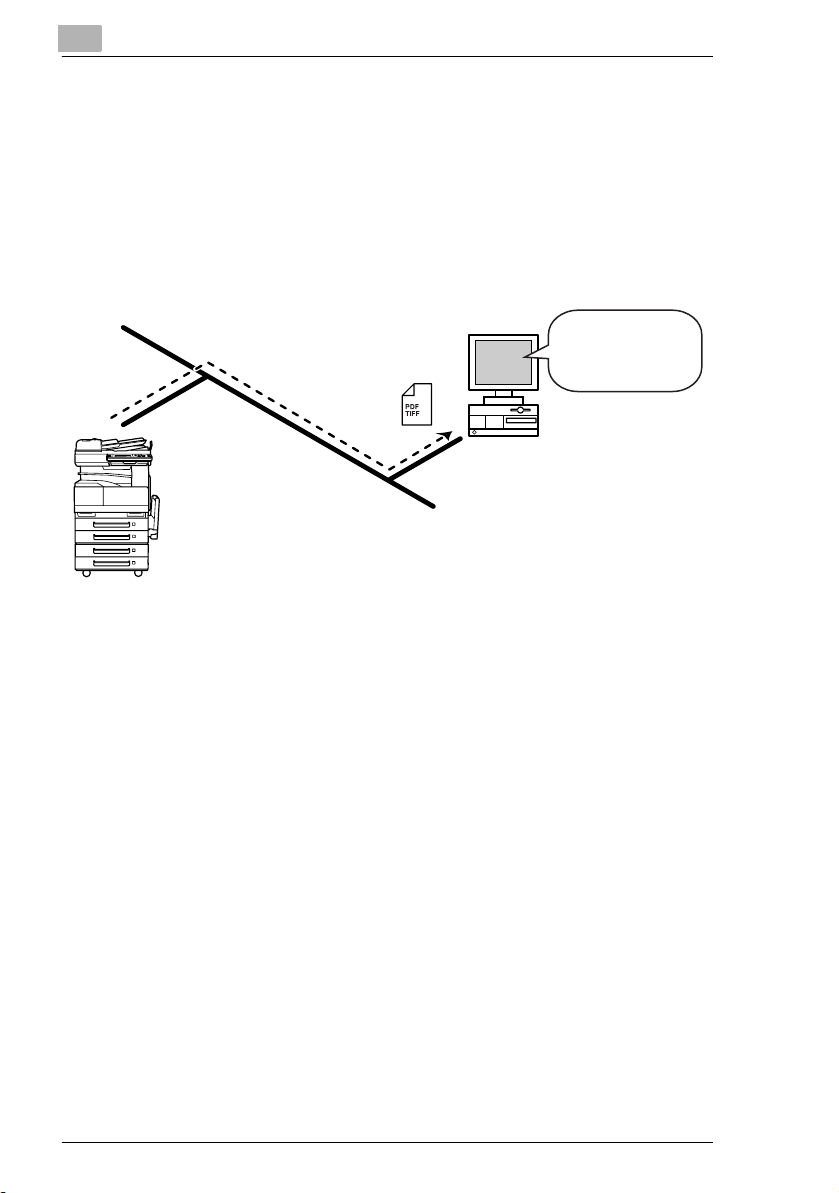
2.1 Scan to E-mail
G Scan data is attached to an e-mail message as a TIFF or PDF file, then
sent to a computer through an intranet or the Internet.
G A network environment that includes a mail server is required.
2
Mail server
Client computer
Intranet
Internet
Mail server
Client computer
Scanner Mode 2-1
Page 22
2
2.2 Scan to Server (FTP)
G Scan data can be uploaded as TIFF or PDF files to a specified
directory on an FTP server.
G A network environment that includes an FTP server is required.
G An FTP server on the Internet can be accessed through a proxy
server.
G A maximum of five FTP server can be registered, and a maximum of
five directories can be set up on each FTP server.
Overview
FTP server
Intranet
Internet
FTP server
2-2 Scanner Mode
Page 23
Overview
2
G With the “URL Report” function, a notification of the URL where the
scan data is saved can be sent by e-mail. (If the “URL Report” function
is used, a mail server is required.)
FTP server
FTP server
Internet
Client computer
Intranet
Internet
Mail server
Client computer
Scanner Mode 2-3
Page 24
2
2.3 Scan to PC (FTP)
G Scan data can be sent as TIFF or PDF files to client computers using
FTP.
G The FTP server application must be running on the client computers.
G The forwarding destination on the client computer is the root folder
specified with the FTP server application. This setting cannot be
specified from the copier’s control panel or from PageScope Light.
Overview
FTP server
application
Intranet
Client computer
2-4 Scanner Mode
Page 25
Overview
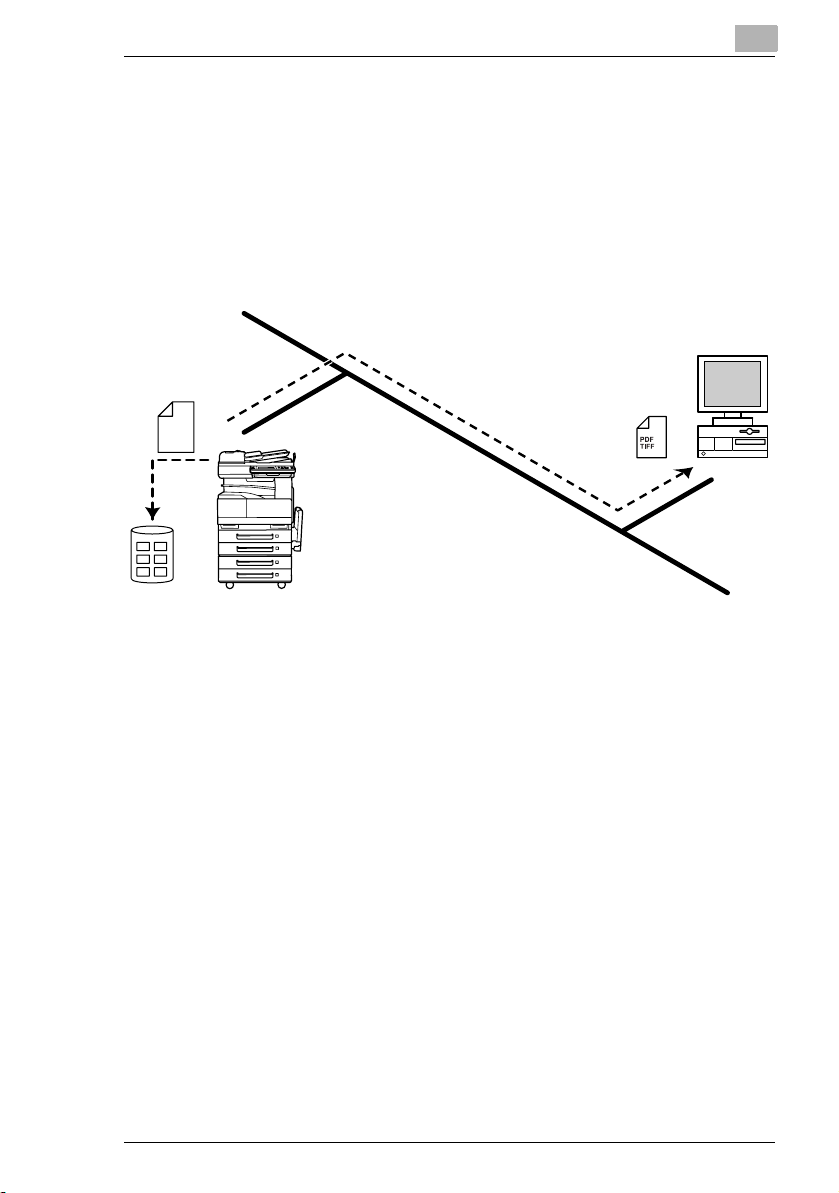
2.4 Scan to HDD
G Scan data is saved on the copier’s hard disk as TIFF or PDF files.
The saved files can be retrieved with PageScope Light or TWAIN
driver.
G With the “URL Report” function, a notification of the URL where the
scan data is saved can be sent by e-mail.
(If the “URL Report” function is used, a mail server is required.)
Scan
data
HDD
Intranet
Client
computer
2
Scanner Mode 2-5
Page 26
2
2.5 Internet Faxing
G As opposed to a normal fax, which transmits through telephone lines,
Internet fax sends and receives fax images through the Internet.
Internet fax uses the Internet electronic mail (e-mail) setup to send and
receive fax images. Image data scanned at an Internet fax terminal is
attached to an e-mail message as a TIFF-F file, then sent to the
recipient’s Internet fax terminal. The file attached to the received email message is printed by the Internet fax terminal on the receiving
end.
In addition, since e-mail is used, the fax can be sent to an individual email address, not just an Internet fax terminal. In this case, the fax
image arrives at the receiving end as an attachment to an e-mail
message received with the usual mail client software.
Overview
Mail server
Client computer
Internet fax
terminal
Intranet
Internet
Mail server
Client computer
2-6 Scanner Mode
Page 27
Overview
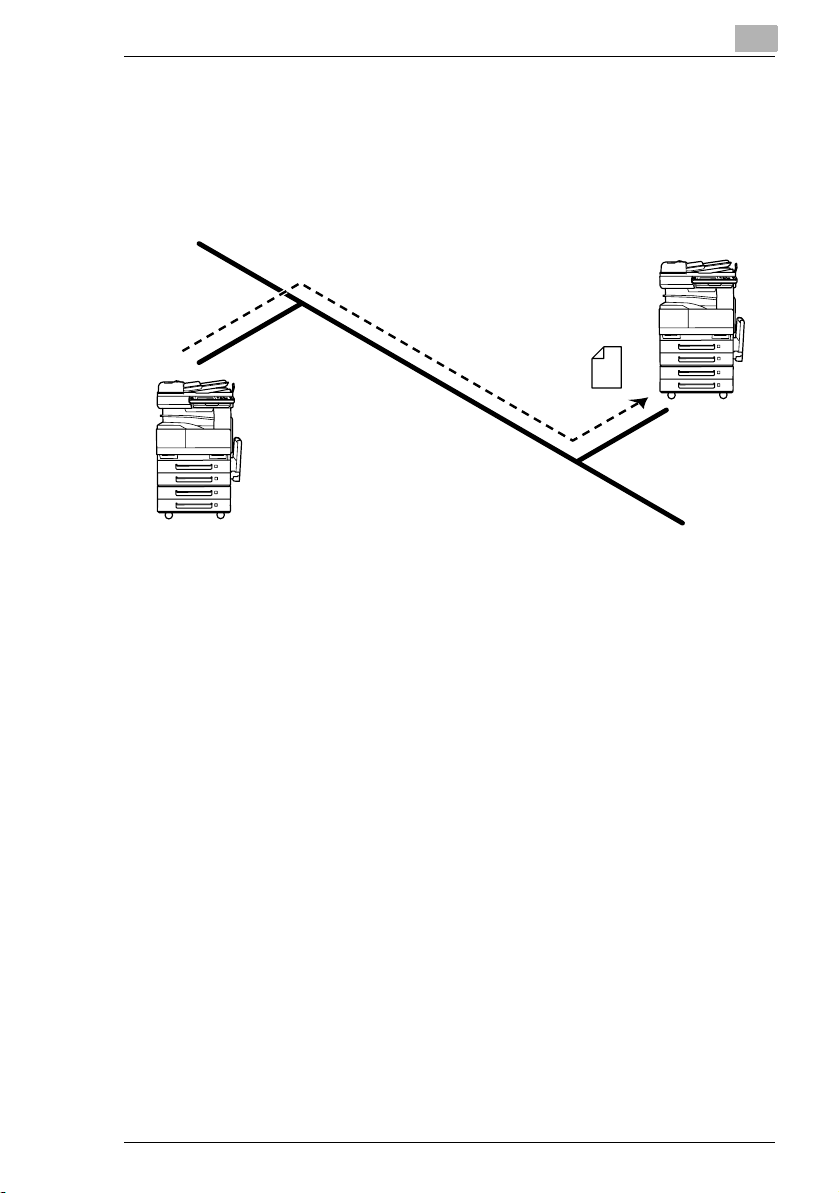
2.6 IP Address FAX (LAN-FAX)
G Scan data is sent to a copier of the same type (Internet fax) through
the Intranet, without passing through a mail server.
Intranet
1 Program a one-touch key with the IP address or the host name of the
recipient.
2
Internet fax terminal
(Same type of unit
as copier)
2 Use the one-touch key to specify the recipient, and then specify the
settings for sending the data (IP address fax transmission).
3 The recipient receives the fax image (IP address fax reception).
Scanner Mode 2-7
Page 28
2
2.7 Scan to PC (SMTP)
G Scan data can be sent as TIFF or PDF files to client computers using
SMTP.
G From the client computer, the enclosed IP Scanner application must
be used to first specify the folder where data is saved. In addition, the
IP Scanner application can be set to save the data in a folder that was
created using the name of the one-touch key.
G In order to receive the data at a client computer and save it as an
image file, the enclosed utilities IP Scanner and Image Receiver are
required.
G If there is a DHCP server on the network, this function may not operate
correctly since IP addresses are automatically distributed to each
computer. In this case, specify a fixed IP address for the computer or
use IP Scanner.
Intranet
Overview
Client computer
1 Program a one-touch key with the IP address of the computer
receiving the data.
2 Using the same procedure for sending e-mail messages, specify that
the data is to be sent to a computer.
3 The sent scan data is received by the recipient computer.
4 The IP Scanner application converts the data to a TIFF or PDF file,
then saves the file in the specified folder.
2-8 Scanner Mode
Page 29
Overview
2.8 IP Scanner
G Scan data is sent to a client computer, where it is saved in a folder that
is created using the name of the scanner button.
G After programming a button (Scan data destination and scan settings)
from the client computer when scanning, a paper document can easily
be saved as an electronic file with just the touch of a button in the
copier’s touch panel.
In order to receive the data at a client computer and save it as an
image file, the enclosed utilities IP Scanner and Image Receiver are
required.
G This function can be used in a network without a LAN if a crossover
cable is used to connect the copier to a client computer. (Network
settings are required.)
2
Client computer
1 From the computer, program a button (recipient of the scan data).
2 Touch the programmed button to send the scan image.
3 The sent scan image is received by the recipient computer.
4 The IP Scanner application converts the data to a TIFF or PDF file,
then saves the file in the specified folder.
Scanner Mode 2-9
Page 30
2
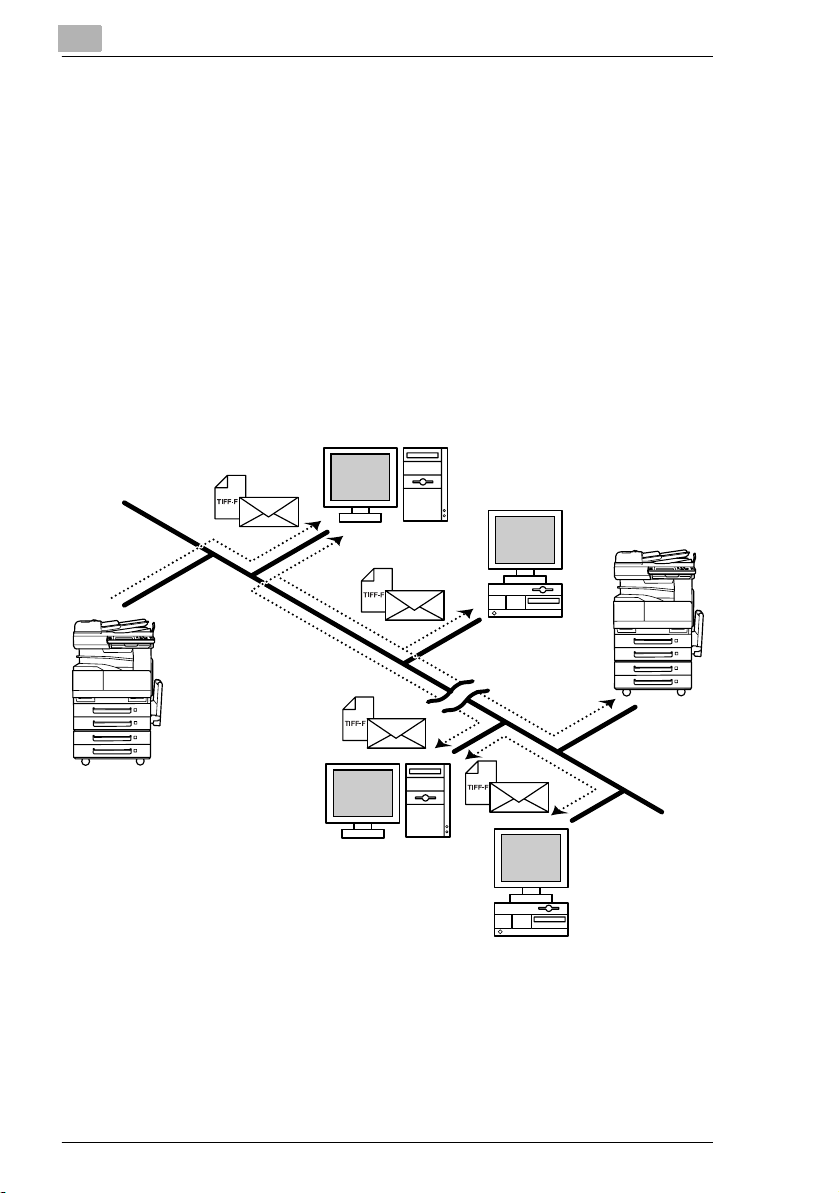
2.9 Document Forwording/Archive Distribution
G Image data received from a fax machine on a common telephone line
can be sent directly to a computer or attached to an e-mail message.
In order to transmit the fax document by e-mail, a network environment
that includes a mail server is required.
G The fax document can be be received at your own computer.
G Received fax documents can be classified as “F-Code”, “Port” or
“Public Document”, and the distribution destinations for each type of
document can be specified.
Overview
Facsimile
terminal
Facsimile
communication
Telephone
line
Client computer
Mail server
1 From the copier, select a Doc. Manage setting to classify the fax
image.
2 The fax image is sent to the computer specified as the recipient.
3 The fax image is received by the recipient computer as an image file.
2-10 Scanner Mode
Page 31

Overview
2.10 Network Fax Transmission
G To use Network Fax transmission, “Network FAX” is required, one of
the attached utilities. Be sure to confirm the network environment, then
perform the network setting and the setup of Network FAX.
G A document created in an application, such as word-processing
software, can be faxed by specifying the telephone (fax) number of the
recipient, without first printing the document.
In addition, the result of the fax transmission can be checked from the
computer.
G An e-mail address or a telephone (fax) number can be specified for the
recipient.
G In order to perform direct faxing operations using a mail server, the
DNS settings must be specified.
Client computer
2
Mail server
Telephone
line
Facsimile
communication
Facsimile terminal
1 Specify the fax number of the destination (specify the recipient after
specifying printing from the application).
2 The image data is transmitted from the client computer or mail server.
3 The data received by the computer is sent to the specified fax number.
Scanner Mode 2-11
Page 32

2
Overview
2.11 Environments for Transmitting Scan Data
The following types of environments are required in order to send scan
data.
✎
Tip
In order to use the Network Scan Kit or the Internet FAX & Network
Scan Kit, the Printer Controller (Pi3505e or Pi3505e/PS) and the
Network Interface Card must be installed.
All scanning operations can only be used in a TCP/IP network.
Required environment
<Operations that can be performed if the Network Scan Kit is installed>
Scan to E-mail
Required options - - - Hard Disk Drive
Required
environment for
image data
transmission
Required
environment for
image data
importing
Mail server FTP server FTP client
Mail client
computer
Scan to
Server(FTP)
FTP client
computer
Scan to PC(FTP) Scan to HDD
Kit
computer
(FTP server
application)
FTP client
computer
(FTP server
application)
-
Web browser or
TWAIN driver
2-12 Scanner Mode
Page 33

Overview
Required
options
Required
environment
for image
data
transmission
Required
environment
for image
data
importing
2
<Operations that can be performed if the Internet Fax & Network Scan Kit
is installed>
In addition to the operations that can be performed when the Network
Scan Kit is installed (refer to the above table), the following operations are
available.
Scan to PC
(SMTP)
----Only with
IP Scanner
and Image
Receiver
utilities
IP Scanner
and Image
Receiver
utilities
* 1: Di2010 and Di2010f are sold only in the U.S.A. and Canada.
Internet
Faxing
Mail server The
Internet fax
terminal
IP Address
Faxing
recipient
must be the
same type
of unit as t he
copier.
The
recipient
must be the
same type
of unit as t he
copier.
IP Scanner
IP Scanner
and Image
Receiver
utilities
IP Scanner
and Image
Receiver
utilities
Distribution
of Fax
Documents
the
1
,
Di2010f*
Di2510f,
Di3010f or
Di3510f
Environmen
t required for
the scan
function
selected as
the
distribution
method
Network
FAX
Only with
the
Di2010f*
Di2510f,
Di3010f or
Di3510f
Network
FAX utility
-
1
,
Scanner Mode 2-13
Page 34

2
Overview
2-14 Scanner Mode
Page 35

Preparation
3 Preparation
3.1 LAN Connection
This copier can transmit with the TCP/IP protocol on a LAN. Therefore, the
LAN cable must be connected.
Connect to the LAN by using a LAN cable (cable for Fast Ethernet
100BASE-TX).
Connecting the LAN cable
Insert one plug on the LAN cable into the connector (marked LAN) at the
back of the machine, and then insert the other plug into the hub.
✎
Tip
The connector is at the back of the machine.
The LAN cable should be a cable for Fast Ethernet 100BASE-TX
(Category 5).
3
The LAN cable is not included as an accessory.
Connector for LAN cable
USB
LAN
LED indicator
Scanner Mode 3-1
USB printer connector (optional)
• For more details, refer to the manual for
the Pi3505e printer controller.
Power cord connector
Page 36

3
Preparation
LED indicators
LED Color Condition Meaning
Green Lit The LAN is connected correctly.
Off The copier has not been turned on.
The LAN is not connected correctly.
Flashing Data is being sent or received.
Red Lit Operating at 100 Mbps
Off Operating at 10 Mbps
3-2 Scanner Mode
Page 37

Preparation
3
3.2 Network Settings
The available network operations are limited according to the connected
LAN environment. Specify the network settings according to the
environment and functions to be used.
The network settings can be specified from the copier’s control panel or
from Administrator mode of PageScope Light. The procedure for
specifying the network settings from the copier’s control panel is
described below.
For details on specifying PageScope Light settings, refer to the
PageScope Light User Manual.
3.2.1 List of Network Settings
●: Required; 2: Available
▲: Necessary depending on environment; -: Unnecessary
Operation
Scan to E-mail
Scan to
Server(FTP)
Scan to PC(FTP)
Scan to PC (SMTP)
Scan to HDD
IP Scanner
Internet Faxing
IP Address Faxing
Distribution of Fax
Documents
(fax reception)
Parameter
Basic Settings screen
DHCP ▲▲▲▲▲▲▲▲▲▲
IP Address
Subnet
Mask
Gateway ●●●●●●●●●●
Selfdomain
Name
Network
Board
Settings
DNS Settings screen
DNS
Setting
Host Name ▲▲▲▲▲ - ▲▲▲ -
Domain
Name
DNS
Server
Address
●●●●●●●●●●
●●●●●●●●●●
---------2
▲▲▲▲▲▲▲▲▲▲
▲▲▲▲▲ - ▲▲▲ -
▲▲▲▲▲ - ▲▲▲ -
▲▲▲▲▲ - ▲▲▲ -
Network FAX
Scanner Mode 3-3
Page 38

IP Address Faxing
Preparation
Distribution of Fax
Documents
(fax reception)
Network FAX
●
3
Operation
Scan to E-mail
Scan to
Server(FTP)
Scan to PC(FTP)
Scan to PC (SMTP)
Scan to HDD
IP Scanner
Parameter
Equipment Name
Equipment
Name
SMTP Settings screen
SMTP
Server
Address
Port
Number
E-mail
Address
POP3 Settings screen
POP3
Server
Address
Port
Number
POP3 User
Name
POP3
Password
Auto-RX
Check
Mail/Scan Settings screen
E-mail
Mode
Scan Mode 22222 -----
Scanner Settings screen
Activity
Report
RX Doc.
Header
Print
TX Doc.
Text Insert
Gateway
Send
Subject
Registration
222 - 2 - 2 - 2 -
● ▲*
● ▲*
● ▲*
------
------
------
------
------
------222 -
------2 ---
------2 ---
2 -----2 - 2 -
---------
2 -----2 ---
1
--▲*
1
--▲*
1
--▲*
1
- ● - ● -
1
- ● - ● -
1
- ● - ● -
Internet Faxing
● ---
● ---
● ---
● ---
● ---
3-4 Scanner Mode
Page 39

Preparation
Operation
Scan to E-mail
Scan to
Server(FTP)
Scan to PC(FTP)
Scan to PC (SMTP)
Scan to HDD
IP Scanner
Internet Faxing
IP Address Faxing
Distribution of Fax
Documents
Parameter
Devide
Setting
File Destination Memory Input
File
Destination
Memory
Input
Ping
This function is used to check if the network connection (LAN connection) is correctly connected.
*The ping can be sent with an SMTP server or POP3 server specified. In addition, a ping can be sent with
any IP address specified.
LDAP Setting
Specify these settings when using the LDAP (Lightweight Directory Access Protocol) search function.
Frame Type Setting
When connecting to the NetWare server and using the PC print function, specify the frame type.
Administrator mode in PageScope Light: [Network]>[FTP Server]>[FTP Configuration]
Proxy
server
address
Proxy port
number
FTP
Connection
Timeout
2 -----2 ---
● --------
-
- ▲ --------
- ▲ --------
- ▲ --------
* 1: If the “URL Report” function is used, the e-mail transmission (SMTP) settings must be
specified. (Refer to page 3-12.)
(fax reception)
3
Network FAX
Scanner Mode 3-5
Page 40

3
Preparation
Copier domain name and registering with a DNS server
In order to perform Network Fax transmissions through a mail server, this
copier must be registered with a DNS server as a mail server.
<Sample settings>
E-mail domain name xyz.co.jp
Copier IP address 192.168.100.200
Copier’s self-registered domain name abcde.xyz.co.jp
DNS server setting for xyz.co.jp abcde.xyz.co.jp MX192.168.100.200
If the settings are specified as shown in the above example, e-mail
addressed to “abcde.xyz.co.jp” will be received by this copier.
3-6 Scanner Mode
Page 41

Preparation
3.2.2 Specifying Network Settings
✎
Note
Before specifying network settings, check with the network
administrator for the necessary information.
Displaying the Network Settings screen
1 Press the [Utility] key on the copier control panel.
2 Touch [Admin.
Management].
3 Use the keypad to type in
the administrator access
code, and then touch
[Enter].
3
4 Touch [Admin. 2].
Scanner Mode 3-7
Page 42

3
Preparation
5 Touch [Network Set].
6 Specify the necessary
settings for the parameters
in the screen that appeared.
❍ For details on specifying
settings for the various
parameters, refer to the
following pages.
7 Continue touching [Enter] to return to the Utility screen, and then touch
[Exit] to return to the Basics screen.
✎
Note
After changing the setting of a parameter marked with , the copier
must be turned off, then on again.
✎
Note
The list of the settings specified for each function can be printed.
For details on printing the list of settings, refer to “Checking the
Settings For Each Function (Settings List)” on page 14-15.
3-8 Scanner Mode
Page 43

Preparation
Basic Settings screen
The following parameters can be set from the Basic Settings screen.
3
Parameter Description
DHCP Specify whether to automatically retrieve the IP
address from the DHCP server or to specify a
fixed IP address.
IP Address Type in the IP address of this unit.
*Type in the IP address only if the “DHCP”
parameter is set to “IP Input”.
Subnet Mask Type in the subnet mask of the connected
network.
*Type in the subnet mask only if the “DHCP”
parameter is set to “IP Input”.
Gateway Type in the default gateway address of the
connected network.
*Type in the default gateway address only if the
“DHCP” parameter is set to “IP Input”.
Self-domain Name Type in the domain name of this unit. This setting
is required in order to perform direct fax
transmissions through a mail server.
Network Board Set Specify the network board transmission speed
(Auto/100 Mbps/10 Mbps) and duplex mode
(Half Duplex/Full Duplex).
*The “Network Board Speed” parameter is
normally set to “Auto”. This automatically selects
the transmission speed through auto
negociation.
The “Duplex” parameter is only available if the
“Network Board Speed” parameter is set to
“100M” or “10M”.
Scanner Mode 3-9
Page 44

3
Preparation
1 In the Network Settings screen, touch [Basic Settings].
2 Specify the necessary settings for the parameters in the page that
appeared.
3 Touch [Enter].
DNS Settings screen
The following parameters can be set from the DNS Settings screen.
Parameter Description
DNS Setting Specify whether or not the DNS (Domain Name
System) function is used.
Host Name Type in the host name for the DNS server.
*Type in the server address only if the “DNS
Setting” parameter is set to “Yes”.
Domain Name Type in the domain name for the DNS server.
*Type in the server address only if the “DNS
Setting” parameter is set to “Yes”.
DNS Server
Address
Type in the IP address of the DNS server. A
maximum of three DNS server addresses can be
specified.
*Type in the server address only if the “DNS
Setting” parameter is set to “Yes”.
1 In the Network Settings screen, touch [DNS Settings].
2 Specify the necessary settings for the parameters in the page that
appeared.
3 Touch [Enter].
3-10 Scanner Mode
Page 45

Preparation
Specifying the device name
The Equipment Name is used as a part of the file name with Scan to Email transmissions, Scan to Server transmissions, Scan to PC
transmissions, Scan to HDD transmissions and Internet fax
transmissions. In addition, it is used as a part of the subject with Internet
fax transmissions and Scan to E-mail transmissions.
1 In the Network Settings screen, touch [Equipment Name].
2 Type the name of the device
3
(16 characters or less), and
then touch [Enter].
Scanner Mode 3-11
Page 46

3
Preparation
SMTP Settings screen
<Scan to E-mail settings and settings for sending Internet faxes (These
settings are also used for the e-mail notifications of the Scan to FTP and
Scan to HDD operations.)>
The following parameters can be set from the SMTP Settings screen.
Parameter Description
SMTP Server
Address
E-mail Address Type in the e-mail address of this unit.
Type in the IP address or host name for the
SMTP server.
*Both the host name and the IP address can be
typed in if the “DNS Setting” parameter is set to
“Yes”. If “No” is selected, only the IP address can
be typed in.
If necessary, change the port number of the
SMTP server.
1 In the Network Settings screen, touch [SMTP Settings].
2 Specify the necessary settings for the parameters in the page that
appeared.
3 Touch [Enter].
3-12 Scanner Mode
Page 47

Preparation
POP3 Settings screen
<Reception settings for Internet faxing>
The following parameters can be set from the POP3 Settings screen.
Parameter Description
POP3 Server
Address
POP3 User Name Type in the login name (account name) for the
POP3 Password Type in the password for logging into the POP3
Auto-RX Check Specify the interval for connecting to the POP3
Type in the IP address or host name for the
POP3 server.
*Both the host name and the IP address can be
typed in if the “DNS Setting” parameter is set to
“Yes”. If “No” is selected, only the IP address can
be typed in.
If necessary, change the port number of the
POP3 server.
POP3 server.
server.
server and checking for e-mail (Internet faxes).
3
1 In the Network Settings screen, touch [POP3 Settings].
2 Specify the necessary settings for the parameters in the page that
appeared.
3 Touch [Enter].
Scanner Mode 3-13
Page 48

3
Preparation
Mail/Scan Setting (E-mail Mode) screen
Specify the maximum size of data that can be transmitted, the maximum
transmission resolution and the coding method that is given priority with
Internet faxing and IP address fax transmissions. The transmission size
specified here is the default transmission size when new one-touch keys
are registered.
With Internet faxing, the fax may be sent using a transmission size,
transmission resolution or coding method that is not supported by the
receiving device, or it may not be possible for the recipient to view the
received data. During transmission, the maximum values for the receiving
device must be entered in the E-mail Mode screen. If the maximum values
are correctly specified, the data is sent with the maximum settings
previously specified, even if settings that are not supported by the
receiving device are specified during transmission.
The following parameters can be set from the Mail/Scan Setting (E-mail
Mode) screen.
Parameter Description
TX Size (Max.) Select the maximum document size for
transmission.
Inch Area: Letter/Legal, 11 × 17
Metric Area: A4, B4, A3
TX Quality (Max.) Select the maximum transmission resolution.
200/400/600dpi
Coding Method Select the coding method for scan data that is to
be transmitted.
MH/MR/MMR
3-14 Scanner Mode
Page 49

Preparation
1 In the Network Settings screen, touch [Mail/Scan Setting].
2 Touch [E-mail Mode].
3 Specify the necessary settings for the parameters in the page that
4 Touch [Enter].
3
appeared.
Scanner Mode 3-15
Page 50

3
Preparation
Mail/Scan Setting (Scan Mode) screen
Specify the file format and coding method that is given priority with Scan
to E-mail, Scan to Server, Scan to PC (FTP), Scan to PC (SMTP) or Scan
to HDD transmissions.
The file format specified here is the default file format when new onetouch keys are registered.
Parameter Description
File Type Select the file format for scan data that is to be
transmitted.
TIFF/PDF
Coding Method Select the coding method for scan data that is to
be transmitted.
MH/MMR
1 In the Network Settings screen, touch [Mail/Scan Setting].
2 Touch [Scan Mode].
3-16 Scanner Mode
Page 51

Preparation
3 Specify the necessary settings for the parameters in the page that
4 Touch [Enter].
3
appeared.
Scanner Mode 3-17
Page 52

3
Preparation
Scanner Settings screen
The following parameters can be set from the Scanner Settings screen.
Parameter Description
Activity Report Select whether (“ON”) or not (“OFF”) to send a
notification of the result for the reception of the
Internet fax. (Full mode)
For details, refer to “Specifies Settings
Concerning Full Mode Functions With Internet
Faxing (Mode 373)” on page 13-57.
RX Doc. Header
Print
E-mail Header Text Select whether or not to insert text explaining that
Select whether (“ON”) or not (“OFF”) to print the
e-mail header information when printing received
Internet fax documents.
a file is attached with Internet faxing and Scan to
E-mail transmissions.
With a Scan to E-mail transmission, the fixed text
is inserted even if “OFF” was selected.
Fixed Text/Custom Text/OFF
*If “Custom Text” is selected, previously
registered text is inserted. Register text from
PageScope Light. (Refer to “Registering text” on
page 8-39.)
*Touch [Text Check] to check the registered
custom text.
3-18 Scanner Mode
Page 53

Preparation
3
Parameter Description
Gateway TX Select whether (“Yes”) or not (“No”) to perform
the direct fax transmission operation. If “YES” is
selected on a machine installed with the multi
port, the screen for selecting the transmission
mode for a gateway transmission appears.
Select the transmission mode to be used with
direct fax transmissions.
Subject Registration Specify subject text for Internet fax and Scan to
E-mail transmissions. (A maximum of four can be
registered.)
Devide Settings Select whether (“Yes”) or not (“No”) the file is
divided and sent in separate sections with
Internet fax and Scan to E-mail transmissions.
Page Division/Size Division/Divide Size
*With Internet fax transmissions, the document
can be divided into its separate pages and sent
(Page Division).
With Scan to E-mail transmissions, the
document can be divided into its separate pages
(Page Division) or divided into sections of a
specified size (Size Division).
The recipient’s e-mail application may not be
able to handle documents sent using the “Size
Division” settings.
1 In the Network Settings screen, touch [Scanner Settings].
2 Specify the necessary settings for the parameters in the page that
appeared.
3 Touch [Enter].
Scanner Mode 3-19
Page 54

3
Preparation
Registering an FTP site
<The following settings must be specified in order for the Scan to Server
(FTP) operation to be performed.>
1 In the Network Settings screen, touch [File Destination Memory Input].
2 Touch [Input], and then
touch where an FTP site
has not yet been registered.
❍ A maximum of five FTP
servers can be registered,
and a maximum of five
directories can be set up
on each FTP server.
✎
Tip
Touch [Check] to check or change the settings for a registered FTP
site or touch [Delete] to delete a registered FTP site, and then
touch the button for the FTP site.
3 Type in the name of the FTP
server, and then touch
[Next].
3-20 Scanner Mode
Page 55

Preparation
4 Type in the address of the
5 Select whether or not a
3
FTP server, and then touch
[Next].
proxy is used, and then
touch [Next].
6 Type in the port number of
the FTP server, and then
touch [Next].
Scanner Mode 3-21
Page 56

3
Preparation
7 Select whether the FTP
server is public or private
(whether or not there is a
server link), and then touch
[Next].
❍ If “Private Site” was
selected, type in the user
name and the password.
8 The “Directory Memory
Input” screen appears.
Touch [Input], and then
touch where a directory
has not yet been registered.
9 Type in the name of the
directory, and then touch
[Enter].
✎
Tip
By typing in “.” (period),
the root directory can be
specified.
3-22 Scanner Mode
Page 57

Preparation
10 Check the name of the
11 When specifying multiple directories (up to five), repeat steps 8
12 Check the specified settings
3
directory, and then touch
[Enter].
through 10.
in the File Destination
Memory Check screen, and
then touch [Enter].
✎
Note
Enabling or disabling the
Passive Mode is set
from PageScope Light.
Refer to page 3-56 of the
PageScope Light User Manual.
Scanner Mode 3-23
Page 58

3
Preparation
Specifying a proxy
<The following settings must be specified in order to connect to an FTP
server through a proxy server. These settings can only be specified with
PageScope Light.>
The following parameters can be set from the FTP Configuration page.
Parameter Description
IP Address Type in the IP address or host name for the proxy
server.
*The host name can only be typed in if the “DNS
Setting” parameter is set to “Yes”.
Port Number Type in the port number of the proxy server.
FTP Connection
Timeout
Specify the amount of time until the connection
with the FTP server times out.
1 Start up PageScope Light.
❍ Refer to “Using PageScope Light” on page 3-28.
2 Log into PageScope Light in Administrator mode.
3 Click [FTP Configuration] in the sub-menu that appeared after clicking
[FTP Server] in the menu on the [Network] tab.
4 Specify the necessary settings for the parameters in the page that
appeared.
5 Click the [Apply] button.
3-24 Scanner Mode
Page 59

Preparation
LDAP Setting screens
The following parameters can be set from the LDAP Setting screens.
Parameter Description
LDAP Search Select whether to enable or disable the LDAP
search function.
Server Address Type in the IP address or host name for the
LDAP server.
The host name can only be typed in when the
“DNS Setting” parameter is set to “Yes”.
Base Directory Specify the search base (root). (255 characters
or less)
(Example) dc=sales, dc=ABCDEFG, dc=com
For details on the search root that should be
entered, consult with the LDAP server
administrator.
Certification Specify the authentication method.
If an authentication method other than
“Anonymous” is selected, the login name and
password must also be specified.
If “GSS-SPNEGO” is selected, the DNS server in
the DNS settings screen must be specified.
Settings: “Anonymous”, “Simple”, “Digest-MD5/
CRAM-MD5”, or “GSS-SPNEGO”*
Certification>
Domain Name*
Maximum number of
search
If the authentication method is set to “GSS-
SPNEGO”, set the domain name used with DNS.
Settings: Up to 64 characters.
Specify the maximum number of hits when
searching.
3
Scanner Mode 3-25
Page 60

3
Preparation
Parameter Description
Connection Time out Specify the amount of time until the search times
out.
SSL/TLS* Set whether to perform communications with the
LDAP server using SSL/TLS.
Settings: “ON” or “OFF”
Port Type in the number of the port that is used to
access the LDAP server.
If SSL is set to “Enable”, the port number is
automatically set to “636”.
* Items that can only be used with firmware version 4030-10G9/A/B-50 or later.
3-26 Scanner Mode
Page 61

3
Preparation
Frame Type Setting
1 In the Network Settings screen, touch [Frame Type Set].
2 Select the frame type
according to the Netware
environment that this copier
is connected to, and then
touch [Enter].
❍ Select a type from
“Auto”, “Ethernet-II”,
“802.2”, “802.3” or
“SNAP”.
These settings are
available when this
copier is connected to a Netware server and is used for PC print
functions.
Ping
Use this feature to check if the network is correctly connected.
1 In the Network Settings screen, touch [Ping].
2 Select the recipient where
the ping is to be sent, and
then press the [Start] key.
The message “Pinging”
appears.
3-26 Scanner Mode
Page 62

Preparation
3 Check the displayed results,
4 Touch [Enter].
3
and then touch [Enter].
Scanner Mode 3-27
Page 63

3
3.2.3 Using PageScope Light
PageScope Light is a utility for managing devices supported by the HTTP
server integrated into the printer/scanner controller. Using a Web browser,
PageScope Light can remotely control the printer/scanner controllers on
the network.
Indexes and one-touch keys can be registered and network settings can
be specified from PageScope Light.
Accessing PageScope Light
✎
Note
In order to use PageScope Light, the IP address must be set in
advance. For details on setting the IP address, refer to page 3-9.
PageScope Light can be accessed through a Web browser.
1 Start up the Web browser.
2 In the Address bar, type the IP address of this copier in the format
shown below, and then press the computer keyboard’s [Enter] key.
http://controller_IP_address/
(Example) If the copier’s IP address is 192.168.0.10:
http://192.168.0.10/
Preparation
3 The initial page of PageScope Light appears.
✎
Note
If your Web browser is set to use a proxy server, it may not be able
to access PageScope Light. In this case, specify the IP address of
the printer/scanner controller as an exception for access through
the proxy server.
3-28 Scanner Mode
Page 64

Preparation
(Example) With Internet Explorer 6
1 Click [Tools] in the menu bar, and then click [Internet Options...].
2 Click the [Connections] tab.
3 Click the [LAN Settings] button.
4 Click the [Advanced...] button in the “Proxy server” group box.
5 Type the IP address of the printer/scanner controller into the
Operation
PageScope Light is used in the same way that Internet Web pages are
viewed. Click Web page links to display those pages, or click the [Back]
(or [Forward]) button to display the previous (or next) page.
3
“Exceptions” list box.
Scanner Mode 3-29
Page 65

3
Preparation
Logging in Administrator mode
By logging into PageScope Light in Administrator mode, printer/scanner
controller settings can be specified or checked.
1 In the Admin Password box in the upper-left corner of the page, type
the administrator password.
2 Click the [Log-in] button to log into the Administrator mode.
3 To log out, click the [Log-out] button.
3-30 Scanner Mode
Page 66

Preparation
✎
Selecting the Display Language
If necessary, the language in which PageScope Light pages are displayed
can be changed. This setting only applies to PageScope Light pages.
1 Log into PageScope Light in Administrator mode.
2 Click [Preference] in the menu on the [System] tab.
3 Select the desired language for PageScope Light.
4 Click the [Apply] button.
3
Note
For the administrator password, use the administrator access code for
the copier. For details, contact the administrator for your copier.
If no operation is performed for 10 minutes after logging into
PageScope Light in Administrator mode, the user is automatically
logged out.
While logged into PageScope Light in Administrator mode, not all
operations can be performed from the copier’s control panel.
Scanner Mode 3-31
Page 67

3
Preparation
Penalty for Incorrect Attempts to Access Administrator Mode
If the “Access Lock” function is set to “ON” (Utility mode>Administrator
Management>Administrator Management 2>Access Lock from the
copier’s control panel), access is denied after three incorrect attempts to
access Administrator mode, even if the correct password is finally
entered.
For more details on the “Access Lock” function, refer to the Advanced
Operations volume of the copier’s User Manual.
✎
Note
Access is denied after a total of three incorrect attempts to access
Administrator mode from the both the copier’s control panel and
PageScope Light.
Allowing Administrator mode to be accessed again
Turn the machine off, then on again.
3-32 Scanner Mode
Page 68

Preparation
3.2.4 Using the Domain Name Buttons
If domain names (characters after @ at the end of the e-mail address,
such as “@xyz.com”) are registered in the domain name buttons, recipient
e-mail addresses can quickly and correctly be specified.
Programming a domain name button
1 Press the [Utility] key on the copier control panel.
2 Touch [User Set].
3 Touch [Fax Input].
❍ For a copier, touch [E-mail Input].
4 Touch [Domain Name].
3
5 Touch the domain name
button that you wish to
program.
Scanner Mode 3-33
Page 69

3
Preparation
6 Type the characters that you
wish to register
(64 characters or less), and
then touch [Enter].
7 Continue touching [Enter] to return to the Utility screen, and then touch
[Exit] to return to the Basics screen.
❍ To program more buttons, repeat steps 5 and 6.
3-34 Scanner Mode
Page 70

Preparation
Using the domain name buttons
✎
1 Type in the e-mail address,
2 Touch the button
3
Tip
From all screens that contain the [Domain Name] button, a domain
name can be entered using the same procedure.
and then touch [Domain
Name].
programmed with the
desired domain name.
❍ To return to the text input
screen, touch [Alpha].
Scanner Mode 3-35
Page 71

3
3.2.5 Installing the Utilities
The procedure for installing IP Scanner is described below.
Precautions
G For details on installing the Network FAX, refer to the Network FAX
User’s Manual.
✎
Note
Do not install IP Scanner onto computer used as mail server or
computers where a mail server is installed.
Utilities disk
The utilities disk contains the IP Scanner and Network FAX applications.
In order to install each utility, the amount of hard disk space shown below
must be available.
G IP Scanner: About 5 MB
G Network FAX: About 22 MB
Installing IP Scanner (Windows Me, 98/95, XP, 2000 and NT4.0)
1 Start up Windows, and then insert the utilities disk (CD-ROM) into the
CD-ROM drive.
The Installer starts up, and the Installer dialog box appears.
Preparation
✎
Tip
If the installer does not start up automatically, double-click “My
Computer” on the desktop, and then double-click the icon for the
CD-ROM drive containing the CD-ROM. Double-click [setup.exe]
on the CD-ROM to start up the installer.
3-36 Scanner Mode
Page 72

Preparation
2 Click the [GO] button beside Install IP Scanner.
3 Check the contents of the dialog box, and then click the [Next] button.
3
Scanner Mode 3-37
Page 73

3
Preparation
4 Check which folder IP Scanner will be installed into, and then click the
[Next] button.
❍ To change the folder where IP Scanner will be installed, click the
[Browse...] button, and then select the desired folder.
❍ While specifying settings in the installer dialog boxes, if you
choose the wrong setting or want to change a setting, click the
[Back] button to return to the previous dialog box and specify the
settings as desired.
5 Select the folder where IP Scanner will be registered, and then click
the [Next] button.
The installation begins.
3-38 Scanner Mode
Page 74

Preparation
6 Click the [Finish] button.
7 In the Installer dialog box, click the [Close] button.
3
A message may appear, informing you that the computer should be
restarted.
Restart the computer to complete the installation.
Scanner Mode 3-39
Page 75

3
Preparation
8 Restart the computer.
❍ Click the [Yes] button to restart the computer.
3-40 Scanner Mode
Page 76

Preparation
Uninstalling (Windows Me, 98/95 and NT4.0)
✎
1 In Windows, click the [Start] button, point to [Settings], and then click
2 Double-click the [Add or Remove Programs] icon.
3 Select “IP Scanner”, and then click the [Add/Remove...] button.
3
Note
Quit Image Receiver before uninstalling IP Scanner.
[Control Panel] to display the Control Panel window.
4 Click the [Yes] button.
5 Restart the computer.
Scanner Mode 3-41
Page 77

3
Preparation
Uninstalling (Windows XP and 2000)
✎
Note
Quit Image Receiver before uninstalling IP Scanner.
1 In Windows, click the [Start] button, point to [Settings], and then click
[Control Panel] to display the Control Panel window.
2 Double-click the [Add/Remove Programs] icon (the [Add or Remove
Programs] icon in Windows XP).
3 Select “IP Scanner”, and then click the [Change/Remove] button.
4 Click the [Yes] button.
5 Restart the computer.
3-42 Scanner Mode
Page 78

3
3.2.6 User Authentication
If User Authentication is set to “ON”, the user name and password must
be specified before the scanning operation is performed, and the scan
transmission operation can be performed by only those users who pass
the user authentication.
✎
Note
This function can only be used with firmware version 4030-10G9/A/B50 or later.
Setting Procedure (Using the Copier’s Control Panel)
1 Press the [Utility] key on the copier control panel.
2 Touch [Admin. Management].
3 Use the keypad to type in the administrator access code, and then
touch [Enter].
4 Touch [Admin. 2].
5 Touch [User Authentication].
Preparation
6 Specify the necessary
settings for the parameters
in the page that appeared.
❍ User Authentication:
Set whether to perform
user authentication.
Settings: “ON” or “OFF”
❍ Authentication
System:
Select the authentication
system.
3-44 Scanner Mode
Page 79

Preparation
7 Touch [Enter].
8 Turn the copier off, then on again.
Using User Authentication
1 Press the [Scan] key or the [Extra Scan] key.
2 If network user
3
If “Active Directory” is selected, the DNS server in the DNS settings
screen must be specified.
Settings: “Active Directory” or “NTLM”
❍ Domain Name:
If “User Authentication” is set to “ON”, set the domain name of the
selected server type.
Settings (for Active Directory): Up to 64 characters
Settings (for NTLM): Up to 15 characters
authentication is enabled, a
login screen appears. In this
case, enter the network user
name and password, and
then touch [Login].
3 If login is successful, the scanning operation can be performed.If user
authentication is used, an LDAP e-mail address search can be
performed. If an e-mail address is acquired, it is set as the From
address when using Scan to E-mail and Internet FAX operations.
If no e-mail address can be acquired, ““login_name” <email_address_of_device>” is set as the From address during Scan to
E-mail and Internet FAX operations.
Scanner Mode 3-45
Page 80

Performing a Scan to E-Mail Operation
4
4 Performing a Scan to E-Mail Operation
4.1 Basic Transmission
1 Position the document(s) to be scanned.
2 Press the [Fax/Scan] key.
❍ For a copier, press the [Scan] key.
3 Touch [10-Key Dialing].
Specify the recipient in any
of the following ways.
❍ For a copier, touch
[Addr. Input].
❍ Select a recipient from
the list on the OneTouch screen. → Refer
to page 4-5.
❍ Select a recipient by
searching for it by name.
→ Refer to page 4-6.
❍ Type in the number of the one-touch key for the desired recipient.
→ Refer to page 4-15.
❍ Select a recipient through an LDAP search.
→ Refer to page 4-8.
Scanner Mode 4-1
Page 81

4
Performing a Scan to E-Mail Operation
4 Touch [Com. Mode].
5 Touch [PC], then [E-mail],
and then touch [Enter].
6 Type in the e-mail address
of the recipient.
4-2 Scanner Mode
Page 82

Performing a Scan to E-Mail Operation
7 To change the file format or
coding method, touch [Scan
Mode], and then specify the
desired settings.
8 Specify the image quality,
density and zoom ratio
according to the document
to be scanned.
❍ Refer to “Specifying the
Scanning Options” on
page 4-25.
4
9 Press the [Start] key.
The transmission begins.
If the document is placed on the original glass:
G When scanning multiple document pages, continue scanning by
placing each consecutive page on the original glass, then pressing the
[Start] key.
G After all pages of the document to be sent are scanned, touch [Scan
End], and then press the [Start] key. The transmission begins.
If the transmission could not be completed
G The unit will automatically try again (auto redial) up to five more times
at one-minute intervals.
G The number of auto redials and the interval can be specified. For
details, refer to “Specifying Transmission Settings” on page 13-22.
G If the transmission could not be completed after auto redialing, a
transmission report is outputted.
Part of the first page of sent document is copied onto this report.
If it is not necessary to output the transmission report, change the
settings.
Scanner Mode 4-3
Page 83

4
Performing a Scan to E-Mail Operation
For details, refer to “Specifying Report Output Settings” on
page 13-42.
1 2
The Following document has not been transmitted. Try to retransmit.
ACCOUNT NAME :SALES
DESTINATION :NEW YORK
ADDRESS :123451234@xyz.com
F-CODE :
PAGES :0 sheets
RESULT :EA0006
2003 APR 23 (WED) 11:32
CHICAGO
DOCUMENT# :6514316-761
TIME STORED :APR 23 11:10
TIME SENT :APR 23 11:10
DURATION :2 min, 28 sec
MODE :E-mail
3
4
IMAGE
1 Report output date
2 Transmission source name
3 Details of transmission
4 Transmission results
• INTERR: The transmission was interrupted.
• F.MEM: The memory is full.
• NG: The transmission failed.
• PT.DEL: Part of the transmission failed.
• Error Code: Refer to “Transmission Results Error Codes” on
page 15-3.
P.1
G You can try again to send documents that could not be transmitted.
(maximum of 20 documents)
To send documents again, touch [Job List], touch [Com.], and then
search for documents that could not be sent.
If [Re-TX] or [Dest. chng] appears in the touch panel, the document
can be resent without having to be placed on the original glass.
Touch [Re-TX] to send the document to the same recipient.
Touch [Dest. chng] to change the recipient, then send the document.
4-4 Scanner Mode
Page 84

Performing a Scan to E-Mail Operation
4.2 Selecting a Recipient From the List on the OneTouch Screen
✎
Note
The recipient must have been registered as a one-touch key in
advance.
1 Position the document(s) to be scanned.
2 Press the [Fax/Scan] key.
❍ For a copier, press the [Scan] key.
3 Touch [One-Touch].
4 Select an index, and then
select a recipient from the
one-touch key list that
appears.
✎
Note
Touch an index tab or
touch [←], [→] or [Index
List], and then search for
the one-touch key of the
desired recipient.
4
5 Press the [Start] key.
Scanner Mode 4-5
Page 85

4
Performing a Scan to E-Mail Operation
4.3 Selecting a Recipient by Searching for It by Name
✎
Note
The recipient must have been registered as a one-touch key in
advance.
1 Position the document(s) to be scanned.
2 Press the [Fax/Scan] key.
❍ For a copier, press the [Scan] key.
3 Touch [Search].
4 Touch [Search], type in the
search name for the
recipient, and then touch
[Enter].
✎
Tip
A recipient can also be
selected by touching its
one-touch key.
4-6 Scanner Mode
Page 86

Performing a Scan to E-Mail Operation
5 Select the desired recipient,
and then press the
[Start] key.
4
Scanner Mode 4-7
Page 87

4
Performing a Scan to E-Mail Operation
4.4 Selecting a Recipient Through an LDAP Search
✎
Note
The LDAP settings must have been registered in advance.
For details on specifying the settings, refer to “LDAP Setting screens”
on page 3-25.
When typing in directly
1 Position the document(s) to be scanned.
2 Press the [Fax/Scan] key.
❍ For a copier, press the [Scan] key.
3 Touch [Search].
4 Touch [LDAP Searching].
4-8 Scanner Mode
Page 88

Performing a Scan to E-Mail Operation
5 Touch [Key Word], and then specify the keyword to be searched for.
For an advanced search, touch [Detail Search], and then specify the
search criteria.
Standard search screen
With a standard search, the characters specified as the keyword
will be searched for in the “Full Name”, “E-mail”, “Last Name”, and
“First Name” fields. The condition is fixed at “Begins”.
Detail search screen
4
Key Word: Touch the button for the desired type of keyword ([Full
Name], [E-mail], [Last Name], or [First Name]), and then specify the
keyword to be searched for.
Condition: Touch the condition button for each type of keyword (“Full
Name”, “E-mail”, “Last Name”, or “First Name”), and then specify the
search condition.
“Contains”, “Identical”, “Begins”, “Ends” or “Don’t use”
6 Touch [Start Search].
❍ To stop the search, touch [Stop Search].
Scanner Mode 4-9
Page 89

4
Performing a Scan to E-Mail Operation
7 From the displayed search results, select the desired recipient.
8 Check the displayed details, and then touch [Add to one touch] to send
the transmission to the displayed recipient.
9 Select the transmission method (“E-mail” or “FAX”), and then touch
[Enter].
❍ The [FAX] button only appears if the unit is used for faxing and a
fax number is registered for the selected recipient.
4-10 Scanner Mode
Page 90

Performing a Scan to E-Mail Operation
When registering one-touch keys
1 Press the [Utility] key.
2 Touch [User Set].
3 Touch [FAX Input].
❍ For a copier, touch [E-mail Input].
4 Select an index, and then touch a key where nothing has been
registered yet.
5 Set “LDAP Search” to “ON”, and then touch [Enter].
4
Scanner Mode 4-11
Page 91

4
Performing a Scan to E-Mail Operation
6 Touch [Key Word], and then specify the keyword to be searched for.
For an advanced search, touch [Detail Seach], and then specify the
search criteria.
Standard search screen
With a standard search, the characters specified as the keyword
will be searched for in the “Full Name”, “E-mail”, “Last Name”, and
“First Name” fields. The condition is fixed at “Begins”.
Detail search screen
Key word: Touch the button for the desired type of keyword ([Full
Name], [E-mail], [Last Name], or [First Name]), and then specify the
keyword to be searched for.
Condition: Touch the condition button for each type of keyword (“Full
Name”, “E-mail”, “Last Name”, or “First Name”), and then specify the
search condition.
“Contains”, “Identical”, “Begins”, “Ends” or “Don’t use”
7 Touch [Start Search].
❍ To stop the search, touch [Stop Search].
4-12 Scanner Mode
Page 92

Performing a Scan to E-Mail Operation
8 From the displayed search results, select the desired recipient.
9 Check the displayed details, and then touch [Register] to register the
displayed recipient.
4
10 Select the transmission method (“E-mail” or “FAX”), and then touch
[Enter].
❍ The [FAX] button only appears if the unit is used for faxing and a
fax number is registered for the selected recipient.
Scanner Mode 4-13
Page 93

4
Performing a Scan to E-Mail Operation
11 Check the information to be registered, and then touch [Enter].
4-14 Scanner Mode
Page 94

Performing a Scan to E-Mail Operation
4
4.5 Typing In the Number of the One-Touch Key for the
Recipient
A number is specified for each one-touch key, as shown below. Instead of
selecting a one-touch key, the number (between 000 an 539) of the onetouch key can be entered in order to specify the recipient.
~
Index 1 Index 36
1 Position the document(s) to be scanned.
2 Press the [Fax/Scan] key.
❍ For a copier, press the [Scan] key.
3 Press the [#] key.
4 Type in the three-digit number of the one-touch key for the desired
recipient.
The one-touch key of the entered number is highlighted.
5 Press the [Start] key.
Scanner Mode 4-15
Page 95

4
4.6 Registering a Recipient
Registering a recipient in the copier in advance is useful for using a
scanning operation. Recipients can be registered from either the copier’s
control panel or from PageScope Light.
In addition, registered one-touch keys can be searched through more
easily if the indexes are used to classify the one-touch keys. There are 36
indexes, and up to 15 one-touch keys can be registered in each index.
The procedure for registering one-touch keys from the copier’s control
panel is described below.
For details on registering one-touch keys using PageScope Light, refer to
the PageScope Light User Manual.
1
2
Performing a Scan to E-Mail Operation
1 Index tab
2 One-touch keys registered in the selected index
Registering indexes
1 Press the [Utility] key.
2 Touch [User Set].
4-16 Scanner Mode
Page 96

Performing a Scan to E-Mail Operation
3 Touch [Fax Input].
❍ For a copier, touch [E-
mail Input].
4 Touch [Index].
4
5 Touch a key where an index
has not yet been registered.
Scanner Mode 4-17
Page 97

4
Performing a Scan to E-Mail Operation
6 Type in the name of the
index.
7 Touch [Enter].
4-18 Scanner Mode
Page 98

Performing a Scan to E-Mail Operation
Registering one-touch keys
If a recipient is registered with a one-touch key, the recipient’s information
can be retrieved with just the touch of a button in the copier’s touch panel.
Registering recipients where data is frequently sent is convenient since it
no longer requires the recipient information to be entered each time data
is sent.
Up to 540 one-touch keys can be registered. However, the total number
of one-touch keys and fax programs (maximum of 30) must not exceed
540.
1 Press the [Utility] key.
2 Touch [User Set].
4
3 Touch [Fax Input].
❍ For a copier, touch [E-
mail Input].
Scanner Mode 4-19
Page 99

4
Performing a Scan to E-Mail Operation
4 Touch [One-Touch].
5 Select an index, and then
touch a key where nothing
has been registered yet.
✎
Note
If the LDAP search
function is enabled, a
recipient can be selected
through an LDAP
search.
6 Type in the recipient name
that will appear on the onetouch key, and then touch
[Next].
4-20 Scanner Mode
Page 100

Performing a Scan to E-Mail Operation
7 Touch [PC], then [E-mail],
and then touch [Next].
8 Type in the e-mail address
of the recipient, and then
touch [Next].
4
❍ To change the file format
or coding method, touch
[Scan Mode], and then
specify the desired
settings.
Scanner Mode 4-21
 Loading...