

Page 1
As an Energy Star Partner, Minolta has determined that
this copier meets the Energy Star Guidelines for Energy
Efficiency.
1075O312AA
What is an Energy Star Copier ?
Energy Star Copiers have a feat ure that allows them to automatically tur n off or "go t o sleep " after a
period of inactivit y, ens uring ni gh t and w eekend sh ut o ff. This auto-feature can reduce a copier’s
annual electricity costs by ov er 60 p ercent. I n ad dit ion, hi gh s peed cop iers will be set to
automatically make double sided copies. An organization’s paper costs can be reduce by $60 a month
and the volume of paper sen t in to t he waste s tr eam w ill d eclin e. It takes 1 0 times more energy to
produce a piece of paper than it does to make a s in gle co py on a copier . Ther efore, u sing less p aper
also means decreased national energy consumption.
Recycled Paper (USA market only)
Your Minolta Copier has been designed to use th e follo w ing Recycled Paper
Minolta Recycled Bond Item No. 8925 701
20% Post Consumer Waste
Page 2

EP6000
Thank you for choosing M inolta.
This operator’s manual exp lain s how to oper ate th e cop ier and rep leni sh its supplies. It also g ives
some troubleshooting tips as well as general precauti ons to be ob serv ed wh en oper atin g th e copier .
i
To ensure the best performance and ef fecti ve us e of your copier, r ead t his man ual caref ull y unti l yo u
familiarize yourself tho roug hly w ith its o per atio n and f eatur es. A fter yo u have r ead t hr ough the
manual, keep it for ready reference.
Please use this manual as a quick and handy reference tool for immed iately clarifying any question s
which may arise.
Page 3

ii
Contents
Chapters 1 through 3 contain the basic information for making copies.
Be sure to read these chapters before attempting to use your copier.
Using This Manual
Organization viii
Page Organization ix
Terms an d S ym bols fo r t he Type of O ri ginals and Copy P a per x
Chapter 1 Safety Note s 1
1. Installing The Copier
Installation Site 2
Power Source 2
Groundi ng 2
Space Requirements 3
2. Precautions for Use
Operating Environment 4
Using the Copier Properly 4
Care of Copier Supplies 5
Moving 5
Page 4

Chapter 2 First Things to Know about
iii
Chapter 2 your Copier 7
1. System Overview 8
2. Copier Parts and Accessories
Copier 10
Options 13
3. Control Panel Keys and Touch Panel 14
4. Touch Panel
What’s a Touch Panel? 16
How the Screen is Organized 16
Adjusting the Displ ay Con trast 17
Using it Properly 18
5. Turning ON and OFF, and Resetting the Copier
Turning ON and OFF 21
When the Copier is Turned ON 21
Initial Mode and Panel Reset tin g 2 2
Auto Co py Start Function 23
Energy Saver Mode 24
Entering the Access Number 25
Chapter 1
Safety Notes
Chapter 2
First Things to
Know about
your Co pi er
Chapter 3
Making Copies
Chapter 4
Usin g the User
Mode
Chapter 5
When a Message
Appears
Chapter 6
Troubleshooting
Chapter 7
Specifications
Chapter 8
Miscellaneous
Page 5

iv
Chapter 3 Making Copies 27
1. Basic Copying Overview 28
2. Placing Originals 30
3. Number of Copies 34
4. Starting the Copy Cycle 35
5. Interrupt Mode 36
6. Manual Bypass Copying 37
7. Basic Functions
Copy Paper Size 40
•
Zoom Ra t io 42
•
Image Density 45
•
8. Selecting the Original Copy Type
▲
1 1 49
•
▲
1 2 49
•
▲
2 1 51
•
▲
2 2 52
•
▲
1 [2 in 1] 52
•
▲
1 2 [2 in 1] 54
•
9. Finishing Mode
Non-Sort 66
•
Sort 66
•
Sort-and-Staple 67
•
Group 67
•
10. Auxiliary Functions
Cover 79
•
Page Ins e rtion 82
•
OHP Interleaving 90
•
File Margin 96
•
Book Copy 100
•
Edge/Frame Erase 102
•
11. Mode Check 105
▲
1 [2 in 1] 1 55
•
2 [2 in 1] 1 56
•
Mixed Original Detection Mode 58
•
Auto Original Count Mode 60
•
•
•
•
▲
▲
Hole Punch 68
Manual Staple 68
Auto Dual Function 7 2
Page 6
Chapter 4 Using the User Mode 107
v
Contents
1. Job Memory Input and Job Recall
Job Memo ry Input 108
Account Job Inp ut 110
Recalling a Job from Memory 112
2. Zoom Memory Input 114
3. Meter Count 116
4. Toner Replenisher 117
5. Drum Dehumidifier 118
6. User’s Choice
User’s Choice Functions 119
Making the User’s Choice Settings 124
Chapter 5 When a Message Appears 127
1. When the Message "The Current Paper
Drawer is empty." Appears 128
2. When the Message
"Replenish Toner." Appears 132
3. When the Message
"The Staple Cartrige is empty," Appears 134
4. When the Message "Misfeed detected."
Appears 136
5. When the Message "The section indicated
by is open." Appears 146
6. When Appears. 149
7. What Does Each M ess age M ean? 150
Chapter 1
Safety Notes
Chapter 2
First Things to
Know about
your Co pi er
Chapter 3
Making Copies
Chapter 4
Usin g the User
Mode
Chapter 5
When a Message
Appears
Chapter 6
Troubleshooting
Chapter 7
Specifications
Chapter 8
Miscellaneous
Page 7

vi
Contents
Chapter 6 Troubleshooting 153
1. When this Type of Copy is Produced
The Image is too Light 15 4
•
The Image is too Dark 154
•
The Copy is Blurry 154
•
The Copy has dark specks or spots 155
•
The Edg e of the Copy is dirt y. 155
•
The Image on the Copy is not aligned properly 155
•
2. The Copier is not functioning as designed
The Touch Panel shows nothing 156
•
No copies are fed out when the S tart Key is pressed 156
•
Control Panel Keys do not respond 156
•
The Copier is not activat ed when th e Pow er Switch is tu rn ed ON 15 6
•
Chapter 7 Specifications 157
1. Copier 158
2. Duplexing Document Feeder 160
3. Large Capacity Casette 161
4. 20 Bin Staple Sorter 162
5. 20 Bin Sorter 163
6. Data Controller 164
7. Copier Outline Dimensions 165
Page 8

Chapter 8 Miscellaneous 167
vii
Contents
1. Care of the Copier
Daily Checks 168
•
Cleaning 169
•
2. Function Combination Matrix 172
3. Description of Copy Paper Size 175
4. Zoom Ratio Table
(Original Size to Copy Paper Size) 176
5. Index 177
Chapter 1
Safety Notes
Chapter 2
First Things to
Know about
your Co pi er
Chapter 3
Making Copies
Chapter 4
Usin g the User
Mode
Chapter 5
When a Message
Appears
Chapter 6
Troubleshooting
Chapter 7
Specifications
Chapter 8
Miscellaneous
Page 9

viii
Using This Manual
Organization
This manual consists o f eight chapters. Chapters 1 throug h 3 gi ve th e basic information for
making copies. Be sure to read th ese chap ters b efore at tempt ing to use y our co pier.
Chapter 1 Safety Notes
About the operating envi ro nment, con di tio ns, and precautions for use.
Chapter 2 First Things to Know About your Copier
A brief description of the system and preliminary infor matio n ab ou t th e di ff erent par ts
of the system.
Chapter 3 Making Copies
About how to make copies and how to make settings for various functions.
Chapter 4 Using the User Mode
About the functions t hat are made av ailab le b y u sing th e User M ode Key, i.e., J o b
Memory Input, Zoom Memory Input, Meter Co unt, Toner R epl enish er, Dr um
Dehumidifier and User’ s Choice. It a lso shows how to recall a job program from t he
memory using the Jo b Recall K ey.
Chapter 5 When Such a Message Appears
About the various warning messages given on the Touch Panel and steps to take to
correct these faulty con dit ion s, as well as th e pr ocedur es to be used for replenishing
supplies.
Chapter 6 Troubleshooting
Instructions on how to troubleshoot copier malfunctions.
Chapter 7 Specifications
Complete specificatio ns o f th e copier system and options.
Chapter 8 Miscellaneous
About care for the copier an d th e copier s up pli es.
Page 10
Page Organization
ix
Using This Manual
Index: Used to locate your ch apter qu ick ly.
Page number
Section title
Useful Tip: Gives you a u sefu l pi ece of adv ice
on using a particular convenient
function or device.
Chapter title
Indicates that this is th e
end of the steps.
Indicates that there are more st eps
to follow in the next column .
Note: Calls your atten tio n t o a p arti cular
point in the procedure.
Page 11
x
Using This Manual
Terms and Symbols for the Type of Originals and Copy Paper
A few special terms and symbols are used in this manual to des ig nate t yp es of originals and copy
paper. These two pages explai n abou t th es e terms an d sy mbo ls .
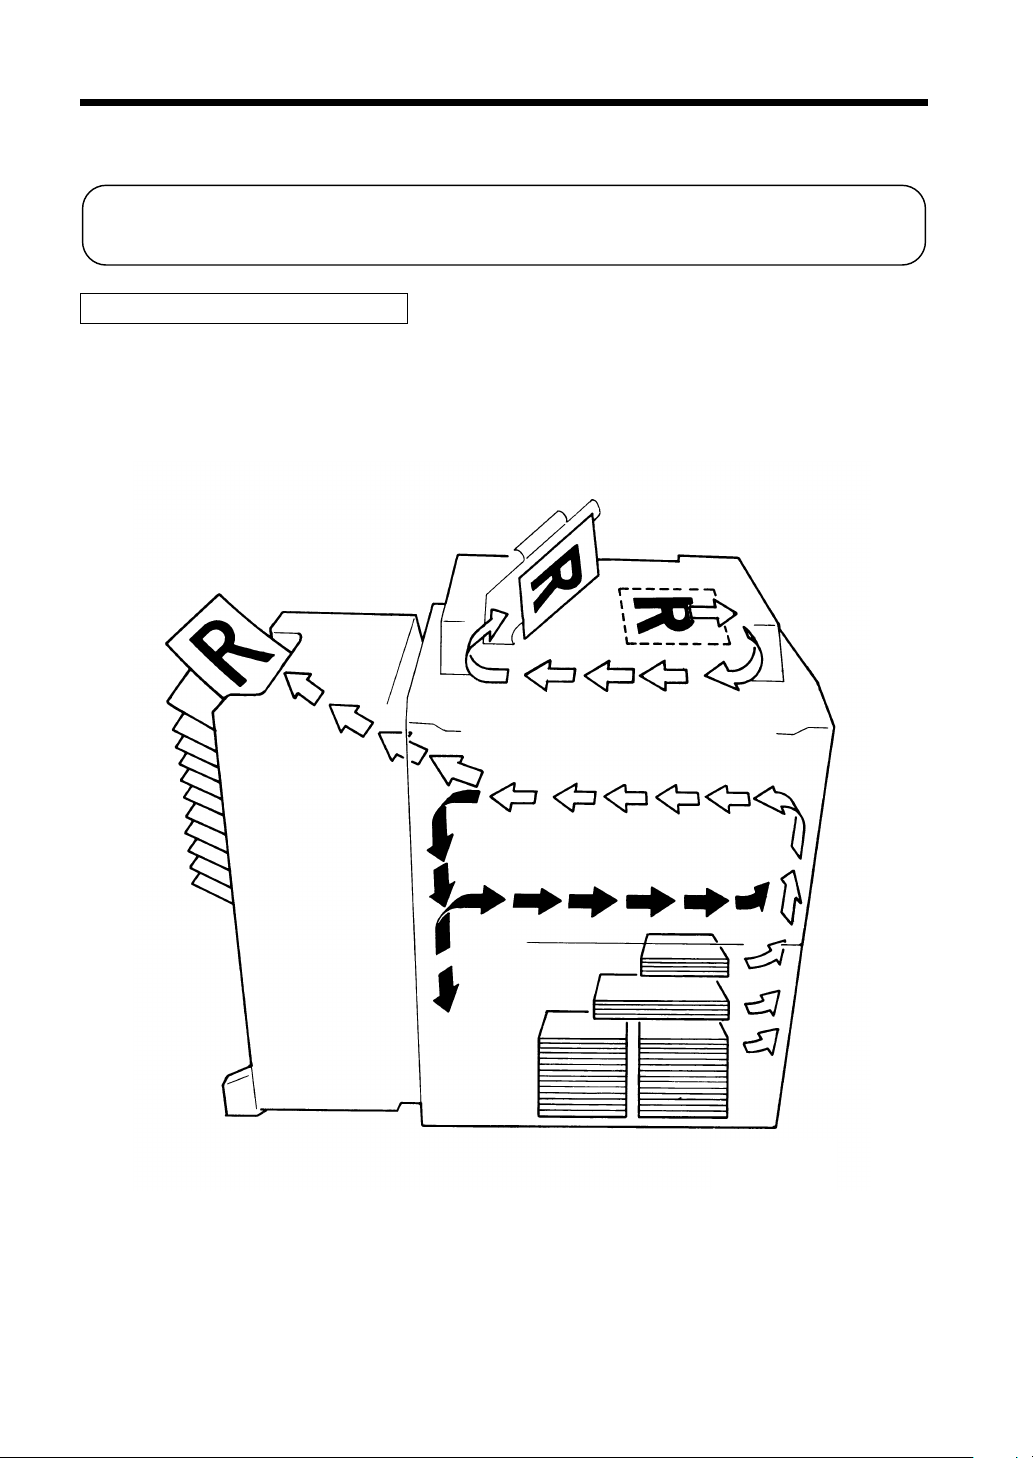
Feeding Direction (copy paper path)
In this copier system, copy pape r i s taken up from the right-ha nd side of the copier and fe d t hrough
the copier toward the left-hand side, out face up onto the Exit Tr ay. In t he f igure b elo w, t he direct ion
in which the copy paper is fed, as indicated by the arrow, is called the "feeding direction."
1075O106CA
Page 12
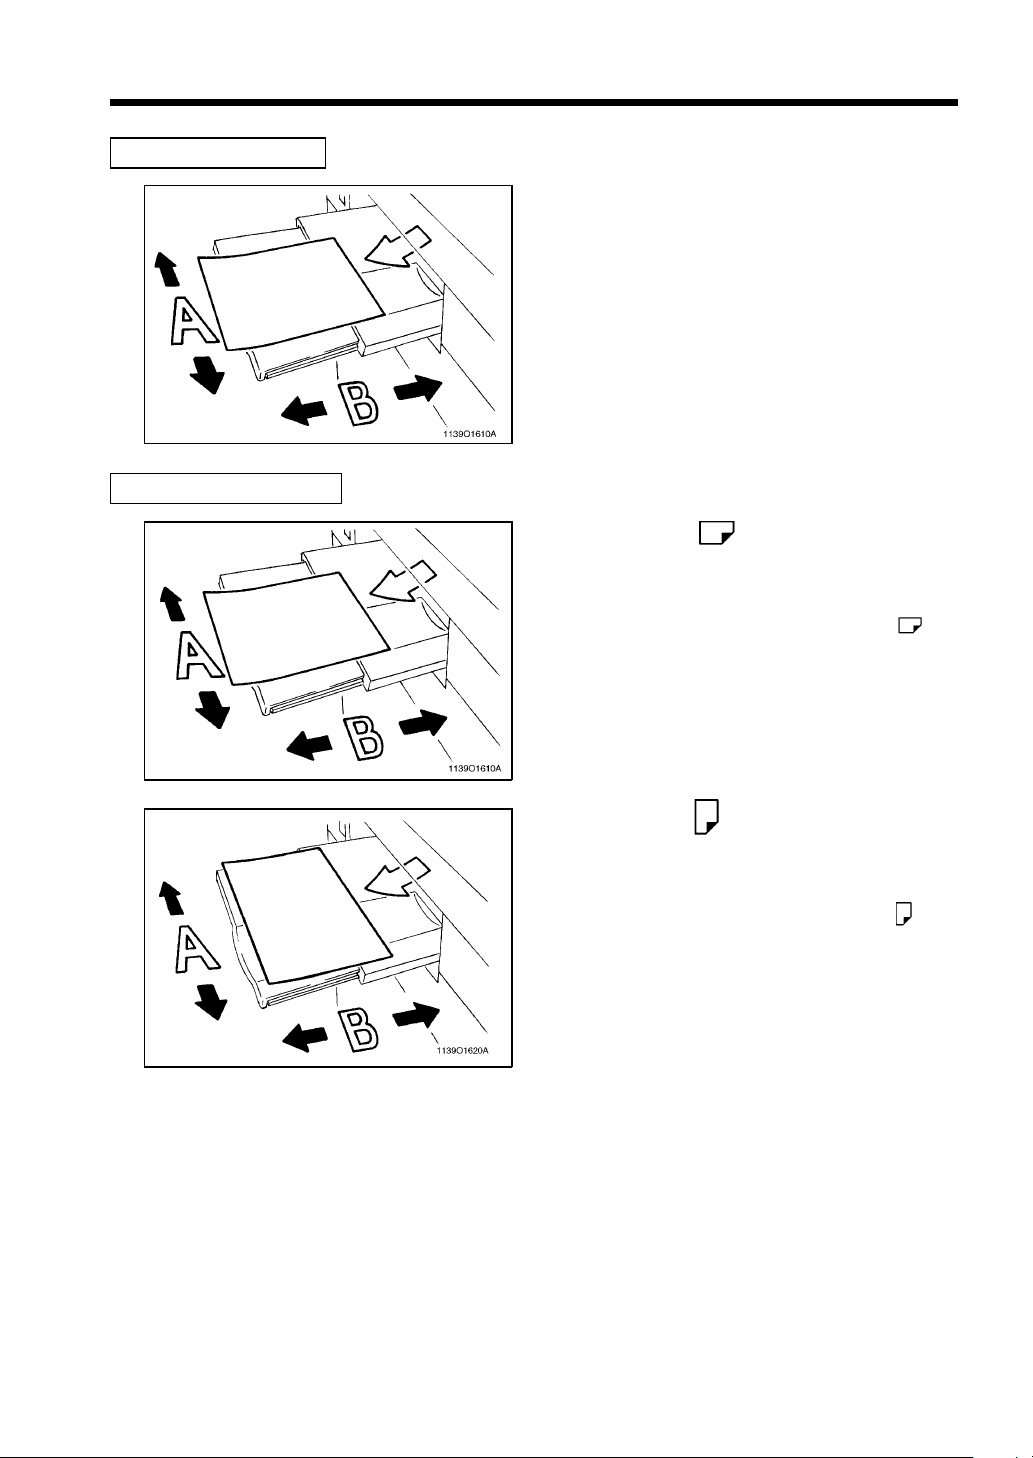
"Width" and "Length"
Terms and Symbols Used
xi
Using This Manual
When we talk about the si ze of the o ri gin al
or copy, we call side A "width" and s ide B
"length."
A: Width
B: Leng t h
<Lengthwise >
When the original or cop y has a "lengt h"
longer than its "width ," we call it
"lengthwise" and use symbol "L" or " ."
<Crosswise >
When the original or cop y has a "lengt h"
shorter than its "wi dth," we call it
"crosswise" and use symbol "C" or " ."
Page 13

xii
Page 14

Chapter 1
Safety Notes
This chapter explains about the operating environment, conditions, and precautions for use.
1. Ins t alling the Copie r
Installation S ite 2
Power Source 2
Grounding 2
Space Requirements 3
2. Precautions for Us e
Operating Enviro nment 4
Using t he Copi er Proper l y 4
Care o f Copier Supplies 5
Moving 5
1
Chapter 1
Safety Notes
Page 15
2
1. Installing the Copier
Installation Site
To ensure utmost safety and p revent possible malfunctions of th e cop ier, i nstall it in a location which
meets the following req uirements.
◆
A place away from a curtain or the like that may catch fire and burn easily.
◆
An area where there is no poss ib ility of being splashed with wat er or o ther types of liquid.
◆
An area free from direct sunlig ht .
Chapter 1
◆
A place out of the direct air stream of an air conditioner, heater, or ventilator.
◆
A well-ventilated p lace.
◆
A dry place.
◆
A dust-free location .
◆
An area not subject to und ue vib rati on .
◆
A stable and level lo catio n.
Safety Notes
Power Source
The power source voltage requi rements are as f ol lows .
◆
Use a power source with l ittle voltage fluctuatio n.
Voltage Fluctuation : Within ±10%
Frequency Fluctuation : Within ±0.3%
◆
If any other electrical equi pmen t is s o ur ced fro m the same p ower outlet, mak e s ure that the
capacity of the outlet is n ot ex ceeded .
◆
The outlet should be lo cated near the copier and easily accessible.
◆
Never connect any other appl iances o r machin es by means o f a multiple socket to the outlet being
used for the copier.
◆
If an extension cord is needed, u se on e with a capacity more than the power consumpt ion of th e
copier.
◆
Make sure that no unusual , excessiv e fo rce i s bein g appl ied to the power cord or extension cord .
Grounding
To prevent receiving electrical sh ock s in the case of electrical leakage, alway s gr ound the copier.
Connect t he grounding wire to:
◆
The ground terminal of t he outl et.
◆
A grounding contact which complies with the local electrical standards.
NOTE
Never connect the grounding wire t o a gas pipe, th e gro undin g wir e fo r a telephone, or a water
pipe.
Page 16
1. Installing the Copier
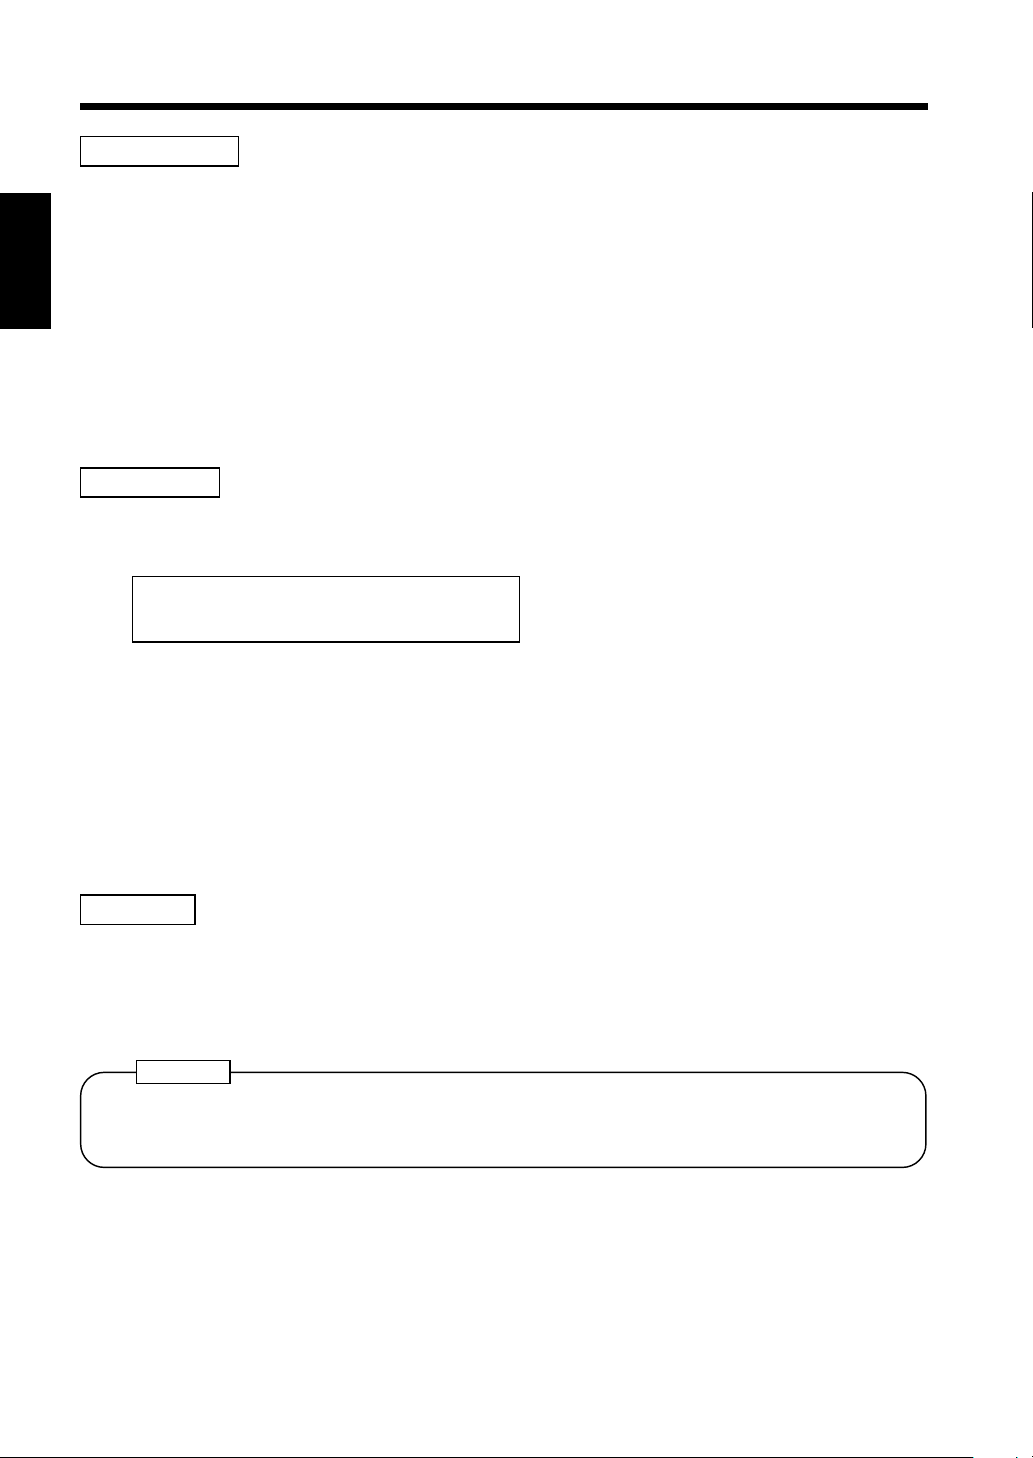
Space Requirements
To ensure easy copier operation, s up pl y replacemen ts an d ser vice maintenance, adhere to the
recommended space requirements detai led b elo w.
NOTE
Be sure to allow a clea ran ce of 150 m m or m ore a t th e ba ck of t he copier a s th ere is a
ventilation duct .
1335
3
Chapter 1
Safety Notes
300
2844
200
150
1342
1075O127CA
Scale: mm
Page 17

4
2. Precautions for Use
Operating Environment
The operating environmental req ui rements of th e copier ar e as follo w s .
Temperature : 10°C to 35°C (50°F to 86°F) with a fluctuation of 10°C (50°F) per hour.
Humidity : 15% to 85% with a fluctuation of 20% per hour.
Chapter 1
Using the Copier Properly
To ensure the optimum performance o f t he copier , fo llo w the precau tio ns listed below.
◆
NEVER place a heavy object on the cop ier or su bj ect the copier to shocks.
◆
NEVER open any Doors, or turn OFF th e copier wh ile th e cop ier is maki ng cop ies.
◆
NEVER bring any magnetized obj ect or use f lammab le s prays n ear t he co pier.
◆
NEVER place a vase or vessel contai nin g water on th e copier.
Safety Notes
◆
NEVER drop paper clips, s tapl es, or oth er smal l pi eces of metal in to the co pi er.
◆
NEVER attempt to remove any Cover that is secur ed.
◆
ALWAYS insert the Power Plug all the way into the outlet.
◆
ALWAYS make sure that the outlet is visible, clear of the copier or co pi er cabinet.
◆
ALWAYS ensure that the copier d oes n ot rid e on the power cor d or co mmunications cable of other
electrical equipment, and it d oes n ot get su ch a co rd or cabl e wedged in to its own mechanism.
◆
NEVER leave a damaged or cracked copier power cor d unat tend ed. If y ou find any of these
conditions, immediatel y sh ut down the co pi er, unp lug the power cord, and call your Technical
Representative for appro pr iate action.
◆
ALWAYS provide good vent i lation w he n making a la rge number of continuous co pies.
◆
NEVER leave the copier running when i t becomes in or dinately ho t o r p rodu ces abn ormal no ise. I f
that happens, immediately turn OFF the copier, unplug it, and then call your Technical
Representative.
NOTE
= Locate the Copier in a Well Ven tilated Room =
A negligible amount of oz one is ge ne r ated du r ing normal operati on of thi s c opier. An
unpleasant odor may, however , be crea ted i n p oor ly vent ila ted ro oms during extensive copier
operations. For a comfor ta ble, heal thy, a nd s af e oper ati ng enviro nmen t, it is recommended that
the room be well ventila ted.
REMARQUE
= Placer le copieur dans un e pi èce larg em ent ventilée =
Une quantité d’ozone négligable est dégagée pendant le fonctionnement du copieur quand
celui-ci est utilisé n ormalement. Cependant, une odeur dés ag réab le peut êtr e res sen tie dans les
pièces dont l’aérati on es t in s uff isan te et lorsque une utilisation prolongée du copieur est
effectuée. Pour avoir la certitude de travailler dans un envi r onnement r éunis s ant d es condit ion s
de confort, santé et de sécur ité, i l es t p r éférab le d e bien aérer la pièce ou se trouve le copieur.
Page 18

2. Precautions for Use
Care of Copier Supplies
Use the following precautio ns w hen han dl ing th e cop ier su pplies ( to ner , paper, etc.) .
◆
Store the paper, toner, and o ther s uppl ies in a place free f rom di rect su nlight and away from any
heating apparatus. Keep them in a dr y, cl ean en viron ment .
◆
Store paper, which has been r emoved f rom its wrap per bu t n ot l oad ed into the Drawer, in a sealed
plastic bag in a cool, dark place.
◆
Keep supplies out of the reach o f children.
◆
If your hands become soil ed with to ner , wash th em with so ap an d water immed iately .
Moving
If you need to transport th e cop ier over a lo ng dist ance, co nsu lt y ou r Technical Rep resen tativ e.
5
Chapter 1
Note on making multiple copies
If the fusing temperature d rops exessively during a multi- cop y cycle, th ere is a possibility that the
copying speed will be reduced. The copyi ng s peed wi ll au tomat ically ret ur n to no rmal when t he
fusing temperature rises en ough to ens ure go od fu sing preformance.
Safety Notes
Page 19

6
2. Precautions for Use
Chapter 1
Safety Notes
Page 20

Chapter 2
First Things to Know about your Copier
This chapter give s you a bri e f de scription of the system an d prelimina r y informa tion about
the different parts of the system.
7
1. System Overview 8
2. Copier Parts and Accessories
Copier 10
Options 13
3. Cont r ol Panel Keys and T ouch Pan e l 14
4. Touch Panel
What’s a Touch Panel? 16
How th e Screen is Organize d 16
Adjusting the Di spla y Contrast 17
Using it Properly 18
5. Turning ON and OFF, and Res ettin g t he C opier
Turning ON and OFF 21
When the Copier is Turned ON 21
Initial Mode and Panel Res ettin g 2 2
Auto Copy Start F unction 23
Energy Saver Mode 24
Entering the Access Num ber 2 5
Chapter 2
First Things to Know about your Copier
Page 21
8
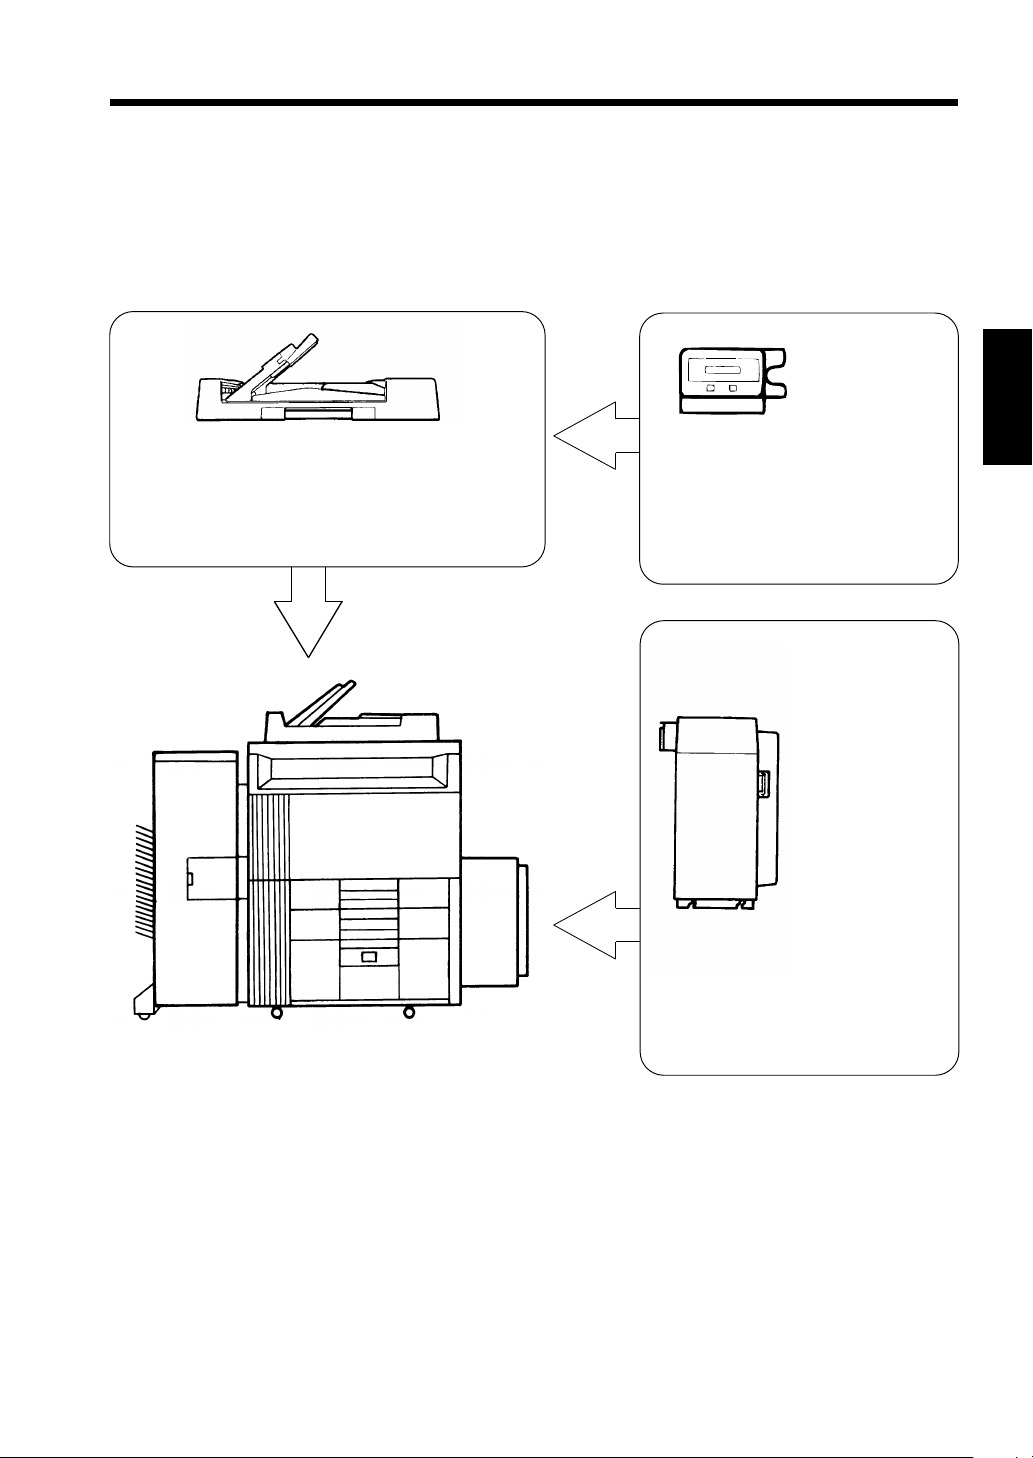
1. System Overview
The EP6000 system can be configured with the following component s.
20-Bin Sorter S-206 <Option>
Permits automatic sor tin g or g ro upin g o f copies into 20 copy
sets or stacks.
Chapter 2
First Things to Know about your Copier
1134O088AA
Staple Sorter ST-207 <Option>
Automatically stap les, and/o r p unches h oles in, the copy sets
or stacks that are s orted or g roup ed, i n addit ion to the
functi ons pro vided by t he S -206.
1136O059AA
Page 22
9
1. System Overview
1139O0010A
Duplexing Document Feeder AFR-9
In addition to bei ng capab le of feed in g in sheet
originals one at a t ime, it can automatically turn
over the original for th e making o f copies from
2-sided originals.
1138O525A
Data Controller D-102 <Option>
Capabl e of control l ing vari ous
types of data includin g th e nu mber
of copies made, copy cost, and user
depart m ent s by means of speci fic
magnetic cards.
Large Capacity
Cassette C-302
<Option>
Holds up to
3,000 sheets of
copy paper
2
(80 g/m
).
1134O005AA
Chapter 2
First Things to Know about your Copier
1075O006DA
Page 23
10
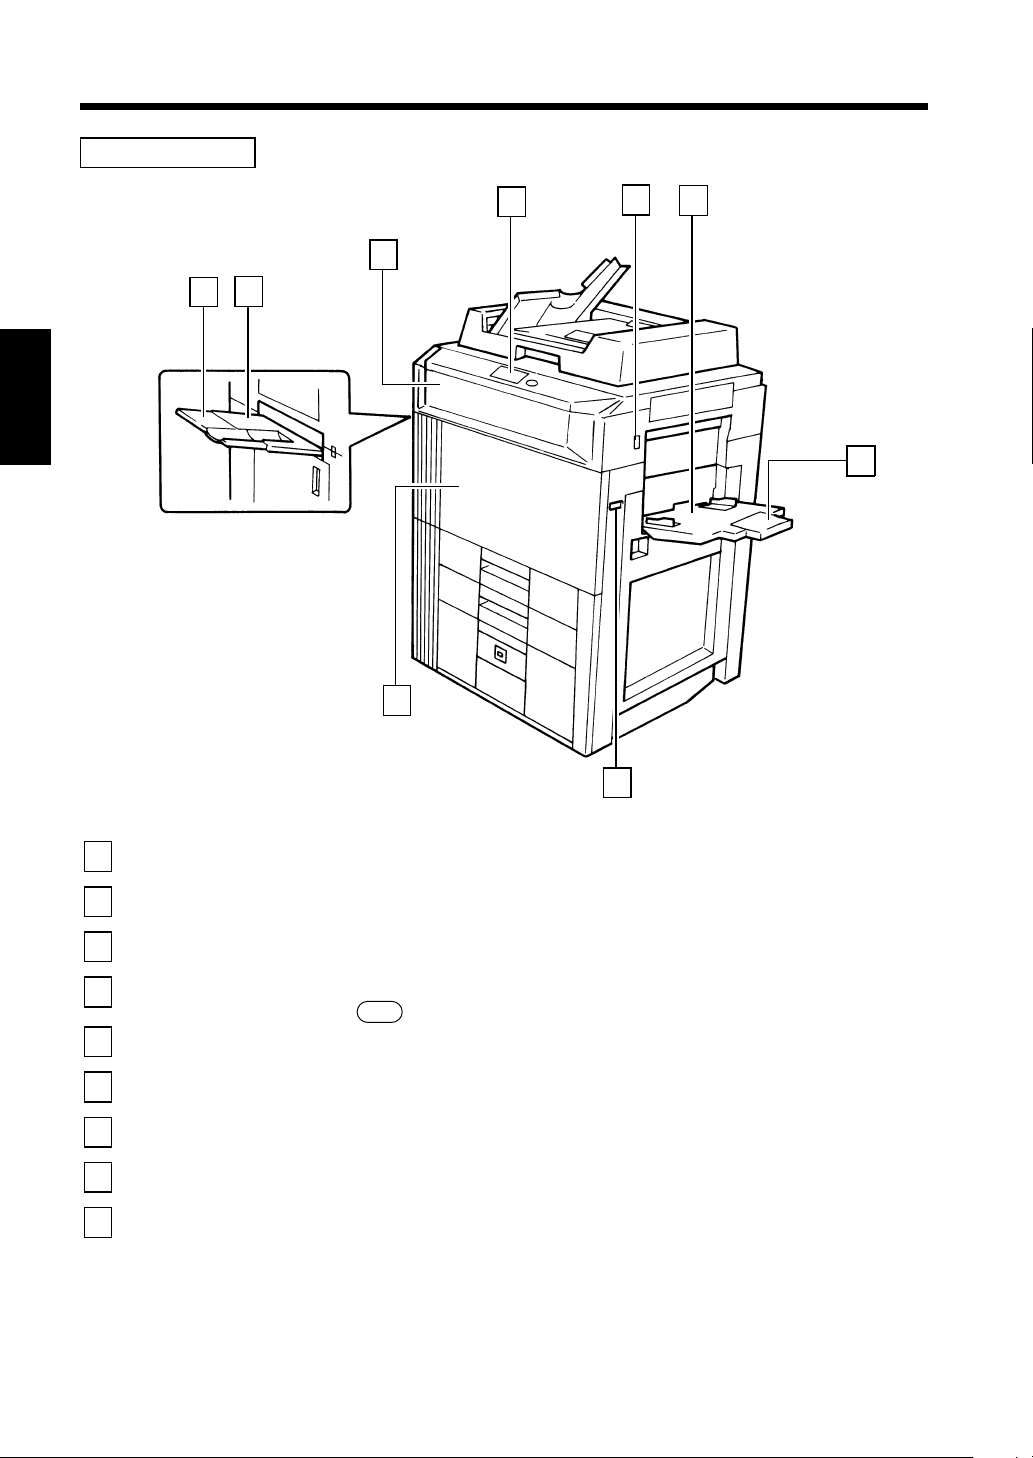
2. Copier Parts and Accessories
Outside the Copier
3
2
1
Chapter 2
4
5
6
7
First Things to Know about your Copier
Exit Tray Extender
1
Exit Tray
2
Upper F r on t D oor
3
Control Panel
4
Power Switch
5
Multi Bypass Table
6
Multi Bypass Ext ender
7
Total Counter
8
Front Door
9
9
8
: Slide this Extender out when making copi es on larg e-si ze pap er.
: Holds copies fed out of the copier.
: Open to replace the Toner Bottle.
: Use to start a copy cycle or to make copying j ob settings.
See Control Panel Keys and Touch Panel.
: Use to turn the copier ON and OFF.
: Use for manual feeding of copy paper into th e copier.
: Slide this Extender out to make copies on l arg e-size co py pap er.
: Shows the total number of copies made so f ar.
: Open to clear a paper misfeed.
Closing the Front Door after a mis f eed h as been cleared will turn
the misfed warning message o n the con tr ol p anel OFF.
➭
➭
p. 138
p. 132
➭
p. 21
1075O095DA
➭
p. 14
➭
p. 37
Page 24
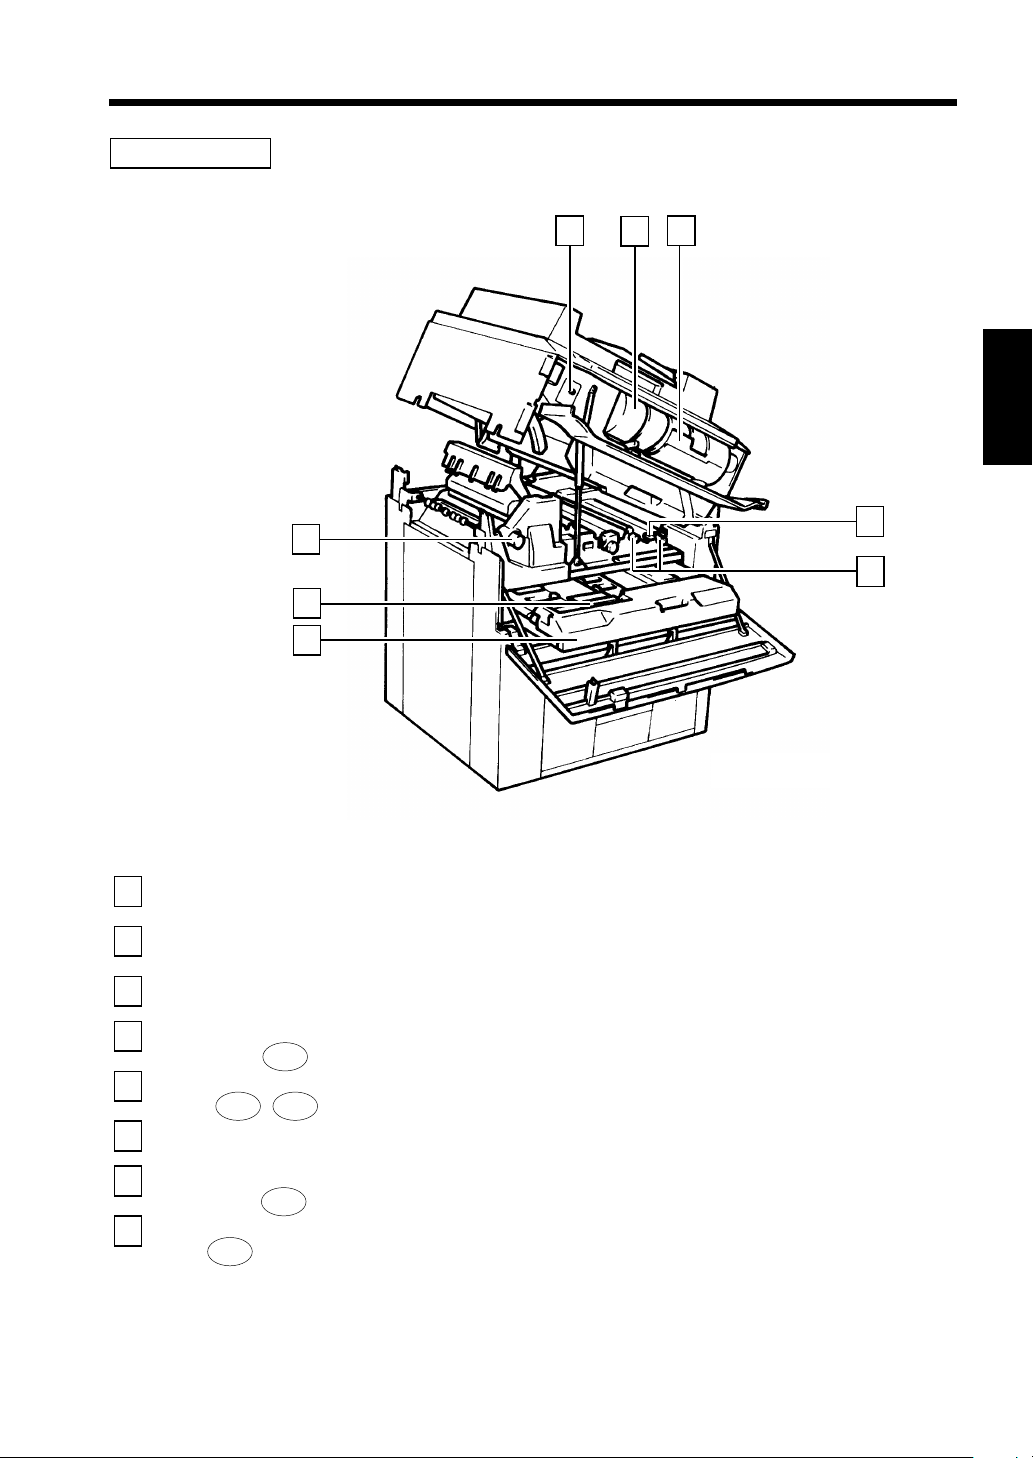
Inside the Copier
11
2. Copier Parts and Accessories
1 2 3
Chapter 2
Display Contrast
1
Control Knob
Toner Bottle
2
Toner Bottle Holder
3
Misfeed Removal
4
Guide Plate M3
Misfeed Removal
5
Knobs M2 , M4
Duplex Unit
6
8
7
6
4
5
1075O111EA
p. 138
p. 138
➭
p. 17
: Use to adjust the contrast of the Touch Panel.
: Contains Toner. Replace it with a new one wh en th e w arning
message t e lls you to.
: Swing open to replace the Toner Bottle.
: Use to clear a misfed sheet of paper.
: Use to clear a misfed sheet of paper.
: Turns over 1-sided copies for making 2-sided copies.
➭
p. 132
➭
➭
First Things to Know about your Copier
Misfeed Removal
7
Guide Plate D2
Misfeed Removal
8
Knob M1
: Use to clear a misfed sheet of paper.
: Use to clear a misfed sheet of paper.
➭
p. 141
➭
p. 138
Page 25

12
2. Copier Parts and Accessories
Chapter 2
1
2
3
4
5
First Things to Know about your Copier
7
Docume nt Exit Tray
1
Document Feed Tray
2
Document Guide Plate
3
1st Drawer
4
2nd Drawer
5
3rd Drawer
6
Paper Descent Key
7
6
1075O097DA
: Receives originals automaticall y eject ed f rom the AF R-9.
: Load the originals face up on this t ray.
: Slide the plate as necessary to the size o f th e or ig inal s .
: Holds up to 500 sheets of copy paper.
: Holds up to 500 sheets of copy paper.
: Holds up to 2,500 s heets of c opy paper .
: Press before sliding the Drawer out o f t he co pier.
➭
p. 128
➭
p. 128
➭
p. 129
Page 26
Options
13
2. Copier Parts and Accessories
5
2
1
3 4
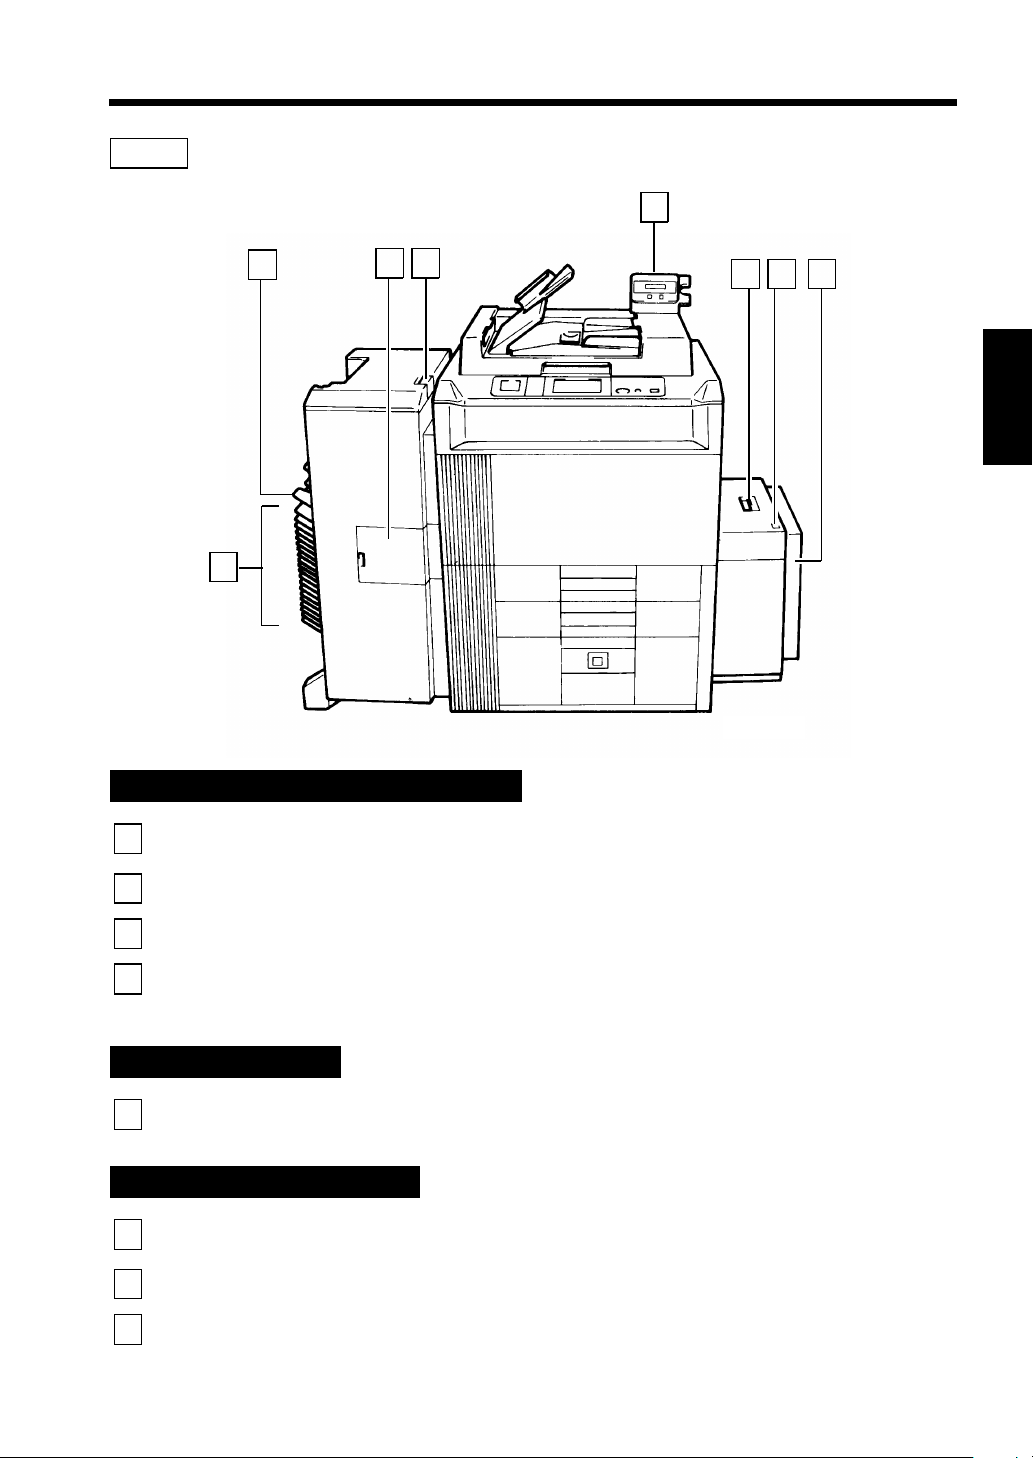
20-Bin Sorter S-206/Staple Sorter ST-207
Sort Bins (1st to 20th
1
Bin)
Non-Sort Bin
2
: Hold sorted or grouped copies, each capable of hold in g up to 50.
: Holds up to 50 copies fed out in the Non-Sort mode.
6 8 7
Chapter 2
1075O098DA
First Things to Know about your Copier
Staple C over
3
Lock Release Lever
4
: Open to replace the Staple Cartridge (ST-207 only ).
: Press to unlock the Sorter from the copier for cl earin g a mi s fed
sheet of paper or other service job.
Data Controller D-102
Data Controller
5
: For details, see the Operator’s Manual for D-102.
Large Capacity Cassette C-302
Lock Release Lever
6
Paper Plate Descent Key
7
Cassette Door
8
: Use to unlock the Cassette from the copier for clearing a misfed
sheet of paper or other service job.
: Press to lower the Paper plate.
: Open to add paper or clear a misfed sheet of paper.
➭
pp. 131, 143
➭
p. 143
➭
p. 144
➭
p. 134
Page 27

14
3. Control Panel Keys and Touch Pane l
10
Chapter 2
First Things to Know about your Copier
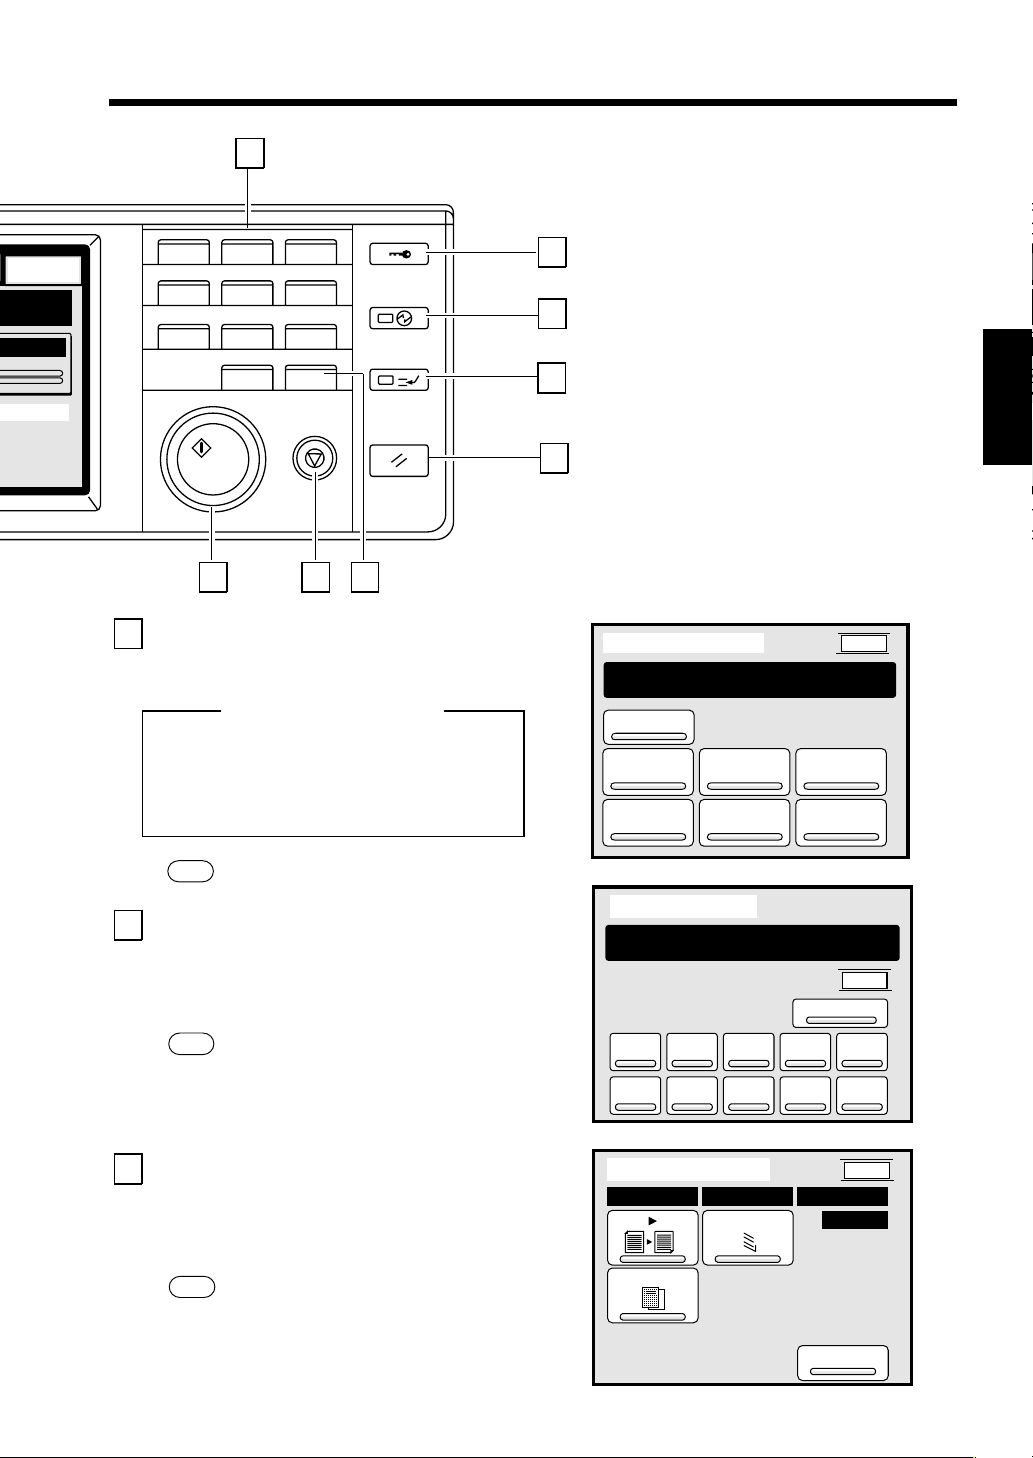
Touch Panel
1
•
Shows various screens and messages.
➭
See Touch Panel
Start K ey
2
•
Press to start a copy cycle. ➭ p. 35
•
If pressed while the copier is w arming
p. 16
up, it enables the Auto Copy Star t
➭
Function.
Stop Ke y
3
•
Press to stop a multi- copy cy cle.
➭
p. 35
Clear Key
4
p. 23
Press to:
•
Reset the multi-copy entry to 1. ➭ p. 34
•
Clear a zoom ratio entered when setting
one using the 10-Key Pad.
Panel Reset Key
5
•
Press to set the copier int o th e in itial
mode, clearing all settings made
previously on the control panel.
Note: It does not, however, cl ear th e
contents of the zoom a nd job
program memor y and the set t ings
immediately before the I nt er rup t
mode.
➭
p. 22
User Mode
Job Recall
Mode Check
12
6
11
Interrupt Key
•
Press to interru pt a curren t jo b with a
different one. Press it agai n to ret ur n to
the previous job.
Energy Saver Key
7
•
Press to set the copier into the Energy
Saver Mode.
Access Mode (ID) Key
8
•
Use to set the Acces s mod e.
Note: For details see the User’s Choice.
10-Key P ad
9
Use to:
•
Enter the number of copi es to b e made.
•
Enter the zoom ratio to be us ed.
•
Enter the number of ori gin als.
➭
p. 25
Auxiliary
Ready to Copy
Auto Exp.
Exposure
➭
➭
p. 24
p. 36
Finishing
Orig. Copy
x1.000
Zoom
1
Basic
1
Auto Paper
Paper
Page 28
9
15
3. Control Panel Keys and Touch Panel
Basic
Paper
Access
123
1
456
789
0C
Start
Stop
Energy Saver
Interrupt
Panel Reset
8
7
6
Chapter 2
5
2
User Mode Key
10
•
Press to select the User Mode setting
1075O269EA
3 4
screen.
Functions in Use r Mode
•
Job Memory Input
•
Zoom Memory Input•User’s Choice
•
Meter Count
•
Toner Replenisher
•
Drum Dehumidifier
•
Data Send
1075O269EA
User Mode
Select a function by pressing the
key.
Data Send
Job Memory
Input
Toner RePlenisher
Zoom Memory Input
Drum Dehumidifier
Exit
Meter
Count
User's
Choice
See Using the User Mode
Job Recall Key
11
•
Press to select the Jo b Recall s cr een, o n
which you can recall or check a
copying-job program previo usly stored in
memory.
See Recalling a Job from Memory
➭
See
Mode Check Key
12
•
Press to select the Mode Check scr een.
p. 112
From this screen, you can access the
setting screen of a particular function and
change or cancel the setting as n ecess ary .
➭
See Mode check
p. 20
➭
p. 107
Job Recall
Press a key to recall a job.
Account job
1
2 3 4 5
6 7 8 9
Mode Check
Auto Expo. X1.000 Auto Paper
Orig. Copy
Cover
Finishing
Mixed Orig
1134P359CA
Exit
10
1134P361CA
Exit
1
1134P362CA
First Things to Know about your Copier
Page 29
16
4. Touch Panel
What’s a Touch Panel?
When you turn the copier ON, th e Basic screen as shown below appears o n the Tou ch Pan el.
➭
See Initial Mode and P anel Res etting
The Touch Panel is the major sour ce of information, showing in messages and graphics the currently
set functions, a va ilable function s to choose from, and the co pi e r status .
You have only to t ouch the k e y s hown on t he T ouch Pane l to select or acti vate the function
represented by the key.
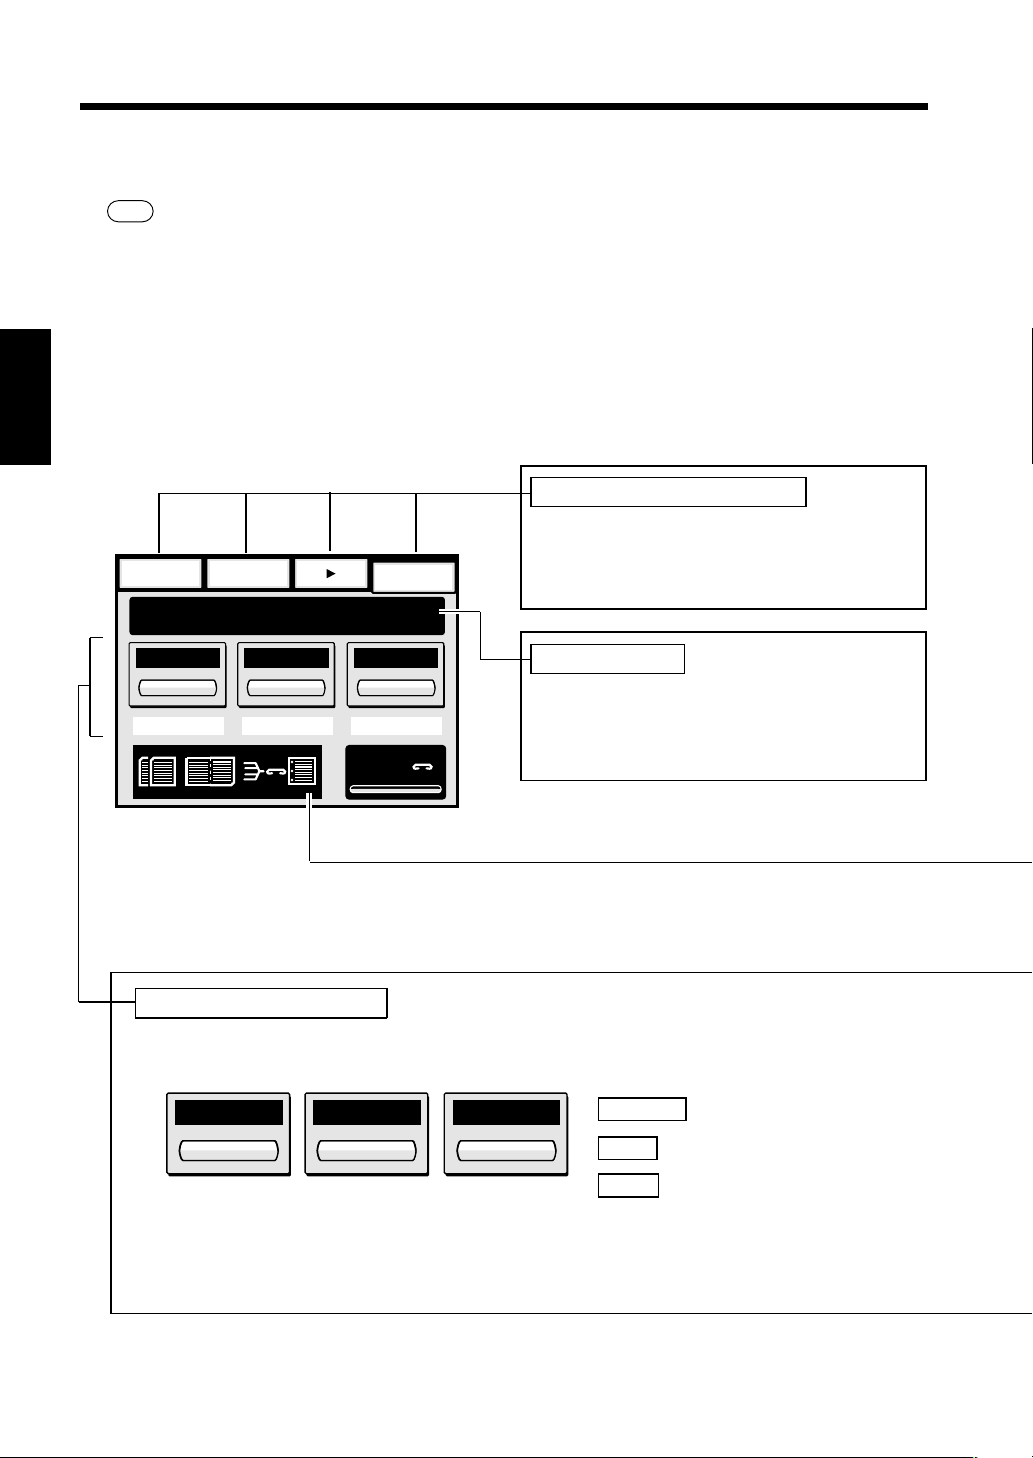
How the Screen is Organized
In the following, we show ty pical s creens with a b ri ef des criptio n o f each of th em.
Chapter 2
<Example: Basic Screen>
Auxiliary Finishing
Ready to copy.
Orig. Copy
Basics
p.22
Supplementary Function Keys
When any of these keys is to uch ed, t he
corresponding Sup plementary Function
screen appears.
1
First Things to Know about your Copier
Auto Expo. x1.000 Auto Paper
Message Display
Shows the current copier status, operating
Exposure PaperZoom
▲
Staple
1134P429CA
instructions, and other data including the
number of copies selected.
Basic Function/Key Displa y
Shows the Basic Function keys and the basic functions current ly sel ected f or use.
<Example: Basic Function Keys o n B asic s cr een>
Auto Expo. x1.000 Auto Paper
Exposure PaperZoom
1134P430CA
Exposure
Zoom
Paper
: Auto Exposure
: ×1.000
: Auto Paper
When any of the Basic Function k eys i s tou ched, the corresponding Basic Functio n scr een
appears.
Page 30
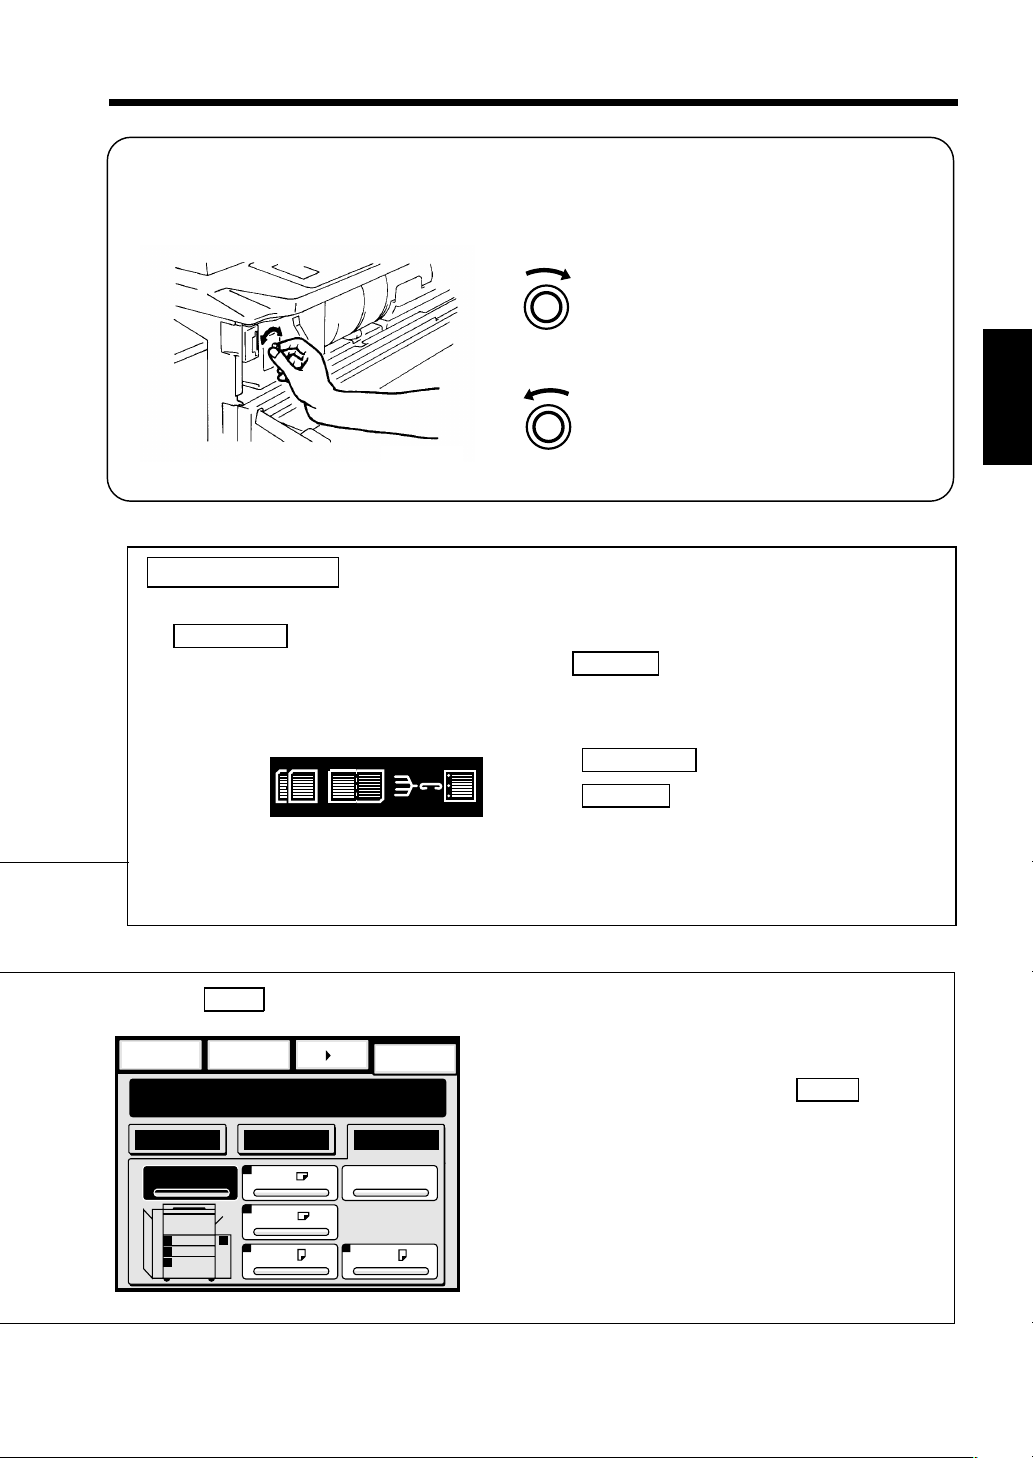
4. Touch Panel
Adjusting the Display Contrast
When you need to adjust the brig ht ness of the Touch Panel, swing down the U pper Fro nt Door
and turn the Display Contr ol Kn ob as necess ar y.
Turn the Knob clockwise to make th e
Panel brighter.
1138O666CA
Turn it counterclockwi se to mak e th e
Panel da rker.
1075O013AA
1138O667CA
Set Function Display
Shows graphic representations of functions s et ot her than th e ini tial o nes, including the
Orig. Copy
Note: If a function or functio ns have be e n s e t by
and Finishing types.
▼
Auxiliary
, the Mode Check Key on the
control panel is lit.
17
Chapter 2
<Example>
▲
1134P157AA
Orig. Copy
Finishing
1134P157AA
: 2in1
▼
: Sort- a nd-Stapl e, Hole Punch
To check for more details of set functions, press the Mo de Check Key. When th e key is
➭
pressed, the Mode Check s creen app ears.
Auto Paper
1
2
3
Paper
setting screen>
1
2
L
3 L
Orig. Copy
A4
A3
A4
Basics
Auto Paper
Manual
A4
<Example:
Auxiliary Finishing
Ready to copy.
Auto Expo. x1.000
1
p. 20
If you want to select paper of a part icul ar size i nstead
of Auto Paper, touch the corresponding paper size key.
To go back to the Basic screen, touch
one of the S upplementary Func tion key s.
You may al s o want to touch any ot her Supp l em e ntary
Function key to s how the co rrespond i ng
Supplementary Function scr een.
Basics
First Things to Know about your Copier
which is
1075O210DA
Page 31

18
4. Touch P anel
Using It Properly
When you operate a key on the Touch Panel , pr ess it o nly lig ht ly. Actu ally, it’s just to "touch " the
key with your finger, and not to "press," as the name indicates. There’s no need of your touching it
hard.
NOTE
Chapter 2
Let’s Try!
1
First Things to Know about your Copier
OK
Now, let’s try it ..., touch
Panel.
Auxiliary Finishing
Ready to copy.
Auto Expo. x1.000 Auto Paper
Exposure PaperZoom
Orig. Copy
You must have heard a beep and, at the
same time, the screen changed. In thi s
case, the new screen allows y ou to
select the copy paper s ize. (It’ s als o
possible to disabl e the b eep.
Choice p. 119)
Auxiliary Finishing
Ready to copy.
Orig. Copy
Paper
Basics
➭
Basics
1134O094AA
on the
1
1075O270CA
User’s
1
Be sure to use your fi ng er to t ou ch li gh tly th e
Touch Panel. NEVER press it h ard or h it it, as a
damage d panel co uld result. Be a ware also t hat
usin g a hard o r pointed o bj ec t can da ma ge it.
Now, touch A4 .
2
Auxiliary Finishing
Ready to copy.
Auto Expo. x1.000
Auto Paper
L
1
2
3
Okay, so you heard a beep again and
A4 is now highli ghted. Thi s
indicates that A4 has been selected
as the current paper si ze.
As you have just s e e n, the key on the
Touch Panel has a functio n to eithe r go
to another screen or select a particular
function.
Orig. Copy
1
A4
2
A3
3 L
A4
Basics
1
A4
Manual
A4
1075O211DA
Auto Expo. x1.000
1
Auto Paper
1
2
3
A4
2
A3
L
3 L
A4
Auto Paper
Manual
A4
1075O210DA
Page 32

19
4. Touch Panel
Let’s Set up a Job!
1
2
This time, touch
You now have the Auxiliary functions
menu screen.
Cover
Touch
Finishing
OHP Interleaving
Book
Copy
File Margin
Auxiliary
Ready to copy.
Auto Expo. Auto Paperx1.000
Page
Insertion
And you have a s c ree n on which you
can make the file margin settings.
Auxiliary
If using the ADF, load originals in
the ADF before making selections.
Finishing
File Margin
Position Mode Width
Auxiliary
Orig. Copy
Edge/Frame
Erase
.
Orig. Copy
10mm 15mm
A
20mm
A
.
Basics
File
Margin
Basics
EnterCancel
1
1134P237CA
4
margin copy cycle.
Let’s Cancel a Setting!
Press the Start Key to start the f ile
1
2
Okay, now let’s see h ow w e can
cancel, or undo, the s e ttings ma de.
Auxiliary
Touch
File Margin
and then touch
. You now see the file
margin setting screen on t he To uch
Panel.
Auxiliary
If using the ADF, load originals in
the ADF before making selections.
Finishing
File Margin
Position Mode Width
Now, touch
Orig. Copy
Cancel
A
A
.
This cancels the file mar gin s ettings
made in step 3 and the Auxili ary
Functions menu screen reappears.
Chapter 2
Basics
EnterCancel
10mm 15mm
20mm
1134P344DA
First Things to Know about your Copier
3
setting screen and th en t ou ch
This enters the high lig ht ed f un ctio ns
and the A uxiliary functi ons menu
screen reappears.
Auxiliary
Ready to copy.
Auto Expo. Auto Paperx1.000
Cover
Page
Insertion
Touch t he key of your choic e on the
Finishing
OHP Interleaving
Book
Copy
Orig. Copy
Edge/Frame
Erase
Basics
File
Margin
1134P344DA
Enter
1
1134P431CA
.
Page 33

20
4. Touch P anel
Alternative Method s fo r Can celin g
•
Press the Mode Check Key on the
control panel to show th e Mod e Check
screen. Touch the key correspond ing to
the function to be canceled to s ho w the
setting screen, then to uch
Cancel
.
Chapter 2
First Things to Know about your Copier
Mode Check
Auto Expo. X1.000 Auto Paper
Orig. Copy
Cover
Finishing
Exit
Mixed Orig
1134P362CA
Note: The actual screen may lo ok
differently fr om th e one ab ove.
Shown are only those functions for
which settings have bee n made.
•
Press the Panel Reset Key on the
control panel to clear all settings made,
restoring the copier t o th e in itial
conditions. Be careful, however, th e
Key also cancels the basic f un ctio n
settings.
1
Page 34

5. Turning ON and OF F, and Resetting the Copier
Turning ON and OFF
•
Turning Copier ON
Press the Power Switch to t he I (ON) position.
•
Turning Copier OFF
Press the Power Switch to t he (OFF)
position.
21
1075O099DA
When Copier is Turned ON
When the Power Switch is turned O N, the mess ag e "Welcome!" app ears o n t he To uch Panel an d the
Start Key lights up orange.
Orange Light
Welcome
1138O531AA
1134P167AB
In about 5 seconds, the messag e chan ges to "Copy job will start after the co pier has warmed up." and
the copier now enables its auto copy start function.
➭
Auto Co py Start Function
p. 23
Pressing the Start Key at this p oin t d oes n ot start a copy cycle. You’re going to have t o wait f or
about 2 minutes and 30 second s (at an ambient temperature of 23°C).
1138O531AA
Chapter 2
First Things to Know about your Copier
Auxiliary Finishing
Ready to copy.
Auto Expo. x1.000 Auto Paper
Exposure PaperZoom
Orig. Copy
Basics
1075O270CA
Green Light
1
1138O531AA
1138O531AA
Page 35

22
5. Turning ON and OFF, and Resetting t he Copi er
Initial Mode and Panel Resetting
Initial Mo de
When the Power Switch is turned ON, t he Bas ic screen appears o n the Touch Panel. The settings on
this screen are called the in itial mode.
Note: The Basic screen serves as the reference for all panel settings to be later made.
Auxiliary Finishing
Ready to copy.
Auto Expo. x1.000 Auto Paper
Chapter 2
Exposure PaperZoom
Orig. Copy
Basics
1075O270CA
No. of copies selected: 1
1
Zoom
: ×1.000
Paper
: Auto Paper
Exposure
Orig. Copy
Finishing
: Auto Expo.
▼
: Non-Sort
: 1 2
▼
Useful Tip
The initial mode can be changed. For det ails, s ee U ser’s Choice. ➭ p. 119
Panel Resetting
The Panel Reset Key resets al l contr ol p anel s ettin gs to default settings including the number of
copies selected and zoom ratio.
Access
Note: If Duplexing Docum ent Feeder AFR-9 is
used, the original present on the Original
Glass will be ejected out of t he u nit .
First Things to Know about your Copier
Energy Saver
Interrupt
Panel Reset
1134P336CA
Useful Tip
The Panel Reset Key enables you to cancel all previous settings ef ficiently. To avoid miscopy, tr y
to press this ke y before m a king any setting for your ow n job.
Auto Reset Function
If no key on the control panel is pressed within about 6 0 seco nd s after a copy cy cle h as been
completed or copying settin gs made, the Auto Reset function is activated to return the copier to t he
default settings.
Useful Tip
The Auto Reset function can be enabled or di s abled by th e User’s C ho ice. For more det ails, s ee
➭
User’s Choice.
p. 119
Page 36

5. Turning ON and OFF, and Resetting t he Cop ier
Auto Copy Start Function
The auto copy start functio n all ows a copy p ro cess to be star ted as soo n as th e cop ier completes
warming up.
23
1
2
Check that the Start Key is lit up green.
Load the originals onto the AF R- 9 or
place an original on t he Ori ginal G lass .
1139O0200A
1075O015AA
Start
NOTE
Do not remove the original until the
copy cycle is completed.
4
As soon as the copier comp letes
warming up (which takes abo ut 2
minutes and 30 seconds), t he copy
cycle is automatically s tart ed.
Note: If the copier has been set into
the Energy Saver mode, it takes
a maximum 30 seconds for th e
copier to complete warming up .
Stop
1134P337CA
1134P337CA
Chapter 2
First Things to Know about your Copier
3
Press the Start Key.
The AFR-9 starts feed in g the first
original onto th e Orig inal Glass and
the mes sage "C opy job will start after
the copier has warmed up." appears.
(Not to mention, th e original manually
placed on the Original Glas s remains
on the Glass.)
Page 37

24
5. Turning ON and OFF, and Resetting t he Copi er
Energy Saver Mode
If the copier is shut dow n when it is not in use, it takes t he co pier a maxi mum o f 2 minu tes an d 3 0
seconds to complete the warm-u p cycle. In stead of turning the copier OFF, it’s a g ood i dea to use
the Energy Saver mode. This mode will minimize the time it takes t he co pier to complete the
warm-up cycle to about 30 secon ds.
Entering the Energy Saver Mode
Chapter 2
First Things to Know about your Copier
Access
Energy Saver
Interrupt
Panel Reset
User Mode
Job Recall
Mode Check
1134P432CA
Auxiliary
Ready to Copy
Auto Exp.
Exposure
Finishing
Press the Energy Saver Key. Whi le th e
copier is in the Energy Saver mo de, the
Energy Saver Key is lit with the Start Key lit
green.
Useful Tip
The User’s Choice can be used to
automatically set th e copier i nto th e Ener gy
Saver mode after the lapse of a given period
of time after a copy cycle has been
➭
completed or a key operated.
123
456
789
Start
x1.000
Zoom
Orig. Copy
Basic
1
Auto Paper
Paper
0C
p. 119
Stop
1134O434CA
Access
Energy Saver
Interrupt
Panel Reset
1134P434CA
Leaving the Energy Saver Mode
Start
Stop
1134P337CA
To allow the copier to leave th e Ener gy
Saver mode, pres s any key on the control
panel, for instance, the Start Key.
This cancels the Energy Saver mod e and th e
copier will be ready to make copi es in ab out
30 seconds.
1134P337CA
Page 38

Entering the Access Number
Please input your 4-digit Access
Code #, then press the ACCESS Key.
Access #
25
5. Turning ON and OFF, and Resetting t he Cop ier
If an access number has been set, t he n umber
assigned for your own department must be
entered before you can make a copy.
Chapter 2
1134P334CA
1
access number and press the Access
Mode Ke y.
Using the 10-Key Pad, en ter t he 4 -digi t
123
456
789
0C
NOTE
To correct the 4-digit a ccess nu mber
entered, first press the Clear Key, then
enter the new number.
•
The Touch Panel ch a nges from the
"Access #" prompt to initial s creen ,
indicating that the access mo de h as
been canceled. A copy cycle can now
be started. Make your copies as
necessary.
Access
1075O224EA
1075O224EA
2
press the Access Mode Key again.
Access
•
The Display changes fr om the no rmal
to the "Access #" prompt scr een.
Please input your 4-digit Access
Code #, then press the ACCESS Key.
Access #
When the copy cycle is complet ed,
1075O225EA
First Things to Know about your Copier
Auxiliary Finishing
Ready to copy.
Auto Expo. x1.000 Auto Paper
Exposure PaperZoom
Orig. Copy
Basics
1
1075O270CA
1134P334CA
NOTE
See the User’s Choice t o set a n acces s
➭
number.
p. 123
Page 39

26
Page 40

Chapter 3
Making Copies
This cha pter show s you how to make co pie s.
The "Basic Copying Overview" offers quick, at-a-glance instructions for making copies.
Each step is keyed to a pa ge numbe r wi th a more deta ile d description.
1. Basic Copying Overview 28
2. Placing Ori gi nals 30
3. Number of Copies 34
4. Starting the Copy Cycle 35
5. Interrupt Mode 36
6. Manual Bypass Copying 37
7. Basi c F unction s
•
Copy Paper Size 40
•
Zoom Ratio 42
•
Image Density 45
8. Selecting the Ori ginal Co py Typ e
▲▲
•
1 1 49
•
1 2 49
▲
•
2 1 51
▲▲
•
2 2 52
•
1 [2in1] 52
▲
•
1 2 [2i n1] 54
•
1 [2in 1] 1 55
•
2 [2in 1] 1 56
•
Mixed Original Detection Mode 58
•
Auto Original Count Mode 60
▲▲
9. Finishing M ode
•
Non-Sort 66
•
Sort 66
•
Sort-and-Staple 67
•
Group 67
•
Hole Punch 68
•
Manual Staple 68
•
Auto Dual Function 72
10. Auxiliary Functions
•
Cover 79
•
Page Insertion 82
•
OHP Interleaving 90
•
File Margin 96
•
Book Copy 100
•
Edge/Fr ame Eras e 102
11. Mode Check 105
▲
27
Chapter 3
Making Copies
Page 41

28
1. Basic Copying Overview
•
Place the original in position (step 1), set the numb er of co pi es to b e made (s tep 8) , and pr ess the
Start Key (step 9). This will allow you to make a full-size co py or copies on pap er of t he same s ize
as the original.
Note: Automatically select ed in the initial mode are Auto Paper, full size, and Auto Expo sure.
•
The sel e ct i ons you m a ke on the Touch Panel w i ll change the expo s ure level , z oom ratio, the
type of copy and so on.
1. Placing the Original ➭ p. 30
•
Load the originals face up on th e AFR -9.
Chapter 3
•
Raise the Origin al Cover and pl ace the
original face down on the Or iginal Glass.
Making Copies
To change the copy paper
size
To change the zoom ratio
To change the exposure
level
To make a 1-sided copy
•
To save the copy paper
•
1139O0210A
Selecting the bas ic functions
2. Touch Paper.
➭
p. 40
3. Tou ch Z oom.
➭
p. 42
4. Tou ch E xposur e.
➭ p. 45
Selecting the origin al copy type
5. Touch Orig. Copy.
➭
p. 46
▲
▲
Auxiliary Finishing
Ready to copy.
Auto Expo. x1.000 Auto Paper
Exposure PaperZoom
Auxiliary Finishing
Ready to copy.
Auto Expo. x1.000 Auto Paper
Orig. Copy
Orig. Copy
1075O015AA
Basics
1
1075O270CA
Basics
1
Exposure PaperZoom
1075O270CA
Page 42

29
1. Basic Copying Overview
To sort copies
•
To staple copies
•
To punch holes in copies
•
To make a file margin
•
on the copy
To copy from a book
•
Selecting the finishing type
6. Touch Finishing
➭
p. 64
Selecting the auxiliary functions
7. Touch Auxiliary.
➭
p. 76
Auxiliary Finishing
Ready to copy.
Auto Expo. x1.000 Auto Paper
Exposure PaperZoom
Auxiliary Finishing
Ready to copy.
Auto Expo. x1.000 Auto Paper
Exposure PaperZoom
Orig. Copy
Orig. Copy
Basics
1075O270CA
Basics
1
Chapter 3
1
8. Setting the number of cop ies. ➭ p. 34
•
Set the desired number of copi es to be
made.
Note: If you have enter ed an incorrect
number, press the Cl ear K ey, then
set the correct number a ga in .
9. Starting the copy cycl e. ➭ p. 35
•
Press the Start Key.
Note: To stop the cop y cycle, press the
Stop Key.
Making Copies
1075O270CA
123
456
789
0C
1136P114AA
Start
Stop
1134P337CA
Page 43

30
2. Placing Originals
Using Duplexing Document Feeder AFR-9
Duplexing Document Feeder AFR- 9 au tomat ically feeds in s heet originals placed on the
Document Feed Tray one by one. After the copy cycle has been completed, it aut omati cally
ejects the original o ut o nt o th e Docu ment Exit Tray.
Some originals may not be su itable for reliable operation o f t he AF R-9. Here is a guideline.
Origin als Suitab le f or t he AFR-9
Type of Originals: Sheets
Type of Origina l P a per: Plain paper (weighin g 50 to 110 g/m
Original Size: Normal mode
A3L, B4L, A4L, A4C, A5L, A5C, FLSL
2-in-1 (Dual Original Scanning) mode
A4C, A5C
Mixed Original Detect ion mod e
Chapter 3
A3L, B4L, A4L, A4C, FLSL
Origin als Not Su it a b le
Typing pa per, paraffin pa pe r, and oth e r thin pap e r (weighing less than 50 g/ m2)
•
Thick paper (weighing mo re than 110 g/m2)
•
Transparencies, translucent p aper
•
Wrinkled, dog-eared, curled, or torn originals
•
Making Copies
Clipped or stapled originals
•
Carbon-backed originals
•
Typing paper,
paraffin paper,
and other thin
paper
Thick paper
Continuous
forms
2
)
Wrinkled or
dog-eared
original
Stapled
originals
1134O073AA
Note: For any of these types of originals, ra is e th e AFR-9 and p lace t he o rigi na l m anua lly o n
➭
the Original Glass to m ake a cop y.
p. 32
Page 44

31
2. Placing Original s
Loading t h e Or iginals
1
2
Swing the Document Exit Tr ay to th e
left as s hown.
Place a neat stack of origi nals f ace up
on the Document Feed Tray and then
slide the Document Guide Plate to the
size of the origin als.
NOTES
•
The maximum number of originals that
can be loaded is as fo llows:
1075O016AA
3
4
Swing the Document Exit Tray back
again.
NOTE
The Copy cycle cannot be star ted
unless you swing the Document Exit
Tray back again.
Pull out the Document Exit Tray
Extender if you are using Ledger- or
Legal-size originals.
1075O017AA
Chapter 3
A4 or small er A3, B4
50 30
•
Make sure that the top level of the
original stack do es not exceed the
marking.
•
If you need to make copies from
originals of assorted sizes, select the
Mixed Original Detect ion mod e.
➭
p. 58
•
Make sure that the Document Guide
Plate is in touch w ith the ed ges o f th e
original stack. If it’s not pressed snugly
against the the or ig ina l s ta ck, skewed
feeding could result.
▼
Making Copies
1075O018AA
Page 45

32
2. Placing Original s
Not Using the AFR-9
Different methods are used to p lace th e or ig inal dep ending on its type. Use the appropriate
procedure.
Sheet Originals
1
Chapter 3
2
Making Copies
Raise the Origin al Cover and pl ace the
original face down on the Original
Glass.
1075O019AA
Align the rear left corner o f t he
original with th e mark er on th e
Original Width Scale. Then, pr es s th e
rear edge of the origin al up agai nst the
Original Positio ni ng Plate at the rear
side of the Origin al G lass .
Original Positioning
Plate
Highly Tra nsparent O r iginals
(Using transparenci es and tran slucent paper for
the original)
1
2
Place the original in the s ame way as
the sheet originals.
Place a blank sheet of paper of th e
same size as the original over th e
original.
Blank Sheet
of Paper
1075O021AA
Gently lower the Origin al Co ver.
3
Gently lower the Or igi nal Cov er.
3
1139O0920A
1075O020AA
Page 46

33
2. Placing Original s
Making Copies from Boo k Orig ina l
Using Book Copy Mode
("Book original" re fers to a n open bound
origina l . Book Cop y m ode
Place the open book as sho wn.
p. 100)
➭
1
1075O022AA
Gently lower the Or igi nal Cov er.
2
NOTES
•
If the book is thick, make a copy wit h
the Original Cover r a is ed.
•
Not positioning th e op en boo k pro perly
will result in co pi es wit h p ages in
incorrect order.
•
Do not look directly at the Or ig ina l
Glass surfac e as a strong beam of light
can be emitted.
Instructions for Original Placement
•
Be sure to raise the Ori gin al Cover 15°
or more before pl acing th e or iginal . If
the Original Cover is raised to an
angle l e s s t han 15°, the copi er may fa il
to select the correct copy paper siz e o r
zoom ratio.
15°
1075O023AA
•
Do not place an origin al weig hin g
more than 3 kg on the Origin al Gla ss .
•
When plac ing an open book, do not
press the book h ar d on the Or iginal
Glass, as trouble could result.
Chapter 3
Making Copies
Page 47

34
3. Number of Copies
Set the number of copies to be mad e. You set th e nu mber of copy sets y ou w ant t o have in th e
Sort mode and th e number of c opies in a group in t he Group m ode.
Setting the Number of Copies
Using the 10-Key Pad, enter the n umber o f
copies to be made.
123
456
789
0C
Chapter 3
Correcting the Number Entry
1136P141AA
1136P141AA
Note: The maximum number that can be set is
999.
Useful Tip
The User’s Choice can be used t o limit
the maximum number of copi es to b e set
in the range between 1 and 99.
➭
p. 119
Making Copies
123
456
789
0C
1136P143AA
To correct or reset a number entry, press the
Clear Key.
Note: This resets the Mu lti- Co py Display to 1.
1136P143AA
Page 48

4. Starting the Copy Cycle
Starting the Copy Cycle
35
Ready to copy.
Start
Now copying.
20
1134P305CA
1134P305CA
Stop
1134P337CA
18
1134P306CA
1134P306CA
Stopping a Multi-Copy Cycle
Checking that the mess age "Read y to cop y." is
on the Touch Panel, press th e St art Key .
The message now changes to "Now copy ing. "
and the copier starts the cop y cycle.
Note: In a multi-copy cycle, the numb er on the
Display is decreas ed by 1 ea ch t ime a
copy i s f e d out of t he copier.
Chapter 3
Making Copies
Now copying.
Start
Copy job has been
canceled. Please wait.
18
1134P306CA
1134P306CA
Stop
1134P338CA
17
1134P307CA
1134P307CA
To stop a multi-copy cy cle in pr ogress, p ress
the Stop Key.
The message changes to "Copy job has b een
canceled. Please wait." and the copier will soon
stop.
Note: The Display shows t he n umber o f co pies
yet to be made.
Page 49

A
36
5. Interrup t Mod e
The Interrupt mode all ows yo u t o interrupt a current job and run a different one. The copier
ensures that the old job will b e resumed as soon as the Interrup t mo de is can celed.
Interrupting a Copy Cycle
Chapter 3
Making Copies
Press the Interr up t Key.
1
Interrupt
The message changes to "Now in
Interrupt Mode. Press to ret ur n to
original job." and , aft er a sh or t time,
the current copy cycle is s to pped.
Auxiliary Finishing
Now in Interrupt Mode. Press
to return to original job.
Auto Expo. x1.000 Auto Paper
Orig. Copy
1139O2602A
1139O2602A
Basics
1
3
press the Interrupt K ey ag ain .
Interrupt
The copier is restored to the p revious
settings.
Press the Start Key to resume the old
When the interrupt cycl e is comp leted ,
4
job.
Start
1139O2612
1139O2612A
Stop
Exposure PaperZoom
Enter the control pan el s ettings for the
2
interrupt job and pres s th e St art Key .
NOTES
•
If the current job in volves 2 -sided
copying, Cover, Page Insertion, or
OHP Interleaving, the copier rejects an
Interrupt mode.
•
If the current job in volves the Sort,
Sort-a nd-Staple , Group, Non-Sor t i s
automatically selected a t th e s ame time
when the copier is set int o th e Inter r u pt
mode.
1075O271CA
1134P337CA
Page 50

6. Manual Bypass Copying
Use the Manual Bypass to make copies o n p aper no t lo aded in any Dr awer, or to copy onto
transparencies, translu cent paper , or any ot her special pap er.
You can also use the Cover mode w hen the Mu lti B yp as s Tabl e is used w ith Dupl exin g
➭
Document Feeder AFR-9 (option).
Copy Paper That Can be Us ed for Ma nua l By pass
Types of Paper
◆
•
Plain paper (weighing 60 to 90 g/m2)
•
Heavyweight pap e r (weighing 90 to 157 g/m2)
•
Transparencies, translucent p aper
Paper Size
◆
•
Width: 100 mm to 297 mm
•
Length: 140 mm to 432 mm
Capacity
◆
•
Plain paper (white) ... 50 sheets or less
•
Plain paper (once-copied paper) ... 20 sheets or less
•
Heavyweight paper, transparencies, translucent paper ... 20 sh eets
p. 79
37
Chapter 3
Using the Manual Bypass
1
2
Place the original on the Original
Glass and make the con trol p anel
settings.
NOTE
The following fu ncti on s can not be
selected for Manual Bypass:
Auto Paper, Auto Size, Fi nish in g,
2-Sided Copying,
Margi n-by-Redu c t ion, and E r ase.
Swing down the Multi Bypass Table
and place a neat stack of copy p aper on
the Table and insert i t in to t he co pier
until it stop s.
3
Slide the Paper Guid e Plate to the size
of the copy paper.
NOTES
•
Before inserting, fan the paper stack
well if you are using t r ans par encies o r
translucent paper.
•
Correct any curl if you a re using
heavyweight pape r .
•
When using once-copied paper, load
the paper stack so that the blank side
faces up.
Making Copies
1075O024AA
1075O025AA
Page 51

A
38
6. Manual Bypass Copying
Using the 10-Key Pad, set the number
4
of copies to be m ade .
123
456
789
0C
Press the Start Key t o star t the copy
5
cycle.
1136P141AA
1136P141A
Chapter 3
Making Copies
Start
Stop
1134P337CA
Page 52

39
6. Manual Bypass Copying
Chapter 3
Making Copies
Page 53

40
7. Basic Functions
We here explain how to make the basi c s ettin gs ( cop y paper, zoom rat io, an d expo sur e lev el) t o
make copies.
Basic Screen
Exposure
Touch this key to s ho w
a screen which allows
you to select the imag e
density of the c opy.
Copy Paper Size
Chapter 3
key:
Auxiliary Finishing
Ready to copy.
Auto Expo. x1.000 Auto Paper
Exposure PaperZoom
Orig. Copy
Basics
1
1075O270CA
Zoom
Touch this key to
show a screen which
allows you to select
the zoom ratio.
Paper
Touch this key to
show a screen which
allows you to select
the paper size.
key:
Key:
AutoPaper
When this key is tou ched, the co pi er is set
into the Auto Paper mode in w hich th e
copy paper is automatically selected
according to the si ze of the o ri ginal being
used and the zoom ratio sel ected f or use.
Making Copies
AutoPaper
Touch
1
into the Auto Paper mode.
Auxiliary Finishing
Ready to copy.
Auto Expo. x1.000
Auto Paper
L
1
2
3
Useful Tip
1
2
3 L
to set the copier
Orig. Copy
A4
A3
A4
Basics
1
Auto Paper
Manual
A4
1075O210DA
Manual Selection
The copy paper size can be set manually
according to your need.
Paper
1
shows which drawer holds which copy
paper size.
Auxiliary Finishing
Ready to copy.
Auto Expo. x1.000
Auto Paper
1
2
3
Touch
, and t he T ouch Panel
Orig. Copy
1
A4
2
A3
L
3 L
A4
Basics
A4
Manual
A4
1075O211DA
1
This mode is efficient when y ou w ant t o
make copies on paper of the same size as
your originals au tomatically.
Page 54

41
7. Basic Functions
2
Touch t he desired paper si z e ke y.
Selects t he Au t o
Paper mode in which
the copier se lec ts the
optimum paper size
automatically.
Auto Paper
1
2
3
Paper loaded
in the 2nd
Drawer
Auto Drawer Switching
If the Drawer currently sel ected f or use
runs out of pap e r and ther e is anothe r
Drawer loaded with paper of the same s i ze
and in the same direction, the copier
automatically selects that second Drawer
to continue copying.
Useful Tip
This feature is a great ad van tage wh en
you need to make a large number of
copies on the same size paper. For
example, you can make up to 3,500
copies without inter ruption if all three
drawers are loaded with paper of the
same size and in the same di recti on. You
can even make up to 6,500 copies if an
optional C-302 is add itio nal ly f itted to
the copier.
Paper lo ad ed in
the 1st Drawer
1
A4
2
A3
L
3 L
A4
Paper lo ad ed in
the 3rd Drawer
Paper loaded on
the Multi Bypass
Table
Manual
A4
1075O227DA
1075O227DA
Paper lo a d ed in
Large Capaci ty
Cassette C-302
(shown only
when the copi er
is equipped with
the option)
Special Paper Setting
If the symbol "S1," "S2," etc. appear s on the
paper select key shown on the Touch Panel, it
means that that particul ar Drawer has b een
designated for special paper.
1
Auto Paper
1
2
3
The copier provides three d iff erent types of
special paper setting, each having speci fic
purposes as detailed b elow. Th e s ettin g can be
made by using "Special Paper" of the Us er ’s
Choice. (User’s Choice
S1:
If S1 is set, the message on the Display asks
you whe t her or not t o use tha t particular
Drawer as a possible candi date i n the A uto
Paper Mo de .
S2:
This setting preclud es bo th Au to Pap er Mode
and Automatic Drawer Switchi ng.
S3:
This setting preclud es 2-s ided cop yi ng .
A4
2
A3
L
3 L
A4
S1
S2
p. 119)
➭
Manual
A4
1075O212DA
1075O212DA
Chapter 3
Making Copies
Page 55

42
7. Basic Functions
Zoom Ratio
When you touch
Zoom
on the Touch Panel, a screen appears t hat allows you to set the zoom
ratio. You have five different ways to choose from to set the zoom ratio. S elect o ne acco rding to
your need.
Zoom Ratio Range : ×0.500 to ×2.000
Auxiliary Finishing
Ready to copy.
Auto Expo.
Re-
B4 A4
duce
En-
B4 A3
large
Chapter 3
A3 A4
A4 A5
A4 A3
A5 A4
Orig. Copy
x0.5
x2.0
Auto Paperx1.000
User SetAuto Size
Basics
Full
Size
1134P314EA
1
Auto Size
When this key is touched , th e cop ier i s s et
into the Auto Size mod e in wh ich t he zo om
ratio is automat ically selected according to
the size of the origin al being used and the
Making Copies
copy paper size selected for u se.
Usef ul Tip
This mode is very helpfu l for n eat f ilin g
when yo u need to ma ke c opies from
originals of assor ted sizes.
Touch
1
the Auto Size mode.
Re-
B4 A4
duce
En-
B4 A3
large
Select the paper size.
2
(Copy Paper Size
Auxiliary Finishing
Ready to copy.
Auto Expo. x1.000
Auto Paper
1
2
3
Auto Size
A3 A4
A4 A5
A4 A3
A5 A4
1
A4
2
A3
L
3 L
A4
to set the copier into
User SetAuto Size
x0.5
x2.0
➭
p. 40)
Orig. Copy
Full
Size
Basics
1134P315DA
1
A4
Manual
A4
1075O211DA
Selecting a Ratio from among Fixed
Ones
The copier provides nine most frequ entl y
used zoom ratios ready for immed iatel y
use.
1
Touch t he appropria te
original-to-copy-size representation
key. You have four reduction and four
enlargement ratios.
User SetAuto Size
Reduce
Enlarge
B4 A4
B4 A3
A3 A4
A4 A5
A4 A3
A5 A4
x0.5
x2.0
Full
Size
1134P316DA
1134P316DA
Page 56

1
43
7. Basic Functions
2
Reduce
Enlarge
touch
B4 A4
B4 A3
Full Size
A3 A4
A4 A5
A4 A3
A5 A4
.
x0.5
x2.0
User SetAuto Size
Full
Size
1134P317DA
1134P317DA
Using Zoom Up/Down Keys
▲
Full size (×1.000) is selected when you
Each touch of the
Touch Panel changes the zoom ratio s ho wn
in 0.001 increments. Y ou can k eep
touching the key to chan ge the rat io
quickly.
1
Touch the
zoom ratio.
▲
▼
or
key on the
▼
or
key to c ha nge the
Using the 10-Key Pad
You can use the 10-Key Pad to dir ectly
enter the zoom ratio.
User Set
1
Touch
Then, the following scr een ap pear s.
Re-
B4 A4
duce
En-
B4 A3
large
10-Key Pad Input
Touch
on the Touch Panel.
A3 A4
x0.5
A4 A5
A4 A3
x2.0
A5 A4
User SetAuto Size
1134P319DA
.
2
Auxiliary Finishing
Ready to copy.
Orig. Copy
Basics
Full
Size
1134P319DA
1
Chapter 3
Auto Expo.
Re-
B4 A4
duce
En-
B4 A3
large
A3 A4
A4 A5
A4 A3
A5 A4
x1.003
x0.5
x2.0
Auto Paper
User SetAuto Size
Full
Size
1075O283DA
Useful Tip
To save time, first select the f ix ed zoom
ratio nearest to the t arg et rat io befo re
▲
▼
or
using the
key.
Auto Expo. Auto Paper
x1.000 x1.000
3
MiniReduce
x1.000
21
10-Key
Pad Input
BackUp
1134O132CA
Making Copies
Page 57

44
7. Basic Functions
Using the 10-Key Pad, en ter t he
3
desired zoom r a ti o.
Using the Zoom Memory
You may have one or two rat ios that a re
123
456
789
0C
frequently used, but not available from the
fixed ones. These can be stor ed i n memory
and recalled later as necess ar y.
User Set
Touch
.
1
1139O4860A
User SetAuto Size
Example: F or 1.300 , press 1, 3 , 0, a nd
0, in that order.
To correct a ratio entered, first pr ess
the Clear Key, then enter the corr ect
Chapter 3
one.
x1.300
1134P820AA
2
Reduce
Enlarge
B4 A4
B4 A3
A3 A4
A4 A5
A4 A3
A5 A4
x0.5
x2.0
Full
Size
1134P319DA
1134P319DA
Select the desi re d ratio f rom among the
three which have previously been
stored in memory.
Making Copies
Auxiliary Finishing
Ready to copy.
Auto Expo. Auto Paper
x1.000 x1.000
3
MiniReduce
x1.000
21
10-Key
Pad Input
Orig. Copy
Basics
1
BackUp
1134O133CA
Usef ul Tip
×
0.930 is stor e d in
Mini-Reduce
can use it when you want to have a
copy which is slightly smaller than the
original.
NOTE
The User Mode is used to store z oom
➭
ratios in memory.
p. 119
. You
Page 58

Image Density
A
45
7. Basic Functions
When you touch
Exposure
on the Touch Panel, a screen appears th at allows you to set the
exposure level or image densi ty. Th ere ar e two way s to adju s t th e exp osu re level. S elect o ne
according to your need.
Auxiliary Finishing
Ready to copy.
Auto Expo.
Lighter
Auto Exposure
When in the Auto Exposu re mode, the
copier reads the image densi ty o f t he
Orig. Copy
Basics
1
Auto Paperx1.000
Auto
Darker
1134P222CA
Manual Exposure
In the Manual Exposure m ode, you can
vary the exposure level in ni ne step s .
original and automati cally adjusts the
exposure level for th e optimum copy
image density.
Auto
1
Touch
Auto
The
.
key is highlig hted,
1
Lighter
Touch
necessary.
or
Darker
as
indicating that t he co pier is set into the
Auto Exposure mode.
Lighter
Auto
Darker
Chapter 3
Making Copies
Lighter
Auto
Darker
1134P248C
1134P248CA
Useful Tips
•
The exposure level in the Aut o
Expos ure mode ca n be varied by usin g
the User’s Choi ce, eith er "Darker" o r
➭
"Lighter."
•
The copier has been factory-set t o
p. 119
automatically select the Auto
Exposure mode. The User’s Choice
can be used to change this def ault
setting to th e Manual Exposu re mo de.
➭
p. 119
134P249CA
<To make the image darker>
Touch
Darker
.
<To make the image lighter>
Touch
Lighter
.
1134P249CA
Page 59

46
▲
8. Selecting the Or iginal Copy Type
In the following pages , let’ s lo ok at ho w we sh ould make the settings for the ty pe o f copy we
want to m a ke from t he type of original w e ha ve.
When you touch
▲
orig. copy type.
▲
Orig. Copy
on the Touch Panel, a screen appears th at allo w s yo u to s et th e
Chapter 3
▲
Original Copy Types
▲
1 1
Making Copies
Originals Copies
Auxiliary Finishing Basics
Ready to copy.
Auto Expo. Auto Paperx1.000
121
12
Orig. Copy
2in1
2in1
1
•
Select 1 1 to make 1-sided copies from
1/2 2
Mixed Orig
▲
1-sid e d origina l s .
1
1134P226CA
➭
p. 49
▲
1 2
Originals
1136P204AA
1136P204AA
Copy
1136P205AA
1136P205AA
•
Select 1 2 to make 2-sided copies from
▲
1-sid e d origina l s .
This is the default settin g.
Note: Two orig inals can be copied onto one
➭
copy.
p. 49
Page 60

▲
2 1
▲
2 2
Original
Original Copy
Copies
1134P207AA
1134P207AA
8. Selecting the Original Copy Type
•
Select 2 1 to make 1-sided copies from
▲
▲
2-sid e d origina l s .
Note: You need twice as many s heet s of co py
➭
paper a s originals.
•
Select 2 2 to make 2-sided copies from
2-sided origina ls.
▲
➭
p. 52
p. 51
47
Chapter 3
1136P207AA
▲
1 [2in1] = 1-sid e d 2-in-1 c opy
Originals Copy
1136P208AA
1136P207AA
1136P208AA
•
Select 1 [2in1] to make a 1-sided c opy,
▲
through reduct i on, from two 1-sid e d origina l s
side-by-side.
Note: You need half as many sh eets o f cop y
paper a s required otherwise.
➭
p. 52
NOTE
The size of the orig ina l sh ou ld be A4
crosswise or A5 cross w is e fo r 2-in- 1.
Making Copies
Page 61

48
8. Selecting the Original Copy Type
▲
1 2[2in1] = 2-si de d 2-in-1 c opy
Originals Copy
▲
1136P210AA
1136P210AA
•
Select 1 2[2in1] to make a 2-sided copy,
▲
through reduct i on, from four 1-s i ded
originals. Each 2-original pair will be placed
side-by-side on either side of t he copy.
Note: You need 1/ 4 as many s heets of c opy
paper a s required otherwise.
➭
p. 54
NOTE
The size of the original should be A4
crosswise or A5 cro s swise for 2-in-1.
Chapter 3
1[2in1] 1 = 1-sided 2-in-1 separa tion cop y
▲
Original
Copies
Making Copies
1136P211AA
2[2in1] 1 = 2-sided 2-in-1 separa tion cop y
▲
Original
Copies
1136P212AA
1136P211AA
1136P212AA
•
Select 1[2in1] 1 to make 1-sided
▲
page-by-page copies of a 1-sided original
which is the result of 2 -i n- 1 copy ing .
Note: You need twice as many s heet s of co py
➭
paper a s t he origi nal.
•
Select 2[2in1] 1 to make 1-sided
▲
p. 55
page-by-page copies of a 2-sided original
which is the result o f 2-sided 2-in-1 copying.
Note: You need four times as many sheets of
➭
copy pape r as the original .
p. 56
Page 62

49
8. Selecting the Original Copy Type
▲
▲
1 1
Touch
.
▲
1 1
1
121
12
▲
1 1 is selected in t he in itial mode.
Mixed Orig
Select
originals of asso rted sizes o n the
AFR-9. ➭ p. 58
2in1
2in1
1
if you are using
1/2 2
Mixed Orig
1134P250CA
1134P250CA
▲
1 2
Touch
.
▲
1 2
1
121
12
Useful Tip
The copier offers the follo wing thr ee
original count functio ns:
AutoCount The copier automatically
Even Select when yo u have an
Odd Select when you have an odd
Even
If
original count functio n, th e cop ier
makes a copy set in correct page order.
Even
is selected as default.
•
If the number of original s is even , go
to step 6.
•
If the number of original s is odd o r
unknown, follow these s t eps.
2in1
1
2in1
counts the number of
originals.
even number of originals.
number of originals.
Odd
or
is selected for the
1/2 2
Mixed Orig
1134P252CA
1134P252CA
Chapter 3
Making Copies
2
Touch
Auxiliary
Ready to copy.
Auto Expo. Auto Paperx1.000
1 2
# of Origs
Finishing Basics
.
Orig. Copy
EnterCancel
# of Origs
Margin
1
1134P223CA
Page 63

50
8. Selecting the Original Copy Type
▲
Select the appropriate or ig inal count
3
function, either
Auxiliary
Ready to copy.
Auto Expo. Auto Paperx1.000
1 2
Finishing Basics
AutoCount
Orig. Copy
# of Originals
EvenAutoCount
or
EnterCancel
Odd
Odd
1
.
7
Select the width of margin on th e
original.
1 2
Touch
Orig. Margin Width
10mm
20mm
Enter
.
EnterCancel
15mm
1134P320DA
1134P320DA
8
1134P227CA
Odd
Touch
4
Chapter 3
To use
AutoCoun t
Touch
Enter
.
functi on, see p . 60.
.
5
Making Copies
If the original has a f ile mar gi n, to uch
6
Margin
.
If not, go to step 8.
Auxiliary
Ready to copy.
Auto Expo. Auto Paperx1.000
Finishing Basics
1 2
Orig. Copy
1
EnterCancel
# of Origs
Margin
1134P228CA
Page 64

51
8. Selecting the Original Copy Type
▲
▲
2 1
1
2
Auxiliary
▲
2 1 / 2 2
Touch
121
12
Touch
Ready to copy.
Auto Expo. Auto Paperx1.000
12
2in1
2in1
▲
2 1
.
Finishing Basics
▲
.
1
Orig. Copy
1/2 2
Mixed Orig
1134P253CA
1134P253CA
1
EnterCancel
4
original.
12
2 2
Touch
Orig. Margin Width
10mm
20mm
Enter
.
15mm
1134P321DA
5
NOTE
When placing the original, ma ke s ure
that it is placed i n th e correct direction.
➭
p. 62
Select the width of margin o n t he
EnterCancel
1134P321DA
Chapter 3
3
2 2
Margin
1134P231CA
If the original has a f ile mar gin , to uch
Margin
.
If not, go to step 5.
12
2 2
EnterCancel
Margin
1134P258CA
1134P258CA
Making Copies
Page 65

52
8. Selecting the Original Copy Type
▲
Chapter 3
▲
2 2
1
2
Auxiliary
▲
2 1 / 2 2
Touch
121
12
Touch
Ready to copy.
Auto Expo. Auto Paperx1.000
2in1
2in1
▲
2 2
.
Finishing Basics
12
▲
.
1
Orig. Copy
1/2 2
Mixed Orig
1134P253CA
1134P253CA
1
EnterCancel
▲
1 [2in1]
Touch
1
121
12
Touch
2
Auxiliary
Ready to copy.
Auto Expo. Auto Paperx1.000
1 2in1
2in1
.
2in1
2in1
1
▲
1
2in1
.
Finishing Basics
Orig. Copy
1/2 2
Mixed Orig
1134P254CA
EnterCancel
1134P254CA
1
Making Copies
3
22
Touch
Enter
1 2- 2in1
1134P234CA
1134P234CA
.
Usef ul Tip
# of Origs
1134P232CA
The copier offers the follo w ing th ree
original count functio ns:
AutoCount The copier automatically
counts the number of
originals.
Even Select when you have an
even numb er of origin al s.
Odd Select when you have an odd
number of originals.
If
Even
or
Odd
is selected for the
original count functio n, the copier
makes a copy set in correct page or de r.
Even
is selected as default.
•
If the number of origin als is even, go
to step 6.
•
If the number of originals is odd or
unknown, follow these steps.
Page 66

3
Touch
1 2in1
1 2- 2in1
# of Origs
.
EnterCancel
# of Origs
1134P260CA
1134P260CA
53
8. Selecting the Original Copy Type
NOTES
•
When the 2-in-1 copy functi on is
selected, the copier auto matica lly
selects a reduction ratio. You can
nonethe l ess make a f ull-size copy.
Select t he desire d zoom r at io and paper
size.
•
The default zoom ratio c an be chan ge d
by using the User’s Cho ice.
Useful Tip
▲
➭
p. 119
4
function, either
Auxiliary
Ready to copy.
Auto Expo. Auto Paperx1.000
1 2in1
1 2- 2in1
Touch
5
Select the appropriate or igi nal co unt
To use
Touch
6
AutoCoun t
Finishing Basics
Odd
AutoCount
Enter
Orig. Copy
# of Originals
.
functi on, see p. 60.
.
EvenAutoCount
Odd
or
EnterCancel
Odd
1
1134P229CA
If the Center Erase function is s elected ,
.
you can eliminate shadows wh ich wo uld
otherwise be produced at the cent er o f
➭
the copy.
p. 102
Chapter 3
Making Copies
Page 67

54
8. Selecting the Original Copy Type
▲
▲
1 2[2in1]
1
2
Chapter 3
Making Copies
2in1
Touch
121
12
▲
1 2
Touch
Auxiliary
Ready to copy.
Auto Expo. Auto Paperx1.000
Finishing Basics
1 2in1
1 2- 2in1
.
2in1
1
2in1
2in1
.
Orig. Copy
# of Originals
AutoCount
1/2 2
Mixed Orig
1134P254CA
1134P254CA
EnterCancel
Input #:
1134P262CA
4
functi on from amo ng the fo ll owing
two.
Select the appropriate ori gin al co unt
Auxiliary
Ready to copy.
Auto Expo. Auto Paperx1.000
AutoCount The copier automatically counts
1
Input # Enter the number of originals
5
Touch
number of origi na ls you h a ve.
Finishing Basics
1 2in1
# of Originals
1 2- 2in1
AutoCount
the number of originals. If you
already know the number of
originals, select "Input #" and
enter the number to save time.
using the 10-Key Pad.
Input #
if you know the
Orig. Copy
1
EnterCancel
Input #:
1134P262CA
3
Touch
1 2in1
1 2- 2in1
# of Origs
.
EnterCancel
# of Origs
1 2in1
1 2- 2in1
Touch the
# of Originals
Auto Count
EnterCancel
Input #:AutoCount
1134P264CA
1134P264CA
if the number
of originals i s unknown .
1134P260CA
1134P260CA
If the
Auto Coun t
is selected, go to
step 7.
To use
AutoCount
functi on, see p. 60.
Page 68

55
8. Selecting the Original Copy Type
▲
6
10-Key Pad.
123
456
789
0C
NOTES
Enter the number of orig in als using the
•
The maximum number of originals that
can be e ntered is 50.
•
Press the Clear Key to correct a
number entry.
Enter
Touch
.
7
NOTES
•
When the 2-in-1 copy functio n is
selected, the copier aut omat ical ly
selects a reduction ratio. You can
nonetheless make a ful l-size copy.
Select the des i r e d z oom rat io and paper
size.
•
The default zoom ratio can be cha nged
by using the User’s Choice.
1136P141AA
1136P141AA
➭
p. 119
1[2in1] 1
▲
Touch
1
121
12
Touch
2
Auxiliary
Ready to copy.
Auto Expo. Auto Paperx1.000
1-
Touch
3
▲
2in1
1
2in1
1 1
Finishing Basics
12in1
12- 2in1
Enter
2in1
2in1
▲
.
.
1/2 2
1
Mixed Orig
1134P255CA
.
Orig. Copy
EnterCancel
1134P255CA
Chapter 3
1
Making Copies
1134P230CA
Useful Tip
If the Center Erase function is selected,
you can eliminate shad ows w hich w ou ld
otherwise be produced at the center of
➭
the copy.
p. 102
NOTES
•
When the 2-in-1 separa tion copy
function is select ed, the cop ier
automatically s elects an enlargement
ratio. You can noneth eless m ake a
full-size copy. Select the desired zoom
ratio and paper size.
•
The default zoom rati o c an be cha nged
➭
by using the Us e r ’s C hoice.
p. 119
Page 69

56
8. Selecting the Original Copy Type
▲
2[2in1] 1
1
2
Chapter 3
Auxiliary
▲
▲
1
Touch
121
12
Touch
Ready to copy.
Auto Expo. Auto Paperx1.000
1- 2in1
2in1
2in1
2in1
2in1
2 1
Finishing Basics
1
.
1
▲
.
Orig. Copy
1/2 2
Mixed Orig
1134P255CA
EnterCancel
1134P255CA
1
Making Copies
12- 2in1
Enter
Touch
.
3
NOTES
•
When the 2-in-1 separat ion copy
function is selected, the copier
automatically sel ects an enl arg ement
ratio. You can nonethel es s make a
full-size copy. Select the desired zoom
ratio and paper size.
•
The default zoom ratio c an be chan ge d
by using the Us e r ’s C hoice.
➭
p. 119
1134P265CA
Page 70

57
8. Selecting the Original Copy Type
▲
Chapter 3
Making Copies
Page 71

58
8. Selecting the Original Copy Type
Mixed Original Detection Mode
Use the Mixed Original Detection mode to make copies automatical ly f rom or ig inal s of as sor ted
sizes loaded in the AFR -9.
If Auto Size is selected, you can make cop ies o f th e s ame size f ro m origi nals o f d if fer ent si zes .
▲
Originals
Chapter 3
NOTE
The copier cannot staple together the copies of different sizes made in the Mixed
Original Detect ion m od e.
Making Copies
Using t he M ixed Original D e t e c tion
Mode
Copies
Auto Paper Mode
Auto Size Mode,
Copy Paper: A4
1138O537AA
1138O537AA
Swing the Document Exit Tr ay t o th e
1
left as shown.
Load t he s t ac k of your originals on the
Document Feed Tray so that the rear
edge of each original is pres sed ag ain s t
the rear Document Guide Pl ate. Then,
slide the front Do cumen t G uide P late
to the rear so that i t is p ress ed agains t
the front edges of t he o rig in als with
the greatest width .
1075O026AA
2
Swing the Document Exit Tray back
again.
1075O027AA
Page 72

3
Touch
▲
Orig. Copy
59
8. Selecting the Original Copy Type
.
▲
Auxiliary Finishing Basics
Ready to copy.
Auto Expo. Auto Paperx1.000
121
12
Mixed Orig
4
Touch
into the Mixed Orig inal Det ectio n
Orig. Copy
2in1
2in1
1
to set the copier
mode.
2in1
2in1
1
121
12
1
1/2 2
Mixed Orig
1134P226CA
1/2 2
Mixed Orig
1134P251CA
1134P251CA
Chapter 3
Making Copies
Useful Tip
The Mixed Original Detection mode can
be set a s a de fault se t ting by using the
➭
User’s Choice.
p. 119
Page 73

60
8. Selecting the Original Copy Type
Auto Original Count Mode
AutoCount
If
is selected, the copier auto matically counts the number of origi nals.
▲
Chapter 3
Using the Auto Or iginal Count Mo de
Touch the
AutoCoun t
Key.
1
Making Copies
1 2
# of Originals
Auxiliary
Ready to copy.
Auto Expo. Auto Paperx1.000
EnterCancel
EvenAutoCount
Odd
Finishing Basics
1 2
Orig. Copy
EnterCancel
# of Originals
EvenAutoCount
Odd
Press the Start Key to start the original
3
count sequence.
1
1134P227CA
Start
Stop
Load the originals onto the AF R- 9.
2
"Placing Originals"
➭
p. 31
1134P309CA
1134P309CA
1139O0210A
1134P337CA
•
The AFR-9 starts feeding t he
originals loaded on it to count the
number of originals. ( At thi s time, no
copy cycle is run.)
Page 74

61
8. Selecting the Original Copy Type
▲
4
Unload the origi nals ej ected o nt o th e
Document Exit Tray and reload them
onto the Document Feed Tray. Then ,
press the Start K ey.
1139O0210A
Chapter 3
Making Copies
Page 75

62
8. Selecting the Original Copy Type
Instructions for Loading Originals
Use th e following proced ure for loa ding ori ginals t o m ake 1-side d copies from 2-s ide d origi nals.
Procedure
Load the originals cross wis e.
If the originals are loaded l eng thwise, the directions of the cop y images will be mixed up.
Correct:
Chapter 3
▲
2-Sided O r i ginals
Loaded Crossw ise
1-Sided Copies
Making Copies
1075O028AA
Incorrect:
2-Sided O r i ginals
Loade d Lengthwise
1-Sid ed C opies
1075O029AA
Page 76

63
8. Selecting the Original Copy Type
▲
Chapter 3
Making Copies
Page 77

64
9. Finishing Mode
We will explain how to set up th e fin ishing function in the fol lowin g.
When you t ouch
finishing type.
Finis hing
on the Touch Panel, a screen appears th at allo w s yo u to s elect the
Auxiliary Finishing
Ready to copy.
Auto Expo. x1.000 Auto Paper
Exposure PaperZoom
Chapter 3
Finishing Modes
Non-Sort
Originals
Making Copies
Orig. Copy
Basics
1
Staple
1134P266CA
1134P266CA
Copies
Auxiliary
Ready to copy.
Auto Expo. Auto Paperx1.000
NonSort Sort Sort &
Finishing
Orig. Copy
Staple
HolePunch
Basics
1
Group
1134P236CA
1134P236CA
In the Non-Sort mode, all cop ies ar e fed out
onto the Non-Sort Bin, without being sorted,
group e d, s tapled, or punche d. ➭ p. 66
Sort
Originals
Copies
1st Bin
2nd Bin
3rd Bin
1076O146
1076O145
(Only when the Sorter or S tapl e Sorter is mounted)
In the Sort mode, copies are sor ted int o
complete sets of th e orig inals. ➭ p. 66
Note: This mode is effective when making
multiple copies fro m multi ple
originals.
Page 78

65
9. Finishing Mode
Sort-and-Staple
Originals
Group
Originals
Hole Punch
Originals
Copies
Copies
Copies
1st Bin
2nd Bin
3rd Bin
1076O147
1136O100A
1st Bin
(Only when the Staple Sorter i s mounted )
In the Sort-and-Staple mod e, copies are
sorted into complete s ets o f the or ig inal s and
each set is stapled tog eth er. ➭ p. 67
(Only when the Sorter or S tapl e Sorter is mounted)
In the Group mode, the copies made from
each single original are separated into
groups. Each group contains the number of
copies. ➭ p. 67
(Only when Staple Sorter is mo un ted)
In the Hole Punch mode, holes ar e punched
in the copy sets or s tacks f or filing. ➭ p. 68
Chapter 3
Making Copies
2nd Bin
NOTE
Holes can be punched only in Ledger
lengthwise or Letter crosswise paper.
This mode allows you to stap le cop y set s
Manual Staple
Sorting or Grouping
3rd Bin
1136O171CA
(Only when the Staple Sorter i s mounted )
Manual Staple
already made in the Sort Mode or cop y
Originals
1076O191
stacks made in the Group Mode. ➭ p. 68
Useful Tip
The copier has been factory- set to automatically select Non-So rt. Th e Us er’ s Ch oice can,
however, be used to change th is defaul t s etting to another finishing type.
Page 79

A
66
9. Finishing Mode
Non-Sort
1
Chapter 3
Making Copies
NonSort
Touch
NonSort Sort Sort &
.
Staple
Holepunch
Group
1134P267CA
1134P267CA
NonSort is select ed in th e initial mode.
NOTE
The maximum capacity of Non- Sor t Bin
is as follows.
Type of Paper Capacity
Plain paper 50
Heavyweight paper
Transparencies
Transluc ent paper
10
Sort
1
Using the 10-Key Pad, enter th e
number of copy sets you w a nt to have.
123
456
789
0C
NOTE
The number of copy sets th at can b e
sorted is as follows.
Sorter No. of Copy Sets
ST-207/S-206 2 to 20
Sort
Touch
.
2
NonSort Sort Sort &
Staple
1136P141A
1136P141AA
Group
Holepunch
1134P268CA
1134P268CA
NOTE
The maximum capacity of each Sort Bin
is as follows.
Sorter Capacity
ST-207/S-206 50
Page 80

A
A
67
9. Finishing Mode
Sort-and-Staple
1
Using the 10-Key Pad, enter th e
number of copy sets you w a nt to have.
123
456
789
0C
NOTE
The number of copy sets th at can b e
sorted is as follows.
Sorter No. of Copy Sets
ST-207 1 to 20
Sort & Staple
Touch
2
NonSort Sort Sort &
Staple
.
1136P141A
1136P141AA
Group
Group
1
2
Using the 10-Key Pad, enter th e
number per copy stack you want to
have.
123
456
789
0C
1136P141A
1136P141AA
Group
Touch
NonSort Sort Sort &
.
Holepunch
Staple
Group
1134P270CA
1134P270CA
NOTE
Chapter 3
Making Copies
Holepunch
1134P269CA
1134P269CA
NOTE
The maximum capacity of each So rt Bin
is as follows.
Sorter Capacity
ST-207 50
The maximum capacity of each So r t Bin
is as follows.
Sorter Capacity
ST-207/S-206 50
Page 81

A
68
9. Finishing Mode
Hole Punch
1
Chapter 3
2
Using the 10-Key Pad, enter th e
number of copy sets or number s tack
you wan t to have.
123
456
789
0C
1136P141A
1136P141AA
Touch t he desired finishi ng type ke y.
NonSort Sort Sort &
Staple
Holepunch
Group
Manual Staple
To staple copies after they have been made:
Check that each copy set or stack has
1
been fed into the Bin.
Staple
Touch
.
1134O038AA
2
Auxiliary Finishing
Ready to copy.
Auto Expo. x1.000 Auto Paper
Orig. Copy
Basics
1
Making Copies
Hole Punch
Touch
3
NonSort Sort Sort &
Staple
Holepunch
.
1134P268CA
1134P268CA
Group
1134P271CA
1134P271CA
Exposure PaperZoom
Staple
1134P266CA
•
The copy set or stack in the B in will
be stapl e d.
Page 82

Manual Staple Mode
To use as a stapler:
ST-207
69
9. Finishing Mode
1
2
Align the sheets of paper n eatly .
1134O039AA
Insert the paper stack int o th e 1st Bin
under the Non-S ort Bin.
Non-S ort Bin
NOTES
•
Make sure of the stapling position and
press the paper stack a gainst t he
bracket.
•
Never attempt to reach for the stapling
position. This can be dan gero us.
Touch
Staple
.
3
Auxiliary Finishing
Ready to copy.
Auto Expo. x1.000 Auto Paper
Exposure PaperZoom
Orig. Copy
Stapling Position
1134O096AA
Chapter 3
Basics
1
Making Copies
Sort Bins
1st Bin
1136O104AA
Non-So r t Bin
1136O105AA
NOTE
Up to 50 sheets of (p la in) pa per ca n be
stapled.
Staple
•
The sheets of paper are stapled.
Useful Tip
This feature is ef fici ent t o stap le
originals after maki ng cop ies.
1134P266CA
Page 83

70
9. Finishing Mode
Instructions for Loading Originals for Stapled Copies
Note the correct direction of the originals loaded in th e AFR-9 to make cop ies in the Staple or
Hole Punch mode.
Original Direction for Stapling
If the copies are to be stapled either in the Sort-and-Staple or Manual Staple mo de, l oad the o ri gin als
crosswise in the AFR-9. Ens ure als o t hat t he stap lin g co rner i s at th e rear left side as indicated by the
arrow.
Correct:
Originals Loaded
Crosswise
Chapter 3
Making Copies
Stapling Corner
Copy Set/Stack
Stapled at Top Left
1075O031AA
Original Direction for Hole Punch
To punch holes in th e cop ies, lo ad th e or ig inal s so
that the edge along which holes ar e pu nched i s pos itio ned on the left as indicated by the arr ow.
Correct:
Punching Position
Punching Position
1075O100DA
Page 84

71
9. Finishing Mode
Chapter 3
Making Copies
Page 85

72
9. Finishing Mode
Auto Dual Function
Each of t he Sort Bins holds up to 50 s heets of paper. The A ut o Dual Fu nct ion, ho wever, all ow s
sorting of copies of up to 100 origina ls under c ertain condition s.
Auto Dual Function in the So rt Mode
When 10 or less copies are made fro m an orig in al s et co nsisting of more than 50 origin als in the
Sort Mode, the Sorter or Staple Sorter is automatically switched into the Auto Dual Function
Mode usi ng the 11 th to 20t h Bins.
Copies Bins Used
1st to 50th sorted copies 1st to 10th Bins
51st to 100th sorted copies 11th to 20th Bins
*
If the number of copies selected exceeds 10, the copy cycle stops at the 50th original.
Chapter 3
Example: M a king 3 co py sets of a 55-page
original set us ing a 20 -B in Staple
Sorter
55-Page O ri ginal Set
Each of the top three Bins
Making Copies
contains 50 sorted copies.
Each of the 11th to 13th
Bins conta i ns 5 sorted copi es.
1075O033AB
*
To have a complete set from th e origi nals, p lace th e cop ies f ro m the 11t h B in on top of those from
the Top Bin. In the same way, pl ace the co pi es fr om the 12 th Bin on to p o f those f ro m th e 2n d Bin,
and so on.
Auto Dual Function in Sort-and-Staple Mode
When 10 or less copies are made fro m an orig in al s et co nsisting of more than 51 origin als in the
Sort-and-Staple mode and the Aut o Dual functi on is activated, the Sort-and-Staple Mode is
automatically switched to the Sort Mode (no stapling takes p lace).
Page 86

9. Finishing Mode
When the Number of Copies Selected Exceeds 50 in the Group Mode
When more than 51 copies are to be g roup ed t ogether in to o ne gro up, the Sorter or Staple Sorter
uses t he s ubsequent Bin t o c ontinue grouping the copie s .
Original Copies Bins Used
1st
2nd to Nth: Same way up to 20th
Example: Separating copies made fro m 2 diff erent
Copies of 1st original
1st Bin: 50
2nd Bin: 10
Copies of 2nd ori gi nal
3rd Bin: 50
4th Bin: 10
1st to 50th copies 1st Bin
51st and subsequent copie s 2nd Bin
originals into t wo grou ps when each group
contains 60 copies.
73
Chapter 3
1075O034AB
If the Number of Copies Selected Exceeds 50 in the Non-Sort Mode
The capacity of the Non-Sort B in i s 51 . If mor e than 50 copies ar e made in th e Non- Sor t mode,
the Sorter uses the 1st, 2 nd , and s ubs equent Bins to hold those excess co pies.
Making Copies
Page 87

74
9. Finishing Mode
Finishing Examples
Finishing Mode Manual Stapling Examples
Chapter 3
Making Copies
Non-Sort
Sort
Impossible
OK
Possible
Originals
Example: Sorting copies into 2 copy sets and having
them stapled manually
Sorting
Original Set
Copies
1136O108AA
Manual
Stapling
Group
OK
Possible
1136O109AA
Example: S e parating co pi es into 3 g roups, eac h group
containi ng 2 copies, and having each stapl ed
manually
Grouping
Original Set
Manual
Stapling
1136O110AA
Page 88

Finishing Mode Manual Stapling Examples
75
9. Finishing Mode
Sort-and-Staple
Sort + H ol e Punch
Group + H ol e Punch
Impossible
OK
Possible
Example:
Example:
Original Set
Sorting and stapling copies into 2 copy sets
Stapled Copy SetsOriginal Set
1140O077
Sorting or separating copies into 2
sets/stacks, punching holes in them, and
then having each stapled manually
Punched
Copies
Sorting
Manual
Stapling
Chapter 3
Making Copies
1136O172CA
Page 89

76
10. Auxiliary Functions
These pages explain about co nv eni ent fun ctio ns o ff ered as th e Auxiliary functions and how to
set these features. When the
function menu screen appear s.
Auxiliary
key on the T ouch Panel is touc hed, the Au xiliary
Auxiliary Finishing
Ready to copy.
Auto Expo. x1.000 Auto Paper
Exposure PaperZoom
Orig. Copy
Chapter 3
Auxiliary Functions Overview
Cover
Only the first page of th e original set is copied
onto col ored pape r. ➭ p. 79
Making Copies
Original Set Copy Set
Cover
(Colored Paper)
Basics
1075O270CA
Auxiliary
1
Ready to copy.
Auto Expo. Auto Paperx1.000
Page
Insertion
Finishing
Cover
Orig. Copy
OHP Interleaving
Book
Copy
Basics
File
Margin
Edge/Frame
Erase
1134P237CB
1134P237CB
1
A sheet of colored paper is in s erted as a cover
before the copy set. ➭ p. 79
Copy Set
Original Set
Cover
(Colored Paper)
1136O130AA
Page Insertion
The original specified f or an i nser t is co pied
onto colored p a per. ➭ p. 82
Specify Page
2 for Insert.
Copy Set
Insert
(Colored Paper)
1136O130AA
Original Set
1136O131AA
A sheet of colored paper is i nser ted at any
specified place between copies. ➭ p. 82
Copy Set
Original Set
Specify Insert
Between Pages
1 and 2.
Insert
(Color ed Paper)
1136O133AA
Page 90

OHP Interleaving
77
10. Auxiliary Functions
Copies are made on transp arencies w ith
copied interleaves betw een each of th em.
p. 90
➭
Copy Se t
Original Set
Multi-Copy
Entry: 1
OHP
Copied I nterleaves
(Copy P aper)
1136O136AA
File Margin
A file margin is made on the copy . ➭ p. 96
Original Copy
Copies are made on transp arencies with a
blank sheet of copy paper bet ween each of
them. ➭ p. 90
Copy Set
Original Set
Non-Copi ed Interl eaves
(Blank Sheet of Copy
Paper)
OHP
1136O138AA
The image of the original is r educed to make a
wider file margin on th e copy. ➭ p. 96
Original Copy
Chapter 3
Making Copies
1136P218AA
1136P218AA
Book Copy
Each page of an open book is copied on to a
separate sheet. ➭ p. 100
Book Original
1-Sided Copies
1136P219AA
1136P219AA
1136P222AA
1136P222AA
Each page of an open book is copied onto
each side of a sheet of paper. ➭ p. 100
2-Side d C opyBook Original
1136P220AA
1136P220AA
Page 91

78
10. Auxiliary Functions
Edge/Fr ame Erase
The image along four edges o f t he o riginal is
erased on the copy. ➭ p. 102
Original
(Fax Out p ut )
Chapter 3
Copy
1136P215AA
Making Copies
1136P215AA
The image at the center of the original is
erased on the copy. ➭ p. 102
Original
(Book)
Copy
1136P216AA
1136P216AA
Page 92

10. Auxiliary Functions
Cover
The Cover mode lets you make a front cov er or a f ront and back cover for a copy set by copyin g
the first page or the firs t an d last page of an original set on d ifferen t p aper fr om the no rmal copy
paper, such as colored paper, or by in serti ng that s pecial paper b efore an d after t he o rig in al set.
There are four different Cover f unctions available. Select the appropr iate o ne acco rdin g to your
need.
Functions
Cover (Front) <Copied Cover>
79
Original Set
Copy Set
Cover
1136O130AA
Cover (Front) <Non-Copied Cov er>
Copy Se t
Original Set
Separate
Front Cover
1136O131AA
Cover (Front&Back) <Copied Cover>
Original Set
Copy Set
Front Co ver
Back Cover
1136O130AA
Cover (Front&Back) <Non-Copied Cover>
Copy Set
Original Set
Separate
Front Co ver
The first page of the o rig in al set is co pi ed
onto a different type of paper (e.g., colored
paper). ➭ p. 80
A sheet of a different type of paper (e.g.,
colored paper) is inserted as a cov er before
the copy set. ➭ p. 80
•
The cover sheet does not under go a cop y
process.
The first and last pag es of the o ri ginal s et
are copied onto a different ty pe of p aper
(e.g., colored paper). ➭ p. 80
A sheet of a different type of paper (e.g.,
colored paper) is inserted as a cov er before
and after the copy set. ➭ p. 80
Chapter 3
Making Copies
Separate
Back Cover
1136O132AA
•
The cover sheets do not under go a cop y
process.
Page 93

80
10. Auxiliary Functions
Using the Cover Mode
Touch
1
Cover
Page
Insertion
Touch the key corresponding to the
2
desired Cover function.
Chapter 3
Making Copies
Cover
Cover Mode
Select the appropriate or ig inal count
3
functi on from a mong the f ol lowing
two.
Cover
Cover Mode
Cover
OHP Interleaving
.
Book
Copy
File
Margin
Edge/Frame
Erase
1134P273CB
1134P273CB
EnterCancel
# of Origs.
AutoCount
Input #:
1134P278CA
1134P278CA
EnterCancel
# of Origs.
AutoCount
4
Input #
Touch
number of origi na ls you h a ve.
Cover
Cover Mode
AutoCount
To use
if you know the
function, see p. 60.
Enter the number of orig in als using the
5
10-Key Pad.
123
456
789
0C
1136P185AA
NOTES
•
The maximum number of originals that
can be entered is 50.
•
Press the Clear Key to correct a
number entry.
EnterCancel
# of Origs.
AutoCount
Input #:
1134P280CA
1134P280CA
1136P185AA
Input #:
1134P279CA
AutoCount:
The copier automatically cou nt s the
number of origi nals. If you already
know the number of originals, select
"Input #" and enter the number to
save time.
Input #:
Enter the number of originals using
the 10-Key Pad.
1134P279CA
6
Touch
Enter
.
Page 94

81
10. Auxiliary Functions
7
8
Place the paper for covers on the Multi
Bypass Table.
NOTE
No cover mode copy can be made
unless the Multi Bypa s s Tabl e is lo ad ed
with paper for covers.
Load the originals onto the AF R- 9 and
press the Start K ey.
"Placing Originals" ➭ p. 31
1075O025AB
Chapter 3
Making Copies
Page 95

82
10. Auxiliary Functions
Page Insertion
Page Insertion allows you to insert a blank sheet of paper (e.g., colo red pap er) between the copy
stacks.
Two different functions are av ailab le. Select the appropriate one according t o y our n eed.
Functions
Page Insertion <Copied Inserts>
Origi nal Set Copy Set
Specify P age
2 for Insert.
The copier copies the pag e, which is
specified for an insert, on paper for inserts
(e.g., colored paper). ➭ pp. 84, 87
Chapter 3
Making Copies
Page Insertion <Non-Copied Inserts>
Copy Set
Original Set
Specify Insert
Between Pages
1 and 2.
Insert
1136O130AA
The copier inserts a blank s heet of p aper fo r
inserts (e.g., colored paper) at an y sp ecified
place between pages. ➭ pp. 84, 87
Insert
1136O133AA
Page 96

10. Auxiliary Functions
Specifying the Place for Insert
In the Page Insertion mode, you mus t speci fy where t o place an i nser t. Tw o ways ar e avai labl e to
specify the insert places, ei ther A DF Detection or 10-Key Pad Input.
ADF Detection (automatic detection)
Put a sheet of paper of a diff erent s ize f ro m the ori gin als at your desired places in the
original set (for co nv enience, let u s call this paper the insert setting paper), load the
original set onto th e AFR-9 , and let th e cop ier s tart the ori gin al co un t s equence. Th is
allows the copier to detect the places for inserts. Up to 20 sheets can be i nser ted.
NOTE
ADF Detection can not be opera ted w hen the Mixed Original Detection Mode i s set.
Copy Set
Original Set
Copy Set
Non-Copied Insert
83
Chapter 3
Copied Insert
Insert Setting Paper
Example:
2nd from top
1134O059AA
10-Key P ad I nput
Using the 10-Key Pad, define the pl aces fo r ins ert s. Up to 20 places can be defi ned.
Original Set
Sheet
Placement
1 2 3
2
6 7
11
123
456
789
1134P281CA
Copy Set
Copied
Insert
Making Copies
Non-Copied
1134O058AA
Page 97

84
10. Auxiliary Functions
Using Page Insertion
<ADF Detection>
5
Sheet Placement
Touch
.
Chapter 3
Making Copies
Touch
1
Page
Insertion
Touch
2
Page Insertion
Copy onto
Inserts
Page Inserti on
Cover
OHP Interleaving
Copy onto Inserts
Sheet
Placement
Yes
Book
Copy
User set
.
File
Margin
Edge/Frame
Erase
1134P274CB
.
EnterCancel
Insert
Paper
A4
1134P413DA
1134P274CA
1134P413DA
Page Insertion
Copy onto
Inserts
Yes
Touch
6
Sheet Placement
ADF
Detection
10-Key
Pad Input
Touch
7
Sheet
Placement
User set
ADF Detection
Enter
.
EnterCancel
Insert
Paper
A4
1134P414DA
.
Enter
1134P285CA
1134P414DA
Select whether to copy ont o ins ert s
3
(YES) or not (NO).
Copy onto Inserts
YES
NO
Enter
Touch
.
4
Enter
1134P283CA
8
Touch
Page Insertion
Copy onto
Inserts
Yes
Insert Pap er
Sheet
Placement
ADF detect
.
Insert
Paper
1134P442DA
EnterCancel
A4
1134P442DA
Page 98

85
10. Auxiliary Functions
9
feed t he paper for i nserts .
Insert Paper
1
A4
2
A3
L
1
2
3
3 L
A4
NOTE
Load the paper source s elected in step
9 with the paper for inserts (e.g.,
colored paper).
Select the paper source fro m which to
Enter
Touch
.
10
11
Make doubly sure that you have
selected the functio ns co rr ectly . Then,
Enter
touch
again.
Enter
Manual
A4
1075O213DA
1075O213DA
Example 2: To place a non-copied in s ert
between pa ges 1 and 2
Copy Set
Original
NOTE
For the insert setting paper, use one
that is a size, or loaded in a direction,
different fr om th e orig inals.
Load the original set cont aini ng inser t
13
setting paper onto the AF R-9.
"Placing Originals" ➭ p. 31
Insert Setting Paper
Non-Copied
Insert
1136O133AA
Chapter 3
Making Copies
12
desired place in the ori gin al set. (The
insert setti ng paper ca n be inserted up
to 20 places.)
Put an insert setti ng paper in to the
Original Set
Insert Setting Paper
Example 1: To place a copied ins ert at
the 2nd positio n fro m top
Original Set
Copy Set
1134O070AA
Copied
Insert
1136O130AA
14
start the original cou nt seq uen ce.
The AFR-9 starts feedi ng the or ig ina ls
loaded on it to det ect th e pla ce fo r
inserts. (At this time, no copy cycle is
run.)
Remove the insert settin g p aper fr om
Press the Start Key to let t he co pier
15
the originals ejected o nto th e
Document Exit Tray.
Insert Setting Paper
1075O035AA
1134O071AA
Page 99

86
10. Auxiliary Functions
16
Unload the original set and rel oad it
onto the Document Feed Tray.
1075O036AA
Press the Start Key.
17
Chapter 3
The copy cycle is run for pag e insertion.
Making Copies
Page 100

Using Page Insertion
<10-Key Pad Input>
5
Sheet Placement
Touch
87
10. Auxiliary Functions
.
1
Touch
Cover
Page
Insertion
Touch
2
Page Insertion
Copy onto
Inserts
Yes
3
Select whether to copy ont o ins ert s
(YES) or not (NO).
Copy onto Inserts
YES
NO
Page Inserti on
OHP Interleaving
Book
Copy
.
Copy onto Inserts
Sheet
Placement
User set
File
Margin
Edge/Frame
Erase
1134P274CB
1134P274CA
.
EnterCancel
Insert
Paper
A4
1134P413DA
1134P413DA
Enter
Page Insertion
Copy onto
Inserts
Yes
Touch
6
Sheet Placement
ADF
Detection
10-Key
Pad Input
7
Using the 10-Key Pad, enter th e
number of origi na ls.
# of origs.
NOTES
Sheet
Placement
User set
10-Key Pad Input
3
123
456
789
EnterCancel
Insert
Paper
A4
1134P414DA
1134P414DA
.
Enter
1134P288CA
1134P289CA
Chapter 3
Making Copies
4
Touch
Enter
•
1134P283CA
To correct a number entry, pr ess th e
Clear Key and then enter th e new
number.
.
•
The maximum numb e r of origi nals tha t
can be en t ered is 50.
 Loading...