

Page 1

The new way to print!
Diiggiittaall SSttoorreeFFrroonntt®®
D
e
UUsseerr GGuuiidde
Page 2

2
Copyright © 2004 - 2013 by Electronics for Imaging, Inc. All Rights Reserved.
Digital StoreFront User Guide
January 2013 Version 6.0
This publication is protected by copyright, and all rights are reserved. No part of it may be reproduced or
transmitted in any form or by any means for any purpose without express prior written consent from Electronics
for Imaging, Inc. Information in this document is subject to change without notice and does not represent a
commitment on the part of Electronics for Imaging, Inc.
Patents
This product may be covered by one or more of the following U.S. Patents: 4,716,978, 4,828,056, 4,917,488,
4,941,038, 5,109,241, 5,170,182, 5,212,546, 5,260,878, 5,276,490, 5,278,599, 5,335,040, 5,343,311, 5,398,107,
5,424,754, 5,442,429, 5,459,560, 5,467,446, 5,506,946, 5,517,334, 5,537,516, 5,543,940, 5,553,200, 5,563,689,
5,565,960, 5,583,623, 5,596,416, 5,615,314, 5,619,624, 5,625,712, 5,640,228, 5,666,436, 5,745,657, 5,760,913,
5,799,232, 5,818,645, 5,835,788, 5,859,711, 5,867,179, 5,940,186, 5,959,867, 5,970,174, 5,982,937, 5,995,724,
6,002,795, 6,025,922, 6,035,103, 6,041,200, 6,065,041, 6,112,665, 6,116,707, 6,122,407, 6,134,018, 6,141,120,
6,166,821, 6,173,286, 6,185,335, 6,201,614, 6,215,562, 6,219,155, 6,219,659, 6,222,641, 6,224,048, 6,225,974,
6,226,419, 6,238,105, 6,239,895, 6,256,108, 6,269,190, 6,271,937, 6,278,901, 6,279,009, 6,289,122, 6,292,270,
6,299,063, 6,310,697, 6,321,133, 6,327,047, 6,327,050, 6,327,052, 6,330,071, 6,330,363, 6,331,899, 6,340,975,
6,341,017, 6,341,018, 6,341,307, 6,347,256, 6,348,978, 6,356,359, 6,366,918, 6,369,895, 6,381,036, 6,400,443,
6,429,949, 6,449,393, 6,476,927, 6,490,696, 6,501,565, 6,519,053, 6,539,323, 6,543,871, 6,546,364, 6,549,294,
6,549,300, 6,550,991, 6,552,815, 6,559,958, 6,572,293, 6,590,676, 6,606,165, 6,633,396, 6,636,326, 6,643,317,
6,647,149, 6,657,741, 6,662,199, 6,678,068, 6,707,563, 6,741,262, 6,748,471, 6,753,845, 6,757,436, 6,757,440,
6,778,700, 6,781,596, 6,816,276, 6,825,943, 6,832,865, 6,836,342, RE33,973, RE36,947, D341,131, D406,117,
D416,550, D417,864, D419,185, D426,206, D439,851, D444,793.
Trademarks
Auto-Count, BioVu, BioWare, ColorWise, Command WorkStation, Digital StoreFront, DocBuilder, DocBuilder Pro,
DocStream, EBEAM, EDOX, the EFI logo, Electronics For Imaging, Fabrivu, Fiery, the Fiery logo, Inkware, Jetrion,
MicroPress, OneFlow, PressVu, Printellect, PrinterSite, PrintFlow, PrintMe, PrintSmith Site, Prograph, RIP-WhilePrint, UltraVu and VUTEk are registered trademarks of Electronics for Imaging, Inc. in the U.S. and/or certain
other countries. BESTColor is a registered trademark of Electronics for Imaging GmbH in the U.S.
The APPS logo, AutoCal, Balance, ColorPASS, DSFdesign Studio, Dynamic Wedge, EFI, Estimate, Fast-4, Fiery
Driven, the Fiery Driven logo, Fiery Link, Fiery Prints, Fiery Spark, the Fiery Prints logo, FreeForm, Hagen, the
Jetrion logo, Logic, Pace, Pecas, Pecas Vision, Printcafe, PrintSmith, Print to Win, PSI, PSI Flexo, Radius, Rastek,
the Rastek logo, RIPChips, SendMe, Splash, Spot-On, UltraPress, UltraTex, UV Series 50, VisualCal, the VUTEk logo
and WebTools are trademarks of Electronics for Imaging, Inc. in the U.S. and/or certain other countries. Best, the
Best logo, Colorproof, Pecas, Pecas Vision, PhotoXposure, Remoteproof, Radius, and Screenproof are trademarks
of Electronics for Imaging GmbH in the U.S. and/or certain other countries.
All other terms and product names may be trademarks or registered trademarks of their respective owners, and
are hereby acknowledged.
Page 3

3
Contents
Section 1: Welcome ............................................................................................................................... 5
What Is Digital StoreFront? ........................................................................................................................ 5
What Is the Home Page? ............................................................................................................................ 6
Section 2: Basics .................................................................................................................................... 9
Getting to the Site ...................................................................................................................................... 9
Registering on the Site .............................................................................................................................. 10
Logging Into the Site ................................................................................................................................. 13
Getting Help ............................................................................................................................................. 13
Contacting Customer Support .................................................................................................................. 14
Changing the Language on the Site .......................................................................................................... 14
Changing the Currency Displayed on the Site ........................................................................................... 15
If You Forget Your Password ..................................................................................................................... 16
Changing Your Password .......................................................................................................................... 17
Changing Your Security Question or Answer ............................................................................................ 18
Viewing and Changing Your Account (User Profile) .................................................................................. 18
Changing Your Print Shop ......................................................................................................................... 19
Section 3: Ordering Products ............................................................................................................... 21
About Products ......................................................................................................................................... 21
Browsing and Searching for Products ....................................................................................................... 22
Ordering Products: Visual Product Builder vs. Classic Product Builder ..................................................... 25
Customizing Products for Which You Supply Content (Visual Product Builder) ........................................ 26
Overview .............................................................................................................................................. 26
General procedure ............................................................................................................................... 27
Having different pages (Visual Product Builder) .................................................................................. 30
Inserting tabs (Visual Product Builder) ................................................................................................ 31
Customizing Fixed-Content Products (Visual Product Builder) ................................................................. 35
Overview .............................................................................................................................................. 35
General procedure ............................................................................................................................... 35
Customizing Superwide Format Products (Visual Product Builder) .......................................................... 37
Overview .............................................................................................................................................. 37
General procedure ............................................................................................................................... 37
Customizing Products (Classic Product Builder) ........................................................................................ 39
Overview .............................................................................................................................................. 39
General procedure ............................................................................................................................... 39
Having different pages (Classic Product Builder) ................................................................................. 42
Inserting tabs (Classic Product Builder) ............................................................................................... 43
Supplying Files .......................................................................................................................................... 43
Supplying content files (Visual Product Builder) .................................................................................. 43
Supplying content files (Classic Product Builder) ................................................................................. 51
Installing Background Uploader (superwide format products) ........................................................... 56
Uploading files to your personal library ............................................................................................... 56
Page 4

4
Supplying files using PrintMessenger .................................................................................................. 57
Ordering Kits ............................................................................................................................................. 63
Personalized Products .............................................................................................................................. 65
DSFdesign Studio Products ....................................................................................................................... 66
General procedure for personalizing DSFdesign Studio products ....................................................... 67
Adding your own objects to DSFdesign Studio products ..................................................................... 69
Moving objects to the back or front .................................................................................................... 72
Colors in DSFdesign Studio products ................................................................................................... 73
Supplying your own images for DSFdesign Studio products ................................................................ 75
Editing images in DSFdesign Studio products ...................................................................................... 79
Formatting text or shapes .................................................................................................................... 87
Moving, re-sizing, rotating, or deleting objects ................................................................................... 87
Changing the opacity of objects .......................................................................................................... 89
Grouping and ungrouping objects ....................................................................................................... 90
Variable Data Products (VDPs) ................................................................................................................. 92
Personalizing single-record VDPs (Visual Product Builder) .................................................................. 92
Personalizing single-record VDPs (Classic Product Builder) ................................................................. 97
Personalizing VDPs in a batch (several at a time) ................................................................................ 99
Shopping Cart and Checkout .................................................................................................................. 103
After you add products to the cart .................................................................................................... 103
Shopping cart: products and recipients ............................................................................................. 103
Shopping cart: payment and review .................................................................................................. 106
Re-Ordering Products ............................................................................................................................. 109
Section 4: Management ..................................................................................................................... 111
Managing Your Address Book ................................................................................................................ 111
Placing Orders for Buyers as a CSR ......................................................................................................... 112
Checking Your Order History and Status ................................................................................................ 113
If a Quote Needs Your Approval ............................................................................................................. 115
(Approvers Only) Handling Pending Approvals ...................................................................................... 116
Viewing and Using Your Saved Jobs ....................................................................................................... 117
Tracking Your Spending Account Usage ................................................................................................. 118
Glossary ............................................................................................................................................. 119
Index ................................................................................................................................................. 125
Page 5

5
SSeeccttiioonn 11:: W
This section will answer the following questions:
What is Digital StoreFront?
What is the home page?
What Is Digital StoreFront?
Digital StoreFront® is an online shop where you can order and purchase print products such as
booklets, manuals, business cards, brochures, sell sheets, flyers, postcards, and so on.
You can:
• Browse and search through a catalog of products.
• Supply the documents you want printed.
• Customize products with a variety of printing and finishing options and proof the products before
adding them to the shopping cart.
• Check out and place your order using familiar online checkout techniques (for example, selecting
recipients, delivery methods, and payment methods).
• Check your order history at any time. (You also receive e-mail notifications throughout the order,
production, and delivery process.)
• Maintain an address book to avoid entering an address each time you want to ship an order to
someone; just select the recipient from your address book during the checkout process.
• Re-order products.
Weellccoo
mee
m
Page 6
6
The header or banner is typically branded for the site.
Register on the site and/or retrieve your password.
from applications such as Word.
Click to see contents of your cart and to check out.
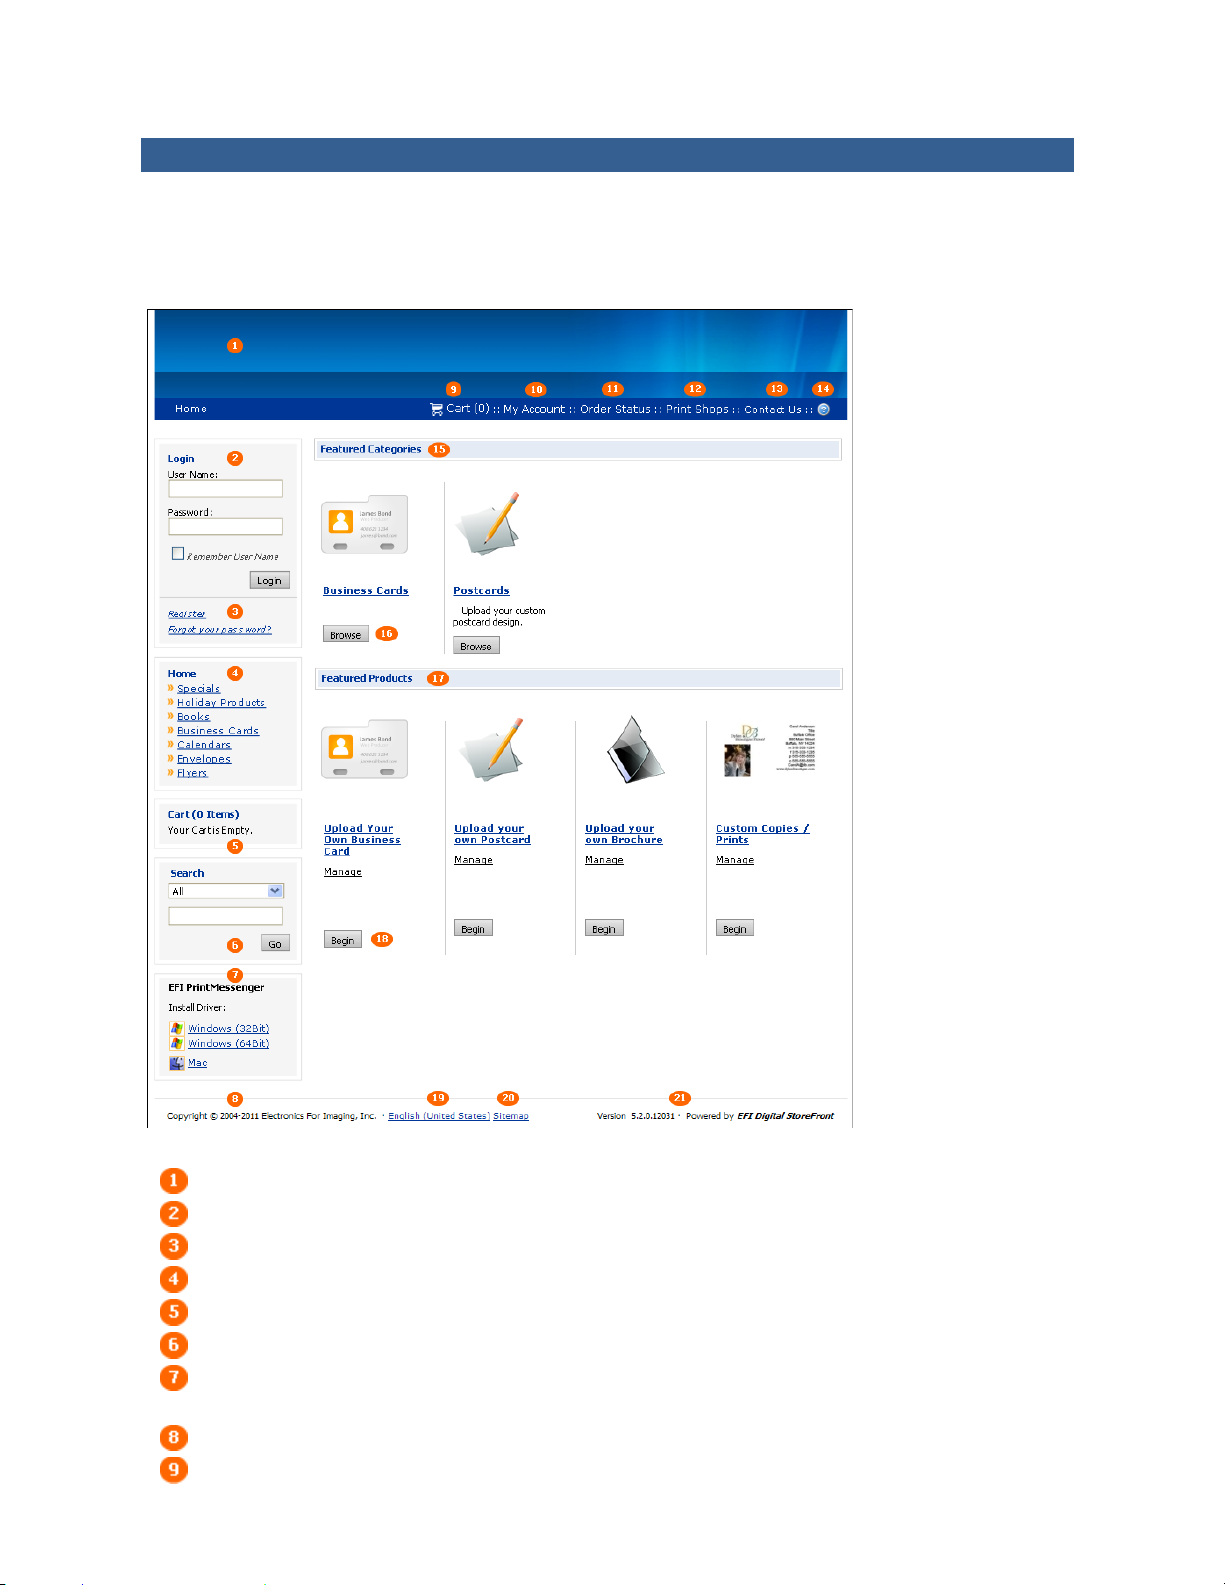
What Is the Home Page?
The page that opens when you come to the site is the home page. This is your starting point for
logging in, as well as finding and selecting products. To return to the home page from other places on
the site, click Home in the navigation bar at the top of the site; this navigation bar is always available
and includes other useful links such as Cart, My Account, and Order Status.
Here you log into the site (required before you can check out).
Product categories you can click to see the products they contain.
The number of items in your cart.
Search for products.
Links to install PrintMessenger, which lets you add content files to a print order directly
Copyright notice.
Page 7

7
your spending account usage.
Click to change your print shop.
Click to obtain help on your current activity or to browse through the Help system.
Browse through the featured category.
The language currently in use on the site. Click to change it.
product.
Click to manage your profile and address book, upload files, review saved jobs, and check
Click to check your order history and status.
Contact information for support on the site.
Featured categories of products.
Featured products.
Click Begin to start the order process.
Click for a hierarchical list of categories and products so you can go directly to a particular
Version information.
Page 8

8
Page 9

9
SSeeccttiioonn 22:: B
This section will answer the following questions:
How do I get to the site?
How do I register and set up an account on the site?
How do I log into the site?
Is online Help available?
How do I contact Customer Support?
How do I change the language on the site?
How do I change the currency displayed on the site?
What if I forget my password?
How do I change my password?
How do I change my security question or answer?
Can I change my account information?
Can I change my print shop?
Getting to the Site
Baassiiccss
You can access the site from a web browser (such as Internet Explorer, Mozilla Firefox, Apple Safari, or
Google Chrome).
To access the site
1. Connect to the Internet by starting your web browser.
2. Enter the URL or web address for the site in the address field at the top of the browser window.
The address is: _____________________________.
3. Press the Enter key on your keyboard or click the Go button in your browser. The home page of
the site opens. (For information about the home page, see page 6.)
You can add products to the cart without being logged in, but you must be logged in before you
can check out and place your order.
Page 10
10
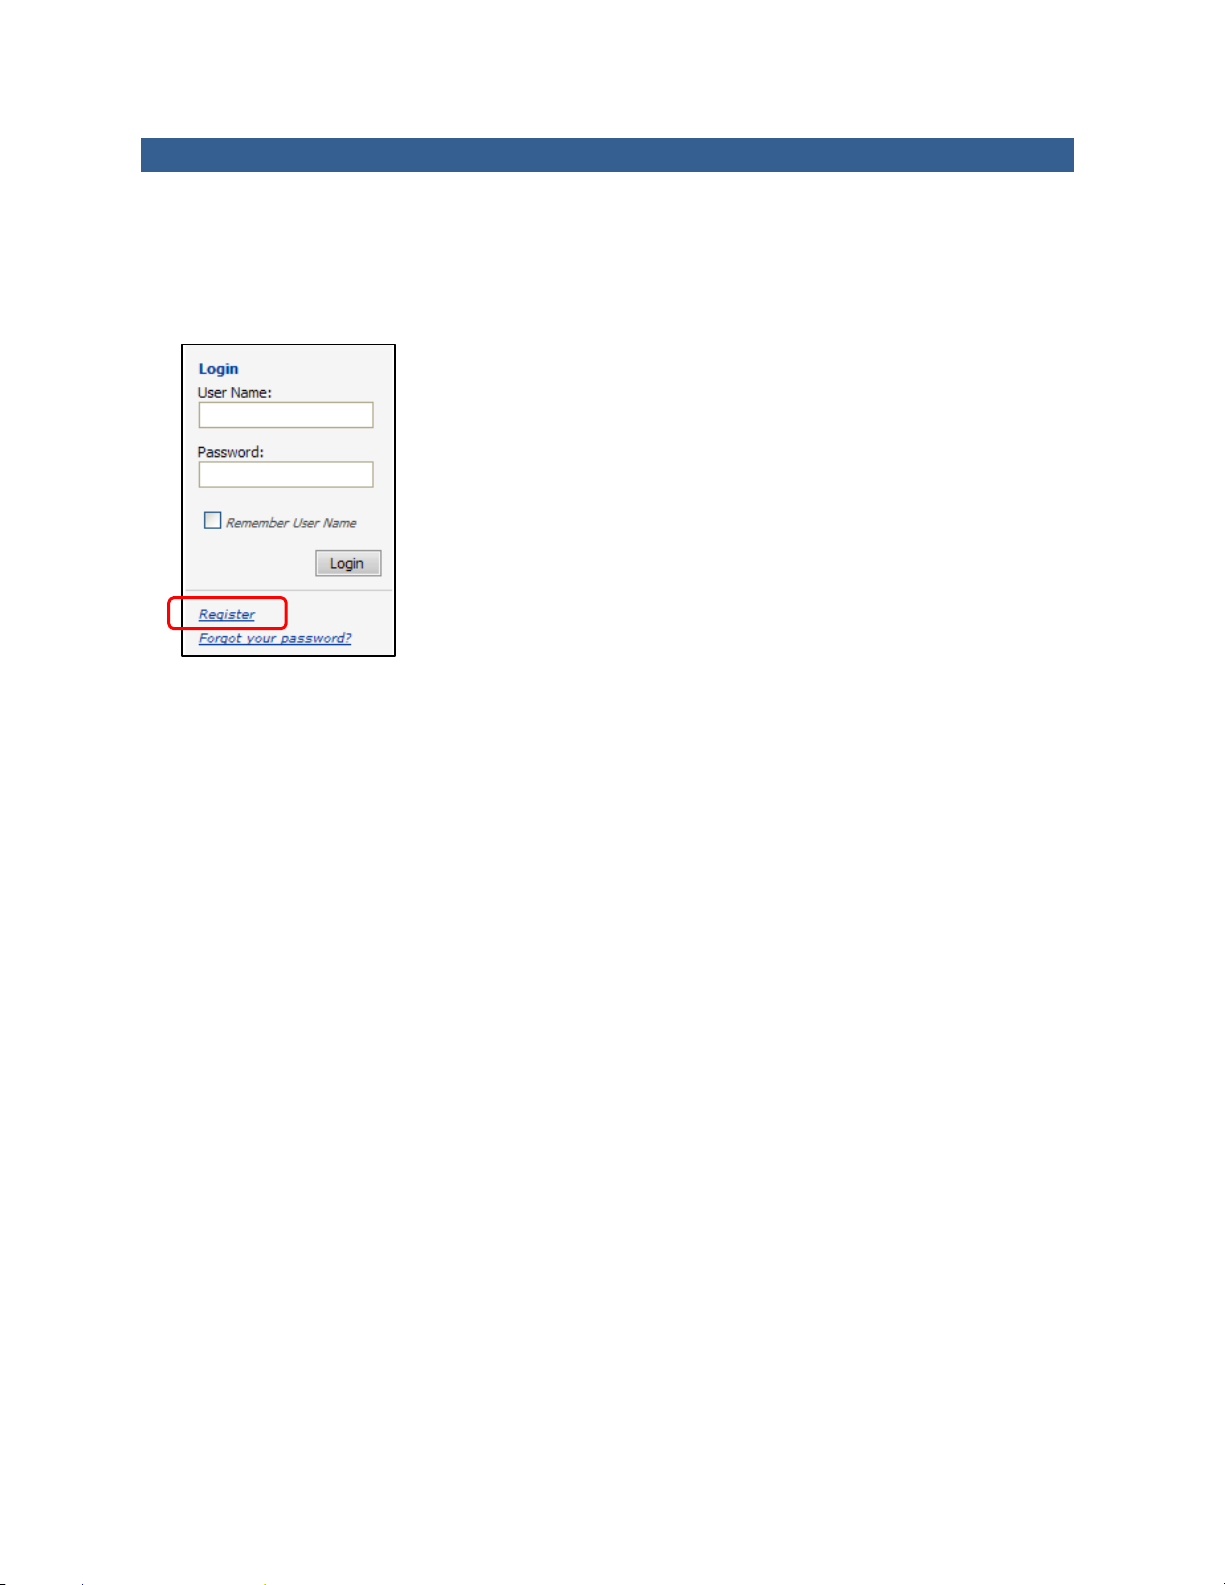
Registering on the Site
Before you can order products on the site and check out using the shopping cart, you must register on
the site by creating an account.
To register on the site
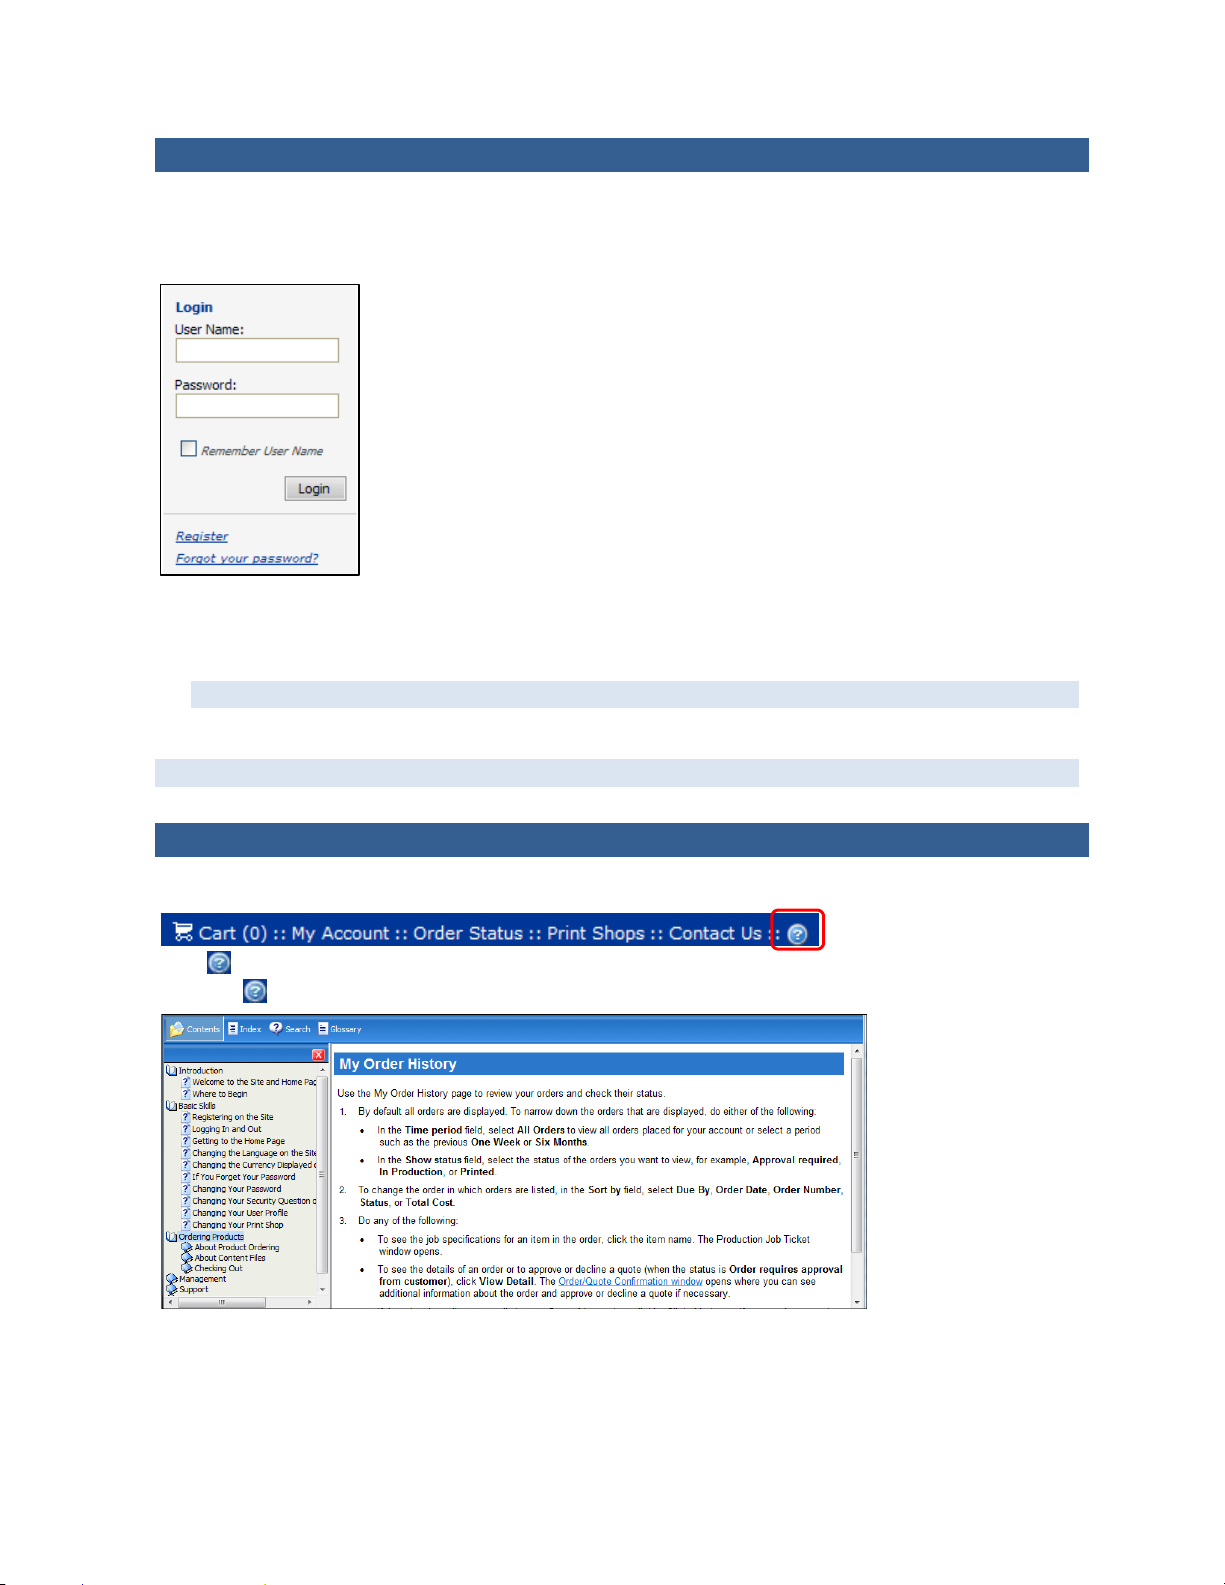
1. On the site’s home page, click Register in the Login box that contains the User Name and
Password fields.
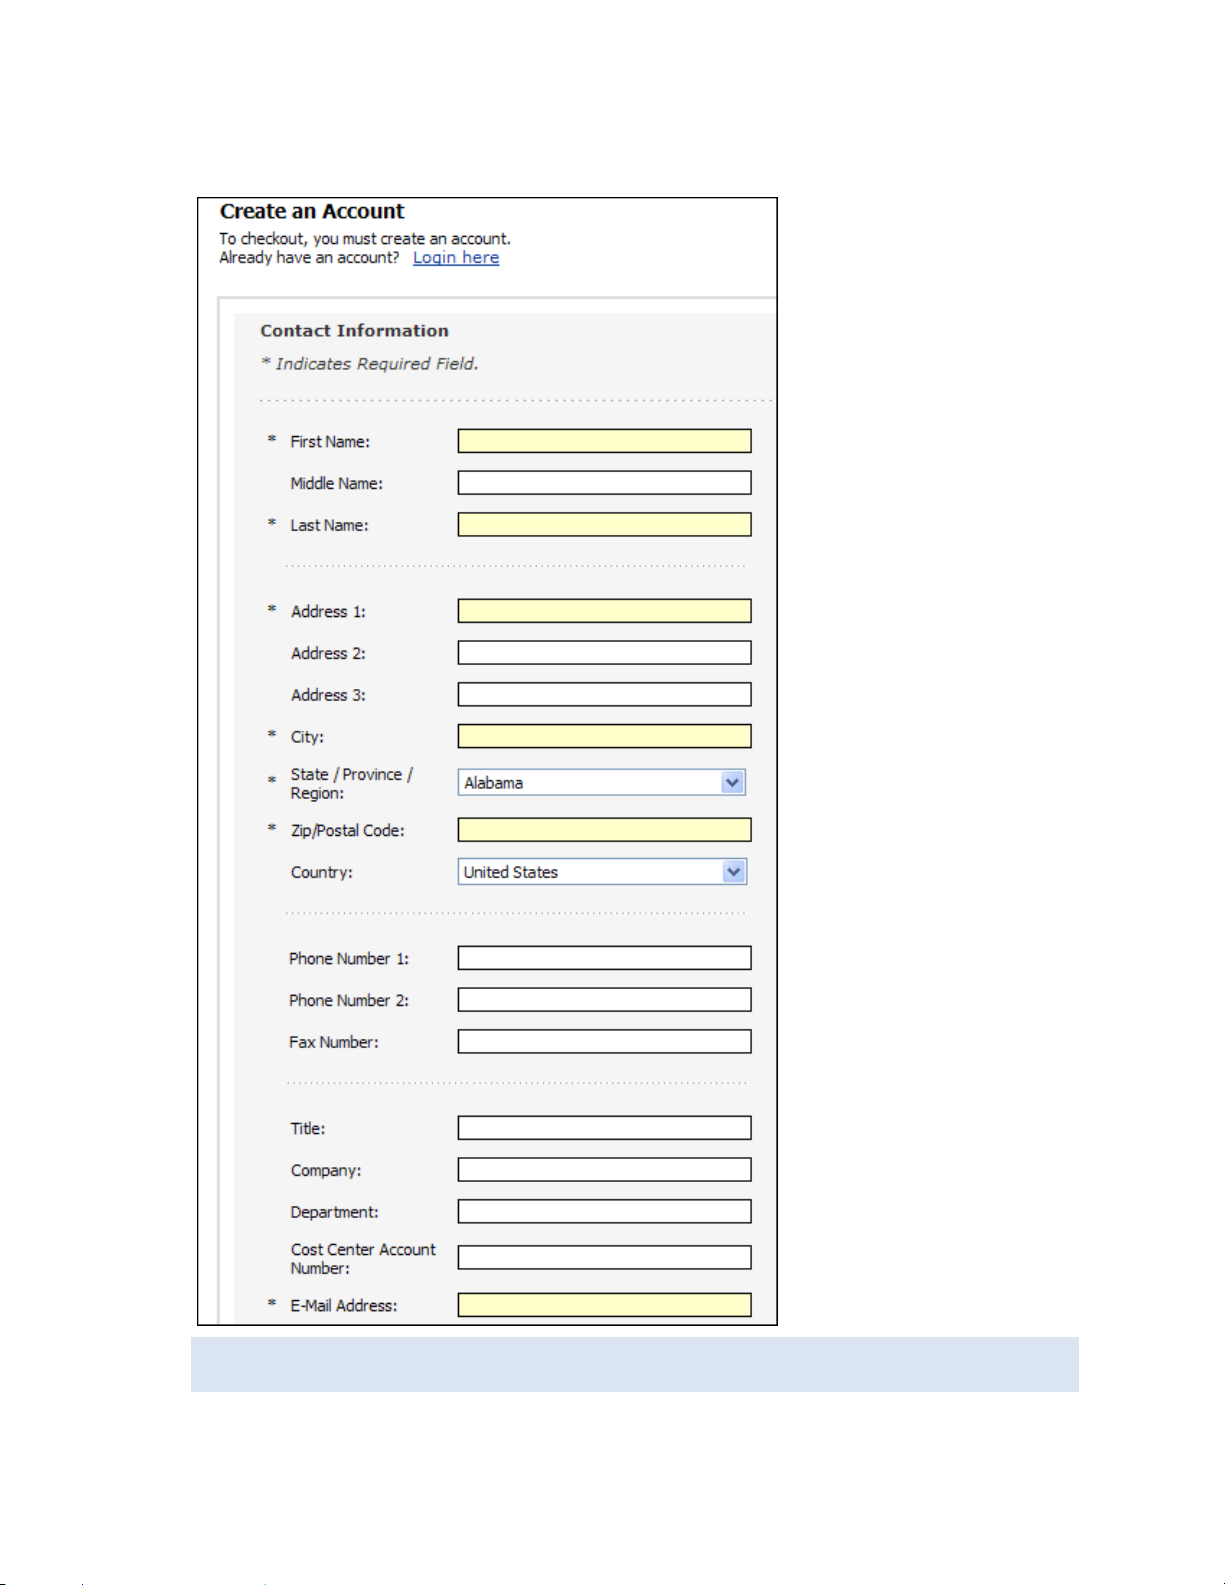
Page 11
11
2. On the Create an Account page, complete the fields under Contact Information. A required field is
identified by * (asterisk) and shading.
An address can consist of three lines (Address 1, Address 2, and Address 3) so that you can
include lines for building names or floors if necessary.
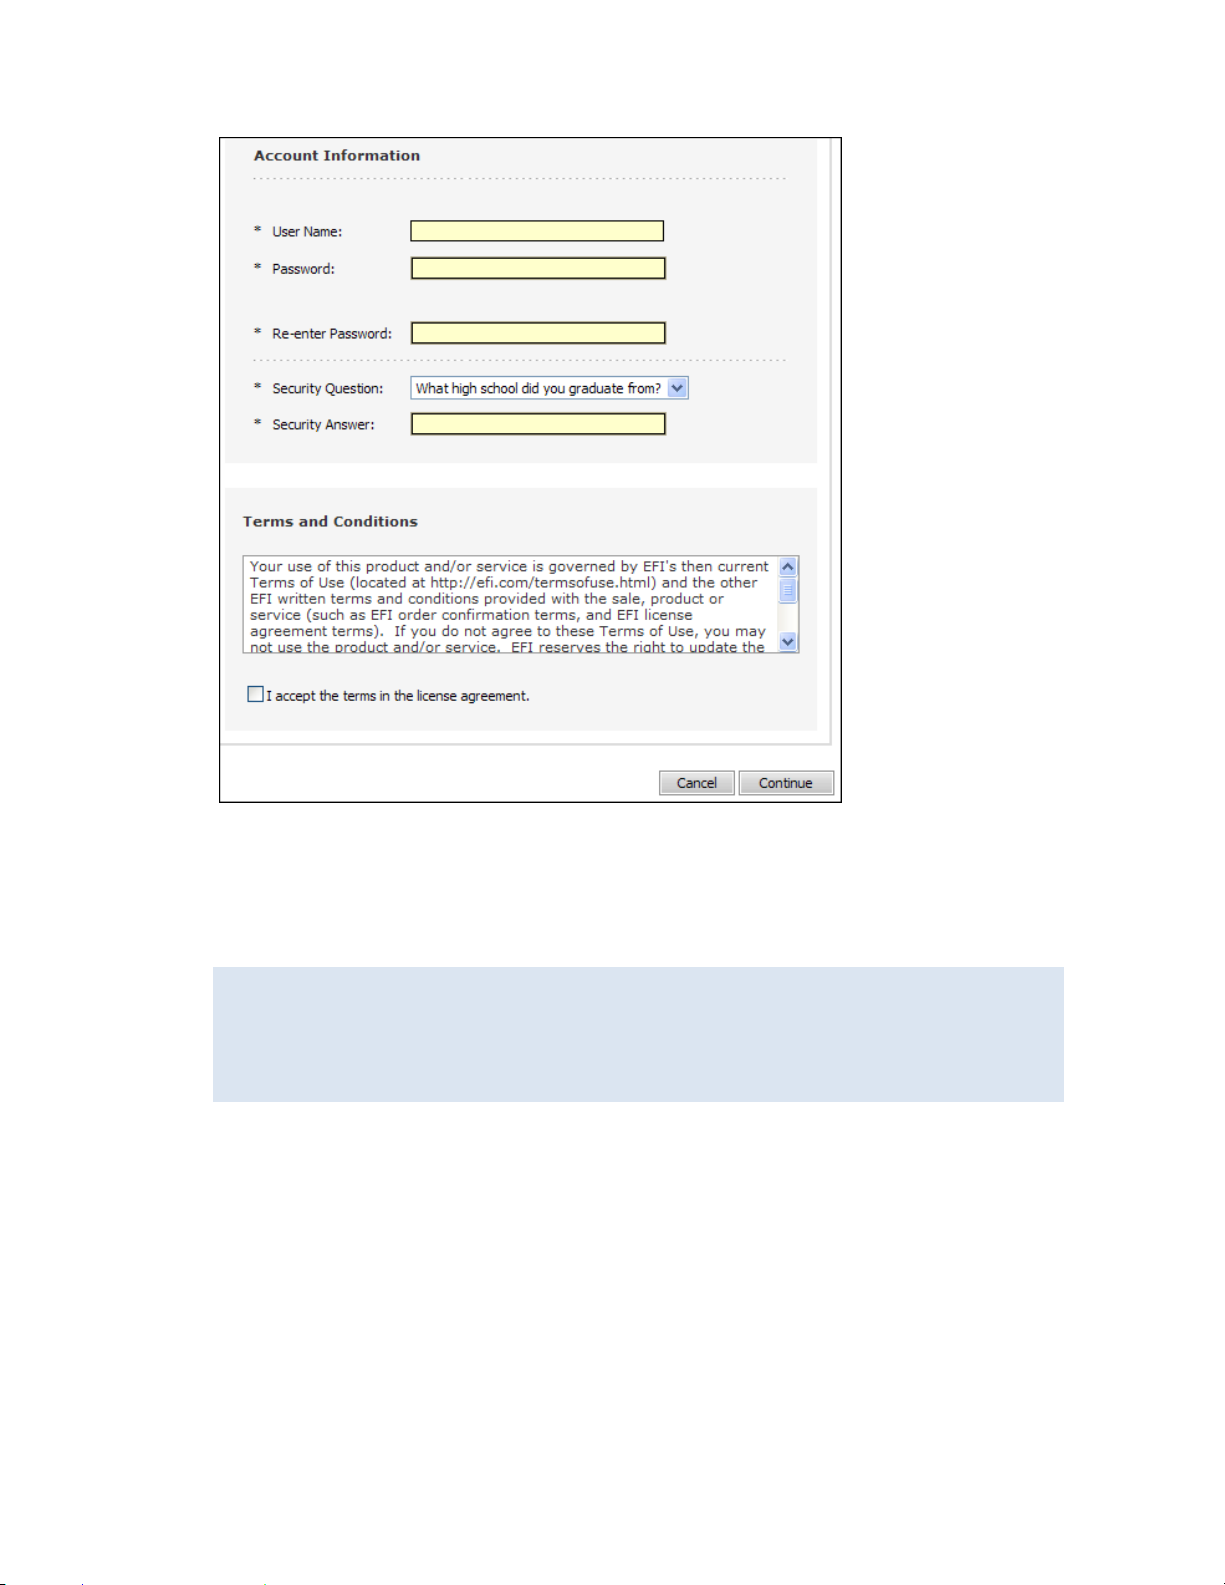
3. Under Account Information,
a. In the User Name field, enter the name you want to use when logging into the site.
Page 12
12
b. In the Password field, enter the password you want to use and then enter it again in the Re-
enter password field.
c. In the Security Question field, either select one of the pre-defined questions or select Other
and enter your own question.
d. In the Security Answer field, enter the answer to the question you selected (or entered).
The answer you provide is case-sensitive. Suppose that you enter Lassie in the New
Security Answer field. If you ever forget your password, and the system asks for your
security answer, you must enter the answer exactly as you entered it here (with an
uppercase L). The system will reject any forms of the answer if the case does not match,
for example, lassie, LaSsie, or LASSIE.
4. Read the Terms and Conditions and then select the I accept the terms in the license agreement
check box.
5. Click Continue.
Page 13
13
Logging Into the Site
Once you are registered on the site, you log in each time you come to the site. (You can add products
to the cart without being logged in, but you must be logged in before you can check out and place
your order.)
1. On the home page under Login, enter your User Name and Password.
2. Select the Remember User Name check box if you want the system to remember your user name
(but not your password).
For security reasons, you may not want your user name remembered on public computers.
3. Click Login.
To log out, click Logout (on the right side of the site under the navigation bar).
Getting Help
As you use the site, online Help is available to you at all times.
Click for information about the current page. For example, if you are reviewing your order history
and click , you get a Help topic about My Order History.
In addition, you can use the Contents, Index, and Search tabs in the left-hand pane of the Help
window to find the information you need.
Page 14
14
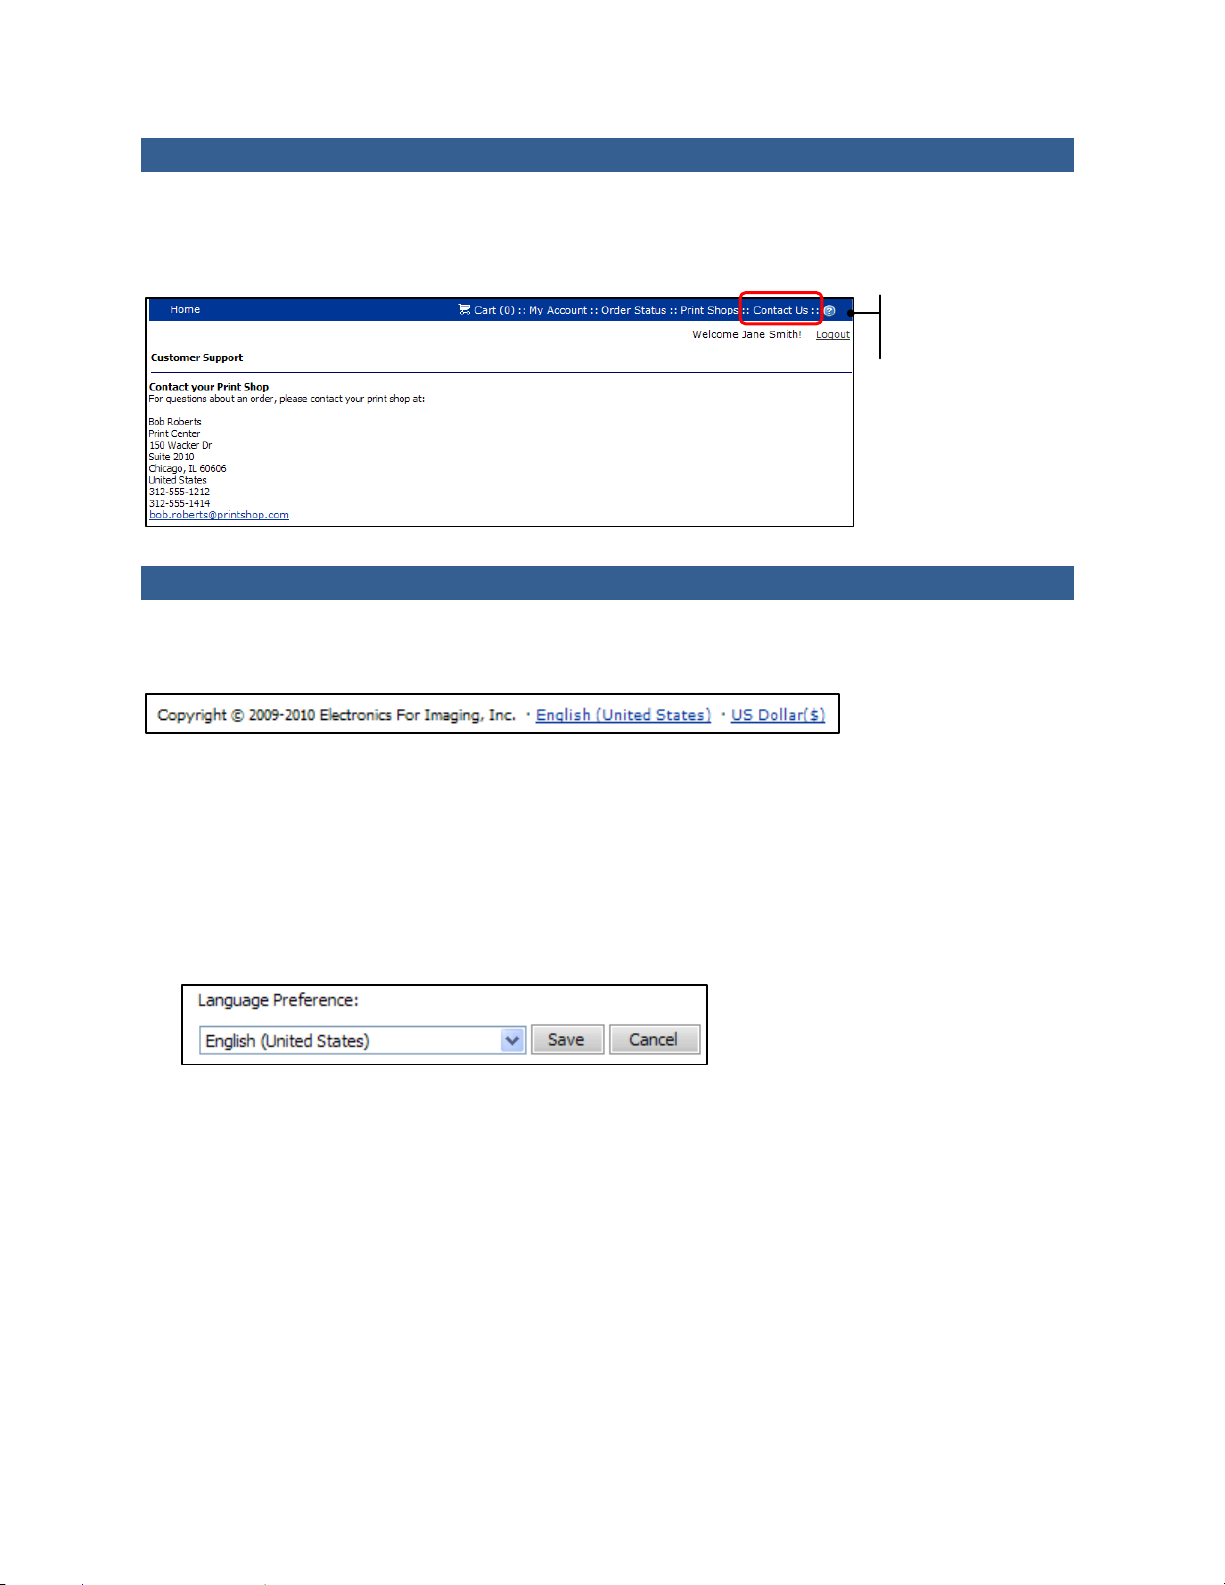
Contacting Customer Support
At times you may need to contact the site’s customer support staff.
• Click Contact Us in the navigation bar.
The contact information for your selected print shop is shown.
Navigation bar
Changing the Language on the Site
A link at the bottom of the site identifies the lang uage that you see on the site, for example, English
(United States) or English (United Kingdom).
You can click this link to
change the language for your current session, w hi ch is helpful when speakers of several langu ages all
use the same site. For example, if you speak Fre nch but someone else speaks German, you can each
select your own language after you come to the sit e (even before you log in).
If your site supports it, you can set a language preference in your user profile so that when you log into
the site, this language is always used.
To change the language for the current session
1. Click the language that is displayed at the bottom of the site.
2. In the Language Preference field, select the language you want used on the site.
3. Click Save.
This language remains in effect until you exit the site.
Page 15
15
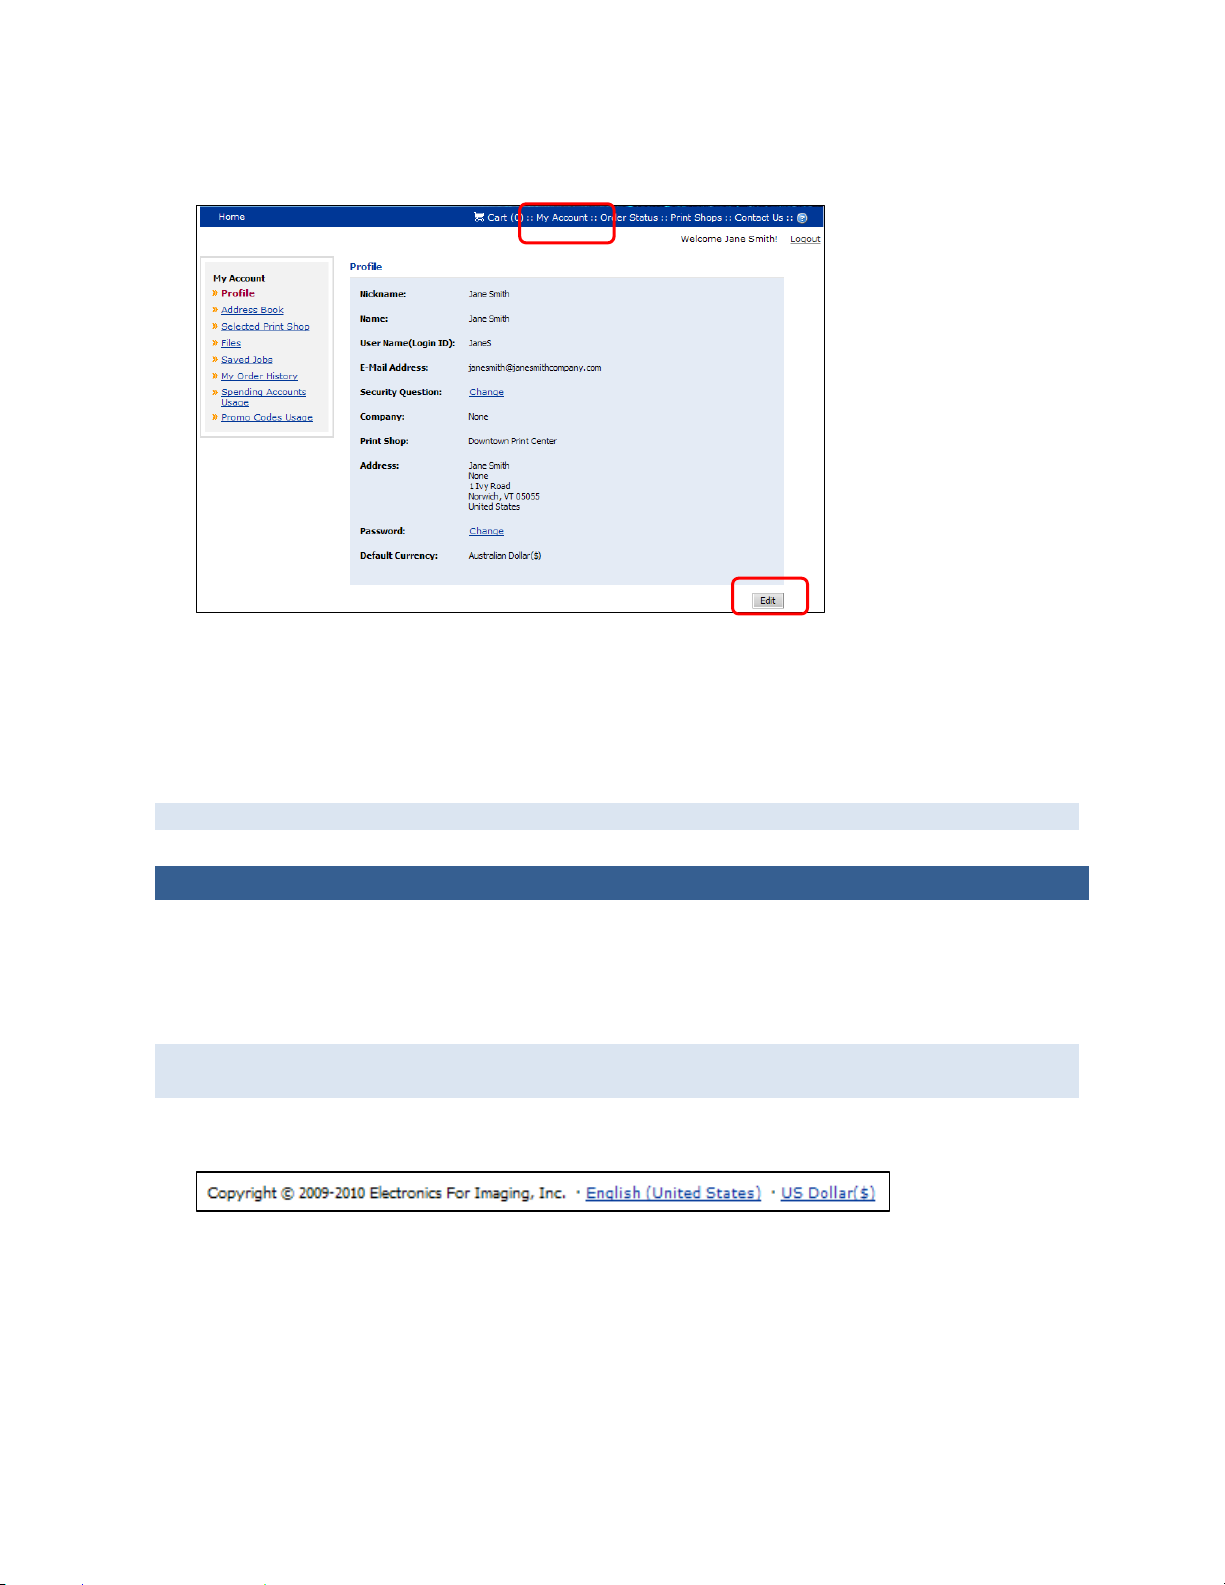
To select the language you always want used when you log in
1. Click My Account in the navigation bar. The Profile page opens.
2. Click Edit.
3. In the Language Preference field (under Contact Information), select the language you always
want used on the site after you log in. (If the Language Preference field is unavailable, you cannot
change the language in your profile, but you can still change it for the current session as described
on page 14.)
4. Click Save.
Whenever you log into the site, the language that you selected is used.
Changing the Currency Displayed on the Site
A link at the bottom of the site identifies the currency that is currently in use, for example, US Dollar
($). You can click this link to change the currency just for your current session. You can also set a
default currency in your user profile so that when you log into the site, this currency is always
displayed.
Although you can change the currency that is displayed on the site, any purchases you make are
still charged in the default currency for the site.
To change the currency for the current session
1. Click the currency that is displayed at the bottom of the site.
2. In the Currency field, select the currency you want to display on the site. The conversion rate
(relative to the default currency for the site) is updated based on the currency you selected.
3. Click Save.
To change the currency you always want to see when you log in
1. Click My Account in the navigation bar. The Profile page opens.
2. Click Edit.
3. In the Default Currency field (under Contact Information), select the currency you always want
displayed on the site when you are logged.
4. Click Save.
Page 16
16
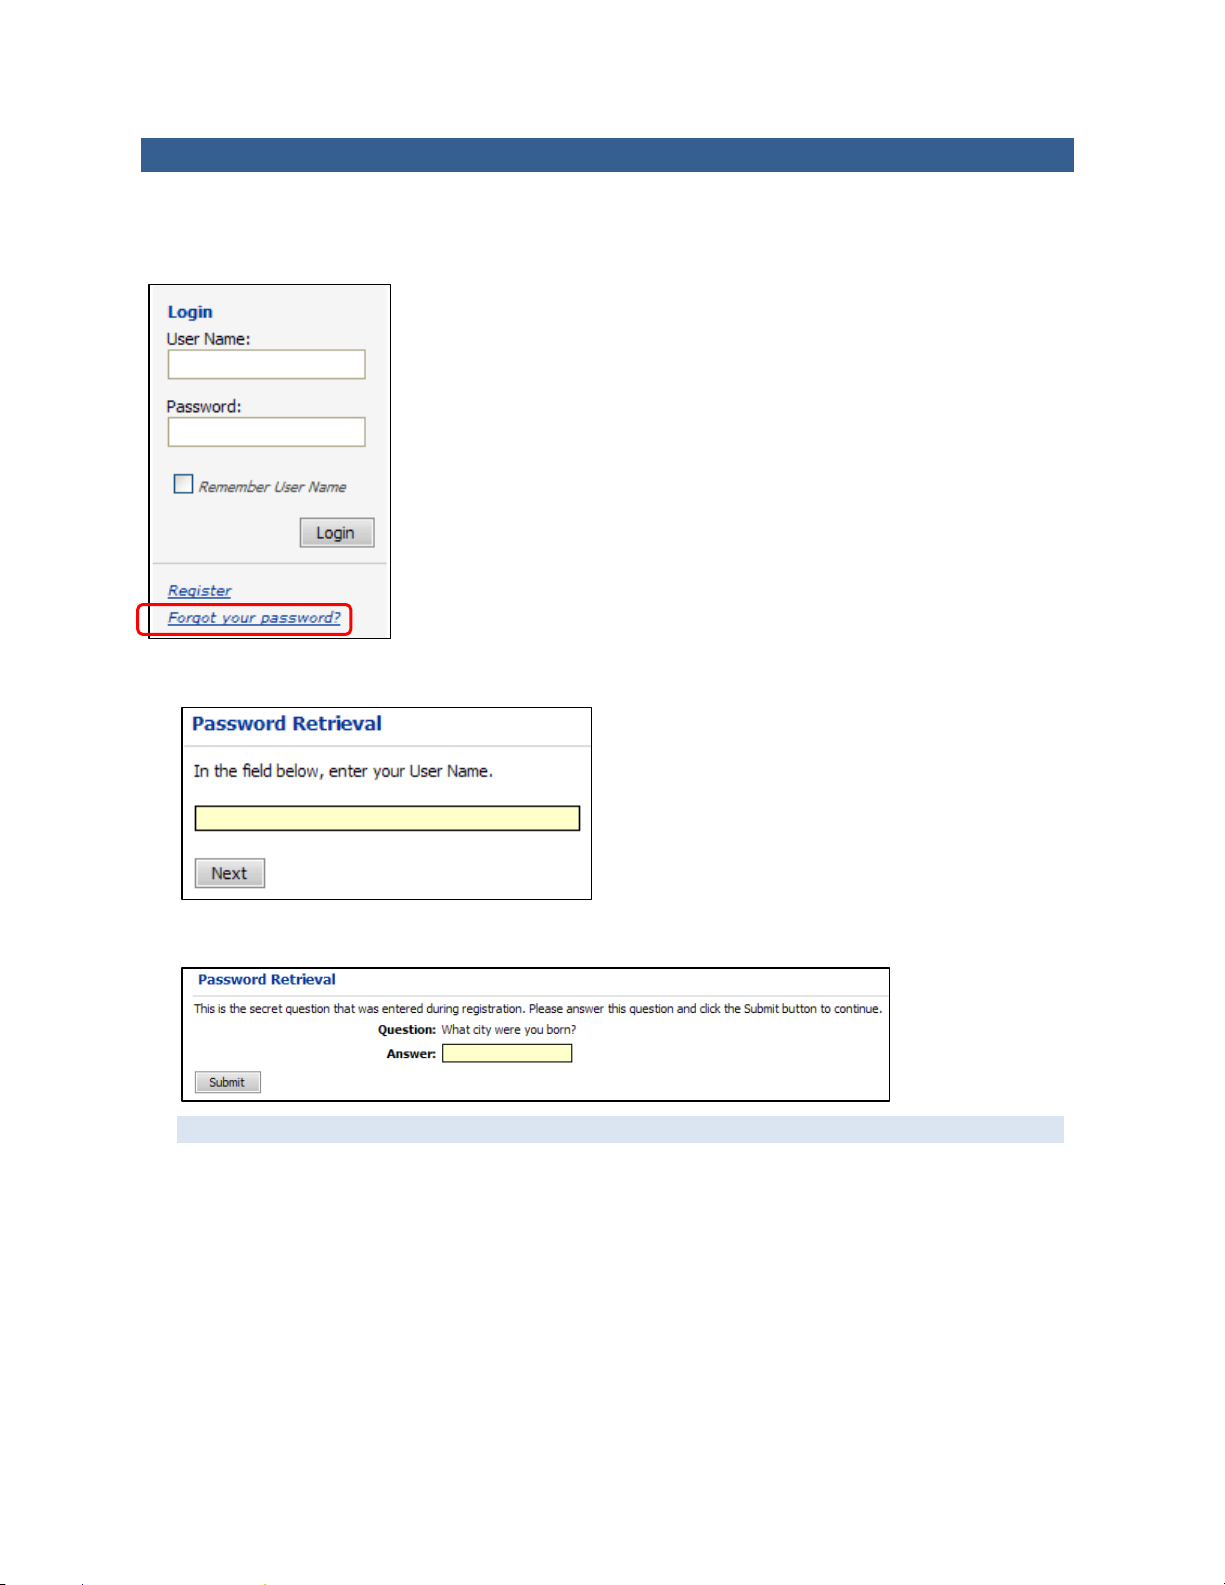
If You Forget Your Password
If you forget your password and are therefore unable to log into the site, you can obtain a new
password by providing your user name and the answer to your security question. After you receive the
new password, you can change it as described on page 17.
1. Under Login on the home page, click Forgot your password? The Password Retrieval page opens.
2. Enter your user name and click Next.
3. The security question that you selected when you registered is displayed. Enter the answer to the
security question and click Submit. Your password is e-mailed to you.
The answer to the security question is case-sensitive.
Page 17

17
Changing Your Password
You can change your password at any time, but if you did not register yourself, you may also be
required to change your password after you first log into the site. In addition, if you forget your
password, a new password is e-mailed to you (see page 16). For security reasons, it is a good idea to
change this password.
To change your password
1. Click My Account in the navigation bar. The Profile page opens.
2. Click Change to the right of Password. The Change Password page opens.
3. In the Password field, enter your current password.
4. In the New Password field, enter a different password and then enter it again in the Confirm New
Password field.
5. Click Save.
Page 18

18
Changing Your Security Question or Answer
Your user profile includes a security question and your answer to the question. If you forget your
password, you must answer the security question before a new password is e-mailed to you.
You can either change the answer to the security question that you previously selected or change
both the question and the answer. To verify your identity, you will need to enter your password
before you can change the security question and answer.
To change your security question or answer
1. Click My Account in the navigation bar. The Profile page opens.
2. Click Change to the right of the Security Question field. The Change Security Question page opens.
3. Enter your current password.
4. In the New Security Question field, either select a question or select Other and enter your own
question.
5. In the New Security Answer field, enter the answer to the question.
The answer you provide is case-sensitive. Suppose that you enter Lassie in the New Security
Answer field. If you ever forget your password, and the system asks for your security answer, you
must enter the answer exactly as you entered it here (with an uppercase L). The system will reject
any forms of the answer if the case does not match, for example, lassie, LaSsie, or LASSIE.
6. Click Save.
Viewing and Changing Your Account (User Profile)
You can change information related to your user account (your profile), for example, your phone
number or e-mail address.
If you did not yet register on the site (so have no account), see “Registering on the Site” on page 10.
To view and change your account (user profile)
1. Click My Account in the navigation bar. The Profile page opens.
2. Click Edit at the bottom of the page. The Edit My Profile page opens.
3. Make your changes and Save.
Page 19
19
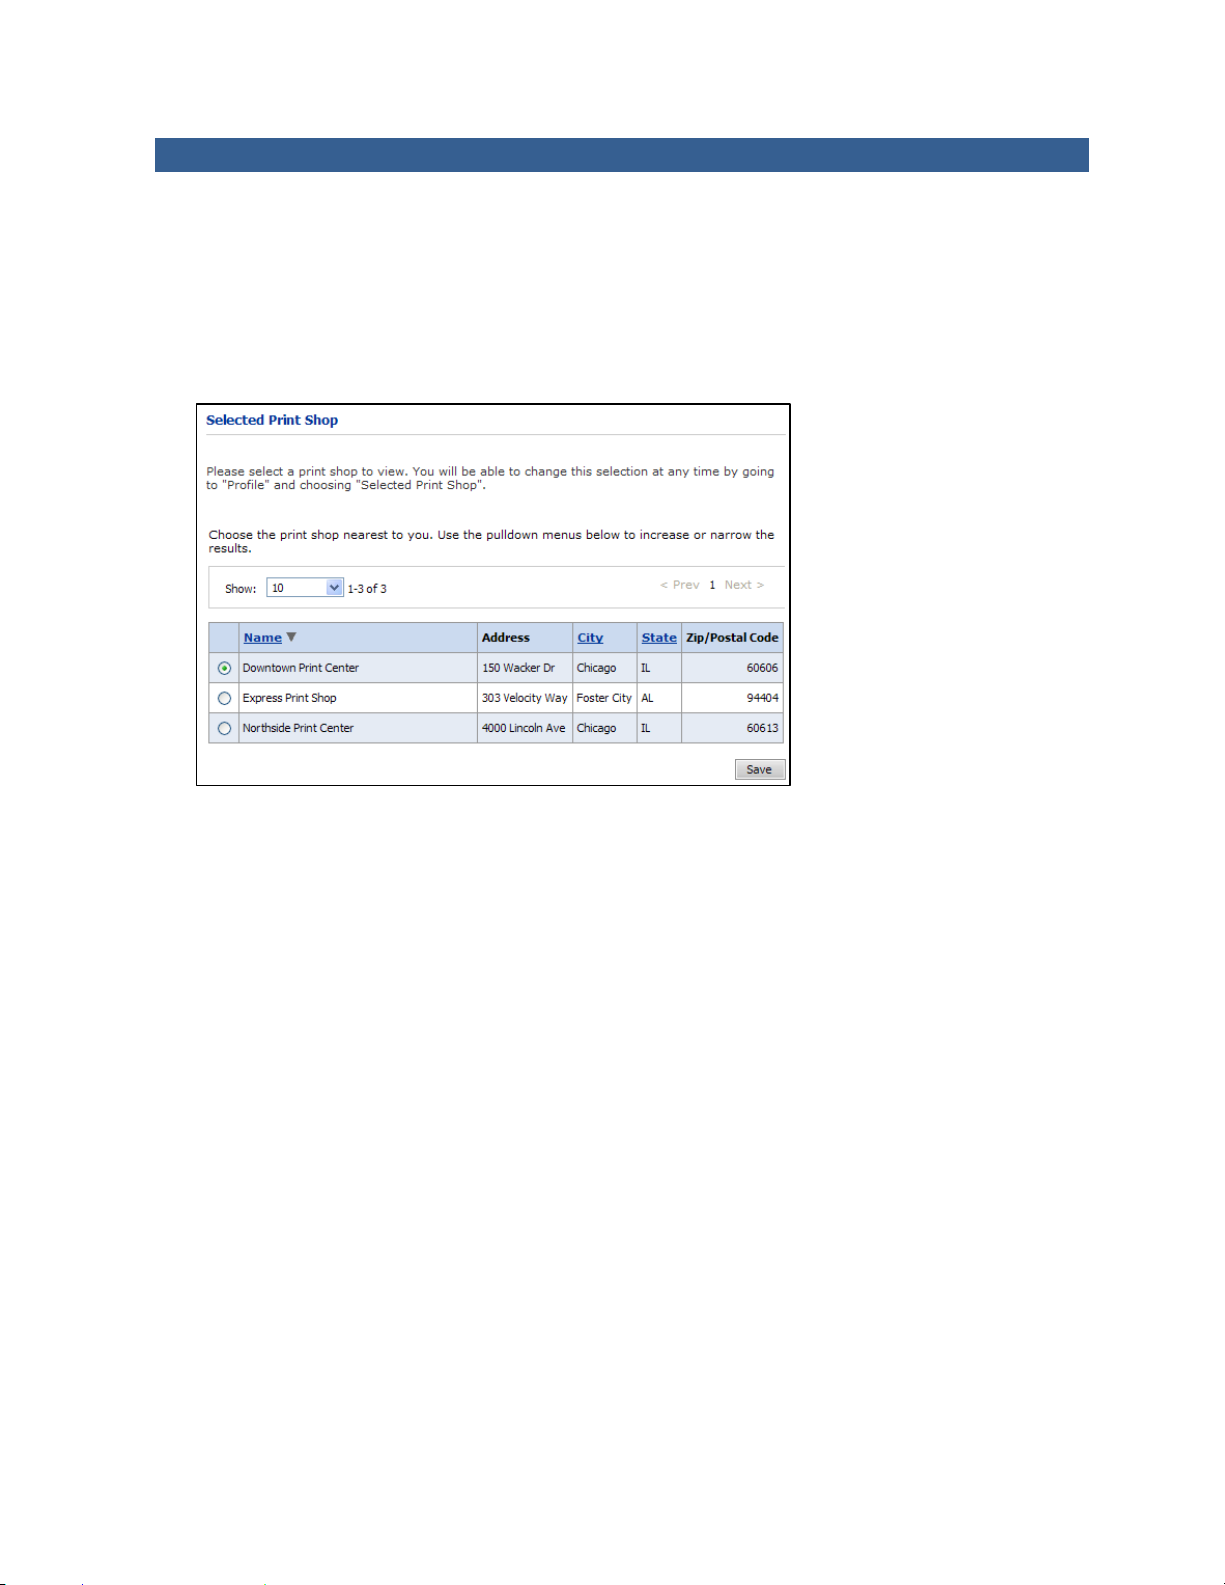
Changing Your Print Shop
A print shop is a place that handles the orders placed on the site, for example, a print center, copy
shop, or warehouse. When you first register on the site, you select a default print shop if several print
shops are available. If necessary, you can change your print shop, perhaps to make pickup more
convenient or to keep shipping costs lower.
To change your print shop
1. Click Print Shops in the navigation bar. (Alternatively, click My Account and then click Selected
Print Shop.) The Selected Print Shop page opens.
2. If many print shops are listed, do any of the following to help you find the print shop you want to
use:
• In the Show field, select a different number of print shops to display at the same time.
• Click Name, City, or State to sort the list of print shops in a different order.
• Click Prev or Next to move to the previous or next group of print shops.
3. Select the shop you want to use and click Save.
Page 20

20
Page 21

21
SSeeccttiioonn 33:: O
This section will answer the following questions:
Orrddeerriinngg PPrroodduuccttss
What are products?
How do I find a product?
What is the process for ordering products?
How do I customize products in Visual Product Builder?
How do I customize products in Classic Product Builder?
How do I supply documents that I want to have printed?
How do I order kits?
What are personalized products?
How do I personalize DSFdesign Studio products?
How do I personalize VDPs (variable data products)?
How do I check out and place my order?
About Products
Here are some examples of the kinds of products that might be available for ordering:
• Booklets, brochures, or specialized copy jobs for which you supply the content (typically a PDF).
You also customize the product with print options (type of paper, binding, and so on).
• Posters or banners (superwide format products) for which you supply the content. You also
customize the product with print options (substrate, color mode, wind slits, and so on).
• Application forms or course materials for which the content is fixed. You can still, however,
customize the product with print options (type of paper, stapling, and so on).
Business cards, note cards, or promotional flyers that you can personalize. Products that you can
•
personalize fall into two categories:
• DSFdesign Studio products. Here you can personalize the product in various ways, for
example, position and size text, images, and shapes; add new text, images, and shapes; edit
and format text; or enhance images.
• Variable data products (VDPs). Here you can personalize the product by supplying data such as
a name and address and/or by adding an image. Sometimes you can create several versions of
the same product, each personalized differently, for example, 500 copies of a promotional
flyer, with each flyer addressed to a different prospect
• Logo merchandise, coffee mugs, or boxes of pencils (non-print or fulfillment products). Here no
customization is required.
Each kind of product follows a slightly different order/customization workflow, after which you add
the product to the shopping cart. At this point you can either check out and place your order or
continue shopping and check out later. Your final order may therefore include several products (also
referred to as jobs).
Some products may be packaged together in a kit. For example, a wedding kit might include an
invitation photo card, envelopes, a wedding program, and some key chains. Each product that
makes up the kit is customized individually (if applicable), but the order is placed for the kit itself.
Page 22
22
Some products require a price quote from the print shop before you can place an order for them.
During the checkout process a request for a quote is sent to the print shop. When you receive the
quote, you either accept it (and finish placing the order) or decline it.
Depending on your company, orders may need to go through an approval process – someone at
your company must “sign off” on your order before it can be placed.
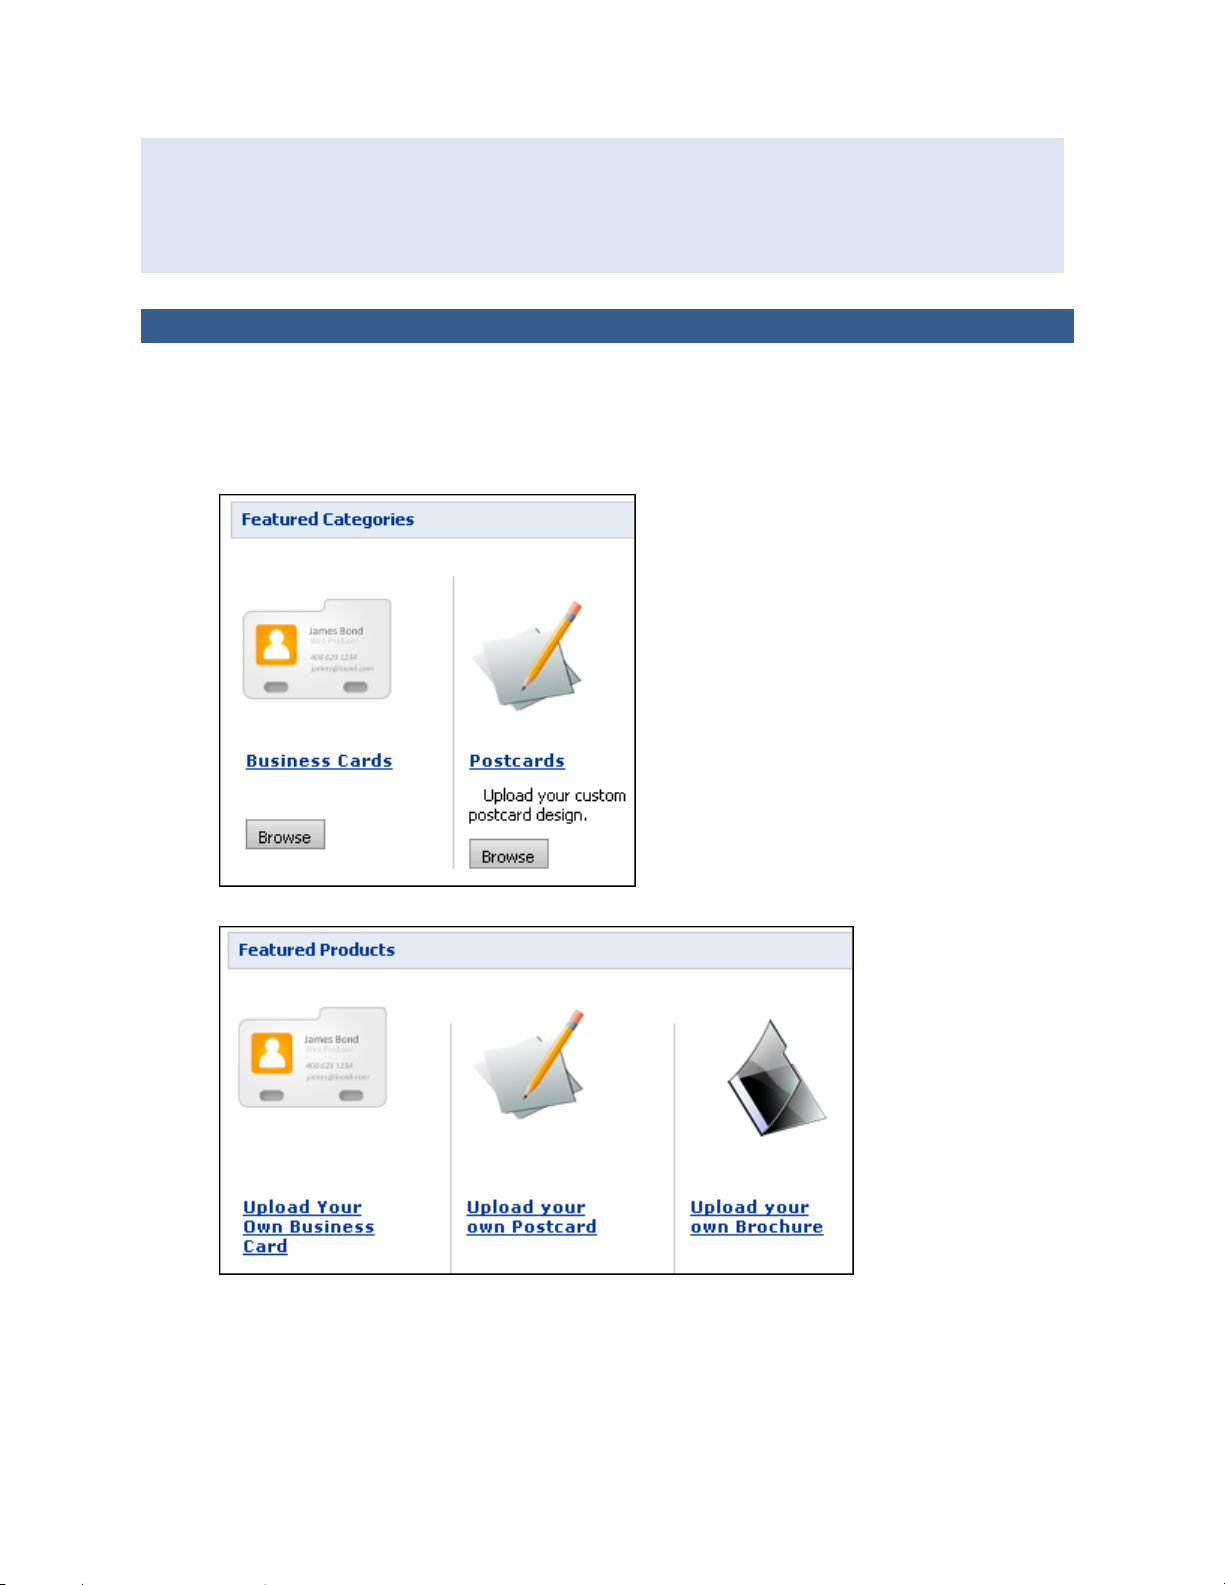
Browsing and Searching for Products
The products on the site are organized in a catalog and grouped in categories. You can look for and
find products in several ways as described below.
1. From the home page, find products in any of these ways:
• Check Featured Categories.
• Check Featured Products.
Page 23
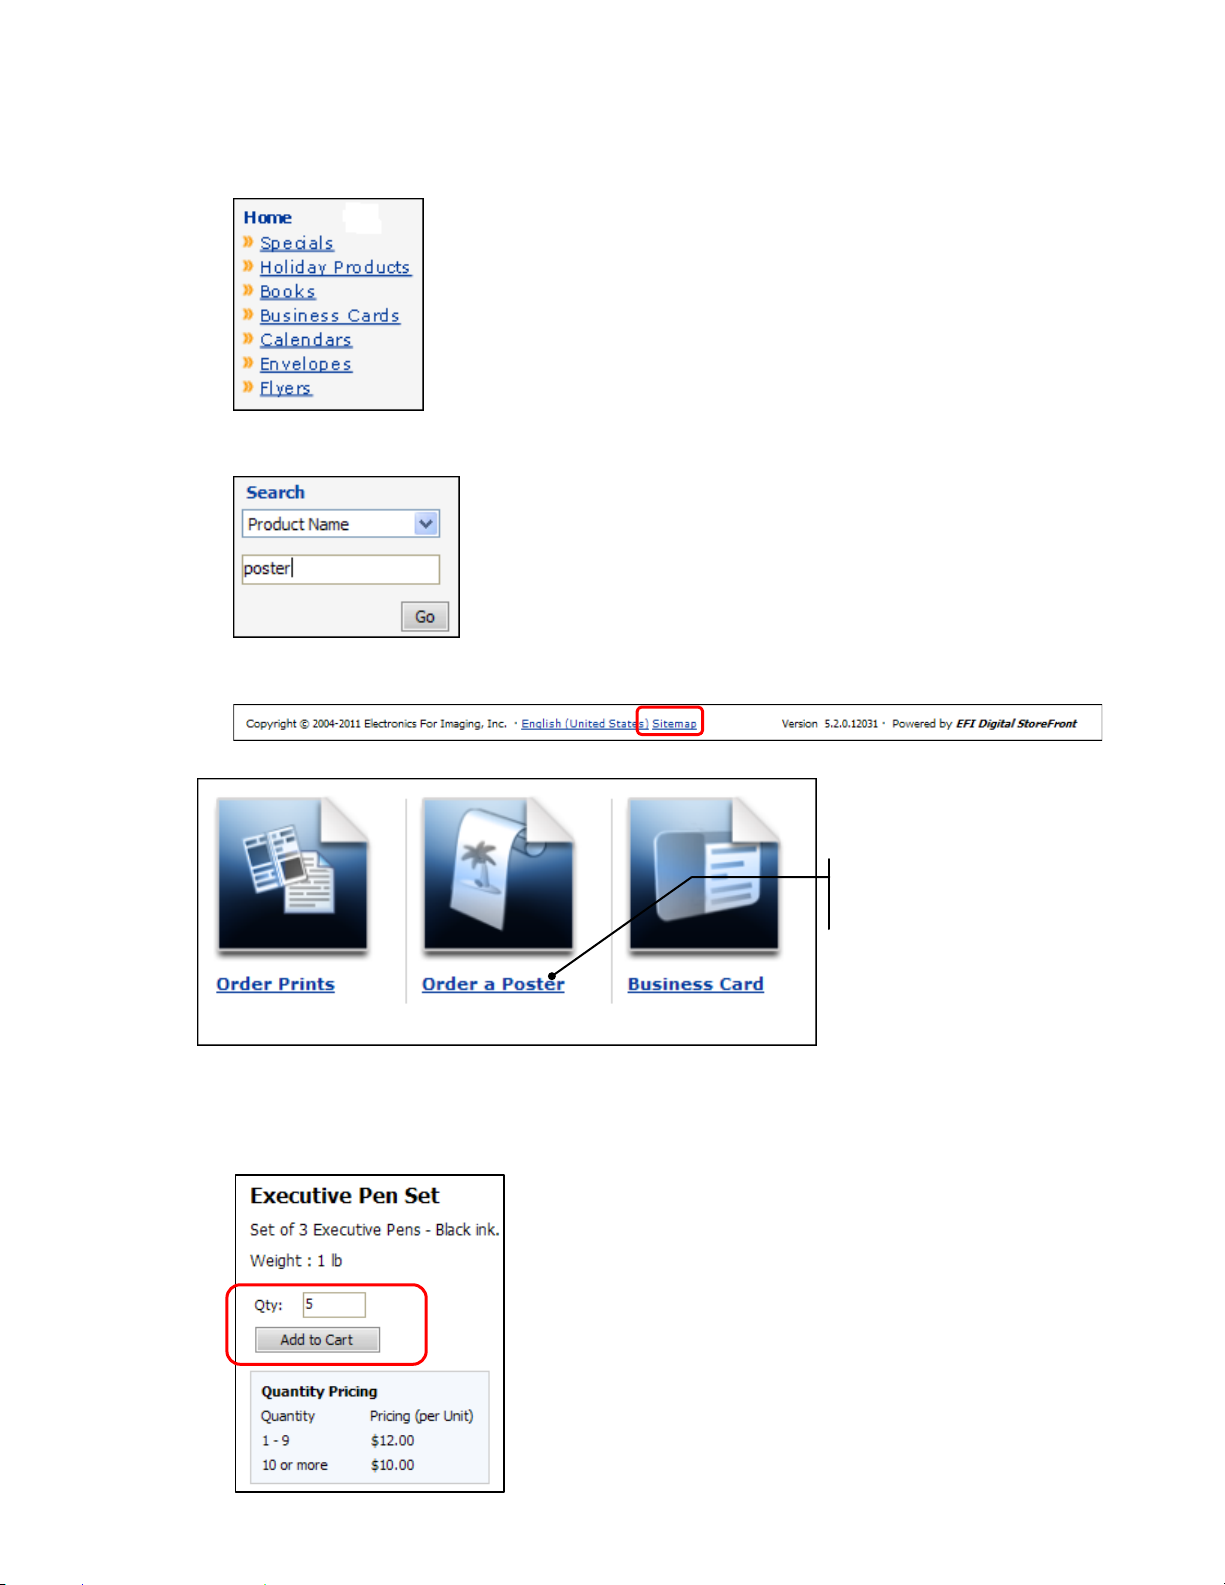
23
• Select a category that contains the type of product you want to order and review the products
in that category.
• In the Search pane, look for a product by selecting Product Name, Keywords, or Product ID;
entering a search string (for example, part of a product name); and clicking Go.
• Click Sitemap at the bottom of the page for a hierarchical list of the categories and products
available for ordering.
2. To learn more about a product, click its name.
Click to find
out more.
3. After you find a product you want to order, do one of the following:
• If the product has an Add to Cart button, enter or select the quantity you want and then click
Add to Cart to proceed with the checkout process described on page 103. (If you are not
ready to check out, click Continue Shopping.) The remaining steps do not apply to you.
Page 24
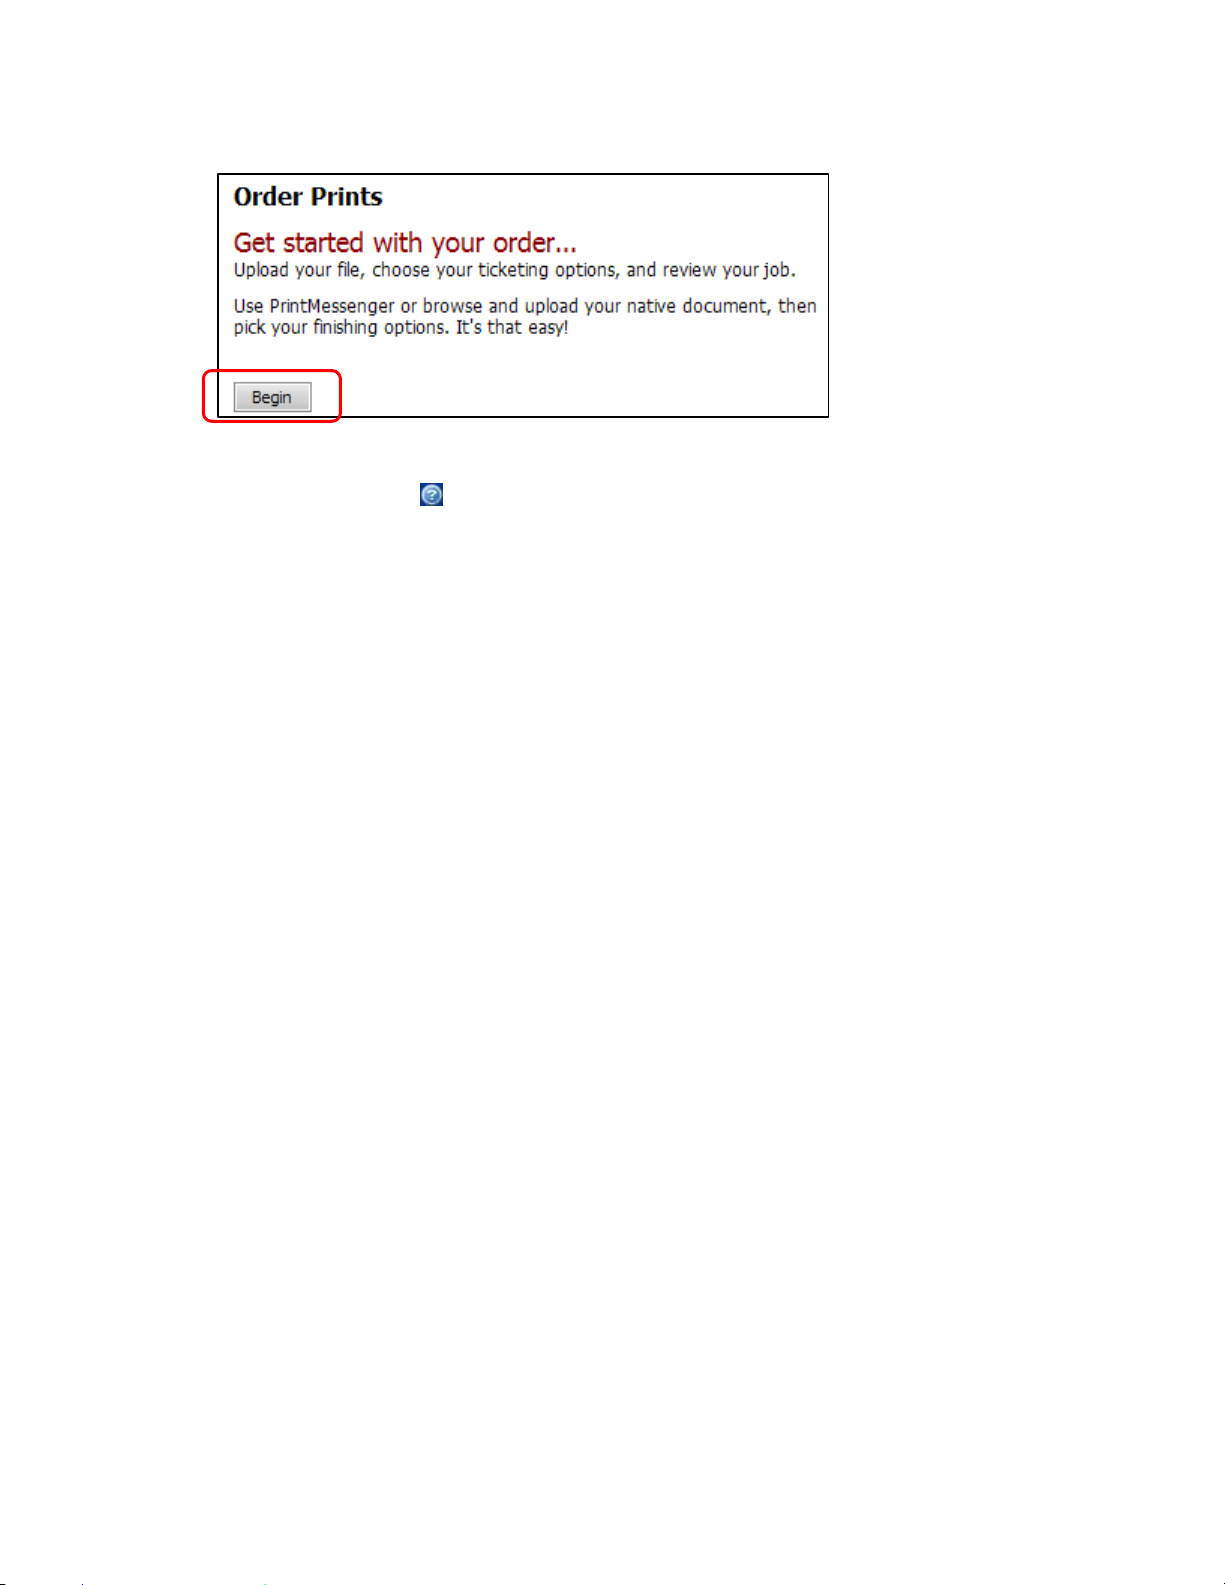
24
• If the product has a Begin button, click it to start the customization process.
4. If you clicked Begin, customize the product. This process depends on how the print shop
configured the product you selected.
5. After you click Begin, click for instructions for customizing the particular type of product you
are ordering.
Page 25
25
Ordering Products: Visual Product Builder vs. Classic Product Builder
After you click Begin next to a product to start the ordering process, the page that opens can vary, as
can the tasks that you must complete to customize the product.
Two ways of customizing – or building – products are possible:
• Visual Product Builder
Products that you customize with Visual Product Builder may include brochures, flyers, and copies
(where you supply the content); application forms or course materials (where the content is
fixed); or superwide format products such as banners and posters. Here you select print options,
provide your files, and preview your selections in a single window. As you make selections, you
can see your changes immediately.
Some single-record variable data products (VDPs) such as business cards, invitations, or note cards
also use Visual Product Builder. These VDPs are personalized with information such as a name,
address, phone number, and so on, or with an image.
In addition, DSFdesign Studio products (such as notecards or flyers that you can personalize with
your own text and graphics) use a visual interface with features related to adding, editing, and
manipulating text, graphics, and shapes.
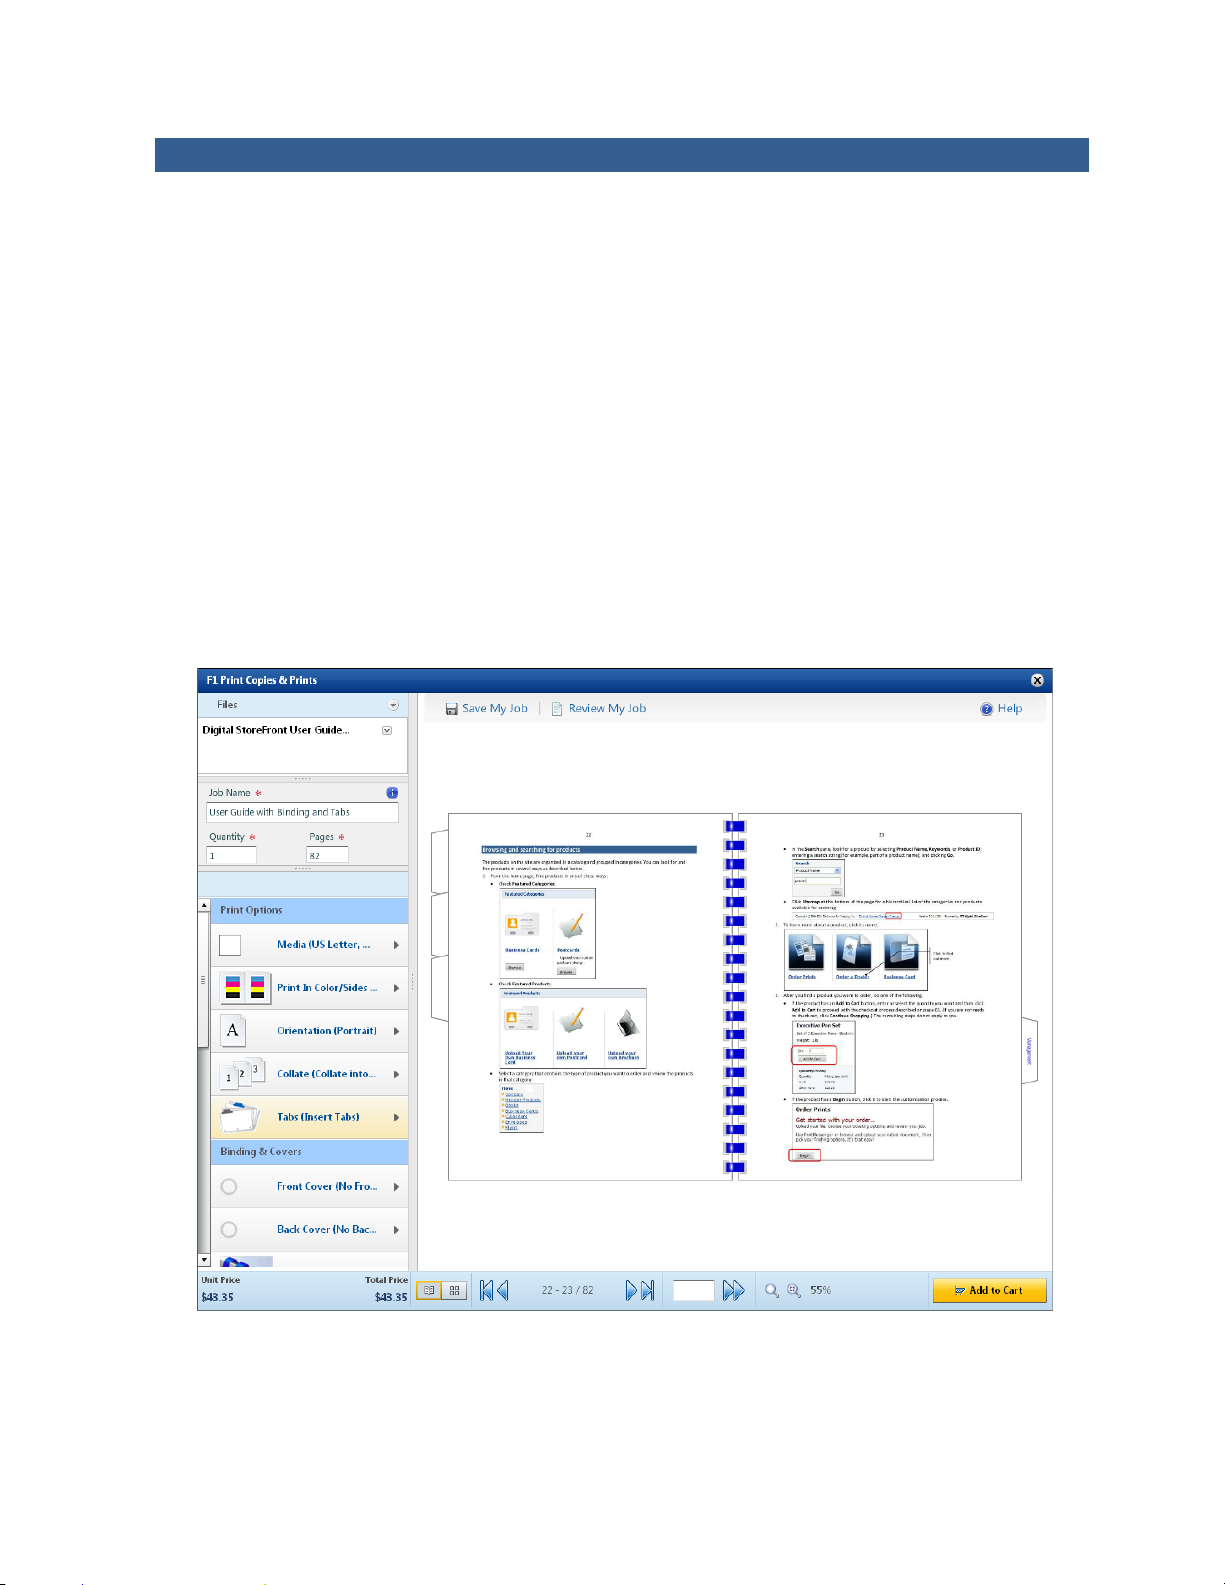
The figure below shows an order for a copy of a user guide in Visual Product Builder.
Page 26
26
• Classic Product Builder
Products that you customize with Classic Product Builder and that require you to provide content
files may include brochures, flyers, and copies, as well as superwide format products such as
banners and posters. Here you select print options, add files, and then preview your selections on
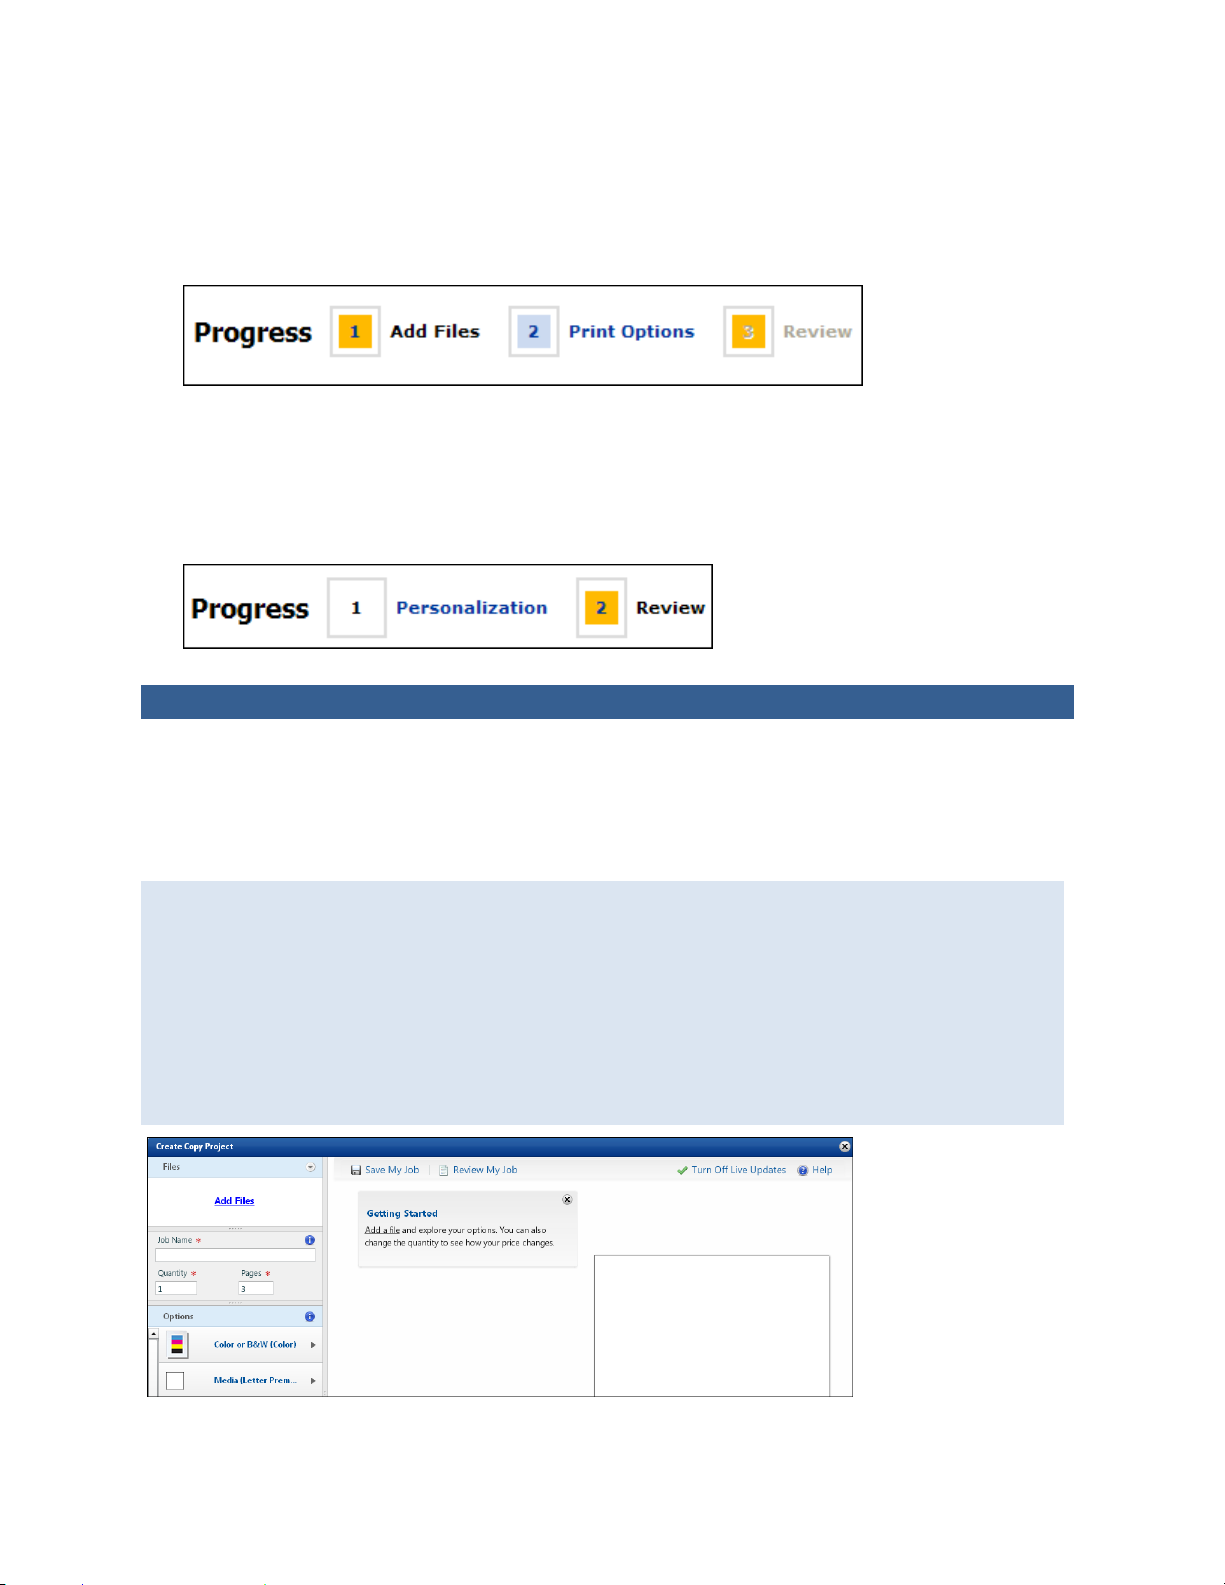
separate pages in a series of steps. The top of each page shows your progress.
Some products do not require you to provide a file, for example, the content of products such as
application forms or course materials is fixed, but you may have a choice of media, collation, or
binding.
Some variable-data products (VDPs) like business cards or promotional flyers also use Classic
Product Builder. These VDPs include a Personalization step so that you can customize the product
with variable information such as a name, address, phone number, and so on, or with an image.
Customizing Products for Which You Supply Content (Visual Product Builder)
Overview
In Visual Product Builder, after you click Begin next to a product in the catalog, you provide the
content file(s) for the job, customize the product, and preview the effects of your selections all on the
same page. When you are satisfied with your selections, you add the product to the shopping cart.
Fixed-content products have a slightly different workflow since you do not need to supply files.
See page 35.
Variable data products that use Visual Product builder also have a different workflow. See page
92.
If the product is part of a kit, some fields will not apply and some information may already be
filled in for you. You will also see a Finish button instead of Add to Cart. For more information
about ordering kits, see page 63.
At any time you can save your work by clicking Save My Job at the top of the page. This allows
you to return to the job later.
Page 27

27
General procedure
In the Visual Product Builder, these are the steps you complete after you click Begin for products that
require you to provide content files. (Superwide format products are slightly different; see page 37.)
Add files
You can either add your files first or select print options first; the order in which you do this does
not matter.
1. Click Add Files to supply the content for the job. After you do so, the files are listed under Files,
and a preview is automatically displayed on the right side of the page. (For more information
about adding files, see page 43.)
2. If you uploaded or selected more than one PDF file, the files are combined into one file in the
order they are listed. This is also the order in which they will be printed. To change the order of the
files, click next to a file and select Move file up in print order or Move file down in print order.
If you have added many files, you can expand the Files pane by dragging between the Files pane
and the Job Name pane.
Provide required information
1. In the Job Name field, enter a descriptive name for your customized product so you can identify it
easily. (A job is just your customized product. When an order includes several jobs, each is an item
in the order.)
2. In the Quantity field, specify the number you are ordering. This number affects the price. (If the
product is ordered in multiples, you are warned if the number you enter is not a valid multiple.)
3. In the Pages field, enter the number of pages you are providing. (When you add a file, the system
calculates the number of pages for you automatically.) This number affects the price.
Page 28
Select print options
28
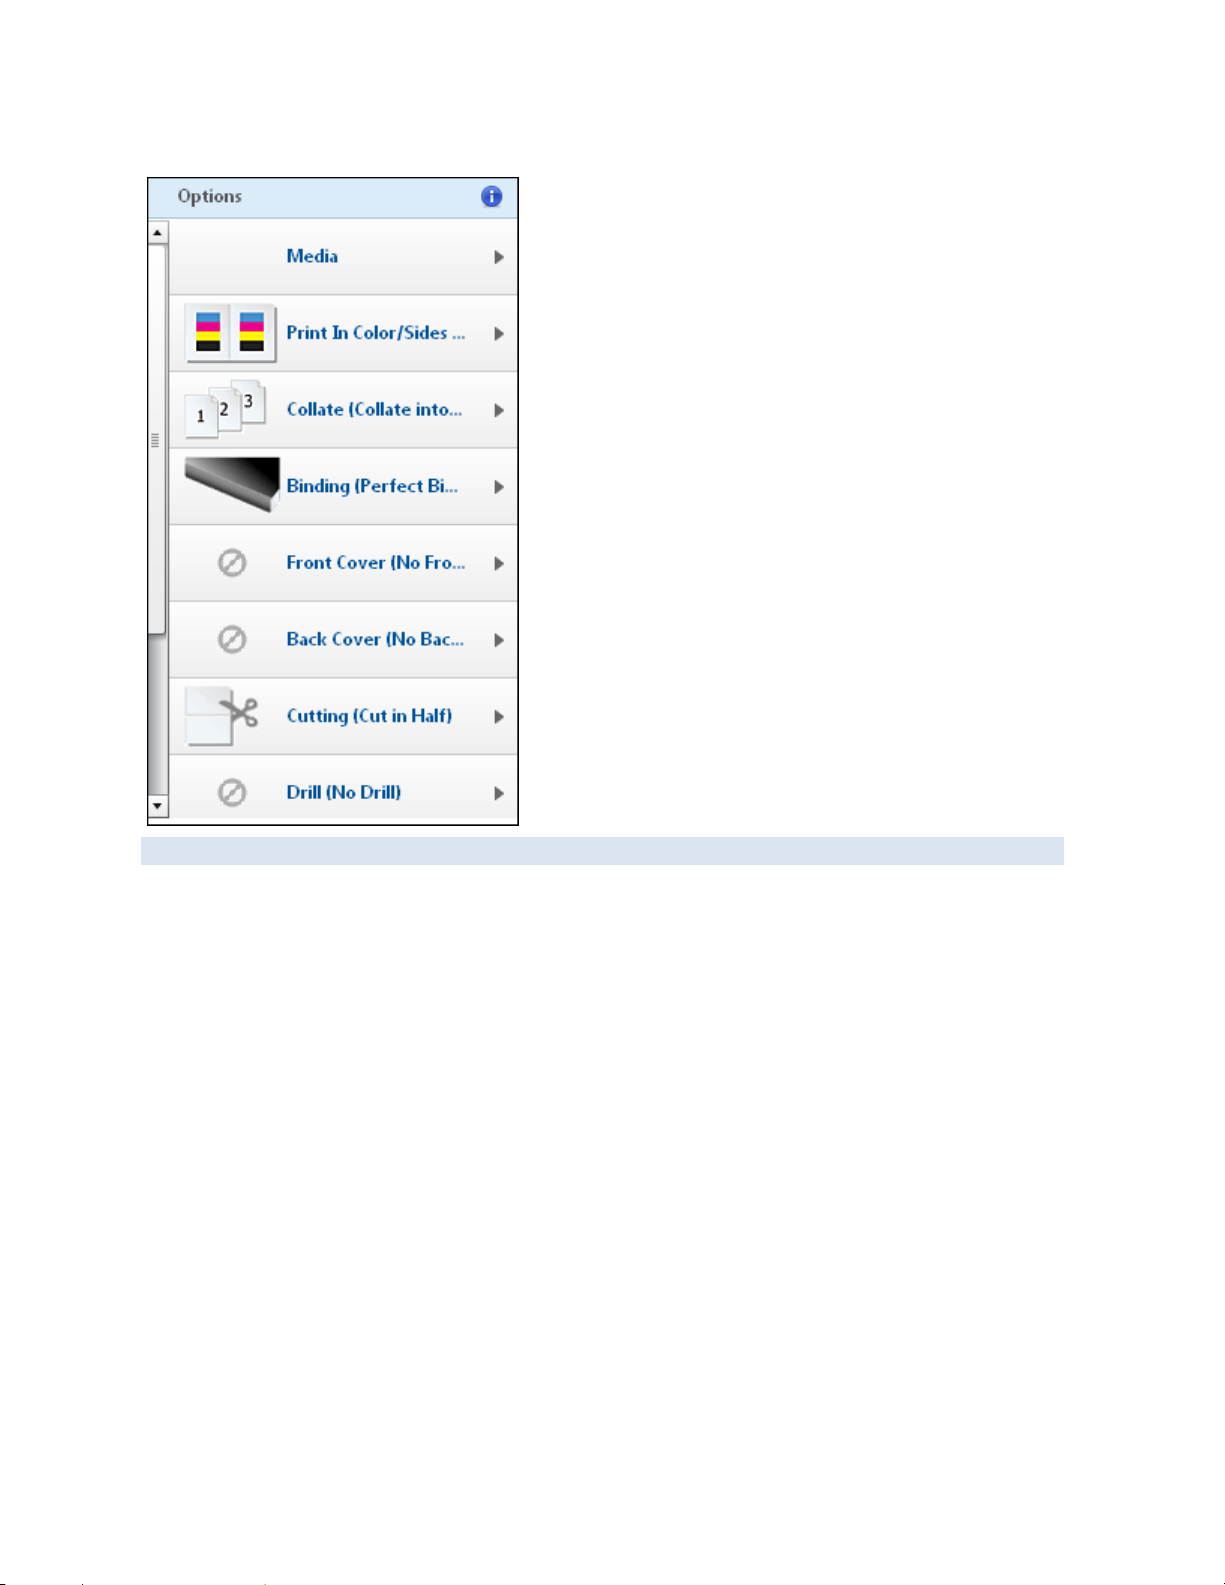
The options that are available to you depend on the product you selected.
1. In the left-hand pane, click an option, for example, Media or Binding.
2. Make further selections as necessary. For example, after clicking Binding you need to select a type
of binding and possibly a color.
3. For some products a Special Pages option may be available. Click this to indicate that you want
certain pages treated differently from the rest of the job. For example, if you are ordering a
booklet, you may want the cover on different stock. (For more information, see “Having different
pages (Visual Product Builder)” on page 30.)
4. If tabs are an option for the product, add tabs as necessary. (For more information, see page 31.)
5. If you have the option of providing non-content files, such as a mailing list or instructions, click
Upload file(s) and browse to the file you want to provide.
Page 29
29
Preview the product
If a preview is not available for the product, you will see a job summary instead.
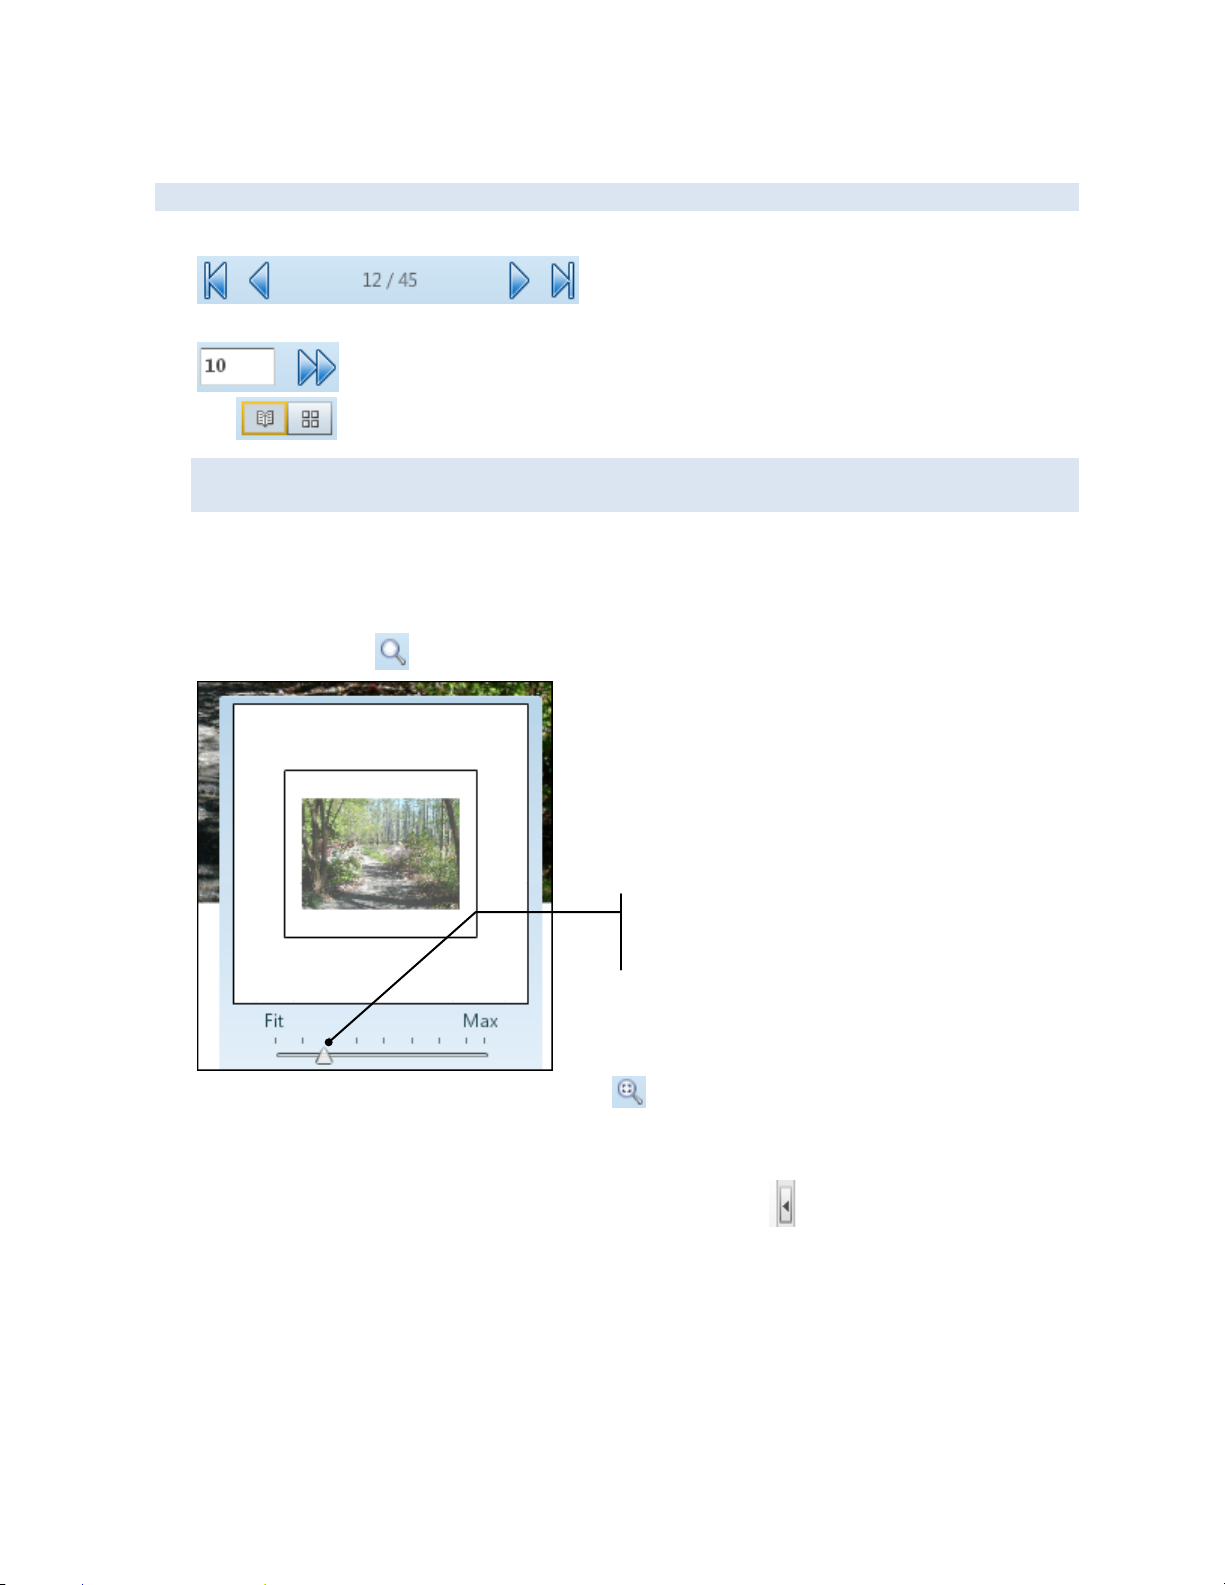
• Display different pages by using the blue navigation buttons:
Or enter a page number and click the double blue arrow:
• Use to switch between spread view and thumbnail view.
If you are in thumbnail view, click a page, and switch to spread view, the page you selected in
thumbnail view continues to be displayed.
• In thumbnail view, click a page to display a shortcut menu, for example, to quickly change the
media of the page.
• In thumbnail view, if you have tabbed pages, and want to move a tab to a different location, drag
the tab before or after the page where you want the tab.
• In spread view click to open a zoom pane so you can zoom in or out by moving the slider:
Use slider to zoom
in or out.
To restore the preview to its default size, click .
• Make the preview area wider or narrower by dragging between the left-hand pane and the
preview area.
To restore the pane and preview area to their original size, click on the right side of the pane.
View pricing details and job summary
1. To see more pricing details, move the pointer to the Unit Price/Total Price area in the bottom left
corner.
2. To see a summary of the job, click Review My Job at the top of the page. The Job Summary
window opens and lists information about the job, for example, files, number of pages, quantity,
and selected print options.
Page 30
30
Add product to cart
1. When you are satisfied with your selections, click Add to Cart.
If the product is part of a kit, a Finish button is displayed instead of Add to Cart. Click Finish to
continue with the process of ordering the kit (see page 63).
2. If prompted, check the preview and the options you selected for accuracy.
3. Proceed with the checkout process when you are ready. (See page 103.)
Having different pages (Visual Product Builder)
For some products, you can indicate that you want some pages treated differently from the rest of the
job. These pages are also known as special pages. For example, you may want most of the job printed
in black-and-white, but want the cover printed in color on different paper.
In Visual Product Builder, if you can define special pages for a product, a Special Pages print option is
available.
To identify pages that should be treated differently
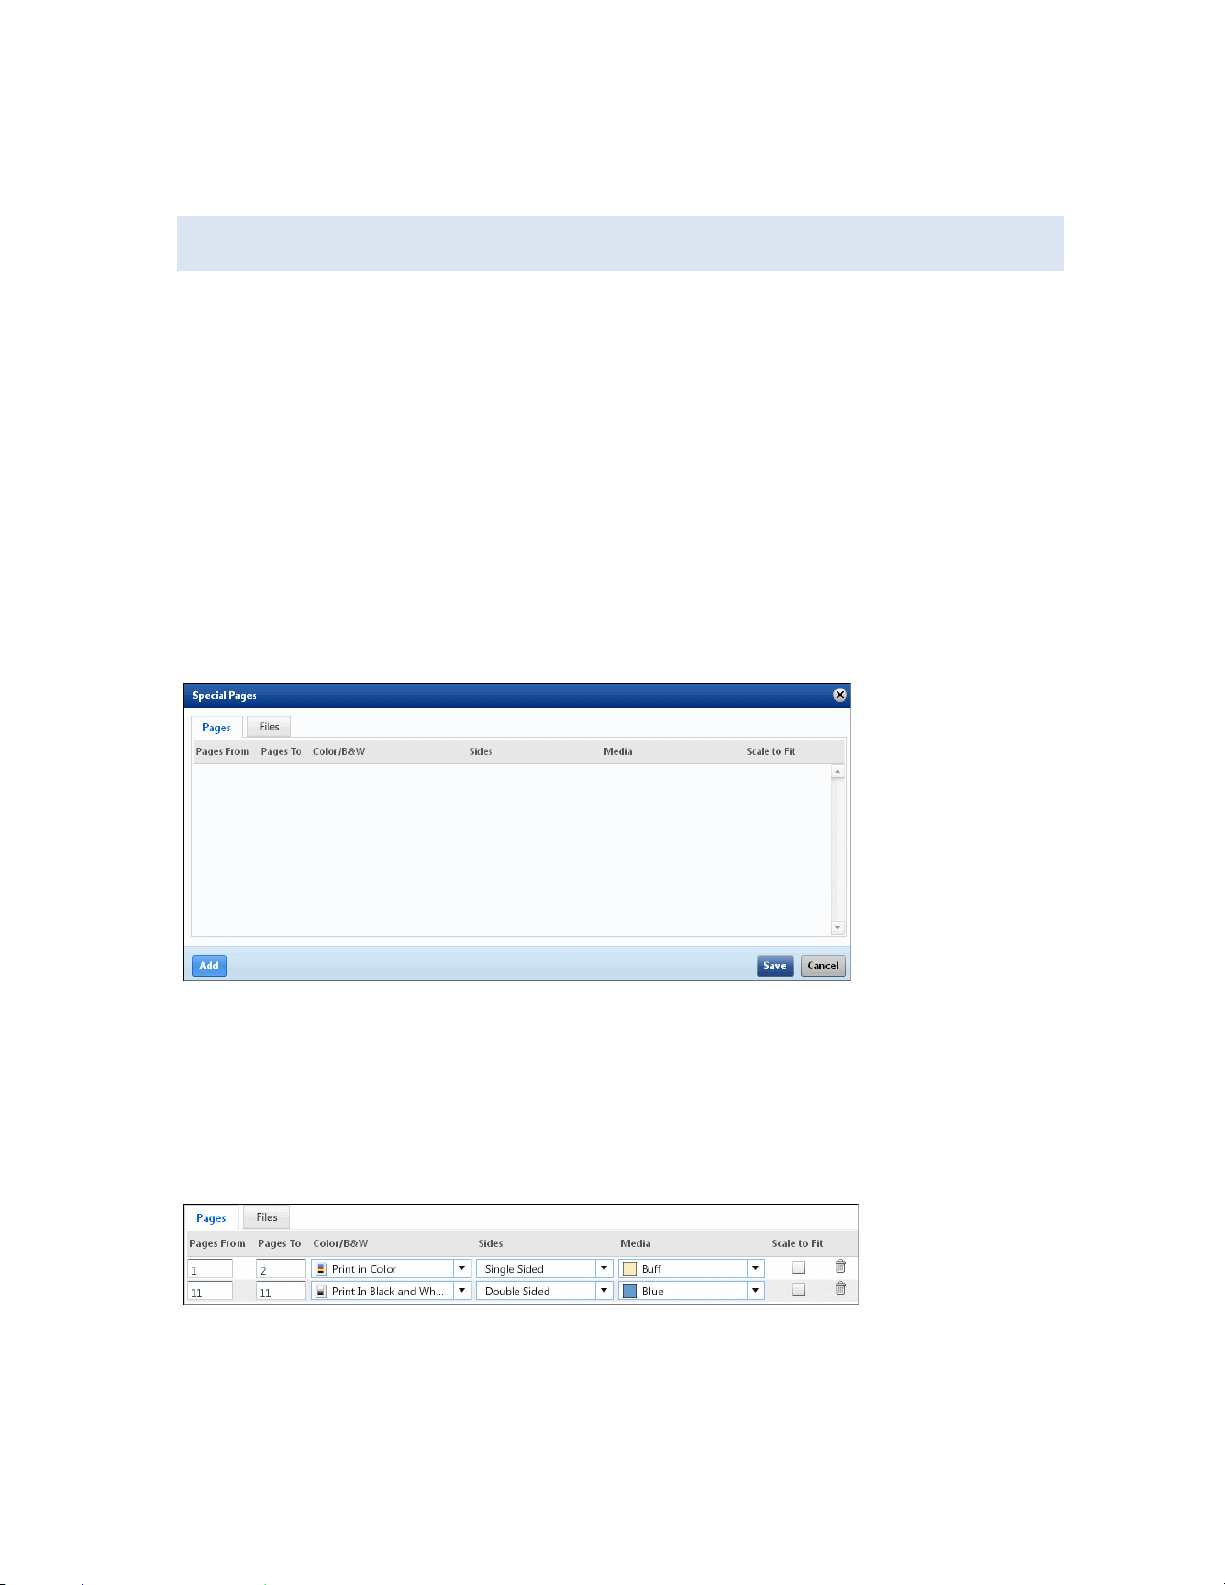
1. Click Special Pages in the Options pane. A Special Pages window opens.
2. Click the Pages or Files tab. (If you are providing more than one content file, Files gives you the
option of making an entire file different, for example, the file that contains the cover pages.)
3. If you clicked the Pages tab,
a. Click Add (at the bottom of the window) and enter the numbers of the pages you want to
change in the Pages From and Pages To fields.
b. Make your selections in the Color/B&W, Sides, and Media columns.
c. Select the Scale to Fit check box so that the contents on the special pages are sized to fit the
selected media.
d. Repeat steps a through c for any additional pages you want to be different.
4. If you clicked the Files tab,
a. Click Add and select a file.
b. Make your selections in the Color/B&W, Sides, and Media columns. (The columns that are
displayed depend on the product.)
c. Select the Scale to Fit check box so that the contents on the special pages are sized to fit the
selected media.
Page 31

31
d. Repeat steps a through c for any additional files you want to be different.
5. To remove a special page or file, click .
6. Click Save.
Inserting tabs (Visual Product Builder)
A tab is the edge of a divider sheet that extends beyond the trim size of the document, and is used to
label sections of a document.
In Visual Product Builder, if a product includes a Tabs option, you can add the tabs as follows:
1. Do one of the following:
• Under Options, click Tabs and then click Insert Tabs.
• In thumbnail view, click a page and select Insert Tab Before or Insert Tab After.
To switch between spread and thumbnail view, use .
The Insert Tabs window opens.
2. If more than one type of tab is available, for example, Tabs: 3 Across or Tabs: 5 Across, select the
type you want.
3. If necessary, select a different font and formatting for the text that is printed on the tabs. (These
formatting selections apply to all the tabs.)
4. At the bottom of the window, select the number of tabs you want to add and click Add.
Select
type of
tab.
Change
format of
tab text.
Page 32

32
5. For each tab,
a. In the Tab Text column, enter the label for the tab.
b. If you selected a page in thumbnail view, its number is automatically displayed in the Insertion
Page # column. Otherwise, select Insert Before Page # or Insert After Page # and enter the
number of the page. A preview of the tab is automatically displayed.
6. If you change your mind about including a tab, click Remove.
7. After you have specified all your tabs, click Accept.
Page 33

33
The preview of your job now includes the tabs you added.
Page 34

The tabs are also shown in thumbnail view.
34
Tabs
before
pages 5
and 7
When in thumbnail view, you can click a tabbed page and click Edit Tab or Remove Tab. Also, if
you want to move a tab to a different location, drag it before or after the page where you want
the tab.
Page 35

35
Customizing Fixed-Content Products (Visual Product Builder)
Overview
In fixed-content products, the content files are built into the product (not supplied by you), but you
still have a choice of print options such as paper or binding. Common examples include application
forms or course materials. In Visual Product Builder, after you click Begin next to a fixed-content
product, you customize the product and preview the effects of your selections all on the same page.
When you are satisfied with your selections, you add the product to the shopping cart.
If the product is part of a kit, some fields will not apply and some information may already be
filled in for you. You will also see a Finish button instead of Add to Cart. For information about
ordering kits, see page 63.
General procedure
In Visual Product Builder, these are the steps you must complete after clicking Begin to customize a
fixed-format product.
Provide required information
1. In the Job Name field, enter a descriptive name for your customized product so you can identify it
easily. (A job is just your customized product. When an order includes several jobs, each is an item
in the order.)
2. In the Quantity field, specify the number you are ordering. This number affects the price. (If the
product is ordered in multiples, you are warned if the number you enter is not a valid multiple.)
Select print options
The options that are available to you depend on the product you selected.
1. In the left-hand pane, click an option, for example, Media or Binding.
2. Make further selections as necessary. For example, after clicking Media you must select a paper.
Preview the product
If a preview is not available for the product, you will see a job summary instead.
• Display different pages by using the blue navigation buttons:
Or enter a page number and click the double blue arrow:
• Use to switch between spread view and thumbnail view.
If you are in thumbnail view, click a page, and switch to spread view, the page you selected in
thumbnail view continues to be displayed.
Page 36

36
• In spread view click to open a zoom pane so you can zoom in or out by moving the slider:
Use slider to zoom
in or out.
To restore the preview to its default size, click .
• Make the preview area wider or narrower by dragging between the left-hand pane and the
preview area.
To restore the pane and preview area to their original size, click on the right side of the pane.
View pricing details and job summary
1. To see more pricing details, move the pointer to the Unit Price/Total Price area in the bottom left
corner.
2. To see a summary of the job, click Review My Job at the top of the page. The Job Summary
window opens and lists information about the job, for example, files, number of pages, quantity,
and selected print options.
Add product to cart
1. When you are satisfied with your selections, click Add to Cart.
If the product is part of a kit, a Finish button is displayed instead of Add to Cart. Click Finish to
continue with the process of ordering the kit (see page 63).
2. If prompted, double-check your preview and selected options for accuracy.
3. Proceed with the checkout process when you are ready. (See page 103.)
Page 37

37
Customizing Superwide Format Products (Visual Product Builder)
Overview
Common superwide format products are banners and posters. In Visual Product Builder, after you
click Begin next to a superwide format product in the catalog, you provide the content file for the job,
customize the product, and preview the effects of your selections all on the same page. When you are
satisfied with your selections, you add the product to the shopping cart.
At any time you can save your work by clicking Save My Job at the top of the page. This allows you
to return to the job later.
If the product is part of a kit, some fields will not apply and some information may already be
filled in for you. You will also see a Finish button instead of Add to Cart. For information about
ordering kits, see page 63.
General procedure
In Visual Product Builder, these are the steps you must complete after clicking Begin to customize a
superwide format product.
Add file
The file you supply can have one page. (If a file has more than one page, only the first page is used for
the job; any additional pages are ignored.)
The content file for a superwide format product is typically very large so a Background Uploader utility
is required to upload your file. The system checks whether this utility is installed. If it is not installed,
you are asked to install it. (This is a one-time procedure.) For information about installing Background
Uploader, see page 56.
After Background Uploader is installed,
• Click Add Files to supply the content for the job. For information about supplying files, see page
43.
After you upload or select your file, it is listed under Files, and a preview is automatically displayed on
the right. If the file is still uploading, a sample image is displayed in its place.
Your file can be uploaded in the background as you select print options and even as you check out
and place your order.
Provide required information
1. In the Job Name field, enter a descriptive name for your customized product so you can identify it
easily. (A job is just your customized product. When an order includes several jobs, each is an item
in the order.)
2. In the Quantity field, specify the number you are ordering. This number affects the price.
Select print options
The options that are available to you depend on the product you selected.
1. In the left-hand pane, click an option, for example, Media, Color Mode, or Wind Slits.
2. Make further selections as necessary. For example, after clicking Media you must select a
substrate.
3. If you have the option of providing non-content files, such as a mailing list or instructions, click
Non-Content Files and then browse to the file you want to provide.
Page 38

38
Preview the product
• Click to open a zoom pane so you can zoom in or out by moving the slider:
Use slider to zoom
in or out.
To restore the preview to its default size, click .
• Make the preview area wider or narrower by dragging between the left-hand pane and the
preview area.
To restore the pane and preview area to their original size, click on the right side of the pane.
• Drag the image of the product to move it around the preview area.
View pricing details
• To see more pricing details, move the pointer to the Unit Price/Total Price area in the bottom left
corner.
Add product to cart
1. When you are satisfied with your selections, click Add to Cart.
If the product is part of a kit, a Finish button is displayed instead of Add to Cart. Click Finish to
continue with the process of ordering the kit (see page 63).
2. If prompted, double-check your preview and selected options for accuracy.
3. Proceed with the checkout process when you are ready. For information about checking out, see
page 103.
Page 39

39
Customizing Products (Classic Product Builder)
Overview
In Classic Product Builder, after you click Begin next to a product in the catalog, you are stepped
through the pages where you customize and proof the product. The top of each page shows your
progress.
General procedure
The steps that you go through depend on the product you selected. For example, if you selected a
product such as custom copies or a brochure you will have an Add Files step to provide your content
files as well as a Print Options step to select media, binding, and so on. If you selected a product with
fixed content (such as tax forms), but for which you can select a paper color, you will not have an Add
Files step, but you will have a Print Options step.
At any time, you can save your work by clicking Save My Job at the bottom of the page. This
allows you to return to the job later, either because you interrupted the customization process or
because you want to re-order a product that you customized.
Provide required information
At the top of the page,
1. In the Job Name field, enter a descriptive name for the job so that you can identify it easily. (A job
is just your customized product. When an order includes several jobs, each is an item in the
order.)
2. Enter or select the Quantity you are ordering. (If the product is ordered in multiples, you are
warned if the number you enter is not a valid multiple.)
3. If the product requires it, enter the No. of pages.
A product with a Personalization step follows a different workflow than the one described below.
See “Personalizing single-record VDPs (Classic Product Builder)” on page 97 and “Personalizing
VDPs in a batch (several at a time)” on page 99.
Page 40

40
Add files
• If the product has an Add Files step (requiring you to provide content files), supply your files (or
indicate you are providing material some other way - "offline"). For more information about
supplying files, see page 51.
If the product requires you to add files after selecting print options, an Add Files link is
available at the bottom of the page.
The content file for a superwide format product is typically very large so a Background
Uploader utility is required to upload your file. The first time you select a superwide format
product you must install Background Uploader. (This is a one-time procedure.) For information,
see page 56.
Select print options
1. If the product has additional options, select them. The options that are available to you depend on
the product you selected. For example, there may be Print Options, Binding & Covers, or
Additional Services sections. If tabs can be added to the product, add the tabs as necessary. (For
information about tabs, see page 43.)
Depending on the product, you may have the option of providing non-content files, such as a
mailing list or instructions. Just click Upload file(s) and browse to the file you want to provide.
2. If an Add Special Page(s) button is available, click it to define pages that you want treated
differently from the rest of the job. (For more information, see “Having different pages (Classic
Product Builder)” on page 42.
3. To see an estimated price for the job (based on the type of job, quantity, and number of pages - if
applicable), click Update Price.
4. Enter any Special Instructions for your order.
5. Click Next to continue to the review step.
Page 41

41
Review and add to cart
Review your order carefully:
1. Use the preview window to examine the document. Note that print options marked with *
(asterisk) are not part of the preview.
The preview window requires Adobe Flash Player. If a Get Flash link is displayed, click it to
install Adobe Flash Player. If you are asked to close your browser during the installation process,
be sure to click Save My Job before you close the browser so you can later pick up where you left
off.
2. Click Edit to change files or print options.
Click to
change print
options.
3. To return to the previous step, click Previous.
4. If available, click View Pricing Summary for a pricing summary based on the options you selected.
5. If the I Approve check box is displayed, select it after you verify your order is correct.
6. Click Add to Cart and proceed with the checkout process as described on page 103.
If the product is part of a kit, a Finish button is displayed instead of Add to Cart. Click Finish to
continue with the process of ordering the kit (see page 63).
Page 42

42
Having different pages (Classic Product Builder)
For some products, you can indicate that you want some pages treated differently from the rest of the
job. These pages are also known as special pages. For example, most of the job may be printed in
black-and-white, but the cover needs to be printed in color on different paper.
In Classic Product Builder (options followed by preview), if you can define special pages for a product,
the Add Special Page(s) button is available when you are customizing the product.
To define special pages
1. To identify pages that should be treated differently, click Add Special Page(s).
2. Select one of the following:
• By File to apply all the special page settings to all the pages in the selected file. Suppose that
you have a multi-file job. If the overall job is to be printed in black-and-white, but you want to
print the cover in color on different stock, and the cover is in its own file, you would select By
File for the file with the cover.
• By Page(s) to specify certain pages in the document for special formatting. You could use this,
for example, in a single-file job where you wanted certain pages treated different. Specify
individual pages separated by commas (for example, 3, 6, 9) and/or specify ranges of page (for
example, 3-6, 10-12).
3. Under Paper/Media, select the paper for the special pages.
4. Select the Scale to Fit check box so that the contents on the special pages are sized to fit the
selected media.
5. Select Print in Color or Print in Black and White.
6. For Sides, select Double Sided (Tumble), Double Sided, or Single Sided.
7. Click Save.
Page 43

43
Inserting tabs (Classic Product Builder)
A tab is the edge of a divider sheet that extends beyond the trim size of the document, and is used for
labeling sections of a document.
In Classic Product Builder, if a product includes a Tabs option, you can insert tabs in a document as
follows:
1. In the Tabs field, select Insert Tabs. You can now specify where you want the tabs and how you
want them labeled.
2. If more than one type of tab is available, for example, Tabs (5 Across) or Tabs (8 Across), select
the type you want.
3. In the Tab #1 field, enter the text you want printed on the tab.
4. Select Insert Tab Before Page or Insert Tab After Page and then enter the page number.
5. To add more tabs, click Add New Tab and repeat steps 3 and 4 for each tab.
6. If you change your mind about a tab, click Remove.
Supplying Files
Many products require you to provide the content for the product. For example, if you want to print
copies of your own brochure, postcard, or poster, you supply what you want printed.
You may be able to provide the content files for your print order in some of these ways:
• Upload files from your computer.
• Download files from the cloud, for example, from Google Drive™, Picasa™, Dropbox, or PrintMe®.
• Select a saved file.
• Indicate that you are providing material another way (hard copy, CD, and so on).
• Use PrintMessenger to send high-quality PDFs directly from an application (like Microsoft® Word)
on your computer to the site.
• Upload files whenever it is convenient and save them in a "library" of files. These saved files are
then available as selections when you are customizing a product.
The procedure for uploading files, downloading files, selecting saved files, or indicating that you are
providing the content some other way is slightly different depending on whether the product you are
ordering uses Visual Product Builder or Classic Product Builder.
Supplying content files (Visual Product Builder)
In Visual Product Builder, an Add Files link is displayed when the product you selected requires you to
provide the content you want printed, for example, the content for a copy job, flyer, or brochure.
Page 44

44
Supply your content in any of these ways depending how the site is configured:
• Upload files from your computer; see below.
• Download files from the cloud, for example, from Google Drive, Picasa, Dropbox, or EFI PrintMe;
see page 46.
• Select saved files; see page 49.
• Indicate that you are providing the material some other way (for example, CD/DVD or hard copy);
see page 50.
You can always supply files while customizing a product as described below. You can also upload
files whenever it is convenient and save them in a "library" of files. These saved files are then
available as selections while you are customizing a product. For information about uploading files
to your library, see page 56. In addition, you can use PrintMessenger to send high-quality PDFs
directly from an application on your computer to the site. See page 57.
Upload files from your computer
For a superwide format product, only one file is allowed. It must have only one page (additional
pages are ignored). Follow the instructions below but ignore the references to multiple files.
For a superwide format product, a Background Uploader utility uploads your file – which is usually
very large for a superwide format product – as you continue with the customizing process. The
first time you work with a superwide format product, you must install Background Uploader as
described on page 56. (This is a one-time procedure.)
To upload files from your computer
When Add Files is not
displayed, click here to
add more files.
1. While customizing a product, click Add Files.
If you add a file and then decide to add another file, click to the right of Files (the Add Files
link is not displayed after you add the first file for the job).
Page 45

The Add Files window opens.
45
2. Click Upload Files.
3. Do the following:
a. Find the file you want to upload and click Open.
b. Files that you upload may automatically be converted to PDF format, but if the Convert to PDF
check box is displayed, leave it selected to convert the file (unless for some reason you need
to keep it in its original format).
Most print shops prefer to receive PDFs since they preserve your layout, number of pages,
and so on. When opened on another computer, a PDF will look the same as on your
computer, while files in their original formats may not look the same. For superwide
format products, PDFs are required.
c. If you expect to use this file again in the future, select the Save File for Later Re-Use check
box.
Page 46

46
4. To select more files for uploading (up to 15 at the same time), click Add More Files and repeat
step 3. (Multiple PDFs are combined into one file.)
A job can have an unlimited number of files. If you need to add more than 15 (the limit you
can upload at the same time), repeat this procedure.
5. Click Upload.
If a pre-flight error is detected (for example, a type face is not embedded), an error message is
temporarily displayed. For details, click next to the file name and select View Preflight Report.
You can then print the report, or accept or remove the content file.
If the system detects missing fonts, a dialog box opens and gives you the option of substituting
fonts or canceling the upload.
If an error occurs during the conversion to PDF, delete the file (by clicking next to the file
name and selecting Remove file) and upload the file without trying to convert it. The preview will
then consist of a sample page with the page number centered on the page.
6. After the upload is complete, click Done. The files you uploaded are now listed under Files and
displayed (as one continuous file) in the preview pane.
To remove a file you uploaded, click next to the file name and select Remove file.
7. If you added more than one file, the files are combined into one file in the order they are listed.
This is also the order in which they will be printed. To change the order of the files, click next to
a file and select Move file up in print order or Move file down in print order.
If you have added many files, you can expand the Files pane by dragging between the Files
pane and the Job Name pane.
Download files from the cloud
If a service that you use for cloud storage is listed in the Add Files window, you can download content
files from the cloud when ordering a product that requires you to supply content. Depending how the
site is configured, you may have the choice of one or more of the following:
• Google Drive (see page 47)
• Picasa (see page 48)
• Dropbox (see page 48)
• PrintMe (see page 49)
Page 47

47
Before you can download files from the cloud
• For Google Drive or Picasa, you need a Google account, and your files must already be uploaded
to Google Drive or to a Picasa web album.
• For Dropbox, you need an account and your files must already be uploaded.
• For PrintMe, no account is necessary, but your file must already be uploaded to PrintMe, and you
should have a document ID for the uploaded file.
To download a file from Google Drive
1. Click Add Files. (If this link is not displayed, click to the right of Files.) The Add Files window
opens.
2. Click Google Drive. (If Google Drive is not displayed in the Add Files window, you cannot
download files from Google Drive.)
3. Enter the user name and password for your Google account. (If you are already logged into your
Google account, you will not be asked for your user name and password.)
4. If asked about allowing access to the service, click Grant Access and click Yes in any other
windows that open.
5. Add the file from Google Drive:
a. Find the content file(s) you want to use and select their check boxes.
b. If the # Pages column is displayed, enter the page count for the file.
c. If a file is not in PDF format, but the Convert files to PDF check box is available, select this
check box to convert the file to PDF.
d. If you expect to use this file again in the future, select the Save file for later re-use check box.
e. Click Add Files.
6. Once the files are downloaded, click Done. The files you downloaded are now listed under Files
and displayed (as one continuous file) in the preview pane.
7. If you added more than one file, the files are combined into one file in the order they are listed.
This is also the order in which they will be printed. To change the order of the files, click next to
a file and select Move file up in print order or Move file down in print order.
Page 48

48
To download a file from a Picasa web album
1. Click Add Files. (If this link is not displayed, click to the right of Files.) The Add Files window
opens.
2. Click Picasa. (If Picasa is not displayed in the Add Files window, you cannot download files from
Picasa.)
3. Enter the user name and password for your Google account. (If you are already logged into your
Google account, you will not be asked for your user name and password.)
4. If asked about allowing access to the service, click Grant Access and click Yes in any other
windows that open.
5. Add the file from Picasa:
a. Thumbnails of the photos in your Picasa albums are displayed. Find the photos you want to
use in the product and select their check boxes.
b. If the Convert files to PDF check box is available, select this check box if you want to convert
the file to PDF format.
c. If you expect to use this file again in the future, select the Save file for later re-use check box.
(The file is saved in your library of files.)
d. Click Add Files.
6. Once the files are downloaded, click Done. The files you downloaded are now listed under Files
and displayed (as one continuous file) in the preview pane.
7. If you added more than one file, the files are combined into one file in the order they are listed.
This is also the order in which they will be printed. To change the order of the files, click next to
a file and select Move file up in print order or Move file down in print order.
To download a file from Dropbox
1. Click Add Files. (If this link is not displayed, click to the right of Files.) The Add Files window
opens.
2.
Click Dropbox. (If Dropbox is not displayed in the Add Files window, you cannot download files
from Dropbox.)
3. Enter the user name and password for your Dropbox account.
4. If asked about allowing access to the service, click Allow.
5. Add the file from Dropbox:
a. Find the content file(s) you want to use and select their check boxes.
b. If the # Pages column is displayed, enter the page count for the file.
Page 49

49
c. If a file is not in PDF format, but the Convert files to PDF check box is available, select this
check box to convert the file to PDF.
d. If you expect to use this file again in the future, select the Save file for later re-use check box.
e. Click Add Files.
6. Once the files are downloaded, click Done. The files you downloaded are now listed under Files
and displayed (as one continuous file) in the preview pane.
7. If you added more than one file, the files are combined into one file in the order they are listed.
This is also the order in which they will be printed. To change the order of the files, click next to
a file and select Move file up in print order or Move file down in print order.
To download a file from PrintMe
To download a file from PrintMe, you must have uploaded the file to PrintMe and received a
document ID via e-mail.
1. Click Add Files. (If this link is not displayed, click to the right of Files.) The Add Files window
opens.
2. Click PrintMe. (If PrintMe is not displayed in the Add Files window, you cannot download files
from PrintMe.)
3. Enter the document ID you received from PrintMe.
4. Add the file from PrintMe:
a. Find the content file(s) you want to use and select their check boxes.
b. If the # Pages column is displayed, enter the page count for the file.
c. If a file is not in PDF format, but the Convert files to PDF check box is available, select this
check box to convert the file to PDF.
d. If you expect to use this file again in the future, select the Save file for later re-use check box.
e. Click Add Files.
5. Once the files are downloaded, click Done. The files you downloaded are now listed under Files
and displayed (as one continuous file) in the preview pane.
6. If you downloaded more than one file, the files are combined into one file in the order they are
listed. This is also the order in which they will be printed. To change the order of the files, click
next to a file and select Move file up in print order or Move file down in print order.
Use saved files for the product
If you have saved files in your library (ones that you previously used and saved, or files that you
uploaded directly to the library as described on page 56), you can select a saved file for the product
you are ordering.
1. Click Add Files. (If this link is not displayed, click to the right of Files.) The Add Files window
opens.
2. Click Saved Files. The Add Files window now lists your saved files.
Page 50

50
3. Under My Saved Files, select the files you want to use and click to move the files under Files
in My Job.
Move the pointer over a file to see some information about the file, for example, its size and
creation date. To preview a file, select it and click Preview File.
4. After you select the files you want for the job, click Finish. The files you selected are now listed
under Files and displayed (as one continuous file) in the preview pane.
5. If you added more than one file, the files are combined into one file in the order they are listed.
This is also the order in which they will be printed. To change the order of the files, click next to
a file and select Move file up in print order or Move file down in print order.
Indicate you are providing content another way
If you selected a product that requires you to provide content files, but you do not have the
information in digital format (for example, you have a hard-copy document), or you plan to deliver the
files later, you can still go through the process of customizing the product you selected. During this
process, you just indicate you are delivering the material another way.
1. Click Add Files. (If this link is not displayed, click to the right of Files.) The Add Files window
opens.
2. Click Other. The Add Files window changes so you can provide information about your file.
Page 51

51
3. In the Type field, indicate how you are supplying the material, for example, CD/DVD, Portable
Drive, or Hard Copy in Box.
4. Enter a File Name.
5. In the No. of Page(s) field, enter the number of pages you plan to deliver. If you have front and
back sides, count two pages per sheet. Superwide format products can have only one page.
6. Under Delivery instructions for hard copy file(s), enter any special information about the delivery
of the material.
7. Click Finish.
Supplying content files (Classic Product Builder)
In Classic Product Builder (where you build your product step-by-step and then preview it), an Add
Files step is part of the customization process when the product requires you to provide the content
you want printed, for example, a poster or a brochure.
Supply your content in any of these ways:
• Upload files from your computer; see page 52.
• Download files from the cloud, for example, from Google Drive, Picasa, Dropbox, or PrintMe; see
page 53.
• Select saved files; see page 55.
• Indicate that you are providing the material "offline" (to be delivered in some other way such as
CD/DVD or hard copy); see page 55.
You can always provide files while customizing a product as described below. You can also upload
files whenever it is convenient and save them in a "library" of files. These saved files are then
available as selections while you are customizing a product. For information about uploading files
to your library, see page 56. In addition, you can use PrintMessenger to send high-quality PDFs
directly from an application on your computer to the site. See page 57.
Page 52

52
Upload files from your computer
For a superwide format product, a Background Uploader utility uploads your file - which is usually
very large for a superwide format product - as you continue with the customization process. The
first time you work with a superwide format product, you must install Background Uploader as
described on page 56. (This is a one-time procedure.)
1. During the Add Files step:
a. Click Browse on the Upload File tab to locate the file you want and click Open.
b. If you expect to use this file again in the future, select the Add to ‘My Saved Files’ for future
use check box.
c. Files that you upload may automatically be converted to PDF format, but if the Convert to PDF
check box is displayed, select it to convert the file (unless for some reason you must keep it in
its original format).
Most print shops prefer to receive PDFs since they preserve your layout, number of pages,
and so on. When opened on another computer, a PDF will look the same as on your
computer, while files in their original formats may not look the same.
d. Click Upload File. The file is now listed under File(s) Added to This Job.
2. Repeat step 1 to add more files.
3. When files are listed under File(s) Added to This Job, do any of the following:
a. Preview a file by clicking its name.
b. Delete a file by clicking .
c. Files are printed in the order they are listed. To change the order, use and to move a
file up or down the list.
4. Click Next to continue to the next step of customizing your product.
Page 53

53
Download files from the cloud
If a service that you use for cloud storage is listed under Cloud / Websites, you can download content
files from the cloud when ordering a product that requires you to supply content. Depending how the
site is configured, you may have the choice of one or more of the following:
• Google Drive (see below)
• Picasa (see below)
• Dropbox (see page 54)
• PrintMe (see page 54)
Before you can download files from the cloud
• For Google Drive or Picasa, you need a Google account, and your files must already be uploaded
to Google Drive or to a Picasa web album.
• For Dropbox, you need an account and your files must already be uploaded.
• For PrintMe, no account is necessary, but your file must already be uploaded to PrintMe, and you
should have a document ID for the uploaded.
To download a file from Google Drive during the Add Files step
1. Click Google Drive. (If Google Drive is not displayed under Cloud / Websites, you cannot
download files from Google Drive.)
2. Enter the user name and password for your Google account. (If you are already logged into your
Google account, you will not be asked for your user name and password.)
3. If asked about allowing access to the service, click Grant Access and click Yes in any other
windows that open.
4. Add the file from Google Drive:
a. Find the content file(s) you want to use and select their check boxes.
b. If the # Pages column is displayed, enter the page count for the file.
c. If a file is not in PDF format, but the Convert files to PDF check box is available, select this
check box to convert the file to PDF.
d. If you expect to use this file again in the future, select the Save file for later re-use check box.
e. Click Add Files.
5. Once the files are listed under File(s) Added to This Job, follow the same steps (3 and 4) as when
uploading files from your computer (see page 52).
To download a file from a Picasa web album during the Add Files step
1. Click Picasa. (If Picasa is not displayed under Cloud / Websites, you cannot download files from
Picasa.)
2. Enter the user name and password for your Google account. (If you are already logged into your
Google account, you will not be asked for your user name and password.)
3. If asked about allowing access to the service, click Grant Access and click Yes in any other
windows that open.
Page 54

54
4. Add the file from Picasa:
a. Thumbnails of the photos in your Picasa albums are displayed. Find the photos you want to
use in the product and select their check boxes.
b. If the Convert files to PDF check box is available, select this check box if you want to convert
the file to PDF format.
c. If you expect to use this file again in the future, select the Save file for later re-use check box.
(The file is saved in your library of files.)
d. Click Add Files
5. Once the files are listed under File(s) Added to This Job, follow the same steps (3 and 4) as when
uploading files from your computer (see page 52).
To download a file from Dropbox during the Add Files Step
1. Click Dropbox. (If Dropbox is not displayed under Cloud / Websites, you cannot download files
from Dropbox.)
2. Enter the user name and password for your Dropbox account.
3. If asked about allowing access to the service, click Allow.
4. Add the files from Dropbox:
a. Find the content file(s) you want to use and select their check boxes.
b. If the # Pages column is displayed, enter the page count for the file.
c. If a file is not in PDF format, but the Convert files to PDF check box is available, select this
check box to convert the file to PDF.
d. If you expect to use this file again in the future, select the Save file for later re-use check box.
e. Click Add Files.
5. Once the files are listed under File(s) Added to This Job, follow the same steps (3 and 4) as when
uploading files from your computer (see page 52).
To download a file from PrintMe during the Add Files step
To download a file from PrintMe, you must have uploaded the file to PrintMe and received a
document ID via e-mail.
1. Click PrintMe. (If PrintMe is not displayed under Cloud / Websites, you cannot download files
from PrintMe.)
2. Enter the document ID you received from PrintMe.
3. Add the file from PrintMe:
a. Find the content file(s) you want to use and select their check boxes.
b. If the # Pages column is displayed, enter the page count for the file.
Page 55

55
c. If a file is not in PDF format, but the Convert files to PDF check box is available, select this
check box to convert the file to PDF.
d. If you expect to use this file again in the future, select the Save file for later re-use check box.
e. Click Add Files.
4. Once the files are listed under File(s) Added to This Job, follow the same steps (3 and 4) as when
uploading files from your computer (see page 52).
Use saved files
If you have saved files in your library (ones that you previously uploaded/downloaded and saved, or
files that you uploaded directly to the library as described on page 56), you can select a saved file for
the product you are ordering.
1. Any saved files are listed under My Saved Files on the Upload File tab. Review this list. To use one
of the saved files:
a. Click the file you want to use. (If necessary, click Preview to check its contents.)
b. Click Add File. The file is now listed under File(s) Added to This Job.
2. Repeat step 1 to select more files. When files are listed under File(s) Added to This Job, do any of
the following:
a. Preview a file by clicking its name.
b. Delete a file by clicking .
c. Files are printed in the order they are listed. To change the order, use and to move a
file up or down the list.
3. Click Next to continue to the next step of customizing your product.
Specify offline material
If you selected a product that requires you to provide content files, but you do not have the
information in digital format (for example, you have a hardcopy document), or you plan to deliver the
files later, you can still go through the process of customizing the product you selected. During this
process, you just indicate you have “offline” material.
1. If your files are not in a digital format, during the Add Files step, click the Offline Material tab.
2. In the Type field, indicate how you are supplying the type of offline material, for example,
CD/DVD, Portable Drive, or Hardcopy in Envelope.
3. Enter a File Name.
4. Enter the number of Page(s). For materials with front and back sides, count two pages per sheet.
Page 56

56
5. Under Delivery instructions for hardcopy file, enter any special information about the delivery of
the material.
6. Click Add. The information about the material is now listed in the right-hand pane. (If you need to
remove this, click .)
7. Repeat steps 2 through 6 for any additional material.
8. Click Next to continue to the next step of customizing your product.
Installing Background Uploader (superwide format products)
Superwide format products typically have large content files, which can take time to upload to the
site. To help with this process, a Background Uploader utility uploads the files while you continue to
customize your product. The first time you customize a superwide format product you must install
Background Uploader. (This is a one-time procedure.) After you install the utility, the content file for a
superwide format job is always uploaded in the background.
To install Background Uploader
1. When you select a superwide format product for the first time:
• In Visual Product Builder, under Files, click Windows/MAC (for all versions of Windows and
for all versions of Mac OS except 10.6) or click Mac 10.6.
• In Classic Product Builder, under File(s) Added to This Job, click Windows/MAC (for all
versions of Windows and for all versions of Mac OS except 10.6) or click Mac 10.6.
2. Save the installer .jar file to your computer.
3. Double-click the .jar file to start the installer and follow the instructions in the wizard.
Java Runtime Environment (JRE) 1.5 must be installed on your computer before you can install
Background Uploader. If JRE is not installed, you are asked to install it by clicking Install. After
installing JRE, refresh the page to apply the changes. Then proceed with step 3 above.
4. Once Background Uploader is installed, upload your files as usual.
Uploading files to your personal library
A print job often requires you to supply a content file. You can upload your files to a personal library
on the site so they are ready to be used when you are customizing a product that requires content
files. Similarly, DSFdesign Studio products (page 66) can often be personalized with your own images.
Images can also be stored in your library of files.
You can also upload or download files (and save them for future use) while customizing a product;
you do not have to upload them ahead of time
To upload a file to your personal library
1. Click My Account in the navigation bar.
2. Under My Account, click Files.
Page 57

57
The Files page opens.
3. To see what types of files you can upload, click Supported File Types.
If your file type is not listed, contact Customer Support (see “Contacting Customer Support”
on page 14) for instructions on how to deliver the file.
4. Click Browse to locate your file and then click Open.
5. Files that you upload may be automatically converted to PDF format, but if the Convert to PDF
check box is displayed, select it to convert the file (unless for some reason you need to keep it in
its original format).
Most print shops prefer to receive PDFs since they preserve your layout, number of pages and
so on. When opened on another computer, a PDF will look the same as on your computer, while
files in their original formats may not look the same.
6. Click Upload File. The file is now listed on the Files page. It will be available for selection (as a
saved file) when you order products.
7. To preview the file to make sure it looks the way you want, click its name.
Click to
preview
file.
Click to
remove file
from library.
8. To remove a file from the library click .
Supplying files using PrintMessenger
An alternative to supplying content files (by uploading them from your computer or downloading
them from the cloud) while creating a product is to install and use EFI PrintMessenger.
PrintMessenger converts documents on your computer to high-quality PDFs and uploads them to the
site.
PrintMessenger offers the following benefits:
• PrintMessenger connects the Print command in your application (for example, Microsoft Word or
Adobe® InDesign®) to the site – you simply select PrintMessenger as the “printer” when working
with a document in the application on your computer.
Page 58

58
• Your documents are converted to high-quality PDFs on your own computer to ensure accurate
printing. You can preview the PDFs before uploading them.
• You can upload several files at a time or combine files into a single file before uploading it. (For
example, if a brochure you want to print is made up of three files, you can combine them into one
file – in the order you want.)
• After your files are uploaded to the site, you are taken to the site where you can immediately add
the files to products that you order.
• The files that you upload are included in your personal library on the site so that you can select
them (from your saved files) when ordering products in the future.
Your first step is to install PrintMessenger (a one-time procedure), after which you can begin to use it
to convert documents to PDFs and upload them to the site.
Downloading and installing PrintMessenger
Before you can use PrintMessenger to convert documents on your computer to PDFs and upload them
to the site, you must download PrintMessenger and install it on your computer. (This is a one-time
procedure.)
Administrative privileges are required on the computer where you are installing PrintMessenger.
To download and install PrintMessenger
1. Make sure the computer on which you plan to install PrintMessenger is running one of the
following supported operating systems:
Windows (32-bit and 64-bit)
• Windows XP
• Windows 2003
• Windows Vista
• Windows 7
• Windows 2008
Macintosh
• Macintosh OS 10.3
• Macintosh OS 10.4
• Macintosh OS 10.5
2. Go to the home page (click Home in the navigation bar).
3. In the EFI PrintMessenger pane on the site:
• For a Windows computer, click Windows (32Bit) or Windows (64Bit) depending on whether
you need a 32-bit or 64-bit version of PrintMessenger.
• For a Macintosh computer, click Mac.
4. Click Run (or Open) to start the driver installation from the site server or click Save to save the
driver installer and install it from your local system.
Mac OS users must start the installation from their desktop.
5. Follow the instructions in the installation wizard to install PrintMessenger.
Page 59

59
Using PrintMessenger to send content files to the site
After you install PrintMessenger, you can start using it to convert documents on your computer to
PDFs and upload them to the site.
Convert files to PDFs
1. Make sure that the document or file that you want to convert and upload is open in the
application that you used to create it (for example, Microsoft® Word or Adobe® PhotoShop®).
2. In the application, select File > Print.
The selections you make in step 3 may be slightly different depending on the operating system
you are using.
3. If your document is to be printed on standard size paper (typically letter size):
• Select Digital StoreFront as the "printer" and click OK or Print (depending on the application).
The system converts the file to PDF format and then the EFI PrintMessenger window opens
and lists the PDF.
If you need to review or select the paper size for the document:
a. Select Digital StoreFront as the "printer" and click Properties.
b. Click Advanced.
c. In the Paper Size field, select the size you want. If the size you want is not listed, select
PostScript Custom Size.
d.
If you selected PostScript Custom Size, enter the dimensions of your custom page and then
click OK in all the dialog boxes
Page 60

60
The system converts the file to PDF format, after which the EFI PrintMessenger window opens and
lists the PDF.
4. To convert more files, repeat steps 1 to 3. (You must wait for the conversion of a file to be
complete before you can convert another file.)
Manage the Converted Documents
Do any of the following:
Use the icons that are displayed to the right of a selected file to delete, preview, or move a file up
•
or down in the list. (The order in which the files are listed is the order in which they are merged if
you select Upload As One File when uploading the PDFs.)
• To rename a file, just change its name in the field to the right of the PDF icon when the file is
selected.
You can edit
the file name
here.
Buttons for
deleting,
previewing,
and moving
the file up or
down the list.
Upload the PDFs to the site
Typically, after you convert your documents to PDFs you upload them to the site so you can start
adding them to products.
1. In the PrintMessenger window, either select Upload Individually to upload each file one by one or
select Upload As One File to merge the files into a single PDF. For example, you may have files
corresponding to the chapters of a book that you want to combine into one PDF.
Page 61

61
2. If you selected Upload As One File, provide a name for the new merged file by replacing
merged_file in the file name field to the right of the PDF icon.
Change to more
descriptive name
3. Click Upload.
4. If the Login window opens, enter your account credentials (user name and password) for the site
if you already have an account (are registered) and click Login. If you do not have an account yet,
click Open an Account.
Select the Save Password and Auto-Login check box if you want to avoid being prompted for
your account credentials during future file upload sessions.
On a Windows computer, you can always open the Login window by right-clicking the
PrintMessenger icon on the right side of the Windows task bar (at the bottom of the desktop) and
selecting Settings > Login.
5. When you are informed the upload was successful, click OK.
Page 62

62
6. The Upload Successful page opens. If you want the file(s) that you uploaded to be automatically
added to products that you create during the current session (until you log off), leave the
Automatically add these files to products... check box selected. (Even if the files are added
automatically, you can always remove them while customizing a product.)
7. Click Get Started to go to the home page on the site where you can begin selecting products.
The PDFs that are uploaded to the site are automatically stored in your personal library of files so
that you can select them (from your saved files) when customizing products that require content
files.
Updating PrintMessenger
If a new version of PrintMessenger is available and you have PrintMessenger installed on a Macintosh,
you must uninstall the old version and install the new version.
On a Windows computer, you can update PrintMessenger as follows:
1. To check for updates to PrintMessenger, right-click the PrintMessenger icon on the right side of
the Windows task bar (at the bottom of the desktop) and select Settings > Check for Updates.
2. If you want to be notified of future updates, select the Alert me when updates are available
check box.
3. If updates are available, click Update.
Page 63

63
Ordering Kits
A kit is a product made up of other products packaged together. For example, a wedding kit might
include an invitation photo card, envelopes, a wedding program, and key chains for the guests. Each
product that makes up the kit is customized individually (if applicable), but the order is placed for the
kit itself.
In some cases, the quantities for the individual products (items) that make up the kit are fixed; in
other cases, you can enter a different quantity for a product in the kit or even enter 0 as the quantity.
A zero lets you opt out of including a product in the kit.
After you click Begin for a kit, a list of the products that make up the kit is displayed.
This product still
needs to be
customized.
This product was
already customized
but can still be
edited.
You may be allowed to
enter 0 to opt out of
buying a product in a
kit.
Before you can add a kit to the cart, each product in the kit must have a Complete check mark or
Opted Out next to it.
To order a kit
1. In the Job Name field, enter a name for the kit order.
2. In the Kit Qty field, enter the number of kits you want to order.
Page 64

64
3. When a product in the kit has a Complete check mark next to it, the product does not require
customizing. If necessary, change the Item Qty of the product or enter 0 to not include the
product in the kit. (The Item Qty may be fixed, or you may not be allowed to enter 0.) When you
enter 0 in the Item Qty field, Opted Out is displayed next to the product to indicate you have
chosen not to include this product in the kit.
The number of items you will receive is a product of the Kit Qty and the Item Qty. For
example, if you enter 125 in the Kit Qty field for a wedding package that has 1 as the Item Qty for
an invitation, you will receive 125 invitations. Sometimes you may want more of one product in a
kit (this assumes the Item Qty field can be edited). For example, if you are ordering a kit made up
of promotional hats and pens, you may want to order only 1 hat per kit, but 3 pens per kit. In this
case, the Item Qty for the hat would be 1 but for the pen would be 3. If you ordered 100 kits, you
would get 100 hats and 300 pens
4. When a product in the kit has a Customize arrow next to it, configure the product:
a.
Click the Customize button.
b. After you click Customize, configure the product. What you must do depends on the product.
For example, you may need to supply a content file and select print options for the product or
you may need to add an image or text to a DSFdesign Studio product.
c. After you customize the product, click Finish. You now return to the list of products that make
up the kit.
5. Go through the products in the kit until they all have a Complete check mark (or Opted Out) next
to them.
6. Click Add to Cart and proceed with the checkout process when you are ready. For information
about checkout, see page 103.
Page 65

65
Personalized Products
Some products such as business cards, note cards, invitations, or promotional flyers can be
personalized, for example, with contact information for a business card or a photo for a note card. The
site provides the basic product (invitation or flyer) and you personalize it.
Products that you can personalize fall into two categories:
• DSFdesign Studio products
DSFdesign Studio products can be personalized in numerous ways. For example, you may be able
to position and re-size text, images, and shapes; add your own text, images, and shapes; edit and
format text; or enhance images.
You personalize DSFdesign Studio products using a visual editor which shows your changes as
soon as you make them.
For information about DSFdesign Studio products, see page 66.
• Variable data products (VDPs)
VDPs are typically personalized with data such as a name and address, as well as with images. The
data you can use for personalizing a product may be provided on the site. For example, an address
book from which you can select contact information may be available. Sometimes you can create
several versions of the same product, each personalized differently, for example, 500 copies of a
promotional flyer, with each flyer addressed to a different prospect.
For information about VDPs, see page 92.
Page 66

66
DSFdesign Studio Products
DSFdesign Studio products may include note cards, invitations, business cards, or promotional flyers
that you can personalize in various ways using a visual editor. You can see your changes to the product
as soon as you make them. The site provides the basic product and you personalize it, for example,
add a photo or some text to a postcard, change the font and color of text, or add some decorative
lines.
The design of a product controls how you can personalize it. For example, if you are ordering a
company business card you may be able to change only your name; on a post card you may be able to
add your own photo, decorate shapes, and text.
Here are some ways you may be able to personalize products:
• Add your own images (in JPG, PNG, PDF, EPS, or SVG format).
• Select pre-supplied images from a gallery.
• Edit and format text, for example, change font, point size, color, or justification.
• Change the color or thickness of lines.
• Change the fill color or border color of a rectangle or circle.
• Change the opacity of objects.
• Move, re-size, rotate, or delete text, shapes, or images.
• Add your own text, shapes, or images.
• Edit images by cropping or rotating them, correcting red eye, changing contrast, and so on.
RGB images in JPG or PNG format can be fully edited as long as their resolution does not
exceed 2,880 x 2,880 pixels; if the resolution is higher, you can just crop the images. CMYK images
in JPG or PNG format can be cropped. You can also crop images that are in PDF, EPS, or SVG
format.
Page 67

67
General procedure for personalizing DSFdesign Studio products
When you click Begin next to a DSFdesign Studio product, it opens in a window like the one shown on
the previous page. You can then personalize the product and add it to the cart.
At any time you can save your work by clicking Save Job at the top of the page. This allows you to
return to the job later.
If the product is part of a kit, some fields will not apply and some information may already be
filled in for you. You will also see a Finish button instead of Add to Cart. For information about
kits, see page 63.
Provide required information
1. In the Job Name field, enter a descriptive name for your product so you can identify it easily. (A
job is just your personalized product. When an order includes several jobs, each is an item in the
order.)
2. In the Quantity field, specify the amount you are ordering. The quantity affects the price. (If the
product is ordered in multiples, you are warned if the number you enter is not a valid multiple.)
3. Ignore the Pages field; the number of pages for the product is pre-determined, and you cannot
change it
Change the preview
1. By default, the product fits the screen. To zoom in or out, use the slider or click - or +.
2. To restore the product to its original size, click .
3. If you zoom so that part of the product is not visible, click to switch to pan mode. You can
then drag the entire product to display different areas without accidentally moving any objects
that are part of the product. When you are panning, no editing is possible. To switch back to edit
mode, click .
4. If the product has more than one page, use the arrows to move from page to page so you can
personalize each page as necessary.
Personalize the Product
What you can personalize depends on the product. Here are some general guidelines:
• If the product includes a placeholder box for an image, do one of the following:
Page 68

68
• If the Photos pane already includes an image you want to use, drag it to the placeholder box.
• Click Add Photos to supply your own image and then drag the image to the placeholder box.
You can add images in JPG, PNG, PDF, EPS, or SVG format. The maximum size of an image
file that you can add is 50 MB.
• If an image gallery is displayed to the left of the Photos pane, and you like one of the images,
drag it to the placeholder box.
You cannot add a product to the cart if a placeholder box for an image is empty. Add an image
or, if the product allows it, delete the placeholder.
• If the product prompts you for text, for example, Enter your name here or Enter your text here,
double-click the prompt and replace it with your own text.
You cannot add a product to the cart if you leave a prompt for text. Replace the text or, if the
product allows it, delete the prompt.
• If the product comes with text, click it to see if you can edit, format, move, rotate, re-size, or
delete the text. (To change the text, double-click it.)
• If the product comes with an image, click it to see if you can move, re-size, rotate, or delete the
image; double-click it to see if you can edit the image.
RGB images in JPG or PNG format can be fully edited as long as their resolution does not
exceed 2,880 x 2,880 pixels; if the resolution is higher, you can just crop the images. CMYK images
in JPG or PNG format can be cropped. You can also crop images that are in PDF, EPS, or SVG
format. An image that was added from an image gallery cannot be edited.
• If the product comes with a rectangle or circle, click it to see if you can change the border or fill
color, or move, re-size, rotate, or delete the rectangle or circle.
• If the product comes with a line, click it to see if you can change its color or width, or move, re-
size, rotate, or delete the line.
When a product comes with text, images, or shapes, what you can do to these objects
depends on the product you selected.
Some objects can be grouped, and then all the objects in the group can be moved, rotated, or
lined up at the same time. (For information about grouping, see page 90.)
• If a toolbar is displayed at the bottom left of the window, use it to add your own objects: text,
images, rectangles, lines, or circles. (For information about adding your own objects, see page 69.)
You can overlap objects and then move them to the back or front. For information, see page
72.
After you add an object, you can make copies of it. Right-click the object, select Copy Item,
right-click again, and select Paste Item. You can then drag the copied object where you want it.
• If the product has more than one page, display each page and personalize it as necessary.
The details of adding and formatting objects start on page 69.
Page 69

69
Add product to cart
1. When the product looks the way you want, click Add to Cart.
If the product is part of a kit, a Finish button is displayed instead of Add to Cart. Click Finish to
continue with the process of ordering the kit (see page 63).
2. If asked, click I Agree to indicate that you have proofed the product.
3. Proceed with the checkout process when you are ready. For information, see “Shopping Cart and
Checkout” on page 103.
Adding your own objects to DSFdesign Studio products
Whenever this toolbar is displayed for a DSFdesign Studio product:
you can use it to add your own text, images, rectangles, lines, or circles.
You have full control over any object that you add to a product, for example, you can edit, move, resize, rotate, or delete the object. You can also group objects together and then move, rotate, or line
them up at the same time. In addition, you can place one object on top of another object and move
one of the objects to the front or back. For example, you could put a colored rectangle behind some
text or overlap some rectangles in a pattern.
After you add an object, you can make copies of it. Right-click the object, select Copy Item, right-
click again, and select Paste Item. You can then drag the copied object where you want it.
Add your own text
1. Click and then click where you want to add the text. You can then drag the text box until it is
where you want it.
To add your text, double-click inside the text box and replace Enter your text here with your own
text.
2. Use the toolbar to format or position the text, or to delete the text if you change your mind about
including it.
3. To change the font, point size, color, style, or justification of the text:
a. Click .
b. Use the buttons on the formatting toolbar to make your changes.
Click to change color of text.
Use to change the size of the text in relation to the size of the box; use to
change the size of the box in relation to the size of the text inside it.
If you click the color button and a color circle is displayed, you can create and select a
custom color. (For more information about colors, see page 73.)
4. Do any of the following:
• Move the text, re-size or rotate the text box, or delete the text. (For information, see page
87.)
• Change the opacity of the text. (For information about opacity, see page 89.)
Page 70

70
• Group the text box with other objects and then move, rotate, or line up the group. (For
information about grouping, see page 90.)
Add your own images
1. Click and then click where you want to place the image. (You can refine its size and position
later.) A placeholder box is displayed for your image.
2. Add an image in any of these ways:
• If an image gallery is available, it is displayed to the left of the Photos pane. (You can click
Change Gallery to check if other galleries are available and choose to display the contents of
another gallery.) If you like one of the images in the gallery, drag it to the placeholder box.
• If the Photos pane already includes images, and you want to use one of them, drag the image
to the placeholder box
• To use one of your own images, click Add Photos. You can then upload an image from your
computer; select an image you previously saved; or (depending how the site is configured)
download an image from the cloud, for example, from Google Drive, Dropbox, or Picasa. After
you upload/download the image or select a saved image, it is displayed in the Photos pane –
you can then drag the image to the placeholder box. (For more information about using your
own images, see page 75.)
You can supply images for DSFdesign Studio products in JPG, PNG, PDF, EPS, or SVG
format. The maximum size of a file that you can add is 50 MB.
3. After you drag one of your own images to the placeholder box, the image may automatically open
in an Edit Photo window. If necessary, edit the image, for example, crop it, change the exposure,
or correct red eye. Then click Apply Changes. (For information about editing images, see page 79.)
RGB images in JPG or PNG format can be fully edited as long as their resolution does not
exceed 2,880 x 2,880 pixels; if the resolution is higher, you can just crop the images. CMYK images
in JPG or PNG format can be cropped. You can also crop images that are in PDF, EPS, or SVG
format. (You cannot edit images that came from an image gallery.)
If the image does not meet the resolution (DPI) requirements for the product, a Low Quality
warning link is displayed in the Edit Photo window. Click this link to open the Photo Information
window so you can find out how the DPI of your image differs from the requirement. If the DPI is
too low, the print quality will be poor (typically blurry). You may want to use a different image.
Page 71

71
4. Do any of the following:
• Move, re-size, rotate, or delete the image. (For information, see page 87.)
• Change the opacity of the image. (For information about opacity, see page 89.)
• Group the image with other objects and then move, rotate, or line up the group. (For
information about grouping, see page 90.)
• To make further changes to the image itself, double-click it, edit the image, and click Apply
Changes.
RGB images in JPG or PNG format can be fully edited as long as their resolution does not
exceed 2,880 x 2,880 pixels; if the resolution is higher, you can just crop the images. CMYK
images in JPG or PNG format can be cropped. You can also crop images that are in PDF,
EPS, or SVG format. You cannot, however, edit an image that was added from an image
gallery, only an image that was added from the Photos pane.
Add rectangles or circles
1. To add a rectangle, click ; to add a circle, click . Then click where you want to place the
rectangle or circle. (You can refine its size and position later.)
2. Use the toolbar to format or position the rectangle or circle, or to delete the rectangle or circle.
3. To format the rectangle or circle:
a. Click .
b. Change the color or thickness of the border or change the fill color. (Thickness is measured in
points.) For information about colors, see page 73.
4. Do any of the following:
• Move, re-size, rotate, or delete the rectangle or circle. (For information, see page 87.)
• Change the opacity of the rectangle or circle. (For information about opacity, see page 89.)
• Group the rectangle or circle with other objects and then move, rotate, or line up the group.
(For information about grouping, see page 90.)
Add horizontal or vertical lines
1. Click or and then click where you want to place the line. (You can refine its size and
position later.)
2. Use the toolbar to format or position the line, or to delete the line.
3. To format the line:
a. Click .
b. Change the color or thickness of the line. (Thickness is measured in points.) For information
about colors, see page 73.
Page 72

72
4. Do any of the following:
• Move or rotate the line, make the line longer or shorter, or delete the line. (For information,
see page 87.)
• Change the opacity of the line. (For information about opacity, see page 89.)
• Group the line with other objects and then move, rotate, or line up the group. (For
information about grouping, see page 90.)
Moving objects to the back or front
You can put one object on top of another object so they partly or completely overlap. You can then
move one of the objects to the front or back to control what is visible. For example, you could add
some text and then decide to put a colored rectangle behind it as background. If you place the
rectangle over the text and fill it with color, the text will no longer be visible. In this situation you must
move the rectangle to the back so the text is visible again. (Alternatively, you can change the opacity
of one of the objects; see page 89.) For example, here a blue-filled rectangle was placed over lighter
blue text and then the rectangle was moved to the back so the text was visible again:
You could also create a design of partly overlapping rectangles and move individual rectangles to the
back or front to change the effect.
To move objects to the back or front
1. If you placed one object over another so one of them is partly or completely hidden, click the
object that you want to move to the back or front and click .
2. Click or to move the object to the back or front. For example, if you overlap three colored
rectangles:
you could move the middle rectangle to the front to change the effect:
Page 73

73
Colors in DSFdesign Studio products
You may be able to change the color of text, lines, and circles and rectangles (both border and fill) in a
DSFdesign Studio product. The ability to change the color of these objects depends on the product you
selected, as does the choice of colors.
Color button
When you click a color button in a formatting toolbar you may have the following choices:
• The default 21 colors
• Custom colors predefined for the product
• The ability to define your own custom colors
Some products let you choose only the default colors while others restrict you to some pre-defined
custom colors. For example, a company business card often limits the color selection to adhere to
company branding. In yet other products you can choose either a default color or create your own
custom color.
Selecting a color
Depending on the available choices do one of the following:
• Select a color from the Default Swatch.
• Select a pre-defined color from the Custom Swatch.
• If the color circle is displayed, create and select a custom color.
Page 74

74
Creating and selecting a custom color
If the color circle is displayed when you are selecting a color, you can define a custom color.
1. Do one of the following:
• If you know the CMYK or RGB values of the color, enter them directly in the % fields. (A
product is configured to use either the CMYK or RGB color scheme; you cannot change this.)
• Click the color you want on the color circle.
You can use the sliders below the color circle to adjust the Saturation (vividness) or
Brightness (lightness) of colors if necessary.
Click after entering
values or clicking a
color on the circle.
Click to save custom
color.
Replace with
descriptive name.
2. Click to add the color.
You must add and save a color before you can use it in a product.
3. In the Color Name field, enter a name for the color unless you want to leave the hex value.
4. To indicate this is a spot color, select the Spot Color check box. (A spot color is typically the result
of specially mixed inks. Spot colors are often used for branding.)
5. Click to save the color. It is now listed under Custom Swatch.
A spot color is identified by a check mark next to the color:
6. If you change your mind about a custom color that you added, click to delete it. (You cannot
delete a color if you used it in the product you are personalizing.)
7. To use a custom color in the product you are personalizing, select the custom color and click OK.
Page 75

75
Supplying your own images for DSFdesign Studio products
Many DSFdesign Studio products can be personalized with your own images. You can add images in
these formats: JPG, PNG, PDF, EPS, or SVG.
The maximum size of a file that you can add is 50 MB.
Supply your images in any of these ways (depending how the site is configured):
• Upload images from your computer. (See below.)
• Download images from the cloud, for example, from Google Drive, Picasa, Dropbox, or EFI
PrintMe. (See page 76.)
• Use saved images. (See page 78.)
After you click Begin for a DSFdesign Studio product, check the Quick Help pane for
recommendations about the DPI (resolution) of images that can be added to the product. Be sure
that the image you want to use meets the DPI recommendation. If the DPI of an image is too low,
the print quality will be poor. (You will get further warnings about quality if you proceed.)
Upload images from your computer
1. Click Add Photos in the Photos pane.
The Add Photos window opens.
2. Click Upload Files.
3. Find and select the image you want to upload and click Open.
4. Click Upload.
Page 76

76
5. To upload another image, click Add and repeat steps 3 and 4. Otherwise, click Done.
After you upload an image, it is displayed in the Photos pane, and you can add it to any DSFdesign
Studio product that allows images to be added (as long as its quality is good enough for the selected
product).
Download images from the cloud
If a service that you use for cloud storage is listed in the Add Photos window, you can download
images from the cloud when personalizing a DSFdesign Studio product.
Depending how the site is configured, you may have the choice of Google Drive, Picasa, Dropbox, or
PrintMe.
Before you can download images from the cloud
• For Google Drive or Picasa, you need a Google account, and your images must already be
uploaded to Google Drive or to a Picasa web album.
• For Dropbox, you need an account and your images must already be uploaded.
• For PrintMe, no account is necessary, but your image must already be uploaded to PrintMe, and
you should have a document ID for the uploaded file.
To download an image from Google Drive
1. Click Add Photos. The Add Photos window opens.
2. Click Google Drive. (If Google Drive is not displayed in the Add Photos window, you cannot
download images from Google Drive.)
3. Enter the user name and password for your Google account. (If you are already logged into your
Google account, you will not be asked for your user name and password.)
4. If asked about allowing access to the service, click Grant Access and click Yes in any other
windows that open.
5. Find the images you want to use and select their check boxes.
6. If you expect to use this image again in the future, select the Save file for later re-use check box.
7. Click Add Files.
8. After the files are downloaded, click Done. The images you downloaded are now displayed in the
Photos pane. Once an image is in the Photos pane, you can drag it to an image placeholder box.
To download an image from a Picasa web album
1. Click Add Photos. The Add Photos window opens.
2. Click Picasa. (If Picasa is not displayed in the Add Photos window, you cannot download images
from Picasa.)
3. Enter the user name and password for your Google account. (If you are already logged into your
Google account, you will not be asked for your user name and password.)
4. If asked about allowing access to the service, click Grant Access and click Yes in any other
windows that open.
Page 77

77
5. Thumbnails of the photos in your Picasa albums are displayed. Find the photos you want to use in
the product and select their check boxes.
6. If you expect to use an image again in the future, select the Save file for later re-use check box.
7. Click Add Files.
8. After the files are downloaded, click Done. The images you downloaded are now displayed in the
Photos pane. Once an image is in the Photos pane, you can drag it to an image placeholder box.
To download an image from Dropbox
1. Click Add Photos. The Add Photos window opens.
2. Click Dropbox. (If Dropbox is not displayed in the Add Photos window, you cannot download files
from Dropbox.)
3. Enter the user name and password for your Dropbox account.
4. If asked about allowing access to the service, click Allow.
5. Find the files you want to use and select their check boxes.
6. If you expect to use this image again in the future, select the Save file for later re-use check box.
7. Click Add Files.
8. After the files are downloaded, click Done. The images you downloaded are now displayed in the
Photos pane. Once an image is in the Photos pane, you can drag it to an image placeholder box.
To download an image from PrintMe
1. To download an image from PrintMe, you must have uploaded the file to PrintMe and received a
document ID via e-mail.
2. Click Add Photos. The Add Photos window opens.
3. Click PrintMe. (If PrintMe is not displayed in the Add Photos window, you cannot download
images from PrintMe.)
4. Enter the document ID you received from PrintMe.
5. Find the images you want to use and select their check boxes.
6. If you expect to use this image again in the future, select the Save file for later re-use check box.
7. Click Add Files.
8. After the files are downloaded, click Done. The images you downloaded are now displayed in the
Photos pane. Once an image is in the Photos pane, you can drag it to an image placeholder box.
Page 78

78
Use saved mages
If you have saved images in your library (ones that you previously uploaded/downloaded and saved,
or images that you uploaded directly to the library), you can add a saved image to the product you are
personalizing.
1. Click Add Photos. The Add Photos window opens.
2. Click Saved Files.
3. Select the image you want to use and click Add Photos.
The saved image that you selected is now displayed in the Photos pane so you can drag it to an image
placeholder box.
Removing images from the Photos pane
If you no longer want an image to be part of the Photos pane, perhaps because the quality of the
image is too poor, you can remove the image from the Photos pane.
1. In the Photos pane, move the pointer over the image you want to delete.
2. Click and confirm the deletion.
Page 79

79
Editing images in DSFdesign Studio products
Some images in DSFdesign Studio products can be edited, for example, cropped, rotated, or
sharpened. RGB images in JPG or PNG format can be fully edited as long as their resolution does not
exceed 2,880 x 2,880 pixels; if the resolution is higher, you can just crop the images. CMYK images in
JPG or PNG format can be cropped. You can also crop images that are in PDF, EPS, or SVG format.
You can make some changes to the appearance of images in a product without changing the
images themselves. For example, you can change the opacity of images (page 89) or rotate them
(page 88).
To edit an image
1. If you added an image to a DSFdesign Studio product by dragging it to an image placeholder box,
the Edit Photo window opens automatically if the image can be edited. Otherwise, double-click an
image to open the Edit Photo window. (A message informs you if the image cannot be edited.)
An image always first opens in crop view. If the image is of poor quality this is where you will be
warned.
The original photo is always displayed on the left. As you make changes, you can see the
transformed photo on the right.
2. Click any of the following buttons on the toolbar at the top of the Edit Photo window:
• Crop (the image always opens in this view automatically) – see page 80.
For some images, cropping is the only option; the other options are unavailable.
Depending on the product, however, you may be able to rotate an image just like other
objects when you are personalizing a product. For information about rotating objects, see
page 88.
• Rotate – see page 82.
• Red Eye – see page 84.
• Brightness/Contrast – see page 85.
Page 80

80
• Exposure – see page 85.
• Tint – see page 86.
• Saturation – see page 86.
• Sharpen – see page 86.
3. If you make a change and do not like the results, click Undo on the toolbar. To go back to the
change again, click Redo.
4. If you make several changes and decide you want to go back to the original photo, click Reset on
the toolbar and then click Yes to confirm that any changes you made will be discarded.
5. To save the changed image so you can use it in other products (and not have to edit it again),
select the Save image for future use check box.
6. After you finish making changes to the image, click Apply Changes. The Edit Photo window closes
and your edited image is displayed as part of the product you are ordering. (To make further edits,
double-click the image.)
Cropping images
If you want to keep only part of an image and remove the rest, you can crop the image. When
cropping, a rectangle is automatically displayed to show a cropped area. You can move this rectangle
and make it large or smaller. As you size the rectangle, the width to height ratio of the rectangle is
maintained no matter how large or small your rectangle becomes. Alternatively, you can crop in free
form. You can then change the rectangle, for example, you can make it very tall and narrow. (In free
form mode, the width to height ratio of the original rectangle is ignored.)
1. An image always opens automatically in crop view, but if you did some other editing and then
want to return to cropping, click Crop on the toolbar of the Edit Photo window. (For some images
cropping is the only option.)
If the image does not meet the resolution (DPI) requirements for the product, a Low Quality
warning link is displayed.
2. If a Low Quality link is displayed, click it to open the Photo Information window so you can find
out how the DPI of your image differs from the requirement. If the DPI is too low, the print quality
will be poor (typically blurry). You may want to use a different image or re-take the photo with
different settings on your camera. (If you decide to include the image despite its poor quality, a
Page 81

81
warning triangle is displayed in the lower right corner of the image when you close the Edit Photo
window and view the product.)
3. To size the cropping rectangle any way you want (without the width to height ratio staying the
same), select the Allow free form selection check box. You can now create narrow or wide
rectangles.
4. Drag the corners of the rectangle so the area you want to keep is surrounded by the rectangle.
(You can also drag the entire rectangle so it covers a different area of the image.) The cropped
image is displayed on the right.
Page 82

82
If the Allow free form selection check box is cleared, the rectangle always maintains the original
width to height ratio no matter what its size.
Rotating images
You can turn images around either to correct their rotation or to change their rotation for a different
effect. You can rotate by 90 degrees or flip images horizontally or vertically.
When you rotate an image in the Edit Photo window and save the changes for future use, the
image is saved with the changed rotation. The next time you use the image in a product, it will be
rotated. If you just want an image to look rotated in a product that you are personalizing, or you
want to turn the image at a specific angle, you can rotate it while viewing the product instead of in
the Edit Photo window. When you do so, you are rotating the image placeholder box, and the
image itself is not changed. (For information about rotating objects, see page 88.)
The steps below show how this image can be rotated in the Edit Photo window.
1. Click Rotate on the toolbar of the Edit Photo window.
Page 83

83
2. Click one of the following:
• Rotate 90 degrees CW to turn the image 90 degrees clockwise (to the left):
• Rotate 90 degrees CWW to turn the image 90 degrees counter-clockwise (to the right):
• Flip Horizontal if you want a mirror image of the original:
• Flip Vertical to turn the image upside down:
Page 84

84
Correcting red eye
If the eyes in a photo have red pupils, you can correct this so the pupil appears black.
1. Click Red Eye on the toolbar of the Edit Photo window.
2. Use the Zoom slider to enlarge the eye that is red. (This makes the next step easier.)
3. Click the red part of the eye and drag so the red is covered with the white rectangle. (Be sure not
to include any red outside the eye, or it will also be changed to black.)
4. Click Apply to the right of the Zoom slider. All the red you covered is removed.
5. If you zoomed in, click Reset Zoom to restore the original display of the photo.
6. If the other eye is also red, repeat steps 2 through 5.
Page 85

85
Changing brightness and contrast
You can lighten and darken your images or increase the contrast between light and dark areas.
1. Click Brightness/Contrast on the toolbar of the Edit Photo window.
2. To lighten or darken the image, do one of the following:
• Use the Brightness slider.
• For finer (more gradual) changes in brightness, increase or decrease the number below the
slider.
3. To change the difference between the light and dark areas in the image, do one of the following:
• Use the Contrast slider.
• For finer (more gradual) changes in contrast, increase or decrease the number below the
slider.
Changing exposure
Exposure is the amount of light applied to a photo. A photo may be overexposed and washed out (too
light) or underexposed (too dark). You can change the exposure to darken or lighten the image.
Thumbnails of recommended exposures are available for selection, or you can change the exposure
manually.
1. Click Exposure on the toolbar of the Edit Photo window.
2. Do one of the following:
• Click a thumbnail to select a recommended exposure.
• Use the Exposure slider.
• For finer (more gradual) changes in exposure, increase or decrease the number below the
slider.
Page 86
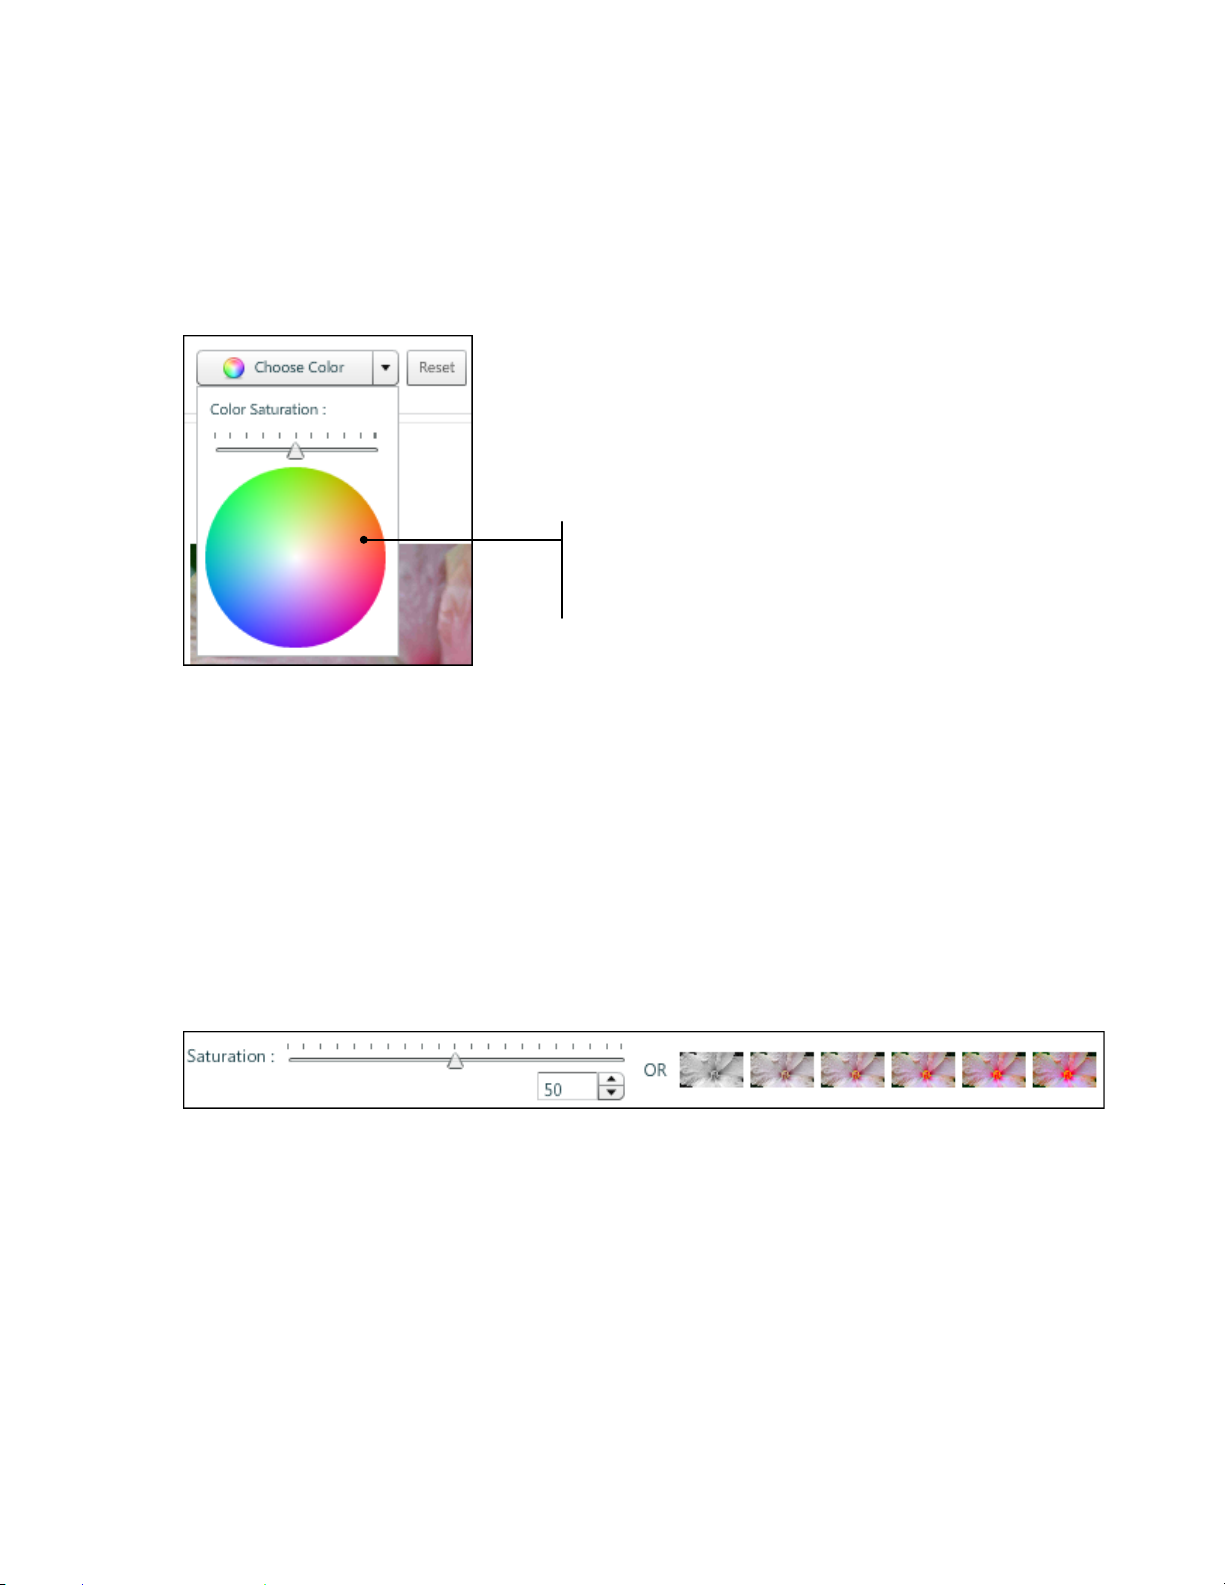
86
Tinting images
For a special effect, you can infuse an entire image with a color of your choice, for example, tint it
blue.
1. Click Tint on the toolbar of the Edit Photo window.
2. If necessary, drag the Color Saturation slider.
3. Click Choose Color and then click a color on the color circle.
Click a color to
select it as the
tint.
4. If you do not like the tint, click Reset.
Changing saturation
Saturation affects the vividness of colors in an image. (The less white there is in an image, the more
vivid the colors are.) Thumbnails of recommended saturations are available for selection, or you can
change the saturation manually.
1. Click Saturation on the toolbar of the Edit Photo window.
2. Do one of the following:
• Click a thumbnail to select a recommended saturation.
• Use the Saturation slider.
• For finer (more gradual) changes in saturation, increase or decrease the number below the
slider.
Sharpening images
You can increase (or decrease) the clarity of edges and details in an image.
1. Click Sharpen on the toolbar of the Edit Photo window.
2. Do one of the following:
• Use the Sharpen slider.
• For finer (more gradual) changes in sharpness, increase or decrease the number below the
slider.
Page 87

87
Formatting text or shapes
When you add your own text or shapes to a DSFdesign Studio product you can always format those
objects, for example, change the font of text or the fill color of a circle. If the text or shape was part of
the original product, your ability to format it depends on the product. For example, you may be able
to format a line in the product but not the text. Just click an object to find out if you can change it any
way. A toolbar of buttons is displayed if you can change an object.
Formatting text
1. Click the text and then click . (To change the text itself, double-click it.)
2. Use the buttons on the formatting toolbar to change the font, point size, color, style, or
justification of the text. (For more information about colors, see page 73.)
3. If necessary, click to change the size of the text in relation to the size of the box; click
to change the size of the box in relation to the size of the text inside it.
Formatting rectangles or circles
1. Click the rectangle or circle and then click .
2. Change the color or thickness of the border or change the fill color. (Thickness is measured in
points.) For more information about colors, see page 73.
Formatting lines
1. Click the line and then click .
2. Change the color or thickness of the line. (Thickness is measured in points.) For more information
about colors, see page 73.
Moving, re-sizing, rotating, or deleting objects
When you add your own objects to a DSFdesign Studio product you can always move, re-size, rotate,
or delete those objects. If an object was part of the original product, what you can do depends on the
product. For example, you may be able to move or rotate an object but not delete it.
Moving objects
As you personalize your product you may want to re-position objects, for example, move some text up
or move a line closer to the right edge.
1. Click an object to select it.
2. Move the pointer until it changes to and then drag the object where you want it. Typically, you
drag from the inside of the object.
Page 88

88
3. As you move an object closer to another object, faint blue lines are displayed temporarily. Use
these lines to help you line up the objects by their edges or centers.
If you want to move several objects at the same time, you can group them and move the group
instead of moving each object one at a time. For information about grouping, see page 90.
Re-sizing objects
After you select (click) an object, small squares called handles are displayed around the object.
• To make a text box, image, rectangle, or circle larger or smaller, click the object and then drag one
of the corner handles out or in, or use the side handles to change just the width or height. By
dragging a side handle of a circle, you can turn it into an oval.
• To make a line longer or shorter, drag the handle at one end of the line to lengthen or shorten it.
Rotating objects
For different effects, you can rotate objects so they are at an angle.
You can rotate an object by dragging it or by using the tool palette.
To rotate by dragging
1. Click the object you want to rotate.
2. When an object is selected, a small green square is displayed above it. Move the pointer towards
this square until you see a curved arrow:
3. Drag to the left or right until the object is rotated the way you want.
Be careful not to rotate the object so that part of it is beyond the edge of the product – that part
will not be included in the product.
Page 89

89
If you want to rotate several objects in the same direction at the same time, you can group them
and rotate the group. For information about grouping, see page 90.
To rotate by using the tool palette
1. Click the object you want to rotate.
2. Click . The tool palette opens.
3. When Rotate is set to 0, the object is in its original horizontal state. Negative numbers rotate the
object to the left and positive numbers rotate it to the right. Either enter a number in the Rotate
field or use the arrows to change the number.
Be careful not to rotate the object so that part of it is beyond the edge of the product – that
part will not be included in the product.
4. When done, click outside the palette.
When you rotate an image using one of the methods above, you are just rotating the box that
contains the image. Some images, however, can be edited so that you rotate the image itself; see
page 82.
Deleting objects
After you select (click) an object, you can delete it whenever is displayed.
• Click an object and click .
Changing the opacity of objects
Opacity controls whether you can see through an object. When you add your own objects to a
DSFdesign Studio product you can always change the opacity of those objects. If an object was part of
the original product, your ability to change its opacity depends on the product.
When the opacity of an object is 100%, nothing shows through it. As you decrease this percentage,
you can gradually see through the object, which also starts to fade. You can use opacity to place
objects on top of each other and still be able to see both objects; you can also use opacity to achieve a
more muted effect.
For example, you may have an image with some text above it:
Page 90

90
You then decide to place a grey rectangle over these two objects to serve as a background. When you
do so, however, the image and text are no longer visible.
You can then decrease the opacity of the rectangle so the text and image are visible. Doing so also
mutes the color of the rectangle.
If you do not want to mute colors, you can move an object to the back or front of other objects.
In this example, you could move the grey rectangle back so it is behind the other two objects, and
the color of the rectangle will remain as it was. For information about moving objects to the back
or front, see page 72.
To change the opacity of an object
1. Click the object and then click . The tool palette opens.
2. In the Opacity field, enter a percentage or use the arrows to increase or decrease the percentage.
Alternatively, use the slider below the Opacity field.
3. When done, click outside the palette.
Grouping and ungrouping objects
In a DSFdesign Studio product, you can group some objects together and then move, rotate, or line up
all the objects in the group at the same time. For example, you may have some text, a line, and a
rectangle that you want to move to one corner of the product and then line up the same way. By
grouping these three objects, you can move them in one step and line them up in another step,
instead of moving and lining up each object individually. When objects are part of a group, the system
ensures they are lined up the same way, for example, by their right edges. You can also make the
horizontal or vertical spacing between grouped objects the same. Likewise, if you rotate a group, all
the objects in the group are turned at exactly the same angle.
Page 91

91
To group objects
1. Click the first object you want in the group, press Shift, and click the other objects you want in the
group. They are now all enclosed in a rectangle.
Rectangle encloses the
objects in the group.
You can also group objects by clicking one object, clicking , clicking , pressing Shift, and
clicking the other objects you want in the group.
2. Do any of the following:
• Move the group by dragging it when the pointer changes to .
• Rotate the group. (For information about rotating objects, see page 88.)
Change the way the objects in the group are lined up in relationship to one another by clicking
•
and then clicking one of the alignment buttons to line up the objects in the group.
For example, in the figure below the two pieces of text and the line are centered.
To ungroup objects
After you finish moving, rotating, or lining up a group of objects, ungroup them so you can work with
the individual objects again.
1. If necessary, click .
2. Click .
Page 92

92
Variable Data Products (VDPs)
Variable data products (VDPs) may include business cards, note cards, invitations, or promotional
flyers that you personalize by supplying data such as a name and address and/or by adding an image.
The site provides the basic product (such as a business card) and you personalize it.
DSFdesign Studio products are another type of product that can be personalized; such products
may also be available for order on the site. For information about DSFdesign Studio products see
page 66.
Sometimes data that you can use for personalizing a product may be provided on the site. For
example, an address book from which you can select contact information may be available.
Sometimes you can create several versions of the same product, each personalized differently, for
example, 500 copies of a promotional flyer, with each flyer addressed to a different prospect.
Different variations of VDPs may be available:
• Some products are personalized one at a time (as a "one-off," or to address a single situation). For
example, you are an HR manager and need to order your company business card for a new
employee. In this case, you customize the business card with the information for a single person.
This is also called a single-record order. Depending on how the print shop configured the product,
single-record VDPs may use Visual Product Builder (see below) or Classic Product Builder (see page
97).
• Some products can be personalized several at a time. For example, your company opens a new
office, and 10 employees need new business cards. In this case, the order includes 10 variations of
the business card, personalized for each employee. This is also called a batch order. VDPs that are
personalized in a batch use Classic Product Builder.
Personalizing single-record VDPs (Visual Product Builder)
Some variable data products (VDPs) are designed to be personalized one at a time. One example is a
note pad to which you add a logo and some text; another example is a business card that you
personalize with information for one person (like yourself or one member of your organization). These
products are also known as single-record personalized products. (Other VDPs are batch products since
they are personalized several at a time. See page 99.)
Depending on the product, sometimes you fill in a form (for example, provide your contact
information) and other times you select information from a data source (for example, an address book
that your company makes available). In addition, for some products you can upload your own image
to personalize the product or select an image from a gallery.
Page 93

93
In Visual Product Builder, you work in a window with two panes: Personalization and Product
Preview. Initially, the Personalization pane is open and the Product Preview pane is minimized
(closed). After you enter or select the data for personalizing the product, you review your personalized
product in the Product Preview pane. For tips about working with the two panes, see “Tips for
working with the personalization and product preview panes” on page 96.
Provide required information
1. In the Job Name field, enter a descriptive name for the job so that you can identify it easily.
2. Enter the Quantity.
You can click Save (at the bottom of the page) at any time to save the job specifications for future
use.
Page 94

94
Personalize the product
How you personalize a product depends on the product you selected.
If you must complete a form
For some products you must complete a form (there is no data to select).
• Enter information in the fields that make up the form. Be sure to complete any required fields,
identified with a red * (asterisk).
If you can select existing data
For some products, you can select information from a data source such as a company address book or
other list. If a data source is available, the Select Data Source field is displayed at the top of the
window above the form. (You can always enter information directly in the form, however.)
1. Select the data source you want to use, for example, Address Book. The Fill from Data Source
window opens and lists the selections available to you.
2. If the list is long, you can search: In the first Search By field, select a field (for example, Last
Name); in the second field, enter what you want to find (for example, Smith); and click .
3. Select the data you want to use and click Map Data.
Page 95

95
The Fill from Data Source window now shows how fields in the data source are mapped to fields in
the product form.
4. Review the mapping and, if necessary, correct it by selecting a different field in the Datasource
Name column. (The Sample column helps you see how data is being mapped.)
5.
When you are satisfied with the mapping, click Fill Form. The data you selected from the data
source is now displayed in the form.
6. If you want to make any further changes to the data, edit it directly in the form.
If you can add an image
Some products can include (or require) images. Either click Upload Image to provide your own image
or click Select from Gallery to choose an image from a gallery of pre-supplied images. (What you can
do depends on the product.)
If you can format text
Some products let you format text in certain fields. For example, you may be able to change the font,
point size, style, or color of the company name in a flyer. When you can format the text in a field, a
formatting toolbar is displayed below the field so you can make your selections.
Page 96

96
If print options are available
• If the left-hand pane includes print options (for example, a choice of color/B&W or of media),
make your selections.
Preview the product
After you personalize the product with your data, you must preview the product before you can add it
to the cart.
1. Click Update Preview. The Product Preview pane now expands and displays your product.
2. Zoom in or out using the - or + zoom buttons.
To restore the preview to its original size, click .
3. To see what the printed version of the product will look like, click PDF Proof.
4. If the product has more than one page, preview each page by using the page buttons.
5.
If necessary, make corrections to the product and then preview it again.
When you make certain changes after previewing your product, an Update Price & Preview
button will flash to remind you to preview the product again.
Add to cart
When you are satisfied with your product, you can add it to the cart.
1. Click Add to Cart.
If the product is part of a kit, a Finish button is displayed instead of Add to Cart. Click Finish to
continue with the process of ordering the kit (see page 63).
2. If asked, click Approve to confirm that you reviewed the product and are satisfied.
3. Proceed with the checkout process when you are ready.
For information about the shopping cart and checkout, see page 103.
Tips for working with the personalization and product preview panes
In Visual Product Builder, you work on single-record VDPs in a window with two panes:
Personalization and Product Preview At times it is helpful to have just one pane open. For example,
when you are previewing the product you may want to view it in a larger space. At other times, it is
helpful to see both the form and preview at the same time.
Page 97

97
You can control what is displayed like this:
• If a pane is open, click its title bar to close it; if a pane is closed, click its title bar to open it (in a
split window).
Alternatively, to close a pane, right-click inside it and select Close Personalization Panel or Close
Preview Panel. To open a closed pane, right-click its title bar and select Open Personalization
Panel or Open Preview Panel.
• Click Split Window at the top of a pane either to divide the window horizontally between the two
panes or to close the current pane so that the window is no longer split.
Alternatively, right-click inside a pane and select Split Window.
• When the window is split, drag between the two panes if you want one to be larger than the
other.
Personalizing single-record VDPs (Classic Product Builder)
Some variable data products (VDPs) are designed to be personalized one at a time. One example is a
note pad to which you add a logo and some text; another example is a business card that you
personalize with information for one person (like yourself or one member of your organization). These
products are also known as single-record personalized products. (Other VDPs are batch products since
they are personalized several at a time. See page 99.)
Depending on the product, sometimes you enter some text (for example, your name and address) and
other times you select information from a data source (for example, an address book that your
company makes available). In addition, for some products you can upload your own image to
personalize the product or select an image from a gallery.
In Classic Product Builder, you are guided through a series of steps, one of which is always a
Personalization step:
Provide required information
After you click Begin for a single-record VDP in Classic Product Builder:
1. In the Job Name field, enter a descriptive name for the job so that you can identify it easily.
2. Enter the Quantity.
You can click Save My Job (at the bottom of the page) at any time to save the job specifications
for future use.
Page 98

98
Personalize the product
1. When information already exists for personalizing the product, a Select Data Source field is
available.
a. In the Select Data Source field, choose the source of information you want to use and click
View. A list of selections (records) is then displayed as shown in the figure below.
Instead of selecting information from a data source, you can always enter information
directly in the fields in the right-hand pane (Street Address through Zip in the figure
below).
b. If there are many records, use the search fields to find what you want and/or use the Show
field to control how many records are displayed at the same time.
c. Select the information you want to use for the product and click Submit and Fill. The selected
information is displayed on the right side of the page, as shown for Georgia in the figure
below.
You can edit the information displayed in the fields on the right.
You can enter
data here instead
of selecting a
record, as well as
edit data in a
selected record.
2. If the product requires you to enter information directly (instead of selecting a record), a Select
Data Source field is not available. Instead there are fields you must complete, for example, names
as shown in the figure below.
• Enter the required information, for example, provide your First Name and Last Name.
3. If the product includes an image, either click Upload Image to provide your own image or click
Select from Gallery to choose an image from a gallery of available images. (What you can do
depends on the product.)
4. If print options are available for the product (for example, media), select the ones you want. (The
selections that are available to you depend on the product.)
Page 99

99
Preview the product
Before you can continue with the order process, you must preview the product.
1. Click Update Preview (above the Personalization area) to see an image of the product.
2. To see the product in its actual size (in a PDF), click Full-Size Preview.
3. If the product looks correct, click Next to continue to the review step. Otherwise, make any
necessary corrections.
Review and add to cart
1. Review the summary of your order (including print options).
2. If the I approve check box is displayed, select it after you verify your order is correct.
3. Click Add to Cart.
If the product is part of a kit, a Finish button is displayed instead of Add to Cart. Click Finish to
continue with the process of ordering the kit (see page 63).
4. Proceed with the checkout process when you are ready.
For information about the shopping cart and checkout, see page 103.
Personalizing VDPs in a batch (several at a time)
Some variable data products (VDPs) are personalized several at a time so that the resulting order
includes several variations of the same product, each personalized differently. One example is an
order for business cards for certain members of your organization, with each business card having
contact information for a particular person. These products are also known as batch VDPs. (Other
VDPs are single-record products since they are personalized one at a time. See above starting on page
92.)
Page 100

100
For products that are personalized in one batch, the information is typically in a data source (for
example, an address book that your company makes available); you select what you need from this
data source. You may also have the option of creating your own data source based on an external file.
In addition, for some products you can upload images to personalize the product or select images
from a gallery.
Provide required information
After you click Begin for a batch VDP:
1. In the Job Name field, enter a descriptive name for the job so that you can identify it easily.
2. Enter the Quantity.
You can click Save My Job (at the bottom of the page) at any time to save the job
specifications for future use.
If uploading data from an external file
A data source may already be available. If so, continue to “If a data source is available” on page 101.
Otherwise, you can upload your data from an external file as described here:
1. Under Select Data, choose Upload Data Source.
2. In the Type field, select the format of the data you are uploading.
3. In the Field Delimiter field, select the delimiter that separates values in the file, for example, , for
a comma-separated values (CSV) file.
4. To use a template for your data, click Download Template. A template helps to ensure that your
data source is in the correct format. (Alternatively, first click View Template Fields and then click
Download.)
If a sample template is available for the product, a Sample Data link is available instead of
Download Template.
5. If you download a template, open it in a spreadsheet application such as Microsoft Excel or a text
editor such as Note Pad that can read files in CSV format. Enter your data or import it (if you
already have it in another format) and then save it as a CSV file under a new name.
Text that you enter in your template file cannot contain any commas (,) or other separators
unless you enclose all the text for that field in double quotation marks (").
 Loading...