

Page 1

Using the REC Menu (Cont’d)
Selecting the Compression Ratio
Use 왔 or 왖 to select the desired
compression ratio, then press either 왘 or
the MENU/SET button. You will return to
screen 2 with your chosen compression
ratio displayed.
• If you press 왗, the setting is invalidated and you
will return to screen 2.
4
4. Select “ENTER” and press either 왘 or the
MENU/SET button. The setting is completed
and you will return to screen 1.
• If you press 왗, the selection is invalidated and
you will return to screen 1.
Standard number of pictures you can take in each quality mode (without
sound or motion)
Image Size
2304 × 1704
1600 × 1200
640 × 480
• The number of photos you can take may vary depending on the subject.
• When there are files other than images, or when the quality and/or recording mode
have been changed, the number of photos you can take is not limited to the table
above. Please use the table is a guide for the number of photos you can take.
Compression 64 MB
Ratio
SD Memory Card
Internal Memory
FINE About 40 Photos –
NORMAL About 80 Photos –
FINE About 80 Photos –
NORMAL About 160 Photos –
FINE About 320 Photos About 10 Photos
NORMAL About 640 Photos About 20 Photos
51
Page 2

Using the REC Menu (Cont’d)
Adjusting Exposure Compensation
- If you wish to brighten or darken an entire image, use the exposure
adjustment function.
- The exposure can be corrected ±2.0 EV in adjustment steps of 0.5 EV.
1
1. Select “EXPOSURE” and press 왘.
2
2. The through image mode is entered, and
the adjusting exposure compensation bar
is displayed. If you press 왘, the cursor
moves toward the plus side while pressing
왗 moves it toward the minus. Select the
desired compensation level (brightness) and
press the MENU/SET button. The setting is
completed and you will return to screen 1.
• Even after a correction, there are times when the change is not apparent, such as
when the subject is in a semi-dark place.
• When flash is used, the compensation effect may not be sufficient.
52
Page 3

Using the REC Menu (Cont’d)
Adjusting White Balance
- The colour tone of your photos will change according to the kind of light
source. While the AUTO mode can be used in almost all instances, you
can alter the white balance settings to suit the environment and lighting
when you take a picture.
1
1. Select “WHITE BALANCE” and press 왘.
2
2. Use 왔 or 왖 to select the desired mode, then
press either 왘 or the MENU/SET button.
The setting is completed and you will return
to screen 1.
• If you press 왗, the selection is invalidated and
you will return to screen 1.
Available Modes
• AUTO (Default) :The camera adjusts the white balance automatically.
• DAY LIGHT :Ideal for taking photos in strong sunlight.
• CLOUDY :Ideal for taking photos in the shade or when it is cloudy.
• FLOU :Ideal for taking photos indoors with normal incandescent lighting.
• TUNGSTEN :Ideal for taking photos indoors with fluorescent lighting.
About White Balance
The human eye has the ability to compensate so that it sees white subjects
as white, whatever the light source. Digital cameras and similar devices can
also “see” white subjects as white by first adjusting the colour balance of the
ambient light to match the photo subject. This adjustment is called the White
Balance.
53
Page 4
Using the REC Menu (Cont’d)
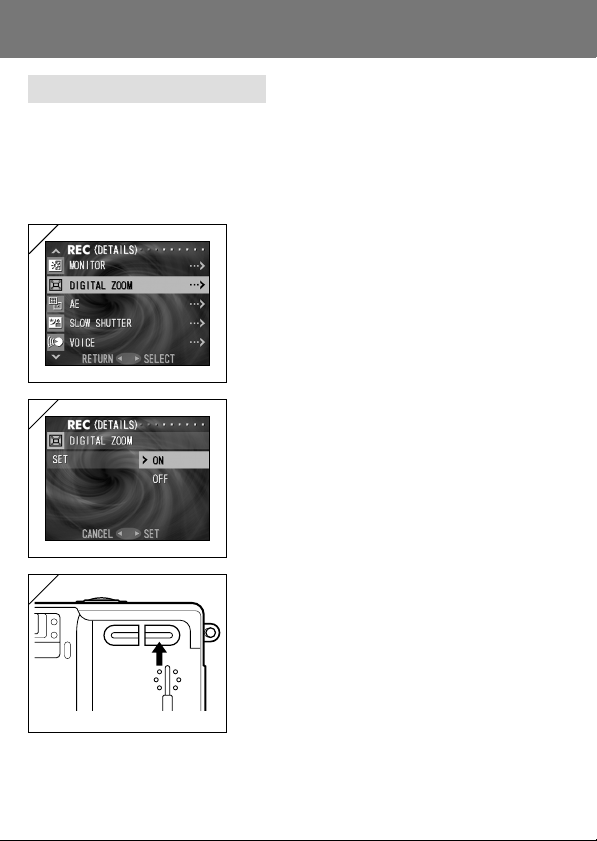
Using the Digital Zoom
- Digital zoom can double the largest zoom ratio achieved by the optical zoom.
- When using the digital zoom, view the field through the LCD monitor.
Because the zoom effect is accomplished electronically, it is not possible
to use the viewfinder.
- When shooting movies, the digital zoom function is not available.
1
1. Select “DIGITAL ZOOM” and press 왘.
2
2. Use 왔 or 왖 to select “ON”, then press either
왘 or the MENU/SET button. The setting is
completed and you will return to screen 1.
• If you press 왗, the selection is invalidated and
you will return to screen 1.
3
3. From screen one, when you press 왗, you will
return to the through image mode. To take a
picture, press the TELE zoom button until it
reaches the end of the optical range, then
release the button for a moment, then press
and hold the TELE zoom button and the digital
zoom is engaged. Use the LCD monitor to
compose your photo, and take your photos.
• The LCD monitor will display the digital zoom
ratio (×2).
• To return to normal mode, press the WIDE zoom
54
button.
Page 5
Using the REC Menu (Cont’d)
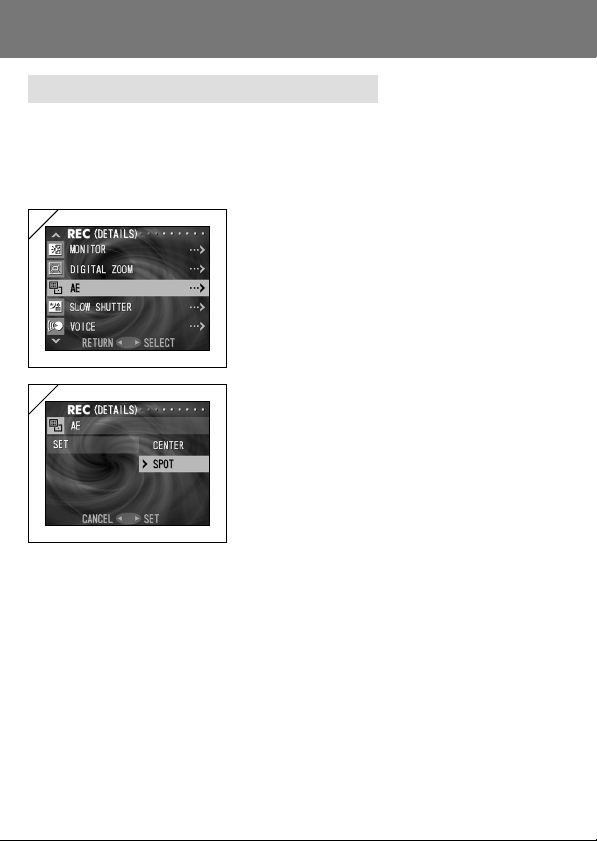
Changing Auto-Exposure (AE) Modes
- Your camera uses center-weighted metering as the default, but it can be
changed to spot metering.
- Spot metering is used to ensure matching the exposure to a targeted part
of your subject.
1
2
1. Select “AE” and press 왘.
2. Use 왔 or 왖 to select “SPOT”, then press
either 왘 or the MENU/SET button. When
the setting is completed, you will return to
screen 1.
• If you press 왗, the selection is invalidated and
you will return to screen 1.
Center-weighted metering
In this mode the camera sets the exposure according to the metering for the
central part of the whole frame. It is ideal for taking photos where the brightness
of the subject in the center of the frame is desired.
Spot metering
In spot metering the camera measures the light of just the subject in the center of
the frame, and sets the exposure to it. This mode is ideal when the background of
the picture is brighter than the subject, or there is a great deal of contrast between
the two, as the camera allows you to take the photo with the exposure set to the
brightness of your desired subject.
55
Page 6
Using the REC Menu (Cont’d)
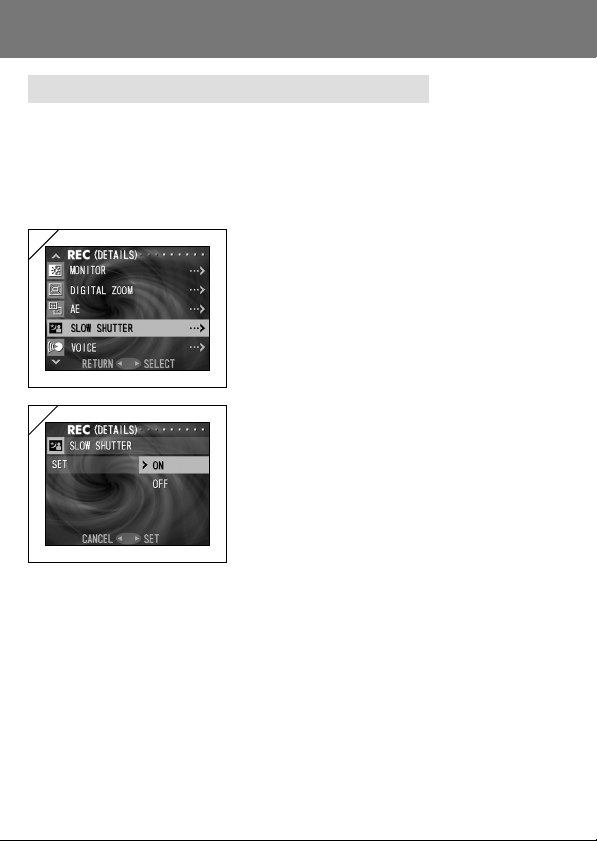
Changing to the Slow Shutter Speed Mode
- The normal (default setting) shutter speed ranges between 1/60th to 1/2000
of a second, but this can be changed to a range of 1 second to 1/2000th of
a second.
- When taking photos in dark locations, the shutter speed must be slow, so
use a tripod to keep the camera steady.
th
1
2
1. Select “SLOW SHUTTER” and press 왘.
2. Use 왔 or 왖 to select “ON”, then press either
왘 or the MENU/SET button. When the
setting is completed, you will return to
screen 1.
• If you press 왗, the selection is invalidated and
you will return to screen 1.
• Slow shutter speed is only in effect whilst in “Slow-Sync”/“Off”/“Distant View”
modes. When in a dark location, use a tripod to keep the camera steady.
• To return to normal shutter speeds, change the setting back to off.
56
Page 7

Using the REC Menu (Cont’d)
Making Voice Memos
- The longest voice only memo you can record at one time is approximately
15 seconds.
- Take care not to cover the microphone on the top of the camera.
1
1. Select “VOICE” and press 왘.
2
2. Screen 2 will appear and the camera enters
in the voice recording mode.
Press the shutter button and recording
begins.
• If you do not press the shutter button, you can
return to screen 1 without making a recording
by pressing the MENU/SET button.
• When the available recording time runs out, recording will end automatically. If you
wish to stop recording, simply press the shutter button again.
• While recording, the elapsed time is displayed on the upper right of the screen.
• To play back the recording, see page 65.
• Recording a voice memo reduces the number of photos you can take.
57
Page 8

Using the REC Menu (Cont’d)
Using After Recording
- You can add voice comments (After Recording) to photos you have already
taken. You can also erase previous voice comments, as well as re-write
them.
- The maximum length of time per photo you can record is about 15 seconds.
1
2
1. Select “ADD REC” and press 왘.
2. Previously recorded photos are displayed.
By pressing 왗 or 왘, select the still photo to
which you wish to attach a voice comment.
• Sound cannot be recorded to a photo displayed
in the movie (MOV) mode.
• If you press the MENU/SET button, the selection
is invalidated and you will return to screen 1.
3
3. Press the shutter button to start recording.
Record your comments facing the
microphone on top of the camera.
• When remaining time runs out, the camera stops
recording automatically. You can stop recording
at any time by simply pressing the shutter button
again.
• While recording, the elapsed time is displayed
on the side of the screen.
58
Page 9

Using the REC Menu (Cont’d)
4
4. When recording is finished, screen 4 is
displayed. Using 왗 or 왘, select either “YES”
or “NO” and press the MENU/SET button.
• If you select “YES”, you will return to screen 2,
so select the next photo to which you want to
add a voice comment.
If you select “NO”, After Recording will finish
and you will return to screen 1.
Erasing recorded voice comments
1
1. When you are on screen 2 on page 58,
select the picture with the recording you
wish to erase and press the DELETE button.
• Photos with voice comments have a WAV sign
displayed on them.
2. If you wish to erase only the voice comment,
select “THIS”, and to erase all the photo and
voice comments in one go, select “ALL”
using 왔 or 왖 and then pressing the MENU/
2
SET button.
• If you decide not to erase, press the DELETE
button again.
3. When the “Now DELETE…” sign
disappears, erasing has finished and you
will return to the REC menu screen.
• To re-record, repeat Steps 1 to 4 on pages 58 and 59. When you have finished rerecording to a photo with a prior recording, the previous recording is erased and only
the new one remains.
• It is not possible to record to a protected photo or when either a card or internal
memory doesn’t have enough space.
• Making recording with After Recording reduces the number of pictures you can take.
59
Page 10

Using the REC Menu (Cont’d)
Taking Sepia Tone Photos
- You can take sepia tone photos.
1
2
1. Select “SEPIA” and press 왘.
2. Use 왔 or 왖 to select “ON”, then press either
왘 or the MENU/SET button. When the
setting is completed, you will return to
screen 1.
• If you press 왗, the selection is invalidated and
you will return to screen 1.
60
Page 11

61
Page 12

Basic Playback/Erasing Playback
Playing Back Pre-recorded Images
- You can play back pre-recorded images on the LCD monitor.
- When you play back images, it doesn’t matter whether the camera’s power
is OFF or ON.
- Just in case battery power runs low, have a spare charged battery pack
(sold separately, DR-LB4) on hand. Alternatively, using the AC adapter is
recommended. (sold separately, model # DR-AC4)
1
1. Press the PLAY button and the last recorded
photo will be played back on the LCD
monitor.
• If there isn’t any image data recorded, the
message “NO DISPLAY DATA” will be displayed.
2. Every time you press or , the previous
or next photo will be played back.
• When you have finished playing back photos,
turn off the LCD monitor by pressing the PLAY
button again to prevent battery consumption.
Also, if you will not be taking any photos, close
the lens cover, turning OFF the power.
62
Page 13

Playback (Cont’d)
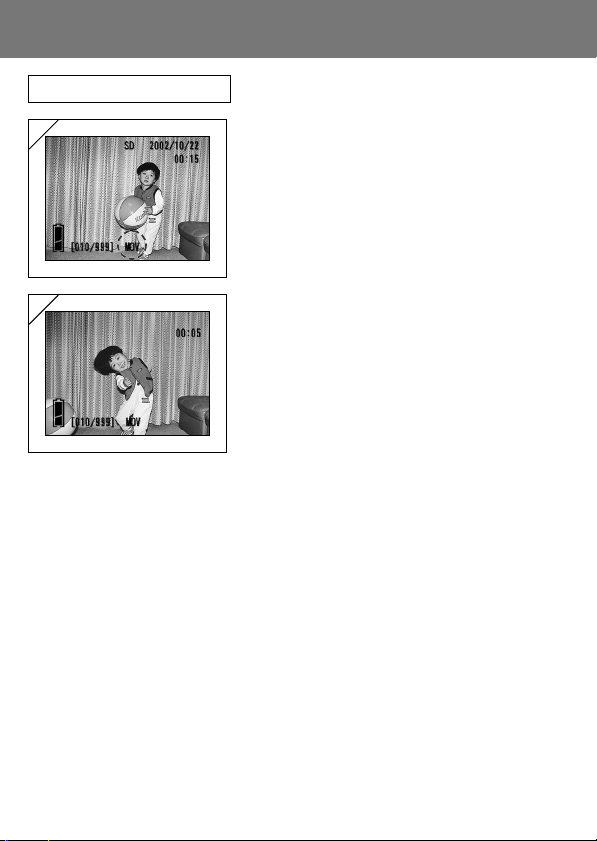
The Playback Image Display
In addition to the images you’ve taken, the following information is displayed.
• You can set the camera so information is not displayed (p.92).
q
w
e
r
u
t
y
1 Recording Media Display
The type of media in use is displayed.
• The SD Memory Card or Multimedia Card* :SD
• Memory Stick :MS
• Internal Memory :IN
* Even if a Multi-media Card is used,
“SD” will be displayed.
2 File Number
The file and directory numbers
recorded in the card are displayed.
3 Protected Display
If an image is protected, the Protected
symbol is displayed.
4 Digital Zoom Magnification
The magnification ratio is displayed
when the digital zoom is in use.
5 Remaining Battery Power
Display
When the battery is in use, the
remaining power is displayed in three
levels (p.19).
i
o
6 Image No. (Playback Frame No./
Total Frame No.)
Your camera is capable of playing back
up to 999 frames. If there are more than
999 frames on a card, it is not possible
to use playback.
7 Date & Time Recorded
1)Normally the time & date an image
was recorded are displayed.
2)When movie images or still images
with sound are played back, the
playback time is displayed.
8 Image Size
Image size is displayed.
9 Picture quality mode
1)Normally the picture quality mode in
use when the picture was shot is
shown.
2)In movie images, MOV is displayed.
3)In still images with sound, WAV is
displayed.
63
Page 14
Playback (Cont’d)
Playing Back Movies
1
1. After pressing the PLAY button, use or
to select the movie you wish to see.
• MOV is displayed on the movie image.
2
2. If you press the shutter button, the movie
images will be played back. When playback
is finished, the display returns to screen 1.
• Symbols displayed when a movie is played back
are MOV, remaining battery power, image
number, and elapsed playback time only.
• If you want to stop during playback, press the
shutter button again.
64
Page 15

Playback (Cont’d)
Playing Back Voice Memos
- Play back the contents of your voice memos (p. 57).
1
1. After pressing the PLAY button, use or
to select a voice memo image.
• The voice memo time is displayed in the upper
right of the screen.
2
2. Press the shutter button and the voice
memo is played back. When the memo
finishes, the display returns to screen 1.
• Take care not to cover the speaker on the back
of the camera (p.15).
• The playback time (elapsed) is displayed in the
upper right of the screen.
• Press the shutter button again if you want to
stop during playback.
65
Page 16

Playback (Cont’d)
Playing Back Enlarged Images (Digital Zoom)
- You can play back your images as enlargements.
1
2
1. After pressing the PLAY button, use or
to select the image you wish to see.
Then use the TELE zoom button to zoom
in; every time you press the TELE button,
the image is enlarged further.
• The zoom ratio is displayed on the LCD monitor.
• To zoom back out, press the WIDE zoom button.
2. Use , , , or to scroll around the photo
to the part you want to see.
• To conserve your battery once you’ve finished
viewing, press the PLAY button again to turn off
the LCD monitor.
66
Page 17

Playback (Cont’d)
Using the Quick-view Function
- If you pre-set the camera to the Quick-view mode (p. 91), you can review
pictures on the LCD monitor right after you’ve taken them.
When using the viewfinder to shoot images, with the LCD monitor off.
Even after you take a picture, the image is not automatically displayed in the
LCD monitor.
When using the LCD monitor for shooting images
1) After you take a picture, the LCD monitor automatically displays it.
2) After about three seconds the LCD monitor returns to the through image.
67
Page 18

Erasing the Playback Image
- You can erase playback images (one frame or all).
- You cannot erase protected images.
- Once an image is erased, it cannot be restored.
1
1. After pressing the PLAY button, use or
to select the image you wish to erase.
• If you wish to erase all frames, it doesn’t matter
which image is displayed.
2
2. Press the DELETE button and a screen
appears indicating the media type to be
erased and prompting you to select the
frame range. Press or to select “THIS”
(the selected image) or “ALL”, and press the
MENU/SET button.
• If you decide not to erase a frame, press the
DELETE button again and you will return to
screen 1.
3
3. Once erasing starts, the “Now DELETE…”
screen is displayed. When the process is
finished, the display returns to the playback
image.
• If there isn’t any image data, “NO DISPLAY
DATA” is displayed.
• Once an image is erased, it cannot be restored.
68
 Loading...