

Page 1
Displaying Images on
the LCD Monitor
Playing Movies
Image
Playback
Basics
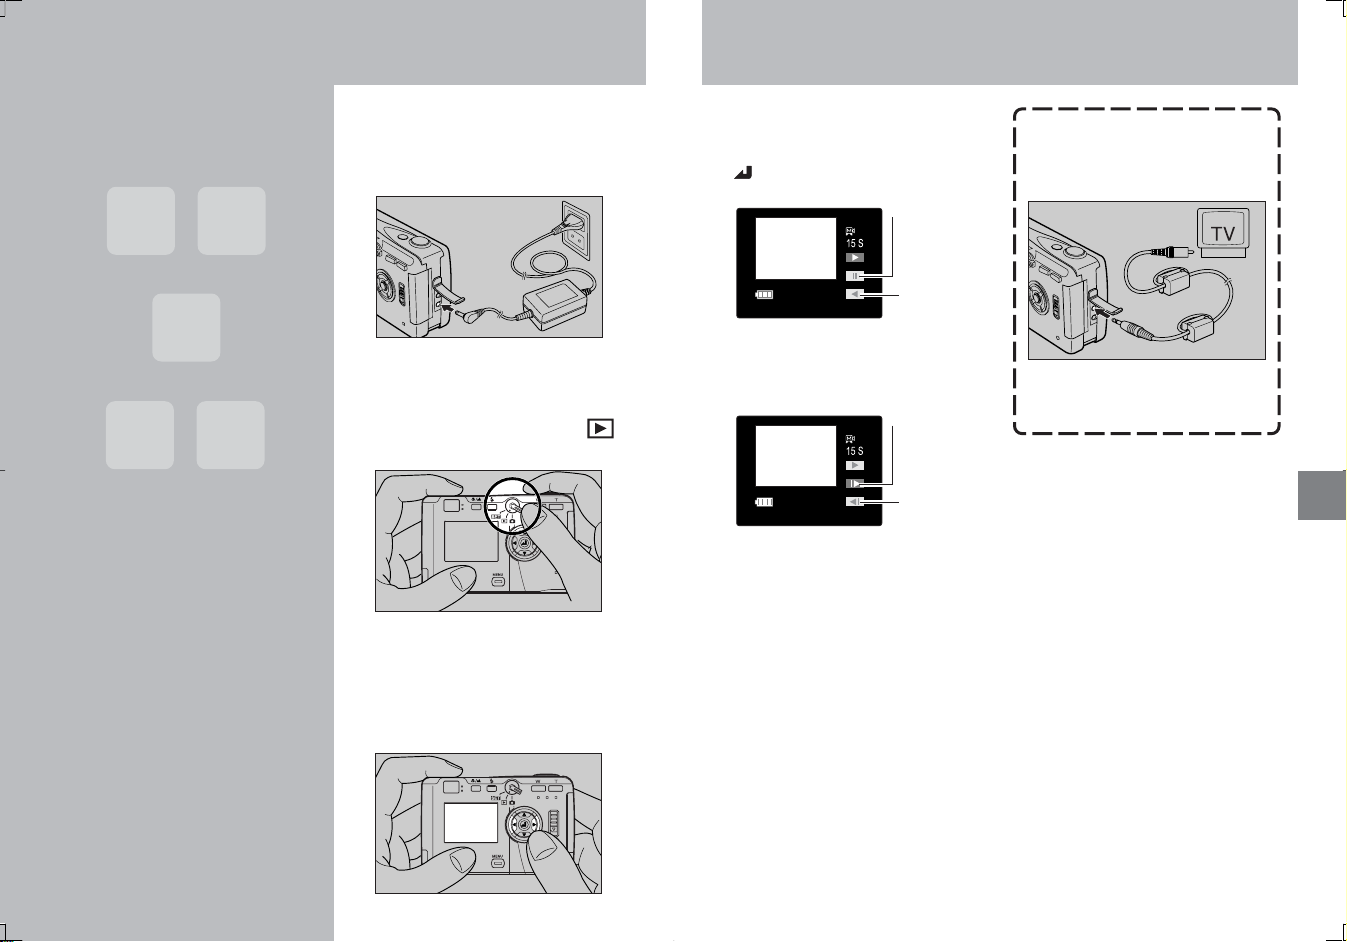
To prevent depletion of the
battery, use the AC adapter when
displaying images for an extended
time.
¶ Confirm that a memory card
containing photographic images is
loaded in the camera.
Set the mode select lever to “ ”
and turn camera power ON.
The image will be displayed on
the LCD monitor. To display
images in the order they were
taken, press the “#” button; to
display images in the reverse
order, press the “@” button.
To play movies, press the “%”
button and select [3], then begin
the movie playback by pressing
“
”.
Pause
Reverse
playback
Frame-by-frame playback can be used
during the pause mode.
Forward
frame
advance
Reverse
frame
advance
<Other Applications>
A television screen can be used to
preview your photographs.
¶ When connected to a television
in this way, the LCD monitor
turns off automatically.
4342
Page 2
Advanced Image
Playback and
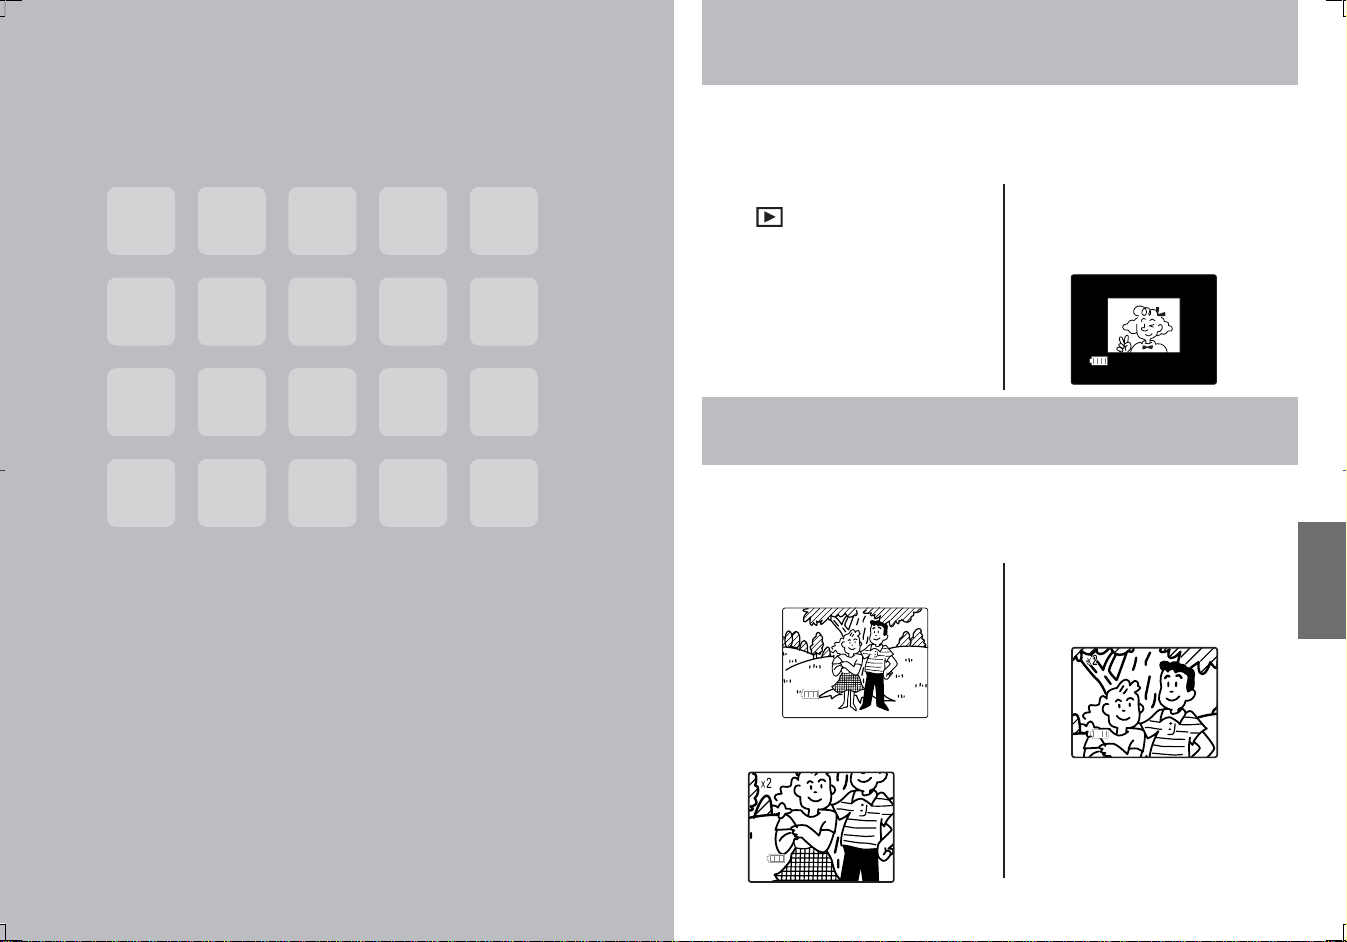
“Thumbnail” Picture Review in Forward/Reverse Direction
Thumbnail images of your pictures can be viewed quickly in succession
in either the forward or reverse direction.
“Thumbnails” are reduced-size versions of the original images in your camera,
and are displayed as follows:
1 Set the mode select lever to
”, then hold the “@” or
“
“#” button depressed.
2 In a few seconds, thumbnail
images of your recorded
pictures will begin appearing in
succession.
Delete Functions
Closeup Image Playback (2x)
Images can be enlarged to twice their original size during playback to
focus on certain features when desired.
<Operation>
1 Display the image you wish to
enlarge.
2 Press the “T” button.
The central
part of the
photograph
will be
enlarged by
2x.
3 Use the “%”, “fi”, “@”, and
“#” buttons to move the
screen to the part of the image
you wish to view.
¶ To change to a different
photograph, first press the “W”
button to return to the original
image size.
45
Page 3

Displaying Exposure Information
Multiple Image Display (Index Display)
Information regarding the exposure conditions and functions set at time
of exposure can be displayed.
<Operation>
1 Select and display the image
whose information you wish to
see.
2 Press the “%” button.
Folder name and
Image file name
Date of exposure
Shutter speed
Aperture
3 Press the “%” button again to
turn off the information display.
¶ The “fi” button can also be used to
select the information display.
Protect status
File size
Image quality setting
DPOF setting contents:
number of prints and date
imprint ON/OFF
Exposure
compensation
This function allows you to display six small images at a time on the
LCD monitor, providing a quick way to find and index your pictures.
This feature can be used in conjunction with other functions on the
playback menu.
<Operation>
1 Press the “MENU” button.
2 Press the “ ” button.
Multiple
image
playback.
3 Use the “%”, “fi”, “@”, and
“#” buttons to move to the
desired picture.
4 Press the “ ” button to
display the selected picture
normally.
<Other Applications>
During use of multiple image
display, pressing the “MENU”
button will allow simultaneous
use of other playback functions
(see page 48-51, 53-55). Use
the “#” and “@” buttons to
select the desired playback
function.
¶ Individual images cannot be
selected when the menu is
displayed. To select an image,
press the “MENU” button to turn
off the menu first.
¶ The image rotation function
cannot be used together with
multiple image display.
4746
Page 4
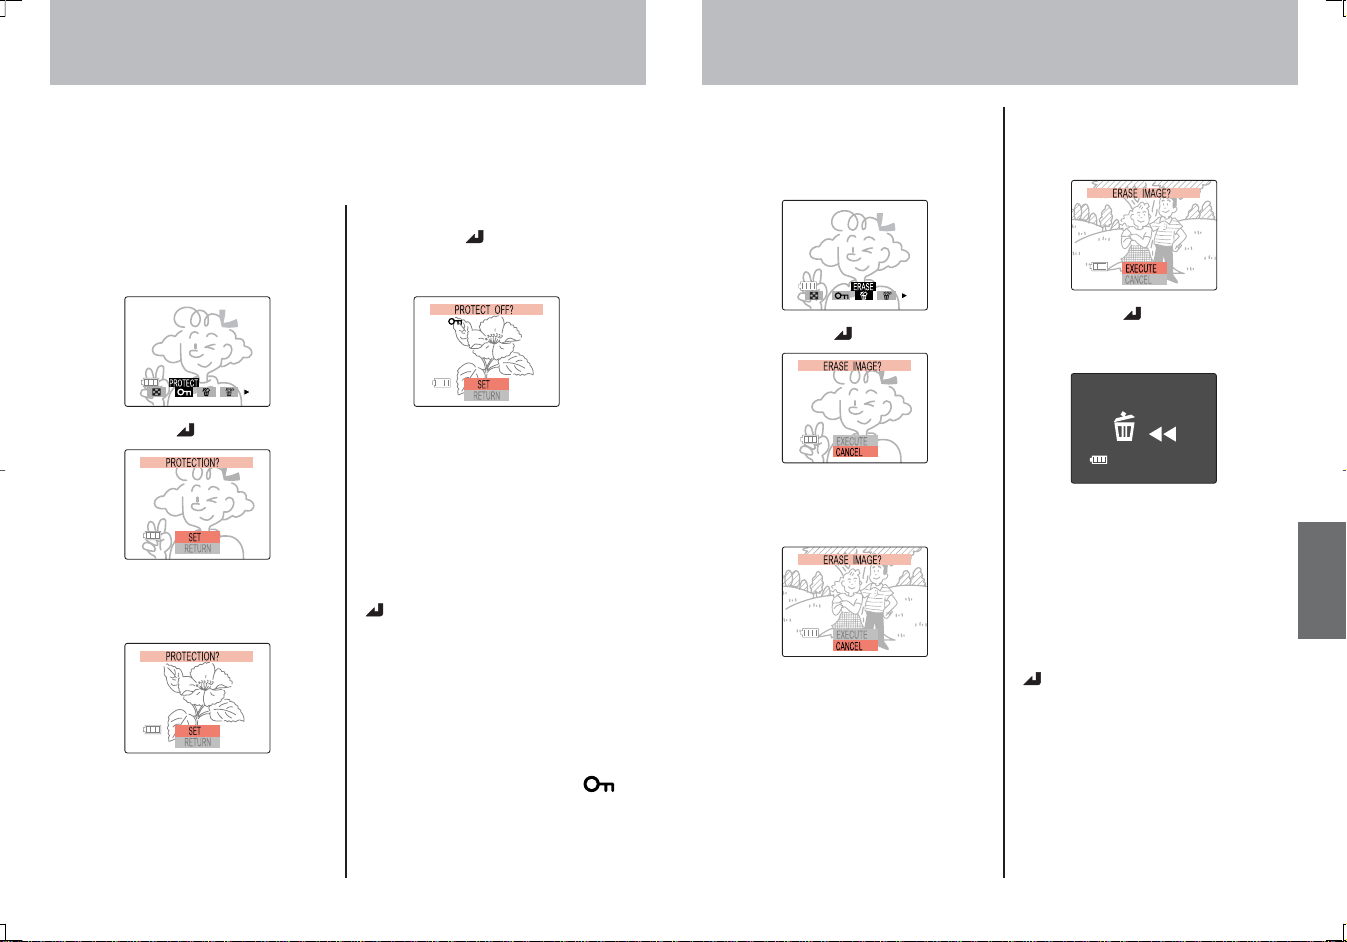
Erasure Prevention (Image Protect Function)
Erasing Individual Images
This function can be used to place a protective lock on individual
pictures, preventing the inadvertent erasure of important images on
your memory cards. This function is particularly convenient when used
when erasing multiple images, or using the all-erase function (page 50).
<Operation>
1 Press the “MENU” button.
Press the “#” or “@” button to
select [PROTECT].
2 Press the “ ” button.
3 Press the “@” or “#” button to
select the picture you wish to
protect.
4 Press the “ ” button to
confirm the selection and
complete the operation.
¶ To unprotect an image, repeat the
above procedure.
To continue by placing protection
on other images, repeat steps 3-
4.
To cancel or interrupt the function,
select [RETURN], followed by the
“
” button, or else press the
“MENU” button.
¶ After setting the protect function,
you can confirm your selections by
displaying the information screen
(page 46), or by using the multiple
image display function (page 47)
and looking for the lock mark [ ]
on the image.
<Operation>
1 Press the “MENU” button.
Press the “#” or “@” button to
select [ERASE].
2 Press the “ ” button.
3 Press the “@” or “#” button to
select the picture you wish to
erase.
4 Press the “%” button to select
[EXECUTE].
5 Press the “ ” button to
confirm the selection and erase
the image.
¶ When an image is erased, the next
image on the card will be displayed
automatically.
To erase other images, repeat
steps 3-5.
To cancel or interrupt the function,
select [CANCEL], followed by the
“
” button, or else press the
“MENU” button.
4948
Page 5
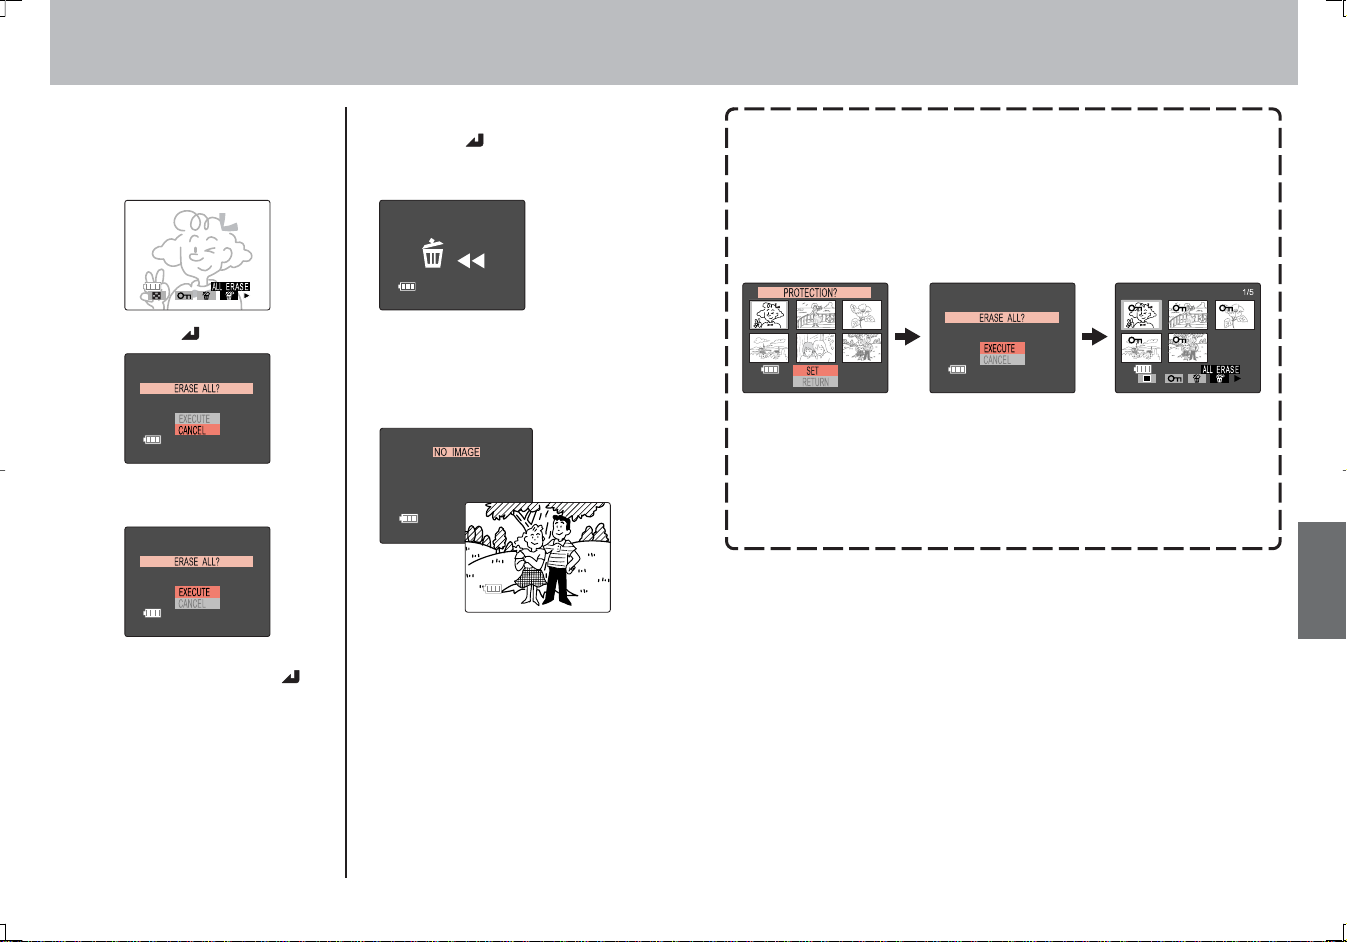
Erasing All Images
<Operation>
1 Press the “MENU” button.
Press the “#” or “@” button to
select [ALL ERASE].
2 Press the “ ” button.
3 Press the “%” button to select
[EXECUTE].
¶ To cancel the operation, select
[CANCEL], followed by the “ ”
button.
4 Press the “ ” button to
confirm the selection and erase
all images on the card.
Display
during the
all-erase
operation.
5 When all images have been
erased, the message [NO
IMAGE] will be displayed; if a
protected image is present, it
will be displayed.
<To erase multiple images>
Simultaneous use of the all-erase function and image protect
function is a convenient way to quickly erase multiple images from a
memory card, while leaving other images on the card.
Example: Out of 30 images on a memory card, you wish to leave 5
while erasing all the others.
¶ Multiple image display is shown.
First, use the
“image protect”
function to prevent
the erasure of the
five desired
images.
Next, use the “all
erase” function.
Only the five
protected images
remain; all others
are erased from
the memory card.
5150
Page 6
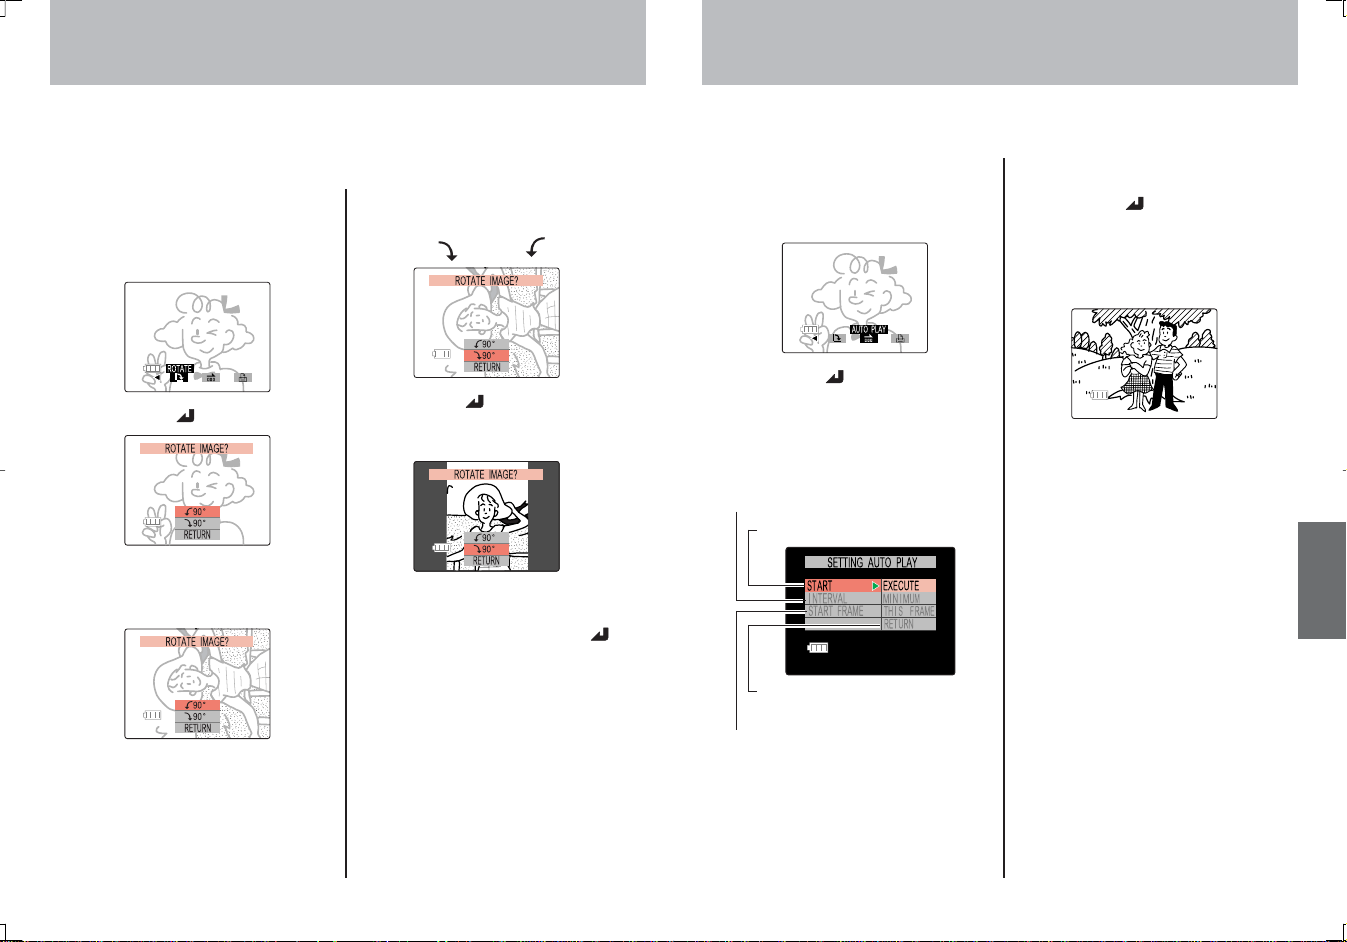
Rotating Images
Automatic Playback (Slide Show)
Images can be rotated 90° to either right or left.
¶ This function cannot be used during multiple image display.
<Operation>
1 Press the “MENU” button.
Press the “#” or “@” button to
select [ROTATE].
2 Press the “ ” button.
3 Press the “@“ or “#” button to
select the picture you wish to
rotate.
4 Press the “%” or “fi” button to
select [
90°] or [ 90°]
5 Press the “ ” button to
confirm the selection and
rotate the image.
¶ To cancel or end the operation,
select [RETURN], followed by “ ”,
or press the “MENU” button.
This function plays back images automatically at set intervals.
<Operation>
1 Press the “MENU” button.
Press the “#” or “@” button to
select [AUTO PLAY].
2 Press the “ ” button. Use the
“%”, fi”, @”, and #” buttons to
select the interval and start frame.
Select the playback interval from
[MINIMUM], [10 SEC], [15 SEC] or
[30 SEC].
Slide show starts.
Operation is canceled and
returns to menu screen.
Selects the start frame.
[THIS FRAME]: Slide show will begin
from the image frame displayed
immediately before this operation
was begun.
[FIRST FRAME]: Slide show will
begin from the first image recorded
on the memory card.
3 With [START] selected, press
“#” or the “
” button to begin
the slide show playback. Images
will be played back in order,
beginning with the selected start
frame.
4 To end the slide show, press
the “MENU” button.
5352
Page 7
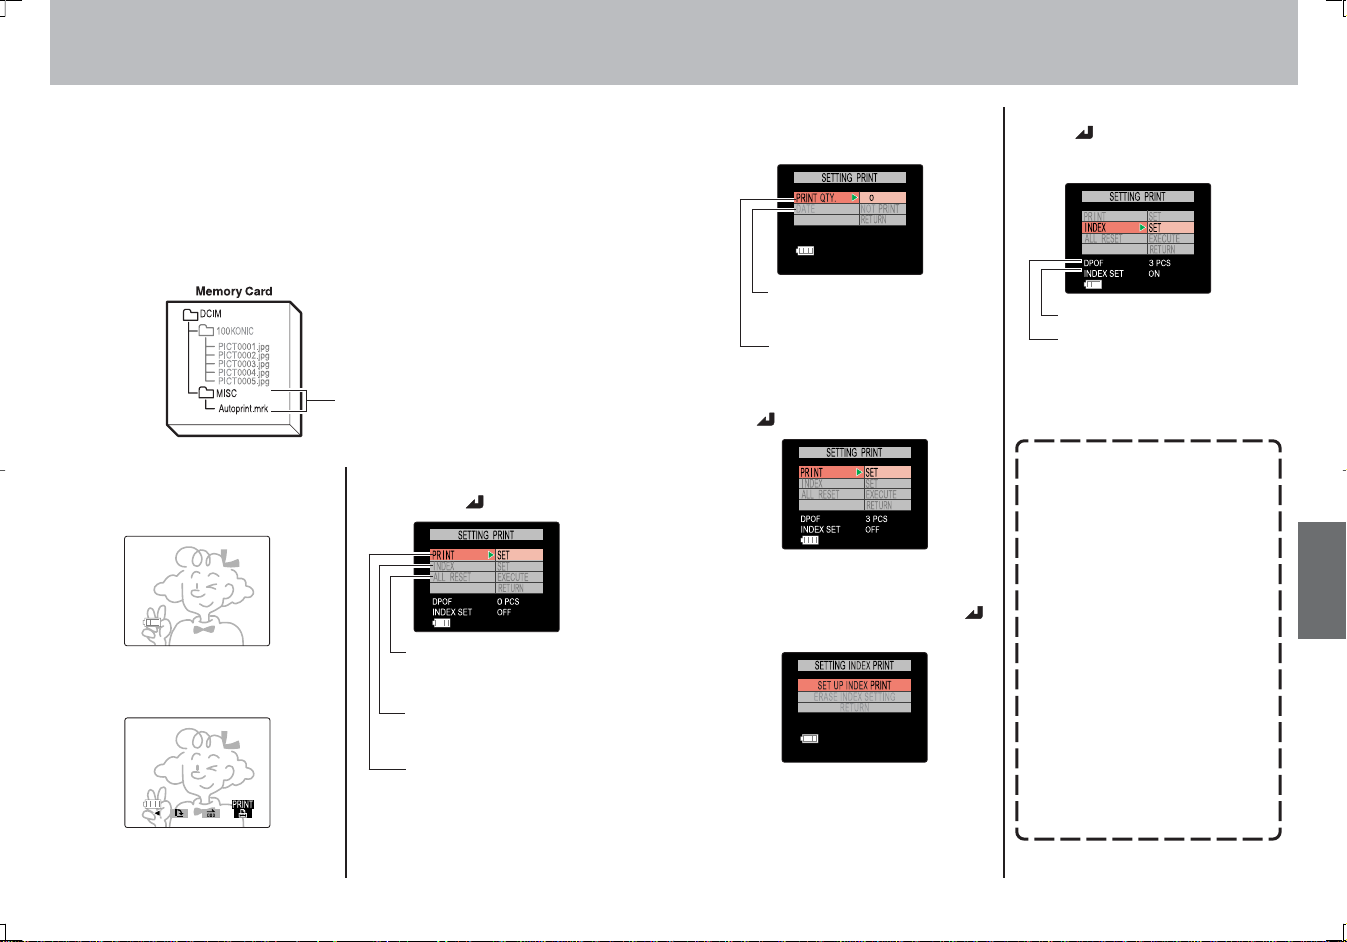
Digital Print Order Format (DPOF) Setting
Digital Print Order Format (DPOF) is a format used when printing out
digital photographs on a home printer or by a commercial printing
service. The function is a simple way of specifying the number of
copies to be printed, the need for date imprinting, and so on. Before
using this function, confirm that your home photo printer or commercial
photo printing service supports DPOF. When printing on a home printer,
be sure to read and follow the operating instructions for your home
printer.
DPOF setting data is stored on the
memory card separately from the image
files.
<Operation>
1 Display the image you wish to
set the DPOF for.
2 Press the “MENU” button.
Use the “#” button to select
[PRINT].
3 Press the “ ” button.
Press to cancel the PRINT
and INDEX setting contents.
Select index print ON/OFF.
Set number of prints, and
date imprint ON/OFF.
4 Press the “#” button to display
the print submenu.
Select date imprint ON/OFF.
Specify number of prints.
5 After completing all settings,
select [RETURN] and press the
” button.
“
6 To print an index sheet, press
[INDEX], followed by “#”, [SET
UP INDEX PRINT], and the “
button.
7 Select [RETURN] and press
” button to complete
the “
settings.
Index print ON/OFF
Total number of prints selected
¶ To confirm the number of
prints set for each individual
picture, use the information
screen (page 46).
<NOTE>
¶ Since DPOF data is preserved as
part of the overall memory of the
memory card, setting may not be
possible if the memory card has
insufficient remaining space.
¶ Do not use a personal computer
to delete or modify DPOF image
data on a memory card.
”
¶ When submitting a memory card
to a commercial photo printing
service for printing, first use the
information screen (page 46) to
confirm the number of prints
desired for each image.
¶ Any pictures taken after setting
the DPOF for an index print will
not be included on the index
print. To include the new
pictures, set the index print
option once again.
5554
Page 8
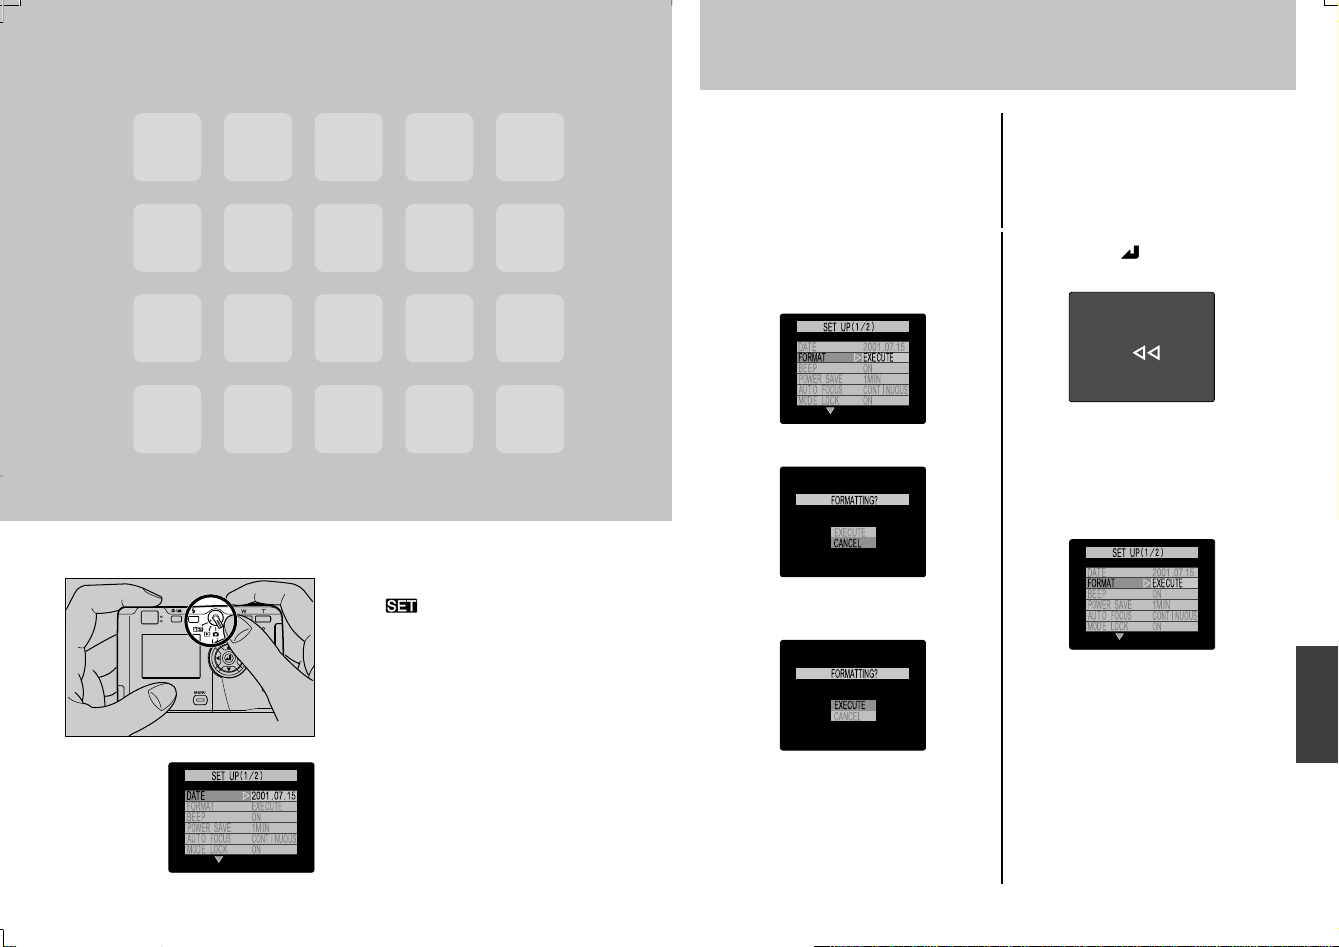
Formatting Memory Cards
Formatting a memory card prepares the card for use, and erases all
previously taken images and other data. Care should be taken when
using the formatting function, since reformatting a memory card will
also result in the loss of “protected” images.
¶ When SD Memory Cards are set to write protect, formatting is not possible.
Camera Setup
Options
1. Set the mode select lever to
”, and turn camera power
“
ON.
2. The setup menu will be
displayed.
<Operation>
1 Press the “fi” button and
select [FORMAT].
2 Press the “#” button.
3 Press the “%” button to select
[EXECUTE].
4 Press the “ ” button to begin
formatting.
¶ Formatting cannot be canceled after
it begins.
5 The setup function menu will
appear to indicate completion
of formatting.
5756
Page 9
Turning the Electronic Tone ON/OFF
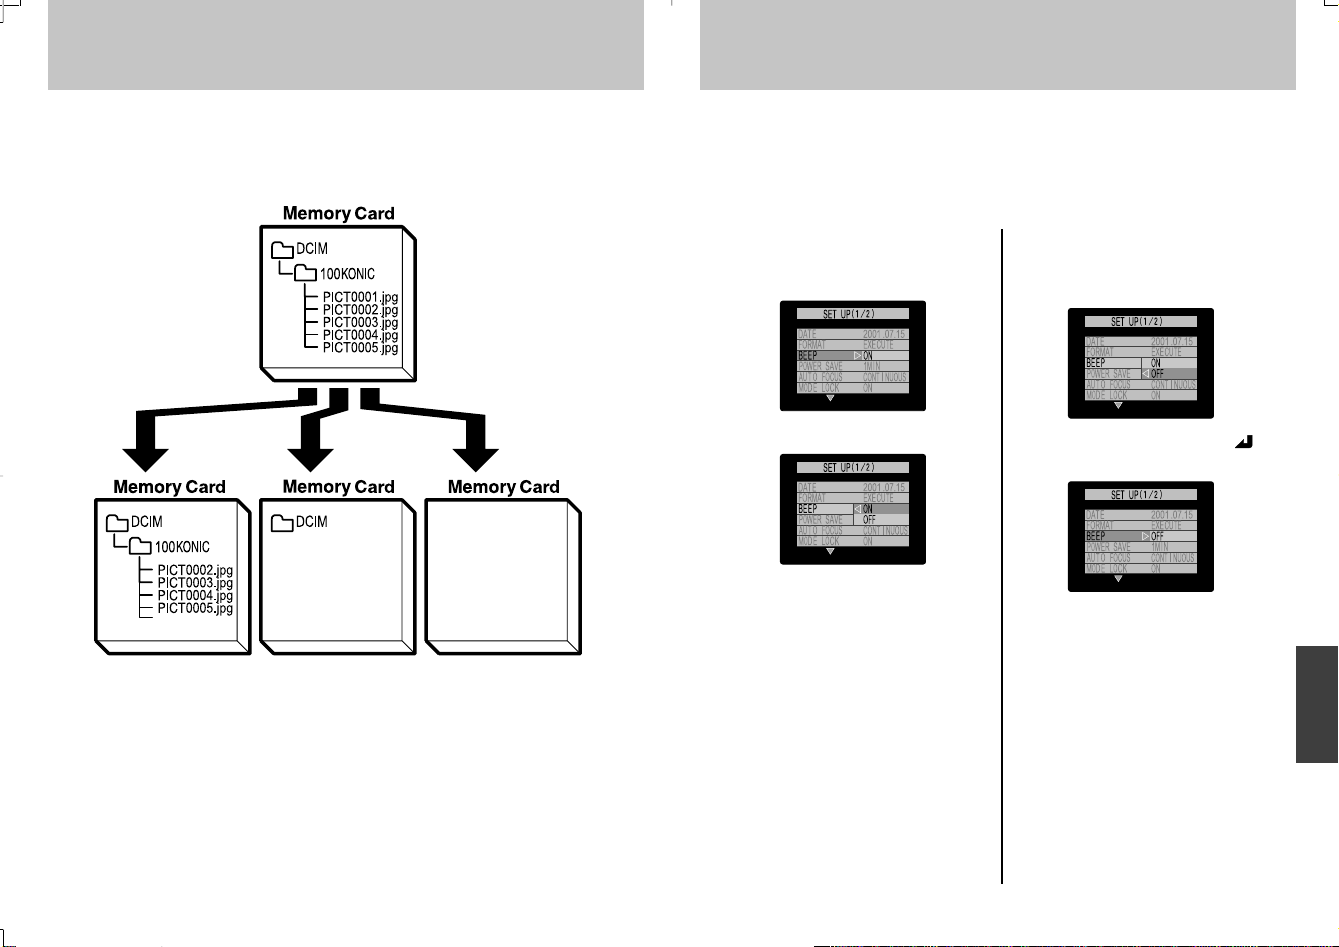
<The Difference between “Erasing” and “Formatting”>
Image erasing and memory card formatting functions differ in the
following ways:
Photographed images
are recorded on the
memory card in data
folders and files as
shown.
Single-Picture
Erase
¶ When the single file
PICT0001.jpg is
erased.
All Erase Format
¶ All image files and
folder structures
are erased. New
folders must be
created.
The electronic beeping tone heard when the shutter button is pressed
can be set to ON or OFF as desired.
¶ Warning beeps and the operating sound made when power is turned ON
cannot be disabled.
<Operation>
1 Press the “%” or “fi” button to
select [BEEP].
2 Press the “#” button.
3 Using the “%” or “fi” button,
set the beep to [OFF] or [ON].
4 Press the “@” button (or “ ”
button) to complete the setting.
5958
Page 10

Selecting Auto Power-Off (Power-Save Function)
When this function is selected, the camera’s power will automatically
turn off if the camera is inactive for a set period of time. The auto
power-OFF function can be set to turn the camera off after 6 minutes, 2
minutes, or 1 minute of inactivity, or not at all (power stays on
indefinitely).
<Operation>
1 Press the “%” or “fi” button to
select [POWER SAVE].
2 Press the “#” button.
3 Using the “%” or “fi” button,
select [6 MIN], [2 MIN], [1 MIN]
or [NO PWR OFF].
¶ Setting the function to [NO PWR
OFF] disables the auto-off function,
and the camera will not turn off by
itself.
4 Press the “@” button (or “ ”
button) to complete the setting.
<Note regarding camera use in the “ ” mode:>
When using the camera in the “ ” mode, the auto power-off setting will
cause the camera to respond as noted:
1. When [POWER SAVE] is set to [1 MIN], [2 MIN] or [6 MIN]:
With this setting, if the camera is left inactive for more than the specified
period of time, it will automatically enter the sleep mode for two minutes,
after which the power will turn off.
During the two-minute power-save sleep period, the camera can be quickly
restored to its original shooting mode by depressing the shutter button
halfway, or by pressing one of the other function buttons. After the two
minutes have expired, the camera’s power will automatically turn off.
2. When [POWER SAVE] is set to [NO PWR OFF]:
With this setting, when the camera is left inactive for more than six minutes, it
automatically enters the sleep mode. (In this case, the camera remains in the
sleep mode indefinitely, without the power turning off.) To restore the camera
to its normal shooting mode, depress the shutter button halfway, or press one
of the other function buttons.
1 MIN
1 MIN
2 MIN
2 MIN 2 MIN 2 MIN
6 MIN 2 MIN6 MIN
NO PWR
OFF
6 MIN
Power on and camera in ready but inactive state.
Sleep mode; camera operation stops with lens in
extended position, but function can be restored by
pressing shutter button halfway, or by pressing other
function button.
Power OFF.
6160
Page 11
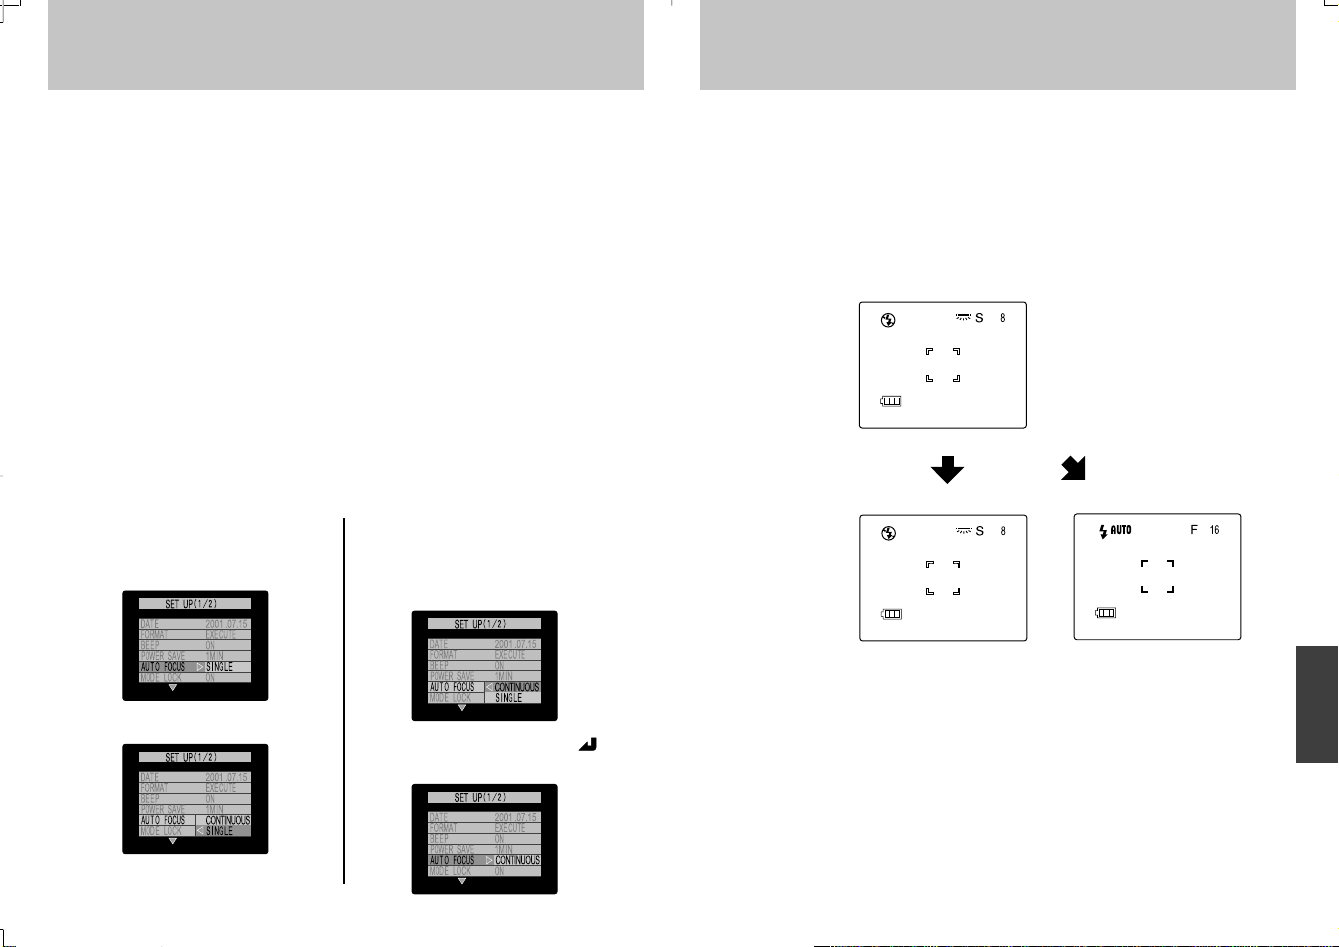
Selecting the Automatic Focus Mode
Mode Lock ON/OFF
This function allows you to set the auto focus format to either
[CONTINUOUS] (the automatic focus mechanism operates
continuously when the camera is turned on), or [SINGLE] (the auto
focus mechanism operates only when the shutter release button is
depressed halfway). The relationship between the two modes, power
consumption, and the lag time between shutter press and actual image
recording is as noted below. Select the mode most appropriate to your
needs and style of photography.
[CONTINUOUS]:
So long as the camera is in recording mode, the auto focus mechanism
operates continuously to focus the lens. Since the focus motor is
operating continuously, less time is needed to begin image recording
when the shutter release button is pressed, but power consumption is
greater.
[SINGLE] (default):
The focus motor only begins operating when the shutter release button
is depressed halfway. As a result, somewhat longer time is required to
begin image recording after the shutter release button is depressed, but
less battery power is consumed.
<Operation>
1 Press the “fi” button to select
[AUTO FOCUS].
2 Press the “#” button.
3 Use the “fi” button to select
either [CONTINUOUS] or
[SINGLE].
4 Press the “@” button (or “ ”
button) to complete the setting.
When enabled, this function preserves the camera mode functions set
when the camera power is turned OFF. As a result, the same mode
settings are restored when the power is next turned ON. When this
function is disabled, any mode functions previously set will be returned
to their default values when the power is turned OFF and then turned
ON again.
<Difference in Displays when Mode Lock is ON and
OFF>
<Setting example>
Flash: No Flash
Before power
is turned OFF:
After power is
turned ON:
When mode lock is
enabled, the function
modes set when the
camera was turned off
are restored when the
camera is turned on
again.
Image Quality: Super Fine
White Balance mode:
Fluorescent
When mode lock is
disabled, all function
modes are returned to
their default values when
the power is turned on
again. (For default
values, see page 71,
<Functions and Contents
of Default Values>.)
6362
Page 12

Digital Zoom ON/OFF
<Operation>
1 Press the “fi” button to select
[MODE LOCK].
2 Press the “#” button.
3 Press the “fi” button and
select either [ON] or [OFF].
4 Press the “@” button (or “ ”
button) to complete the setting.
This function allows the digital zoom function to be set to ON or OFF.
When ON, pressing the “T” button will first cause the lens to zoom to
its maximum optical telephoto setting; when pressed again, the digital
zoom function will operate to further extend the telephoto range (see
page 15). When disabled, only the optical zoom function will operate.
<Operation>
1 Press the “%” or “fi” button to
select [DIGITAL ZOOM].
2 Press the “#” button.
3 Use the “%” or “fi” button to
select [OFF] or [ON].
4 Press the “@” button (or “ ”
button) to complete the setting.
6564
Page 13

Selecting the Display Language
Selecting the Video Output Mode
The camera’s display language can be set to either English or
Japanese.
<Operation>
1 Press the “%” or “fi” button to
select [LANGUAGE].
2 Press the “#” button.
3 Use either the “%” or “fi”
button to select [
(Japanese) or [ENGLISH]
4 Press the “@” button (or “ ”
button) to complete the setting.
When traveling overseas, differences in television standards may make
it impossible to view pictures normally on local television monitors. In
this case, use this function to select the television standard of the
locality in which you are using the camera.
¶ The camera’s default value is NTSC.
]
<Operation>
1 Press the “%” or “fi” button to
select [VIDEO OUT].
2 Press the “#” button.
3 Use either the “%” or “fi”
button to select [PAL] or
[NTSC]
4 Press the “@” button (or “ ”
button) to complete the setting.
6766
Page 14

Creating a New Folder on the Memory Card
(Resetting File Numbers)
This function is used to create a new folder on the memory card for the
storage of new image data. When new images are added to the folder,
their file names will begin again from 0001. This is convenient when you
wish to keep photographs filed separately for separate shooting
scenes, etc.
<Recording Status Before and After Resetting File
Numbers>
Before reset:
Images are stored as files named with consecutive numbers.
After reset:
A new folder is created, and subsequent photographs are stored there,
beginning again with the file name PICT0001.jpg.
<Operation>
1 Press the “%” or “fi” button to
select [FILE NO.].
2 Press the “#” button.
3 Press the “%” button to select
[EXECUTE].
4 Press the “ ” button to
complete the setting.
6968
Page 15

Returning Settings to their Default Values
This function is used to restore the default values of recording mode
settings made with mode lock ON, and setup mode values (excluding
[DATE], [VIDEO OUT] and [
<Operation>
1 Press the “%” or “fi” button to
select [MODE RESET].
LANGUAGE]).
3 Press the “%” or “fi” button to
select [EXECUTE].
2 Press the “#” button.
4 Press the “@” button (or “ ”
button) to complete the setting.
<Functions and Contents of Default Values>
“ ” Recording Mode:
Flash: Automatic
flash
Macro/Landscape: OFF
Self-Timer: OFF
Exposure
Compensation: OFF
Long Exposure: OFF
Image quality: F
Color mode: COLOR
White balance mode: AUTO
AE mode: PROGRAM
Sensitivity: STANDARD
Focusing: AF (auto
focus)
Metering: EVALUATION
“ ” Mode:
Beep: ON
Auto focus: SINGLE
Mode lock: ON
Digital Zoom: ON
Power Save: 2 MIN
”/“ ” Modes:
“
BRIGHTNESS
CONTROL: Normal
7170
Page 16

Transferring Images to a Computer
By using SD memory card reader or commercially available card
adapter, images can be transferred to a computer, where they can be
further copied, manipulated, and deleted.
¶ SD MEMORY CARD READER
(DR-CR1)
Transferring
Images to Other
Devices
Remove memory card
from camera.
Insert in card
reader.
Insert adapter with memory card
into computer’s card drive.
Remove memory card
from camera.
Insert memory card
in card adapter.
¶ Manipulation of image data contents is performed on the computer.
73
Page 17
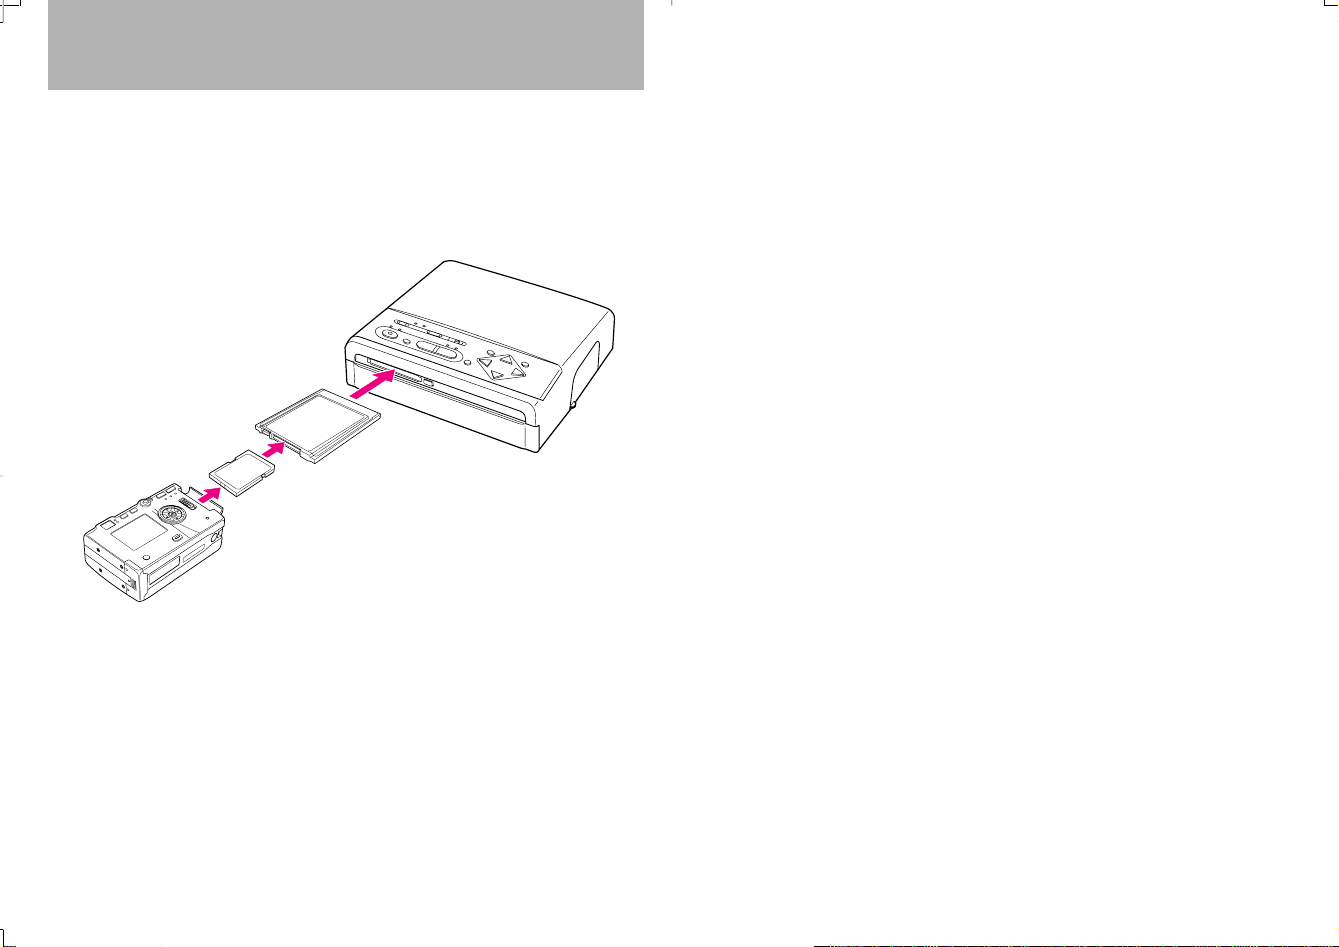
Sending Images to a Printer
Images can be transferred directly to a printer for printing in
accordance with the DPOF setting data (see page 54).
¶ This function operates only with printers which support DPOF modes. For
detailed operation information, consult the instruction manual for your printer.
Remove memory card from
camera.
Insert memory card into printer.
Insert memory card
in card adapter.
74
Page 18

Other
Information
Page 19

LCD Monitor Operations
<Turning the LCD Monitor ON/OFF>
In the recording mode, the LCD
monitor can be turned ON/OFF by
pressing the “DISPLAY” button.
¶ To conserve power, it is recommended
that the monitor be turned off
whenever not being actually used.
<Adjusting LCD Monitor Brightness>
Caution and Warning Symbols
These Operating Instructions feature the following caution and warning symbols
to indicate items of special importance. Be sure to read the contents of these
warnings carefully, and use the features correctly.
This symbol indicates procedures which may result in injury to the
CAUTION
WARNING
DANGER
user, or physical damage to the product if not followed properly.
This symbol indicates handling procedures which may result in
death or personal injury if not followed properly.
This symbol indicates procedures which have a high likelihood of
resulting in death or serious personal injury if not followed properly.
Slide the mode select lever to the
” or “ ” position.
“
Press the “
” button.
Press the “@” or “#” button and
adjust the monitor brightness as
desired.
Press the “
” button or wait three
seconds for the display to return to
its previous status.
¶ Monitor brightness cannot be adjusted
when the camera is connected to a
television monitor.
Handling Precautions
<Precautions for Operating the Camera>
¶ This camera is not designed to be waterproof, and cannot be used in the rain
or under water. If the camera should inadvertently be exposed to water, it
should be taken quickly to a Konica Service Center for inspection.
¶ Fingerprints or smudges on the camera’s lens or light sensors may adversely
affect the precision of the camera. If soiling occurs, use a piece of clean
chamois or commercially available lens tissue to gently wipe away the
smudge. Do not apply excessive pressure or touch the lens with any rough
material. An air blower or lens brush may be used to remove loose dust or dirt
from the lens.
¶ Clean the camera body by wiping with soft cloth. Never use benzene, thinner,
or other volatile solvents or cleansers, since such substances will damage the
body materials.
¶ Do not remove the SD memory card or Multi-Media Card (MMC) while the card
access LED is flashing.
¶ Interference may occur in recorded or played back images when the camera is
used in areas subject to strong electromagnetic interference (e.g., near a
television set or stereo speakers).
¶ Do not direct the camera lens directly toward the sun when shooting, since
the CCD element may be damaged.
¶ Dropping the camera may cause damage to internal parts even though the
camera may appear superficially undamaged. Always take the camera to a
Konica Service Center for inspection if it is dropped.
¶ Do not subject the LCD monitor to strong pressure or impact, nor press it with
a pointed object, since the glass screen and other parts may be damaged.
¶ Do not attempt to touch the insides of the memory card slot, since damage or
malfunction may result.
7776
Page 20

CAUTION
WARNING
¶ Clean the camera well after using it at the beach or other
locations subject to large concentrations of sand or dust. Salt air
may promote corrosion of metal components and damage or
short circuits in electronic parts, causing the camera to emit
smoke or catch fire. Sand inside the camera may result in
internal damage and operating malfunctions.
¶ If the camera is brought quickly from a cold place to a warm
room, condensation may form on the lens and internal parts.
Such condensation may result in damage or short circuits in
electronic parts, causing the camera to emit smoke or catch fire.
Whenever possible, avoid subjecting the camera to sudden
changes in temperature, and if condensation occurs, turn off the
camera power quickly and leave it off until all condensation is
gone.
¶ This camera is a precision electronic instrument, and should be
protected from impacts and falls that might cause damage to
internal parts or the shorting of circuitry.
¶ When taking the camera overseas or using it to record
important events, check its operating condition and take test
pictures beforehand to confirm proper operation.
¶ If camera or batteries become hot, emit smoke or a burning
smell, or display other abnormal symptoms, remove them from
the camera immediately to prevent fire. When handling the
batteries, take precautions to avoid being burned.
¶ This camera includes high-voltage circuitry; if the camera’s
electronic flash is damaged as the result of an impact or being
dropped, do not touch the internal parts of the flash since you
may receive a strong electric shock.
¶ Never attempt to disassemble or modify the camera, since you
may receive a severe electric shock.
¶ Do not operate the electronic flash at close proximity to a
person’s eyes (especially those of an infant), since eye damage
may result.
¶ Do not look through the camera directly at the sun or other
strong light source, since your eyesight may be damaged.
¶ Do attempt to take pictures while driving or walking, particularly
when looking through the viewfinder or at the LCD monitor, since
you may cause an accident.
¶ When taking pictures, remain aware of your surroundings and
what is happening around you.
<Storing the Camera>
¶ Do not place the camera in places that may be exposed to high temperatures
for extended periods of time (the beach in summer, a closed car under bright
sun, etc.). Such high temperatures may cause adverse affects or damage to
the camera, batteries, or memory cards.
¶ Remove the batteries before storing the camera for extended periods of time,
to prevent battery leakage and resulting damage.
¶ Store the camera in a well-ventilated location, avoiding damp or
dusty areas, drawers or boxes containing mothballs, or in
laboratories or other locations where chemicals are handled.
CAUTION
Exposure to such chemical fumes can result in damage to the
camera’s circuitry, resulting in short circuits and causing the
camera to emit smoke or catch fire.
<Precautions for Handling Rechargeable Lithium Ion Battery Pack>
¶ Do not allow the battery pack to come in contact with seawater,
rain, or other source of moisture, since it may emit heat or
smoke, catch fire, or expose the user to electric shock.
¶ Do not attempt to use or recharge a wet battery pack, since it
may emit heat or smoke, catch fire, or expose the user to electric
shock.
¶ Keep battery packs out of the reach of infants or small children,
to prevent injury.
¶ Do not throw battery packs or subject them to strong impacts,
CAUTION
since the battery may be damaged, resulting in leakage of
battery fluid.
¶ Battery packs are designed for use at normal room temperature
(20°C plus or minus 5°C). Battery capacity and usable battery
time reduced if the battery is exposed to extreme temperature
conditions such as in summer, winter, or when left in a hot car,
etc. Exposing the battery to such conditions may also shorten
the service lifetime of the battery.
¶ When not using the battery pack, store it in a dry location.
<Automatic Reset Function>
This camera may fail to operate if exposed to very strong electromagnetic waves
or static electricity. In this case, remove the batteries and reinsert them again to
reset the camera’s circuits.
7978
Page 21

WARNING
DANGER
¶ Do not place battery pack in microwave oven or other high-
voltage contained, since it may cause the battery to leak fluid,
emit heat or smoke, catch fire, or explode.
¶ Do not use a leaking battery pack. Battery fluid is corrosive and
may cause personal injury if it comes in contact with human skin.
If battery fluid touches your skin, wash it off quickly with clean
water.
¶ Do not use a broken or ruptured battery pack, since it may emit
heat or smoke, catch fire, or expose the user to electrical shock.
¶ Do not recharge or store the battery pack in locations near open
flame, sources of high heat, or flammable gas, since the battery
may generate heat, emit smoke, catch fire or explode.
¶ Do not allow any metal object to contact and short-circuit the
plus and minus terminals of the battery pack.
¶ Do not store battery pack together with keys, necklaces, coins or
other metal objects, since the objects may contact the battery
terminals and cause a short-circuit.
¶ Do not heat the battery pack, and never dispose of an old
battery pack in fire, since it may emit smoke, catch fire, or
explode.
¶ Do not attempt to disassemble or modify the battery pack, since
it may emit heat or smoke, catch fire, and corrosive battery fluid
may splash in eyes, resulting in blindness. In the event that your
eyes are exposed to battery fluid, flush eyes with copious
amounts of clean water and seek medical care immediately.
¶ This battery pack has been designed for exclusive use with the
accompanying camera. The battery pack must be installed in the
camera during recharging. Do not attempt to use the battery
pack for any application other than that for which it was
designed, and do not attempt to recharge it using any
commercial recharger, since the battery may generate heat or
smoke, catch fire, or explode.
Lithium-Ion Battery Pack.
Please recycle after use.
For best performance, we recommend the use of genuine Konica accessories.
Konica is not responsible for any accidents or damage caused by the use of
accessories made by other manufacturers or fashioned by the user.
Photographs taken of professional performances, exhibitions, displays, or
copyrighted materials may be used only for your own personal enjoyment, and
only with the consent of the copyright holders. Other use may constitute
violation of applicable copyright laws. Be aware that some performances,
exhibitions, or displays may impose restrictions on photographic or other
recording even when the purpose of such recordings are personal enjoyment.
¶ To display photos on a television set, use a set equipped with video input
connectors.
¶ Turn off the camera’s power in prohibited locations such as airplanes or
hospitals. Use of the camera in such locations may cause surrounding
electronic devices to malfunction.
<Handling Precautions for the Optional AC Adapter>
¶ Prolonged use may cause the AC adapter to feel warm; this is normal and not
a malfunction.
¶ When not using AC power for an extended period, disconnect the AC adapter
from its power outlet as a safety precaution. Before disconnecting the AC
adapter from power outlet, first disconnect the connector plug from the
camera body.
¶ When using the AC adapter with battery pack installed in the camera, turn the
camera power off before connecting or disconnecting the AC adapter.
¶ This AC adapter has been designed for exclusive use with the accompanying
camera. To prevent danger of fire or electric shock, do not attempt to use it
with any appliance other than the one for which it was designed.
¶ Use only the designated AC adapter with this camera. The use of
other adapters may cause accidents or fire hazard.
¶ Do not subject the cord to unreasonable twisting, bending, or
CAUTION
stretching, and never attempt to patch the cord to extend its
length.
¶ Do not connect or disconnect the AC adapter with wet hands,
since you may receive an electric shock.
8180
Page 22

CAUTION
¶ Grasp the body of the adapter when connecting and
disconnecting it from a power outlet, and similarly grasp the
connector plug when connecting and disconnecting it from the
camera body. Pulling on the cords may cause internal breakage
of the wires, resulting in fire or electric shock.
¶ If you observe any damage to the AC adapter, broken wires, or
faulty connector contacts, discontinue use and consult your
place of purchase or Konica Service Center as soon as possible.
Troubleshooting
Function
Symptom Cause Remedy
“0” appears as the
number of images
recordable.
The memory card has
insufficient free memory
available.
Insert a new memory card,
or erase unneeded images
on the current card.
¶ Never use the AC adapter when it is incompletely connected to a
power outlet. Faulty contacts may cause abnormal heating, fire,
or electrical shock.
¶ Do not tamper with the cord or subject it to excessive force, since
the cord may be damaged, resulting in fire or electrical shock. If the
cord is so damaged as to expose the wire core, discontinue use
immediately and consult your place of purchase or Konica Service
Center .
¶ Due to the danger of electric shock, do not attempt to open the
AC adapter’s cover, or to disassemble, repair, or modify the
adapter.
¶ Do not use the adapter when the plug is covered with dust, or do
WARNING
not bring pieces of metal near it, since current may travel
through the dust and metal and cause a fire or electric shock. If
dust collects on the adapter plug, disconnect it from the
electrical outlet and clean away the dust before using.
¶ If the adapter emits smoke or abnormal odors, or if you drop or
damage the adapter, discontinue use and consult your place of
purchase or Konica Service Center, since continued use may
result in fire hazard.
¶ Do not connect the AC adapter to any source of power other
than a household AC outlet for which it is rated. Using the
adapter with other voltages or ratings may cause the hazard of
fire or electrical shock.
* The SD logo is a registered trademark.
* QuickTime and the QuickTime logo are trademarks used under license.
QuickTime is a trademark registered in the United States and other countries.
* All brand and product names are the registered trademarks or trademarks of
their respective owners.
Record-
ing
The LCD monitor
displays “Card
has not been
inserted”
The LCD monitor
displays “Card
Error”.
“WRITE
PROTECT”
appears on the
LCD monitor .
Card access LED
flashes.
Caution LED
flashes slowly.
Caution LED
flashes rapidly.
The number of
images
recordable does
not change when
a picture is taken.
Green LED
flashes.
Focus mark
flashes.
No memory card is
loaded.
The inserted memory
card has been formatted
on a different camera or
information device.
The write protect
switch is activated (SD
memory card).
Image data is being
written to the memory
card.
The flash is charging.
Camera shake warning,
indicating that a slow
shutter speed has been
selected.
The file size of the
recorded image was
very small.
Focus is not locked on
subject (shutter will
operate).
Insert a memory card.
Reformat the memory card
on the camera (see page
57).
Release the write protect
switch, or insert a different
memory card.
Remove your finger from the
shutter release button and
wait for the flashing to stop.
Use a tripod or other means
to stabilize the camera.
File size and number of
pictures recordable differ
depending on the image
quality setting and subject
conditions; not a
malfunction.
Use the focus lock function
(page 41) to lock the focus
on a part of the subject with
higher contrast before final
composition of the image.
8382
Page 23

Function
Record-
ing
Play-
back
Symptom Cause Remedy
LCD doesn’t
appear.
Images appear
with severe visual
noise.
Images do not
appear on the
television monitor .
“Card Error”
appears in LCD
monitor.
“No Image” is
displayed on LCD
monitor .
Setting of power-save
function may cause
camera to enter sleep
mode when it is
inactive for set period.
A strong magnet or
other electromagnetic
generator is located too
near the camera or
television set.
The camera is not
correctly connected to
the television set.
The video output mode
selected doesn’t match
that of the television
standard.
The memory card
contains image data of
a non-compatible file
format.
The memory card
format is noncompatible with the
camera.
Memory card is not
loaded correctly.
Nothing is recorded on
the memory card.
Press shutter button halfway ,
or press other function button
to return camera to normal
operating condition. Since
camera response differs
depending on the setting of
the Power-Save function,
consult p. 61 for details.
Move the camera away from
the magnet or
electromagnetic field.
Confirm your connections
are correct.
Set the video output
mode to match the
television standard
(page 67).
View the images with a
computer.
Remove the memory card
and reload it correctly.
Insert a memory card with
recorded image data.
Function
Playback
Erasing
Recharg-
ing
Other
Symptom Cause Remedy
Image cannot be
rotated or set for
DPOF.
Image cannot be
erased; “ ”
mark appears.
Image cannot be
erased
The number of
images recordable
didn’t change
when an image
was erased.
Can’t recharge
the camera.
Can’t recharge
the camera. Or it
is canceled
midway through.
Caution LED
flashes slowly.
Nothing appears
on the LCD
monitor.
Nothing appears
on the LCD
monitor .
The write protect
switch is set (SD
memory card).
The image is protected. Release the image protect
Image data was
recorded on a different
camera or device.
The size of the erased
image file was very
small.
No lithium ion battery
pack is loaded.
Ambient temperature is
too high or too low,
causing the charger’s
protect circuits to
operate and interrupt
the recharging function.
Battery power is
depleted, or no battery
pack is loaded.
The auto-off function
has operated to turn
power off (page 60).
Release the SD memory
card’ s write pr otect lock
(page 11).
function (page 48).
The image cannot be erased
normally by the camera. The
card can be reformatted to
erase all images.
File size and number of
pictures recordable differ
depending on the image
quality mode and subject
conditions; not a malfunction.
Insert the battery pack into
the camera.
Ambient temperature during
recharging should be
between +10°C and +30°C.
(In practice, a range of +5°C
- +40°C is possible, but the
recharging time may
become somewhat longer).
Insert the lithium ion battery
pack into the camera and
recharge if necessary.
Press the main power
switch again to turn power
ON.
“Card has not
been inserted” is
displayed on LCD
monitor .
Memory card is not
loaded.
Load memory card into
camera.
8584
Page 24

Specifications
Function
Other
Symptom Cause Remedy
The camera feels
hot.
“ERROR-xx”
appears in the
LCD monitor.
ERROR-99
appears in
monitor .
Large power consumption
occurs during use of the
LCD monitor; the camera
may feel warm when the
LCD monitor is used for a
long period of time.
Very rarely, a strong
external electrostatic field
may cause the camera to
stop operating.
Camera has become
overheated due to
being left in closed car
or other environmental
conditions.
This in itself is not a
malfunction, but the
camera should be allowed
to cool before continuing
use.
Remove the lithium ion
battery pack and load it once
again, then turn on the power.
ERROR-99 will continue to
appear until the camera's
internal temperature cools.
Turn power OFF and set
camera in shaded location
until it cools.
Type: Digital still camera with record, playback, and erase
modes.
Recording medium: SD Memory Card, Multi-Media Card (MMC)
Recording Capacity (Guideline) and Image Dimensions in Pixels:
(when using 16MB SD Memory Card, all pictures taken in the same mode).
Super Fine: About 7-9 (2048 × 1536 pixels)
Fine: About 15-19 (2048 × 1536 pixels)
Normal: About 54-64 (1024 × 768 pixels)
TIFF-RGB (non-compressed): About 1 (2048 × 1536 pixels)
Movies (15 seconds each): About 3 (320 × 240 pixels)
Image Format: Complies with JPEG standard (Exif ver 2.1), DCF
Standard (Design rule for Camera File systems),
supports DPOF.
CCD Sensor: 1/1.8” square-pixel interlace readout system CCD with
3,340,000 pixels gross, 3,240,000 effective.
Lens: f=7.8 mm - 15.6 mm (35 mm camera equivalent about
38 mm - 76 mm), F2.8-3.5
Focusing Range (measured from front lens surface): About 90 cm - infinity ∞
In Macro Mode: About 6 cm - 90 cm (at wide-angle
setting)
About 35 cm - 90 cm (at telephoto lens setting)
Exposure Control/Metering Method: CCD multi-area evaluation, center-
weighted, and spot metering.
Control Method: Programmed AE, Aperture-Priority AE, Long Exposure
modes.
Exposure Compensation: +2.0 EV to -2.0 EV (in 1/3 steps)
Aperture Control: automatic, or manually settable to F2.8 or F6.2.
Automatic Exposure Linkage Range: LV6 to LV16
White Balance: Automatic, manual (preset), outdoor (daylight/clouds),
indoor (Tungsten/Fluorescent).
Shutter: CCD electronic shutter and programmed electronic
shutter with independent aperture control (1 sec-1/2000
sec, 2 sec, 4 sec, 8 sec).
Focusing control: Video feedback auto-focusing (single AF, continuous AF
modes), and manual focusing.
Viewfinder: True image zoom viewfinder
Flash: Built-in flash, recycling time about 6 seconds (on full
battery charge, at room temperature, based on our
testing standards). Flash range about 90 cm - 2.5
meters (at wide-angle setting).
8786
Page 25

Recording Modes: Flash modes (auto flash, red-eye reduction, fill-in flash,
flash-off, red-eye reduction forced flash*); macro
recording mode, landscape recording mode; color
modes (color, B/W, sepia); white balance (Auto,
daylight, tungsten, cloudy, fluorescent, preset); AE
modes (programmed, F2.8; F6.2); focus (AF/MF); longexposure (OFF/2 sec/4 sec/8 sec); sensitivity (standard/
2×/4×); metering modes (evaluation; center-weighted;
spot).
* Settable during long-exposure
Playback modes: Multiple image display; protect; erase* (single image); all
erase* (erases all images in folder \DCIM); image
rotation (right/left 90°); slide show; DPOF setting.
* Note that files (and folders) recorded on other
manufacturer’s cameras and devices cannot be
erased by this camera.
Setup modes: Date; memory card format; electronic tone ON/OFF;
auto power off setting function ON/OFF and time
setting (time until camera power turns off automatically);
AF mode selection (continuous or single-image); mode
lock ON/OFF (preserves mode setting data); digital
zoom ON/OFF; display language setting (Japanese/
English); video output standard (NTSC/PAL); file number
reset; default reset.
LCD monitor: Built-in, 1.5” 110,000-pixel polysilicon TFT color LCD
monitor; size: 521×218 pixels.
<Display>
LCD monitor display: Remaining battery capacity; recording mode settings
(flash mode, macro/landscape mode, white-balance
mode, AE mode, focus, long-exposure, sensitivity,
metering mode); number of images recordable, digital
zoom setting (×1.3, ×1.6, ×2.0), date (appears for 3
seconds after power is turned on only), focus frame, SD
memory card write protect status (appears only when
write protect is enabled); image recorded (still/movie);
playback mode setting (multi-image, protect, erase, allerase, rotate, slide-show, DPOF setting); setup mode
(date, format, electronic tone, auto-off, AF mode, mode
lock, digital zoom, display language, video output, file
number reset, default reset).
Self-timer LED (red): lights to indicate self-timer operation, recording
completed.
Card access LED (orange): lights when writing to memory card.
Standby LED (green): lights to indicate focus display, battery recharging
completed.
Caution LED (red): lights to indicate flash charging, camera-shake warning,
lithium ion battery pack recharging and malfunction.
<Input/Output>
Output mode: NTSC/PAL composite video signal selectable
Input/output connector: video output connector (3.5 mm minijack); external
power input connector.
<Battery/Power>
Power: 3.6V lithium ion battery pack, dedicated AC adapter
Recharging time: about 5 hours (at +10°C - +30°C)
Battery capacity Number of images recordable: (using 50% flash, Fine
(reference): Mode):
LCD monitor ON: 140
LCD monitor OFF: 170
Continuous playback time: about 50 minutes (using
LCD monitor)
(All values assume full battery charge, room
temperature, based on our testing standards).
<Other>
Ambient operating temperature: 0°C - 45°C
Dimensions: 87(W)×55(H)×30(D) mm (not including protruding parts)
Weight: About 165 g (not including memory card or battery
pack)
* All descriptions and specifications are subject to change without notice.
8988
Page 26

FCC Statement:
Declaration of Conformity
Trade name: Konica
Model: Digital Revio KD-300Z
Responsible party: KONICA PHOTO IMAGING, INC.
Address: 725 Darlington Avenue Mahwar, NJ 07430, U.S.A.
Telephone number: 201-574-4000
This device complies with part 15 of the FCC Rules. Operation is subject to
the following two conditions:
(1)This device may not cause harmful interference, and (2) this device must
accept any interference received, including interference that may cause
undesired operation.
This equipment has been tested and found to comply with the limits for a
class B digital device, pursuant to Part 15 of the FCC Rules. These limits are
designed to provide reasonable protection against harmful interference in a
residential installation. This equipment generates, uses and can radiate radio
frequency energy and, if not installed and used in accordance with the
instructions, may cause harmful interference to radio communications.
However, there is no guarantee that interference will not occur in a particular
installation. If this equipment does cause harmful interference to radio or
television reception, which can be determined by turning the equipment off
and on, the user is encouraged to try to correct the interference by one or
more of the following measures:
– Reorient or relocate the receiving antenna.
– Increase the separation between the equipment and receiver.
– Connect the equipment into an outlet on a circuit different from that to
which the receiver is connected.
– Consult the dealer or an experienced radio/TV technician for help.
¶ Shielded cables must be used for this equipment to comply with the
relevant FCC regulation.
¶ The user is cautioned that changes and modifications made to the
equipment without approval of the manufacturer could void the user’s
authority to operate this equipment.
CANADA ONLY
Industry Canada’s Compliance Statement:
This Class B digital apparatus complies with Canadian ICES-003.
Cet appareil numérique de la classe B est conforme à la norme NMB-003 du
Canada.
Bitte besorgen Sie sich im Fachhandel “Secure Digital Memory
Cards” (SD-Speicherkarten) oder “MultiMedia Cards*” (MMC) für
den Gebrauch mit dieser Kamera. In dieser Anleitung werden die
Karten beider Ausführungen unter dem allgemeinen Begriff
“Speicherkarten” zusammengefasst.
* “MultiMedia Card” ist ein eingetragenes Warenzeichen von Infineon
Technologies AG (Deutschland), das unter Lizenz an MMCA (MultiMedia Card
Associatoon) vergeben ist.
9190
 Loading...