

Konica Minolta MAGICOLOR 6100, MAGICOLOR 2200, MAGICOLOR 3300DN, CROWNNET, MAGICOLOR 3300EN User Manual
Page 1

QMS® CrownNet®
Setup Guide
1800329-001H
Page 2

Trademarks
The following are trademarks or registe red tradem arks of their respective owners. Other
product names mentio ned in this manua l may also be trademar ks or re gistered
trademarks of their respective owners. Registered trademarks are registered in the
United States Patent and Trademark Office; some trademarks may also be registered in
other countries. QMS, Crown, CrownNet, the QM S logo, and the Crown seal are
registered trademar ks of QMS, Inc. Adobe, Acrob at, and Illustrator/Adobe Systems
Incorporated. PostScrip t is a trademark o f Adobe Sys tems Incor porated for a page
description languag e and may be registere d in certa in jurisdic tions. Apple, AppleTalk,
EtherTalk , LaserWr iter, LocalTalk , Macintosh, TrueType/Apple Com puter, Inc. DEC,
DECnet, VMS/Digital Equipm ent Cor poration. FrameMaker/Frame Techno logy
Corporation. Hewlett-Packard, HP, PCL, HP-GL, HP-UX , LaserJet/Hewlett-Packard Co.
AIX, IBM PC, Token-Ring /Internation al Business M achines Cor poration. H elvetica/
Linotype-Hell AG and/or its subsidiaries. Inter net Explorer, Microsoft, MS-DOS/
Microsoft Corporatio n. Netscape/Nets cape, Inc. Novell, Novell YES, and NetWare/
Novell, Inc. Transverter Pro/TechPool, Inc. UNIX/UNIX Systems Laborator ies. Ethern et,
Xerox/Xerox Corporation. ITC Zapf Ding bats/Inter national Typeface Corporation.
Solaris, SunOS/Sun.
Proprietary Statement
The software included with your CrownNe t interface is Copyrighted © 1998 by QMS,
Inc. All Rights Reser ved. This software may not be reprod uced, modified, disp layed,
transferred, or copied in any form or in any manner or on any med ia, in whole or in part,
without the express written per mission of QMS, Inc.
Copyright Notice
This manual is Copyrighted © 1998 by QMS, Inc., One Magnum Pass, Mobile, AL
36618. All Rights Reser ved. This manual may not be cop ied in whole or in part, no r
transferred to any other media or languag e, without the express written permission o f
QMS, Inc.
Page 3

ContentsContents
Introduction ..................................................................................... 5
Typographic Conventions 5
What's Included in CrownNet ........................................................6
Alternate Media 6
Manuals on the CD-ROM 7
QMS Product Registration .............................................................8
Setting up the CrownNet Interface—Overview .............................9
Network Connection ................................. ....... ...... ....... ...... ...... ....12
Ethernet Network Connection 12
Token-Ring Network Connection 15
Software Installation .....................................................................17
Installing CrownAdmin 3 for AIX 17
Installing CrownAdmin for DOS 18
Installing CrownAdmin 3 for HP-UX 19
Page 4

Installing CrownAdmin 3 for Macintosh 20
Installing CrownNet Manager for OS/2 21
Installing CrownAdmin 3 for OS/2 22
Installing CrownAdmin 3 for Solaris 23
Installing CrownAdmin 3 for SunOS 24
Installing CrownAdmin 3 for Windows/Windows 95/Windows
NT/Windows for Workgroups 26
Installing the CrownNet Print Utility for Windows 27
Installing the UNIX Host Software 30
Interface Configuration .................................................................32
EtherTalk Interface Configuration 33
OS/2 LAN Manager/LAN Server and Microsoft Windows
Network Interface Configuration 33
NetWare Interface Configuration (Netware 3.x) 33
NetWare Interface Configuration (Netware 4.x) 36
TCP/IP Interface Configuration 37
Network Configuration .... ...... ....... ...... ....... ...... ....... ...... ....... ...... .... 3 9
CrownNet Print Utility for Windows Configu rati on 39
EtherTalk NetWork Configuration 46
NetWare 3.x Network Configuration (Using CrownAdmin 3) 46
NetWare 3.x Network Configuration (Using PCONSOLE) 49
NetWare 4.x Network Configuration (Using PCONSOLE) 51
NetWare 4.x Network Configuration (Using NWAdmin) 52
OS/2 LAN Manager/LAN Server Network Configuration 54
TCP/IP NetWork Configuration 57
Printer Web Page ...........................................................................59
Accessing the Web Page 60
Printer Home Page 64
Operator Control Page 64
General Settings Page 64
Printer Jobs Page 65
Consumable Status Page 66
Accounting Page 66
System Support Page 66
QMS, Inc. Page 67
Online Help Page 67
CrownNet Menus ...........................................................................68
Overall View of the CrownNet Menu 68
Common Menu 69
EtherTalk Menu 70
Lan Manager Menu 71
QMS CrownNet Setup Guideii
Page 5

NetWare Menu 72
TCP/IP Menu 73
Where To Go From Here ..................................................... ..........74
If You Have Trouble... ...................................................................75
Sources of Support ... ...... ....... ...... ....... ...... ....... ...... ....... ...... ...... .... 75
Your QMS Vendor 75
Your Application Vendor 75
Q-FAX 76
CompuServe 76
Internet 76
QMS Customer Response Center (CRC) 77
QMS World-wide Offices ..............................................................78
v
Contents iii
Page 6

Page 7

Introduction
Your QMS CrownNet network interface includes the hardware, utilities software, and built-in network protocol software to enable you to
connect your QMS printer to your network.
This document guides you through setting up the QMS CrownNet
network interface. The
discusses the CrownNet interface configuration options and explains
how to use the CrownNet software (CrownAdmin, CrownAdmin 3,
CrownNet Manager, and CrownNet Print Utility for Windows).
Typographic Conventions
The following typographic conventions are used throughout this document:
Courier Text you type; type it exactly as it appears
QMS CrownNet System Administrator’s Guide
Introduction
Italic Courier
lowercase italic
↵ Press the Enter key (PC or workstation) or Return key
» Note:
▲ Caution:
Notes contain tips, extra information, or important information
that deserves emphasis or reiteration.
Cautions present information that you ne ed to know to
avoid equipment damage, process failure, or extreme annoyance.
QMS CrownNet Setup Guide
Variable text you type; replace the italicized word(s)
with information specific to your printer or computer
Variable information in the text
(Macintosh)
5
Page 8

What's Included in CrownNet
What's Included in CrownNet
In addition to this manual, CrownNet consists of the items listed
below. If your printer came standard with an Ethernet network interface, these items accompanied your printer. If you ordered an Ethernet or Token-Ring network interface card (NIC) separately, these
items accompanied the NIC.
QMS Software Utilities
n
Includes this network interface software:
n CrownAdmin for DOS
n CrownAdmin 3 and on-line help for AIX, HP-UX, Macintosh,
OS/2, Solaris, SunOS, and Windows/Windows 95/Windows
NT/Windows for Workgroups
n CrownNet Manager for OS/2
n QMS Network Print Monitor for Windows NT
n QMS Network Print Monitor for Windows 95
n CrownNet Print Utility for Windows
n QMS UNIX Host Software
Includes this PDF documentation:
n
QMS CrownNet Setup Guide
n
QMS CrownNet System Administrator’s Guide
n
QMS Network Print Monitor Administrator’s Guide
n
QMS Network Print Monitor for Windows 95 Administrator’s
Guide
n
QMS Crown Remote Console User’s Guide
CD-ROM
Alternate Media
QMS provides these software utilities and manuals on other media as
well as on CD-ROM. Contact your QMS vendor for media availability
and purchase information. You can also download them via our World
QMS CrownNet Setup Guide6
Page 9

What's
Included in
CrownNet
Wide Web Server at http://www.qms.com, our FTP server at
ftp.qms.com, or CompuServe at go qmsprint
Manuals on the CD-ROM
Your
CrownNet Systems Administrator Guide, CrownNet Setup
Guide, Network Print Monitor Administrator’s Guide, and Network
Print Monitor for Windows 95 Administrator’s Guide
the CD-ROM in Adobe Acrobat PDF format. The Acrobat Reader program is also on the CD-ROM. The CD-ROM insert provides installation instructions.
When you use Acrobat to view your manuals, keep the following tips
in mind for using some of the navigation features built into Acrobat
and your manuals.
n You may view the document in three different styles: page only,
with bookmarks, or with thumbnails. Try each to see which you
like best. Viewing with bookmarks will enable you to use a quick
table of contents to move around the document.
n The toolbar also gives you quick access to page navigation fea-
tures. For example, you may click a button to advance (>) or
reverse (<) one page, go to the start (|<) or end (>|) of the document, or use the history button (<<) to go to the previous pages
you viewed. There are other buttons in the toolbar to change view
or magnification of the document.
are inclu ded on
n As you browse through the document the open hand tool will
sometimes turn into a pointing hand. You have discovered an
embedded link in the manual. You will find these links in the table
of contents, index, www addresses, and cross references. Click
on the link to jump to a new location.
n Use the Acrobat Reader online help for a more complete expla-
nation of these features.
Using the Acrobat Reader with your Manuals
Your manuals are stored in PDF format on the
CD-ROM. Use the Adobe Acrobat Reader, also included on the CDROM, to open them. PDF-formatted manuals give you more flexibility
QMS CrownNet Setup Guide
QMS Software Utilities
7
Page 10

QMS Product Registration
and convenience than do hardcopy manuals when you have to
access needed information. Here’s a list of some of the advantages of
PDF formatted manuals:
n Ability to store the PDF manuals in a central location for access
by anyone on the network
n Ability to view and print the manuals on any of the supported plat-
forms (Windows, Macintosh, UNIX)
n Ability to view the manuals on-screen in different formats (side-
by-side or two-up, one page at a time, scrolling two-up, article
flow, and zooming capability up to 800%)
n Ability to conduct full text search built into Acrobat Reader 3.0
n Ability to print only the pages that you need
n Ability to view the manuals on web browsers using the Acrobat
plug-in
In addition, your PDF-formatted manuals have been enhanced for onscreen viewing and navigation. Throughout each manual are numerous hotlinks to cross-reference points. The table of contents and the
index are fully hotlinked to their respective page references.
We hope you enjoy using the Acrobat software to access the information in your QMS CrownNet user manuals. Your PDF-formatted manuals will never become dog-eared and yellowed or collect dust on
some forgotten shelf. Your manuals will empower you to take full
advantage of all the capabilities of your CrownNet interface
QMS Product Registration
To register over the World Wide Web, visit the QMS web page at
http://www.qms.com/support/prodreg. To register by mail, fill out and
send in your warranty card. To register by telephone, in the US call
QMS toll-free at (334)633-4300. In other countries, refer to “QMS
World-wide Offices” on page78 for the appropriate telephone number.
QMS CrownNet Setup Guide8
Page 11

Setting up the
CrownNet
Interface
Overview
Setting up the CrownNet
Interface—Overview
1 If necessary, install the CrownNet interface card.
This might not be necessary because some printers ship
standard with an Ethernet network interface. Check the printer
documentation if you’re not sure.
For instructions on installing a CrownNet interface card, refer to
the “Printer Options” chapter or the
printer documentation.
2 Connect the printer to the network.
If you use... Follow these instructions.. .
Ethernet “Ethernet Network Connection” on page 12.
Token-Ring “Token-Ring Network Connection” on page 15.
3 Install the appropriate CrownNet software.
Options
manual of your
If you use this
operating
system...
AIX CrownAdmin 3 “Installing Cro wnAdmin 3 for
DOS CrownAdmin “Installing CrownAdmin for
HP-UX CrownAdmin 3 “Installing CrownAdmin 3 for
Macintosh CrownAdmin 3 “Insta lling CrownAdmin 3 for
QMS CrownNet Setup Guide
Install this software
(on the CD-ROM)...
UNIX Host Software “Installing the UNIX Host
UNIX Host Software “Installing the UNIX Host
Following these
instructions*...
AIX” on page 17
Software” on page 30
DOS” on page18
HP-UX” on page 1 9
Software” on page 30
Macintosh” on page 20
9
Page 12

Setting up the
CrownNet
Interface
Overview
If you use this
operating
system...
OS/2 CrownNet Manager “Installing CrownNet
Sun/SPARC
Solaris 2.4
Sun/SPARC
SunOS 4.1.x
Windows
3.1,Windows 95,
Windows for
Workgroups
3.11, Windows
NT 3.5, or
Windows 4.0
Install this software
(on the CD-ROM)...
CrownAdmin 3 “Installing CrownAdmin 3 for
CrownAdmin 3 “Installing CrownAdmin 3 for
UNIX Host Software “Installing the UNIX Host
CrownAdmin 3 “Installing CrownAdmin 3 for
UNIX Host Software “Installing the UNIX Host
Windows 32s (if you’re
using Windows or Windows for Workgroups
and don’t have Win 32s
installed)
CrownAdmin 3
CrownNet Print Utility
for Windows
Following these
instructions*...
Manager for OS/2” on
page21
OS/2” on page22
Solaris” on page23
Software” on page30
SunOS” on page24
Software” on page30
“Installing CrownAdmin 3 for
Windows” on page26
“Installing the CrownNet
Print Utility for Windows” on
page27
Network Print Monitor
for Windows 95
QMS Network Print Monitor
“
for Window s 95 System
Administrator’s Guide”
Network Print Monitor
for NT
“
QMS Network Print Monitor
for Windows NT System
Administrator's Guide”
*These instructions are also included in readme files in the appropriate directories
on the CD-ROM.
QMS CrownNet Setup Guide10
Page 13

Setting up the
CrownNet
Interface
Overview
4 Configure the CrownNet interface.
If you use... Follow these instructions.. .
EtherTalk “EtherTalk Interface Configuration” on page 33.
Microsoft
Windows
Network
NetWare “NetWare Interface Configuration (Netware 3.x)” on
OS/2 LAN
Manager/LAN
Server
TCP/IP “TCP/IP Interface Configuration” on page 38.
“CrownNet Print Utility for Windows Configuration”
on page 39.
page 34 or “NetWare Interface Configuration
(Netware 4.x)” on page 37
“OS/2 LAN Manager/LAN Server and Microsoft
Windows Network Interface Configuration” on
page 33.
5 Configure the network.
If you use... Follow these instructions.. .
EtherTalk “CrownNet Print Utility for Windows Configuration”
on page 39.
Microsoft
Network Interface
NetWare “NetWare 3.x Network Configuration (Using
OS/2 LAN
Manager/LAN
Server
TCP/IP “TCP/IP NetWork Configur ati on” on pag e 57.
“CrownNet Print Utility for Windows Configuration”
on page 39
CrownAdmin 3)” on page 46 or “NetWare 3.x
Network Configuration (Using PCONSOLE)” on
page 49.
“NetWare 4.x Network Configuration (Using
PCONSOLE)” on page 50 or “NetWare 4.x Network
Configuration (Using NWAdmin)” on page52
“OS/2 LAN Manager/LAN Server Network
Configuration” on page 54
QMS CrownNet Setup Guide
11
Page 14

Network Connection
Network Connection
The method you use to connect your printer to the network depends
on whether you’re connecting to an Ethernet network (described
below) or a Token-Ring network (described on page 15).
Ethernet Network Connection
n For thin-wire Ethernet (10Base2, BNC connector) see the next
section.
n For thick-wire Ethernet (10Base5, AUI connector)—not available
for some printers—see page 13.
n For twisted-pair Ethernet (10BaseT/100BaseTX, RJ45 connec-
tor) see page 14.
Thin-Wire Ethernet Connection
Thin-wire Ethernet connections use BNC connectors.
BNC 50 Ohm
Terminator
▲ Caution:
thin-wire Ethernet cable, your network’s operation is disrupted during
the connection process.
1 Turn off the printer, and unplug the power cord.
2 If the BNC “T” connector is already installed, go to step 3.
Unless the BNC “T” connector is already installed on the
Otherwise, attach one section of thin-wire Ethernet cable to
one end of the BNC “T” connector.
QMS CrownNet Setup Guide12
BNC “T”
Connector
Page 15

Network
Connection
3 Attach another section of thin-wire Ethernet cable or a
50 ohm terminator to the other end of the BNC “T” connector.
4 Attach the BNC “T” connector to the BNC port on the Crown-
Net interface.
5 Plug in the printer, and turn it on.
6 Go to “Software Installation” on page 17.
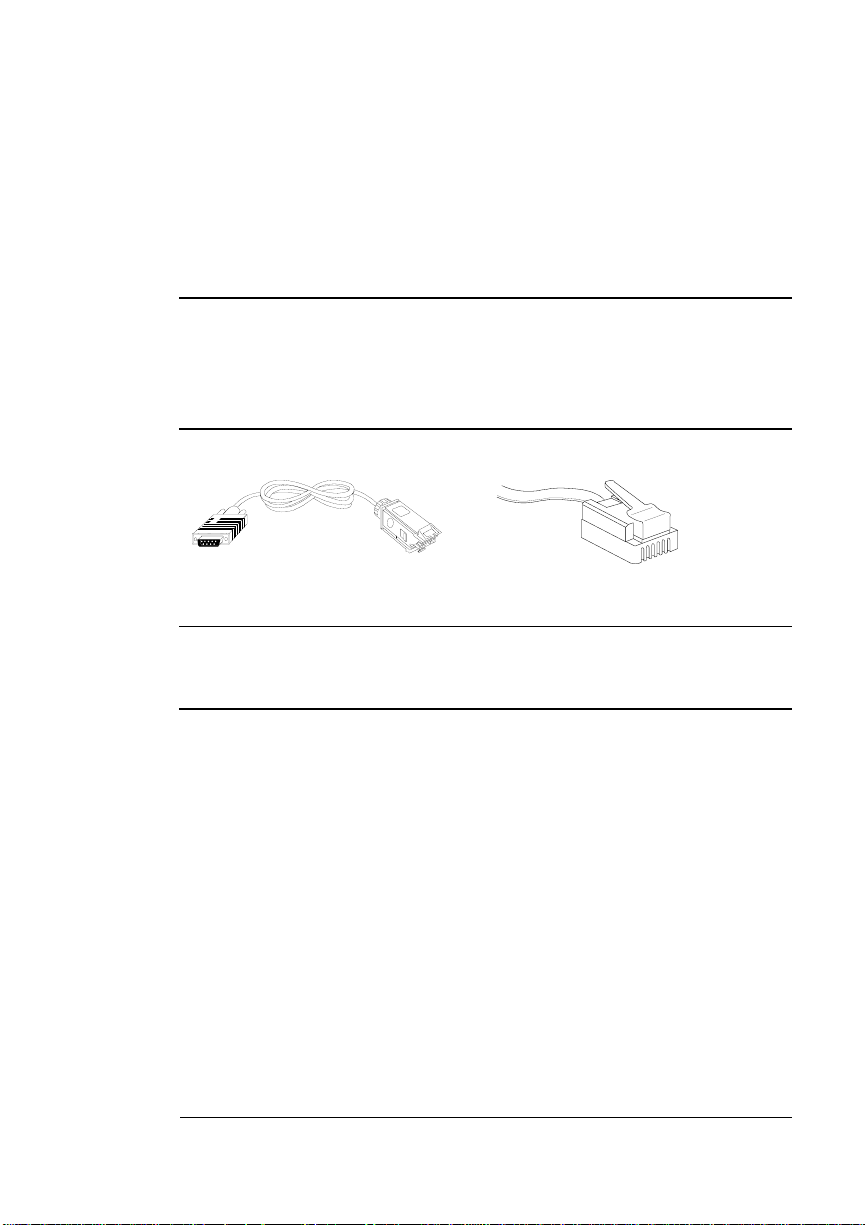
Thick-Wire Ethernet Connection
Thick-wire Ethernet connections use AUI connectors.
Transceiver with an
integrated AUI connector
Transceiver with a
separate AUI
connector
1 Turn off the printer, and unplug the power cord.
2 Plug the transceiver through the retainer into the A UI port on
the CrownNet interface.
n If you’re using a transceiver with an integrated AUI cable,
tighten the retainer screws.
n If you’re using a transceiver without an AUI cable, attach the
AUI connector to the transceiver.
3 Plug in the printer, and turn it on.
4 Go to “Software Installation” on page 17.
QMS CrownNet Setup Guide
13
Page 16
Network
Connection
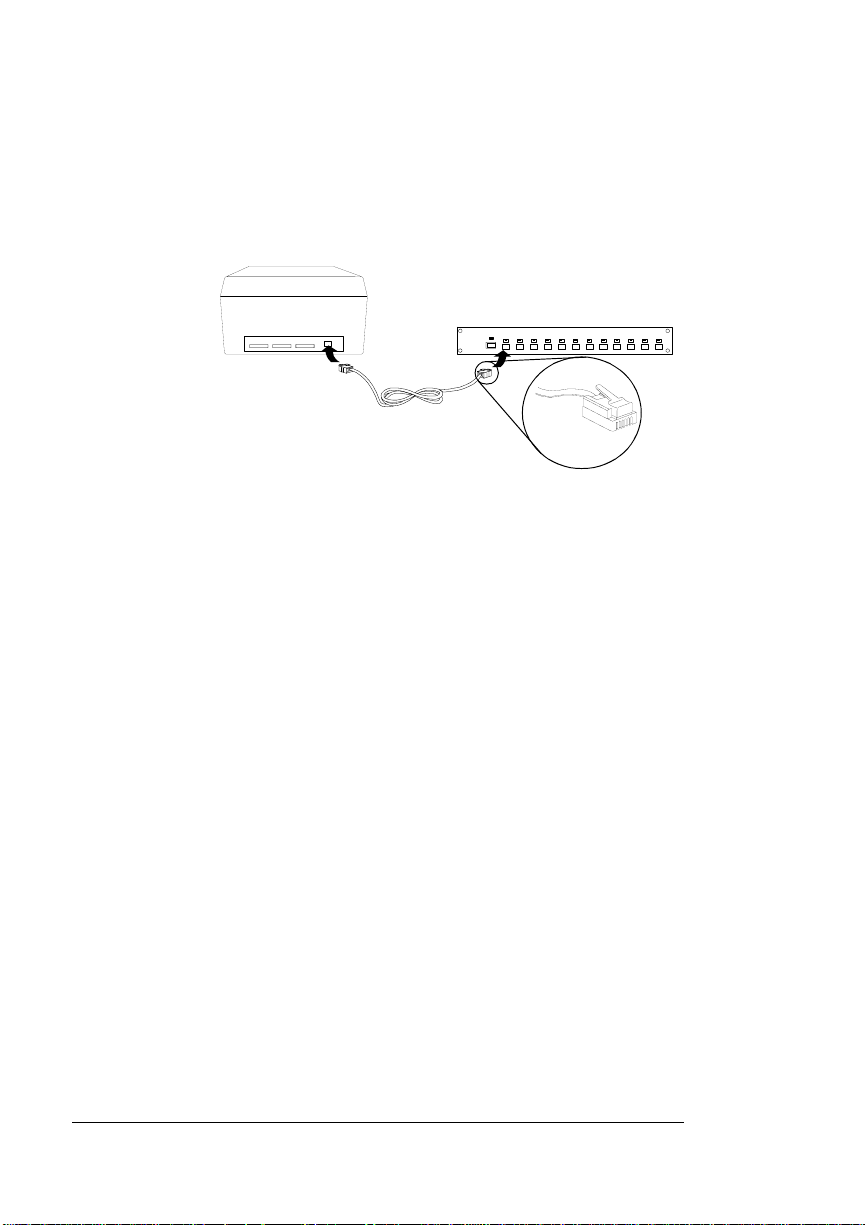
Twisted-Pair Ethernet Connection
Twisted-pair Ethernet connections use RJ45 connectors.
1 Turn off the printer, and unplug the power cord.
2 Connect one end of the twisted-pair Ethernet cable to the
3 Connect the other end of the cable to the 10BaseT/
10BaseT/100BaseTX concentrator
RJ45 Port
RJ45
Connector
RJ45 port on the CrownNet interface.
100BaseTX concentrator.
4 Plug in the printer, and turn it on.
5 Go to “Software Installation” on page 17.
QMS CrownNet Setup Guide14
Page 17
Network
Connection
Token-Ring Network Connection
Token-Ring connections support both Type 1 (shielded twisted-pair—
IBM Token-Ring Network Adapter cable or the equivalent) or Type 3
(unshielded twisted-pair) cables.
▲ Caution:
While Type 3 unshielded twisted-pair Token-Ring cables
can be used on Ethernet networks, unshielded twisted-pair Ethernet
cables may not be compatible with Token-Ring networks. Check the
Electronic Industries Association (EIA) TIA 568B specification for
more information.
Type 1 Type 3
To NetworkTo Printer
▲ Caution:
Before continuing with this procedure, make sure you know
the network’s ring speed. If the printer is set to the wrong network ring
speed, network operation will be disrupted.
1 Turn off the printer, and unplug the power cord.
2 Connect the network adapter cable to the appropriate Token-
Ring port on the CrownNet interface.
3 Plug in the printer.
4 Configure, if necessary, the interface.
For 16 Megabit Networks (default setting)
a Connect the printer to the network with the network adapter
cable.
b Turn on the printer.
For 4 Megabit Networks
a Turn on the printer.
QMS CrownNet Setup Guide
15
Page 18

Network
Connection
b Once the printer is on line and the message window reads
IDLE, press the Online/Offline key to take it off line.
c Access the Administration/Communications/
CrownNet/Common/Ring Speed menu (where
either Resident or Optional).
» Note:
For complete information on using the control panel,
xxxxxxxx
xxxxxxxx
see your printer documentation.
d Select 4 Mbits/Sec as the network speed.
▲ Caution:
Leave the printer disconnected from the network if
you are changing the ring speed.
e Use the Administration/Communications/
CrownNet/Common/Soft Reset menu to reset the CrownNet
interface (where
f Connect the printer to the network with the network adapter
cable.
5 The default source routing type (Auto—Send the file as the
most appropriate frame type) is fine for most Token-Ring networks.
However, if your network uses a different type of source routing,
identify that now in the Administration/Communications/
xxxxxxxx
xxxxxxxx
NIC/CrownNet/Common/Source Routing menu (where
is either Resident or Optional). Other choices are
xxxxxxxx
is either Resident or Optional).
xxxxxxxx
NIC/
is
NIC/
n All—Send as an all-routes-explorer frame, also known as an
all-routes-broadcast frame.
n Off—Send without source routing information.
n Single—Send as a spanning-tree-explorer frame, also
known as a single-route-broadcast frame.
6 Go to “Software Installation” on page 17.
QMS CrownNet Setup Guide16
Page 19

Software Installation*
Installing CrownAdmin 3 for AIX
CrownAdmin 3 for AIX is a software utility that allows you to monitor
and configure QMS printers and perform network operations on printers connected to your network..
1 Insert the CD-ROM in the CD-ROM drive.
Software Installation
» Note:
2 Logon the UNIX system as root.
3 Go to the root directory by typing
4 If you don't already have a CD-ROM mountpoint, create a
5 Mount the CD-ROM file system by typing
6 Verify that t he CD-ROM file system has been mounted by list-
Some CD-ROM drives require that the disk be placed in a
caddy before being inserted in the drive. Check your CD-ROM
documentation for information.
cd /↵
root-level directory by typing
mkdir /cdrom↵
mount -o ro -v cdrfs
where
device_filename
file associated with the CD-ROM drive. If you’re not sure of the
pathname, check your AIX documentation.
ing the contents of the directory:
ls /cdrom↵
The directory contains several subdirectories, including unix.
is the complete pathname of the device
device_filename
/cdrom↵
*These instructions are also provided in readme files in the appropriate directories on the
CD-ROM.
QMS CrownNet Setup Guide
17
Page 20

Software
Installation
7 Change to the location where you want the CrownAdmin 3
directory to be created.
» Note:
The directory in which the crnadm file resides must be able
to be mounted by all network nodes that need to access the
printer.
8 Extract the files from the CD-ROM:
For example:
tar xvf /cdrom/plaform/unix/crnadm/aix/
aix.tar↵
This creates a crnadm directory containing CrownAdmin 3.
» Note:
See the main readme file on the CD-ROM for the exact
location of this file.
9 Unmount the CD-ROM file system:
umount
For
device_filename
device_filename
↵
, substitute the complete pathname of the
device file associated with the CD-ROM drive.
10 Add the name of the directory containing crnadm (the direc-
tory in which you extracted the aix.tar file) to your path.
11 Install the UNIX Host Software, following the instructions in
“Installing the UNIX Host Software” on page 30.
Installing CrownAdmin for DOS
CrownAdmin for DOS is a software utility that allows you to monitor
and configure QMS printers and perform network operations on printers connected to your network..
1 Insert the CD-ROM in the CD-ROM drive.
2 At the DOS C> prompt, type the full path of the install pro-
gram.
For example
x:\platform\dos\crnadm\install
QMS CrownNet Setup Guide18
source destination
↵
Page 21

Software
Installation
where
x
is the letter of the CD-ROM drive,
pathname of the drive/directory containing the installation
software, and
which the software will be installed.
destination
is the full pathname of the directory in
source
is the
» Note:
See the main readme file on the CD-ROM for the exact
location of this file.
3 Go to “Interface Configuration” on page 32.
Installing CrownAdmin 3 for HP-UX
CrownAdmin 3 for HP-UX is a software utility that allows you to monitor and configure QMS printers and perform network operations on
printers connected to your network..
1 Insert the CD-ROM in the CD-ROM drive.
» Note:
2 Log on the UNIX system as root.
3 Go to the root directory by typing
4 If you don't already have a CD-ROM mountpoint, create a
5 Mount the CD-ROM file system by typing
Some CD-ROM drives require that the disk be placed in a
caddy before being inserted in the drive. Check your CD-ROM
documentation for information.
cd /↵
root-level directory by typing
mkdir /cdrom↵
mount -t cdfs
where
device_filename
file associated with the CD-ROM drive. If you're not sure of this
pathname, check your HP-UX documentation.
6 Verify that t he CD-ROM file system has been mounted by list-
ing the contents of the directory:
The directory contains several subdirectories, including unix.
QMS CrownNet Setup Guide
device_filename
is the complete pathname of the device
/cdrom↵
19
Page 22

Software
Installation
7 Change to the location in which you want the Cro wnAdmin 3
directory to be created.
» Note:
The directory in which crnadm.exe resides must be able to
be mounted by all network nodes that need to access the printer.
8 Extract the appropriate files from the CD-ROM.
n For example, if you're running HP-UX version 9.
tar xvf /cdrom/platform/unix/crnadm/hp_ux/
hp9.tar↵
n For example, if you're running HP-UX version 10.
tar xvf /cdrom/platform/unix/crnadm/hp_ux/
hp10.tar↵
This creates a crnadm directory containing CrownAdmin 3.
» Note:
See the main readme file on the CD-ROM for the exact
x
, type
x
location of this file.
9 Unmount the CD-ROM file system:
umount
For
device_filename
device file associated with the CD-ROM drive.
10 Add the name of the directory containing crnadm (the direc-
tory in which you extracted the hp9.tar or hp10.tar file) to
your path.
device_filename
, substitute the complete pathname of the
↵
, type
11 Install the UNIX Host Software, following the instructions in
“Installing the UNIX Host Software” on page 30.
Installing CrownAdmin 3 for Macintosh
CrownAdmin 3 for Macintosh is a software utility that allows you to
monitor and configure QMS printers and perform network operations
on printers connected to your network.
1 Insert the CD-ROM in your CD-ROM drive.
QMS CrownNet Setup Guide20
Page 23

Software
Installation
2 If necessary, double-click the CD-ROM icon to display the
CD-ROM contents.
3 Double-click the MAC folder icon to display the folder con-
tents.
» Note:
See the main readme file on the CD-ROM for the exact
location of this folder.
4 Double-click the CRNADM folder icon to display the folder
contents.
5 Double-click the install or setup file to install CrownAdmin 3.
6 Go to “Interface Configuration” on page 32.
Installing CrownNet Manager for OS/2
» Note:
For information on bypassing the print server and printing
directly to the printer, see the QMS CrownNet System Administrator’s
Guide.
OS/2 Print Server
1 At the OS/2 LAN Manager/LAN Server print server, log into
the network as the system administrator.
2 Insert the CD-ROM in the CD-ROM drive.
3 Open an OS/2 window.
4 At the DOS prompt, enter the path and filename for Crown-
Net Manager installer and the destination.
For example:
x
:\platform\os2\cnetmgr\lsminst x: y:↵
where
x
is the drive in which you inserted the CD-ROM, and y is
the drive on which CrownNet Manager will be installed.
» Note:
If you’ve previo usly insta lled the CrownNet Manager, you
can use
x
:\platform\os2\cnetmgr\lsminst x: y: /u↵
QMS CrownNet Setup Guide
21
Page 24

Software
Installation
to force installation of the upgraded software.
The installation program creates and installs the software in a
directory named
important events in a log file, also in this directory.
y
:\CROWN. CrownNet Manager stores
» Note:
See the main readme file on the CD-ROM for the exact
location of this file.
5 To start the CrownNet Manager for OS/2 automatically each
time the print server is turned on, add the following commands, in this order, at the end of the STARTUP.CMD file (but
before any @EXIT command):
set crownman=c:\crown↵
start c:\crown\crownman.exe -m↵
» Note:
The -m option minimizes the CrownNet Manager window to
an icon after the program opens.
6 To start the CrownNet Manager now, open an OS/2 window
and type the following commands:
set crownman=c:\crown↵
start c:\crown\crownman.exe↵
The CrownNet Manager window appears.
7 To install specific ports, choose Install from the CrownNet
Manager window.
8 In the Installation of CrownNet Ports dialog box, select the
appropriate printer port(s) and choose Install.
The selected ports are displayed in the CrownNet Manager
window.
» Note:
Port names are either the default or those chosen in
“Interface Configuration” on page 32.
Installing CrownAdmin 3 for OS/2
CrownAdmin 3 for OS/2 is a software utility that allows you to monitor
and configure QMS printers and perform network operations on printers connected to your network.
QMS CrownNet Setup Guide22
Page 25

Software
Installation
1 Insert the CD-ROM in your CD-ROM drive.
2 From Program Manager's File menu choose Run.
3 In the Run dialog box, enter the path and filename for the
install program.
For example:
x
:\platform\os2\crnadm\install↵
where
x
is the letter of your CD-ROM.
» Note:
See the main readme file on the CD-ROM for the exact
location of this file.
4 Follow the instructions on the screen. For additional infor-
mation, choose the Help button.
5 Go to “Installing the CrownNet Print Utility for Windows” on
page 27.
Installing CrownAdmin 3 for Solaris
CrownAdmin 3 for Solaris is a software utility that allows you to monitor and configure QMS printers and perform network operations on
printers connected to your network.
1 Insert the CD-ROM in your CD-ROM drive.
» Note:
2 Log on the UNIX system as root.
3 Type the following command to go to the root directory:
4 Verify that the CD-ROM file system has been automounted
Some drives require that the disk be placed in a caddy
before being inserted in the drive. Check your CD-ROM drive
documentation for information. Also, it takes a few seconds for the
automounter to detect the CD.
cd /↵
by listing the contents of the directory:
ls /cdrom↵
The directory contains the several subdirectories, including unix.
QMS CrownNet Setup Guide
23
Page 26

Software
Installation
5 Change to the location in which you want the Cro wnAdmin 3
directory to be created.
» Note:
The directory in which crnadm.exe resides must be able to
be mounted by all network nodes that need to access the printer.
6 Extract the files from the CD-ROM.
For example:
tar xvf /cdrom/platform/unix/crnadm/solaris/
solaris.tar↵
This creates a crnadm directory containing CrownAdmin 3.
» Note:
See the main readme file on the CD-ROM for the exact
location of this file.
7 Unmount the CD-ROM file system:
umount
For
device_filename
device file associated with the CD-ROM drive.
8 Add the name of the directory containing crnadm (the direc-
tory in which you extracted the solaris.tar file) to your path.
9 Install the UNIX Host Software, following the instructions in
“Installing the UNIX Host Software” on page 30.
device_filename
, substitute the complete pathname of the
↵
Installing CrownAdmin 3 for SunOS
CrownAdmin 3 for SunOS is a software utility that allows you to monitor and configure QMS printers and perform network operations on
printers connected to your network.
1 Insert the CD-ROM in your CD-ROM drive.
» Note:
Some drives require that the disk be placed in a caddy
before being inserted in the drive. Check your CD-ROM drive
documentation for information.
2 Log on the UNIX system as root.
QMS CrownNet Setup Guide24
Page 27

Software
Installation
3 Type the following command to go to the root directory:
cd /↵
4 If you already have a directory on the system named cdrom,
skip to step 5.
If you don't have a directory on the system named cdrom, type
the following command to make one:
mkdir /cdrom↵
5 Mount the CD-ROM file system:
mount -r -t hsfs
For
device_filename
device associated with the CD-ROM drive. On SunOS systems,
device_filename is usually /dev/sr0. If it isn’t, check your SunOS
system documentation.
6 Verify that t he CD-ROM file system has been mounted by list-
ing the contents of the directory:
ls /cdrom↵
The directory contains several subdirectories, including unix.
7 Change to the location in which you want the Cro wnAdmin 3
directory to be created.
» Note:
The directory in which crnadm.exe resides must be able to
device_filename
substitute the complete pathname of the
/cdrom↵
be mounted by all network nodes that need to access the printer.
8 Extract the files from the CD-ROM.
For example:
tar xvf /cdrom/platform/unix/crnadm/sunos/
sunos.tar↵
This creates a crnadm directory containing CrownAdmin 3.
» Note:
See the main readme file on the CD-ROM for the exact
location of this file.
9 Unmount the CD-ROM file system:
umount
QMS CrownNet Setup Guide
device_filename
↵
25
Page 28

Software
Installation
For
device_filename
device file associated with the CD-ROM drive.
10 Add the name of the directory containing crnadm (the direc-
tory in which you extracted the sunos.tar file) to your path.
11 Install the UNIX Host Software, following the instructions in
“Installing the UNIX Host Software” on page 30.
, substitute the complete pathname of the
Installing CrownAdmin 3 for Windows
CrownAdmin 3 for Windows is a software utility that allows you to
monitor and configure QMS printers and perform network operations
on printers connected to your network.
System Requirements
You must have the following to run CrownAdmin 3 for Windows:
n Windows 3.1, Windows 95, Windows for Workgroups 3.11, or
Windows NT 3.5/4.0 on an IBM or compatible PC
n At least a 386 with 8 MB or more RAM and 10 MB of free hard
disk space
n A Winsock 1.1-compliant stack—if you require TCP/IP compatibil-
ity
Installation
1 Insert the CD-ROM in the CD-ROM drive.
» Note:
2 If you’re using Windows NT or Windows 95, or if you already
▲ Caution:
If you’re using Windows 95 or Windows NT, the CD-ROM
boots automatically.
have Windows 32s installed, skip to step 3.
If you don’t currently have Win32s installed, install it now.
You must do this before installing CrownAdmin 3.
a From the Start menu choose Run...
QMS CrownNet Setup Guide26
Page 29

b In the Run dialog box type
x
:\platform\windows\win32s\disk1\setup↵
Software
Installation
where
c Follow the instructions on the screen. For more information
on Windows 32s, refer to your Windows documentation.
3 Install the CrownAdmin 3 software.
Windows NT and Windows 95
a In the CD-ROM’s Welcome dialog box choose Install Printer
Utilities and Drivers.
b In the Installation dialog box choose Next>.
c In the Installation Type dialog box select Network/Custom
Installation, and then choose Next>,
d In the Network/Custom Installation dialog box, select
CrownAdmin, if necessary, and then choose Next>.
Windows 3.1 and Windows for Workgroups
a In Program Manager, from the File menu choose Run...
b In the Run dialog box, type
x
where
4 Follow the instructions on the screen.
x
is the letter of the CD-ROM drive, and choose OK.
:\platform\windows\crnadm\install↵
x
is the letter of your CD-ROM, and choose OK.
For additional information, choose the Help button.
5 Go to “Installing the CrownNet Print Utility for Windows” on
page 27.
Installing the CrownNet Print Utility for Windows
The QMS CrownNet Print Utility for Windows is compatible with all
CrownNet-equipped printers running with LAN Manage r/LAN Server
enabled (Administration/Communications/
Lan Manager/Protocol menu (where
Optional)).
QMS CrownNet Setup Guide
xxxxxxxx
xxxxxxxx
NIC/CrownNet/
is either Resident or
27
Page 30

Software
Installation
This utility operates over the NetBIOS/NetBEUI protocol from the following Windows environments:
n Windows 3.1—with LAN Server/LAN Manager Workstation Ser-
n Windows for Workgroups 3.11, Windows NT 3.5 and above, or
vice
Windows 95—with Microsoft Windows Network (Microsoft NetBEUI protocol)
» Note:
The Print Manager must be activated in all Windows
environments. In addition, the Microsoft NetBEUI protocol must be
installed and operational prior to the installation of the QMS
CrownNet Print Utility for Windows. Refer to your Windows
documentation for installation and configuration instructions.
The installation program creates a CrownNet Print Utility group with a
CrownNet Print Utility icon.
1 With Windows running, insert the QMS Software Utilities CD-
ROM in your computer's CD-ROM drive.
2 Open the Run dialog box.
n Windows 3.1, Windows for Workgroups, Windows NT
3.x—In Program Manager, from the File menu choose Run...
n Windows 95,Windows NT 4.x—From the Start menu
choose Run...
3 In the Run dialog box enter the path and filename for the
install program.
For example:
x
:\platform\windows\prnutil\prntutil
(where
CD-ROM), and choose OK.
x
is the letter of the drive in which you inserted the
» Note:
location of this file.
See the main readme file on the CD-ROM for the exact
QMS CrownNet Setup Guide28
Page 31

Software
Installation
4 Follow the instructions on the screen. You will be asked for
the following information:
n Destination drive and subdirectory for the program files (the
default is C:\CROWNPUW).
n Destination drive and subdirectory for the spool directory (the
default is C:\~).
The spool directory is the directory in which Windows print
files are stored prior to redirection to the CrownNet Print Utility interface. Ensure that the hard disk containing the spool
directory has ample space available to hold spool files. At
least 10 MB free space is recommended.
5 When the installation is complete, you are prompted to exit
from the installation program and return to Program
Manager. Choose OK.
6 Since the CrownNet Print Utility must be running when you
print to a CrownNet port, we strongly recommend that you
place the CrownNet Print Utility (CROWNPUW.EXE) into your
Startup folder.
7 Go to “Interface Configuration” on page 32.
» Note:
For installation instructions for the QMS Network Print
Monitor, see the Administrator’s Guide. The QMS Network Print
Monitor for Windows 95 Administrator’s Guide and the QMS Print
Monitor Administrators Guide for Windows NT are included on the
QMS Software Utilities CD-ROM.
QMS CrownNet Setup Guide
29
Page 32

Software
Installation
Installing the UNIX Host Software
1 Insert the CD-ROM in your CD-ROM drive.
» Note:
Some drives require that the disk be placed in a caddy
before being inserted in the drive. Check your CD-ROM drive
documentation for information. Also, it takes a few seconds for
the automounter to detect the CD.
2 Log on the UNIX system as root.
3 Type the following command to go to the root directory:
cd /↵
4 If you’re using a Solaris system, skip to step 6.
If you’re using a SunOS system and already have a directory on
the system named cdrom, skip to step 5.
If you’re using a SunOS system and don't have a directory on the
system named cdrom, type the following command to make one:
mkdir /cdrom↵
5 Mount the CD-ROM file system:
mount -r -t hsfs device_filename /cdrom↵
For device_filename substitute the complete pathname of the
device associated with the CD-ROM drive. On SunOS systems,
device_filename is usually /dev/sr0. If it isn't, check your SunOS
system documentation.
6 Verify that the CD-ROM file system has been mounted by
listing the contents of the directory:
The directory contains several subdirectories, including unix.
7 Change to the directory in which you want the UNIX Host
Software to be installed.
8 Extract the files from the CD-ROM.
For example:
tar xvf /cdrom/platform/unix/host_sw/hs_tar↵
QMS CrownNet Setup Guide30
Page 33

Software
Installation
The utilities are installed in a directory named QMSoft in the
current directory.
» Note:
See the main readme file on the CD-ROM for the exact
location of this file.
9 Unmount the CD-ROM file system:
umount
For
device_filename
device file associated with the CD-ROM drive.
10 Change to the newly created QMSoft directory:
cd QMSoft↵
11 Run the Qinstall installation utility:
./Qinstall↵
12 Follow the instructions on the screen. When the installation
is complete, the following message displays:
QMS UNIX Host Software installation complete
13 Copy the addprt and qpr utilities and their associated man-
ual pages to standard directories. For example,
cp addprt /usr/bin↵
cp qpr /usr/bin↵
cp man/addprt.1 /usr/man/man1↵
device_filename
, substitute the complete pathname of the
↵
cp man/qpr.1 /usr/man/man1↵
» Note:
If you're using SNMP to manage your network using
SunNet Manager, copy the appropriate files to the SunNet
Manager-agents directory.
See your SunNet Manager documentation for more information.
14 Update the printer's Internet name and address in the
/etc/hosts file.
15 Run the QMS addprt utility by typing
addprt↵
QMS CrownNet Setup Guide
31
Page 34

Interface Configuration
16 Follow the instructions on the screen.
See chapter 7, “UNIX Utilities” in the
Administrator’s Guide
17 Go to “Interface Configuration” on page 32.
for more information.
QMS CrownNet System
Interface Configuration
This section briefly describes the configuration procedure for the
printer interface. For an overview of menus and options see “CrownNet Menus” on page 68. For a complete discussion of all of the configuration options available through the Adm in istrati on/
Communications/
either Resident or Optional), see chapter 2, “Interface Configuration,”
QMS CrownNet System Administrator’s Guide
of the
You can make these configuration changes through any of the follow-
ing means:
n Printer Control Panel—For information on using the printer con-
trol panel to change configuration menu settings, refer to your
printer documentation.
n CrownAdmin (for DOS), CrownAdmin 3 (for AIX, HP-UX, Mac-
intosh, OS/2, Solaris/SunOS, and Windows/Windows NT/
Windows for Workgroups), or CrownNet Manager (for OS/
2)—For more information on using this software, refer to the
appropriate chapter in the system administrator’s guide or to the
software’s on-line help.
xxxxxxxx
NIC/CrownNet menu (where
xxxxxxxx
.
is
n Remote Console—For information on accessing Remote Con-
sole, refer to the appropriate chapter in the system administrator’s guide. For information on using Remote Console, refer to the
QMS Crown Remote Console User’s Guide
QMS CrownNet Setup Guide32
.
Page 35

Interface
Configuration
EtherTalk Interface Configuration
1 If your network has more than one zone, use the Administra-
tion/Communications/
Zone Name/Zone Part 1 and Zone Part 2 menus, (where
xxxxxxxx
the zone to which the printer is attached.
is either Resident or Optional) to enter the name of
xxxxxxxx
NIC/CrownNet/EtherTalk/
» Note:
2 Skip to “Network Configuration” on page 39.
The two Zone Part x menus allow you to identify 1 zone
with a name up to 32 characters long. (Up to 16 characters can
be entered in each of the two menus). You cannot use these two
menus to identify two zones. Trailing spaces are not considered
part of the zone name. All standard printable ASCII characters
are valid except the @ and ' symbols. The names are case
sensitive.
OS/2 LAN Manager/LAN Server and Microsoft Windows Network Interface Configuration
1 One unique printer name is broadcast to the network. Use
the Administration/Communications/
Net/LAN Manager/Printer Name menu (where
either Resident or Optional) to enter the name of the printer.
» Note:
2 If you’re using OS/2 LAN Manager/LAN Server, skip to “OS/2
The name can be up to 16 characters long. Spaces and
lowercase characters are not allowed. Underscore characters (_)
are allowed to simulate multiword names (for example,
PRODUCT_MKTG).
LAN Manager/LAN Server Network Configuration” on
page 54.
xxxxxxxx
NIC/Crown-
xxxxxxxx
is
If you’re using Microsoft Windows Network, skip to “CrownNet
Print Utility for Windows Configuration” on page 39.
QMS CrownNet Setup Guide
33
Page 36

Interface
Configuration
NetWare Interface Configuration (Netware 3.x)
Unless you want to use the default settings, use the following procedure to name the file and print servers. These names must be unique.
» Note:
In CrownAdmin 3, the printer shows up as QMS_xxxx_Print_
System_hardwareaddress, where xxxx is the printer model
number and hardwareaddress is the printer’s hardware address as
found on the printer start-up page. This address will be blank until the
interface has been reset following installation.
1 In the Administration/Communications/
Net/NetWare/Config PServer/File Srv Name[1], File Srv
Name[2], and File Srv Name[3] menus, (where
either Resident or Optional) enter the name of the target file
x
server (primary 3.
» Note:
The three File Srv Name[x] menus allow you to identify 1
configuration server).
xxxxxxxx
xxxxxxxx
NIC/Crown-
file server with a name up to 47 characters long. (Up to 16
characters can be entered in the first two menus and 15 in the
third menu). You cannot use these 3 menus to identify 3 file
servers. Up to 16 file servers are supported. T o enter the 15 other
file server names, use CrownAdmin 3.
Spaces and lowercase characters are not allowed within file
server names. However, underscore characters (_) are all owed
to simulate multiword names (for example, PUBS_SERVER). At
the printer control panel only, a space must be used following the
last character of the file server name to end the name. For
example, the file server name
FIRSTGROUP_GROUPS_BLUE_TEAM_TEAMS_CRC_QMS
is
is 42 characters long, and must be entered as follows:
FILE SRV NAME[1]
FIRST_GROUP_GROU
File Srv Name[2]
PS_BLUE_TEAM_TEA
File Srv Name[3]
MS_CRC_QMS<space>
where <space> is the space character.
QMS CrownNet Setup Guide34
Page 37

Interface
Configuration
2 In the Administration/Communications/
Net/NetWare/Config PServer/PServer Name[1], PSer ver
Name[2], and PServer Name[3] menus (where
either Resident or Optional), enter the name of the bindery
print server.
» Note:
The three PServer Name[x] menus allow you to identify
one print server with a name up to 47 characters long. (Up to 16
characters can be entered in the first two menus and 15 in the
third menu). You cannot use these 3 menus to identify 3 print
servers.
Spaces and lowercase characters are not allowed in print server
names. However, underscore characters (_) are allowed to
simulate multiword names (for example, PUBS_PSERVER). At
the printer control panel only, a space must be used following the
last character of the print server name to end the name. For
example, the print server name
FIRSTGROUP_GROUPS_GRAY_TEAM_TEAMS_CRC_QMS
is 42 characters long, and must be entered as follows:
PSERVER Name[1]
FIRST_GROUP_GROU
PSERVER Name[2]
PS_GRAY_TEAM_TEA
PSERVER Name[3]
MS_CRC_QMS<space>
where <space> is the space character.
xxxxxxxx
xxxxxxxx
NIC/Crown-
is
If you want the server to operate in an Rprinter mode, go to step
3. Otherwise, go to step 5
3 In the Administration/Communications/
CrownNet/NetWare/RN Printer#1/Printer Slot # menu (where
xxxxxxxx
slot number.
» Note:
is either Resident or Optional), enter the printer
This number must match the slot number chosen in the
Printer Configuration submenu of the Print Server Configuration
menu in the NetWare PCONSOLE utility.
QMS CrownNet Setup Guide
xxxxxxxx
NIC /
35
Page 38

Interface
Configuration
4 In the Administration/Communications/
Net/NetWare/RN Printer#1/PServer Name[1], PServer
Name[2], and PServer Name[3] menus (where
either Resident or Optional), enter the name of the print
server.
» Note:
The three PServer Name[x] menus allow you to identify 1
print server with a name up to 47 characters long. (Up to 16
characters can be entered in the first two menus and 15 in the
third menu). You cannot use these 3 menus to identify 3 print
servers.
Spaces and lowercase characters are not allowed. However,
underscore characters (_) are allowed to simulate multiword
names (for example, PUBS_PSERVER). At the printer control
panel only, a space must be used following the last character of
the print server name to end the name. For example, the print
server name
FIRSTGROUP_GROUPS_RED_TEAM_TEAMS_CRC_QMS
is 42 characters long, and must be entered as follows:
PSERVERName[1]
FIRST_GROUP_GROU
PSERVER Name[2]
PS_RED_TEAM_TEAM
PSERVER Name[3]
S_CRC_QMS<space>
where <space> is the space character.
xxxxxxxx
xxxxxxxx
NIC/Crown-
is
5 Reset the CrownNet interface by using the Administration/
Communications/
Reset menu (where
6 Skip to “Network Configuration” on page 39.
xxxxxxxx
xxxxxxxx
NIC/CrownNet/Common/Soft
is either Resident or Optional).
QMS CrownNet Setup Guide36
Page 39

Interface
Configuration
NetWare Interface Configuration (Netware 4.x)
Unless you want to use the default settings, use the following procedure to name the file and print servers. These names must be unique.
» Note:
In CrownAdmin 3, the printer shows up as QMS-xxxx-PrintSystem-hardwareaddress, where xxxx is the printer model
number and hardwareaddress is the printer’s hardware address as
found on the printer start-up page.
1 In the Administration/Communications/
Net/NetWare/Config PServer/PServer Context[1], PServer
Context[2], and PServer Context[3] menus (where
is either Resident or Optional), enter the name of the configuration file server and print server context.
» Note:
The three PServer Context[x] menus allow you to identify
xxxxxxxx
NIC/Crown-
xxxxxxxx
the name of the NDS configuration file server and the print server
context.
The format for the option is
n File server name
n Space
n Print server context
For example, if the configuration file server name is QMS-4 and
the print server context is PRINTSERV2.SALES.QMS, you would
enter:
QMS-4 PRINTSERV2.SALES.QMS
» Note:
» Note:
Make sure to put a space between the file server name
(QMS-4)
PRINTSERV2.SALES.QMS).
(
Up to 16 characters can be entered in the Pserver Context[1]
field, and additional 16 characters in Pserver Context[2] field, and
15 characters in the Pserver Context[3] field.
and the print server context
If you need to assign more than 14 characters to the file
server name you must use CrownAdmin 3 to enter the name.
QMS CrownNet Setup Guide
37
Page 40

Interface
Configuration
2 Reset the CrownNet interface by using the Administration/
Communications/
Reset menu (where
3 Skip to “Network Configuration” on page 39.
xxxxxxxx
xxxxxxxx
NIC/CrownNet/Common/Soft
TCP/IP Interface Configuration
1 If necessary, in the Administration/Communications/
xxxxxxxx
(where
printer’s Internet address.
The factory default Internet address is 161.033.128.024.
2 If necessary, in the Administration/Communications/
xxxxxxxx
xxxxxxxx
address of the default router.
The factory default router address is 000.000.000.000.
3 If necessary, in the Administration/Communications/
xxxxxxxx
xxxxxxxx
subnet mask.
NIC/CrownNet/TCPIP/Internet Address menu
xxxxxxxx
NIC/CrownNet/TCPIP/Default Router menu (where
is either Resident or Optional), enter the Internet
NIC/CrownNet/TCPIP/Subnet Mask menu (where
is either Resident or Optional), enter the printer’s
is either Resident or Optional), enter the
is either Resident or Optional).
The default subnet mask is 000.000.000.000. This setting
provides automatic sensing of gateways. If you identify a subnet
mask, automatic sensing is disabled.
4 Go to “Network Configuration” on page 39.
QMS CrownNet Setup Guide38
Page 41

Network Configuration
CrownNet Print Utility for Windows Configuration
Follow the appropriate procedure below to install a QMS CrownNet
printer port as a Windows port and to connect it to a printer driver.
The procedure you use depends on the version of Windows you’re
running.
Network
Configuration
» Note:
You must have the QMS CrownNet Print Utility software
installed before completing these procedures.
Windows 3.1 and Windows for Workgroups 3.11
» Note:
Windows 3.1 requires OS/2 LAN Se rver/LAN Manager
Workstation Service. Windows for Workgroups 3.11 requires
Microsoft Windows Network (Microsoft NetBEUI protocol). Refer to
your Windows documentation for installation instructions.
1 Double-click the CrownNet Print Utility icon to start the util-
ity.
2 In the Port menu, choose Add.
3 In the CrownNet Port list, select the CrownNet port you want
to install.
The ports appear as an alphanumeric list of printers attached to
the network. The names of these printers are defined in the
Administration/Communications/
Manager/Printer Name menu (where
or Optional), and are listed on the CrownNet configuration page
(Administration/Communications/
Common/Config Page menu (where
or Optional)). The factory default name for each printer is
QMS_080086
by QMS. (Refer to the “Configuring the OS/2 LAN Manager/LAN
Server or Microsoft Windows Network Protocol” section of
chapter 2, “Printer Configuration,” for instructions on changing the
xxxxxx
, where
xxxxxxxx
xxxxxxxx
xxxxxx
NIC/CrownNet/Lan
xxxxxxxx
xxxxxxxx
is a unique number assigned
is either Resident
NIC/CrownNet/
is either Resident
QMS CrownNet Setup Guide
39
Page 42

Network
Configuration
printer name so you can identify the printers on the network
more easily.)
If the printer you want is not in the port list, make sure it’s
attached to the network and on line, and that the CrownNet LAN
Manager/LAN Server protocol is enabled (Administration/
Communications/
menu (where
You may need to refresh the list by choosing the Cancel button
and then from the Port menu by choosing Add again.
4 Accept or change the suggested Windows port name, and
type any comments in the Description field. Make a note of
the Windows port name (you'll need it later), and then
choose OK to install the Windows port.
The Windows port name must adhere to standard DOS file
naming conventions. However, use of the file extension is
optional. Be sure to make this name as descriptive as possible.
You may want to include the type of printer and its location or
owner as part of the name (for example, mktg1660 or
dan_4525.mkt).
xxxxxxxx
xxxxxxxx
NIC/CrownNet/Lan Manager/Protocol
is either Resident or Optional)).
If you get a Bad port name error after you choose OK, make
sure that you are using standard DOS file naming conventions.
5 In the CrownNet Print Utility, select the Windows port you
just installed.
If the printer Status shows No Response, you can either wait up
to 15 seconds for the status to change or, after about 15 seconds,
choose the Refresh command to display a message such as OK,
Busy, Offline, Occupied, or Out of Paper. If the No
Response message persists, or if an Internal Error
message displays, either refer to the CrownNet Print Utility online help for advice on further action or close the utility and restart
it.
6 In the Port menu, choose Connect to bring up the Windows
Printers dialog box.
QMS CrownNet Setup Guide40
Page 43

Network
Configuration
7 Select a printer driver from the list of Installed Printers (or
choose Add>> to install a new driver), and then choose
Connect...
8 In the Connect dialog box select the Windows port you
installed in steps 2-4, and choose OK.
The Windows port name will be at the bottom of the Ports list and
will be in this format:
spooling drive,
CrownNet Windows port name.
9 Choose OK to close the Connect dialog box, and then
choose Close to close the Printers dialog box.
The setup is now complete, and you can immediately print through
your CrownNet port. Refer to the
tor’s Guide
ent-server (server-based) printing.
for additional information on setting up serverless and cli-
drive:\directory\port
directory
is the spooling directory, and
, where
drive
is the
port
is the
QMS CrownNet System Administra-
» Note:
The QMS CrownNet Print Utility must be running when you
print to your CrownNet port. We strongly recommend that , if you
haven't already, you place the CrownNet Print Utility
(CROWNPUW.EXE) into your Startup folder.
Windows NT
» Note:
Windows NT requires preinstallation of the Microsoft Windows
Network running the NetBEUI Protocol, NetBIOS Interface, and
Workstation and/or Server network software. Refer to your Windows
documentation for installation instructions.
1 Double-click the CrownNet Print Utility icon to start the util-
ity.
2 In the Port
3 In the CrownNet Port list, select the CrownNet port you want
to install.
The ports appear as an alphanumeric list of printers attached to
the network. The names of these printers are defined in the
Administration/Communications/
Manager/Printer Name menu (where
QMS CrownNet Setup Guide
menu, choose Add.
xxxxxxxx
xxxxxxxx
NIC/CrownNet/Lan
is either Resident
41
Page 44

Network
Configuration
or Optional) and are listed on the CrownNet configuration page
(Administration/Communications/
Common/Config Page menu (where
or Optional)). The factory default name for each printer is
QMS_080086
by QMS. (Refer to the “Configuring the OS/2 LAN Manager/LAN
Server or Microsoft Windows Network Protocol” section of
chapter 2, “Printer Configuration,” for instructions on changing the
printer name so you can identify the printers on the network
more easily.)
If the printer you want is not in the port list, make sure it’s
attached to the network and on line, and that the CrownNet LAN
Manager/LAN Server protocol is enabled (Administration/
Communications/
menu (where
You may need to refresh the list by choosing the Cancel button
and then from the Port menu by choosing Add again.
4 Accept or change the suggested Windows port name, and
type any comments in the Description field. Make a note of
the Windows port name (you'll need it later), and then
choose OK to install the Windows port.
xxxxxx
, where
xxxxxxxx
xxxxxxxx
xxxxxxxx
xxxxxx
NIC/CrownNet/Lan Manager/Protocol
is either Resident or Optional)).
NIC/CrownNet/
xxxxxxxx
is a unique number assigned
is either Resident
The Windows port name must adhere to standard DOS file
naming conventions. However, use of the file extension is
optional. Be sure to make this name as descriptive as possible.
You may want to include the type of printer and its location or
owner as part of the name (for example, mktg1660 or
dan_4525.mkt).
If you get a Bad port name error after you choose OK, make
sure that you are using standard DOS file naming conventions.
5 Repeat steps 2-4 for each of the printers you want to set up
to use the CrownNet Print Utility.
6 In the CrownNet Print Utility, select the Windows port you
installed in steps 2-4.
If the printer Status shows No Response, you can either wait up
to 15 seconds for the status to change or, after about 15 seconds,
QMS CrownNet Setup Guide42
Page 45

Network
Configuration
choose the Refresh command to display a message such as OK,
Busy, Offline, Occupied, or Out of Paper. If the No
Response message persists, or if an Internal Error
message displays, either refer to the CrownNet Print Utility on-line
help for advice on further action or close the utility and restart it.
7 In the Port menu, choose Connect to bring up Print Manager.
8 In the Printer menu, choose Create Printer.
9 Type a name in the Printer Name field, select a suitable
printer driver from the Driver list, then select the Windows
port name you installed in steps 2-4, and choose OK.
The Windows port name will be near the bottom of the Ports list
and will be in this format:
spooling drive,
CrownNet Windows port name.
10 If you installed more than one Windows port, repeat steps 6-
10 for each Windows port you installed.
11 Close the Print Manager.
directory
drive:\directory\port
is the spooling directory, and
, where
drive
port
is the
is the
The setup is now complete, and you can immediately print through
your CrownNet port. Refer to the
tor’s Guide
ent-server (server-based) printing.
» Note:
for additional information on settin g up ser verle ss and cli-
The QMS CrownNet Print Utility for Windows must be running
QMS CrownNet System Administra-
when you print to your CrownNet port. We strongly recommend that,
if you haven't already, you place the CrownNet Print Utility for
Windows (CROWNPUW.EXE) into your Startup folder.
Windows 95
» Note:
Windows 95 requires preinstallation of the Microsoft Windows
Network running the NetBEUI Protocol, NetBIOS Interface, and
Workstation and/or Server network software. Refer to your Windows
documentation for installation instructions.
1 Open the CrownNet Print Utility.
2 In the Port menu, choose Add.
QMS CrownNet Setup Guide
43
Page 46

Network
Configuration
3 In the CrownNet Port list, select the CrownNet port you want
to install.
The ports appear as an alphanumeric list of printers attached to
the network. The names of these printers are defined in the
Administration/Communications/
Manager/Printer Name menu (where
or Optional) and are listed on the CrownNet configuration page
(Administration/Communications/
Common/Config Page menu (where
or Optional)). The factory default name for each printer is
QMS_080086
by QMS. (Refer to the “Configuring the OS/2 LAN Manager/LAN
Server or Microsoft Windows Network Protocol” section of
chapter 2, “Printer Configuration,” of the
Administrator’s Guide
name so you can identify the printers on the network more
easily.)
If the printer you want is not in the port list, make sure it’s
attached to the network and on line, and that the CrownNet LAN
Manager/LAN Server protocol is enabled (Administration/
Communications/
menu (where
xxxxxx
, where
xxxxxxxx
xxxxxxxx
xxxxxxxx
xxxxxxxx
xxxxxx
NIC/CrownNet/Lan
xxxxxxxx
xxxxxxxx
is a unique number assigned
is either Resident
NIC/CrownNet/
is either Resident
QMS CrownNet System
for instructions on changing the printer
NIC/CrownNet/Lan Manager/Protocol
is either Resident or Optional)).
You may need to refresh by list by choosing the Cancel button
and then from the Port menu choosing Add again.
4 Accept or change the suggested Windows port name, and
type any comments in the Description field. Make a note of
the Windows port name (you'll need it later), and then
choose OK to install the Windows port.
The Windows port name must adhere to standard DOS file
naming conventions. However, use of the file extension is
optional. Be sure to make this name as descriptive as possible.
You may want to include the type of printer and its location or
owner as part of the name (for example, mktg1660 or
dan_4525.mkt).
If you get a Bad port name error after you choose OK, make
sure that you are using standard DOS file naming conventions.
QMS CrownNet Setup Guide44
Page 47

Network
Configuration
5 In the CrownNet Print Utility, select the Windows port you
just installed.
If the printer Status shows No Response, you can either wait up
to 15 seconds for the status to change or, after about 15 seconds,
choose the Refresh command to display a message such as OK,
Busy, Offline, Occupied, or Out of Paper. If the No
Response message persists, or if an Internal Error
message displays, either refer to the CrownNet Print Utility online help for advice on further action or close the utility and restart
it.
6 In the Port menu, choose Connect to bring up the Printers
dialog box.
7 Select a printer from the list of Printers, and then from the
File menu choose Properties.
» Note:
If you double-click (instead of single-click) on the printer
driver to display the printer driver dialog box, the Properties
command is located in the Prin ter menu .
If the printer is not listed, choose Add Printer to install a new
printer. This opens the Add Printer Wizard.
» Note:
When adding a printer, keep the following two points in
mind:
n When asked how the printer is attached to your computer,
not
choose Local Printer,
n When asked what port you want to use with the printer, select
the Windows port you installed in steps 2-4. It will be in this
format:
directory
Windows port name.
8 In the Properties dialog box, choose the Details tab.
9 In the Print to the Following Port drop-down list box, select
the Windows port you installed in steps 2-4, and choose OK.
The Windows port name will near the top of the Ports list and will
be in this format:
drive:\directory\port
is the spooling directory, and
drive:\directory\port
Network Printer.
, where
drive
is the spooling drive,
port
, where
is the CrownNet
drive
is the spooling
QMS CrownNet Setup Guide
45
Page 48

Network
Configuration
drive,
Windows port name.
10 Close the Printers dialog box.
directory
is the spooling directory, and
port
is the CrownNet
» Note:
If you opened the printer driver dialog box in step 7, you’ll
have to close that before closing the Printers dialog box.
The setup is now complete, and you can immediately print through
your CrownNet port. Refer to the
tor’s Guide
ent-server (server-based) printing.
» Note:
for additional information on settin g up ser verle ss and cli-
The QMS CrownNet Print Utility must be running when you
QMS CrownNet System Administra-
print to your CrownNet port. We strongly recommend that , if you
haven't already, you place the CrownNet Print Utility
(CROWNPUW.EXE) into your Startup folder.
EtherTalk NetWork Configuration
1 With the Macintosh running, from the Apple menu, choose
Chooser.
2 Click the LaserWriter icon.
3 If your network has more than one zone, click the name of
the default zone.
The printer name is automatica ll y displ ayed in the d efa ult zo ne.
4 Select the name of the printer.
5 Click the close box.
The setup is now complete.
QMS CrownNet Setup Guide46
Page 49

Network
Configuration
NetWare 3.x Network Configuration (Using CrownAdmin 3)
Add a Print Server and Assign it to a Queue
» Note:
If you don’t have CrownAdmin 3 installed or if you’re using
CrownAdmin 3 with Windows NT, UNIX, OS/2, or Macintosh, use the
instructions in “NetWare 3.x Network Configuration (Using
PCONSOLE)” on page 49.
1 In the main CrownAdmin 3 window, select the printer you
want to configure.
Choose the Printers option button to display a list of printers.
2 Choose the NetWare NDS button.
3 In the list of options that appears, choose (NDS) PServer
Name-Bind, type the print server name in uppercase only,
and choose OK.
The print server name you enter must match the print server
name defined on a file server.
CrownAdmin 3 will ask you for the password.
4 If you're already logged in to a file server with supervisor
privileges, skip to step 5.
If not, you need to log in to a file server with supervisor privileges:
a From the Server menu, choose Logins.
b In the Login/Logout dialog box, select a NetWare file server
from the Availabl e File Servers list.
c Choose the Login button.
» Note:
d In the Server Authentication dialog box that appears, type
QMS CrownNet Setup Guide
You can't simply attach to a file server; you must log in.
your name in the Username text box, type your file server
password in the Password text box, and choose the OK
button.
47
Page 50

Network
Configuration
e You're returned to the Login/L ogou t dialog box, and the file
f Choose the Done button.
5 From the Server menu, choose Configure PServers.
6 Type the name of the print server (from step 3) in uppercase
only, in the Print Server name text box and choose the Find
Print Servers button.
A list of File Servers on which that print server is defined appears
in the Defined Print Servers list. Skip to step 8.
If you don't remember the name of the Print Server, choose the
Find Name button. In the Find Print Server dialog box a list of File
Servers you're logged in appears in the Available File Servers list.
Select one, choose the Find Print Servers button, select a print
server from the Choose a Print Server list, and choose OK.
You're returned to the Configure Print Server dialog box.
7 If the print server name defined in step 3 doesn’t appear in
the Defined Print Servers list, select a File Server from the
File Servers list and choose the Add>> button to create a
print server on that file server, then select the new print
server.
server is added to the File Servers Logged Into list.
8 Use the Operators button and/or the Users button to assign
operators and/or users to the Print Server.
9 Choose Done to return to the Configure PServer mode dia-
log box.
10 Choose the Queues button in the Configure Print Server dia-
log box to create and assign queues to be serviced by the
printer.
11 Select a queue from the list of “Unserviced Queues”, or use
the Create button to create a new queue.
12 After selecting the queue in the list of “Unserviced Queues”,
use the Add button to move the queue selected to the “Serviced Queues” list.
QMS CrownNet Setup Guide48
Page 51

Network
Configuration
13 Select the queue from the “Serviced Queues” list, and
choose the Operator’s or Users button to assign operators
and users to the queue.
14 Choose Done to return to the Configure PServer dialog box.
15 Choose Done in the Configure PServer Mode dialog box to
return to the main CrownAdmin 3 window.
16 Choose the CrownNet Soft Reset button at the top of the
main CrownAdmin 3 window to reset the printer’s CrownNet
interface.
» Note:
The setup is now complete.
A password may be needed to execute a soft reset. The
default password is ADMIN. This may be needed to execute a
soft reset.
NetWare 3.x Network Configuration (Using PCONSOLE)
» Note:
This procedure can also be performed through CrownAdmin 3
on supported platforms, if you have it installed. See “NetWare 3.x
Network Configuration (Using CrownAdmin 3)” on page 46.
Add a Print Server and Assign it to a Queue
1 From any network workstation, log in with supervisor privi-
leges to the file server you want to service the printer.
2 Start the NetWare 3.
3 At the Available Options menu, select Print Server Informa-
tion and press Enter.
4 To create a new print server, press the Ins[ert] key on the
workstation keyboard.
5 Type the name (up to 47 characters) of the new print server,
and press Enter.
x
PCONSOLE utility.
6 Press Esc to return to the Available Options menu.
QMS CrownNet Setup Guide
49
Page 52

Network
Configuration
7 From the Available Options menu, select Print Queue Infor-
mation and press Enter.
8 If you want to select an existing print queue to be serviced
by the print server, skip to step 10.
If you want to create a new print queue, press the Ins key.
9 Type the name of the new print queue and press Enter.
10 Select the queue you want the print server to service, and
press Enter.
11 In the Print Queue Information menu select Queue Servers
and press Enter.
12 Press the Ins key to display the Queue Server Candidates
menu.
13 Select the appropriate print server name and press Enter.
14 Press Esc three times to return to the Available Options
menu.
15 Select the option Print Server Information and press Enter.
16 Highlight your print server and press Enter.
17 Select the option Print Server Configuration and press Enter.
18 Select Printer Configuration and press Enter.
19 Highlight one of the “Not Installed” printers and press Enter.
20 Enter the name of the printer, if desired.
21 Select Type and choose Remote/Other Unknown.
22 Press Esc.
23 Choose Yes to save changes.
24 Press Esc once to return to the Print Server Configuration
menu.
25 Select Queues Serviced By Printer and press Enter.
26 Select Defined Printer and press Enter.
QMS CrownNet Setup Guide50
Page 53

Network
Configuration
27 Press Ins[ert] to add queue to be serviced by the printer.
28 Select Queue and press Enter.
29 Select Priority and press Enter.
30 Press Esc six times to display the Exit PCONSOLE menu.
31 Select Yes to exit from PCONSOLE.
The setup is now complete.
NetWare 4.x Network Configuration (Using PCONSOLE)
1 From any network workstation, log in with admin privileges
to the file server you want to service the printer.
2 Start the NetWare PCONSOLE utility. If needed, use the
option Change Context to position yourself in the proper
place within the NDS tree to install your print server.
3 At the Available Options menu, select Print Servers and
press Enter.
4 To create a new print server, press the Ins[ert] key on the
workstation keyboard.
5 Type the name of the new print server, and press Enter.
6 Choose Print Server and press Enter.
7 Select Printers from the Print Server Information menu.
8 Press the Ins[ert] key at the Serviced Printers screen.
9 Press the Ins[ert] key at the Object, Class screen.
10 Type the new printer name and press Enter.
11 Select Printer on the Object, Class screen and press Enter to
return to the Serviced Printers screen.
12 Select Printer and press Enter.
13 At the Printer NAME Configuration screen, enter the printer
number (0-254).
QMS CrownNet Setup Guide
51
Page 54

Network
Configuration
14 Enter the Printer Type as “Other/Unknown.”
15 At the Print Queues Assigned screen press Enter.
16 At the Print Queue screen press Ins[ert].
17 At the Object, Class screen press Ins[ert].
18 Enter the queue name and press Enter.
19 At the Print Queue’s Volume prompt, Press Ins[ert] to high-
light the volume where the queue will be stored.
20 Press Enter to return to Object, Class screen.
21 Highlight Queue and press Enter
22 Press Esc twice and answer Yes to the “Save changes”
prompt.
23 You should be back at the Serviced Printers screen.
24 Press Esc 4 times to exit PCONSOLE.
The setup is now complete.
NetWare 4.x Network Configuration (Using NWAdmin)
1 If you are not already within Windows, start Windows.
2 Double click the NWAdmin icon.
3 If the tree is not displayed, select Tools - Browse to display
the directory tree.
4 Select the container that will hold the print server, printer,
and queue.
» Note:
5 Select Object - Create.
» Note:
Although it’s not required that all three objects reside in the
same container, it is recommended by Novell.
While the order of creation is not mandatory, we
recommend that the objects be created in this order.
QMS CrownNet Setup Guide52
Page 55

Network
Configuration
On all creation opening screens, you have the opportunity to
change context if needed.
6 Select Print Queue and click OK.
7 Type the name of the print queue.
8 Click the icon button next to the Print Queue Volume to
select the volume to store the queue. The context can be
changed if needed.
9 Click OK.
10 Choose Create.
11 Select Object - Create.
12 Select Printer and click OK.
13 Type the name of the printer.
14 Select Define Additional Properties.
15 Choose Create.
16 Click the Assignment tab.
17 Click the Add button.
18 Select the queue added in above to be serviced by this
printer and click OK.
19 Click the Configuration tab.
20 Select "Other/Unknown" for the printer type.
21 Click OK.
22 Select Object - Create.
23 Select Print Server and click OK.
24 Type the name of the print server. (This should match the
name entered on the interface card).
a Choose Define Additional Properties.
b Choose Create.
25 Click the Assignments tab.
QMS CrownNet Setup Guide
53
Page 56

Network
Configuration
26 Click the Add button.
27 Select the printer you named in the previous steps. Change
the context if needed.
28 Select OK.
29 Select OK.
» Note:
30 If the CrownNet Interface Card has already been configured,
The setup is now complete.
Additional properties, such as users and operators, can
also be assigned during initial installation or at a later time.
the print server should now log into the file server.
OS/2 LAN Manager/LAN Server Network Configuration
1 With the CrownNet Manager for OS/2 installed and running,
add the printer by clicking the Install entry on the action bar.
The printer appears in the list displayed on the screen (for
example, QMS_080086000001).
2 Use the appropriate section below to create a print queue
and assign it to the printer.
OS/2 Version 1.x Network Configuration
If you’re using OS/2 version 2.x, skip to “OS/2 Version 2.x and OS/2
Warp NetWork Configuration” on page 56.
» Note:
This is the standard method of adding a printer in OS/2
version 1.x. The procedure is repeated here for your convenience.
Add a Printer
1 With the Print Manager open, from the Setup menu choose
Printers...
2 In the Printers dialog box, choose Add...
QMS CrownNet Setup Guide54
Page 57

Network
Configuration
» Note:
If you’re working with an existing printer, select the printer
name and choose Change.
The Add Printer (or Change Printer) dialog box appears.
3 In the Name field, type the printer name (only if you are add-
ing a printer).
The printer name is local to the workstation and is used to
associate queues with physical printers. It can be the same as
the name used at the printer.
4 In the Device box, select the printer’s pipe name.
Pipe names have the form \PIPE\QMS_
printer’s default hardware address or the printer name set in the
“Interface Configuration” on page 32.
5 Select IBMNULL as the printer driver.
6 If appropriate, fill in the Description and Printer Timeout
Transmission Retry boxes.
7 Choose Add... to return to the Printers dialog box.
» Note:
8 In the Printers dialog box, choose OK to return to the Print
If you’re working with an existing printer, choose Change.
Manager.
name
where
name
is the
Add a Print Queue
1 With the Print Manager still open, from the Setup menu
choose Queues...
2 In the Queues dialog box, choose Add...
» Note:
If you’re working with an existing queue, select the queue
to be changed and then choose Change.
The Add Queue (or Change Queue) dialog box appears.
3 In the Name field type a name for the queue (only if adding a
queue).
This is the name available to workstations on the network. It can
be the same as the name set for the printer.
QMS CrownNet Setup Guide
55
Page 58

Network
Configuration
4 If appropriate, fill in the Description, Queue Driver, Priority,
and Scheduling boxes.
» Note:
5 Select the printer name you identified in the previous section
6 Choose Add... to return to the Queue dialog box.
» Note:
7 In the Queue dialog box choose OK to return to the Print
8 Skip to “Print Queue Sharing” on page 57.
Separator pages are not currently supported.
from the list of Printers.
This name will be displayed in the box titled Select the Printer to
be Used by This Queue.
If you’re working with an existing queue, choose Change.
Manager window.
OS/2 Version 2.x and OS/2 Warp NetWork Configuration
» Note:
This is the standard method of installing a printer in OS/2
version 2.x and OS/2 Warp.
1 With OS/2 running, double-click the Templates folder.
2 Hold down the right mouse button and drag the Network
Printer icon out to the Workplace Shell (or into a folder).
3 Type a name in the Printer Name field.
4 Select a printer driver from the Default Printer Driver list.
5 Select a pipe name from the Output Port list.
Pipe names have the form \PIPE\QMS_
printer’s default hardware address or the printer name set in
“Interface Configuration” on page 32. If a QMS pipe is not
available, make sure you have installed the CrownAdmin 2 for
OS/2.
6 Choose Create to confirm the new printer definition.
7 Go to the following section, “Print Queue Sharing.”
QMS CrownNet Setup Guide56
name
where
name
is the
Page 59

Network
Configuration
Print Queue Sharing
To access a print queue from other workstations or servers on the
network, the queue must be a shared resource. The following procedure is only one of the ways a queue can be shared. For other methods, see your OS/2 LAN Manager/LAN Server documentation.
» Note:
» Note:
You need administrator privileges to perform this operation.
1 If necessary, with OS/2 running, open an OS/2 window.
2 Type
net share
where
queue_name
above.
queue_name
is the queue or printer object you created
/print↵
While queue and printer names may differ in OS/2 version
1.x, they are the same in version 2.x.
TCP/IP NetWork Configuration
1 Log on the UNIX system as root.
2 Edit the system host table by ad ding the following line to the
/etc/hosts file:
internetaddress hostname
where
internetaddress
(Administration/Communications/
TCPIP/Internet Address menu (where
or Optional)) and
3 If necessary, set the hardware address.
is the Internet address of the printer
hostname
xxxxxxxx
is the name of the printer.
NIC/CrownNet/
xxxxxxxx
is either Resident
▲ Caution:
We strongly recommend that you do not change the
hardware address.
n If you’re working on a system other than a UNIX system, set
the hardware address through the printer control panel.
QMS CrownNet Setup Guide
57
Page 60

Network
Configuration
n If you’re working on a UNIX system, send the hardware
address to the print server by typing
arp -s
ping
where
dress
##.##.##.##
» Note:
system through the BOOTP and RARP utilities.
hostname hardwareaddress
hostname
hostname
is the new hardware address of the printer (in the form
↵
is the name of the host and
as found on the printer start-up page).
temp↵
hardwaread-
You can also send the hardware address of a UNIX
QMS CrownNet Setup Guide58
Page 61

Printer Web Page
Built into your QMS printer is an accessible HTTP/HTML web page
that can be viewed by your web-browser software over your intranet.
The printer web page gives you status and configuration information
about your printer and allows you to access the QMS web page for
more help and printer information.
This example shows a printer web page for a QMS 3260 Print System. Elements of the web page will change depending on the type of
printer you have.
Printer Web
Page
59QMS CrownNet Setup Guide
Page 62

Printer Web
Page
Accessing the Web Page
For your browser to access the printer web page on your intranet, you
must add the printer name to the no proxy list for your browser.
For Netscape
1 Start your web browser.
2 Access the Options menu and choose Network Preferences.
3 Select the Proxies tab on the dialog box.
4 Select the Manual Proxy Configuration radio button and
press the View.. button.
QMS CrownNet Setup Guide60
Page 63

Printer Web
Page
5 In the No Proxy For: text box, type a comma after the last
entry and then type the host name used for the printer asso-
ciated with the IP address or the IP address.
QMS 3260
6 Click OK.
7 Now you should be able to enter the printer name in the Go
to: URL address box
http:\\QMS 3260 Print System
61QMS CrownNet Setup Guide
Page 64

Printer Web
Page
For Internet Explorer
1 Start your web browser.
2 Access the View menu and choose Options.
3 Select the Connection tab on the dialog box.
4 Click the Settings button to display the Proxy Settings dialog
box.
QMS CrownNet Setup Guide62
Page 65

Printer Web
Page
5 In the Exceptions text box, type a semicolon after the last
entry and then type the host name used for the printer or the
IP address.
QMS 3260
6 Click OK.
7 Now you should be able to enter the printer name in the URL
address box
http:\\QMS 3260 Print System
63QMS CrownNet Setup Guide
Page 66

Printer Web
Page
Printer Home Page
The Printer Home Page is the starting point for all access to the
printer web pages. On this page you can find hotlinks to all of the supporting web pages for your printer.
The home page of the printer web page contains
n A printer graphic that shows active status of input and output bins
n The product name and the configured printer name
n Current status, resolution, default input and outp ut bins, numb er
of sheets and faces printed
n Hotlinks to other pages in the printer
You can return to this page from any other printer web page by
choosing the Home hotlink.
Operator Control Page
The Operator Control hotlink on the home page will jump to the Operator Control page. This page contains a form which will allow you to
configure settings in your printer.
The Operator Control page contains
n The product name and the configured printer name
n Number of copies, duplex, collation, orientation, inputbin, output-
bin, and other configuration options based on your printer’s features
» Note:
For complete information on printer configuration settings, refer
to your printer documentation.
General Settings Page
The General Settings Page contains links to different groups of
printer configuration settings. This information can be viewed to show
you the status of the printer, but it cannot be changed. To change
QMS CrownNet Setup Guide64
Page 67

Printer Web
Page
these settings you must access the printer’s configuration through the
control panel of the printer, a remote or local console, or
CrownAdmin 3.
The General Settings page contains
n Printer settings
n Communications settings and input buffer sizes
n Paper sources
n Options available with the printer (such as duplexer or emulation)
n Current memory configuration
n Hard disk status
n Timeouts
» Note:
For complete information on printer configuration settings, refer
to your printer documentation.
Printer Jobs Page
The Printer Jobs hotlink on the home page jumps to the Printer Jobs
page. This page contains information about the current jobs the
printer is processing and information on the previous five jobs printed.
The Printer Jobs Page contains
n Job number, status, priority, owner name, job title, interface used,
number of sheets, number of pages, of the current
n Job number, status, priority, owner name, job title, interface used,
number of sheets, number of pages, of the previous
cessed
» Note:
For complete information on printer configuration settings, refer
to your printer documentation.
jobs pr oc essing
five jobs pro-
Consumable Status Page
The Consumable Status hotlink on the home page jumps to the Consumable Status page. This page contains information about the
QMS CrownNet Setup Guide
65
Page 68

Printer Web
Page
usage and level of consumables that the printer is using (such as
paper and toner.)
» Note:
The scales are an estimate, reported as a percentage, and do
not indicate the exact amount of consumables used.
Accounting Page
The Accounting hotlink on the home page jumps to the Accounting
page. This page shows you the status of the accounting function and
the amount of disk space allocated to accounting.
» Note:
For complete information on accounting, refer to your printer
documentation.
Statistics Page
The Statistics hotlink on the home page allows you to check the
amount of usage for printer consumables, such as the number of
sheets, faces, and planes printed as well as the average coverage of
toner.
» Note:
The number of sheets/faces printed statistics differ from the
number of sheets printed statistics on the printer’s start-up and status
pages, which refer to the total number of sheets/faces of media
printed during the life of the printer.
QMS, Inc. Page
The QMS, Inc. hotlink on the home page jumps to the QMS web site
(QMS Corporate URL selection) configured on the System Support
page. From the QMS web site you can access information about
other QMS printers, contact information, a FAQ database, printer
manuals, and online performance support.
Online Help Page
The Online Help hotlink on the home page jumps to any help information that has been configured on the System Support Page (printer
help URL selection). You can configure this to jump to your own help
web site set up on your local intranet. The default setting will jump to
QMS CrownNet Setup Guide66
Page 69

Printer Web
Page
the QMS online support information for your QMS print system. From
this location you can access QMS technical support, a FAQ list for
your printer, and a quick-help system.
System Support Page
The System Support hotlink on the home page jumps to the System
Support Page. This page can be used to set up internal support for
the printer as well as links to the QMS web site.
The System Support Page contains
n Refresh rate selection option. Allows you to select the refresh
rates Off, 15 seconds, 30 seconds, 60 seconds, and 5 minutes
n Product name and printer name
n A text box for entering the name of a local expert
n A text box for entering a local or QMS contact number
n The printer help URL. The default address takes you to the help
located on the QMS website.
n The QMS corporate URL (web address)
n A text box for entering a supplies and accessories contact num-
ber
» Note:
For complete information on printer configuration settings, refer
to your printer documentation.
QMS CrownNet Setup Guide
67
Page 70

CrownNet Menus
CrownNet Menus
Use the following menu flowcharts to help find your way around the
CrownNet configuration menu structure.
» Note:
The structure of these flowcharts may vary slightly with older
versions of CrownNet. See your printer documentation for higherlevel menus.
Overall View of the CrownNet Menu
Idle
Administration
Communications
Optional NIC*
CrownNet
Common EtherTalk LanManager NetWare TCP/IP
Mode
Emulation
Min K Spool
Resident NIC
Def Job Prio
PS Protocol
*
Some printers may not have an Optional NIC interface menu.
QMS CrownNet Setup Guide68
Page 71

CrownNet
Menus
Common Menu
This menu gives you choices common to all of the CrownNet communications interfaces.
Idle
Administration
Communications
Optional NIC*
CrownNet
Common EtherTalk LanManager NetWare TCP/IP
Spooling
On
On Input Idle
On Idle
*
HW
Address
Address
Config
Page
No
Yes
Factory
Reset
No
Yes
Soft
Reset
No
Yes
Ring
Speed
4 Mbps
16 Mbps
Source
Routing
Auto
Single
All
Off
Auto
10Mb H/D
100Mb H/D
Some printers may not have an Optional NIC interface menu.
QMS CrownNet Setup Guide
Ethernet
Speed
69
Page 72

CrownNet
Menus
EtherTalk Menu
Idle
Administration
Communications
Optional NIC*
CrownNet
Common EtherTalk LanManager NetWare TCP/IP
Protocol Network Ident
Disabled
Enabled
*
Some printers may have an Optional NIC interface menu.
LaserWriter
QMS RC Res
HP Zoner Res
Connection
Conventional
Spooling
Both
Zone Name
Zone Part 1
Zone Part 2
Default
QMS CrownNet Setup Guide70
Page 73

CrownNet
Menus
Lan Manager Menu
Idle
Administration
Communications
Optional NIC*
CrownNet
Common EtherTalk LanManager NetWare TCP/IP
Protocol Printer Name
Disabled
Enabled
*
Some printers may have an Optional NIC interface menu.
Default
Yes
No
QMS CrownNet Setup Guide
71
Page 74

CrownNet
Menus
NetWare Menu
Idle
Administration
Communications
Optional NIC*
CrownNet
Common EtherTalk LanManager NetWare TCP/IP
Protocol Config Pserver
Disabled
Enabled
*
Some printers may have an Optional NIC interface menu.
File Srv Name 1
File Srv Name 2
File Srv Name 3
Default
PServer Name 1
PServer Name 2
PServer Name 3
Job Check Delay
Conf Check Delay
Burst Mode
PServer Context 1
PServer Context 2
PServer Context 3
R/N Printer #1- 8
Printer Slot #
PServer Name 1
PServer Name 2
PServer Name 3
Default
Printer Name
Printer Name 1
Printer Name 2
Printer Name 3
Default
QMS CrownNet Setup Guide72
Frame Type
802.3 IPX Addr
Ether 2 IPX Addr
802.2 IPX Addr
SNAP IPX Addr
802.5 IPX Addr
Page 75

TCP/IP Menu
CrownNet
Menus
Idle
Administration
Communications
Optional NIC*
CrownNet
Common EtherTalk LanManager NetWare
Protocol
Internet
Address
Subnet
Mask
Default
Router
Remove
Passwords
Remove
Hosts
Secure
Files
» Note:
Disabled
Enabled
No
Yes
No
Yes
No
Yes
Some printers may have an Optional NIC interface menu.
Accnting/Rev
Chan
Accnting
Timeout
Port
Assignment
LPD
Banner
BOOTP
RARP
Disabled
Enabled
Disabled
Enabled
Disabled
Enabled
Disabled
Enabled
Community
Internet
Address
TCP/IP
SNMP
NMS 1-5
Access
Read
Write
Trap
Write-Trap
Read-Trap
None
QMS CrownNet Setup Guide
73
Page 76

Where To Go From Here
Where To Go From Here
In addition to this setup guide, the following documentation contains
information you may need:
n CrownAdmin 3 online help—Contains detailed information on
using CrownAdmin 3. Choose Contents from the Help menu in
the main CrownAdmin 3 window (or choose any Help button) to
access the on-line user’s guide. CrownAdmin 3 online help is also
provided on the documentation CD-ROM in hypertext PDF files.
n CrownNet Print Utility online help—Contains detailed information
on using CrownNet Print Utility.
n QMS Printer Web Page support information—Contains FAQ
database and full hyperlinked help pages in PDF format with
information on CrownNet and the printer.
QMS CrownNet System Administrator’s Guide
n
detailed configurati on and uti lit y inf ormati on .
n
QMS Crown Remote Console User’s Guide
use Remote Console to control printing from a workstation anywhere on the network.
QMS Network Print Monitor Administrator’s Guide
n
help—Explains how to install and use QMS Network Print Monitor
for Windows NT.
QMS Network Print Monitor for Windows 95 Administrator’s
n
and online help—Explains how to install and use QMS
Guide
Network Print Monitor for Windows 95.
n Your network documentation—Contains information on printing.
QMS CrownNet Setup Guide74
—Provides
—Explains how to
and online
Page 77

If You Have Trouble...
If you have trouble installing and setting up your QMS CrownNet
interface, check the following:
n If the printer requires a network interface card, is it correctly
installed in the printer?
n Is the printer connected to the network?
n Is the printer plugged in, turned on, and correctly configured?
n Do the printer start-up and status pages list the interface? Is the
configuration information correct?
n Is the interface enabled?
n Is the appropriate protocol (or protocols) enabled?
n Are all printer and protocol addresses configured correctly?
If You Have
Trouble...
Sources of Support
Several sources of help and information are available, depending on
the type of help you need:
Your QMS Vendor
Your local vendor (the one from whom you bought the printer) may be
best equipped to help you. Your vendor has specially trained service
technicians available to answer questions, and the equipment to analyze your printer problems.
Your Application Vendor
Often, “printing” problems have more to do with the application being
used than with the printer. In this case, the application manufacturer
is the best source of help.
QMS CrownNet Setup Guide
75
Page 78

Sources of
Support
Q-FAX
Q-FAX, a QMS information retrieval service, provides application
notes, technical support notes on common printing problems, and
information about printer specifications, options, accessories, consumables, and prices.
In the United States and Canada, call (800) 633-7213 to reach
Q-F AX. In all other countries, call (334) 633-3850. Have your fax number handy when you call (or place the call from your fax machine's
handset).
You can choose to have either a directory (a list of currently available
documents) or a specific document sent to you. The first time you call,
request the directory (press 2 on your phone or fax keypad when
prompted). Then call back to request specific documents. You can
order up to three documents per call.
CompuServe
Through CompuServe, you ask general (non-technical) questions,
share information with other users, and access printing information
and programs. When you use CompuServe, type go qmsprint↵ to
go directly to the forum where QMS is located. The QMS library section contains application notes, printer drivers, utilities, technical information, and announcement files.
Internet
The QMS server provides access to technical reports, new product
announcements, a trade show schedule, and other general information about QMS.
If you have access to the World Wide Web, you can view the QMS
home page at http://www.qms.com/. The QMS ftp resource is
ftp.qms.com.
QMS CrownNet Setup Guide76
Page 79

Sources of
Support
QMS Customer Response Center (CRC)
You can contact the QMS Customer Response Center (CRC) in three
different ways:
n T elephone—You can call the CRC at (334) 633-4500 (US)
Monday–Friday, 7:00 am–6:00 pm, Central Time.
» Note:
If you call for assistance, have the following information
ready so our technicians can help you more quickly:
þ Your phone number, fax number, and shipping address
þ A description of the problem
þ The printer model
þ The type of host computer you’re using
þ The type and version of operating system you’re using
þ The interface you’re using, and, if seri al, the protocol (for
example, XON/XOFF)
þ The application and version you’re using
þ The emulation you’re using
þ Your printer firmware version (listed on the status/start-up
pages)
n Fax—You can fax questions to the CRC at (334) 633-3716 (US).
Provide the same information as listed above, and indicate
whether you would like a faxed or a phoned reply.
n Internet—If you have access to the World Wide Web, you can
access the CRC through the QMS home page at
http://www.qms.com/
QMS CrownNet Setup Guide
77
Page 80

QMS Worldwide Offices
QMS World-wide Offices
QMS United States and Latin America
General Contact
1 (334) 633-4300
Fax 1 (334) 633-4866
Email info@qms.com
Internet http://www. qms .c om
Information on QMS products, supplies, and accessories, and on the
authorized QMS remarketer or service provide r neare st you
1 (800) 523-2696
Customer Response Center (CRC)
Technical Assistance
1 (334) 633-4500 7:00 am–6:00 pm Central Time
Fax 1 (334) 633-3716
Internet http://www. qms .c om
Latin America Fax
1 (334) 639-3347
National Service
Service Information, Installation, and Maintenance Pricing
1 (800) 762-8894
On-Site Service and Depot Repair Information
1 (800) 858-1597 7:00 am–7:00 pm Central Time
Spare Parts Ordering and Information
1 (334) 633-4300 x2530 8:00 am–5:00 pm Central Time
QMS Canada
General Contact
1 (514) 340-0646
Fax 1 (514) 340-0401
Supplies and Accessories 1 (800) 268-0343 x223
National Service
On-Site Service and Depot Repair Information
1 (800) 268-4969 8:30 am–7:00 pm Eastern Time
Spare Parts Ordering and Information
1 (905) 206-9234 x238 8:30 am–5:00 pm Eastern Time
QMS CrownNet Setup Guide78
Page 81

QMS in Japan
General Contact
(+81)-3 3779-9600
Fax (+81)-3 3779-9650
Internet http://www . qmsj. co.jp
QMS in Latin America
General Contact
Cra 43 DD#8-42
Officina 201
Medellin, Colombia
(+57) (4) 312 13 70
Fax (+57) (4) 268 92 97
QMS EMEA
QMS Australia
QMS Benelux
Belgium, Netherlands, and all
unlisted countries
QMS France
QMS GmbH
Germany and
Austria
Anitech
Sydney Business & Tech. Centre
52/2 Railway Parade
2141 Lidcombe NSW
Australia
(+61) 2–9901 3235
Fax (+61) 2–9901 3273
Planetenbaan 60 ‘Corner Plaza’
3606 AK Maarssen
The Netherlands
(+31) 346–551333
Fax (+31) 346–550170
Internet http://www . qms .n l
Vélizy Plus
1 Bis, Rue du Petit Clamart
78142 Vélizy Cedex
France
(+33) 1–410 79 393
Fax (+33) 1–4 08 30 110
Gustav Heinemann Ring 212
D-81739 Munich
Germany
(+49) 89 63 02 67 0
Fax (+49) 89 63 02 67 67
QMS Worldwide Offices
QMS CrownNet Setup Guide
79
Page 82

QMS Worldwide Offices
v
QMS Italy
QMS Nordic
Sweden, Finland,
Norway, and
Denmark
QMS South
Africa
QMS UK
United Kingdom
and Ireland
Via della Repubblica 56
43100 Parma
Italy
(+39) 52–1231 998
Fax (+39) 52–1232 902
Arenavägen 41, 6th floor
121 77 Johanneshov
Sweden
(+46) 8–600 01 30
Fax (+46) 8–6 00 01 33
Saskay House
Unit 24 Sunninghill Business Park
Peltier Road, Sunninghill, Johannesburg
Republic of South Africa
(+27) 11–807 6957
Fax (+27) 11–807 6960
Old Bridge House, The Hythe
Staines, Middlesex TW18 3JF
United Kingdom
(+44) 1784–442255
Fax (+44) 1784–461641
QMS CrownNet Setup Guide80
Page 83

Index
A
Acrobat
Using online manuals 7
AIX
Set up 17
C
Common Menu 69
Config PServer 34
Conventions, typographic 5
CrownAdmin 3 17
Netware 4.x configuratio n 46
NetWare configuration 46
Set up
AIX 17
DOS 18
HP-UX 19
Macintosh 20
OS/2 21
Solaris 23
SunOS 24
Windows 26
CrownAdmin 3 on-line help 74
CrownNet 9
Alternate Media 6
What is included 6
CrownNet Menus 68
CrownNet menus
EtherTalk menu 70
Lan Manager menu 71
NetWare menu 72
TCP/IP menu 73
CrownNet Print Utility 27
LAN Server/LAN Manag er Workstation
Service 28
Microsoft Windows Network sup por t
28
Windows 3.1
Windows for Workgroups 39
Page 84

Windows 95 43
Windows NT 3.5 41
WindowsNetwork Configuration
CrownNet Print Utility 39
CrownNet Print Utility for Windows
Installation 27
Customer Response Center (CRC),
QMS 77
Customer support, QMS 75
D
Documentation
Conventions, typographic 5
DOS
CrownAdmin 3 set up 18
E
Ethernet
Thick-wire 13
Thin-wire 12
Twisted Pair 14
EtherTalk
Interface Configuration 33
Menu 70
NetWork Configuration 46
F
File Srv Name 34
H
HP-UX
CrownAdmin 3 set up 19
I
Interface Configuration 32
EtherTalk 33
NetWare 3.xx 33
NetWare 4.x 36
Printer Control Panel 32
Remote Console 32
TCP/IP 37
Internet 76
Internet address 6
WWW address
Web address 6
L
Lan Manager Menu 71
LAN Manager/LAN Server 54
See also OS/2
LAN Server/LAN Manager Work station
Service 28
M
Macintosh
CrownAdmin 3 set up 20
Microsoft Windows Network 28
Mounting the CD-ROM
AIX 17
HP-UX 19
Solaris 23
SunOS 25
N
Naming File and Print Servers 33
NetBEUI Protocol 43
NetBIOS Interface 43
NetWare 3.x Network Configuration
Using PCONSOLE 49
NetWare 3.xx
Interface Configuration 33
NetWare 4.x
Interface Configuration 36
NetWare 4.x configuration
Network Configuration
NetWare 4.x
CrownAdmin 3 46
NetWare 4.x Network Configuration
CrownAdmin 3 46
Using CrownAdmin 3
CrownAdmin 3
I-2 QMS CrownNet Setup Guide—Index
Page 85

Netware 4.x configuratio n 46
Using NWAdmin 52
Using PCONSOLE 51
NetWare Menu 72
Network Configuration
EtherTalk 46
NetWare 4.x
NWAdmin 52
PCONSOLE 51
OS/2 54
TCP/IP 57
Network Connection 12
Ethernet 12
Ethernet Thick-wire 13
Ethernet Thin-wire 12
Ethernet Twisted-Pair 14
Token-Ring 15
Token-Ring 16 Mb 15
Token-Ring 4 Mb 15
NWAdmin 52
O
Online manuals
Tips 7
OS/2
CrownAdmin 3 set up 21
See also LAN Manager/LAN Server
OS/2 LAN Manager/LAN Server
Interface Configuration 33
OS/2 LAN Manager/LAN Server
Network Configuration 54
Print Queue Sharing 57
Version 1.x 54
Warp 56
OS/2 Print Server 21
OS/2 Workstation 22
P
PCONSOLE 51
Network Configuration
NetWare 3.x
PCONSOLE 49
Print Monitor
Windows 95 74
Windows NT 74
Printer Control Panel 32
Printer Name
Windows 33
Printer Web Page 59
Accessing 60
Accounting Page 66
Consumable Status Page 66
General Settings Page 64
Internet Explorer setup 62
Netscape setup 60
Online Help Page 67
Operator Control Page 64
Printer Home Page 64
Printer Jobs Page 65
QMS, Inc. Page 67
System Support Page 66
Product Registration 8
PServer Name 34
Q
Q-FAX 76
QMS
Customer Response Center (CRC) 77
World-wide offices 78
QMS Software Utilities CD-ROM
CrownNet Print Utility for Windows 28
R
Remote Console 32
Remote Printers 35
RN Printer 35
S
Service
United States 77
Set up
AIX 17
DOS 18
I-3QMS CrownNet System Administrator's Guide—Index
Page 86

HP-UX 19
Macintosh 20
OS/2 21
Set up 9
Software installation 17
Solaris 23
SunOS 24
Windows 26
Setup
Internet Explorer 62
Netscape 60
Soft Reset
Common Menu
CrownNet menus
Common menu 69
NetWare 3.x 36
NetWare 4.x 37
Solaris
CrownAdmin 3 set up 23
Source Routing Type 16
SunOS
CrownAdmin 3 set up 24
Support, QMS
Customer 75
Internet 76
Technical 77
World-wide 78
U
UNIX Host Software
Installation 30
Using Soft Reset
Common Menu 69
NetWare 3.x 36
NetWare 4.x 37
W
Web address 6
Windows
CrownAdmin 3 set up 26
Port setups 41
System Requirements 26
Windows 95
Network configuration 43
Windows 95 Print Monitor 74
Windows Network
See Microsoft Windows Network
Windows Network Interface
Configuration 33
Windows NT Print Monitor 74
Windows Print Utility 27
Network configuration 39, 41, 43
WWW address 6
T
TCP/IP
Interface Configuration 37
TCP/IP Menu 73
TCP/IP NetWork Configuration 57
Technical support, QMS 77
Token-Ring 15
16 Mb 15
4 Mb 15
Source Routing Type 16
Troubleshooting 75
Typographic conventions 5
v
I-4 QMS CrownNet Setup Guide—Index
 Loading...