

Page 1

Using the Fiery X3e System Software Service Kit
System software
The Fiery X3e System Software CD includes system software which can be installed over
the parallel port of the Fiery X3e using a PC/laptop with Windows 98/Me or over the
network port using a PC/laptop with Windows 2000/XP. The Fiery X3e system software
is installed on the HDD at the factory. You will need to install system software if a more
recent version is required, you replace the HDD, or if you discover problems with the
current system.
System software installation reminders
Keep in mind the following when installing system software:
Fonts
•
—Installing system software deletes all fonts that the customer has installed on
the Fiery X3e. Only resident fonts will be restored during system software installation.
Fiery Downloader can be used to reinstall additional fonts.
To determine which additional fonts were downloaded to the Fiery X3e, print the
Fonts List before you format the HDD and again after you complete the system
software installation. Any fonts not listed after installation will need to be reinstalled.
See the Printing Guide for more information.
Language
•
even if the copier is configured for another language.
Compatibility
•
to the Fiery X3e. Using incompatible versions of the system and user software may
result in system problems.
For the parallel port procedure, see page 7. For the network port procedure see below.
—Screens for installing system software are always displayed in English,
—The latest user software must be installed onto all computers that print
Installing system software over the network port
To install system software using the network port on the Fiery X3e, you need:
•Either:
•One Category 5 Ethernet cross-over cable (8-wire, short-length)
or
•One Ethernet network hub or switch that supports 100BaseTX
•Two Category 5 Ethernet network cables
•A PC with:
•Windows XP/2000
•A CD-ROM drive, built in or attached
Copyright © 2004 Electronics for Imaging, Inc.
•Support for 100BaseTX
•Approximately 500MB of disk space free, if you copy the files to your PC
hard disk
Part Number: 45040397
05 March 2004
Page 2
Using the Fiery X3e System Software Service Kit
T
O
INSTALL
1. Shut down (see page 10) and power off the Fiery X3e.
SYSTEM
SOFTWARE
USING
THE
NETWORK
PORT
To power off the Fiery X3e, power off the Print engine using its main power switch. The
main power switch is located inside the Print engine underneath the Main Power LED
on the Control Panel. Access it by opening the left front door. Do not use the Sub Power
switch located on the Control Panel.
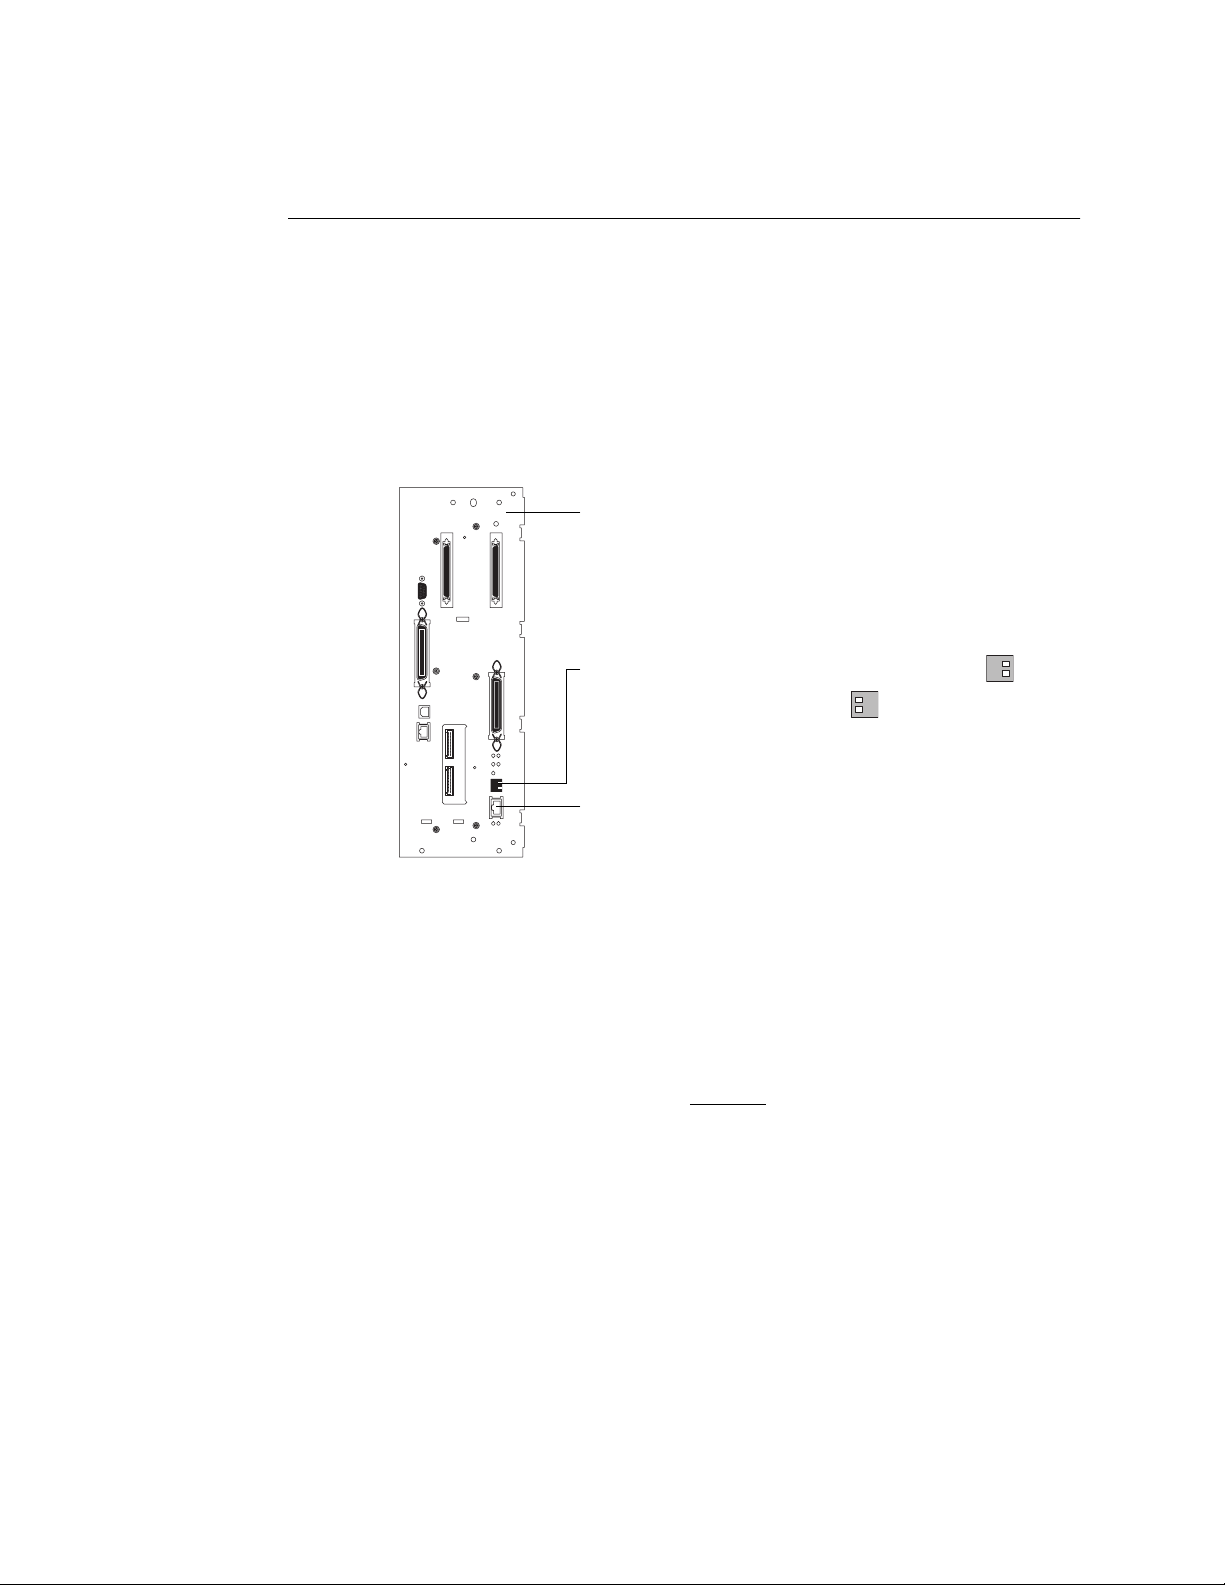
2. Flip the Fiery X3e service switches to the service mode position (toward the
motherboard).
Fiery X3e as installed in the Print engine
1 2
IGURE
F
Flip the service switches from the normal (Open) position
to the service mode (Closed) position
Use this port for this procedure
Fiery X3e service switches and the network port
A
1 2
OPEN
Service position (toward the motherboard) allows you to download the system software
without time constraints. When you are done installing system software, make sure to
change the switches back to the normal position (away from the motherboard).
3. Connect the Fiery X3e network port to the PC network port in one of two ways:
Either:
•Attach a short Category 5 Ethernet cross-over cable to the network port of the
Fiery X3e and of the PC.
or:
•Attach a Category 5 network cable to the Fiery X3e and to an isolated hub/switch;
attach another Category 5 network cable to the PC and to the isolated hub/switch.
OPEN
Do not connect any other devices to the hub/switch; do not put the hub/switch on the
LAN; do not use the hub’s optical port or uplink switch.
4. Power on the PC and insert the System Software CD into the PC CD-ROM drive.
2
Page 3

System software
5. Navigate to the CD-ROM drive and click the icon for Install.exe.
For a faster installation, you may wish to copy the files from the CD to the PC and then
perform the installation from the PC hard disk. If so, copy all CD files to the PC hard
disk. Choose a location that will not mix the CD files with any other files. Make sure to
delete the files when you are finished with the installation.
6. Power on the Fiery X3e by powering on the Print engine using its main power switch.
7. Click Start on the installer screen. Read the Software License Agreement and click Agree
if you wish to continue the installation process.
8. Wait while the files are copied and installed. Click Exit when the message is displayed
that the installation is successful. Remove the System Software CD from the PC.
For most PCs, the expected wait is under 15 minutes. If you click Abort, you will need to
power off the Print engine using its main power switch and wait 10 seconds before
repeating this procedure. If the installation terminates abnormally, reboot the PC also.
9. Power off the Print engine using the main power switch.
10. Dismantle the isolated Ethernet network between the Fiery X3e and the PC by removing
the cross-over cable from the Fiery X3e and the PC (or the two network cables from the
Fiery X3e, the PC, and the isolated hub/switch).
11. Reconnect the Ethernet network cable to the Fiery X3e and to the customer’s LAN (see
page 11).
Do not use the cross-over cable.
12. Flip the service switches back to the normal position (away from the motherboard).
13. Power on the Print engine using its main power switch.
The language screen will appear on the Control Panel when the Fiery X3e starts up.
14. Press the name of the language you want to use, and then press OK.
15. If the Select Market Region screen is displayed, press the name of the region for the
Fiery X3e and then press OK.
This screen is displayed only if English was selected from the language selection screen.
16. At the Setup screen, select Run Setup and press OK. Reenter the customer’s settings
from the Configuration page that you printed earlier.
Enter settings for Server, Network, and Printer Setup, in that order. Ignore the settings
not included on the Configuration page if it is more appropriate for the network
administrator to set them. For more information, see the
Configuration Guide
.
17. After all setup options are configured, select Exit Setup from the Setup screen, and
press OK.
The Fiery X3e will reboot with the updated system software and setup options.
18. Allow the Fiery X3e to reach Idle.
3
Page 4

Using the Fiery X3e System Software Service Kit
Installing system software over the parallel port
The System Software CD contains two files. The first file is the smaller of the two and
contains basic information required for the Fiery X3e to boot; the second contains all of
the system software.
To install system software using the parallel port on the Fiery X3e, you need:
• IEEE 1284 parallel cable, short
One end of the parallel cable requires a male IEEE 1284-B (36-pin Centronics)
connector for connecting to the Fiery X3e.
•A PC with Windows 98/Me
•A CD-ROM drive, built in or attached
•At least 600MB of disk space free
•Support for ECP mode on the parallel port
N
OTE
:
If you use a PC with Windows XP or Windows 2000, installing system software
over the parallel port may succeed, but if it fails or runs too slowly, install system software
over the network port instead (see “Installing system software over the network port” on
page 1).
The PC will need to be configured so the parallel port mode in the BIOS is set to ECP.
When you access the PC BIOS to set the parallel port mode to ECP, you may discover
that ECP is the default mode, or you may discover that ECP mode is not supported at
all. If ECP is not supported, you can either install an add-in board (not provided), use a
different PC, or opt for a much slower installation using Compatibility Mode.
In addition to accessing the BIOS, setting up the PC requires certain port and printer
settings in Windows 98/Me. Before you begin installing system software, follow the
procedure for setting up the PC.
T
O
SET
PC
UP
THE
1. Access the PC BIOS and make sure that Parallel Port Mode is set to ECP.
Power on the PC and immediately press the key indicated on your monitor for entering
the BIOS (or a likely key if it is not indicated). Pressing a likely key repeatedly (ESC,
DEL, F1, or a combination) may interrupt the starting of Windows and access the BIOS
or give you directions for accessing the BIOS.
Once in the BIOS, you may have to scroll through several screens to reach the settings for
the parallel port. After setting the Parallel Port Mode to ECP, save your changes and exit
the BIOS.
2. In Windows, click Start, choose Settings, and then choose Printers.
4
Page 5

System software
3. Double-click Add Printer.
The Add Printer wizard appears. You will use this wizard to add a generic printer to
your PC.
4. Click Next.
5. Select the Local Printer option, and click Next.
6. Select Generic from the Manufacturers list, and click Next.
7. Select LPT 1: Printer Port from the list of available ports, and click Next.
8. Accept the default printer name. In response to the question “Do you want your
Windows-based programs to use this printer as the default printer,” select No. Then click
Next.
9. In response to the question “Would you like to print a test page,” select No. Then click
Finish.
The generic printer is added to your PC.
5
Page 6

Using the Fiery X3e System Software Service Kit
10. Click Start, choose Settings, and then choose Printers. Right-click the icon for the
generic printer, and choose Properties from the menu that appears.
The Properties dialog box for the generic printer is displayed.
11. Click the Details tab and make sure the field “Print to the following port” reads exactly
as follows: LPT 1: (ECP Printer Port).
If this field reads
LPT 1: (Printer Port)
instead of
LPT 1: (ECP Printer Port)
, the LPT1 port
settings in the BIOS for ECP mode have not been configured. Reboot the PC to reenter
the BIOS and set the parallel Port Mode to ECP. Compatibility mode will work, but the
installation will take much longer.
12. Click Spool Settings. Specify settings as described below, and then click OK.
•Select “Spool print jobs so program finishes printing faster” and then select “Start
printing after first page is spooled.”
Selecting these options ensures no disruption from a parallel port timeout.
•If the option is available, select “Disable bi-directional support for this printer.”
• Choose RAW from the Spool data format menu.
13. Click Port Settings, and select “Spool MS-DOS print jobs” and “Check port state before
printing.” Then click OK.
14. Click Apply, and then click OK to activate the settings and exit from the Printer
Properties screen.
The PC is properly configured. Prepare for the installation using the following procedure.
6
Page 7

T
O
System software
PREPARE
FOR
INSTALLATION
1. Print the Configuration page from the Functions menu (if possible) to record the
customer’s current Setup configuration (see page 12).
USING
THE
PARALLEL
PORT
Setup defaults to its original configuration when system software is installed.
2. Print the Font List(s) from the Functions menu.
The Font List(s) details what fonts are resident on the Fiery X3e. Along with the fonts
that are provided on the System Software CD, the customer may have installed
additional fonts that will be deleted when system software is installed.
3. Power off the copier and the PC before attaching any cables.
4. Connect an IEEE 1284 cable to the LPT1 port on your PC (generally, a 25-pin D-type
connector) and to the 36-pin parallel port connector on the Fiery X3e (see Figure D on
page 11).
T
O
INSTALL
SYSTEM
OTE
N
SOFTWARE
To view the Fiery screens during this procedure, you may need to press the Print
:
USING
THE
PARALLEL
PORT
mode button on the Control Panel.
1. Power on the PC and insert the System Software CD into the PC CD-ROM drive.
2. In Windows, click Start, choose Programs, and then choose MS-DOS Prompt to bring up an
MS-DOS window.
Do not use the option to “Shut Down and Restart Windows in DOS mode.”
3. Locate the boot file on the System Software CD.
The boot file will have a descriptive name: for example,
boot.efi
. The boot file is the
smaller of the two files on the System Software CD.
4. At the MS-DOS prompt, type the following command but do not press the Enter key yet:
copy boot.efi lpt1 /b
/b
specifies the binary option (not ASCII).
N
:
OTE
Make sure to spell the file name correctly and include the file extension. Do not
press the Enter key yet.
7
Page 8

Using the Fiery X3e System Software Service Kit
5. Make sure the Print engine is powered off and then flip the Fiery X3e service switches to
the service mode position (toward the motherboard).
Fiery X3e as installed in the Print engine
Use this port for this procedure
OPEN
Flip the service switches from the normal (Open) position
to the service mode (Closed) position
1 2
OPEN
1 2
IGURE
F
Fiery X3e service switches and the parallel port
B
When the switches are in service position (toward the motherboard), the Fiery X3e
communication port timeout is disabled so that you can download the system software
without time constraints. When you are done installing system software, make sure to
change the switches back to the normal position (away from the motherboard).
6. Power on the Print engine using its main power switch.
The main power switch is located inside the Print engine underneath the Main Power
LED on the Control Panel. Access it by opening the left front door. Do not use the Sub
Power switch located on the Control Panel.
7. Press the Enter key on the PC.
The message “Flushing parallel port. Please wait” will appear on the Control Panel.
The DOS-type window on the PC will display a message that one file was copied.
8. Return to the PC and locate the system file on the System Software CD.
The system file will have a descriptive filename: for example,
system.efi
. The system file
will also be the larger of the two files on the System Software CD.
9. At the PC, type the following command at the MS-DOS prompt but do not press the Enter
key yet:
copy system.efi lpt1 /b
/b
specifies the binary option (not ASCII).
N
:
OTE
Make sure to spell the file name correctly and include the file extension. Do not
press the Enter key yet.
8
Page 9

System software
10. If the Config Mode screen appears, select Config Mode.
OTE
You may need to press the Print mode button on the Control Panel to view the
N
:
Fiery screens. If you do not select Config Mode when it appears, the Fiery X3e will
continue booting. If this happens, power off the copier and try again.
11. At the next screen, scroll down and select Installation.
The message “Flushing parallel port. Please wait” will appear on the Control Panel.
12. For the type of installation, select Parallel and OK.
13. At the message “Copy software to parallel port” on the Control Panel, press OK. Then
press the Enter key on the PC.
Wait while the Fiery X3e Control Panel displays status messages indicating that the
Fiery X3e is downloading the file and installing the system software. Do not press any
keys during this time. This process can take over an hour depending on your PC.
14. At the message “Installation was successful” on the Control Panel, press OK.
15. Power off the Print engine using the main power switch.
16. Flip the service switches back to the normal position (away from the motherboard).
17. Power on the Print engine using its main power switch.
The language screen will appear on the Control Panel when the Fiery X3e starts up.
18. Press the name of the language you want to use, and then press OK.
19. If the Select Market Region screen is displayed, press the name of the region for the
Fiery X3e and then press OK.
This screen is displayed only if English was selected from the language selection screen.
20. At the Setup screen, select Run Setup and press OK. Reenter the customer’s settings
from the Configuration page that you printed earlier.
Enter settings for Server, Network, and Printer Setup, in that order. Ignore the settings
not included on the Configuration page if it is more appropriate for the network
administrator to set them. For more information, see the Configuration Guide .
21. After all setup options are configured, select Exit Setup from the Setup screen, and
press OK.
The Fiery X3e will reboot with the updated system software and setup options.
22. When the Fiery X3e reaches the Idle screen, exit MS-DOS at the PC and remove the
System Software CD from the CD-ROM drive.
23. Power off the Fiery X3e and PC, and remove the parallel cable.
9
Page 10

Using the Fiery X3e System Software Service Kit
Shutting down the Fiery X3e
Use the following procedure to shut down the Fiery X3e properly.
T
O
SHUT
DOWN
THE
F
Always verify that the Fiery X3e is not in use before you power off or restart it. Make sure
that the system is not ripping or printing a job. Always obtain permission from the
network administrator before you take the Fiery X3e off the network.
1. Press the Print mode button and make sure the Fiery Control Panel LCD reads Idle.
When
Idle
appears on the LCD when the system is finished processing.
IERY
Printing
X3
E
or
Ripping
appears on the LCD, the system is currently processing a job.
Idle appears on the
Touch Panel Display
Sub Power switch
(Do not use)
Main Power LED
Mode buttons: PRINT, SCAN, and COPY
IGURE
F
2. At the Idle screen, press the Menu/Esc button on the Control Panel LCD.
Fiery X3e Control Panel
C
Print Pages
Suspend Printing
Resume Printing
Secure Print
Shut Down
Run Setup
Use this selection to get
to the Shut Down menu.
Run Diagnostics
Calibration
10
3. Use the arrow buttons on the LCD and select Shut Down, and then Shut Down System.
4. At the message
the main power switch on the Print engine.
[It is now safe to power off the system....], power off the system using
The main power switch is located inside the Print engine underneath the Main Power
LED on the Control Panel. Access it by opening the left front door. Do not use the Sub
Power switch located on the Control Panel. If necessary, press the Print mode button to
view the message.
Page 11

Connecting to the network
Connecting to the network
The network cable connects to the RJ-45 connector at the faceplate of the Fiery X3e
(see Figure D). For more information, see the Service Guide.
Parallel port connector
10/100BaseT connector for twisted pair Ethernet
10/100BaseT LED
Off = 10BaseT
On = 100BaseTX
Network activity LED
Off = No activity
Blinks = Network activity
FIGURE D Fiery X3e network connector and network LEDs
Printing Fiery X3e pages
Use the following procedure to print Fiery X3e pages such as the Configuration page or
the Fiery Test Page.
11
Page 12

Using the Fiery X3e System Software Service Kit
TO PRINT FIERY X3E PAGES FROM THE CONTROL PANEL LCD
1. Press the Print mode button on the Control Panel (see Figure C on page 10).
2. Press the Menu/ESC button on the Control Panel LCD.
Info
CONTROLLER
Printer Name
IDLE
XXMB XXX.VXXX
Menu/ESC button
Menu/Esc Key Pad
F
IGURE E Fiery X3e Info screen
3. Select Print pages.
4. Select the particular page you wish to print (use the arrow key, if necessary).
You may select PS Test Page, PCL Test Page, Configuration, Job Log, Control Panel Map,
Color Charts, PS Font List, PCL Font List, or FTP Log.
5. Examine the Test Page.
If the Test Page prints, you know the Fiery X3e print engine is functional and the
connection between the Fiery X3e and the copier is operating properly. When you
examine the PS Test Page, keep in mind that:
• All swatches should be visible, even though they may be very faint in the lowest ranges.
•Swatches should show uniform gradation as the tone lightens.
•Poor image quality may indicate a need to calibrate the system or service the copier.
6. Post the current Configuration page near the server for quick reference.
Users may need the information on this page.
12
 Loading...