

Page 1

Data Management Software
CA-S20w
Installation Guide
Page 2
Formal designations of application software used in this manual
(Designation in this manual) (Formal designation)
Windows, Windows XP Microsoft
Windows XP Professional Operating System
Windows, Windows Vista Microsoft
Windows Vista Business Operating System
Windows, Windows 7 Microsoft
Windows 7 Professional Operating System
Excel Microsoft
Excel
Visual Basic .NET 2003 Microsoft Visual Basic .NET 2003
Visual Basic .NET 2005 Microsoft
Visual Basic .NET 2005
Visual Basic 2010 Microsoft
Visual Basic 2010
Visual C++ .NET 2003 Microsoft
Visual C++ .NET 2003
Visual C++ .NET 2005 Microsoft
Visual C++ .NET 2005
Trademarks
• “Microsoft”, “Windows”, “Windows XP”, “Windows Vista”, “Windows 7” and “Excel” are
registered trademarks of Microsoft Corporation in the U.S.A. and other countries.
• “Intel” and “Pentium” are registered trademarks of Intel Corporation in the U.S.A. and other
countries.
Other company names and product names mentioned in this manual are the registered trademarks
or trademarks of their respective companies.
Notes on this manual
• No part of this manual may be reprinted or reproduced in any form or by any means without the
permission of Konica Minolta Sensing, Inc.
• The contents of this manual are subject to change without notice.
• Every effort has been made to ensure the accuracy of the contents of this manual. However,
should you have any questions or comments, or find an error or missing section, please contact
your local sales office.
• Konica Minolta accepts no responsibility for consequences resulting from failure to follow the
instructions outlined in this manual, the condition above notwithstanding.
Safety Precautions
Before you use the CA-S20w software, we recommend that you thoroughly read this manual
as well as the instruction manuals of your PC and the instrument.
Page 3

Introduction
Software License Agreement
The terms of the license agreement of the CA-S20w software are provided in the Software License
Agreement dialog box displayed on-screen during the installation process. This software can be
installed only if you agree to all the terms of the agreement.
Notes on Use
• The CA-S20w application software is designed to be used with the Windows XP, Windows Vista or
Windows 7 operating system. Note that neither operating system is included with this software.
• The Windows XP operating system must be installed on the PC before this software can be installed.
• When inserting the CD-ROM/DVD-ROM into the CD-ROM/DVD-ROM drive, note the correct
orientation of the disc. Insert it gently.
• Keep the CD-ROM/DVD-ROM clean and free from scratches. If the recorded surface becomes dirty
or the label surface is scratched, a read error may result.
• Avoid exposing the CD-ROM/DVD-ROM to rapid temperature changes and condensation.
• Avoid leaving it in locations where it may be exposed to high temperatures from direct sunlight or
heaters.
• Do not drop the CD-ROM/DVD-ROM or subject it to strong impact.
• Keep the CD-ROM/DVD-ROM away from water, alcohol, paint thinners, and other such
substances.
• Remove the CD-ROM/DVD-ROM from the CD-ROM/DVD-ROM drive while the computer is
turned on.
Notes on Storage
• After using the CD-ROM/DVD-ROM, return it to its case and store in a safe place.
• Avoid leaving the CD-ROM/DVD-ROM in locations where it may be exposed to high temperatures
from direct sunlight or heaters.
• The CD-ROM/DVD-ROM should not be kept in areas of high humidity.
Notes on Instruction Manual
The Instruction Manual is also installed in PDF form with a shortcut in the start menu during the
software installation.
To read the manual, go to Start Menu → All programs → KONICAMINOLTA → Data Management
Software CA-S20w → Manual PDF file.
The Instruction Manual of 2D Color Analyzer CA-2000 Series is also included on the installation CDROM.
You will need Adobe Reader
for free from the Adobe website. Also, it is possible to use the Adobe Reader
installation CD-ROM.
(Example) When the CD-ROM is in D drive D:\Adobe Reader\EN
Every effort has been made to ensure the accurate operation of this software. However, should you have
any questions or comments, please contact the nearest KONICA MINOLTA SENSING authorized
service facility.
®
from Adobe Corporation. The latest Adobe Reader® can be downloaded
®
installer included on the
1
Page 4

CONTENTS
System
1.1 System Requirements ................................................................................. 3
Requirements
1.1.1 System Requirements ....................................................................................3
1.1.2 Compatible Instruments .................................................................................3
1.1.3 Language .........................................................................................................3
1.2 Software Installation ................................................................................... 4
1.2.1 Installation Method.........................................................................................4
Software
Installation
1.2.2 Uninstallation Method....................................................................................7
1.3 Connecting the CA-2000 to PC.................................................................... 9
1.3.1 Connecting the CA-2000 for the first time (Windows XP) ...........................9
1.3.2 Connecting the CA-2000 for the first time (Windows Vista)......................12
1.3.3 Connecting the CA-2000 for the first time (Windows 7) ............................13
1.4 Installing Calibration Files ......................................................................... 16
CA-2000 to PC
Connecting the
Installing
Calibration Files
1.4.1 Installation Method.......................................................................................16
1.4.2 Notes on Calibration Files ............................................................................17
1.4.3 Hierarchy of the Installed Files ....................................................................17
1.4.4 File Path Settings ..........................................................................................18
2
Page 5

CONTENTS
1.1 System Requirements
1.1.1 System Requirements
OS Windows XP Professional 32-bit Service Pack 3, 64-bit Service Pack 2
Windows Vista Business 32-bit, 64-bit
Windows 7 Professional 32-bit, 64-bit
(English, Japanese and Korean versions
For Windows XP professional 64-bit, English and Japanese versions only)
CPU Equivalent to Pentium 4, 2.8GHz or better
Memory 1024 MB or more
Hard disk drive At least 80 MB of available disk space is required on the system drive (drive where the OS
is installed).
To install the calibration data, the following disk space is required for each lens:
For a standard lens: approximately 540 MB
For a wide angle lens: approximately 470 MB
For a telephoto lens: approximately 1.3 GB
To save measurement data on the hard disk, you need to reserve the following additional
space on the hard disk:
For example, approximately 110 MB is required to save 10 pieces of measurement data
with 980 × 980 resolution.
(Up to 1,000 pieces of measurement data can be saved.)
About 1 MB is required for configuration files such as the spot setting file and
measurement condition file.
For protection in the event of forced termination, the CA-S20w retains measurement data
in the temporary work area until the data is saved by the user. Temporary data will be
stored in the following folder (assuming that the system drive is Drive C):
C:\Document and Settings\<login user name>\Local Settings\Temp\mcl
When the file is saved, the temporary data is deleted. The data, however, is retained
temporarily until it is saved on the hard disk, or until you exit the CA-S20w normally.
Consequently, when you plan to measure a large amount of data, you need to reserve a
certain amount of space for the temporary evaluation area (11 GB or more when
measurement at 980 × 980 resolution is performed 1,000 times). This must be considered
before starting continuous measurement.
Excel 2003 (required for continuous measurement with the automation function)
Display Display hardware capable of displaying 1280 × 1024 pixels / 65,536 colors (High Color:
16-bit color) or better
Other 1 CD-ROM drive Required for installation
1 DVD-ROM drive Required for installation of calibration data
(As a substitute for the two drives above, 1 combo drive capable of reading CD-R media
and DVD-R media can be used.)
1 USB port (Ver. 2.0, type A connector) Required for instrument
Excel 2003 (when the OS is Windows XP), Excel 2007 (when the OS is Windows Vista or
Windows 7) or Excel 2010 (when the OS is Windows 7)
(required for continuous measurement with the automation function)
Requirements
System
1.1.2 Compatible Instruments
Instrument CA-2000
1.1.3 Language
Display language English, Japanese (Select one during installation)
3
Page 6
CONTENTS
T
ip
1.2 Software Installation
Install the software before connecting the CA-2000 to the PC.
The software is provided on a CD-ROM and the calibration data on a DVD-ROM. A CD-ROM/DVDROM drive is required to use them.
If an older version of this software has been installed, you need to uninstall it before installing this
version.
Note
Software
If there are any measurement data or setting files stored in the installation folder, be sure to move
Installation
them to a different folder before uninstalling the older version.
For the uninstallation procedure, refer to page 7.
To install the software, be sure to log on to the PC as an administrator.
If you selected a user other than a user with administrator privileges, you cannot install the software.
1.2.1 Installation Method
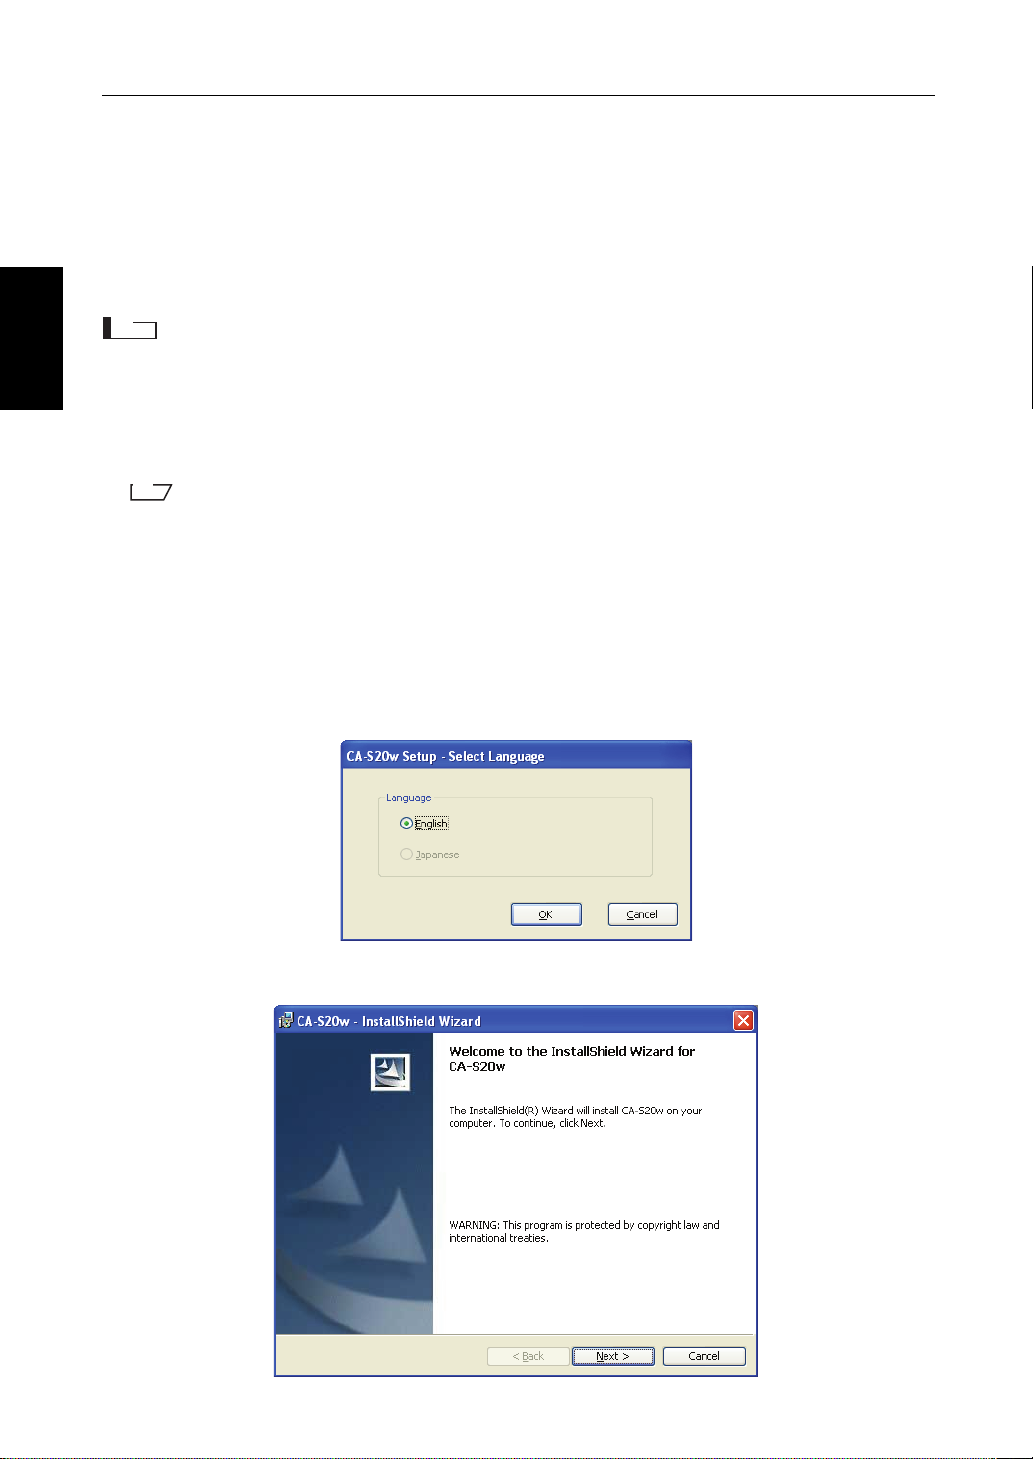
1. Insert the software CD into the CD-ROM/DVD-ROM drive.
When the Select Language dialog box appears, select the language to install and click the OK button.
The procedure below assumes that English is the selected language.
The InstallShield Wizard appears.
2. Click the Next button.
4
Page 7

CONTENTS
3. Read the software license agreement, select ‘I accept the terms in the license agreement’, and click
the Next button.
4. Check the destination folder.
Click the Next button.
Installation
Software
To install to a different folder, click the Change button and specify the folder.
5
Page 8

CONTENTS
5. Click the Install button.
Installation starts.
Software
Installation
6. Click the Finish button.
Installation is complete.
6
Page 9

CONTENTS
T
ip
1.2.2 Uninstallation Method
1. In Windows, select Start - Control Panel - Add or Remove Programs.
In the Add or Remove Programs dialog box, a list of currently installed programs is displayed.
Installation
Software
2. Select ‘CA-S20w’ from the list and click the Remove button.
3. In the Add or Remove Programs dialog box, click the Yes button.
The uninstallation program is executed.
4. Follow the prompts to complete the uninstallation process.
See pages 17 and 18 for calibration files and folders.
7
Page 10

CONTENTS
Then, for Windows Vista or Windows 7, follow the procedure below to uninstall the driver of the CA-
2000.
5. From the Start menu, select Control Panel. When ‘Classic View’ is displayed in Windows Vista,
select ‘Control Panel Home’.
Software
Installation
6. From the ‘System and Maintenance’ menu (Windows Vista) or ‘System and Security’ menu
(Windows 7), select ‘System’.
7. Select ‘Device Manager’ under Tasks.
8. Right-click ‘KMSE 2D Analyzer CA-2000’ in ‘Universal Serial Bus controllers’, and click the
Uninstall button.
8
Page 11

CONTENTS
1.3 Connecting the CA-2000 to PC
Install the software before connecting the CA-2000 to the PC.
1.3.1 Connecting the CA-2000 for the first time (Windows XP)
1. After turning on the CA-2000’s power, connect the USB cable to the PC and the CA-2000.
The Found New Hardware Wizard dialog box appears. Wait a while.
Connecting the
CA-2000 to PC
2. Select ‘No, not this time’ and click the Next button.
9
Page 12

CONTENTS
3. Select ‘Install the software automatically’ and click the Next button.
When your OS is Windows XP Professional 64-bit, you need to specify the source of the
installation. Select “ca2000.inf” in the “Driver” folder in the software CD and click the Next button.
The Hardware Installation dialog box appears.
CA-2000 to PC
Connecting the
10
Page 13

4. Click the Continue Anyway button.
5. Click the Finish button.
Installation is complete.
CONTENTS
Connecting the
CA-2000 to PC
11
Page 14

CONTENTS
1.3.2 Connecting the CA-2000 for the first time (Windows Vista)
1. After turning on the CA-2000’s power, connect the USB cable to the PC and the CA 2000.
• The Found New Hardware dialog box appears.
CA-2000 to PC
Connecting the
2. Click ‘Locate and install driver software’. When the dialog box which confirms User Account
Control appears, select ‘Continue’.
3. Insert the software CD into the drive and click the Next button.
4. Click the Close button.
• The installation of the driver software is complete.
12
Page 15

CONTENTS
1.3.3 Connecting the CA-2000 for the first time (Windows 7)
1. Insert the software CD into the drive. After turning on the CA-2000’s power, connect the USB cable
to the PC and the CA-2000.
• The installation of the device driver should start automatically.
2. Select the icon showing Installing device driver software from the taskbar.
3. When the Device Software Installation dialog box appears, click ‘Skip obtaining driver software
from Windows Update’.
Connecting the
CA-2000 to PC
4. When the confirmation window appears, click the Yes button.
13
Page 16

CONTENTS
5. Wait for the screen below to appear and click the Close button.
• Please wait for a while as this may take several minutes.
6. Right click on the ‘Computer’ from the Start menu and select ‘Properties’.
• The screen below will appear after clicking ‘Device Manager’ on the left of the Control Panel.
CA-2000 to PC
Connecting the
7. Right click on ‘k364usb’ and select ‘Update Driver Software’.
8. Click ‘Browse my computer for driver software’.
14
Page 17

9. Designate the driver folder in the software CD and click the Next button.
(Example) In the case of CD-ROM in D drive.
D:\Driver
10. Click the Close button.
CONTENTS
Connecting the
CA-2000 to PC
• The installation of the driver software is complete.
15
Page 18

CONTENTS
Note
1.4 Installing Calibration Files
The CA-2000 you have purchased comes with a calibration data DVD for each lens you selected at time
of purchase.
All items on the DVD provided must be installed in order for the CA-2000 to make measurements.
To install the calibration files, be sure to log on as an administrator to the PC.
Note
If you selected a user other than a user with administrator privileges, you cannot install the
calibration files.
If you are installing calibration files for the first time, you need to run the CA-S20w as an
administrator. To do this, right-click ‘CA-S20w’ from the program menu and select ‘Run as
administrator’.
1.4.1 Installation Method
1. Start the software.
The Connect CA-2000 dialog box appears.
Installing
2. Select ‘Disconnect’ and click the OK button.
Calibration Files
3. Select Too l - Install calibration files from the menu.
4. When the Insert calibration-DVD message dialog box appears, insert the calibration data DVD in
the drive and click the OK button.
Insert the disk in the drive recognized first.
After inserting the disk, the message may be displayed several times. Click the OK button each time
it appears.
Installation starts when the disk is recognized. Installation takes about 3 minutes.
16
Page 19

CONTENTS
The drive name may be different
depending on your PC usage
environment.
C: Program Files
KONICAMINOLTA
CA-S20w
1001006
CA-S20w.exe
The calibration files
are installed in the
folder with the
same name as the
CA-S2000’s serial
number.
C: Users
“Login user name” folder
AppData
Local
VirtualStore
Program Files
KONICAMINOLTA
CA-S20w
1001006
CA-S20w.exe
When the OS is Windows XP When the OS is Windows Vista or Windows 7
The calibration files
are installed in the
folder with the
same name as the
CA-S2000’s serial
number.
This operation must be performed for each disk.
T
ip
If the disk is not recognized, check the file path of the drive for the calibration disk in “File Path
Settings” below.
1.4.2 Notes on Calibration Files
During measurement, or when connecting the PC and CA-2000, the information in the installed
calibration files is compared with the information stored in the CA-2000.
You will not be able to connect, or you will not be able to select some lenses, if the calibration files are
found to be out of date (because more recent calibration files exist due to re-calibration after purchase).
Delete the folder containing the out-of-date files and install more recent calibration files. See the next
section for folders.
Calibration Files
Installing
1.4.3 Hierarchy of the Installed Files
CA-S20w and the calibration files are installed in the following hierarchy.
The calibration files are installed for each serial number (See page 9 “Status Bar” in the CA-S20w Instruction
Manual.) of the CA-2000 to use.
17
Page 20

CONTENTS
1.4.4 File Path Settings
You can change the storage location of measurement files and calibration data and the file path of the
drive for the calibration disk.
1. Select To o l - File Path from the menu.
The Option File Path dialog box appears.
Installing
Calibration Files
2. Change each file path as necessary.
Click the Browse button to specify the existing file path.
In the ‘Save folder’ field, do not choose a location in the root directory of the hard drive (such as
C:\) but specify a folder.
For ‘Calibration data’, specify the folder one level higher than the folder with the serial number
(‘CA-S20w’ in the figure above).
3. Click the OK button.
If the file path setting is wrong, the Option File Path dialog box appears again. Check the file path
and specify it correctly.
18
Page 21

Page 22

© 2011 KONICA MINOLTA SENSING, INC. BBDAGA Printed in Japan9222-1735-22
 Loading...