

Konica Minolta Bizhub Pro 1100 Additional Information


Table of contents
1 Blank Page Removal
1.1 Original Setting: COPY ................................................................................................................... 1-2
1.2 Original Setting: SCAN ................................................................................................................... 1-4
1.3 Copy Setting: Setting the Various Operations When Copying.................................................... 1-6
2 Setting Zoom
2.1 Specifying the Horizontal Zoom and Vertical Zoom for Copy .................................................... 2-2
3 Copy Job Output
3.1 Application....................................................................................................................................... 3-2
3.1.1 Program Job: Collectively Outputting Multiple Copy Jobs.................................................................3-2
4 Paper Setting
4.1 Paper Setting: Setting Paper for Tray ........................................................................................... 4-2
4.2 Paper Setting: Registering the Paper Conditions ........................................................................ 4-4
5 Paper Tray Setting
5.1 Paper Tray Setting .......................................................................................................................... 5-2
5.1.1 Preset Profile Management: Managing Profiles..................................................................................5-2
Adding the Preset Profile to the Paper Profile ................................................................................... 5-2
Deleting the Preset Profiles................................................................................................................ 5-4
Searching for the Preset Profiles or Paper Profiles............................................................................ 5-6
6 Shortcut Key Register
6.1 Shortcut Key Register .................................................................................................................... 6-2
7 General Settings
7.1 General Settings: Specifying Authentication Conditions ............................................................ 7-2
7.2 Auth. Device Setting: Setting the Authentication Device............................................................ 7-3
7.2.1 General Settings: Specifying the IC card to be used with the authentication device.........................7-3
8 Operation Screen Customize
8.1 Basic Function Display Setting...................................................................................................... 8-2
Basic Function Display Setting .......................................................................................................... 8-2
9 OpenAPI Settings
9.1 OpenAPI Settings: Setting OpenAPI Information......................................................................... 9-2
10 Security
10.1 Enhancement of Password .......................................................................................................... 10-2
10.2 USB Port Functions ...................................................................................................................... 10-2
10.3 Printing through computer........................................................................................................... 10-2
10.4 Data not to be protected in Enhanced Security mode .............................................................. 10-3
10.5 Functions of Enhanced Security Mode....................................................................................... 10-3
10.5.1 Synchronously set and restricted functions .....................................................................................10-3
bizhub PRO 1100 Contents-1

10.6 Enhanced Security Mode ............................................................................................................. 10-4
10.6.1 Service mode use restriction by administrator .................................................................................10-4
10.7 Outputting Audit Log .................................................................................................................... 10-5
10.8 Transmitting Audit Log................................................................................................................. 10-5
10.8.1 Audit log address setting..................................................................................................................10-5
10.8.2 Audit Log Manual Transmission........................................................................................................10-7
10.9 Analyzing audit log........................................................................................................................ 10-9
10.10 Items Saved in Audit Log ............................................................................................................. 10-9
10.10.1 Table of items saved in audit log ......................................................................................................10-9
10.11 Possible Troubles in Outputting all Audit Log Data to USB Flash Drive................................ 10-10
10.12 Job Log ........................................................................................................................................ 10-11
10.12.1 Job Log: Spooling job information as log information....................................................................10-11
10.13 [Password Rules Setting]: Enabling Password Rules ............................................................. 10-13
11 PageScope Web Connection
11.1 [Maintenance] Tab ....................................................................................................................... 11-2
11.1.1 [Meter Count] ..................................................................................................................................11-2
11.1.2 [Job Log] .........................................................................................................................................11-3
[Create Job log] .............................................................................................................................. 11-3
[Download Job log] ........................................................................................................................ 11-5
11.2 [User Auth./Account Track] tab.................................................................................................. 11-6
11.3 [Network] Tab................................................................................................................................ 11-6
11.3.1 [OpenAPI Setting]............................................................................................................................11-6
[Specified Application Start Setting] .............................................................................................. 11-6
[Single Sign-On Setting] ................................................................................................................. 11-6
12 Optional Units
12.1 Addition of New Optional Units ................................................................................................... 12-2
12.2 Specifications................................................................................................................................ 12-3
12.2.1 Output Tray OT-510..........................................................................................................................12-3
12.2.2 Relay Unit RU-518 ............................................................................................................................12-4
12.2.3 Humidifier HM-103............................................................................................................................12-5
12.3 Machine Configuration ................................................................................................................. 12-6
12.3.1 Output Tray OT-510..........................................................................................................................12-6
12.3.2 Relay Unit RU-518 (Humidifier HM-103)...........................................................................................12-7
12.4 Paper Information ......................................................................................................................... 12-9
12.4.1 Paper Weight Available for Use ........................................................................................................12-9
12.4.2 Paper Capacity Available for Use .....................................................................................................12-9
12.4.3 Paper Size Available for Use...........................................................................................................12-10
12.5 Adjustment .................................................................................................................................. 12-11
12.5.1 [Finisher Adjustment] (Output Tray OT-510) ...................................................................................12-11
12.6 Standard/Optional Equipment ................................................................................................... 12-12
12.6.1 Feeding option ................................................................................................................................12-12
12.6.2 Main body options ..........................................................................................................................12-12
12.6.3 Output Option .................................................................................................................................12-13
12.7 RU Curl Adjustment .................................................................................................................... 12-14
12.8 Other Options .............................................................................................................................. 12-16
13 Others
13.1 Default Settings for 2-Sided Printing .......................................................................................... 13-2
13.1.1 Layout ...............................................................................................................................................13-2
13.1.2 Installing the PS Plug-in driver..........................................................................................................13-2
13.2 Density Balance Adjustment........................................................................................................ 13-4
13.2.1 Density Balance Chart Output ..........................................................................................................13-4
Measuring the Colorimetric Data for Density Balance Chart Using the Spectrophotometer .......... 13-4
Contents-2 bizhub PRO 1100

13.3 Default Punch Setting................................................................................................................... 13-6
13.4 Hot Folder Setting......................................................................................................................... 13-6
13.5 Software Switch Setting............................................................................................................... 13-7
13.6 [Hot Folder Backup].................................................................................................................... 13-11
13.6.1 [Hot Folder Backup]........................................................................................................................13-11
13.7 Color Centro ................................................................................................................................ 13-14
13.7.1 Operating environment ...................................................................................................................13-14
13.8 Job Centro ................................................................................................................................... 13-15
13.8.1 Operating environment ...................................................................................................................13-15
13.8.2 Collectively Editing Jobs.................................................................................................................13-16
13.8.3 [Layout] Screen ...............................................................................................................................13-16
13.9 Web Utilities................................................................................................................................. 13-17
13.9.1 Operating Environment...................................................................................................................13-17
13.9.2 Displaying Job History List .............................................................................................................13-17
13.9.3 Importing Paper Profile...................................................................................................................13-18
13.10 Change of [Register] Button Display Position.......................................................................... 13-21
13.11 Number of Registered Addresses ............................................................................................. 13-21
13.11.1 Registering an FTP server as a destination ....................................................................................13-21
13.11.2 Registering an SMB server as a destination...................................................................................13-22
13.12 Service Port Device Setting ....................................................................................................... 13-23
13.12.1 Service Port Device Setting: Selecting whether or not to use a service port device......................13-23
13.13 ADF Mode Default Setting.......................................................................................................... 13-23
13.14 Common Setting: Setting the Various Operations of the Machine ........................................ 13-24
13.15 [Both Sides Adj.] ........................................................................................................................ 13-25
13.15.1 Procedure of [Both Sides Adjust]..................................................................................................13-25
13.15.2 [Scan Meas.] adjustment...............................................................................................................13-25
13.16 Specifications of Printer Functions........................................................................................... 13-27
13.17 [Advanced Options] Window ..................................................................................................... 13-27
13.18 Stamp/Composition.................................................................................................................... 13-28
13.19 Displaying Output History .......................................................................................................... 13-29
13.20 AccurioPro Hot Folder................................................................................................................ 13-29
13.21 Correction of Terminology ......................................................................................................... 13-29
[Backup]......................................................................................................................................... 13-11
[Restore]......................................................................................................................................... 13-12
Importing Paper Profile.................................................................................................................. 13-18
14 Trademarks and Copyrights
14.1 SOFTWARE LICENSE AGREEMENT ........................................................................................... 14-2
bizhub PRO 1100 Contents-3

MEMO
Contents-4 bizhub PRO 1100

1
Blank Page Removal
1
1 Blank Page Removal
1.1 Original Setting: COPY
<Additional information>
Original Setting: COPY
1.1
User's guide / Addition position
<HTML User's Guide>
[Copy] ) [Basic Settings] ) [Set-
ting Originals]
If blank pages are included in the original loaded on the ADF, they are removed from the scan target.
Select this option when scanning the original including blank pages.
The original pages detected as blank pages are not counted as the number of original pages.
Description
Addition of function
* For details, refer to the following.
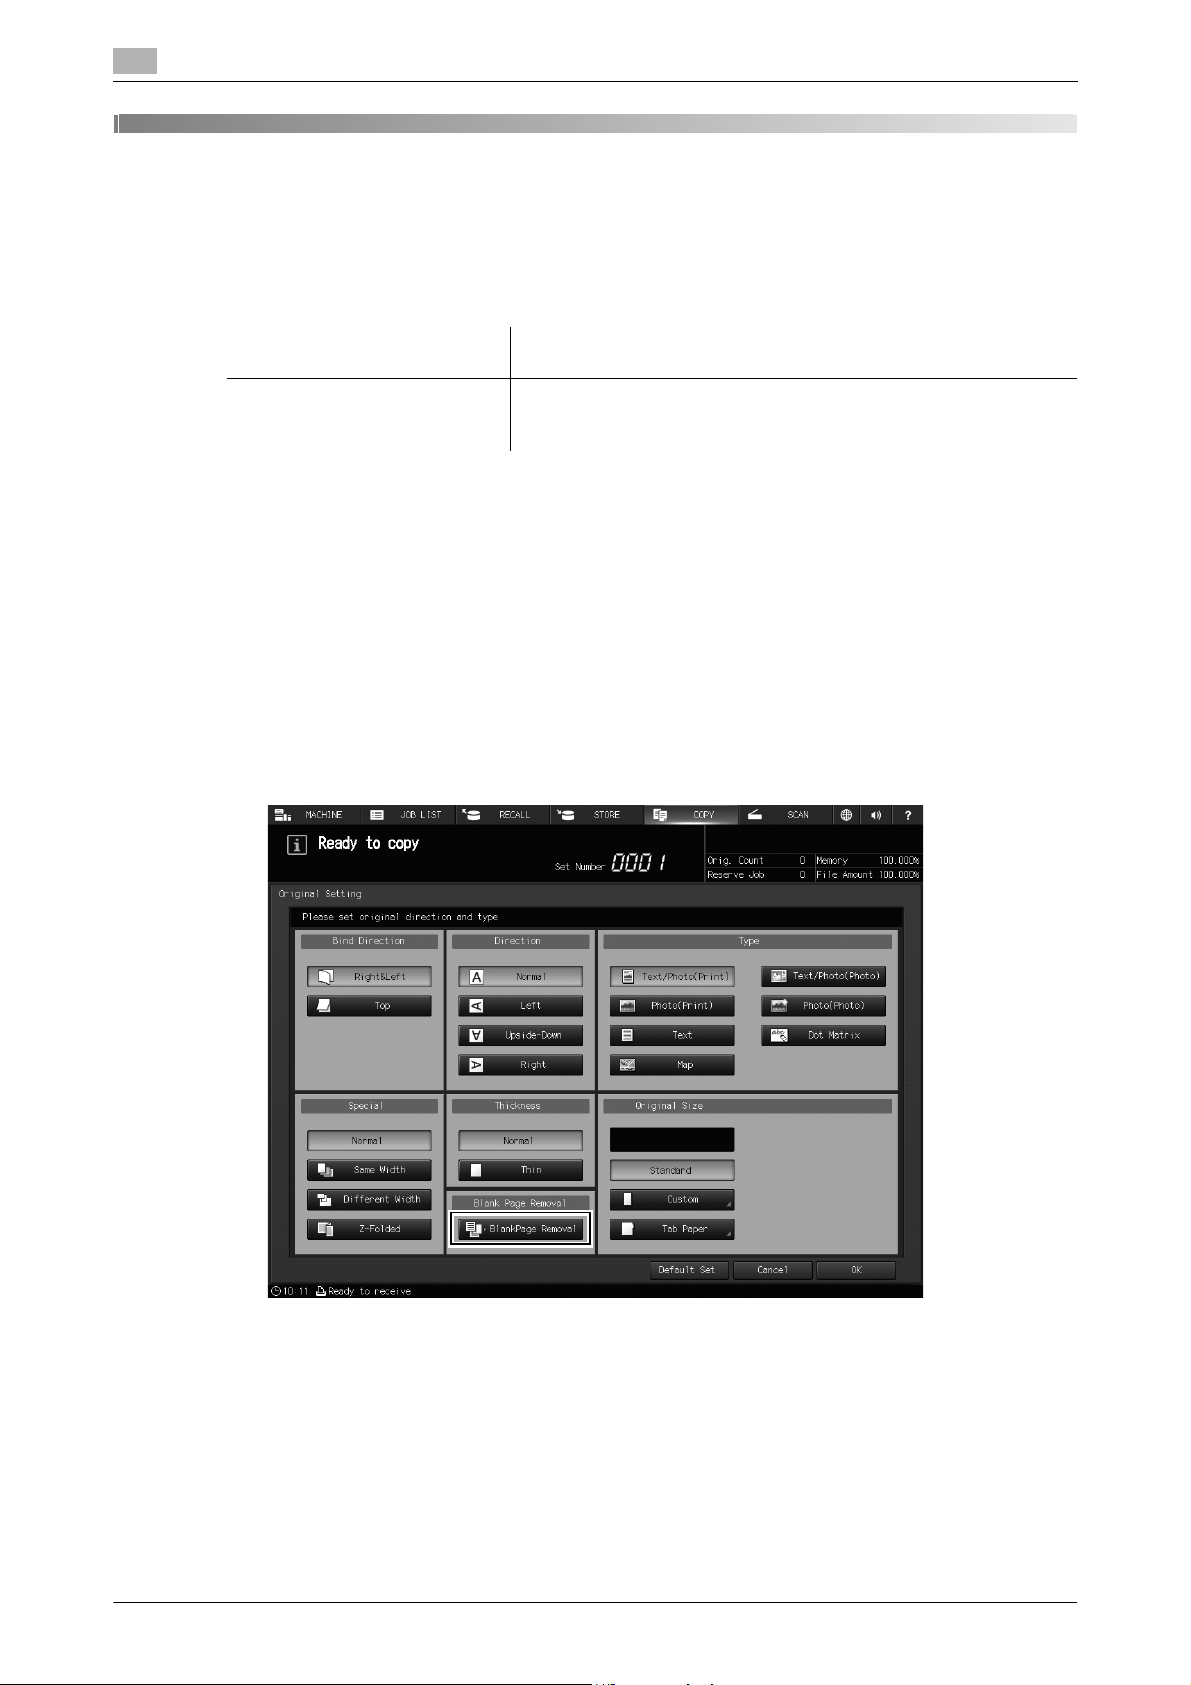
1 Position the original.
2 Press the [COPY] tab to display the [COPY] screen.
3 Press [Original Setting].
The [Original Setting] screen is displayed.
4 Select [BlankPage Removal] under [Blank Page Removal].
5 Press [OK].
The screen returns to the [COPY] screen.
% To restore the default setting, press [Default Set] and to restore the previous setting, press [Cancel].
1-2 bizhub PRO 1100

1.1 Original Setting: COPY
dReference
If blank pages are not correctly detected while the original is scanned with [BlankPage Removal] enabled, adjust the level to detect blank pages.
For details, refer to "1.3 Copy Setting: Setting the Various Operations When Copying" in this guide.
Tips
[Blank Page Removal] is not available when [Same Width], [Different Width], or [Z-Folded] is selected.
1
bizhub PRO 1100 1-3
1
1.2 Original Setting: SCAN
<Errata>
Original Setting: SCAN
1.2
User's guide / Correction position
<HTML User's Guide>
[Scan] ) [Scanning Functions of
Image Controller] ) [Overview
of Scanner] ) [Scanning Function Screens] ) [Scan Settings
Screen] ) [Original Setting]
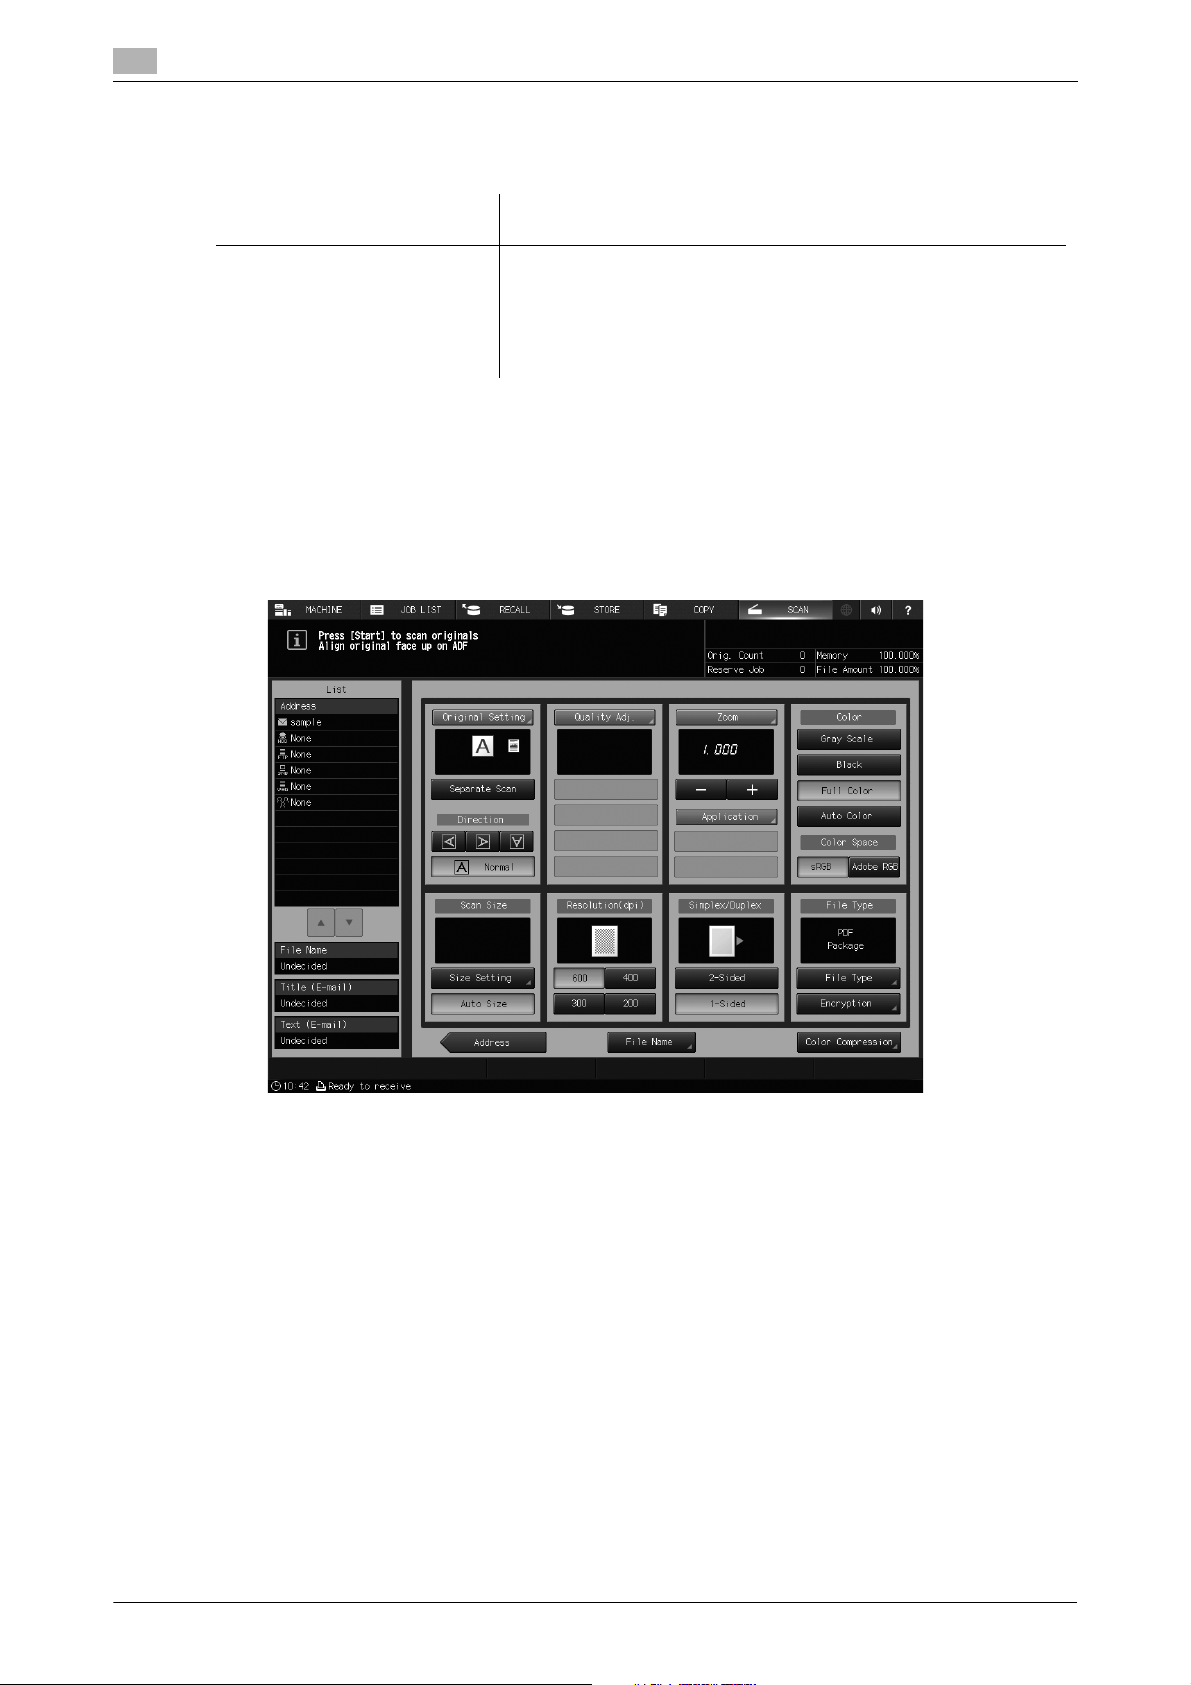
You can set separate scan, bind direction of two-sided original (whether the top and bottom of both sides
are the same, or one side is flipped vertically), original orientation, and original type.
[Separate Scan]
The scan operation is divided into several sessions and turns into a single job. Select [Separate Scan] before
making the first scan. When the last scan is completed, cancel [Separate Scan].
Description
Correction of operation with the operation button (Blank Page Removal) added
* For details, refer to the following.
[Bind Direction]
[Right&Left], [Top]
[Direction]
[Normal], [Left], [Upside-Down], [Right]
[Type]
[Text/Photo(Print)], [Text/Photo(Photo)], [Photo(Print)], [Photo(Photo)], [Text], [Dot Matrix]
[Special]
[Normal], [Same Width], [Different Width], [Z-Folded]
[Thickness]
[Normal], [Thin]
1-4 bizhub PRO 1100
1.2 Original Setting: SCAN
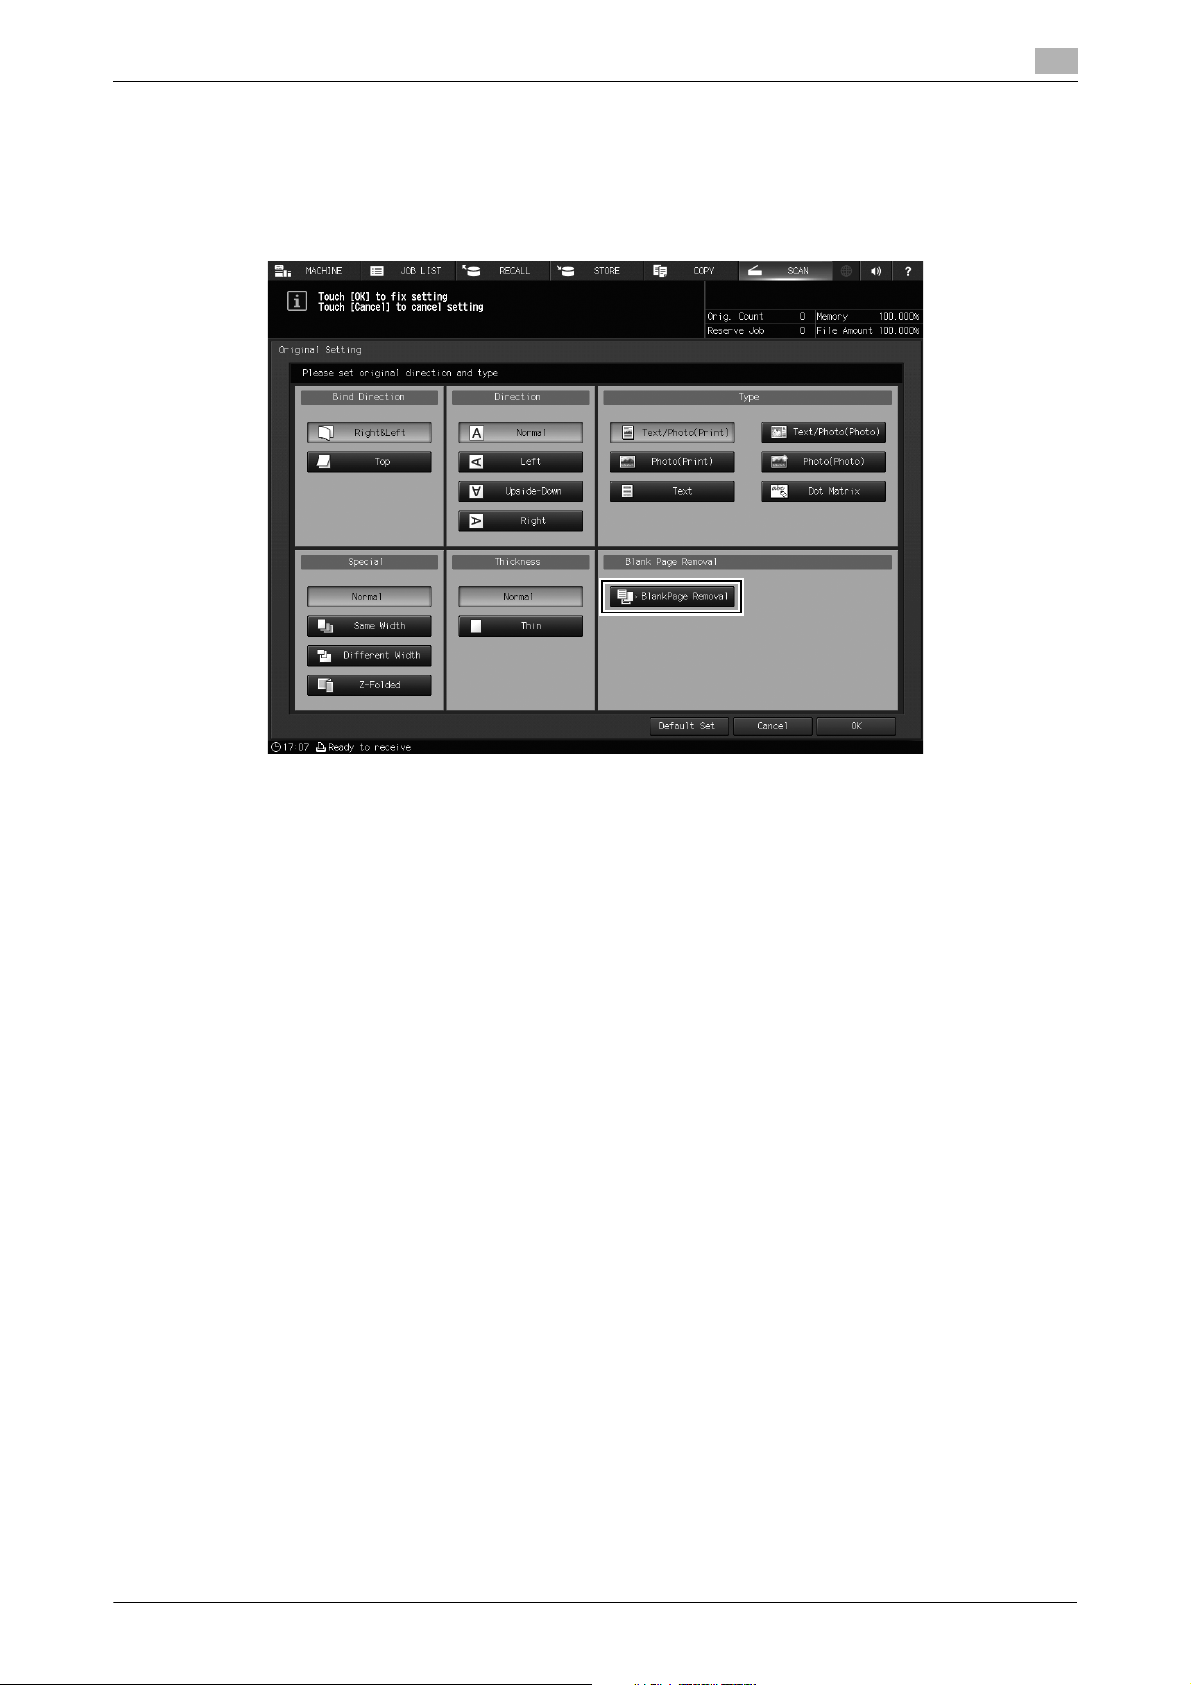
[BlankPage Removal]
Excludes blank pages from the scanning target when they are included in the original loaded on the ADF.
Select this option when scanning the original including blank pages.
Blank pages detected in the original are not counted as the number of original pages.
1
[OK]
Applies the setting.
[Cancel]
Cancels the setting.
[Default Set]
Returns the setting to the default.
dReference
For details, refer to [COPY] ) [Basic Setting] ) [Setting Originals].
If blank pages are not correctly detected while the original is scanned with [BlankPage Removal] enabled, adjust the level to detect blank pages.
For details, refer to "1.3 Copy Setting: Setting the Various Operations When Copying" in this guide.
Reference
- [BlankPage Removal] is not available when [Same Width], [Different Width], or [Z-Folded] is selected.
bizhub PRO 1100 1-5
1
Copy Setting: Setting the Various Operations When Copying
1.3 Copy Setting: Setting the Various Operations When Copying
<Additional information>
1.3
User's guide / Addition position
<HTML User's Guide>
[Settings and Adjustments] )
[Utility/Counter] ) [Administrator Setting] ) [Copy Setting:
Setting the Various Operations
When Copying]
At the end of table
<HTML User's Guide>
[Settings and Adjustments] )
[Utility/Counter] ) [User Setting]
) [Copy Setting: Setting the
Various Operations When Copying]
At the end of table
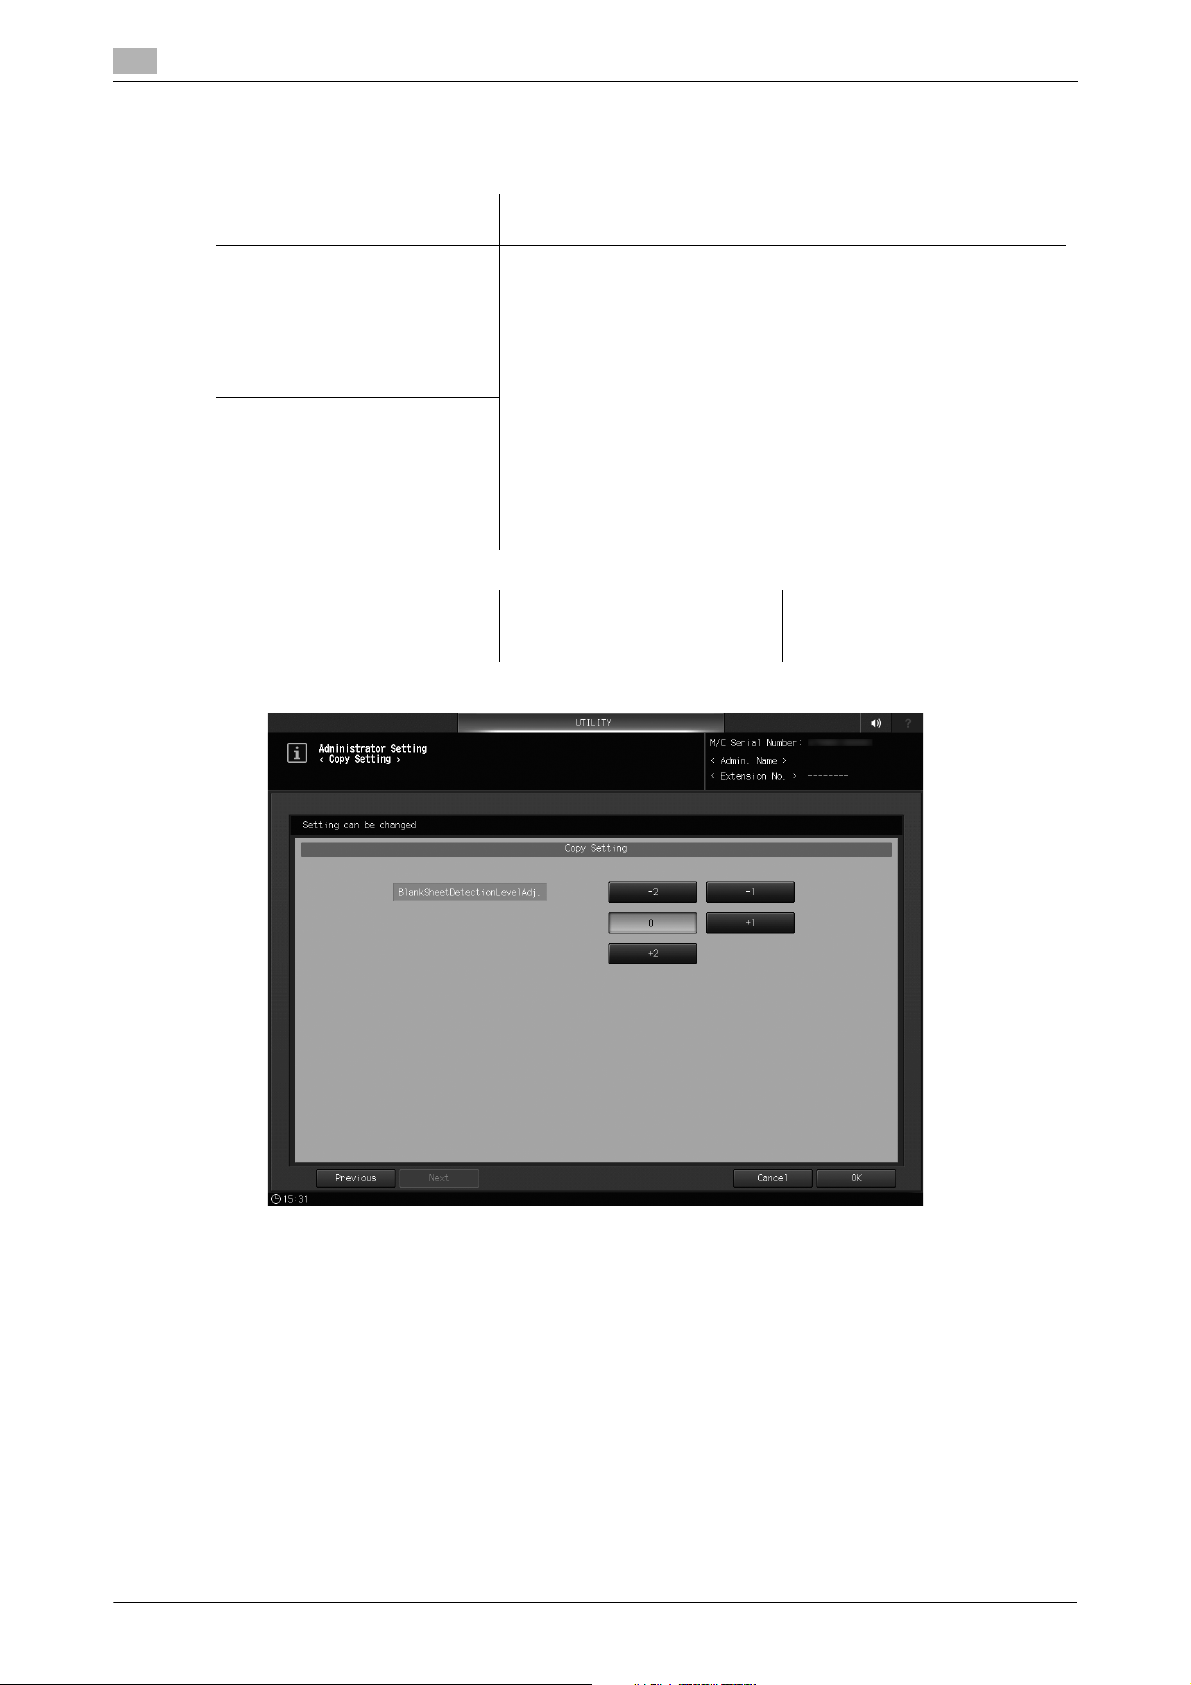
[BlankSheetDetectionLevelAdj.] Adjust the level to detect blank
Description
Addition of function
* For details, refer to the following.
pages when [BlankPage Removal] is enabled.
-2, -1, 0, +1, +2
1-6 bizhub PRO 1100

2
Setting Zoom
2
2 Setting Zoom
<Additional information>
Specifying the Horizontal Zoom and Vertical Zoom for Copy
2.1
User’s guide / Addition position
<HTML User’s Guide>
[Copy])[Basic Settings])[Setting Zoom]
Description
Addition of function
* For details, refer to the following.
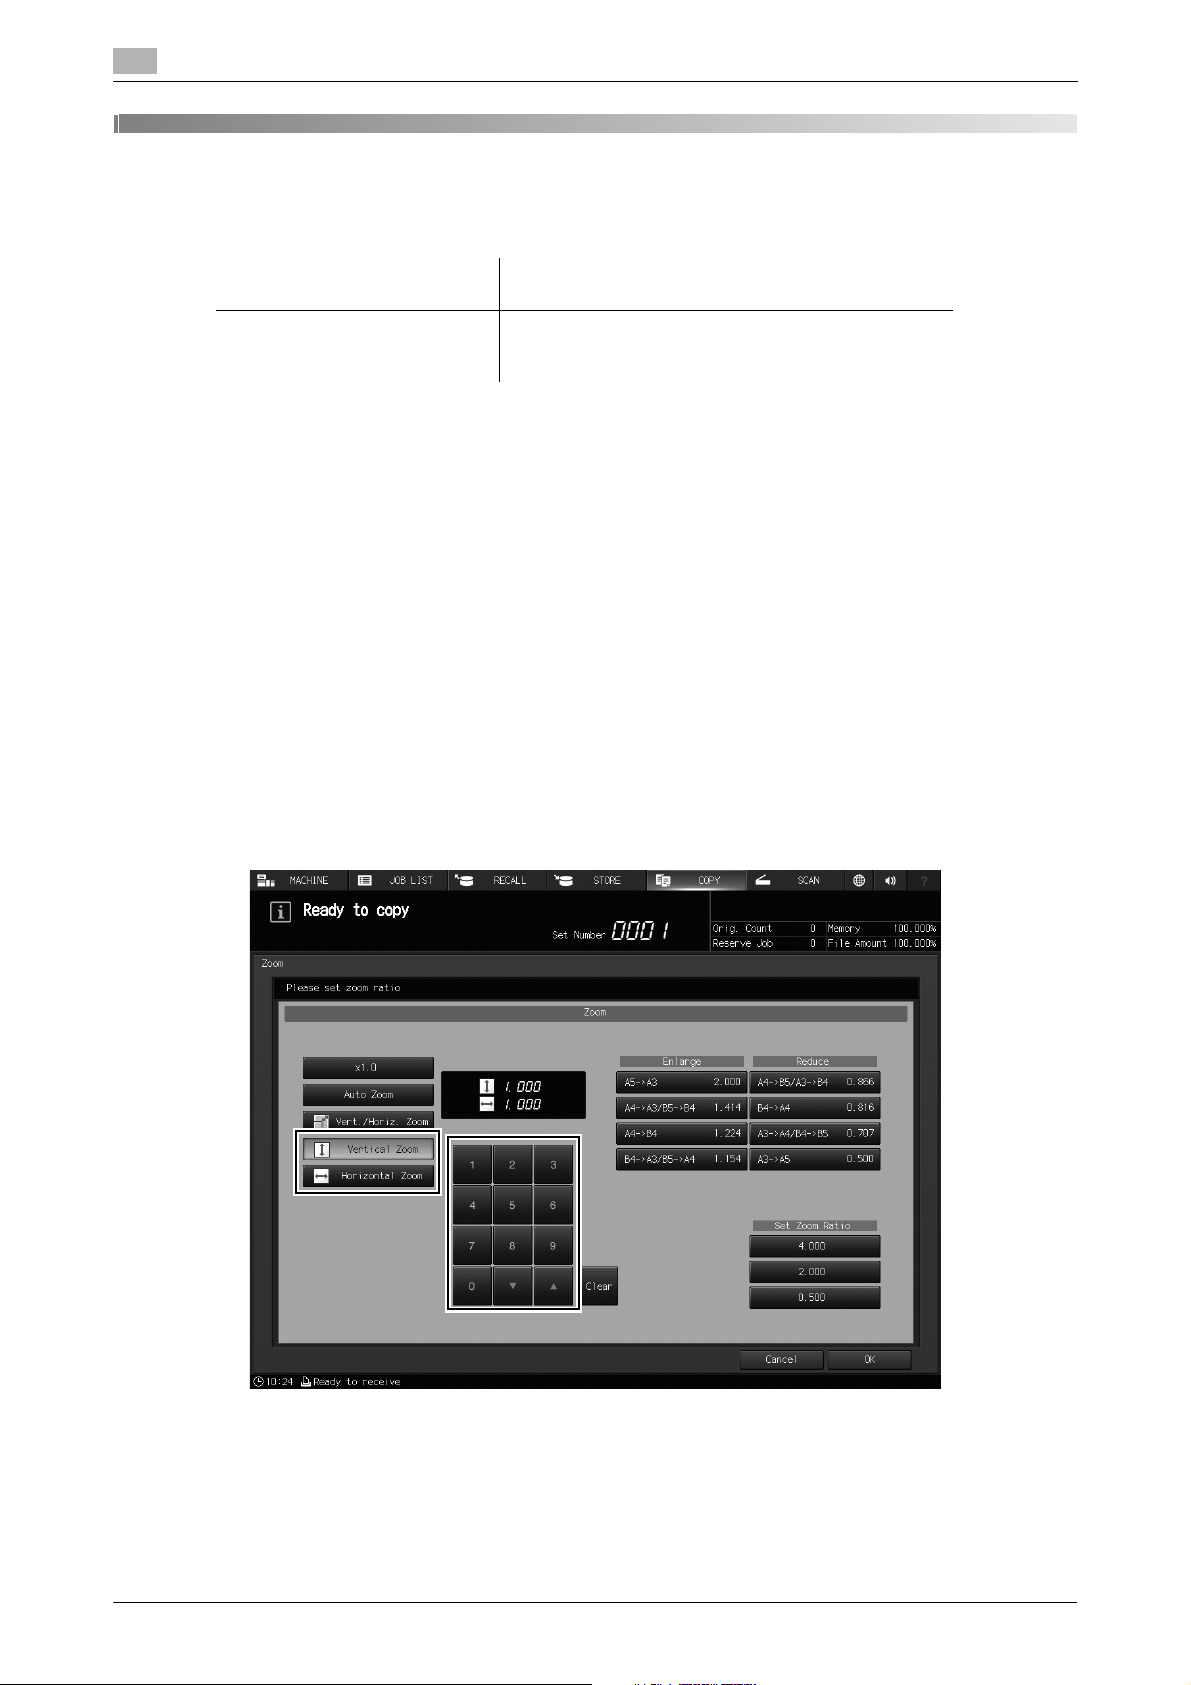
2.1 Specifying the Horizontal Zoom and Vertical Zoom for Copy
Specify the desired ratio for the horizontal zoom and vertical zoom, and make copies of which the aspect
ratio is different.
- For [Vertical Zoom] and [Horizontal Zoom], individually specify the zoom ratio from 0.250 to 4.000 in
0.001 (0.1%) increments.
To use this function, a setting service by a customer engineer is required. For details, contact your service
representative.
1 Press the [COPY] tab to display the [COPY] screen.
2 Press [Zoom].
The [Zoom] screen is displayed.
3 Specify the desired zoom ratio.
Select [Vertical Zoom] or [Horizontal Zoom], and press the keypad on the screen or the [,] or [+] key
to enter the zoom ratio.
% If wrong number is entered, continue by entering the correct number from the beginning.
% Holding down the [,] or [+] key changes the ratio in 0.001 (0.1%) steps at first, and then in 0.010
(1%) steps.
2-2 bizhub PRO 1100
2.1 Specifying the Horizontal Zoom and Vertical Zoom for Copy
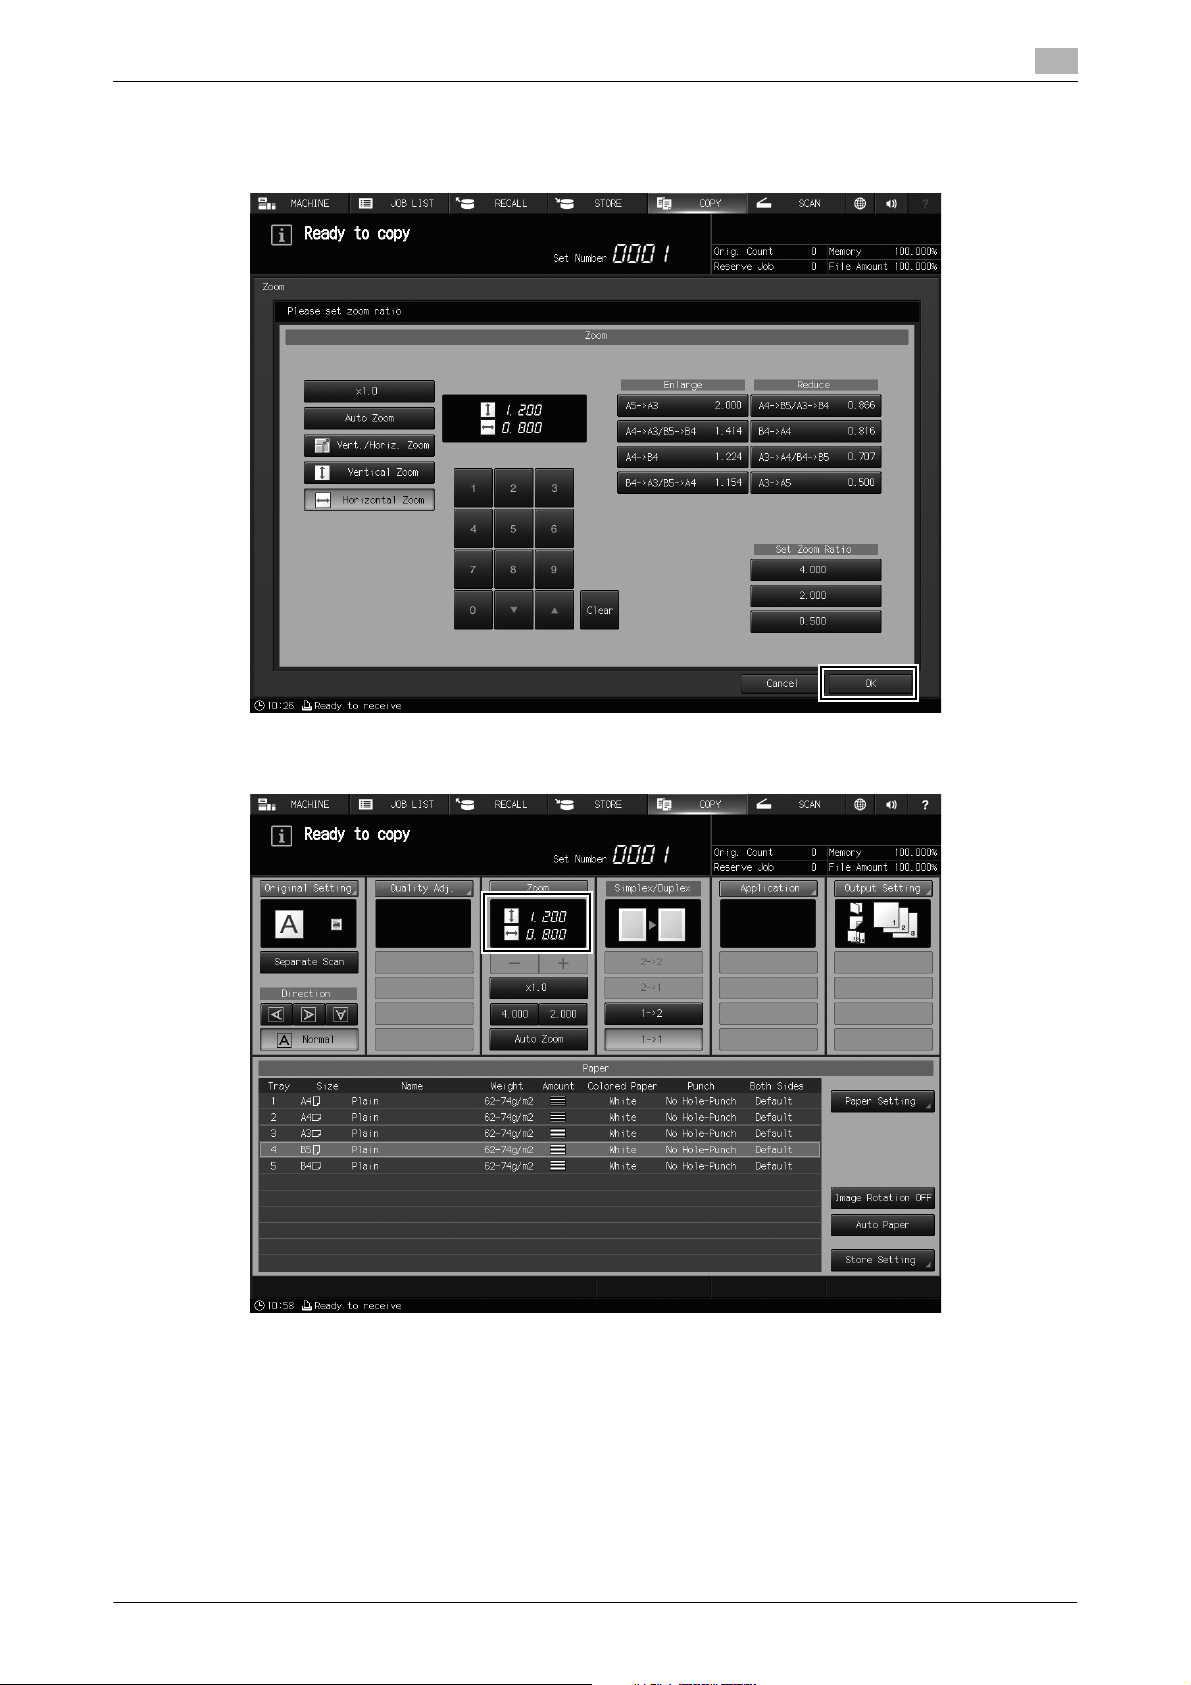
4 Press [OK].
This returns to the [COPY] screen.
2
The ratio values of the vertical zoom and horizontal zoom are displayed under [Zoom].
bizhub PRO 1100 2-3

2
MEMO
Specifying the Horizontal Zoom and Vertical Zoom for Copy
2.1
2-4 bizhub PRO 1100

3
Copy Job Output
3
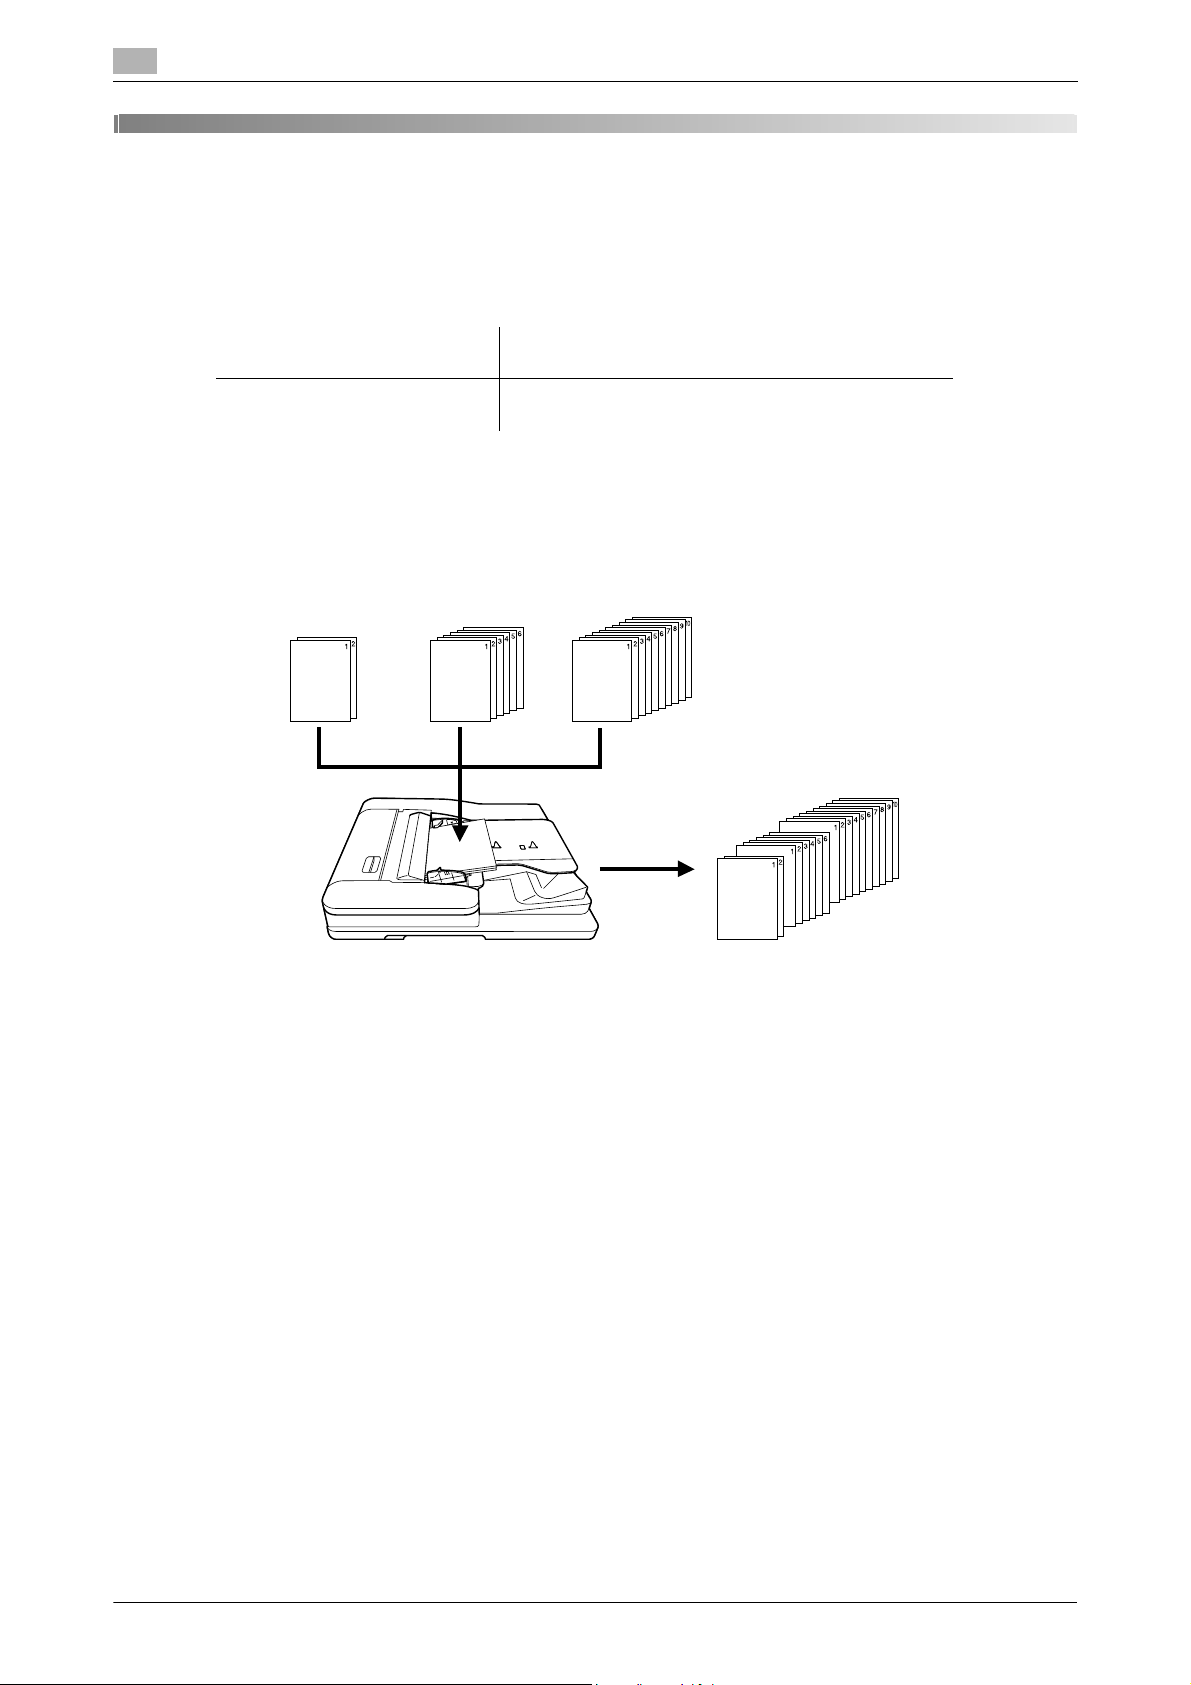
Copy job B Copy job CCopy job A
Program job output
3Copy Job Output
3.1 Application
<Additional information>
Application
3.1
User's guide / Addition position
<HTML User's Guide>
[Copy] ) [Application Setting]
Description
Addition of function
* For details, refer to the following.
3.1.1 Program Job: Collectively Outputting Multiple Copy Jobs
This function combines multiple copy jobs loaded with different settings, and outputs them as a single job.
When configuring the program job setting, be sure to note the following points.
- Separate Scan mode is automatically selected.
- The paper tray can be specified for each job; therefore, the paper size can be changed for each job.
- The staple setting in output mode can be configured for all jobs or for each loaded job.
- The punch setting in output mode is applied to all jobs with the same contents.
The punch setting in output mode cannot be configured for each job. However, you can specify the
punched or unpunched mode to output jobs by setting [Pre-Punched] in [Paper Setting] for the tray in
which the punched sheets are loaded, and then specifying the paper tray for each job.
- When changing the output mode or the number of copies after loading has been completed, press
Mode Check on the control panel to display the [Program Job Edit] screen.
- There is no limit to the number of jobs that can be loaded. However, up to 10,000 pages can be loaded.
- A program job cannot be registered in the [Copy Mode Memory].
3-2 bizhub PRO 1100

3.1 Application
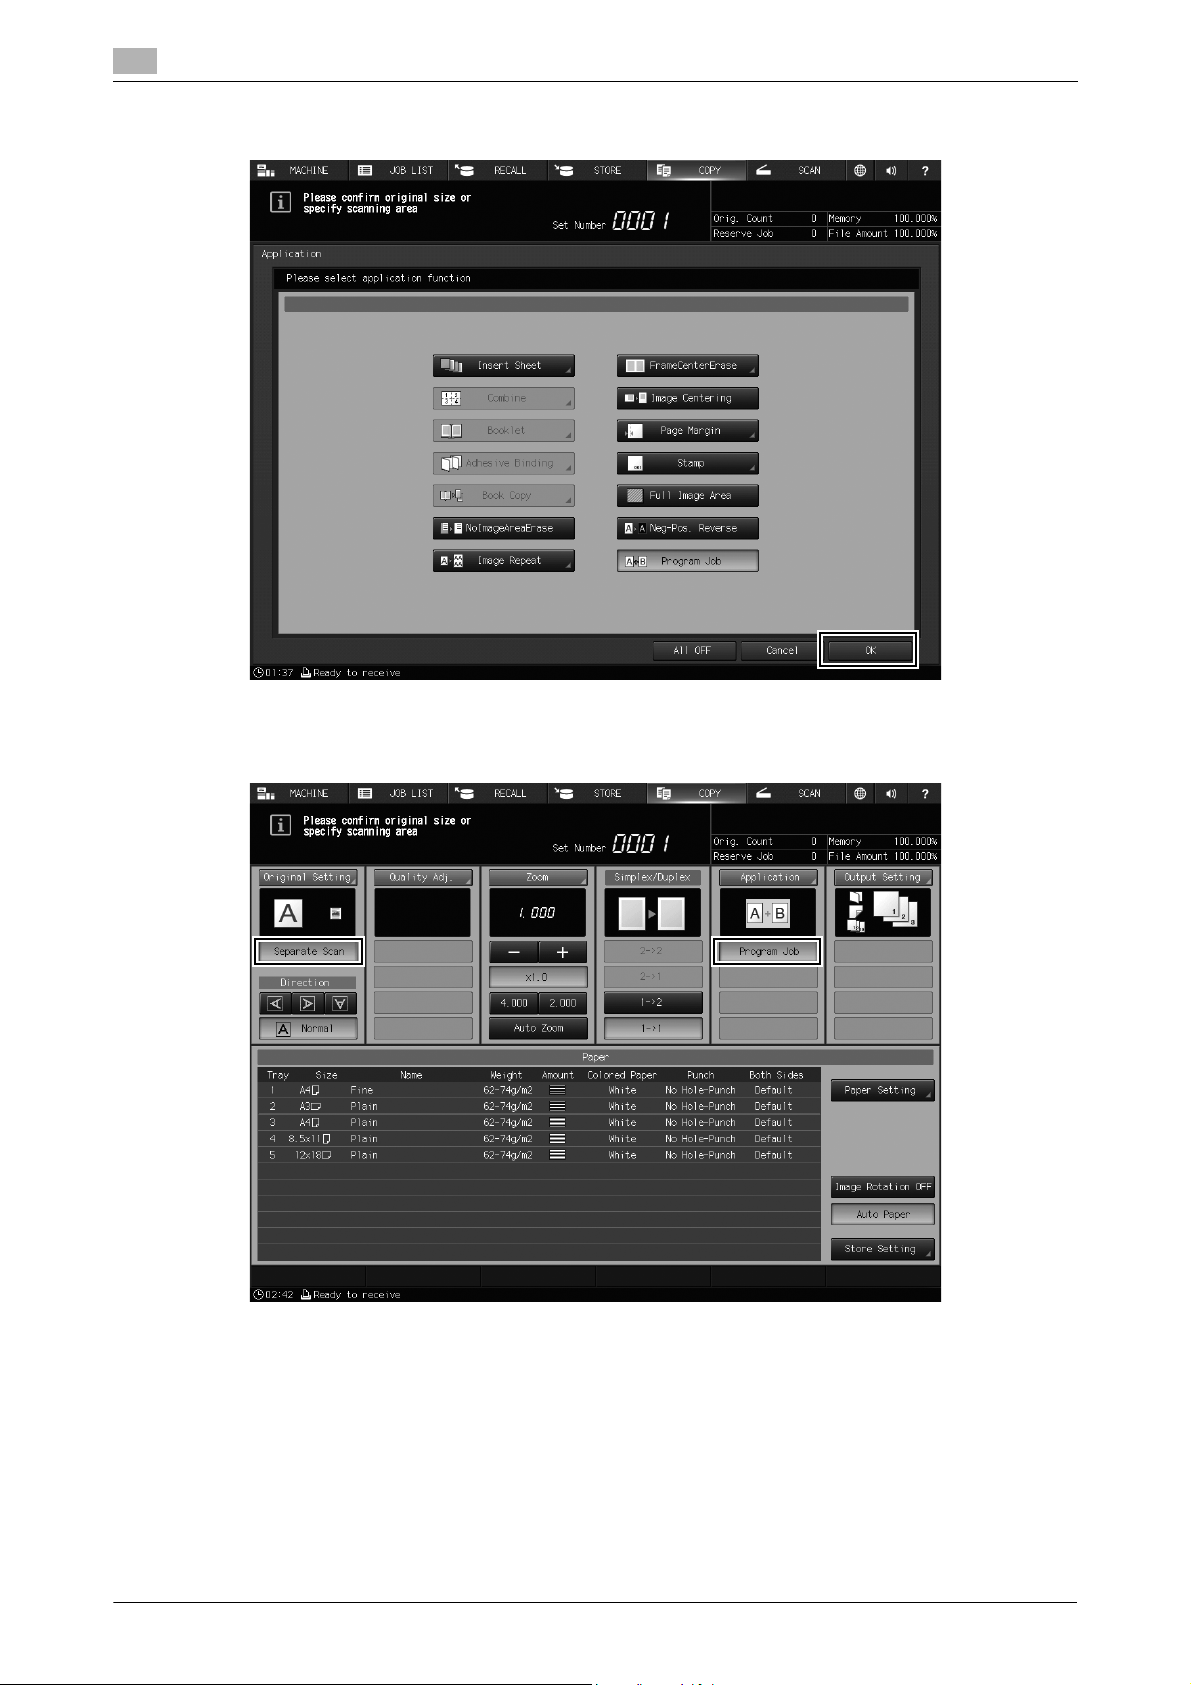
1 Press [Application] on the [COPY] screen.
3
The [Application] screen is displayed.
2 Press [Program Job].
The incompatible function keys will be dimmed to show inactivity.
bizhub PRO 1100 3-3
3
3 Press [OK] to return to the [COPY] screen.
Application
3.1
The [Program Job] icon and shortcut key are displayed under [Application] on the [COPY] screen. And,
[Separate Scan] is automatically selected.
4 Position the original.
5 Press Start on the control panel.
The original is loaded. When loading is completed, the [Program Job Edit] screen is displayed.
3-4 bizhub PRO 1100

3.1 Application
6 Specify copy conditions as needed.
3
[Paper Setting], [Print Side], [Output Setting], and [Quality Adjustment] can be specified as copy conditions. For the setting procedure, refer to [Saving and Editing Jobs] ) [Hold Job and Save on HDD] )
[Hold Job Screen] ) [Job Ticket Edit Screen] in the HTML User's Guide.
7 Press either [Bunch Done] or [Done&Division].
[Bunch Done]: Press this button to combine the loaded jobs and define them as a single job.
bizhub PRO 1100 3-5
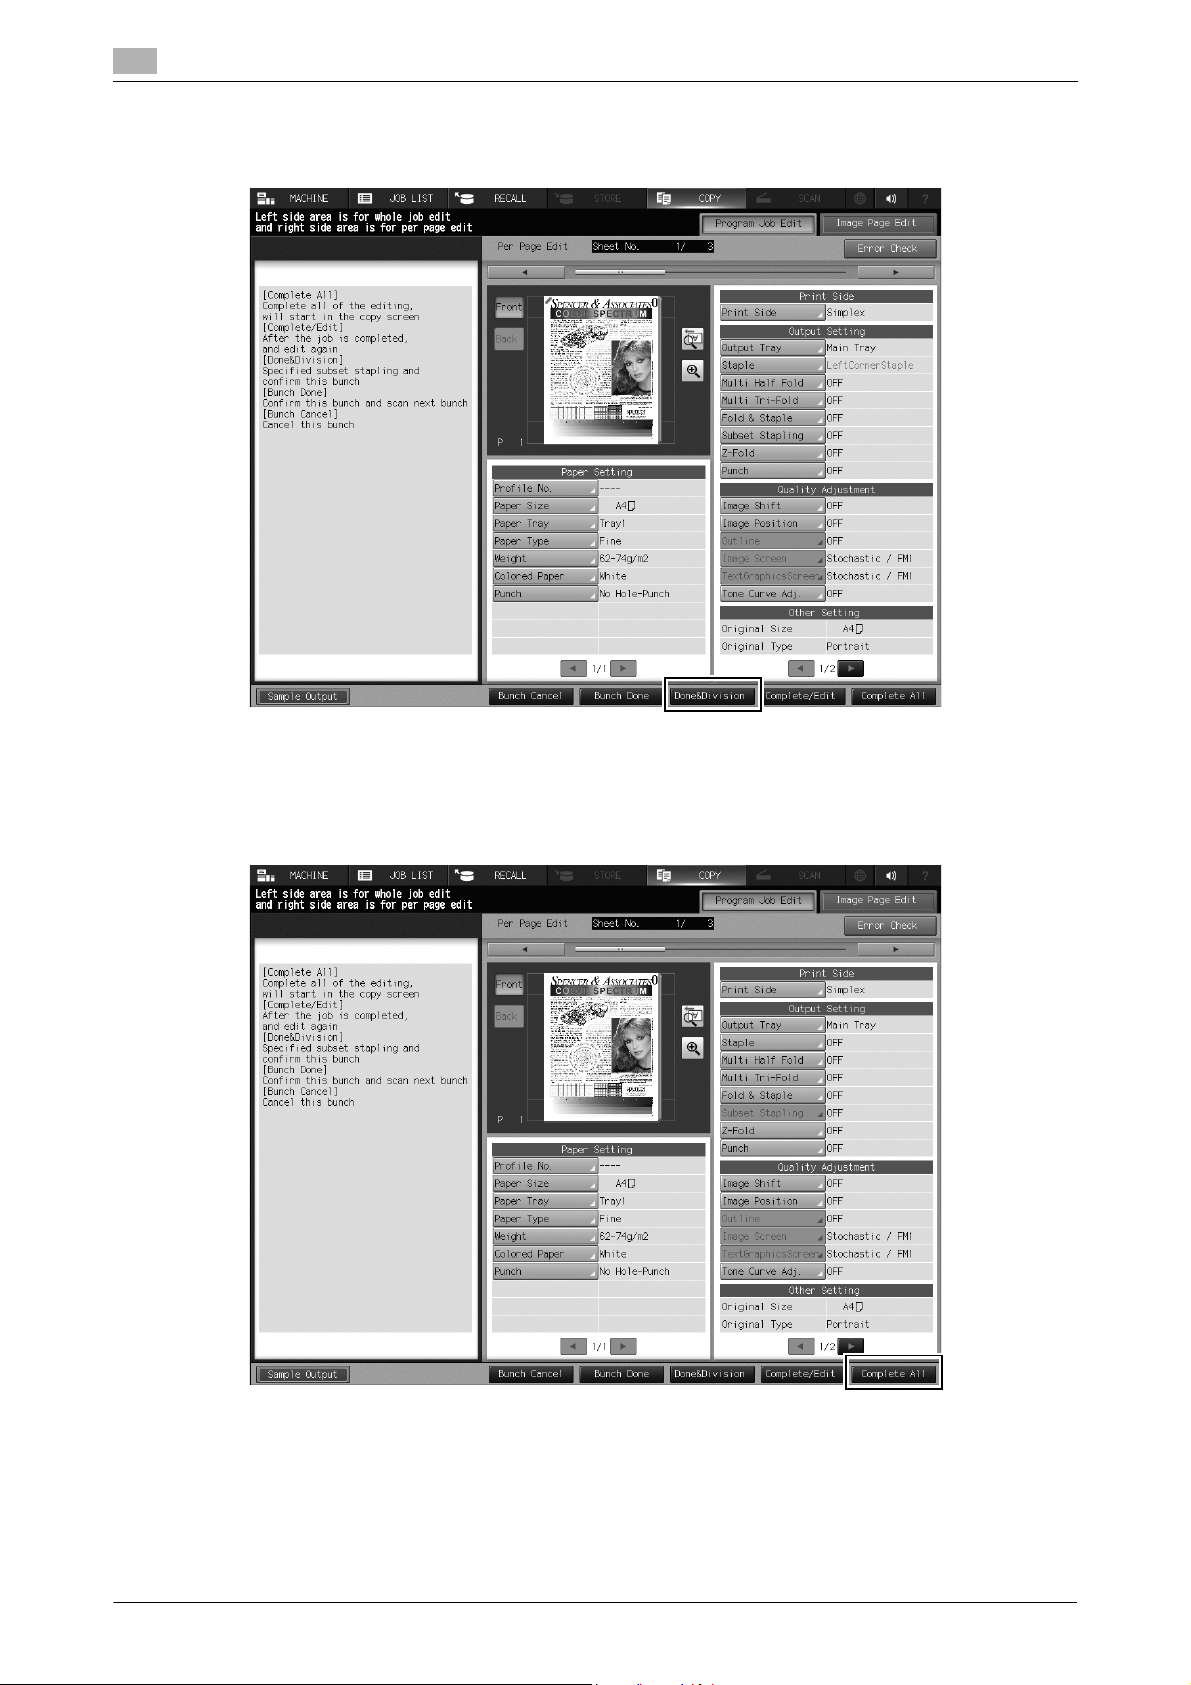
3
[Done&Division]: Press this button to set stapling for each job.
Multiple jobs are combined by subset stapling, and defined as a single job.
Application
3.1
[Bunch Cancel]: Press this button to cancel all the loaded jobs and return to the [COPY] screen.
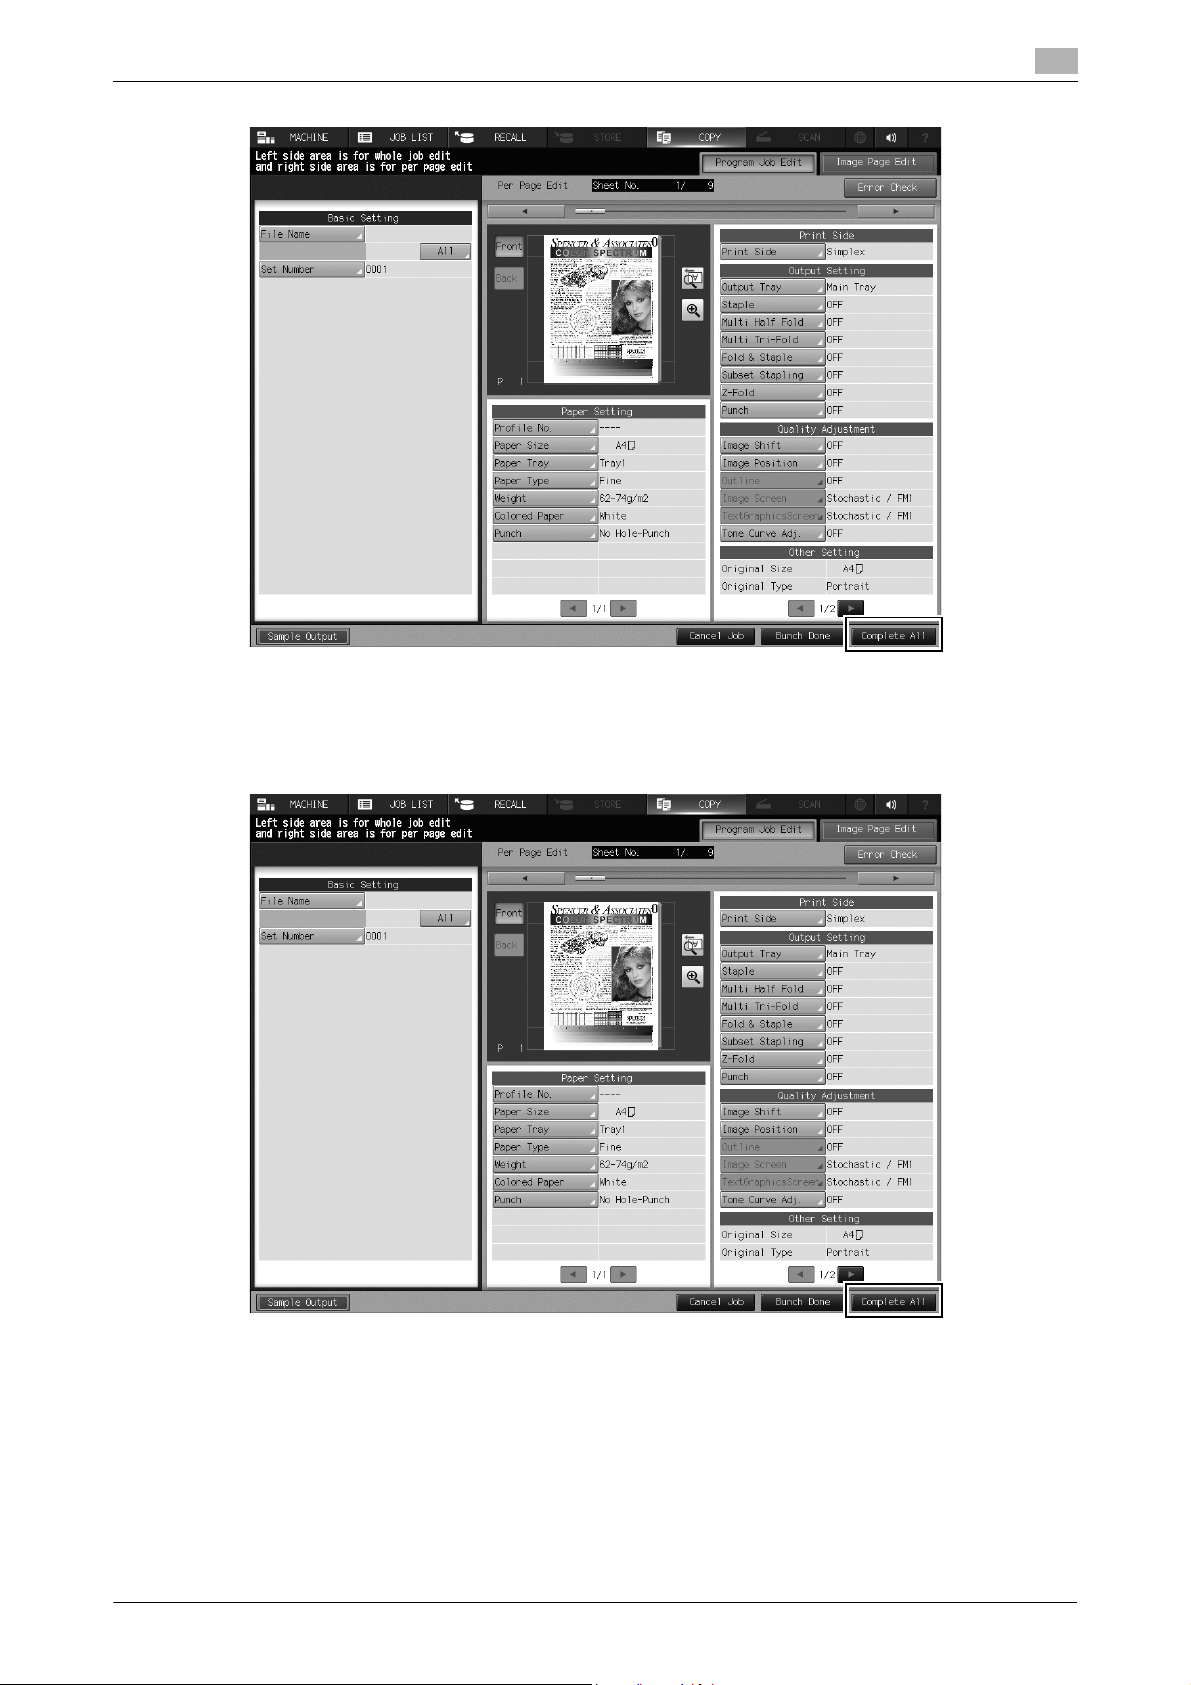
8 Repeat steps 4 to 7 to load all the originals.
% When the last original is loaded, press [Complete All]. Output processing starts.
% To change copy conditions after combining all jobs, press [Complete/Edit] to display the [Program
Job Edit] screen as shown below. After the change has been completed, press [Complete All].
3-6 bizhub PRO 1100
3.1 Application
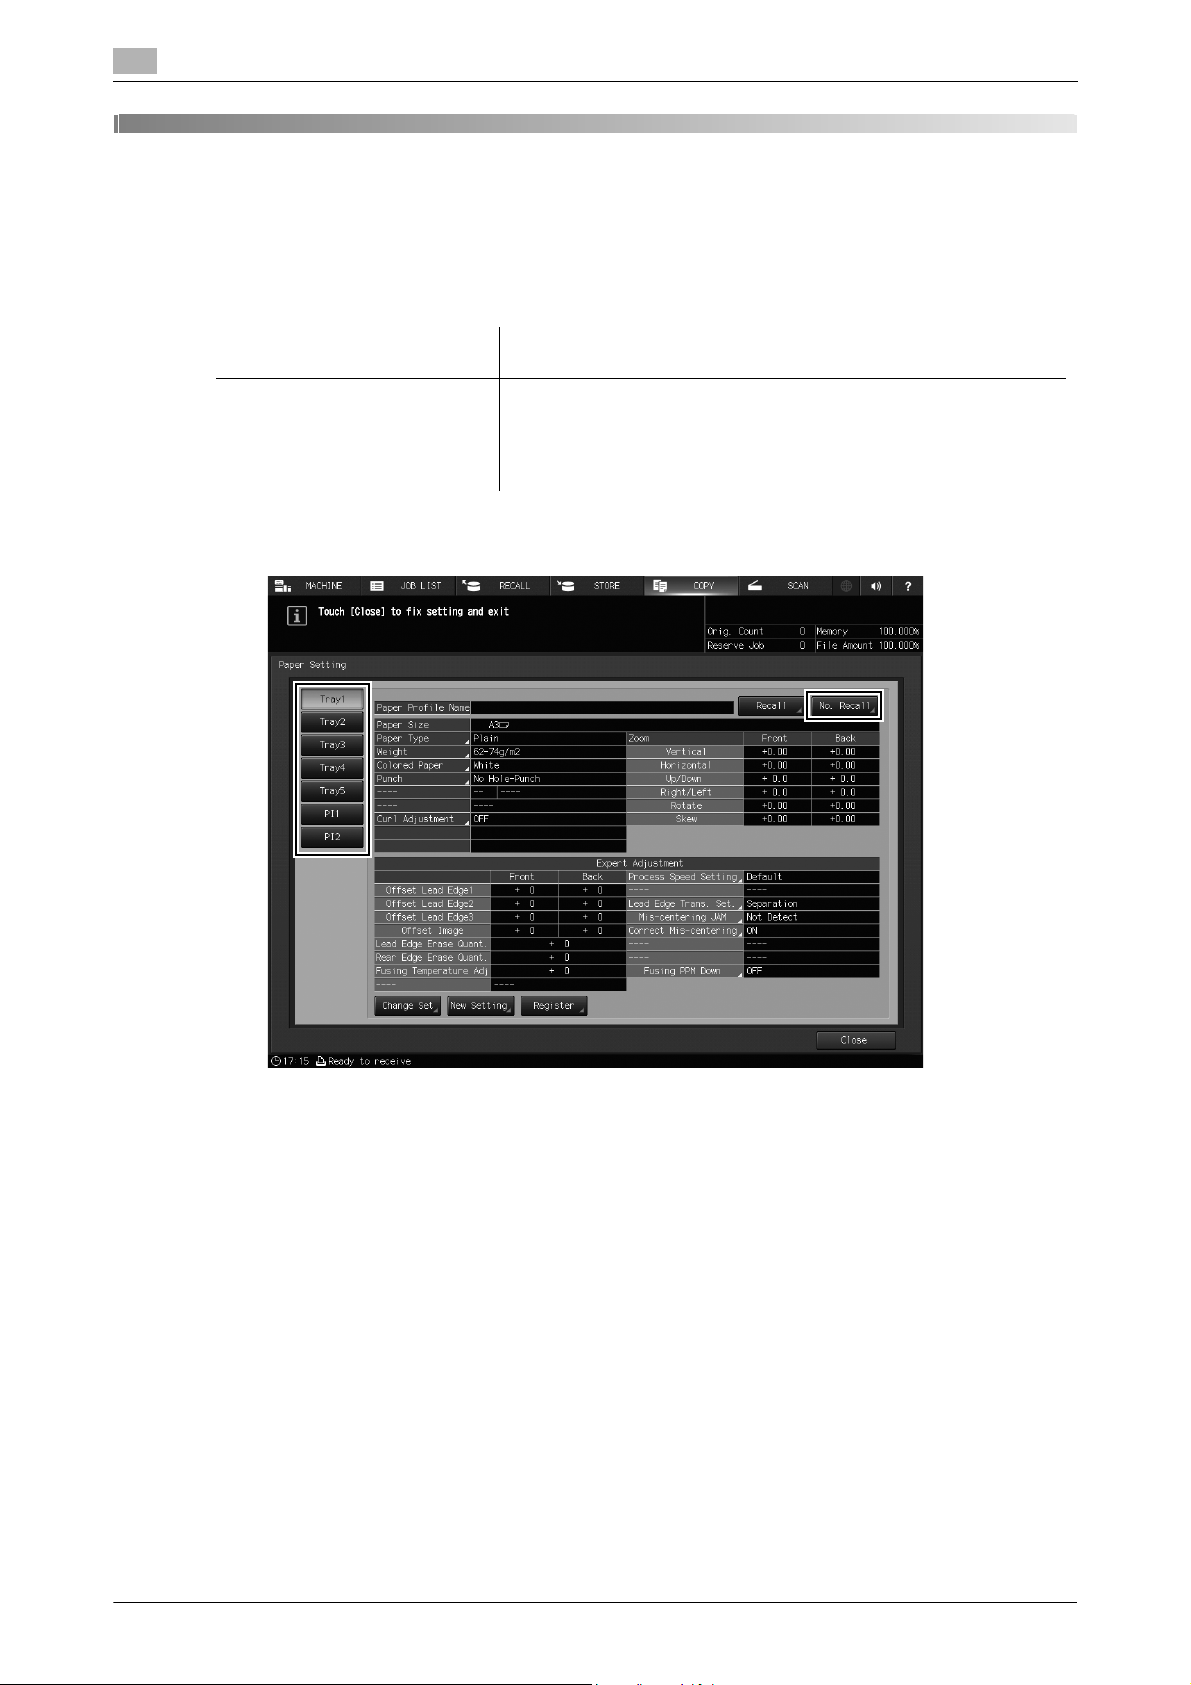
3
After the last original has been loaded, if you press [Bunch Done] or [Done&Division] without pressing
[Complete All] or you press [Bunch Done] on the [Program Job Edit] screen that is displayed by pressing
[Complete/Edit], press Mode Check on the control panel to return to the [Program Job Edit] screen.
Press [Complete All] to output job data.
bizhub PRO 1100 3-7

3
MEMO
Application
3.1
3-8 bizhub PRO 1100

4
Paper Setting
4
4 Paper Setting
4.1 Paper Setting: Setting Paper for Tray
<Errata>
Paper Setting: Setting Paper for Tray
4.1
User's guide / Correction position
<HTML User's Guide>
[Copy] ) [Basic Settings] ) [Paper Setting] ) [Paper Setting:
Setting Paper for Tray]
Steps 5 and 6
Description
Operation with the operation button changed and added.
* For details, refer to the following.
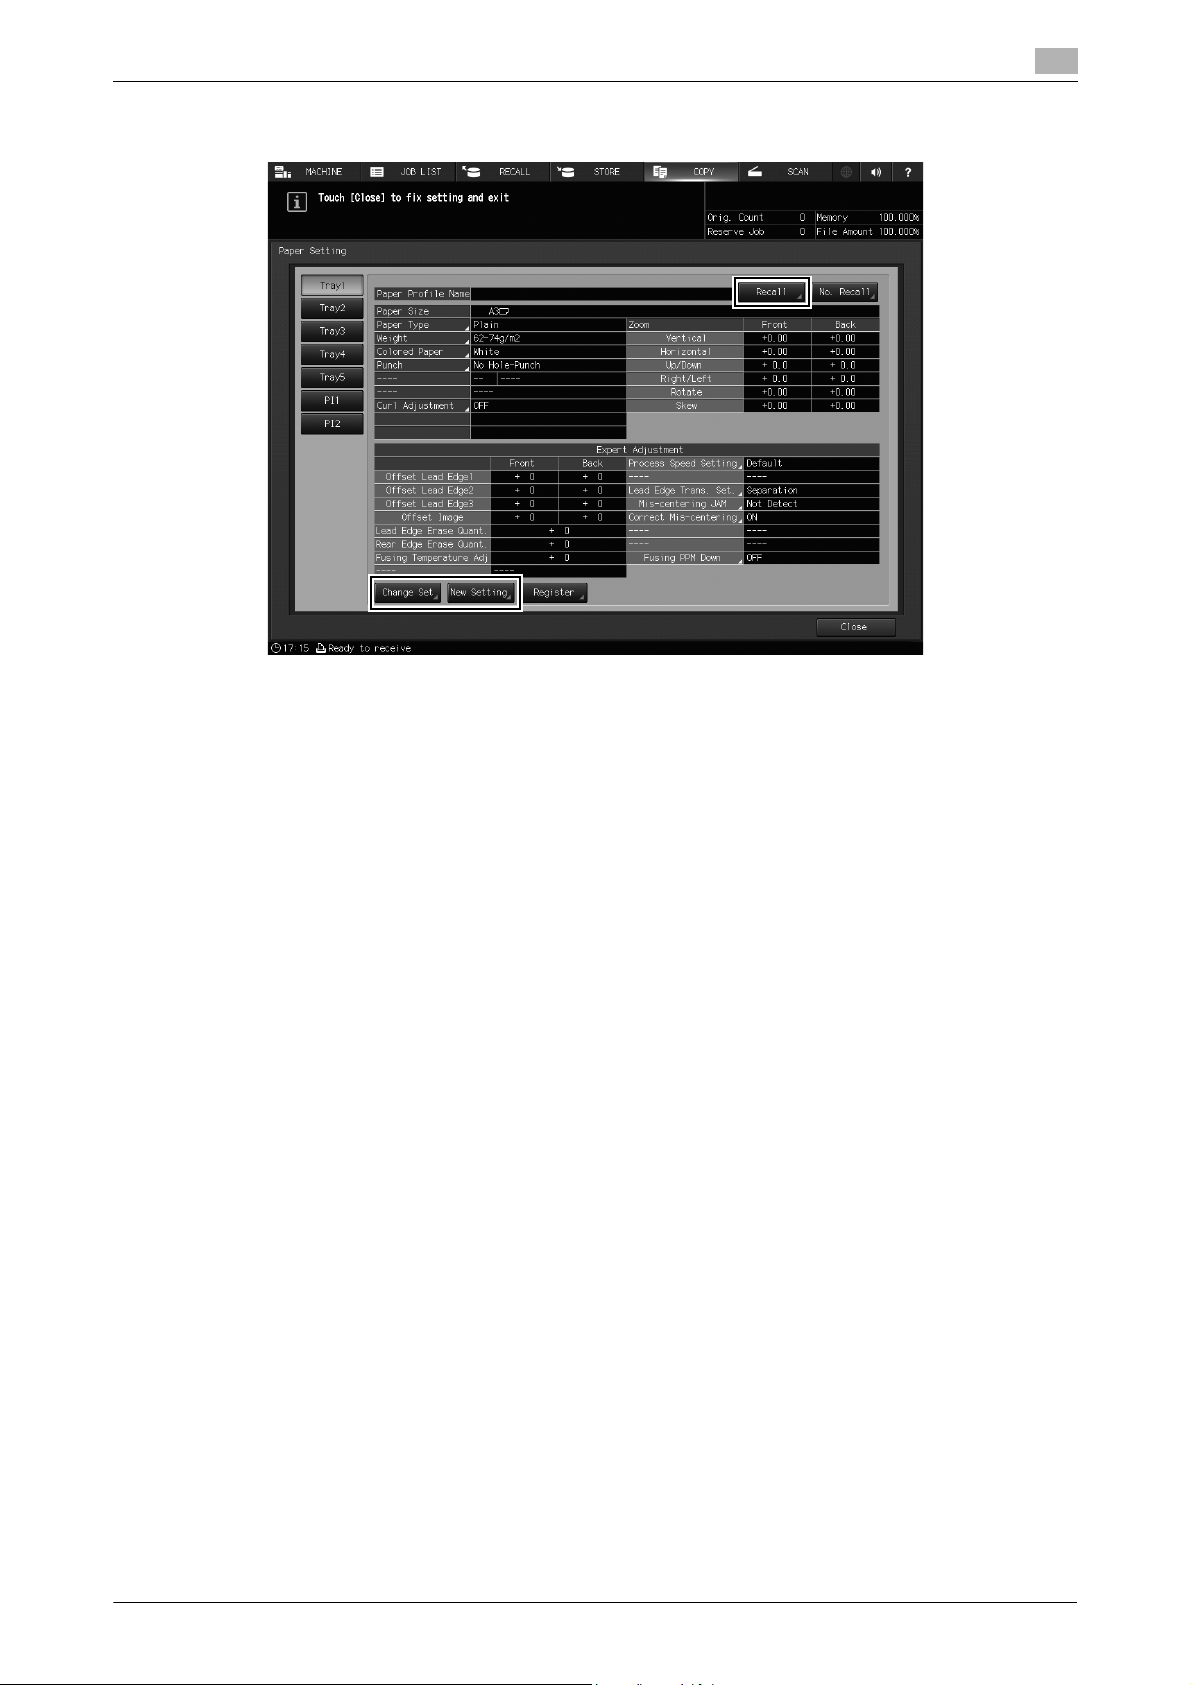
5 Press the tray key to change the Paper Setting.
% Tray keys are provided in the left side area of the [Paper Setting] screen. Pressing a tray key shows
the conditions specified for that tray in the right side.
% If the paper condition profile number to be recalled is known, press [No. Recall]. You can enter the
profile number and easily recall the profile for setting.
4-2 bizhub PRO 1100
4.1 Paper Setting: Setting Paper for Tray
6 Press [Recall], [Change Set], or [New Setting].
4
Pressing [Recall] displays the [Recall] screen, on which registered paper specifications can be selected.
Proceed to step 7.
Pressing [Change Set] or [New Setting] displays the [Change IndividualSet] screen to change the specifications individually. Proceed to step 11.
% Pressing [Change Set] displays the current setting.
% Pressing [New Setting] displays the defaults on the machine.
bizhub PRO 1100 4-3
4
Paper Setting: Registering the Paper Conditions
4.2 Paper Setting: Registering the Paper Conditions
<Errata>
4.2
User's guide / Correction position
<HTML User's Guide>
[Settings and Adjustments] )
[Utility/Counter] ) [User Setting]
) [System Setting] ) [Paper
Tray Setting] ) [Paper Setting:
Registering the Paper Conditions] )
[Adding/Editing the Paper Conditions Registration]
[Deleting the Paper Conditions]
[Importing Paper Setting Data]
[Exporting Paper Setting Data]
Step 2 in items above
Description
Operation correction by addition of an operation screen
* For details, refer to the following.
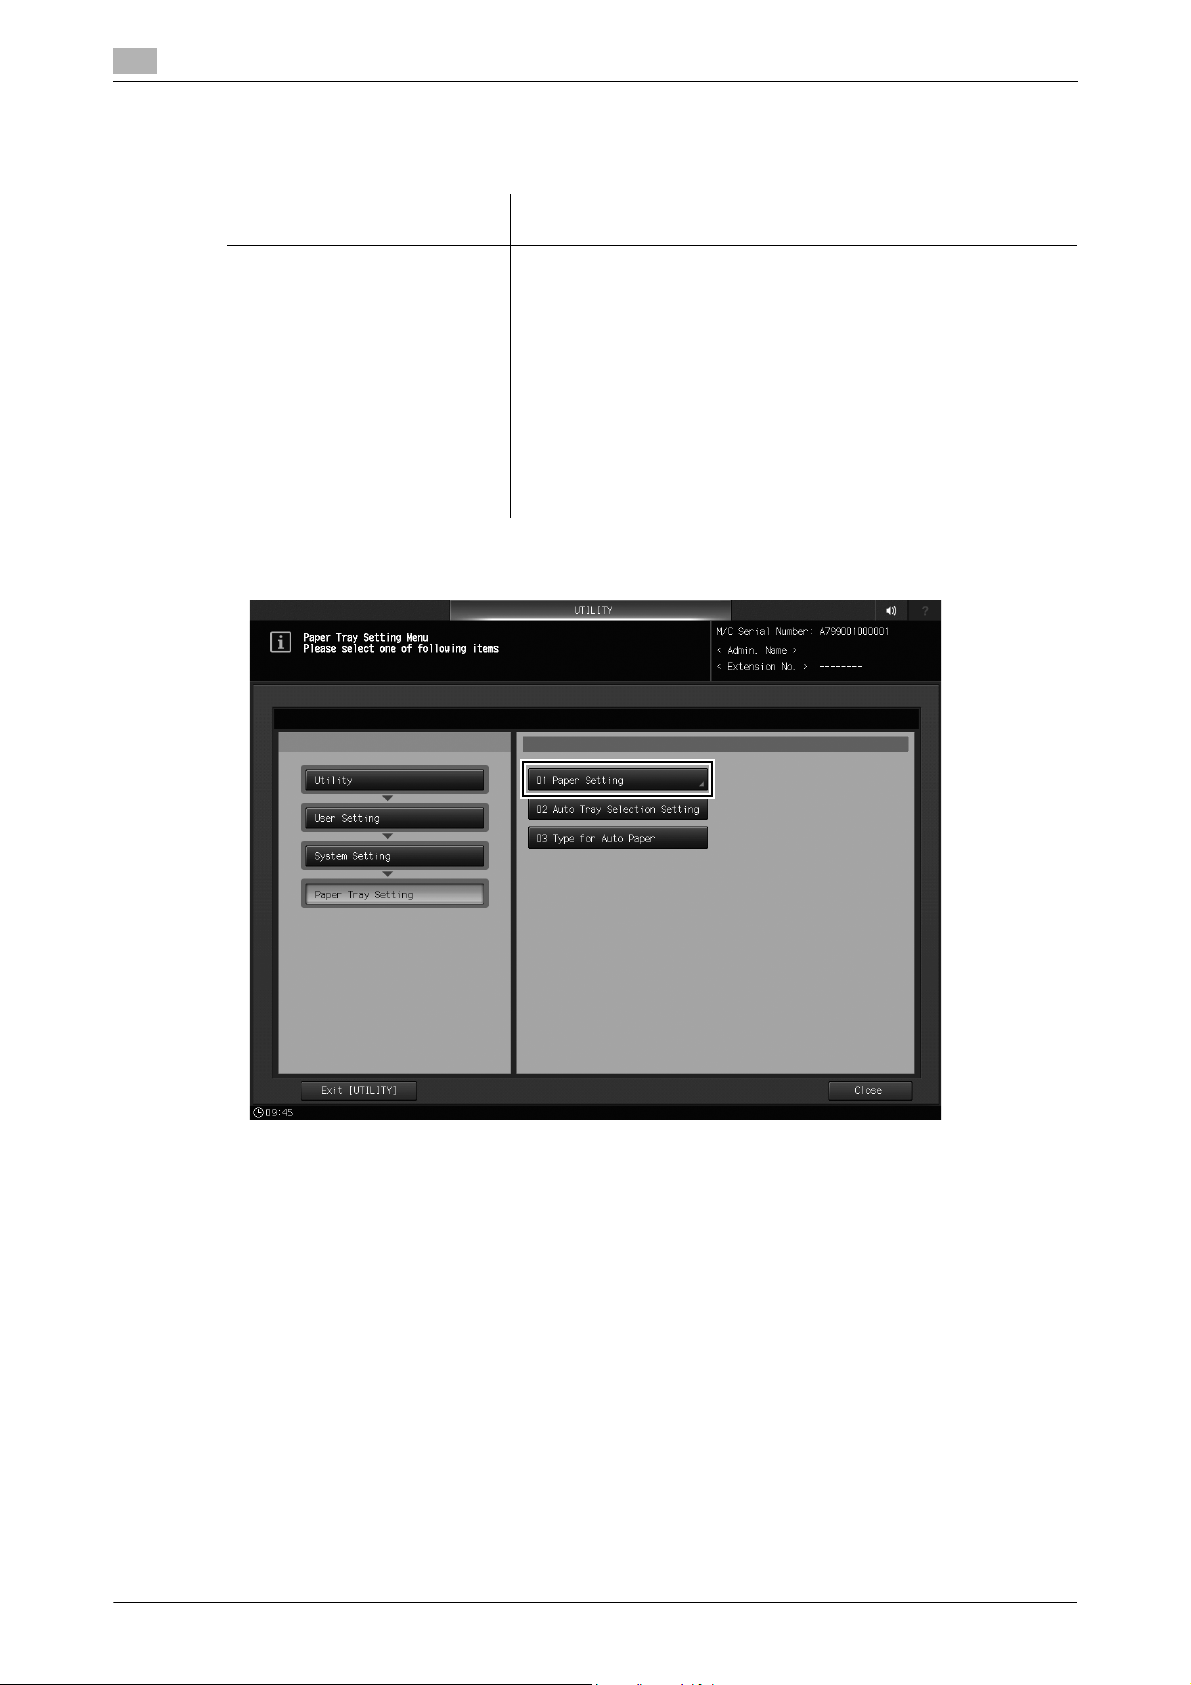
2 On the [User Setting Menu] screen, press [System Setting] ) [Paper Tray Setting] ) [Paper Setting].
4-4 bizhub PRO 1100
4.2 Paper Setting: Registering the Paper Conditions
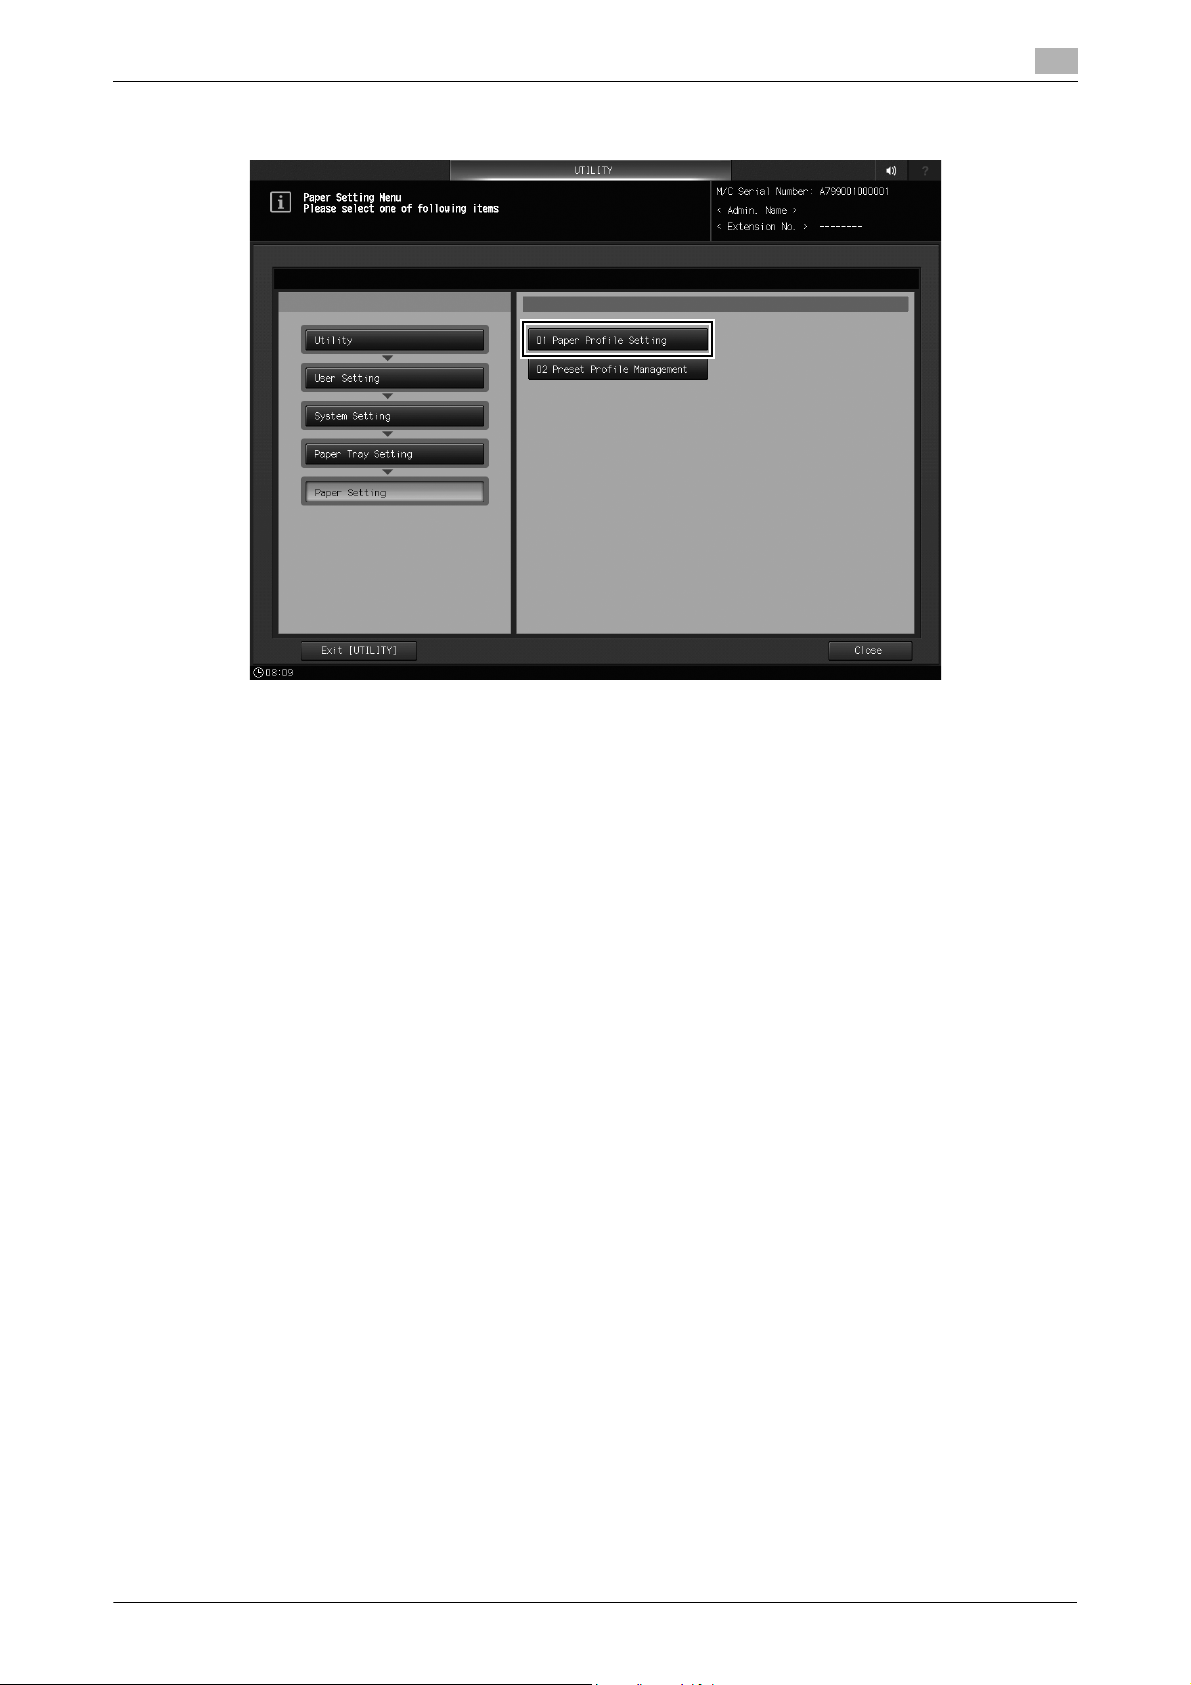
3 Press [Paper Profile Setting].
4
The [Register/Delete Paper Setting] screen is displayed.
% After this, read the user's guide while shifting steps one by one.
bizhub PRO 1100 4-5

4
MEMO
Paper Setting: Registering the Paper Conditions
4.2
4-6 bizhub PRO 1100

5
Paper Tray Setting
 Loading...