

Konica Minolta BIZHUB PRESS C1100, BIZHUB PRESS C1085 Daily Maintenance Manual
2016. 6
Aim of this manual
This manual describes the daily care, both sides adjustment and image quality adjustment
procedures. These daily adjustments are important for stable printings.
This manual will be useful to enable the full capabilities of this machine to realize stable
printings.
Notations and symbols used in this manual
NOTICE
This symbol indicates a risk that may result in damage to this machine or originals.
Follow the instructions to avoid property damage.
Tips
This symbol indicates information that complements the topic or optional devices required to use a certain function.
Reference
This symbol indicates a function or functions that are related to the topic.
This guide describes product names and system configurations as follows.
The meaning of other notations and symbols are as follows.
Notation/Symbol Description
[ ] These brackets indicate the name of a key on the touch panel or of a button on a
computer screen.
Bold Words in bold type indicate the name of a key on the control panel, of a part, of an
option, or of User's Guide.
CAUTION
This symbol indicates that negligence of the instructions may lead to mishandling that may cause injury
or property damage.
Product name Conventions used in this guide
bizhub PRESS C1100/C1085 This machine: Indicates the entire system including options and functions.
The main body: Indicates a main unit that covers printing functions.
The machine: Indicates a mechanical part related to the structure or mechanism.
Microsoft Windows Windows

i
bizhub PRESS C1100/C1085
Intended use of this machine
Intended use
This machine is designed to be used as a digital printing system for the following purposes:
- Print, copy and scan documents.
- Use available finishing functions such as duplexing, stapling, hole-punching, multi-folding and booklet creation
if appropriate options are installed.
- Store documents to reprint on the HDD of this machine.
The intended use also requires that:
- The system is used within the limits of device specifications and specifications of optional components,
- All safety instructions in the related user's guides are observed,
- Legal restrictions on copying or printing (refer to instruction booklet "Safety Information") are observed,
- Inspection and maintenance instructions are adhered to,
- General, national and company safety provisions are observed.
Impermissible operating conditions
The system may not be operated if:
- Errors or damage have been discovered,
- Maintenance intervals have been exceeded,
- Mechanical or electrical functions do not work as they should.
Exclusion of liability
The manufacturer of the system assumes no liability for damages if the system was operated under impermissible
conditions.
Target groups
The Daily Maintenance Guide are intended for the following users of this machine:
- Operator: Person who has been trained by Konica Minolta or authorized partner to operate the system for its
intended use as well as manage consumables, and perform the maintenance and troubleshooting described in
user's guides.
Everyone who uses this system must have read and understood the related user's guides.

ii
Contents
Intended use of this machine . . . . . . . . . . . . . . . . . . . . . . . . . . . . . . . . . . . . . . . . . . . . . . . . . . . i
Intended use. . . . . . . . . . . . . . . . . . . . . . . . . . . . . . . . . . . . . . . . . . . . . . . . . . . . . . . . . . . . . . i
Impermissible operating conditions . . . . . . . . . . . . . . . . . . . . . . . . . . . . . . . . . . . . . . . . . . . . i
Exclusion of liability . . . . . . . . . . . . . . . . . . . . . . . . . . . . . . . . . . . . . . . . . . . . . . . . . . . . . . . . i
Target groups . . . . . . . . . . . . . . . . . . . . . . . . . . . . . . . . . . . . . . . . . . . . . . . . . . . . . . . . . . . . . . . i
Contents . . . . . . . . . . . . . . . . . . . . . . . . . . . . . . . . . . . . . . . . . . . . . . . . . . . . . . . . . . . . . . . . . . . ii
1 DAILY CARE
About daily care . . . . . . . . . . . . . . . . . . . . . . . . . . . . . . . . . . . . . . . . . . . . . . . . . . . . . . . . . . . 1-1
Cleaning timing. . . . . . . . . . . . . . . . . . . . . . . . . . . . . . . . . . . . . . . . . . . . . . . . . . . . . . . . . . 1-1
Cleaning the duplex section . . . . . . . . . . . . . . . . . . . . . . . . . . . . . . . . . . . . . . . . . . . . . . . . . . 1-2
Cleaning section of the duplex section . . . . . . . . . . . . . . . . . . . . . . . . . . . . . . . . . . . . . . . 1-2
Cleaning procedure . . . . . . . . . . . . . . . . . . . . . . . . . . . . . . . . . . . . . . . . . . . . . . . . . . . . . . 1-2
Cleaning the centering sensor (Paper feeder unit PF-707/PF-708) . . . . . . . . . . . . . . . . . . . . 1-6
Cleaning the roller of the humidification section
(Relay conveyance unit RU-511). . . . . . . . . . . . . . . . . . . . . . . . . . . . . . . . . . . . . . . . . . . . . . . 1-7
2 BOTH SIDES ADJUSTMENT
About both sides adjustment . . . . . . . . . . . . . . . . . . . . . . . . . . . . . . . . . . . . . . . . . . . . . . . . . 2-1
Adjustment flow
when using a new paper brand, a new paper weight, or a new paper size . . . . . . . . . . . . . . 2-1
Adjustment timing . . . . . . . . . . . . . . . . . . . . . . . . . . . . . . . . . . . . . . . . . . . . . . . . . . . . . . . 2-1
Adjustment order . . . . . . . . . . . . . . . . . . . . . . . . . . . . . . . . . . . . . . . . . . . . . . . . . . . . . . . . 2-1
Regular adjustment flow . . . . . . . . . . . . . . . . . . . . . . . . . . . . . . . . . . . . . . . . . . . . . . . . . . . . . 2-2
Adjustment timing . . . . . . . . . . . . . . . . . . . . . . . . . . . . . . . . . . . . . . . . . . . . . . . . . . . . . . . 2-2
Adjustment order . . . . . . . . . . . . . . . . . . . . . . . . . . . . . . . . . . . . . . . . . . . . . . . . . . . . . . . . 2-2
Adjustment flow for each job . . . . . . . . . . . . . . . . . . . . . . . . . . . . . . . . . . . . . . . . . . . . . . . . . 2-2
Adjustment timing . . . . . . . . . . . . . . . . . . . . . . . . . . . . . . . . . . . . . . . . . . . . . . . . . . . . . . . 2-2
Adjustment order . . . . . . . . . . . . . . . . . . . . . . . . . . . . . . . . . . . . . . . . . . . . . . . . . . . . . . . . 2-2
Contents of both sides adjustment items. . . . . . . . . . . . . . . . . . . . . . . . . . . . . . . . . . . . . . . . 2-3
Placing paper . . . . . . . . . . . . . . . . . . . . . . . . . . . . . . . . . . . . . . . . . . . . . . . . . . . . . . . . . . . 2-3
Front side adjustment . . . . . . . . . . . . . . . . . . . . . . . . . . . . . . . . . . . . . . . . . . . . . . . . . . . . 2-6
Gap adjustment (When not using PF-708 scanner) . . . . . . . . . . . . . . . . . . . . . . . . . . . . . 2-11
Scan measurement adjustment (When using PF-708 Scanner). . . . . . . . . . . . . . . . . . . . 2-16
Registering the paper profile . . . . . . . . . . . . . . . . . . . . . . . . . . . . . . . . . . . . . . . . . . . . . . 2-24
Back side fine adjustment . . . . . . . . . . . . . . . . . . . . . . . . . . . . . . . . . . . . . . . . . . . . . . . . 2-26
3 IMAGE QUALITY ADJUSTMENT
3.1 Image quality adjustment for Image Controller IC-602 . . . . . . . . . . . . . . . . . . . . . . . . . . . . . . . . 3-1
About Quality Adjustment. . . . . . . . . . . . . . . . . . . . . . . . . . . . . . . . . . . . . . . . . . . . . . . . . . . . 3-1
Regular adjustment flow (High accuracy) . . . . . . . . . . . . . . . . . . . . . . . . . . . . . . . . . . . . . . . . 3-2
Adjustment timing . . . . . . . . . . . . . . . . . . . . . . . . . . . . . . . . . . . . . . . . . . . . . . . . . . . . . . . 3-2
Adjustment order . . . . . . . . . . . . . . . . . . . . . . . . . . . . . . . . . . . . . . . . . . . . . . . . . . . . . . . . 3-2
Adjustment flow when changing the screen. . . . . . . . . . . . . . . . . . . . . . . . . . . . . . . . . . . . . . 3-3
Adjustment timing . . . . . . . . . . . . . . . . . . . . . . . . . . . . . . . . . . . . . . . . . . . . . . . . . . . . . . . 3-3
Adjustment order . . . . . . . . . . . . . . . . . . . . . . . . . . . . . . . . . . . . . . . . . . . . . . . . . . . . . . . . 3-3
Contents of the image quality adjustment items . . . . . . . . . . . . . . . . . . . . . . . . . . . . . . . . . . 3-4
Change setting of Custom Screen . . . . . . . . . . . . . . . . . . . . . . . . . . . . . . . . . . . . . . . . . . . 3-4
Gamma Automatic Adjustment . . . . . . . . . . . . . . . . . . . . . . . . . . . . . . . . . . . . . . . . . . . . . 3-6
Density Balance Adjustment (for i1Pro/i1Pro2/ES-1000/ES-2000) . . . . . . . . . . . . . . . . . . 3-7
Density Balance Adjustment (for FD-5BT) . . . . . . . . . . . . . . . . . . . . . . . . . . . . . . . . . . . . 3-16
Added procedures of Density Balance Adjustment
(Registration of color measurement data using a USB memory). . . . . . . . . . . . . . . . . . . 3-24
Maximum Density Auto Adjustment (RU). . . . . . . . . . . . . . . . . . . . . . . . . . . . . . . . . . . . . 3-26

iii
bizhub PRESS C1100/C1085
Check setting of Color Density Control . . . . . . . . . . . . . . . . . . . . . . . . . . . . . . . . . . . . . . 3-28
Color Density Manual Control . . . . . . . . . . . . . . . . . . . . . . . . . . . . . . . . . . . . . . . . . . . . . 3-31
Exact Color (for i1Pro/i1Pro2/ES-1000/ES-2000, or FD-5BT) . . . . . . . . . . . . . . . . . . . . . 3-33
G7 Calibration (for i1Pro/i1Pro2/ES-1000/ES-2000, or FD-5BT) . . . . . . . . . . . . . . . . . . . 3-39
3.2 Image quality adjustment for Image Controller IC-308/IC-310 . . . . . . . . . . . . . . . . . . . . . . . . . 3-45
About Quality Adjustment . . . . . . . . . . . . . . . . . . . . . . . . . . . . . . . . . . . . . . . . . . . . . . . . . . . 3-45
Regular adjustment flow (High accuracy) . . . . . . . . . . . . . . . . . . . . . . . . . . . . . . . . . . . . . . . 3-45
Adjustment timing. . . . . . . . . . . . . . . . . . . . . . . . . . . . . . . . . . . . . . . . . . . . . . . . . . . . . . . 3-45
Adjustment order . . . . . . . . . . . . . . . . . . . . . . . . . . . . . . . . . . . . . . . . . . . . . . . . . . . . . . . 3-45
Adjustment flow when changing the screen . . . . . . . . . . . . . . . . . . . . . . . . . . . . . . . . . . . . . 3-46
Adjustment timing. . . . . . . . . . . . . . . . . . . . . . . . . . . . . . . . . . . . . . . . . . . . . . . . . . . . . . . 3-46
Adjustment order . . . . . . . . . . . . . . . . . . . . . . . . . . . . . . . . . . . . . . . . . . . . . . . . . . . . . . . 3-46
Contents of the image quality adjustment items . . . . . . . . . . . . . . . . . . . . . . . . . . . . . . . . . 3-47
Change setting of Custom Screen . . . . . . . . . . . . . . . . . . . . . . . . . . . . . . . . . . . . . . . . . . 3-47
Gamma Automatic Adjustment . . . . . . . . . . . . . . . . . . . . . . . . . . . . . . . . . . . . . . . . . . . . 3-49
Density Balance Adjustment (for i1Pro/i1Pro2/ES-1000/ES-2000) . . . . . . . . . . . . . . . . . 3-50
Added procedures of Density Balance Adjustment
(Registration of color measurement data using a USB memory) . . . . . . . . . . . . . . . . . . . 3-59
Maximum Density Auto Adjustment (RU) . . . . . . . . . . . . . . . . . . . . . . . . . . . . . . . . . . . . . 3-61
Check setting of Color Density Control . . . . . . . . . . . . . . . . . . . . . . . . . . . . . . . . . . . . . . 3-63
Color Density Manual Control . . . . . . . . . . . . . . . . . . . . . . . . . . . . . . . . . . . . . . . . . . . . . 3-66
Controller Calibration (IC-308/IC-310) . . . . . . . . . . . . . . . . . . . . . . . . . . . . . . . . . . . . . . . 3-68

1-1
1 DAILY CARE
About daily care
To reproduce stable output by this machine, be sure to clean the machine before output.
)
Cleaning timing
Check the cleaning section every day before you activate the power of the machine.
Clean the cleaning section when the cleaning section is dirty.
Cleaning section Reference
Duplex section P.1-2
Centering sensor (Paper feeder unit PF-707/PF-708) P.1-6
Roller of the humidification section (Relay conveyance unit RU-511) P.1-7
1-2
bizhub PRESS C1100/C1085
1
Cleaning the duplex section
CAUTION
Be sure to check the cleaning section before you activate the power of the main body.
If you activate the power with closed the door of the main body, the inside of the fusing unit becomes hot. Therefore,
you possibly get burned when you clean near the fusing unit.
)
Cleaning section of the duplex section
- Upper side of the duplex section
- Paper path of the registration unit
- Pre-fusing guide plate
- Fusing unit entrance guide
- Paper path of the duplex unit
- Paper path inside the jam processing guide
NOTICE
- Be careful not to drop any dirt inside the machine when you clean the machine.
)
Cleaning procedure
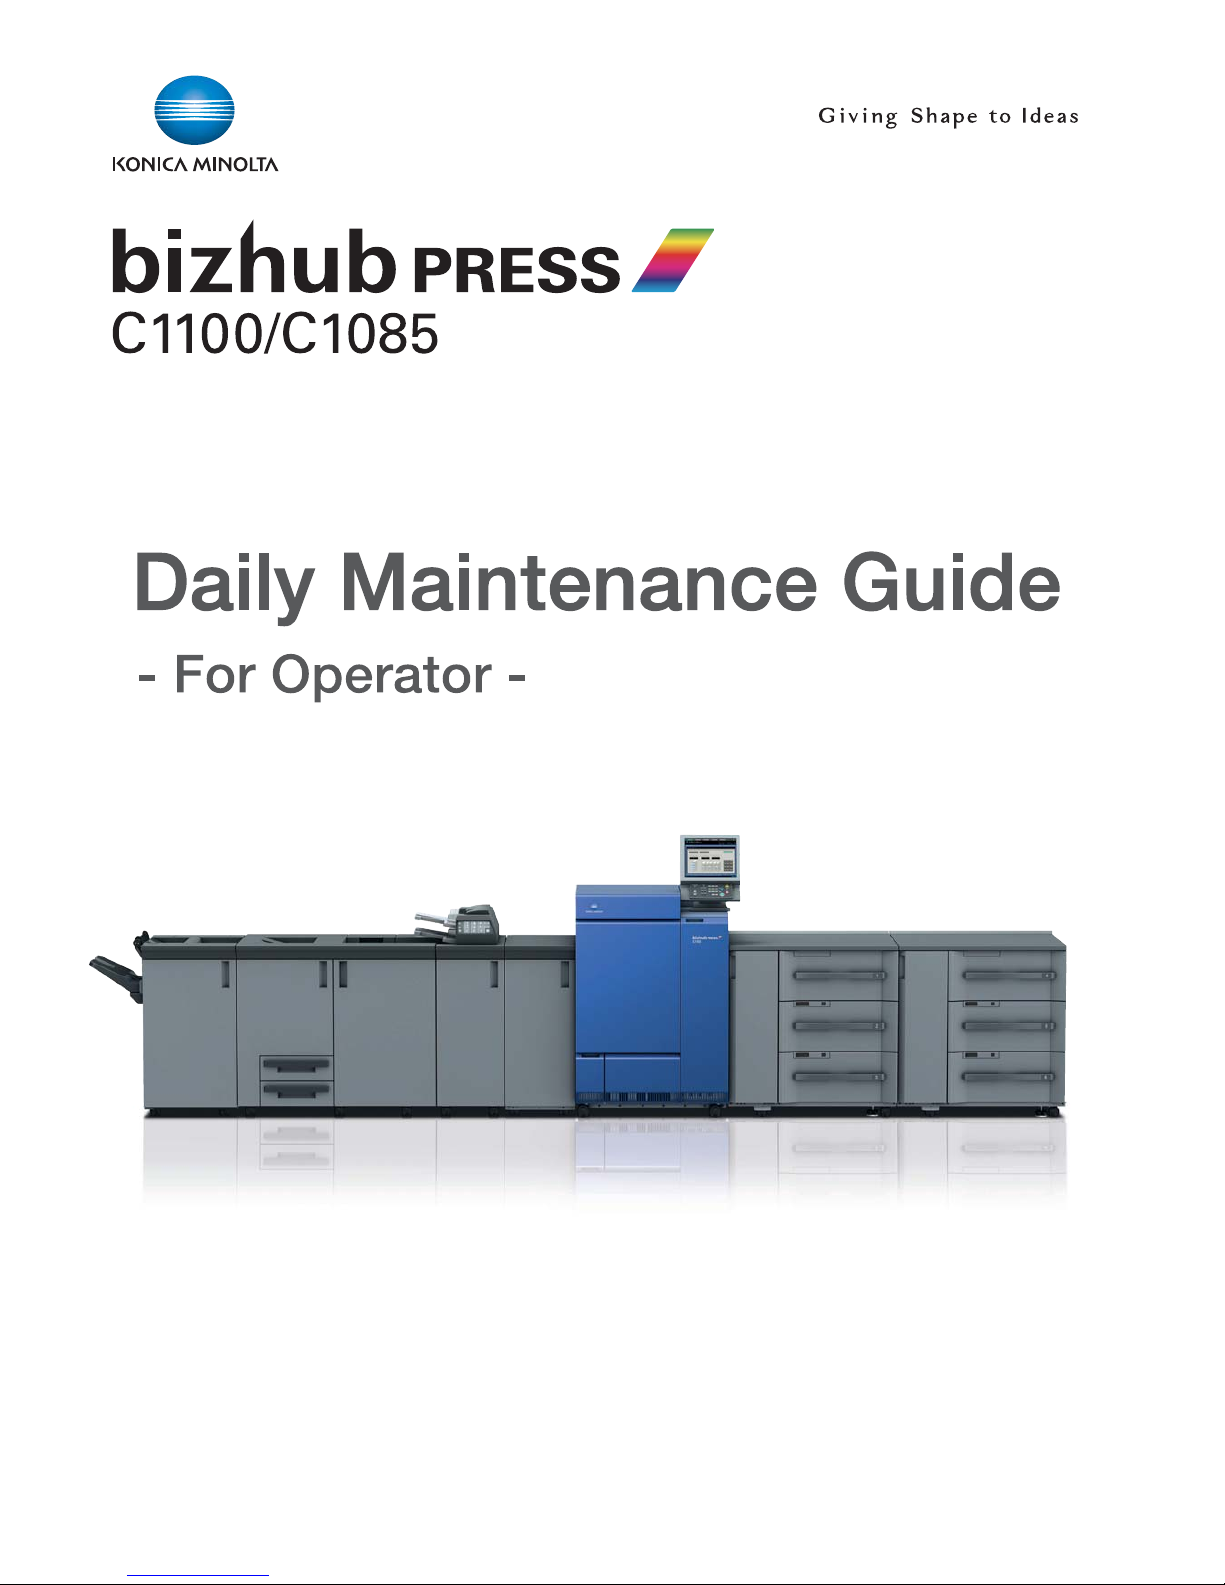
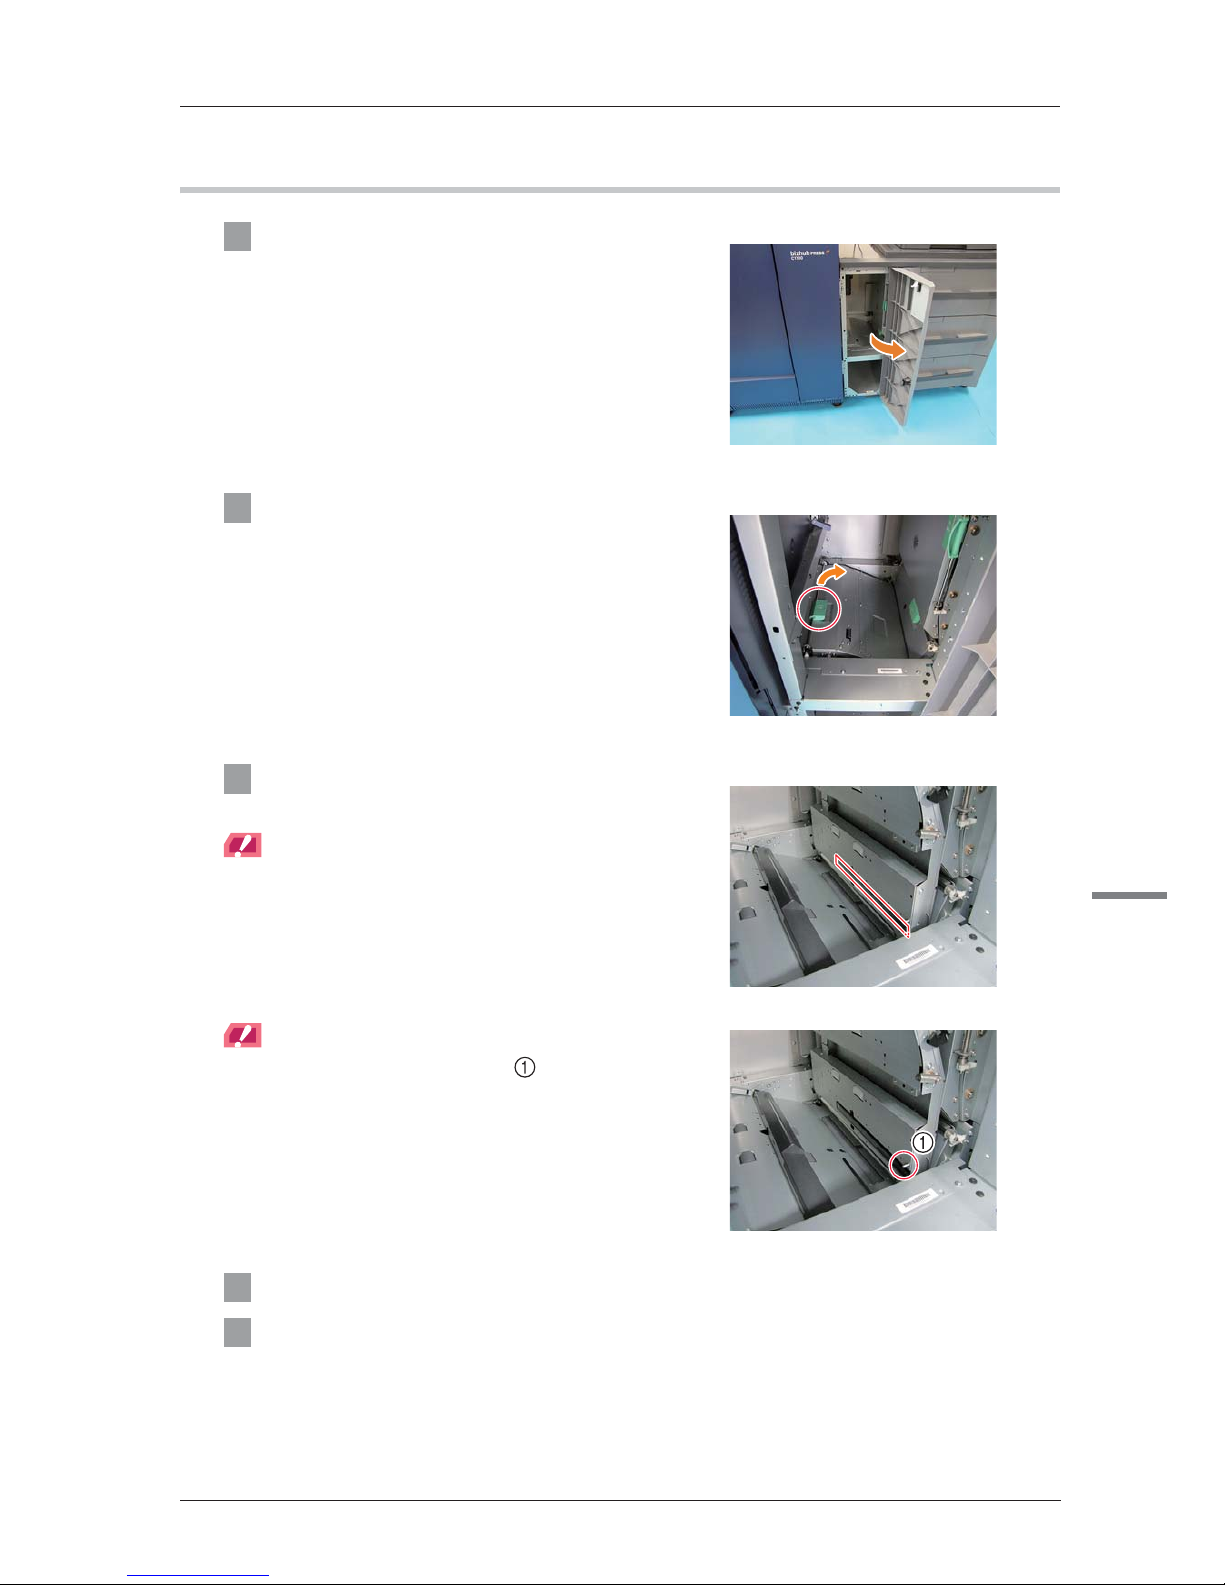
1 Open the right door and the left door of
the main body.
2 Activate the main power switch, then activate the sub power switch.
1-3
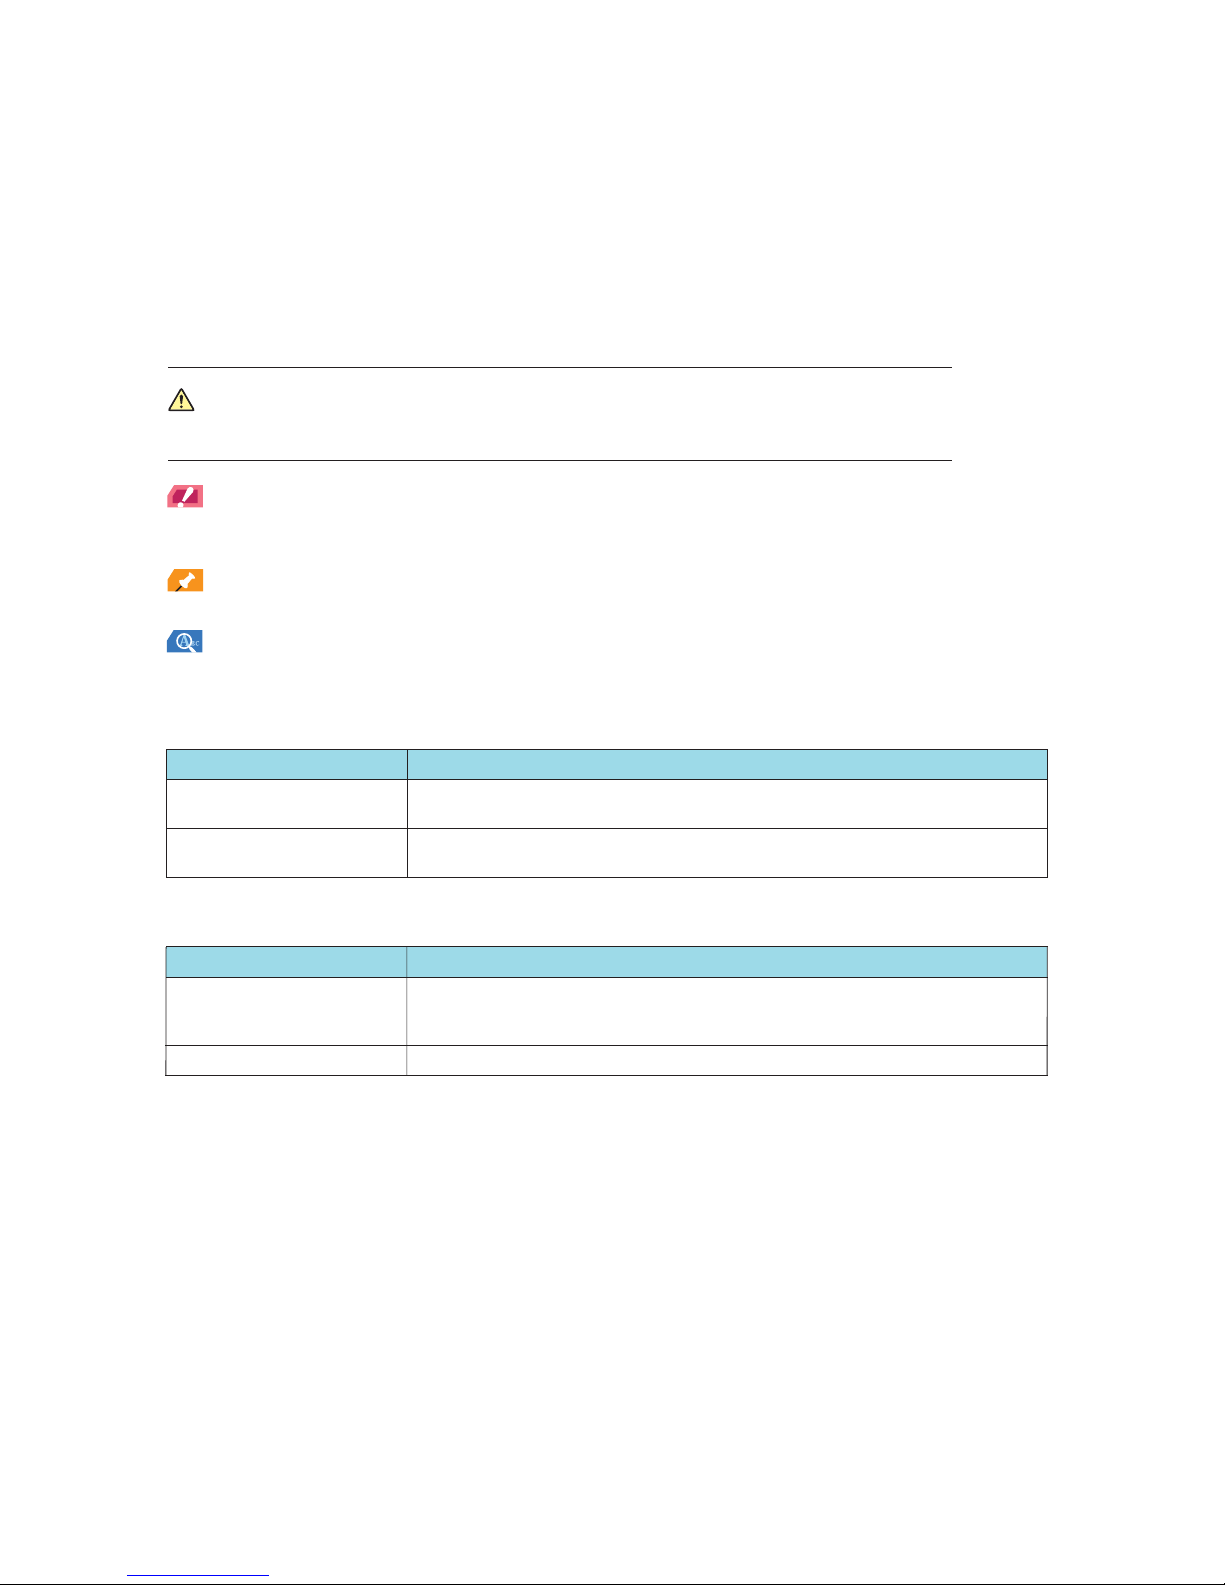
3 Tilt the lever [M1] counterclockwise.
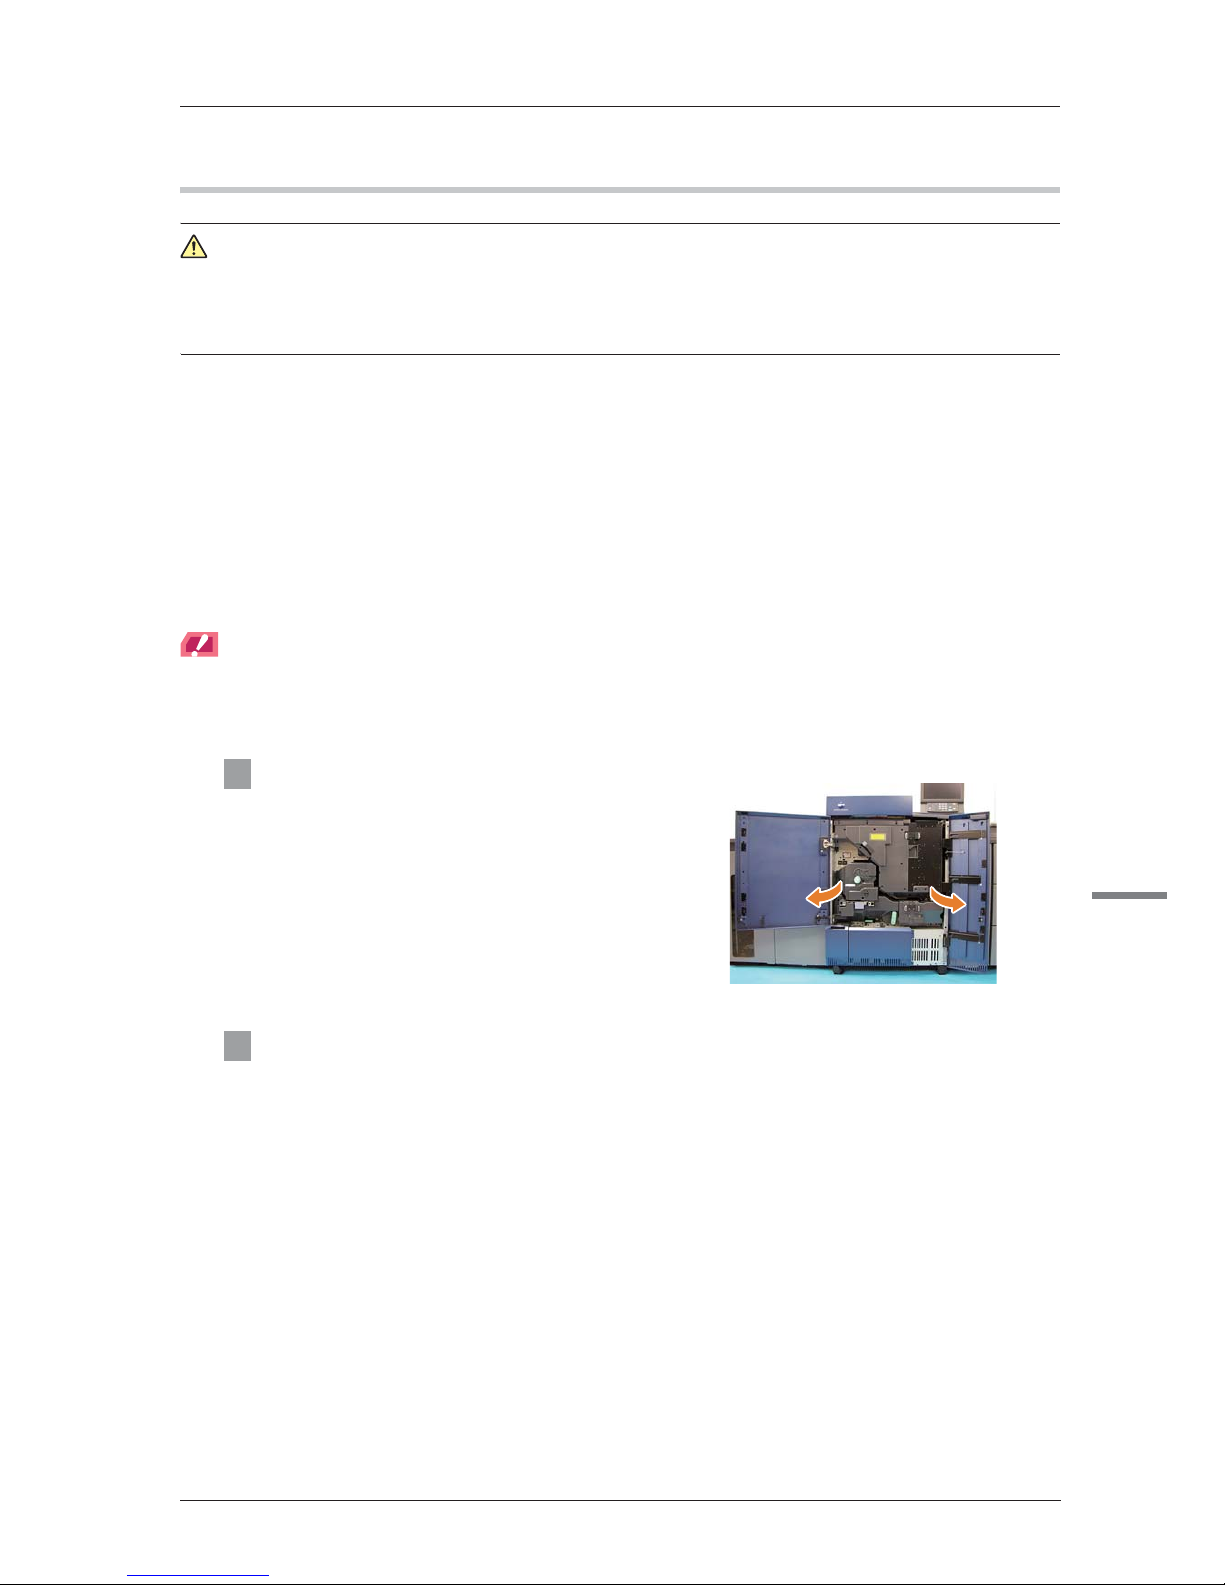
4 Hold the lever [M1], and pull out the
duplex section.
5 Deactivate the sub power switch, then deactivate the main power switch.
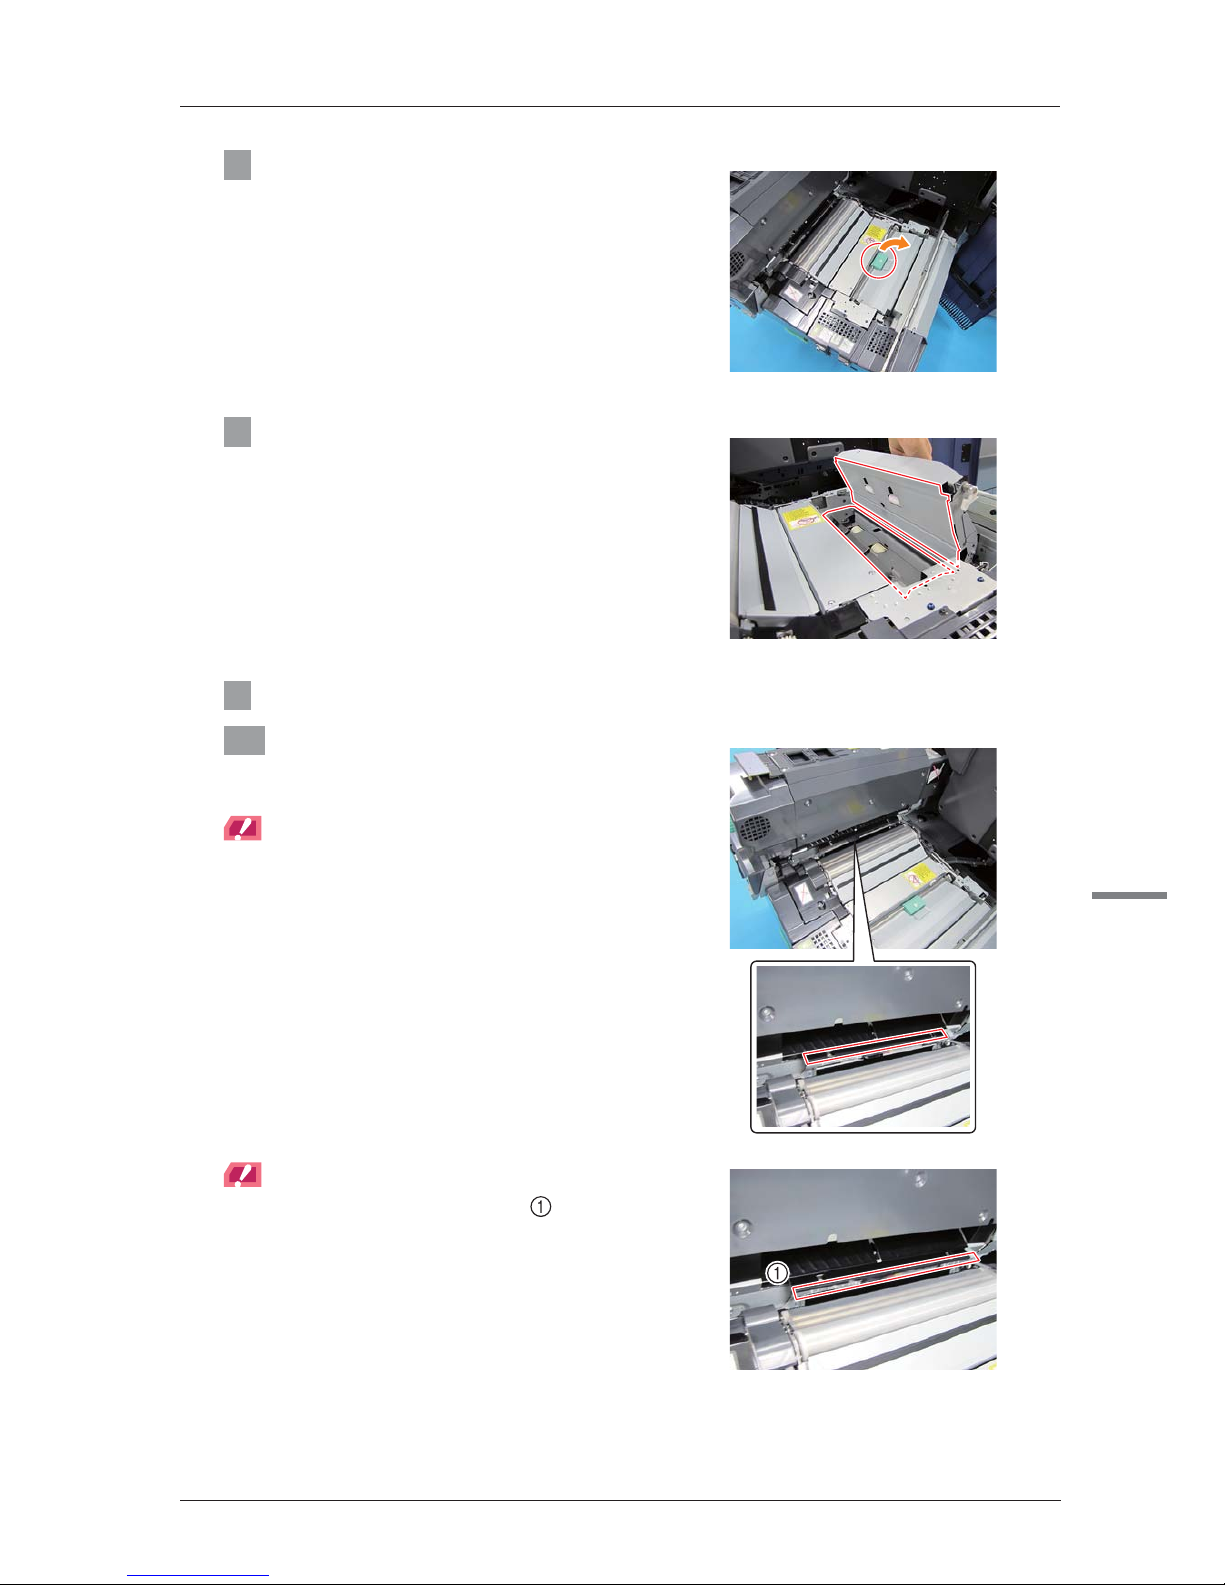
6 Wipe off the dirt at the upper side of the
duplex section with a hydro-wipe (nonwoven fabric without fluff).
NOTICE
- Do not use alcohol when you clean the upper side of
the duplex section.
- Be sure to clean the duplex section in an axial
direction. If you clean the unit in the paper feed
direction, toner drops on the paper path.
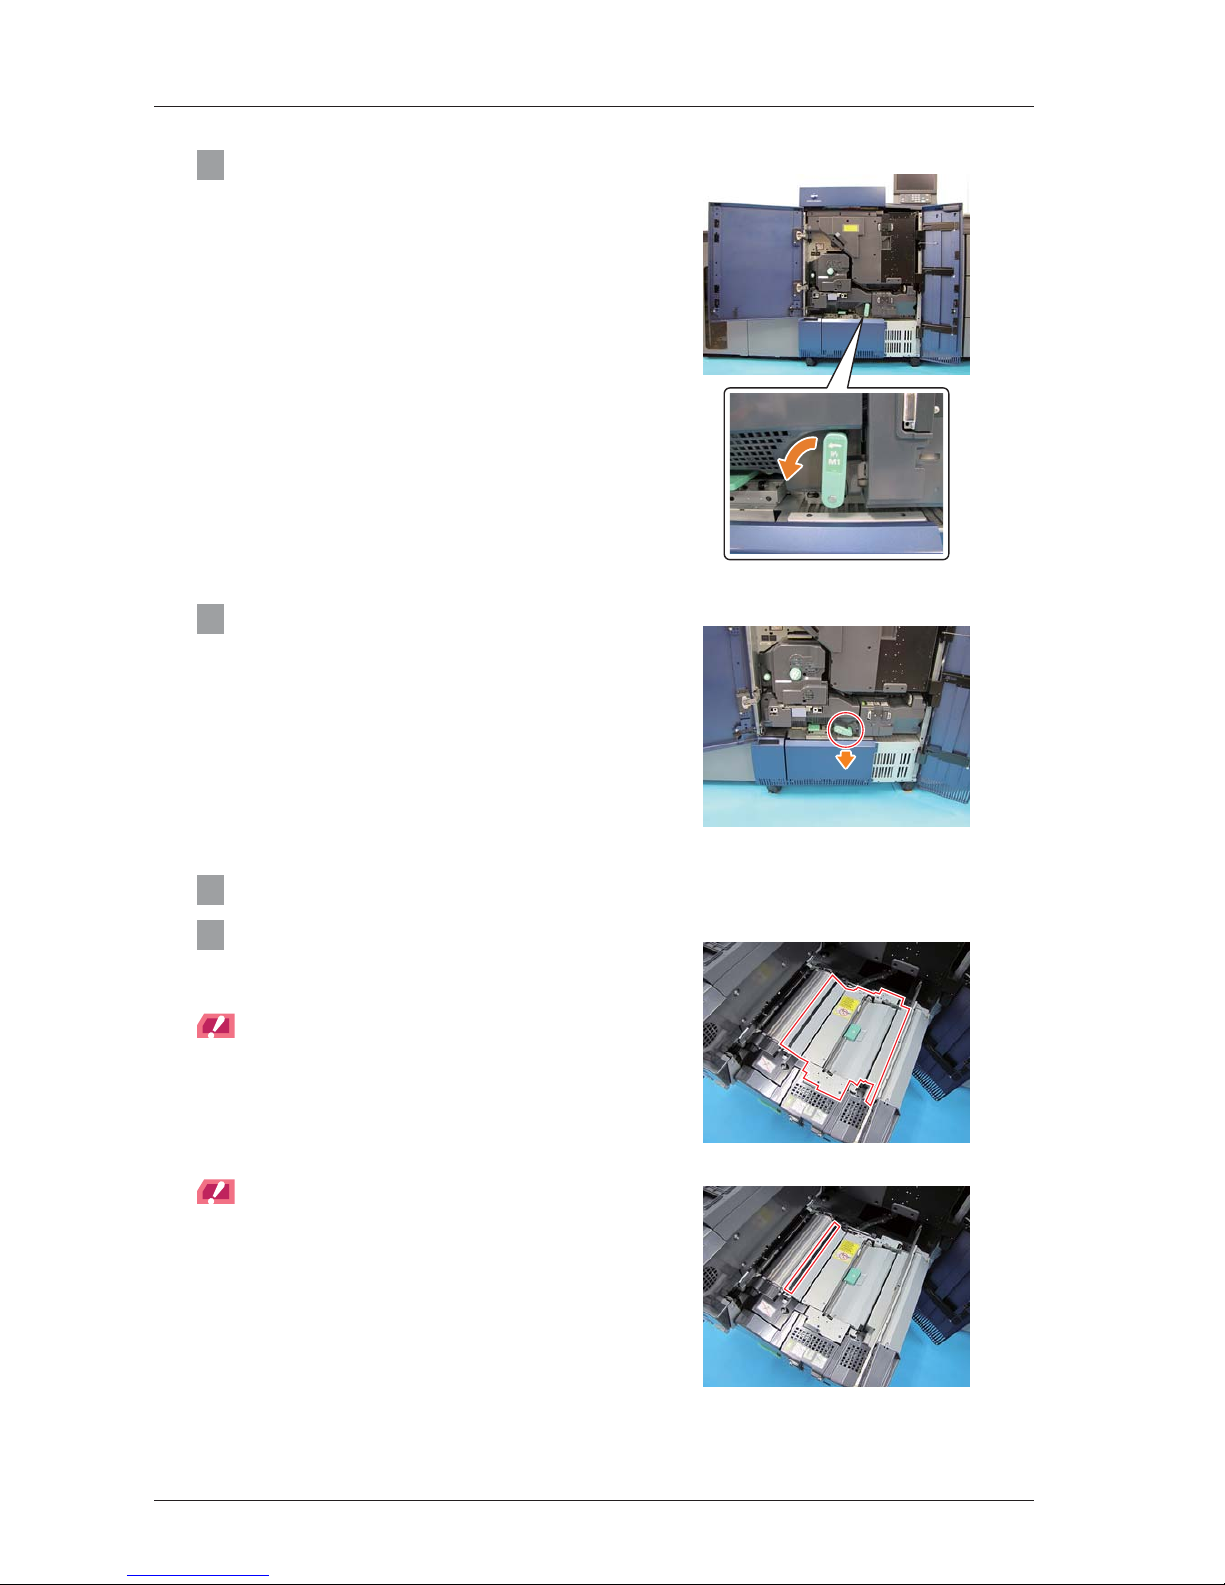
NOTICE
- Be sure to clean the duplex section so that the sheet
at the upper side of the duplex section does not
deform.
1-4
bizhub PRESS C1100/C1085
1
7 Open the cover [M3].
8 Wipe off the dirt at the paper path of the
registration unit with a hydro-wipe (nonwoven fabric without fluff).
9 Close the cover [M3].
10 Wipe off the dirt at the pre-fusing guide
plate with a hydro-wipe (non-woven
fabric without fluff).
NOTICE
- Do not use alcohol when you clean the pre-fusing
guide plate.
NOTICE
- Be careful not to deform the sheet ( ) at the
entrance of the fusing unit when you clean the prefusing guide plate.

1-5
11 Moisten the hydro-wipe (non-woven
fabric without fluff) with isopropyl
alcohol, and clean the dirt of the fusing
unit entrance guide.
12 Hold the lever [M8], and open the paper
path of the duplex unit.
13 Moisten the hydro-wipe (non-woven
fabric without fluff) with isopropyl
alcohol, and clean the dirt of the paper
path of the duplex unit.
14 Hold the lever [M9] and open the jam
processing guide. Then, moisten the
hydro-wipe (non-woven fabric without
fluff) with isopropyl alcohol, and clean the
dirt of the paper path inside the guide.
15 Close the jam processing guide, and close the duplex unit.
16 Push the duplex section into the main body, and move the lever [M1] to the initial
position.
17 Close the left door and the right door of the main body
1-6
bizhub PRESS C1100/C1085
1
Cleaning the centering sensor (Paper feeder unit PF-707/PF-708)
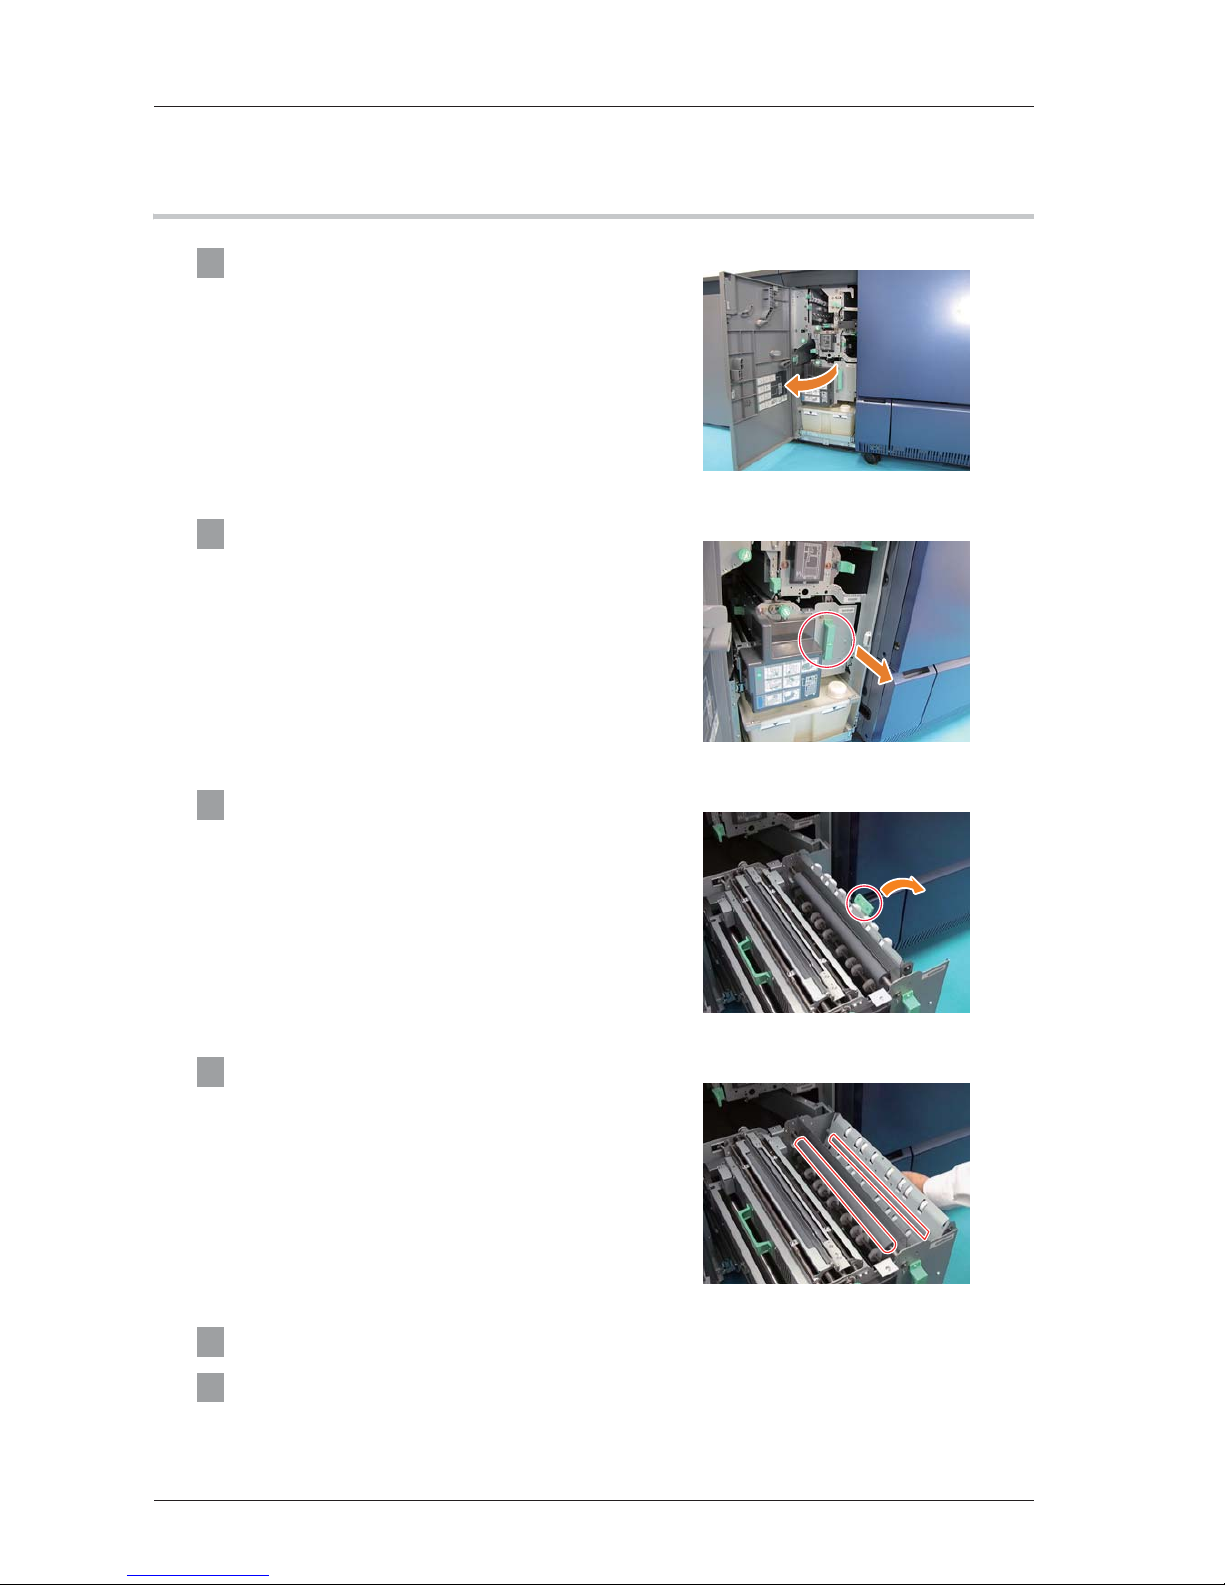
1 Open the front door of the paper feeder
unit.
2 Open the cover [PF4].
3 Clean the centering sensor with a
cleaning pad.
NOTICE
- Do not use alcohol when you clean the sensor. The
surface of the sensor becomes fuzzy.
NOTICE
- Do not touch the positioning pin ( ) with the
cleaning pad since there is grease on the pin.
4 Close the cover [PF4]
5 Close the front door of the paper feeder unit.
1-7
Cleaning the roller of the humidification section
(Relay conveyance unit RU-511)
1 Open the front door of the relay
conveyance unit.
2 Hold the handle [HM1], and pull out the
humidification unit.
3 Hold the lever [HM2], and open the paper
path.
4 Moisten the cleaning pad with isopropyl
alcohol, and clean the roller.
5 Hold the handle [HM1], and move the humidification unit to the initial position.
6 Close the front door of the relay conveyance unit.
2-1
bizhub PRESS C1100/C1085
2
2 BOTH SIDES ADJUSTMENT
About both sides adjustment
To maintain stable both sides accuracy against a change in ambient temperature or humidity, a change of this machine
conditions, or a change of the both sides accuracy due to the paper type, perform the both sides adjustment at
periodic intervals.
After you understand the both sides adjustment flow (timing, method, and order), perform the necessary adjustment.
There are three types of both sides adjustment flows as follows.
Adjustment flow
when using a new paper brand, a new paper weight, or a new paper size
)
Adjustment timing
- When you use a new paper brand, a new paper weight, or a new paper size
)
Adjustment order
Reference
For details of each adjustment item, refer to "Contents of both sides adjustment items" (Page 2-3).
Type of adjustment flow Adjustment timing
Adjustment flow when using a
new paper brand, a new paper
weight, or a new paper size
When you use a new paper brand, a new paper weight, or a new paper size
Regular adjustment flow When you change the brand, weight, or size of the paper inside the tray
Adjustment flow for each job • Before you output a job that the both sides accuracy is important
• Before you output a job that the printing area is large
• When you are not satisfied with the both sides accuracy (when you want to
raise the both sides accuracy)
Order Adjustment item Reference
1 Placing paper P.2-3
2 Front side adjustment P.2-6
3 "Gap adjustment" or "Scan measurement adjustment"
P.2-11
(When not using
PF-708 scanner)
P.2-16
(When using PF708 scanner)
4 Registering the paper profile P.2-24

2-2
Regular adjustment flow
)
Adjustment timing
- When you change the brand, weight, or size of the paper inside the tray
NOTICE
When you have not changed the paper inside the tray for more than one day, perform the adjustment before you output
the job (before the adjustment flow for each job).
)
Adjustment order
Reference
For details of each adjustment item, refer to "Contents of both sides adjustment items" (Page 2-3).
Adjustment flow for each job
)
Adjustment timing
- Before you output a job that the both sides accuracy is important
- Before you output a job that the printing area is large
- When you are not satisfied with the both sides accuracy (when you want to raise the both sides accuracy)
)
Adjustment order
Reference
For details of each adjustment item, refer to "Contents of both sides adjustment items" (Page 2-3).
Order Adjustment item Reference
1 Placing paper P.2-3
2 Front side adjustment P.2-6
3 "Gap adjustment" or "Scan measurement adjustment"
P.2-11
(When not using
PF-708 scanner)
P.2-16
(When using PF708 scanner)
Order Adjustment item Reference
1 Back side fine adjustment P.2-26
2-3
bizhub PRESS C1100/C1085
2
Contents of both sides adjustment items
This section describes the contents of the following six adjustment items.
- Placing paper (Page 2-3)
- Front side adjustment (Page 2-6)
- Gap adjustment (When not using PF-708 scanner) (Page 2-11)
- Scan measurement adjustment (When using PF-708 Scanner) (Page 2-16)
- Registering the paper profile (Page 2-24)
- Back side fine adjustment (Page 2-26)
)
Placing paper
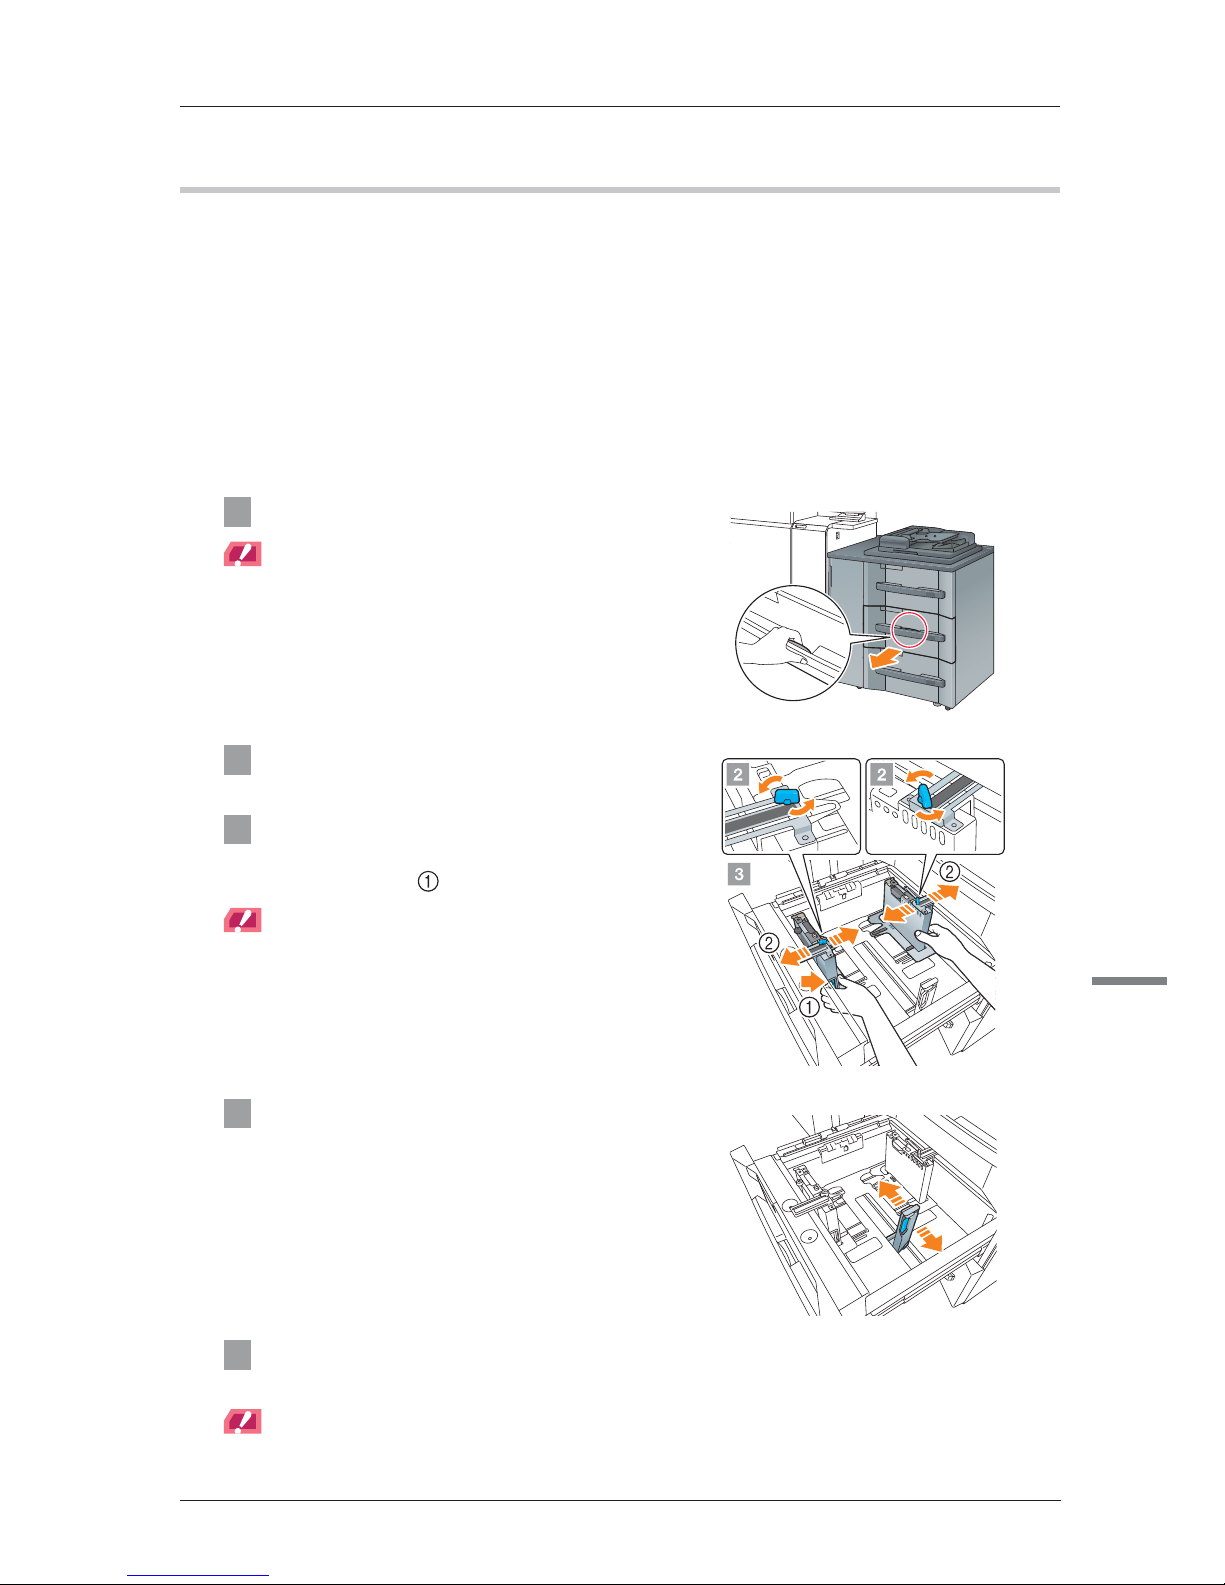
1 Pull out the tray to load paper into.
NOTICE
Trays can be pulled out only when this machine is turned
on. Before pulling out the target tray, check that the sub
power switch is turned on.
2 Turn the side guide lock knobs (2 pieces)
counterclockwise to loosen them.
3 Widen the side guide plates on both
sides with pressing the side guide lock
release lever ( ).
NOTICE
To slide the side guide plates, be sure to hold both side
guide plates together. If you move it by holding only either
of the side guide plate, the side guide plate that is held
may become displaced.
4 Widen the rear guide plates on both
sides with pressing the rear guide lock
release lever.
5 Load an appropriate amount of paper into the tray while aligning it to the left-hand side
of the tray.
NOTICE
Load paper with the print side facing up.
2-4
6 Slide the side guide plates on both sides, and press the side guide plates against the
paper.
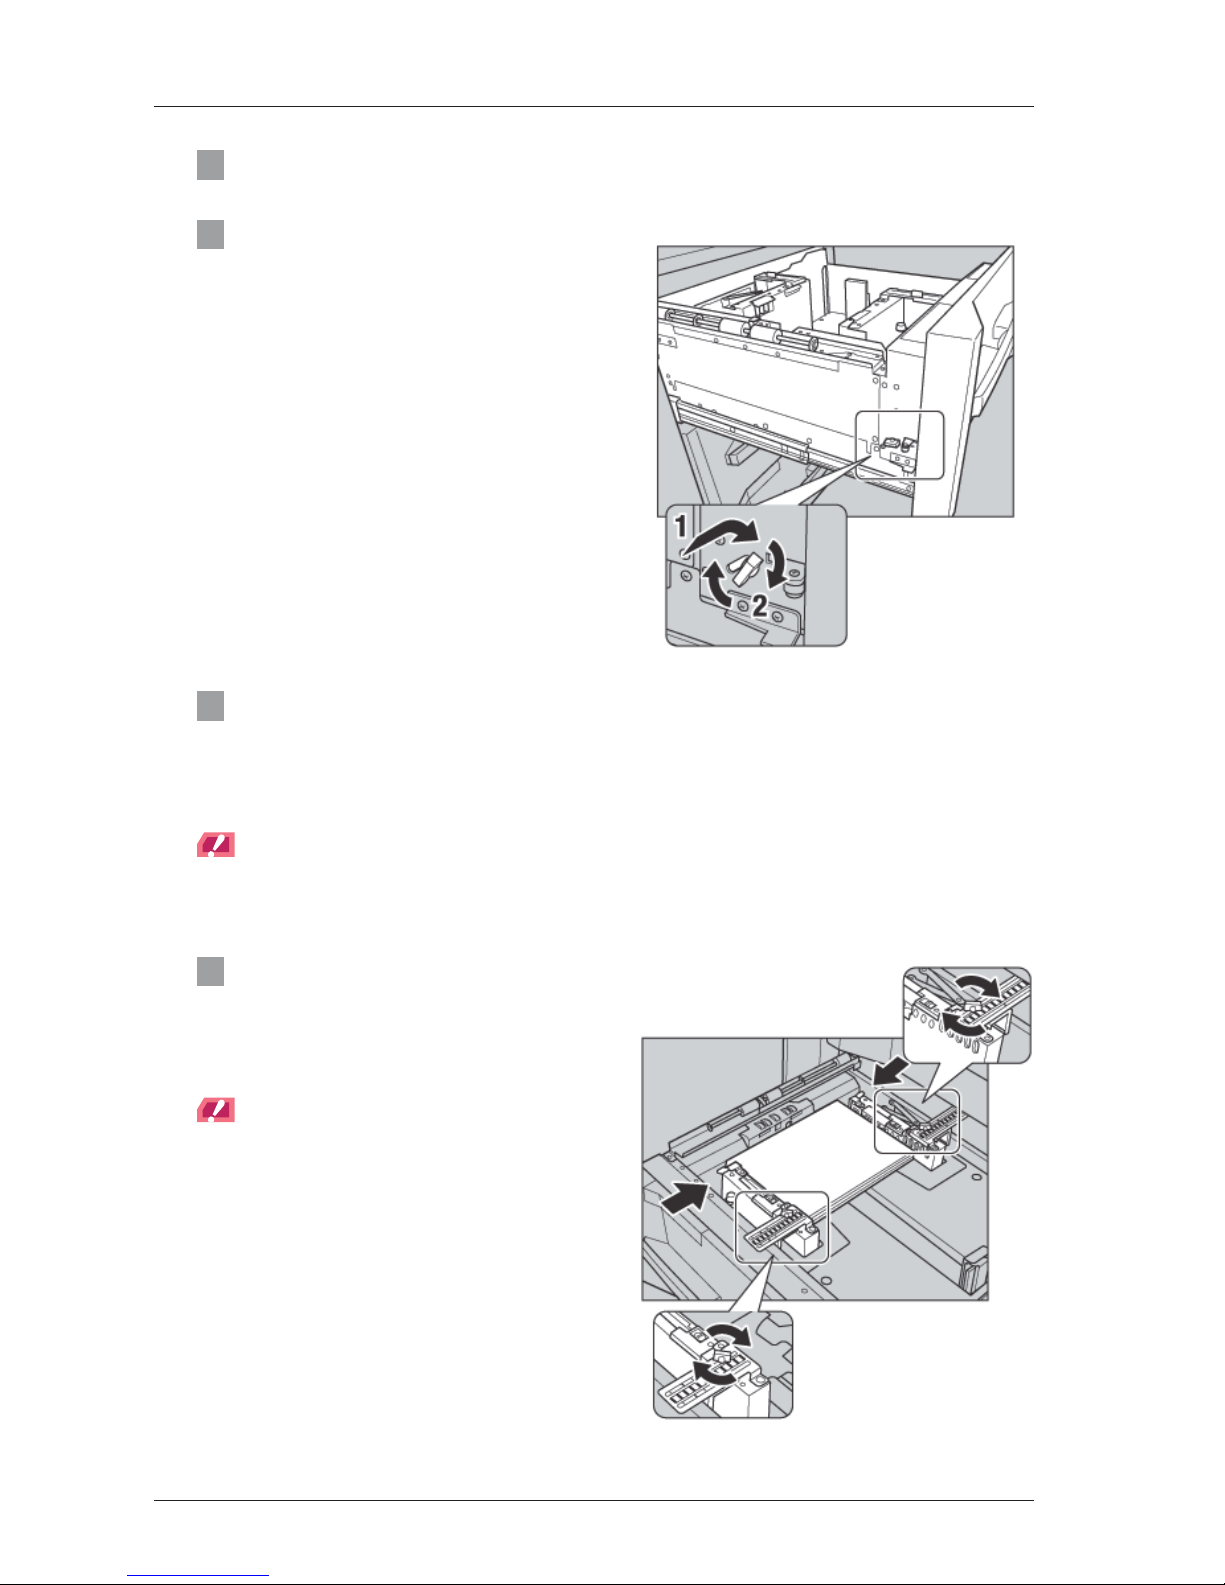
7 Turn the bottom plate fixing knob
counterclockwise to loosen it, slide it to
the front, and turn it clockwise to fix the
plate.
8 Return the tray to its original position, then withdraw it again after the bottom plate of
the tray goes up completely.
The sound of motor elevating the bottom plate can be heard when the tray is returned in position. After
that automation is completed, again withdraw the tray to find that the bottom plate has been elevated to
the top position.
NOTICE
- Be sure not to withdraw the tray till the motor sound stops. Otherwise, the later operation may be affected
because the bottom plate is not elevated completely to the top.
- Adjust so that the scale marks of the front side and the back side become the same value.
9 Fix the position of the top edges of the
side guide plates.
Move top edges of the side guide plates to align
them to the paper, then turn the two side guide
fixing knobs clockwise to fix the guides.
NOTICE
- Avoid making the space between the side guide
plates too wide or too narrow for the paper to be
seated straight.
- Adjust so that the scale marks of the front side and
the back side become the same value.
2-5
bizhub PRESS C1100/C1085
2
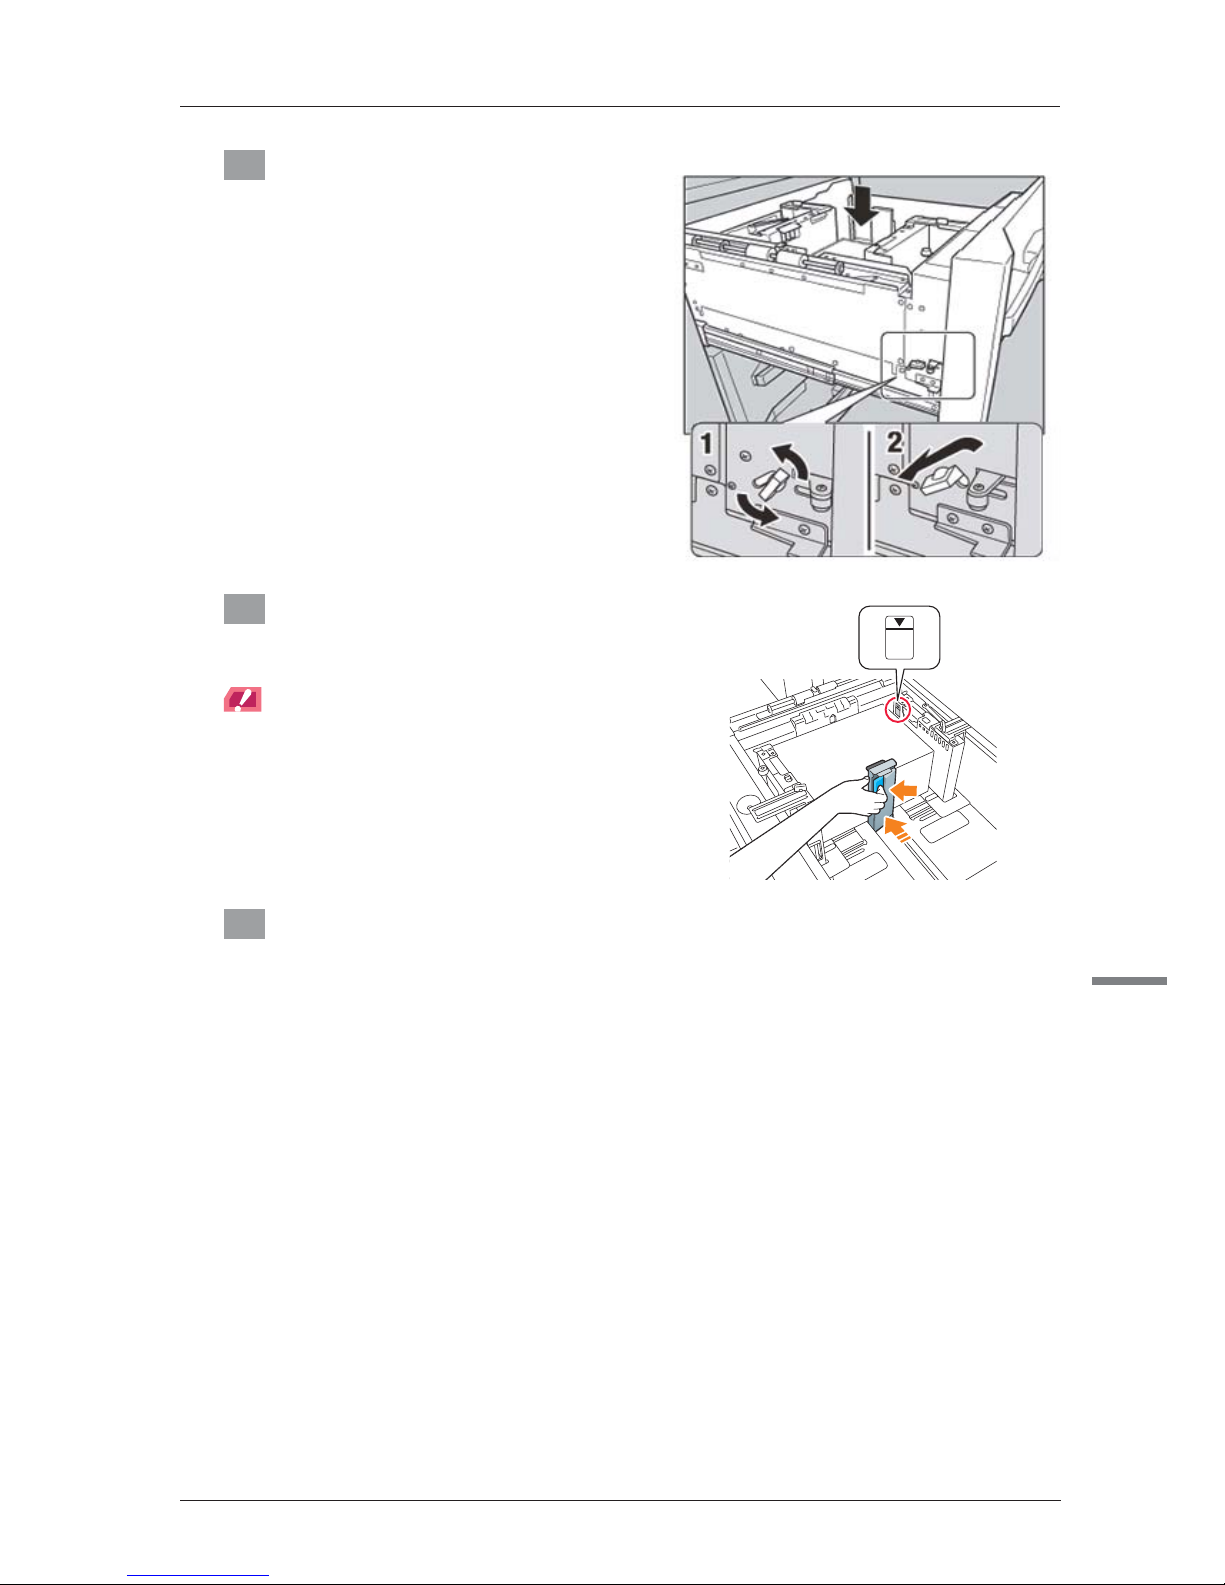
10 Lower the bottom plate of the tray.
Turn the bottom plate fixing knob
counterclockwise to loosen it, slide it to the back,
and turn it clockwise to fix the plate. The bottom
plate automatically goes down.
11 Load the remaining paper into the tray,
then press the rear guide plate against
the paper.
NOTICE
Be careful not to load paper above the , mark that
indicates the height limit on the side guide plate.
Otherwise, a paper jam may occur.
Load paper with the print side facing up.
12 Close the tray.
Push the tray in until it locks into place.

2-6
)
Front side adjustment
1 Press [Paper Setting] on the [MACHINE]
screen.
2 Press the tray with the target paper
loaded.
3 Press [Recall].
2-7
bizhub PRESS C1100/C1085
2
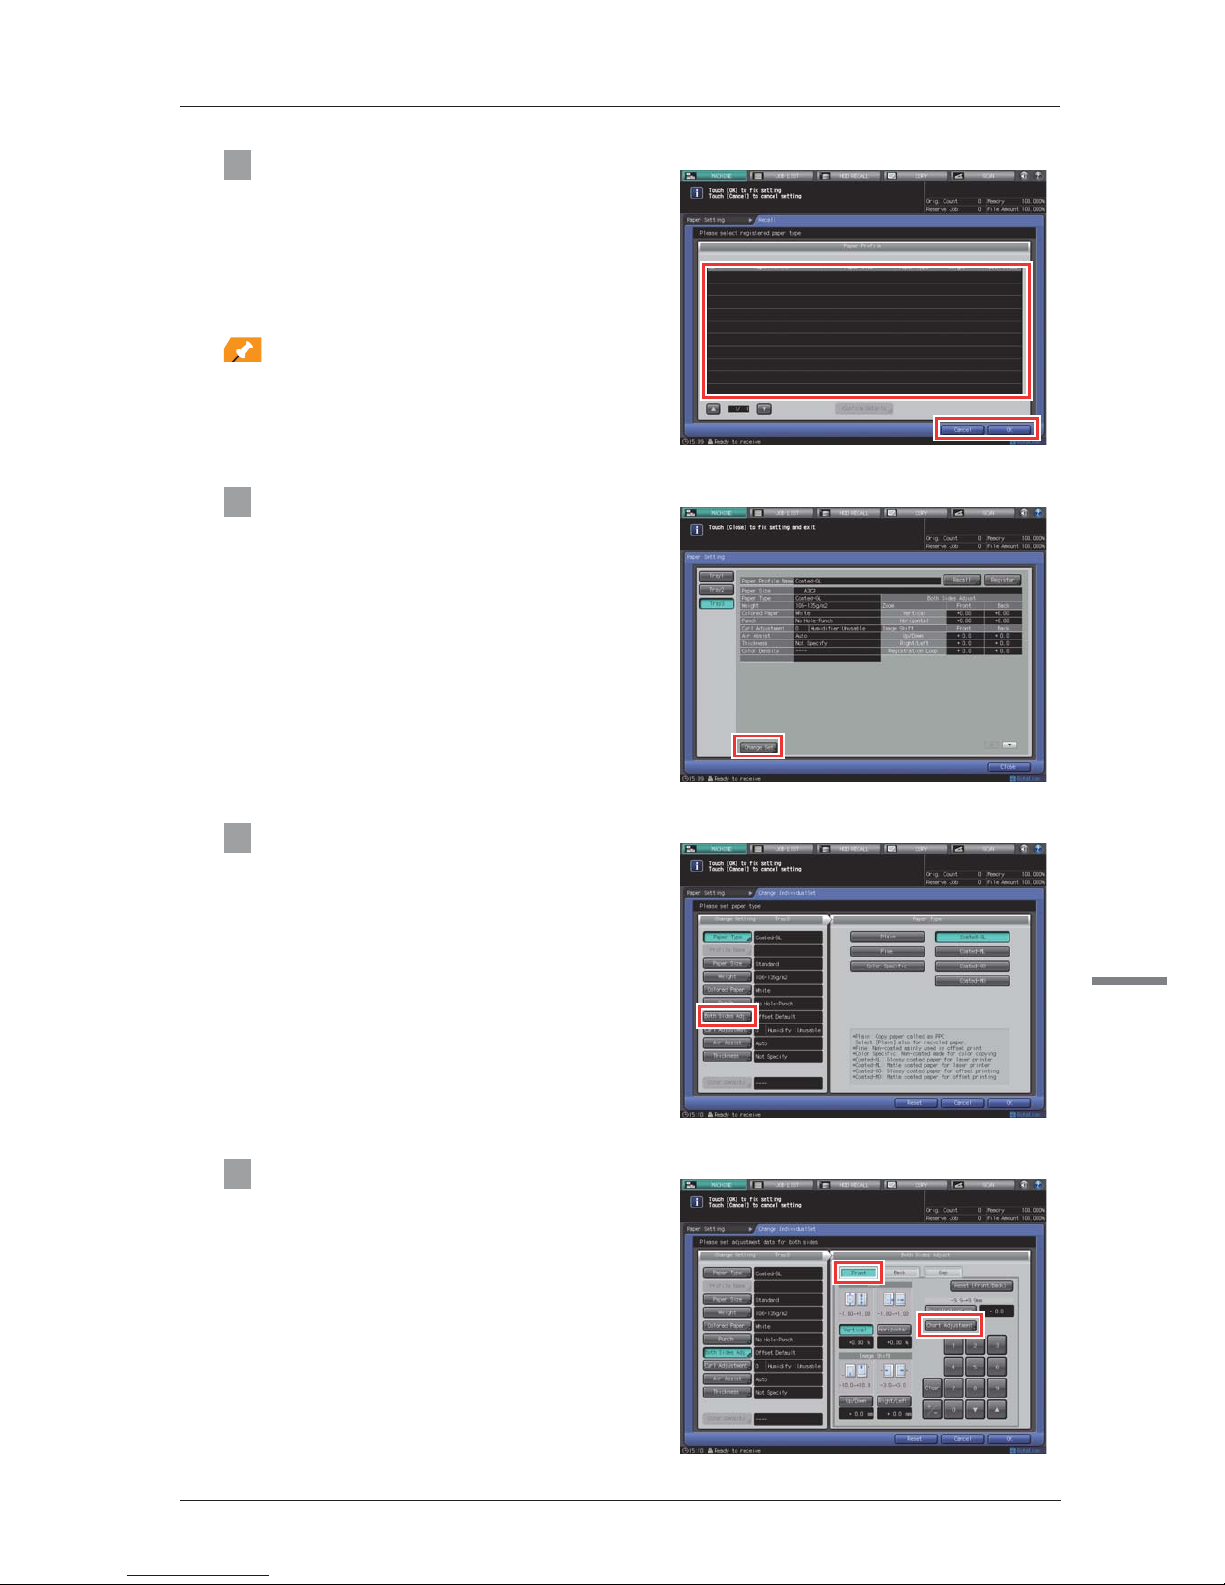
4 Select the paper profile of the same
paper brand (paper profile name), "Paper
size", "Type of paper" and "Paper
weight" as the paper that you want to
adjust. Then, select [OK].
When there is no paper profile to select, select
[Cancel].
Tips
When the paper profile has a different "Paper size" or "Set
direction" information to the paper that is loaded, the
paper profile is gray out. Therefore, the profile cannot be
selected.
5 Press [Change Set].
6 Press [Both Sides Adj.]
7 Select [Front], then press [Chart
Adjustment].
2-8
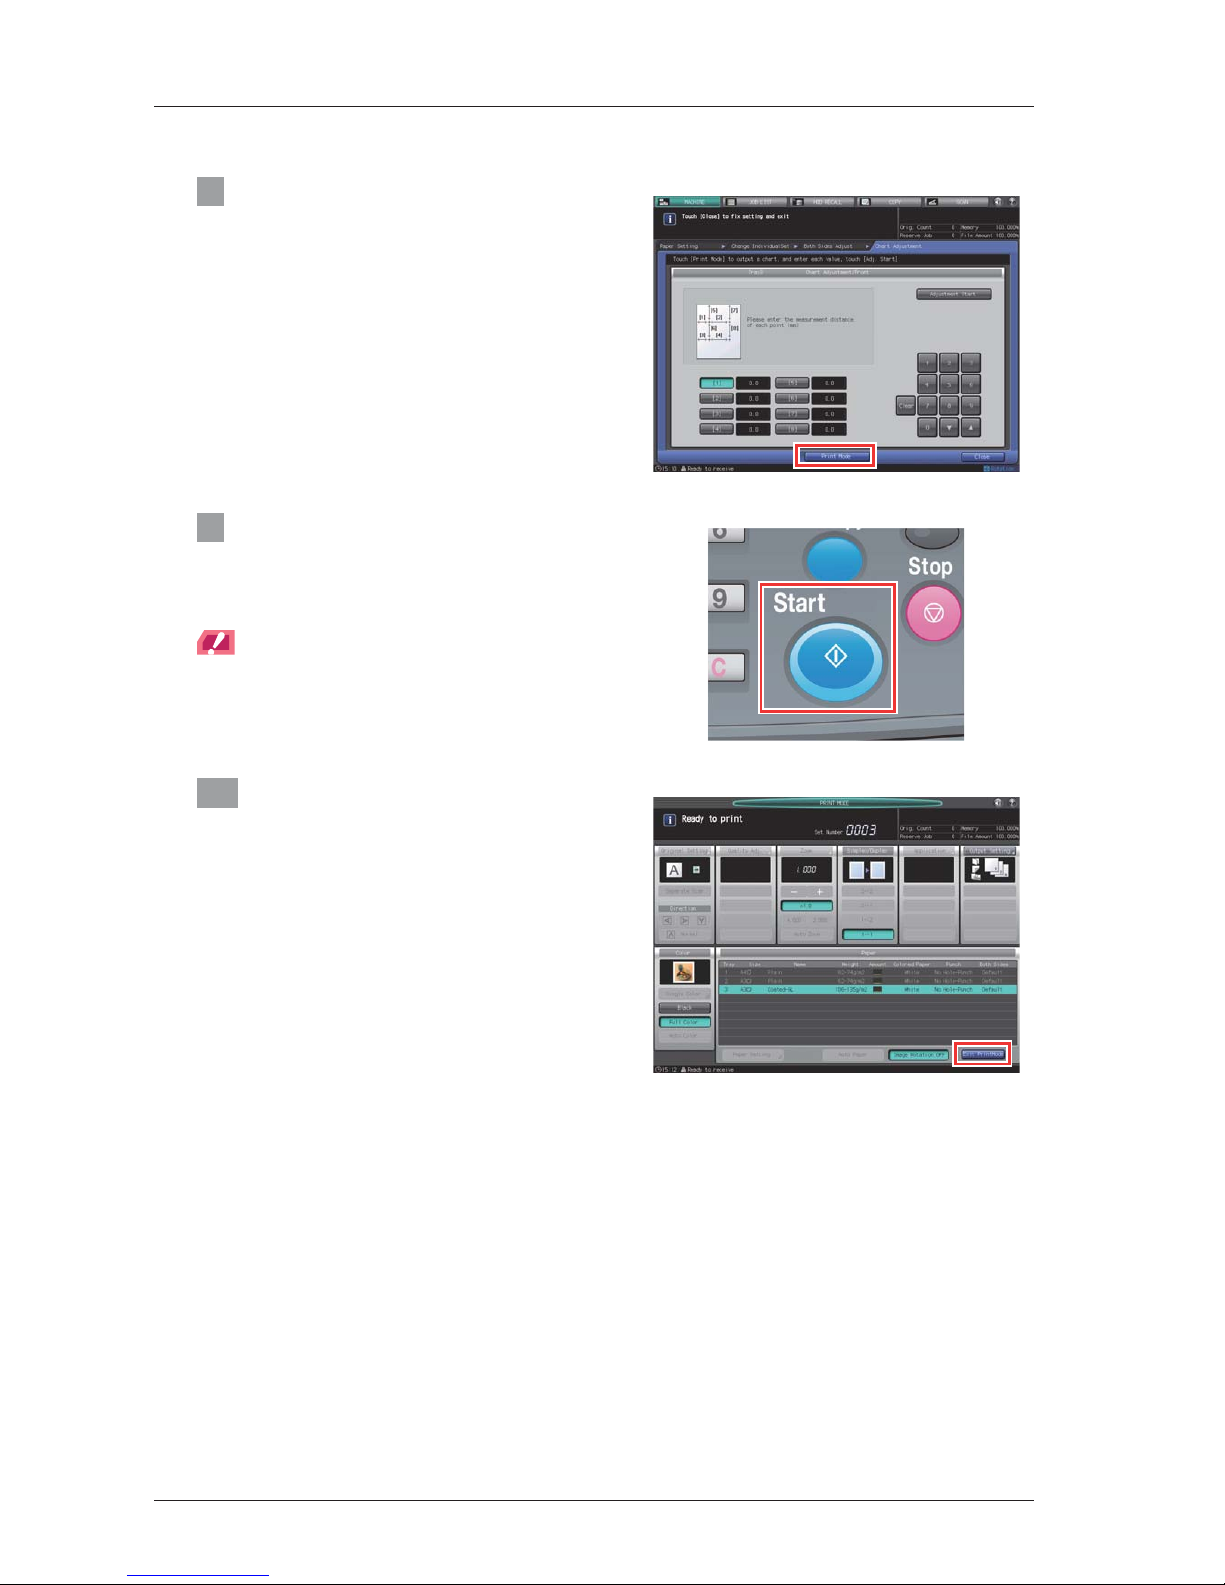
8 Press [Print Mode].
9 When the [PRINT MODE] screen is
displayed, press Start on the control
panel.
A test chart is printed out.
NOTICE
Output about 3 sheets.
10 Press [Exit Print Mode].
2-9
bizhub PRESS C1100/C1085
2
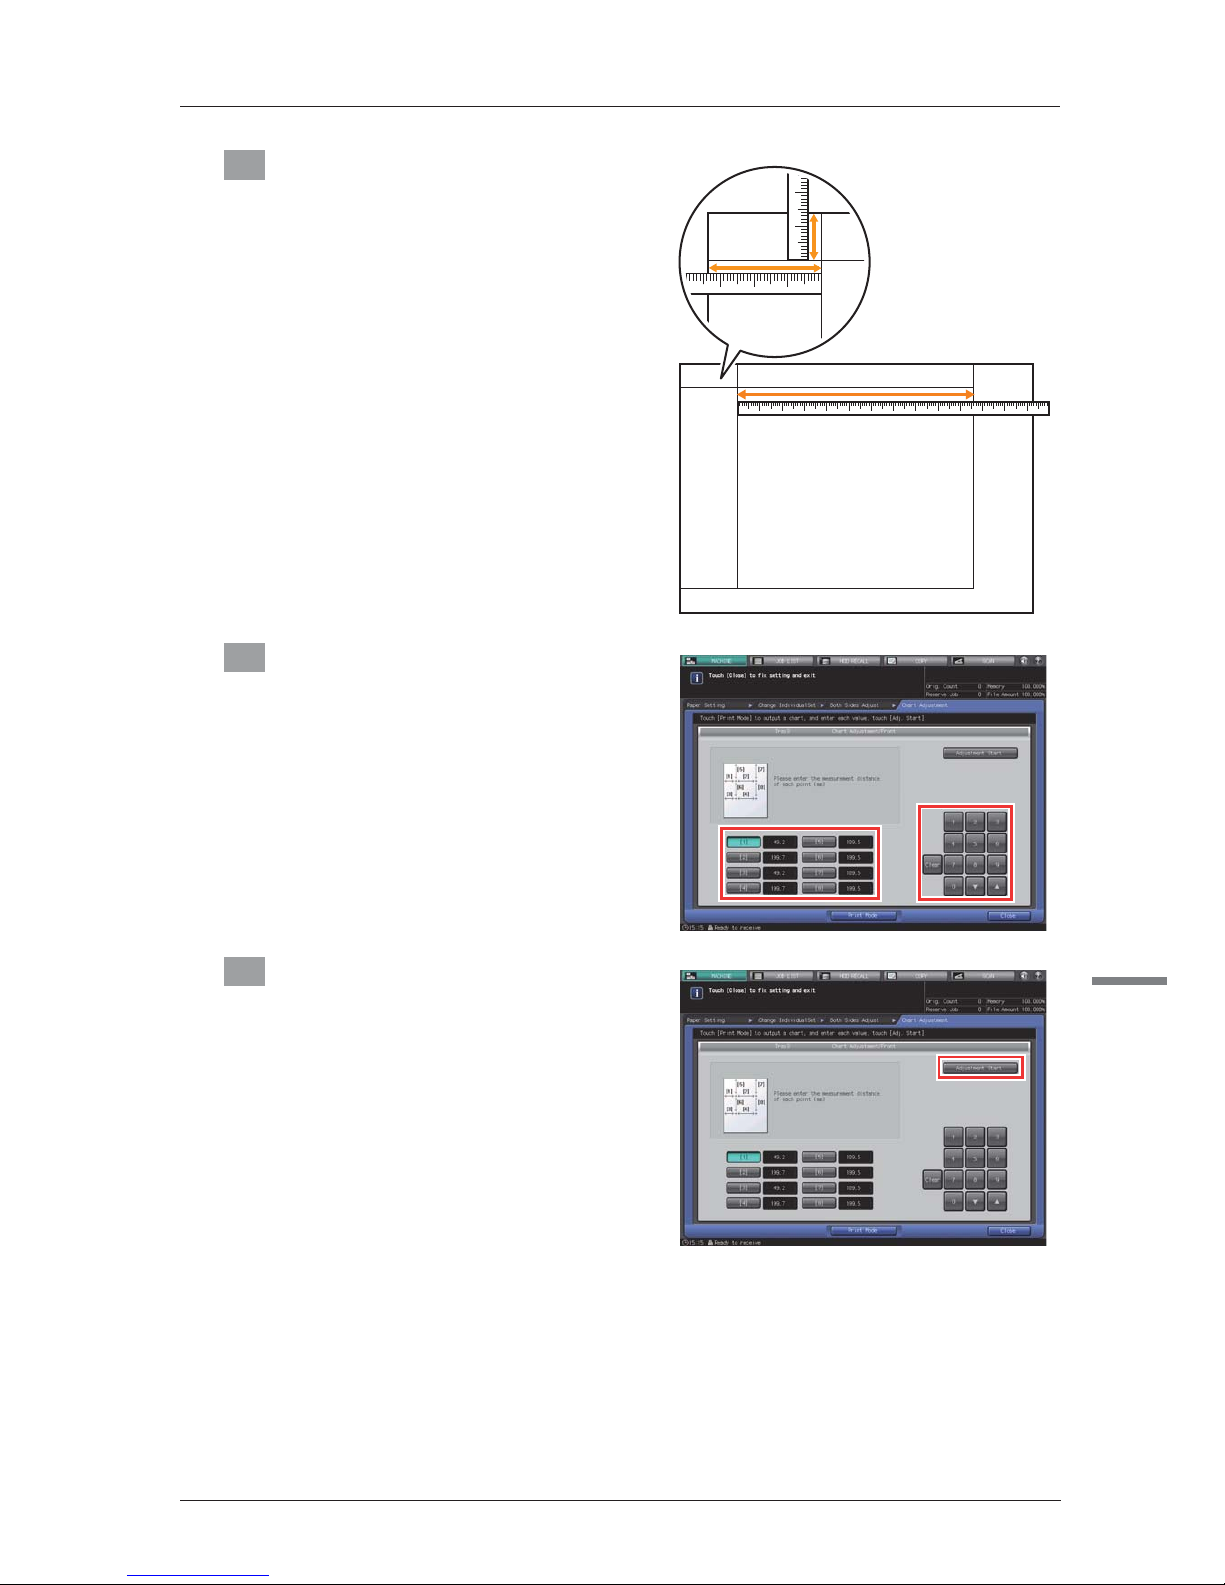
11 Check the length of [2], [4], [6], and [8] of
the charts that are output as the second
and third sheet.
Write down the measured lengths so that you do
not forget them.
When the length of [2], [4], [6], and [8] is within the
following range, press [Close] and then press [OK]
to exit the adjustment.
When the length of [2], [4], [6], and [8] is out of the
following range, measure [1], [3], [5], and [7], and
go to the next step.
[2]: 200mm±0.3mm
[4]: 200mm±0.3mm
[6]: 200mm±0.3mm
[8]: 200mm±0.3mm
12 Press each point number, then enter the
measured length using the keypad on the
screen.
To reset a value, press [Clear].
13 When entry processing is completed,
press [Adjustment Start].
[1]
[5] [7]
[6] [8]
[2]
[3] [4]
[1]
[5]
2-10
14 Output the front side adjustment chart again, and check the length of [2], [4], [6], and
[8] of the charts that are output as the second and third sheet.
Repeat from step 11 to step 14 until the length of [2], [4], [6], and [8] are within the range of the following
values.
[2]: 200mm±0.3mm
[4]: 200mm±0.3mm
[6]: 200mm±0.3mm
[8]: 200mm±0.3mm
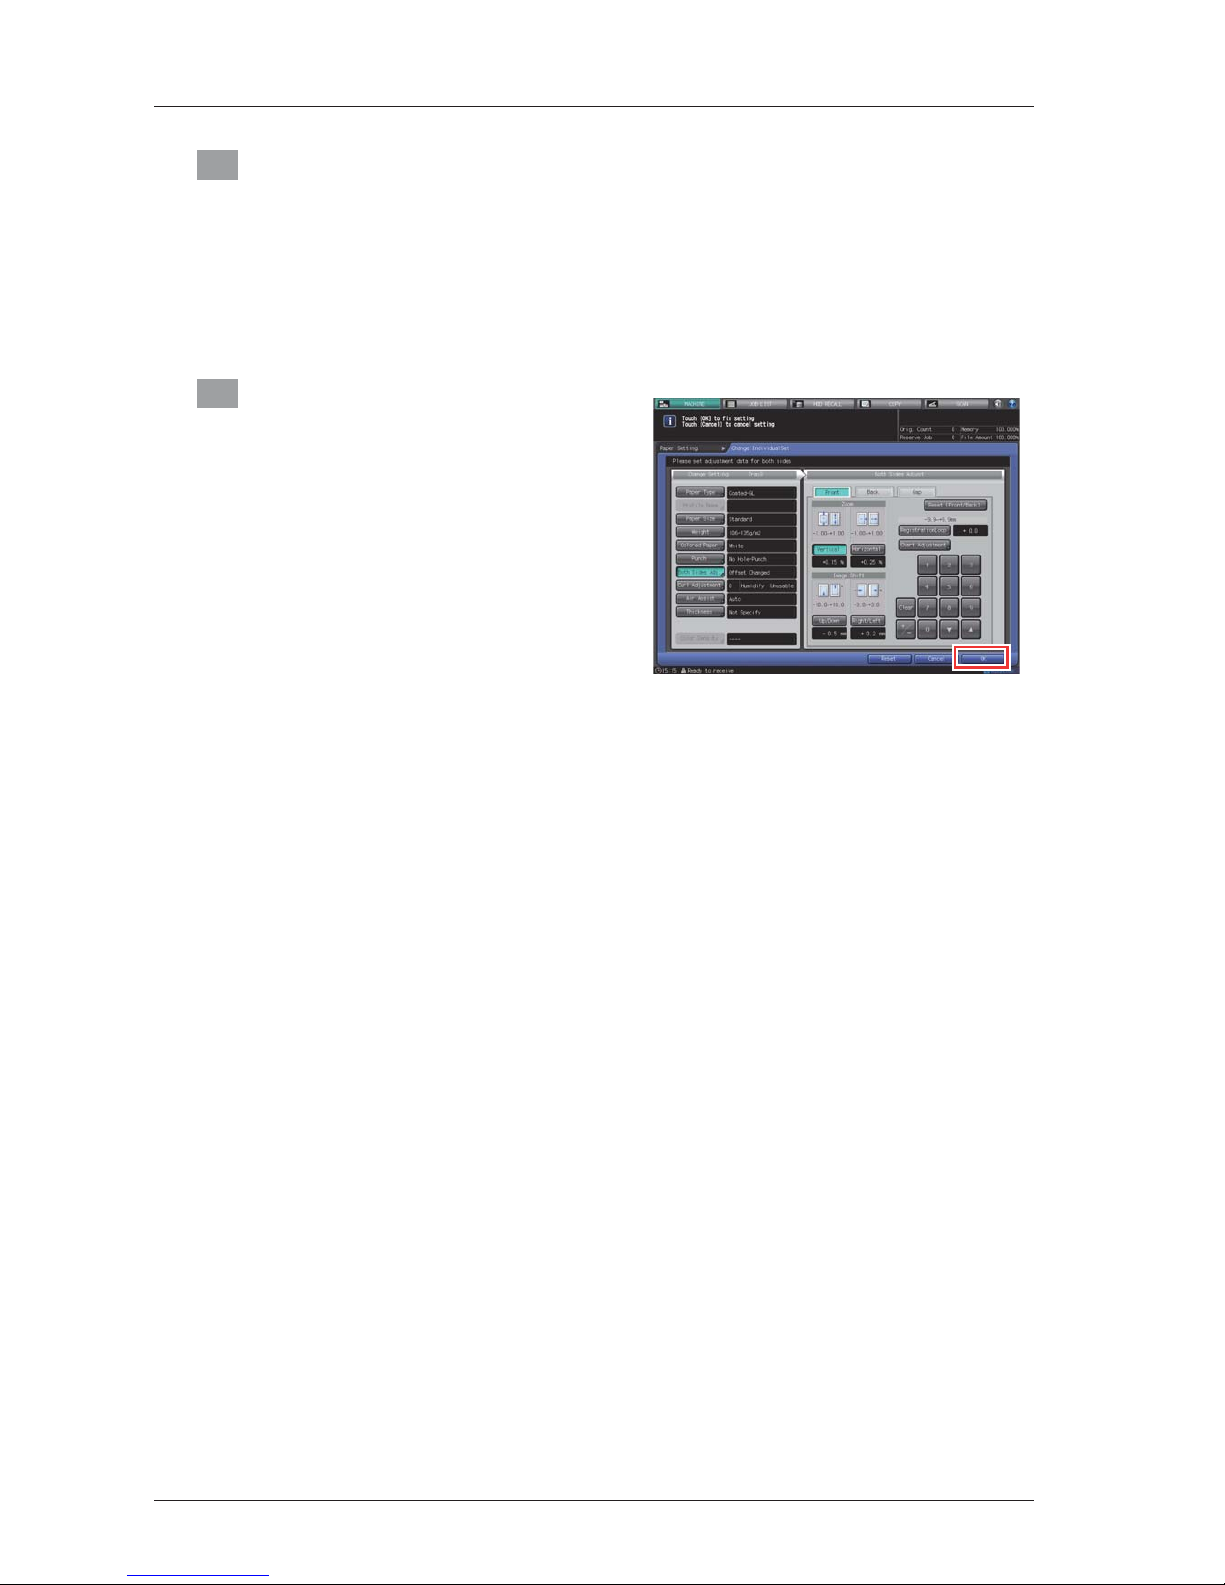
15 Press [OK] to exit the adjustment.

2-11
bizhub PRESS C1100/C1085
2
)
Gap adjustment (When not using PF-708 scanner)
NOTICE
The Gap Adjustment is a simple method to adjust only the zoom ratio and image position of the back side. To also
adjust it on the front side, carry out "Front Side Adjustment" (Page 2-6) .
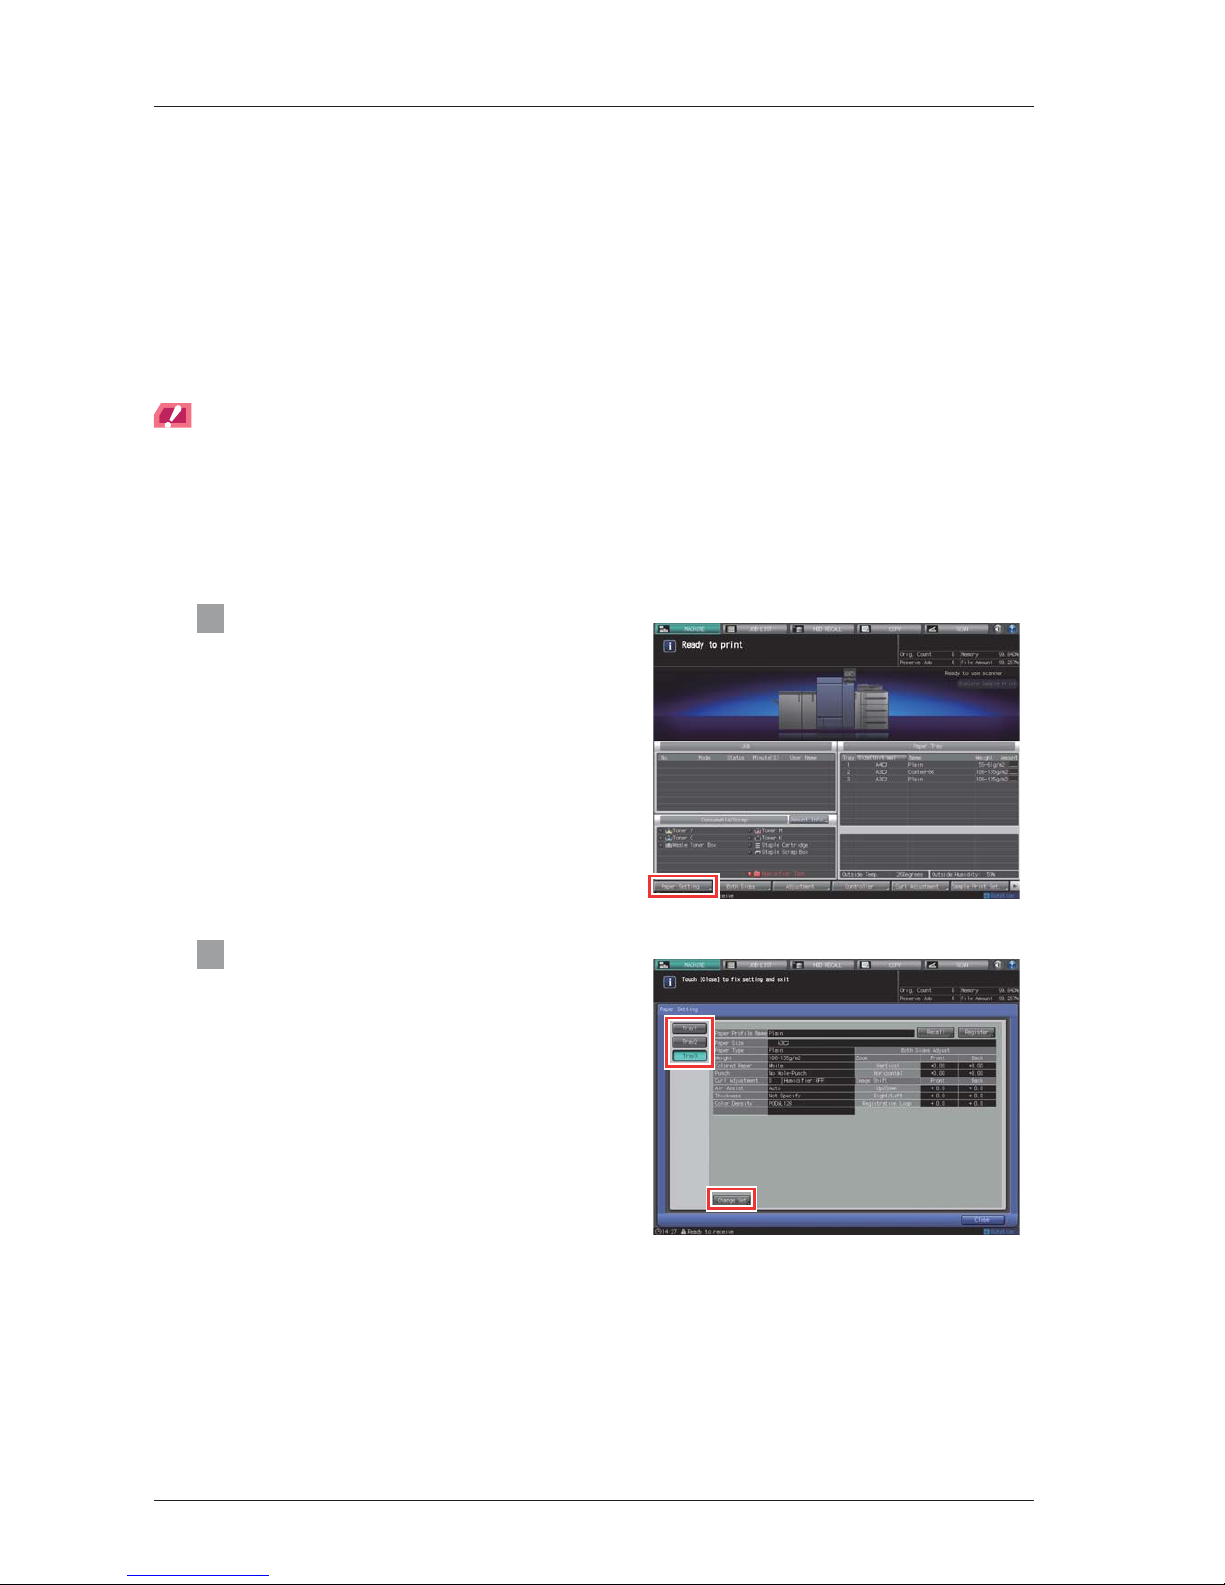
1 Press [Paper Setting] on the [MACHINE]
screen.
2 Press the tray that you conducted "Front
Side Adjustment".
3 Press [Change Set].
2-12
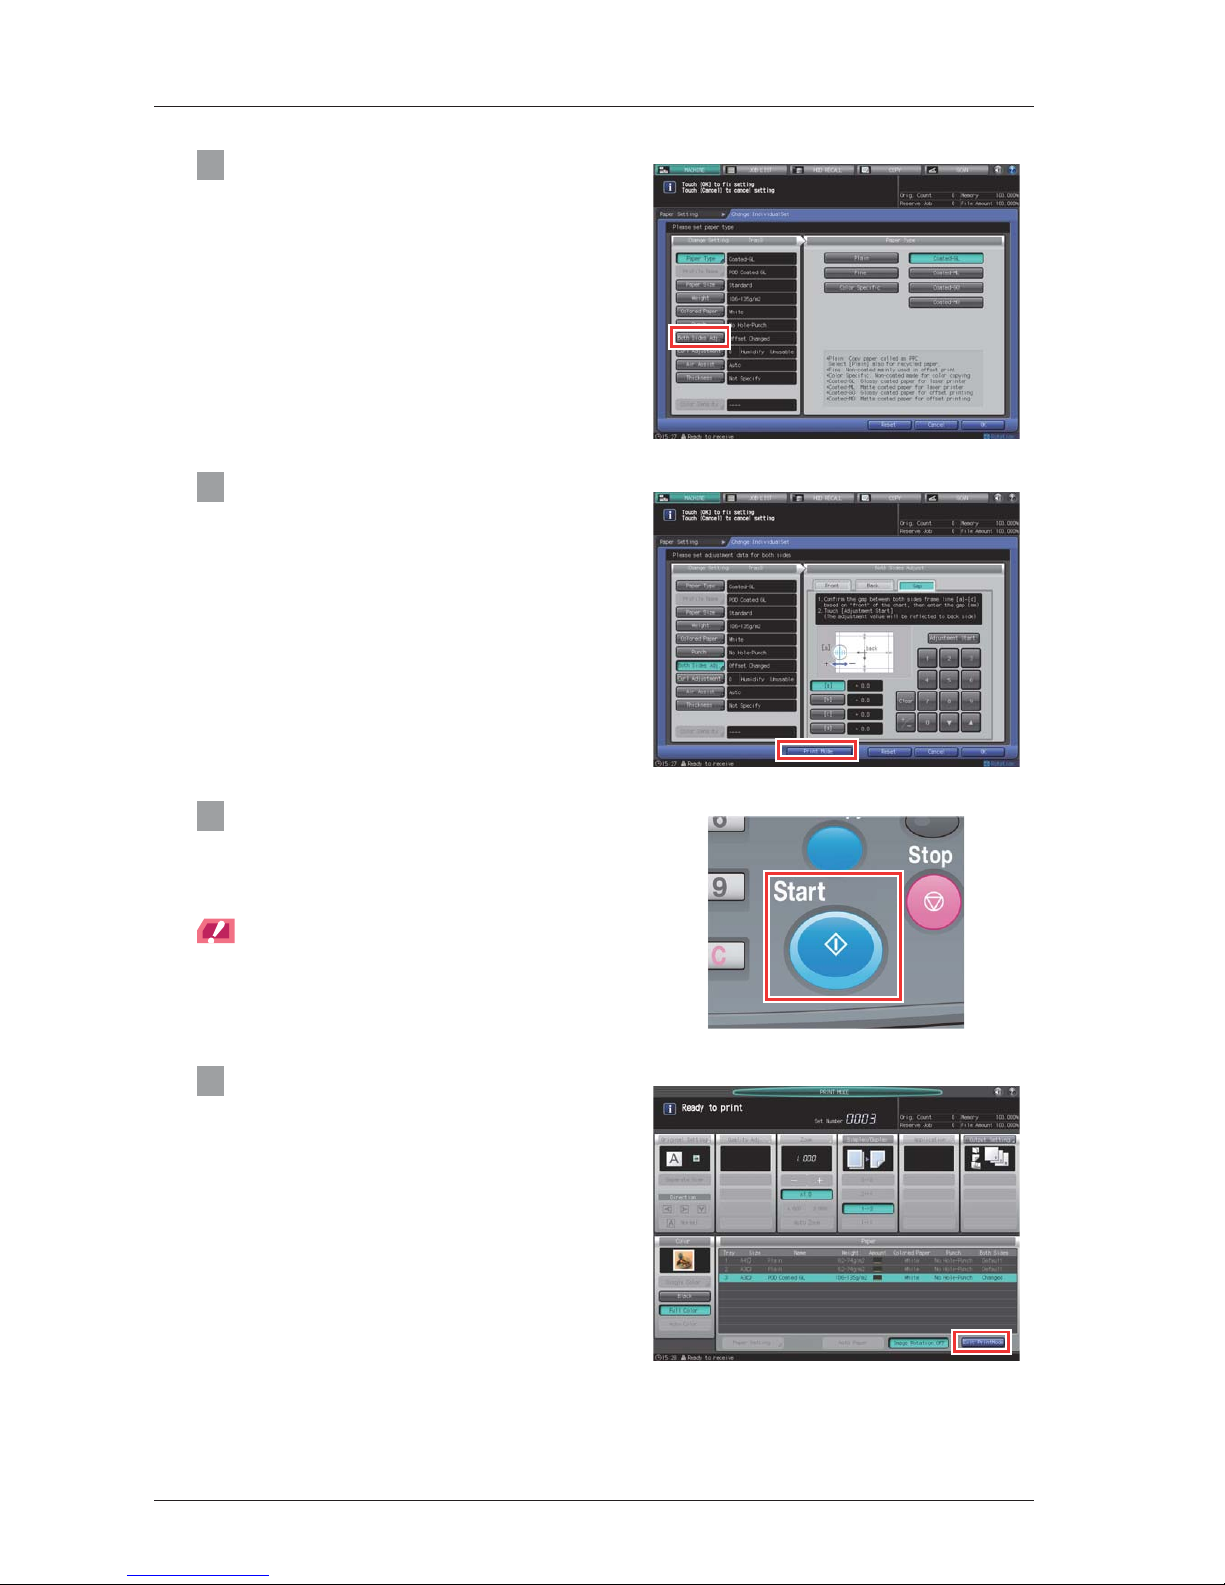
4 Press [Both Sides Adj.].
5 Press [Print Mode].
6 When the [PRINT MODE] screen is
displayed, press Start on the control
panel.
A test chart is printed out.
NOTICE
Output about 3 sheets.
7 Press [Exit Print Mode].
2-13
bizhub PRESS C1100/C1085
2
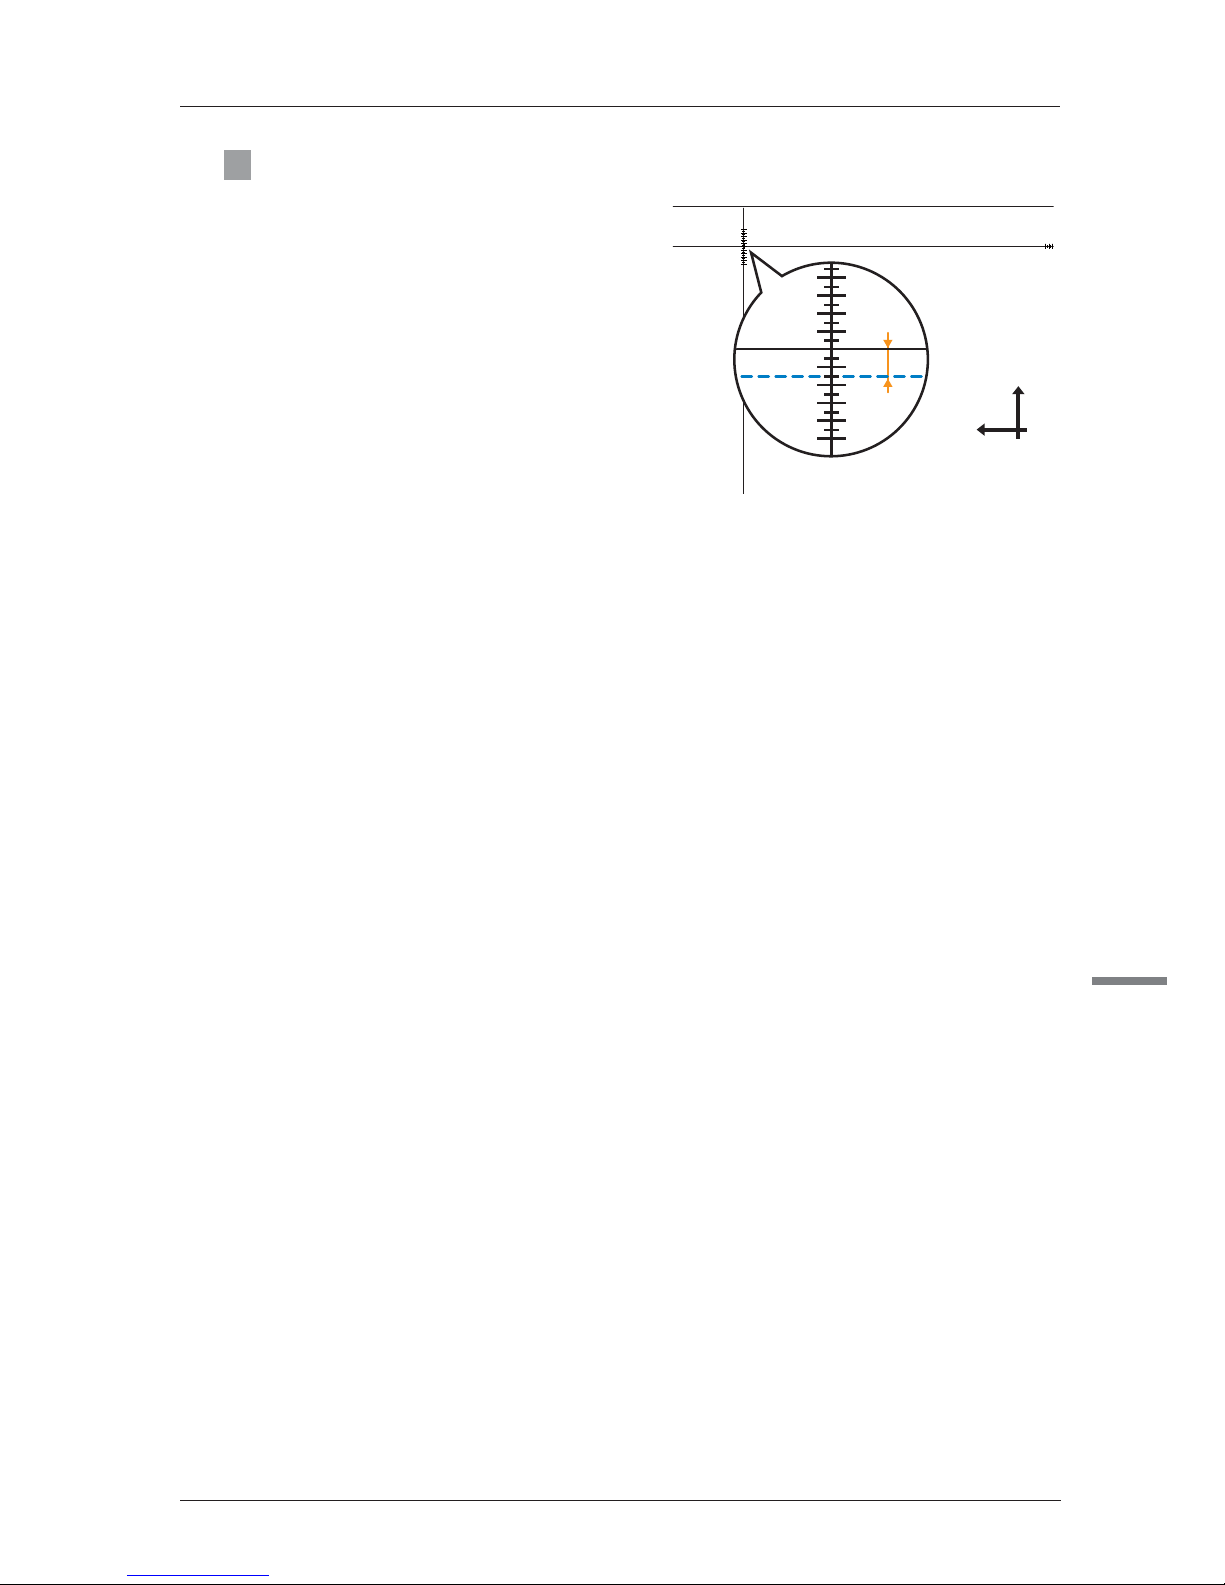
8 Measure the back side image difference
at each point from [a] to [d] that is
positioned at the [back] side of the
second and third output charts.
- The scale resolution is 0.5 mm.
- The black line in the figure shows the back
side, and the blue dashed line shows the
other side (front side).
- The measurement value can be entered in
units of up to 0.1 mm.
- For example, as this figure shows, when the
black line at the back side is shifted by 1.5
mm to the plus direction than the blue dashed
line at the front side, input -1.5 and correct the
difference. Then, the black line at the back
side 1.5 mm is moved to the minus direction.
- Write down the measured values so that you
do not forget them.
EDFN
>D@
[
\
2-14
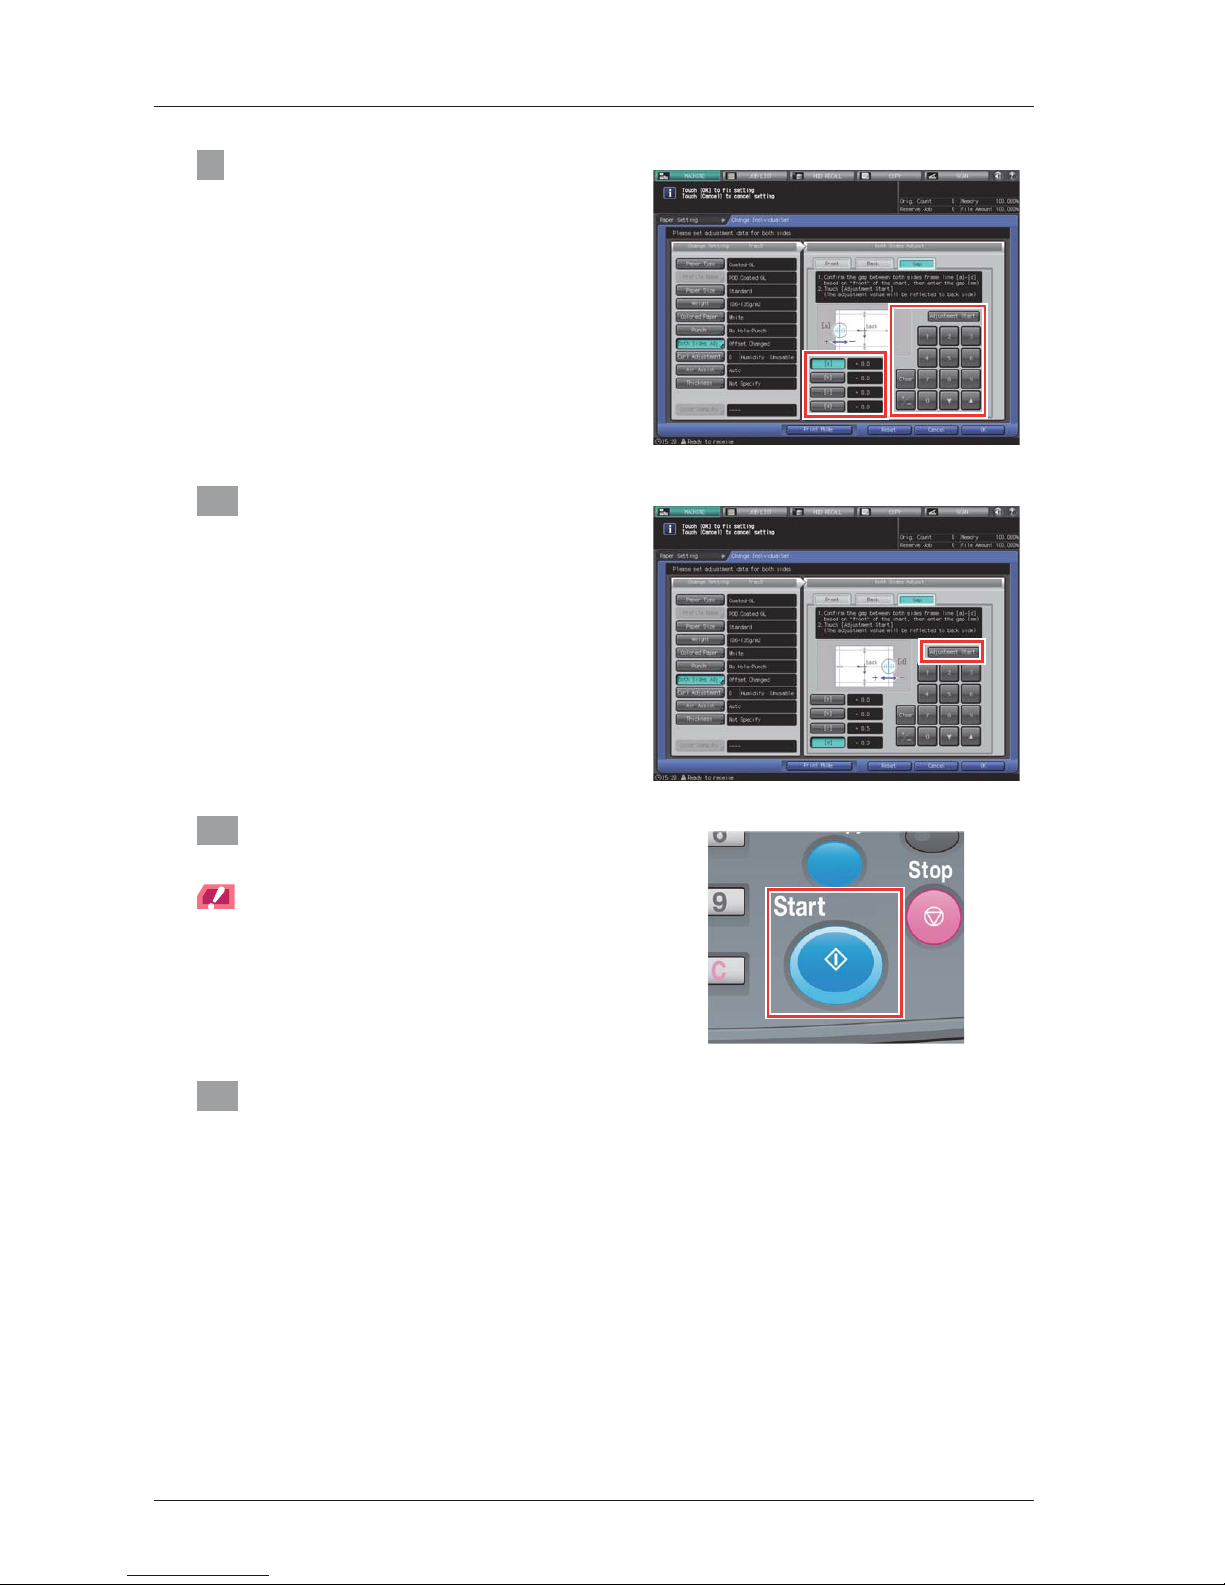
9 Press [a] to [d] of each point, and enter
the adjustment value using the keypad,
[,], or [+] on the screen.
10 When entry processing is completed,
press [Adjustment Start].
The input adjustment value is reflected to the
"Zoom" value and the "Image Shift" value at the
[Back] screen.
When [User Setting] - [Common Setting] - [Back
Side Magnification Adjustment] - is configured to
[OFF], the adjustment value is not reflected to
[Horizontal] at the [Back] screen.
11 Press Start on the control panel.
A test chart is printed out.
NOTICE
Output about 3 charts.
12 Check the gap of the printing position referring to the charts that are output as the
second and third sheet.
Repeat steps 10 to 13 until all gaps between the front and back sides are cleared.

2-15
bizhub PRESS C1100/C1085
2
13 Press [Exit Print Mode].
14 Press [OK] to exit the adjustment.
2-16
)
Scan measurement adjustment (When using PF-708 Scanner)
Adjust the magnification ratio and printing position of the back side with reference to the printing position of the front
side. The magnification ratio and printing position of the back side are automatically adjusted by using the scanner
function of this machine to measure the gap amount in printing position of the back side to the front side. You do not
need to measure the gap amount with a scale. The adjustment is available for paper of all sizes which can be used
with this machine.
Print out 1 to 20 sheets of the adjustment chart having both front and back sides printed, and scan them 4 times per
sheet. The average value of gap amounts in printing position of the back side to the front side, which can be obtained
by scanning up to 20 sheets of the adjustment chart, will be calculated in order to adjust the magnification ratio and
printing position of the back side.
NOTICE
The [Scan Meas.] adjustment provides the coordination based on the average value of gap amounts, taking into
account the gap in printing position between the first and last sheets which can be produced when multiple sheets are
output.
Performing the [Scan Meas.] adjustment may require readjustment of the "Zoom and Image Shift Adjustment"
registered in a paper profile.
The [Scan Meas.] adjustment is a simple method to adjust only the magnification ratio and image position of the back
side. To adjust both front and back sides, perform the "Front side Adjustment" (Page 2-6).
1 Press [Paper Setting] on the [MACHINE]
screen.
2 Select the tray with the target paper
loaded, then press [Change Set].

2-17
bizhub PRESS C1100/C1085
2
3 Press [Both Sides Adj].
4 Check that [Scan Meas.] is displayed,
then press [Output Background Sheet].
5 When the [PRINT MODE] screen is
displayed, press Start on the control
panel.
A background sheet is printed out. If you already
have the background sheet available for
measurement, you do not need to print out a
background sheet. Proceed to Step 7.
NOTICE
Use paper of A3 or larger, or 11 e 17 or larger to output
the background sheet. When you press [Output
Background Sheet] to display the PRINT MODE Screen
for the background sheet, the tray selected in step 2 is
automatically selected on the screen, but it can be
changed as desired. Select a tray loaded with A3 or larger,
or 11 e 17 or larger paper. You can also change the print
count, but only one sheet is needed. If the background
sheet size is smaller than A3 or 11 e 17, the scan
measurement may not be performed.

2-18
6 Press [Exit Print Mode].
7 Press [1. Output Adjustment Chart].
8 Enter the number of adjustment charts
you want to print out.
however, only up to 20 adjustment charts can be
scan-measured continuously.
9 Press Start on the control panel.
Adjustment charts are printed on both sides of the
paper in the tray you selected in Step 2.
 Loading...