


V Control panel (For administrator)
This volume explains the settings made by the printer administrator using the control panel.
Chapter 14 Control Panel Names .... |
378 |
Chapter 15 Printer Settings.............. |
384 |
Chapter 16 Key Operator Settings... |
431 |
377

V Control panel (For administrator)
Chapter 14 Control Panel Names
This chapter explains the names of the buttons on the copier's control panel and their functions, the contents of the LCD screen display, and the operations.
14-1. Control panel names....................................................................... |
379 |
14-2. LCD screen ...................................................................................... |
381 |
378

14-1. Control panel names
The buttons on the copier's control panel and the key displayed on the LCD screen can be used to make settings for the printing system.
This section explains the names and functions of the buttons used for setting operations. For information on buttons not explained here, refer to the copier's user’s manual.
[Check] button [SCAN/PRINT] button
|
|
|
|
|
|
|
|
|
|
|
|
|
|
|
|
|
|
|
|
|
|
|
|
|
|
|
|
|
|
|
|
|
|
|
|
|
|
|
|
|
|
|
|
|
|
|
|
|
|
|
|
|
|
|
|
|
|
|
|
|
|
|
|
|
|
|
|
|
|
|
|
|
|
|
|
|
|
|
|
|
|
|
|
|
|
|
|
|
|
|
|
|
|
|
|
|
|
|
|
|
|
|
|
|
|
|
|
|
|
|
|
|
|
|
|
|
|
|
|
|
|
|
|
|
|
|
|
|
|
|
|
|
|
|
|
|
|
|
|
|
|
|
|
|
|
|
|
|
|
|
|
|
|
|
|
|
|
|
|
|
|
|
|
|
|
|
|
|
|
|
|
|
|
|
|
|
|
|
|
|
|
|
|
|
|
|
|
|
|
|
|
|
|
|
|
|
|
|
|
|
|
|
|
|
|
|
|
|
|
|
|
|
|
|
|
|
|
|
|
|
|
|
|
|
|
|
|
|
|
|
|
|
|
|
|
|
|
|
|
|
|
|
|
|
|
|
|
|
|
|
|
|
|
|
|
|
|
|
|
|
|
|
|
|
|
|
|
|
|
|
|
|
|
|
|
|
|
|
|
|
|
|
|
|
|
|
|
|
|
|
|
|
|
|
|
|
|
|
|
|
|
|
|
|
|
|
|
|
|
|
|
|
|
|
|
|
|
|
|
|
|
|
|
|
|
|
|
|
|
|
|
|
|
|
|
|
|
|
|
|
|
|
|
|
|
|
|
|
|
|
|
|
|
|
|
|
|
|
|
|
|
|
|
|
|
|
|
|
|
|
|
|
|
|
|
|
|
LCD |
|
screen |
[Reset] |
|
button |
|
|
[Stop/Clear] |
|
|
button |
|||||||||||||||
|
|
|
|
|
||||||||||||||||||||||
LCD screen
The LCD screen displays the print controller status, menus used for settings, selection items, and other such information. To make settings, touch the necessary key displayed on the screen.


 (SCAN/PRINT) button
This switches over to scanner/printer mode.
 (Start) button
This resumes the paused print processing or starts scanning.
 (Stop/Clear) button
This stops copy or print processing.
 (Check) button
This displays the copier's settings check screen.


 (Reset) button
This resets the copier settings to their defaults.
Data LED
This flashes green when the copier is receiving data. This stays lit when data is accumulated in the copier.
Scanner/Printer LED
This lights up green for scanner/printer mode.
379 |
V Control panel (For administrator) |
|
Chapter 14 Control Panel Names |

14-1. Control panel names
zThe LED lights up red when a warning or error message is displayed.
In this case, check the error information on the LCD screen and solve the error. For information on how, refer to the copier's user’s manual.
zIf the LED lights up red during printing, print processing is interrupted. When the error is eliminated, printing resumes.
380 |
V Control panel (For administrator) |
|
Chapter 14 Control Panel Names |
14-2. LCD screen
LCD screen operation methods
Select items by touching the appropriate key displayed on the LCD screen.
When you touch a key and open a setting screen, the selected key is displayed inverted.
Buttons common to all setting screens
When you touch [OK], the results of the operation are applied.
When you touch [CANCEL], the results of the operation are cancelled.
When you touch [PREV] or [NEXT], the screen display is switched.
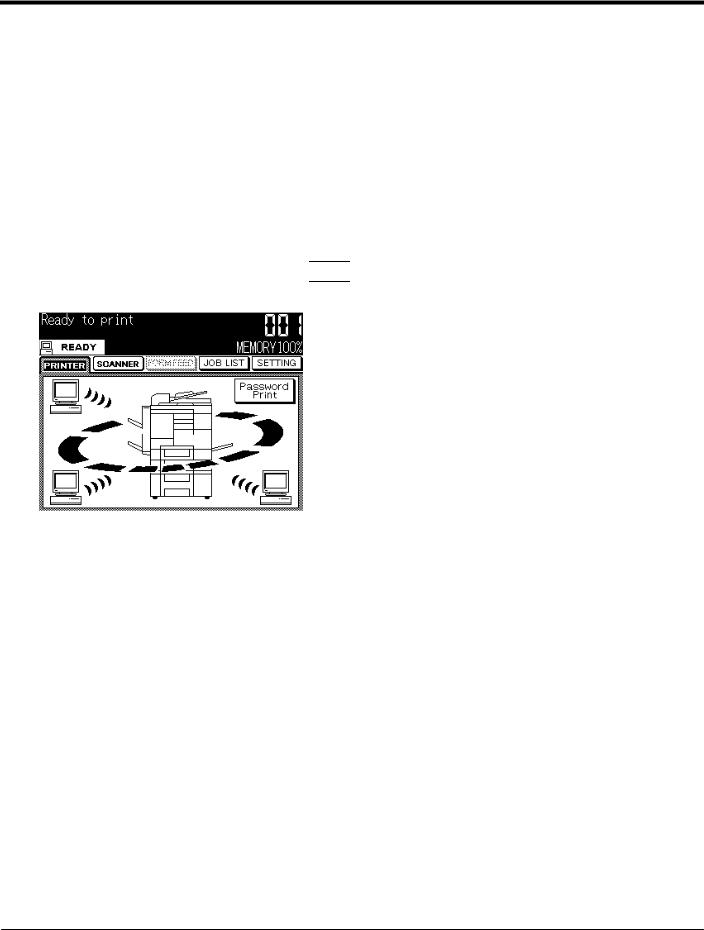
Basic screen
With the copier started, if you press the 

 button on the control panel, the [Printer mode basic] screen is displayed on the LCD screen.
381 |
V Control panel (For administrator) |
|
Chapter 14 Control Panel Names |
14-2. LCD screen
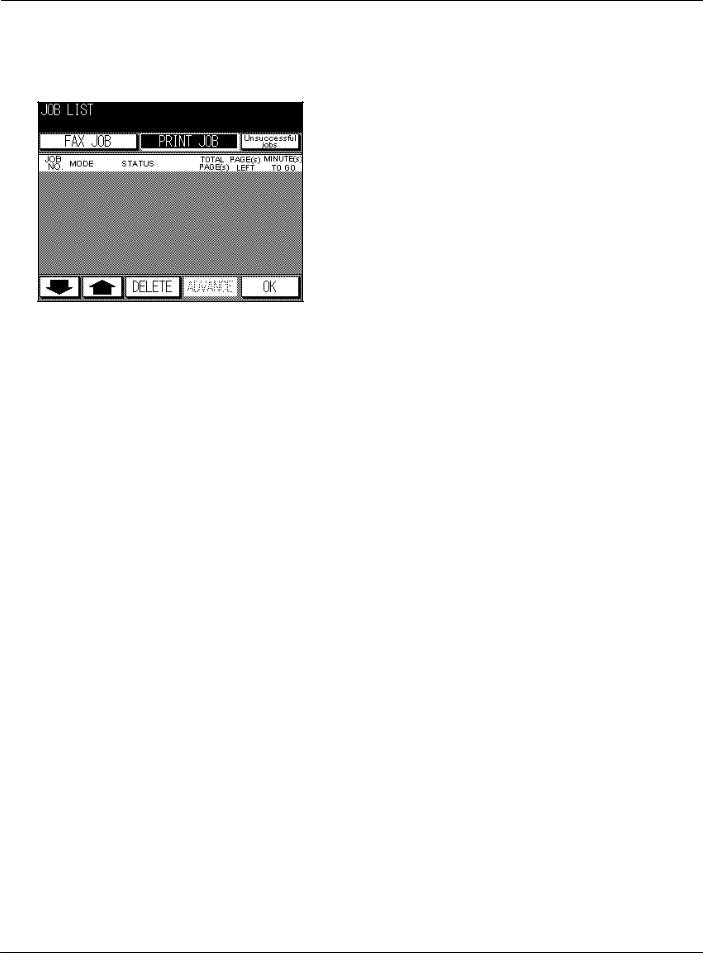
Job list screen
When you touch the [JOB LIST] key on the [Printer mode basic] screen, the [Job List] screen is displayed on the LCD screen and the status of the current print job or fax job can be checked.
Touch the [PRINT JOB] or [FAX JOB] key to switch to the print job or fax job status display. If there are no scheduled jobs, the column is blank.
When you touch [Unsuccessful jobs], incomplete jobs can be checked. This is displayed if a scan job or print job has not been output.
When the copier sub power is turned off, the contents are erased.
Status display contents
Job No.
The job number (1 to 999) is displayed.
Mode
This displays the job processing mode (copier/printer/scanner).
Status
This displays the status of each job.
Error: |
An error occurred. |
Outputting: |
The data is being copied/printed/scanned. |
No paper: |
There is no paper in the tray (copy/print mode). |
Stopped: |
Stopped, interrupted, waiting jam processing (each mode). |
Jam: |
The paper jammed during copying/printing. |
Scanning: |
The document is being scanned. |
Waiting output: |
The job has been scheduled and is waiting for copy/print/scan output. |
Total Page(s)
This displays the number of output pages (1 to 999) set for the job.
382 |
V Control panel (For administrator) |
|
Chapter 14 Control Panel Names |

14-2. LCD screen
Page(s) left
This displays the number of pages left to be output (1 to 9999).
Number of pages left to be output = Number of pages (per copy) x Number of copies set
zIf the number of pages left to be output is greater than 9999, [9999Ç] is displayed.
Minute(s) to go
This displays the time remaining until job completion in minutes (1 to 999).
zThe displayed time is an approximation.The actual time may be somewhat longer or shorter than the time displayed.
zIf the time remaining is greater than 999 minutes, [999Ç] is displayed.
zIf the time remaining is less than 1 minute, [<1] is displayed.
Changing job order
1
2
Touch the [ ], [
], [ ] key on the LCD screen to select the job to be processed first.
Touch the [ADVANCE] key on the LCD screen.
→ The selected job is displayed inverted and is moved to next after the job currently being output.
Job deletion
1
2
Touch the [ ], [
], [ ] key on the LCD screen to select the job to delete.
Touch the [DELETE] key on the LCD screen.
→ The selected job is deleted from the copier's E-RDH memory.
383 |
V Control panel (For administrator) |
|
Chapter 14 Control Panel Names |

V Control panel (For administrator)
Chapter 15 Printer Settings
This chapter explains the contents of the settings that can be made with operations on the copier's LCD screen.
15-1. Menu configuration......................................................................... |
385 |
|
15-2. Test print.......................................................................................... |
390 |
|
15-3. Controller settings .......................................................................... |
398 |
|
15-4. |
Print default setting ........................................................................ |
410 |
15-5. |
PCL setup ........................................................................................ |
420 |
15-6. |
Scan error list .................................................................................. |
428 |
15-7. |
Format HD........................................................................................ |
430 |
384
15-1. Menu configuration
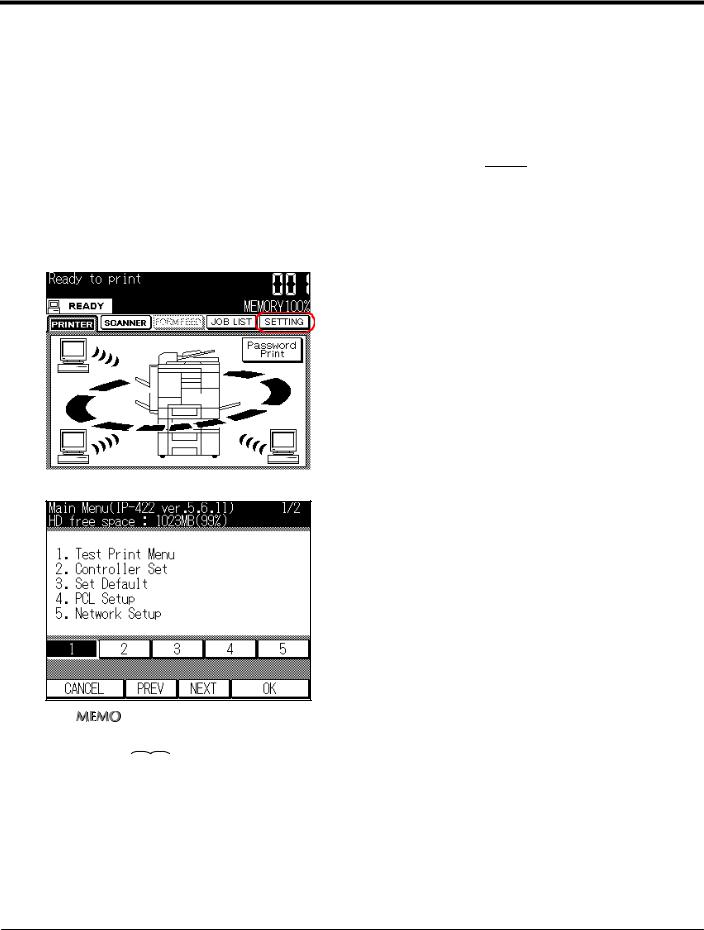
When making printer settings with operations from the copier, the [Main Menu] screen is displayed with the following procedure.
Displaying the Main Menu screen
1 With the [Copy basic mode] screen displayed, press the  button on the copier's
control panel.
→ The [Printer basic mode] screen is displayed on the LCD screen.
2 Touch the [SETTING] key on the LCD screen.
→ The [Main Menu] screen is displayed on the LCD screen.
zFor details on the network settings in [5. Network Setup], refer to [18-1. Method for setting network from control panel] (


 Page 452).
385 |
V Control panel (For administrator) |
|
Chapter 15 Printer Settings |

15-1. Menu configuration
The following settings can be made from the [Main Menu] screen.The setting items depend on whether or not the PostScript option is installed. The items marked with * in the table are only displayed when the PostScript option is installed.
The gray colored part in settings is a factory default.
Menu item |
|
Setting item |
|
Settings |
Reference |
|
|
page |
|||
|
|
|
|
|
|
1 Test Print Manu |
1 PCL Demo Page |
|
|
Page 390 |
|
|
|
|
|
|
|
|
2 |
PCL Font List |
|
|
Page 391 |
|
|
|
|
|
|
|
3 |
PS Demo Page * |
|
- |
Page 392 |
|
|
|
|
|
|
|
4 |
PS Font List * |
|
Page 393 |
|
|
|
|
|||
|
|
|
|
|
|
|
5 |
Config. Data |
|
|
Page 394 |
|
|
|
|
|
|
|
6 |
NIC Config. |
|
|
Page 396 |
|
|
|
|
|
|
2 Controller set |
1 |
Banner Page |
1 |
On |
Page 398 |
|
|
|
|
|
|
|
|
|
2 |
Off |
|
|
2 |
Banner Page Tray |
1 |
Auto Tray |
Page 400 |
|
|
|
2 |
Tray1 |
|
|
|
|
|
|
|
|
|
|
3 |
Tray2 |
|
|
|
|
|
|
|
|
|
|
4 |
Tray3 |
|
|
|
|
|
|
|
|
|
|
5 |
Tray4 |
|
|
|
|
|
|
|
|
|
|
6 |
Bypass Tray |
|
|
|
|
|
|
|
|
3 |
Spool |
1 |
On |
Page 402 |
|
|
|
2 |
Off |
|
|
|
|
|
|
|
|
4 |
Job Time Out |
1 |
5 sec |
Page 404 |
|
|
|
|
|
|
|
|
|
2 |
10 sec |
|
|
|
|
|
|
|
|
|
|
3 |
15 sec |
|
|
|
|
|
|
|
|
|
|
4 |
20 sec |
|
|
|
|
|
|
|
|
|
|
5 |
30 sec |
|
|
|
|
|
|
|
|
|
|
6 |
60 sec |
|
|
|
|
7 |
120 sec |
|
|
|
|
|
|
|
|
|
|
8 |
180 sec |
|
|
|
|
|
|
|
|
|
|
9 |
240 sec |
|
|
|
|
|
|
|
|
|
|
10 |
300 sec |
|
|
|
|
|
|
|
|
5 |
Scan Data Auto Del. |
1 |
Off |
Page 406 |
|
|
|
|
|
|
|
|
|
2 |
12 hour |
|
|
|
|
|
|
|
|
|
|
3 |
24 hour |
|
|
|
|
4 |
2 days |
|
|
|
|
|
|
|
|
|
|
5 |
4 days |
|
|
|
|
|
|
|
|
|
|
6 |
6 days |
|
|
|
|
|
|
|
|
|
|
7 |
8 days |
|
|
|
|
|
|
|
|
|
|
8 |
10 days |
|
|
|
|
|
|
|
|
6 |
PDL Select * |
1 |
Auto |
Page 408 |
|
|
|
2 |
PCL |
|
|
|
|
|
|
|
|
|
|
3 |
PostScript |
|
|
|
|
|
|
|
386 |
V Control panel (For administrator) |
|
Chapter 15 Printer Settings |
15-1. Menu configuration
|
Menu item |
|
Setting item |
|
Settings |
|
Reference |
||
|
|
|
|
page |
|||||
|
|
|
|
|
|
|
|
|
|
3 |
Set Default |
1 |
Default Paper |
1 |
A3R |
|
1 |
A3R |
Page 410 |
|
|
|
|
|
|
|
|
|
|
|
|
|
|
2 |
A4 |
|
2 |
A4 |
|
|
|
|
|
3 |
A5R |
|
3 |
A5R |
|
|
|
|
|
|
|
|
|
|
|
|
|
|
|
4 |
B4R |
|
4 |
B4R |
|
|
|
|
|
|
|
|
|
|
|
|
|
|
|
5 |
B5 |
|
5 |
B5 |
|
|
|
|
|
|
|
|
|
|
|
|
|
|
|
6 |
B6R |
|
6 |
F4R |
|
|
|
|
|
|
|
|
|
|
|
|
|
|
|
7 |
F4R |
|
7 |
11 x 17R |
|
|
|
|
|
|
|
|
|
|
|
|
|
|
|
8 |
11 x 17R |
|
8 |
8.5 x 14R |
|
|
|
|
|
|
|
|
|
|
|
|
|
|
|
9 |
8.5 x 14R |
|
9 |
8.5 x 11 |
|
|
|
|
|
10 |
8.5 x 11 |
10 |
5.5 x 8.5R |
|
|
|
|
|
|
|
|
(For U.S. and |
|
||
|
|
|
|
11 |
5.5 x 8.5R |
|
|||
|
|
|
|
|
|
Canada |
|
||
|
|
|
|
|
|
|
|
|
|
|
|
|
|
12 |
8KR |
|
|
market |
|
|
|
|
|
|
|
|
|
area) |
|
|
|
|
|
13 |
16K |
|
|
|
|
|
|
|
|
|
|
|
|
||
|
|
|
|
|
|
|
|
|
|
|
|
2 |
Duplex |
1 |
Off |
|
|
|
Page 412 |
|
|
|
|
2 |
Long Edge |
|
|
|
|
|
|
|
|
|
|
|
|
|
|
|
|
|
|
3 |
Short Edge |
|
|
|
|
|
|
|
|
|
|
|
|
|
|
|
|
3 |
Orientation |
1 |
Portrait |
|
|
|
Page 414 |
|
|
|
|
2 |
Landscape |
|
|
|
|
|
|
|
|
|
|
|
|
|
|
|
|
4 |
Copies |
|
|
- |
|
|
Page 416 |
|
|
|
|
|
|
|
|
|
|
|
|
5 |
Override Paper |
1 |
Off |
|
|
|
Page 418 |
|
|
|
|
2 |
8.5 x 11 → A4 |
|
|
|
|
|
|
|
|
|
|
|
|
|
|
|
|
|
|
3 |
A4 → 8.5 x 11 |
|
|
|
|
|
|
|
|
|
|
|
|
||
4 |
PCL Setup |
1 |
Point Size |
12.00 |
|
0.4 ~ 99.75 |
Page 421 |
||
|
|
2 |
Pitch |
10.00 |
|
0.44 ~ 99.95 |
Page 422 |
||
|
|
3 |
Font Number |
11 |
|
|
0 |
~ 88 |
Page 423 |
|
|
4 |
Form Lines |
60 |
|
|
5 |
~ 128 |
Page 424 |
|
|
5 |
CR/LF Mapping |
1 |
Off |
|
|
|
Page 425 |
|
|
|
|
2 |
CR |
|
|
|
|
|
|
|
|
|
|
|
|
|
|
|
|
|
|
3 |
LF |
|
|
|
|
|
|
|
|
|
|
|
|
|
|
|
|
|
|
4 |
CR/LF |
|
|
|
|
|
|
|
|
|
|
|
|
|
|
|
|
6 |
Input Tray |
1 |
Auto Tray |
|
|
|
Page 426 |
|
|
|
|
2 |
Tray1 |
|
|
|
|
|
|
|
|
|
|
|
|
|
|
|
|
|
|
3 |
Tray2 |
|
|
|
|
|
|
|
|
|
|
|
|
|
|
|
|
|
|
4 |
Tray3 |
|
|
|
|
|
|
|
|
|
|
|
|
|
|
|
|
|
|
5 |
Tray4 |
|
|
|
|
|
|
|
|
|
|
|
|
|
|
|
|
|
|
6 |
Bypass Tray |
|
|
|
|
|
|
|
|
|
|
|
|
|
|
|
|
7 |
Symbol Set |
|
|
- |
|
|
Page 427 |
|
|
|
|
|
|
|
|
|
|
387 |
V Control panel (For administrator) |
|
Chapter 15 Printer Settings |

15-1. Menu configuration
Menu item |
|
Setting item |
|
Settings |
Reference |
|
|
page |
|||
|
|
|
|
|
|
5 Network Setup |
1 |
Unit Info |
ROM Version |
Page 457 |
|
|
|
|
|
|
|
|
|
|
Serial Number |
|
|
|
|
|
|
|
|
|
|
|
Ethernet Address |
|
|
|
|
|
|
||
|
2 Update NIC |
1 YES |
Page 458 |
||
|
|
|
2 |
NO |
|
|
|
|
|
|
|
|
3 |
Print on Start up |
1 YES |
Page 464 |
|
|
|
|
2 |
NO |
|
|
|
|
|
|
|
|
4 |
TCP/IP Setup |
1 |
Enable TCP/IP |
Page 466 |
|
|
|
|
|
|
|
|
|
2 |
IP Address |
Page 468 |
|
|
|
|
|
|
|
|
|
3 |
Subnet Mask |
Page 470 |
|
|
|
|
|
|
|
|
|
4 |
Default Gateway |
Page 472 |
|
|
|
|
|
|
|
|
|
5 |
Base Port Number |
Page 474 |
|
|
|
|
|
|
|
|
|
6 |
Enable DHCP |
Page 476 |
|
|
|
|
|
|
|
|
|
7 |
IP Addr. in NVRAM |
Page 478 |
|
|
|
|
|
|
|
|
|
8 |
LPD Banner |
Page 480 |
|
|
|
|
||
|
5 NetWare Setup |
1 Enable NetWare |
Page 483 |
||
|
|
|
|
|
|
|
|
|
2 |
Server Name |
Page 485 |
|
|
|
|
|
|
|
|
|
3 |
Server Password |
Page 487 |
|
|
|
|
|
|
|
|
|
4 |
File Server |
Page 489 |
|
|
|
|
|
|
|
|
|
5 |
NDS Context |
Page 491 |
|
|
|
|
|
|
|
|
|
6 |
NDS Tree |
Page 493 |
|
|
|
|
|
|
|
|
|
7 |
Queue Scan Rate |
Page 495 |
|
|
|
|
|
|
|
|
|
8 |
Frame Type |
Page 497 |
|
|
|
|
|
|
|
|
|
9 |
Disable Bindery |
Page 499 |
|
|
|
|
|
|
388 |
V Control panel (For administrator) |
|
Chapter 15 Printer Settings |

15-1. Menu configuration
|
Menu item |
|
Setting item |
|
Settings |
Reference |
|
|
|
page |
|||
|
|
|
|
|
|
|
5 |
Network Setup |
6 |
AppleTalk Setup |
1 |
Enable AppleTalk |
Page 502 |
|
|
|
|
|
|
|
|
|
|
|
2 |
Printer Name |
Page 504 |
|
|
|
|
|
|
|
|
|
|
|
3 |
Zone Name |
Page 506 |
|
|
|
|
|
|
|
|
|
7 |
WINS Setup |
1 NetBIOS Name |
Page 509 |
|
|
|
|
|
|
|
|
|
|
|
|
2 |
Primary Server |
Page 511 |
|
|
|
|
|
|
|
|
|
|
|
3 |
Secondary Server |
Page 513 |
|
|
|
|
|
|
|
|
|
8 |
FTP Setup |
1 FTP Port Number |
Page 516 |
|
|
|
|
|
|
|
|
|
|
|
|
2 |
FTP Timeout |
Page 518 |
|
|
|
|
|
|
|
|
|
9 |
Email Setup |
1 SMTP Server Name |
Page 521 |
|
|
|
|
|
|
|
|
|
|
|
|
2 |
SMTP Port Number |
Page 523 |
|
|
|
|
|
|
|
|
|
|
|
3 |
SMTP Timeout |
Page 525 |
|
|
|
|
|
|
|
|
|
|
|
4 |
Max.Message Size |
Page 527 |
|
|
|
|
|
|
|
|
|
|
|
5 |
From |
Page 529 |
|
|
|
|
|
|
|
|
|
|
|
6 |
Subject |
Page 531 |
|
|
|
|
|
|
|
|
|
|
|
7 |
Message Body |
Page 533 |
|
|
|
|
|
||
|
|
10 DNS Setup |
1 DNS Server |
Page 536 |
||
|
|
|
|
|
|
|
|
|
|
|
2 |
NIC Domain Name |
Page 538 |
|
|
|
|
|
|
|
|
|
11 Admin Password |
|
- |
Page 460 |
|
|
|
|
|
|
|
|
|
|
12 |
Factory Default |
1 YES |
Page 540 |
|
|
|
|
|
2 |
NO |
|
|
|
|
|
|
|
|
6 |
Scan Error List |
|
- |
|
- |
Page 428 |
|
|
|
|
|
|
|
7 Format HD |
1 |
YES |
|
- |
Page 430 |
|
|
|
|
|
|
|
|
|
|
2 |
NO |
|
|
|
|
|
|
|
|
||
|
|
|
|
|
|
|
389 |
V Control panel (For administrator) |
|
Chapter 15 Printer Settings |
15-2. Test print
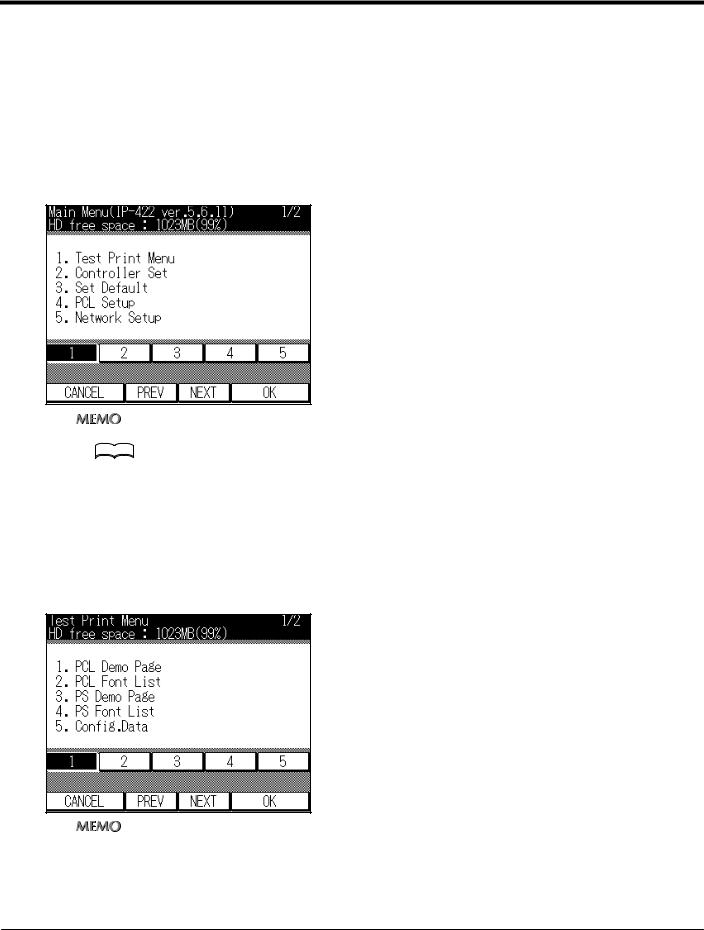
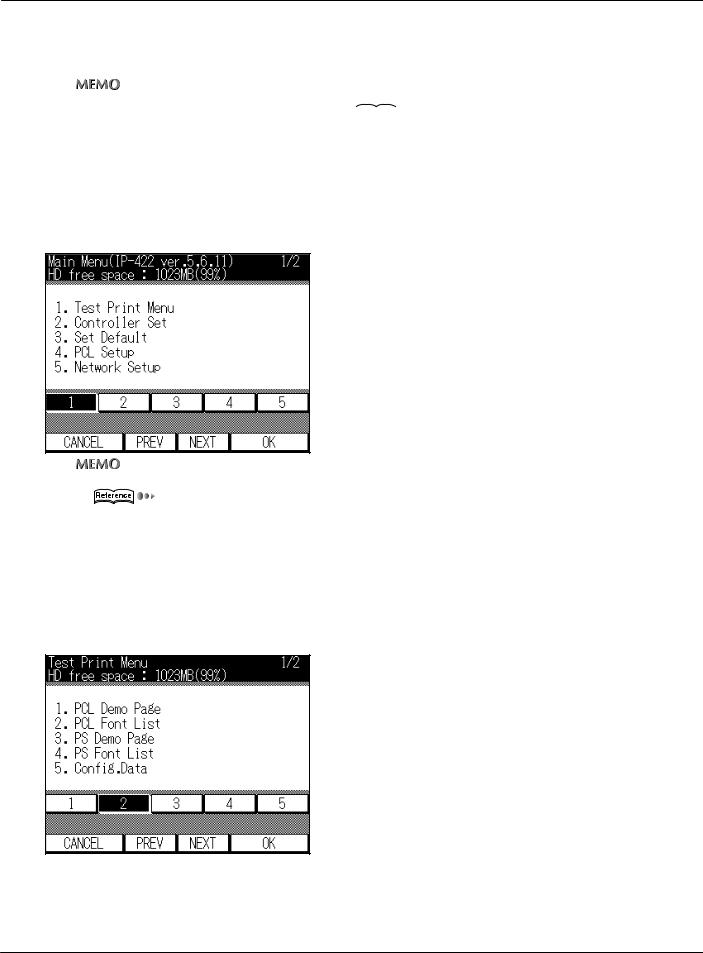
This can print samples of the fonts installed on the printer, a list of the printer default settings, etc. On the [Printer menu] screen, select [Test Print Menu].
PCL Demo Page
This prints samples of fonts installed on the printer.
1 Touch the [1] key on [Main Menu] screen on the LCD screen.
zFor details on the procedure for displaying the [Main Menu] screen, refer to [Displaying the Main Menu screen] ( 


 Page 385).
zThe [Main Menu] screen displays with [1] already selected.
2 Touch the [OK] key on the LCD screen.
→ The [Test Print Menu] screen is displayed.
3 Touch the [1] key on the LCD screen.
zThe [Test Print Menu] screen displays with [1] already pressed.
390 |
V Control panel (For administrator) |
|
Chapter 15 Printer Settings |
15-2. Test print
4 Touch the [OK] key on the LCD screen.
→ The display returns to the [Main Menu] screen and the PCL Demo Page is printed.
zFor a printed sample, refer to [29-4. Function list] (


 Page 688).
PCL Font List
This prints the list of fonts installed on the printer.
1 Touch the [1] key on [Main Menu] screen on the LCD screen.
zFor |
details on the procedure for displaying the [Main Menu] screen, refer to [Displaying the Main Menu screen] |
( |
Page 385). |
zThe [Main Menu] screen displays with [1] already selected.
2
3
Touch the [OK] key on the LCD screen.
→ The [Test print] screen is displayed.
Touch the [2] key on the LCD screen.
4 Touch the [OK] key on the LCD screen.
→ The display returns to the [Main Menu] screen, and the PCL font list is printed.
391 |
V Control panel (For administrator) |
|
Chapter 15 Printer Settings |
15-2. Test print
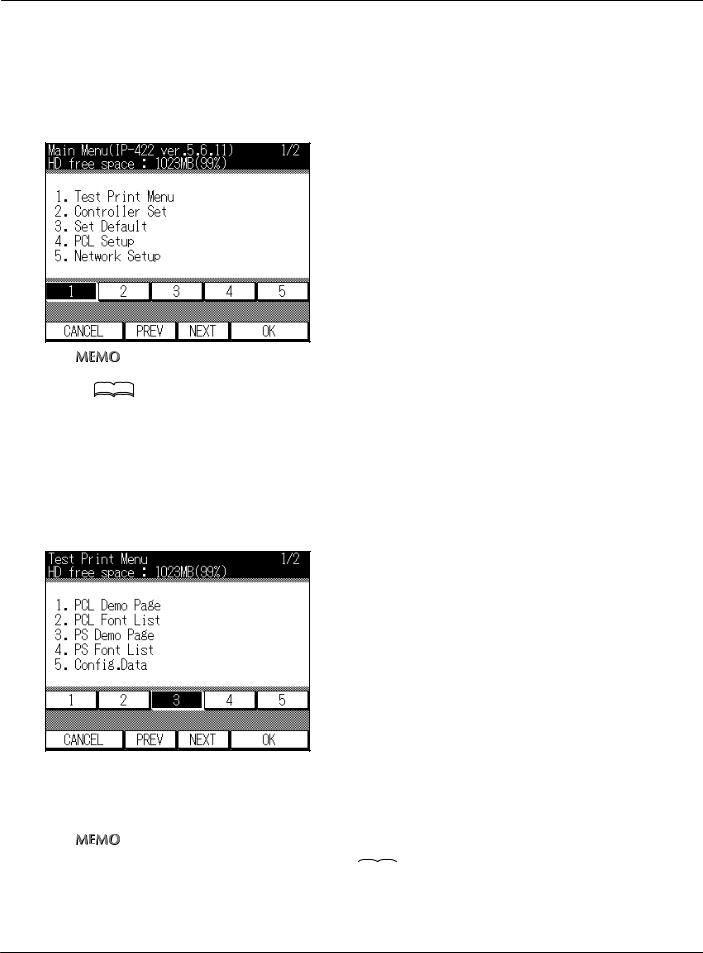
PS Demo Page (only when PostScript option installed)
This prints a demo page for the Adobe PostScript.
1 Touch the [1] key on [Main Menu] screen on the LCD screen.
zFor details on the procedure for displaying the [Main Menu] screen, refer to [Displaying the Main Menu screen] ( 


 Page 385).
zThe [Main Menu] screen displays with [1] already selected.
2
3
Touch the [OK] key on the LCD screen.
→ The [Test Print Menu] screen is displayed.
Touch the [3] key on the LCD screen.
4 Touch the [OK] key on the LCD screen.
→ The display returns to the [Main Menu] screen and the PostScript demo page is printed.
zFor a printed sample, refer to [PostScript font list] (


 Page 712).
392 |
V Control panel (For administrator) |
|
Chapter 15 Printer Settings |
15-2. Test print
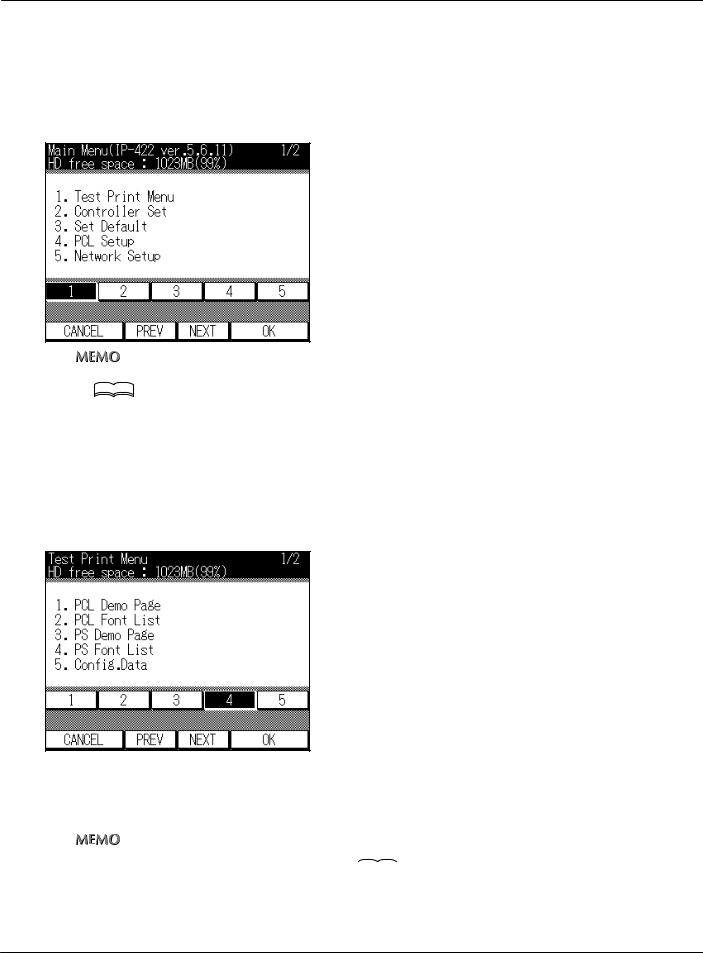
PS Font List (only when PostScript option installed)
This prints samples of the PostScript fonts installed on the printer.
1 Touch the [1] key on [Main Menu] screen on the LCD screen.
zFor details on the procedure for displaying the [Main Menu] screen, refer to [Displaying the Main Menu screen] ( 


 Page 385).
zThe [Main Menu] screen displays with [1] already selected.
2
3
Touch the [OK] key on the LCD screen.
→ The [Test Print Menu] screen is displayed.
Touch the [4] key on the LCD screen.
4 Touch the [OK] key on the LCD screen.
→ The display returns to the [Main Menu] screen and the PostScript font list is printed.
zFor a printed sample, refer to [PostScript font list] (


 Page 712).
393 |
V Control panel (For administrator) |
|
Chapter 15 Printer Settings |
15-2. Test print
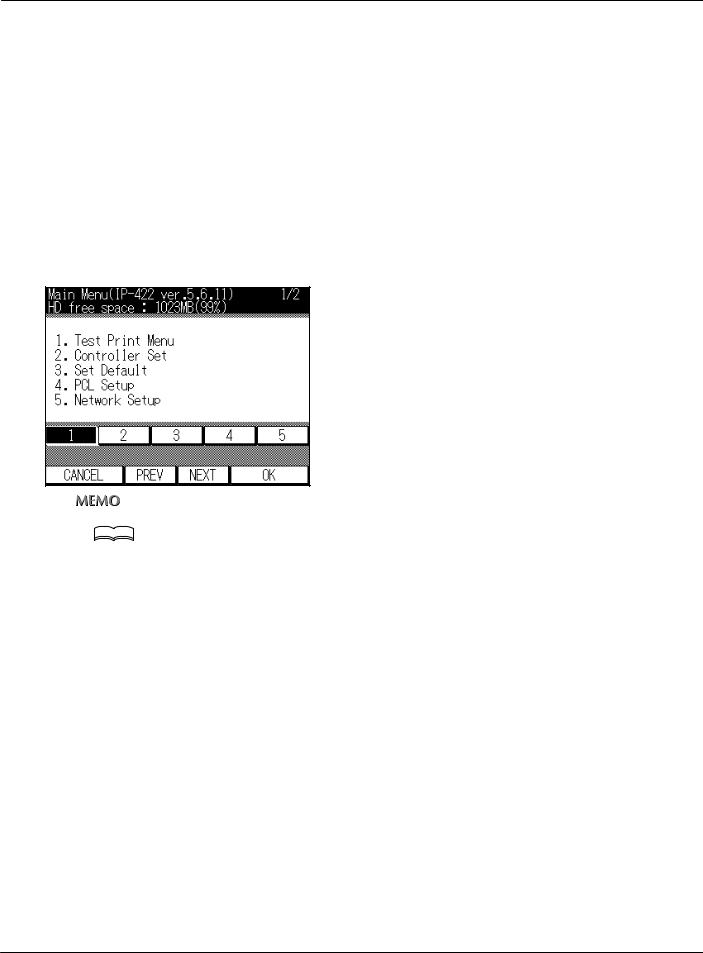
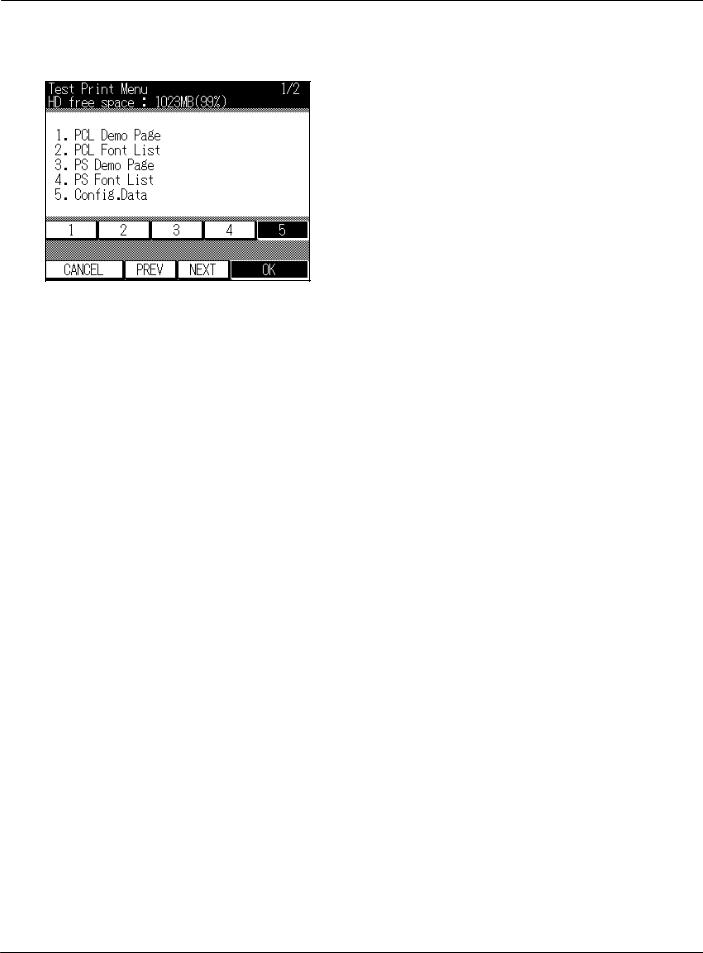
Config.Data
This prints a list of print controller setting information.
The following information is printed on the setting information list.
Version Info
Current Settings (Resolution/Print Quality/Copy mode timeout/Default Paper size/Language)Installed Paper (Manual/Tray 1/Tray 2/Tray 3/Tray 4)
Device Status (Total RAM installed/Hard disk free space)Miscellaneous (Total print page count)
1 Touch the [1] key on [Main Menu] screen on the LCD screen.
zFor details on the procedure for displaying the [Main Menu] screen, refer to [Displaying the Main Menu screen] ( 


 Page 385).
zThe [Main Menu] screen displays with [1] already selected.
2 Touch the [OK] key on the LCD screen.
→ The [Test Print Menu] screen is displayed.
394 |
V Control panel (For administrator) |
|
Chapter 15 Printer Settings |
15-2. Test print
3 Touch the [3] key on the LCD screen. (When PostScript option is installed, touch the [5] key on the LCD screen).
4 Touch the [OK] key on the LCD screen.
→ The display returns to the [Main Menu] screen and the setting information list is printed.
395 |
V Control panel (For administrator) |
|
Chapter 15 Printer Settings |

15-2. Test print
NIC Config.
This prints information concerning network settings.
The following contents are printed.
When network settings are made or changed, this information can be printed out to check the contents of the settings.
396 |
V Control panel (For administrator) |
|
Chapter 15 Printer Settings |
15-2. Test print
1 Touch the [1] key on [Main Menu] screen on the LCD screen.
zFor details on the procedure for displaying the [Main Menu] screen, refer to [Displaying the Main Menu screen] ( 


 Page 385).
zThe [Main Menu] screen displays with [1] already selected.
2
3
Touch the [OK] key on the LCD screen.
→ The [Test Print Menu] screen is displayed.
Touch the [4] key on the LCD screen. (When PostScript option is installed, touch the [6] key on the LCD screen.)
To select [6], touch the [Next] key on the LCD screen.
4 Touch the [OK] key on the LCD screen.
→ The network setting list is printed.
397 |
V Control panel (For administrator) |
|
Chapter 15 Printer Settings |
 Loading...