


III FAX
This chapter explains the operations for sending/receiving faxes using a computer.
Chapter 7 Fax Functions (PC-Fax)... |
267 |
Chapter 8 Sending Faxes.................. |
272 |
Chapter 9 Phonebook Registration . 279 |
|
Chapter 10 Receiving Faxes............. |
293 |
266

III FAX
Chapter 7 Fax Functions (PC-Fax)
You can send and receive faxes directly on the computer without using paper. This is called [PC-Fax].
This chapter summarizes the PC-Fax functions and explains the general flow of their processing.
7-1. |
Sending faxes from the computer ................................................... |
268 |
7-2. |
Receiving faxes with the computer ................................................. |
269 |
7-3. |
Registering recipient names and their fax numbers. .................... |
270 |
7-4. |
Using PC-Fax..................................................................................... |
271 |
267
7-1. Sending faxes from the computer
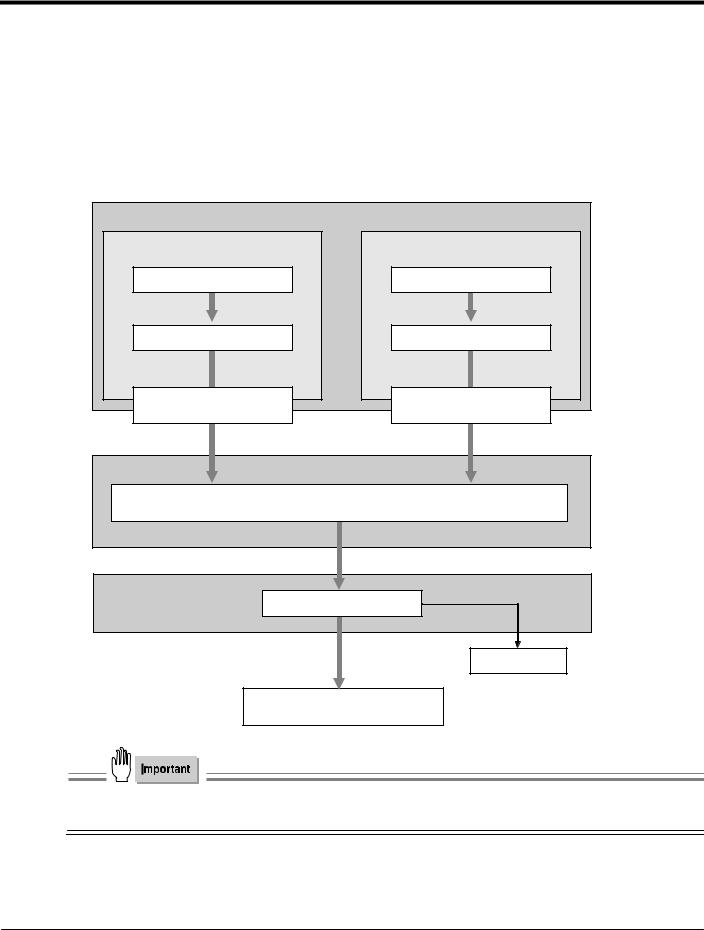
Normally, when a fax is sent, a handwritten or printed document is set in the fax machine and transmitted. When the PC-Fax functions are used, you can use the the computer to send and receive faxes directly without using paper.
The transmission command sent from the application is received by the printer driver.
When this printing system is used as a local printer, data is sent to the controller via the parallel interface (IEEE1284); when it is used as a network printer, the data is sent via Ethernet (TCP/IP, IPX/SPX). The Print Controller executes rasterizing processing for the picture (converting the output characters and pictures into bit-map data). This data is accumulated in the E-RDH memory in the copier and transmitted as a fax.
|
Computer |
Using as local printer |
Using as network printer |
Application |
Application |
Transmission |
Transmission |
command |
command |
Printer driver |
Printer driver |
Parallel interface |
Ethernet |
(IEEE1284) |
(TCP/IP, IPX/SPX) |
Print Controller
PDL processing (rasterizing)
copier
E-RDH memory
Printing with copier
Fax transmission
●To use PC-Fax, it is necessary to install the optional fax kit on the copier main unit. For details, ask your service representative.
268 |
III FAX Chapter 7 Fax Functions (PC-Fax) |

7-2. Receiving faxes with the computer
You can check fax documents received with the copier on the computer's screen.
After received fax data is accumulated into the copier's E-RDH memory, it can be printed on the copier. When this data is checked on the computer, it is stored from the E-RDH memory to the Print Controller's hard disk, then sent via the Ethernet to the computer's hard disk.
Fax reception
copier
E-RDH memory
Printing with copier
Print Controller
Hard disk
|
Ethernet |
Computer |
(TCP/IP, IPX/SPX) |
|
|
|
Hard disk |
●To use PC-Fax, it is necessary to install the optional fax kit on the copier main unit. For details, ask your service representative.
269 |
III FAX Chapter 7 Fax Functions (PC-Fax) |

7-3. Registering recipient names and their fax numbers.
You can register and manage recipient names and their fax numbers in the phonebook.
These transmission recipients can be put together into groups. You can send a document to all the members of a group with just a single operation.
Phonebook
Broadcast Group 1 |
Broadcast Group 2 |
|
|
|
|
|
|
|
|
|
|
|
|
|
|
|
|
|
|
|
|
|
|
|
|
|
|
|
|
|
|
|
|
|
|
|
|
|
|
|
|
|
|
|
|
|
|
|
|
|
|
|
|
|
|
|
|
|
|
|
|
|
|
|
|
|
|
|
|
|
|
|
|
|
|
|
|
|
|
|
|
|
|
|
|
|
|
|
|
|
|
|
|
|
|
|
|
|
|
|
|
|
|
|
|
|
|
|
|
|
|
|
|
|
|
|
|
|
|
|
|
|
|
|
|
|
|
|
|
|
|
|
|
|
|
|
|
|
|
|
|
|
|
|
|
|
|
|
|
|
|
|
|
|
|
|
|
|
|
|
|
|
|
|
|
|
|
|
|
|
|
|
|
|
|
|
|
|
|
|
|
|
|
|
|
|
|
|
|
|
|
|
|
|
|
|
|
|
|
|
|
|
|
|
|
|
|
|
|
|
|
|
|
|
|
|
|
|
|
|
|
|
|
|
|
|
|
|
|
|
|
|
|
|
|
|
|
|
|
|
|
|
|
|
|
|
|
|
|
|
|
|
|
|
|
|
|
|
|
|
|
|
|
|
|
|
|
|
|
|
|
|
|
|
|
|
|
|
|
|
|
|
|
|
|
|
|
|
|
|
|
|
|
|
|
|
|
|
|
|
|
|
|
|
|
|
|
|
|
|
|
|
|
|
|
|
|
|
|
|
|
|
|
|
|
|
|
|
|
|
|
|
|
|
|
|
|
|
|
|
|
|
|
|
|
|
|
|
|
|
|
|
|
|
|
|
|
|
|
|
|
|
|
|
|
|
|
|
|
|
|
|
|
|
|
|
|
|
|
|
|
|
|
|
|
|
|
|
|
|
|
|
|
|
|
|
|
|
|
|
|
|
|
|
|
|
|
|
|
|
|
|
|
|
|
|
|
|
|
|
|
|
|
|
|
|
|
|
|
|
|
|
|
|
|
|
|
|
|
|
|
|
|
|
|
|
|
|
|
|
|
|
|
|
|
|
|
|
|
|
|
|
|
|
|
|
|
|
|
|
|
|
|
|
|
|
|
|
|
|
|
|
|
|
|
|
|
|
|
270 |
|
|
|
|
III FAX Chapter 7 Fax Functions (PC-Fax) |
||||||||||||
7-4. Using PC-Fax
OSs supported by PC-Fax
The PC-Fax functions are executed using the PCL driver. The PC-Fax functions work on the following operations systems.
Windows 95
Windows 98
Windows Me
Windows NT 4.0
Windows 2000
Windows XP
Setting the fax unit
First, ready the fax kit installed on the copier for use.
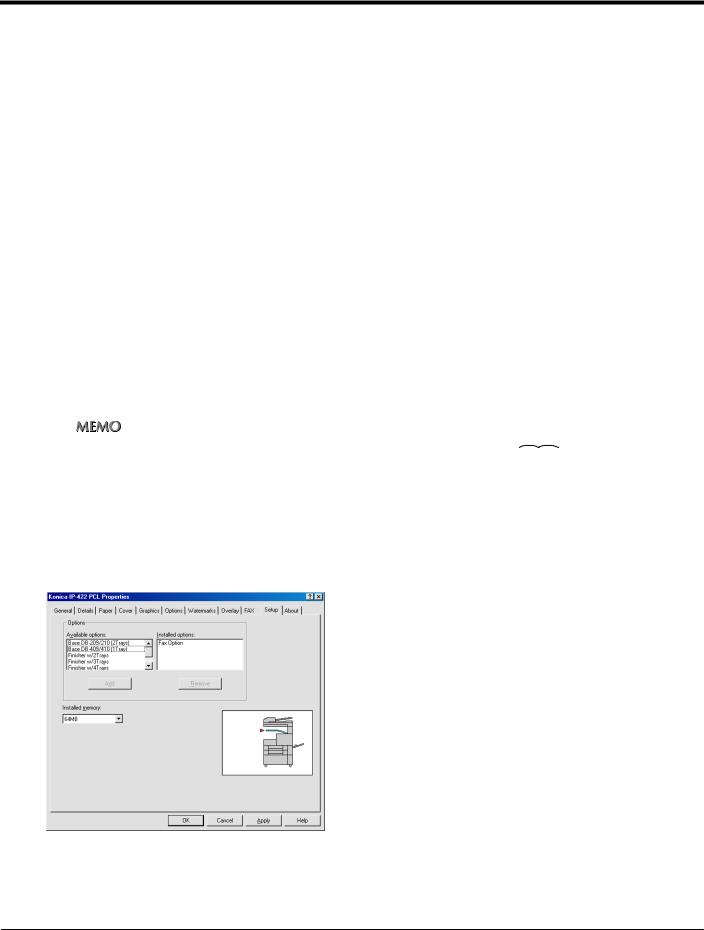
1 Display the PCL driver [Properties].
zFor details on how to display [Properties], refer to [3-1. Setting printer functions] (


 Page 119).
2
3
Select the [Setup] tab.
In [Available options], select [Fax option], then click the [Add] button.
[Fax option] is displayed on the [Installed options].
4 Click the [OK] button.
271 |
III FAX Chapter 7 Fax Functions (PC-Fax) |

III FAX
Chapter 8 Sending Faxes
This chapter explains the procedures for sending faxes.
8-1. |
Transmission procedure .................................................................. |
273 |
8-2. |
PC-Fax transmission error reports.................................................. |
278 |
272
8-1. Transmission procedure
This section explains how to use a computer to send files as faxes using PC-Fax.
Fax transmission
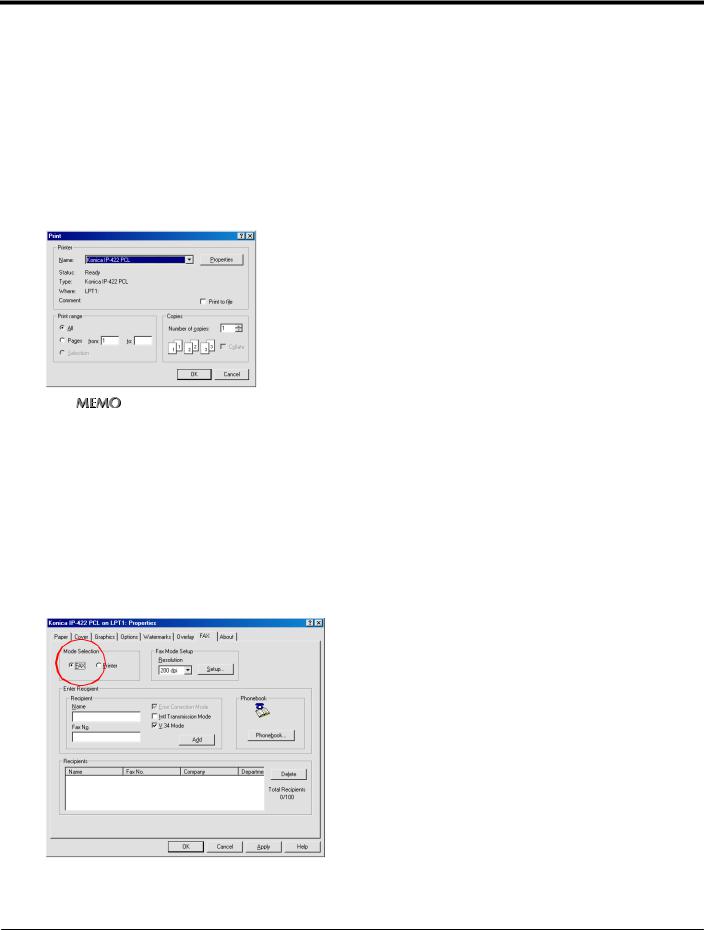
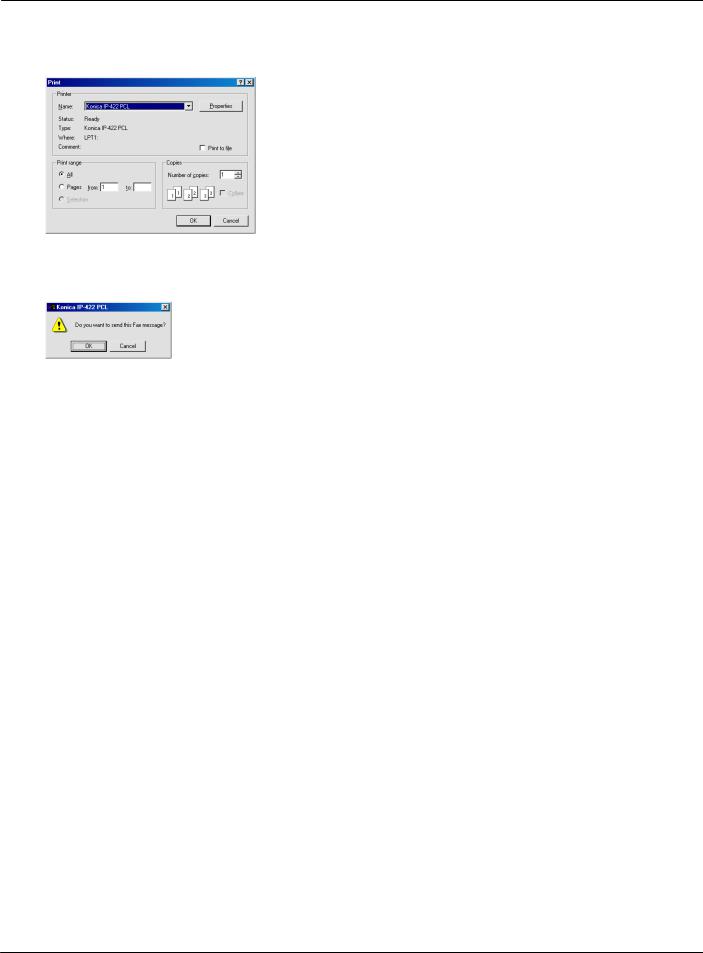
1 Open data with the application, then execute [Print].
→ The [Print] screen is displayed.
2 Check that the [Name] is [Konica IP-xxx PCL].
zThe model name of print controller is displayed in [xxx].
3 Click the [Properties] button.
→ The [Properties] screen is displayed.
4
5
Select the [FAX] tab.
In [Mode Selection], select the [FAX].
273 |
III FAX Chapter 8 Sending Faxes |
8-1. Transmission procedure
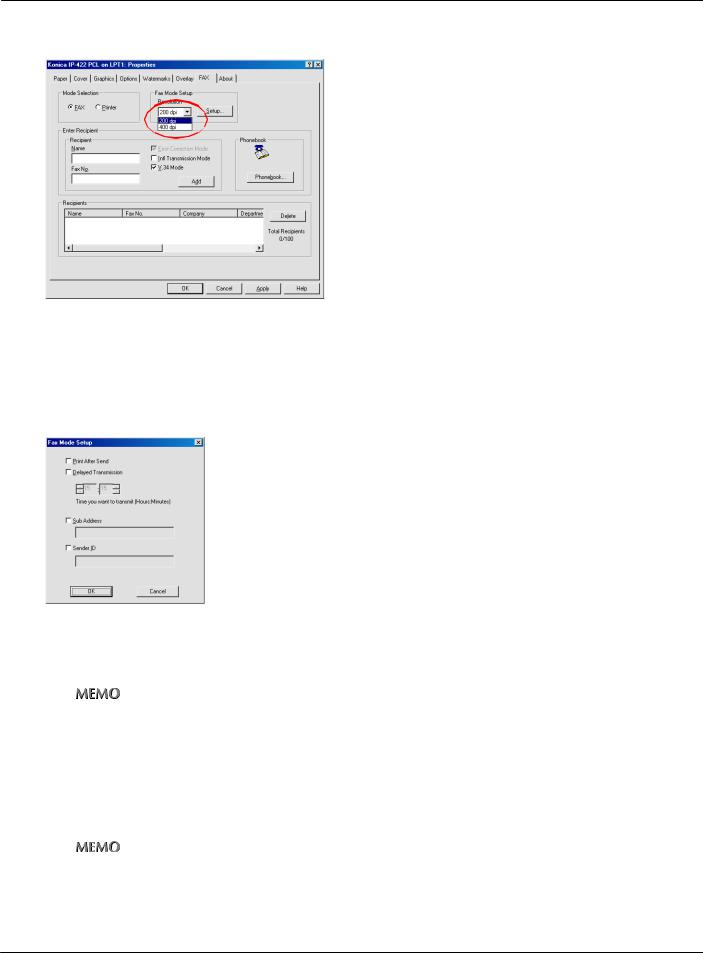
6 In [Resolution], select either [200 dpi] (fine mode) or [400 dpi] (super fine mode).
7
8
Click the [Setup] button.
→ The [Fax Mode Setup] screen is displayed.
To print a file after a fax is sent, select [Print After Send].
9 To set a time to send the fax later, select [Delayed Transmission], then at [Time you want to transmit], either click the [▲] or [▼] button or key in the time.
zWhen using timer send, check that the clocks on the computer and the copier are synchronized.If the send time is earlier than the Copier current time, the fax is sent the next day.
Example: Send time 12:00
Copier current time 12:10
→Fax sent at 12:00 the next day
10 For confidential transmission, select or input the [Sub Address] and [Sender ID].
zIt is possible to execute confidential communications with another fax model by using F codes.
zThe sub-address can be a number of up to 20 byte digits
zUp to 20 byte numbers, #, and * can be input as the ID.
zFor details on sub-addresses and send IDs, refer to the fax kit user’s manual.
274 |
III FAX Chapter 8 Sending Faxes |
8-1. Transmission procedure
11 Click the [OK] button.
→ The display returns to the [Properties] screen.
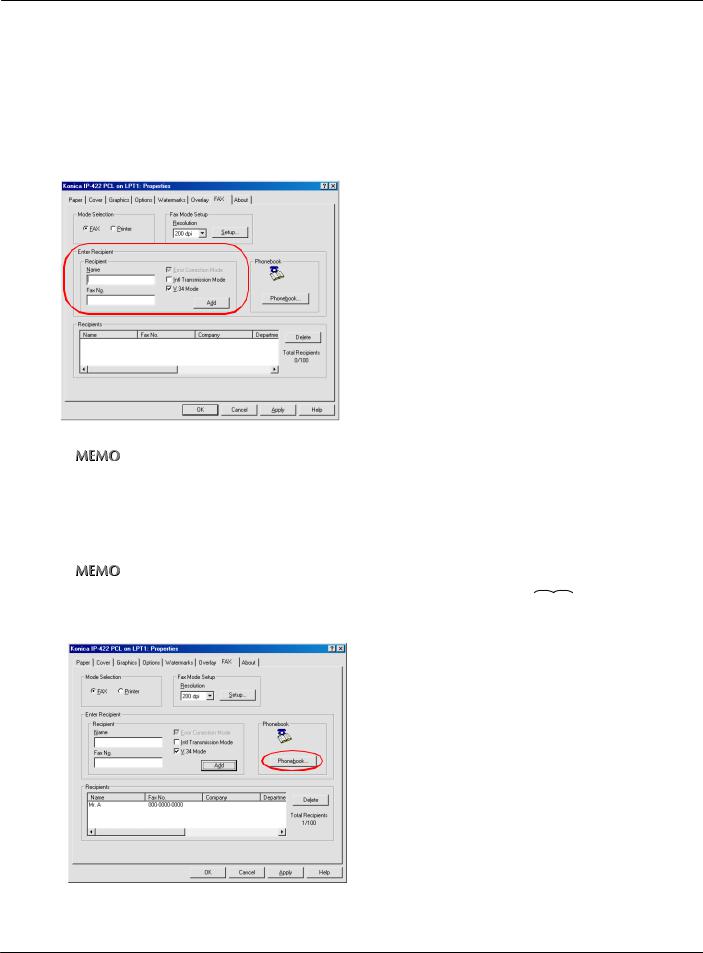
12 Specifying the fax destination.
When inputting the fax recipient
At [Recipient], input the [Name] and [Fax No.], then click the [Add] button.
→ The recipient input into the [Recipient] is displayed.
zThe [Name] may be up to 40 byte characters.
zThe [Fax No.] may be up to 38 byte numbers (0 to 9), hyphens, #, *, E, P, T and spaces.
zUp to 100 recipients may be registered in the [Recipient].
Selecting the recipient from the phonebook
This procedure selects a recipient preset in the phone book.
zFor details on phonebook registration, refer to [Chapter 9 Phonebook Registration] (


 Page 279)
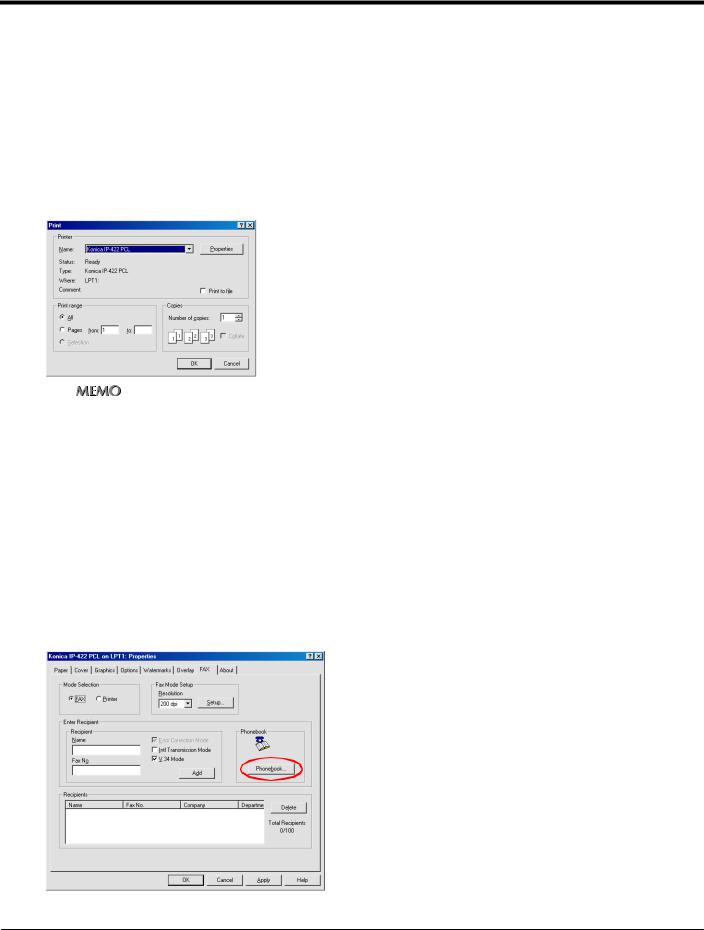
1 Click the [Phonebook] button.
→ The [Phonebook] screen is displayed.
275 |
III FAX Chapter 8 Sending Faxes |
8-1. Transmission procedure
2
3
Select the recipient or broadcast group to send the fax to.
Click the [Add Recipient] button.
→ The selected recipient is displayed in the [Recipient].
zWhen a broadcast group is selected, all the members of the group are displayed in the [Recipient].
4 Check the recipient, then click the [OK] button.
→ The display returns to the [FAX] tab.
13 Check that the party for file transmission is displayed in the [Recipient].
zTo delete a recipient, select the recipient to delete from the [Recipients], then click the [Delete] button.
zThere is no need to change the [Error Correction Mode], [Intl Transmission Mode], and [V.34 Mode] checkboxes. For details, refer to the fax kit user’s manual.
14 Click the [OK] button.
→ The display returns to the [Print] screen.
276 |
III FAX Chapter 8 Sending Faxes |
8-1. Transmission procedure
15 Click the [OK] button.
→ The fax transmission check message is displayed.
16 Click the [OK] button.
→ The fax is sent to the specified recipient.
277 |
III FAX Chapter 8 Sending Faxes |
8-2. PC-Fax transmission error reports
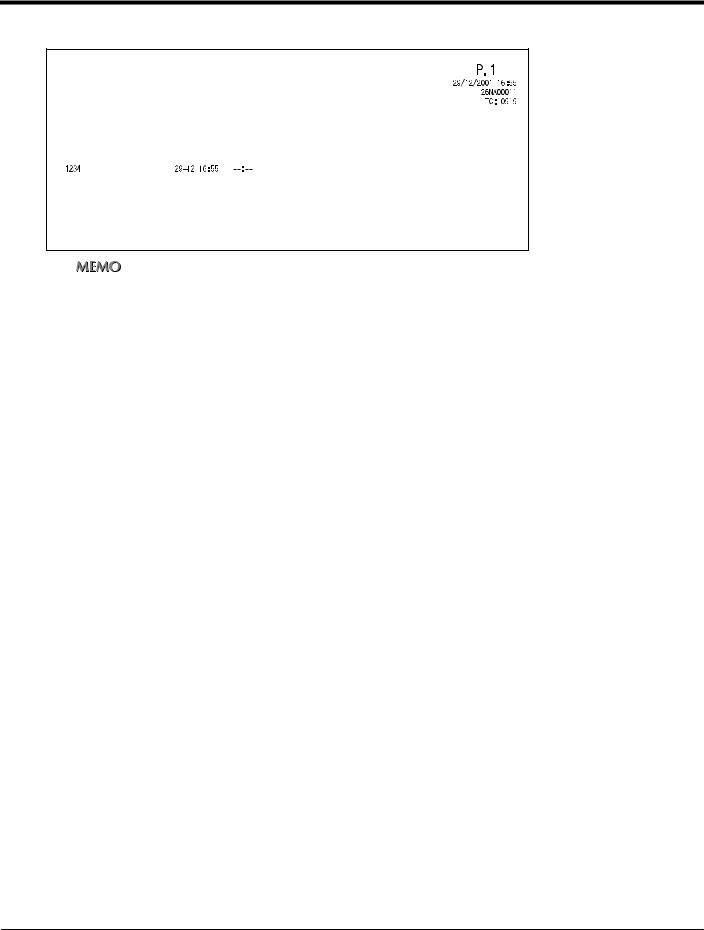
If an error occurs during PC-Fax transmission, an error report is printed automatically.
PC-Fax Tx Error Report
REMOTE STATION |
CREATE |
START |
Cause |
Name |
|
|
|
|
|
|
|
|
|
|
|
Mem Full |
test .pdf |
|
|
|
|
|
|
Factor |
Cancel : Stop PC-Fax job, ID difer : EKC/ECM user ID differ, Limit over : EKC/ECM counter limit over |
||||
|
HD full : Hard disc full, Mem full : Memory over |
|
|||
Failed to PC-Fax Tx. Please check and try PC-Fax Tx again!
zIf you do not want error reports printed automatically, use the operator panel keys and switch [Report output settings] [PC-Fax transmission error reports] - [Off].
REMOTE STATION
Fax number for the first recipient
CREATE
Time at which PC-Fax transmission was executed on the computer
START
Time specified for the timer reservation
Cause
Cause of the error
Name
Job name or user name
278 |
III FAX Chapter 8 Sending Faxes |

III FAX
Chapter 9 Phonebook Registration
You can register and manage recipient information in the phonebook.
This chapter explains how to use the phonebook.
9-1. |
Registering phonebook .................................................................... |
280 |
9-2. |
Managing phonebooks ..................................................................... |
289 |
9-3. |
Phonebook usage ............................................................................. |
292 |
279
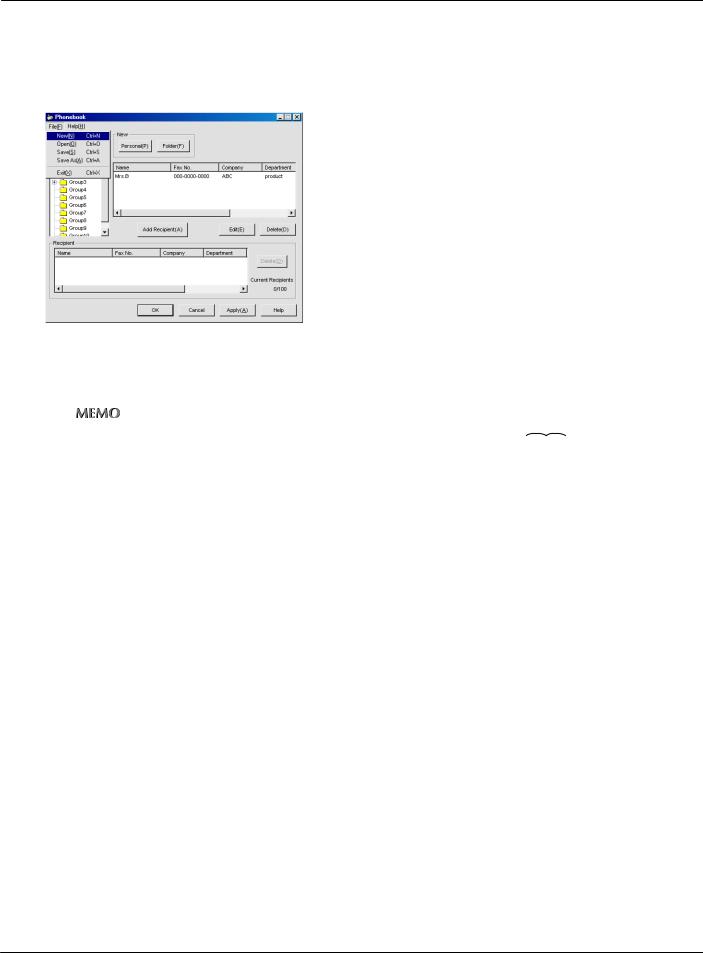
9-1. Registering phonebook
Registering parties to which you send fax documents into the phonebook.
Registering recipient information
1
2
Open data with the application, then execute [Print].
→ The [Print] screen is displayed.
Check that [Name] is [Konica IP-xxx PCL].
zThe model name of print controller is displayed in [xxx].
3
4
5
6
Click the [Properties] button.
→ The [Properties] screen is displayed.
Select the [FAX] tab.
In [Mode Selection], select the [FAX].
Click the [Phonebook] button.
→ The [Phonebook] screen is displayed.
280 |
III FAX Chapter 9 Phonebook Registration |
9-1. Registering phonebook
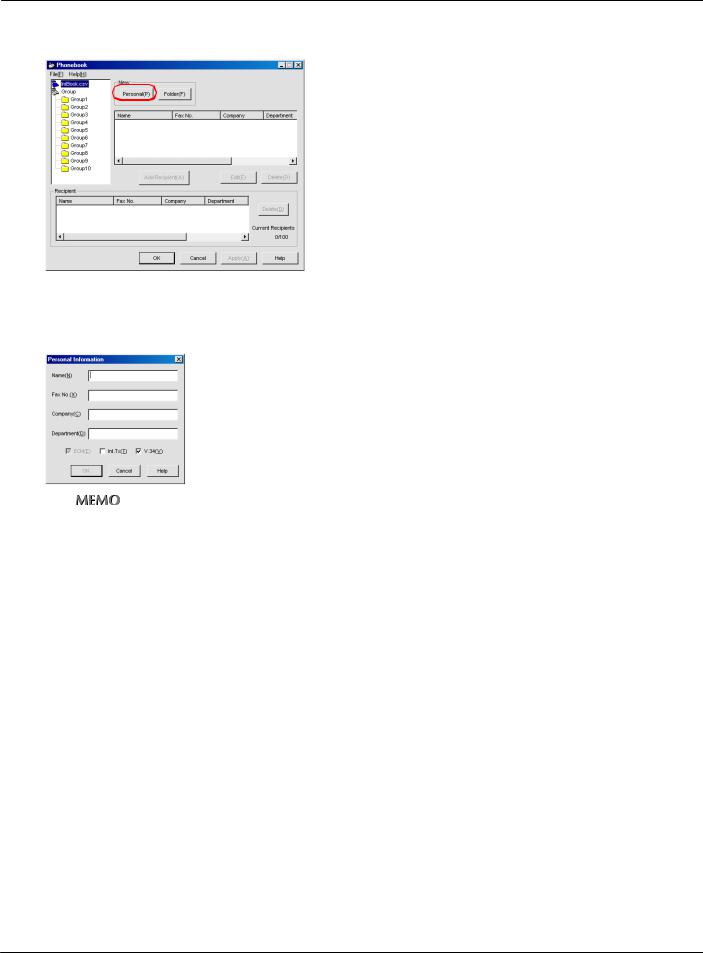
7 Click the [Personal] button.
→ The [Personal Information] screen is displayed.
8 Input the [Name], [Fax No.], [Company], and [Department].
zWhen inputting into the name column of the phonebook, add honorifics.
zThere is no need to change the [ECM], [Int.Tx], and [V.34] checkboxes. For details, refer to the fax kit user’s manual.
zFor the [Name], [Company], and [Department], up to 40 byte characters may be input.
z[Fax No.] may be up to 38 byte numbers (0 to 9), hyphens, #, *, E, P, T and spaces.
9 Click the [OK] button.
→ The recipient is registered and displayed in the recipient column.
281 |
III FAX Chapter 9 Phonebook Registration |
9-1. Registering phonebook
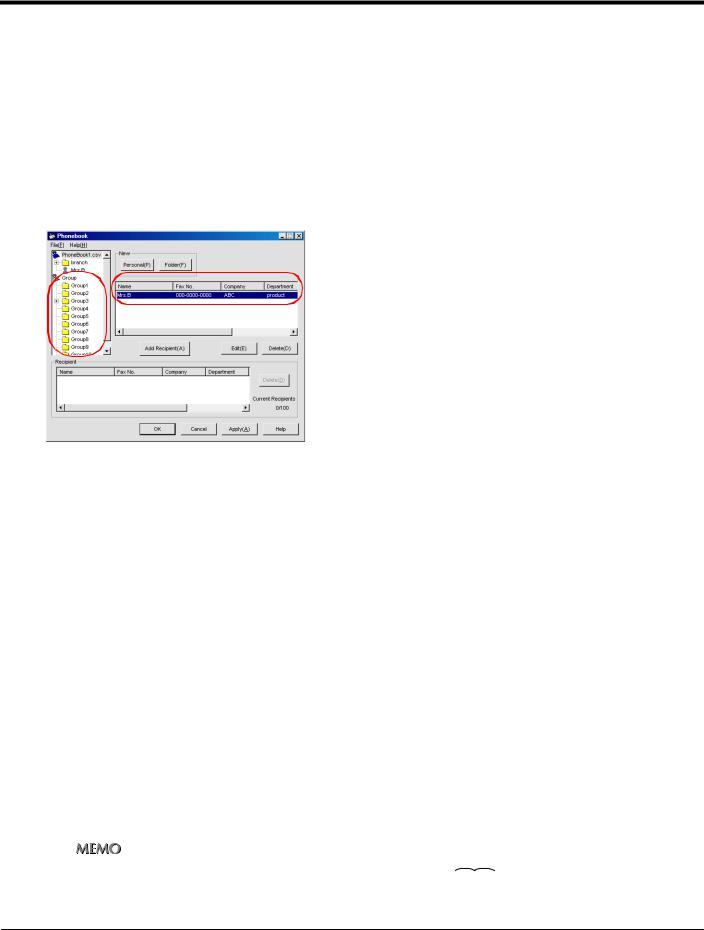
Creating groups of recipients
Recipients can be registered into groups, such as [suppliers] or [branch companies].
● Broadcast transmission is not possible using groups prepared here.
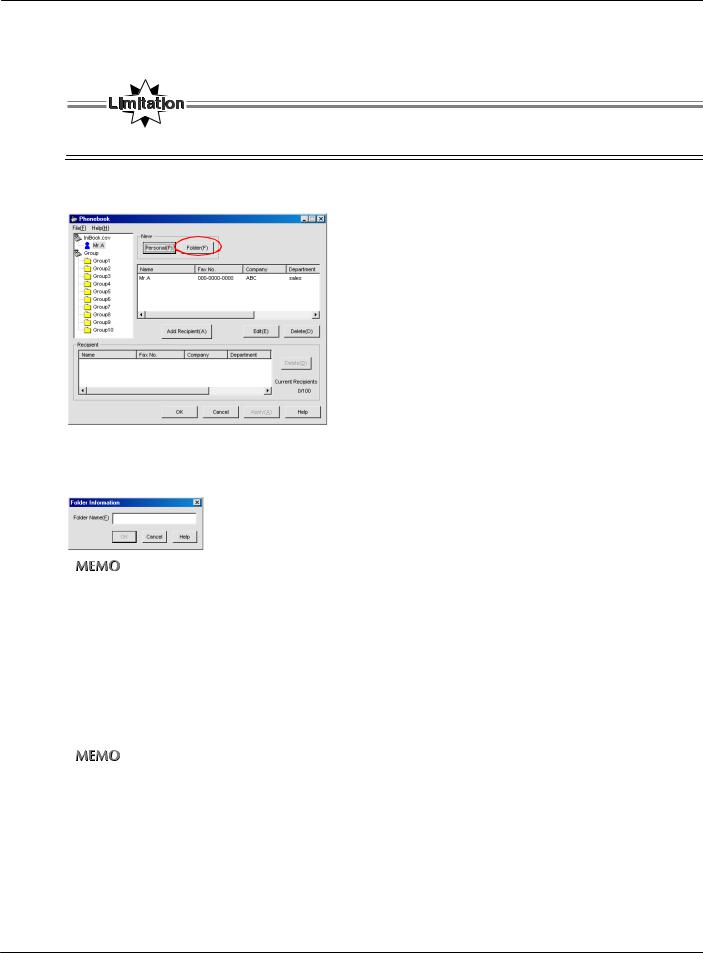
1 On the [Phonebook] screen, click the [Folder] button.
→ The [Folder Information] screen is displayed.
2 Input the [Folder Name].
zThe folder name may be up to 40 byte characters.
3 Click the [OK] button.
→ The folder is registered and displayed in the layer column.
4 Select the recipient to be registered into a group from the left-side directory tree.
5 Right click, then select [Copy] or [Cut].
zFolders can be set up to three layers deep.
6 Select the group into which to register the recipient from the left-side directory tree.
7 Right click, then select [Paste].
→ The recipient information is registered in the group.
282 |
III FAX Chapter 9 Phonebook Registration |
9-1. Registering phonebook
Revising recipient information
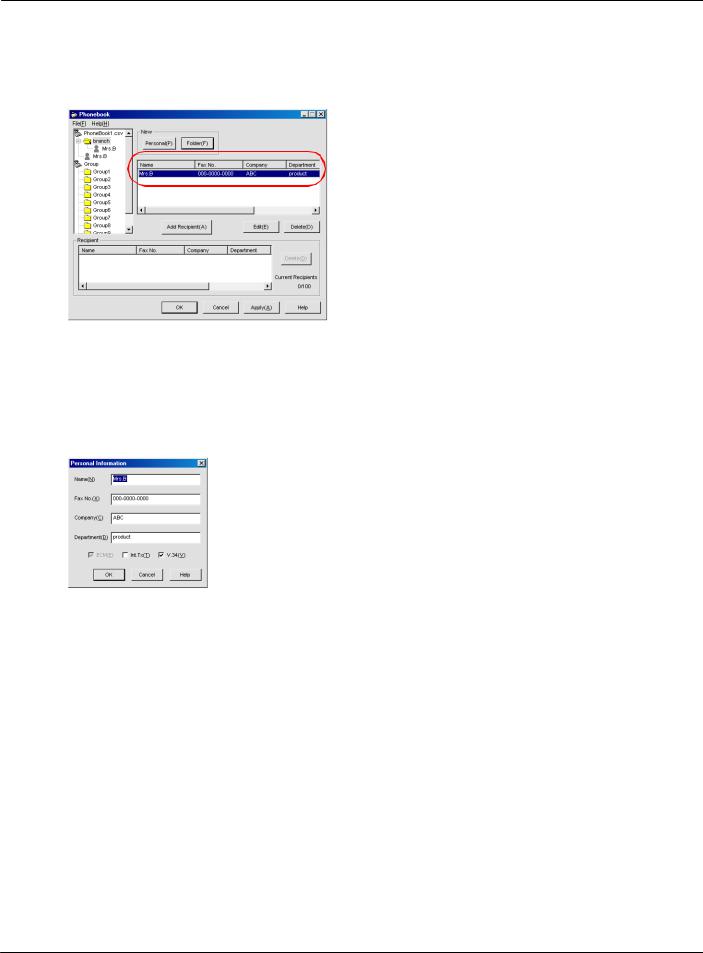
1 On the [Phonebook] screen, select the recipient to be changed from the recipient information column.
→ The selected recipient information is displayed inverted.
2
3
Click the [Edit] button.
→ The [Personal Information] screen is displayed
Revise any necessary items.
283 |
III FAX Chapter 9 Phonebook Registration |
9-1. Registering phonebook
Deleting unnecessary recipients and folders
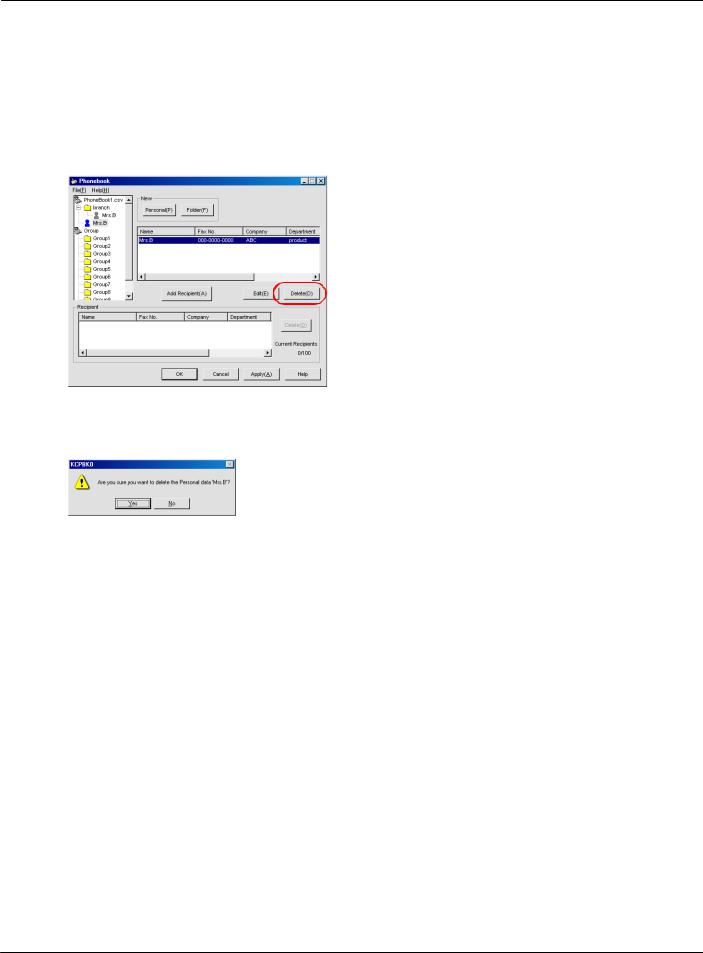
On the [Phonebook] screen, select the recipient or folder to delete.
1
2
On the [Phonebook] screen, select the recipient information or folder to be deleted.
→ The selected recipient information or folder is displayed inverted.
Click the [Delete] button.
→ The confirmation message is displayed.
3 Click the [Yes] button.
→ The specified recipient or folder is deleted.
284 |
III FAX Chapter 9 Phonebook Registration |
9-1. Registering phonebook
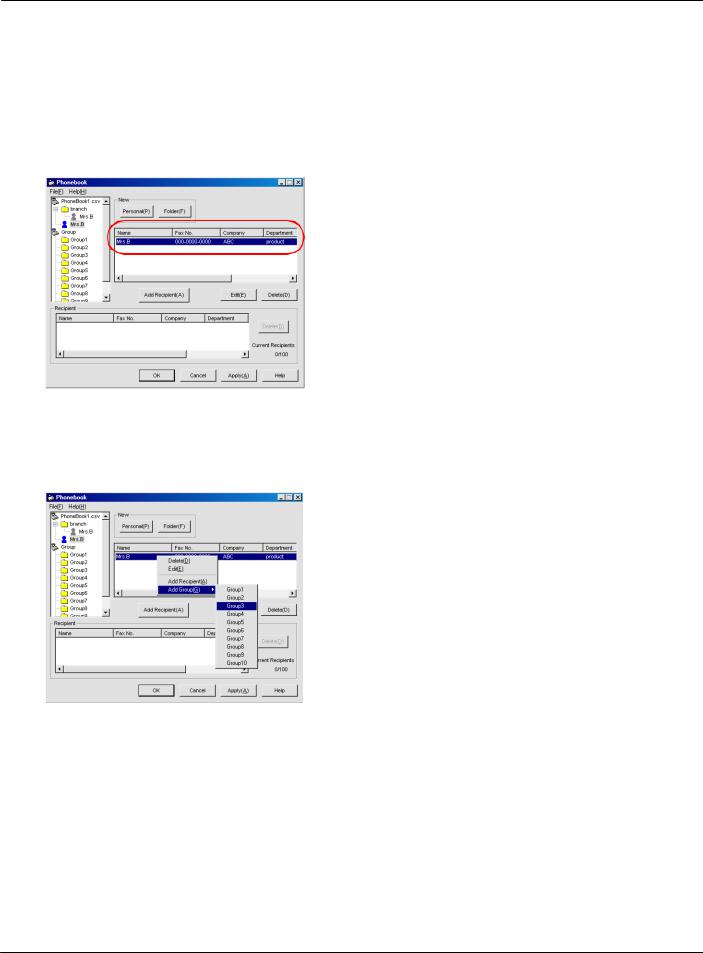
Registering broadcast group
You can pre-register the recipients to which you want to send the same fax. Such a group is called a [broadcast group].
1 On the [Phonebook] screen, select the recipient to be registered into the broadcast group from the recipient information column.
→ The selected recipient information is displayed inverted.
2 Right click, then from the [Add Group] broadcast group list, select the broadcast group to register into.
→ The recipient is copied into the selected broadcast group.
285 |
III FAX Chapter 9 Phonebook Registration |
9-1. Registering phonebook
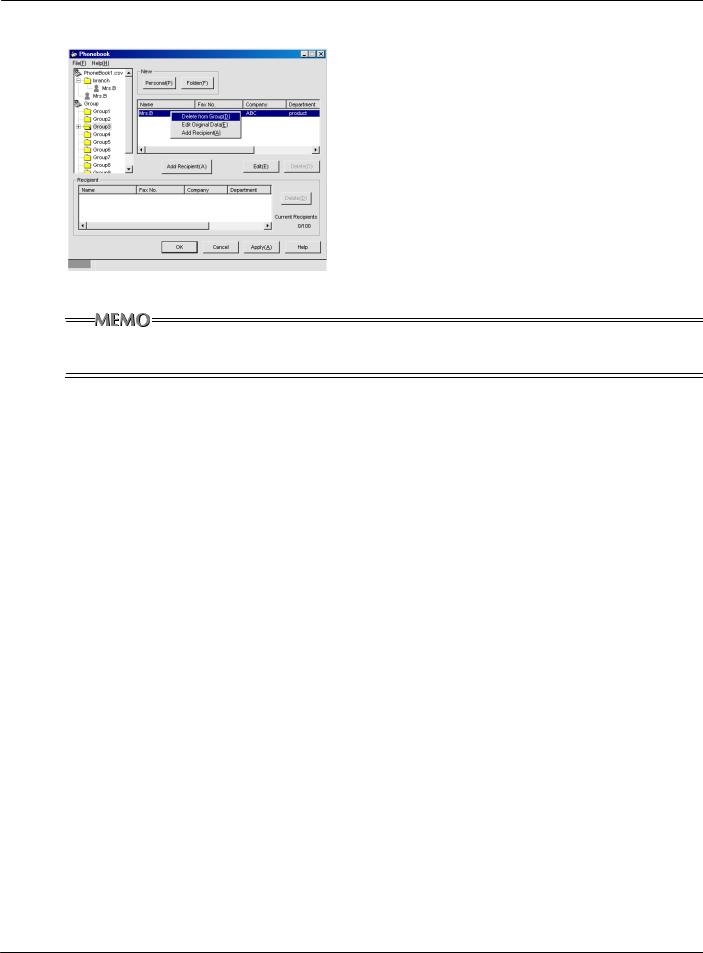
Deleting a recipient from a broadcast group
1 On the [Phonebook] screen, select the broadcast group in which the recipient is registered from the broadcast group column.
→The selected broadcast group is displayed inverted and the recipients registered in that broadcast group are displayed in the recipient column.
2 Select the recipient to delete from the recipient column.
→ The selected recipient is displayed inverted.
286 |
III FAX Chapter 9 Phonebook Registration |
9-1. Registering phonebook
3 Right click, then select [Delete from Group].
→The recipient is deleted from the broadcast group.
●Ten broadcast groups are set. You cannot add or delete broadcast groups.
●The total number of recipients that can be registered in all 10 broadcast groups is 100.
287 |
III FAX Chapter 9 Phonebook Registration |
9-1. Registering phonebook
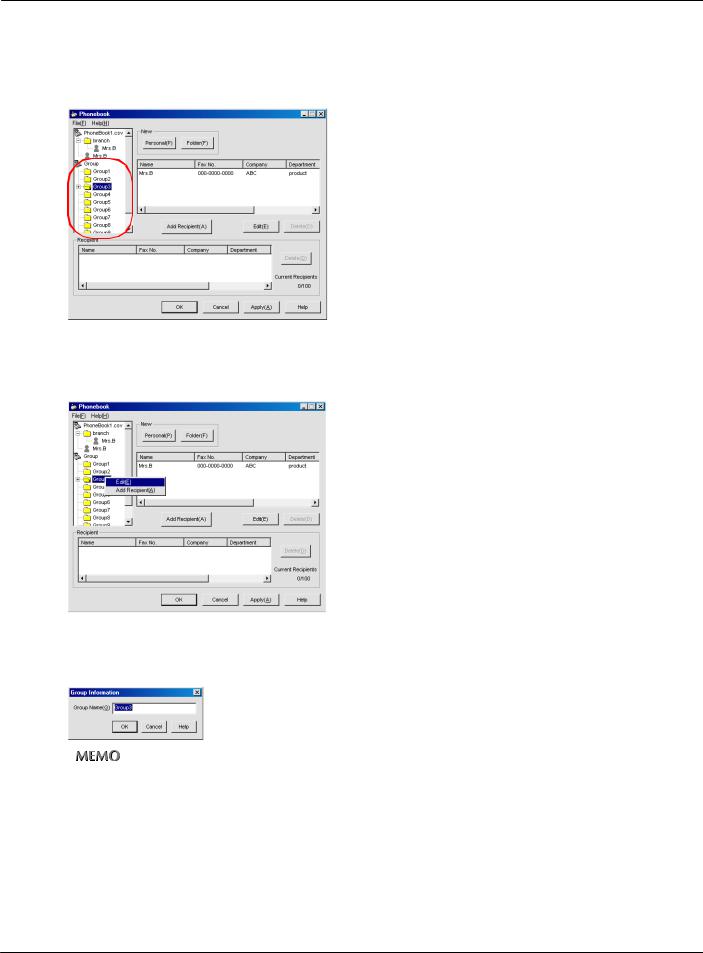
Naming a broadcast group
1 On the [Phonebook] screen, select the broadcast group to be named from the broadcast group column.
→ The selected broadcast group is displayed inverted.
2 Right click, then select the [Edit] screen.
→ The [Group Information] screen is displayed
3 Input the [Group Name].
zThe group name may be up to 40 byte characters.
4 Click the [OK] button.
→ The group name is registered and displayed in the broadcast group column.
288 |
III FAX Chapter 9 Phonebook Registration |
9-2. Managing phonebooks
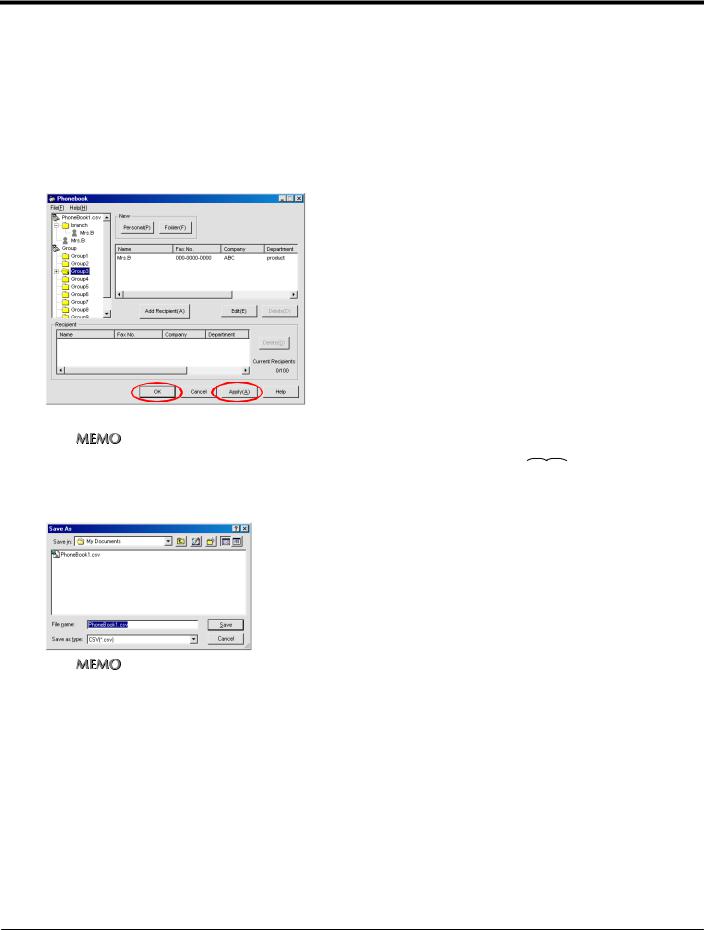
The phonebook in which recipient information is registered can be named and saved as a file. You can have multiple phonebooks for different usages.
Saving phonebooks
1 When the registration of the information in the phonebook is complete, click the [OK] or [Apply] button on the [Phonebook] screen.
→ The [Save As] screen is displayed.
zFor details on registering in the phonebook, refer to [9-1. Registering phonebook] (


 Page 280)
2 Specify the storage location, then input the file name.
zThe extension of a file is [.csv].
3 Click the [Save] button.
→ The phonebook is saved as a file.
289 |
III FAX Chapter 9 Phonebook Registration |
9-2. Managing phonebooks
Preparing a new phonebook
1 On the [Phonebook] screen, click [File] - [New].
→ The [IniBook.csv] folder is displayed in the layer column.
2 The recipient information is registered.
zFor details on registering in the phonebook, refer to [9-1. Registering phonebook] (


 Page 280)
3 Click the [OK] or [Apply] button.
→ The [Save As] screen is displayed.
4
5
Specify the storage location, then input the File name.
Click the [Save] button.
→ The phonebook is saved as a file.
290 |
III FAX Chapter 9 Phonebook Registration |
9-2. Managing phonebooks
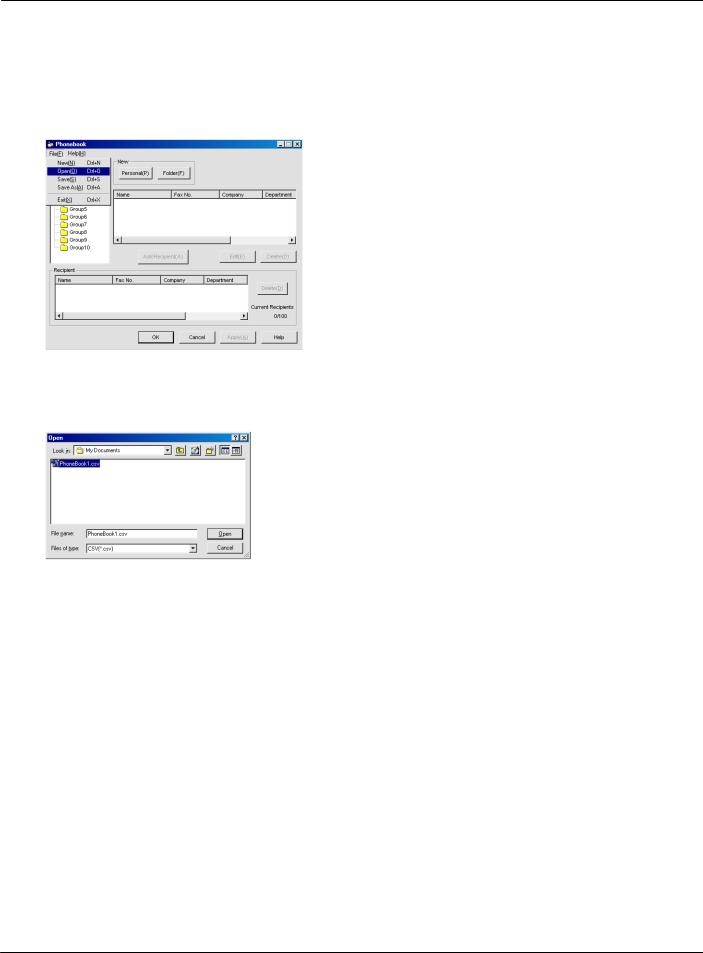
Switching between phonebooks
This is used to switch between phonebooks on the [Phonebook] screen.
1 On the [Phonebook] screen, click [File] - [Open].
→ The [Open] screen is displayed.
2 Select the folder for the phonebook to switch to, then click the [Open] button.
→ The selected phonebook is displayed.
291 |
III FAX Chapter 9 Phonebook Registration |
9-3. Phonebook usage
Specifying the recipients registered in the phonebook and sending the fax.
Sending faxes using the phonebook
1
2
Click the [Phonebook] button on the [Fax] tab.
→ The [phonebook] screen is displayed.
Select the recipient or broadcast group to which send the fax.
3 Click the [Add Recipient] button.
→The selected recipient is displayed in [Recipient].
If you have selected a broadcast group, all the recipients in that group are displayed.
4
5
6
7
If there are any unnecessary recipients in [Recipient], select them, then click the
[Delete] button.
→ The unnecessary recipients are deleted from the send list.
Check the send list, then click the [OK] button.
→ The display returns to the [Fax] tab.
Click the [OK] button.
→ The display returns to the [Print] screen.
Send the fax.
zFor details on sending faxes, refer to [8-1. Transmission procedure] (


 Page 273)
292 |
III FAX Chapter 9 Phonebook Registration |

III Fax
Chapter 10 Receiving Faxes
You can view and save fax documents received by the copier.
This chapter explains the procedures for setting the PC-Fax functions on the copier.
10-1. Fax reception settings.................................................................... |
294 |
293

10-1. Fax reception settings
Fax documents received by the copier can be imported into the computer.
Received fax data is stored on the print controller's hard disk via the copier E-RDH memory.
The print controller's hard disk has [Boxes] with four-digit ID numbers for managing documents. The boxes used for fax reception are numbered 0000 and 1000 to 1099.
Sent documents are normally stored in [Fixed box] 0000.
To automatically sort sent documents by objective, have the sender specify a number from 1000 to 1099 as the [User box] number. When the sender does this, the document is stored in the specified user box.
Hard disk
Box No. 1000
Box No. 1099
Document
E-RDH
Outbox
● For details on fax reception, refer to the fax kit user's manual.
294 |
III Fax Chapter 10 Receiving Faxes |

10-1. Fax reception settings
PC-Fax reception settings
Using the PC-Fax functions requires that the copier be set to enable PC-Fax reception.
1 Press the  button on the control panel.
[Copy] button
2
3
Press the [HELP] button on the control panel.
→ The [HELP MODE] screen is displayed on the LCD screen.
Touch the [Key Operator Mode] key on the LCD screen.
→ The [Password input] screen is displayed on the LCD screen.
295 |
III Fax Chapter 10 Receiving Faxes |
 Loading...