


 Loading...
QMS® 2060 WX
Print System
Setup Guide
1800466-001A

Trademarks
The following are trademarks or registered trademarks of their respective owners. Other product names mentioned in this manual may also be trademarks or registered trademarks of their respective owners. Registered trademarks are registered in the United States Patent and Trademark Office; some trademarks may also be registered in other countries. QMS, and the QMS logo are registered trademarks of QMS, Inc. TrueType/Apple Computer, Inc. Windows/Microsoft Corporation. Xerox/Xerox Corporation. Hammermill/Hammermill. Avery/Avery.
Proprietary Statement
The digitally encoded software included with your QMS 2060 WX Print System is Copyrighted © 1996 by QMS, Inc. All Rights Reserved. This software may not be reproduced, modified, displayed, transferred, or copied in any form or in any manner or on any media, in whole or in part, without the express written permission of QMS, Inc.
Copyright Notice
This manual is Copyrighted © 1997 by QMS, Inc., One Magnum Pass, Mobile, AL 36618. All Rights Reserved. This manual may not be copied in whole or in par t, nor transferred to any other media or language, without the express written permission of QMS, Inc.
Manual Notice
QMS, Inc. reserves the right to make changes to this manual and to the equipment described herein without notice. Considerable effort has been made to ensure that this manual is free of inaccuracies and omissions. However, QMS, Inc. makes no warranty of any kind including, but not limited to, any implied warranties of merchantability and fitness for a particular purpose with regard to this manual. QMS, Inc. assumes no responsibility for, or liability for, errors contained in this manual or for incidental, special, or consequential damages arising out of the furnishing of this manual, or the use of this manual in operating the equipment, or in connection with the performance of the equipment when so operated.
.

Contents
Introduction ........................................................................... |
1 |
About the Documentation .................................................... |
1 |
Standard Product Documentation 1 |
|
Typographic Conventions 2 |
|
Find a Good Location ........................................................... |
3 |
Location Requirements 3 |
|
Power Requirements 4 |
|
PC Requirements 4 |
|
Unpack the Printer ................................................................ |
5 |
Check the Shipment Contents ............................................. |
6 |
Shipment Contents 6 |
|
Install the Toner Cartridge ................................................... |
7 |
Load the Media Cassette .................................................... |
10 |
Prepare the Paper 10 |
|

Load the Paper 11 |
|
Connect the Printer to Your PC and Plug It In ................. |
15 |
Parallel Connection 15 |
|
Install a Printer Driver ......................................................... |
16 |
Windows 95 (Parallel Connections) 16 |
|
Ethernet Connection 16 |
|
Windows 95 (Ethernet Connections) 17 |
|
Windows NT 3.51 18 |
|
Windows NT 4.0 20 |
|
Install a Network Print Monitor .......................................... |
23 |
Windows 95 23 |
|
Windows NT 3.51/4.0 29 |
|
Register the Printer ............................................................. |
36 |
Installing Options ................................................................ |
37 |
For More Assistance ........................................................... |
37 |
A QMS Customer Support
Sources of Support ........................................................... |
A-2 |
Your QMS Vendor A-2
Your Application Vendor A-2
Q-FAX A-2
The QMS Corporate Bulletin Board System A-3
CompuServe A-3
Internet A-3
QMS Customer Response Center (CRC) A-4
QMS World-wide Offices .................................................. |
A-5 |
Index
L
ii |
QMS 2060 WX Print System Setup Guide |

Introduction
Introduction
The QMS 2060 WX Print System is a powerful but easy-to-use 20- page-per-minute laser printer that produces 600 dpi monochrome documents on an extensive range of media sizes in Windows 95, Windows NT 3.51, and Windows NT 4.0 environments.
About the Documentation
The documentation provides a window into the many capabilities of your printer. The more familiar you are with the documentation, the easier it’ll be for you to achieve the results you want from your printer.
Standard Product Documentation
&Print System the setup procedures described in Read Me First detail in the Setup Guide.
QMS 2060 WX This manual contains detailed,
&Print System illustrated instructions to guide you as Setup Guide you unpack and set up your printer,This sheet provides a quick overview ofQMS 2060 WX
|
connect it directly to a PC via the |
(You’re looking at |
parallel port or to a network via the |
this right now.) |
Ethernet port, and then install a |
|
Windows 95 or Windows NT printer |
|
driver and network print monitor. |
&Print System day-to-day operation of your printer. It User’s Guide includes information on printing files;QMS 2060 WX This manual guides you through the
adding print media; selecting input and output bins; duplexing; collating; replacing print media and toner; handling, cleaning, and maintaining your printer; and troubleshooting printer problems.
QMS 2060 WX Print System Setup Guide |
1 |

About the
Documentation
Typographic Conventions
The following typographic conventions are used in this manual:
Mixed-Case |
Text you type, and messages and information |
Courier |
displayed on the screen |
|
|
Mixed-Case |
Variable text you type; replace the italicized |
Italic |
word(s) with information specific to your printer |
Courier |
or computer |
|
|
UPPERCASE |
Information displayed in the printer message |
COURIER |
window |
|
|
lowercase bold |
PostScript operators and DOS commands |
|
|
lowercase italic |
Variable information in text |
|
|
UPPERCASE |
File and utility names |
|
|
|
Press the Enter key (PC) or Return key |
|
(Macintosh) |
|
|
^ |
Press and hold down the Ctrl key (PC) |
|
|
»Note: Notes contain tips, extra information, or important information that deserves emphasis or reiteration.
ICaution: Cautions present information that you need to know to avoid equipment damage, process failure, or extreme annoyance.
MWARNING! Warnings indicate the possibility of personal injury if a specific procedure is not performed exactly as described in the manual.
ACHTUNG! Bitte halten Sie sich exakt an die im Handbuch beschriebene Vorgehensweise, da sonst Verletzungsgefahr bestehen könnte.
2QMS 2060 WX Print System Setup Guide
Find a Good
Location
Find a Good Location
Location Requirements
nOn a hard, level surface capable of supporting the 53 lb (24 kg) printer. (By “level” we mean that the surface should be so flat—1° or less slant—that you can lay a round pencil down on it, and it doesn’t roll in any direction.)
nIn an area with a temperature range of 50° - 95° F/10° - 35° C (with temperature fluctuation of ±10°) and relative humidity range of 15% - 85% (with humidity fluctuation of ± 20°).
nAway from cooling and heating sources, extreme temperature changes, direct sunlight, excessive dust, corrosive chemicals or vapors, water pipes, refrigerators, any strong electromagnetic field (such as that created by an air conditioner), items that can easily burn (such as a curtain), and excessive vibration. Don’t connect it to the same electrical outlet as noise-generating equipment.
n6 feet (1.8 meters) or less from your PC for a parallel connection.
nClose to an easily accessible power supply.
nIn a well-ventilated room.
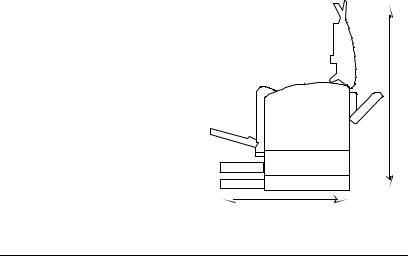
nWith enough space around
the printer to allow adequate |
5E@A 8EAM |
|||
ventilation and easy servicing: |
||||
|
||||
- |
Front |
36"/914 mm |
m |
|
m |
||||
- |
Rear |
12"/305 mm |
||
0 |
||||
- |
Left side |
12"/305 mm |
8 |
|
8 |
||||
- |
Right side |
12"/305 mm |
/ |
|
5" |
||||
|
|
|
. |
|
|
|
|
4 |
|
|
|
|
3 |
|
|
|
|
Optional feeder |
|
|
|
|
23.4"\593 mm |
|
QMS 2060 WX Print System Setup Guide |
3 |

Find a Good
Location
Power Requirements
Your printer requires a properly grounded AC outlet with a power range of ±10% of the rated line voltage (either 100/120 V or 220/240 V).
»Note: Your printer cannot automatically switch between voltages; in other words, 110 volt and 220 volt systems are not interchangeable. To determine the rated voltage of your printer, refer to the data plate on the back of the printer.
Make sure that the capacity of the electrical outlet is at least 1.2 times that used by the printer. Noise-generating equipment should not be connected to the same electrical outlet as the printer.
The recommended frequency is 50-60 Hz for a 100/120 V system and 50-60 Hz for a 200/240 V system. The frequency fluctuation is ±0.3%.
Energy Star Compliance
The QMS 2060 WX Print System is compliant with US Environmental Protection Agency (EPA) Energy Star regulations. After a specified period of inactivity, the printer changes to a low-power state (the engine remains on, but the fuser turns off).
When a print job is received, the printer 

 returns to normal power within 90 seconds.
PC Requirements
Printer performance depends upon the type of PC to which you connect it. We recommend a Pentium-class PC with at least 16 MB of RAM (if you’re using Windows 95) or 32 MB of RAM (if you’re using Windows NT 3.51 or 4.0).
4 |
QMS 2060 WX Print System Setup Guide |

Unpack the
Printer
Unpack the Printer
The packing materials that protect your printer during shipment— cardboard, polystyrene, tape, and shipping spacers—must be removed before you can use the printer.
Use the following procedure to unpack the printer. To ensure that your printer was not damaged during shipment, follow the entire procedure.
»Note: Save the packing materials in case you ever have to move or ship the printer to a new location.
ICaution: To avoid damaging the printer, remove all packing materials before turning it on.
1Lift off the box and remove everything except the printer from the shipping carton.
Use the carrying grips on the bottom of the left and right sides of the printer.
2Lift the printer out of the shipping carton.
MWARNING! The printer weighs about 53 lbs (24 kg). Don’t lift it by yourself.
ACHTUNG! Der Drucker wiegt ca 24 kg; bitte versuchen Sie niemals, das Gerät alleine anzuheben oder zu tragen.
3Remove the protective plastic covering, and then remove any tape and polystyrene from the printer body.
»Note: Make sure all of the polystyrene is removed.
4Remove the packing materials and tape from inside the printer and cassette.
5Slide the cassette into the printer.
6Place the printer in its proper location.
QMS 2060 WX Print System Setup Guide |
5 |

Check the
Shipment
Contents
Check the Shipment Contents
Shipment Contents
nQMS 2060 WX Print System
n250-sheet universal media cassette
nDocumentation
-QMS 2060 WX Print System Read Me First
-QMS 2060 WX Print System Setup Guide (this manual)
-QMS 2060 WX Print System User’s Guide
-QMS Network Print Monitor for Windows 95 Administrator’s Guide (on disk or CD-ROM with the software)
-QMS Network Print Monitor for Windows NT Administrator’s Guide (on disk or CD-ROM with the software)
nDocumentation binder and binder inserts
nPower cord
nSoftware
-Windows 95, Windows NT 3.51, and Windows NT 4.0 printer drivers
-QMS Network Print Monitors for Windows 95, Windows NT 3.51, and Windows NT 4.0
nToner cartridge
nWarranty and registration card
»Note: An interface cable is not included in the shipment. If you need a cable, contact your QMS vendor or a local computer store. (Refer to the “Connect the Printer to Your PC and Plug It In” section on page 15 for more information on the type of cable you need.)
6QMS 2060 WX Print System Setup Guide
Install the Toner
Cartridge
Make sure that all of these items are included in your shipment before setting up your printer. If any items are missing or damaged, contact your shipping company or your QMS vendor. See appendix A, “QMS Customer Support,” for product sales and support information.
Install the Toner Cartridge
»Note: Toner cartridges are sensitive to bright light. Don’t remove one from its protective bag until you’re ready to install it. Store toner cartridges in an environment that is not subject to extreme heat or humidity, salty air, or corrosive gases, such as aerosols. Also, keep toner cartridges away from your computer. The magnets in the cartridges can damage data, particularly on floppy disks.
1 Pull the latch on top of the printer forward, and open the top cover.
2Remove a toner cartridge from its shipping carton and protective aluminum bag.
»Note: Don’t open the cartridge cover or touch the OPC drum of the cartridge; this may deteriorate the drum and reduce print quality.
QMS 2060 WX Print System Setup Guide |
7 |
Install the Toner
Cartridge
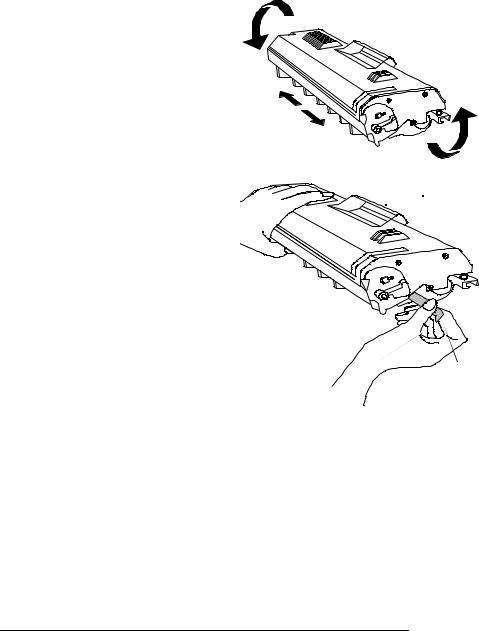
3Distribute the toner in the cartridge.
Holding the cartridge with both hands, gently rock it from side-to-side five or six times to distribute the toner.
4Remove the tape seal.
a Position the cartridge so the center handle faces away from you.
b Holding the cartridge in place with your left hand, use your right hand to grasp the tab on the side of the toner cartridge.
 Handle
Tab
cPull the plastic strip straight out.
If the strip breaks, grasp the clear part of the tape seal and pull it straight out.
dDiscard the strip and the tape seal.
8 |
QMS 2060 WX Print System Setup Guide |
Install the Toner
Cartridge
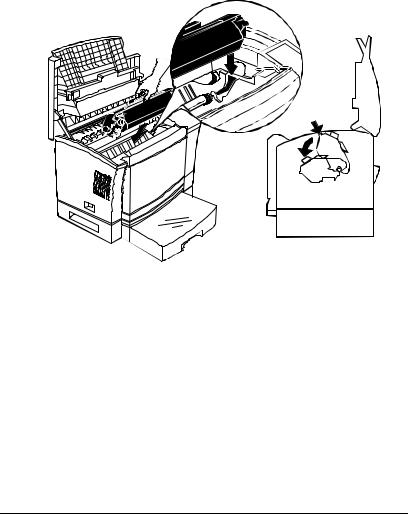
5Slide the toner cartridge in the printer.
a Holding the handle of the toner cartridge so that the arrow on the cartridge is facing away from you, angle the cartridge down into the printer.
b Place the cartridge on the rails inside the upper unit of the printer, and gently slide it straight down until it’s firmly seated.
6 Close the printer’s top cover.
QMS 2060 WX Print System Setup Guide |
9 |

Load the Media
Cassette
Load the Media Cassette
The QMS 2060 WX Print System comes standard with a 250-sheet universal cassette. Loading media in the cassette involves the following steps:
nPrepare the paper
nLoad the paper
Prepare the Paper
»Note: Ensure that the media size matches the cassette size (for example, letter/A4 media must be loaded only when the universal cassette is set to letter/A4 size or when a letter/A4 cassette is available). Since the media cassette sends a media size signal to the printer controller, using the wrong size media will cause your image to be positioned incorrectly on the page or clipped.
1Unwrap the paper, and pull the stack out.
»Note: Don’t unpack the paper above the printer because this might cause particles to fall into the printer components. Note the arrows on the wrapper. They show which side of the paper should be on the top when it’s loaded in the cassette.
2With one hand at each end of the stack, lift and hold it in a curved position, without gripping.
3Grip each end of the stack firmly.
4Straighten the stack, and then roll the fanned sheets from side to side to get air through the sheets and prevent static buildup.
5Take off the top and bottom sheets.
ICaution: The top and bottom sheets sometimes have residual glue buildup that could cause the printer to jam.
10 |
QMS 2060 WX Print System Setup Guide |

Load the Media
Cassette
Load the Paper
»Note: Reload the media cassette only when it’s empty.
1Pull out the universal cassette.
»Note: This cassette is known as a universal cassette because you can load any of the supported media sizes in it. In the printer driver it’s called the upper tray because it’s in the upper position if an optional feeder is installed. The cassette in the optional feeder is called the lower tray in the printer driver because it’s in the lower position. Information on the optional feeder are in chapter 5, “Printer Options,” of the User’s Guide. Instructions for using the multipurpose tray are in chapter 3, “Printing,” in the User’s Guide.
Multipurpose tray in the “manual feed” position
Universal cassette in the “upper tray” position
Universal cassette in the “lower tray” position
2 Open the cassette cover.
QMS 2060 WX Print System Setup Guide |
11 |
Load the Media
Cassette
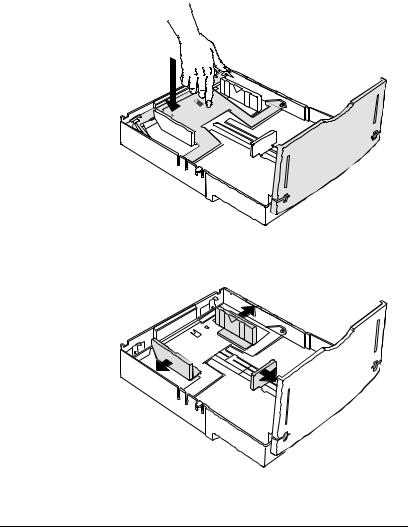
3Position the cassette.
The cassette has a spring in the bottom that provides some resistance when print media is placed on it. Lay the cassette flat on a hard surface, and push down on the plate in the cassette until it locks.
4 Adjust the media guides to fit the paper size.
12 |
QMS 2060 WX Print System Setup Guide |
Loading...