


KH4000 Automatic Free-Arm Sewing Machine
Operating instructions

|
|
|
q |
w e r t |
y u |
i |
|
|
||
|
|
|
o |
|
|
|
a |
|
|
|
s |
|
2% |
|
|
|
2$ |
|
|
|
2# |
h |
d |
|
|
|
|
2@ |
|
j |
|
|
2! |
|
|
|
|
|
f |
|
|
|
g |
2) ; l k

Lervia KH 4000
Lervia Automatic Free-Arm Sewing Machine
1. |
Intended Use |
4 |
|
|
|
|
|
2. |
Technical data |
4 |
|
|
|
|
|
|
|
|
|
3. |
Package contents |
4 |
|
|
|
|
|
|
|
|
|
4. |
Operating elements |
4 |
|
|
|
|
|
|
|
|
|
5. |
Safety instructions |
5 |
|
|
|
|
|
|
|
|
|
6. |
Setting up |
6 |
|
|
|
|
|
|
|
|
|
7. |
Switching On / Off |
6 |
|
|
|
|
|
|
|
|
|
8. |
Threading |
7 |
|
|
|
|
|
|
a) |
Threading the lower bobbin |
7 |
|
b) |
Threading the lower thread |
8 |
|
c) |
Threading the upper thread |
11 |
|
d) |
Retrieving the lower thread |
12 |
|
e) |
Threading with 2 needles |
12 |
|
|
|
|
9. |
Attaching accessories |
13 |
|
|
|
|
|
|
a) |
Changing needles |
13 |
|
b) |
Changing the stitch plate |
13 |
|
c) |
Changing the snap-on foot |
14 |
|
|
||
10. Settings |
15 |
||
|
|
|
|
|
a) |
Setting the upper thread tension |
15 |
|
b) |
Setting the lower thread tension |
15 |
|
c) |
Setting the presser foot pressure |
16 |
|
d) |
Setting the stitch width |
16 |
|
e) |
Setting the stitch length |
16 |
11. Sewing |
17 |
|
a) |
To place the material |
17 |
b) |
To start a seam |
17 |
c) |
To finish off a seam |
17 |
d) |
Guiding the material |
18 |
e) |
Changing the sewing direction |
18 |
f) |
Selecting a stitch pattern |
19 |
g) |
Straight stitch |
19 |
h) |
Zigzag |
19 |
i) |
Stitch pattern table |
20 |
j) |
Blind hem |
21 |
k) |
Material-Thread-Needle Table |
22 |
l) |
Seam guide |
23 |
m) |
Overcast stitch |
23 |
n) |
Stretch seams |
23 |
o) |
Sewing buttonholes |
24 |
p) |
Buttonhole table |
24 |
q) |
Sewing on buttons |
25 |
r) |
"Edge-to-edge" sewing |
25 |
s) |
Decorative stitches |
25 |
t) |
Sewing a zipper |
26 |
u) |
Sewing with the twin needle |
27 |
v) |
Embroidery |
27 |
w) |
Thread cutter |
27 |
12. Care |
28 |
|
a) |
Clean the gripper area |
28 |
b) |
Clean the feeder |
28 |
c) |
Clean the casing |
29 |
d) |
Oil the gripper track |
29 |
e) |
What else needs oiling? |
29 |
f) |
Storing |
30 |
|
|
|
13. Troubleshooting |
30 |
|
|
|
|
|
|
|
14. Warranty and service |
31 |
|
|
|
|
|
|
|
15. Disposal |
31 |
|
|
|
|
Keep this manual for future reference and pass it on with the equipment to any future users.
- 3 - |
|
Lervia KH 4000
Operating instructions
Lervia Automatic Free-Arm Sewing Machine
1. Intended Use
The sewing machine is intended ...
-for use as a movable machine,
-for sewing of typical household textiles and ...
-only for private household use.
The sewing machine is not intended ...
-to be installed at a fixed location,
-for processing of other materials (e.g. leather or other heavy materials such as tent or sail fabrics)
-for commercial or industrial use.
2. Technical data
Power supply |
: 230 V / ~50 Hz |
Motor output |
: 70 W |
Bulb power |
: 15 W |
Bulb voltage |
: 230 V / ~50 Hz |
Bulb thread |
: E14 thread |
Protection class |
: II |
3. Package contents
(see front fold-out page)
● 1 sewing machine1 blind hem foot1 seam guide
1 zipper foot
1 buttonhole foot1 button foot
1 sewing foot holder (attached)1 finger protector (attached)1 zigzag foot (attached)
1 knife
1 oil tube
1 set of needles (incl. twin needle)3 screwdrivers
2 felt wheels1 darning plate3 bobbins
1 foot switch
●Operating instructions
●Warranty booklet
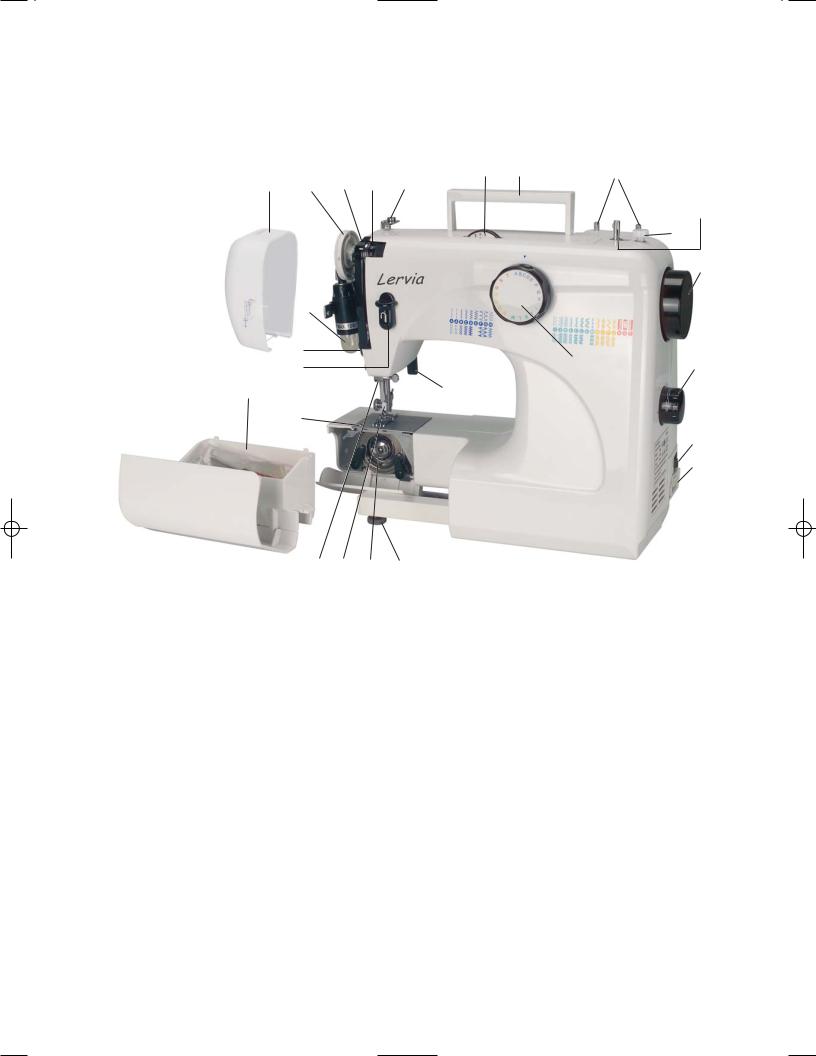
4. Operating elements
(see rear fold-out page) q Front cover
w Selector wheel (contact pressure sewing foot) e Threading hook
r Selector wheel (upper thread tension) t Upper thread guide
y Selector wheel (stitch width) u Carrying handle
i Thread spool carrier o Winder spindle
a Spool stop 1! Handwheel
1@ Selector wheel (stitch length) 1# ON / OFF switch
1$ Foot switch connection
1% Stitch pattern selector 1^ Foot lever
1& Adjusting foot 1* Bobbin case 1( Foot holder
2) Needle retainer 2! Stitch plate
2@ Box compartment
2# Lever (reverse operation) 2$ Tension spring
2% Lamp
- 4 -

5. Safety instructions
Like any other electrical device, a sewing machine can cause serious, even life-threatening injuries. To avoid this, and in order to work safely:
•Before initial use of your sewing machine, read these operating instructions thoroughly.
•Keep the operating instructions in a suitable place near the machine. When passing the appliance on to others, always enclose the operating instructions.
•Always disconnect the power supply when leaving the machine unattended. This will prevent the risk of accidents if the machine is switched on accidentally.
•First pull the power plug before changing the bulb or performing maintenance work on the machine.
This will prevent possibly life-threatening electric shocks.
•Do not remove the plug from the socket by pulling on the cable. Always grip the plug and not the cable when pulling out the power plug.
•Only use the sewing machine in dry rooms.
•In case of any visible damage on the machine, the foot switch or the power cable: Have the damage repaired by Customer Service before using the sewing machine again.
•Never let children or elderly persons handle the machine unsupervised because they may not properly appreciate the possible dangers. Keep electrical appliances outside the reach of children.
•Never use the machine when the ventilation apertures are blocked. Keep the ventilation apertures of the machine and the foot switch free from fluff, dust and waste material.
Lervia KH 4000
Warning
against injuries and material damages:
According to legislation, you as the user of an electrical appliance are responsible for preventing possible accidents through safetyconscious behaviour:
•Keep your work space tidy. An untidy workplace can lead to accidents.
• Provide adequatelighting when working!
•Do not wear loose clothing or jewellery, as these can be caught in the moving parts. You should also wear a hair net if you have long hair.
•Avoidabnormal posture. Remain steady
and in a well-balanced position at all times.
•Be alert! Pay attention to what you are doing. Always take a rational approach to your work. Never work with the sewing machine if you are unable to concentrate or if you are feeling unwell!
If accidents occur as a result of handling the machine with insufficient care, or failure to follow the safety instructions in this manual, then the manufacturer cannot accept liability.
- 5 - |
|

Lervia KH 4000
|
|
|
|
|
2@ |
6. Setting up
• Place thesewing machine on a stabile table.
• Plug thefoot switch into the connection
socket g of the machine and ...
• insert theplug into the wall socket.
If the worktop is not completely even, you can compensate for slight unevenness as follows:
•Pull thebox compartment 2@ off to the side, it is only slid on, not firmly attached.
• You can turn theadjusting foot 1& that becomes visible underneath in order to make the sewing machine rest properly.
You can simply slide the box compartment 2@ back on – for instance if you need this as an "extension table" for sewing large material. You can also leave the box compartment 2@ off, for example for free-arm sewing of arms, trouser legs, etc. The box compartment 2@ is also used to store the accessories.
7. Switching On / Off
You should familiarize yourself with these methods of switching on and off, so that you can take the correct action in the event of an emergency:
•You can switch the sewing machine on or off by pressing the switch 1#. The bulb 2% indicates the operating state.
•If you pull out the foot switch plug, the
machine is without power.
• If you pull thepower plug from the socket, the machine and the foot switch are without power.
- 6 -
|
i |
|
t |
|
|
o |
|
a |
|
s |
Lervia KH 4000
8. Threading
Warning:
Make sure that the sewing mahine is switched off and the plug has been pulled out of the socket when threading in order to avoid injury if the sewing machine should be accidentally switched on.
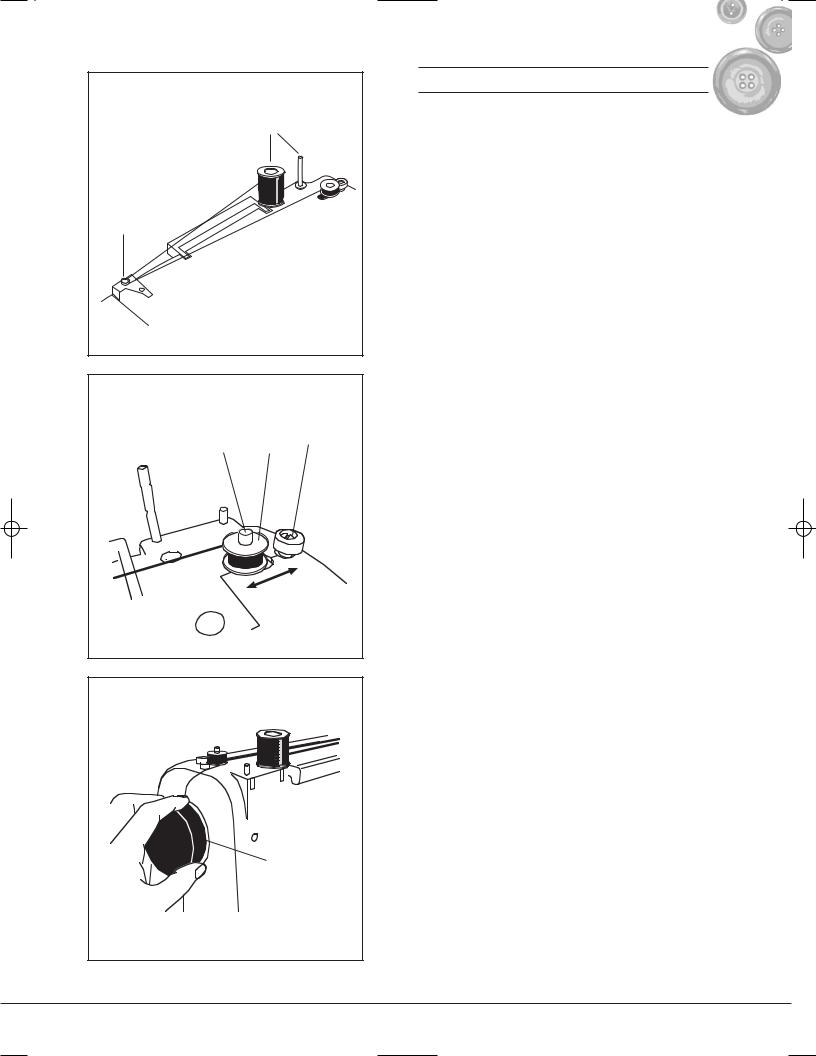
a) Threading the lower bobbin
To load the lower bobbin with thread:
•Pull out one of the two thread spool carriers i on top and place a spool of thread there.
•You can place a felt pad underneath the spool of thread , so that the bobbin runs evenly.
•Place anempty spool on thewinder spindle o.
•Pull the thread through the upper thread guide t.
•Wind the loose end of the thread clockwise a few times around the empty spool .
•When the first windings of thread are taut against the spool, press the spool with the winder spindle o against thespool stop a.
•Pull thehandwheel s on the right of the machine slightly outward in order to disconnect the sewing mechanism from the motor.
•Now switch the sewing machine on and step on the foot switch . Once the spool is full, cut the thread.
•Press the winder spindle o back to the left and remove the full spool.
•Do not forget to push the handwheel s back in – otherwise the sewing mechanism remains disconnected from the motor.
- 7 - |
|

Lervia KH 4000
“ |
2@ |
18a |
1* |
1* |
b) Threading the lower thread
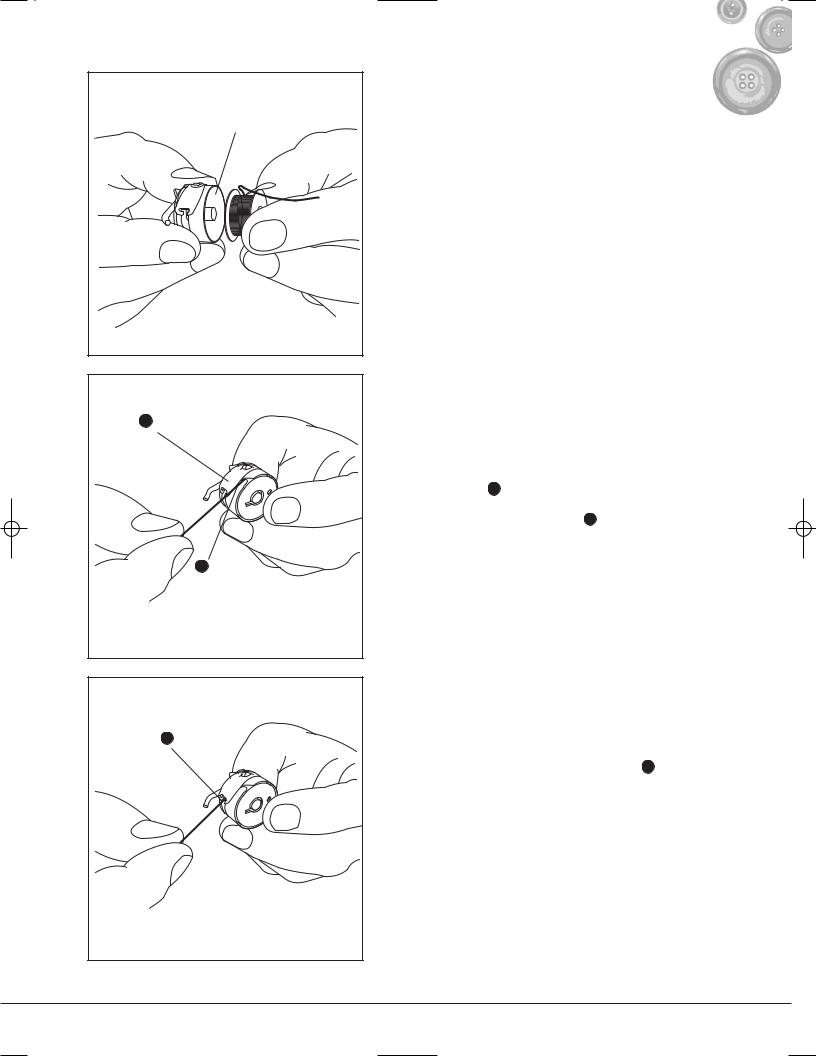
Turn the handwheel s in an anti-clockwise direction to fully raise the needle.
•Pull thebox compartment 2@ off to the side, it is only slid on, not firmly attached.
•Then open thegripper flap “ situated behind it.
• Fold out thefolding lever 18a of the bobbin
case l ...
• and pull out thebobbin case l as shown.
- 8 -
Lervia KH 4000
1*
• Unwind approximately 10 cm of thread from the spool and slide this into the bobbin case l so that the spool unwinds anti-clockwise.
18c |
|
• Pull the unwound end of the thread through |
|
|
the gap 18b in the side wall of the bobbin |
|
case ... |
• |
under thetension spring 18c , |
18b |
|
18d |
|
• |
until the thread comes out the slit 18d in |
|
the bobbin case. |
For optimal setting of the lower thread |
|
|
tension, see Chapter 10. |
- 9 - |
|
Lervia KH 4000
1* |
” |
18e |
2@ |
• Put the bobbin case l back on the pin and ...
•turn the bobbin case l until thedriver 18e catches in the notch.
•Lay the excessthreadsuch that it does not bind anywhere ...
•then close thegripper flap ”.
•You can simply slide the box compartment 2@ back on – for instance if you need this as an "extension table" for sewing large
material. You can also leave the box compartment off, for example for free-arm sewing of arms, trouser legs, etc.
- 10 -
 Loading...