Lervia KH 750 Manual
CV_KH750_E3730_LB3.qxd 13.05.2008 16:47 Uhr Seite 1
3
KOMPERNASS GMBH · BURGSTRASSE 21 · D-44867 BOCHUM www.kompernass.com
ID-Nr.: KH750-04/08-V2
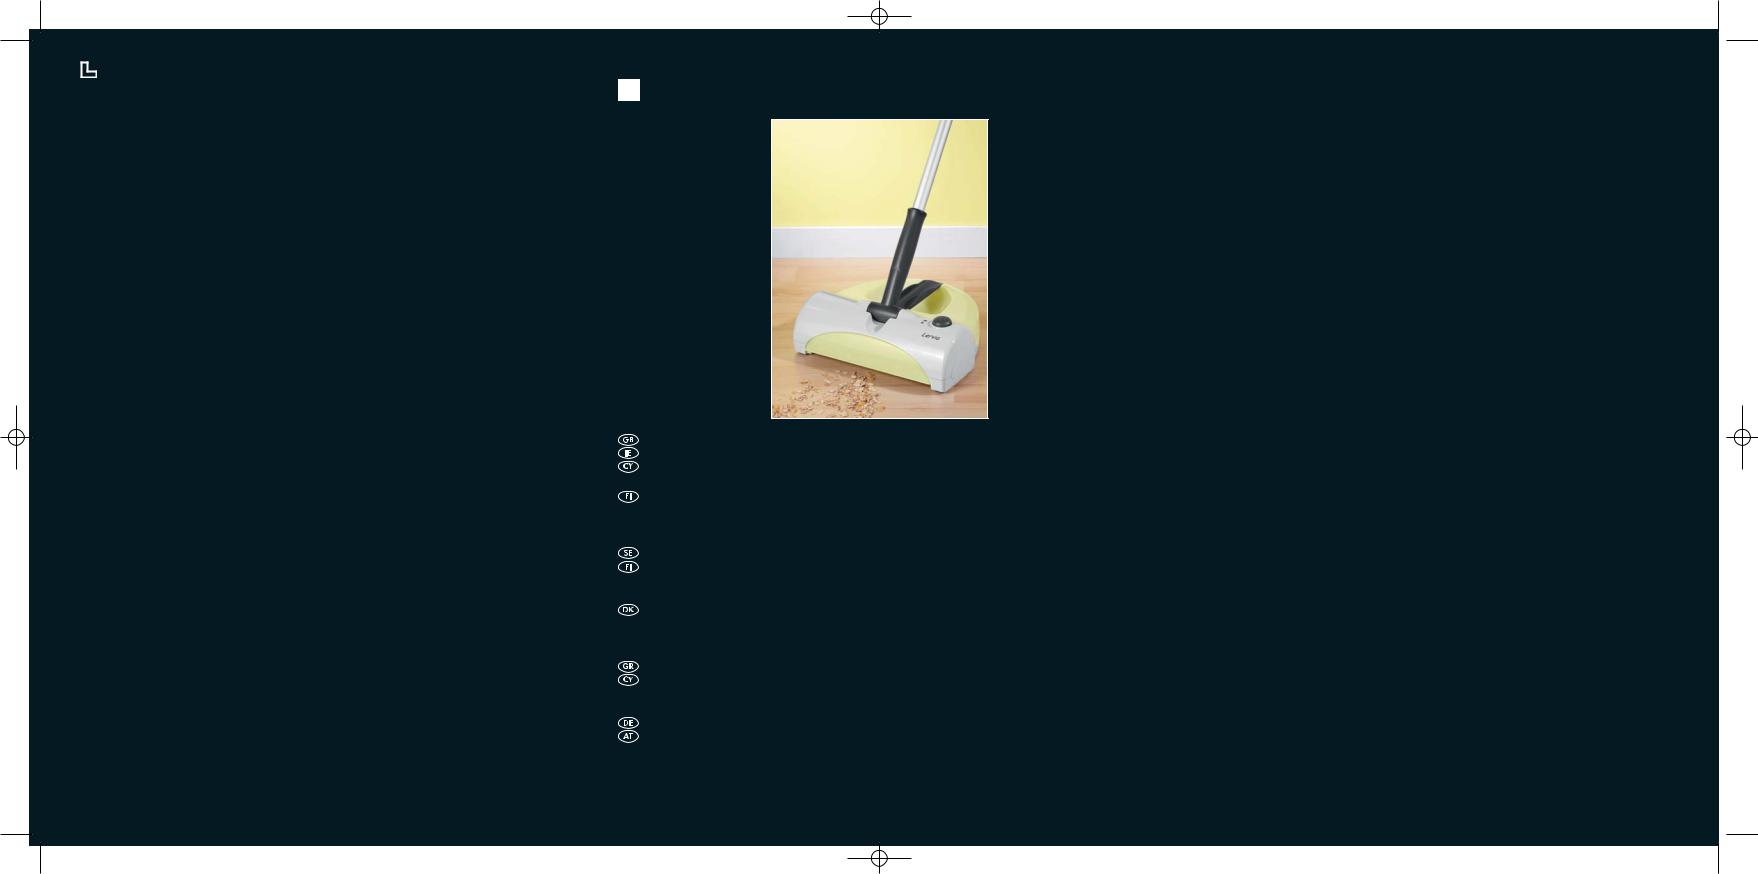
RECHARGEABLE BROOM
KH 750
RECHARGEABLE BROOM
Operating instructions
PARISTOKÄYTTÖINEN HARJA
Käyttöohje
BATTERIDRIVEN BORSTE
Bruksanvisning
BATTERI-KOST
Betjeningsvejledning
ΣΚΟΥΠΑ ΜΠΑΤΑΡΙΑΣ Οδηγίες χρήσης
AKKU-BESEN
Bedienungsanleitung
CV_KH750_E3730_LB3.qxd 13.05.2008 16:47 Uhr Seite 4
KH 750
|
|
|
|
|
|
|
|
|
|
|
|||
|
|
|
|
|
|
|
|
|
|
|
|
|
|
IB_KH750_E3730_LB3 13.05.2008 16:49 Uhr Seite 1
RECHARGEABLE BROOM |
2-5 |
Read the operating instructions carefully before using the appliance for the first time and preserve this booklet for later reference. Pass the manual on to whomsoever might acquire the appliance at a later date.
PARISTOKÄYTTÖINEN HARJA |
6-9 |
Säilytä käsikirja myöhempää käyttöä varten. Jos myyt laitteen, anna käsikirja uudelle |
|
omistajalle! |
|
BATTERIDRIVEN BORSTE |
10-13 |
Spara den här anvisningen för senare frågor – och överlämna den tillsammans med |
|
apparaten om du överlåter den till någon annan person! |
|
BATTERI-KOST |
14-17 |
Læs betjeningsvejledningen igennem før første brug, og opbevar den til senere brug. |
|
Lad vejledningen følge med, hvis apparatet gives videre til andre. |
|
ΣKOYΠA MΠATAPIAΣ |
18-21 |
Φυλάξτε αυτή την οδηγία για ερωτήσεις που θα προκύψουν αργότερα – και σε περίπτωση |
|
παράδοσης της συσκευής δώστε την επίσης σε αυτούς που θα την αποκτήσουν! |
|
AKKU-BESEN |
22-25 |
Lesen Sie die Bedienungsanleitung vor der ersten Verwendung aufmerksam durch und heben Sie diese für den späteren Gebrauch auf. Händigen Sie bei Weitergabe des Gerätes an Dritte auch die Anleitung aus.
- 1 -

IB_KH750_E3730_LB3 13.05.2008 16:49 Uhr Seite 2
RECHARGEABLE
BROOM KH 750
Proper Use
This rechargeable battery floor sweeper is intended for the sweeping of dry dirt in dry enclosed rooms and only for private use. It must only be operated with the enclosed accessories.
The rechargeable battery floor sweeper is not intended for the sweeping of gravel-faced concrete, gravel and similar surfaces, not for deeppile carpets and wet floor coverings or for commercial use. Use only as described in this manual. Do not allow the appliance to be used as toy. Do not let children use this devices unsupervised.
Technical data
Voltage/frequency (charger) |
230 V ~ / 50 Hz |
|
Rated consumption (charger) |
|
4.5 W |
Output (charger) |
9 V |
200 mA |
Operating time with full battery charge |
|
|
(depending on floor covering) |
|
15 - 20 min |
Battery - working voltage |
|
4.8 V |
Charging time with empty battery |
|
12 - 16 hrs. |
Items supplied
Floor sweeper
Battery charger with cable Broomstick (3 Elements) Wall bracket
3 Screws
3 Wallplugs Operating instructions
Prior to initial use
Before starting the device satisfy yourself that…
•the floor sweeper, the charger and its cable are in perfect condition and ...
•all packaging materials have been removed from the device.
Safety information
•Do not allow individuals (including children) to use the appliance whose physical, sensorial or mental abilities or lack of experience and knowledge hinder their safe usage of it if they have not previously been supervised or instructed in its correct usage.
•Tell children about the appliance and its potential dangers so that they do not play with it.
 Danger of Electrocution!
•Arrange for defective power plugs and/or cables to be replaced as soon as possible by a qualified technician or by our Customer Service Department to avoid the risk of injury.
Assembling the floor sweeper
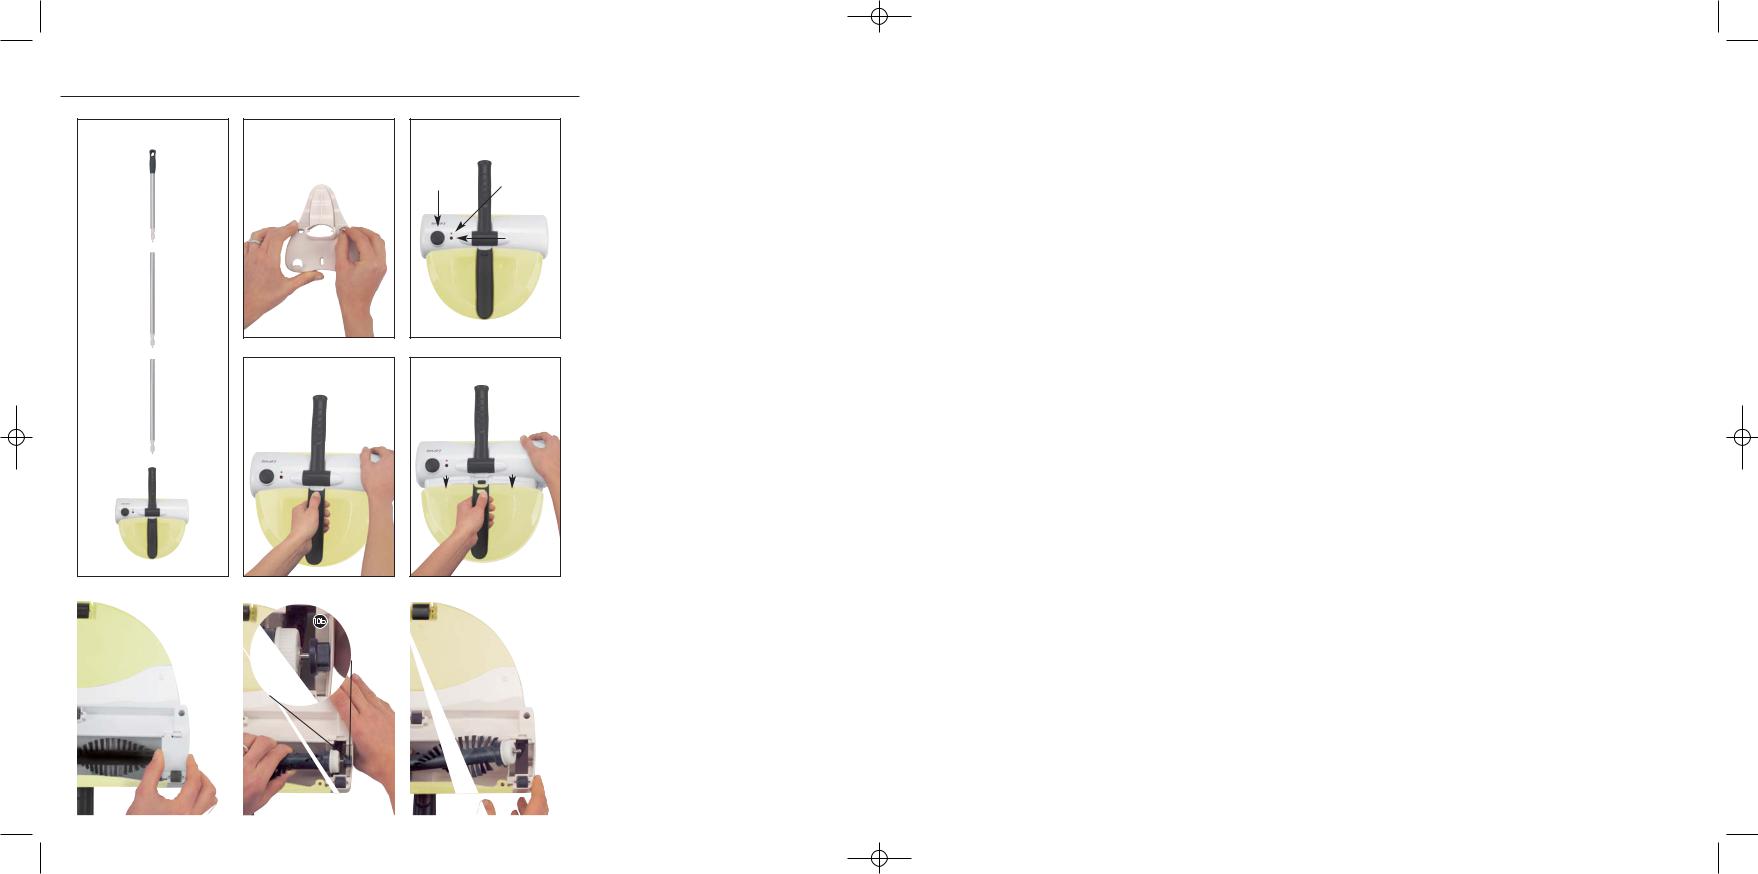
The numbers before the operating steps refer to the illustrations on the fold-out page.
Assemble the broomstick by inserting the 3 elements into each other and turn to secure.
Screw the stick in the device mounting.
Attach the wall bracket with the enclosed screws.
- 2 -
IB_KH750_E3730_LB3 13.05.2008 16:49 Uhr Seite 3
Battery charging |
Working with the floor sweeper |
The rechargeable battery floor sweeper is supplied with an empty Ni-MH rechargeable battery. To ensure that the battery will receive its full efficiency it is necessary to charge the battery for 16 hours prior to initial use. Charging processes thereafter take 12 - 16 hours.
With fully charged battery the device provides an operating time of 15 - 20 minutes before recharging becomes necessary.
To charge the battery, ensure that the battery brush is switched off.
if necessary, switch it off at the switch,
insert the plug of the charger in the charging jack of the device then insert the mains plug in a 230 V ~ 50 Hz socket.
The red charging lamp is illuminated during the charging process. If this is not the case, check the plug connections.
Once the charging process is over, the device switches over to the charge maintenance position (management function). However, it is not advisable to leave the device permanently connected to the mains charging device so as to prevent the batteries from possibly getting damaged.
Caution:
•Only use the enclosed charger (9V  200 mA).
•Only operate the device with the enclosed rechargeable battery. It could otherwise get damaged.
•Do not attempt to remove the rechargeable battery for charging.
•Do not attempt to open the rechargeable battery jacket or dismantle the battery, this would destroy it.
Caution:
•Never use the device with the dirt container removed.
•Keep end of rotating brush, wands and other openings away from your face and body.
Press the switch to start the rechargeable battery floor sweeper. Press again to switch off the device.
•Guide the rechargeable battery floor sweeper over the floor.
•You can leave the floor sweeperstick locked in vertical position during work interruptions.
Note:
With some types of carpet the rechargeable battery floor sweeper could rattle or bounce. In this case work slowly and in the opposite direction.
Cleaning
How to clean the dirt container:
To maintain the efficiency of the rechargeable battery floor sweeper, empty the dirt container after every use.
Press the unlocking button of the dirt container to detach it from the device.
With a slight upward movement, pull the dirt container horizontally from the device.
• Empty the dirt container and re-insert.
How to clean the brush:
If the brush roller cannot be turned any longer because of accumulated coarse dirt or threads, proceed as follows:
- 3 -
IB_KH750_E3730_LB3 13.05.2008 16:49 Uhr Seite 4
•Turn over the rechargeable battery floor sweeper and hold it so that the flat side with the brush roller faces you.
Remove the small cover on the right-hand side.
•Loosen the drive belt by pushing it to the right.
Lift the brush roller on the right-hand side and remove the guide bushing with the washer  .
.
Now pull the brush roller from the device to the right-hand side.
•Remove the dirt (on both sides of the bristle) and clean the brush.
After cleaning, proceed as follows to re-install the brush roller:
•Insert the drive belt in the compartment and place it around the motor drive pulley.
•Place the washer on the guide bushing and insert the brush roller into the left guide channel.
•Pull the drive belt over the guide bushing and re-insert the brush roller into the right channel.
•Now pull the drive belt over the drive cog of the brush roller.
•Fit the brush cover by first introducing the lower lugs in the recesses and press the cover in at the top.
Caution:
•Ensure that the device is not inadvertently switched on with the dirt container removed or while cleaning the brush.
•Do not clean the device during the charging process.
Storage
Use the supplied wall bracket for practical and space-saving storage or when charging the device.
Caution:
•Do not expose the rechargeable battery floor sweeper to extreme temperatures or moisture.
•Do not therefore store it near ovens, heating elements, burners or in the bathroom.
•Never leave the device without it having been switched off - the rechargeable battery could be damaged through depletion.
Disposal
Do not dispose of the appliance in your normal domestic waste. This product is subject to the European guideline 2002/96/EC.
Dispose of the appliance through an approved disposal centre or at your community waste facility. Observe the currently applicable regulations.
In case of doubt, please contact your waste disposal centre.
Battery disposal!
Batteries may not be disposed of with normal domestic waste. All consumers are statutorily obliged to dispose of batteries at the collection point in their community/district or with the original supplier. The purpose of this obligation is to ensure that batteries can be disposed of in an environmentally friendly manner. Only dispose of batteries when they are fully discharged.
Dispose of all packaging materials in an environmentally friendly manner.
- 4 -
IB_KH750_E3730_LB3 13.05.2008 16:49 Uhr Seite 5
Warranty & Service |
|
Importer |
|
The warranty for this appliance is for 3 years from |
|
KOMPERNASS GMBH |
|
the date of purchase. The appliance has been |
|
BURGSTRASSE 21 |
|
manu-factured with care and meticulously examined |
|
44867 BOCHUM, GERMANY |
|
before delivery. Please retain your receipt as proof |
|
|
|
of purchase. In the case of a warranty claim, please |
|
www.kompernass.com |
|
make contact by telephone with our service depart- |
|
|
|
ment. Only in this way can a post-free despatch for |
|
|
|
your goods be assured. |
|
|
|
The warranty covers only claims for material and |
|
|
|
maufacturing defects, not for wearing parts or for |
|
|
|
damage to fragile components. This product is for |
|
|
|
private use only and is not intended for commercial |
|
|
|
use. |
|
|
|
The warranty is void in the case of abusive and im- |
|
|
|
proper handling, use of force and internal tampe- |
|
|
|
ring not carried out by our authorized service |
|
|
|
branch. Your statutory rights are not restricted in |
|
|
|
any way by this warranty. |
|
|
|
|
DES Ltd |
|
|
Units 14-15 |
|
|
|
Bilston Industrial Estate |
|
|
|
Oxford Street |
|
|
|
Bilston |
|
|
|
WV14 7EG |
|
|
|
Tel.: 0870/787-6177 |
|
|
|
Fax: 0870/787-6168 |
|
|
|
e-mail: support.uk@kompernass.com |
|
|
|
|
Irish Connection |
|
|
Harbour view |
|
|
|
Howth |
|
|
|
Co. Dublin |
|
|
|
Tel: |
00353 (0) 87 99 62 077 |
|
|
Fax: 00353 18398056 |
|
|
|
e-mail: support.ie@kompernass.com |
|
|
|
- 5 -
IB_KH750_E3730_LB3 13.05.2008 16:49 Uhr Seite 6
PARISTOKÄYTTÖINEN HARJA KH 750
Käyttötarkoitus
Tämä akkuharja on tarkoitettu kuivan pölyn ja roskien lakaisuun kuivissa suljetuissa tiloissa ja vain kotikäyttöön. Käytä sitä ainoastaan sen omilla tarvikkeilla. Akkuharjaa ei ole tarkoitettu pesubetonin, sepelin tai muiden sen kaltaisten pintojen lakaisuun, eikä myöskään pitkänukkaisille matoille tai märille lattiapinnoille, eikä ammattimaiseen käyttöön teollisuudessa tai kaupassa. Käytä laitetta vain niin kuin tässä ohjeessa on kuvattu. Älä anna käyttää laitetta leluna. Älä anna lasten käyttää laitetta ilman valvontaa.
Tekniset tiedot
Jännite/taajuus (laturi) |
230 V ~ / 50 Hz |
Nimellisotto (laturi) |
4,5 W |
Ulostulo (laturi) |
9 V 200 mA |
Käyttöaika täysillä akuilla |
|
(riippuen lattiapäällysteestä) |
15 - 20 min |
Akku - työjännite |
4,8 V |
Tyhjän akun latausaika |
12 - 16 tuntia |
Ennen ensimmäistä käyttöä
Lue käyttöohje ennen ensimmäistä käyttökertaa huolellisesti läpi ja pidä sitä lähettyvillä myös myöhemmissä käytöissä. Jos myyt laitteen, anna ohje myös seuraavalle omistajalle.
Ennen kuin otat laitteen käyttöön, varmista, että…
•akkuharja, laturi ja sen johto ovat moitteettomassa kunnossa ja…
•kaikki pakkausmateriaalit on poistettu laitteesta.
Turvaohjeet
•Älä anna laitetta sellaisten henkilöiden (mukaan lukien lapset) käyttöön, joiden fyysiset, aistilliset tai henkiset kyvyt tai kokemuksen ja tiedon puute estävät heitä käyttämästä laitetta turvallisesti, jollei heitä ole aikaisemmin valvottu tai opastettu laitteen käytössä.
•Selvitä lapsille laite ja sen vaarat, jotta he eivät leikkisi laitteella.
 Sähköiskujen vaara
•Anna valtuutetun ammattihenkilöstön vaihtaa vaurioitunut virtajohto tai verkkopistoke välittömästi uuteen vaarojen välttämiseksi.
Toimitussisältö |
|
Akkuharjan kokoaminen |
|
Ennen toimintaohjeita mainittavat numerot viittaavat |
|
|
|
|
Akkuharja |
|
kääntöpuolen kuviin. |
Johdollinen latauslaite |
|
|
Varsi (3 osaa) |
|
q Kokoa varsi työntämällä sen 3 osaa yhteen ja |
Seinäteline |
|
kiertämällä ne paikoilleen. |
3 ruuvia |
|
w Ruuvaa varsi paikoilleen laitteessa olevaan pidik- |
3 tulppaa |
|
keeseen. |
Käyttöohje |
|
e Kiinnitä seinäteline mukana tulleilla ruuveilla. |
- 6 -

IB_KH750_E3730_LB3 13.05.2008 16:49 Uhr Seite 7
Akun lataus
Akkuharjan mukana toimitetaan tyhjä Ni-MH-akku. Jotta akku saisi täyden tehonsa, sitä täytyy ladata ennen ensimmäistä käyttöä 16 tunnin ajan. Seuraaviin latauksiin tarvitaan 12-16 tuntia.
Kun akku on ladattu täyteen, laitetta voidaan käyttää 15-20 min., ennen kuin akku täytyy ladata uudestaan.
Varmista ennen akun lataamista, että akkuharjan virta on sammutettu,
r sammuta laite tarpeen vaatiessa kytkimestä. t työnnä laturin pistoke laitteen latausliittimeen ja
sen jälkeen verkkopistoke 230 V ~ 50 Hz pistorasiaan.
y Latauksen aikana palaa punainen merkkivalo. Jos näin ei ole, tarkista, ovatko pistokkeet kunnolla paikoillaan.
Kun lataus on valmis, laite siirtyy latauksen ylläpitotilaan (ylläpitolataus). Älä pidä laitetta pysyvästi kytkettynä laturiin, jotta akku ei vahingoittuisi.
Huom!
•Käytä vain mukana tullutta laturia (9V  200 mA).
•Käytä laitetta vain sen mukana tulleella akulla. Muussa tapauksessa laite voi vahingoittua.
•Älä yritä irrottaa akkua lataamista varten.
•Älä avaa akun suojusta tai pura akkua!
Akkuharjalla työskentely
Huom!
•Älä käytä laitetta koskaan ilman roskasäiliötä.
•Pidä pyörivä harja, vaarna ja laitteen aukot kaukana kasvoistasi tai muista ruumiinosistasi.
r Paina kytkintä kytkeäksesi akkuharjan päälle. Kun painat kytkintä uudelleen, laite kytkeytyy pois päältä.
•Kuljeta akkuharjaa lattiaa pitkin.
•Jos keskeytät lakaisun, voit lukita harjanvarren pystysuoraan asentoon.
Ohje: joillakin matoilla akkuharja voi ratista tai hyppiä. Kokeile työntää laitetta hitaammin ja vastakkaiseen suuntaan.
Puhdistus
Näin puhdistat roskasäiliön:
Jotta akkuharjan teho säilyisi, tyhjennä roskasäiliö jokaisen käytön jälkeen.
u Paina roskasäiliön lukitusnappia irrottaaksesi sen laitteesta.
i Vedä roskasäiliö vaakasuoraan kevyellä nykäyksellä ylöspäin ulos laitteesta.
•Tyhjennä roskasäiliö ja aseta se jälleen paikoilleen.
- 7 -
 Loading...