

Page 1
A
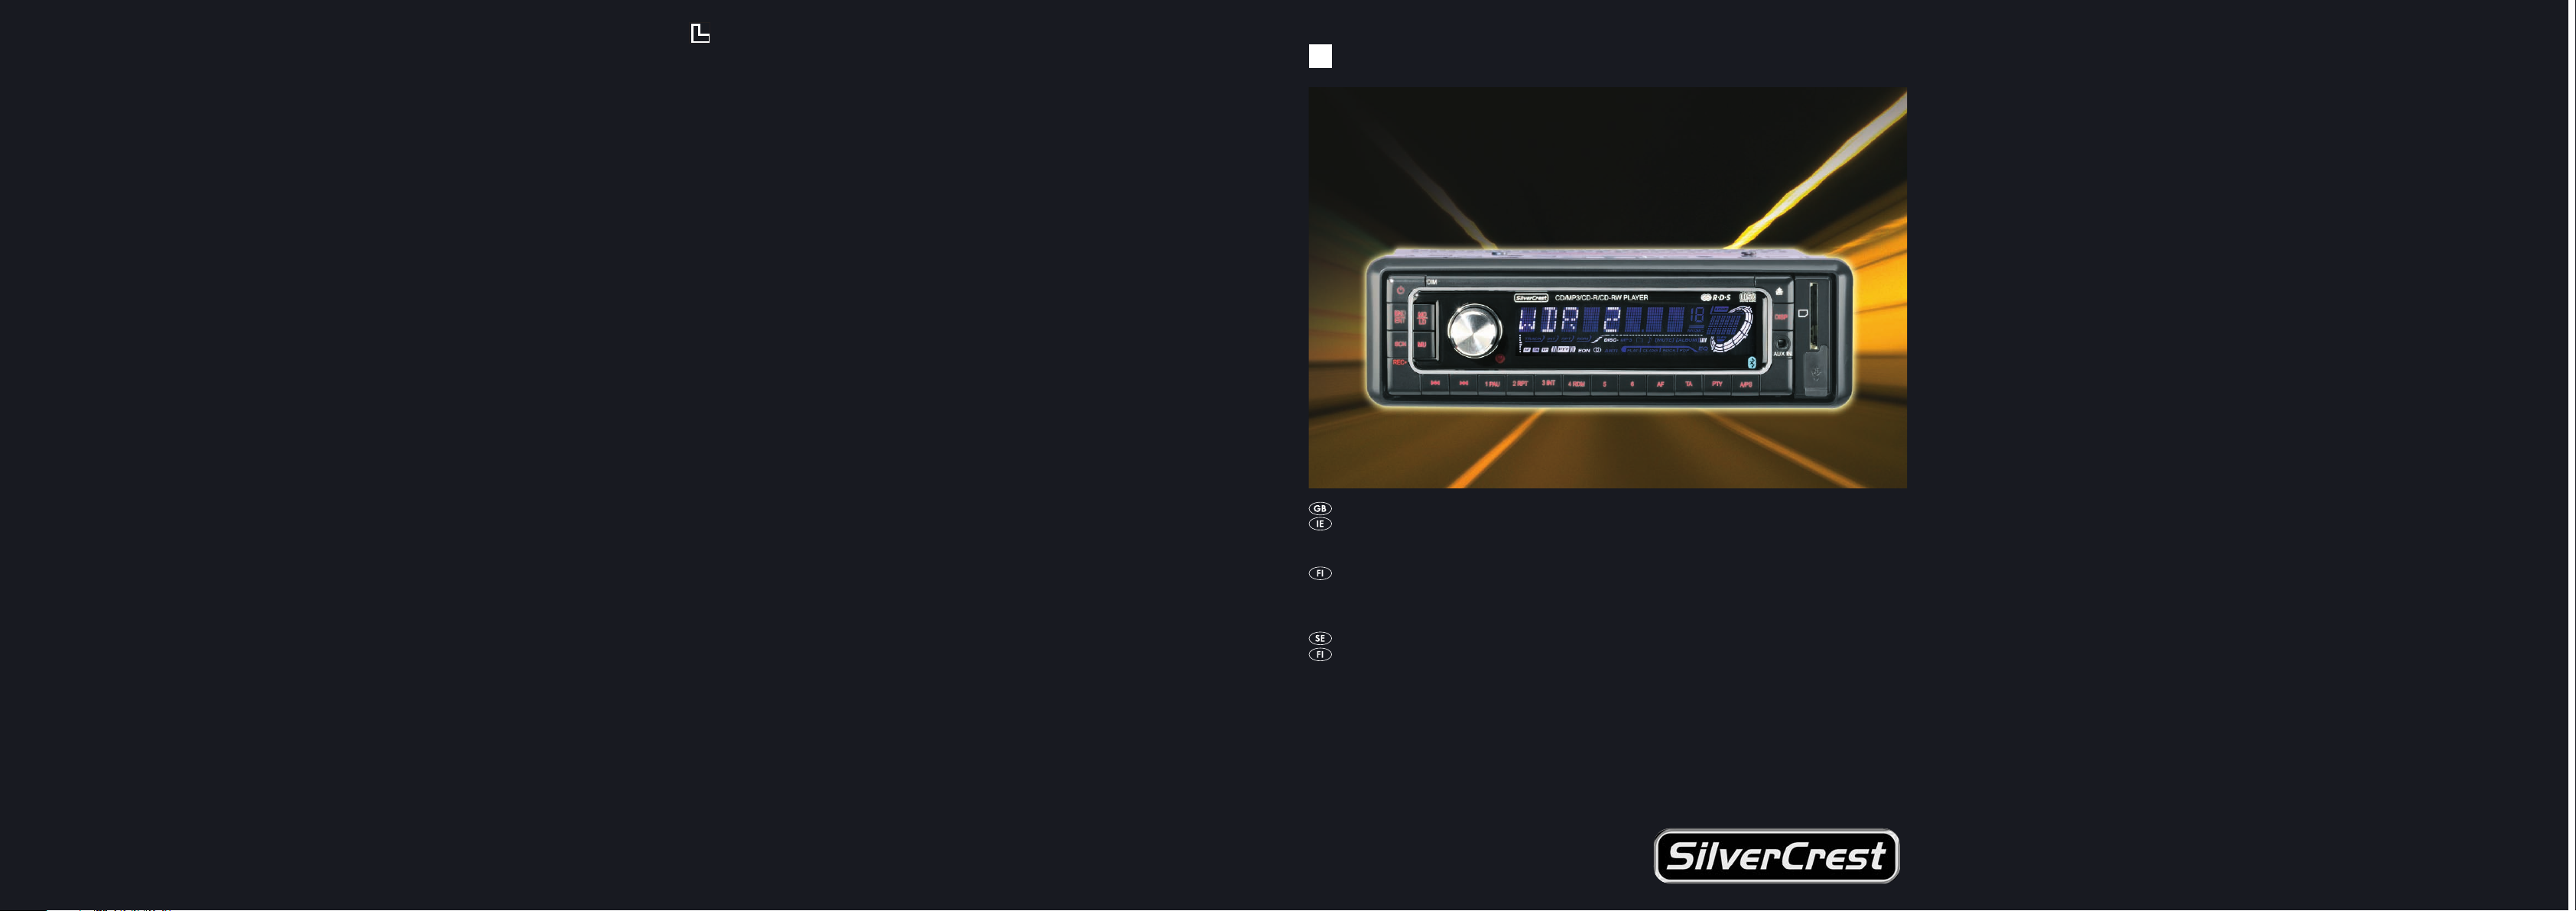
BLUETOOTH CAR RADIO
KH 2375
KOMPERNASS GMBH · BURGSTRASSE 21 · D-44867 BOCHUM
www
.kompernass.com
ID-Nr.: KH2375-01/08-V2
BLUETOOTH CAR RADIO
Operating instructions
BLUETOOTH-AUTORADIO
Käyttöohje
BLUETOOTH BILRADIO
Bruksanvisning
Page 2
KH 2375
A
w
D
4!
4) 4@
3(
E
e r t y iuq
2$ 2@ 2! ; l k j h g f d s a o
2# 2)
B
2%
2&2^
C
2*
2(
3)
2^
3!
5&
5^
4#
4$
5%
5$
5#
5@
5!
5)
4%
4^
4&
4*
6!
5*
5(
6)
4(
I
F
3*
3&
3^ 3%
3@
H
3#
G
3$
Page 3

CONTENT PAGE
Intended Use 3
Technical Data 3
Items supplied 3
Safety information 4
Operating Elements 5
Installation 6
Connection 6
Configuration of the ISO connections............................................................................................7
Installing the radio into the ISO duct ............................................................................................7
Connection schematic......................................................................................................................8
Connecting an external audio device to the car radio 8
Disassembling the device 8
Face plate 9
Remote control 9
Inserting the battery .........................................................................................................................9
Operation 10
Basic operation ..............................................................................................................................10
Volume ............................................................................................................................................10
Bass/Treble/Balance/Fader.........................................................................................................10
Loudness..........................................................................................................................................10
Display ............................................................................................................................................10
Setting the operating mode ..........................................................................................................10
RESET - Reset the radio..................................................................................................................10
Settings for the multi controller .....................................................................................................11
Radio functions 11
Selecting the band range..............................................................................................................11
Automatic station search ...............................................................................................................11
Programming stations.....................................................................................................................12
Accessing the station .....................................................................................................................12
Automatic saving ...........................................................................................................................12
- 1 -
Page 4

Running through saved stations....................................................................................................12
Alternative Frequency (AF)............................................................................................................12
PTY (Programme Type Code Programme type/kind identification).......................................12
TA ("Traffic Announcement") - TRAFFIC RADIO..........................................................................13
Playing audio CDs 13
Inserting and removing CDs .........................................................................................................14
Title skip ..........................................................................................................................................14
Fast forward/backward................................................................................................................14
Stopping a CD ...............................................................................................................................14
Repeating a title .............................................................................................................................14
Title sampling..................................................................................................................................14
Random playback of all titles .......................................................................................................14
Playing MP3-CDs 14
Title search (by numbers)..............................................................................................................15
Search for directories ....................................................................................................................15
USB port 16
Card reader 16
Record function 16
Bluetooth operation 17
Connection......................................................................................................................................17
Coupling a telephone with the car radio....................................................................................17
Using the microphone....................................................................................................................18
Operation .......................................................................................................................................18
Audio streaming (A2DP) ...............................................................................................................18
Replacing the fuse 19
Troubleshooting 19
Cleaning 20
Disposal 20
Warranty and Service 21
Importer 21
Read the operating instructions carefully before using the appliance for the first time and preserve this
booklet for later reference. Pass the manual on to whomsoever might acquire the appliance at a later date.
- 2 -
Page 5
BLUETOOTH CAR RADIO
KH 2375
Intended Use
This device is designed for the reception of FM/AM
radio stations as well as for the playback of audio
and MP3-CDs, MP3 data from USB data carriers
and SD/MMC memory cards and also audio signals
from external audio devices. In addition you can connect the car radio to a bluetooth mobile telephone
and, with the microphone unit, you can use the car
radio as hands free equipment. This device is intended
for use only in private environments. It is not suitable
for use in commercial or industrial areas.
Technical Data
Input voltage : 12V
Input current: max. 10 A
Impulse rating: 4 x 40 W
Radio frequency range:
Radio: FM (USW) : 87.5 - 108 MHZ
AM (MW) : 522 – 1620 KHz
Station memory slots: 18 FM (USW)
12 AM (MW)
Remote control:
Battery: 3 V Button cell (CR2025)
Card slot
SD/MMC memory card slot
Device fuse:
10 A Automotive flat fuse
General
Operating temperature range: +5°— +40°C
Humidity: 5 — 90% (no condensation)
Dimensions
(L x D x H): 18,8 x 23 x 6 cm
Weight : approx. 1530 gr
CE Conformity
This device complies with the basic requirements
and other relevent regulations regarding conformity to the automotive directive 2004/104
/EG and the directive R&TTE 99/5/EG.
Items supplied
- Car radio (incl. face plate)
- Installation bracket (Attached)
- Bezel frame (Attached)
- Fixture plate (incl. securing material)
- Remote control
- 1 Battery CR2025, 3 V DC
- Key for installation bracket
- Case for face plate
- Microphone unit with adhesive strip
- Operating manual
Audio input (AUX IN):
3,5 mm Stereo jack plug
USB port
USB 1.1 and 2.0 compatible data carrier
- 3 -
Page 6
Safety information
• This device is not intended for use by individuals
(including children) with restricted physical, physiological or intellectual abilities or deficiences in
experience and/or knowledge unless they are
supervised by a person responsible for their safety
or receive from this person instruction in how the
device is to be used.
• Children should be supervised to ensure that they
do not play with the device..
• Keep batteries away from children. Children can
put batteries into their mouths and swallow them.
If a battery is swallowed medical assistance must
be sought immediately.
To avoid damage through short circuits:
• If possible have the car radio installed by a qualified
technician.
• Only connect the device to a properly installed
12 V automotive battery. Only connect the car
radio in the vehicle via an ISO plug.
• Make sure that during operation the connection
cable can never become wet or moist. Run the
cable in such a way that it cannot become clamped
or damaged in any other way.
• To avoid possible dangers exchange damaged
cables or connectors immediately at an authorized
specialist establishment or the customer service
department.
• Only use the device in a vehicle interior.
• Make sure that liquids or objects are never able
to enter into the device.
• Do not open the housing or attempt to repair the
device yourself. Should you do so, device safety
can no longer be assured and the warranty will
become void.
Repairs are to be carried out exclusively by a
specialist firm or the service centre.
Information regarding the handling
of batteries
The remote control for this device uses a battery.
For the handling of batteries please observe the
following:
Risk of explosion!
Do not throw batteries into a fire. Do not recharge the batteries.
• Never open batteries, never solder or weld
batteries.
The risk of explosions and injuries exists!
• Regularly check the condition of the batteries.
Leaking batteries can cause damage to the device.
• Remove the batteries if you do not intend to use
the device for an extended period of time.
• Put on protective gloves when handling a leaking
battery.
• Keep batteries away from children. Children can
put batteries into their mouths and swallow them.
If a battery is swallowed immediately seek medical
assistance.
• Clean the battery compartment and the battery
contacts with a dry cloth.
To avoid the risks of fire or injury:
• Install the device in such a way as to avoid the
development of heat accumulation and so that
the device is sufficiently ventilated.
• Never cover the ventilation openings!
• Avoid any additional heat build up, e.g. direct
sunlight, heaters, other devices, etc.
• Do not operate the device if it has sustained a
fall or is damaged. Arrange for the device to be
checked and/or repaired by qualified technicians.
- 4 -
Page 7
Danger laser radiation!
The device is fitted with a "Class 1 Laser".
• Never open the device.
• Never attempt to repair the device. There is
invisible laser radiation inside the device.
• Avoid all direct optical contact with the laser
beam, it could lead to serious eye injuries.
Traffic safety
Traffic safety is the number one priority. Only
operate your car radio when the traffic situation
allows. Familiarize yourself with the device before driving. Acoustical signals from the police,
fire service and other emergency services must
be able to be heard inside the vehicle in good
time. Therefore moderate the programme's
volume during the journey.
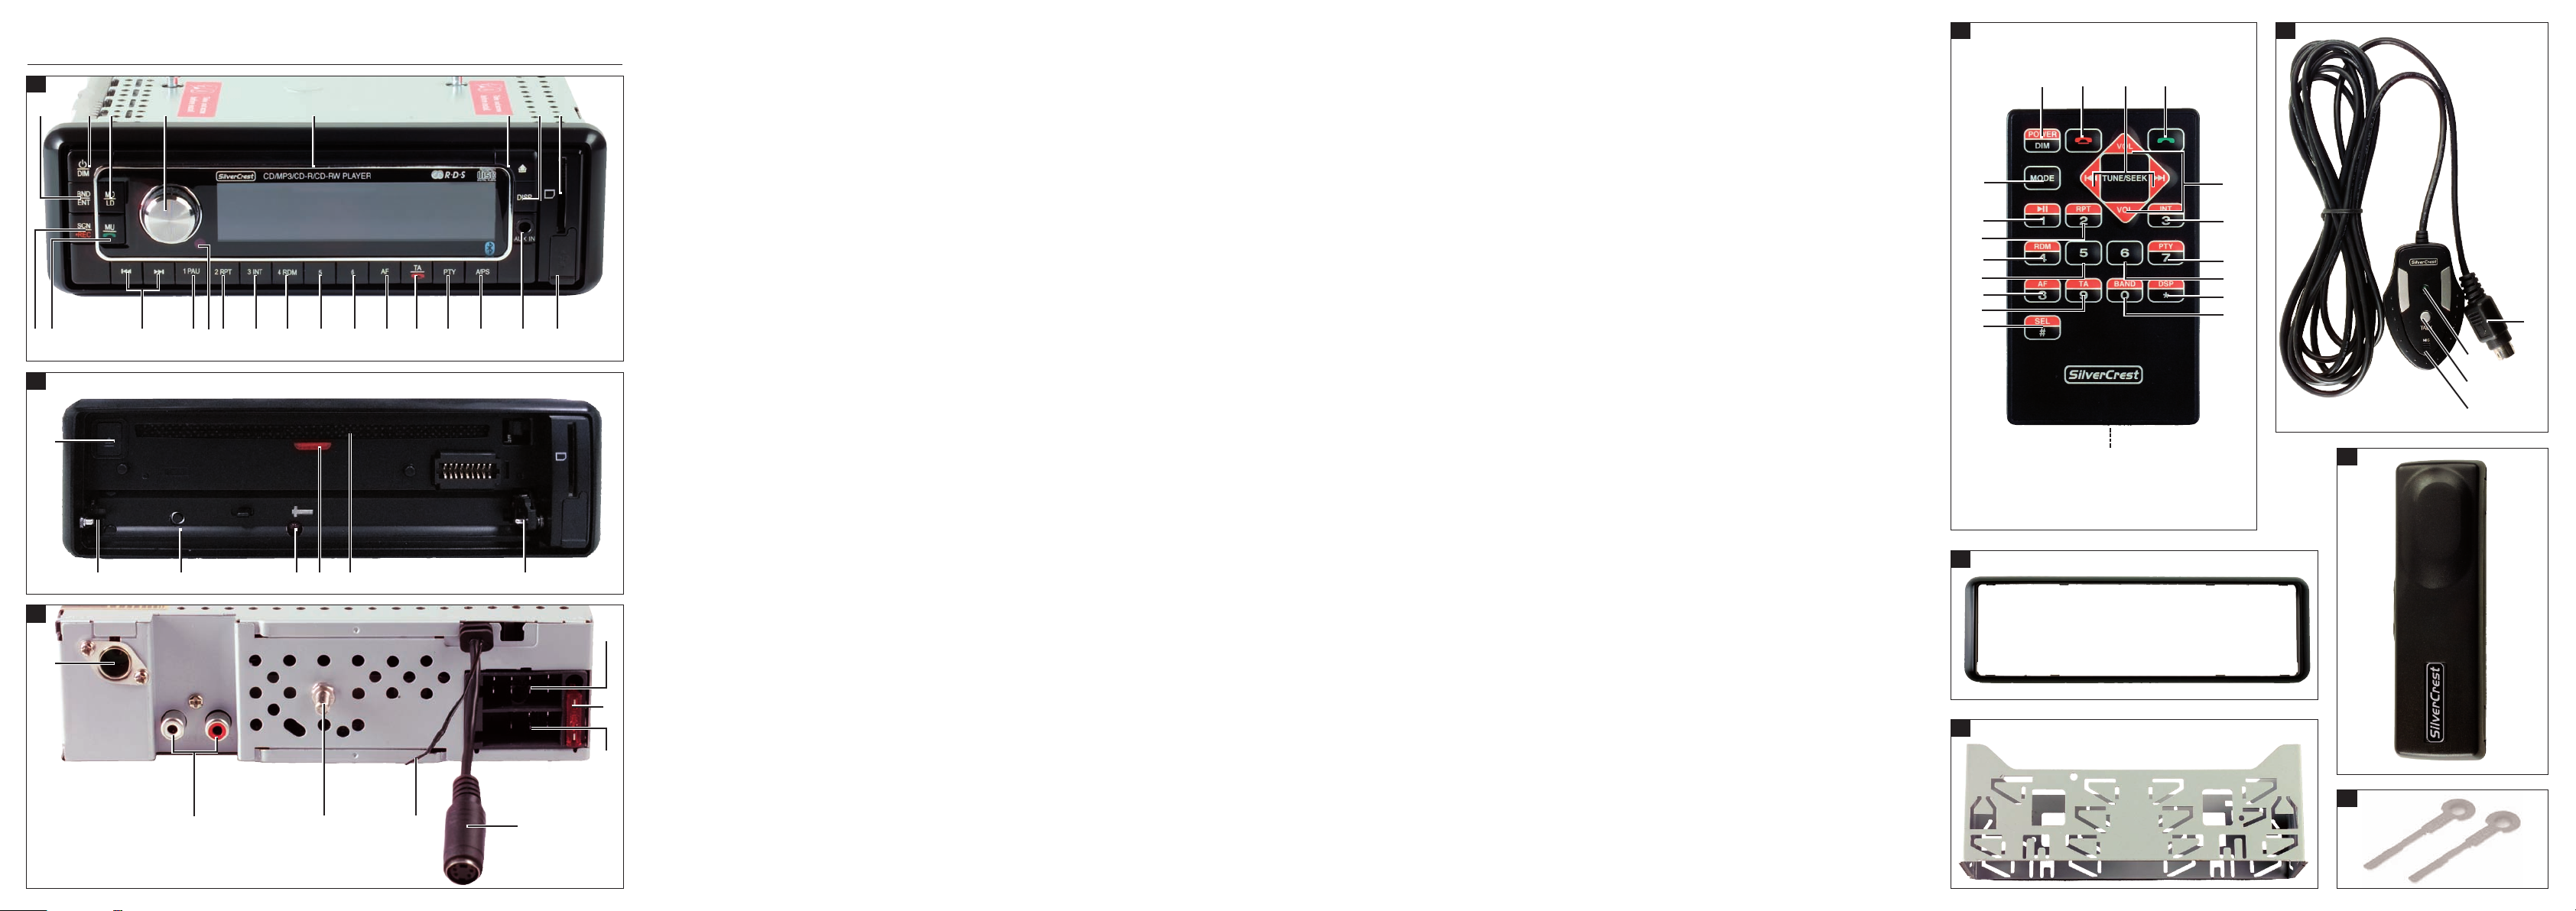
Operating Elements
A
Front panel (face plate)
BND/ENT: Select band range/confirm selection
q
POWER/DIM: Switch device on and off/dim display
w
illumination
MD/LD: Set operating mode/switch to loudness
e
Multi controller: Press to access the bass, treble,
r
balance and fader settings/turn
to set the value/volume
Display
t
Unlocking the face plate
y
DISP: Show display information
u
Card slot for SD/MMC cards
i
USB port
o
AUX IN: 3,5 mm stereo input socket for the con-
a
nection of an external audio device
A/PS: Automatic station saving
s
PTY ("Programme Type"): Station search by
d
PTY group
TA ("Traffic Announcement"):
f
Activate traffic radio station
AF ("Alternative Frequency"): Alternative
g
Station button 6/next directory
1%
Station button 5/previous directory
j
RDM/4: Random playback in the CD/MP3
1&
operation mode, station button 4
INT/3: Intro function in the CD/MP3 operation
l
mode, station button 3
RPT/2: Repeat function in the CD/MP3
1(
operation mode, station button 2
Remote control sensor
2)
PAU/1: Stop playback in the CD/MP3
2!
operation mode, station button 1
/: Title/Station search backwards/forwards
2@
MU: Switch sound off/ACCEPT-button
2#
SCN/REC: Automatic station search/Record to
2$
a data carrier at the USB port or the
SD/MMC card slot
B
Behind the face plate
OPEN : Eject disc
2%
Holder for the face plate
2^
RESET: Reset the car radio
2&
Anti theft LED
2*
CD compartment's position LED
2(
CD compartment
3)
C
Connections, rear panel
ISO-Block connection B
3!
Automotive flat fuse 10 A
3@
ISO-Block connection A
3#
Microphone unit socket
3$
Bluetooth antenna
3%
Securing screw
3^
(incl. M5 nut and washer)
LINE OUT: Audio cinch output L/R for amplifier
3&
Antenna connection for a DIN antenna plug
3*
/ END-button
Frequency search
- 5 -
Page 8
D
Remote control
POWER/DIM: Switch device on and off/dim
3(
display illumination
END-button
4)
/: Title/Station search backwards/forwards
4!
ACCEPT-button
4@
VOL+/-: Volume increase/decrease
4#
INT/3: Intro function in the CD/MP3 operation
4$
mode, number button 3
PTY/7: ("Programme Type") Station search by
4%
PTY group/number button 7
Number button 6
4^
DSP/
4&
4*
4(
5)
5!
5@
5#
5$
5%
5^
5&
: ("Digital Sound Processing") Sound
*
settings/ button
*
BAND/0: Select band range/number button 0
Battery compartment
SEL/#: Access settings for volume, bass, treble,
balance and fader/ button #
TA/9: ("Traffic Announcement"): Activate traffic
radio station/ number button 9
AF/8: ("Alternative Frequency"): Alternative
frequency search/ number button 8
Number button 5
RDM/4: Random playback in the CD/MP3
operation mode/ number button 4
RPT/2: Repeat function in the CD/MP3 operation
mode/ number button 2
/1: Playback start or stop/ number button 1
MODE: Set operation mode/loudness function
Installation
If you want to install your car radio yourself follow
the installation and connection instructions in this
manual.
Installation instructions
• Insert the device in the slot provided for it or select
a location for mounting the device that does not
obstruct the driver during normal operation of
the vehicle.
• Briefly connect the cable before finally installing
the device. Make sure that it is plugged in properly
and that the system functions correctly.
• In the event that changes to the vehicle are necessary contact your vehicle dealer/qualified
radio installation facility.
• Install the device in such a way as to avoid injuries in the event of harsh braking.
• If the device is installed with more than a 30° inclination it could lead to function disorders.
• Avoid installation of the device in the vicinity of
high temperature sources (i.e. direct sunlight or
heating vents) or dusty and dirty locations. Do
not subject the device to excessive vibration.
Connection
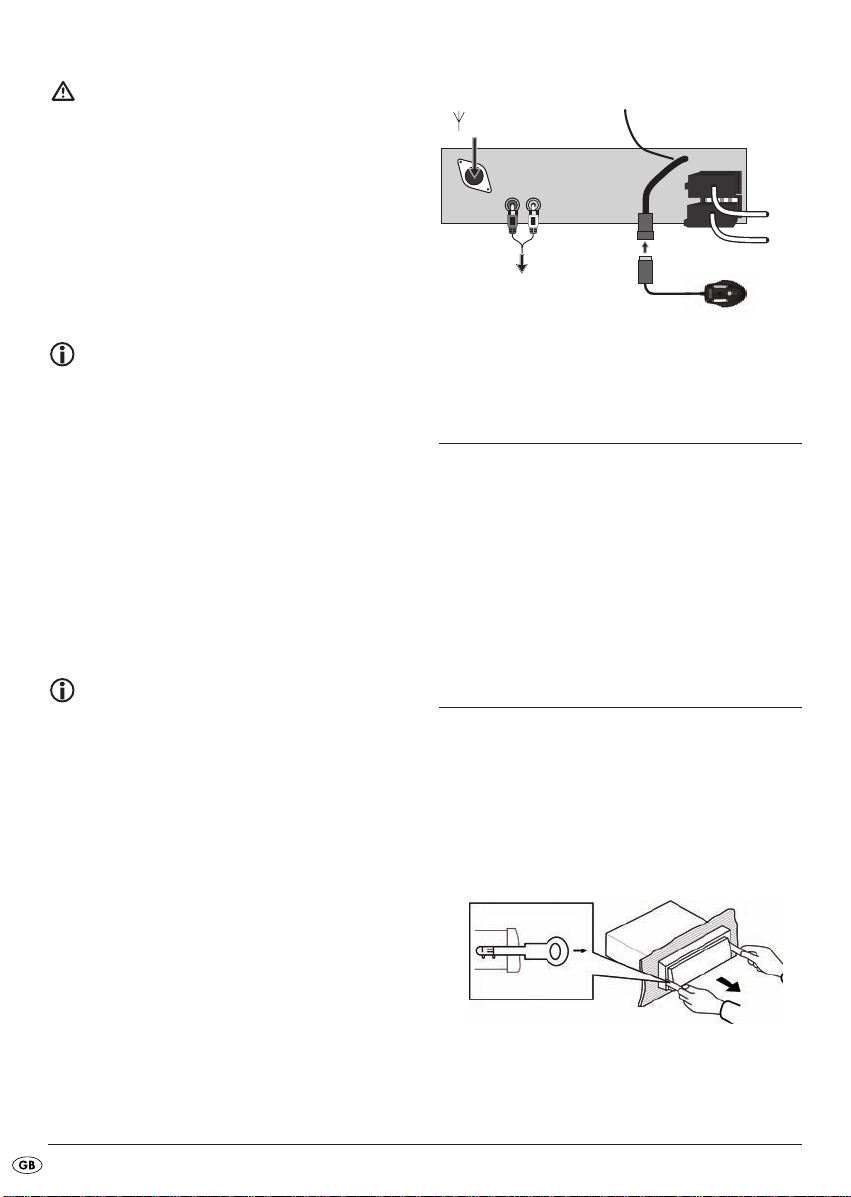
E
Microphone unit
green LED for connection status
5*
TALK button
5(
Microphone
6)
Microphone unit plug
6!
F
Case for face plate
G
Key for installation bracket
H
Installation bracket
I
Bezel frame
Note:
Make sure that a permanent positive connection
is applied to the station memory of connection
6 in the ISO block A.
You can connect an external amplifier to the
audio cinch output. For this follow the operating
instructions for the external amplifier.
- 6 -
Page 9
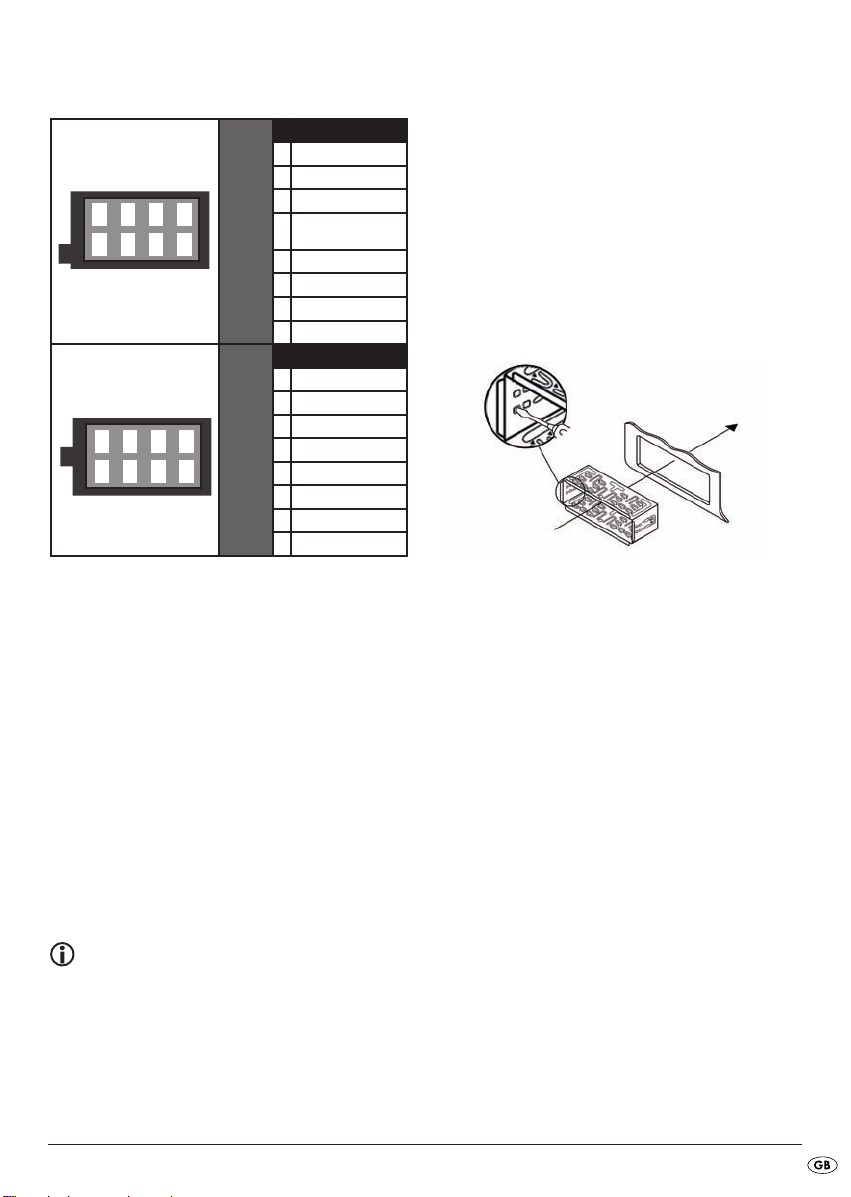
Configuration of the ISO connections
Configuration
1 unconfigured
2 unconfigured
1234
5678
1234
5678
3 Antenna power
4 12 V (Ignition
ISO A
5 unconfigured
6 Permanent positive
7 unconfigured
8 Minus (-)
1 Rear right +
2 Front right +
3 Front left +
4 Rear left +
ISO B
5 Rear right 6 Front right 7 Front left 8 Rear left -
positive)
Configuration
Of course you can also only connect the car radio
to two speakers. Then you only use the cable for the
front speakers.
Problems because of cable interchanging
In a few vehicle models the standard configuration of the connections [4] and [6] in the ISO
Block A (see above "Configuration of the ISO
Blocks") is interchanged at the factory. If this is
the case the station memory can be lost.
To correct this the connections 4 (Ignition positive)
and 6 (Permanent positive) in the ISO Block A must
be swapped.
Installing the radio into the ISO duct
Note
Before installation remove, without fail, the two
transport securing screws on the top of the radio
housing (marked with a red sticker)!
The car radio can be installed into any standard
ISO mounting duct. In the event that your vehicle
does not have an ISO mounting duct contact your
local specialist establishment, local dealer or the
technical department of the store.
• Pull the installation bracket and the bezel frame
off of the car radio's housing.
• Place the installation bracket into the ISO mounting
duct.
• Bend the tabs on the installation bracket with a
screw driver so that the bracket is fixed firmly
into the mounting duct (see diagram).
• Check to make sure that the bracket is securely
fixed.
• Connect the ISO socket block of the car radio with
the two ISO plugs on your vehicle.
• Connect the antenna cable from the vehicle antenna to the antenna socket on the car radio.
• Feed the microphone unit cable into the mounting
duct and connect it to the microphone unit socket.
Run the cable in such a way that the microphone
unit can later be secured in the vehicle interior.
• Contingently connect the audio cinch cable of
an external amplifier to the
LINE OUT socket on the
car radio.
• If necessary secure your device against theft
with additional measures. Attach the securing
screw with the anchoring plate and the securing
material to the engine firewall of the vehicle.
• Carefully push the car radio into the mounting
duct until it locks into place. Finally put on the
bezel frame.
- 7 -
Page 10
Attention!
1234
5678
1234
5678
ISO A
ISO B
For installation please use the car radio's ISO
connections. The vehicle specific ISO adapter
that you may possibly require can be obtained
from a specialist establishment, from a local
dealer or from the store's technical department.
When using other connection types the warranty
becomes void!
Observe the cable positioning when pushing
the radio in; it could become damaged.
Antenna power connection
The connection for the antenna power is available
for a relay controlled antenna. The relay then
automatically extends the antenna when the radio
is switched on. When switched off the antenna
retracts.
This connection can also be used to control an
external amplifier. For exact connection information please consult the amplifier's operating instructions.
Never attach the antenna power connection with
the antenna's motor power cable; this can cause
damage to the radio!
Connection schematic
Antenna
External amplifier
Microphone unit
Connecting an external audio
device to the car radio
• Connect the audio output of an external audio
device (i.e. an MP3 player) via a 3.5 mm stereo
jackplug to the socket
the device.
• Select playback of the audio input by pressing,
several times, the
shown in the display.
AUX IN on the front panel of
MD/LD button until AUX is
Backup connection
Make sure that for the station memory the permanent positive is applied to the connection 6
in the ISO block A. Otherwise you will not be
able to save any radio stations!
• After all connections have been made activate the
RESET button with a ball point pen or other pointed
object.
• Attach the face plate as described below.
Disassembling the device
• To disassemble the device first remove the bezel
frame and then feed the right and left keys into
the respective slots on the sides of the device.
The tabs are now bent back and you can pull the
device out.
- 8 -
Page 11
Face plate
Remote control
Putting the face plate on
• Place the face plate with the left side in the frame
first. Then firmly press the right side until it locks
into place.
• Check to make sure that the face plate is firmly
and correctely installed in the frame. If the face
plate is incorrectely installed it can result in malfunctions when operating the car radio.
Removing the face plate
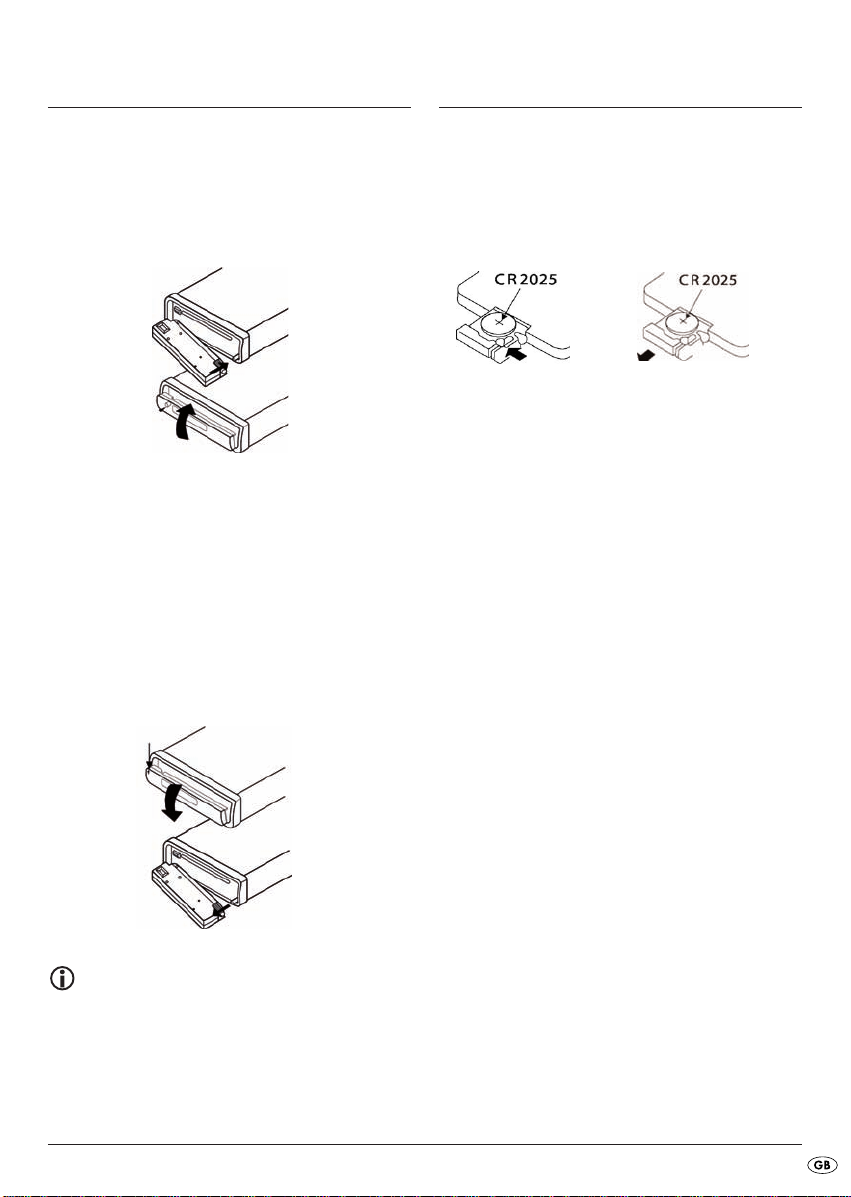
• Press the button to unlock the face plate.
• To remove the face plate first tip it slightly forward
and pull the right side away first and then the left
side.
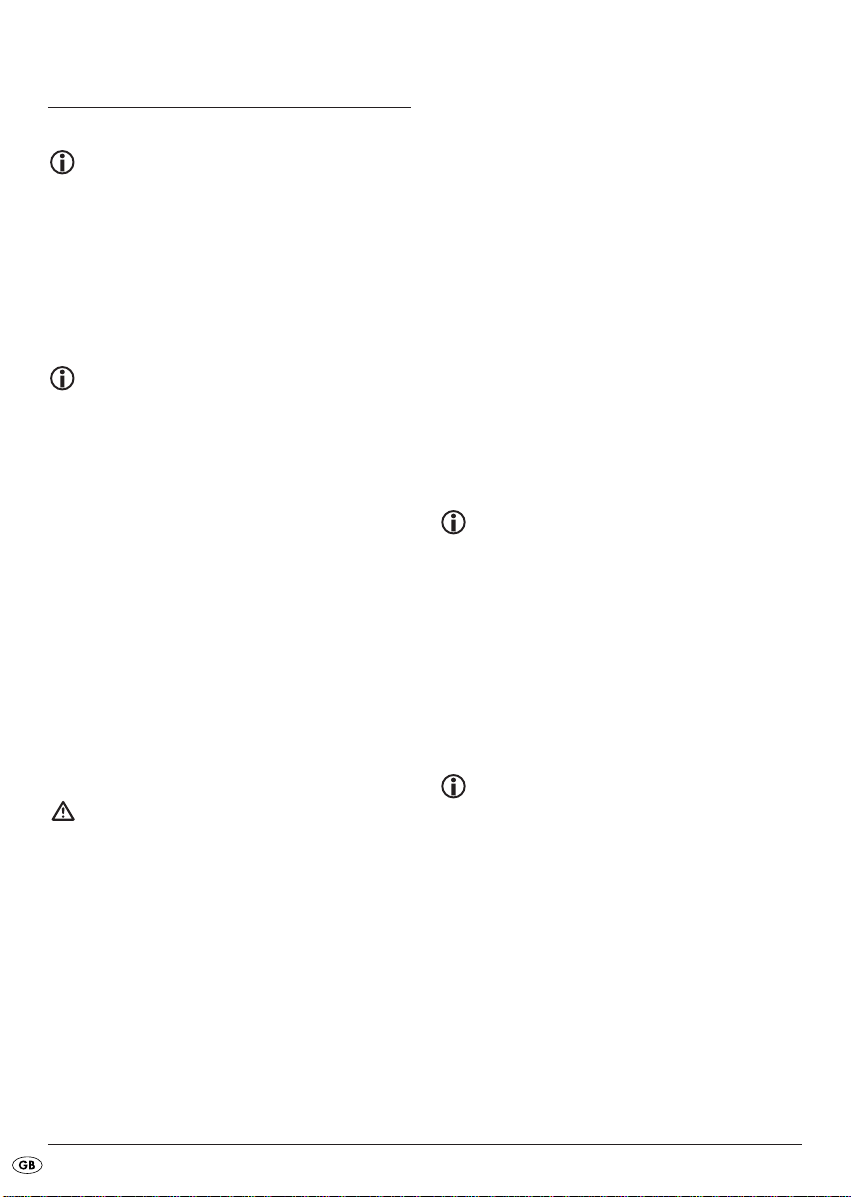
Inserting the battery
Remove the supplied battery from the packing.
To insert the battery and/or change the battery
proceed as follows:
• Pull the battery compartment out of the remote
control by first pressing the lateral locking device
and then pulling the battery compartment out.
• Remove the depleted battery and insert a new
battery of the type CR2025 (Button cell) into the
battery compartment. Make sure that the battery
is inserted in accordance with its correct polarity.
• Slide the battery compartment back into the remote control.
Using the remote control
• Point the remote control to the Infrared sensor
on the front panel of the device.
• You can use the remote control for distances of
up to approx. 8 m from the device.
Note
When the face plate is not inserted into the frame
the theft protection LED on the device blinks.
To safeguard the face plate always keep it stored
in its case.
- 9 -
Page 12
Operation
Operation via the buttons on the
device and on the remote control
Most of the functions can be operated by the
buttons on the device as well as by the buttons
on the remote control. In these instructions the
buttons on the device are described.
If the buttons on the remote control are meant
this will be specifically mentioned.
Note
Approx. 5 seconds after a setting has been
made the playback will again be displayed
and the setting is saved.
Basic operation
Switching On and Off
Press briefly the POWER/DIM button to switch the radio
on. In the display the notice WELCOME appears.
• Briefly touch the
play illumination.
To switch off hold down the
Volume
• Turn the multi controller to increase or decrease
the volume.
Attention!
Always set the volume to a level that will allow
you, at any time, to clearly hear acoustical signals
from emergency service vehicles!
Bass/Treble/Balance/Fader
• Press the multi controller to display the current
settings for the Bass (BASS), Treble (TREBLE),
Balance (BALANCE) and Fader (FADER).
• Turn the multi controller to change the settings.
POWER/DIM button to dim the dis-
POWER/DIM button longer.
Loudness
• Hold down the MD/LD button to switch the loudness
function on or off.
Display
• By pressing the DISP button you can switch the notices
in the display around in the following manner:
With radio reception:
Programme name, time of day (will automatically
be set with RDS reception), PTY settings (these RDS
functions are transmitted by the broardcast institutions in various extents; see also the chapter "Radio
functions") and frequencies.
In CD mode:
Time of day, PTY settings and frequencies.
Note
If you do not receive any RDS or PTY information
"NO CLOCK" or "NO PTY" appears in the display. Each notice only appears for a few seconds.
Setting the operating mode
• Press the MD/LD button to switch between radio re-
ception (frequency indicator), CD/MP3 operation
(CD), card slot (SD/MMC), USB port (USB) and
audio input (AUX).
Note
The operating modes CD, SD/MMC and USB
can only be accessed when the corresponding
medium is inserted.
RESET - Reset the radio
• To reset the car radio to its factory default settings
press the
example a ball point pen.
• Reset the car radio:
- at initial operation,
- after the cable connection,
- if not all function buttons are working
- when an error message appears in the display.
RESET button with a pointed object, for
- 10 -
Page 13

Settings for the multi controller
Via the multi controller you can, in addition, administer settings for the switch on volume, time of day
settings, traffic radio volume, EON function, recording format and the equalizer.
• Hold down the multi controller for approx. 2 seconds and then press it several times to access
the following settings:
INVOL - switch on volume
• Turn the multi controller in order to set a volume
level, which will apply when the car radio is
switched on.
ADJ - Time of day
Your car radio is equipped with an RDS controlled
clock. The clock sets itself automatically when the
EON function is switched on and also continues to
run when the radio is switched off. If you do not
receive any RDS signal you can also set the time of
day manually.
• Turn the multi controller to the right to set the
hours and to the left to set the minutes.
TAVOL - Volume for traffic radio
• Turn the multi controller in order to set a volume
level, which will apply when the traffic report is
switched on.
EON - Function
Turn the multi controller in order to switch the EON
function on (EON ON) or off (EON OFF). When
the EON function is switched on the radio switches
to traffic radio or PTY types if the TA or PTY function
has been switched on.
DSP - Equalizer
• Turn the multi controller to select one of the set-
tings DSP CLASSIC, DSP ROCK, DSP POP, DSP
FLAT or DSP NONE. In the setting DSP NONE
no Digital Sound Processing (DSP) is switched on.
You can also set the equalizer by pressing the
button on the remote control. With this setting DSP is
switched off when the radio frequency is shown
again.
The DSP equalizer setting is shown at the bottom of
the display.
DSP
Radio functions
Selecting the band range
• Press the BND/ENT button to switch between USW
(FM1, FM2, FM3) and medium wave (MW1,
MW2).
Automatic station search
• Press briefly the search buttons or to start
a search forwards/backwards. The search stops
at the next station found.
Manual station selection
• When you hold down one of the buttons or
for two seconds you switch to manual station
search. MANUAL appears in the display.
• Now press the search buttons or several
times to set the frequency in steps of 0.05 MHz
(MW: 9 kHz) up/down.
If no button is pressed for approx. two seconds the
automatic station search is set again. AUTO appears
in the display..
REC - Recording format
• Turn the multi controller to set the record format
for recording on SD/MMC and/or USB data
carriers, MP3 (MP3 data) or WMA (Windows
Media Audio).
- 11 -
Page 14

Programming stations
• Press the BND/ENT button to set a band range.
In each range you can save six stations.
• Search for the station that you want to save.
• After the search has found a station press one of
the station buttons 1-6 for approx. three seconds.
The brief switching off of the sound indicates that
the station is saved.
The device switches back to radio playback after a
few seconds.
Accessing the station
• Select with BND/ENT the band range.
• By pressing one of the station buttons 1-6 you
access the saved station again.
Automatic saving
• Hold down the A/PS button. A search immediately
starts whereby each found station remains for
approx. five seconds. The blinking number in the
display shows the number of the station button,
on which will be saved the respective station.
With weak stations the search will automatically
continue.
• Whilst the search is stopped press a station button
to save the station on another memory position.
Running through saved stations
• You can access the saved stations of the current
station range.
• Select with
• Press briefly the
briefly selected.
• When you hear the desired station press briefly
the
BND/ENT the band range.
A/PS button. All stations will be
A/PS button.
Alternative Frequency (AF)
You can search for alternative frequencies of a station
so that it will always have optimal reception.
• Press the
display. Now the radio will always search for
the optimal radio frequency of the currently set
station.
AF button. The notice AF appears in the
Regional programmes
A few stations broadcast regional programmes.
• In order to playback only the station's regional
programme hold down the
notice REG ON appears in the display.
• To again playback the national programme hold
down the
pears in the display.
AF button until the notice REG OFF ap-
AF button until the
PTY (Programme Type Code Program-
me type/kind identification)
For this function the EON function must be switched
on.
• To activate the PTY search press the
In the display the notice PTY appears.
With the station search only stations of the currently
selected PTY identification (see the PTY identification
table) will be considered.
• To deactivate the PTY search press the
again.
Setting the PTY identification
• Hold down the PTY button and then turn the multi
controller to set the individual PTY identifications.
Station search by PTY identification
• During the display of a PTY identification if you press
briefly the
immediately starts for stations, which correspond to
this PTY identification.
If no station is found that corresponds to this PTY
identification the notice NOT FND appears briefly
and then the search ends with the last set station.
PTY button or the buttons / a search
PTY button.
PTY button
- 12 -
Page 15
PTY identification
PTY indicator Contents
1 NEWS News
2 AFFAIRS Politics & current events
3 INFO Special word programmes
4 SPORT Sport
5 EDUCATE Study & further education
6 DRAMA Radio play & literature
7 CULTURE Culture, church, social
8 SCIENCE Science
9 VARIED Conversational
10 POP M Pop music
11 ROCK M Rock music
12 EASY M Easy listening music
13 LIGHT M Light classical music
14 CLASSICS Serious classical music
15 OTHER M Special music programmes
16 WEATHER Weather
17 FINANCE Finance
18 CHILDREN Childrens programme
19 SOCIAL Social
20 RELIGION Religion
21 PHONE IN Caller broadcasts
22 TRAVEL Travel
23 LEISURE Leisure
24 JAZZ Jazz music
25 COUNTRY Country music
26 NATION M National music
27 OLDIES Oldies music
28 FOLK M Folk music
29 DOCUMENT Documentaries
30 TEST Display indicator "Alarm Test"
31 ALARM Alarm reports
Please note that this information is dependent on the
region, the broadcasting corporation and the station.
TA ("Traffic Announcement")
- TRAFFIC RADIO
For this function the EON function must be switched
on.
• Press the
TA button briefly to switch this mode on
or off.
In the TA mode the device will immediately switch
from other stations or operation types to the radio
station, which is currently broadcasting traffic information. With this the volume level entered under
TAVOL will be set.
The TA function can be stopped during the playback of traffic information, without switching off the
TA mode, by pressing the
TA button again.
Playing audio CDs
ASP "Anti shock protection"
The device is equipped with an anti shock function.
This function serves to compensate for vibrations,
for example on uneven streets, and to provide
an uninterupted playback even with device
movement. When the device is switched on
the memory automatically fills with data:
– with audio CDs for 10 seconds;
– with MP3-CDs for 120 seconds.
Further information for CD operation
Dampness and high humidity can cause the
CD player to malfunction. In this case switch on
the vehicle heating to dissipate the dampness
before using the device. Do not subject the CD
player to any extreemly high or low temperatures.
- 13 -
Page 16
Inserting and removing CDs
• Fold the face plate downward by pressing the
face plate's unlocking device.
• Push the CD into the CD slot with the inscribed
side facing up.
• Lock the face plate back into place by folding it
upwards. Playback of the CD begins. TOC READ
appears in the display (Read directory contents).
• To remove the CD open the face plate again. Press
the
OPEN button.
The CD will be ejected. The car radio switches to
radio mode.
Attention!
Do not drive with an ejected CD. Immediately
remove the CD from the CD slot.
If an ejected CD is not removed within approx.
5 seconds the device will draw it back in, however
playback of the CD will not start.
Title skip
• By means of the button or you can select
the next and/or the previous title. The title number
will be shown in the display.
Fast forward/backward
• Hold down the buttons or longer to start
fast forward or backward.
Stopping a CD
• You can stop the playback with the PAU/1 button.
To continue playback press the
more.
PAU/1 button once
Repeat function with MP3-CDs:
• Press the RPT/2 button. In the display RPT ONE is
shown and then RPT. The current title is repeated.
• Press the
appear in the display followed by RPT ALL. All
titles in the current directory will be repeated.
A repeat pressing launches the normal playback
(the entire disc is repeated). RPT ALL appears briefly in
the display.
RPT/2 button once more. RPT DIR will
Title sampling
• Press the INT/3 button. In the display INT will be
shown. Appox. 10 seconds from all titles will
playback one after the other. A repeat pressing
launches the normal playback.
Random playback of all titles
• Press the RDM/4 button. In the display RDM is
shown. A random controlled playback is started.
A repeat pressing launches the normal playback.
Playing MP3-CDs
The basic functions correspond to those of the audio
CDs (see previous chapter). However with MP3-CDs
you can select the titles and the interpreters directly.
These functions and the other MP3 specific functions
are definitivly dependent on the MP3-CD. Please
bear this in mind when creating these CDs (see the
next section).
All conventional codings can be played back.
TITLE > INTERPRET > ALBUM NAME >
RELEASE YEAR > COMMENTARY.
Repeating a title
• Press the RPT/2 button. In the display RPT ONE is
shown and then
A repeat pressing launches the normal playback
(the entire disc is repeated). RPT ALL appears briefly
in the display.
RPT. The current title is repeated.
Note:
Creation of MP3-CDs; ID3TAGs
MP3-CDs like data CDs can contain individual
titles or directories. Please bear in mind with
the creation of an MP3-CD that you do not
save titles on the same level as directories but
rather only in the directory.
- 14 -
Page 17

A mixture of titles and directories on the same
level can result in problems when playing
back.
With the creation of the MP3 file you can also
save the so called "ID3 tag" (for input we recommend an ID3 tag editor). This is a block of information that is contained in the MP3 file. This can
be, for example, information about the interpreters, titles, album name, release year and a
short commentary. The car radio can read this
block of information and show it in the display.
Title search (by numbers)
Title numbers search
• Press the A/PS button. The notice 001 appears in
the display.
The last digit of the three digit title input blinks.
• Turn the multi controller to enter the last digit of
the title number.
• Press the multi controller.
The second digit of the three digit title input blinks.
• Turn the multi controller to enter the ten's digit of
the title number.
• Press the multi controller.
The first digit of the three digit title input blinks.
• Turn the multi controller to enter the hundreds
digit of the title number.
• When you have entered the desired title number
confirm the entry with
mediately playback.
BND/ENT. The title will im-
• Press the
begin with the sought after symbol.
• Turn the multi controller to select a title and start
playback with
BND/ENT button to show all titles that
BND/ENT.
Search for directories
Search from the current directory
• Press A/PS three times. The directory that is currently playing back appears.
• Turn the multi controller to show the available
MP3 directory and select a directory with the
BND/ENT button.
Playback of the first title from the selected directory
starts immediately.
Playback of the previous/next directory
• Press the station button 6 to playback the next
directory and/or the station button
the previous directory.
5 to playback
WMA files
The device can also play WMA files. The operation functions exactly the same as for MP3 files.
Title name search (Letters)
• Press A/PS twice.
The notice A** blinks in the display. The first symbol
blinks.
• Turn the multi controller to enter a letter or number,
with which the title name begins. Press the multi
controller.
The next symbol blinks in the display.
• Turn the multi controller to enter the second letter
or a number. Press the multi controller.
The next symbol blinks in the display.
• Turn the multi controller to enter the second letter
or a number.
- 15 -
Page 18
USB port
Record function
playback
You can connect an MP3 player or another USB
data carrier to the USB port on the front panel of
the device. Your car radio can handle USB data
carriers up to 1 GB. With this the directory structure
may contain a maximum of 1024 folders, 4096 files
and a directory depth of 8 levels.
• Remove the protective cap from the USB port.
• Connect your USB device to the port. The car
radio searches for MP3 or WMA files on the
data carrier and the notice USB appears in the
display.
• The operations for playing files on the external
data carrier as well as the search function are
exactly the same as with MP3-CDs.
• If the device is in another mode (CD or card
reader) you can select the USB port with the
MD/LD button.
• Place the protective cap back on the USB port
when no USB device is connected to avoid contamination.
Card reader
Your car radio is equipped with a memory card slot
for SD and Multimedia cards.
playback
• Slide a memory card into the memory card slot
with the marking pointing to the right. Playback
of the MP3 or WMA title on the memory card
begins automatically.
• The operations for playing files, function exactly
the same as for MP3-CDs.
• If the device is in another mode (CD, Radio,
AUX or USB) you can select the card reader
with the
MD/LD button.
Note:
Please observe the legal regulations valid in
your place of residence regarding the duplication of copyrighted works. In case of doubt
please consult a specialist in your area.
Recording from audio CDs
With your car radio you can record files from the
CD player to an external USB data carrier or an
SD/MMC card.
• In audio CD mode hold down the
button.
The notice USB ALL appears (When the recording
target is MMC MMC ALL appears).
• Press the
• Start recording by pressing the
The audio file is now saved in the format set beforehand (MP3 or WMA, see page 11 "REC settings recording format") on the data carrier. At the beginning of the recording the notice RECORD appears
in the display.
After that the recording is characterized by a prefixed
"R".
SCN/REC button to select either the recording
option USB/MMC-ALL (Record all titles) or
USB/MMC -ONE (Record one title).
SCN/REC
BND/ENT button.
Note
When the USB data carrier is full the recording
automatically switches to the card reader, so
long as a memory card is inserted (see the following chapter).
• To stop the recording press briefly the
button once more. After WAIT is shown briefly in
the display, the recording is saved.
BND/ENT
- 16 -
Page 19
You can play the data again by switching to the
USB or SD/MMC mode with the
then accessing the corresponding title from the data
carrier.
MD/LD button and
Copying MP3 files
You can copy individual titles from an MP3-CD to
the external USB data carrier or an SD/MMC memory card.
• During playback of a title from an MP3-CD hold
down the
The notice COPY MMC appears.
• Press the
either the copy option COPY USB (copy to a
USB data carrier) or COPY MMC (copy to an
SD/MMC memory card).
• Start the copy process by pressing the
button.
During the copy process COPY appears in the display
and a procentage indicator from 01 - 99 shows the
copying progress. After the notice COPY 99 the
copying process is ended and playback of the MP3
title continues.
SCN/REC button.
SCN/REC button several times to select
BND/ENT
Recording from the radio or audio input
With your radio you can also record data from the
radio and/or the audio input to a USB memory
stick or a memory card.
• Place a memory medium into the card slot or
USB port and with the
radio mode or operation type AUX.
• If necessary start playback of the external audio
device.
• Hold down the
The notice REC MMC appears.
• Press the
her the recording option USB (Recording to a USB
memory medium) or MMC (Recording to an
SD/MMC memory card).
• Start the copy process by pressing the
button.
SCN/REC button several times to select eit-
MD/LD button select the
SCN/REC button.
BND/ENT
Information regarding the recorded
data
The recording will be saved to the data carrier
with the following notations:
Audio CD recordings: Track01, Track02 ...
MP3-CD recordings: Music01, Music02 ...
Radio recordings: Tuner01, Tuner02 ...
Audio CD and radio recordings are recorded
in stereo and with a bitrate of 128 kbps
and/or a sampling frequency of 44 kHz.
When copying MP3 files the recording format
of the copy source will be adopted.
Bluetooth operation
Connection
• Connect the microphone unit to the car radio as
described under "Connection/Connection schematics".
To use the microphone unit you need a mobile telephone, which supports Bluetooth data transmissions.
Coupling a telephone with the car radio
• Carry out a search for Bluetooth devices on your
mobile telephone.
• After a successful search the entry CAR--BT appears
for the car radio in the display of the mobile telephone.
• Select this entry for the connection and for the
subsequent password request enter the password 0000 for the car radio. You may possibly
have to confirm the connection structure once
more.
After a successful coupling CONNECT briefly appears
in the car radio's display and the green LED on the
microphone unit lights up.
- 17 -
Page 20

Using the microphone
During the telephone call you will hear the caller
via the speaker connected to the car radio.
• For optimal transmitting of your voice place the
microphone unit close to you.
• Attach the microphone unit, for example, to the
dashboard. For this purpose you can use the
supplied sticky tape. In this case clean beforehand dust and grease from the surface. The sticky
tape can be used for securing on almost all
smooth surfaces.
Operation
Call accept/end
With an incoming call you hear the call signal via
your mobile telephone, whilst in the car radio's display is shown the call number.
• You accept an incoming call by pressing the
button on the microphone unit or the ACCEPT
button on the remote control and/or on the front
panel.
• You end the telephone call by pressing the
button on the microphone unit again or by pressing the
END button.
Rejecting a call
• With an incoming call press, for longer than
2 seconds, the
unit or press the
call.
TALK button on the microphone
END button to reject the
To call
• Press the ACCEPT button on the remote control.
A blinking cursor appears in the car radio's display.
• With the number buttons enter the telephone
number that you want to call.
• Press the
The number will be dialed.
ACCEPT button again.
TALK
TALK
Redial
• Hold down the TALK button on the microphone
unit or the
trol and/or on the front panel for approx. 2 seconds.
- If no call number was previously selected via the
remote control's number buttons REDIAL appears
briefly in the display and then the last number
dialed from the mobile telephone will be dialed.
- If one or more call numbers were already dialed
via the remote control's number buttons REDIAL
appears in the display.
Turn the multi controller or press the
on the remote control to show the last 10 dialed
numbers one after the other.
Press the
phone number.
Select the entry REDIAL and then press the
ACCEPT button on the remote con-
VOL-/+ buttons
ACCEPT button to dial the selected tele-
END
button to end redial.
Audio streaming (A2DP)
Your car radio uses the A2DP profile (Advanced
Audio Distribution Profile) and therefore can playback your mobile telephone's audio data.
• Select an audio file from your mobile telephone
and start the playback.
The entry A2DP appears in the car radio's display
and the audio file will playback via the car radio's
speaker.
Note
On the mobile telephone it may possibly be
necessary to switch playback via the Bluetooth
stereo headset.
For this read also, without fail, the operating instructions for your mobile telephone.
With a few mobile telephones the car radio
does not automatically switch to the A2DP
mode. In this case you switch to the A2DP
mode by pressing the MD/LD button several
times until the notice A2DP appears in the display.
- 18 -
Page 21

Replacing the fuse
The car radio is equipped with a 10 A fuse on the
rear panel, which blows if a voltage peak or a short
circuit should occur.
• In this case replace the fuse with one of equal
value and of the same type as listed in the technical data with the same trip characteristics.
• Before switching the car radio on again remedy
the cause of the fuse burnout.
No sound
The volume is set to minimum.
• Increase the volume.
The cables are not connected correctly.
• Check the cable connections.
Function buttons are not functioning
There is a malfunction with the device.
• Press the RESET button.
The face plate is not correctly installed.
• Check to see that the face plate is installed
correctly.
Troubleshooting
The device will not switch on
The ignition is not switched on
• Switch the ignition on by turning the key.
One of the fuses is defective.
• Replace the fuse.
The CD will not load or eject
A CD is already inserted into the car radio.
• Remove the CD.
The CD has been inserted the wrong way up.
• Insert the CD with the inscripted side up.
The CD is dirty or defective.
• Clean the CD or insert a different CD.
The temperature in the vehicle is too high.
• Wait until the surrounding temperature has
normalized.
Condensation on the laser lens
• Switch the car radio off for a few hours and then
try it again.
The CD jumps
The mounting angle exceeds 30°.
• Correct the mounting angle.
The CD is very dirty or defective.
• Clean the CD or insert a different CD.
Failure with burnt CDs
Check the burnt CD in another playback device.
The radio and/or the automatic station
memory is not functioning
The antenna cable is not connected correctly.
• Check the antenna cable for correct connection.
The station signals are too weak.
• Set the station manually.
Station memory is not functioning
The connection 6 in the ISO block A (Permanent
positive) is not connected correctly.
• Check the cable connections.
For this consult the chapter "Connections".
The device's USB port does not function
The USB port is intended for devices that function
according to the USB standard. Not all market available devices conform to this standard. It is possible
that a device is connected that does not function
according to the USB standard.
• Connect a device that functions according to
the USB standard.
- 19 -
Page 22
The card reading device does not read the
cards
The card is possibly defective, dirty and not properly
inserted.
• Check the card. Slide it in with the inscribed side
facing to the right.
The Bluetooth connection does not function
The mobile telephone does not support Bluetooth
transmissions.
The mobile telephone is not coupled with the car
radio.
• Reconnect the mobile telephone and the car radio.
For this also read, without fail, your mobile telephone's instructions.
Cleaning
• Clean the housing exclusively with a soft damp
cloth and a mild detergent. Ensure that moisture
cannot permeate into the device during cleaning!
Warning!
Moisture penetrating into the device creates
the risk of electric shock! Besides which, the
device could become irreparably damaged!
Disposal
Do not dispose of the device in your
normal domestic waste. This product
is subject to the European directive
2002/96/EG.
Dispose of the device through an approved disposal
centre or at your community waste facility.
Observe the currently applicable regulations. In
case of doubt, please contact your waste disposal
centre.
Disposal of batteries/rechargeable batteries
Used batteries/rechargeable batteries may not be disposed of in household waste. Every consumer is legally obligated to dispose of batteries at a collection
site in his community / city district or at a retail store.
The purpose of this obligation is to ensure that batteries are disposed of in a non-polluting manner. Only
dispose of batteries when they are fully discharged.
Dispose of all packaging materials in an
environmentally friendly manner.
- 20 -
Page 23
Warranty and Service
Importer
You receive a 3-year warranty for this device as of
the purchase date. Should you, in spite of our high
quality standards, have grounds for complaint please
contact our Service Hotline.
In the event that processing of your complaint is not
possible by telephone here you will receive
• a processing number (RMA number) as well as
• an address, to which you can send your product
for warranty processing.
In the case of a mail-in shipment please enclose a
copy of the purchase receipt (sales slip). The device
must be securely packed and rhe RMA number clearly
visible. Products sent in without the RMA number
cannot be processed.
Note:
The warranty provisions cover only material
or factory defects.
The warranty is not valid;
• for worn out parts
• for damages to breakable parts such as switches and batteries.
This product is for private use only and is not intended
for commercial use. In the event of misuse and improper handling, use of force and interference not
carried out by our authorized service branch, the
warranty will become void.
Your statutory warranty claims are not restricted by
this warranty.
KOMPERNASS GMBH
BURGSTRASSE 21
44867 BOCHUM, GERMANY
www.kompernass.com
- 21 -
Page 24

Page 25

Bluetooth car radio
KH 2375
In order to guarantee a cost free repair procedure please get in touch
with the service hotline. Make sure
you have your sales slip handy.
Sender, please write clearly:
Last name
First name
Street
Postcode/Place
Country
Fill in this section and submit it with the device!
Telephone
Warranty
DES Ltd
Tel.: 0870/787-6177
Fax:0870/787-6168
e-mail: support.uk@kompernass.com
Irish Connection
Tel: 00353 (0) 87 99 62 077
Fax:00353 18398056
e-mail: support.ie@kompernass.com
www.mysilvercrest.de
Date/Signature
Description of fault:
Page 26

Page 27

SISÄLLYSLUETTELO SIVU
Määräystenmukainen käyttö 27
Tekniset tiedot 27
Toimituslaajuus 27
Turvaohjeet 28
Käyttöelementit 29
Asennus 30
Liitäntä 30
ISO-liitäntöjen käyttö......................................................................................................................31
Radion asentaminen ISO-aukkoon...............................................................................................31
Liitäntäkaavio..................................................................................................................................32
Ulkoisen audiolaitteen liittäminen autoradioon 32
Laitteen irrottaminen 32
Käyttöosa 33
Kaukosäädin 33
Paristojen asettaminen...................................................................................................................33
Käyttö 34
Peruskäyttö......................................................................................................................................34
Äänenvoimakkuus..........................................................................................................................34
Basso/Korkeat äänet/Balanssi/Fader.........................................................................................34
Kuuluvuus........................................................................................................................................34
Näyttö .............................................................................................................................................34
Käyttötavan asettaminen...............................................................................................................34
RESET - Radion nollaaminen.........................................................................................................34
Monisäätimen asetukset ................................................................................................................35
Radiotoiminnot 35
Kaista-alueen valinta......................................................................................................................35
Radioaseman automaattihaku ......................................................................................................35
Radioaseman tallentaminen..........................................................................................................36
Radioaseman esiinkutsuminen ......................................................................................................36
Automaattinen tallentaminen .......................................................................................................36
- 25 -
Page 28

Tallennettujen radioasemien läpikäynti........................................................................................36
Vaihtoehtoiset taajuudet (AF)........................................................................................................36
PTY (Ohjelmatyyppikoodi ohjelmatyypin/-lajin tunnistus) ........................................................36
TA ("Traffic Announcement") - LIIKENNETIEDOTUKSET............................................................37
Audio-CD-levyjen soittaminen 37
CD-levyjen asettaminen ja poistaminen.......................................................................................38
Kappaleen ohittaminen .................................................................................................................38
Nopea kelaus eteen/taakse.........................................................................................................38
CD-levyn keskeyttäminen...............................................................................................................38
Kappaleen kertaaminen................................................................................................................38
Kappaleen lyhyt soitto...................................................................................................................38
Kaikkien kappaleiden satunnaistoisto..........................................................................................38
MP3-CD-levyjen soittaminen 38
Kappaleiden (numeroiden) haku..................................................................................................39
Hakemistojen haku.........................................................................................................................39
USB-liitäntä 40
Kortinlukija 40
Tallennustoiminto 40
Bluetooth-käyttö 41
Liitäntä.............................................................................................................................................41
Puhelimen kytkeminen autoradioon..............................................................................................41
Mikrofonin käyttö...........................................................................................................................42
Käyttö..............................................................................................................................................42
Audio-Streaming - virtausääni (A2DP) .........................................................................................42
Sulakkeen vaihtaminen 43
Vianetsintä 43
Puhdistus 44
Hävittäminen 44
Takuu ja huolto 45
Maahantuoja 45
Säilytä käsikirja myöhempää käyttöä varten. Jos myyt laitteen, anna käsikirja uudelle omistajalle!
- 26 -
Page 29

BLUETOOTHAUTORADIO KH 2375
Määräystenmukainen käyttö
Tämä laite on tarkoitettu FM-/AM-radioasemien vastaanottoon sekä audio- ja MP3-CD-levyjen, USB-tallennusvälineille ja SD-/MMC-muistikorteille tallennettujen MP3-tiedostojen ja ulkoisten audiolaitteiden
audiosignaalien toistamiseen. Lisäksi voit yhdistää
autoradion Bluetooth-matkapuhelimeen ja käyttää
autoradiota ja mikrofoniyksikköä handsfree-laitteena.
Tämä laite on tarkoitettu ainoastaan yksityiseen käyttöön. Sitä ei ole tarkoitettu käytettäväksi kaupallisilla
tai teollisilla alueilla.
Tekniset tiedot
Tulojännite: 12 V
Tulovirta: kork. 10 A
Sykäysteho: 4 x 40 W
Taajuusalue radio:
Radio: FM (ULA): 87,5 - 108 MHZ
AM (KA): 522 - 1620 kHz
Asemamuistipaikat18 FM (ULA)
12 AM (KA)
Kaukosäädin:
Paristo: 3 V nappiparisto (CR2025)
Korttiaukko
SD-/MMC-muistikorttiliitäntä
Laitesuojaus:
10 A auton lattapistosulake
Yleistä
Käyttölämpötila-alue: +5 ... +40 °C
Kosteus: 5 ... 90 % (ei kondensaatiota)
Mitat
(P x L x K): 18,8 x 23 x 6 cm
Paino: n. 1530 g
CE-vaatimustenmukaisuus
Tämä laite vastaa moottoriajoneuvodirektiivin
2004/104/EY ja direktiivin R&TTE-direktiivin
99/5/EY perustavia vaatimuksia ja muita tärkeitä määräyksiä.
Toimituslaajuus
- Autoradio (ml. käyttöosa)
- Asennuskehys (liitettynä)
- Paneelikehys (liitettynä)
- Ankkurointilevy (ml. kiinnitysmateriaali)
- Kaukosäädin
- 1 paristo CR2025, 3 V DC
- Asennuskehyksen avain
- Käyttöosan säilytyskotelo
- Mikrofoniyksikkö ja kiinnitysteippi
- Käyttöohje
Audiotulo (AUX IN):
3,5 mm:n stereojakkiholkki
USB-liitäntä
USB 1.1- ja 2.0-yhteensopiva tietoväline
- 27 -
Page 30

Turvaohjeet
• Tätä laitetta ei ole tarkoitettu sellaisten henkilöiden
(mukaan lukien lapset) käyttöön, joiden rajoitetut,
fyysiset, aistilliset tai henkiset kyvyt tai kokemuksen
ja/tai tiedon puute estävät käytön, lukuun ottamatta
tilanteita, joissa heitä valvoo turvallisuudesta vastaava henkilö tai joissa he ovat saaneet tältä ohjeita laitteen käytöstä.
• Lapsia on valvottava ja on varmistettava, etteivät
he leiki laitteella.
• Paristoja ei saa jättää lasten käsiin. Lapset saattavat pistää paristot suuhunsa ja niellä ne. Jos
paristo on joutunut nieluun, on hakeuduttava
välittömästi lääkärin hoitoon.
Oikosulun aiheuttamien vaarojen
välttämiseksi:
• Anna alan liikkeen asentaa autoradio paikoilleen,
mikäli mahdollista.
• Liitä laite ainoastaan määräysten mukaisesti asennettuun 12 V:n autoakkuun. Liitä autoradio autoon
vain ISO-pistokkeen avulla.
• Varmista, etteivät liitäntäjohdot pääse koskaan
kastumaan tai kostumaan käytössä. Vedä johdot
niin, etteivät ne pääse puristumaan tai muuten
vahingoittumaan.
• Anna valtuutetun ammattihenkilöstön tai huoltopalvelun vaihtaa vaurioituneet johdot tai liitännät
välittömästi uusiin vaarojen välttämiseksi.
• Käytä laitetta ainoastaan ajoneuvon sisätiloissa.
• Huolehdi siitä, että laitteeseen ei koskaan pääse
nesteitä tai vieraita esineitä.
• Älä koskaan itse avaa laitteen koteloa tai yritä
korjata sitä. Se heikentää laitteen turvallisuutta
ja takuu raukeaa.
Korjauksia saa suorittaa ainoastaan ammattitaitoinen alan liike tai huoltoliike.
Ohjeita paristojen käsittelyyn
Tämän laitteen kaukosäätimessä käytetään paristoa.
Huomaa paristojen käsittelystä seuraavaa:
Räjähdysvaara!
Älä heitä paristoja tuleen. Älä lataa paristoja
uudelleen.
• Älä koskaan avaa paristoja, älä koskaan juota
tai hitsaa paristoja.
On olemassa räjähdyksen ja loukkaantumisen
vaara!
• Tarkasta paristot säännöllisesti. Vuotavat paristot
saattavat vahingoittaa laitetta.
• Jos laite on pidempään käyttämättä, poista paristo.
• Käytä suojakäsineitä pariston vuotaessa.
• Paristoja ei saa jättää lasten käsiin. Lapset saattavat pistää paristot suuhunsa ja niellä ne.
Jos paristo on joutunut nieluun, hakeudu välittömästi lääkärin hoitoon.
• Puhdista paristokotelo ja paristoliitännät kuivalla
liinalla.
Palo- ja loukkaantumisvaarojen
välttämiseksi:
• Asenna laite niin, ettei kuumuus pääse patoutumaan
ja että ilma pääsee vaihtumaan hyvin laitteen
takana.
• Älä koskaan peitä ilmanottoaukkoja!
• Älä altista laitetta ylimääräiselle lämmölle, esim.
suoralle auringonsäteilylle, lämmittimille tai muille
laitteille.
• Jos laite putoaa tai vahingoittuu, sitä ei saa ottaa
käyttöön. Jätä laite pätevän ammattihenkilön tarkastettavaksi ja tarvittaessa korjattavaksi.
- 28 -
Page 31

Vaara, lasersäteteilyä!
Laitteessa on "luokan 1 laser".
• Älä koskaan avaa laitetta.
• Älä yritä itse korjata laitetta. Laitteen sisällä
on näkymätöntä lasersäteilyä.
• Älä altista itseäsi lasersäteelle, se saattaa
johtaa silmävammoihin.
Liikenneturvallisuus
Liikenneturvallisuus on ensisijainen asia. Käytä
autoradiotasi vain, kun tilanne liikenteessä sen
sallii. Tutustu laitteeseen ennen ajon alkua. Poliisin,
palokunnan ja muiden pelastusajoneuvojen
äänisignaalit on pystyttävä kuulemaan ajoneuvon
sisällä ajoissa. Kuuntele siksi ajon aikana radiota
sopivalla äänenvoimakkuudella.
Käyttöelementit
A
Etupuoli (käyttöosa)
BND/ENT: Kaista-alueen valinta / Valinnan vahvistus
q
POWER/DIM: Virtakytkin/näyttövalaistuksen
w
himmennys
MD/LD: Käyttötilan asettaminen / Kuuluvuuden
e
päällekytkentä
Monisäädin: Paina äänenvoimakkuuden, basson,
r
korkeiden äänien, balanssin ja faderin
säätöjen esiinkutsumiseksi / käännä
arvojen/äänenvoimakkuuden säätämiseksi
Näyttö
t
Käyttöosan lukituksen vapautus
y
DISP: Näyttötietojen näyttö
u
Korttiaukko SD-/MMC-korteille
i
USB-liitäntä
o
AUX IN: 3,5 mm stereotuloholkki ulkoisen
a
audiolaitteen liitäntää varten
A/PS: Automaattinen ohjelmatallennus
s
PTY ("Program Type"): Ohjelmien etsiminen
d
PTY-ryhmän perusteella
TA ("Traffic Announcement"):
f
Liikennetiedotuskanavan aktivointi
/
PÄÄTÄ-painike
AF ("Alternative Frequency"): Vaihtoehtoisen
g
taajuuden haku
Radioasemapainike 6/seuraava hakemisto
1%
Radioasemapainike 5/edellinen hakemisto
j
RDM/4: Satunnaistoisto CD/MP3-käytössä,
1&
radioasemapainike 4
INT/3: Intro-toiminto CD/MP3-käytössä,
l
radioasemapainike 3
RPT/2: Kertaustoiminto CD/MP3-käytössä,
1(
radioasemapainike 2
Kaukosäätimen anturi
2)
PAU/1: Toiston keskeyttäminen CD/
2!
MP3-käytössä, radioasemapainike 1
/: Nimike-/asemahaku taakse/eteen
2@
MU: Äänen kytkeminen pois päältä/
2#
VASTAA-painike
SCN/REC: Automaattinen asemahaku / Tallennus
2$
USB-liitännässä tai SD-/MMC-korttiaukossa olevalle tietovälineelle
B
Käyttöosan takana
OPEN : Levyn ulostyöntö
2%
Käyttöosan pidike
2^
RESET: Autoradion nollaus
2&
Varkaussuojauksen merkkivalo
2*
CD-lokeron aseman merkkivalo
2(
CD-lokero
3)
C
Taustapuolen liitännät
ISO-lohkon liitäntä B
3!
Auton lattapistosulake 10 A
3@
ISO-lohkon liitäntä A
3#
Mikrofoniyksikön holkki
3$
Bluetooth-antenni
3%
Kiinnitysruuvi (ml. M5-mutteri ja aluslevy)
3^
LINE OUT: Audio-cinch-lähtö V/O vahvistimelle
3&
DIN-antennipistokkeen antenniliitäntä
3*
- 29 -
Page 32

D
Kaukosäädin
POWER/DIM: Virtakytkin/näyttövalaistuksen
3(
himmennys
PÄÄTÄ-painike
4)
/: Nimike-/asemahaku taakse/eteen
4!
VASTAA-painike
4@
VOL+/-: Äänenvoimakkuuden nostaminen/
4#
laskeminen
INT/3: Intro-toiminto CD/MP3-käytössä,
4$
numeropainike 3
PTY/7: ("Program Type") Asemahaku PTY-ryhmän
4%
perusteella / numeropainike 7
Numeropainike 6
4^
DSP/
4&
4*
4(
5)
5!
5@
5#
5$
5%
5^
5&
5*
5(
6)
6!
: ("Digital Sound Processing") Soinnin säätö/
*
painike
*
BAND/0: Kaista-alueen valinta / numeropainike 0
Paristokotelo
SEL/#: Äänenvoimakkuuden, basson, korkeiden
äänien, balanssin ja faderin säädön
esiinkutsu / painike #
TA/9: ("Traffic Announcement"): Liikennetiedotusa-
seman aktivointi / numeropainike 9
AF/8: ("Alternative Frequency"): Vaihtoehtoisen
taajuuden haku / numeropainike 8
Numeropainike 5
RDM/4: Satunnaistoisto CD/MP3-käytössä /
numeropainike 4
RPT/2: Kertaustoiminto CD/MP3-käytössä /
Numeropainike 2
/1: Toiston aloittaminen tai keskeyttäminen
/ Numeropainike 1
MODE: Käyttötilan asettaminen / Kuuluvuustoiminto
E
Mikrofoniyksikkö
Vihreä yhteystilan merkkivalo
TALK-painike
Mikrofoni
Mikrofoniyksikön pistoke
I
Paneelikehys
Asennus
Jos haluat asentaa autoradiosi itse, seuraa tämän
käyttöohjeen asennus- ja liitäntäohjeita.
Asennusohjeet
• Aseta laite sille tarkoitettuun aukkoon tai valitse
laitteen asennusta varten paikka, jossa laite ei
häiritse kuljettajan tavanomaisia ajotoimia.
• Liitä johdot lyhyesti ennen laitteen lopullista paikoilleen asentamista. Varmista, että johdot on
asetettu paikoilleen oikein ja että järjestelmä
toimii oikein.
• Jos ajoneuvoon tarvitaan muutoksia, käänny
autokauppiaasi / ammattikorjaamon puoleen.
• Asenna laite paikoilleen niin, ettei loukkaantuminen
ole mahdollista voimakkaasti jarrutettaessa.
• Jos laite asennetaan yli 30° kulmaan, saattaa
esiintyä toimintahäiriöitä.
• Vältä laitteen asentamista korkeiden lämpötilojen
lähteiden lähelle (esim. suora auringonpaiste tai
lämmitysilma) tai paikkoihin, joissa laite altistuu
lialle ja pölylle. Älä altista laitetta liialliselle tärinälle.
Liitäntä
Ohje:
Huomaa, että asematallennusta varten ISOlohko A:n liitännän 6 on oltava liitettynä jatkuvaan
plussyöttöön.
Voit liittää audio-cinch-lähtöön ulkoisen vahvistimen.
Huomaa tällöin ulkoisen vahvistimen käyttöohjeet.
F
Käyttöosan säilytyskotelo
G
Asennuskehyksen avain
H
Asennuskehys
- 30 -
Page 33

ISO-liitäntöjen käyttö
Liitännät
1 ei käytössä
2 ei käytössä
1234
5678
1234
5678
3 Antennijännite
4 12 V (sytytyksen
ISO A
5 ei käytössä
6 Jatkuva plussyöttö
7 ei käytössä
8 Miinus (-)
1 Takaoikea +
2 Etuoikea +
3 Etuvasen +
4 Takavasen +
ISO B
5 Takaoikea 6 Etuoikea 7 Etuvasen 8 Takavasen -
plussyöttö)
Liitännät
Luonnollisesti voit liittää autoradion myös vain kahteen
kaiuttimeen. Käytä silloin vain etummaisten kaiuttimien
johtoja.
Johtojen vaihtamisen aiheuttamat
ongelmat
Joissakin ajoneuvomalleissa on ISO-lohko A:n
liitäntöjen [4] ja [6] vakiokäyttö (katso yllä,
"ISO-lohkon käyttö") vaihdettu keskenään tehtaalla. Jos näin on, saattavat tallennetut asemat kadota.
Tämä estetään, kun ISO-lohko A:n liitännät 4 (sytytyksen
plussyöttö) ja 6 (jatkuva plussyöttö) vaihdetaan keskenään.
Radion asentaminen ISO-aukkoon
Autoradio voidaan asettaa jokaiseen vakiomalliseen
ISO-asennusaukkoon. Jos ajoneuvossasi ei ole ISOasennusaukkoa, käänny ammattikorjaamon, alan
liikkeen tai tavaratalojen autotarvikeosastojen puoleen.
• Poista asennuskehys ja paneelikehys autoradion
kotelolta.
• Työnnä asennuskehys ISO-asennusaukkoon.
• Taivuta asennuskehyksen laatat ruuvimeisselillä
niin, että asennuskehys on kiinnitetty tiiviisti asennusaukkoon (ks. kuva).
• Tarkista kehyksen tiivis paikoillaanolo.
• Liitä autoradion ISO-holkkilohko ajoneuvosi molempiin ISO-pistokkeisiin.
• Liitä ajoneuvon antennin johto autoradion antenniholkkiin.
• Vie mikrofoniyksikön johto asennusaukkoon ja
liitä se mikrofoniyksikön holkkiin. Vedä johto niin,
että mikrofoniyksikkö voidaan myöhemmin kiinnittää ajoneuvon sisätiloihin.
• Liitä mahdollinen ulkoisen vahvistimen audiochinch-johto autoradion
LINE OUT-holkkeihin.
• Varmista laitteesi tarvittaessa lisäksi varkautta
vastaan. Kiinnitä kiinnitysruuvi ankkurointilevyllä
ja kiinnitysmateriaalilla ajoneuvon moottorin paloseinään.
• Työnnä autoradio varovasti asennuskehykseen,
kunnes se lukittuu paikoilleen. Aseta sitten paneelikehys paikoilleen.
Ohje
Irrota ehdottomasti ennen asennusta ylemmässä
radiokotelossa olevat molemmat kuljetusvarmistusruuvit (merkitty punaisella tarralla)!
Huomio!
Käytä asennukseen autoradion ISO-liitäntöjä.
Mahdollisesti tarvitsemasi ajoneuvokohtaisen
ISO-sovittimen saat ammattikorjaamoista, alan
liikkeistä tai tavaratalojen autotarvikeosastoilta.
Muita liitäntätapoja käytettäessä oikeus takuuseen raukeaa!
- 31 -
Page 34

Huomaa sisään työntäessäsi johtojen sijoittaminen.
1234
5678
1234
5678
ISO A
ISO B
Johdot saattavat vaurioitua.
Antennivirtaliitäntä
Antennivirran liitäntä on käytettävissä releohjattaville antenneille. Rele ajaa silloin antennin
automaattisesti ulos, kun radio kytketään päälle.
Sammutettaessa antenni ajetaan jälleen kokoon.
Tätä liitäntää voidaan myös käyttää ulkoisen
vahvistimen ohjaukseen. Katso tarkka liitäntä
vahvistimen käyttöoppaasta.
Älä koskaan liitä antennivirran liitäntää antennin
moottorivirtajohtoon - Se voi vahingoittaa radiota!
Varmuusliitäntä
Varmista, että asemamuistia varten ISO-lohkon
A liitäntä 6 on liitetty jatkuvaan plussyöttöön.
Muutoin et voi tallentaa yhtään radioasemaa!
Ulkoisen audiolaitteen liittäminen
autoradioon
• Liitä ulkoisen audiolaitteen (esim. MP3-soittimen)
audiolähtö 3,5 mm stereojakkipistokkeella laitteen
etupuolella olevaan
AUX IN -liitäntään.
• Valitse audiotulon toisto painamalla useamman
kerran painiketta
MD/LD, kunnes näytössä näkyy
AUX.
Laitteen irrottaminen
• Laite irrotetaan jälleen irrottamalla ensin paneelikehys ja viemällä oikea ja vasen avain laitteen
sivuilla oleviin rakoihin.
Nyt levyt on taitettu taaksepäin ja laite voidaan vetää
ulos.
• Kun kaikki liitännät on suoritettu, paina
RESET-pai-
niketta kuulakärkikynällä tai muulla terävällä esineellä.
• Aseta käyttöosa paikoilleen alla kuvatulla tavalla.
Liitäntäkaavio
Antenni
Ulkoinen vahvistin
Mikrofoniyksikkö
- 32 -
Page 35

Käyttöosa
Kaukosäädin
Käyttöosan asettaminen
• Aseta ensin käyttöosan vasen sivu kehykseen.
Paina sitten oikeaa puolta lujaa, kunnes se lukittuu
paikoilleen.
• Tarkista, että käyttöosa on tiiviisti paikoillaan
kehyksessä. Jos käyttöosaa ei ole asennettu paikoilleen oikein, saattaa autoradion toiminnassa
esiintyä toimintahäiriöitä.
Käyttöosan irrottaminen
• Paina käyttöosan vapauttavaa painiketta.
• Irrota käyttöosa kääntämällä käyttöosaa ensin
kevyesti eteenpäin ja vedä sitten ensin oikea,
sitten vasen puoli irti.
Paristojen asettaminen
Poista mukana toimitettu paristo pakkauksestaan.
Toimi seuraavasti asettaaksesi pariston paikoilleen
tai vaihtaaksesi pariston:
• Vedä paristokotelo irti kaukosäätimestä painamalla
ensin sivuttaisen lukituksen sisään ja vetämällä sitten
paristokotelo ulos.
• Poista käytetty paristo ja aseta uusi tyypin
CR2025 (nappiparisto) paristo paristokoteloon.
Varmista, että asetat pariston oikein päin.
• Työnnä paristokotelo uudelleen kaukosäätimeen.
Kaukosäätimen käyttäminen
• Suuntaa kaukosäädin laitteen etupuolella sijaitsevaan infrapuna-anturiin.
• Voit käyttää kaukosäädintä jopa n. 8 m etäisyydeltä.
Ohje
Jos käyttöosaa ei ole asetettu kehyksiin oikein,
laitteen varkaussuojan merkkivalo vilkkuu.
Säilytä käyttöosa aina suojakotelossa.
- 33 -
Page 36

Käyttö
Käyttö laitteessa ja kaukosäätimessä
olevien painikkeiden avulla
Suurinta osaa toiminnoista voidaan käyttää
sekä laitteen painikkeiden että kaukosäätimen
avulla. Tässä ohjeessa kuvataan laitteessa olevia
painikkeita.
Jos tarkoitetaan kaukosäätimen painikkeita,
tämä ilmoitetaan selkeästi erikseen.
Ohje
Noin 5 sekuntia asetuksen suorittamisen jälkeen
näytetään jälleen toistoa ja asetus on tallennettu.
Peruskäyttö
Kytkeminen päälle ja pois päältä
Kytke radio päälle painamalla lyhyesti painiketta
POWER/DIM. Näyttöön ilmestyy WELCOME (tervetuloa).
• Paina painiketta
näytön valaistusta.
Sammuta radio pitämällä painiketta
pidempään painettuna.
Äänenvoimakkuus
• Kierrä monisäädintä nostaaksesi tai laskeaksesi
äänenvoimakkuutta.
Huomio!
Aseta äänenvoimakkuus aina vain niin kovalle,
että voit vielä selkeästi kuulla hälytysajoneuvojen
äänisignaalit selkeästi!
Basso/Korkeat äänet/Balanssi/Fader
• Paina monisäädintä nähdäksesi basson (BASS),
korkeiden äänien (TREBLE), balanssin (BALAN-
CE) ja faderin (FADER) ajankohtaiset asetukset.
• Käännä monisäädintä muuttaaksesi asetuksia.
POWER/DIM lyhyesti himmentääksesi
POWER/DIM
Kuuluvuus
• Pidä painiketta MD/LD painettuna kytkeäksesi
kuuluvuustoiminnon päälle tai pois päältä.
Näyttö
• Painiketta DISP painamalla voidaan näyttöä vaih-
taa seuraavasti:
Radiovastaanotossa:
Radioaseman nimi, kellonaika (säädetään automaattisesti RDS-vastaanotossa), PTY-asetukset (radioasemat lähettävät näitä RDS-toimintoja eri laajuuksina;
katso myös luku "Radiotoiminnot") ja taajuus.
CD-käytössä:
Kellonaika, PTY-asetukset ja taajuus.
Ohje
Jos et vastaanota RDS- tai PTY-tietoja, näytössä
näkyy "NO CLOCK" (ei kelloa) tai "NO PTY"
(ei PTY:tä). Jokainen näyttö näkyy vain muutaman sekunnin ajan.
Käyttötavan asettaminen
• Paina painiketta MD/LD vaihtaaksesi radiovas-
taanoton (taajuusnäyttö), CD-/MP3-käytön (CD),
korttiaukon (SD/MMC), USB-liitännän (USB) ja
audiotulon (AUX) välillä.
Ohje
Käyttötavat CD, SD/MMC ja USB voidaan
kutsua esiin vain, jos vastaava tallennusväline
on asetettu paikoilleen.
RESET - Radion nollaaminen
• Autoradio nollataan eli palautetaan takaisin toimitustilaansa painamalla painiketta
lä esineellä, esim. kuulakärkikynällä.
• Nollaa autoradio:
- ensimmäisessä käyttöönotossa,
- johdon liittämisen jälkeen,
- jos kaikki toimintopainikkeet eivät toimi
- jos näytössä näkyy vikailmoitus.
RESET teräväl-
- 34 -
Page 37

Monisäätimen asetukset
Monisäätimen avulla voidaan säätää lisäksi päällekytkentä-äänenvoimakkuutta, kellonaika-asetuksia,
liikennetiedotusten äänenvoimakkuutta, EON-toimintoa, tallennusmuoto ja taajuuskorjainta.
• Pidä monisäädintä painettuna noin 2 sekunnin
ajan ja paina sitä sitten useampaan kertaan
kutsuaksesi esiin seuraavat asetukset:
INVOL - Päällekytkentä-äänenvoimakkuus
• Kierrä monisäädintä asettaaksesi sen äänenvoimakkuuden, jolla autoradio toimii, kun se kytketään päälle.
DSP - Taajuuskorjain
• Kierrä monisäädintä valitaksesi yhden asetuksista
DSP CLASSIC, DSP ROCK, DSP POP, DSP FLAT
tai DSP NONE. Asetuksella DSP NONE ei DSPtaajuuskorjain ("Digital Sound Processing") ole
päällä.
Voit myös säätää taajuuskorjaimen painamalla kaukosäätimen painiketta
pois päältä, kun näytössä näkyy jälleen radiotaajuus.
DSP-taajuuskorjaimen asetus näkyy alhaalla näytössä.
DSP. Tällä asetuksella DSP on
Radiotoiminnot
ADJ - Kellonaika
Autoradiosi on varustettu RDS-ohjatulla kellolla. Jos
EON-toiminto on päällä, kello säädetään automaattisesti ja käy edelleen, vaikka radio kytkettäisiin pois
päältä. Jos et vastaanota RDS-signaalia, voit myös
asettaa kellonajan tässä käsin.
• Kierrä monisäädintä oikealle asettaaksesi tunnit
ja vasemmalle minuuttien asettamiseksi.
TAVOL - Äänenvoimakkuus liikennetiedotuksissa
• Kierrä monisäädintä asettaaksesi sen äänenvoimakkuuden, jolla haluat liikennetiedotusten kuuluvan.
EON-toiminto
Kierrä monisäädintä kytkeäksesi EON-toiminnon
päälle (EON ON) tai pois päältä (EON OFF). Kun
EON-toiminto on päällä, radio vaihtaa liikennetiedotuksille tai PTY-tyypeille, jos TA- tai PTY-toiminto
on säädetty.
REC - Tallennusmuoto
• Kierrä monisäädintä valitaksesi SD-/MMC- tai
USB-tietovälineelle suoritettavan tallennuksen
muodoksi MP3 (MP3-tiedostot) tai WMA
(WindowsMedia-Audio).
Kaista-alueen valinta
• Paina painiketta BND/ENT vaihtaaksesi välillä
ULA:n (FM1, FM2, FM3) ja keskiaaltojen
(MW1, MW2) välillä.
Radioaseman automaattihaku
• Paina lyhyesti hakupainikkeita tai käynnistääksesi haun eteenpäin/taaksepäin. Asemahaku pysähtyy seuraavalla löytämällään asemalla.
Radioaseman säätäminen käsin
• Kun pidät yhtä painikkeista tai painettuna
kahden sekunnin ajan, vaihdat manuaaliselle
asemahaulle. Näytössä näkyy MANUAL.
• Paina nyt hakupainikkeita tai useampaan
kertaan säätääksesi taajuutta 0,05 MHz (KA: 9
kHz) välein ylöspäin/alaspäin.
Jos mitään painiketta ei paineta noin kahden sekunnin
ajan, on automaattinen asemahaku jälleen päällä.
Näytössä näkyy AUTO.
- 35 -
Page 38

Radioaseman tallentaminen
• Paina painiketta BND/ENT asettaaksesi kaista-alueen.
Jokaisella alueella voit tallentaa kuusi asemaa.
• Etsi tallennettavaksi haluamasi asema.
• Kun hakutoiminto on löytänyt aseman, paina n.
kolmen sekunnin ajan yhtä radioasemapainikkeista 1-6.
Äänen lyhyt poiskytkeminen ilmoittaa tallennuksesta.
Laite kytkeytyy parin sekunnin kuluttua jälleen takaisin radiotoistoon.
Radioaseman esiinkutsuminen
• Valitse taajuusalue painikkeella BND/ENT.
• Kutsu tallennettu asema jälleen esiin painamalla
yhtä radioasemapainikkeista 1-6.
Automaattinen tallentaminen
• Pidä painiketta A/PS painettuna. Näin käynnistyy
heti haku, joka pysähtyy jokaiselle löydetylle radioasemalle n. viideksi sekunniksi. Näytössä vilkkuva
luku näyttää sen radioasemapainikkeen, jolle
kulloinenkin radioasema tallennetaan. Jos radioaseman kuuluvuus on heikko, hakutoiminto siirtyy
automaattisesti eteenpäin.
• Paina yhtä radioasemapainiketta hakutoiminnon
ollessa pysähtyneenä. Näin voit tallentaa radioaseman toiseen muistipaikkaan.
• Paina painiketta AF. Näytössä näkyy nyt AF.
Radio hakee nyt aina ajankohtaisesti asetetun
radioaseman ihanteellisimman radiotaajuuden.
Paikallisohjelmat
Jotkut radioasemat lähettävät paikallisohjelmia.
• Vain radioaseman paikallisohjelmien toistamista
varten pidetään painiketta
näyttöön ilmestyy REG ON.
• Toistaaksesi jälleen yleistä ohjelmaa, pidä painiketta
AF painettuna, kunnes näyttöön ilmestyy
REG OFF.
AF painettuna, kunnes
PTY (Ohjelmatyyppikoodi ohjelmatyy-
pin/-lajin tunnistus)
Tätä toimintoa varten on EON-toiminnon oltava
päällä.
• Aktivoi PTY-haku painamalla painiketta
Näyttöön ilmestyy PTY.
Asemahaussa huomioidaan nyt ainoastaan valitun
PTY-tunnuksen (ks. taulukko PTY-tunnukset) omaavat
radioasemat.
• Ota PTY-haku pois käytöstä painamalla painiketta
PTY uudelleen.
PTY-tunnuksen asettaminen
• Pidä painiketta PTY painettuna ja kierrä sitten multisäädintä asettaaksesi yksittäiset PTY-tunnukset.
PTY.
Tallennettujen radioasemien läpikäynti
• Voit kutsua esiin ajankohtaisen taajuusalueen
tallennetut radioasemat.
• Valitse taajuusalue painikkeella
• Pidä lyhyesti painiketta
lyhyesti.
• Kun kuulet haluamasi radioaseman, paina lyhyesti
painiketta
A/PS.
A/PS. Kaikki asemat valitaan
BND/ENT.
Vaihtoehtoiset taajuudet (AF)
Voit etsiä radioasemalle vaihtoehtoisia taajuuksia
niin, että radioasema kuuluu aina ihanteellisesti.
Ohjelmien etsiminen PTY-tunnuksen perusteella
• Jos painat PTY-tunnuksen näytön aikana lyhyesti
painiketta
heti tätä PTY-tunnusta vastaavien radioasemien
haun.
Kun tätä PTY-tunnusta vastaavaa radioasemaa ei
löydy, näyttöön tulee lyhyesti NOT FND ja haku
päättyy viimeksi asetetulle radioasemalle.
- 36 -
PTY tai painikkeita / , radio aloittaa
Page 39

PTY-tunnukset
PTY-näyttö Sisältö
1 NEWS Uutiset
2 AFFAIRS Politiikka&Ajankohtaista
3 INFO Erityiset puheohjelmat
4 SPORT Urheilu
5 EDUCATE Oppiminen&jatkokoulutus
6 DRAMA Kuunnelmat&kirjallisuus
7 CULTURE Kulttuuri, kirkko, yhteiskunta
8 SCIENCE Tiede
9 VARIED Viihdyttävä sana
10 POP M Popmusiikki
11 ROCK M Rockmusiikki
12 EASY M Viihdemusiikki
13 LIGHT M Kevyt klassinen musiikki
14 CLASSICS Vakava klassinen musiikki
15 OTHER M Erityiset musiikkiohjelmat
16 WEATHER Sää
17 FINANCE Talous
18 CHILDREN Lastenohjelmat
19 SOCIAL Seurustelu
20 RELIGION Uskonto
21 PHONE IN Soitto-ohjelmat
22 TRAVEL Matkat
23 LEISURE Vapaa-aika
24 JAZZ Jazz-musiikki
25 COUNTRY Kantrimusiikki
26 NATION M Kansallinen musiikki
27 OLDIES Ikivihreät
28 FOLK M Kansanmusiikki
29 DOCUMENT Dokumentit
30 TEST Näyttösymboli "Hälytystesti"
31 ALARM Hälytysilmoitukset
Huomaa, että nämä tiedot riippuvat alueesta,
radioyhtiöstä ja radioasemasta.
TA ("Traffic Announcement") LIIKENNETIEDOTUKSET
Tätä toimintoa varten on EON-toiminnon oltava
päällä.
• Paina painiketta
TA lyhyesti kytkeäksesi tämän
tilan päälle tai pois päältä.
TA-tilassa vaihdetaan toisilta radioasemilta tai käyttötavoilta suoraan sille radioasemalle, joka lähettää
parhaillaan liikennetiedotuksia. Tällöin käytetään
kohdassa TAVOL asetettua äänenvoimakkuuden
tasoa.
TA-toiminto voidaan keskeyttää liikennetiedotuksen
toiston aikana painamalla uudelleen painiketta
TA.
Tämä ei kuitenkaan kytke TA-tilaa pois päältä.
Audio-CD-levyjen soittaminen
ESP "Electronic Shock Protection"
Laite on varustettu iskunvaimennusjärjestelmällä.
Tämä toiminto on tarkoitettu tasoittamaan
esim. epätasaisen tien aiheuttamaa tärinää ja
takaamaan keskeytyksettömän toiston myös
laitteen liikkuessa. Kun laite kytketään päälle,
muisti täyttyy automaattisesti tiedoilla:
– Audio-CD-levyillä 10 sekunniksi;
– MP3-CD-levyillä 120 sekunniksi.
Lisätietoja CD-käytöstä
Kosteus ja korkea ilmankosteus voivat aiheuttaa
CD-soittimen toimintahäiriöitä. Kytke tässä tapauksessa ajoneuvon lämmitys päälle, jotta
kosteus haihtuisi ennen käyttöä. Älä altista CDsoitinta äärimmäisen korkeille tai alhaisille lämpötiloille.
- 37 -
Page 40

CD-levyjen asettaminen ja poistaminen
• Käännä käyttöosa alas painamalla käyttöosan
lukituksen avausta.
• Työnnä CD-levy CD-lokeroon tekstipuoli ylöspäin.
• Sulje käyttöosa jälleen kääntämällä se ylös. CDlevyn toisto alkaa. Näytössä näkyy TOC READ
(luetaan sisällysluetteloa).
• Avaa käyttöosa jälleen CD-levyn poistamista varten.
Paina painiketta
CD-levy työnnetään ulos. Autoradio vaihtaa
radiotilaan.
OPEN .
Huomio!
Älä aja CD-levyn työntyessä esiin radiosta.
Ota CD-levy heti pois CD-lokerosta.
Jos ulostyönnettyä CD-levyä ei poisteta noin 5
sekunnin kuluessa, laite vetää sen jälleen sisään,
mutta ei käynnistä toistoa.
Kappaleen ohittaminen
• Painikkeen tai avulla voit valita seuraavan
tai edellisen kappaleen. Näytössä näytetään
kappaleen numero.
Nopea kelaus eteen/taakse
• Pidä painikkeita tai painettuna pidempään
aloittaaksesi nopean kelauksen eteenpäin tai taaksepäin.
CD-levyn keskeyttäminen
• Toisto voidaan keskeyttää painikkeella PAU/1.
Jatka toistoa painamalla painiketta
kerran.
PAU/2 vielä
Kappaleen kertaaminen
• Paina painiketta RPT/2. Näytössä näkyy RPT
ONE ja sen jälkeen
kerrataan.
Uusi painallus jatkaa tavanomaista toistoa (koko
levy toistetaan). Näytössä näkyy lyhyesti RPT ALL.
RPT. Senhetkinen kappale
Toistotoiminto MP3-CD-levyillä:
• Paina painiketta RPT/2. Näytössä näkyy RPT
ONE ja sen jälkeen RPT. Senhetkinen kappale
kerrataan.
• Paina painiketta
kyy RPT DIR ja sen jälkeen RPT ALL. Kaikki ajankohtaisen hakemiston kappaleet toistetaan.
Uusi painallus jatkaa tavanomaista toistoa (koko
levy toistetaan). Näytössä näkyy lyhyesti RPT ALL.
RPT/2 vielä kerran. Näytössä nä-
Kappaleen lyhyt soitto
• Paina painiketta INT/3. Näytössä näkyy INT. Kaikkia
kappaleita soitetaan peräkkäin n. 10 sekunnin
ajan. Uusi painallus jatkaa tavanomaista toistoa.
Kaikkien kappaleiden satunnaistoisto
• Paina painiketta RDM/4. Näytössä näkyy RDM.
Satunnaisohjattu toisto käynnistyy. Uusi painallus
jatkaa tavanomaista toistoa.
MP3-CD-levyjen soittaminen
Perustoiminnot vastaavat audio-CD-levyjen toimintoja
(katso edellinen luku). MP3-CD-levyissä voidaan
kuitenkin kappaleet ja esittäjät valita suoraan. Tämä
toimintoja muut erityiset MP3-toiminnot riippuvat
huomattavasti MP3-CD-levystä. Huomaa tämä jo
näitä CD-levyjä luodessasi (katso seuraava kappale).
Kaikkia tavanomaisia koodauksia voidaan toistaa.
KAPPALE > ESITTÄJÄ > LEVYN NIMI >
ILMESTYMISVUOSI > KOMMENTTI.
Ohje:
MP3-CD-levyjen luominen; ID3TAG:t
MP3-CD-levyt voivat sisältää CD-levyjen tietojen
tapaan yksittäisiä kappaleita tai hakemistoja.
Huomaa MP3-CD-levyä laadittaessa, ettei kappaleita tallenneta samalle tasolle kuin hakemistoja, vaan ainoastaan hakemistoihin.
- 38 -
Page 41

Kappaleiden ja hakemistojen sekoittaminen samalle tasolle voi aiheuttaa ongelmia soitettaessa.
MP3-tiedostoa luotaessa voidaan lisäksi tallentaa niin kutsuttuja "ID3-tägejä" (syöttöä varten
suosittelemme ID3-TagEditoria). Tämä on tietolohko, joka sisältyy MP3-tiedostoon. Näitä tietoja voivat olla esim. esittäjätiedot, kappale, levyn
nimi, ilmestymisvuosi ja lyhyt kommentti. Autoradio
voi lukea tämän tietolohkon ja esittää sen näytössä.
Kappaleiden (numeroiden) haku
Kappalenumeroiden haku
• Paina lyhyesti painiketta A/PS. Näyttöön ilmestyy
001.
Kolminumeroisen kappalesyötön viimeinen numero
vilkkuu.
• Kierrä monisäädintä syöttääksesi kappalenumeron
viimeisen numeron.
• Paina monisäädintä nähdäksesi.
Kolminumeroisen kappalesyötön toinen numero vilkkuu.
• Kierrä monisäädintä syöttääksesi kappalenumeron
kymmenluvun.
• Paina monisäädintä nähdäksesi.
Kolminumeroisen kappalesyötön ensimmäinen
numero vilkkuu.
• Kierrä monisäädintä syöttääksesi kappalenumeron
sataluvun.
• Kun olet syöttänyt haluamasi kappalenumeron,
vahvista syöttämäsi tieto painamalla
Kappale toistetaan heti.
BND/ENT.
tai luvun.
• Paina painiketta
paleet, jotka alkavat valitsemillasi merkeillä.
• Kierrä monisäädintä valitaksesi kappaleen ja
aloita toisto painamalla painiketta
BND/ENT nähdäksesi kaikki kap-
BND/ENT.
Hakemistojen haku
Haku ajankohtaisesta hakemistosta käsin
• Paina painiketta A/PS kolmesti. Sillä hetkellä
toistettava hakemisto näytetään.
• Kierrä monisäädintä nähdäksesi olemassa olevat
MP3-hakemistot ja valitse yksi hakemisto painikkeella
BND/ENT.
Valitun hakemiston ensimmäisen kappaleen toisto
alkaa välittömästi.
Edellisen/seuraavan hakemiston toistaminen
• Paina radioasemapainiketta 6 toistaaksesi seuraavan hakemiston tai radioasemapainiketta
taaksesi edellisen hakemiston.
5 tois-
WMA-tiedostot
Laite voi toistaa myös WMA-tiedostoja. Käyttö
toimii aivan samalla tavalla kuin MP3-tiedostoilla.
Kappalenimien haku (kirjaimet)
• Paina painiketta A/PS kahdesti.
Näytössä vilkkuu A**. Ensimmäinen merkki vilkkuu.
• Kierrä monisäädintä valitaksesi kirjaimen tai
luvun, jolla kappaleen nimi alkaa. Paina monisäädintä.
Näytössä vilkkuu seuraava merkki.
• Kierrä monisäädintä valitaksesi seuraavan kirjaimen
tai luvun. Paina monisäädintä.
Näytössä vilkkuu seuraava merkki.
• Kierrä monisäädintä valitaksesi seuraavan kirjaimen
- 39 -
Page 42

USB-liitäntä
Tallennustoiminto
Toisto
Voit liittää laitteen etupuolelle MP3-soittimen tai muun
USB-tietovälineen. Autoradiosi voi työstää korkeintaan
1 GB:n USB-tietovälineitä. Tällöin hakemistorakenne
saa sisältää korkeintaan 1024 kansiota, 4096 tiedostoa ja yhden 8-tasoisen hakemistosyvyyden.
• Poista USB-liitännän suojus.
• Liitä USB-laite liitäntään. Autoradio hakee tietovälineeltä MP3- tai WMA-tiedostoja ja näytössä
näkyy ilmoitus USB.
• Ulkoisella tietovälineellä sijaitsevien tiedostojen
toisto- ja hakutoiminnot toimivat samalla tavalla
kuin MP3-CD-levyillä.
• Jos laite on toisessa tilassa (CD tai kortinlukija),
voit valita USB-liitännän painikkeella
• Aseta suojus jälleen takaisin USB-liitäntään, jos
USB-laitetta ei ole liitettynä. Näin vältetään epäpuhtauksia.
MD/LD.
Kortinlukija
Autoradiossasi on muistikorttiaukko SD-kortteja ja
multimediakortteja varten.
Toisto
• Työnnä muistikortti korttiaukkoon teksti oikealle.
Muistikortilla olevien MP3- tai WMA-kappaleiden
toisto alkaa automaattisesti.
• Tiedostojen toistotoiminnot toimivat samalla
tavalla kuin MP3-CD-levyillä.
• Jos laite on toisessa tilassa (CD, Radio, AUX tai
USB), voit valita kortinlukijan painikkeella
MD/LD.
Ohje:
Huomaa asuinpaikassasi voimassa olevat lakisääteiset määräykset tekijänoikeuksin suojattujen
teosten kopioinnista. Jos olet epävarma asiasta,
käänny lähelläsi olevan asiantuntijan puoleen.
Tallentaminen audio-CD-levyltä
Voit tallentaa autoradiollasi CD-soittimen tietoja ulkoiselle USB-tietovälineelle tai SD-/MMC-kortille.
• Pidä CD-painiketta
Näyttöön ilmestyy USB ALL (tallennuskohteen ollessa
MMC, näytössä näkyy MMC ALL).
• Paina painiketta
joko tallennustoiminnon USB/MMC-ALL (kaik-
kien kappaleiden tallentaminen) tai USB/MMC -
ONE (yhden kappaleen tallentaminen).
• Aloita tallennus painamalla painiketta
Audiotiedot tallennetaan nyt tietovälineelle aikaisemmin valitussa muodossa (MP3 tai WMA, ks. sivu
11 "REC-tallennusmuodon asettaminen"). Tallennuksen
aluksi näyttöön ilmestyy ilmoitus RECORD.
Tämän jälkeen edessä näkyvä "R" ilmaisee tallennuksesta.
SCN/REC painettuna.
SCN/REC useita kertoja valitaksesi
BND/ENT.
Ohje
Kun USB-tietoväline on täynnä, tallennus vaihtaa
automaattisesti kortinlukijalle, jos siinä on muistikortti (ks. seuraava luku).
• Tallennus päätetään painamalla uudelleen lyhyesti painiketta
lyhyesti WAIT (odota), tallennus on muistissa.
BND/ENT. Kun näytössä näkyy
- 40 -
Page 43

Voit toistaa tiedot uudelleen vaihtamalla painikkeella
MD/LD USB- tai SD-/MMC-tilaan ja kutsumalla esiin
vastaavan kappaleen tietovälineeltä.
MP3-tiedostojen kopiointi
Voit kopioida MP3-CD-levyn yksittäisiä kappaleita
ulkoiselle USB-tietovälineelle tai SD-/MMC-kortille.
• Pidä MP3-CD-levyn kappaleen toiston aikana
painiketta
Näyttöön ilmestyy COPY MMC.
• Paina painiketta
valitaksesi joko kopiointivaihtoehdon COPY USB
(USB-tietovälineelle kopiointi) tai COPY MMC
(SD-/MMC-kortille kopiointi).
• Aloita kopiointitapahtuma painamalla painiketta
SCN/REC painettuna.
SCN/REC useampaan kertaan
BND/ENT.
Kopiointitapahtuman aikana näytössä näkyy COPY
ja prosenttitieto 01 - 99, joka ilmoittaa kopioinnin
edistymisen. Kun näytössä näkyy COPY 99, ko-
piointitapahtuma on päättynyt ja MP3-kappaleen
toistoa jatketaan.
Tallentaminen radiosta tai audiotulosta
Voit tallentaa autoradiollasi myös tietoja radiosta
tai audiotulosta USB-tikulle tai muistikortille.
• Aseta tietoväline korttilokeroon tai USB-liitäntään
ja valitse painikkeella
AUX.
• Käynnistä tarvittaessa ulkoisen audiolaitteen toisto.
• Pidä painiketta
Näyttöön ilmestyy REC MMC.
• Paina painiketta
si joko tallennusvaihtoehdon USB (tallennus USBtallennusvälineelle) tai MMC (tallennus SD-/MMCmuistikortille).
• Aloita kopiointitapahtuma painamalla painiketta
MD/LD radiotila tai käyttötapa
SCN/REC painettuna.
SCN/REC useamman kerran valitakse-
BND/ENT.
Tallennustiedostoja koskevia ohjeita
Tallennukset tallennetaan tietovälineelle seuraavilla nimityksillä:
Audio-CD-tallennukset: Track01, Track02 ...
MP3-CD-tallennukset: Music01, Music02 ...
Radiotallennukset: Tuner01, Tuner02 ...
Audio-CD- ja radiotallennukset tallennetaan
stereona ja 128 kbps:n siirtonopeudella tai 44
kHz:n näytteenottotaajuudella. MP3-tiedostoja
kopioitaessa käytetään kopiointilähteen tallennusformaattia.
Bluetooth-käyttö
Liitäntä
• Liitä mikrofoniyksikkö autoradioon kohdassa
"Liitäntä/Liitäntäkaavio" kuvatulla tavalla.
Mikrofoniyksikön käyttöön tarvitaan matkapuhelin,
joka tukee Bluetooth-tiedonsiirtoa.
Puhelimen kytkeminen autoradioon
• Suorita matkapuhelimessasi Bluetooth-laitehaku.
• Onnistuneen haun jälkeen matkapuhelimen näytöllä näkyy autoradiolle CAR--BT.
• Valitse tämä kohta yhteyden luomiseksi ja anna
valintaa seuraavassa salasanapyynnössä autoradion salasanaksi 0000. Sinun on ehkä vahvistettava yhteyden luominen vielä kerran.
Onnistuneen kytkennän jälkeen autoradion näytössä näkyy lyhyesti CONNECT ja mikrofoniyksikön vihreä
merkkivalo palaa.
- 41 -
Page 44

Mikrofonin käyttö
Puhelun aikana kuulet soittajan äänen autoradioon
kytkettyjen kaiuttimien kautta.
• Jotta oma äänesi siirtyisi ihanteellisesti, sijoita
mikrofoniyksikkö lähellesi.
• Kiinnitä mikrofoniyksikkö esim. kojelautaan. Voit
käyttää tähän mukana tulevaa teippiä. Puhdista
tässä tapauksessa pinta pölystä ja rasvasta. Teippiä
voidaan käyttää kiinnitykseen lähes kaikilla tasaisilla pinnoilla.
Käyttö
Puheluun vastaaminen / puhelun päättäminen
Puhelun saapuessa kuulet soittoäänen matkapuhelimestasi ja autoradion näytössä näkyy soittajan puhelinnumero.
• Vastaa saapuvaan puhelimeen painamalla
mikrofoniyksikön painiketta
messä tai laitteen etupuolella sijaitsevaa painiketta
VASTAA .
• Lopeta puhelu painamalla uudelleen mikrofoniyksikön painiketta
ta
PÄÄTÄ .
Puhelun hylkääminen
• Hylkää saapuva puhelu painamalla mikrofoniyksikön painiketta
namalla painiketta
TALK yli 2 sekunnin ajan tai pai-
Soittaminen
• Paina kaukosäätimen painiketta VASTAA .
Autoradion näyttöön ilmestyy nyt vilkkuva kursori.
• Syötä kaukosäätimen numeropainikkeilla se
puhelinnumero, johon haluat soittaa.
• Paina painiketta
Numero valitaan.
VASTAA uudelleen.
TALK tai kaukosääti-
TALK tai painamalla painiket-
PÄÄTÄ .
Numeron uudelleenvalinta
• Pidä mikrofoniyksikön painiketta TALK tai kauko-
säätimessä / laitteen etuosassa sijaitsevaa painiketta
VASTAA painettuna noin 2 sekunnin
ajan.
- Jos kaukosäätimen numeropainikkeilla ei ole aikaisemmin valittu yhtään puhelinnumeroa, näytössä näkyy lyhyesti REDIAL ja matkapuhelimella
viimeksi valittu puhelinnumero valitaan.
- Jos kaukosäätimen numeropainikkeilla on jo valittu yksi tai useampia puhelinnumeroita, näytössä näkyy REDIAL.
Kierrä monisäädintä tai paina kaukosäätimen painikkeita
VOL-/+ nähdäksesi 10 viimeksi valittua puhe-
linnumeroa peräkkäin.
Paina painiketta
linnumeron.
Lopeta numeron uudelleenvalinta painamalla kohtaa
REDIAL ja painamalla sitten painiketta
VASTAA valitaksesi valitun puhe-
PÄÄTÄ .
Audio-Streaming - virtausääni (A2DP)
Autoradiosi käyttää A2DP-profiilia (Advanced Audio
Distribution Profile) ja voi siten toistaa matkapuhelimesi
audiotietoja.
• Valitse matkapuhelimestasi audiotiedosto ja aloita
toisto.
Autoradion näyttöön ilmestyy viesti A2DP ja audio-
tiedosto toistetaan autoradion kaiuttimien kautta.
Ohje
Matkapuhelimessa on ehkä valittava toisto
Bluetooth stereokuulokkeiden kautta.
Lue tästä ehdottomasti myös matkapuhelimesi
käyttöohjeesta.
Muutamilla harvoilla matkapuhelimilla autoradio ei vaihda automaattisesti A2DP-tilaan.
Vaihda tässä tapauksessa A2DP-tilaan painamalla painiketta MD/LD, kunnes näyttöön ilmestyy A2DP.
- 42 -
Page 45

Sulakkeen vaihtaminen
Autoradiossa on taustapuolella 10 A:n sulake, joka
laukeaa, jos esiintyy jännitehuippuja tai oikosulku.
• Korvaa sulake tässä tapauksessa samanarvoisella,
teknisissä tiedoissa ilmoitetun tyyppisellä sulakkeella, jonka irtikytkentäominaisuudet ovat samanlaiset.
• Selvitä sulakkeen laukeamisen syy, ennen
kuin kytket autoradion uudelleen päälle.
Vianetsintä
Laitetta ei voida kytkeä päälle
Auton sytytystä ei ole kytketty päälle.
• Kytke sytytys päälle virta-avainta kiertämällä.
Yksi sulakkeista on viallinen.
• Vaihda sulake.
Ei ääntä
Äänenvoimakkuus on säädetty minimiin.
• Nosta äänenvoimakkuutta.
Johtoja ei ole liitetty oikein.
• Tarkista johtoliitännät.
Toimintopainikkeet eivät toimi
Laitteessa on häiriö.
• Paina painiketta RESET.
Käyttöosa ei ole paikoillaan oikein.
• Tarkista käyttöosan oikea paikoillaanolo.
CD-levy hyppii
Asennuskulma ylittää 30°.
• Korjaa asennuskulma.
CD-levy on erittäin likainen tai viallinen.
• Puhdista CD-levy tai aseta laitteeseen toinen
CD-levy.
Virhe itsepoltetuissa CD-levyissä
Tarkista itsepoltettu CD-levy toisessa toistolaitteessa.
CD-levyä ei ladata tai työnnetä ulos
Autoradiossa on jo CD-levy.
• Poista CD-levy.
CD-levy on asetettu paikoilleen väärin päin.
• Aseta CD-levy paikoilleen tekstipuoli ylöspäin.
CD-levy on likainen tai viallinen.
• Puhdista CD-levy tai aseta laitteeseen toinen
CD-levy.
Auton lämpötila on liian korkea.
• Odota, kunnes ympäristön lämpötila on palannut
normaaliksi.
Tiivistevettä laserlinssillä
• Kytke autoradio pois päältä muutamaksi tunniksi
ja yritä sitten uudelleen.
Radio ja/tai automaattinen radioasematallennus
ei toimi
Antennijohto on liitetty väärin.
• Tarkista antennikaapelin oikea paikoillaanolo.
Lähetyssignaalit ovat liian heikkoja.
• Säädä radioasema paikoilleen käsin.
Radioasemamuisti ei toimi
ISO-lohkon A liitäntä 6 (jatkuva plussyöttö) on
liitetty väärin.
• Tarkista johtoliitännät.
Huomioi tässä luku "Liitäntä".
USB-liitännässä oleva laite ei toimi
USB-liitäntä on tarkoitettu laitteille, jotka toimivat
USB-normin mukaisesti. Kaikki markkinoilla olevat
laitteet eivät täytä tätä normia. Saattaa olla, ettei
liitetty laite toimi USB-normin mukaisesti.
• Liitä laite, joka toimii USB-normin mukaisesti.
- 43 -
Page 46

Kortinlukulaite ei lue korttia
Kortti saattaa olla viallinen, likainen tai väärin asetettu.
• Tarkista kortti. Työnnä se sisään tekstipuoli oikealle
päin osoittaen.
Bluetooth-yhteys ei toimi
Matkapuhelin ei tue Bluetooth-tiedonsiirtoa.
Matkapuhelinta ei ole yhdistetty autoradioon.
• Luo matkapuhelimen ja autoradion välinen
yhteys uudelleen. Lue tästä ehdottomasti myös
matkapuhelimesi käyttöohjeista.
Puhdistus
• Puhdista kotelo ainoastaan kevyesti kostutetulla
liinalla ja miedolla astianpesuaineella. Varo, ettei
puhdistuksen yhteydessä laitteeseen pääse kosteutta!
Varoitus!
Mikäli laitteeseen joutuu kosteutta, on olemassa sähköiskun vaara! Lisäksi laite saattaa vaurioitua korjauskelvottomaan kuntoon!
Hävittäminen
Älä hävitä laitetta tavallisen talousjätteen
mukana. Tämä tuote on eurooppalaisen
direktiivin 2002/96/EY alainen.
Anna laite hyväksytyn jätehuoltoyrityksen tai kunnallisen
jätelaitoksen hävitettäväksi.
Noudata voimassa olevia määräyksiä. Epäselvissä
tilanteissa ota yhteyttä paikalliseen jätehuoltoviranomaiseen.
Paristojen/akkujen hävittäminen
Paristoja/akkuja ei saa hävittää kotitalousjätteiden
seassa. Laki velvoittaa jokaista kuluttajaa toimittamaan
paristot ja akut asianmukaisiin keräyspisteisiin tai
kauppaan.
Näin varmistetaan, että paristot/akut hävitetään
ympäristöystävällisellä tavalla. Palauta paristot/
akut ainoastaan lataus purettuna.
Hävitä kaikki pakkausmateriaalit ympäristöystävällisellä tavalla.
- 44 -
Page 47

Takuu ja huolto
Maahantuoja
Laitteen takuu on 3 vuotta ostopäivästä. Jos sinulla
on korkeista laatustandardeistamme huolimatta syytä
valituksiin, ota yhteyttä palvelunumeroomme.
Mikäli vikaa ei voida korjata puhelimitse, saat
• käsittelynumeron (RMA-numeron) sekä
• osoitteen, johon voit lähettää tuotteesi takuuta
varten.
Laita lähetyksen mukaan kopio ostotositteesta (kassakuitti). Laite tulee pakata kuljetuksen kestävästi ja
RMA-numeron tulee olla selkeästi esillä. Ilman RMAnumeroa lähetettyjä tuotteita emme voi käsitellä.
Ohje:
Takuu koskee ainoastaan materiaali- ja
valmistusvirheitä.
Takuu ei koske
• kuluvia osia
• herkkien osien, kuten kytkinten tai akkujen,
vaurioita.
Tuote on tarkoitettu ainoastaan yksityiseen käyttöön.
Tuotetta ei siten saa käyttää kaupallisiin tarkoituksiin.
Väärä tai asiaton käyttö, väkivallan käyttö ja muiden
kuin valtuutetun huoltopisteen suorittamat korjaukset
aiheuttavat takuun raukeamisen.
Tämä takuu ei rajoita lakimääräisiä takuuoikeuksia.
KOMPERNASS GMBH
BURGSTRASSE 21
44867 BOCHUM, SAKSA
www.kompernass.com
- 45 -
Page 48

Page 49

Bluetooth-Autoradio
KH 2375
Ota yhteyttä asiakaspalvelunumeroomme maksuttoman korjauksen
takaamiseksi. Pidä kassakuittisi käsillä soittaessasi.
Kirjoita lähettäjän tiedot selvästi:
Sukunimi
Etunimi
Katuosoite
Postinumero/-toimipaikka
Maa
Puhelin
Täytä tämä lipuke kokonaan ja lähetä se laitteen mukana!
Päiväys/allekirjoitus
Takuu
Kompernass Service Suomi
Tel.: 02 822 28 87
Fax:010 293 02 63
e-mail: support.fi@kompernass.com
www.mysilvercrest.de
Vian kuvaus:
Page 50

Page 51

INNEHÅLLSFÖRTECKNING SIDAN
Föreskriven användning 51
Tekniska data 51
Leveransens omfattning 51
Säkerhetsanvisningar 52
Komponenter 53
Montering 54
Anslutning 54
Beläggning av ISO-anslutningarna..............................................................................................55
Montera in radion i ISO-facket ...................................................................................................55
Anslutningsschema.........................................................................................................................56
Ansluta en extern audioapparat till bilradion 56
Montera ut apparaten 56
Kontrolldel 57
Fjärrkontroll 57
Lägga i batterier.............................................................................................................................57
Användning 58
Basanvändning...............................................................................................................................58
Volym...............................................................................................................................................58
Bas/Diskant/Balans/Fader...........................................................................................................58
Loudness..........................................................................................................................................58
Display ............................................................................................................................................58
Ställa in typ av drift .......................................................................................................................58
RESET - återställa radion ...............................................................................................................58
Inställningar med multireglaget ....................................................................................................59
Radiofunktioner 59
Välja band......................................................................................................................................59
Automatisk sändarsökning ............................................................................................................59
Spara sändare................................................................................................................................60
Hämta sändare ..............................................................................................................................60
Spara sändare automatiskt ..........................................................................................................60
- 49 -
Page 52

Gå igenom sparade sändare.......................................................................................................60
Alternativa frekvenser (AF)............................................................................................................60
PTY (Program Type Code Programtyp/Automatiskt val)............................................................60
TA (Traffic Announcement) - TRAFIKMEDDELANDEN...............................................................61
Spela CD-skivor (audio) 61
Stoppa in och ta ut CD-skivor.......................................................................................................62
Hoppa över titlar............................................................................................................................62
Snabb framåt/bakåtspolning........................................................................................................62
Avbryta CD-skivor ..........................................................................................................................62
Upprepa en titel.............................................................................................................................62
Introfunktion....................................................................................................................................62
Spela alla titlar i slumpmässig ordningsföljd...............................................................................62
Spela CD-skivor med MP3-filer 62
Titelsökning (efter nummer) ...........................................................................................................63
Katalogsökning...............................................................................................................................63
USB-anslutning 64
Kortläsare 64
Inspelningsfunktion 64
Bluetoothdrift 65
Anslutning .......................................................................................................................................65
Koppla en telefon till bilradion.....................................................................................................65
Använda mikrofonenheten............................................................................................................66
Användning.....................................................................................................................................66
Audio streaming (A2DP) ...............................................................................................................66
Byta säkring 67
Åtgärda fel 67
Rengöring 68
Kassering 68
Garanti och service 69
Importör 69
Spara den här anvisningen för senare frågor – och överlämna den tillsammans med apparaten om du
överlåter den till någon annan person!
- 50 -
Page 53

BLUETOOTH BILRADIO
KH2375
Föreskriven användning
Den här apparaten ska användas för att ta emot
radiosändare i FM/AM-området, för att spela vanliga
CD-skivor (audio), CD-skivor med MP3-filer och
USB-datamedia och SD/MMC minneskort med
MP3-filer samt audiosignaler från externa audioapparater. Radion kan dessutom kopplas till en mobiltelefon med bluetoothanslutning och användas som
handsfreeanordning tillsammans med mikrofonenheten. Den här apparaten är endast avsedd för privat
bruk. Apparaten är inte avsedd att användas yrkesmässigt eller industriellt.
Kortplats
Anslutning för SD/MMC minneskort
Intern säkring:
10 A platt säkring
Allmänt
Drifttemperatur: +5°— +40°C
Luftfuktighet: 5 — 90% (ingen kondensation)
Mått
(L x B x H): 18,8 x 23 x 6 cm
Vikt: ca 1530 g
CE-överensstämmelse
Den här apparaten motsvarar de grundläggande
kraven och andra relevanta bestämmelser i fordonsdirektiv 2004/104/EG och direktiv R&TTE
99/5/EG.
Tekniska data
Inspänning : 12 V
Ingångsström: max. 10 A
Impulseffekt: 4 x 40 W
Frekvensområde för radio:
Radio: FM (UKV) : 87,5 - 108 MHZ
AM (MV) : 522 – 1620 KHz
Minnesplatser för sändare: 18 FM (UKV)
12 AM (MV)
Fjärrkontroll:
Batteri: 3 V knappcell (CR2025)
Audioingång (AUX IN):
3,5 mm stereouttag
USB-port
USB 1.1 och 2.0 kompatibla datamedia
Leveransens omfattning
- Bilradio (inklusive kontrolldel)
- Inbyggnadsram (påsatt)
- Frontram (påsatt)
- Förankringsplåt (inkl. fästmaterial)
- Fjärrkontroll
- 1 batteri CR2025, 3 V DC
- Nyckel till inbyggnadsram
- Etui för kontrolldel
- Mikrofonenhet med klisterremsor
- Bruksanvisning
- 51 -
Page 54

Säkerhetsanvisningar
• Den här apparaten ska inte användas av personer
(inklusive barn) med begränsad fysisk, sensorisk
eller mental förmåga eller bristande erfarenhet
och kunskap om de inte först övervakats eller
instruerats av någon ansvarig person.
• Se noga till så att barnen inte leker med apparaten.
• Små barn får inte handskas med batterier. De kan
stoppa dem i munnen och svälja dem. Om någon
råkar svälja ett batteri måste man omedelbart
söka medicinsk vård.
För att undvika skador och kortslutning:
• Låt helst en fackverkstad bygga in bilradion.
• Anslut endast apparaten till ett 12 V bilbatteri som
monterats efter föreskrifterna. Anslut bara apparaten
med ISO-kontakter inuti fordonet.
• Se till så att anslutningskablarna aldrig blir våta
eller fuktiga när apparaten används. Dra kablarna
så att de inte kan klämmas eller skadas på annat
sätt.
• Skadade kablar och anslutningar måste åtgärdas
direkt en av auktoriserad yrkesman eller vår
kundtjänst för att undvika risken för olyckor.
• Använd endast apparaten inuti ett fordon.
• Se till så att det inte kan komma in vätska eller
främmande föremål i apparaten.
• Du får aldrig försöka öppna eller reparera höljet.
Gör du det kan vi inte garantera säkerheten och
garantin förlorar sin giltighet.
Reparationer får endast utföras av behöriga
yrkesmän och av kundtjänst.
Handskas med batterier
I apparatens fjärrkontroll ligger ett batteri. Tänk på
följande när du handskas med batterier:
Explosionsrisk!
Kasta aldrig in batterier i en eld. Ladda aldrig
upp batterier (som inte är uppladdningsbara).
• Öppna, löd eller svetsa aldrig batterier.
Då finns risk för explosion och personskador!
• Kontrollera batterierna regelbundet. Läckande
batterier kan orsaka skador på apparaten.
• Ta ut batteriet om du inte ska använda apparaten
under en längre tid.
• Ta på dig skyddshandskar om batteriet läcker.
• Små barn får inte handskas med batterier.
De kan stoppa dem i munnen och svälja dem.
Om någon råkar svälja ett batteri ska man omedelbart uppsöka läkare.
• Rengör batterifacket och batteriernas kontakter
med en torr trasa.
För att undvika eldsvådor och personskador:
• Montera in apparaten så att det ingen värmeuppdämning kan uppstå och så att den får tillräckligt med ventilation
• Täck aldrig över ventilationsöppningarna!
• Undvik ytterligare uppvärmning, t.ex. genom
direkt solstrålning, värmeelement, andra apparater, osv.
• Om apparaten faller i golvet eller skadas på annat
sätt får du inte använda den längre. Låt kvalificerad
fackpersonal kontrollera och reparera den om
det behövs.
- 52 -
Page 55

Farlig laserstrålning!
Den här apparaten innehåller en "Klass 1 laser".
• Öppna aldrig höljet.
• Försök aldrig reparera apparaten själv.
Innanför höljet finns osynlig laserstrålning.
• Exponera dig inte för laserstrålen, den kan
skada dina ögon.
Trafiksäkerhet
Trafiksäkerheten går före allt annat. Använd
bara bilradion om trafiksituationen tillåter det.
Bekanta dig med apparatens funktioner innan
du kör. Akustiska signaler från polis, brandkår
och andra räddningstjänster måste kunna höras
tydligt inuti fordonet. Lyssna därför bara på
radion med måttlig volym.
Komponenter
A
Framsida (kontrolldel)
BND/ENT: Välja bandområde/Bekräfta val
q
POWER/DIM: Sätta på och stänga av apparaten/
w
Dimmer till displaybelysning
MD/LD: Ställa in driftläge/Koppla på
e
Loudness-funktion
Multireglage: Tryck på den för att ta fram inställ-
r
ningar för volym, bas, diskant, balans och fader och skruva på den
för att ändra värden eller volym
Display
t
Lossa kontrolldelen
y
DISP: Visa displayinformation
u
Kortplats för SD/MMC-kort
i
USB-anslutning
o
AUX IN: 3,5 mm stereoingång för anslutning av
a
extern audioapparat
A/PS: Spara sändare automatiskt
s
PTY (Program Type):
d
Sändarsökning efter programtyp
TA (Traffic Announcement):
f
Aktivera sändare med trafikmeddelanden
AVSLUTA
AF (Alternative Frequency):
g
Sökning efter alternativa frekvenser
Stationsknapp 6/Nästa katalog
1%
Stationsknapp 5/Föregående katalog
j
RDM/4: Slumpmässig uppspelning av CD/MP3,
1&
stationsknapp 4
INT/3: Introfunktion för CD/MP3, stationsknapp 3
l
RPT/2: Upprepningsfunktion för CD/MP3,
1(
stationsknapp 2
Sensor till fjärrkontroll
2)
PAU/1: Stoppa CD-skiva med MP3-filer,
2!
stationsknapp 1
/: Titel/Sändarsökning bakåt/framåt
2@
MU: Stänga av ljudet/ SVARA-knapp
2#
SCN/REC:
2$
Automatisk sändarsökning/Spela in på datamedia
via USB-port eller SD/MMC-kortplats
B
Bakom kontrolldelen
OPEN : Ta ut CD-skiva
2%
Hållare till kontrolldel
2^
RESET: Återställa bilradion
2&
Kontrollampa för stödskydd
2*
Positionslampa till CD-fack
2(
CD-fack
3)
C
Anslutningar på baksidan
ISO-block med anslutning B
3!
Platt säkring 10 A
3@
ISO-block med anslutning A
3#
Uttag till mikrofon
3$
Bluetoothantenn
3%
Fästskruv
3^
(inklusive M5-mutter och mellanläggsbricka)
LINE OUT: Audio-cinch-utgång vänster/höger (L/R)
3&
för förstärkare
Anslutning för DIN-antenn
3*
/
- 53 -
Page 56

D
Fjärrkontroll
POWER/DIM:
3(
Sätta på och stänga av apparaten/Dimmer till
displaybelysning
AVSLUTA-knapp
4)
/: Titel/Sändarsökning bakåt/framåt
4!
SVARA-knapp
4@
VOL+/-: Öka/Minska volym
4#
INT/3: Introfunktion för CD/MP3, sifferknapp 3
4$
PTY/7: (Program Type) Sändarsökning efter
4%
programtyp/Sifferknapp 7
Sifferknapp 6
4^
DSP/
4&
4*
4(
5)
5!
5@
5#
5$
5%
5^
5&
5*
5(
6)
6!
: (Digital Sound Processing) klanginställning/
*
-knapp
*
BAND/0: Välja bandområde/Sifferknapp 0
Batterifack
SEL/#: Ta fram inställningar för volym, bas,
diskant, balans och fader/ #-knapp
TA/9: (Traffic Announcement): Aktivera sändare
med trafikmeddelanden/Sifferknapp 9
AF/8: (Alternative Frequency): Sökning efter
alternativa frekvenser/Sifferknapp 8
Sifferknapp 5
RDM/4: Slumpmässig uppspelning vid CD/
MP3-drift/Sifferknapp 4
RPT/2: Upprepningsfunktion för CD/MP3-drift/
Sifferknapp 2
/1: Starta eller stanna uppspelning/
Sifferknapp 1
MODE: Ställa in driftläge/Loudnessfunktion
E
Mikrofonenhet
Grön kontrollampa för förbindelsens status
TALK-knapp
Mikrofon
Kontakt till mikrofonenhet
Montering
Om du tänker montera bilradion själv ska du följa
instruktionerna för inbyggnad och anslutning i den
här bruksanvisningen.
Inbyggnadsinstruktion
• Sätt in apparaten i det fack som är avsett för detta
eller välj en monteringsplats där apparaten inte
är i vägen vid vanlig körning.
• Provanslut kablarna innan du monterar in apparaten på riktigt. Försäkra dig om att de sitter rätt
och att systemet fungerar som det ska.
• Om det krävs förändringar inuti fordonet ska du
vända dig till bilhandlaren eller en fackverkstad.
• Bygg in apparaten så att den inte kan skada någon
vid en kraftig inbromsning.
• Om apparaten monteras med mer än 30° lutning
kan det uppstå störningar i funktionen.
• Undvik att montera apparaten i närheten av ställen
som kan bli mycket heta (t ex i direkt solljus eller
vid varmluftsfläktar) eller dammiga och smutsiga.
Utsätt inte apparaten för alltför mycket stötar.
Anslutning
Observera:
Observera att anslutning 6 i ISO-block A måste
vara kopplad till batteriplus för att sändare ska
kunna sparas.
Du kan ansluta en extern förstärkare till
audio-cinch-utgången. Följ även anvisningarna
i förstärkarens bruksanvisning.
F
Etui till kontrolldel
g
Nyckel till inbyggnadsram
h
Inbyggnadsram
i
Frontram
- 54 -
Page 57

Beläggning av ISO-anslutningarna
Beläggning
1 inte belagd
2 inte belagd
1234
5678
1234
5678
3 Antennspänning
4 12 V (tändningsplus)
ISO A
5 inte belagd
6 Batteriplus
7 inte belagd
8 Minus (-)
1 Höger bak +
2 Höger fram +
3 Vänster fram +
4 Vänster bak +
ISO B
5 Höger bak 6 Höger fram 7 Vänster fram 8 Vänster bak -
Beläggning
Naturligtvis kan du också ansluta två högtalare till
bilradion. Använd då bara kablarna till de främre
högtalarna.
Problem vid omkastade kablar
På vissa fordonsmodeller är den standardmässiga beläggningen av anslutningar [4] och [6]
i ISO-blocket A (se ""Beläggning av ISO-block"
ovan) omkastade. Om så är fallet på ditt
fordon kan det hända att sparade sändare
försvinner.
För att det inte ska inträffa måste anslutning 4 (tändningsplus) och 6 (batteriplus) byta plats i ISO-blocket A.
Montera in radion i ISO-facket
Den här bilradion kan monteras i alla ISO-fack av
standardtyp. Om det inte finns något ISO-fack i din
bil ska du vända dig till en fackverkstad eller specialavdelningen på ett varuhus.
• Dra loss inbyggnadsramen och frontramen från
radion.
• Stick in inbyggnadsramen i ISO-facket.
• Böj in inbyggnadsramens flikar med en skruvmejsel
för att fixera den i facket (se Bild).
• Kontrollera att ramen sitter fast.
• Koppla fordonets två ISO-kontakter till uttagen på
bilradions ISO-block.
• Koppla bilantennens kabel till bilradions antennuttag.
• För in mikrofonenhetens kabel i inbyggnadsfacket
och anslut den till motsvarande uttag. Dra kabeln
så att det går att fästa mikrofonenheten inuti
fordonet sedan.
• Anslut eventuellt en extern förstärkares audiocinchkabel till bilradions
LINE OUT-uttag.
• Sedan kan du också installera ett stöldskydd till
apparaten. Skruva fast fästskruven i förankringsplåten och fästmaterialet på motorns brandvägg.
• Skjut försiktigt in bilradion i inbyggnadsramen
tills den låser fast. Sätt sedan på frontramen.
Observera
Innan radion monteras måste de två skruvarna
till transportskyddet (märkta med röda klistermärken) upptill på höljet tas bort!
OBS!
Använd alltid bilradions ISO-anslutningar när
du monterar in den. Den fordonsspecifika ISOadapter som du ev. behöver kan köpas i en
specialbutik, en fackverkstad eller i varuhusets
specialavdelning. Om man använder andra typer
av anslutningar upphör garantin att gälla!
Akta kablarna när du skjuter in radion; annars
kan de skadas.
- 55 -
Page 58

An
1234
5678
1234
5678
ISO A
ISO B
slutning för antennström
Det finns en anslutning för antennström till en
relästyrd antenn. Relät får antennen att åka ut
när radion sätts på. När radion stängs av åker
antennen in igen.
Samma anslutning kan också användas för att
styra en extern förstärkare. Läs mer om exakt
hur man ansluter en förstärkare i förstärkarens
bruksanvisning.
Koppla aldrig ihop anslutningen för antennström
med antennens motorströmkabel; då kan radion
skadas!
Backup
anslutning
Observera att anslutning 6 i ISO-block A måste
ligga på batteriplus. Annars går det inta att
spara några sändare!
• När alla anslutningar gjorts trycker du in
knappen med en kulspetspenna eller något
annat smalt, spetsigt föremål.
• Sätt in kontrolldelen så som beskrivs nedan.
Anslutningsschema
Antenn
RESET-
Ansluta en extern audioapparat
till bilradion
• Koppla den externa audioapparatens (t ex en
MP3-spelare) audioutgång till uttaget AUX IN
på apparatens framsida med en 3,5 mm stereopropp.
• Välj den här utgången genom att trycka upprepade gånger på knappen
MD/LD tills AUX kommer
upp på displayen.
Montera ut apparaten
• Om du ska montera ut apparaten igen drar du
först av frontramen och för in höger och vänster
nyckel i motsvarande springa på apparatens sidor.
Flikarna böjs då tillbaka igen så att du kan dra ut
apparaten.
Extern förstärkare
Mikrofonenhet
- 56 -
Page 59

Kontrolldel
Fjärrkontroll
Sätta in kontrolldelen
• Sätt in kontrolldelen med den vänstra sidan först
i ramen. Tryck sedan in höger sida tills den låser
fast.
• Kontrollera att kontrolldelen sitter fast i ramen.
Om den inte sitter ordentligt kan det hända att
radions knappar och reglage inte fungerar som
de ska.
Ta ut kontrolldelen
• Tryck på knappen för att lossa kontrolldelen.
• Luta kontrolldelen något utåt och dra först ut den
i höger och sedan i vänster sida.
Lägga i batterier
Ta ut det medföljande batteriet ur förpackningen.
Gör så här för att sätta i resp. byta batteri:
• Ta ut batterifacket ur fjärrkontrollen genom att först
trycka in spärren på sidan och sedan dra ut facket.
• Ta ut det gamla batteriet och sätt in ett nytt av
typ CR2025 (knappcell) i batterifacket. Se till
så att polerna ligger åt rätt håll.
• För in batterifacket i fjärrkontrollen igen.
Använda fjärrkontrollen
• Rikta alltid fjärrkontrollen mot den infraröda sensorn
på apparatens framsida.
• Du kan använda fjärrkontrollen från ett avstånd
på upp till ca 8 meter.
Observera
Om kontrolldelen inte sitter i ramen blinkar
stöldskyddets kontrollampa på apparaten.
Förvara alltid kontrolldelen i etuiet för att skydda
den.
- 57 -
Page 60

Användning
Använda apparaten med vanliga
knappar eller fjärrkontroll
De flesta funktioner kan utnyttjas både med
knapparna på apparaten och på fjärrkontrollen.
Här beskrivs som regel knapparna på apparaten.
Om man syftar på fjärrkontrollens knappar anges
det speciellt.
Observera
Ungefär 5 sekunder efter att man gjort en
inställning visas åter typen av drift och inställningen har sparats.
Basanvändning
Sätta på/Stänga av
Tryck snabbt på POWER/DIM för att sätta på radion.
WELCOME kommer upp på displayen.
• Tryck snabbt och lätt på
på dimmern till displayens belysning.
För att stänga av radion håller du knappen
POWER/DIM inne lite längre.
Volym
• Skruva på multireglaget för att öka eller minska
volymen.
OBS!
Ställ aldrig in så hög volym att du inte kan höra
signalerna från räddningsfordon tydligt!
POWER/DIM för att koppla
Loudness
• Håll knappen MD/LD inne för att sätta på eller
stänga av Loudness-funktionen.
Display
• Om du trycker på knappen DISP kan du växla
mellan följande visningar på displayen:
Vid radiomottagning:
Programnamn, klockslag (ställs in automatiskt vid
RDS-mottagning), PTY-inställningar (en RDS-funktion
som sänds i varierande omfattning och frekvens; se
även kapitel "Radiofunktioner").
Vid CD-drift:
Klockslag, PTY-inställningar och frekvens.
Observera
Om ingen RDS- eller PTY-information tas emot
kommer "NO CLOCK" eller "NO PTY" upp
på displayen. Visningarna försvinner efter några
sekunder.
Ställa in typ av drift
• Tryck på knappen MD/L för att växla mellan radio-
mottagning (frekvensvisning), CD/MP3-drift (CD),
minneskort (SD/MMC), USB-anslutning (USB) och
audioingång (AUX).
Observera
Det går bara att ta fram visningar för CD,
SD/MMC och USB om motsvarande medium
sitter i apparaten.
Bas/Diskant/Balans/Fader
• Tryck på multireglaget för att ta fram någon av
inställningarna för bas (BASS), diskant (TREBLE),
balans (BALANCE) och fader (FADER) på
displayen.
• Skruva på multireglaget för att ändra inställningen.
RESET - återställa radion
• För att återställa bilradions grundinställningar
trycker du in knappen
t ex en kulspetspenna.
• Återställ bilradion:
- innan du använder den första gången,
- när kablarna anslutits,
- när knappar inte fungerar
- när det kommer upp felmeddelanden på displayen.
- 58 -
RESET med ett spetsigt föremål,
Page 61

Inställningar med multireglaget
Med multireglaget kan du också ställa in påkopplingsvolym, klockslag, volym på trafikmeddelanden,
EON-funktion, inspelningsformat och equalizer.
• Håll multireglaget inne i ca 2 sekunder och
tryck sedan på det upprepade gånger för att
ta fram följande inställningar:
INVOL - påkopplingsvolym
• Skruva på multireglaget för att ställa in på vilken
volym du vill att radion ska kopplas på.
ADJ - klockslag
Bilradion är utrustad med en RDS-styrd klocka. Klockan
ställs in automatiskt när EON-funktionen är påkopplad
och den fortsätter att fungera även om radion är
avstängd. Om du inte kan ta emot någon RDS-signal
kan du också ställa klockan manuellt här.
• Skruva multireglaget åt höger för att ställa in rätt
timme och till vänster för att ställa in minuterna.
DSP - equalizer
• Skruva på multireglaget för att välja mellan DSP
CLASSIC, DSP ROCK, DSP POP, DSP FLAT eller
DSP NONE. Vid inställningen DSP NONE är
ingen DSP-funktion (Digital Sound Processing)
påkopplad.
Du kan också ställa in equalizern genom att trycka
på knappen
ningen är DSP-funktionen avstängd när radiofrekvensen
visas igen.
Inställningen DSP-equalizer visas längst ner på
displayen.
DSP på fjärrkontrollen. Vid den inställ-
Radiofunktioner
Välja band
• Tryck på knappen BND/ENT för att växla mellan
UKV (FM1, FM2, FM3) och mellanvåg (MV1,
MV2).
TAVOL - volym på trafikmeddelanden
• Skruva på multireglaget för att ställa in på vilken
volym du vill att trafikmeddelandena ska kopplas på.
EON-funktion
Skruva på multireglaget för att koppla på (EON ON)
eller stänga av (EON OFF) funktionen. När EON-
funktionen är påkopplad växlar radion över till
trafikmeddelanden eller PTY om TA- eller PTYfunktionen ställts in.
REC - inspelningsformat
• Skruva på multireglaget för att ställa in format
för inspelning på SD/MMC resp. USB-datamedia
på MP3 (MP3-filer) eller WMA (WindowsMediaAudio).
Automatisk sändarsökning
• Tryck snabbt på sökknappen eller för att
starta en sökning framåt eller bakåt. Sökningen
stannar så snart nästa sändare hittats.
Ställa in sändare manuellt
• Om du håller någon av knapparna eller
inne i två sekunder kopplas du över till den manuella sändarsökningen och MANUAL kommer
upp på displayen.
• Tryck sedan upprepade gånger på sökknapp
eller för att öka eller minska frekvensen i steg
på 0,05 MHz (MV: 9 kHz).
Om man inte trycker på någon knapp inom ca
2 sekunder går apparaten tillbaka till automatisk
sändarsökning. AUTO kommer upp på displayen.
- 59 -
Page 62

Spara sändare
• Tryck på knappen BND/ENT för att ställa in ett
bandområde.
Du kan spara sex sändare för varje område.
• Sök efter den sändare du vill spara.
• När en sändare hittats håller du någon av
stationsknapparna 1 - 6 inne i ca 3 sekunder.
Ljudet stängs av en liten stund för att visa att sändaren
sparas.
Efter några sekunder kopplas radion på igen.
Hämta sändare
• Välj bandområde med knappen BND/ENT.
• Tryck på någon av stationsknapparna 1 - 6 för
att hämta den sparade sändaren.
Spara sändare automatiskt
• Håll knappen A/PS intryckt. Nu startas omedelbart
en sökning som stannar upp i ca fem sekunder
varje gång en sändare hittats. Numret på den
stationsknapp där sändaren ska sparas blinkar
på displayen. Om mottagningen är för svag går
sökningen vidare.
• När sökningen stannat upp trycker du på en annan
stationsknapp om du vill spara sändaren på en
annan plats.
Gå igenom sparade sändare
• Du kan hämta sändare som sparats i det aktuella
sändarområdet.
• Välj bandområde med knappen
• Tryck snabbt på knappen
visas en kort stund.
• När du ser den sändare du vill ha trycker du
på knappen
A/PS.
BND/ENT.
A/PS. Alla sändare
• Tryck på knappen
playen. Radion letar upp den bästa frekvensen
för den inställda sändaren.
AF. "AF" kommer upp på dis-
Regionala program
Vissa sändare sänder regionala program.
• Om du bara vill höra regionala program från
en sändare håller du knappen
ON" kommer upp på displayen.
• För att gå tillbaka till den vanliga sändningen
håller du knappen
upp på displayen.
AF inne tills "REG OFF" kommer
AF inne tills "REG
PTY (Program Type Code
Programtyp/Automatiskt val)
För att den här funktionen ska kunna användas måste
EON-funktionen vara påkopplad.
• För att aktivera PTY-sökningen trycker du på
knappen
Sändarsökningen söker nu endast efter sändare av
den typ som valts (se tabellen PTY).
• För att avaktivera PTY-sökningen trycker du på
knappen
Ställa in PTY-val
• Håll knappen PTY inne och skruva sedan på
multireglaget för att välja PTY.
Sändarsökning efter PTY
• Om du trycker snabbt på knappen PTY när PTYfunktionen visas eller på knapparna / startas
genast en sökning efter sändare av den här typen.
Om ingen sändare som motsvarar ditt PTY-val hittas
kommer "NOT FND" upp på displayen och sedan
stoppas sökningen vid den sist inställda sändaren.
PTY. "PTY" kommer upp på displayen.
PTY igen.
Alternativa frekvenser (AF)
Du kan söka efter alternativa frekvenser för en
sändare för att få så bra mottagning som möjligt.
- 60 -
Page 63

PTY
PTY-visning Innehåll
1 NEWS Nyheter
2 AFFAIRS Politik&/Aktuella händelser
3 INFO Speciella talade program
4 Sport Sport
5 EDUCATE (Vidare)utbildning
6 DRAMA Högläsning/radioteater
7 CULTURE Kultur, kyrka, samhälle
8 SCIENCE Vetenskap
9 VARIED Talad underhållning
10 POP M Popmusik
11 ROCK M Rockmusik
12 EASY M Underhållningsmusik
13 LIGHT M Lättare klassisk musik
14 CLASSICS Äkta klassisk musik
15 OTHER M Speciella musikprogram
16 WEATHER Väder
17 FINANCE Ekonomi
18 CHILDREN Barnprogram
19 SOCIAL Samhälle
20 Religion Religion
21 PHONE IN Inkommande samtal
22 TRAVEL Resor
23 LEISURE Fritid
24 Jazz Jazzmusik
25 COUNTRY Countrymusik
26 NATION M Nationell musik
27 OLDIES Gamla godingar
28 FOLK M Folkmusik
29 DOCUMENT Dokumentation
30 TEST Displayvisning "Alarm Test"
31 ALARM Larmmeddelanden
Kom ihåg att informationens giltighet beror på
region, radioanstalt och sändare.
TA (Traffic Announcement) TRAFIKMEDDELANDEN
För att den här funktionen ska kunna användas måste
EON-funktionen vara påkopplad.
• Tryck snabbt på knappen
TA för att sätta på eller
stänga av den här funktionen.
I TA-läget kopplar radion omedelbart över från andra
sändare eller driftlägen till den sändare som för tillfället skickar ut trafikmeddelanden. Den kopplas på
med den volym som angivits under TAVOL in.
TA-funktionen kan avbrytas om man trycker på
knappen
TA igen, utan att TA-läget stängs av.
Spela CD-skivor (audio)
ESP "Electric Shock Protection
Apparaten är utrustad med en ESP-funktion.
Den används för att utjämna skakningar och
stötar, t ex när man kör på ojämna vägbanor,
för att det inte ska bli några störande avbrott
i ljudet, även om apparaten flyttar sig. När
apparaten kopplas på fylls minnet automatiskt
med data:
– apparaten sparar 10 sekunder på en vanlig
CD;
– 120 sekunder på en CD med MP3-filer.
Mer information om CD-
Fukt och hög luftfuktighet kan göra så att CDspelaren inte fungerar som den ska. Om det
händer ska du sätta på värmen i bilen så att
fukten försvinner innan du sätter på CD-spelaren.
Utsätt inte CD-spelaren för extremt höga eller
låga temperaturer.
"
drift
- 61 -
Page 64

Stoppa in och ta ut CD-skivor
• Fäll ner kontrolldelen genom att trycka in
spärren till kontrolldelen.
• Skjut in CD-skivan med etiketten/skriften uppåt
i CD-facket.
• Stäng kontrolldelen igen genom att fälla upp
den. CD-skivan börjar spelas. "TOC READ"
(läser innehåll) kommer upp på displayen.
• För att ta ut CD-skivan öppnar du kontrolldelen
igen. Tryck på knappen
CD-skivan kommer ut. Bilradion kopplar över
till radioläget.
OPEN .
OBS!
Kör inte omkring med en CD som sticker ut ur
facket. Ta genast ut CD-skivan ur facket.
Om en CD inte tagits ut helt ur facket inom
5 sekunder dras den in i apparaten igen, men
den börjar inte spelas.
Hoppa över titlar
• Med knappen eller kan du hoppa till nästa
eller föregående titel. Titelns nummer kommer
upp på displayen.
Snabb framåt/bakåtspolning
• Håll någon av knapparna eller inne en
lång stund för att snabbspola framåt eller bakåt.
Avbryta CD-skivor
• CD-skivan kan stannas om du trycker på knappen
PAU/1. För att sätta på den igen trycker du på
knappen
PAU/1 en gång till.
Upprepa en titel
• Tryck på knappen RPT/2. Först kommer "RPT
ONE" och sedan
Den aktuella titeln upprepas.
Om du trycker på knappen en gång till spelas skivan
på normalt sätt igen (dvs. hela skivan kommer att
upprepas). "RPT ALL" kommer upp på displayen.
"RPT" upp på displayen.
Upprepningsfunktion för CD-skivor med
MP3-filer:
• Tryck på knappen RPT/2. Först kommer "RPT
ONE" och sedan ""RPT"" upp på displayen.
Den aktuella titeln upprepas.
• Tryck på
"RPT ALL" kommer upp på displayen. Alla titlar i
den aktuella katalogen upprepas.
Om du trycker på knappen en gång till spelas skivan
på normalt sätt igen (dvs. hela skivan kommer att
upprepas). "RPT ALL" kommer upp på displayen.
RPT/2 en gång till. "RPT DIR" och därefter
Introfunktion
• Tryck på knappen INT/3. "INT" kommer upp på
displayen. Nu spelas ca 10 sekunder av alla titlar
på skivan i tur och ordning. Om man trycker på
samma knapp en gång till spelas skivan på vanligt
sätt igen.
Spela alla titlar i slumpmässig
ordningsföljd
• Tryck på knappen RDM/4. "RDM" kommer upp
på displayen. Titlarna på skivan spelas nu i
slumpmässig ordning. Om man trycker på samma
knapp en gång till spelas skivan på vanligt sätt
igen.
Spela CD-skivor med MP3-filer
Grundfunktionerna är desamma som för vanliga
audioskivor (se förra kapitlet). På CD-skivor med
MP3-filer kan man dock välja titel och artist direkt.
Den här och andra MP3-specifika funktioner är helt
beroende av CD-skivan med MP3-filer. Tänk på det
när du spelar in sådana skivor (se nästa avsnitt).
Alla vanliga krypteringar kan spelas.
TITEL > ARTIST > ALBUM > ÅRTAL
> KOMMENTAR.
- 62 -
Page 65

Observera:
Framställa CD-skivor med MP3-filer;
ID3TAGs
CD-skivor med MP3-filer kan, precis som CDskivor med andra data, innehålla enstaka titlar
eller kataloger. När du överför MP3-filer till en
CD ska du tänka på att titlarna inte får sparas
på samma nivå som katalogerna, utan bara i
katalogerna.
Om titlar och kataloger blandas på samma
nivå kan det uppstå problem när man spelar
skivan.
När man skapar en MP3-fil kan man också spara
så kallade ID3-taggar eller ID3-etiketter (då
rekommenderas en ID3-TagEditor). Det är ett
informationsblock som ingår i MP3-filen. Det
kan innehålla t ex information om artist, titel, album,
året för utgåvan och en kort kommentar. Bilradion
kan läsa av den här informationen och visa den
på displayen.
Titelsökning (efter nummer)
Söka titelnummer
• Tryck på knappen A/PS. "001" kommer upp på
displayen.
Platsen för den sista siffran i det tresiffriga titelnumret
blinkar.
• Skruva på multireglaget för att skriva in den sista
siffran i titelnumret.
• Tryck på multireglaget.
Platsen för den andra siffran i det tresiffriga titelnumret
blinkar.
• Skruva på multireglaget för att skriva in den andra
siffran i titelnumret.
• Tryck på multireglaget.
Platsen för den första siffran i det tresiffriga titelnumret
blinkar.
• Skruva på multireglaget för att skriva in den
första siffran i titelnumret.
• När du ställt in rätt titelnummer bekräftar du det
med
BND/ENT. Titeln börjar spelas direkt.
Söka titelnamn (bokstäver)
• TRYCK TVÅ GÅNGER PÅ A/PS.
"A**" blinkar på displayen. Det första tecknet blinkar.
• Skruva på multireglaget för att skriva in den bokstav
eller siffra som titeln börjar med. Tryck sedan på
multireglaget.
Nästa tecken blinkar på displayen.
• Skruva på multireglaget för att skriva in nästa
bokstav eller siffra i titelns namn. Tryck på
multireglaget.
Nästa tecken blinkar på displayen.
• Skruva på multireglaget för att skriva in nästa
bokstav eller siffra i titelns namn.
• Tryck på knappen
som börjar med de här tecknen.
• Skruva på multireglaget för att välja en titel och
sätt på den med
BND/ENT för att visa alla titlar
BND/ENT.
Katalogsökning
Söka från den aktuella katalogen
• Tryck tre gånger på A/PS. Den katalog som spelas
för tillfället visas.
• Skruva på multireglaget för att visa alla MP3kataloger och välj en katalog med knappen
BND/ENT.
Den första titeln i den valda katalogen spelas direkt.
Spela ur föregående/nästa katalog
• Tryck på stationsknapp 6 för att gå till nästa och
på stationsknapp
katalog.
WMA-
filer
Med den här apparaten kan du också spela
WMA-filer. Det fungerar precis likadant som
för MP3-filer.
5 för att gå till föregående
- 63 -
Page 66

USB-anslutning
Inspelningsfunktion
Uppspelning
Du kan ansluta en MP3-spelare eller någon annan
USB-apparat till USB-porten på apparatens framsida.
Bilradion kan hantera USB-datamedia med upp till
1 GB. Katalogstrukturen får då vara maximalt
1024 mappar, 4096 filer och 8 katalognivåer.
• Ta bort skyddet över USB-anslutningen.
• Koppla USB-apparaten till anslutningen. Bilradion
letar efter MP3- eller WMA-filer på datamediet
och "USB" kommer upp på displayen.
• Att spela filer från ett externt datamedium och
sökfunktionen fungerar precis som på CD-skivor
med MP3-filer.
• Om apparaten står på ett annat läge (CD eller
kortläsare) kan du välja USB-anslutningen med
knappen
• Sätt tillbaka skyddet över USB-anslutningen igen
när ingen USB-apparat är ansluten så att det inte
kommer in smuts i den.
MD/LD.
Kortläsare
Bilradion är utrustad med kortplatser för SD- och
Multimediakort.
Uppspelning
• Skjut in minneskortet med påskriften till höger
i kortplatsen. MP3- eller WMA-titlarna på kortet
börjar spela automatiskt.
• Att spela filerna fungerar precis som på CD-skivor
med MP3-filer.
• Om apparaten står på ett annat läge (CD, Radio,
AUX eller USB) kan du välja kortläsaren med
knappen
MD/LD.
Observera:
Följ de lagar och bestämmelser som gäller där
du bor när det gäller framställning av kopior
av verk som skyddas av upphovsrätt. I tveksamma fall ska du vända dig till en sakkunnig
i närheten.
Spela in från vanliga CD-skivor
Bilradion kan användas för att spela in från CD-spelaren
till ett externt USB-datamedium eller ett SD/MMC-kort.
• I CD-skivor håller du
"USB ALL" kommer upp på displayen (om man ska
spela in på MMC-kort visas "MMC ALL").
• Tryck upprepade gånger på knappen
för att välja antingen alternativet USB/MMC-ALL
(spela in alla titlar) eller USB/MMC -ONE
(spela in en titel).
• Starta inspelningen genom att trycka på
knappen
Audiodata sparas nu på datamediet i det inställda
formatet (MP3 eller WMA, se sidan 11 "Inställning
REC - inspelningsformat"). Till att börja med visas
"RECORD" på displayen.
Därefter visar ett "R" att inspelning pågår.
BND/ENT.
SCN/REC intryckt.
SCN/REC
Observera
När USB-datamediet är fullt växlar apparaten
automatiskt till kortläsaren om ett minneskort
stoppats in (se följande kapitel).
• För att avsluta inspelningen trycker du snabbt på
knappen
en liten stund på displayen har inspelningen sparats.
BND/ENT en gång till. När "WAIT" visats
- 64 -
Page 67

Du kan spela dina data genom att trycka på knappen
MD/LD för att växla till USB- eller SD/MMC-läget
och sedan hämta den titel du vill ha från datamediet.
Kopiera MP3-filer
Du kan kopiera enstaka titlar på en CD med
MP3-filer till ett externt USB-datamedium eller ett
SD/MMC-kort.
• Håll knappen
titel som ska kopieras på en CD med MP3-filer.
"COPY MMC" kommer upp på displayen.
• Tryck upprepade gånger på knappen
för att välja antingen kopieringsalternativet
COPY USB (kopiera till USB-datamedium) eller
COPY MMC (kopiera till SD/MMC-kort).
• Starta kopieringen genom att trycka på knappen
SCN/REC inne när du kommit till den
SCN/REC
BND/ENT.
Under kopieringen visas "COPY" och en procentangivelse på mellan 01 - 99 som visar hur långt
processen har framskridit. När "COPY 99" kommer
upp är kopiering färdig och MP3-titeln spelas igen.
Spela in från radio eller audioingång
Bilradion kan också användas för att spela in från
radion eller audioingången till ett USB-Stick eller ett
minneskort.
• Stoppa in kortet på kortplatsen eller ett USB
Stick i USB-anslutningen och välj radioläge eller
AUX med knappen
• Starta ev. uppspelningen på den externa
audioapparaten.
• Håll knappen
"REC MMC" kommer upp på displayen.
• Tryck upprepade gånger på knappen
att välja antingen inspelningsalternativ USB (spela
in på USB-datamedium) eller MMC (spela in på
SD/MMC minneskort).
• Starta kopieringen genom att trycka på knappen
MD/LD .
SCN/REC inne.
SCN/REC för
BND/ENT.
Information om inspelade filer
Inspelningarna sparas på datamediet under
följande beteckningar:
Inspelningar från vanliga CD-skivor:
Track01, Track02 ...
Inspelningar från CD-skivor med MP3-filer:
Music01, Music02 ...
Inspelningar från radio:
Tuner01, Tuner02 ...
Inspelningar från vanliga CD-skivor och radio
spelas in med en bithastighet på 128 kbps
resp. en samplingfrekvens på 44 kHz. När
man kopierar MP3-filer används kopieringskällans
inspelningsformat.
Bluetoothdrift
Anslutning
• Anslut mikrofonenheten till bilradion så som
beskrivs under "Anslutning/Anslutningsschema".
För att mikrofonenheten ska kunna användas krävs
en mobiltelefon som stöder dataöverföring via
bluetooth.
Koppla en telefon till bilradion
• Sök efter bluetooth-apparater med telefonen.
• När sökningen avslutats kommer "CAR--BT" upp
på mobiltelefonens display för att visa att bilradion
är ansluten.
• Välj det alternativet som förbindelse och skriv in
sedan in lösenordet 0000 för bilradion. Eventuellt
måste du bekräfta förbindelsen en gång till.
När en förbindelse upprättats visas "CONNECT"
en liten stund på bilradions display och den gröna
kontrollampan på mikrofonenheten tänds.
- 65 -
Page 68

Använda mikrofonenheten
Under ett telefonsamtal hörs din samtalspartner
genom de anslutna högtalarna.
• För att den andra personen ska kunna höra vad
du säger ska du placera mikrofonenheten nära dig.
• Sätt t ex mikrofonenheten på instrumentbrädan.
Du kan använda medföljande klisterremsor för
att fästa den där. Torka först av den yta där
mikrofonenheten ska sättas så att den blir fri från
damm och smuts. Klisterremsorna kan användas
för att fästa mikrofonenheten på nästan alla släta
underlag.
Användning
Svara på/Avsluta samtal
Vid ett inkommande samtal hörs ringsignalen genom
mobiltelefonen och det nummer som ringer upp visas
på bilradions display.
• Svara på det inkommande samtalet genom att
trycka på knappen
knappen SVARA på fjärrkontrollen eller
radions framsida.
• Avsluta samtalet genom att trycka på knappen
TALK på mikrofonenheten igen eller på knappen
AVSLUTA .
Avstå från att svara på samtal
• Håll knappen TALK på mikrofonenheten inne
längre än 2 sekunder eller tryck på knappen
AVSLUTA om du inte vill svara på ett inkom-
mande samtal.
Ringa upp
• Tryck på knappen SVARA på fjärrkontrollen.
En blinkande markör kommer upp på bilradions
display.
• Knappa in telefonnumret med fjärrkontrollens
sifferknappar.
• Tryck på SVARA igen.
Numret rings upp.
TALK på mikrofonenheten eller
Återuppringning
• Håll knappen TALK på mikrofonenheten eller
knappen SVARA på fjärrkontrollen eller
på framsidan inne i ca 2 sekunder.
- Om du inte redan knappat in något telefonnummer med fjärrkontrollens sifferknappar visas
"REDIAL" en kort stund på displayen och därefter
kommer det senast uppringda numret att väljas.
- Om du redan knappat in ett eller flera telefonnummer med fjärrkontrollens sifferknappar kommer
"REDIAL.." upp på displayen.
Skruva på multireglaget eller tryck på knapparna
VOL-/+ på fjärrkontrollen för att ta fram de 10 senast
slagna telefonnumren i tur och ordning.
Tryck på knappen SVARA för att slå det valda
numret.
Välj alternativet REDIAL och tryck sedan på
knappen AVSLUTA för att gå ut ur återuppringningsfunktionen.
Audio streaming (A2DP)
Bilradion använder en A2DP-profil (Advanced Audio
Distribution Profile) för att kunna återge audiodata
från en mobiltelefon.
• Välj en audiofil på din mobiltelefon och starta
uppspelningen.
"A2DP" visas på bilradions display och audiofilen
spelas genom högtalarna.
Observera
Det kan hända att man måste ställa in mobiltelefonen så att ljudet går genom ett headset
med bluetooth-anslutning.
Läs om detta i mobiltelefonens bruksanvisning.
Vid vissa mobiltelefoner växlar bilradion inte
till A2DP-läget automatiskt. Växla i så fall till
A2DP-läget genom att trycka upprepade gånger
på knappen MD/LD tills "A2DP" kommer upp
på displayen.
- 66 -
Page 69

Byta säkring
På baksidan av bilradion sitter en 10 A säkring som
utlöser vid spänningstoppar eller kortslutningar.
• Byt i så fall säkringen mot en likvärdig av den
typ som anges i tekniska data och med samma
frånkopplingsautomatik.
• Ta reda på orsaken till att säkringen utlöstes
innan du sätter på bilradion igen.
Inget ljud
Volymen har skruvats ner till lägsta nivån.
• Öka volymen.
Kablarna är inte rätt anslutna.
• Kontrollera kabelförbindelserna.
Knapparna fungerar inte
Det har uppstått en störning i apparaten.
• Tryck in RESET-knappen.
Kontrolldelen sitter inte rätt.
• Kontrollera hur kontrolldelen sitter.
Åtgärda fel
Det går inte att sätta på apparaten
Tändningen är inte påkopplad.
• Koppla på tändningen genom att vrida om
nyckeln.
En säkring är defekt.
• Byt säkring.
CD-skivan laddas inte eller stöts ut igen
Det ligger redan en CD i bilradions CD-fack.
• Ta ut CD-skivan.
CD-skivan har lagts i med fel sidan uppåt.
• Lägg in CD-skivan med etiketten/skriften uppåt.
CD-skivan är smutsig eller defekt.
• Rengör skivan eller lägg i en annan CD.
Det är för varmt i bilen.
• Vänta tills temperaturen sjunkit till normal nivå.
Det har bildats kondens på laserlinsen
• Låt bilradion vara avstängd i några timmar och
försök sedan igen.
CD-skivan hoppar ut
Inbyggnadsvinkeln är mer än 30°.
• Korrigera inbyggnadsvinkeln.
CD-skivan är mycket smutsig eller defekt.
• Rengör skivan eller lägg i en annan CD.
Fel vid brända CD-skivor
Kontrollera om den brända CD-skivan fungerar i en
annan apparat.
Radion och/eller funktionen för att spara
sändare automatiskt fungerar inte
Antennkabeln är inte rätt ansluten.
• Kontrollera antennkabelns anslutning.
Sändarsignalerna är för svaga.
• Ställ in sändarna manuellt.
Det går inte att spara sändare
Anslutning 6 i ISO-block A (batteriplus) är inte rätt
ansluten.
• Kontrollera kabelförbindelserna.
Observera angivelserna i kapitel "Anslutning".
Apparaten i USB-anslutningen fungerar inte
USB-anslutningen är till för apparater som fungerar
enligt USB-normen. Alla apparater på marknaden
uppfyller inte den här normen. I vissa fall kan problemet bero på att en apparat som inte motsvarar
USB-normen anslutits.
• Anslut en apparat som fungerar enligt USB-normen.
- 67 -
Page 70

Kortläsaren kan inte läsa kortet
Eventuellt är kortet defekt, smutsigt eller har inte
satts i på rätt sätt.
• Kontrollera kortet. För in kortet med sidan med
skrift åt höger.
Bluetooth-förbindelsen fungerar inte
Mobiltelefonen har inget stöd för bluetooth-överföring.
Mobiltelefonen är inte kopplad till bilradion.
• Koppla mobiltelefonen till bilradion en gång till.
Då måste du läsa i mobiltelefonens bruksanvisning.
Rengöring
• Torka bara av apparaten utvändigt med en något
fuktig trasa och ett milt diskmedel. Akta så att
det inte kommer in fukt i apparaten när den
rengörs!
Varning!
Om det kommer in fukt i apparaten finns risk
för elchocker! Dessutom kan apparaten bli
totalförstörd!
Kassering
Apparaten får absolut inte kastas bland
hushållssoporna. Den här produkten
faller under bestämmelserna för
EU-direktiv 2002/96/EG.
Lämna in den till ett företag som har tillstånd att ta
hand om kasserade apparater av den här typen
eller till rätt återvinningsstation på din kommuns
avfallsanläggning.
Följ gällande föreskrifter. Om du är tveksam ska du
fråga den lokala avfallshanteringsmyndigheten.
Kassera batterier
Vanliga batterier och uppladdningsbara batterier får
inte kastas bland hushållssoporna. Den som använder
någon typ av batterier är skyldig att lämna in dem till
ett godkänt insamlingsställe.
Den här bestämmelsen är till för att batterier ska
kunna kasseras utan att skada miljön. Lämna bara
in urladdade batterier för återvinning/destruktion.
Lämna in allt förpackningsmaterial till miljövänlig återvinning.
- 68 -
Page 71

Garanti och service
Importör
För den här apparaten lämnar vi tre års garanti från
och med inköpsdatum. Skulle du, trots våra högt
ställda kvalitetskrav, ha några klagomål på produkten
ber vi dig att kontakta vår Service Hotline.
Om ditt problem inte kan lösas per telefon kommer
du då att få
• ett returnummer (RMA-nummer) samt
• en adress dit du kan skicka produkten för att
utnyttja garantiförmånerna.
Om du skickar in apparaten ber vi dig bifoga en
kopia av inköpsbeviset (kassakvittot). Apparaten ska
förpackas så att den inte kan skadas i transporten
och så att RMA-numret syns tydligt. Vi kan inte ta
hand om produkter som skickas in utan RMA-nummer.
Observera:
Garantin gäller bara för material- eller
fabrikationsfel.
Garantin gäller inte
• för förslitningsdelar
• för skador på ömtåliga delar,
t ex brytare och batterier.
Produkten är endast avsedd för privat bruk och får
inte användas yrkesmässigt. Vid missbruk och felaktig
behandling, användande av våld och vid ingrepp
som inte gjorts av vår auktoriserade servicefilial
upphör garantin att gälla.
Den lagstadgade garantin begränsas inte av denna
garanti.
KOMPERNASS GMBH
BURGSTRASSE 21
44867 BOCHUM, GERMANY
www.kompernass.com
- 69 -
Page 72

Page 73

Bluetooth Bilradio
KH 2375
Kontakta vår Service Hotline för att
få en gratis reparation. Ha kassakvittot till hands.
Garanti
Kompernass Service Sverige
EA Rosengrensgata 22
42131 Västra Frölunda
Tel.: 031-491080
Fax:031-497490
e-mail: support.sv@kompernass.com
Skriv avsändare tydligt:
Efternamn
Förnamn
Gata
Postnummer/Ort
Land
Telefon
Fyll i hela följande avsnitt och bifoga med apparaten!
Datum/Underskrift
Felbeskrivning:
Kompernass Service Suomi
Petäjäksentie 19
FIN - 26100 Rauma
Tel.: 02 822 28 87
Fax:010 293 02 63
e-mail: support.fi@kompernass.com
www.mysilvercrest.de
Page 74

 Loading...