

Page 1
C
BLUETOOTH CAR RADIO
KH 2375
KOMPERNASS GMBH · BURGSTRASSE 21 · D-44867 BOCHUM
www.kompernass.com
ID-Nr.: KH2375-01/08-V2
BLUETOOTH CAR RADIO
Operating instructions
BLUETOOTH BILRADIO
Betjeningsvejledning
BLUETOOTH BILRADIO
Bruksanvisning
Page 2

KH 2375
A
w
D
4!
4) 4@
3(
E
e r t y iuq
2$ 2@ 2! ; l k j h g f d s a o
2# 2)
B
2%
2&2^
C
2*
2(
3)
2^
3!
5&
5^
4#
4$
5%
5$
5#
5@
5!
5)
4%
4^
4&
4*
6!
5*
5(
6)
4(
I
F
3*
3&
3^ 3%
3@
H
3#
G
3$
Page 3

CONTENT PAGE
Intended Use 3
Technical Data 3
Items supplied 3
Safety information 4
Operating Elements 5
Installation 6
Connection 6
Configuration of the ISO connections............................................................................................7
Installing the radio into the ISO duct ............................................................................................7
Connection schematic......................................................................................................................8
Connecting an external audio device to the car radio 8
Disassembling the device 8
Face plate 9
Remote control 9
Inserting the battery .........................................................................................................................9
Operation 10
Basic operation ..............................................................................................................................10
Volume ............................................................................................................................................10
Bass/Treble/Balance/Fader.........................................................................................................10
Loudness..........................................................................................................................................10
Display ............................................................................................................................................10
Setting the operating mode ..........................................................................................................10
RESET - Reset the radio..................................................................................................................10
Settings for the multi controller .....................................................................................................11
Radio functions 11
Selecting the band range..............................................................................................................11
Automatic station search ...............................................................................................................11
Programming stations.....................................................................................................................12
Accessing the station .....................................................................................................................12
Automatic saving ...........................................................................................................................12
- 1 -
Page 4

Running through saved stations....................................................................................................12
Alternative Frequency (AF)............................................................................................................12
PTY (Programme Type Code Programme type/kind identification).......................................12
TA ("Traffic Announcement") - TRAFFIC RADIO..........................................................................13
Playing audio CDs 13
Inserting and removing CDs .........................................................................................................14
Title skip ..........................................................................................................................................14
Fast forward/backward................................................................................................................14
Stopping a CD ...............................................................................................................................14
Repeating a title .............................................................................................................................14
Title sampling..................................................................................................................................14
Random playback of all titles .......................................................................................................14
Playing MP3-CDs 14
Title search (by numbers)..............................................................................................................15
Search for directories ....................................................................................................................15
USB port 16
Card reader 16
Record function 16
Bluetooth operation 17
Connection......................................................................................................................................17
Coupling a telephone with the car radio....................................................................................17
Using the microphone....................................................................................................................18
Operation .......................................................................................................................................18
Audio streaming (A2DP) ...............................................................................................................18
Replacing the fuse 19
Troubleshooting 19
Cleaning 20
Disposal 20
Warranty and Service 21
Importer 21
Read the operating instructions carefully before using the appliance for the first time and preserve this
booklet for later reference. Pass the manual on to whomsoever might acquire the appliance at a later date.
- 2 -
Page 5

BLUETOOTH CAR RADIO
KH 2375
Intended Use
This device is designed for the reception of FM/AM
radio stations as well as for the playback of audio
and MP3-CDs, MP3 data from USB data carriers
and SD/MMC memory cards and also audio signals
from external audio devices. In addition you can connect the car radio to a bluetooth mobile telephone
and, with the microphone unit, you can use the car
radio as hands free equipment. This device is intended
for use only in private environments. It is not suitable
for use in commercial or industrial areas.
Technical Data
Input voltage : 12V
Input current: max. 10 A
Impulse rating: 4 x 40 W
Radio frequency range:
Radio: FM (USW) : 87.5 - 108 MHZ
AM (MW) : 522 – 1620 KHz
Station memory slots: 18 FM (USW)
12 AM (MW)
Remote control:
Battery: 3 V Button cell (CR2025)
Card slot
SD/MMC memory card slot
Device fuse:
10 A Automotive flat fuse
General
Operating temperature range: +5°— +40°C
Humidity: 5 — 90% (no condensation)
Dimensions
(L x D x H): 18,8 x 23 x 6 cm
Weight : approx. 1530 gr
CE Conformity
This device complies with the basic requirements
and other relevent regulations regarding conformity to the automotive directive 2004/104
/EG and the directive R&TTE 99/5/EG.
Items supplied
- Car radio (incl. face plate)
- Installation bracket (Attached)
- Bezel frame (Attached)
- Fixture plate (incl. securing material)
- Remote control
- 1 Battery CR2025, 3 V DC
- Key for installation bracket
- Case for face plate
- Microphone unit with adhesive strip
- Operating manual
Audio input (AUX IN):
3,5 mm Stereo jack plug
USB port
USB 1.1 and 2.0 compatible data carrier
- 3 -
Page 6
Safety information
• This device is not intended for use by individuals
(including children) with restricted physical, physiological or intellectual abilities or deficiences in
experience and/or knowledge unless they are
supervised by a person responsible for their safety
or receive from this person instruction in how the
device is to be used.
• Children should be supervised to ensure that they
do not play with the device..
• Keep batteries away from children. Children can
put batteries into their mouths and swallow them.
If a battery is swallowed medical assistance must
be sought immediately.
To avoid damage through short circuits:
• If possible have the car radio installed by a qualified
technician.
• Only connect the device to a properly installed
12 V automotive battery. Only connect the car
radio in the vehicle via an ISO plug.
• Make sure that during operation the connection
cable can never become wet or moist. Run the
cable in such a way that it cannot become clamped
or damaged in any other way.
• To avoid possible dangers exchange damaged
cables or connectors immediately at an authorized
specialist establishment or the customer service
department.
• Only use the device in a vehicle interior.
• Make sure that liquids or objects are never able
to enter into the device.
• Do not open the housing or attempt to repair the
device yourself. Should you do so, device safety
can no longer be assured and the warranty will
become void.
Repairs are to be carried out exclusively by a
specialist firm or the service centre.
Information regarding the handling
of batteries
The remote control for this device uses a battery.
For the handling of batteries please observe the
following:
Risk of explosion!
Do not throw batteries into a fire. Do not recharge the batteries.
• Never open batteries, never solder or weld
batteries.
The risk of explosions and injuries exists!
• Regularly check the condition of the batteries.
Leaking batteries can cause damage to the device.
• Remove the batteries if you do not intend to use
the device for an extended period of time.
• Put on protective gloves when handling a leaking
battery.
• Keep batteries away from children. Children can
put batteries into their mouths and swallow them.
If a battery is swallowed immediately seek medical
assistance.
• Clean the battery compartment and the battery
contacts with a dry cloth.
To avoid the risks of fire or injury:
• Install the device in such a way as to avoid the
development of heat accumulation and so that
the device is sufficiently ventilated.
• Never cover the ventilation openings!
• Avoid any additional heat build up, e.g. direct
sunlight, heaters, other devices, etc.
• Do not operate the device if it has sustained a
fall or is damaged. Arrange for the device to be
checked and/or repaired by qualified technicians.
- 4 -
Page 7
Danger laser radiation!
The device is fitted with a "Class 1 Laser".
• Never open the device.
• Never attempt to repair the device. There is
invisible laser radiation inside the device.
• Avoid all direct optical contact with the laser
beam, it could lead to serious eye injuries.
Traffic safety
Traffic safety is the number one priority. Only
operate your car radio when the traffic situation
allows. Familiarize yourself with the device before driving. Acoustical signals from the police,
fire service and other emergency services must
be able to be heard inside the vehicle in good
time. Therefore moderate the programme's
volume during the journey.
Operating Elements
A
Front panel (face plate)
BND/ENT: Select band range/confirm selection
q
POWER/DIM: Switch device on and off/dim display
w
illumination
MD/LD: Set operating mode/switch to loudness
e
Multi controller: Press to access the bass, treble,
r
balance and fader settings/turn
to set the value/volume
Display
t
Unlocking the face plate
y
DISP: Show display information
u
Card slot for SD/MMC cards
i
USB port
o
AUX IN: 3,5 mm stereo input socket for the con-
a
nection of an external audio device
A/PS: Automatic station saving
s
PTY ("Programme Type"): Station search by
d
PTY group
TA ("Traffic Announcement"):
f
Activate traffic radio station
AF ("Alternative Frequency"): Alternative
g
Station button 6/next directory
1%
Station button 5/previous directory
j
RDM/4: Random playback in the CD/MP3
1&
operation mode, station button 4
INT/3: Intro function in the CD/MP3 operation
l
mode, station button 3
RPT/2: Repeat function in the CD/MP3
1(
operation mode, station button 2
Remote control sensor
2)
PAU/1: Stop playback in the CD/MP3
2!
operation mode, station button 1
/: Title/Station search backwards/forwards
2@
MU: Switch sound off/ACCEPT-button
2#
SCN/REC: Automatic station search/Record to
2$
a data carrier at the USB port or the
SD/MMC card slot
B
Behind the face plate
OPEN : Eject disc
2%
Holder for the face plate
2^
RESET: Reset the car radio
2&
Anti theft LED
2*
CD compartment's position LED
2(
CD compartment
3)
C
Connections, rear panel
ISO-Block connection B
3!
Automotive flat fuse 10 A
3@
ISO-Block connection A
3#
Microphone unit socket
3$
Bluetooth antenna
3%
Securing screw
3^
(incl. M5 nut and washer)
LINE OUT: Audio cinch output L/R for amplifier
3&
Antenna connection for a DIN antenna plug
3*
/ END-button
Frequency search
- 5 -
Page 8
D
Remote control
POWER/DIM: Switch device on and off/dim
3(
display illumination
END-button
4)
/: Title/Station search backwards/forwards
4!
ACCEPT-button
4@
VOL+/-: Volume increase/decrease
4#
INT/3: Intro function in the CD/MP3 operation
4$
mode, number button 3
PTY/7: ("Programme Type") Station search by
4%
PTY group/number button 7
Number button 6
4^
DSP/
4&
4*
4(
5)
5!
5@
5#
5$
5%
5^
5&
: ("Digital Sound Processing") Sound
*
settings/ button
*
BAND/0: Select band range/number button 0
Battery compartment
SEL/#: Access settings for volume, bass, treble,
balance and fader/ button #
TA/9: ("Traffic Announcement"): Activate traffic
radio station/ number button 9
AF/8: ("Alternative Frequency"): Alternative
frequency search/ number button 8
Number button 5
RDM/4: Random playback in the CD/MP3
operation mode/ number button 4
RPT/2: Repeat function in the CD/MP3 operation
mode/ number button 2
/1: Playback start or stop/ number button 1
MODE: Set operation mode/loudness function
Installation
If you want to install your car radio yourself follow
the installation and connection instructions in this
manual.
Installation instructions
• Insert the device in the slot provided for it or select
a location for mounting the device that does not
obstruct the driver during normal operation of
the vehicle.
• Briefly connect the cable before finally installing
the device. Make sure that it is plugged in properly
and that the system functions correctly.
• In the event that changes to the vehicle are necessary contact your vehicle dealer/qualified
radio installation facility.
• Install the device in such a way as to avoid injuries in the event of harsh braking.
• If the device is installed with more than a 30° inclination it could lead to function disorders.
• Avoid installation of the device in the vicinity of
high temperature sources (i.e. direct sunlight or
heating vents) or dusty and dirty locations. Do
not subject the device to excessive vibration.
Connection
E
Microphone unit
green LED for connection status
5*
TALK button
5(
Microphone
6)
Microphone unit plug
6!
F
Case for face plate
G
Key for installation bracket
H
Installation bracket
I
Bezel frame
Note:
Make sure that a permanent positive connection
is applied to the station memory of connection
6 in the ISO block A.
You can connect an external amplifier to the
audio cinch output. For this follow the operating
instructions for the external amplifier.
- 6 -
Page 9

Configuration of the ISO connections
Configuration
1 unconfigured
2 unconfigured
1234
5678
1234
5678
3 Antenna power
4 12 V (Ignition
ISO A
5 unconfigured
6 Permanent positive
7 unconfigured
8 Minus (-)
1 Rear right +
2 Front right +
3 Front left +
4 Rear left +
ISO B
5 Rear right 6 Front right 7 Front left 8 Rear left -
positive)
Configuration
Of course you can also only connect the car radio
to two speakers. Then you only use the cable for the
front speakers.
Problems because of cable interchanging
In a few vehicle models the standard configuration of the connections [4] and [6] in the ISO
Block A (see above "Configuration of the ISO
Blocks") is interchanged at the factory. If this is
the case the station memory can be lost.
To correct this the connections 4 (Ignition positive)
and 6 (Permanent positive) in the ISO Block A must
be swapped.
Installing the radio into the ISO duct
Note
Before installation remove, without fail, the two
transport securing screws on the top of the radio
housing (marked with a red sticker)!
The car radio can be installed into any standard
ISO mounting duct. In the event that your vehicle
does not have an ISO mounting duct contact your
local specialist establishment, local dealer or the
technical department of the store.
• Pull the installation bracket and the bezel frame
off of the car radio's housing.
• Place the installation bracket into the ISO mounting
duct.
• Bend the tabs on the installation bracket with a
screw driver so that the bracket is fixed firmly
into the mounting duct (see diagram).
• Check to make sure that the bracket is securely
fixed.
• Connect the ISO socket block of the car radio with
the two ISO plugs on your vehicle.
• Connect the antenna cable from the vehicle antenna to the antenna socket on the car radio.
• Feed the microphone unit cable into the mounting
duct and connect it to the microphone unit socket.
Run the cable in such a way that the microphone
unit can later be secured in the vehicle interior.
• Contingently connect the audio cinch cable of
an external amplifier to the
LINE OUT socket on the
car radio.
• If necessary secure your device against theft
with additional measures. Attach the securing
screw with the anchoring plate and the securing
material to the engine firewall of the vehicle.
• Carefully push the car radio into the mounting
duct until it locks into place. Finally put on the
bezel frame.
- 7 -
Page 10
Attention!
1234
5678
1234
5678
ISO A
ISO B
For installation please use the car radio's ISO
connections. The vehicle specific ISO adapter
that you may possibly require can be obtained
from a specialist establishment, from a local
dealer or from the store's technical department.
When using other connection types the warranty
becomes void!
Observe the cable positioning when pushing
the radio in; it could become damaged.
Antenna power connection
The connection for the antenna power is available
for a relay controlled antenna. The relay then
automatically extends the antenna when the radio
is switched on. When switched off the antenna
retracts.
This connection can also be used to control an
external amplifier. For exact connection information please consult the amplifier's operating instructions.
Never attach the antenna power connection with
the antenna's motor power cable; this can cause
damage to the radio!
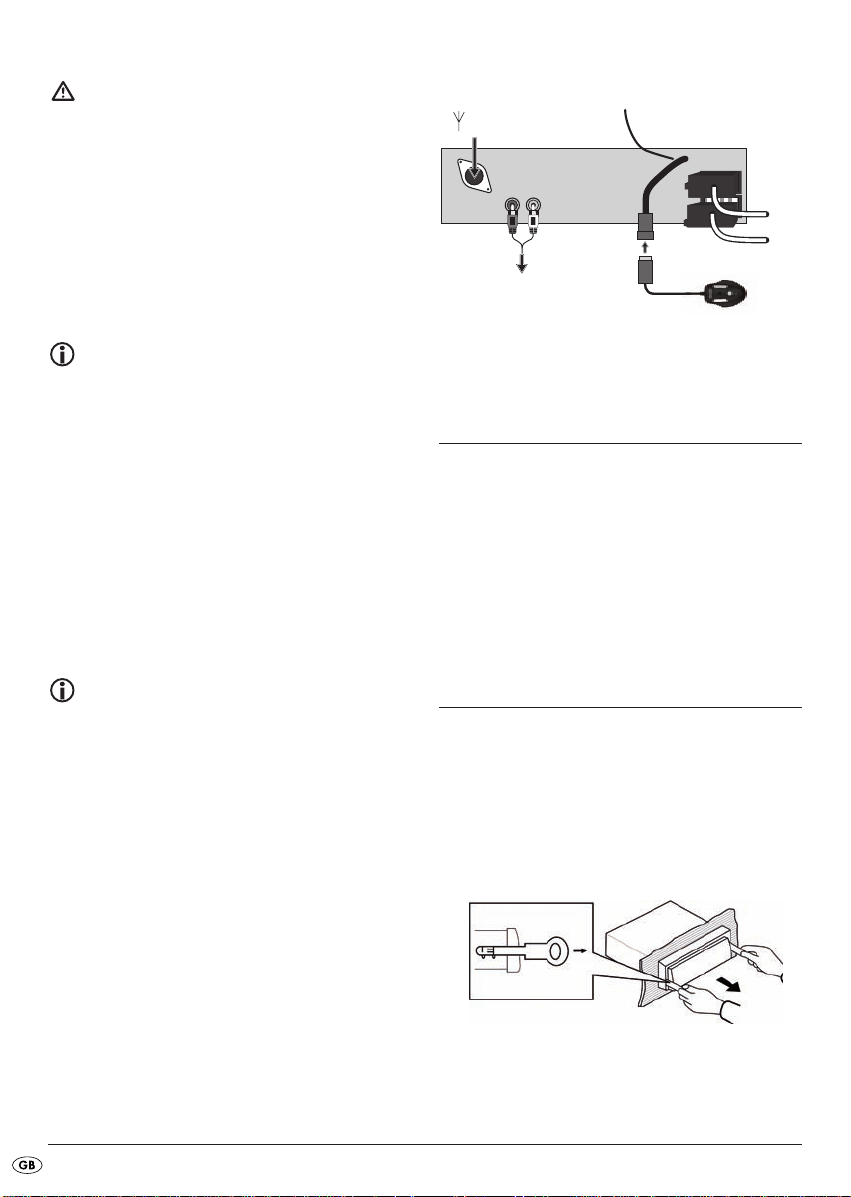
Connection schematic
Antenna
External amplifier
Microphone unit
Connecting an external audio
device to the car radio
• Connect the audio output of an external audio
device (i.e. an MP3 player) via a 3.5 mm stereo
jackplug to the socket
the device.
• Select playback of the audio input by pressing,
several times, the
shown in the display.
AUX IN on the front panel of
MD/LD button until AUX is
Backup connection
Make sure that for the station memory the permanent positive is applied to the connection 6
in the ISO block A. Otherwise you will not be
able to save any radio stations!
• After all connections have been made activate the
RESET button with a ball point pen or other pointed
object.
• Attach the face plate as described below.
Disassembling the device
• To disassemble the device first remove the bezel
frame and then feed the right and left keys into
the respective slots on the sides of the device.
The tabs are now bent back and you can pull the
device out.
- 8 -
Page 11
Face plate
Remote control
Putting the face plate on
• Place the face plate with the left side in the frame
first. Then firmly press the right side until it locks
into place.
• Check to make sure that the face plate is firmly
and correctely installed in the frame. If the face
plate is incorrectely installed it can result in malfunctions when operating the car radio.
Removing the face plate
• Press the button to unlock the face plate.
• To remove the face plate first tip it slightly forward
and pull the right side away first and then the left
side.
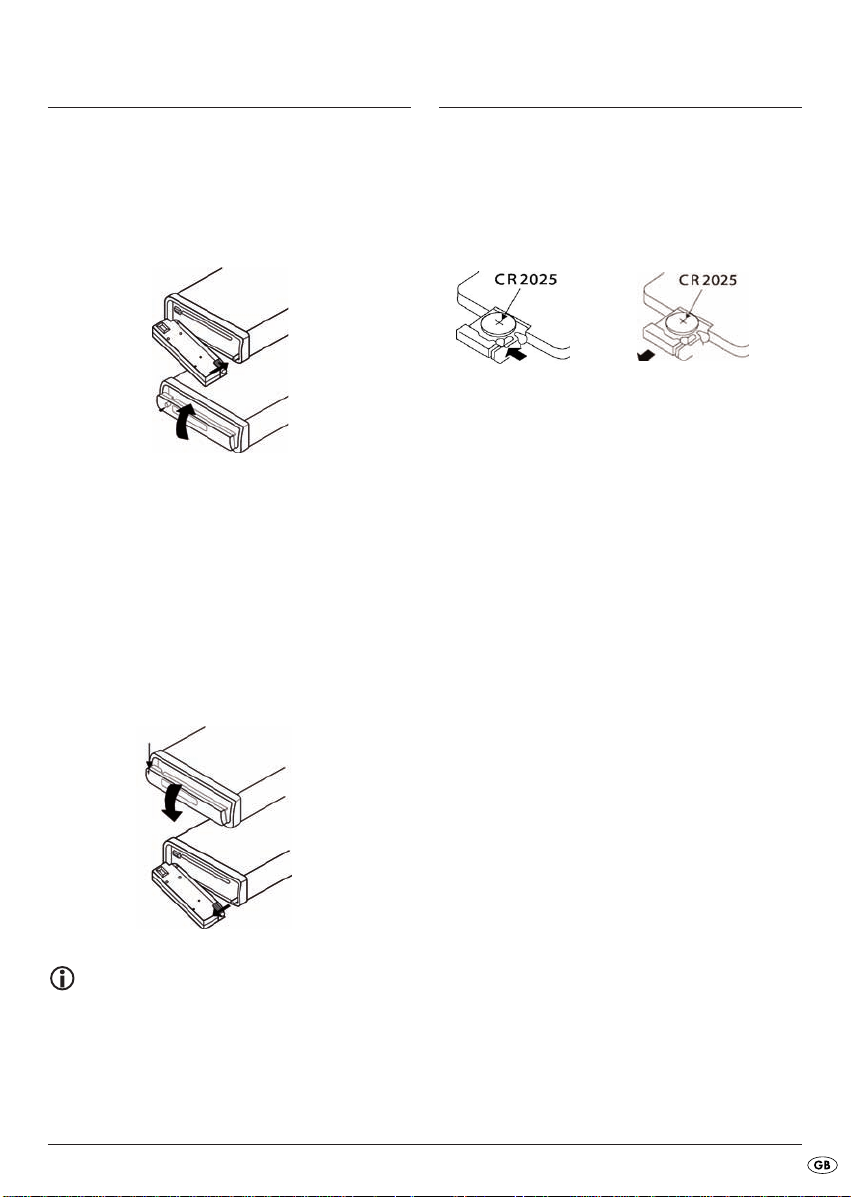
Inserting the battery
Remove the supplied battery from the packing.
To insert the battery and/or change the battery
proceed as follows:
• Pull the battery compartment out of the remote
control by first pressing the lateral locking device
and then pulling the battery compartment out.
• Remove the depleted battery and insert a new
battery of the type CR2025 (Button cell) into the
battery compartment. Make sure that the battery
is inserted in accordance with its correct polarity.
• Slide the battery compartment back into the remote control.
Using the remote control
• Point the remote control to the Infrared sensor
on the front panel of the device.
• You can use the remote control for distances of
up to approx. 8 m from the device.
Note
When the face plate is not inserted into the frame
the theft protection LED on the device blinks.
To safeguard the face plate always keep it stored
in its case.
- 9 -
Page 12
Operation
Operation via the buttons on the
device and on the remote control
Most of the functions can be operated by the
buttons on the device as well as by the buttons
on the remote control. In these instructions the
buttons on the device are described.
If the buttons on the remote control are meant
this will be specifically mentioned.
Note
Approx. 5 seconds after a setting has been
made the playback will again be displayed
and the setting is saved.
Basic operation
Switching On and Off
Press briefly the POWER/DIM button to switch the radio
on. In the display the notice WELCOME appears.
• Briefly touch the
play illumination.
To switch off hold down the
Volume
• Turn the multi controller to increase or decrease
the volume.
Attention!
Always set the volume to a level that will allow
you, at any time, to clearly hear acoustical signals
from emergency service vehicles!
Bass/Treble/Balance/Fader
• Press the multi controller to display the current
settings for the Bass (BASS), Treble (TREBLE),
Balance (BALANCE) and Fader (FADER).
• Turn the multi controller to change the settings.
POWER/DIM button to dim the dis-
POWER/DIM button longer.
Loudness
• Hold down the MD/LD button to switch the loudness
function on or off.
Display
• By pressing the DISP button you can switch the notices
in the display around in the following manner:
With radio reception:
Programme name, time of day (will automatically
be set with RDS reception), PTY settings (these RDS
functions are transmitted by the broardcast institutions in various extents; see also the chapter "Radio
functions") and frequencies.
In CD mode:
Time of day, PTY settings and frequencies.
Note
If you do not receive any RDS or PTY information
"NO CLOCK" or "NO PTY" appears in the display. Each notice only appears for a few seconds.
Setting the operating mode
• Press the MD/LD button to switch between radio re-
ception (frequency indicator), CD/MP3 operation
(CD), card slot (SD/MMC), USB port (USB) and
audio input (AUX).
Note
The operating modes CD, SD/MMC and USB
can only be accessed when the corresponding
medium is inserted.
RESET - Reset the radio
• To reset the car radio to its factory default settings
press the
example a ball point pen.
• Reset the car radio:
- at initial operation,
- after the cable connection,
- if not all function buttons are working
- when an error message appears in the display.
RESET button with a pointed object, for
- 10 -
Page 13

Settings for the multi controller
Via the multi controller you can, in addition, administer settings for the switch on volume, time of day
settings, traffic radio volume, EON function, recording format and the equalizer.
• Hold down the multi controller for approx. 2 seconds and then press it several times to access
the following settings:
INVOL - switch on volume
• Turn the multi controller in order to set a volume
level, which will apply when the car radio is
switched on.
ADJ - Time of day
Your car radio is equipped with an RDS controlled
clock. The clock sets itself automatically when the
EON function is switched on and also continues to
run when the radio is switched off. If you do not
receive any RDS signal you can also set the time of
day manually.
• Turn the multi controller to the right to set the
hours and to the left to set the minutes.
TAVOL - Volume for traffic radio
• Turn the multi controller in order to set a volume
level, which will apply when the traffic report is
switched on.
EON - Function
Turn the multi controller in order to switch the EON
function on (EON ON) or off (EON OFF). When
the EON function is switched on the radio switches
to traffic radio or PTY types if the TA or PTY function
has been switched on.
DSP - Equalizer
• Turn the multi controller to select one of the set-
tings DSP CLASSIC, DSP ROCK, DSP POP, DSP
FLAT or DSP NONE. In the setting DSP NONE
no Digital Sound Processing (DSP) is switched on.
You can also set the equalizer by pressing the
button on the remote control. With this setting DSP is
switched off when the radio frequency is shown
again.
The DSP equalizer setting is shown at the bottom of
the display.
DSP
Radio functions
Selecting the band range
• Press the BND/ENT button to switch between USW
(FM1, FM2, FM3) and medium wave (MW1,
MW2).
Automatic station search
• Press briefly the search buttons or to start
a search forwards/backwards. The search stops
at the next station found.
Manual station selection
• When you hold down one of the buttons or
for two seconds you switch to manual station
search. MANUAL appears in the display.
• Now press the search buttons or several
times to set the frequency in steps of 0.05 MHz
(MW: 9 kHz) up/down.
If no button is pressed for approx. two seconds the
automatic station search is set again. AUTO appears
in the display..
REC - Recording format
• Turn the multi controller to set the record format
for recording on SD/MMC and/or USB data
carriers, MP3 (MP3 data) or WMA (Windows
Media Audio).
- 11 -
Page 14

Programming stations
• Press the BND/ENT button to set a band range.
In each range you can save six stations.
• Search for the station that you want to save.
• After the search has found a station press one of
the station buttons 1-6 for approx. three seconds.
The brief switching off of the sound indicates that
the station is saved.
The device switches back to radio playback after a
few seconds.
Accessing the station
• Select with BND/ENT the band range.
• By pressing one of the station buttons 1-6 you
access the saved station again.
Automatic saving
• Hold down the A/PS button. A search immediately
starts whereby each found station remains for
approx. five seconds. The blinking number in the
display shows the number of the station button,
on which will be saved the respective station.
With weak stations the search will automatically
continue.
• Whilst the search is stopped press a station button
to save the station on another memory position.
Running through saved stations
• You can access the saved stations of the current
station range.
• Select with
• Press briefly the
briefly selected.
• When you hear the desired station press briefly
the
BND/ENT the band range.
A/PS button. All stations will be
A/PS button.
Alternative Frequency (AF)
You can search for alternative frequencies of a station
so that it will always have optimal reception.
• Press the
display. Now the radio will always search for
the optimal radio frequency of the currently set
station.
AF button. The notice AF appears in the
Regional programmes
A few stations broadcast regional programmes.
• In order to playback only the station's regional
programme hold down the
notice REG ON appears in the display.
• To again playback the national programme hold
down the
pears in the display.
AF button until the notice REG OFF ap-
AF button until the
PTY (Programme Type Code Program-
me type/kind identification)
For this function the EON function must be switched
on.
• To activate the PTY search press the
In the display the notice PTY appears.
With the station search only stations of the currently
selected PTY identification (see the PTY identification
table) will be considered.
• To deactivate the PTY search press the
again.
Setting the PTY identification
• Hold down the PTY button and then turn the multi
controller to set the individual PTY identifications.
Station search by PTY identification
• During the display of a PTY identification if you press
briefly the
immediately starts for stations, which correspond to
this PTY identification.
If no station is found that corresponds to this PTY
identification the notice NOT FND appears briefly
and then the search ends with the last set station.
PTY button or the buttons / a search
PTY button.
PTY button
- 12 -
Page 15
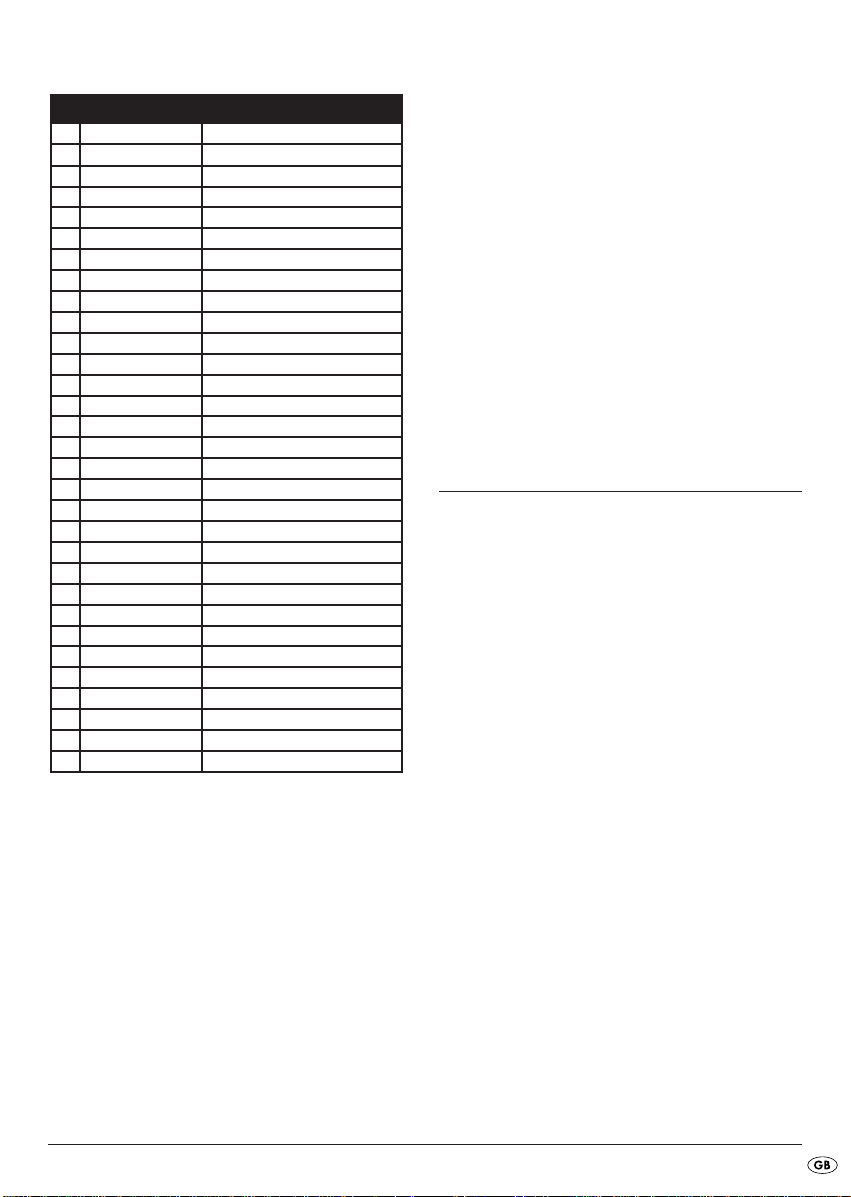
PTY identification
PTY indicator Contents
1 NEWS News
2 AFFAIRS Politics & current events
3 INFO Special word programmes
4 SPORT Sport
5 EDUCATE Study & further education
6 DRAMA Radio play & literature
7 CULTURE Culture, church, social
8 SCIENCE Science
9 VARIED Conversational
10 POP M Pop music
11 ROCK M Rock music
12 EASY M Easy listening music
13 LIGHT M Light classical music
14 CLASSICS Serious classical music
15 OTHER M Special music programmes
16 WEATHER Weather
17 FINANCE Finance
18 CHILDREN Childrens programme
19 SOCIAL Social
20 RELIGION Religion
21 PHONE IN Caller broadcasts
22 TRAVEL Travel
23 LEISURE Leisure
24 JAZZ Jazz music
25 COUNTRY Country music
26 NATION M National music
27 OLDIES Oldies music
28 FOLK M Folk music
29 DOCUMENT Documentaries
30 TEST Display indicator "Alarm Test"
31 ALARM Alarm reports
Please note that this information is dependent on the
region, the broadcasting corporation and the station.
TA ("Traffic Announcement")
- TRAFFIC RADIO
For this function the EON function must be switched
on.
• Press the
TA button briefly to switch this mode on
or off.
In the TA mode the device will immediately switch
from other stations or operation types to the radio
station, which is currently broadcasting traffic information. With this the volume level entered under
TAVOL will be set.
The TA function can be stopped during the playback of traffic information, without switching off the
TA mode, by pressing the
TA button again.
Playing audio CDs
ASP "Anti shock protection"
The device is equipped with an anti shock function.
This function serves to compensate for vibrations,
for example on uneven streets, and to provide
an uninterupted playback even with device
movement. When the device is switched on
the memory automatically fills with data:
– with audio CDs for 10 seconds;
– with MP3-CDs for 120 seconds.
Further information for CD operation
Dampness and high humidity can cause the
CD player to malfunction. In this case switch on
the vehicle heating to dissipate the dampness
before using the device. Do not subject the CD
player to any extreemly high or low temperatures.
- 13 -
Page 16

Inserting and removing CDs
• Fold the face plate downward by pressing the
face plate's unlocking device.
• Push the CD into the CD slot with the inscribed
side facing up.
• Lock the face plate back into place by folding it
upwards. Playback of the CD begins. TOC READ
appears in the display (Read directory contents).
• To remove the CD open the face plate again. Press
the
OPEN button.
The CD will be ejected. The car radio switches to
radio mode.
Attention!
Do not drive with an ejected CD. Immediately
remove the CD from the CD slot.
If an ejected CD is not removed within approx.
5 seconds the device will draw it back in, however
playback of the CD will not start.
Title skip
• By means of the button or you can select
the next and/or the previous title. The title number
will be shown in the display.
Fast forward/backward
• Hold down the buttons or longer to start
fast forward or backward.
Stopping a CD
• You can stop the playback with the PAU/1 button.
To continue playback press the
more.
PAU/1 button once
Repeat function with MP3-CDs:
• Press the RPT/2 button. In the display RPT ONE is
shown and then RPT. The current title is repeated.
• Press the
appear in the display followed by RPT ALL. All
titles in the current directory will be repeated.
A repeat pressing launches the normal playback
(the entire disc is repeated). RPT ALL appears briefly in
the display.
RPT/2 button once more. RPT DIR will
Title sampling
• Press the INT/3 button. In the display INT will be
shown. Appox. 10 seconds from all titles will
playback one after the other. A repeat pressing
launches the normal playback.
Random playback of all titles
• Press the RDM/4 button. In the display RDM is
shown. A random controlled playback is started.
A repeat pressing launches the normal playback.
Playing MP3-CDs
The basic functions correspond to those of the audio
CDs (see previous chapter). However with MP3-CDs
you can select the titles and the interpreters directly.
These functions and the other MP3 specific functions
are definitivly dependent on the MP3-CD. Please
bear this in mind when creating these CDs (see the
next section).
All conventional codings can be played back.
TITLE > INTERPRET > ALBUM NAME >
RELEASE YEAR > COMMENTARY.
Repeating a title
• Press the RPT/2 button. In the display RPT ONE is
shown and then
A repeat pressing launches the normal playback
(the entire disc is repeated). RPT ALL appears briefly
in the display.
RPT. The current title is repeated.
Note:
Creation of MP3-CDs; ID3TAGs
MP3-CDs like data CDs can contain individual
titles or directories. Please bear in mind with
the creation of an MP3-CD that you do not
save titles on the same level as directories but
rather only in the directory.
- 14 -
Page 17

A mixture of titles and directories on the same
level can result in problems when playing
back.
With the creation of the MP3 file you can also
save the so called "ID3 tag" (for input we recommend an ID3 tag editor). This is a block of information that is contained in the MP3 file. This can
be, for example, information about the interpreters, titles, album name, release year and a
short commentary. The car radio can read this
block of information and show it in the display.
Title search (by numbers)
Title numbers search
• Press the A/PS button. The notice 001 appears in
the display.
The last digit of the three digit title input blinks.
• Turn the multi controller to enter the last digit of
the title number.
• Press the multi controller.
The second digit of the three digit title input blinks.
• Turn the multi controller to enter the ten's digit of
the title number.
• Press the multi controller.
The first digit of the three digit title input blinks.
• Turn the multi controller to enter the hundreds
digit of the title number.
• When you have entered the desired title number
confirm the entry with
mediately playback.
BND/ENT. The title will im-
• Turn the multi controller to enter the second letter
or a number.
• Press the
begin with the sought after symbol.
• Turn the multi controller to select a title and start
playback with
BND/ENT button to show all titles that
BND/ENT.
Search for directories
Search from the current directory
• Press A/PS three times. The directory that is currently playing back appears.
• Turn the multi controller to show the available
MP3 directory and select a directory with the
BND/ENT button.
Playback of the first title from the selected directory
starts immediately.
Playback of the previous/next directory
• Press the station button 6 to playback the next
directory and/or the station button
the previous directory.
5 to playback
WMA files
The device can also play WMA files. The operation functions exactly the same as for MP3 files.
Title name search (Letters)
• Press A/PS twice.
The notice A** blinks in the display. The first symbol
blinks.
• Turn the multi controller to enter a letter or number,
with which the title name begins. Press the multi
controller.
The next symbol blinks in the display.
• Turn the multi controller to enter the second letter
or a number. Press the multi controller.
The next symbol blinks in the display.
- 15 -
Page 18

USB port
Record function
playback
You can connect an MP3 player or another USB
data carrier to the USB port on the front panel of
the device. Your car radio can handle USB data
carriers up to 1 GB. With this the directory structure
may contain a maximum of 1024 folders, 4096 files
and a directory depth of 8 levels.
• Remove the protective cap from the USB port.
• Connect your USB device to the port. The car
radio searches for MP3 or WMA files on the
data carrier and the notice USB appears in the
display.
• The operations for playing files on the external
data carrier as well as the search function are
exactly the same as with MP3-CDs.
• If the device is in another mode (CD or card
reader) you can select the USB port with the
MD/LD button.
• Place the protective cap back on the USB port
when no USB device is connected to avoid contamination.
Card reader
Your car radio is equipped with a memory card slot
for SD and Multimedia cards.
playback
• Slide a memory card into the memory card slot
with the marking pointing to the right. Playback
of the MP3 or WMA title on the memory card
begins automatically.
• The operations for playing files, function exactly
the same as for MP3-CDs.
• If the device is in another mode (CD, Radio,
AUX or USB) you can select the card reader
with the
MD/LD button.
Note:
Please observe the legal regulations valid in
your place of residence regarding the duplication of copyrighted works. In case of doubt
please consult a specialist in your area.
Recording from audio CDs
With your car radio you can record files from the
CD player to an external USB data carrier or an
SD/MMC card.
• In audio CD mode hold down the
button.
The notice USB ALL appears (When the recording
target is MMC MMC ALL appears).
• Press the
• Start recording by pressing the
The audio file is now saved in the format set beforehand (MP3 or WMA, see page 11 "REC settings recording format") on the data carrier. At the beginning of the recording the notice RECORD appears
in the display.
After that the recording is characterized by a prefixed
"R".
SCN/REC button to select either the recording
option USB/MMC-ALL (Record all titles) or
USB/MMC -ONE (Record one title).
SCN/REC
BND/ENT button.
Note
When the USB data carrier is full the recording
automatically switches to the card reader, so
long as a memory card is inserted (see the following chapter).
• To stop the recording press briefly the
button once more. After WAIT is shown briefly in
the display, the recording is saved.
BND/ENT
- 16 -
Page 19

You can play the data again by switching to the
USB or SD/MMC mode with the
then accessing the corresponding title from the data
carrier.
MD/LD button and
Copying MP3 files
You can copy individual titles from an MP3-CD to
the external USB data carrier or an SD/MMC memory card.
• During playback of a title from an MP3-CD hold
down the
The notice COPY MMC appears.
• Press the
either the copy option COPY USB (copy to a
USB data carrier) or COPY MMC (copy to an
SD/MMC memory card).
• Start the copy process by pressing the
button.
During the copy process COPY appears in the display
and a procentage indicator from 01 - 99 shows the
copying progress. After the notice COPY 99 the
copying process is ended and playback of the MP3
title continues.
SCN/REC button.
SCN/REC button several times to select
BND/ENT
Recording from the radio or audio input
With your radio you can also record data from the
radio and/or the audio input to a USB memory
stick or a memory card.
• Place a memory medium into the card slot or
USB port and with the
radio mode or operation type AUX.
• If necessary start playback of the external audio
device.
• Hold down the
The notice REC MMC appears.
• Press the
her the recording option USB (Recording to a USB
memory medium) or MMC (Recording to an
SD/MMC memory card).
• Start the copy process by pressing the
button.
SCN/REC button several times to select eit-
MD/LD button select the
SCN/REC button.
BND/ENT
Information regarding the recorded
data
The recording will be saved to the data carrier
with the following notations:
Audio CD recordings: Track01, Track02 ...
MP3-CD recordings: Music01, Music02 ...
Radio recordings: Tuner01, Tuner02 ...
Audio CD and radio recordings are recorded
in stereo and with a bitrate of 128 kbps
and/or a sampling frequency of 44 kHz.
When copying MP3 files the recording format
of the copy source will be adopted.
Bluetooth operation
Connection
• Connect the microphone unit to the car radio as
described under "Connection/Connection schematics".
To use the microphone unit you need a mobile telephone, which supports Bluetooth data transmissions.
Coupling a telephone with the car radio
• Carry out a search for Bluetooth devices on your
mobile telephone.
• After a successful search the entry CAR--BT appears
for the car radio in the display of the mobile telephone.
• Select this entry for the connection and for the
subsequent password request enter the password 0000 for the car radio. You may possibly
have to confirm the connection structure once
more.
After a successful coupling CONNECT briefly appears
in the car radio's display and the green LED on the
microphone unit lights up.
- 17 -
Page 20

Using the microphone
During the telephone call you will hear the caller
via the speaker connected to the car radio.
• For optimal transmitting of your voice place the
microphone unit close to you.
• Attach the microphone unit, for example, to the
dashboard. For this purpose you can use the
supplied sticky tape. In this case clean beforehand dust and grease from the surface. The sticky
tape can be used for securing on almost all
smooth surfaces.
Operation
Call accept/end
With an incoming call you hear the call signal via
your mobile telephone, whilst in the car radio's display is shown the call number.
• You accept an incoming call by pressing the
button on the microphone unit or the ACCEPT
button on the remote control and/or on the front
panel.
• You end the telephone call by pressing the
button on the microphone unit again or by pressing the
END button.
Rejecting a call
• With an incoming call press, for longer than
2 seconds, the
unit or press the
call.
TALK button on the microphone
END button to reject the
To call
• Press the ACCEPT button on the remote control.
A blinking cursor appears in the car radio's display.
• With the number buttons enter the telephone
number that you want to call.
• Press the
The number will be dialed.
ACCEPT button again.
TALK
TALK
Redial
• Hold down the TALK button on the microphone
unit or the
trol and/or on the front panel for approx. 2 seconds.
- If no call number was previously selected via the
remote control's number buttons REDIAL appears
briefly in the display and then the last number
dialed from the mobile telephone will be dialed.
- If one or more call numbers were already dialed
via the remote control's number buttons REDIAL
appears in the display.
Turn the multi controller or press the
on the remote control to show the last 10 dialed
numbers one after the other.
Press the
phone number.
Select the entry REDIAL and then press the
ACCEPT button on the remote con-
VOL-/+ buttons
ACCEPT button to dial the selected tele-
END
button to end redial.
Audio streaming (A2DP)
Your car radio uses the A2DP profile (Advanced
Audio Distribution Profile) and therefore can playback your mobile telephone's audio data.
• Select an audio file from your mobile telephone
and start the playback.
The entry A2DP appears in the car radio's display
and the audio file will playback via the car radio's
speaker.
Note
On the mobile telephone it may possibly be
necessary to switch playback via the Bluetooth
stereo headset.
For this read also, without fail, the operating instructions for your mobile telephone.
With a few mobile telephones the car radio
does not automatically switch to the A2DP
mode. In this case you switch to the A2DP
mode by pressing the MD/LD button several
times until the notice A2DP appears in the display.
- 18 -
Page 21

Replacing the fuse
The car radio is equipped with a 10 A fuse on the
rear panel, which blows if a voltage peak or a short
circuit should occur.
• In this case replace the fuse with one of equal
value and of the same type as listed in the technical data with the same trip characteristics.
• Before switching the car radio on again remedy
the cause of the fuse burnout.
No sound
The volume is set to minimum.
• Increase the volume.
The cables are not connected correctly.
• Check the cable connections.
Function buttons are not functioning
There is a malfunction with the device.
• Press the RESET button.
The face plate is not correctly installed.
• Check to see that the face plate is installed
correctly.
Troubleshooting
The device will not switch on
The ignition is not switched on
• Switch the ignition on by turning the key.
One of the fuses is defective.
• Replace the fuse.
The CD will not load or eject
A CD is already inserted into the car radio.
• Remove the CD.
The CD has been inserted the wrong way up.
• Insert the CD with the inscripted side up.
The CD is dirty or defective.
• Clean the CD or insert a different CD.
The temperature in the vehicle is too high.
• Wait until the surrounding temperature has
normalized.
Condensation on the laser lens
• Switch the car radio off for a few hours and then
try it again.
The CD jumps
The mounting angle exceeds 30°.
• Correct the mounting angle.
The CD is very dirty or defective.
• Clean the CD or insert a different CD.
Failure with burnt CDs
Check the burnt CD in another playback device.
The radio and/or the automatic station
memory is not functioning
The antenna cable is not connected correctly.
• Check the antenna cable for correct connection.
The station signals are too weak.
• Set the station manually.
Station memory is not functioning
The connection 6 in the ISO block A (Permanent
positive) is not connected correctly.
• Check the cable connections.
For this consult the chapter "Connections".
The device's USB port does not function
The USB port is intended for devices that function
according to the USB standard. Not all market available devices conform to this standard. It is possible
that a device is connected that does not function
according to the USB standard.
• Connect a device that functions according to
the USB standard.
- 19 -
Page 22

The card reading device does not read the
cards
The card is possibly defective, dirty and not properly
inserted.
• Check the card. Slide it in with the inscribed side
facing to the right.
The Bluetooth connection does not function
The mobile telephone does not support Bluetooth
transmissions.
The mobile telephone is not coupled with the car
radio.
• Reconnect the mobile telephone and the car radio.
For this also read, without fail, your mobile telephone's instructions.
Cleaning
• Clean the housing exclusively with a soft damp
cloth and a mild detergent. Ensure that moisture
cannot permeate into the device during cleaning!
Warning!
Moisture penetrating into the device creates
the risk of electric shock! Besides which, the
device could become irreparably damaged!
Disposal
Do not dispose of the device in your
normal domestic waste. This product
is subject to the European directive
2002/96/EG.
Dispose of the device through an approved disposal
centre or at your community waste facility.
Observe the currently applicable regulations. In
case of doubt, please contact your waste disposal
centre.
Disposal of batteries/rechargeable batteries
Used batteries/rechargeable batteries may not be disposed of in household waste. Every consumer is legally obligated to dispose of batteries at a collection
site in his community / city district or at a retail store.
The purpose of this obligation is to ensure that batteries are disposed of in a non-polluting manner. Only
dispose of batteries when they are fully discharged.
Dispose of all packaging materials in an
environmentally friendly manner.
- 20 -
Page 23

Warranty and Service
Importer
You receive a 3-year warranty for this device as of
the purchase date. Should you, in spite of our high
quality standards, have grounds for complaint please
contact our Service Hotline.
In the event that processing of your complaint is not
possible by telephone here you will receive
• a processing number (RMA number) as well as
• an address, to which you can send your product
for warranty processing.
In the case of a mail-in shipment please enclose a
copy of the purchase receipt (sales slip). The device
must be securely packed and rhe RMA number clearly
visible. Products sent in without the RMA number
cannot be processed.
Note:
The warranty provisions cover only material
or factory defects.
The warranty is not valid;
• for worn out parts
• for damages to breakable parts such as switches and batteries.
This product is for private use only and is not intended
for commercial use. In the event of misuse and improper handling, use of force and interference not
carried out by our authorized service branch, the
warranty will become void.
Your statutory warranty claims are not restricted by
this warranty.
KOMPERNASS GMBH
BURGSTRASSE 21
44867 BOCHUM, GERMANY
www.kompernass.com
- 21 -
Page 24

Page 25

Bluetooth car radio
KH 2375
In order to guarantee a cost free repair procedure please get in touch
with the service hotline. Make sure
you have your sales slip handy.
Sender, please write clearly:
Last name
First name
Street
Postcode/Place
Country
Fill in this section and submit it with the device!
Telephone
Warranty
DES Ltd
Tel.: 0870/787-6177
Fax:0870/787-6168
e-mail: support.uk@kompernass.com
Irish Connection
Tel: 00353 (0) 87 99 62 077
Fax:00353 18398056
e-mail: support.ie@kompernass.com
www.mysilvercrest.de
Date/Signature
Description of fault:
Page 26

Page 27

INDHOLDSFORTEGNELSE SIDE
Bestemmelsesmæssig anvendelse 27
Tekniske data 27
Medfølger ved køb 27
Sikkerhedsanvisninger 28
Betjeningselementer 29
Montering 30
Tilslutning 30
Reservering af ISO-tilslutninger.....................................................................................................31
Montering af radio i ISO-skakten ................................................................................................31
Tilslutningsskema ............................................................................................................................32
Tilslutning af en ekstern audioenhed til bilradioen 32
Afmontering af enheden 32
Betjeningsdel 33
Fjernbetjening 33
Sådan sættes batterierne i ............................................................................................................33
Betjening 34
Grundlæggende betjening ...........................................................................................................34
Lydstyrke..........................................................................................................................................34
Bas/diskant/balance/fader..........................................................................................................34
Loudness..........................................................................................................................................34
Display ............................................................................................................................................34
Indstilling af driftstype....................................................................................................................34
RESET - Tilbagestilling af Radio....................................................................................................34
Multiknappens indstillinger ...........................................................................................................35
Radiofunktioner 35
Valg af båndområde.....................................................................................................................35
Automatisk søgning af stationer....................................................................................................35
Lagring af stationer........................................................................................................................36
Aktivering af station .......................................................................................................................36
Automatisk lagring ........................................................................................................................36
- 25 -
Page 28

Gennemgang af gemte stationer .................................................................................................36
Alternative frekvenser (AF)............................................................................................................36
PTY ( Program Type Code=Program-typekode)..........................................................................36
TA („Traffic Announcement“) - TRAFIKRADIO.............................................................................37
Afspilning af audio-cd'er 37
Isætning og udtagning af cd'er ....................................................................................................38
Overspringelse af nummer............................................................................................................38
Hurtigt frem/tilbage.......................................................................................................................38
Afbrydelse af cd ............................................................................................................................38
Gentagelse af et nummer..............................................................................................................38
Kort afspilning af nummer.............................................................................................................38
Tilfældig afspilning af alle numre.................................................................................................38
Afspilning af MP3-cd'er 38
Søgning efter titler (numre) ...........................................................................................................39
Søgning efter biblioteker...............................................................................................................39
USB-tilslutning 40
Kortlæser 40
Optagefunktion 40
Bluetooth-drift 41
Tilslutning.........................................................................................................................................41
Tilslutning af telefon til bilradio.....................................................................................................41
Anvendelse af mikrofon.................................................................................................................42
Betjening .........................................................................................................................................42
Audio-streaming (A2DP)................................................................................................................42
Udskiftning af sikring 43
Afhjælpning af fejl 43
Rengøring 44
Bortskaffelse 44
Garanti og service 45
Importør 45
Læs betjeningsvejledningen igennem før første brug, og opbevar den til senere brug. Lad vejledningen følge
med, hvis apparatet gives videre til andre."
- 26 -
Page 29

BLUETOOTH-BILRADIO
KH2375
Bestemmelsesmæssig anvendelse
Denne enhed er beregnet til at modtage FM/AMradiostationer samt afspilning af audio- og MP3cd'er, MP3-filer fra USB-datamedier og SD/MMChukommelseskort, samt audiosignaler fra eksterne
audioenheder. Endvidere kan du slutte bilradioen til
en Bluetooth-mobiltelefon og bruge bilradioen med
mikrofonenhed som håndfri enhed. Radioen er kun
beregnet til privat brug. Den er ikke egnet til erhvervsmæssigt eller industrielt brug.
Tekniske data
Kortslot
SD/MMC-hukommelseskorttilslutning
Enhedssikring:
10 A fladsikring
Generelt
Funktionstemperaturområde: +5°— +40° C
Fugt:5 — 90% (ingen kondensation)
Mål
(L x B x H): 18,8 x 23 x 6 cm
Vægt : ca. 1530 gr.
CE-konformitet
Denne enhed er i overensstemmelse med de
grundlæggende krav og de andre relevante
forskrifter i motorkøretøjsforsikringsdirektiv
2004/104/EF og direktiv R&TTE 99/5/EF.
Indgangsspænding: 12 V
Indgangsstrøm: maks. 10 A
Impulseffekt: 4 x 40 W
Frekvensområder radio:
Radio: FM : 87,5 - 108 MHz
AM (MB) : 522 - 1620 kHz
Hukommelsespladser
til sendere: 18 FM (UKW)
12 AM (MW)
Fjernbetjening:
Batteri: 3 V knapbatteri (CR2025)
Audioindgang (AUX IN):
3,5 mm stereo-jackstik
USB-tilslutning
USB 1.1 og 2.0 kompatible datamedier
Medfølger ved køb
- Bilradio (inklusiv betjeningsdel)
- Monteringsramme (er sat på)
- Pynteramme (er sat på)
- Forankringsplade (inkl. fastgørelsesmateriale)
- Fjernbetjening
- 1 batteri CR2025, 3 V DC
- Nøgle til monteringsramme
- Etui til betjeningsdel
- Mikrofonenhed med klæbestrimmel
- Betjeningsvejledning
- 27 -
Page 30

Sikkerhedsanvisninger
• Denne enhed må ikke benyttes af personer (in-
klusive børn) med begrænsede fysiske, sensoriske
eller psykiske evner eller med manglende erfaringer og/eller manglende viden, medmindre en
ansvarlig person holder opsyn med dem og giver
dem anvisninger til, hvordan enheden anvendes.
• Børn skal være under opsyn, så det sikres, at de
ikke leger med maskinen.
• Lad ikke børn få fat i batterierne. Børn kan putte
batterierne i munden og sluge dem. Hvis et batteri
sluges, skal der omgående søges lægehjælp.
Undgå skader som følge af kortslutning
ved at følge nedenstående punkter:
• Lad så vidt muligt en fagmand montere bilradioen.
• Tilslut kun enheden til et forskriftsmæssigt installeret
12 V bilbatteri. Tilslut kun bilradioen via ISO-stikket i
bilen.
• Sørg for, at tilslutningskablet aldrig bliver vådt eller
fugtigt, når du bruger enheden. Læg kablerne
således, at de ikke bliver klemt eller på anden
måde kan blive beskadiget.
• Få straks en autoriseret fagmand eller kundeservice
til at udskifte beskadigede kabler eller stik, så
farlige situationer undgåes.
• Anvend kun enheden i bilens kabine.
• Sørg for, at der aldrig kan komme væsker eller
genstande ind i apparatet.
• Du må ikke åbne eller reparere radioens kabinet.
Gør du det, er enheden ikke sikker, og garantien
bortfalder.
Reparationer må KUN udføres af en fagmand
eller et servicecenter.
Informationer vedrørende omgang
med batterier
Fjernbetjeningen til denne enhed anvender et batteri.
Overhold følgende ved omgang med batterier:
Eksplosionsfare!
Kast ikke batterierne ind i ild. Batterierne må
ikke genoplades.
• Batterierne må aldrig åbnes, loddes eller svejses.
Der er fare for eksplosioner og personskader!
• Kontrollér regelmæssigt batterierne. Batterier,
som løber ud, kan beskadige radioen.
• Tag batterierne ud, hvis du ikke skal bruge enheden i længere tid.
• Tag beskyttelseshandsker på, hvis batteriet er
løbet ud.
• Lad ikke børn få fat i batterierne. Børn kan putte
batterierne i munden og sluge dem.
Hvis et batteri sluges, skal du straks søge læge.
• Rengør batterirummet og batterikontakten med
en tør klud.
Undgå fare for brand og personskader
på følgende måde:
• Montér enheden således, at der ikke kan opstå
varmeophobning, og enheden kan blive ventileret
bagest.
• Dæk aldrig ventilationsåbningerne til!
• Undgå ekstra varmetilførsel, f.eks. i form af direkte
sollys, varmeapparater, andre apparater osv.!
• Hvis radioen har været faldet ned eller er beskadiget, må den ikke længere tages i brug. Lad
kvalificeret fagpersonale kontrollere og reparere
apparatet ved behov.
- 28 -
Page 31

Fare laserstråling!
Enheden har en laser af "klasse 1".
• Åbn aldrig apparatet.
• Prøv aldrig at reparere apparatet. I det
indvendige af afspilleren er der usynlig
laserstråling.
• Udsæt dig aldrig for laserstrålen, da det
kan føre til øjenlæsioner.
Trafiksikkerhed
Trafiksikkerheden har højeste prioritet. Betjen
kun bilradioen, når trafikforholdene tillader
det. Sørg for at være fortrolig med enhedens
funktioner, før du kører af sted. Akustiske
signaler fra politi, brandvæsen og andre redningstjenester skal kunne høres rettidigt i bilen.
Lyt derfor til dit program med en passende
lydstyrke under turen.
Betjeningselementer
A
Forside (betjeningsdel)
BND/ENT: Vælg båndområde/bekræft valg
q
POWER/DIM: Tænd og sluk enhed/dæmp
w
displaybelysning
MD/LD: Indstil driftstilstand/slå loudness til
e
Multiknap: Tryk for at aktivere indstilling af lyd-
r
styrke, bas, diskant, balance og fader /
Drej for at indstille værdier/lydstyrke
Display
t
Frigivelse betjeningsdel
y
DISP: Visning af displayinformationer
u
Kortslot til SD/MMC-kort
i
USB-tilslutning
o
AUX IN: 3,5 mm stereo-indgangsstik til tilslutning
a
af ekstern audioenhed
A/PS: Automatisk lagring af stationer
s
PTY („Program Type“): Søg station efter
d
PTY-gruppe
TA („Traffic Announcement“):
f
Aktivér trafikradiostation
AF („Alternative Frequency“): Søg efter alternativ
g
Stationsknap 6/næste bibliotek
1%
Stationsknap 5/foregående bibliotek
j
RDM/4: Tilfældig afspilning i CD/MP3-drift,
1&
stationsknap 4
INT/3: Introfunktion i CD/MP3-drift,
l
stationsknap 3
RPT/2: Gentagefunktion i CD/MP3-drift,
1(
stationsknap 2
Sensor til fjernbetjening
2)
PAU/1: Stop afspilning i CD/MP3-drift,
2!
stationsknap 1
/: Nummer-/stationssøgning tilbage/
2@
fremad
MU: Slå tone fra /MODTAG-knap
2#
SCN/REC: automatisk stationssøgning/ Optag
2$
på datamedie på USB-tilslutning eller
SD/MMC-kortslot
B
Bag betjeningsdel
OPEN : Skub disk ud
2%
Holder til betjeningsdel
2^
RESET: Tilbagestil bilradio
2&
Tyverisikrings-LED
2*
Positions-LED til cd-slot
2(
Cd-slot
3)
C
Tilslutningerne bagside
ISO-blok tilslutning B
3!
10 A fladsikring
3@
ISO-blok tilslutning A
3#
Bøsning til mikrofonenhed
3$
Bluetooth-antenne
3%
Fastgørelsesskrue
3^
(inklusiv M5-møtrik og spændeskive)
LINE OUT: Audio-cinch-udgang L/R til forstærker
3&
Antennetilslutning til DIN-antennestik
3*
/ AFSLUT-knap
frekvens
- 29 -
Page 32

D
Fjernbetjening
POWER/DIM: Tænd og sluk enhed/Dæmp display-
3(
belysning
AFSLUT-knap
4)
/: Nummer-/stationssøgning tilbage/fremad
4!
MODTAG-knap
4@
VOL+/-: Skru op/ned for lydstyrke
4#
INT/3: Introfunktion i CD/MP3-drift, cifferknap 3
4$
PTY/7: („Program Type“) Søg efter station efter
4%
PTY-Gruppe / cifferknap 7
Cifferknap 6
4^
DSP/
4&
4*
4(
5)
5!
5@
5#
5$
5%
5^
5&
5*
5(
6)
6!
: („Digital Sound Processing“)
*
Klangindstilling/ knap
*
BÅND/0: Vælg båndområde/Ciffertaste 0
Batterirum
SEL/#: Aktivering af indstilling af lydstyrke, bas,
diskant, balance og fader / knap #
TA/9: („Traffic Announcement“): Aktivér trafik-
radiostation / cifferknap 9
AF/8: („Alternative Frequency“): Søg efter
alternativ frekvens /cifferknap 8
Cifferknap 5
RDM/4: Tilfældig afspilning i CD/MP3-drift/
Cifferknap 4
RPT/2: Gentagefunktion i CD/MP3-drift/
Cifferknap 2
/1: Start eller stop afspilning / cifferknap 1
MODE: Indstil driftstilstand / loudnessfunktion
E
Mikrofonenhed
grøn LED til forbindelsesstatus
TALK-knap
Mikrofon
Stik til mikrofonenhed
F
Etui til betjeningsdel
Montering
Hvis du selv vil montere din bilradio, skal du følge
monterings- og tilslutningsanvisningerne i denne
vejledning.
Monteringsanvisninger
• Indsæt enheden i skakten, der er beregnet hertil,
eller vælg en plads til montering af enheden, hvor
den ikke generer førerens normale køreopgaver.
• Tilslut kablerne, før du endegyldigt monterer enheden. Kontrollér, at disse er korrekt tilsluttet, og
systemet fungerer rigtigt.
• Hvis der skal udføres ændringer på bilen, skal
du kontakte din bilforhandler /et værksted.
• Montér enheden således, at der ikke kan opstå
skader under hårde opbremsninger.
• Hvis enheden monteres med en hældning på mere
end 30°, kan der opstå funktionsfejl.
• Undgå montering af enheden i nærheden af kilder
med høje temperaturer (f.eks. direkte solindstråling
eller opvarmet luft), eller støv og snavs. Udsæt
ikke enheden for kraftige rystelser.
Tilslutning
Bemærk:
Vær opmærksom på, at tilslutning 6 i ISO-blok
A skal være tilsluttet den permanente plusforbindelse, når stationer skal lagres.
Du kan tilslutte en ekstern forstærker til audiocinch-udgangen. Følg i den forbindelse betjeningsvejledningen til den eksterne forstærker.
G
Nøgle til monteringsramme
H
Monteringsramme
I
Pynteramme
- 30 -
Page 33

Reservering af ISO-tilslutninger
Reservering
1 ikke reserveret
2 ikke reserveret
1234
5678
1234
5678
3 Antennespænding
4 12 V (Tændingsplus)
ISO A
5 ikke reserveret
6 Permanent plusforbindelse
7 ikke reserveret
8 Minus (-)
1 Bagest til højre 2 Forrest til højre 3 Forrest til venstre 4 Bagest til venstre -
ISO B
5 Bagest til højre 6 Forrest til højre 7 Forrest til venstre 8 Bagest til venstre -
Reservering
Du kan naturligvis også nøjes med at tilslutte bilradioen
til to højttalere. Anvend i det tilfælde kun kablerne til
de forreste højttalere.
Problemer pga. kabelombytning
På nogle bilmodeller er den standardmæssige
reservering af tilslutningerne [4] og [6] i ISOblok A (se ovenfor, "Reservering af ISO-blokken") byttet om fra fabrikkens side. Hvis dette
er tilfældet, kan lagringen af stationer gå tabt.
For at afhjælpe dette problem, skal tilslutningerne 4
(tændingsplus) og 6 (permanent plus) i ISO-blok A
byttes om.
• Træk monteringsrammen og pynterammen af
bilradiohuset.
• Sæt monteringsrammen ind i ISO-monteringsskakten.
• Buk fligene på monteringsrammen med en
skruetrækker, så at denne sidder fast i
monterings-skakten (se figur).
• Kontrollér, at rammen sidder fast.
• Tilslut bilradioens ISO-bøsnings-blok med din bils
to ISO-stik.
• Tilslut bilantennens antennekabel med bilradioens
antennebøsning.
• Før mikrofonenhedens kabel ind i monteringsskakten og tilslut det til mikrofonenhedens bøsning. Før kablet således, at mikrofonenheden
senere kan fastgøres i bilens kabine.
• Tilslut eventuelt en ekstern forstærkers audiocinchkabel til
LINE OUT-bøsninger i bilradioen.
• Sørg for at sikre din enhed ekstra mod tyveri.
Fastgør fastgørelsesskruen med forankringspladen
og fastgørelsesmaterialet på bilens motor-forpanel.
• Skub bilradioen forsigtigt ind i monteringsrammen,
til den går i indhak. Sæt herefter pynterammen
forsigtigt på.
Montering af radio i ISO-skakten
Bemærk
Fjern begge transportsikringsskruer på det
øverste radiohus (markeret med rød mærkat)
før montering!
Bilradioen kan indsættes i alle standard-ISO-monteringsskakte. Hvis din bil ikke har nogen ISO-monteringsskakt, skal du kontakte dit værksted, din forhandler eller den relevante afdeling i varehuset.
Obs!
Benyt bilradioens ISO-tilslutninger ved monteringen. Den bilspecifikke ISO-adapter, som du
også skal bruge, kan du få på værksteder, i
faghandelen eller i de relevante afdelinger i
varehuse. Anvendes andre tilslutningstyper,
bortfalder garantikravet!
Vær opmærksom på kablerne, når du skubber
enheden ind; de kan blive beskadiget.
- 31 -
Page 34

Antennestrøm-tilslutning
1234
5678
1234
5678
ISO A
ISO B
Tilslutningen til antennestrømmen står til rådighed
for en relæstyret antenne. Relæet kører automatisk
antennen ud, når du tænder for radioen. Når
du slukker for radioen igen, trækkes antennen
ind igen.
Denne tilslutning kan også anvendes til styring
af en ekstern forstærker. Følg betjeningsvejledningen til forstærkeren, så tilslutningen bliver
korrekt.
Slut aldrig tilslutningen til antennestrømmen til antennens motorstrømskabel; dette kan beskadige
radioen!
Tilslutning af en ekstern
audioenhed til bilradioen
• Tilslut en ekstern audioenheds audio-udgang
(f.eks. en MP3-afspiller) via et 3,5 mm stereojackstik med bøsningen
AUX IN på forsiden af
enheden.
• Vælg audioindgangens afspilning ved at trykke
flere gange på knappen
MD/LD, indtil AUX vises
i displayet.
Afmontering af enheden
Backup-tilslutning
Sørg for, at tilslutning 6 i ISO-blok A er konstant tilsluttet plus af hensyn til stationshukommelsen. Ellers kan du ikke lagre nogen radiostationer!
• Efter at alle forbindelser er etableret, skal du
aktivere knappen
RESET med en kuglepen eller
en anden spids genstand.
• Indsæt betjeningsdelen som beskrevet nedenfor.
Tilslutningsskema
Antenne
Ekstern forstærker
Mikrofonenhed
• For at afmontere enheden, skal du først afmontere
pynterammen og føre den højre og den venstre
nøgle ind i åbningerne ved siderne af enheden.
Fligene er nu bukket bagud, og du kan nu trække
enheden ud.
- 32 -
Page 35

Betjeningsdel
Fjernbetjening
Montering af betjeningsdel
• Sæt betjeningsdelen først med den venstre side
ind i rammen. Tryk herefter den højre side fast,
indtil den går i indhak.
• Tjek, om betjeningsdelen sidder rigtigt og sidder
fast i rammen. Er betjeningsdelen ikke monteret
korrekt, kan der opstå fejlfunktioner ved betjening af bilradioen.
Afmontering af betjeningsdel
• Tryk på knappen til frigørelse af betjeningsdelen.
• For at tage betjeningsdelen af, skal du først vippe
den let fremad, og dernæst først trække den højre
og så den venstre side af.
Sådan sættes batterierne i
Tag det medfølgende batteri ud af emballagen.
Følg nedenstående punkter, når du skal sætte batteriet
i eller skifte batteriet:
• Træk batterirummet ud af fjernbetjeningen ved at
trykke låsen i siden ind og trække batterirummet
ud.
• Fjern det brugte batteri og læg et nyt batteri af
typen CR2025 (knapbatteri) i batterirummet.
Sørg for, at batteriet vender korrekt med hensyn
til polaritet.
• Skub batterirummet ind i fjernbetjeningen igen.
Anvendelse af fjernbetjeningen
• Ret fjernbetjeningen mod den infrarøde føler på
enhedens forside.
• Du kan bruge fjernbetjeningen fra en afstand på
op til 8 m fra enheden.
Bemærk
Hvis betjeningsdelen ikke er sat ind i rammen,
blinker tyverisikrings-LED'en på enheden.
Opbevar altid betjeningsdelen i etuiet for at
beskytte det.
- 33 -
Page 36

Betjening
Betjening af knapperne på enheden
og på fjernbetjeningen
De fleste funktioner kan betjenes via knapperne
på enheden og via fjernbetjeningen. I denne
vejledning beskrives knapperne på enheden.
Er det fjernbetjeningens knapper, der menes,
nævnes dette udtrykkeligt.
Bemærk
Ca. 5 sekunder efter en indstilling vises
afspilningen igen, og indstillingen er lagret.
Grundlæggende betjening
Loudness
• Hold knappen MD/LD trykket nede for at tænde
og slukke for loudness-funktionen.
Display
• Ved at trykke på knappen DISP kan du skifte
visningen i displayet på følgende måde:
Ved radiomodtagelse:
Programnavn, klokkeslæt (indstilles automatisk ved
RDS-modtagelse), PTY-indstillinger ( stationerne sender
disse RDS-funktioner i forskelligt omfang); se også
kapitlet „Radiofunktioner”) og frekvens.
I cd-drift:
Klokkeslæt, PTY-indstillinger og frekvens.
Sådan tænder/slukker du enheden
Tryk kort på knappen POWER/DIM for at tænde for
radioen. I displayet vises WELCOME.
• Tryk let på knappen
belysningen i displayet.
Når du skal slukke for radioen, skal du holde knappen
POWER/DIM for at dæmpe
POWER/DIM trykket nede i længere tid.
Lydstyrke
• Drej multiknappen for at skrue op eller ned for
lyden.
Obs!
Indstil altid kun lyden på en styrke, så at du til
enhver tid kan høre de akustiske signaler fra
udrykningskøretøjer tydeligt!
Bas/diskant/balance/fader
• Tryk på multiknappen for at vise bassens (BASS),
diskantens (TREBLE), balancens (BALANCE) og
faderens (FADER) aktuelle indstilling.
• Drej multiknappen for at ændre indstillingerne.
Bemærk
Hvis du ikke modtager RDS- eller PTY-informationer, vises „NO CLOCK“ eller „NO PTY“ i
displayet. Informationerne vises kun i et par
sekunder.
Indstilling af driftstype
• Tryk på knappen MD/LD for at skifte mellem radio-
modtagelse (frekvensvisning), CD/MP3-drift (CD),
kortslot (SD/MMC), USB-tilslutning (USB) og audioindgang (AUX).
Bemærk
Driftstyperne CD, SD/MMC og USB kan kun
aktiveres, hvis det pågældende medie er lagt i.
RESET - Tilbagestilling af Radio
• For at tilbagestille bilradioen til udleveringstilstanden, skal du trykke på knappen
en spids genstand, f.eks. en kuglepen.
• Tilbagestil bilradioen:
- ved den første idrifttagning,
- efter tilslutning af kablet,
- hvis ikke alle funktionsknapper fungerer
- når der vises en fejlmeddelelse i displayet.
RESET med
- 34 -
Page 37

Multiknappens indstillinger
Via multiknappen kan du herudover indstille startlydstyrke, klokkeslæt, lydstyrke for trafikradio, EONfunktion, optageformat og equalizer.
• Hold multiknappen trykket nede i ca. 2 sekunder,
og tryk herefter på den flere gange, for at aktivere
følgende indstillinger:
INVOL - Startlydstyrke
• Drej på multiknappen for at indstille den lydstyrke,
som bilradioen skal tænde med.
ADJ - klokkeslæt
Din bilradio er udstyret med et RDS-styret ur. Uret
indstilles automatisk, når EON-funktionen er slået til,
og fortsætter, når radioen er slået fra. Når du ikke
modtager noget RDS-signal, kan du også indstille
klokkeslættet manuelt her.
• Drej multiknappen til højre for at indstille timerne,
og til venstre for at indstille minutterne.
TAVOL - Lydstyrke ved trafikradio
• Drej på multiknappen for at indstille den lydstyrke, som trafikmeddelelser skal tænde med.
EON - funktion
Drej på multiknappen for at slå EON-funktionen til
(EON ON) eller fra (EON OFF). Når EON-funktionen er slået til, skifter radioen til trafikradio eller
PTY-typer, når TA- eller PTY-funktionen er indstillet.
REC - optageformat
• Drej på multiknappen for at indstille optageformatet til optagelse på SD/MMC eller USB-datamedie på MP3 (MP3-filer) eller WMA (Win-
dowsMedia-Audio).
DSP - equalizer
• Drej på multiknappen for at vælge indstillingerne
DSP CLASSIC, DSP ROCK, DSP POP, DSP FLAT
oder DSP NONE. I indstillingen DSP NONE er
Digital Sound Processing (DSP) ikke slået til.
Du kan også indstille equalizer-funktionen ved at
trykke på knappen
indstilling er DSP slået fra, når radiofrekvensen igen
vises.
DSP-equalizer-indstillingen vises nederst i displayet.
DSP på fjernbetjeningen. I denne
Radiofunktioner
Valg af båndområde
• Tryk på knappen BND/ENT for at skifte mellem
ultrakortbølge (FM1, FM2, FM3) og mellembøl-
ge (MW1, MW2).
Automatisk søgning af stationer
• Tryk kort på søgeknapperne eller for at
starte en søgning frem/tilbage. Søgefunktionen
stopper ved den næste station.
Manuel indstilling af stationer
• Når du holder en af knapperne eller tryk-
ket nede i to sekunder, skifter du til den manuelle
stationssøgning. I displayet vises MANUAL.
• Tryk nu på søgeknapperne eller flere gan-
ge for at indstille frekvensen trinvist fra 0,05
MHz (MW: 9 kHz) opad / nedad.
Hvis du ikke trykker på nogen knap i ca. 2 sekunder, er den automatiske stationssøgning indstillet
igen. I displayet vises AUTO.
- 35 -
Page 38

Lagring af stationer
• Tryk på knappen BND/ENT for at indstille båndom-
rådet.
Du kan lagre seks stationer i hvert område.
• Søg den station, som du vil lagre.
• Efter at søgningsfunktionen har fundet en station,
skal du trykke på én at stationstasterne 1-6 i ca.
tre sekunder.
Den korte afbrydelse af tonen signalerer, at den er
lagret.
Enheden skifter efter et par sekunder igen til
radio-afspilning.
Aktivering af station
• Vælg båndområde med BND/ENT .
• Ved at trykke på én af stationsknapperne 1-6
kan du aktivere den lagrede station igen.
Automatisk lagring
• Hold knappen A/PS trykket nede. Der starter
straks en søgning, som stopper i ca. 5 sekunder
ved alle de stationer, systemet finder. Det tal,
som blinker i displayet, viser stationsknappens
nummer, hvor stationen gemmes. Ved svage
stationer, fortsætter søgningen automatisk.
• Tryk, når søgningen er stoppet, på en stationsknap for at gemme stationen på en anden
hukommelsesplads.
Gennemgang af gemte stationer
• Du kan aktivere de lagrede stationer i det aktuelle
sendeområde.
• Vælg båndområde med
• Tryk kort på knappen
kort.
• Når du hører den ønskede station, skal du kort
trykke på knappen
BND/ENT .
A/PS. Alle stationer vælges
A/PS.
• Tryk på knappen
dioen søger nu altid efter den aktuelt indstillede
stations optimale radiofrekvens.
AF. I displayet vises AF. Ra-
Regionale programmer
Nogle stationer sender regionale programmer.
• For at kun stationens regionale programmer
afspilles, skal du holde knappen
indtil der i displayet står REG ON .
• For igen at afspille det landsdækkende program,
skal du holde knappen
i displayet står REG OFF.
AF trykket nede, indtil der
AF trykket nede,
PTY ( Program Type Code=
Program-typekode)
For at denne funktion kan fungere, skal EONfunktionen slås til.
• For at aktivere PTY-søgningen, skal du trykke på
knappen
Under stationssøgningen tages der kun højde for
stationer i den aktuelt valgte PTY-kode (se tabellen
med PTY-koder).
• For at aktivere PTY-søgningen, skal du trykke på
knappen
Indstilling af PTY-kode
• Hold knappen PTY trykket nede, og drej herefter
multiknappen for at indstille de enkelte PTY-koder.
Søgning efter station efter PTY-kode
• Når du under visning af en PTY-kode kort trykker på
knappen
straks en søgning efter stationer, som svarer til denne
PTY-kode.
Hvis der ikke findes nogen station, der svarer til denne
PTY-kode, vises beskeden NOT FND kort, og herefter
slutter søgningen ved den sidst indstillede station.
PTY. I displayet vises PTY.
PTY igen.
PTY eller knapperne / , starter der
Alternative frekvenser (AF)
Du kan søge efter en stations alternative frekvenser,
så at denne altid kan modtage optimalt.
- 36 -
Page 39

PTY-koder
PTY-visning Indhold
1 NEWS Nyheder
2 AFFAIRS Politik & aktuelle temaer
3 INFO Specielle informationsprogrammer
4 SPORT Sport
5 EDUCATE Læring & videruddannelse
6 DRAMA Hørespil & litteratur
7 CULTURE Kultur, kirke, samfund
8 SCIENCE Videnskab
9 VARIED Underholdning
10 POP M Popmusik
11 ROCK M Rockmusik
12 EASY M Underholdningsmusik
13 LIGHT M Let klassisk musik
14 CLASSICS Tung klassisk musik
15 OTHER M Specielle musikprogrammer
16 WEATHER Vejret
17 FINANCE Økonomi
18 CHILDREN Børneprogram
19 SOCIAL Samfund
20 RELIGION Religion
21 PHONE IN Phone-in-programmer
22 TRAVEL Rejser
23 LEISURE Fritid
24 JAZZ Jazzmusik
25 COUNTRY Countrymusik
26 NATION M Nationalt musik
27 OLDIES Oldies
28 FOLK M Folkemusik
29 DOCUMENT Dokumentar
30 TEST Displayvisning „Alarmtest“
31 ALARM Alarmmeddelelser
Vær opmærksom på, at disse informationer er afhængige af regionen, radiostationen og senderen.
TA („Traffic Announcement“) TRAFIKRADIO
For at denne funktion kan fungere, skal EONfunktionen være slået til.
• Tryk kort på knappen
TA for at slå denne tilstand
til eller fra.
I TA-tilstanden skiftes der straks fra en anden station
eller andre driftstyper til radiostationen, som netop
sender trafikradio. I den forbindelse indstilles det
lydstyrkeniveau, der er indstillet under TAVOL.
TA-funktionen kan afbrydes under afspilningen af
trafikradioen ved at trykke på knappen
TA igen,
uden at TA-tilstanden slås fra.
Afspilning af audio-cd'er
ESP „Electric Shock Protection“
Enheden er udstyret med en anti-chok-funktion.
Denne funktions opgave er at udligne rystelser
f.eks. på ujævne veje og sikre, at afspilningen
ikke afbrydes, heller ikke når enheden bevæges.
Når enheden slås til, fyldes hukommelsen
automatisk med data:
– ved audio-cd'er i 10 sekunder;
– ved MP3-cd'er i 120 sekunder.
Yderligere bemærkninger til anvendelse
af cd'er
Fugt og høj luftfugtighed kan forårsage fejlfunktioner i cd-afspilleren. Slå i dette tilfælde
bilens varme til, for at fugten kan fordampe før
brug. Udsæt ikke cd-afspilleren for ekstremt
høje eller lave temperaturer.
- 37 -
Page 40

Isætning og udtagning af cd'er
• Klap betjeningsdelen ned ved at trykke på
betjeningsdelens frigivelsesdel.
• Skub cd'en med den side der har påtrykt skift
opad ind i cd-slotten.
• Luk igen betjeningsdelen ved at klappe den op.
Afspilningen af cd'en starter. I displayet vises
TOC READ (Læser indholdsfortegnelse).
• For at tage cd'en ud skal du igen åbne betjeningsdelen. Tryk på knappen
Cd'en skubbes ud. Bilradioen skifter til radio
-tilstand.
OPEN .
Obs!
Kør ikke med en cd, der er skubbet ud. Tag
straks cd'en ud af cd-slotten.
Hvis en cd, der er skubbet ud, ikke er taget helt
ud efter ca. 5 sekunder, trækker enheden cd'en
tilbage. Afspilningen starter dog ikke.
Overspringelse af nummer
• Vha. knappen eller kan du vælge det næste
eller det forrige nummer. Titelnummeret vises i
displayet.
Hurtigt frem/tilbage
• Hold knapperne eller trykket nede i længere
tid for at køre hurtigt frem eller tilbage.
Afbrydelse af cd
• Du kan afbryde afspilningen med knappen
PAU/1. For at forsætte afspilningen skal du trykke
på knappen
PAU/1 én gang til.
Gentagefunktion ved MP3-cd'er:
Tryk på knappen RPT/2. I displayet vises RPT ONE
og herefter RPT. Det aktuelle nummer gentages.
Tryk på knappen
RPT DIR og herefter RPT ALL. Alle numre i det aktuelle bibliotek gentages.
Hvis du trykker flere gange, igangsættes den normale afspilning (hele disken gentages). I displayet
vises kort RPT ALL.
RPT/2 en gang til. I displayet vises
Kort afspilning af nummer
• Tryk på knappen INT/3. I displayet vises INT. Alle
numre afspilles efter hinanden i ca.10 sekunder.
Trykker du igen, igangsættes den normale afspilning.
Tilfældig afspilning af alle numre
• Tryk på knappen RDM/4. I displayet vises RDM.
Numrene afspilles nu i tilfældig rækkefølge. Trykker
du igen, igangsættes den normale afspilning.
Afspilning af MP3-cd'er
De grundlæggende funktioner svarer til audio-cd'ernes
funktioner (se forrige kapitel). Når der er tale om
MP3-cd'er, kan du dog vælge titel og kunstner direkte.
Denne funktion og de andre MP3-specifikke funktioner
er i afgørende grad afhængig af MP3-cd'en. Vær
opmærksom på dette, allerede når du fremstiller
disse cd'er (se næste afsnit).
Alle gængse formater kan afspilles.
TITEL > KUNSTNER > ALBUMNAVN >
UDGIVELSESÅR> KOMMENTAR.
Gentagelse af et nummer
Tryk på knappen RPT/2. I displayet vises RPT ONE
og herefter
Hvis du trykker endnu en gang, igangsættes den
normale afspilning (hele disken gentages). I displayet
vises kort RPT ALL.
RPT. Det aktuelle nummer gentages.
Bemærk:
Fremstilling af MP3cd'er; ID3TAGs
MP3-cd'er kan som data-cd'er indeholde enkelttitler eller biblioteker. Vær opmærksom på
ved fremstilling af en MP3-cd, at du ikke kan
lagre titler på det samme niveau som bibliotekerne, men derimod kun i bibliotekerne.
- 38 -
Page 41

Hvis titler og biblioteker blandes på det samme
niveau, kan det give problemer ved afspilningen.
Ved fremstilling af MP3-filen kan du endvidere
gemme såkaldte „ID3-Tag“ (til indlæsningen
anbefaler vi en ID3-TagEditor). Dette er en
informationsblok, der er indeholdt i MP3-filen.
Dette kan f.eks. være informationer om kunstnerne, titel, albumnavn, udgivelsesår og en kort
kommentar. Bilradioen kan udlæse denne
informationsblok og vise den i displayet.
Søgning efter titler (numre)
Søgning efter titelnumre
• Tryk på knappen A/PS. I displayet vises 001.
Det sidste ciffer i den trecifrede titeldatapostering
blinker.
• Drej på multiknappen for at indtaste det sidste
ciffer i titelnummeret.
• Tryk på multiknappen.
Det andet ciffer i den trecifrede titeldatapostering
blinker.
• Drej på multiknappen for at indtaste et tal på
tiernes plads for titelnummeret.
• Tryk på multiknappen.
Det første ciffer i den trecifrede titeldatapostering
blinker.
• Drej på multiknappen for at indtaste et tal på
hundredernes plads for titelnummeret.
• Når du har indlæst det ønskede titelnummer, skal
du bekræfte indlæsningen med
afspilles straks.
BND/ENT. Nummeret
bogstav eller et tal.
• Tryk på knappen
som begynder med det søgte tegn.
• Drej på multiknappen for at vælge en titel, og
start afspilningen med
BND/ENT for at vise alle titler,
BND/ENT.
Søgning efter biblioteker
Søgning ud fra det aktuelle bibliotek
• Tryk på A/PS tre gange. Det aktuelt afspillede
bibliotek vises.
• Drej på multiknappen for at vise de eksisterende
MP3-biblioteker, og vælg et bibliotek med
knappen
Afspilningen af det første nummer i det udvalgte
bibliotek starter straks.
BND/ENT.
Afspilning af det forrige/næste bibliotek
• Tryk på stationsknap 6 for at afspille det næste
bibliotek eller stationsknap
forrige bibliotek.
5 for at afspille det
WMA-filer
Enheden kan også afspille WMA-filer. Betjeningen
fungerer på præcis samme måde som ved
MP3-filer.
Søgning efter titelnavn (bogstaver)
• Tryk på A/PS to gange.
I displayet blinker teksten A**. Det første tegn blinker.
• Drej på multiknappen for at indlæse et bogstav
eller et tal, som titelnavnet starter med. Tryk på
multiknappen.
I displayet blinker det næste tegn.
• Drej på multiknappen for at indlæse det andet
bogstav eller et tal. Tryk på multiknappen.
I displayet blinker det næste tegn.
• Drej på multiknappen for at indlæse det andet
- 39 -
Page 42

USB-tilslutning
Optagefunktion
Afspilning
Du kan tilslutte en MP3-afspiller eller et andet USBdatamedie til USB-tilslutningen på enhedens front.
Din bilradio kan bearbejde USB-datamedier på op
til 1 GB. I den forbindelse må biblioteksstrukturen
maksimalt indeholde 1024 mapper, 4096 filer og
en biblioteksdybde på 8 niveauer.
• Tag beskyttelseskappen af USB-tilslutningen.
• Slut din USB-enhed til tilslutningen. Bilradioen søger
efter MP3- eller WMA-filer på datamediet, og i
displayet vises meddelelsen USB.
• Betjeningen til afspilning af filer på det eksterne
datamedie og søgefunktionen fungerer præcist
som ved MP3-CD'erne.
• Når enheden er i en anden tilstand (CD eller
Kortlæser), kan du vælge USB-tilslutningen med
knappen
• Sæt igen beskyttelseskappen på USB-tilslutningen,
hvis der ikke er tilsluttet nogen USB-enhed for at
undgå urenheder.
MD/LD.
Kortlæser
Din bilradio er udstyret med en hukommelseskortskakt til
SD-kort og multimedie-kort.
Afspilning
• Skub hukommelseskortet med teksten pegende til
højre ind i kortslotten. Afspilningen af MP3- eller
WMA-titlen på hukommelseskortet begynder
automatisk.
• Betjeningen til afspilning af filer fungerer præcist
som ved MP3-cd'er.
• Når enheden er i en anden tilstand (CD, Radio,
AUX eller USB), kan du vælge kortlæseren med
knappen
MD/LD.
Bemærk:
Overhold de retlige bestemmelser, der gælder
det sted, hvor du bor, vedrørende kopiering af
ophavsretligt beskyttede værker. Er du i tvivl,
skal du kontakte en fagmand i nærheden.
Optagelse fra audio-cd
Du kan optage data fra cd-afspilleren på et eksternt
USB-datamedie eller et SD/MMC-kort med din
bilradio.
• Hold i CD-audio-tilstand knappen
nede.
Teksten USB ALL vises (ved optagedestinationen
MMC vises MMC ALL).
• Tryk på knappen
at vælge optageoptionen USB/MMC-ALL
(op-tagelse af alle numre) eller USB/MMC -
ONE (optagelse af ét nummer).
• Start optagelsen ved at trykke på knappen
SCN/REC flere gange for enten
SCN/REC trykket
BND/ENT.
Audiodataene lagres nu i det tidligere indstillede
format (MP3 eller WMA, se side 11 „Indstilling
REC - Optageformat“) på datamediet. Når optagelsen
starter,vises meddelelsen RECORD i displayet.
Herefter indikerer et foranstillet „R“ optagelsen.
Bemærk
Når USB-datamediet er fuldt, skifter optagelsen
automatisk til kortlæseren, hvis der er sat et
hukommelseskort i (se følgende kapitel).
• For at afslutte optagelsen, skal du trykke kort en
gang til på knappen
vist det kort øjeblik i displayet, er optagelsen lagret.
BND/ENT. Når WAIT har været
- 40 -
Page 43

Du kan afspille dataene igen ved at skifte til USBeller SD/MMC-tilstand med knappen
aktivere det pågældende nummer fra datamediet.
MD/LD og dernæst
Kopiering af MP3-filer
Du kan kopiere enkelte numre fra en MP3-cd til det
eksterne USB-datamedie eller et SD/MMC-kort.
• Hold knappen
nummer på en MP3-cd afspilles.
Visningen COPY MMC vises.
• Tryk på knappen
at vælge kopifunktionen COPY USB (kopiering
på USB-datamedie) eller COPY MMC
(på SD/MMC-kort).
• Start kopieringen ved at trykke på knappen
SCN/REC trykket nede, mens et
SCN/REC flere gange for enten
BND/ENT.
Under kopieringen vises COPY i displayet og en
procentangivelse fra 01 - 99, som viser kopierings-
statussen. Efter visningen af COPY 99 er kopieringen
afsluttet, og afspilningen af MP3-numre fortsætter.
Optagelse fra radio eller audioindgang
Du kan også optage data fra radio eller audioindgang til et USB-stick eller et hukommelseskort med
din bilradio.
• Sæt hukommelsesmediet ind i kortslotten eller
USB-tilslutningen og vælg med knappen
radiotilstanden eller driftstype AUX.
• Start afspilningen af den eksterne audioenhed.
• Hold knappen
Visningen REC MMC vises.
• Tryk på knappen
vælge optagefunktionen USB (optagelse på USBhukommelsesmedie) eller MMC (optagelse på
SD/MMC-hukommelseskort).
• Start kopieringen ved at trykke på knappen
SCN/REC trykket nede.
SCN/REC flere gange for enten at
MD/LD
BND/ENT.
Bemærkninger til de optagede filer
Optagelserne lagres med de følgende betegnelser på datamediet:
Audio-cd-optagelser: Track01, track02 ...
MP3-cd-optagelser: Musik01, musik02 ...
Radiooptagelser: Tuner01, tuner02 ...
Audio-cd- og radiooptagelser optages i stereo
og med en bitrate på 128 kbps eller en samplingfrekvens på 44 kHz. Ved kopiering fra
MP3-filer overtages kopieringskildens optageformat.
Bluetooth-drift
Tilslutning
• Slut mikrofonenheden til bilradioen som beskrevet
under „Tilslutning/Tilslutningsskema“.
For at anvende mikrofonenheden, skal du bruge en
mobiltelefon, som understøtter Bluetooth-dataoverførsel.
Tilslutning af telefon til bilradio
• Gennemfør søgning efter Bluetooth-enheder på
din mobiltelefon.
• Når søgningen er gennemført med succes, vises
teksten CAR--BT for bilradioen i mobiltelefonens
display.
• Vælg denne til tilslutningen, og indtast adgangskoden 0000 for bilradioen, når du bliver bedt
om at indtaste adgangskode. Du skal eventuelt
bekræfte forbindelsesopbygningen en gang til.
Når tilslutningen er gennemført, vises CONNECT
kort i bilradioens display, og den grønne LED på
mikrofonenheden lyser.
- 41 -
Page 44

Anvendelse af mikrofon
Under telefonsamtalen hører du den person, der ringer
op, via højttalere, som er tilsluttet bilradioen.
• Placér mikrofonenheden tæt på dig, for at din
stemme kan blive overført optimalt.
• Anbring f.eks. mikrofonenheden på instrumentpanelet. Du kan i den forbindelse anvende den
medfølgende klæbestrimmel. Rengør først overfladen for støv og fedtrester. Klæbestrimlen kan
anvendes til fastgørelse på alle glatte underlag.
Betjening
Modtagelse/afslutning af opkald
Ved indgående opkald hører du opkaldssignalet
via din mobiltelefon. Opkaldsnummeret vises i
bilradioens display.
• Du modtager et indgående opkald ved at trykke
på knappen
knappen
eller på forsiden.
• Du afslutter en telefonsamtale ved at trykke på
knappen
knappen
Afvisning af et opkald
• Tryk ved et indgående opkald på knappen TALK
på mikrofonenheden i mere end 2 sekunder,
eller tryk på knappen
opkaldet.
Opkald
• Tryk på knappen MODTAG på fjernbetjeningen. I bilradioens display vises en blinkende cursor.
• Indtast med talknapper på fjernbetjeningen et
telefonnummer, som du vil ringe til.
• Tryk på knappen
Nummeret ringes op.
TALK på mikrofonenheden eller
MODTAG på fjernbetjeningen
TALK igen på mikrofonenheden eller
AFSLUT .
AFSLUT for at afvise
MODTAG igen.
Genkald
• Hold knappen TALK på mikrofonenheden eller
knappen
forsiden trykket nede i ca. 2 sekunder.
- Hvis der ikke er indtastet et opkaldsnummer via
fjernbetjeningen talknapper, vises kort REDIAL i
displayet, og herefter vælges det nummer på
mobiltelefonen, der sidst blev indtastet.
- Hvis der allerede er indtastet et eller flere telefonnumre via talknapperne på fjernbetjeningen,
vises REDIAL i displayet.
Drej multiknappen, eller tryk på knapperne
på fjernbetjeningen for at vise de 10 sidst indtastede telefonnumre efter hinanden.
Tryk på knappen
udvalgte opkaldsnummer.
Vælg REDIAL og tryk herefter på knappen
MODTAG på fjernbetjeningen eller på
VOL-/+
MODTAG for at vælge det
AFSLUT
for at afslutte genkaldet.
Audio-streaming (A2DP)
Din bilradio anvender A2DP-profilen (Advanced
Audio Distribution Profile) og kan således afspille
audiodata fra din mobiltelefon.
• Vælg en audiofil på din mobiltelefon, og start
afspilningen.
I bilradioens display vises teksten A2DP, og audio-
filen afspilles via bilradioens højttalere.
Bemærk
Afspilningen skal eventuelt omstilles på mobiltelefonen via Bluetooth Stereo-Headset.
Følg i den forbindelse også betjeningsvejledningen til din mobiltelefon.
Ved nogle få mobiltelefoner skifter bilradioen
ikke automatisk til A2DP-tilstand. Skift i dette
tilfælde til A2DP-tilstand ved at trykke flere
gange på knappen MD/LD, indtil teksten
A2DP vises i displayet.
- 42 -
Page 45

Udskiftning af sikring
Bilradioen er på bagsiden forsynet med en 10 A
sikring, som springer, hvis der opstår spændingsspidser eller en kortslutning.
• Udskift i dette tilfælde sikringen med en tilsvarende
type, der er angivet i de tekniske data, med
samme afbrydelseskarakteristik.
• Før du skifter sikringen, skal du undersøge årsagen
til at sikringen sprang, før du tænder for bilradioen
igen.
Afhjælpning af fejl
Enheden kan ikke tændes.
Tændingen er ikke slået til.
• Slå tændingen til ved at dreje på nøglen.
En af sikringerne er defekt.
• Skift sikringen.
Cd'en trækkes ikke ind eller skubbes ikke ud
Der er allerede en cd i bilradioen.
• Fjern cd'en.
Cd'en er lagt omvendt i.
• Læg cd'en i med teksten opad.
Cd'en er snavset eller defekt.
• Rengør cd'en eller læg en anden cd i.
Temperaturerne i bilen er for høje.
• Vent indtil omgivelsestemperaturen er normaliseret.
Kondensation på laserlinsen
• Slå bilradioen fra et par timer og forsøg herefter
igen.
Ingen lyd
Lydstyrken står på laveste trin.
• Skru op for lyden.
Kablerne er ikke tilsluttet korrekt.
• Kontrollér kabelforbindelserne.
Funktionsknapperne fungerer ikke
Der er fejl på enheden.
Tryk på knappen Reset.
Betjeningsdelen sidder ikke korrekt.
• Kontrollér, at betjeningsdelen sidder korrekt.
Cd'en hopper
Monteringsvinklen overstiger 30°.
• Korrigér monteringsvinklen.
Cd'en er snavset eller defekt.
• Rengør cd'en eller læg en anden cd i.
Fejl på cd'er, du selv har brændt
Kontrollér den cd, du selv har brændt, i en anden
afspiller.
Radio og / eller den Automatiske
Stationshukommelse fungerer ikke
Antennekablet er ikke korrekt tilsluttet.
• Kontrollér, at antennekablet sidder korrekt.
Sendersignalerne er for svage.
• Indstil senderne manuelt.
Stationshukommelsen fungerer ikke
Tilslutning 6 i ISO-blok A (permanent plus) er ikke
korrekt tilsluttet.
• Kontrollér kabelforbindelserne.
Se i den forbindelse kapitlet “Tilslutning”.
Enheden på USB-tilslutningen fungerer ikke
USB-tilslutningen er beregnet til enheder, som fungerer
efter USB-standarden. Ikke alle enheder på markedet
opfylder denne standard. Under visse omstændigheder
er en enhed, som ikke fungerer efter USB-standarden,
tilsluttet.
• Tilslut en enhed, der fungerer efter USB-standarden.
- 43 -
Page 46

Kortlæseenheden læser ikke kortet
Kortet kan være defekt, snavset eller ikke sat i korrekt.
• Kontrollér kortet. Skub det ind, idet siden med
tekst peger til højre.
Bluetooth-forbindelsen fungerer ikke
Mobiltelefonen understøtter ikke Bluetooth-overførsel.
Mobiltelefonen er ikke parret med bilradioen.
• Gentag parring af mobiltelefon og bilradio.
Følg i den forbindelse også vejledningen til din
mobiltelefon.
Rengøring
• Rengør kun huset med en let fugtig klud og et
mildt rengøringsmiddel. Sørg for, at der ikke
kommer fugt ind i radioen under rengøringen!
Advarsel!
Hvis der trænger fugt ind i radioen, er der
fare for elektrisk stød! Endvidere kan der
opstå uoprettelige skader på enheden!
Bortskaffelse
Smid aldrig bilradioen ud sammen med
det normale husholdningsaffald. Dette
produkt er underlagt det europæiske
direktiv 2002/96/EF.
Bortskaf apparatet hos et godkendt affaldsfirma
eller på dit kommunale affaldsanlæg.
Følg de aktuelt gældende regler. Kontakt affaldsordningen, hvis du er i tvivl.
Bortskaffelse af batterier/akkuer
Batterier/akkuer må ikke smides ud med husholdningsaffaldet. Alle forbrugere er i henhold til loven
forpligtet til at aflevere almindelige batterier/genopladelige batterier på et indsamlingssted i kommunen
eller hos en forhandler.
Denne forpligtelse hjælper med til, at batterier /
akkuer kan afleveres til miljøskånsom destruktion.
Levér kun batterier/genopladelige batterier tilbage
i afladet tilstand.
Aflever alle emballagematerialer på et
affaldsdepot, så miljøet skånes.
- 44 -
Page 47

Garanti og service
Importør
På dette apparat får du 3 års garanti fra købsdatoen.
Skulle du trods vores høje kvalitetsstandarder have
grund til reklamationer, bedes du venligst kontakte
vores Service-Hotline.
Hvis telefonisk behandling af reklamationen ikke er
muligt, modtager du
• et bearbejdningsnummer (RMA-nummer) såvel
som
• en adresse, til hvilken du kan indsende produktet
til garantibehandling.
Du bedes vedlægge en kopi af kvitteringen (kassebon) ved indsendelse. Apparatet skal være pakket
transportsikkert og RMA-nummeret direkte synligt.
Indsendte apparater uden RMA-nummer kan ikke
behandles.
Bemærk:
Garantiydelsen gælder kun for materiale- eller
fabrikationsfejl.
Garantiydelsen gælder ikke
• for sliddele
• for skader på skrøbelige dele som kontakter
eller akkuer.
Produktet er kun beregnet til privat og ikke til erhvervsmæssigt brug. Ved misbrug og uhensigtsmæssig behandling, anvendelse af vold og ved indgreb, som
ikke er foretaget af vores autoriserede service-afdeling,
ophører garantien.
Dine garantikrav, som er fastsat i loven, begrænses
ikke af denne garanti.
KOMPERNASS GMBH
BURGSTRASSE 21
44867 BOCHUM, GERMANY
www.kompernass.com
- 45 -
Page 48

Page 49

Bluetooth-Bilradio
KH 2375
For at garantere reparation uden
udgifter for Dem bedes du kontakte
vores Service-hotline. Til dette bedes
De venligst have Deres kassebilag
parat.
Afsender skriv venligst tydeligt:
Navn
Fornavn
Gade/vej
Postnummer/By
Land
Udfyld dette afsnit fuldstændigt, og vedlæg radioen!
Telefon
Garanti
Kompernass Service Danmark
Tel.: +45 4975 8454
Fax: +45 4975 8453
e-mail: support.dk@kompernass.com
www.mysilvercrest.de
Dato/underskrift
Fejlbeskrivelse :
Page 50

 Loading...