

Page 1

KH 2331/2332/2333 - 10/04 - V1
Kompernaß Handelsgesellschaft mbH · Burgstraße 21
D-44867 Bochum · www.kompernass.com
Instruction Manual
KH2331
KH2332
KH2333
UK
Page 2
2!
Page 3

3
GB
Table of contents
Intended use ..........................................................................................................................4
Operating elements ................................................................................................................4
Technical data ........................................................................................................................4
Safety instructions ..................................................................................................................4
Power supply ..........................................................................................................................5
Mains operation ......................................................................................................................5
Battery operation ....................................................................................................................5
Inserting the battery................................................................................................................5
Setting the time ......................................................................................................................5
Operation /Radio operation ....................................................................................................5
Transmission search ..............................................................................................................5
Saving the radio transmission ................................................................................................6
Selection of the saved radio transmission ............................................................................6
CD / MP3-CD operation ........................................................................................................6
Insert the CD / MP3-CD ........................................................................................................6
Playing back the inserted CD ................................................................................................6
Selecting different tracks during playback ............................................................................6
Searching a song passage during playback ..........................................................................7
Search function ......................................................................................................................7
Searching with the help of the file name ................................................................................7
Searching with the help of the album name ..........................................................................7
Text display ............................................................................................................................7
Track programming ................................................................................................................7
CD playback ..........................................................................................................................7
MP3-CD playback ..................................................................................................................7
Checking the programming ....................................................................................................7
Playing back the programme..................................................................................................8
Deleting track programming ..................................................................................................8
Repeated playback of tracks..................................................................................................8
Timer function ........................................................................................................................8
Sleep function ........................................................................................................................8
Equalizer function ..................................................................................................................9
Connecting the stereo headphones ......................................................................................9
Cleaning ..................................................................................................................................9
Disposal ..................................................................................................................................9
Service ....................................................................................................................................9
Page 4

4
GB
5
GB
PLL CD player with radio and MP3
KH 2331/2332/2333
Intended use:
The device is suitable for playing back Audio
CDs, CD-Rs, CD-RWs and MP3-CDs.
It is also used for receiving MW and UKW radio
transmissions.
Not intended for commercial use.
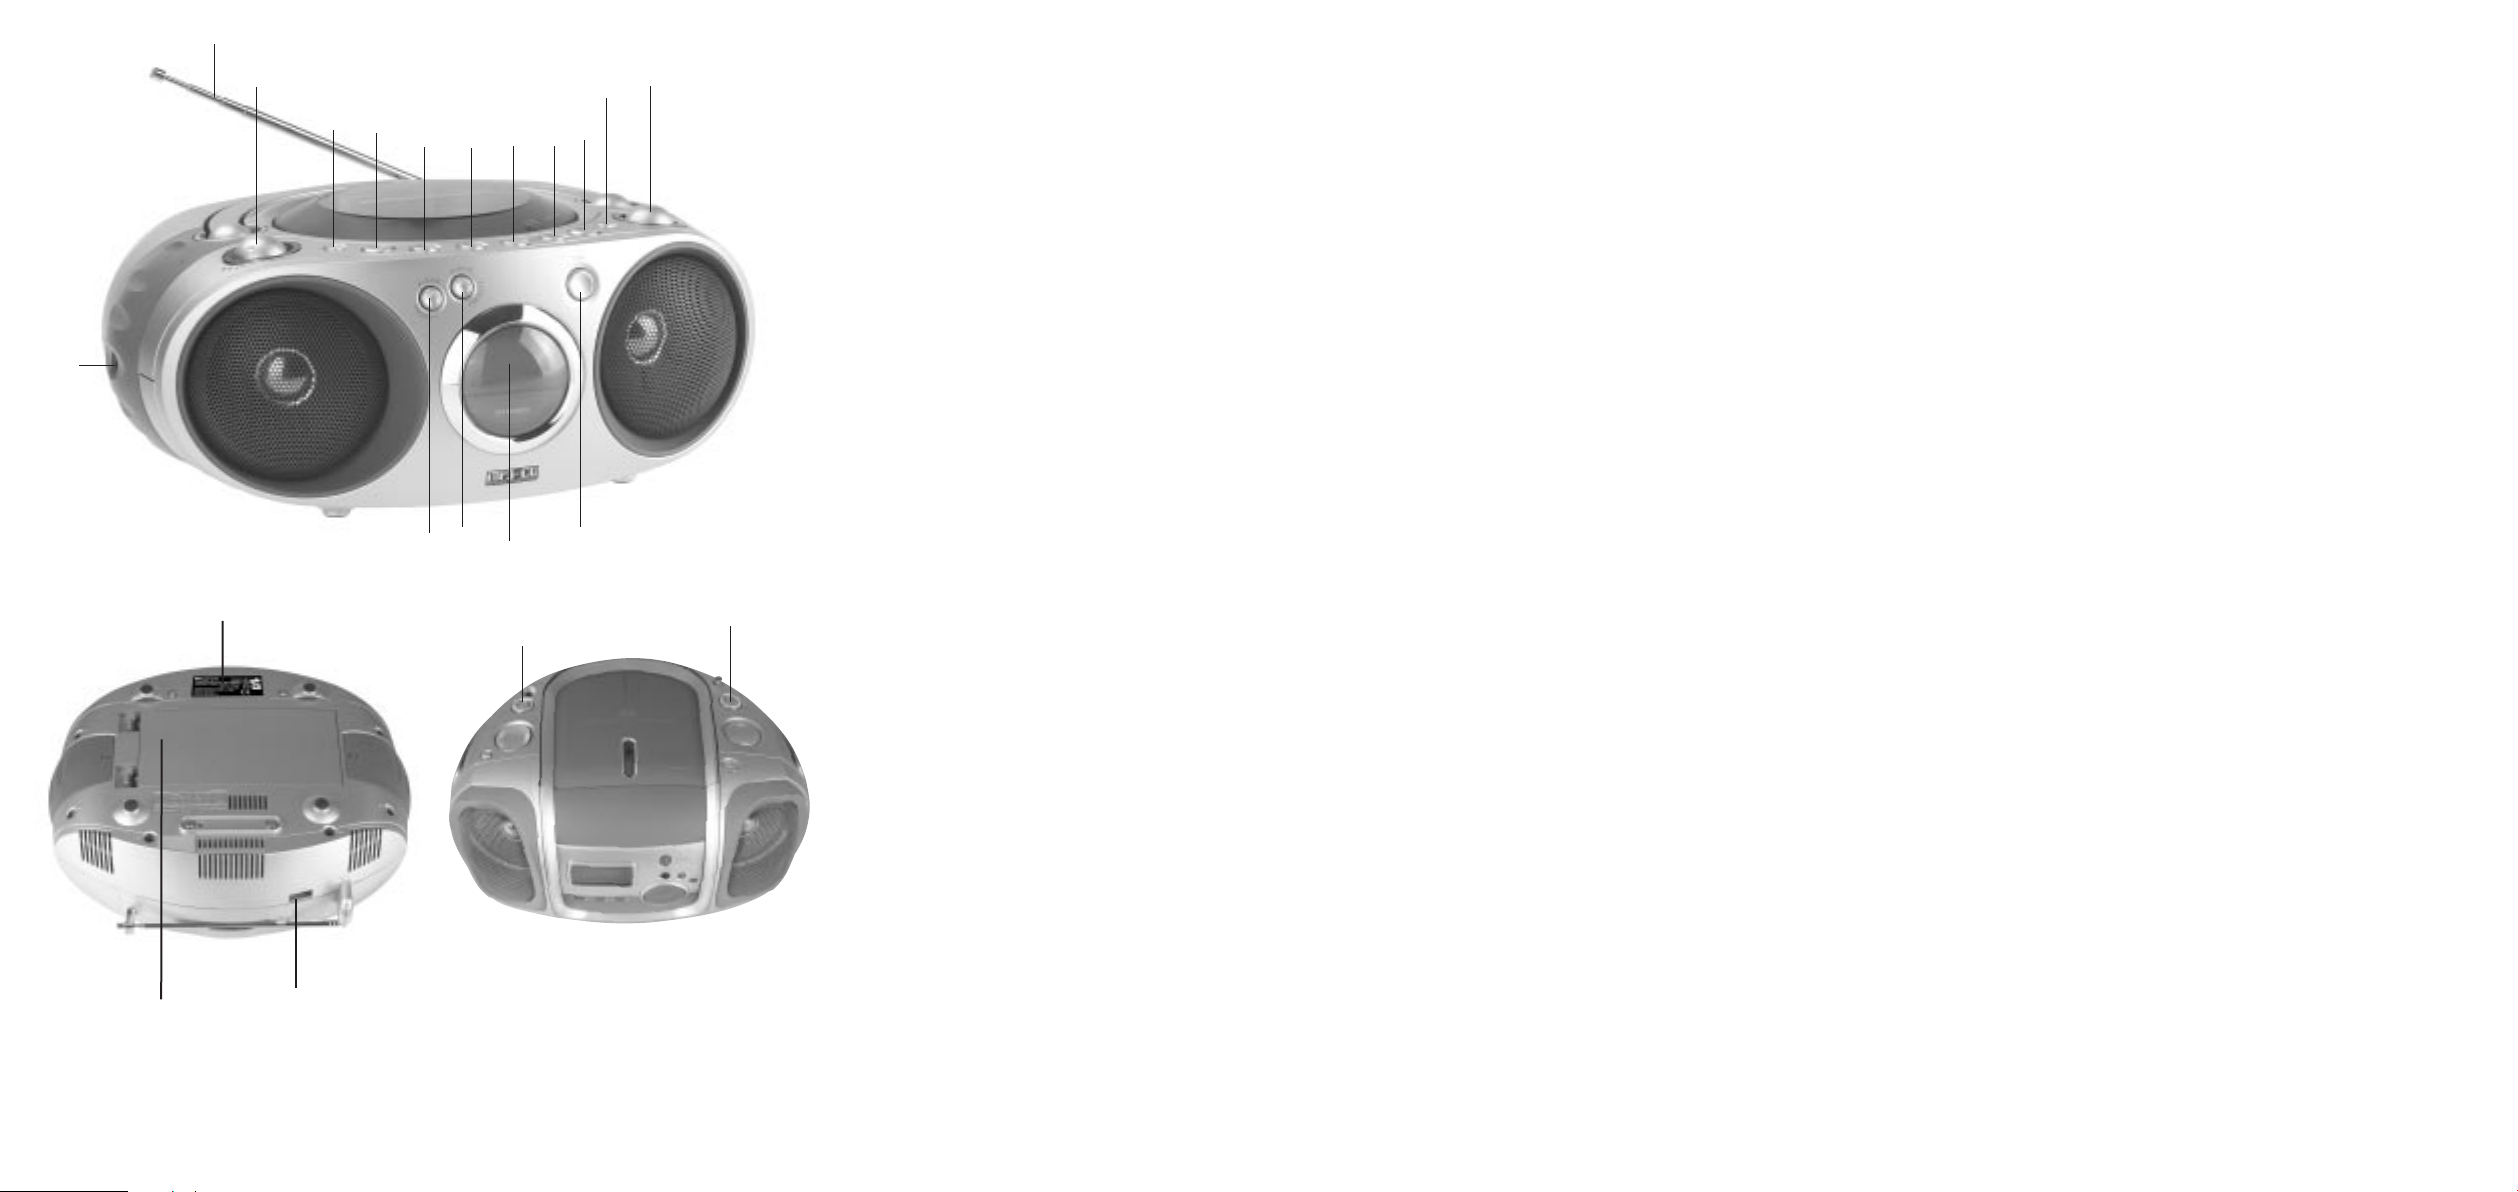
Operating elements:
Volume control (Setting playback volume)
Equalizer key (Equalizer function)
STOP key (Stopping playback)
MEMORY/ PROG. key (Track program-
ming/allocation of up to 64 storage spaces)
REPEAT key (repeated playback)
R-SKIP key (CD skip track/
Search /Rewind key)
F-SKIP key (CD skip track /Search /
Forward key)
CD PLAY/ CD PAUSE key (start/ pause
playing back)
POWER key (Switch on/off the device)
Function switch TUNER / BAND; *MONO / ST.
(Switch on radio operation/ Wave range
selection/ MONO/ STEREO play back.)
FIND key (MP3-CD: Display of the track
search function)
Display
ALBUM / PRESET+ key (MP3-CD/CD:
Selecting the next album/
radio: Selecting the next saved radio
transmission)
ALBUM / PRESET key (MP3-CD/CD:
Selecting the previous album/ radio:
Selecting the previous saved radio
transmission)
Headphone socket
UKW antenna
Type label
Mains connection
Battery compartment
TIMER key (Model KH2331)
! SLEEP key (Model KH2331)
Technical data:
Rated voltage: ....................230V AC / 50 Hz
Power consumption :..........18 Watt
Max. output rating: ............2 x 2 Watt
Battery operation: ..............8 x UM-1 battery/
2 x UM-3 battery
(Memory backup)
Model KH2331: ..................8 x UM-2 battery/
2 x UM-3 battery
(Memory backup)
Radio operation: ................MW: 522 - 1620 KHZ
UKW: 87.5 - 108 MHZ
CD player: ..........................CD, CD-R, CD-RW,
MP3-CD
Headphone socket: ............Stereo / 3.5 mm
Safety instructions:
Danger! Electric shock!
•Warning: Do not operate the device, if the
power plug, power cord or the device is
damaged.
• If the device falls of, get it checked by an
electrician befire you operate it again.
•Prevent liquids from seeping into the device.
In case of emergency, pull out the power
plug immediately.
• Do not use the device in wet areas (e. g.
Bathroom) or areas with a lot of dust
accumulation.
• Do not remove the cover under any circumstances. The components inside the device
are not intended to be maintained by the
user. Repairs are to be carried out exclusively
by a specialist firm or the service centre.
• Do not place the device in direct proximity
of inflammable material (e.g. curtains,
inflammable liquids, etc.).
•To disconnect the device from the power
supply completely, pull out the power plug
out of the power socket and whicle doing
so, always hold the connector and not the
cable.
•Check the power cord regularly for possible
damages.
• Important: Before the initial use, remove the
protective cap from the CD slot.
Danger! Laser radiation!
The CD player has a "Class 1 Laser“.
• Never open the device.
• Never attempt to repair the device. There is
invisible laser radiation inside the device.
• Do not expose yourself to the laser beam.
Important! Fire hazard!
Do not expose the device to extreme temperatures, as the heat built-up inside the device can
lead to defect and/or fire.
•Avoid direct solar radiation.
• Do not cover the ventilation slots of the
device.
• Leave a minimum free space of approx.
10 cm on the sides.
• Do not place any open sources of fire, like
candles, on the device.
Power supply
Mains operation:
• Check whether the voltage of your device
and the local voltage are identical.
• If you want to operate the device on a 230V
household network power socket:
➜ Plug the power cord into the adaptor
provided on the rear side of the device.
➜ Plug the power plug into the power socket.
Battery operation:
Note: Always use new batteries of the same
type while changing batteries.
➜ Batteries with values that have not been
recommended can damage the device.
➜ Never try to open the batteries.
➜ Never expose the batteries to extreme
amount of heat and never throw them into
fire.
➜ Always dispose off the batteries in an envi-
ronmentally compatible manner. Contact
your local authorities for the purpose.
Inserting the batteries: (The power plug is to
be removed)
➜ Insert the eight batteries
(TYPE UM-1/Model KH2331: TYPE UM-2)
and the two batteries (Type UM-3 „AA“) into
the battery compartment on the underside of the device. Make sure that the plus
(+) and minus (-) poles of the batteries have
rightly been placed in the indicated places.
Note:
Power Standby
If the device is being connected to the power
socket for the first time, it switches on to the
standby mode.
➜ Press the POWER key to switch on the
device. The device remains in the standby
mode until it is switched on.
➜ Pull out the power plug in order to complete-
ly switch off the device.
Setting the time
In the standby mode
1. Press the MEMORY/ PROG. key for two
seconds in order to set the time. The "12
HOUR“ display appears in the display.
2. Press the F-SKIP or the
R-SKIP key to select the 12/24 hour display.
Confirm the selection by pressing the
MEMORY/PROG. key again. The first two
digits flash in the display.
3. Press the F-SKIP or the
R-SKIP key to set the current hour. Confirm
the selection by pressing the MEMORY/PROG.
key again. The last two digits flash in the
display.
4. Press the F-SKIP or R-SKIP key to set
the current minutes. Confirm the set time by
pressing the MEMORY/PROG. key again.
Operation/ Radio operation
Set up the antenna and if necessary, adjust it to
receive better radio reception.
Transmission search
1. Press the POWER key to switch on the
device.
2. Press the TUNER/BAND key. The radio
switches on.
3. Press the TUNER/BAND key again to set
the transmission range (MW/UKW).
Page 5

76
4. Press the F-SKIP or the
R-SKIP key for a few seconds and
release the key. The automatic transmission
now starts searching the first transmission
with adequate signal strength.
5. Repeat the process to set other transmissions.
To set the transmission with weak signal
strength:
6. Press the F-SKIP or the
R-SKIP key continuously until you get
the desired frequency or the reception is
optimal.
Save the radio transmission
1. Press the TUNER/BAND key again to
sent the transmission range (MW/UKW).
2. Search the desired transmission as described under the point "Transmission search".
3. Press the MEMORY/ PROG. 4 briefly. The
indication "PROG“ appears in the display and
the memory position “01“ blinks.
4. Press the ALBUM/PRESET+ or
ALBUM/PRESET- key to save the
current transmission in another memory
position (1-10).
5. Press the MEMORY/ PROG. key again.
The previously set transmissions are written
in the memory.
6. Repeat the process to save other transmissions.
Selecting the saved radio transmissions
➜ Press the ALBUM/PRESET+ or
ALBUM/PRESET- key to select a memory position between 1-10.
Note: (Mains or battery operation)
Make sure that both the (UM-3/“AA“) batteries
have been inserted. The saved radio transmissions are thus received even if there is a drop in
the mains voltage.
CD/MP3-CD operation
Inserting the CD/MP3-CD
1. Press OPEN/CLOSE to open the
CD slot.
2. Place the CD/MP3-CD in the CD slot.
3. Press OPEN/CLOSE to close the
CD slot. The CD/MP3 player starts and
reads the contents of the CD/MP3-CD.
After a few seconds, the total playback
time and the number of the current track
appears in the display.
Playing back the inserted CD
1. Press the PLAY/PAUSE key.
- The playback begins with the first track of
the CD.
- The display shows the current track num-
ber and the previous playback time.
- The CD player stops when all the tracks
have been played. The total playback time
as well as the number of the current track
are shown in the display.
2. Press the STOP key to stop the playback.
3. Press the PLAY/PAUSE key to interrupt
the playback. (The playback should be previously activated).
4.
Press the PLAY/PAUSE key again
to conti-
nue the playback.
Selecting different tracks during
playback
➜ Press the F-SKIP or the R-SKIP key
until the desired track appears in the
display.
Only for MP3-CDs:
➜ Press the ALBUM/PRESET+ or
ALBUM/PRESET key once or multiple
times to find the desired album.
Restarting the current track
➜ During the playback, press the R-SKIP
once. Playback of the current track restarts.
Searching a song passage during the
playback
➜ Press and hold the F-SKIP or R-SKIP
key to search the desired song passage.
The playback continues when you release
the F-SKIP or R-SKIP key.
Search function
Possible only for playing back MP3-CDs:
➜ Press the FIND key to call the MP3-CD
search function.
Searching with the help of the file name
➜ Press the FIND once to call the MP3-CD
search function.
and the alphabet "A" appears in the
display. If a file name begins with the alphabet "A“ beginnt, it appears in the display as
well.
➜ Press the F-SKIP or
R-SKIP key to search from A-Z and 0-9.
➜ Press the PLAY/PAUSE key to begin
playing back the desired track.
Searching with the help of the album name
➜ Press the FIND key twice to call the
search function. and the "ALBUM“
appears in the display.
➜ Press the F-Skip or R-SKIP key to
search the desired album.
➜ Press the PLAY/PAUSE key to start play-
ing back the album.
Text display (ID3 display)
➜ While playing back an MP3-CD, press the
FIND key for two seconds. The file
name/ track/ artist/ album of the current
track appears in the display.
➜ Press the FIND key once again for two
seconds to go to the playback time display.
Note: The device is compatible with ID3 V.1, V.2
only.
Track programming
Up to 64 tracks can be stored.
CD playback
1. Insert the CD in the device, as described
under "Insert the CD“.
2. Press the MEMORY/PROG. key to start
the programming.
3. Press the F-Skip or R-SKIP key to
find a particular track.
4. Press the MEMORY/PROG. key to write
the track in the memory.
5. Repeat the process until you have written
all the tracks in the memory.
6. Press the PLAY/PAUSE key to playback
the automatically created programme.
7. Press the STOP key to stop the playback.
MP3-CD playback
1. Insert the CD in the device, as described
under "Insert the CD“.
2. Press the MEMORY/PROG. key to start
the programming.
3. Press the F-SKIP or R-SKIP key to
find the desired album/ folder.
4. Press the MEMORY/PROG. key to write
the album/ folder in the memory.
5. Press the F-SKIP or R-SKIP to find
the desired track.
6. Press the MEMORY/PROG. key to write
the track in the memory.
7. Press the PLAY/PAUSE key to playback
the automatically created programme.
8. Press the STOP key to stop the playback.
Checking the programming
1. Press the MEMORY/PROG. to take a
look at the stored track. The first programmed track appears in the display.
2. Press the MEMORY/PROG. key again to
go to the next track.
GBGB
Page 6

9
GB
8
GB
Playing back the programm
➜ Press the PLAY/PAUSE key. The play-
back begins with the first track of the programme. When all the tracks have been
played, the CD/MP3-CD player stops
playing back.
Deleting track programming
➜ Press the STOP key or open and close
the CD compartment to delete the track
programming.
Repeated payback of tracks
Use the Repeat Function to repeat a track
/complete CD or the programme.
CD:
1. Press the REPEAT key once. "REPEAT
1“ appears in the display and the current
track is repeatedly played back.
2. Press the REPEAT key twice. REPEAT
ALL“ appears in the display and the the
complete CD is repeatedly played back.
3. Press the REPEAT key thrice to switch
off repeated playback.
MP3-CD:
1. Press the REPEAT key once. "REPEAT
1“ appears in the display and the current
track is repeatedly played back..
2. Press the REPEAT key twice. REPEAT
ALL“ appears in the display and the the
complete CD is repeatedly played back.
3. Press the REPEAT key thrice. REPEAT
ALBUM“ appears in the display and the the
complete album is repeatedly played back.
4. Press the REPEAT key four times to
switch off repeated playback.
Timer function (Only in model KH2331)
Make sure that the time has been set before
you programme the Timer.
Select CD or Radio as the playback source. For
Radio operation, the desired transmission must
be first set.
Switching on the timer:
1. Press the ALBUM/PRESET+ or
ALBUM/PRESET key to set the desired
transmission.
2. Press the TIMER keys. appears in
the display and the first two digits blink.
3. Press the F-SKIP or
R-SKIP keys to set the hours. Confirm the
setting by pressing the TIMER key again.
The last two digits blink.
4. Press the F-SKIP or
R-SKIP keys to set the minutes. Confirm the
start time by pressing the TIMER key
again.
5. Repeat steps 3 + 4 to set the turn-off time.
6. TUNER appears in the display.
Press the F-SKIP or
R-SKIP keys to select the playback
source (CD or Tuner).
7. Press the TIMER key to confirm the
playback source. Volume level 15 appears
in the display.
8. Press the F-SKIP or R-SKIP keys to
sent the volume level.
9. Press the TIMER key to store the settings.
Switching off the timer:
1. Press the TIMER key.
2. is no longer shown in the display. The
timer is switched off.
Sleep function (Only in Model KH2331)
1. Press the SLEEP 2! key. SLEEP appears in
the display.
2. Press the SLEEP 2! key again to set a
Sleep time of 90 - 10 minutes.
3. Press the SLEEP 2! key again to switch off
the Sleep function.
Equalizer function
This device has a preset Equalizer
➜ Press the EQ key to select the Equalizer
settings.
The following setting options are available:
- CLASSIC
- ROCK
- POP
- JAZZ
- PASS (Equalizer function is deactivated)
Connection of stereo headphones
This device has a 3.5mm stereo headphone
connection.
➜ Insert the plug of the headphone in the
headphone socket and set volume control as desired. During the reception
through the headphone, the speakers are
automatically muted.
Cleaning
Clean the casing with a slightly damp cloth
only. In case of stubborn stains, pour a few
drops of a mild detergent on the damp cloth.
Important: Make sure that moisture does not
seep into the casing or the mains connection at
the time of cleaning.
Disposal
The packaging is made of 100% environmentfriendly materials, which you can dispose off
through the local recycling centres.
Contact your municipal authorities or city administration for information on disposal options
for used household appliances.
Batteries should not be disposed off with household waste. Always dispose off the batteries
in an environment-friendly manner. Contact
your local authorities for the purpose.
Service
Please take the warranty card from the appropriate service centre of your province.
Kompernass Handelsgesellschaft mbH
Burgstrasse 21
44867 Bochum
Deutschland / Germany
www.kompernass.com
 Loading...