

Page 1
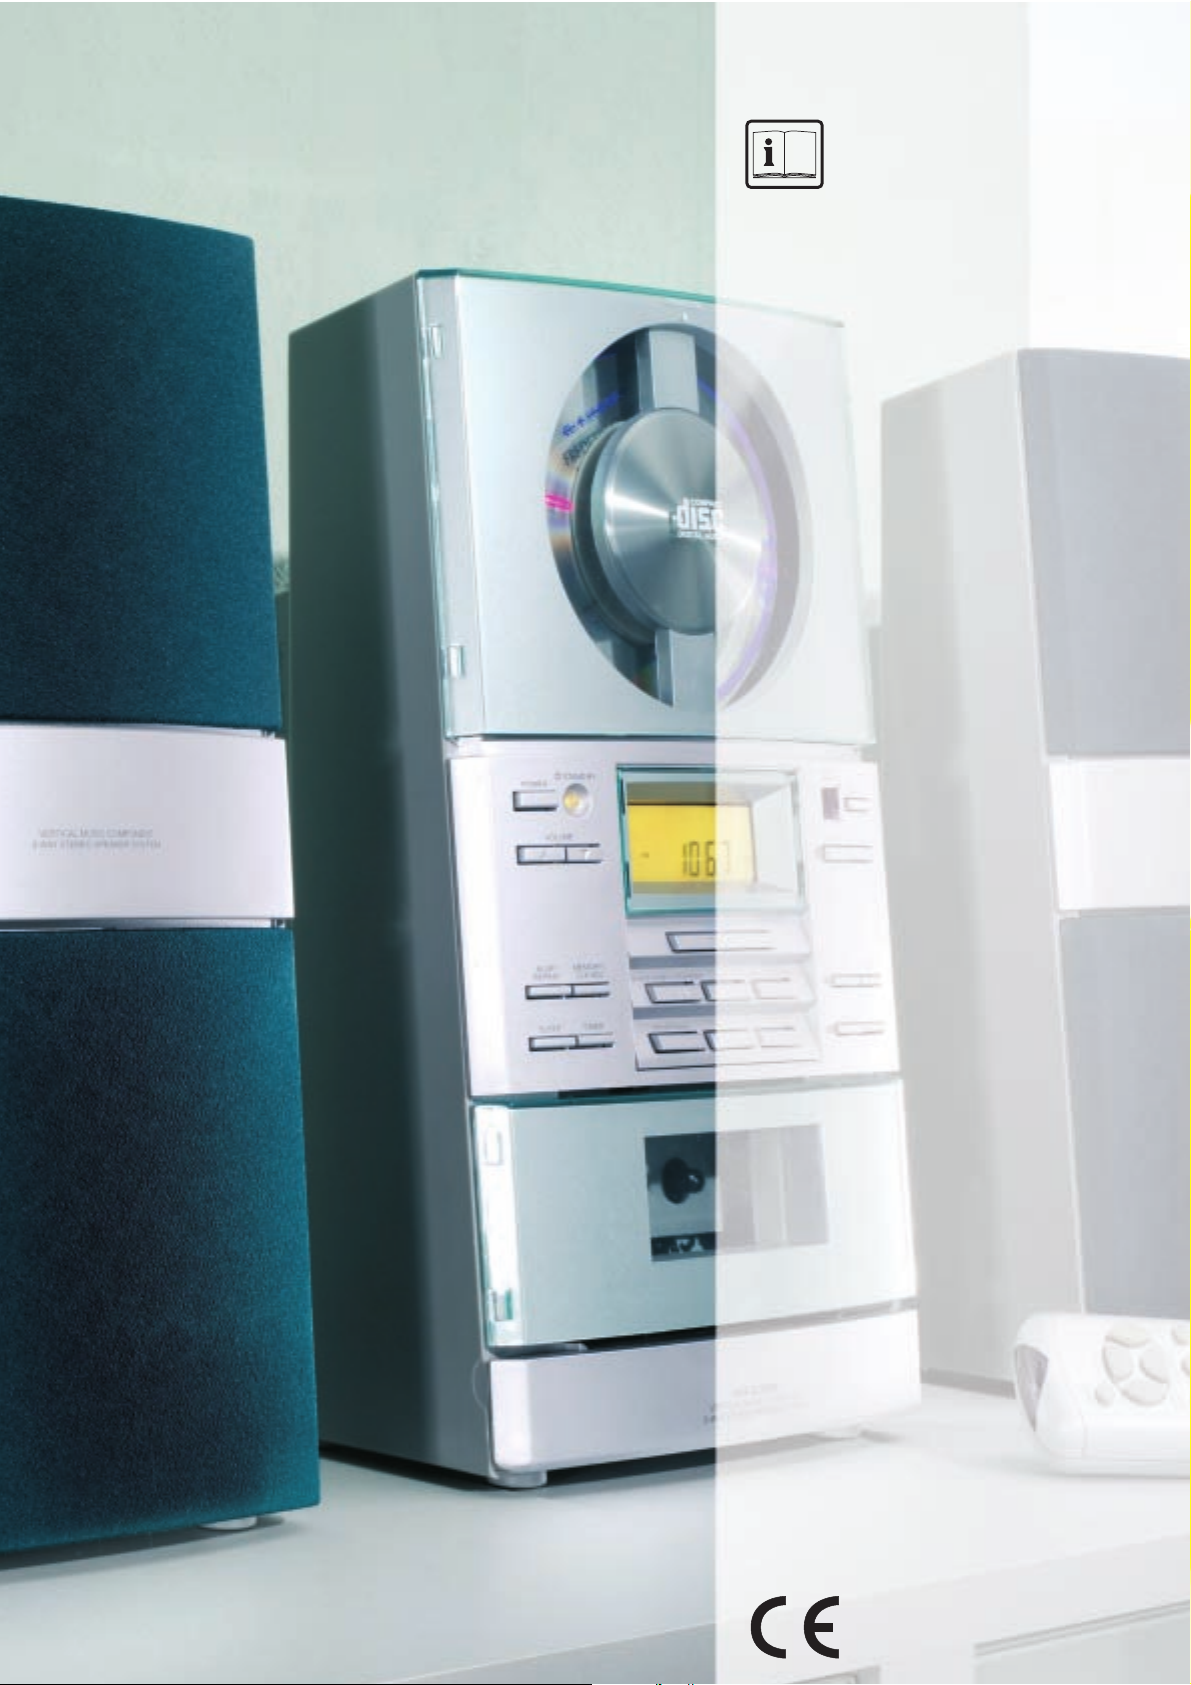
DESIGN ANLAGE
MIT VERTICAL CD-PLAYER
Bedienungs- und Sicherheitshinweise
DESIGNER AUDIO UNIT
WITH VERTICAL CD PLAYER
Operating and safety instructions
CHAÎNE DESIGN
À PLATINE LASER VERTICALE
Mode d'emploi et instructions de sécurité
IMPIANTO DESIGN CON LETTORE
DI COMPACT DISC VERTICALE
Informazioni di sicurezza e istruzioni per l‘uso
EQUIPO DESIGN
CON CD-PLAYER VERTICAL
Instrucciones para el manejo y la seguridad
APARELHAGEM DESIGN
COM LEITOR DE CD VERTICAL
Instruções de utilização e de segurança
DESIGNINSTALLATIE
MET VERTICALE CD-SPELER
Bedienings- en veiligheidsaanwijzingen
∏¯ÔÛ‡ÛÙËÌ· Design
Ì ηٷÎfiÚ˘ÊÔ CD-Player
АФ‰В›НВИ˜ ¯ВИЪИЫМФ‡ О·И ·ЫК·ПВ›·˜
WIE˚A DESIGN Z PIONOWYM
ODTWARZACZEM CD
Wskazówki dotyczàce obs∏ugi i bezpieczeƒstwa
DESIGN-LAITTEISTO
PYSTY-CD-SOITTIMELLA
Käyttö- ja turvaohjeet
DESIGN-ANLÄGGNING
MED VERTIKAL CD-SPELARE
Användar- och Säkerhetsanvisning
KH 2300
Page 2
Bedienungsanleitung
Seite 4 - 9
Operating instructions
Page 10 - 15
Mode d'emploi
Page 16 - 21
Istruzioni per l‘uso
Pagina 22 - 27
Instrucciones de servicio
Página 28 - 33
Instruções de serviço
Página 34 - 39
Gebruiksaanwijzing
Pagina 40 - 45
√¢∏°π∂™ §∂π∆√Àƒ°π∞™
™ÂÏ›‰·
46 - 51
D
F
E
P
Kompernaß Handelsgesellschaft mbH
Burgstraße 21 · D-44867 Bochum (Germany)
Instrukcja obs∏ugi
Strona 52 - 57
Användaranvisning
Sidan 64 - 69
S
Käyttöohjeet
Sivu 58 - 63
Page 3
R
T
YI
P
OU
8
9
%
*
E7
=
_
&
)
Q
W^
E
Q
W
\
=
0
-
9
8
6
7
5
4231|`+
!
@
$
#
%
^
*
&
(
)
_
Page 4

WICHTIGE SICHERHEITSHINWEISE
Folgende grundlegende Sicherheitshinweise müssen beim Einsatz von elektrischen Geräten in jedem Fall berücksichtigt werden:
Bitte lesen Sie die folgenden Informationen für Sicherheit und sachgemäßen Gebrauch aufmerksam durch. Klappen Sie
vor dem Lesen die Seite mit den Abbildungen aus und machen Sie sich anschließend mit allen Funktionen des Gerätes
vertraut. Bewahren Sie diese Hinweise sorgfältig auf und geben Sie sie ggf. an Dritte weiter.
Das Gerät nicht in Betrieb nehmen, wenn der Netzstecker, das Netzkabel oder das Gerät beschädigt sind.
Falls das Gerät heruntergefallen ist, zuerst von einem Elektro-Fachmann prüfen lassen, bevor Sie es wieder in Betrieb nehmen.
Im Inneren des Gerätes gibt es gefährliche Spannungen. Niemals das Gehäuse öffnen oder Gegenstände durch die Belüftungen
einführen.
Verhindern Sie, dass Flüssigkeit in das Gerät gelangt. Notfalls sofort den Netzstecker ziehen.
Ziehen Sie ebenfalls den Stecker aus der Steckdose, wenn während des Betriebs Störungen auftreten und bevor Sie das Gerät
reinigen.
Nehmen Sie keine Veränderungen oder Reparaturen am Gerät selbst vor. Auch die Anschlussleitung darf nicht selbst ausgetauscht
werden. Lassen Sie Reparaturen am Gerät oder der Anschlussleitung nur von einer Fachwerkstatt bzw. im Service-Center durchführen.
Durch unsachgemäße Reparaturen können erhebliche Gefahren für den Benutzer entstehen.
Kinder unterschätzen häufig die Gefahren beim Umgang mit Elektrogeräten. Lassen Sie daher Kinder nie unbeaufsichtigt in die Nähe
von Elektrogeräten.
Betreiben Sie das Gerät nicht unbeaufsichtigt.
Das Gerät darf nicht in Feuchträumen (z.B. Badezimmer) oder Räumen mit starkem Staubanfall verwendet werden.
Die im Inneren des Gerätes aufgestaute Hitze kann zum Defekt bzw. zum Brand des Gerätes führen.
Setzen Sie dieses Gerät daher keiner extremen Temperatur aus:
– direkte Sonneneinstrahlung und Heizungswärme vermeiden
– Lüftungsschlitze des Gerätes nicht verdecken
– zu den Seiten möglichst ca. 10 cm freilassen
Das Gerät darf nicht in unmittelbarer Nähe von entflammbarem Material (z.B. Vorhänge, brennbare Flüssigkeiten etc.) aufgestellt
werden.
Wenn die Design-Anlage vom Kalten ins Warme gelangt (z.B. nach dem Transport), kann sich Kondenswasser im Inneren bilden.
Um die Design-Anlage vor Schäden zu schützen, frühestens nach 2 Stunden einschalten.
Bei einem Gewitter können am Stromnetz angeschlossene Geräte Schaden nehmen. Ziehen Sie bei Gewitter deshalb immer den
Netzstecker aus der Steckdose und entfernen Sie den Antennenstecker.
Um das Gerät vollständig von der Stromversorgung zu trennen, muss der Netzstecker aus der Steckdose gezogen werden. Dabei
immer am Stecker und niemals am Kabel anfassen.
Schützen Sie die Anschlussleitung vor heißen Oberflächen oder sonstigen Beschädigungen und klemmen Sie sie nicht ein.
Prüfen Sie die Anschlussleitung regelmäßig auf eventuelle Schäden.
Wickeln Sie die Anschlussleitung zum Gebrauch vollständig ab.
Achten Sie darauf, dass die Anschlussleitung nicht zur Stolperfalle wird.
Bei längerer Abwesenheit Netzstecker ziehen und Batterien aus der Fernbedienung nehmen.
Das Gerät ist für die Nutzung im privaten Bereich ausgelegt.
Hinweis: Die Design-Anlage ist mit rutschfesten Gummifüßen ausgestattet. Da die Bodenoberflächen aus den verschiedensten
Materialien bestehen und mit unterschiedlichsten Pflegemitteln behandelt werden, kann es nicht völlig ausgeschlossen werden,
dass manche dieser Stoffe Bestandteile enthalten, die die Gummifüße angreifen und aufweichen. Legen Sie gegebenenfalls eine
rutschfeste Unterlage unter die Füße.
Umweltschutz:
Niemals gebrauchte und neue Batterien zusammen verwenden. Entsorgen Sie verbrauchte Batterien im Interesse
unserer Umwelt nicht im Hausmüll, sondern geben Sie sie an entsprechenden Sammelstellen ab.
AUFSTELLEN UND ANSCHLIESSEN
Befolgen Sie unbedingt die aufgeführten Anweisungen bevor Sie die Design-Anlage erstmals in Betrieb nehmen und stecken Sie das
Netzkabel erst zum Schluß in die Steckdose.
1) Entnehmen Sie die Design-Anlage und die Lautsprecher vorsichtig aus der Verpackung.
2) Wählen Sie für Ihre Design-Anlage den geeigneten Platz aus, er sollte
… waagerecht
… trocken und staubfrei
… nicht in der Nähe von Heizkörpern oder in der prallen Sonne sein.
3) WICHTIG: Entfernen Sie alle Transportsicherungen /Klebebänder am CD- und Kassettenfach !
Öffnen Sie das CD-Fach
! durch Ziehen an der oberen Kante und entfernen Sie die rote Transportsicherung (danach CD-Fach wieder
schließen).
4
D
Page 5

4) Schließen Sie die beiden Lautsprecher an. Die Lautsprecheranschlüsse Y sind entsprechend gekennzeichnet (L=LINKS / R=RECHTS).
Tipps zur Aufstellung der Lautsprecher:
Lautsprecher möglichst in Kopfhöhe aufstellen
Lautsprecher nicht durch Gardinen oder Gegenstände verdecken
Lautsprecher im Regal so aufstellen, dass die Frontblende mit der vorderen Regalkante abschließt.
um Dröhnen zu verhindern, eventuell eine Gummiplatte unter die Lautsprecher legen.
5) Zum Anschluß eines externen Gerätes (z.B. Plattenspieler) die Cinch-Anschlüsse
U benutzen.
6) Für den UKW-Radioempfang 75 Ohm-Antenne (Hausantenne oder Kabelanschluß) an den Antennenanschluß
O anschließen. Steht
diese nicht zur Verfügung, die mitgelieferte Wurfantenne auf den Mittelkontakt des AntennenanschlussesO aufstecken.
Die Antenne für MW-Empfang ist im Gerät eingebaut.
7) Nun den Netzstecker an eine Steckdose 230 V anschließen.
8) Batterien (nicht im Lieferumfang enthalten) in die Fernbedienung einlegen (2x AA Mignon LR6 1,5 V):
– Deckel auf der Rückseite der Fernbedienung öffnen
– Batterien einlegen. Dabei auf die richtige Polung achten (siehe Bodenbeschriftung des Batteriefaches)
– Deckel wieder schließen
WANDMONTAGE
Die Design-Anlage mit den dazugehörigen Lautsprechern kann an der Wand montiert werden.
Entsprechende Schrauben und Wandhalterungen sind im Lieferumfang enthalten. Bringen Sie das
Gerät vertikal an eine stabile Wand an.
Die Schraublöcher müssen in einem Abstand von 14 cm untereinander gebohrt werden
.
Damit die Schrauben richtig in die Halterungen P auf der Rückseite der Design-Anlage und der
Lautsprecher greifen können, müssen die Schraubenköpfe ca. 3 mm aus der W
and ragen.
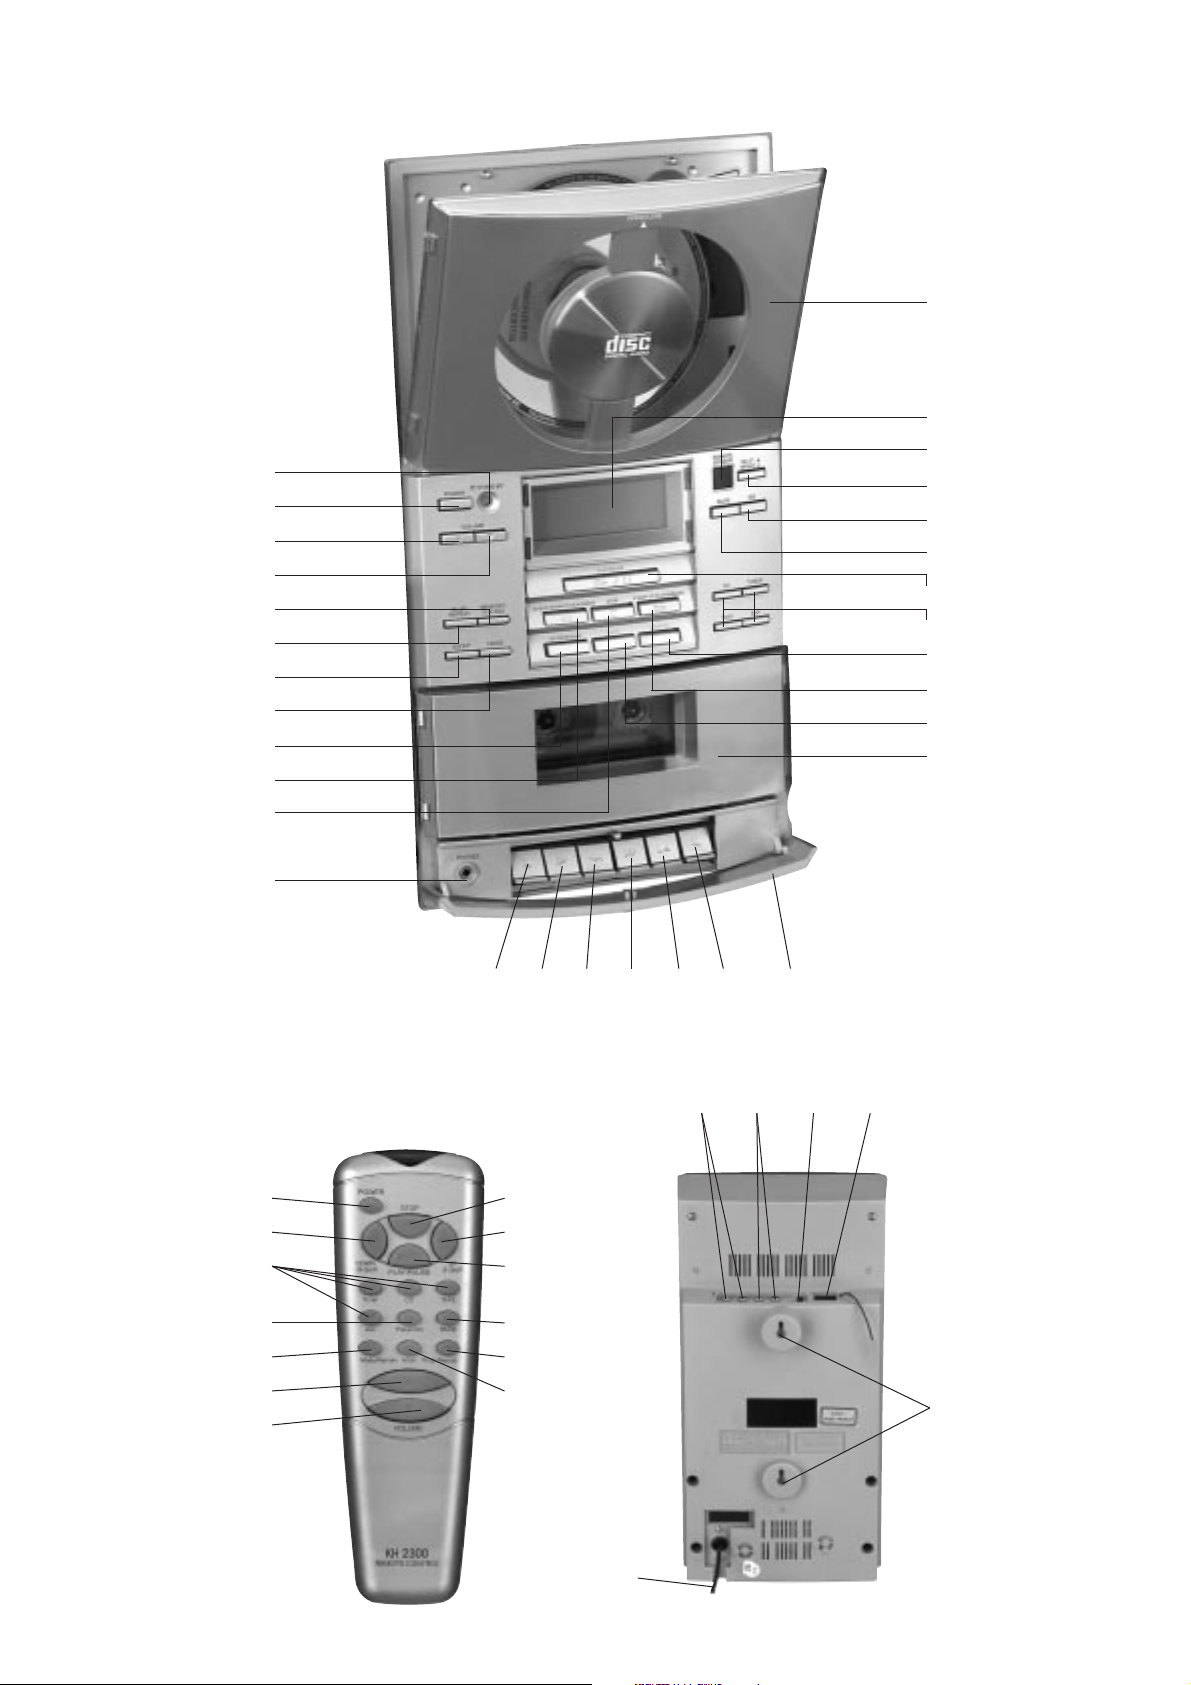
BEDIENELEMENTE
! CD-Fach 6 Kassettenfach
@ Display 7 Stop-Taste (CD)
# Empfänger für Signale der Fernbed. 8 Rückwärts-Taste (*)
$ Taste Mono/Stereo (nur UKW-Radiobetrieb) 9 Anzeige umschalten
% Klangwahltaste 0 TIMER-Taste
^ Tonstop /Stummschaltung - SLEEP-Taste
& CD-Wiedergabe /Pause = M-UP/REPEAT-Taste (*)
* Gerätewahltasten \ MEMORY/CLK-ADJ-Taste (*)
( RANDOM-Taste Q Lautstärke verringern
) Vorwärts-Taste (*) W Lautstärke erhöhen
_ Bandwahl-Taste (UKW / MW) E EIN-/AUS-(Stand-By) -Taste
+ Schutzklappe R Betriebsanzeige
| Pause-Taste (nur Kassette) T Netzstecker
` Stop/Auswurf-Taste (nur Kassette) Y Lautsprecheranschlüsse
1 Vorspulen (nur Kassette) U Cinch-Anschlüsse für externes Gerät (AUX)
2 Zurückspulen (nur Kassette) I Rauschunterdrückung Aufnahme(nur Kassette)
3 Wiedergabe-Taste (nur Kassette) O Antennenanschluss
4 Aufnahme-Taste (nur Kassette) P Aufhängevorrichtung für Wandmontage
5 Kopfhöreranschluß
Die mit (*) gekennzeichneten Bedienelemente sind je nach Gerätewahl (z.B. Radio- oder CD-Betrieb) mit mehreren unterschiedlichen
Funktionen belegt. Lesen Sie bitte in den entsprechenden Kapiteln nach.
Die Bedienelemente
| bis 4 und I sind ausschließlich für Betrieb des Kassettenrekorders.
BEDIENUNG
EIN- UND AUSSCHALTEN [ » POWER / STAND-BY « ]
• Wenn der Netzstecker eingesteckt wird befindet sich das Gerät im Stand-By-Modus. Die Betriebsanzeige
R leuchtet rot.
• Drücken Sie die EIN-/AUS-Taste
E. Das Gerät befindet sich jetzt im Betriebsmodus. Die Betriebsanzeige R leuchtet grün.
• Um in den Stand-By-Modus zurück zu schalten, EIN-/AUS-Taste E erneut drücken.
• Bei längerer Abwesenheit den Netzstecker ziehen.
5
D
Page 6

GERÄT /TONQUELLE WÄHLEN [ » CD / TUNER / TAPE / AUX « ]
• Drücken Sie die entsprechend gekennzeichnete Taste
* um ein Gerät zu wählen bzw. die Tonquelle zu wechseln:
CD = CD-Spieler TUNER = Radio TAPE = Kassettenrekorder AUX = externes Gerät, z.B. Plattenspieler
LAUTSTÄRKE EINSTELLEN [ » VOLUME / MUTE « ]
• Sie erhöhen die Lautstärke mit der
Taste W.
• Sie verringern die Lautstärke mit der Taste Q.
• Durch Drücken der Tonstop-Taste ^ werden die Lautsprecher und der Kopfhörer ausgeschaltet (Stummschaltung).
KLANG EINSTELLEN [ » CLASSIC / ROCK / POP « ]
Mit der Klangwahltaste
% können Sie die Klangqualität eines Titels der jeweiligen Musikrichtung anpassen und somit den Hörgenuss
steigern. Die jeweils gewählte Einstellung CLASSIC, ROCK oder POP wird im Display
@ angezeigt (keine Anzeige = neutraler Klang).
KOPFHÖRER [ » PHONES « ]
An den Kopfhöreranschluß
5 kann ein Stereo-Kopfhörer 8-32 Ohm mit 3,5 mm Klinkenstecker angeschlossen. Sobald der Kopfhörer
eingesteckt ist, werden die Lautsprecher abgeschaltet. Bitte beachten Sie, dass zu hohe Lautstärke zu schweren Hörschäden führt.
UHR STELLEN
01) Um die Uhrzeit einstellen zu können, muss sich das Gerrät im Stand-By-Modus befinden (Betriebsanzeige R leuchtet rot).
02) MEMORY/CLK-ADJ-Taste
\ einmal drücken – die Stundenanzeige blinkt.
03) Mit den Tasten Vorwärts ) bzw. Rückwärts 8 die Stunde einstellen.
04) MEMORY/CLK-ADJ-Taste \ erneut drücken – die Minutenanzeige blinkt.
05) Mit den Tasten Vorwärts ) bzw. Rückwärts 8 die Minuten einstellen.
06) MEMORY/CLK-ADJ-Taste
\ erneut drücken – die Anzeige hört auf zu blinken und die Uhr läuft (der „Doppelpunkt” blinkt).
EIN- UND AUSSCHALTZEIT EINSTELLEN [ » TIMER « ]
Wenn Sie die Einschaltzeit aktivieren, können Sie sich zu jeder Zeit von Ihren Design-Anlage wecken lassen.
01) Mit der entsprechenden Taste
* das gewünschte Gerät /Tonquelle (CD, TAPE oder TUNER) auswählen.
02) Tonquelle vorbereiten, d.h. bei TUNER (RADIO) den gewünschten Sender einstellen, bei TAPE (KASSETTENREKORDER) die Kassette
einlegen und an die gewünschte Stelle spulen oder eine CD einlegen und ggf. eine Titelfolge programmieren.
03) TIMER-Taste
0 drücken. Im Display @ wird TIMER angezeigt.
0 HINWEIS: Für die folgenden Schritte haben Sie jeweils 5 Sekunden Zeit. Anderfalls wird der Vorgang abgebrochen.
Beginnen Sie dann erneut ab Schritt 4).
04) Taste
9 MODE/REMAIN 2 x drücken. Im Display @ erscheint die Zeitanzeige und es blinkt TIMER ON.
05) MEMORY/CLK-ADJ-Taste \ einmal drücken – die Stundenanzeige blinkt.
06) Mit den Tasten
Vorwärts ) bzw. Rückwärts 8 die Stunde einstellen.
07) MEMORY/CLK-ADJ-Taste \ erneut drücken – die Minutenanzeige blinkt.
08) Mit den Tasten Vorwärts ) bzw. Rückwärts 8 die Minuten einstellen.
09) MEMORY/CLK-ADJ-Taste
\ erneut drücken – die Einschaltzeit ist jetzt gespeichert.
10) Wenn Sie sich von einer Kassette wecken lassen wollen: die Wiedergabe-Taste 3 drücken.
11) Abschließend die Design-Anlage ausschalten (EIN-/AUS-Taste E).
Wenn Sie die Ausschaltzeit aktivieren, schaltet Ihre Design-Anlage immer zur eingeschalteten Zeit aus.
01) TIMER-Taste
0 drücken. Im Display @ wird TIMER angezeigt.
0 HINWEIS: Für die folgenden Schritte haben Sie jeweils 5 Sekunden Zeit. Anderfalls wird der Vorgang abgebrochen.
Beginnen Sie dann erneut ab Schritt 2).
02) Taste
9 MODE/REMAIN 3 x drücken. Im Display @ erscheint die Zeitanzeige und es blinkt TIMER OFF.
03) MEMORY/CLK-ADJ-Taste \ einmal drücken – die Stundenanzeige blinkt.
04) Mit den Tasten Vorwärts ) bzw. Rückwärts 8 die Stunde einstellen.
05) MEMORY/CLK-ADJ-Taste \ erneut drücken – die Minutenanzeige blinkt.
06) Mit den Tasten Vorwärts ) bzw. Rückwärts 8 die Minuten einstellen.
07) MEMORY/CLK-ADJ-Taste \ erneut drücken – die Ausschaltzeit ist jetzt gespeichert.
Um die TIMER-Funktionen auszuschalten, TIMER-Taste
0 so oft drücken, bis im Display @ TIMER ausgeblendet wird.
6
D
Page 7
EINSCHLAF-FUNKTION AKTIVIEREN [ » SLEEP « ]
Sie können eine Zeit zwischen 90 und 10 Minuten bestimmen, nach der sich das Gerät einmalig abschalten soll.
• Um eine Abschaltzeit nach 90 Minuten zu aktivieren, die SLEEP-Taste - 1 x kurz drücken.
• Um eine kürzere Abschaltzeit einzustellen, die SLEEP-Taste - gedrückt halten, bis die gewünschte Zeit im Display erscheint.
• Um die Einschlaf-Funktion auszuschalten, SLEEP-Taste - so oft drücken, bis im Display @ SLEEP ausgeblendet wird.
RADIO
ANTENNE AUSRICHTEN
Falls für den UKW-Empfang die Wurfantenne verwendet wird:
• die Wurfantenne muss ganz ausgerollt sein
• stellen Sie durch Probieren die beste Position der Wurfantenne fest
• fixieren Sie die Wurfantenne ggf. mit einem Klebstreifen an der Wand.
Für den MW-Empfang stellen Sie die beste Position für die im Gerät eingebaute Antenne ebenfalls durch Probieren fest.
RADIOBETRIEB / BAND (UKW/MW) WÄHLEN
01) Mit der Gerätewahltaste * TUNER (=Radio) wählen.
02) Durch Drücken der Bandwahl-Taste
_ zwischen UKW (FM) und Mittelwelle (AM) umschalten.
AUTOMATISCHER SENDERSUCHLAUF / MANUELLE SUCHE
Beim automatischen Sendersuchlauf wird die Frequenz so lange erhöht bzw. verringert, bis ein Sender mit ausreichender
Empfangsstärke gefunden wird.
01) Taste Vorwärts ) bzw. Rückwärts 8 ca. 1 Sekunde gedrückt halten – der Suchlauf startet und stoppt automatisch.
02) Um den Suchlauf erneut zu starten, Taste
Vorwärts ) bzw. Rückwärts 8 nochmals ca. 1 Sekunde gedrückt halten.
Die manuelle Sendersuche können Sie zur Feinabstimmung benutzen oder wenn Ihnen die Frequenz des Senders bekannt ist.
01) Taste Vorwärts ) bzw. Rückwärts 8 jeweils nur kurz drücken, um die Frequenz in kleinen Schritten zu erhöhen oder
zu verringern.
02) Halten Sie die Taste
Vorwärts ) oder Rückwärts 8 so lange gedrückt, bis Sie in die Nähe der gewünschten Frequenz kommen.
SENDER SPEICHERN [ » MEMORY « ]
Die Design-Anlage KH 2300 kann bis zu 40 Sender (20 UKW / 20 MW) speichern.
01) Stellen Sie den gewünschten Sender, wie unter „Automatischer Sendersuchlauf / manuelle Suche“ beschrieben, ein.
02) MEMORY/CLK-ADJ-Taste \ einmal drücken. Im Display @ erscheint 5 Sekunden lang auf der linken Seite die Anzeige für den
Programmplatz. Innerhalb dieser 5 Sekunden müssen Sie den nächsten Schritt ausführen, sonst schaltet das Gerät wieder auf
Normalanzeige um. Drücken Sie diesem Fall erneut die MEMORY/CLK-ADJ-Taste \.
03) M-UP/REPEAT-Taste = so oft drücken, bis der gewünschte Programmplatz (1 bis 20) angezeigt wird.
Wiederholen Sie diese Prozedur für alle weiteren gewünschten Sender die gespeichert werden sollen.
GESPEICHERTE SENDER AUSWÄHLEN
Im Radiobetrieb die M-UP/REPEAT-Taste = so oft drücken, bis der gewünschte Programmplatz mit dem gespeicherten Sender im
Display @ erscheint.
CD-SPIELER
GEFAHR! Im CD-Spieler tastet ein schwacher, aber scharf gebündelter Laserstrahl die Oberfläche der eingelegten CD ab. Bei unsachgemäßem Gebrauch kann dieser Strahl eine Gefahr für das Auge sein – Gerät keinesfalls öffnen!
CD EINLEGEN
01) Zum Öffnen des CD-Faches ! die obere Kante nach vorne ziehen.
02) Die CD mit der bespielten Seite zum Gerät hin einlegen. Sie sehen bei korrekt eingelegter CD also die bedruckte Seite. Die CD muss
fest auf die (in der Mitte liegende) Achse geschoben werden.
03) CD-Fach
! schließen.
04) Mit der Gerätewahltaste * CD den CD-Spieler anwählen. Im Display @ wird die Gesamtspieldauer und die Anzahl der Titel
angezeigt.
HINWEIS: Sollte nach dem Einlegen der CD im Display nicht die Anzahl der Titel und die Gesamtspieldauer angezeigt werden, ist die
CD möglicherweise verkehrt herum eingelegt oder verschmutzt. Säubern Sie die CD mit einem CD-Reinigungstuch bzw. legen Sie
die CD korrekt ein und überprüfen Sie die Anzeige erneut
7
D
Page 8

GRUNDFUNKTIONEN DES CD-SPIELERS
• WIEDERGABE STARTEN: Taste & PLAY/PAUSE drücken – die Wiedergabe startet.
• WIEDERGABE UNTERBRECHEN (PAUSE): Taste
& PLAY/PAUSE drücken – die Wiedergabe wird unterbrochen. Im Display @
blinkt die Spieldauer. Durch erneutes Drücken der Taste & PLAY/PAUSE wird die Wiedergabe fortgesetzt.
• WIEDERGABE STOPPEN: Taste 7 STOP drücken – die Wiedergabe wird beendet.
• TITELSPRUNG VORWÄRTS: Taste
Vorwärts ) springt mit jedem Tastendruck einen Titel weiter.
• TITELSPRUNG RÜCKWÄRTS: Taste Rückwärts 8 springt mit jedem Tastendruck einen Titel zurück.
• VORLAUF: Taste Vorwärts ) gedrückt halten, um innerhalb eines Titel vorzuspulen.
• RÜCKLAUF: Taste Rückwärts 8 gedrückt halten, um innerhalb eines Titel zurückzuspulen.
Das CD-Fach
! kann jederzeit geöffnet werden. Die Wiedergabe stoppt dann automatisch. Entnehmen Sie die CD aber erst,
wenn sie vollständig gestoppt hat.
TITELFOLGE PROGRAMMIEREN [ » TRACK MEMORY « ]
Die Programmierung der Titelfolge ist nur bei gestoppter CD möglich. Es können bis zu 20 Titel programmiert werden.
01) CD einlegen
02) Mit der Gerätewahltaste * CD den CD-Spieler anwählen.
03) MEMORY/CLK-ADJ-Taste \ drücken. Im Display @ erscheint TRACK MEMORY.
04) Mit der Taste Vorwärts ) bzw. Rückwärts 8 die Nummer des Titels auswählen, der als erster gespielt werden soll.
05) MEMORY/CLK-ADJ-Taste
\ drücken. Der Titel ist nun auf dem ersten Programmplatz (P-01) gespeichert.
Wiederholen Sie die Schritte 3) bis 5) für bis zu 20 Titel. Sie können einen Titel auch mehrfach programmieren.
Die programmierte Titelfolge bleibt solange gespeichert, bis die CD oder dem CD-Fach entnommen wird , eine andere Funktion
gewählt oder das Gerät ausgeschaltet wird.
PROGRAMMIERTE TITELFOLGE STARTEN
01) MEMORY/CLK-ADJ-Taste \ drücken. Im Display @ erscheint TRACK MEMORY und die programmierten Titel.
02) Taste & PLAY/PAUSE drücken – die Wiedergabe startet und erfolgt in der von Ihnen programmierten Reihenfolge.
03) Um ein Programm zu löschen, drücken Sie die Taste 7 STOP.
WIEDERHOL-FUNKTIONEN [ » REPEAT « ]
• Um alle Titel einer CD zu wiederholen, M-UP/REPEAT-Taste
= drücken. Im Display @ erscheint REPEAT.
• Um einen einzigen Titel zu wiederholen, M-UP/REPEAT-Taste
= 2 x drücken wenn der gewünschte Titel läuft. Im Display @
blinkt REPEAT.
• Um eine programmierte Titelfolge zu wiederholen, M-UP/REPEAT-Taste = drücken wenn die programmierte Titelfolge läuft.
Im Display
@ erscheint REPEAT.
• Um die Wiederhol-Funktion auszuschalten, M-UP/REPEAT-Taste = so oft drücken, bis im Display @ REPEAT ausgeblendet wird.
TITEL IN ZUFÄLLIGER REIHENFOLGE ABSPIELEN [ » RANDOM « ]
Mit der RANDOM-Funktion wird die Titelfolge der eingelegten CD zufällig ausgewählt.
01) CD einlegen
02) Mit der Gerätewahltaste * CD den CD-Spieler anwählen.
03) RANDOM-Taste ( drücken. Im Display @ erscheint RANDOM.
04) Taste & PLAY/PAUSE drücken – die Wiedergabe startet in zufälliger Reihenfolge.
KASSETTENREKORDER
KASSETTE EINLEGEN
01) Schutzklappe + nach vorne öffnen. Dahinter befinden sich die Bedientasten des Kassettenrekorders (und der Kopfhöreranschluss).
02) Zum Öffnen des Kassettenfachs Taste ` drücken. Das Kassettenfach öffnet sich automatisch.
03) Kassette mit der Bandseite nach unten einlegen. Das Band soll straff und ohne Schlaufen sein.
04) Kassettenfach schließen.
05) Mit der Gerätewahltaste
* TAPE den Kassettenrekorder anwählen.
8
D
Page 9
GRUNDFUNKTIONEN DES KASSETTENREKORDERS
• WIEDERGABE STARTEN: Taste 3 drücken – die Wiedergabe startet.
• WIEDERGABE UNTERBRECHEN (PAUSE): Taste
| drücken – die Wiedergabe wird unterbrochen. Durch erneutes Drücken
der Taste | wird die Wiedergabe fortgesetzt.
• WIEDERGABE STOPPEN: Taste ` STOP drücken – die Wiedergabe wird beendet.
• VORSPULEN: Taste
1 drücken.
• ZURÜCKSPULEN: Taste 2 drücken.
KASSETTEN AUFNEHMEN
Die Design-Anlage KH 2300 ist mit einer automatischen Aussteuerung ausgestattet. Veränderungen der Lautstärke oder Klangwahl
haben keinen Einfluß auf die Aufnahme.
01) Kassette einlegen und ggf. an die Stelle spulen, an der die Aufnahme beginnen soll.
02) Die (PAUSE-) Taste
| drücken.
03) Drücken Sie die (AUFNAHME-) Taste 4. Die Taste 3 wird automatisch mitgedrückt.
04) Drücken Sie die entsprechend gekennzeichnete Taste * um ein Gerät bzw. die Tonquelle für die Aufnahme zu wählen.
05) Durch Lösen der (PAUSE-) Taste
| wird die Aufnahme gestartet.
06) Sie beenden die Aufnahme durch Drücken der Taste ` STOP.
TONKÖPFE REINIGEN
Verwenden Sie zur Reinigung der Tonköpfe und Bandführungsteile regelmäßig eine entsprechende Reinigungskassette.
KONFORMITÄTSERKLÄRUNG
Wir, Kompernaß Handelsgesellschaft mbH, Burgstr. 21, D-44867 Bochum, Germany, erklären hiermit für dieses Produkt
die Übereinstimmung mit folgenden EG-Richtlinien:
Elektromagnetische Verträglichkeit: 89/336 EEC (EMC Directive)
Angewandte harmonisierte Normen: EN 55013
:06.90+A12:08.94+A13:12.96
EN 55020:12.94+A11:12.96
EN 61000-3-2:04.95+A1:1998+A2:1998
EN 61000-3-3:01.95
Gerätetyp/Type: KH 2300
Bezeichnung des Gerätes: MICRO DESIGN-ANLAGE MIT VERTIKAL CD-PLAYER
Bochum, 31.08.2002
Hans Kompernaß
- Geschäftsführer -
9
D
Page 10

IMPORTANT SAFETY ADVICE
The following safety advice must be always followed before using electrical equipment:
Please read carefully through the following information concerning safety and proper use. Before reading, fold out
the page with the illustrations and make yourself familiar with all the functions of the equipment. Be careful to keep
these advice notes and if necessary pass them on to a third party.
Do not operate the equipment if the mains plug, cable or the equipment itself is damaged.
If the equipment is dropped, then it must be checked by an electrician before further use.
Dangerous voltages are present inside the equipment. Never open the housing or insert objects through the ventilation holes.
Do not allow liquids to get into the equipment. In case of emergency, pull out the plug from the socket.
Similarly, if a fault develops during use or before you start to clean the equipment, pull the plug out if the socket.
Do not carry out any modifications or repairs to the equipment yourself. This includes changing the mains cable. Have repairs
done to the equipment or the mains cable only by an electrician or at a specialist service centre. Unsatisfactory repairs can lead
to considerable danger for the user.
Children frequently underestimate the dangers associated with electrical equipment. Therefore you must never leave children
unsupervised in the vicinity of electrical equipment.
In addition, you should never leave the equipment working unattended.
The equipment is not to be used in a damp room (e.g. bathrooms) or rooms where there is a lot of dust.
The heat building up inside the equipment can lead to faults or to it catching fire.
Do subject this equipment to extremes of temperature:
– Avoid direct sunlight and heaters
– Do not cover the ventilation slots
– Leave approx. 10 cm free around the sides
The equipment is not to be used in the direct vicinity of inflammable materials (e.g. curtains, inflammable liquids etc.).
If the equipment is brought into a warm room from the cold (for example after transport) then this can lead to condensation forming
on the insides. To protect the equipment from damage, allow at least 2 hours before switching it on.
Equipment connected to the mains during a thunderstorm can be damaged by lightning. Therefore you should pull the plug out
of the mains socket during a storm and disconnect the aerial.
To completely disconnect the equipment from the electricity supply, the plug must be removed from the socket. When doing this
always pull on the plug itself and never on the cable.
Protect the mains cable from hot surfaces or other sources of damage and do not allow it to become constrained.
Check the mains cable regularly for any damage.
Unwind the mains cable completely before use.
Make sure that the mains cable does not represent a trip hazard.
If you are likely leave the equipment unattended for a long period, pull the plug out of the socket and take out the batteries
from the remote control.
The equipment is intended for private and domestic use only.
Note: The Designer Audio Unit is provided with anti-slip rubber feet. The rubber feet may become stuck to or softened by the material
used for or used to clean the supporting surface. This cannot be excluded because of the variety of materials in common use.
You should therefore place an anti-slip layer under the feet.
Environmental protection:
Never use combinations of new and used batteries. Never dispose of used batteries in the household
waste. Take them to an appropriate collection centre.
SETTING UP AND CONNECTING THE EQUIPMENT
You must follow the instructions given when preparing to use the equipment for the first time and only then insert the plug into
the socket.
1) Carefully take the Designer Audio Unit and the loudspeakers out of the packaging.
2) Choose a suitable position for your Designer Audio Unit. It should be
... horizontal
... dust-free and dry
... away from heaters and direct sunlight.
3) IMPORTANT: Remove all transport restraints /adhesive tape from the CD and cassette drive compartments !.
Open the CD compartment
! by pulling the top edge and removing the red transport restraint (then closing the CD compartment
again).
10
Page 11

4) Connect the two loudspeakers. The loudspeaker connections Y are appropriately labelled (L=LEFT / R=RIGHT).
T
ips for setting up the loudspeakers:
If possible set up the speakers at head height
Do not cover the loudspeakers with curtains or other objects
Set up the loudspeakers on the shelf so that the front trim is flush with the front edge of the shelf.
You can place rubber pads under the loudspeakers to prevent them from turning.
5) Use cinch connectors U to connect an external device such as a turntable.
6) To receive FM radio signals connect a 75 Ohm aerial lead (house or cable) to the aerial connector socket O. If these signals are not
available, use the supplied wire aerial connected to the middle contact in the aerial connection O.
The aerial for medium wave reception is built into the equipment.
7) Now connect the mains plug into a 230 V socket.
8) Insert the batteries (not supplied) into the remote control (2x AA LR6 1.5 V):
– Open the cover on the back of the remote control
– Insert batteries. Note the correct polarities (see diagram on back of battery compartment)
– Close cover again
WALL MOUNTING
The Designer Audio Unit and the loudspeakers can be mounted on a wall.
Suitable screws and wall mountings are supplied. Place the pieces of equipment vertically on to a suitably strong wall.
The screw holes must be drilled 14 cm apart one under the other.
So that the screws can engage properly into the fastener
P on the rear of the Designer Audio Unit and loudspeakers,
the screw heads must project no more than approx. 3 mm from the wall face.
OPERATING FEATURES
! CD compartment 6 Cassette compartment
@ Display 7 Stop button (CD)
# Remote control signal sensor 8 Reverse button (*)
$ Mono/stereo button (only on FM radio) 9 Change display
% Tone selector 0 TIMER button
^ Mute switch - SLEEP button
& CD play/ pause = M-UP/REPEAT button (*)
* Device selector \ MEMORY/CLK-ADJ button (*)
( RANDOM button Q Reduce volume
) Forward button (*) W Increase volume
_ Band selector (FM / AM) E ON / OFF (standby) switch
+ Protective cover R Display
| Pause button (cassette only) T Mains plug
` Stop/ eject button (cassette only) Y Loudspeaker connections
1 Fast forward (cassette only) U Cinch connections for external devices (AUX)
2 Rewind (cassette only) I Noise reduction system (cassette only)
3 Play button (cassette only) O Aerial connector
4 Record button (cassette only) P Fastening for wall mounted option
5 Headphones connector
The operating features marked with a (*) have several different functions depending on the device selected (e.g. radio or CD mode).
Please read the appropriate sections.
The operating elements
| to 4 and I are exclusively for the operation of the cassette recorder.
OPERATION
SWITCHING ON AND OFF [ » POWER / STAND-BY « ]
• If the mains plug is inserted, the equipment is in Stand-by mode. The operating display
R lights up red.
• Press the ON/OFF button E. The equipment is now in Operating mode. The operating display R lights up green.
• To switch back to Stand-by mode, press the ON/OFF button E again.
• For longer periods of absence pull out the plug from the mains socket.
11
Page 12

DEVICE/ SOURCE SELECT [ » CD / TUNER / TAPE / AUX « ]
• Press the appropriate button
* to select a device or change the source:
CD = CD player TUNER = radio TAPE = cassette recorder AUX = external device, e.g. record deck
ADJUST VOLUME [ » VOLUME / MUTE « ]
• To increase the volume use the
button W.
• To reduce the volume use the button Q.
• To mute (silence) the loudspeakers and headphones press the mute button ^.
ADJUST TONE [ » CLASSIC / ROCK / POP « ]
Use the tone selector button
% to set the tone quality of a track to suit the type of music and increase listening pleasure. The
current setting CLASSIC, ROCK or POP is shown in the display
@ - (blank display = neutral tone).
HEADPHONES [ » PHONES « ]
8-32 Ohm stereo headphones
5 can be connected to the headphones connector with a 3.5 mm jack plug. As soon as the headphones
are connected the loudspeakers are turned off. Please note that high levels of sound can lead to serious hearing damage.
SETTING THE TIME
01) For you to be able to set the time, the equipment must be in Stand-by mode (operating display R lights up red).
02) Press MEMORY/CLK-ADJ button
\ once - the hours display flashes.
03) Move the hours setting forward or backward using the Forward button ) or Reverse button 8.
04) Press MEMORY/CLK-ADJ button \ again - the minutes display flashes.
05) Move the minutes setting forward or backward using the Forward button ) or Reverse button 8.
06) Press the MEMORY/CLK-ADJ button
\ again - the display stops flashing and the clock starts (the colon flashes).
SETTING TIMES FOR SWITCHING ON AND OFF [ » TIMER « ]
If the Switch-on time feature is enabled then your Designer Audio Unit can wake you at your chosen time.
01) Using the appropriate button
* select the desired device/ source (CD, TAPE or TUNER).
02) Set up the source, i.e. for TUNER (RADIO) set the desired station, for TAPE (CASSETTE RECORDER) insert the tape and wind
to the correct place or insert a CD and if required program a track sequence.
03) Press TIMER button
0. The display @ now shows TIMER.
NOTE: You have five seconds to complete the following steps. Otherwise the process is halted and you must begin
again with step 4.
04) Press the MODE/REMAIN button
9 twice. The time appears in display @ and TIMER ON flashes.
05) Press the MEMORY/CLK-ADJ button \ once - the hours display flashes.
06) Move the hours setting forward or backward using the Forward button ) or Reverse button 8.
07) Press MEMORY/CLK-ADJ button \ again - the minutes display flashes.
08) Move the minutes setting forward or backward using the Forward button ) or Reverse button 8.
09) Press the MEMORY/CLK-ADJ button
\ again - the Switch on time is stored.
10) If you wish to be woken to a cassette: Press the Play button 3.
11) Then switch off the Designer Audio Unit (ON-/OFF-button E).
If you enable the Switch-off time feature, your Designer Audio Unit will always switch off at the set time.
01) Press the TIMER button
0. The display @ now shows TIMER.
NOTE: You have five seconds to complete the following steps. Otherwise the process is halted and you must
begin again with step 2.
02) Press the MODE/REMAIN button
9 three times. The time appears in the display @ and TIMER OFF flashes.
03) Press the MEMORY/CLK-ADJ button \ once - the hours display flashes.
04) Move the hours setting forward or backward using the
Forward button ) or Reverse button 8.
05) Press MEMORY/CLK-ADJ button \ again - the minutes display flashes.
06) Move the minutes setting forward or backward using the Forward button ) or Reverse button 8.
07) Press the MEMORY/CLK-ADJ button
\ again - the Switch-off time is stored.
To switch off the TIMER functions, press the TIMER button 0 repeatedly until the display @ shows TIMER.
12
Page 13
ACTIVATE SLEEP FUNCTION [ » SLEEP « ]
You can set a time of between 90 and 10 minutes, after which the device switches itself off.
• To activate a Switch-off time of 90 minutes, press the SLEEP button - once briefly.
• To set a shorter Switch-off time, keep the SLEEP button - pressed until the desired time is displayed.
•To switch off the Sleep function, press the SLEEP button - repeatedly until the display @ no longer shows SLEEP.
RADIO
ATTACHING AERIAL
If you use the wire aerial for FM reception:
• The wire must be fully wound out
• Determine the best position by trial and error
• Attach the wire aerial to the wall if necessary using a strip of adhesive tape.
For MW reception, place the device in the best position for the in-built aerial, again by trial and error.
OPERATING THE RADIO/ SELECT BAND (FM/MW)
01) Select * TUNER (=Radio) using the device selector button.
02) Select between FM (VHF) and AM (medium wave) using the BAND SELECTOR button
_.
AUTOMATIC STATION SEARCH / MANUAL SEARCH
In an automatic search the frequency is increased or deceased until a station of adequate reception strength is found.
01) Hold down the Forward button ) or Reverse button 8 for about 1 second – the search starts and stops automatically.
02) To start the search again, hold down the Forward button ) or Reverse button 8 again for about 1 second.
You can use the manual station search for fine adjustment or when the frequency of the station is known.
01) Press the
Forward button ) or Reverse button 8 briefly to increase or decrease the frequency in small steps.
02) Keep the Forward button ) or Reverse button 8 pressed until you are close to the frequency you require.
STORE STATION [ » MEMORY « ]
The Designer Audio Unit KH 2300 can store up to 40 stations (20 FM / 20 AM).
01) You set up the desired station by following the instructions relating to "Automatic station search/manual station search"
described above.
02) Press the MEMORY/CLK-ADJ button \ once. Next the station number shows for 5 seconds on the left side of the display @.
You must carry out the next step within those 5 seconds, otherwise the device switches itself into normal display. If this happens,
press the MEMORY/CLK-ADJ button
\ again.
03) Press the M-UP/REPEAT button = repeatedly until the required station number (1 to 20) is displayed.
Repeat this procedure for all the other stations you require have been stored.
SELECT STORED STATION
Press the M-UP/REPEAT button = repeatedly until the required station number (1 to 20) for the stored station is displayed @.
CD PLAYER
DANGER! The CD player uses a weak but sharply focussed laser beam to scan the surface of the CD. If the device is used improperly
then this light can be dangerous to the eyes - never open the case.
INSERTING A CD
01) To open the CD compartment ! pull the top edge towards the front.
02) Insert the CD with the playing side facing towards the device. If you have done this correctly, you should be looking at the
printed side. The CD must be placed securely on the central pin.
03) Close CD compartment
!.
04) Select the CD player with the device selector button
* CD. The display @ shows the total playing time and the number of tracks.
NOTE: When you insert a CD, if the display does not show the number of tracks and the total playing time then the CD is possibly
the wrong way round or dirty. Clean the CD with a CD cleaning cloth or insert the CD correctly and check the display again.
13
Page 14

BASIC FEATURES OF THE CD PLAYER
• START PLAY: Press the PLAY/PAUSE button & - to start playing.
• INTERRUPT PLAY (PAUSE): Press the PLAY/PAUSE button & - to interrupt playing. The duration of play flashes in the display @.
Press the PLAY/PAUSE button & once more - to continue playing.
• STOP PLAY: Press the STOP button 7 - to stop playing.
• NEXT TRACK: The
Forward button ) jumps forward one track each time it is pressed.
• PREVIOUS TRACK: The Reverse button 8 jumps backward one track each time it is pressed.
• FORWARD: Keeping the Forward button ) pressed goes forward within a track.
• REVERSE: Keeping the
Reverse button 8 pressed goes backward within a track.
The CD compartment ! can be opened anytime. Play stops automatically. Remove the CD only when movement has stopped
completely.
PROGRAMMING A TRACK SEQUENCE [ » TRACK MEMORY « ]
Programming a track sequence can only be done when the CD has stopped. You can program up to 20 titles.
01) Insert CD
02) Select the CD player using the device selector button *.
03) Press the MEMORY/CLK-ADJ button \. The display @ shows TRACK MEMORY.
04) Using the
Forward button ) or Reverse button 8 select the number of the track you wish to play first.
05) Press the MEMORY/CLK-ADJ button \. The track is now stored in the first programmed position (P-01).
Repeat steps 3) - 5) for up to 20 tracks. You can also program a track several times.
The programmed track sequence is stored until you remove the CD from the CD compartment, choose another function
or switch off the equipment.
START PROGRAMMED TRACK SEQUENCE
01) Press the MEMORY/CLK-ADJ button \. The display @ shows TRACK MEMORY and the programmed track.
02) Press the PLAY/PAUSE button & - to start playing in the programmed track sequence.
03) Press the STOP button
7 to switch of a programmed track sequence.
REPEAT FUNCTIONS [ » REPEAT « ]
• To repeat all the tracks on a CD, press the M-UP/REPEAT button
=. The display @ shows REPEAT.
• To repeat a single track on a CD, press the M-UP/REPEAT button = twice when the desired track is running. The display @
flashes REPEAT.
•To repeat a programmed track sequence on a CD, press the M-UP/REPEAT button
= when the programmed track sequence
is running. The display @ shows REPEAT.
•To switch off the repeat functions, press the M-UP/REPEAT button = repeatedly until the display @ no longer shows REPEAT.
PLAY TRACKS IN RANDOM SEQUENCE [ » RANDOM « ]
The RANDOM function selects a random choice of tracks from the inserted CD.
01) Insert CD
02) Select the CD player using the device selector button *.
03) Press the RANDOM button (. The display @ shows RANDOM.
04) Press the PLAY/PAUSE button & - to start playing a random track sequence.
CASSETTE RECORDER
INSERT CASSETTE
01) Open the protective flap + forwards. Behind it you will find the operating buttons for the cassette recorder (and the headphone
connector).
02) Press the button
` to open the cassette compartment. The cassette compartment opens automatically.
03) Insert the cassette with the tape side facing down. The tape should be tight and without loops.
04) Close the cassette compartment.
05) Select the cassette recorder using the device selector TAPE button
*.
14
Page 15

BASIC FEATURES OF THE CASSETTE RECORDER
• START PLAY: Press Button 3 to start playing.
• INTERRUPT PLAY (PAUSE): Press button | to interrupt playing. Press button | once more - to continue playing.
• STOP PLAY: Press the STOP button ` - to stop playing.
• FORWARD: Press button 1.
• REWIND: Press button
2.
RECORD CASSETTE
The Designer Audio Unit KH 2300 is equipped with automatic level control. Changes in the volume or tone selection
have no effect on the recording.
01) Insert a cassette and if necessary wind to the correct position from which the recording is to start.
02) Press the (PAUSE) button
|.
03) Press (RECORD) button 4. Button 3 goes down automatically with it.
04) Press the appropriate button * to select a device or the source for the recording.
05) Releasing the (PAUSE)
| button starts the recording.
06) You end the recording by pressing the button `.
CLEANING THE RECORDING HEADS
For cleaning the recording heads and tape guidance components use a suitable cleaning cassette.
STATEMENT OF CONFORMITY
We, Kompernaß Handelsgesellschaft mbH, Burgstr. 21, D-44867 Bochum, Germany, hereby declare that this product
conforms with the following EC regulations:
Electromagnetic compatibility: 89/336 EEC (EMC Directive)
Applicable harmonised standards: EN 55013
:06.90+A12:08.94+A13:12.96
EN 55020:12.94+A11:12.96
EN 61000-3-2:04.95+A1:1998+A2:1998
EN 61000-3-3:01.95
Model type: KH 2300
Description: MICRO DESIGNER AUDIO UNIT WITH VERTICAL CD PLAYER
Bochum, 31.08.2002
Hans Kompernaß
- Managing Director -
15
Page 16

INSTRUCTIONS DE SECURITE IMPORTANTES
Les instructions de sécurité fondamentales suivantes doivent être prises en compte dans tous les cas lors de l'utilisation
d'appareils électriques:
Lisez attentivement les informations suivantes relatives à la sécurité et à l'utilisation correcte de l'appareil. Avant
la lecture, ouvrez la page comportant les illustrations et familiarisez-vous avec l'ensemble des fonctions de l'appareil.
Conservez ces instructions avec soin et remettez-les à des tiers le cas échéant.
Ne pas mettre l'appareil en service si la prise, le cordon ou l'appareil sont endommagés.
Si l'appareil est tombé, le faire contrôler au préalable par un électricien spécialisé avant de le remettre en service.
L'intérieur de l'appareil est soumis à des tensions dangereuses. Ne jamais ouvrir le boîtier ni introduire des objets par les trous
d'aérations.
Evitez de faire pénétrer des liquides dans l'appareil. Si nécessaire, débrancher la prise.
Débranchez également la prise de la prise murale en cas d'apparition de défauts pendant le fonctionnement de l'appareil et avant
de nettoyer l'appareil.
Ne procédez vous-même à aucunes modifications ni réparations de l'appareil. De même, ne remplacez pas vous-même le cordon
de raccordement. Ne faites procéder à toutes réparations de l'appareil ou du cordon de raccordement que par un atelier spécialisé
ou un centre SAV. Toute réparation incorrecte peut être la source de dangers importants pour l'utilisateur.
Les enfants sous-estiment souvent les dangers lors de la manipulation d'appareils électriques. Ne laissez donc jamais des enfants
à proximité d'appareils électriques sans surveillance.
Ne laissez pas l'appareil sans surveillance pendant le fonctionnement.
Ne pas utiliser l'appareil dans les lieux humides (par exemple salles de bain) ou soumis à une poussière importante.
La chaleur accumulée à l'intérieur de l'appareil peut entraîner une panne ou un incendie.
N'exposez donc pas l'appareil à des températures extrêmes:
– éviter les rayons directs du soleil et la chaleur du chauffage
– ne pas boucher ou recouvrir les fentes d'aération de l'appareil
– dans la mesure du possible, laisser 10 cm de libre par rapport aux côtés de l'appareil
Ne pas installer l'appareil à proximité immédiate de matériaux inflammables (par exemple rideaux, liquides inflammables etc...).
Si la chaîne est transportée d'un lieu froid dans un lieu chaud (par exemple après le transport), il peut se former une condensation
à l'intérieur. Pour ne pas endommager la chaîne, attendre au moins 2 heures avant de la mettre en marche.
Lors d'un orage, les appareils raccordés au secteur peuvent être endommagés. En cas d'orage, débranchez donc la prise de la prise
murale et débranchez également la prise de l'antenne.
Pour que l'appareil soit coupé complètement de l'alimentation électrique, il faut absolument débrancher la prise de la prise murale.
Ce faisant, saisir la prise et jamais le cordon.
Protégez le cordon de raccordement de tout contact avec des surfaces chaudes et de tous autres endommagements et veillez
à ne pas le coincer.
Contrôlez régulièrement le cordon de raccordement en vue de détecter d'éventuels endommagements.
Lors de l'utilisation, déroulez complètement le cordon.
Veillez à ce qu'il ne soit pas possible de trébucher sur le cordon de raccordement.
En cas d'absence prolongée, débrancher la prise et retirer les piles de la télécommande.
L'appareil est conçu pour un usage domestique.
Avis: La chaîne est équipée de pieds en caoutchouc antidérapants. Etant donné que les sols peuvent être constitués des matériaux
les plus divers et traités avec les produits d'entretien les plus divers, il ne peut être entièrement exclu que certaines de ces
substances contiennent des composants susceptibles d'attaquer et de ramollir les pieds en caoutchouc. Le cas échéant, posez
un support antidérapant sous les pieds.
Protection de l'environnement: Ne jamais mélanger des piles usagées et des piles neuves. Dans l'intérêt de notre environnement,
n'éliminez pas
les piles usagées dans les ordures ménagères, mais remettez-les à des centres de collecte correspondants.
INSTALLATION ET RACCORDEMENT
Suivez obligatoirement les instructions mentionnées avant de mettre la chaîne en service pour la première fois et ne branchez
la prise qu'à la fin.
1) Retirez la chaîne et les enceintes de l'emballage avec précaution.
2) Choisissez l'emplacement adapté pour votre chaîne; cet emplacement devrait être
… horizontal
… sec et exempt de poussière
… ne pas se trouver à proximité de radiateurs ni en plein soleil.
3) IMPORTANT: Retirez les dispositifs de blocage de transport /les rubans adhésifs au niveau du logement de la platine laser
et des cassettes !
Ouvrez le logement de la platine laser
! en tirant sur le bord supérieur et retirez le blocage de transport rouge (refermer ensuite
le logement de la platine laser).
16
F
Page 17

4) Raccordez les deux enceintes. Les raccordements des enceintes Y sont marqués en conséquence (L=GAUCHE / R=DROITE).
Conseils pour l'installation des enceintes:
Dans la mesure du possible, installer les enceintes à hauteur de la tête
Ne pas recouvrir les enceintes par des rideaux ou des objets
Sur des étagères, installer les enceintes de telle sorte que le cache avant soit bord à bord avec le bord avant de l'étagère.
Pour éviter une résonance, placer éventuellement un tapis en caoutchouc sous les enceintes.
5) Pour raccorder un appareil externe (par exemple une platine disque), utiliser les raccordements cinch U.
6) Pour la réception radio FM, raccorder l'antenne 75 Ohm (antenne de toit ou raccordement au réseau câblé) au raccordement de
l'antenne O. Si celle-ci n'est pas à disposition, brancher l'antenne volante fournie au contact médian du raccordement de l'antenne O.
L'antenne de réception des ondes moyennes est intégrée à l'appareil.
7) Raccorder alors la prise à une prise murale 230 V.
8) Placer les piles (non fournies) dans la télécommande (2x AA Mignon LR6 1,5 V):
– Ouvrir le couvercle au dos de la télécommande
– Mettre les piles en place. Respecter la polarité (voir marquage au fond du compartiment à piles)
– Refermer le couvercle
MONTAGE MURAL
La chaîne et les enceintes correspondantes peuvent être montées au mur.
Les vis et les dispositifs de fixation muraux sont fournis. Posez l'appareil verticalement sur un mur solide.
Les orifices pour les vis doivent être percés les uns sous les autres à un écart de 14 cm.
Afin que les vis puissent bien prendre dans les dispositifs de fixation
P au dos de la chaîne et des enceintes, les têtes des vis doivent
dépasser du mur d'env. 3 mm.
ELEMENTS DE COMMANDE
! Logement de la platine laser 6 Logement à cassettes
@ Affichage 7 Arrêt (platine laser)
# Récepteur des signaux de la télécommande 8 Touche de retour en arrière (*)
$ Touche mono/stéréo (pour mode radio FM uniquement) 9 Commutation de l'affichage
% Touche d'ambiances 0 Touche TIMER (réveil)
^ Commutation silence - Touche SLEEP (sommeil)
& Lecture /pause platine laser = Touche M-UP/REPEAT (répétition) (*)
* Touche de sélection de l'élément \ Touche MEMORY/CLK-ADJ (mémoire) (*)
( Touche de lecture aléatoire Q Réduction du volume
) Touche d'avance rapide (*) W Augmentation du volume
_ Touche de sélection de la bande E Touche MARCHE/ARRET (attente)
+ Clapet de protection R Affichage de service
| Touche pause (cassette uniquement) T Prise
` Touche d'éjection (cassette uniquement) Y Raccordements des enceintes
1 Avance rapide (cassette uniquement) U Raccordements cinch pour appareil externe (AUX)
2 Rembobinage (cassette uniquement) I Système réduisant les bruits à l'enregistrement (cassette)
3 Touche de lecture (cassette uniquement) O Raccordement de l'antenne
4 Touche d'enregistrement (cassette uniquement) P Dispositif de suspension pour montage mural
5 Prise casque
Les éléments de commande marqués d'un (*) ont plusieurs fonctions, en fonction de l'appareil sélectionné (par exemple mode radio
ou platine laser). Consultez les différents chapitres correspondants.
Les éléments de commande
| à 4 et I commandent exclusivement la platine cassette.
COMMANDE
MISE EN MARCHE ET A L'ARRET [ » POWER / STAND-BY « ]
• La prise branchée, l'appareil se trouve en mode d'attente. L'affichage de service
R est allumé et rouge.
• Appuyez sur la touche MARCHE/ARRET E. L'appareil se trouve alors en mode de service. L'affichage de service R est allumé et vert.
• Pour revenir au mode d'attente, appuyer à nouveau sur la touche MARCHE/ARRET E.
• En cas d'absence prolongée, débrancher la prise.
17
F
Page 18

SELECTION DE L'APPAREIL / DE LA SOURCE [ » CD / TUNER / TAPE / AUX « ]
• Pour sélectionner un appareil ou la source, appuyez sur la touche marquée de manière correspondante
*:
CD = platine laser TUNER = radio TAPE = platine cassette AUX = appareil externe, par exemple platine disque
REGLAGE DU VOLUME [ » VOLUME / MUTE « ]
• Vous augmentez le volume avec la
touche W.
• Vous diminuez le volume avec la touche Q.
• Si l'on appuie sur la touche silence ^, les enceintes et le casque sont coupés (commutation silence).
REGLAGE DE L'AMBIANCE [ » CLASSIC / ROCK / POP « ]
La touche de sélection du mode d'ambiance
% vous permet d'adapter la qualité du son d'un morceau en fonction de son style musical,
et d'améliorer ainsi le plaisir de l'audition. Le mode respectivement réglé, CLASSIC, ROCK ou POP, est affiché sur l'affichage
@ (pas
d'affichage = son neutre).
CASQUE [ » PHONES « ]
La prise casque
5 permet de raccorder un casque stéréo 8-32 Ohm à prise à jack de 3,5 mm. Le branchement du casque entraîne
la coupure immédiate des enceintes. Tenez compte du fait qu'un volume important peut entraîner une lésion de l'oreille.
REGLAGE DE L'HEURE
01) Pour pouvoir régler l'heure, l'appareil doit être en mode d'attente (l'affichage de service R est allumé et rouge).
02) Appuyer une fois sur la touche MEMORY/CLK-ADJ (mémoire) \ – l'affichage de l'heure clignote.
03) A l'aide des touches d'avance ) et de retour en arrière 8, régler l'heure.
04) Appuyer à nouveau sur la touche MEMORY/CLK-ADJ (mémoire) \ – l'affichage des minutes clignote.
05) A l'aide des touches
d'avance ) et de retour en arrière 8, régler les minutes.
06) Appuyer à nouveau sur la touche MEMORY/CLK-ADJ (mémoire) \ – l'affichage cesse de clignoter et l'horloge fonctionne
(les „deux points” clignotent).
REGLAGE DU REVEIL ET DE L'HEURE DE COUPURE [ » TIMER « ]
Si vous activez l'heure de réveil, vous pouvez vous faire réveiller à tout moment par votre chaîne.
01) Avec la touche correspondante
*, sélectionner l'appareil / la source souhaitée (CD, TAPE ou TUNER).
02) Préparer la source voulue, c'est-à-dire, pour TUNER (RADIO), sélectionner la station voulue, pour TAPE (PLATINE CASSETTE),
mettre une cassette dans le logement et l'embobiner jusqu'à l'endroit voulu, ou insérer un disque compact et programmer
le cas échéant l'ordre des titres.
03) Appuyer sur la touche TIMER
0. TIMER est affiché sur l'affichage @.
AVIS: Pour les étapes suivantes, vous avez respectivement 5 secondes. Au-delà, le processus est annulé.
Recommencez alors à l'étape 4).
04) Appuyer 2 x sur la touche 9 MODE/REMAIN (commutation de l'affichage). L'affichage de l'heure apparaît sur l'affichage @
et TIMER ON clignote.
05) Appuyer une fois sur la touche MEMORY/CLK-ADJ (mémoire)
\ – l'affichage des heures clignote.
06) A l'aide des touches d'avance ) et de retour en arrière 8, régler l'heure.
07) Appuyer à nouveau sur la touche MEMORY/CLK-ADJ (mémoire) \ – l'affichage des minutes clignote.
08) A l'aide des touches d'avance ) et de retour en arrière 8, régler les minutes.
09) Appuyer à nouveau sur la touche MEMORY/CLK-ADJ (mémoire)
\ – l'heure de réveil est alors mémorisée.
10) Si vous voulez vous faire réveiller par une cassette: appuyer sur la touche de lecture 3.
11) Eteindre ensuite la chaîne (touche MARCHE/ARRET E ).
Si vous activez l'heure de coupure, votre chaîne s'éteint toujours à l'heure réglée.
01) Appuyer sur la touche TIMER
0.TIMER est affiché sur l'affichage @.
AVIS: Pour les étapes suivantes, vous avez respectivement 5 secondes. Au-delà, le processus est annulé.
Recommencez alors à l'étape 2).
02) Appuyer 3 x sur la touche
9 MODE/REMAIN (commutation de l'affichage). L'affichage de l'heure apparaît sur l'affichage @
et TIMER OFF clignote
03) Appuyer une fois sur la touche MEMORY/CLK-ADJ (mémoire) \ – l'affichage des heures clignote.
04) A l'aide des touches d'avance ) et de retour en arrière 8, régler l'heure.
05) Appuyer à nouveau sur la touche MEMORY/CLK-ADJ (mémoire) \ – l'affichage des minutes clignote.
06) A l'aide des touches
d'avance ) et de retour en arrière 8, régler les minutes.
07) Appuyer à nouveau sur la touche MEMORY/CLK-ADJ (mémoire) \ – l'heure de coupure est alors mémorisée.
Pour couper les fonctions du réveil, appuyer à plusieurs reprises sur la touche TIMER
0 jusqu'à ce que TIMER disparaisse
de l'affichage @.
18
F
Page 19

ACTIVATION DE LA FONCTION DE SOMMEIL [ » SLEEP « ]
Vous pouvez fixer une durée de 90 à 10 minutes, au bout de laquelle l'appareil doit s'éteindre, de manière unique.
• Pour activer une coupure au bout de 90 minutes, appuyer brièvement 1 x sur la touche SLEEP (sommeil) -.
• Pour régler une coupure au bout d'un temps plus court, maintenir la touche SLEEP (sommeil) - appuyée jusqu'à ce que la durée
voulue apparaisse sur l'affichage.
• Pour couper la fonction de sommeil, appuyer à plusieurs reprises sur la touche SLEEP (sommeil)
- jusqu'à ce que SLEEP disparaisse
de l'affichage @.
RADIO
ORIENTATION DE L'ANTENNE
Si l'antenne volante est utilisée pour la réception FM:
• L'antenne volante doit être déroulée complètement
• Essayez diverses orientations pour déterminer la meilleure position de l'antenne
• Le cas échéant, fixez l'antenne au mur à l'aide d'un ruban adhésif.
Pour la réception OM, déterminez également la meilleure position pour l'antenne intégrée à l'appareil en essayant
diverses orientations.
FONCTIONNEMENT DE LA RADIO / SELECTION DE LA MODULATION (FM/OM)
01) A l'aide de la touche de sélection de l'élément *, sélectionner TUNER (= radio).
02) Si l'on appuie à nouveau sur la touche TUNER BAND (RADIO/BANDE)
_, on peut commuter entre FM et OM.
RECHERCHE AUTOMATIQUE PAR BALAYAGE DES STATIONS / RECHERCHE MANUELLE
En cas de recherche automatique par balayage des stations, la fréquence est augmentée ou réduite jusqu'à ce qu'une station
ayant une puissance suffisante soit trouvée.
01) Maintenir la touche d'avance ) ou de retour en arrière 8 appuyée pendant env. 1 seconde – la recherche démarre
et s'arrête automatiquement.
02) Pour relancer la recherche, maintenir la touche
d'avance ) ou de retour en arrière 8 à nouveau appuyée pendant
env. 1 seconde.
Vous pouvez utiliser la recherche manuelle pour le réglage de précision sur une station ou si vous connaissez la fréquence
de la station recherchée.
01) Appuyer brièvement seulement sur la touche
d'avance ) ou de retour en arrière 8 pour augmenter ou réduire la fréquence
par petites étapes.
02) Maintenez la touche
d'avance ) ou de retour en arrière 8 appuyée jusqu'à ce que vous approchiez de la fréquence voulue.
MEMORISATION DES STATIONS [ » MEMORY « ]
La chaîne KH 2300 peut mémoriser jusqu'à 40 stations (20 FM / 20 OM).
01) Réglez la station voulue comme il l'est décrit au chapitre „Recherche automatique par balayage des stations / recherche automatique“.
02) Appuyer une fois sur la touche MEMORY/CLK-ADJ (mémoire)
\. L'affichage de l'emplacement de programme apparaît pendant
5 secondes sur le côté gauche de l'affichage
@. Vous devez procéder à l'étape suivante pendant ces 5 secondes, sinon l'appareil
revient à l'affichage normal. Dans ce cas, appuyez à nouveau sur la touche MEMORY/CLK-ADJ (mémoire) \.
03) Appuyer à plusieurs reprises sur la touche M-UP/REPEAT (répétition) = jusqu'à ce que l'emplacement de programme voulu (1 à 20)
soit affiché. Répétez cette procédure pour toutes les stations que vous désirez mémoriser.
SELECTION D'UNE STATION MEMORISEE
En mode radio, appuyer à plusieurs reprises sur la touche M-UP/REPEAT = jusqu'à ce que l'emplacement de programme
voulu apparaisse sur l'affichage @ avec la station mémorisée.
PLATINE LASER
DANGER! Dans la platine laser, la surface du disque compact est balayée par un rayon laser de faible intensité, mais très concentré.
En cas d'utilisation incorrecte, ce rayon peut constituer un danger pour les yeux – n'ouvrir en aucun cas l'appareil !
MISE EN PLACE DU DISQUE COMPACT
01) Pour ouvrir le logement de la platine laser !, tirer le bord supérieur vers l'avant.
02) Mettre le disque compact en place, le côté pressé vers l'appareil. Si le disque compact est en place correctement, vous voyez
donc le côté imprimé du disque compact. Le disque compact doit être poussé à fond sur l'axe (au centre).
03) Fermer le logement de la platine laser
!.
19
F
Page 20

04) A l'aide de la touche de sélection de l'élément CD *, sélectionner la platine laser. La durée totale du disque et le nombre de titres
sont affichés sur l'affichage @.
AVIS: Si le nombre de titres et la durée totale du disque ne sont pas affichés sur l'affichage après insertion du disque, il est possible
que le disque ait été inséré dans le mauvais sens ou qu'il soit souillé. Nettoyez le disque compact avec une lingette de nettoyage
spéciale disques compacts ou insérez le disque dans le bon sens et contrôlez à nouveau l'affichage.
FONCTIONS FONDAMENTALES DE LA PLATINE LASER
• LANCEMENT DE LA LECTURE: Appuyer sur la touche & PLAY/PAUSE (lecture/pause) – la lecture est lancée.
• INTERRUPTION DE LA LECTURE (PAUSE): Appuyer sur la touche
& PLAY/PAUSE (lecture/pause) – la lecture est interrompue.
La durée écoulée clignote sur l'affichage @. Si l'on appuie à nouveau sur la touche & PLAY/PAUSE (lecture/pause), la lecture reprend.
• ARRET DE LA LECTURE: Appuyer sur la touche 7 STOP – la lecture est arrêtée.
• SAUT D'UN TITRE VERS L'AVANT: La touche
d'avance ) permet de sauter au titre suivant à chaque pression.
• SAUT D'UN TITRE VERS L'ARRIERE: La touche de retour en arrière 8 permet de sauter au titre précédent à chaque pression.
• AVANCE RAPIDE: Maintenir appuyée la touche d'avance ) rapide pour avancer au sein d'un titre.
• RETOUR EN ARRIERE RAPIDE: Maintenir appuyée la touche
de retour en arrière 8 rapide pour revenir en arrière au sein d'un titre.
Il est possible à tout moment d'ouvrir le logement de la platine laser !. La lecture s'arrête alors automatiquement. Mais attendez
que le disque compact soit complètement arrêté pour le retirer.
PROGRAMMATION DE L'ORDRE DES TITRES [ » TRACK MEMORY « ]
La programmation de l'ordre des titres n'est possible que si le disque compact est à l'arrêt. Il est possible de programmer
jusqu'à 20 titres.
01) Mettre le disque compact en place.
02) Avec la touche de sélection de l'élément * CD, sélectionner la platine laser.
03) Appuyer sur la touche MEMORY/CLK-ADJ (mémoire) \. TRACK MEMORY apparaît sur l'affichage @.
04) A l'aide des touches
d'avance ) ou de retour en arrière 8, sélectionner le numéro du titre devant être joué en premier.
05) Appuyer sur la touche MEMORY/CLK-ADJ (mémoire) \. Le titre est alors mémorisé sur le premier emplacement de programme (P-01).
Répétez les étapes 3) à 5) pour jusqu'à 20 titres. Vous pouvez également programmer un titre plusieurs fois.
La suite de titres programmés reste mémorisée jusqu'à ce que le disque compact soit retiré de son logement, qu'une autre fonction
soit sélectionnée ou que l'appareil soit éteint.
LANCEMENT DES TITRES PROGRAMMES
01) Appuyer sur la touche MEMORY/CLK-ADJ (mémoire) \.TRACK MEMORY apparaît sur l'affichage @, avec les titres programmés.
02) Appuyer sur la touche & PLAY/PAUSE (lecture/pause) – la lecture est lancée et a lieu dans l'ordre que vous avez programmé.
03) Pour effacer une programmation, appuyez sur la touche
7 STOP.
FONCTIONS DE REPETITION [ » REPEAT « ]
• Pour répéter tous les titres d'un disque compact, appuyer sur la touche M-UP/REPEAT (répétition)
=. REPEAT ALL apparaît
sur l'affichage @.
• Pour répéter un seul titre, appuyer 2 x sur la touche M-UP/REPEAT (répétition)
= pendant le passage du titre correspondant.
REPEAT ONE apparaît sur l'affichage @.
• Pour répéter une suite de titres programmée, appuyer sur la touche M-UP/REPEAT (répétition) = pendant le passage
de la suite de programme. REPEAT apparaît sur l'affichage @.
• Pour arrêter la fonction de répétition, appuyer sur la touche M-UP/REPEAT
= jusqu'à ce que REPEAT ALL ou REPEAT ONE
disparaisse de l'affichage @.
ECOUTE ALEATOIRE [ » RANDOM « ]
Avec la fonction RANDOM (lecture aléatoire), l'ordre des titres du disque compact inséré est sélectionné au hasard.
01) Mettre le disque compact en place.
02) Avec la touche de sélection de l'élément
* CD, sélectionner la platine laser.
03) Appuyer sur la touche RANDOM (lecture aléatoire) (. RANDOM apparaît sur l'affichage @.
04) Appuyer sur la touche & PLAY/PAUSE (lecture/pause) – la lecture démarre dans un ordre aléatoire.
20
F
Page 21

PLATINE CASSETTE
MISE EN PLACE DE LA CASSETTE
01) Ouvrir le clapet de protection + vers l'avant. Les touches de commande de la platine cassette (et la prise casque) se trouvent
derrière ce clapet.
02) Pour ouvrir le logement de la platine cassette, appuyer sur la touche
`. Le logement de la platine cassette s'ouvre automatiquement.
03) Insérer la cassette, la bande vers le bas. La bande doit être bien tendue et ne pas former de boucles.
04) Refermer le logement de la platine cassette.
05) A l'aide de la touche de sélection de l'élément
* TAPE, sélectionner la platine cassette.
FONCTIONS FONDAMENTALES DE LA PLATINE CASSETTE
• LANCEMENT DE LA LECTURE: Appuyer sur la touche 3 – la lecture est lancée.
• INTERRUPTION DE LA LECTURE (PAUSE): Appuyer sur la touche | – la lecture est interrompue. Si l'on appuie à nouveau
sur la touche |, la lecture reprend.
• ARRET DE LA LECTURE: Appuyer sur la touche
` STOP – la lecture est arrêtée.
• AVANCE RAPIDE: Appuyer sur la touche 1.
• RETOUR EN ARRIERE RAPIDE: Appuyer sur la touche 2.
ENREGISTREMENT DE CASSETTES
La chaîne KH 2300 est équipée d'une commande automatique. Les modifications du volume ou du son sélectionné n'ont pas
d'incidence sur l'enregistrement.
01) Insérer une cassette et l'embobiner le cas échéant jusqu'à l'endroit voulu où doit commencer l'enregistrement.
02) Appuyer sur la touche (PAUSE)
|.
03) Appuyez sur la touche (ENREGISTREMENT)
4. La touche 3 est enfoncée automatiquement en même temps.
04) Appuyez sur la touche marquée en conséquence * pour sélectionner un élément ou une source pour l'enregistrement.
05) Lorsque l'on débloque la touche (PAUSE) |, l'enregistrement est lancé.
06) Terminez l'enregistrement en appuyant sur la touche
`.
NETTOYAGE DES TETES DE LECTURE ET D'ENREGISTREMENT
Pour le nettoyage des têtes de lecture et d'enregistrement et des éléments de guidage de la bande, utilisez régulièrement
une cassette de nettoyage adaptée.
CERTIFICAT DE CONFORMITE
Le société Kompernaß Handelsgesellschaft mbH, Burgstr. 21, D-44867 Bochum, Allemagne,
certifie par le présent document que ce produit est conforme aux directives européennes suivantes:
Compatibilité électromagnétique: 89/336 EEC (EMC Directive)
Normes correspondantes applicables: EN 55013
:06.90+A12:08.94+A13:12.96
EN 55020:12.94+A11:12.96
EN 61000-3-2:04.95+A1:1998+A2:1998
EN 61000-3-3:01.95
Machine/type : KH2300
Désignation : (MICRO) CHAÎNE DESIGN À PLATINE LASER VERTICALE
Bochum, le 31.08.2002
Hans Kompernaß
- Directeur/Gérant-
21
F
Page 22

IMPORTANTI INFORMAZIONI DI SICUREZZA
Nell'impiego di apparecchi elettrici sono in ogni caso da osservare e rispettare le seguenti informazioni di sicurezza fondamentali:
Si prega di leggere attentamente le seguenti informazioni, per garantire la massima sicurezza nonché un impiego
appropriato. Prima della lettura aprite completamente la pagina delle illustrazioni, per familiarizzarvi innanzitutto
con tutte le funzioni dell'apparecchio. Conservate sempre accuratamente le presenti informazioni ed inoltrarle anche
agli eventuali futuri proprietari.
Non mettere mai in funzione l'apparecchio dopo aver constatato dei danneggiamenti al cavo d'alimentazione o alla spina
di corrente o all'apparecchio stesso.
Nel caso l'apparecchio fosse una volta caduto, sarà innanzitutto necessario lasciarlo verificare presso un elettricista specializzato,
prima di rimetterlo in funzione.
All'interno dell'apparecchio si possono riscontrare pericolosissime scosse elettriche. Non aprire mai il contenitore e non introdurre
alcuni oggetti o corpi estranei attraverso le aperture delle prese d'aria.
Evitare di fare pervenire del liquido all'interno dell'apparecchio. In caso d'emergenza, è necessario estrarre immediatamente
la spina dalla presa di corrente!
La spina deve estratta dalla presa di corrente anche nei casi di disfunzione durante il funzionamento dell'apparecchio nonché
prima di eseguirne la pulizia.
Non apportare alcune modifiche all'apparecchio o eseguirne delle riparazioni su propria iniziativa. Neanche il cavo d'alimentazione
può essere sostituito su propria iniziativa. Le eventuali riparazioni all'apparecchio devono essere affidate ad officine specializzate
ovvero al centro del servizio di assistenza. In seguito a riparazioni effettuate in modo non appropriato, possono persistere degli
imminenti pericoli per l'utente.
Molto spesso i bambini sono ignari dei pericoli a cui sono esposti durante la manipolazione con apparecchi elettrici. Pertanto,
non lasciate mai insorvegliati i Vostri bambini in prossimità di apparecchi elettrici.
Non impiegare l'apparecchio in stato insorvegliato.
L'apparecchio non deve essere impiegato in ambienti umidi, quali ad esempio bagni e servizi oppure in ambienti esposti ad elevata
formazione di polvere.
Il calore accumulatosi all'interno dell'apparecchio può causare dei difetti o perfino incendio dello stesso.
Pertanto, è necessario evitare di esporre l'apparecchio ad eccessive fonti di calore:
– evitare la diretta esposizione ai raggi solari e al calore di termosifoni
– non coprire mai le prese d'aria dell'apparecchio
– lasciare possibilmente uno spazio libero di almeno 10 cm nei lati dell'apparecchio
L'apparecchio non deve essere disposto nelle immediate vicinanze di materiali infiammabili, quali ad esempio tendaggi, liquidi
infiammabili, ecc.
Se trasportate l'impianto Design da un ambiente freddo in un posto caldo, all'interno non è da escludere una formazione di acqua
condensata. Al fine di proteggere l'impianto Design contro eventuali danneggiamenti, bisogna evitare di accenderlo, non prima
che siano trascorse almeno 2 ore.
Nel caso di un temporale, gli apparecchi collegati alla rete elettrica possono subire dei danni. Pertanto, durante i temporali
si raccomanda sempre di estrarre la spina dalla presa di corrente e di staccare anche la spina dell'antenna.
Per staccare completamente l'apparecchio dalla rete di corrente, occorre estrarre la spina di rete dalla presa elettrica. Non estrarre
mai la spina dalla presa di corrente, tirandola dal cavo d'alimentazione.
Il cavo d'alimentazione deve essere protetto contro superfici calde o altri pericoli di danneggiamento, inoltre, sono da evitare incastramenti.
Controllare periodicamente il cavo d'alimentazione sulla presenza di eventuali danneggiamenti.
Per l'impiego dell'apparecchio è necessario svolgere completamente il cavo d'alimentazione.
Accertarsi che il cavo d'alimentazione non costituisca dei pericoli di inciampare.
Estrarre sempre la spina dalla presa di corrente in caso di assenza prolungata e rimuovere le batterie dal telecomando.
L'apparecchio è prevalentemente stabilito per l'impiego in settori privati.
Avvertenza: L'impianto Design è provvisto di piedini di gomma antiscivolanti. Poiché le superfici dei piani d'appoggio sono realizzate
con i più svariati materiali e vengono trattate con diversi detergenti e mezzi di cura, non è possibile escludere del tutto, che alcune di
queste sostanze contengano dei componenti che possono avere un'azione aggressiva su questi piedini di gomma, con la conseguenza
del loro rammollimento. Disporre all'occorrenza un ripiano non scivolante sotto i piedini.
Protezione ambientale:
Non utilizzare mai le batterie usate insieme a batterie nuove. Non smaltire mai le batterie esaurite
nei normali rifiuti urbani, bensì recarle ai rispettivi punti di raccolta, nell'interesse e per la protezione del nostro ambiente.
INSTALLAZIONE E COLLEGAMENTO
È assolutamente necessario attenersi alle istruzioni presenti, prima di mettere per la prima volta in funzione l'impianto Design. Inoltre,
inserire la spina nella presa di corrente solamente dopo aver terminato i necessari lavori.
1) Rimuovere con molta cautela l'impianto Design e le casse acustiche dalla confezione.
22
I
Page 23

2) Scegliere un posto adatto dove piazzare il Vostro impianto Design. Esso dovrebbe essere
… orizzontale
… asciutto r privo di polvere
… e non trovarsi in prossimità di termosifoni o nella diretta esposizione ai raggi solari.
3) IMPORTANTE: Rimuovere tutte le sicure di trasporto/nastri adesivi dal vano dei compact disc e delle cassette !
Aprire il vano del compact disc
!, trascinandolo nel bordo superiore e rimuovere successivamente la sicura di trasporto rossa
(dopodiché chiudere nuovamente il vano compact disc).
4) Collegare a questo punto le due casse acustiche. I collegamenti delle casse acustiche Y sono rispettivamente contrassegnati
(L = SINISTRA / R = DESTRA).
Espedienti per l'installazione delle casse acustiche:
Disporre possibilmente le casse acustiche all'altezza del capo
Non coprire le casse acustiche con delle tende o altri simili oggetti
Integrare le casse acustiche nello scaffale in maniera tale, che il pannello frontale sia allineato con il bordo anteriore dello scaffale
Al fine di prevenire dei rimbombi, disporre eventualmente una piastra di gomma sotto le casse acustiche.
5) Per collegare un apparecchio esterno (ad esempio un giradischi), sono da utilizzare i collegamenti RCA
U.
6) Per la radioricezione delle emittenti in FM, occorre collegare l'antenna da 75 Ohm (antenna centralizzata oppure collegamento)
RADIO/TV via cavo O. Se non sono disponibili questi allacciamenti, sarà necessario applicare l'antenna a cavo fornita sul contatto
centrale del collegamento per l'antenna
O.
L'antenna per la ricezione delle emittenti in AM è integrata nell'apparecchio.
7) Collegare a questo punto la spina di rete ad una presa di corrente da 230 V.
8) Introdurre le batterie (non comprese in dotazione) nel telecomando (2x AA Mignon LR6 1,5 V):
– Aprire il coperchio situato nella parte posteriore del telecomando
– Introdurre le batterie. Rispettare la corretta polarità (si veda alla scritta applicata sulla base dell'alloggiamento delle batterie)
– Chiudere nuovamente il coperchio
MONTAGGIO ALLA PARETE
L'impianto Design e le rispettive casse acustiche possono essere anche montati alla parete.
Nella dotazione sono comprese anche le rispettive viti di fissaggio e supporti per la parete. Applicare l'apparecchio ad una parete
stabile in posizione verticale.
Le forature per le viti devono essere eseguite con il trapano l'una sopra l'altra ad una distanza di 14 cm.
Affinché le viti possano venire correttamente in contatto dentro i supporti
P situati nella parte posteriore dell'impianto Design
e delle casse acustiche, è necessario che le teste delle viti sporgano di ca. 3 mm dalla parete.
ELEMENTI DI COMANDO
! vano compact disc 6 vano cassette
@ display 7 tasto stop (CD)
# ricevitore dei segnali del telecomando 8 tasto di ritorno (*)
$ tasto Mono/Stereo (solo per radioricezione in FM) 9 commutazione dell'indicazione
% selettore audio 0 tasto TIMER
^ stop audio / ammutolazione - tasto SLEEP
& riproduzione CD / pausa = tasto M-UP/REPEAT (*)
* tasti di selezione della fonte \ tasto MEMORY/CLK-ADJ (*)
( tasto RANDOM Q riduzione del volume
) tasta avanti (*) W aumento del volume
_ tasti di selezione banda E tasto ON/OFF (standby)
+ coperchio di protezione R spia di funzionamento
| tasto pausa (solo cassette) T spina di rete
` tasto stop/espulsione (solo cassette) Y collegamento casse acustiche
1 avvolgimento in avanti (solo cassette) U collegamenti RCA per apparecchio esterno (AUX)
2 avvolgimento all'indietro (solo cassette) I soppressione rumori in registrazione (solo cassette)
3 tasto di riproduzione (solo cassette) O collegamento antenna
4 tasto di registrazione (solo cassette) P sospensione per il montaggio alla parete
5 collegamento per cuffia
Gli elementi contrassegnati con una (*), a seconda della fonte attivata (ad esempio funzionamento radio oppure compact disc),
sono provvisti di parecchie funzioni diverse. A tal fine si prega di leggere attentamente i rispettivi capitoli.
Gli elementi di comando
| fino 4 e I sono previsti esclusivamente per il funzionamento del registratore a cassette.
23
I
Page 24

IMPIEGO
ACCENSIONE E SPEGNIMENTO [ » POWER / STANDBY « ]
• Dopo aver inserito la spina di rete nella presa di corrente, l'apparecchio si trova nel modo standby. La spia di funzionamento
R
si illumina in color rosso.
• Premere il tasto ON/OFF
E. A questo punto l'apparecchio si trova nel modo di disponibilità. La spia di funzionamento R
si illumina in color verde.
• Per ricommutare al modo standby, basta premere nuovamente il tasto ON/OFF E.
• Estrarre la spina di rete dalla presa di corrente in caso di assenza prolungata.
SELEZIONE DELL'APPARECCHIO/FONTE AUDIO [ » CD / TUNER / TAPE / AUX « ]
• Premere il tasto rispettivamente contrassegnato
*, per selezionare un apparecchio ovvero fonte audio:
CD = lettore compact disc TUNER = radio TAPE = registratore a cassette
AUX = apparecchio esterno, per esempio giradischi
REGOLAZIONE DEL VOLUME [ » VOLUME / MUTE « ]
• Il volume può essere aumentato tramite il
tasto W.
• Il volume può essere ridotto tramite il
tasto Q.
• Premendo il tasto stop audio ^, vengono disinserite le casse acustiche e la cuffia (ammutolazione).
REGOLAZIONE DELL'AUDIO [ » CLASSIC / ROCK / POP « ]
Tramite il tasto di selezione dell'audio
% potete adattare a piacere la qualità dell'audio ai rispettivi tipi di brani musicali, per poter
così godere il massimo dell'acustica. La rispettiva selezione CLASSIC, ROCK oppure POP viene visualizzata nel display @. Nel caso
di nessuna visualizzazione, significa che è attivo l'audio normale).
CUFFIA [ » PHONES « ]
Al collegamento della cuffia
5 si può collegare una cuffia stereo da 8-32 Ohm con spina a jack da 3,5 mm. Non appena viene
collegata la cuffia, vengono immediatamente disattivate le casse acustiche. Si prega di osservare, che un volume troppo alto
può causare gravi danni all'udito.
REGOLAZIONE DELL'ORA
01) Per poter regolare l'ora, è necessario che l'apparecchio si trovi nel modo standby (spia di funzionamento R illuminata in color rosso).
02) Premere una volta il tasto MEMORY/CLK-ADJ
\ – a questo punto lampeggia l'indicazione dei secondi.
03) Tramite i tasti avanti ) ossia indietro 8 potete ora regolare l'ora.
04) Premere nuovamente il tasto MEMORY/CLK-ADJ \ – a questo punto lampeggia l'indicazione dei minuti.
05) Tramite i tasti
avanti ) ossia indietro 8 potete ora regolare i minuti.
06) Premere nuovamente il tasto MEMORY/CLK-ADJ \ – l'indicazione smette ora di lampeggiare e l'orologio incomincia a funzionare
normalmente (a questo punto lampeggiano i "due punti").
IMPOSTAZIONE DEI TEMPI D'ACCENSIONE E SPEGNIMENTO [ » TIMER « ]
Se avete attivato il timer per l'accensione, allora potete farvi svegliare ad un qualsiasi orario dal Vostro impianto Design.
01) Selezionare tramite il rispettivo tasto * l'apparecchio / fonte audio desiderata (CD, TAPE oppure TUNER).
02) Preparare la fonte audio, per esempio, sintonizzare l'emittente desiderata nella selezione del TUNER (RADIO), oppure introdurre
una cassetta nella selezione del TAPE (REGISTRATORE A CASSETTE) ed avvolgerla al brano desiderato oppure introdurre un compact
disc e programmare eventualmente una sequenza di brani desiderati.
03) Premere il tasto
0 del TIMER. Nel display @ viene ora visualizzato TIMER.
AVVERTENZA: Per l'esecuzione dei passi seguenti avete rispettivamente 5 secondi di tempo. In caso contrario verrà
annullato il procedimento. Dopodiché sarà necessario incominciare nuovamente dal passo 4).
04) Premere due volte il tasto
9 MODE/REMAIN. A questo punto nel display @ viene visualizzata l'ora e TIMER ON lampeggia.
05) Premere una volta il tasto MEMORY/CLK-ADJ \ – a questo punto lampeggia l'indicazione dell'ora.
06) Tramite i tasti avanti ) ossia indietro 8 potete adesso regolare l'ora.
07) Premere nuovamente il tasto MEMORY/CLK-ADJ
\ – a questo punto lampeggia l'indicazione dei minuti.
08) Tramite i tasti avanti ) ossia indietro 8 potete ora regolare i minuti.
09) Premere nuovamente il tasto MEMORY/CLK-ADJ \ – a questo punto è stata memorizzata l'ora d'accensione.
10) Se desiderate essere svegliati con un brano della cassetta: premere il tasto di riproduzione
3.
11) Spegnere infine l'impianto Design (tasto ON/OFF E).
24
I
Page 25

Se avete attivato il timer per lo spegnimento, allora il Vostro impianto Design si spegnerà sempre all'ora d'accensione.
01) Premere il tasto TIMER 0. Nel display @ viene ora visualizzato TIMER.
AVVERTENZA: Per l'esecuzione dei passi seguenti avete rispettivamente 5 secondi di tempo. In caso contrario verrà
annullato il procedimento. Dopodiché sarà necessario incominciare nuovamente dal passo 2).
02) Premere tre volte il tasto
9 MODE/REMAIN. A questo punto nel display (–) viene visualizzata l'ora e TIMER OFF lampeggia.
03) Premere una volta il tasto MEMORY/CLK-ADJ \ – a questo punto lampeggia l'indicazione dell'ora.
04) Tramite i tasti
avanti ) ossia indietro 8 potete adesso regolare l'ora.
05) Premere nuovamente il tasto MEMORY/CLK-ADJ \ – a questo punto lampeggia l'indicazione dei minuti.
06) Tramite i tasti avanti ) ossia indietro 8 potete ora regolare i minuti.
07) Premere nuovamente il tasto MEMORY/CLK-ADJ
\ – a questo punto è stata memorizzata l'ora di spegnimento.
Per disattivare le funzioni del TIMER, premere ripetutamente il tasto TIMER 0, finché nel display @ non scompare l'indicazione TIMER.
ATTIVAZIONE DELLA FUNZIONE PER ADDORMENTARSI [ » SLEEP « ]
Potete preimpostare un periodo tra 90 e 10 minuti, dopo il quale deve spegnersi una volta l'apparecchio.
• Per attivare un tempo di spegnimento dopo 90 minuti, occorre premere brevemente una volta il tasto SLEEP
-.
• Per impostare un tempo di spegnimento più breve, basta mantenere premuto il tasto SLEEP
-, finché nel display non viene
visualizzato l'orario voluto.
• Per disattivare la funzione per addormentarsi, occorre premere ripetutamente il tasto SLEEP -, finché nel display non scompare
l'indicazione
@ SLEEP.
RADIO
ALLINEAMENTO DELL'ANTENNA
Se per la ricezione delle emittenti in FM impiegate l'antenna a cavo:
• l'antenna a cavo deve essere completamente srotolata
• rilevate la migliore posizione per l'antenna a cavo tramite rispettivi esperimenti di ricezione
• fissare necessariamente alla parete l'antenna a cavo con del nastro adesivo.
Per la ricezione delle emittenti in AM, la migliore posizione per l'antenna in ferrite integrata nell'apparecchio può essere altrettanto
rilevata per mezzo di rispettivi esperimenti.
SELEZIONE DEL FUNZIONAMENTO RADIO / BANDA (FM/AM)
01) Selezionare per mezzo del selettore * TUNER (= radio).
02) Commutare tra la banda di modulazione di frequenza (FM) e onde medie (AM), premendo nuovamente il tasto TUNER/BAND _.
RICERCA AUTOMATICA / RICERCA MANUALE DELLE EMITTENTI
Nella funzione di ricerca automatica delle emittenti la frequenza viene aumentata ossia ridotta, finché non è stata trovata
e centrata una emittente con un'intensità di ricezione sufficiente.
01) Mantenere premuto il tasto avanti ) ovvero indietro 8 per ca. 1 secondo – la funzione di ricerca viene ora avviata e si ferma
automaticamente.
02) Per riavviare nuovamente la funzione di ricerca, mantenere premuto ancora una volta il tasto
avanti ) ovvero indietro 8
per ca. 1 secondo.
La funzione di ricerca manuale può essere impiegata per la sintonia fine di un'emittente radiofonica, ad esempio quando conoscete
la frequenza della Vostra emittente preferita.
01) Premere solo brevemente il tasto
avanti ) ovvero indietro 8, per aumentare ossia ridurre la frequenza in passi piccoli.
02) Mantenere premuto il tasto avanti ) ovvero indietro 8, finché Vi siete quasi sintonizzati alla frequenza desiderata.
MEMORIZZAZIONE DI UNA EMITTENTE [ » MEMORY « ]
L'impianto Design KH 2300 può memorizzare fino a 40 emittenti radiofoniche (20 in FM / 20 AM).
01) Sintonizzare la frequenza desiderata, come descritto al paragrafo della funzione di „Ricerca automatica / Ricerca manuale“.
02) Premere una volta il tasto MEMORY/CLK-ADJ \. Per la durata di 5 secondi nella parte sinistra del display @ viene visualizzata
l'indicazione del posto di programma. Entro questi 5 secondi dovete poi eseguire il prossimo passo, poiché, altrimenti, l'apparecchio
si ricommuterà di nuovo all'indicazione dello stato normale. In questo caso sarà necessario premere nuovamente il tasto
MEMORY/CLK-ADJ
\.
03) Premere ripetutamente il tasto M-UP/REPEAT =, finché viene visualizzato il posto di programma desiderato (da 1 fino 20).
Questo procedimento è da ripetere per tutte le ulteriori emittenti radiofoniche desiderate nella memoria.
SELEZIONE DELLE EMITTENTI MEMORIZZATE
Nell'attivazione della funzione radio, premere ripetutamente il tasto M-UP/REPEAT =, finché nel display @ viene visualizzato
il posto di programma desiderato con l'emittente radiofonica memorizzata.
25
I
Page 26

LETTORE DI COMPACT DISC
PERICOLO! All'interno del lettore di compact disc è attivo un raggio laser molto debole, ma altamente concentrato, che viene
impiegato per la scansione della superficie del compact disc. Questo raggio può costituire un pericolo per gli occhi in un impiego
non appropriato – Non aprire in nessun caso l'apparecchio!
INTRODUZIONE DEL COMPACT DISC
01) Per aprire il vano del compact disc !, occorre trascinare in avanti il bordo superiore.
02) Introdurre il compact disc con la parte incisa rivolta verso l'apparecchio. Nell'introduzione corretta del compact disc vedete
perciò la parte stampata con le scritte. Il compact disc deve essere spinto bene sull'asse (situato al centro).
03) Chiudere il vano del compact disc
!.
04) Selezionare ora il lettore di compact disc per mezzo del selettore
* CD. A questo punto nel display @ viene visualizzata la durata
totale del programma musicale ed il numero dei titoli.
NOTA: Se dopo l'introduzione del compact disc il display non dovesse visualizzare il numero dei titoli e la durata complessiva
del programma musicale, molto probabilmente il compact disk non è stato introdotto correttamente, oppure è sporco. Pulire in questo
caso il compact disc con un apposito panno di pulizia ovvero introdurlo correttamente, per poi ricontrollare la visualizzazione.
FUNZIONI BASE DEL LETTORE DI COMPACT DISC
• AVVIO DELLA RIPRODUZIONE: Premere il tasto & PLAY/PAUSA – viene ora avviata la riproduzione.
• INTERRUZIONE DELLA RIPRODUZIONE (PAUSA): Premere il tasto & PLAY/PAUSA – viene ora interrotta la riproduzione.
Nel display
@ lampeggia ora la durata di riproduzione. La riproduzione verrà proseguita, dopo aver premuto nuovamente
il tasto & PLAY/PAUSA.
• STOP DELLA RIPRODUZIONE: Premere il tasto 7 STOP – viene ora terminata la riproduzione.
• SALTATITOLI IN AVANTI: Ogni volta che viene premuto il tasto
avanti ) si avanza rispettivamente di un titolo.
• SALTATITOLI ALL'INDIETRO: Ogni volta che viene premuto il tasto indietro 8 si ritorna rispettivamente indietro di un titolo.
• AVANZAMENTO: Mantenere premuto il tasto avanti ), per avanzare all'interno di un titolo.
• RITORNO: Mantenere premuto il tasto indietro 8, per ritornare indietro all'interno di un titolo.
Il vano del compact disc
! può essere aperto in qualsiasi momento. In questo caso verrà automaticamente fermata la riproduzione.
Il compact disc dover, tuttavia, essere rimosso solamente dopo che si è completamente fermato.
PROGRAMMAZIONE DELL'ORDINE DEI TITOLI [ » TRACK MEMORY « ]
La programmazione dell'ordine dei titoli può essere effettuata soltanto con il compact disc fermo. Si possono programmare
al massimo 20 titoli.
01) Introdurre il compact disc.
02) Selezionare ora il lettore di compact disc per mezzo del selettore * CD.
03) Premere il tasto MEMORY/CLK-ADJ \. A questo punto nel display @ viene visualizzato TRACK MEMORY.
04) Selezionare a questo punto il numero del titolo, che deve essere riprodotto per primo, tramite i tasti
avanti ) ossia indietro 8
potete ora regolare i minuti.
05) Premere il tasto MEMORY/CLK-ADJ \. Il titolo è ora memorizzato sul primo posto del programma (P-01).
Ripetere i passi 3) fino 5) per tutti i rimanenti titoli. Potete anche programmare parecchie volte un titolo.
L'ordine dei titoli programmato rimane memorizzato, finché non viene rimosso il compact disc dal vano di lettura, o dopo la selezione
di un'altra funzione oppure dopo aver spento completamente l'apparecchio.
AVVIO DEI TITOLI NELL'ORDINE PROGRAMMATO
01) Premere il tasto MEMORY/CLK-ADJ \. A questo punto nel display @ vengono visualizzati TRACK MEMORY ed i titoli programmati.
02) Premere il tasto
& PLAY/PAUSA – viene ora avviata la riproduzione nell'ordine programmato.
03) Per cancellare un programma, basta premere semplicemente il tasto 7 STOP.
FUNZIONI DI RIPETIZIONE [ » REPEAT « ]
• Per ripetere tutti i titoli di un compact disc, occorre premere il tasto M-UP/REPEAT
=. Nel display @ viene visualizzato REPEAT
ALL.
• Per ripetere un solo titolo, occorre premere due volte il tasto M-UP/REPEAT
=, durante la riproduzione del titolo desiderato.
Nel display @ viene visualizzato REPEAT ONE.
• Per ripetere una sequenza di titoli programmati, occorre premere il tasto M-UP/REPEAT
=, durante la riproduzione della sequenza
di titoli desiderata.
Dopodiché nel display @ viene visualizzato REPEAT.
• Per disattivare la funzione di ripetizione, premere ripetutamente il tasto M-UP/REPEAT =, finché nel display @ non scompare
il messaggio REPEAT ALL oppure REPEAT ONE.
26
I
Page 27

RIPRODUZIONE DI TITOLI IN ORDINE CASUALE [ » RANDOM « ]
Nella funzione RANDOM l'ordine dei titoli del compact disc introdotto viene scelto casualmente.
01) Introdurre il compact disc.
02) Selezionare ora il lettore di compact disc per mezzo del selettore
* CD.
03) Premere il tasto RANDOM (. Dopodiché nel display @ viene visualizzato RANDOM.
04) Premere il tasto
& PLAY/PAUSA – viene ora avviata la riproduzione in ordine casuale.
REGISTRATORE A CASSETTE
INTRODUZIONE DELLA CASSETTA
01) Aprire in avanti il coperchio di protezione +. Dietro questo coperchio si trovano i tasti di comando del registratore a cassette
(e la presa di collegamento per la cuffia).
02) Per aprire il vano cassette, premere il tasto `. Il vano delle cassette si apre automaticamente.
03) Introdurre la cassetta con la parte del nastro rivolta in basso. Il nastro dovrebbe essere teso e privo di nodi.
04) Chiudere ora il vano delle cassette.
05) Selezionare ora il registratore a cassette per mezzo del selettore
* TAPE.
FUNZIONI BASE DEL REGISTRATORE A CASSETTE
• AVVIO DELLA RIPRODUZIONE: premere il tasto 3 – la riproduzione viene ora avviata.
• INTERRUZIONE DELLA RIPRODUZIONE (PAUSA): premere il tasto | – la riproduzione viene ora interrotta. La riproduzione
verrà proseguita, dopo aver premuto nuovamente il tasto
|.
• STOP DELLA RIPRODUZIONE: Premere il tasto ` STOP – viene ora terminata la riproduzione.
• AVANZAMENTO: Premere il tasto 1.
• RIAVVOLGIMENTO: Premere il tasto
2.
REGISTRAZIONE DI UNA CASSETTA
L'impianto Design KH 2300 è provvisto di un sistema automatico di pilotaggio. Le modifiche di regolazione del volume
o della selezione audio non hanno alcun influsso sulla registrazione.
01) Introdurre la cassetta ed avvolgerla eventualmente fino al punto in cui deve iniziare la registrazione.
02) Premere il tasto
| (PAUSA).
03) Premere il tasto 4 (REGISTRAZIONE). Viene altrettanto premuto automaticamente il tasto 3.
04) Premere il tasto rispettivamente contrassegnato *, per selezionare un apparecchio ovvero fonte audio per la registrazione.
05) La registrazione viene avviata al rilascio del tasto
| (PAUSA).
06) La registrazione può essere terminata, premendo il tasto `.
PULIZIA DELLE TESTINE AUDIO
Per eseguire la pulizia delle testine audio e dei componenti di guida del nastro, si raccomanda di utilizzare periodicamente
un'apposita cassetta di pulizia.
DICHIARAZIONE DI CONFORMITÀ
Noi della Kompernaß Handelsgesellschaft mbH, Burgstr. 21, D-44867 Bochum, con la presente
dichiariamo che il prodotto è conforme alle seguenti direttive CE:
Compatibilità elettromagnetica: 89/336 EEC (EMC Directive)
Norme armonizzate applicate: EN 55013
:06.90+A12:08.94+A13:12.96 EN 55020:12.94+A11:12.96
EN 61000-3-2:04.95+A1:1998+A2:1998 EN 61000-3-3:01.95
Tipo macchina: KH2300
Denominazione dell’apparecchio: (MICRO) IMPIANTO DESIGN CON LETTORE DI COMPACT DISC VERTICALE
Bochum, 31.08.2002
Hans Kompernaß - Dirigente -
27
I
Page 28

INSTRUCCIONES IMPORTANTES PARA LA SEGURIDAD
Las siguientes instrucciones fundamentales para la seguridad tienen que observarse en cualquiera de los casos en la utilización
de aparatos eléctricos:
Por favor, lea con atención las siguientes informaciones para seguridad y uso apropiados. Antes de leer abra la página
con las ilustraciones y familiarícese seguidamente con todas las funciones del aparato. Guarde estas instrucciones
esmeradamente y páselas, dado el caso, a terceros.
No poner el aparato en servicio cuando estén deteriorados el enchufe de la red, el cable de red o el aparato.
Para el caso que se haya caído el aparato, dejar controlar primero por un electricista especializado antes de volverlo a poner en servicio.
En el interior del aparato existen tensiones peligrosas. No abrir nunca la carcasa o introducir objetos por las ventilaciones.
Evite que el líquido llegue al aparato. En caso de necesidad sacar inmediatamente el enchufe de la red.
Saque el enchufe igualmente de la caja de enchufe, cuando se produzcan fallos durante el servicio y antes de limpiar el aparato.
No efectúe nunca por sí mismo modificaciones o reparaciones en el aparato. Tampoco el conducto de conexión deberá cambiarlo
uno mismo. Encargue las reparaciones en el aparato o en el conducto de conexión solamente a un taller especializado, si bien,
en el Centro de Servicio. Por reparaciones inadecuadas pueden producirse considerables peligros para el usuario.
Los niños apoyan a menudo los peligros en el trato con aparatos eléctricos. Por consiguiente, no deje nunca a niños sin atención
en las cercanías de aparatos eléctricos.
No maneje la máquina sin vigilancia.
El aparato no deberá utilizarse en cuartos húmedos (por ejemplo cuarto de baño) o cuartos con mucho polvo.
El calor formado en el interior del aparato puede inducir a defectos, si bien, a incendio del mismo.
Por consiguiente, no exponga este aparato a ninguna temperatura extrema:
– evitar los rayos del sol directos y el calor de calefacción
– no tapar las ranuras de ventilación del aparato
– dejar libre a los lados en lo posible unos 10 cm.
El aparato no deberá colocarse nunca en las cercanías de material inflamable (por ejemplo, cortinas, líquidos inflamables, etc.).
Cuando el equipo Design pasa del frío al calor (por ejemplo, después del transporte), puede formarse agua de condensación en
el interior. Para proteger al equipo Design ante daños, conectar no antes de 2 horas.
En caso de una tormenta, los aparatos conectados a la red pueden dañarse. En caso de tormenta saque, por consiguiente, siempre
el enchufe de la red y retire el enchufe de antena.
Para separar el aparato completamente de la alimentación de corriente, se tiene que sacar el enchufe de la red de la caja de enchufe.
Aquí coger siempre del enchufe y nunca del cable.
Proteja el conducto de conexión ante superficies calientes o demás deterioros y no las agarrote.
Controle el conducto de conexión con regularidad en cuanto a deterioros eventuales.
Desenrolle completamente el conducto de conexión para su utilización.
Ponga atención en que el conducto de conexión no se convierta en trampa de tropiezo.
En caso de larga ausencia sacar el enchufe de la red y sacar las pilas del mando a distancia.
El aparato está concebido para la utilización en el sector privado.
Advertencia: El equipo Design está equipada con pies de goma antideslizantes. Debido a que las superficies de los suelos
se componen de diferentes materiales y son tratados con los más diferentes medios de conservación, no se puede excluir
completamente, que algunos de estos materiales contengan componentes que ataquen a los pies de goma y se ablanden. Coloque,
dado el caso, un apoyo antideslizante debajo de los pies.
Protección del medio ambiente: No utilizar nunca pilas usadas y nuevas al mismo tiempo. Elimine las pilas usadas en el interés
de nuestro medio ambiente, no en la basura doméstica, sino entréguelas a los puestos correspondientes de acumulación de las mismas.
COLOCACIÓN Y CONEXIÓN
Siga imprescindiblemente las instrucciones expuestas antes de poner en servicio por primera vez el equipo Design e introduzca
solamente al final el cable de la red en la caja de enchufe.
1) Saque con precaución del embalaje el equipo Design y los altavoces.
2) Elija para su equipo Design el lugar apropiado, éste debería estar
… horizontal
… seco y libre de polvo
… no en las cercanías de cuerpos de calefacción o al sol.
3) ¡ IMPORTANTE: Retire todos los aseguramientos del transporte /cintas adhesivas en el compartimento de CD y casete !
Abra el compartimento de CD
! tirando del borde superior y retire el aseguramiento rojo de transporte (seguidamente volver
a cerrar compartimento de CD).
28
E
Page 29

4) Conecte ambos altavoces. Las conexiones de altavoces Y están caracterizadas correspondientemente (L=IZQUIERDA / R=DERECHA).
Consejos para la colocación de los altavoces:
Colocar los altavoces en lo posible a la altura de la cabeza
No tapar los altavoces con cortinas u objetos
Colocar los altavoces en la estantería de tal manera, que la carátula frontal conecte con el borde de estantería delantero.
Para evitar zumbidos o un retumbar, colocar eventualmente una placa de goma debajo de los altavoces.
5) Para la conexión de un aparato externo (por ejemplo, tocadiscos) utilizar las conexiones Cinch U.
6) Para la recepción de radio FM 75 antena ohmios (antena de la casa o cableado) conectar a la conexión de antena O. Si no se
tiene esta disposición, enchufar la antena también suministrada en el contacto central de la conexión de antena O.
La antena para la recepción de onda media está instalada en el aparato.
7) Conectar ahora el enchufe de la red a una caja de enchufe de 230 V.
8) No colocar las pilas (no contenidas en el volumen de suministro) en el mando a distancia (2x AA Mignon LR6 1,5 V):
– Abrir tapa al dorso del mando a distancia
– Colocar pilas. Observar aquí los polos correctos (véase rotulación de fondo del compartimento de pilas)
– Volver a cerrar la tapa
MONTAJE DE PARED
El equipo Design puede montarse en la pared con los altavoces pertenecientes al respecto.
Los tornillos y soportes de pared correspondientes están contenidos en el volumen de suministro. Coloque el aparato verticalmente
en una pared estable.
Los agujeros de tornillos tienen que taladrarse a una distancia de 14 cm. entre sí
.
Para que los tornillos puedan agarrar correctamente en los soportes P al dorso de el equipo Design y de los altavoces,
los cabezales de tornillo tienen que sobresalir de la pared unos 3 mm.
ELEMENTOS DE MANEJO
! Compartimento de CD 6 Compartimento de casete
@ Display 7 Tecla de stop (CD)
# Receptor para señales del mando a distancia 8 Tecla de bobinado hacia atrás (*)
$ Tecla mono/estéreo (sólo servicio de radio FM) 9 Indicación conmutar
% Tecla para selección de sonido 0 Tecla TIMER
^ Stop de tono /conexión a sin sonido - Tecla SLEEP
& Interpretación de CD /pausa = Tecla M-UP/REPEAT (*)
* Selectores de aparato \ Tecla MEMORY/CLK-ADJ (*)
( Tecla RANDOM Q Reducir volumen
) Tecla de avance (*) W Aumentar volumen
_ Tecla selección de BAND E Tecla CONECTAR/DESCONECTAR (Stand-By)
+ Tapa de protección R Indicación de servicio
| Tecla de pausa (sólo casete) T Enchufe de la red
` Stop/tecla de arrojo (sólo casete) Y Conexiones de altavoces
1 Bobinar adelante (sólo casete) U Conexiones cinch para aparato externo (AUX)
2 Bobinar hacia atrás (sólo casete) I Supresión de ruidos al grabar (sólo casete)
3 Tecla de interpretación (sólo casete) O Conexión de antena
4 Tecla de grabación (sólo casete) P Dispositivo colgador para montaje en pared
5 Conexión de auricular
Los elementos de manejo caracterizados con (*) están ocupados, dependiendo de la elección de aparato (por ejemplo servicio
de radio o de CD), con varias y diferentes funciones. Por favor, lea en los capítulos correspondientes.
Los elementos de manejo
| hasta 4 y I son exclusivamente para el servicio del Casete.
MANEJO
CONECTAR Y DESCONECTAR [ » POWER / STAND-BY « ]
• Cuando se introduce el enchufe de la red, el aparato se encuentra en el modo stand-by. La indicación de servicio
R ilumina en rojo.
• Pulse la tecla CONECTAR/DESCONECTAR E . El aparato se encuentra ahora en el modo de servicio. La indicación de servicio R
ilumina en verde.
• Para conmutar de vuelta al modo stand-by, pulsar de nuevo la tecla CONECTAR/DESCONECTAR E.
• En caso de ausencia por largo tiempo sacar el enchufe de la red.
29
E
Page 30

SELECCIONAR APARATO /FUENTE DE SONIDO [ » CD / TUNER / TAPE / AUX « ]
• Pulse la tecla correspondientemente caracterizada
* para seleccionar un aparato, si bien, cambiar la fuente de sonido:
CD = disco de CD TUNER = radio TAPE = casete AUX = aparato externo, por ejemplo, tocadiscos
AJUSTAR VOLUMEN [ » VOLUME / MUTE « ]
• Con
la tecla W subirá el volumen.
• Con la tecla Q reducirá el volumen.
• Pulsando la tecla ^ se desconectan los altavoces y el auricular (conexión a sin sonido).
AJUSTAR SONIDO [ » CLASSIC / ROCK / POP « ]
Con el selector de sonido
% podrá adaptar la calidad de sonido de un título de la dirección de música respectiva y con ello aumentar
el disfrute de escucha. La regulación seleccionada respectivamente CLASSIC, ROCK o POP se indica en el
@ (ninguna indicación =
sonido neutral).
AURICULAR [ » PHONES « ]
En la conexión de auricular
5 puede conectarse un auricular de estéreo de 8-32 ohmios con enchufe de trinquete de 3,5 mm.
En tanto como se haya introducido, se desconectan los altavoces. Por favor, tenga en cuenta que un volumen demasiado elevado
induce a daños en los oídos.
AJUSTAR HORA
01) Para poder ajustar la hora, el aparato tiene que encontrarse en el modo stand-by (indicación de servicio R ilumina en rojo).
02) Pulsar una vez tecla MEMORY/CLK-ADJ \ – la indicación de las horas hace intermitencia.
03) Con las teclas hacia adelante ) si bien hacia atrás 8 ajustar la hora.
04) Pulsar de nuevo la tecla MEMORY/CLK-ADJ
\ – la indicación de los minutos hace intermitencia.
05) Con las teclas hacia adelante ) si bien hacia atrás 8 ajustar los minutos.
06) Volver a pulsar la tecla MEMORY/CLK-ADJ \ – la indicación deja de hace intermitencia y el reloj empieza a funcionar (el “punto
doble” hace intermitencia).
AJUSTAR HORARIO DE CONEXIÓN Y DESCONEXIÓN [ » TIMER « ]
Si activa el horario de conexión, podrá despertarse en todo momento por su equipo Design.
01) Seleccionar con la tecla correspondiente
* el aparato deseado /fuente de sonido (CD, TAPE o TUNER).
02) Preparar fuente de sonido, o sea, en TUNER (RADIO) ajustar la emisora deseada, en TAPE (APARATO DE CASETE) colocar
el casete y bobinar al punto deseado o colocar un CD y, dado el caso, programar una sucesión de títulos.
03) Pulsar tecla
0 TIMER. En el display @ se indica TIMER.
ADVERTENCIA: Para los siguientes pasos tiene 5 segundos de tiempo. En caso contrario se interrumpe el proceso.
Comience de nuevo a partir del paso 4).
04) Pulsar 2 veces la tecla 9 MODE/REMAIN. En el display @ aparece la indicación de la hora y TIMER ON hace intermitencia.
05) Pulsar una vez la tecla MEMORY/CLK-ADJ \ – La indicación de las horas hace intermitencia.
06) Ajustar la hora con la tecla
hacia adelante ) si bien hacia atrás 8.
07) Pulsar de nuevo la tecla MEMORY/CLK-ADJ \ – la indicación de los minutos hace intermitencia.
08) Ajustar los minutos con las teclas hacia adelante ) si bien hacia atrás 8.
09) Volver a pulsar la tecla MEMORY/CLK-ADJ \ – el horario de conexión está ahora memorizado.
10) Si desea despertarse mediante un casete, pulsar la tecla de interpretación
3.
11) Seguidamente desconectar el equipo Design (Tecla E CONECTAR/DESCONECTAR ).
Si activa el horario de desconexión, su equipo Design se desconecta siempre a la hora programada.
01) Pulsar tecla
0 TIMER. En el display @ se indica TIMER.
ADVERTENCIA: Para los siguientes pasos tiene 5 segundos de tiempo respectivamente. En caso contrario se interrumpe
el proceso. Comience de nuevo a partir del paso 2).
02) Pulsar 3 veces la tecla
9 MODE/REMAIN. En el display @ aparece la indicación de la hora y TIMER OFF hace intermitencia.
03) Pulsar una vez la tecla MEMORY/CLK-ADJ \ – la indicación de las horas hace intermitencia.
04) Ajustar la hora con las teclas
hacia adelante ) si bien hacia atrás 8.
05) Volver a pulsar la tecla MEMORY/CLK-ADJ \ – la indicación de los minutos hace intermitencia.
06) Ajustar los minutos con las teclas hacia adelante ) si bien hacia atrás 8.
07) Volver a pulsar la tecla MEMORY/CLK-ADJ \ – el horario de desconexión está ahora memorizado.
Para desconectar las funciones de TIMER, pulsar la tecla TIMER
0 por tantas veces, hasta que en el display @ TIMER esté apagado.
30
E
Page 31

ACTIVAR FUNCIÓN PARA DORMIR [ » SLEEP « ]
Usted podrá determinar un tiempo entre 90 y 10 minutos, después del que el aparato deberá desconectarse.
• Para activar un tiempo de desconexión después de 90 minutos, pulsar brevemente 1 vez la tecla - SLEEP.
• Para ajustar un tiempo de desconexión más breve, mantener pulsada la tecla - SLEEP, hasta que aparezca en el display
el tiempo deseado.
• Para desconectar la función de dormir, pulsar tantas veces la tecla
- SLEEP, hasta que SLEEP se apague en el display @.
RADIO
AJUSTAR LA ANTENA
Para el caso que para la recepción de FM se utilice la antena:
• la antena deberá estar completamente desenrollada
• constate mediante pruebas la mejor posición de la antena
• fije la antena, dado el caso, con una cinta adhesiva en la pared.
Para la recepción de AM constate la mejor posición para la antena instalada en el aparato, igualmente mediante pruebas.
SERVICIO DE RADIO / SELECCIONAR BANDA (FM/AM)
01) Con la tecla de selección de aparato * seleccionar TUNER (=Radio).
02) Volviendo a pulsar la tecla TUNER/BAND _ conmutar entre UKW (FM) y onda media (AM).
BÚSQUEDA AUTOMÁTICA / BÚSQUEDA MANUAL
En la búsqueda de emisora automática se aumenta la frecuencia por tanto tiempo, si bien, se disminuye, hasta que la emisora
se encuentre con suficiente intensidad de recepción.
01) Mantener pulsada la tecla
hacia adelante ) si bien hacia atrás 8 aproximadamente 1 segundo – la búsqueda se pone
en marcha y se para automáticamente.
02) Para volver a poner en marcha la búsqueda, mantener de nuevo pulsada, durante aproximadamente 1 segundo, la tecla hacia
adelante
) si bien hacia atrás 8.
La búsqueda de emisora manual la podrá utilizar usted para la sintonía fina o cuando le es conocida la frecuencia de la emisora.
01) Tecla hacia adelante ) si bien hacia atrás 8 pulsar respectivamente sólo de forma breve, para aumentar o disminuir
la frecuencia en pequeños pasos.
02) Mantenga la tecla
hacia adelante ) si bien hacia atrás 8 por tanto tiempo, hasta que usted llegue a la cercanía de la
frecuencia deseada.
MEMORIZAR EMISORA [ » MEMORY « ]
El equipo Design KH 2300 puede momorizar hasta 40 emisoras (20 FM / 20 AM).
01) Ajuste la emisora deseada, como se describe bajo “búsqueda de emisora automática / búsqueda manual”.
02) Pulsar una vez la tecla \ MEMORY/CLK-ADJ. En el display @ aparece, durante 5 segundos al lado izquierdo, la indicación para el
lugar de programa. En el plazo de estos 5 segundos deberá efectuar usted el próximo paso, en caso contrario el aparato conmuta
de nuevo a la indicación normal. En este caso vuelva a pulsar la tecla \ MEMORY/CLK-ADJ.
03) Pulsar tantas veces la tecla
= M-UP/REPEAT, hasta que se indique el lugar de programa deseado (1 hasta 20).
Repita este procedimiento para todas las emisoras deseadas que deberán ser memorizadas.
SELECCIONAR LAS EMISORAS MEMORIZADAS
En el servicio de radio pulsar tantas veces la tecla = M-UP/REPEAT, hasta que el lugar de programa deseado aparezca en
el display @ con la emisora memoriza.
APARATO DE CD
¡PELIGRO! En el aparato de CD palpa la superficie del CD colocado un rayo de láser concentrado, débil pero agudo. En uso
inadecuado este rayo puede ser un peligro para los ojos - ¡ no abrir el aparato en ninguno de los casos !
COLOCAR EL CD
01) Para abrir el compartimento ! del CD tirar hacia adelante el borde superior.
02) Colocar el CD con el lado grabado hacia el aparato. Con el CD correctamente colocado verá entonces el lado con la impresión
o ilustración. El CD deberá empujarse fijamente sobre el eje (que se encuentra en el centro).
03) Cerrar compartimento
! del CD.
31
E
Page 32

04) Con la tecla selectiva de aparato * de CD seleccionar el CD. En el display @ se indica la duración de interpretación total y la cifra de títulos.
ADVERTENCIA: Para el caso que después de colocar el CD no se indique la cifra de los títulos y la duración de interpretación
total en el display, posiblemente se ha colocado el CD al revés o está sucio. Limpie el CD con un trapo de limpieza de CD, si bien,
coloque el CD correctamente y controle de nuevo la indicación.
FUNCIONES FUNDAMENTALES DEL APARATO DE CD
• PONER EN MARCHA INTERPRETACIÓN: Pulsar tecla & PLAY/PAUSE – la interpretación se pone en marcha.
• INTERRUMPIR INTERPRETACIÓN (PAUSA): Pulsar tecla & PLAY/PAUSE – la interpretación se interrumpe. En el display @
hace intermitencia la duración de interpretación. Pulsando de nuevo la tecla & PLAY/PAUSE se continúa con la interpretación.
• PARAR INTERPRETACIÓN: Pulsar tecla 7 STOP – la interpretación se finaliza.
• SALTO DE TÍTULO HACIA ADELANTE: Tecla hacia adelante ) salta en un título hacia adelante con cada pulsación de tecla.
• SALTO DE TÍTULO HACIA ATRÁS: Tecla
hacia atrás 8 salta en un título hacia atrás por cada pulsación de tecla.
• AVANCE: Mantener pulsada la tecla hacia adelante ), para bobinar hacia adelante dentro de un título.
• RETROCESO: Mantener pulsada la tecla hacia atrás 8, para bobinar hacia atrás dentro de un título.
El compartimento de CD
! puede abrirse en todo momento. La interpretación se para entonces en todo momento. Sin embargo,
saque el CD solamente cuando éste se haya parado completamente.
PROGRAMAR SUCESIÓN DE TÍTULOS [ » TRACK MEMORY « ]
La programación de la sucesión de títulos solamente es posible con CD parado. Pueden programarse hasta 20 títulos.
01) Colocar CD
02) Seleccionar el aparato de CD con la tecla selector de aparato * CD.
03) Pulsar tecla \ MEMORY/CLK-ADJ. en el display @ aparece TRACK MEMORY.
04) Con la tecla hacia adelante ) si bien hacia atrás 8 seleccionar el número del título que deberá interpretarse en primer lugar.
05) Pulsar tecla \ MEMORY/CLK-ADJ. El título esta ahora memorizado en el primer lugar de la programación (P-01).
Repita los pasos 3) hasta 5) para hasta 20 títulos. Un título lo podrá programar también varias veces.
La sucesión de títulos queda memorizada por tanto tiempo, hasta que se saque el CD del compartimento de CD, se seleccione
otra función o se desconecte el aparato.
PONER EN MARCHA LA SUCESIÓN DE TÍTULOS PROGRAMADOS
01) Pulsar tecla Pulsar tecla \ MEMORY/CLK-ADJ. En el display @ aparece TRACK MEMORY y el título programado.
02) Pulsar tecla
& PLAY/PAUSE – la interpretación se pone en marcha y se efectúa en la sucesión programada por usted.
03) Para borrar un programa, pulse la tecla 7 STOP.
FUNCIONES DE REPETICIÓN [ » REPEAT « ]
• Para repetir todos los títulos de un CD, pulsar tecla
= M-UP/REPEAT. En el display @ aparece REPEAT ALL.
• Para repetir un título único, pulsar 2 veces la tecla = M-UP/REPEAT cuando está en marcha el título deseado. En el display @
aparece REPEAT ONE.
• Para repetir una sucesión de títulos programada, pulsar tecla = M-UP/REPEAT cuando está en marcha la sucesión
de títulos programada. En el display @ aparece REPEAT.
• Para desconectar la función de repetición, pulsar la tecla
= M-UP/REPEAT por tantas veces, hasta que aparezca en pantalla
REPEAT ALL ó REPEAT ONE.
INTERPRETAR TÍTULO EN SUCESIÓN CASUAL [ » RANDOM « ]
Con la función RANDOM se deselecciona la sucesión de títulos casual del CD colocado.
01) Colocar CD
02) Con la tecla selectiva de aparato * CD seleccionar aparato de CD.
03) Pulsar tecla ( RANDOM. En el display @ aparece RANDOM.
04) Pulsar la tecla & PLAY/PAUSE – la interpretación se pone en marcha en sucesión casual.
32
E
Page 33

APARATO DE CASETE
COLOCAR CASETE
01) Abrir hacia adelante la tapa de protección +. Detrás se encuentran las tecla de mando del aparato de casete (y la conexión
del auricular).
02) Pulse para abrir el compartimento de casete pulse la tecla
`. El compartimento de casete se abre automáticamente.
03) Colocar casete con el lado de cinta hacia abajo. La cinta deberá estar tensa y sin nudos.
04) Cerrar compartimento de casete.
05) Con la tecla selectora de aparato
* TAPE seleccionar el aparato de casete.
FUNCIONES FUNDAMENTALES DEL APARATO DE CASETE
• PONER EN MARCHA INTERPRETACIÓN: Pulsar tecla 3 – la interpretación se pone en marcha.
• INTERRUMPIR INTERPRETACIÓN (PAUSA): Pulsar tecla | – la interpretación se interrumpe. Pulsando de nuevo la tecla |
se continúa con la interpretación.
• PARAR INTERPRETACIÓN: Pulsar tecla
` STOP – la interpretación se finaliza.
• BOBINAR HACIA ADELANTE: Pulsar tecla 1.
• BOBINAR HACIA ATRÁS: Pulsar tecla 2.
GRABAR UN CASETE
El equipo Design KH 2300 está equipado con un mando automático. Las modificaciones del volumen o la selección del sonido
no tienen ninguna influencia en la grabación.
01) Colocar casete y, dado el caso, bobinar al punto en el que desea comenzar con la grabación.
02) Pulsar la tecla
| (PAUSA).
03) Pulse la tecla
4 (GRABACIÓN). La tecla 3 se pulsa a la vez automáticamente.
04) Pulse la tecla * caracterizada correspondientemente para así seleccionar un aparato, si bien, la fuente de sonido para la grabación.
05) Soltando la tecla | (PAUSA) se pone en marcha la grabación.
06) Usted finalizará la grabación pulsando la tecla
`.
LIMPIAR CABEZA SONORA
Para la limpieza de las cabezas sonoras y elementos de guía de cinta utilice con regularidad un casete de limpieza correspondiente.
DECLARACION DE CONFORMIDAD
Nosotros, Kompernaß Handelsgesellschaft mbH, Burgstr. 21, D-44867 Bochum, Germany, declaramos para este producto
la conformidad con las siguientes directivas CE:
Compatibilidad electromagnética: 89/336 EEC (EMC Directive)
Normas armonizadas aplicadas: EN 55013:06.90+A12:08.94+A13:12.96
EN 55020:12.94+A11:12.96
EN 61000-3-2:04.95+A1:1998+A2:1998
EN 61000-3-3:01.95
Tipo de máquina: KH2300
Denominación de la máquina: (MICRO) EQUIPO DESIGN CON CD-PLAYER VERTICAL
Bochum, a 31.08.2002
Hans Kompernaß
- Gerente -
33
E
Page 34

IMPORTANTES INDICAÇÕES DE SEGURANÇA
As seguintes indicações básicas de segurança têm de ser sempre respeitadas ao utilizar aparelhos eléctricos:
Leia com atenção as seguintes informações sobre segurança e uso em conformidade com a regra. Antes de começar
a ler, abra na página com as imagens, e familiarize-se depois com todas as funções do aparelho. Guarde estas indicações
com cuidado e entregue-as a terceiros, se for o caso.
Não use o aparelho quando a ficha , o cabo ou o aparelho estão danificados.
Se o aparelho caiu, terá de ser primeiro visto por um técnico de electrónica antes de o poder voltar a usar.
No interior do aparelho há tensões perigosas. Nunca abra a caixa nem introduza objectos pela ventilação.
Evite a entrada de líquido no aparelho. Em caso de emergência puxe logo pela ficha da rede.
Puxe também a ficha da tomada, se durante o funcionamento surgirem avarias e antes de limpar o aparelho.
Não efectue alterações ou reparações no aparelho. Mesmo o terminal, não pode ser você a trocar. As reparações no aparelho
ou no terminal devem apenas ser realizadas por uma oficina especializada ou pelo centro de assistência. Reparações indevidas
podem causar perigos significativos para o operador.
As crianças subestimam frequentemente os perigos ao manejar aparelhos eléctricos. Por isso nunca deixe as crianças sem vigilância
junto de aparelhos eléctricos.
Não use o aparelho sem vigilância.
O aparelho não pode ser usado em espaços húmidos (por ex. quarto de banho) ou espaços onde se forme muito pó.
O calor que se forma no interior do aparelho pode causar defeitos ou incêndio no aparelho.
Não deve, por isso, expor o aparelho a temperaturas extremas:
– evite raios solares directos e o calor de aquecimentos
– não tape as ranhuras de ventilação no aparelho
– deixe, se possível, ca. 10 cm de espaço livre para os lados
O aparelho não pode ser colocado muito próximo de materiais inflamáveis (por ex. cortinas, líquidos inflamáveis etc.).
Se a aparelhagem Design passar do frio para o calor (por ex. depois do transporte), pode formar-se água de condensação no interior.
Para proteger a aparelhagem Design de danos, deixe pelo menos passar 2 horas antes de o ligar.
Em caso de trovoada, os aparelhos ligados à corrente podem sofrer danos. Por esse motivo deve, sempre que há trovoada,
tirar a ficha de rede da tomada e a ficha de antena.
Para separar o aparelho completamente da alimentação de corrente , terá de se puxar a ficha da tomada.
Deve agarrar pela ficha e não pelo cabo.
Proteja o terminal de superfícies quentes ou de outros danos e não o entale.
Verifique regularmente o terminal quanto a eventuais danos.
Desenrole completamente o terminal quando está a usá-lo.
Veja se o terminal não será a causa das pessoas tropeçarem nele.
Em caso de ausência prolongada puxe a ficha da rede e retire as pilhas do comando à distância
O aparelho destina-se ao uso privado.
Indicação: A aparelhagem Design está equipada com pés de borracha anti-derrapantes. Uma vez que o chão é constituído
pelos mais diversos materiais e é tratado com os mais diversos produtos, não se pode excluir a possibilidade de alguns destes
materiais conterem substâncias que agridam e amoleçam os pés de borracha. Em caso de necessidade coloque uma base
anti-derrapante por baixo dos pés.
Protecção do Ambiente: Nunca use pilhas usadas e novas em simultâneo. No interesse do nosso ambiente não elimine pilhas
no lixo doméstico, deve antes depositá-las nos respectivos locais colectores.
COLOCAÇÃO E LIGAÇÃO
Siga imprescindivelmente as instruções apresentadas antes de colocar pela primeira vez em funcionamento a aparelhagem Design,
e encaixe o cabo de rede na tomada apenas no fim.
1) Retire a aparelhagem Design e as colunas com muito cuidado da embalagem.
2) Escolha o local mais apropriado para a sua aparelhagem Design, que devia ser
… horizontal
… seco e sem pó
… longe de elementos térmicos ou do sol intenso.
3) IMPORTANTE: Retire todos os dispositivos de segurança de transporte/autocolantes no compartimento de CD e de cassetes !
Abra o compartimento de CD
!, puxando no canto superior e retire o dispositivo de segurança de transporte vermelho (depois disso
volte a fechar o compartimento de CD).
34
P
Page 35

4) Ligue as duas colunas. Os terminais Y das colunas estão respectivamente identificados (L=ESQUERDA / R=DIREITA).
Conselhos para colocação das colunas:
Colocar as colunas, se possível, à altura da cabeça.
Não tape as colunas com cortinas ou objectos.
Coloque as colunas na estante de forma que a parte da frente termine no canto da estante
para evitar retumbâncias poderá colocar uma base de borracha por debaixo das colunas.
5) Para ligar um aparelho externo (por ex. um gira-discos) use os terminais Cinch U.
6) Para captação da banda de radio FM ligue uma antena de 75 Ohms (antena doméstica ou ligação de cabo) ao cabo da antena O. Se
não houver uma antena destas disponível, coloque a antena fornecida com a aparelhagem no contacto central do cabo de antena O.
A antena para a captação MW está montada no aparelho.
7) Ligue agora a ficha de rede a uma tomada de 230 V.
8) Coloque as pilhas (não faz parte do fornecimento) no comando à distância (2x AA pilha LR6 1,5 V):
– Abra a tampa no verso do comando à distância
– Coloque as pilhas. Repare nos pólos correctos (veja inscrição no fundo do compartimento das pilhas)
– Volte a fechar a tampa
MONTAGEM NA PAREDE
A aparelhagem Design e as respectivas colunas podem ser montadas na parede.
Os respectivos parafusos e dispositivos de fixação à parede fazem parte do fornecimento. Coloque o aparelho de forma vertical
numa parede estável.
Os buracos para os parafusos têm de ser feitos a uma distância de 14 cm abaixo uns dos outros
.
Para que os parafusos fiquem bem presos nos dispositivos de fixação P no verso da aparelhagem Design e das colunas,
as cabeças dos parafusos têm de sair da parede ca. 3 mm.
ELEMENTOS DE COMANDO
! Compartimento de CD 6 Compartimento de cassetes
@ visor 7 Tecla Stop (CD)
# Receptor para sinais de comando à distância. 8 Tecla de retrocesso (*)
$ Tecla mono/estéreo (apenas operação rádio FM) 9 Comutar indicação
% Selector do som 0 Tecla TIMER
^ Stop sonoro /silencioso - Tecla SLEEP
& Reprodução / pausa de CD = Tecla M-UP/REPEAT (*)
* Selectores do aparelho \ Tecla MEMORY/CLK-ADJ (*)
( Tecla RANDOM Q Baixar volume
) Tecla de avanço (*) W Aumentar volume
_ Tecla selecção de banda E Tecla LIGADO-/DESLIGADO-(Stand-By)
+ Tampa protectora R Indicação de funcionamento
| Tecla de pausa (apenas para cassetes) T Ficha de rede
` Tecla stop / ejecção (apenas para cassetes) Y Cabos das colunas
1 Bobinar (apenas para cassetes) U Terminais Cinch para aparelho externo (AUX)
2 Rebobinar (apenas para cassetes) I Redução do ruído na gravação (apenas para cassetes)
3 Tecla de reprodução (apenas para cassetes) O Cabo de antena
4 Tecla de gravação (apenas para cassetes) P Dispositivo de suspensão para montagem na parede
5 Ligação para auscultador
Os elementos de comando identificados com (*) possuem várias funções diferentes conforme a opção do aparelho (por ex.
funcionamento rádio ou CD). Consulte os respectivos capítulos.
Os elementos de comando
| até 4 e I são única e exclusivamente para funcionar com o gravador de cassetes.
OPERAÇÂO
LIGAR E DESLIGAR [ » POWER / STAND-BY « ]
• Quando se encaixa a ficha o aparelho encontra-se em modo Stand-By. A indicação de funcionamento
R está vermelha.
• Prima a tecla LIGAR/DESLIGAR E. O aparelho encontra-se agora em modo de funcionamento. A indicação de funcionamento R
está verde.
• Para voltar para o modo Stand-By, prima novamente a tecla LIGAR/DESLIGAR E.
• Em caso de ausência prolongada tire a ficha da rede.
35
P
Page 36

SELECIONAR APARELHO /FONTE SONORA [ » CD / TUNER / TAPE / AUX « ]
• Prima a respectiva tecla marcada
* para seleccionar um aparelho ou mudar a fonte sonora:
CD = Leitor de CD TUNER = Rádio TAPE = Gravador de cassetes AUX = Aparelho externo, por ex. Gira-Discos
REGULAR VOLUME [ » VOLUME / MUTE « ]
• Com a
tecla W pode aumentar o volume.
• Com a tecla Q pode baixar o volume.
• Se premir a tecla de stop sonoro ^ as colunas e o auscultador desligam-se (silencioso).
REGULAR SOM [ » CLASSIC / ROCK / POP « ]
Com a tecla de selecção sonora
% pode adaptar a qualidade de som do título da respectiva orientação musical, para assim
aumentar o prazer sonoro. A regulação seleccionada CLASSIC, ROCK ou POP é indicada no visor
@ (sem indicação = som neutro).
AUSCULTADOR [ » PHONES « ]
Pode conectar-se à ligação para auscultador
5 um auscultador estéreo de 8-32 Ohms com 3,5 mm de ficha de jaques. Assim que
o auscultador estiver encaixado, as colunas ficam desactivadas. Tenha em tenção que um volume demasiado elevado pode causar
graves lesões a nível auditivo.
REGULAR O RELÓGIO
01) Para poder regular a hora, o aparelho tem de estar no modo Stand-By (indicação de funcionamento R está vermelha).
02) Prima uma vez a tecla MEMORY/CLK-ADJ \ – a indicação das horas pisca.
03) Regule a hora com as teclas avanço ) ou retrocesso 8.
04) Prima de novo a tecla MEMORY/CLK-ADJ \ – a indicação dos minutos pisca.
05) Regule os minutos com as teclas
avanço ) ou retrocesso 8.
06) Prima e novo a tecla MEMORY/CLK-ADJ \ – a indicação pára de piscar e o relógio está a funcionar (os „Dois Pontos” piscam).
REGULAR TEMPORIZADOR [ » TIMER « ]
Se activar a hora para ligar, a sua aparelhagem Design pode ser o seu despertador.
01) Seleccione com a respectiva tecla
* o aparelho / fonte sonora pretendida (CD, GRAVADOR ou RÁDIO).
02) Preparar a fonte sonora, ou seja, em TUNER (RÁDIO) sintonize a emissora desejada, em TAPE (GARVADOR DE CASSETES)
introduzir as cassetes e bobinar para o sítio pretendido ou colocar um CD e event. programar uma sequência de títulos.
03) Premir a tecla TIMER
0. No visor @ aparece indicado TIMER.
INDICAÇÃO: Para cada um dos passos seguintes tem 5 segundos. Caso contrário o processo é interrompido.
Recomece depois a partir do passo 4).
04) Prima 2 x a tecla
9 MODE/REMAIN. No visor @ aparece a indicação da hora e TIMER ON pisca.
05) Prima uma vez a tecla MEMORY/CLK-ADJ \ – a indicação das horas pisca.
06) Regule a hora com as teclas avanço ) ou retrocesso 8.
07) Prima de novo a tecla MEMORY/CLK-ADJ \ – a indicação dos minutos pisca.
08) Regule os minutos com as teclas
avanço ) ou retrocesso 8.
09) Prima de novo a tecla MEMORY/CLK-ADJ \ – a hora para ligar ficou memorizada.
10) Se quiser ser despertado por uma cassete: prima a tecla de reprodução 3.
11) Depois desligue a aparelhagem Design (Tecla E de LIGAR/DESLIGAR ).
Se activar a hora para desligar, a sua aparelhagem Design desliga-se sempre à hora marcada.
01) Premir a tecla TIMER
0. No visor @ aparece indicado TIMER.
INDICAÇÃO: Para cada um dos passos seguintes tem 5 segundos. Caso contrário o processo é interrompido.
Recomece depois a partir do passo 2).
02) Prima 3 x a tecla
9 MODE/REMAIN. No visor @ aparece a indicação da hora e TIMER OFF pisca.
03) Prima uma vez a tecla MEMORY/CLK-ADJ
\ – a indicação das horas pisca.
04) Regule a hora com as teclas avanço ) ou retrocesso 8.
05) Prima de novo a tecla MEMORY/CLK-ADJ \ – a indicação dos minutos pisca.
06) Regule os minutos com as teclas
avanço ) ou retrocesso 8.
07) Prima de novo a tecla MEMORY/CLK-ADJ \ – a hora para desligar ficou memorizada.
Para desligar as funções de TIMER, prima a tecla TIMER 0 tantas vezes até que no visor @ desapareça TIMER.
36
P
Page 37

ACTIVAR FUNÇÃO DE DORMIR [ » SLEEP « ]
Pode determinar um tempo entre 90 e 10 minutos, após o qual o aparelho deve ser desligado definitivamente.
• Para activar um tempo de desactivação após 90 minutos, prima 1 x ligeiramente a tecla SLEEP
-.
• Para regular um tempo de desactivação mais curto, mantenha a tecla SLEEP - premida, até aparecer o tempo pretendido no visor.
• Para desligar a função de dormir, prima a tecla SLEEP -, até desaparecer o sinal SLEEP no visor @.
RÁDIO
ALINHAR A ANTENA
Caso seja utilizada a antena para a captação FM:
• a antena deve encontrar-se completamente desenrolada
• determina a melhor posição da antena, testando-a
• fixe eventualmente a antena à parede com uma fita adesiva.
Para a captação MW, também pode determinar a melhor posição, para a antena montada no aparelho, através de ensaio.
OPERAÇÃO RÁDIO / SELECCIONAR BANDA (UKW/MW)
01) Seleccionar com a tecla de selecção do aparelho * TUNER (=Rádio).
02) Premindo novamente o botão TUNER/BAND (Sintonizador/Banda)
_ altera entre UKW (FM) e onda média (AM).
PROCURA AUTOMÁTICA DE EMISSORA / PROCURA MANUAL
Na procura automática de emissora, a frequência é aumentada, ou seja, diminuída até ser encontrada uma emissora
com uma suficiente potência de recepção.
01) Manter premida a tecla avanço ) ou seja, retrocesso 8 durante ca. 1 segundo – a procura inicia e pára automaticamente.
02) Para iniciar novamente a procura, voltar a manter premida a tecla
avanço ) ou seja, retrocesso 8 durante de ca. 1 segundo.
Pode utilizar a procura manual de emissora para a regulação fina, ou se conhecer a frequência da emissora.
01) Somente premir durante um curto espaço de tempo a tecla avanço ) ou seja, retrocesso 8, para aumentar ou diminuir
a frequência em passos pequenos.
02) Mantenha a tecla
avanço ) ou seja, retrocesso 8 premida até chegar à proximidade da frequência pretendida.
MEMORIZAR EMISSORA [ » MEMORY « ]
A aparelhagem Design KH 2300 pode memorizar até 40 emissoras (20 FM / 20 MW).
01) Regule a emissora pretendida conforme descrito em „Procura automática de emissora / Procura manual“.
02) Premir uma vez a tecla MEMORY/CLK-ADJ \. No visor @ surge durante 5 segundos, no lado esquerdo, a indicação para o lugar
de programa. Dentro destes 5 segundos deve efectuar o passo seguinte, caso contrário o aparelho volta a mudar para indicação
normal. Neste caso prima novamente a tecla MEMORY/CLK-ADJ \.
03) Premir a tecla M-UP/REPEAT
= tantas vezes até ser indicado o lugar de programa pretendido (1 a 20).
Repita este procedimento para todas as outras emissoras desejadas, as quais pretende memorizar.
SELECCIONAR EMISSORAS MEMORIZADAS
Premir a tecla M-UP/REPEAT = tantas vezes até ser indicado o lugar de programa pretendido, com a emissora memorizada,
aparecer no visor @.
LEITOR DE CD
PERIGO! Dentro do leitor de CD encontra-se um raio laser, fraco mas altamente concentrado, o qual lê a superfície do CD colocado.
Em caso de utilização indevida, este raio pode representar um perigo para os olhos – Nunca abrir o aparelho !
COLOCAR CD
01) Para abrir o compartimento de CD !, puxar o canto superior para a frente.
02) Colocar o CD com o lado gravado virado para o aparelho. Com o CD correctamente colocado, visualizará o lado impresso.
O CD deve ser bem colocado sobre o eixo (o qual se encontra no centro).
03) Fechar compartimento de CD
!.
04) Seleccionar o leitor de CD com a tecla de selecção do aparelho *. No visor @ é indicado o tempo total de reprodução e
a quantidade dos títulos.
INDICAÇÃO: Caso não seja apresentado o tempo total de reprodução e a quantidade de títulos, após ter colocado o CD, o CD poderá
estar colocado erradamente ou poderá conter sujidade. Limpe o CD com um pano para limpeza de CD’s, ou seja, coloque o CD
correctamente e verifique novamente a indicação.
37
P
Page 38

FUNÇÕES BÁSICAS DO LEITOR DE CD
• INICIAR REPRODUÇÃO: Prima a tecla & PLAY/PAUSE – a reprodução começa.
• INTERROMPER A REPRODUÇÃO (PAUSA): Prima a tecla & PLAY/PAUSE – a reprodução é interrompida. No visor @
pisca o tempo de reprodução. Premindo de novo a tecla & PLAY/PAUSE a reprodução continua.
• PARAR REPRODUÇÃO: Prima a tecla 7 STOP – a reprodução pára.
• AVANÇO DE UM TÍTULO: A tecla
de avanço ) salta sempre um título cada vez que se pressiona.
• RETROCESSO DE UM TÍTULO: A tecla de retrocesso 8 salta sempre um título para trás cada vez que se pressiona.
• BOBINAR: Mantenha a pressão na tecla de avanço ), para bobinar dentro de um título.
• REBOBINAR: Mantenha a pressão na tecla
de retrocesso 8, para rebobinar dentro de um título.
O compartimento de CD ! pode ser aberto a qualquer hora. A reprodução pára imediatamente. Retire, no entanto, o CD
apenas quando parar completamente.
PROGRAMAR SEQUÊNCIA DE TÍTULOS [ » TRACK MEMORY « ]
A programação da sequência de títulos é apenas possível com o CD parado. Podem programar-se até 20 títulos.
01) Colocar CD
02) Seleccionar o leitor de CD com a tecla de selecção do aparelho *.
03) Prima a tecla MEMORY/CLK-ADJ \. No visor @ aparece TRACK MEMORY.
04) Com a tecla
avanço ) ou retrocesso 8 seleccione o número do título que deve tocar primeiro.
05) Prima a tecla MEMORY/CLK-ADJ \. O título está agora memorizado no primeiro lugar de programa (P-01).
Repita os passos 3) até 5) para um máximo de 20 títulos. Pode também programar um título mais de uma vez.
A sequência de títulos programada mantém-se memorizada até retirar o CD do compartimento de CD, seleccionar outra função
ou desligar o aparelho.
INICIAR A SEQUÊNCIA DE TÍTULOS PROGRAMADA
01) Prima a tecla MEMORY/CLK-ADJ \. No visor @ aparece TRACK MEMORY e os títulos programados.
02) Prima a tecla & PLAY/PAUSE – a reprodução começa respeitando a sequência programada por si.
03) Para anular um programa, prima a tecla
7 STOP.
FUNÇÕES DE REPETIÇÃO [ » REPEAT « ]
• Para repetir todos os títulos de um CD, prima a tecla M-UP/REPEAT
=. No Display @ aparece REPEAT ALL (Repete tudo).
• Para repetir um único título, prima 2 x a tecla M-UP/REPEAT = quando o título está a tocar. No Display @ aparece REPEAT ONE
(Repete um).
• Para repetir uma sequência de títulos programada, prima a tecla M-UP/REPEAT
= quando a sequência de títulos programada
está a tocar. No visor @ aparece REPEAT.
• Para desligar a função de repetição prima o botão M-UP/REPEAT = as vezes necessárias até que no Display desapareça @
REPEAT ALL ou REPEAT ONE.
DEIXAR OS TÍTULOS TOCAREM ALEATORIAMENTE [ » RANDOM « ]
Com a função RANDOM a sequência de títulos do CD colocado é feita aleatoriamente.
01) Colocar CD.
02) Seleccionar o leitor de CD com a tecla de selecção do aparelho
*.
03) Prima a tecla RANDOM (. No visor @ aparece RANDOM.
04) Prima a tecla
& PLAY/PAUSE – a reprodução começa numa sequência aleatória.
GRAVADOR DE CASSETES
COLOCAR CASSETES
01) Abrir a tampa de protecção + para a frente. Por detrás encontram-se as teclas de comando do gravador de cassetes (e da ligação
dos auscultadores).
02) Prima a tecla ` para abrir o compartimento de cassetes. O compartimento de cassetes abre automaticamente.
03) Coloque a cassete com a fita virada para baixo. A fita deve estar firme e esticada.
04) Fechar o compartimento de cassetes.
05) Seleccionar o gravador de cassetes com a tecla de selecção do aparelho
* TAPE.
38
P
Page 39

FUNÇÕES BÁSICAS DO GRAVADOR DE CASSETES
• INICIAR REPRODUÇÃO: Prima a tecla 3 – a reprodução começa.
• INTERROMPER A REPRODUÇÃO (PAUSA): Prima a tecla | – a reprodução é interrompida. Premindo de novo a tecla |
a reprodução continua.
• PARAR REPRODUÇÃO: Prima a tecla ` STOP – a reprodução pára.
• BOBINAR: Prima a tecla
1.
• REBOBINAR: Prima a tecla 2.
GRAVAR CASSETES
A aparelhagem Design KH 2300 está equipada com um comando automático. Alterações de volume ou do som não têm
qualquer influência na gravação.
1) Colocar cassete e, se for o caso, bobinar para o sítio onde pretende que comece a gravação.
2) Prima a tecla
| (PAUSE-) .
3) Prima a tecla 4 (GRAVAÇÃO) . A tecla 3 é automaticamente accionada.
4) Prima a respectiva tecla marcada
* para seleccionar um aparelho ou mudar a fonte sonora para a gravação.
5) Soltando a tecla | (PAUSE-) a gravação inicia-se.
6) Para terminar a gravação prima a tecla `.
LIMPAR AS CABEÇAS DE LEITURA
Faça uma limpeza regular das cabeças de leitura e das peças condutoras das fitas, usando uma cassete de limpeza correspondente.
DECLARAÇÃO DE CONFORMIDADE
A firma Kompernaß Handelsgesellschaft mbH, Burgstr. 21, D-44867 Bochum, Alemanha, certifica, por este meio,
a concordância deste produto com as seguintes directivas da CE:
Inocuidade electromagnética: 89/336 EEC (EMC Directive)
Normas de concordância correlativas: EN 55013
:06.90+A12:08.94+A13:12.96
EN 55020:12.94+A11:12.96
EN 61000-3-2:04.95+A1:1998+A2:1998
EN 61000-3-3:01.95
Modelo: KH2300
Designação da máquina: (MICRO) APARELHAGEM DESIGN COM LEITOR DE CD VERTICAL
Bochum, 31.08.2002
Hans Kompernaß
- Gerente -
39
P
Page 40

BELANGRIJKE VEILIGHEIDSVOORSCHRIFTEN
Onderstaande fundamentele veiligheidsvoorschriften moeten bij het gebruik van elektrische apparaten in ieder geval opgevolgd worden.
Lees de onderstaande informatie over veiligheid en doelmatig gebruik aandachtig door. Vouw vóór het lezen de pagina
met de afbeeldingen open en zorg dat u vertrouwd raakt met alle functies van het apparaat. Bewaar deze handleiding
zorgvuldig en geef deze zo nodig aan anderen door.
Neem het apparaat niet in gebruik wanneer de netsteker, de netkabel of het apparaat beschadigd is.
Wanneer het apparaat gevallen is, laat het dan eerst door een elektriciteitsvakman controleren voordat u het opnieuw
in gebruik neemt.
Binnen in het apparaat vormen zich gevaarlijke spanningen. Open de behuizing nooit en steek nooit voorwerpen naar binnen
door de luchtopeningen.
Zorg dat er geen vloeistoffen in het apparaat kunnen dringen. Trek in noodgevallen onmiddellijk de steker uit de contactdoos.
Trek ook altijd de steker uit de contactdoos wanneer er tijdens het bedrijf storingen optreden en voordat u het apparaat schoonmaakt.
Voer zelf geen veranderingen of reparaties uit aan het apparaat. Ook de aansluitkabel mag niet door u zelf worden omgewisseld.
Laat de reparaties aan het apparaat of aan de aansluitkabel over aan de vakhandel of aan het servicecentrum. Door niet vakkundige
reparaties kunnen aanzienlijke gevaren voor de gebruiker ontstaan.
Kinderen onderschatten vaak de gevaren bij de omgang met elektrische apparaten. Laat kinderen nooit zonder toezicht toe
in de buurt van elektrische apparaten.
Stel het apparaat nooit zonder toezicht in bedrijf.
Het apparaat mag niet in vochtige ruimten (bijv. de badkamer) of in zeer stoffige ruimten worden gebruikt.
De opgestuwde warmte binnen in het apparaat kan leiden tot een defect of brand in het apparaat.
Zet het apparaat daarom niet in een omgeving met extreme temperaturen:
– directe zonnestraling en warmte van de centrale verwarming vermijden.
– luchtopeningen van het apparaat niet afdekken.
– aan de zijkanten zo mogelijk ca. 10 cm vrijlaten.
Het apparaat mag niet in de onmiddellijke nabijheid van ontvlambare materialen (bijv. gordijnen, brandbare vloeistoffen enz.) worden
geplaatst.
Wanneer de designinstallatie vanuit de kou in de warmte komt (bijv. na het transport), kan zich aan de binnenzijde condenswater
vormen. Om de designinstallatie tegen schade te beschermen: op z’n vroegst na 2 uur inschakelen.
Bij onweer kunnen op het elektriciteitsnet aangesloten apparaten beschadigd worden. Trek bij onweer daarom altijd de steker
uit de contactdoos en verwijder de antennesteker.
Om het apparaat geheel van de stroomverzorging af te sluiten moet de steker uit de contactdoos genomen worden. Daarbij altijd
de steker en niet de kabel aanpakken.
Bescherm de aansluitkabel tegen warme oppervlakken of soortgelijke beschadigingen en zorg dat hij niet afgeklemd wordt.
Controleer de aansluitkabel regelmatig op eventuele beschadigingen.
Rol de aansluitkabel bij gebruik volledig af.
Zorg dat niemand over de aansluitkabel kan struikelen.
Bij langere afwezigheid de steker uit de contactdoos nemen en de batterijen uit de afstandsbediening halen.
Het apparaat is bedoeld voor particulier gebruik.
Opmerking: de designinstallatie is uitgerust met antislip rubberpootjes. Omdat de ondergrond uit verschillende materialen kan
bestaan en met verschillende onderhoudsmiddelen kan worden behandeld, is het niet volledig uitgesloten dat sommige van
deze stoffen bestanddelen bevatten die de rubberpootjes aantasten en week maken. Leg in dergelijke gevallen een antislip
ondermat onder de pootjes.
Milieubescherming: nooit gebruikte en nieuwe batterijen samen gebruiken. Deponeer gebruikte batterijen in het belang
van het milieu niet bij het huisafval, maar geef ze af bij de daarvoor aanwezige inzamelingspunten.
OPSTELLEN EN AANSLUITEN
Volg beslist de aangegeven aanwijzingen op voordat u de designinstallatie voor de eerste maal in gebruik neemt en sluit
als laatste de elektriciteitskabel aan.
1) Neem de designinstallatie en de luidsprekers voorzichtig uit de verpakking.
2) Zoek voor uw designinstallatie de geschikt plaats uit, deze moet
… waterpas
… droog en stofvrij
… niet in de buurt van verwarmingsapparaten of in de volle zon liggen
3) BELANGRIJK: verwijder alle transportbeveiligingen (plakband op het cd- en cassettevak!)
Open het cd-vak
! door aan de bovenzijde te trekken en verwijder de rode transportbeveiliging (daarna het cd-vak weer sluiten).
40
Page 41

4) Sluit de beide luidsprekers aan. De aansluitpunten voor de luidsprekers Y zijn overeenkomstig aangeduid: (L=LINKS / R=RECHTS).
T
ips voor opstelling van de luidsprekers:
luidsprekers zo mogelijk op hoofdhoogte plaatsen
luidsprekers niet afdekken door gordijnen of andere voorwerpen
luidsprekers zodanig op een plank plaatsen dat de voorzijde gelijk afsluit met de voorzijde van de plank.
om dreunen te voorkomen eventueel een rubbermat onder de luidsprekers leggen.
5) Voor het aansluiten van een extern apparaat, (bijv. een platenspeler) de cinchaansluiting U gebruiken.
6) Voor de FM-radio-ontvangst een 75 Ohm-antenne (huisantenne of kabelaansluiting) op de antenneaansluiting O aansluiten.
Wanneer deze niet beschikbaar is, kunt u de meegeleverde antenne aansluiten op het middencontact van de antenneaansluiting O.
De antenne voor AM-ontvangst is in het apparaat ingebouwd.
7) Nu de elektriciteitssteker aan een 230 V contactdoos aansluiten.
8) Batterijen (niet bij de verpakking inbegrepen) in de afstandsbediening plaatsen.(2x AA mignon LR6 1,5 V):
– Kap aan de achterzijde van de afstandsbediening openen.
– Batterijen plaatsen. Let daarbij op de juiste polen (zie aanduiding op de bodem van het batterijvak).
– Kap weer sluiten.
WANDMONTAGE
De designinstallatie met de bijbehorende luidsprekers kan aan de wand gemonteerd worden.
Passende schroeven en wandhaken zijn bij de verpakking inbegrepen. Monteer het apparaat verticaal aan een duurzame wand.
De schroefgaten moeten met een afstand van 14 cm onder elkaar geboord worden.
Aangezien de schroeven op de juiste wijze in de houders
P aan de achterzijde van de designinstallatie moeten kunnen grijpen,
moeten de schroefkoppen ca. 3 mm uit de wand steken.
BEDIENINGSELEMENTEN
! Cd-vak 6 Cassettevak
@ Display 7 Stoptoets (cd)
# Ontvanger voor signalen van de afstandsbediening. 8 Teruglooptoets (*)
$ Toets mono/stereo (alleen bij FM-radio-ontvangst) 9 Aanwijzing omschakelen
% Toets voor klankkeuze 0 TIMER-toets
^ geluidsstop /dempingstoets - SLEEP-toets
& Cd-weergave/pauze = M-UP/REPEAT-toets (*)
* Selectietoetsen \ MEMORY/CLK-ADJ-toets (*)
( RANDOM-toets Q Geluidssterkte verminderen
) Vooruittoets (*) W Geluidssterkte verhogen
_ Selectietoetsen bandkeuze E AAN-/UIT-(Stand-by) -toets
+ Beschermkap R Aanwijzing “ingeschakeld”
| Pauzetoets (alleen voor cassette) T Elektriciteitssteker
` Stop/uitwerptoets (alleen voor cassette) Y Luidsprekeraansluitingen
1 Vooruitspoelen (alleen voor cassette) U Cinchaansluitingen voor extern apparaat (AUX)
2 Terugspoelen (alleen voor cassette) I Ruisonderdrukking opname (alleen voor cassette)
3 Weergavetoets (alleen voor cassette) O Antenneaansluiting
4 Opnametoets (alleen voor cassette) P Ophanging voor wandmontage
5 Aansluiting koptelefoon
De met (*) aangeduide bedieningselementen zijn al naargelang de selectie (bijv. radio- of cd-gebruik) voor meerdere functies
te gebruiken. Lees hiervoor het betreffende hoofdstuk.
De bedienelementen
| tot 4 en I zijn uitsluitend voor het gebruik van de cassetterecorder. .
BEDIENING
IN- EN UITSCHAKELEN [ » POWER / STAND-BY « ]
• Wanneer de elektriciteitssteker is aangesloten, bevind het apparaat zich in de stand-by-modus. De “ ingeschakeld”-indicator
R
brandt rood.
• Druk dan op de AAN-/UIT-toets E. Het apparaat bevind zich nu in de “ingeschakeld”-modus. De “ingeschakeld”-indicator R
brandt groen.
• De AAN-/UIT-toets E opnieuw indrukken om terug te schakelen naar de stand-by-modus.
• Bij langere afwezigheid de elektriciteitssteker uit de contactdoos verwijderen.
41
Page 42

APPARAAT /GELUIDSBRON KIEZEN [ » CD / TUNER / TAPE / AUX « ]
• Druk de desbetreffende toets
* in om een apparaat te kiezen of van geluidsbron te wisselen:
CD = cd-speler TUNER = radio TAPE = cassetterecorder AUX = extern apparaat, bijv. platenspeler
GELUIDSSTERKTE INSTELLEN [ » VOLUME / MUTE « ]
• U verhoogt de geluidssterkte met de
toets W.
• U verlaagt de geluidssterkte met de toets Q.
• Door het indrukken van de geluidsstop-toets ^ worden de luidspreker en de koptelefoon uitgeschakeld (demperschakeling).
KLANK INSTELLEN [ » CLASSIC / ROCK / POP « ]
Met de klankkeuzetoets
% kunt u de klankkwaliteit van een titel aan de betreffende muziekweergave aanpassen en daarmee
het luisterplezier verhogen. De gekozen instelling CLASSIC, ROCK of POP wordt op het display
@ aangegeven (geen melding =
neutraal geluid).
KOPTELEFOON [ » PHONES « ]
Aan de koptelefoonaansluiting
5 kan een stereokoptelefoon 8-32 Ohm met 3,5 mm steker aangesloten worden. Zodra de koptelefoon
aangesloten is, worden de luidsprekers uitgeschakeld. Let op dat te hoge geluidssterkte tot ernstige gehoorschade kan leiden.
KLOK INSTELLEN
01) Om de tijd in te kunnen stellen, moet het apparaat zich in de stand-by-modus bevinden. (De “ingeschakeld”-indicator R brandt rood).
02) MEMORY/CLK-ADJ-toets \ eenmaal indrukken – de urenaanduiding knippert.
03) Met de toetsen vooruit ) of achteruit 8 de uurtijd instellen.
04) MEMORY/CLK-ADJ-toets \ opnieuw indrukken – de minutenaanduiding knippert
05) Met de toetsen
vooruit ) of achteruit 8 de minuten instellen.
06) MEMORY/CLK-ADJ-toets \ opnieuw indrukken – de aanduiding knippert niet meer en de klok is actief (knipperende dubbele punt)
IN- OF UITSCHAKELTIJD INSTELLEN [ » TIMER « ]
Wanneer u de inschakeltijd activeert, kunt u zich op ieder tijdstip door uw designinstallatie laten wekken.
01) Met de hiervoor bestemde toets
* het gewenste apparaat /geluidsbron (cd, TAPE of TUNER) kiezen.
02) Geluidsbron voorbereiden - dus bij de TUNER (radio) de gewenste zender instellen, bij TAPE (cassetterecorder) de cassette plaatsen
en naar de gewenste positie spoelen of een cd plaatsen en naar wens een titelvolgorde programmeren.
03) TIMER-toets
0 indrukken. Op het display @ wordt TIMER aangeduid.
AANWIJZING: voor de volgende stappen hebt u telkens 5 seconden tijd. Wanneer u langer dan 5 seconden
geen handelingen verricht, wordt de procedure afgebroken. (Begin dan opnieuw met stap 4).
04) Toets
9 MODE/REMAIN 2 x indrukken. Op het display @ verschijnt de tijdsaanduiding en TIMER ON knippert.
05) MEMORY/CLK-ADJ-toets \ eenmaal indrukken – de urenaanduiding knippert.
06) Met de toetsen vooruit ) of achteruit 8 de uurtijd instellen.
07) MEMORY/CLK-ADJ-toets \ opnieuw indrukken – de minutenaanduiding knippert..
08) Met de toetsen
vooruit ) of achteruit 8 de minuten instellen.
09) MEMORY/CLK-ADJ-toets \ opnieuw indrukken– de inschakeltijd is nu opgeslagen.
10) Wanneer u zich door een cassette wilt laten wekken: de weergavetoets 3 indrukken.
11) Afsluitend de designinstallatie uitschakelen (AAN-/UIT-toets E).
Wanneer u de uitschakeltijd activeert, schakelt uw designinstallatie steeds op de ingeschakelde tijd uit.
01) TIMER-toets
0 indrukken. Op het display @ wordt TIMER aangeduid.
AANWIJZING: Voor de volgende stappen hebt u telkens 5 seconden tijd. Anders wordt de voortgang afgebroken.
(Beginnen dan opnieuw met stap 2).
02) Toets
9 MODE/REMAIN 3 x indrukken. Op het display @ verschijnt de tijdsaanduiding en TIMER OFF knippert.
03) MEMORY/CLK-ADJ-toets
\ eenmaal indrukken – de urentijd knippert.
04) Met de toetsen vooruit ) of achteruit 8 de urentijd instellen.
05) MEMORY/CLK-ADJ-toets \ opnieuw indrukken – de minutentijd knippert.
06) Met de toetsen
vooruit ) of achteruit 8 de minuten instellen.
07) MEMORY/CLK-ADJ-toets \ opnieuw indrukken – de uitschakeltijd is nu opgeslagen.
Om de timerfuncties uit te schakelen: TIMER-toets 0 steeds opnieuw indrukken totdat op het display @ TIMER verdwijnt.
42
Page 43

SLUIMERFUNCTIE ACTIVEREN [ » SLEEP « ]
U kunt een periode tussen 90 en 10 minuten vaststellen, waarna het apparaat moet uitschakelen.
• Om een uitschakeltijd van 90 minuten te activeren: de SLEEP-toets - - 1 x kort indrukken.
• Om een kortere uitschakeltijd in te stellen: de SLEEP-toets - ingedrukt houden totdat de gewenste tijd op het display verschijnt.
• Om de sluimerfunctie uit te schakelen: de SLEEP-toets - steeds opnieuw indrukken totdat op het display @ SLEEP verdwenen is.
RADIO
ANTENNE RICHTEN
Indien voor de FM-ontvangst de draadantenne gebruikt wordt:
• de antenne moet helemaal uitgerold zijn
• stel door richten de beste positie van de antenne vast.
• bevestig de antenne zo nodig met een stukje plakband aan de wand.
Voor de AM-ontvangst kunt u de beste positie voor de in het apparaat ingebouwde antenne eveneens vaststellen door hem te richten.
RADIOFUNCTIE / BAND (FM/AM) KIEZEN
01) Met de selectietoets * TUNER (= radio) kiezen.
02) Door het opnieuw indrukken van de toets TUNER/BAND
_ schakelt u om tussen FM en AM.
AUTOMATISCH ZENDERZOEKSYSTEEM / HANDMATIG ZOEKEN
Bij het automatisch zenderzoeksysteem wordt de frequentie zo lang verhoogd of verlaagd tot een zender met voldoende
ontvangststerkte is gevonden.
01) Toets vooruit ) of achteruit 8 ca. 1 seconde ingedrukt houden – het afstemmen start en stopt automatisch.
02) Om de afstemming opnieuw te starten: toets
vooruit ) of achteruit 8 nog eens ca. 1 seconde ingedrukt houden.
U kunt de handmatige zenderzoeker gebruiken voor een fijne afstemming of wanneer u de frequentie van de zender kent.
01) Toets vooruit ) of achteruit 8 telkens slechts kort indrukken om de frequentie in kleine stappen te verhogen of te verlagen.
02) Houd de toets
vooruit ) of achteruit 8 ingedrukt totdat u in de buurt van de gewenste frequentie komt.
ZENDER OPSLAAN [ » MEMORY « ]
De designinstallatie KH 2300 kan tot 40 zenders (20 UKW / 20 MW) opslaan.
01) Stel de gewenste zender in zoals bij “automatisch zenderzoeksysteem / handmatig zoeken” beschreven staat.
02) MEMORY/CLK-ADJ-toets
\ een keer indrukken. Links op het display @ verschijnt 5 seconden lang de aanduiding van de
programmaplaats. Binnen deze 5 seconden moet u de volgende stap uitvoeren, anders schakelt het apparaat weer over naar
normale weergave. Druk in dit geval opnieuw op de MEMORY/CLK-ADJ-toets
\.
03) M-UP/REPEAT-toets = steeds opnieuw indrukken totdat de gewenste programmaplaats (1 bis 20) wordt weergegeven.
Herhaal deze procedure voor alle verder gewenste zenders die u wilt opslaan.
OPGESLAGEN ZENDERS KIEZEN
Bij de radiofunctie de M-UP/REPEAT-toets = steeds opnieuw indrukken totdat de gewenste programmaplaats met de opgeslagen
zender op het display @ verschijnt.
CD-SPELER
GEVAAR! In de cd-speler tast een zwakke, maar scherp gebundelde laserstraal de oppervlakte van de geplaatste cd af.
Bij ondeskundig gebruik kan deze straal een gevaar voor de ogen betekenen – apparaat nooit openen!
CD PLAATSEN
01) Voor het openen van het cd-vak ! de bovenkant naar voren trekken.
02) De cd met de bespeelde zijde naar beneden in het apparaat leggen. Bij een correct geplaatste cd ziet u dus de bedrukte zijde. De cd
moet vast op de (in het midden liggende) as geschoven worden.
03) Cd-vak
! sluiten.
04) Met de selectietoets * CD de cd-speler kiezen. Op het display @ wordt de totale speelduur en het aantal titels aangegeven..
AANWIJZING: wanneer na het plaatsen van de cd op het display niet het aantal titels en de gezamenlijke speelduur verschijnen,
is de cd mogelijk verkeerd geplaatst of vuil. Maak de cd schoon met een cd-reinigingsdoekje of plaats de cd correct en controleer
de aanduiding opnieuw.
43
Page 44

BASISFUNCTIES VAN DE CD-SPELER
• WEERGAVE STARTEN: toets & PLAY/PAUSE indrukken – de weergave start.
• WEERGAVE ONDERBREKEN (PAUZE): toets & PLAY/PAUSE indrukken– de weergave wordt onderbroken. Op het display @
knippert de speelduur. Door het opnieuw indrukken van de toets & PLAY/PAUSE wordt de weergave weer voortgezet.
• WEERGAVE STOPPEN: toets 7 STOP indrukken – de weergave wordt beëindigd.
• TITELSPRONG VOORUIT: toets
vooruit ) springt met iedere toetsindruk één titel verder.
• TITELSPRONG ACHTERUIT: toets achteruit 8 springt met iedere toetsindruk één titel achteruit.
• VOORUITLOOP: toets vooruit ) ingedrukt houden om binnen een titel vooruit te spoelen.
• TERUGLOOP: toets
achteruit 8 ingedrukt houden, om binnen een titel terug te spoelen.
Het cd-vak ! kan op ieder moment geopend worden. De weergave stopt dan automatisch. Neem echter de cd pas uit
wanneer deze geheel stilstaat.
TITELVOLGORDE PROGRAMMEREN [ » TRACK MEMORY « ]
De programmering van de titelvolgorde is slechts mogelijk bij een stilstaande cd. Er kunnen tot 20 titels geprogrammeerd worden .
01) cd plaatsen.
02) Met de selectietoets * CD de cd-speler kiezen.
03) MEMORY/CLK-ADJ-toets \ indrukken. Op het display @ verschijnt TRACK MEMORY.
04) Met de toets
vooruit ) of. achteruit 8 het nummer van de titel kiezen die als eerste moet worden gespeeld.
05) MEMORY/CLK-ADJ-toets \ indrukken. De titel is nu op de eerste programmaplaats (P-01) opgeslagen.
Herhaal de stappen 3) t/m 5) voor maximaal 20 titels. U kunt een titel ook vaker programmeren.
De geprogrammeerde titelvolgorde blijft opgeslagen totdat de cd uit het cd vak genomen, een andere functie gekozen of het
apparaat uitgeschakeld wordt.
GEPROGRAMMEERDE TITELVOLGORDE STARTEN
01) MEMORY/CLK-ADJ-toets \ indrukken. Op het display @ verschijnt TRACK MEMORY en de geprogrammeerde titels.
02) Toets & PLAY/PAUSE indrukken – de weergave start en loopt in de door u geprogrammeerde volgorde..
03) Om een programma te stoppen drukt u op de toets
7 STOP.
HERHAALFUNCTIES [ » REPEAT « ]
• Om alle titels van een cd te herhalen, M-UP/REPEAT-toets
= indrukken. Op het display @ verschijnt REPEAT ALL.
• Om een enkele titel te herhalen, M-UP/REPEAT-toets = 2 x indrukken wanneer de gewenste titel wordt afgespeeld. Op het
display @ verschijnt REPEAT ONE.
• Om een geprogrammeerde titelvolgorde te herhalen, M-UP/REPEAT-toets
= indrukken wanneer de geprogrammeerde
titelvolgorde wordt afgespeeld. Op het display @ verschijnt REPEAT.
• Om de herhaalfunctie uit te schakelen drukt u de M-UP/REPEAT-toets = steeds opnieuw in totdat de melding REPEAT ALL
of REPEAT ONE op het display @ is gedoofd.
TITELS IN WILLEKEURIGE VOLGORDE AFSPELEN [ » RANDOM « ]
Met de RANDOM-functie wordt de titelvolgorde van de geplaatste cd willekeurig gekozen.
01) Cd plaatsen
02) Met de selectietoets
* CD de cd-speler kiezen.
03) RANDOM-toets ( indrukken. Op het display @ verschijnt RANDOM.
04) Toets
& PLAY/PAUSE indrukken – de weergave start in willekeurige volgorde.
CASSETTERECORDER
CASSETTE PLAATSEN
01) Beschermklepje + naar voren openen. Daarachter bevinden zich de bedieningstoetsen van de cassetterecorder (en de
koptelefoonaansluiting).
02) Voor het openen van het cassettevak toets ` indrukken. Het cassettevak open automatisch.
03) Cassette met de bandzijde naar beneden plaatsen. De band moet strak en zonder lussen zijn.
04) Cassettevak sluiten.
05) Met de selectietoets
* TAPE de cassetterecorder kiezen.
44
Page 45

GRONDFUNCTIES VAN DE CASSETTERECORDER
• WEERGAVE STARTEN: toets 3 indrukken – de weergave start.
• WEERGAVE ONDERBREKEN (PAUZE): toets | indrukken – de weergave wordt onderbroken. Door het opnieuw indrukken
van de toets | wordt de weergave voortgezet.
• WEERGAVE STOPPEN: toets ` STOP indrukken – de weergave wordt beëindigd.
• VOORUITSPOELEN: toets
1 indrukken.
• TERUGSPOELEN: toets 2 indrukken.
CASSETTES OPNEMEN
De Designinstallatie KH 2300 is uitgerust met een automatische modulatie. Veranderingen in de geluidssterkte
of de klankkeuze hebben geen invloed op de opname.
01) Cassette plaatsen en zo nodig naar de plaats spoelen waar de opname moet beginnen.
02) De (PAUSE-) toets
| indrukken.
03) Druk op de (OPNAME-) toets 4. De toets 3 wordt automatisch mee ingedrukt.
04) Druk op de betreffende toets
* om een apparaat of een geluidsbron voor de opname te kiezen.
05) Door het ontgrendelen (opnieuw indrukken) van de (PAUZE-) toets | wordt de opname gestart.
06) U beëindigt de opname door het indrukken van de toets `.
KOPPEN REINIGEN
Gebruik voor her reinigen van de koppen en het bandloopwerk regelmatig een daarvoor geschikte reinigingscassette.
CONFORMITEITSVERKLARING
Wij, Kompernaß Handelsgesellschaft mbH, Burgstr. 21, D-44867 Bochum, Duitsland, verklaren hiermede dat dit product
overeenstemt met de volgende EG-richtlijnen:
Elektromagnetische compatibiliteit: 89/336 EEC (EMC Directive)
Aangewende, aangepaste normen: EN 55013
:06.90+A12:08.94+A13:12.96
EN 55020:12.94+A11:12.96
EN 61000-3-2:04.95+A1:1998+A2:1998
EN 61000-3-3:01.95
Machine/type: KH 2300
Machinenaam: (MICRO) DESIGNINSTALLATIE MET VERTICALE CD-SPELER
Bochum, 31.08.2002
Hans Kompernaß
- Directeur -
45
Page 46

™∏ª∞¡∆π∫∂™ À¶√¢∂π•∂π™ ∞™º∞§∂π∞™
√И ·ОfiПФ˘ıВ˜ ‚·ЫИО¤˜ ˘Ф‰В›НВИ˜ ·ЫК·ПВ›·˜ ı· Ъ¤ВИ ФˆЫ‰‹ФЩВ У· ПЛКıФ‡У ˘fi„Л О·Щ¿ ЩЛУ ¯Ъ‹ЫЛ
ЛПВОЩЪИОТУ Ы˘ЫОВ˘ТУ:
¶·Ъ·О·ПФ‡МВ У· ‰И·‚¿ЫВЩВ ВИМВПТ˜ ЩИ˜ ·ОfiПФ˘ıВ˜ ПЛЪФКФЪ›В˜ БИ· ЩЛУ ·ЫК¿ПВИ· О·И ЩЛУ ВУ‰В‰ВИБМ¤УЛ ¯Ъ‹ЫЛ.
¶ЪИУ ЩФ ‰И¿‚·ЫМ· НВ‰ИПТЫЩВ ЩЛУ ЫВП›‰· МВ ЩИ˜ ВИОfiУВ˜ О·И ·ОФПФ‡ıˆ˜ ВНФИОВИˆıВ›ЩВ МВ fiПВ˜ ЩИ˜ ПВИЩФ˘ЪБ›В˜
ЩЛ˜ Ы˘ЫОВ˘‹˜. º˘П¿НЩВ ВИМВПТ˜ ·˘Щ¤˜ ЩИ˜ ˘Ф‰В›НВИ˜ ВУ‰В¯ФМ¤Уˆ˜ О·И БИ· О¿ФИФУ ВfiМВУФ ¯Ъ‹ЫЩЛ.
∏ Ы˘ЫОВ˘‹ ‰ВУ Ъ¤ВИ У· Щ›ıВЩ·И ЫВ ПВИЩФ˘ЪБ›·, fiЩ·У ¤¯Ф˘У ˘ФЫЩВ› ‚П¿‚Л Ф ЪВ˘М·ЩФП‹ЩЛ˜, ЩФ О·ПТ‰ИФ Щ¿ЫЛ˜
‹ Ë Û˘Û΢‹.
∂¿У Л Ы˘ЫОВ˘‹ ¤¯ВИ ¤ЫВИ О¿Щˆ, ЩfiЩВ ı· Ъ¤ВИ ЪТЩ· У· ВПВБ¯ıВ› ·fi ВИ‰ИОfi ЛПВОЩЪФПfiБФ ЪИУ ЩВıВ› Н·У¿
ЫВ ПВИЩФ˘ЪБ›·.
™ЩФ ВЫˆЩВЪИОfi ЩЛ˜ Ы˘ЫОВ˘‹˜ ˘¿Ъ¯Ф˘У ВИО›У‰˘УВ˜ Щ¿ЫВИ˜. ¶ФЩ¤ МЛУ ·УФ›БВЩВ ЩФ ВЪ›‚ПЛМ· О·И ФЩ¤ МЛУ
ЩФФıВЩВ›ЩВ ·УЩИОВ›МВУ· М¤Ы· ЫЩ· ·УФ›БМ·Щ· ВН·ВЪИЫМФ‡ ЩЛ˜ Ы˘ЫОВ˘‹˜.
∞ФЩЪ¤„ЩВ ЩЛУ ВИЫ¯ТЪЛЫЛ ˘БЪТУ М¤Ы· ЫЩЛ Ы˘ЫОВ˘‹. ™В ВЪ›ЩˆЫЛ ·У¿БОЛ˜ ЩЪ·‚‹НЩВ ·М¤Ыˆ˜ ЩФУ ЪВ˘М·ЩФП‹ЩЛ
·fi ÙËÓ Ú›˙·.
∆Ъ·‚‹НВЩВ В›ЫЛ˜ ЩФУ ЪВ˘М·ЩФП‹ЩЛ ·fi ЩЛУ Ъ›˙·, fiЩ·У О·Щ¿ ЩЛУ ПВИЩФ˘ЪБ›· ЪФО‡ЩФ˘У ‚П¿‚В˜ О·ıТ˜ О·И ЪИУ
·fi ÙÔÓ Î·ı·ÚÈÛÌfi Ù˘ Û˘Û΢‹˜.
ªËÓ ÂȯÂÈÚ›Ù ӷ οÓÂÙ ÌfiÓÔÈ Û·˜ ÙÚÔÔÔÈ‹ÛÂȘ ‹ ÂÈÛ΢¤˜ ÛÙËÓ Û˘Û΢‹. ∂›Û˘ ‰ÂÓ ÂÈÙÚ¤ÂÙ·È Ó·
·УЩИО·ıИЫЩ¿ЩВ МfiУФИ Ы·˜ ЩФ О·ПТ‰ИФ Ы‡У‰ВЫЛ˜. √И ВИЫОВ˘¤˜ ЫЩЛ Ы˘ЫОВ˘‹ ‹ ЫЩФ О·ПТ‰ИФ Ы‡У‰ВЫЛ˜ Ъ¤ВИ
У· Б›УФУЩ·И МfiУФ ·fi ВИ‰ИОВ˘М¤УФ Ы˘УВЪБВ›Ф ‹ ·fi ВНФ˘ЫИФ‰ФЩЛМ¤УФ О¤УЩЪФ Ы¤Ъ‚И˜. ∞fi МЛ ВУ‰В‰ВИБМ¤УВ˜
ВИЫОВ˘¤˜ МФЪВ› У· ЪФО‡„Ф˘У ЫЛМ·УЩИОФ› О›У‰˘УФИ БИ· ЩФУ ¯Ъ‹ЫЩЛ.
∆· ·И‰И¿ Ы˘¯У¿ ˘ФЩИМФ‡У ЩФ˘˜ ОИУ‰‡УФ˘˜ О·Щ¿ ЩЛУ ¯ЪЛЫИМФФ›ЛЫЛ ЛПВОЩЪИОТУ Ы˘ЫОВ˘ТУ. °И· ЩФУ ПfiБФ ·˘Щfi
МЛУ ·К‹УВЩВ Щ· ·И‰И¿ У· ПЛЫИ¿˙Ф˘У ЛПВОЩЪИО¤˜ Ы˘ЫОВ˘¤˜ ¯ˆЪ›˜ В›‚ПВ„Л.
ªЛУ ·К‹УВЩВ ЩЛУ Ы˘ЫОВ˘‹ У· ПВИЩФ˘ЪБВ› ¯ˆЪ›˜ В›‚ПВ„Л.
∏ Ы˘ЫОВ˘‹ ‰ВУ ВИЩЪ¤ВЩ·И У· ¯ЪЛЫИМФФИВ›Щ·И ЫВ ˘БЪФ‡˜ ¯ТЪФ˘˜ (.¯. ПФ˘ЩЪfi) ‹ ЫВ ¯ТЪФ˘˜ МВ МВБ¿ПЛ Ы˘БО¤УЩЪˆЫЛ
ÛÎfiÓ˘.
∏ ıВЪМfiЩЛЩ· Ф˘ Ы˘ЫЫˆЪВ‡ВЩ·И ЫЩФ ВЫˆЩВЪИОfi ЩЛ˜ Ы˘ЫОВ˘‹˜ МФЪВ› У· Ф‰ЛБ‹ЫВИ ЫВ ‚П¿‚Л ‹ ˘ЪО·БИ¿ ЫЩЛ Ы˘ЫОВ˘‹.
°И· ЩФУ ПfiБФ ·˘Щfi МЛУ ВОı¤ЩВЩВ ЩЛ Ы˘ЫОВ˘‹ ЫВ ·ОЪ·›В˜ ıВЪМФОЪ·Ы›В˜:
- ∞ФКВ‡БВЩВ ЩЛУ ¿МВЫЛ ЛПИ·О‹ ·ОЩИУФ‚ФП›· О·И ¿МВЫВ˜ ЛБ¤˜ ı¤ЪМ·УЫЛ˜.
- ªЛУ О·П‡ЩВЩВ ЩИ˜ Ы¯ИЫМ¤˜ ВН·ВЪИЫМФ‡ ЩЛ˜ Ы˘ЫОВ˘‹˜.
- ŸЫФ В›У·И ‰˘У·ЩfiУ ·К‹УВЩВ ВПВ‡ıВЪФ ¯ТЪФ ЩФ˘П¿¯ИЫЩФУ 10 ВО. ·fi ЩЛ˜ ПВ˘Ъ¤˜ ЩЛ˜ Ы˘ЫОВ˘‹˜.
∏ Ы˘ЫОВ˘‹ ‰ВУ Ъ¤ВИ У· ЩФФıВЩВ›Щ·И ОФУЩ¿ ЫВ В‡КПВОЩ· ˘ПИО¿ (.¯. ОФ˘ЪЩ›УВ˜, В‡КПВОЩ· ˘БЪ¿ ОП.).
ŸÙ·Ó ÙÔ Ë¯ÔÛ‡ÛÙËÌ· Design ÌÂÙ·ÊÂÚı› ·fi „˘¯Úfi Û ıÂÚÌfi ¯ÒÚÔ (.¯. ÌÂÙ¿ ÙË ÌÂÙ·ÊÔÚ¿ ÙÔ˘), ÌÔÚ›
У· ЫЛМВИˆıВ› Ы˘М‡ОУˆЫЛ ˘‰Ъ·ЩМТУ ЫЩФ ВЫˆЩВЪИОfi ЩФ˘. °И· У· ЪФЫЩ·ЩВ˘ıВ› ЩФ Ы‡ЫЩЛМ· ·fi ‚П¿‚В˜, Ъ¤ВИ
У· ЩВıВ› ЫВ ПВИЩФ˘ЪБ›· ЩФ УˆЪ›ЩВЪФ МВЩ¿ ·fi ‰‡Ф ТЪВ˜.
™В ВЪ›ЩˆЫЛ О·Щ·ИБ›‰·˜ ФИ Ы˘ЫОВ˘¤˜ Ф˘ В›У·И Ы˘У‰В‰ВМ¤УВ˜ ЫЩФ ЛПВОЩЪИОfi ‰›ОЩ˘Ф МФЪВ› У· ˘ФЫЩФ‡У ‚П¿‚В˜.
°È· ÙÔÓ ÏfiÁÔ ·˘Ùfi, Û ÂÚ›ÙˆÛË Î·Ù·ÈÁ›‰·˜, ÙÚ·‚‹ÍÙ ÙÔÓ ÚÂ˘Ì·ÙÔÏ‹ÙË ·fi ÙËÓ Ú›˙· Î·È ·Ê·ÈÚ¤ÛÙ ÙÔ ‚‡ÛÌ·
Ù˘ ÎÂÚ·›·˜.
°И· У· ·ФЫ˘У‰¤ЫЩВ ЩЛ Ы˘ЫОВ˘‹ ЩВПВ›ˆ˜ ·fi ЩЛУ ·ЪФ¯‹ ЛПВОЩЪИОФ‡ ЪВ‡М·ЩФ˜, ‚Б¿ПЩВ ЩФУ ЪВ˘М·ЩФП‹ЩЛ ·fi
ЩЛУ Ъ›˙·, ЪФЫ¤¯ФУЩ·˜ У· ¯ЪЛЫИМФФИВ›ЩВ ¿УЩ· ЩФ ‚‡ЫМ· О·И ФЩ¤ ЩФ О·ПТ‰ИФ Щ¿ЫЛ˜ БИ· ЩФ ЫОФfi ·˘Щfi.
¶ЪФЫЩ·ЩВ‡ВЩВ ЩФ О·ПТ‰ИФ Ы‡У‰ВЫЛ˜ ·fi ˙ВЫЩ¤˜ ВИК¿УВИВ˜ ‹ ¿ПП· ·›ЩИ· ‚П·‚ТУ О·И МЛУ ЩФ М·БОТУВЩВ.
∂ϤÁ¯ÂÙ ٷÎÙÈο ÙÔ Î·ÏÒ‰ÈÔ Û‡Ó‰ÂÛ˘ ÁÈ· ÂӉ¯fiÌÂÓ˜ ‚Ï¿‚˜ ÙÔ˘.
•ВЩ˘П›НЩВ ЩВПВ›ˆ˜ ЩФ О·ПТ‰ИФ Щ¿ЫЛ˜ БИ· У· ¯ЪЛЫИМФФИ‹ЫВЩВ ЩЛ Ы˘ЫОВ˘‹.
¶ЪФЫ¤НЩВ ТЫЩВ У· МЛУ ˘¿Ъ¯ВИ ВЪ›ЩˆЫЛ У· ЫОФУЩ¿КЩВЩВ ЫЩФ О·ПТ‰ИФ Ы‡У‰ВЫЛ˜.
ŸЩ·У ЪfiОВИЩ·И У· ·Ф˘ЫИ¿ЫВЩВ МВБ·П‡ЩВЪФ ¯ЪФУИОfi ‰И¿ЫЩЛМ· ЩЪ·‚‹НЩВ ЩФУ ЪВ˘М·ЩФП‹ЩЛ О·И ‚Б¿ПЩВ ЩИ˜ М·Щ·Ъ›В˜
·fi ЩФ ЩЛПВ¯ВИЪИЫЩ‹ЪИФ.
∏ Û˘Û΢‹ Â›Ó·È Û¯Â‰È·Ṳ̂ÓË ÁÈ· ȉȈÙÈ΋ ¯Ú‹ÛË.
Àfi‰ÂÈÍË: ∆Ф Л¯ФЫ‡ЫЩЛМ· Design В›У·И ВКФ‰И·ЫМ¤УФ МВ ·УЩИФПИЫıЛЩИО¤˜ ВП·ЫЩИО¤˜ ‚¿ЫВИ˜. ∂ВИ‰‹ ФИ ВИК¿УВИВ˜
‰·¤‰ˆУ ·ФЩВПФ‡УЩ·И ·fi ‰И¿КФЪ· ˘ПИО¿ О·И ВВИ‰‹ Л ВЪИФ›ЛЫ‹ ЩФ˘˜ Б›УВЩ·И МВ ‰И¿КФЪ· М¤Ы· КЪФУЩ›‰·˜, ‰ВУ
МФЪВ› У· ·ФОПВИЫЩВ› ЩВПВ›ˆ˜ fiЩИ О¿ФИ· ·fi Щ· ˘ПИО¿ ·˘Щ¿ ВЪИ¤¯Ф˘У Ы˘ЫЩ·ЩИО¿ Ф˘ ЪФЫ‚¿ППФ˘У О·И М·П·ОТУФ˘У
ЩИ˜ ВП·ЫЩИО¤˜ ‚¿ЫВИ˜. ∆ФФıВЩ‹ЫЩВ ВУ‰В¯ФМ¤Уˆ˜ МИ· ·УЩИФПИЫıЛЩИО‹ ˘fi‚·ЫЛ О¿Щˆ ·fi ЩИ˜ ‚¿ЫВИ˜.
¶ЪФЫЩ·Ы›· ВЪИ‚¿ППФУЩФ˜: ªЛУ ¯ЪЛЫИМФФИВ›ЩВ ФЩ¤ Щ·˘Щfi¯ЪФУ· ·ПИ¤˜ М·Щ·Ъ›В˜ М·˙› МВ О·ИУФ‡ЪБИВ˜. °И· ПfiБФ˘˜
ЪФЫЩ·Ы›·˜ ЩФ˘ ВЪИ‚¿ППФУЩФ˜ ·ФКВ‡БВЩВ ЩЛУ ‰И¿ıВЫЛ ¿‰ВИˆУ М·Щ·ЪИТУ МВ ФИОИ·О¿ ·ФЪЪ›ММ·Щ·, ·ПП¿ ·Ъ·‰ТЫЩВ
ЩИ˜ ЫЩ· ·УЩ›ЫЩФИ¯· ЫЛМВ›· Ы˘ППФБ‹˜ ЩФ˘˜.
∂°∫∞∆∞™∆∞™∏ ∫∞π ™À¡¢∂™∏
∞ОФПФ˘ı‹ЫЩВ ФˆЫ‰‹ФЩВ ЩИ˜ ·У·КВЪfiМВУВ˜ Ф‰ЛБ›В˜ ЪИУ ·fi ЩЛУ ЪТЩЛ ПВИЩФ˘ЪБ›· ЩФ˘ Л¯ФЫ˘ЫЩ‹М·ЩФ˜ Design
О·И ЫЩФ Щ¤ПФ˜ ‚¿ПЩВ ЩФ О·ПТ‰ИФ Щ¿ЫЛ˜ ЫЩЛУ Ъ›˙·.
1) µБ¿ПЩВ ЪФЫВОЩИО¿ ЩФ Л¯ФЫ‡ЫЩЛМ· Design О·И Щ· Л¯В›· ·fi ЩЛ Ы˘ЫОВ˘·Ы›·.
2) ¢И·П¤НЩВ БИ· ЩФ Л¯ФЫ‡ЫЩЛМ· Design ¤У· О·Щ¿ППЛПФ ¯ТЪФ, Ф˘ ı· Ъ¤ВИ:
…У· В›У·И ФЪИ˙fiУЩИФ˜
…У· В›У·И ЫЩВБУfi˜ О·И ¯ˆЪ›˜ ЫОfiУЛ
…У· МЛУ БВИЩУИ¿˙ВИ МВ ıВЪМ·УЩИО¿ ЫТМ·Щ· О·И У· МЛУ В›У·И ВОЩВıВИМ¤УФ˜ ЫЩЛУ ·В˘ıВ›·˜ В›‰Ъ·ЫЛ ЩФ˘ ЛП›Ф˘.
3) ™∏ª∞¡∆π∫√: ∞К·ИЪ¤ЫЩВ fiПВ˜ ЩИ˜ ·ЫК¿ПВИВ˜ МВЩ·КФЪ¿˜ / ·˘ЩФОfiППЛЩВ˜ Щ·ИУ›В˜ ·fi ЩЛУ ı‹ОЛ ЩФ˘ CD О·И ЩЛУ
О·ЫВЩФı‹ОЛ! ∞УФ›НЩВ ЩЛУ ı‹ОЛ ЩФ˘ CD
! ЩЪ·‚ТУЩ·˜ ЩФ ¿Уˆ ¿ОЪФ О·И ·К·ИЪ¤ЫЩВ ЩЛУ ОfiООИУЛ ·ЫК¿ПВИ· МВЩ·КФЪ¿˜
(ÌÂÙ¿ Í·Ó·ÎÏ›ÛÙ ÙËÓ ı‹ÎË ÙÔ˘ CD).
46
Page 47

4) ™˘Ó‰¤ÛÙ ٷ ‰‡Ô ˯›·. √È ·ÎÚÔ‰¤ÎÙ˜ ÙˆÓ Ë¯Â›ˆÓ Y В›У·И ВИЫЛМ·ЫМ¤УФИ О·Щ’ ·УЩИЫЩФИ¯›· (L = ·ЪИЫЩВЪ¿ / R = ¢ВНИ¿).
™˘М‚Ф˘П¤˜ БИ· ЩЛУ ЩФФı¤ЩЛЫЛ ЩˆУ Л¯В›ˆУ:
∆· ˯›· ı· Ú¤ÂÈ Î·Ù¿ ÙÔ ‰˘Ó·ÙfiÓ Ó· ÙÔÔıÂÙÔ‡ÓÙ·È ÛÙÔ ‡„Ô˜ ÙÔ˘ ÎÂÊ·ÏÈÔ‡.
ªЛУ О·П‡ЩВЩВ Щ· Л¯В›· МВ ОФ˘ЪЩ›УВ˜ ‹ ·УЩИОВ›МВУ·.
∫·Щ¿ ЩЛУ ЩФФı¤ЩЛЫЛ ЩˆУ Л¯В›ˆУ ЫВ Ъ¿КИ·, ЩФ МЪФЫЩИУfi ‰И¿КЪ·БМ· ЩˆУ Л¯В›ˆУ Ъ¤ВИ У· ¤ЪıВИ ВЪ·ЫИ¿
МВ ЩЛУ МЪФЫЩИУ‹ ¿ОЪЛ ЩФ˘ Ъ·КИФ‡.
°È· ÙËÓ ·ÔÊ˘Á‹ ÙÚ·ÓÙ¿ÁÌ·ÙÔ˜ ÙˆÓ Ë¯Â›ˆÓ ÙÔÔıÂÙ‹ÛÙ ÂӉ¯Ô̤ӈ˜ ÌÈ· ÂÏ·ÛÙÈ΋ Ͽη οو ·fi Ù· ˯›·.
5) °И· ЩЛ Ы‡У‰ВЫЛ МИ·˜ ВНˆЩВЪИО‹˜ Ы˘ЫОВ˘‹˜ (.¯. ИО¿) ¯ЪЛЫИМФФИ‹ЫЩВ ЩФ˘˜ ·ОЪФ‰¤ОЩВ˜ Cinch
U.
6) °È· Ú·‰ÈÔʈÓÈ΋ Ï‹„Ë ÛÙ· FM Û˘Ó‰¤ÛÙ ÌÈ· ÎÂÚ·›· ÙˆÓ 75 Ohm (ÔÈÎȷ΋ ÎÂÚ·›· ‹ ηψ‰È·Î‹ Û‡Ó‰ÂÛË)
ÛÙÔÓ ·ÎÚÔ‰¤ÎÙË Ù˘ ÎÂÚ·›·˜ O. ∂¿Ó ·˘Ù‹ ‰ÂÓ Â›Ó·È ‰È·ı¤ÛÈÌË, Û˘Ó‰¤ÛÙ ÛÙËÓ ÌÂÛ·›· ·ʋ ÙÔ˘ ·ÎÚÔ‰¤ÎÙË O
Ù˘ ÎÂÚ·›·˜ ÙËÓ ·Ú¯fiÌÂÓË Û˘ÚÌ¿ÙÈÓË ÎÂÚ·›·.
∏ ÎÂÚ·›· ÁÈ· Ï‹„Ë ÛÙ· ÌÂÛ·›· ·̷ٷ (MF) Â›Ó·È ÂÓۈ̷و̤ÓË.
7) ™˘Ó‰¤ÛÙ ÙÒÚ· ÙÔÓ ÚÂ˘Ì·ÙÔÏ‹ÙË Û ÌÈ· Ú›˙· ÙˆÓ 230 V.
8) ∆ФФıВЩ‹ЫЩВ ЩИ˜ М·Щ·Ъ›В˜ (‰ВУ ·Ъ¤¯ФУЩ·И ЫЩЛ Ы˘ЫОВ˘·Ы›·) ЫЩФ ЩЛПВ¯ВИЪИЫЩ‹ЪИФ (2 x AA Mignon LR6 1,5 V):
- ∞УФ›НЩВ ЩФ О·¿ОИ ЫЩЛУ ›Ыˆ ПВ˘Ъ¿ ЩФ˘ ЩЛПВ¯ВИЪИЫЩЛЪ›Ф˘.
- ∆ÔÔıÂÙ‹ÛÙ ÙȘ ̷ٷڛ˜, ÚÔÛ¤¯ÔÓÙ·˜ ÙËÓ ÛˆÛÙ‹ ÔÏÈÎfiÙËÙ· (‚Ϥ ·ÂÈÎfiÓÈÛË ÛÙË ‚¿ÛË Ù˘ ı‹Î˘ Ì·Ù·ÚÈÒÓ).
- ∫Ï›ÛÙ ¿ÏÈ ÙÔ Î·¿ÎÈ.
™∆∂ƒ∂ø™∏ ™∆√¡ ∆√πÃ√
∆Ф Л¯ФЫ‡ЫЩЛМ· Design МВ Щ· ·УЩ›ЫЩФИ¯· Л¯В›· МФЪВ› У· ЫЩВЪВˆıВ› ЫЩФУ ЩФ›¯Ф.
√И ·УЩ›ЫЩФИ¯В˜ ‚›‰В˜ О·И Щ· ЫЩЛЪ›БМ·Щ· Ы˘МВЪИП·М‚¿УФУЩ·И ЫЩЛ Ы˘ЫОВ˘·Ы›·. ∆ФФıВЩ‹ЫЩВ ЩЛ Ы˘ЫОВ˘‹
О·Щ·ОfiЪ˘К· ЫВ ¤У· ЫЩ·ıВЪfi ЩФ›¯Ф.
√И ЩЪ‡В˜ БИ· ЩИ˜ ‚›‰В˜ Ъ¤ВИ У· ·УФИ¯ıФ‡У ЫВ МИ· ·fiЫЩ·ЫЛ 14 ВО. МВЩ·Н‡ ЩФ˘˜.
√И ОВК·П¤˜ ЩˆУ ‚И‰ТУ Ъ¤ВИ У· ЪФВН¤¯Ф˘У ВЪ›Ф˘ 3 mm ·fi ЩФУ ЩФ›¯Ф, ¤ЩЫИ ТЫЩВ ФИ ‚›‰В˜ У· ·ЪМfi˙Ф˘У
О·П¿ ЫЩ· ЫЩЛЪ›БМ·Щ·
P ÛÙÔ ›Ûˆ ̤ÚÔ˜ ÙÔ˘ ˯ÔÛ˘ÛÙ‹Ì·ÙÔ˜ Design.
¶§∏∫∆ƒ∞ Ã∂πƒπ™ª√À
! £‹ÎË CD 6 ∫·ÛÂÙÔı‹ÎË
@ √ıfiÓË 7 ¶Ï‹ÎÙÚÔ STOP (ÁÈ· CD)
# ¢¤ОЩЛ˜ БИ· Щ· Ы‹М·Щ· ЩФ˘ ЩЛПВ¯ВИЪИЫЩЛЪ›Ф˘ 8 ¶Ï‹ÎÙÚÔ ›Ûˆ (*)
$ ¶Ï‹ÎÙÚÔ ª√¡√/STEREO (ÌfiÓÔ ÁÈ· Ï‹„Ë ÛÙ· FM) 9 ∞ÏÏ·Á‹ ¤Ó‰ÂÈ͢
% ¶Ï‹ÎÙÚÔ ÂÈÏÔÁ‹˜ ‹¯Ô˘ 0 ¶Ï‹ÎÙÚÔ TIMER (¯ÚÔÓԉȷÎfiÙ˘)
^ ∞ВУВЪБФФ›ЛЫЛ ‹¯Ф˘ - ¶Ï‹ÎÙÚÔ SLEEP (ηٿÛÙ·Û˘ ·Ó·ÌÔÓ‹˜)
& ∞Ó··Ú·ÁˆÁ‹ CD / PAUSE (·‡ÛË ·Ó··Ú·ÁˆÁ‹˜) = ¶Ï‹ÎÙÚÔ M-UP/REPEAT (*)
* ¶Ï‹ÎÙÚ· ÂÈÏÔÁ‹˜ Û˘Û΢ÒÓ \ ¶Ï‹ÎÙÚÔ MEMORY/CLK-ADJ (*)
( ¶Ï‹ÎÙÚÔ RANDOM (·Ó··Ú·ÁˆÁ‹ ÌÂ Ù˘¯·›· ÛÂÈÚ¿) Q ªÂ›ˆÛË ¤ÓÙ·Û˘ ‹¯Ô˘
) ¶Ï‹ÎÙÚÔ ÂÌÚfi˜ (*) W ∞‡ÍËÛË ¤ÓÙ·Û˘ ‹¯Ô˘
_ ÂÈÏÔÁ‹ ÂÚÈÔ¯‹˜ ·̷ÙÔ˜ E ¶Ï‹ÎÙÚÔ ON/OFF (∫·Ù¿ÛÙ·ÛË ·Ó·ÌÔÓ‹˜)
+ ¶ÚÔÛٷ٢ÙÈÎfi Î¿Ï˘ÌÌ· R ŒУ‰ВИНЛ О·Щ¿ЫЩ·ЫЛ˜ ПВИЩФ˘ЪБ›·˜
| ¶Ï‹ÎÙÚÔ PAUSE (ÌfiÓÔ ÁÈ· ηÛÂÙfiʈÓÔ) T ƒÂ˘Ì·ÙÔÏ‹Ù˘
` ¶Ï‹ÎÙÚÔ STOP / Ï‹ÎÙÚÔ Y ∞ÎÚÔ‰¤ÎÙ˜ ˯›ˆÓ
БИ· ¿УФИБМ· О·ЫВЩФı‹ОЛ˜
(ÌfiÓÔ ÁÈ· ηÛÂÙfiʈÓÔ) U ∞ОЪФ‰¤ОЩВ˜ cinch БИ· ВНˆЩВЪИО‹ Ы˘ЫОВ˘‹ (AUX)
1 °Ú‹ÁÔÚÔ Á‡ÚÈÛÌ· ÂÌÚfi˜ (ÌfiÓÔ ÁÈ· ηÛÂÙfiʈÓÔ) I ªÂ›ˆÛË ıÔÚ‡‚ˆÓ ηٿ ÙËÓ ÂÁÁÚ·Ê‹ (ÌfiÓÔ ÁÈ· ηÛÂÙfiʈÓÔ)
2
°Ú‹ÁÔÚÔ Á‡ÚÈÛÌ· ›Ûˆ (ÌfiÓÔ ÁÈ· ηÛÂÙfiʈÓÔ) O ∞ÎÚÔ‰¤ÎÙ˘ ÎÂÚ·›·˜
3 ¶Ï‹ÎÙÚÔ ·Ó··Ú·ÁˆÁ‹˜ (ÌfiÓÔ ÁÈ· ηÛÂÙfiʈÓÔ) P ¢И¿Щ·НЛ ·У¿ЪЩЛЫЛ˜ БИ· ЫЩВЪ¤ˆЫЛ ЫЩФУ ЩФ›¯Ф
4 ¶Ï‹ÎÙÚÔ ÂÁÁÚ·Ê‹˜ (ÌfiÓÔ ÁÈ· ηÛÂÙfiʈÓÔ)
5
∞ОЪФ‰¤ОЩЛ˜ ·ОФ˘ЫЩИОТУ
∆· ¯·Ъ·ОЩЛЪИЫМ¤У· МВ (*) П‹ОЩЪ· ¯ВИЪИЫМФ‡ ·УЩИЫЩФИ¯Ф‡У ·У¿ПФБ· МВ ЩЛУ ВИПВБМ¤УЛ Ы˘ЫОВ˘‹ (.¯. ПВИЩФ˘ЪБ›·
Ъ·‰ИФКТУФ˘ ‹ CD) ЫВ ‰И¿КФЪВ˜ ПВИЩФ˘ЪБ›В˜. ¶·Ъ·О·ПФ‡МВ ‰И·‚¿ЫЩВ Щ· ·УЩ›ЫЩФИ¯· ОВК¿П·И·. ∆· П‹ОЩЪ· ¯ВИЪИЫМФ‡
|
̤¯ÚÈ 4 Î·È I ·КФЪФ‡У ·ФОПВИЫЩИО¿ ЩЛУ ПВИЩФ˘ЪБ›· ЩФ˘ О·ЫВЩfiКˆУФ˘.
Ã∂πƒπ™ª√™
∂¡∂ƒ°√¶√π∏™∏ ∫∞π ∞¶∂¡∂ƒ°√¶√π∏™∏ [ » POWER / STAND-BY « ]
ñ ŸÙ·Ó Ô ÚÂ˘Ì·ÙÔÏ‹Ù˘ Â›Ó·È ÛÙËÓ Ú›˙· Ë Û˘Û΢‹ ‚Ú›ÛÎÂÙ·È Û ηٿÛÙ·ÛË ·Ó·ÌÔÓ‹˜ (Stand-By). ∏ ¤Ó‰ÂÈÍË
ЩЪfiФ˘ ПВИЩФ˘ЪБ›·˜
R В›У·И ОfiООИУЛ.
ñ ¶·Ù‹ÛÙ ÙÔ Ï‹ÎÙÚÔ √¡/OFF E. ∏ Ы˘ЫОВ˘‹ ‚Ъ›ЫОВЩ·И ЩТЪ· ЫВ О·Щ¿ЫЩ·ЫЛ ПВИЩФ˘ЪБ›·˜. ∏ ¤У‰ВИНЛ ЩЪfiФ˘
ПВИЩФ˘ЪБ›·˜
R Â›Ó·È Ú¿ÛÈÓË.
ñ °È· Ó· ·ӷʤÚÂÙ ÙË Û˘Û΢‹ Û ηٿÛÙ·ÛË ·Ó·ÌÔÓ‹˜ (Stand-By), ·Ù‹ÛÙ ÂÎ Ó¤Ô˘ ÙÔ Ï‹ÎÙÚÔ ON / OFF E.
ñ ŸЩ·У ·Ф˘ЫИ¿˙ВЩВ БИ· МВБ·П‡ЩВЪФ ¯ЪФУИОfi ‰И¿ЫЩЛМ· ‚Б¿ПЩВ ЩФУ ЪВ˘М·ЩФП‹ЩЛ ·fi ЩЛУ Ъ›˙·.
47
Page 48

∂¶π§√°∏ ™À™∫∂À∏™ / ¶∏°∏™ ∏Ã√À [ » CD / TUNER / TAPE / AUX « ]
ñ ¶·Ù‹ÛÙ ÙÔ ·ÓÙ›ÛÙÔȯ· ÂÈÛËÌ·Ṳ̂ÓÔ Ï‹ÎÙÚÔ * ÁÈ· Ó· ÂÈϤÍÙ ÌÈ· Û˘Û΢‹ ‹ ÌÈ· ËÁ‹ ‹¯Ô˘:
CD = CD-Player TUNER = Ъ·‰ИfiКˆУФ TAPE = О·ЫВЩfiКˆУФ AUX = ВНˆЩВЪИО‹ Ы˘ЫОВ˘‹, .¯. ИО¿
ƒÀ£ªπ™∏ ∂¡∆∞™∏™ ∏Ã√À [ » VOLUME / MUTE « ]
ñ ∞˘Í¿ÓÂÙ ÙËÓ ¤ÓÙ·ÛË ‹¯Ô˘ Ì ÙÔ
Ï‹ÎÙÚÔ W.
ñ ªВИТУВЩВ ЩЛУ ¤УЩ·ЫЛ ‹¯Ф˘ МВ ЩФ Ï‹ÎÙÚÔ Q.
ñ ªВ ¿ЩЛМ· ЩФ˘ П‹ОЩЪФ˘ ·ВУВЪБФФ›ЛЫЛ˜ ‹¯Ф˘ ^ ·ВУВЪБФФИФ‡УЩ·И Щ· Л¯В›· О·И Щ· ·ОФ˘ЫЩИО¿ (Ъ‡ıМИЫЛ
ЫИˆЛП‹˜ ПВИЩФ˘ЪБ›·˜).
ƒÀ£ªπ™∏ ∏Ã√À [ » CLASSIC / ROCK / POP « ]
ªÂ ÙÔ Ï‹ÎÙÚÔ ÂÈÏÔÁ‹˜ ‹¯Ô˘ % МФЪВ›ЩВ У· ЪФЫ·ЪМfiЫВЩВ ЩЛУ ФИfiЩЛЩ· ЩФ˘ ‹¯Ф˘ ВУfi˜ Щ›ЩПФ˘ ЫЩФ ВО¿ЫЩФЩВ В›‰Ф˜
МФ˘ЫИО‹˜ О·И Ы˘УВТ˜ У· ‚ВПЩИТЫВЩВ ЩФ ·ОФ˘ЫЩИОfi ·ФЩ¤ПВЫМ·. ∏ ВИПВБМ¤УЛ Ъ‡ıМИЫЛ CLASSIC, ROCK ‹ POP
ВМК·У›˙ВЩ·И ЫЩЛУ ФıfiУЛ
@ (η̛· ¤Ó‰ÂÈÍË = Ô˘‰¤ÙÂÚÔ˜ ‹¯Ô˜).
∞∫√À™∆π∫∞ [ » PHONES « ]
™ЩФУ ·ОЪФ‰¤ОЩЛ ЩˆУ ·ОФ˘ЫЩИОТУ
5 МФЪФ‡У У· Ы˘У‰ВıФ‡У ЫЩВЪВФКˆУИО¿ ·ОФ˘ЫЩИО¿ ЩˆУ 8-32 Ohm МВ ‚‡ЫМ· ЩˆУ
3,5 mm. ªfiПИ˜ Ы˘У‰ВıФ‡У Щ· ·ОФ˘ЫЩИО¿ Щ· Л¯В›· ·ВУВЪБФФИФ‡УЩ·И. §¿‚ВЩВ ˘fi„Л Ы·˜ fiЩИ Л ФП‡ МВБ¿ПЛ
¤УЩ·ЫЛ ‹¯Ф˘ МФЪВ› У· ЪФО·П¤ЫВИ ‚·ЪИ¤˜ ‚П¿‚В˜ ЫЩЛУ ·ОФ‹.
ƒÀ£ªπ™∏ ƒ√§√°π√À
01) °È· ÙËÓ Ú‡ıÌÈÛË Ù˘ ÒÚ·˜ Ë Û˘Û΢‹ Ú¤ÂÈ Ó· ‚Ú›ÛÎÂÙ·È Û ηٿÛÙ·ÛË ·Ó·ÌÔÓ‹˜ (Stand-By). (∏ ¤Ó‰ÂÈÍË
ПВИЩФ˘ЪБ›·˜ R В›У·И ОfiООИУЛ.)
02) ¶·Ù‹ÛÙ ÌÈ· ÊÔÚ¿ ÙÔ Ï‹ÎÙÚÔ MEMORY/CLK-ADJ \ – Ë ¤Ó‰ÂÈÍË Ù˘ ÒÚ·˜ ·Ó·‚ÔÛ‚‹ÓÂÈ.
03) ƒ˘ıÌ›ÛÙ ÙËÓ ÒÚ· Ì ٷ Ï‹ÎÙÚ· ÂÌÚfi˜ ) Î·È ›Ûˆ 8.
04) ¶·Ù‹ÛÙÂ ÂÎ Ó¤Ô˘ ÙÔ Ï‹ÎÙÚÔ MEMORY/CLK-ADJ
\ – Ë ¤Ó‰ÂÈÍË ÏÂÙÒÓ ·Ó·‚ÔÛ‚‹ÓÂÈ.
05) ƒ˘ıÌ›ÛÙ ٷ ÏÂÙ¿ Ì ٷ Ï‹ÎÙÚ· ÂÌÚfi˜ ) Î·È ›Ûˆ 8.
06) ¶·Ù‹ÛÙÂ ÂÎ Ó¤Ô˘ ÙÔ Ï‹ÎÙÚÔ MEMORY/CLK-ADJ \ – Л ¤У‰ВИНЛ ЫЩ·М·Щ¿ВИ У· ·У·‚ФЫ‚‹УВИ О·И ЩФ ЪФПfiИ ПВИЩФ˘ЪБВ›
(·Ó·‚ÔÛ‚‹ÓÂÈ Ë ¿Óˆ Î·È Î¿Ùˆ ÙÂÏ›·).
ƒÀ£ªπ™∏ øƒ∞™ ∂¡∂ƒ°√¶√π∏™∏™ / ∞¶∂¡∂ƒ°√¶√π∏™∏™ [ » TIMER « ]
ŸЩ·У ВУВЪБФФИВ›ЩВ ЩЛУ ТЪ· ВУВЪБФФ›ЛЫЛ˜ ÌÔÚ›Ù ӷ Ú˘ıÌ›ÛÂÙ ÙÔ Ë¯ÔÛ‡ÛÙËÌ· Design ÁÈ· ·Ê‡ÓÈÛË
ФФИ·‰‹ФЩВ ВИı˘МЛЩ‹ ЫЩИБМ‹.
01) ªÂ ÙÔ ·ÓÙ›ÛÙÔÈ¯Ô Ï‹ÎÙÚÔ
* ÂÈϤÍÙ ÙËÓ ÂÈı˘ÌËÙ‹ Û˘Û΢‹ / ËÁ‹ ‹¯Ô˘ (CD, TAPE ‹ TUNER).
02) ¶ЪФВЩФИМ¿ЫЩВ ЩЛУ ЛБ‹ ‹¯Ф˘, ‰ЛП·‰‹ БИ· TUNER (Ъ·‰ИfiКˆУФ) Ъ˘ıМ›ЫЩВ ЩФУ ВИı˘МЛЩfi ЫЩ·ıМfi,
ÁÈ· TAPE (ηÛÂÙfiʈÓÔ) ÙÔÔıÂÙ‹ÛÙ ÙËÓ Î·Û¤Ù· Î·È Á˘Ú›ÛÙ ÙËÓ ÛÙËÓ ÂÈı˘ÌËÙ‹ ı¤ÛË Î·È ÁÈ· CD
ÙÔÔıÂÙ‹ÛÙ ¤Ó·Ó ‰›ÛÎÔ CD Î·È ÚÔÁÚ·ÌÌ·Ù›ÛÙ ÂӉ¯Ô̤ӈ˜ ÌÈ· ÛÂÈÚ¿ Ù›ÙψÓ.
03) ¶·Ù‹ÛÙÂ ÙÔ Ï‹ÎÙÚÔ TIMER
0 ÙÔ˘ ¯ÚÔÓԉȷÎfiÙË. ™ÙËÓ ÔıfiÓË @ ÂÌÊ·Ó›˙ÂÙ·È Ë ¤Ó‰ÂÈÍË TIMER.
А¶√¢∂π•∏: °И· О¿ıВ ¤У· ·fi Щ· ‚‹М·Щ· Ф˘ ·ОФПФ˘ıФ‡У ¤¯ВЩВ ЫЩЛ ‰И¿ıВЫ‹ Ы·˜ 5 ‰В˘ЩВЪfiПВЩ·. ¢И·КФЪВЩИО¿
Л ‰И·‰ИО·Ы›· ‰И·ОfiЩВЩ·И. •ВОИУ‹ЫЩВ ЩfiЩВ ВО У¤Ф˘ ·fi ЩФ ‚‹М· 4).
04) ¶·Ù‹ÛÙ ‰‡Ô ÊÔÚ¤˜ ÙÔ Ï‹ÎÙÚÔ
9 MODE/REMAIN – ÛÙËÓ ÔıfiÓË @ ÂÌÊ·Ó›˙ÂÙ·È Ë ¤Ó‰ÂÈÍË Ù˘ ÒÚ·˜
Î·È ·Ó·‚ÔÛ‚‹ÓÂÈ ÙÔ TIMER ON.
05) ¶·Ù‹ÛÙÂ ÌÈ· ÊÔÚ¿ ÙÔ Ï‹ÎÙÚÔ
\ MEMORY/CLK-ADJ– Ë ¤Ó‰ÂÈÍË Ù˘ ÒÚ·˜ ·Ó·‚ÔÛ‚‹ÓÂÈ.
06) ƒ˘ıÌ›ÛÙ ÙËÓ ÒÚ· Ì ٷ Ï‹ÎÙÚ· ÂÌÚfi˜ ) Î·È ›Ûˆ 8.
07) ¶·Ù‹ÛÙ ÂÎ Ó¤Ô˘ ÙÔ Ï‹ÎÙÚÔ \ MEMORY/CLK-ADJ– Ë ¤Ó‰ÂÈÍË ÏÂÙÒÓ ·Ó·‚ÔÛ‚‹ÓÂÈ.
08) ƒ˘ıÌ›ÛÙ ٷ ÏÂÙ¿ Ì ٷ Ï‹ÎÙÚ· ÂÌÚfi˜ ) Î·È ›Ûˆ 8.
09) ¶·Ù‹ÛÙÂ ÂÎ Ó¤Ô˘ ÙÔ Ï‹ÎÙÚÔ
\ MEMORY/CLK-ADJ– Л ТЪ· ВУВЪБФФ›ЛЫЛ˜ ·ФıЛОВ‡ıЛОВ.
10) ∞Ó ı¤ÏÂÙ ӷ Û·˜ ͢ӋÛÂÈ ÌÈ· ηۤٷ: ¶·Ù‹ÛÙ ÙÔ Ï‹ÎÙÚÔ ·Ó··Ú·ÁˆÁ‹˜ 3.
11) ∆ВПВИТУФУЩ·˜ ·ВУВЪБФФИ‹ЫЩВ ЩФ Л¯ФЫ‡ЫЩЛМ· Design (П‹ОЩЪФ ON / OFF E).
ŸЩ·У ВУВЪБФФИВ›ЩВ ЩЛУ ТЪ· ·ВУВЪБФФ›ЛЫЛ˜, ЩfiЩВ ЩФ Л¯ФЫ‡ЫЩЛМ· Design ·ВУВЪБФФИВ›Щ·И ¿УЩ·
ЩЛУ Ъ˘ıМИЫМ¤УЛ ТЪ·.
01) ¶·Ù‹ÛÙ ÙÔ Ï‹ÎÙÚÔ ÙÔ˘ ¯ÚÔÓԉȷÎfiÙË TIMER
0. ™ÙËÓ ÔıfiÓË @ ÂÌÊ·Ó›˙ÂÙ·È Ë ¤Ó‰ÂÈÍË TIMER.
А¶√¢∂π•∏: °И· О¿ıВ ¤У· ·fi Щ· ‚‹М·Щ· Ф˘ ·ОФПФ˘ıФ‡У ¤¯ВЩВ ЫЩЛ ‰И¿ıВЫ‹ Ы·˜ 5 ‰В˘ЩВЪfiПВЩ·. ¢И·КФЪВЩИО¿
Л ‰И·‰ИО·Ы›· ‰И·ОfiЩВЩ·И. •ВОИУ‹ЫЩВ ЩfiЩВ ВО У¤Ф˘ ·fi ЩФ ‚‹М· 2).
02) ¶·Ù‹ÛÙ 3 ÊÔÚ¤˜ ÙÔ Ï‹ÎÙÚÔ
9 MODE/REMAIN – ÛÙËÓ ÔıfiÓË @ ÂÌÊ·Ó›˙ÂÙ·È Ë ¤Ó‰ÂÈÍË Ù˘ ÒÚ·˜
Î·È ·Ó·‚ÔÛ‚‹ÓÂÈ ÙÔ TIMER OFF.
03) ¶·Ù‹ÛÙ ÌÈ· ÊÔÚ¿ ÙÔ Ï‹ÎÙÚÔ \ MEMORY/CLK-ADJ– Ë ¤Ó‰ÂÈÍË Ù˘ ÒÚ·˜ ·Ó·‚ÔÛ‚‹ÓÂÈ.
04) ƒ˘ıÌ›ÛÙ ÙËÓ ÒÚ· Ì ٷ Ï‹ÎÙÚ·
ÂÌÚfi˜ ) Î·È ›Ûˆ 8.
05) ¶·Ù‹ÛÙ ÂÎ Ó¤Ô˘ ÙÔ Ï‹ÎÙÚÔ \ MEMORY/CLK-ADJ– Ë ¤Ó‰ÂÈÍË ÏÂÙÒÓ ·Ó·‚ÔÛ‚‹ÓÂÈ.
06) ƒ˘ıÌ›ÛÙ ٷ ÏÂÙ¿ Ì ٷ Ï‹ÎÙÚ·
ÂÌÚfi˜ ) Î·È ›Ûˆ 8.
07) ¶·Ù‹ÛÙÂ ÂÎ Ó¤Ô˘ ÙÔ Ï‹ÎÙÚÔ \ MEMORY/CLK-ADJ– Л ТЪ· ·ВУВЪБФФ›ЛЫЛ˜ ·ФıЛОВ‡ıЛОВ.
°И· У· ·О˘ЪТЫЩВ ЩИ˜ ПВИЩФ˘ЪБ›В˜ ЩФ˘ ¯ЪФУФ‰И·ОfiЩЛ ·Щ‹ЫЩВ ЩФ П‹ОЩЪФ TIMER 0 ÙfiÛ˜ ÊÔÚ¤˜ ̤¯ÚÈ
Ó· Û‚‹ÛÂÈ ·fi ÙËÓ ÔıfiÓË
@ Ë ¤Ó‰ÂÈÍË TIMER.
48
Page 49

∂¡∂ƒ°√¶√π∏™∏ ∫∞∆∞™∆∞™∏™ ∞¡∞ª√¡∏™ [ » SLEEP « ]
ªФЪВ›ЩВ У· Ъ˘ıМ›ЫВЩВ ¤У· ¯ЪФУИОfi ‰И¿ЫЩЛМ· МВЩ·Н‡ 90 О·И 10 ПВЩТУ, МВЩ¿ ЩФ ФФ›Ф Л Ы˘ЫОВ˘‹ ·ВУВЪБФФИВ›Щ·И.
ñ °И· У· ВУВЪБФФИ‹ЫВЩВ ¤У· ¯ЪФУИОfi ‰И¿ЫЩЛМ· БИ· ·ВУВЪБФФ›ЛЫЛ ЩЛ˜ Ы˘ЫОВ˘‹˜ МВЩ¿ ·fi 90 ПВЩ¿,
·Ù‹ÛÙÂ Û‡ÓÙÔÌ· ÌÈ· ÊÔÚ¿ ÙÔ Ï‹ÎÙÚÔ SLEEP
-.
ñ °И· У· Ъ˘ıМ›ЫВЩВ ¤У· МИОЪfiЩВЪФ ¯ЪФУИОfi ‰И¿ЫЩЛМ·, ОЪ·Щ‹ЫЩВ ·ЩЛМ¤УФ ЩФ П‹ОЩЪФ SLEEP -, М¤¯ЪИ У· ВМК·УИЫЩВ›
ЫЩЛУ ФıfiУЛ ЩФ ВИı˘МЛЩfi ¯ЪФУИОfi ‰И¿ЫЩЛМ·.
ñ °И· У· ·ВУВЪБФФИ‹ЫВЩВ ЩЛУ ПВИЩФ˘ЪБ›· МВЩ¿‚·ЫЛ˜ ЫВ О·Щ¿ЫЩ·ЫЛ ·У·МФУ‹˜, ·Щ‹ЫЩВ ЩФ П‹ОЩЪФ SLEEP
-
ÙfiÛ˜ ÊÔÚ¤˜ ̤¯ÚÈ Ó· Û‚‹ÛÂÈ ·fi ÙËÓ ÔıfiÓË @ Ë ¤Ó‰ÂÈÍË SLEEP -.
ƒ∞¢π√ºø¡√
¶ƒ√™∞¡∞∆√§π™ª√™ ∫∂ƒ∞π∞™
∂КfiЫФУ ¯ЪЛЫИМФФИЛıВ› БИ· ЩЛ П‹„Л ЫЩ· FM Л Ы˘ЪМ¿ЩИУЛ ОВЪ·›·:
ñ •ÂÙ˘Ï›ÍÙ ÙÂÏ›ˆ˜ ÙË Û˘ÚÌ¿ÙÈÓË ÎÂÚ·›·.
ñ ∂Н·ОЪИ‚ТЫЩВ МВ ‰ФОИМ¤˜ ЩЛУ ‚¤ПЩИЫЩЛ ı¤ЫЛ ЩЛ˜ Ы˘ЪМ¿ЩИУЛ˜ ОВЪ·›·˜.
с ™ЩВЪВТЫЩВ ВУ‰В¯ФМ¤Уˆ˜ ЩЛ Ы˘ЪМ¿ЩИУЛ ОВЪ·›· МВ ·˘ЩФОfiППЛЩЛ Щ·ИУ›· ЫЩФУ ЩФ›¯Ф.
°И· ЩЛ П‹„Л ЫЩ· МВЫ·›· О‡М·Щ· (MF) ВН·ОЪИ‚ТЫЩВ В›ЫЛ˜ МВ ‰ФОИМ¤˜ ЩЛ ‚¤ПЩИЫЩЛ ı¤ЫЛ БИ· ЩЛУ ВУЫˆМ·ЩˆМ¤УЛ
ЫЩЛ Ы˘ЫОВ˘‹ ОВЪ·›·.
§∂π∆√Àƒ°π∞ ƒ∞¢π√ºø¡√À / ∂¶π§√°∏ ∑ø¡∏™ ™Àá√∆∏∆ø¡ (FM / MF)
01) ∂ÈϤÍÙ Ì ÙÔ Ï‹ÎÙÚÔ ÂÈÏÔÁ‹˜ Û˘Û΢ÒÓ * ÙÔ Ú·‰ÈfiʈÓÔ (=TUNER).
02) ªÂ ÂÎ Ó¤Ô˘ ¿ÙËÌ· ÙÔ˘ Ï‹ÎÙÚÔ˘ TUNER/BAND _ ·ÏÏ¿˙ÂÙ ÌÂٷ͇ UKW (Î˘Ì¿ÙˆÓ Ôχ ˘„ËÏ‹˜ Û˘¯ÓfiÙËÙ·˜ ) (FM)
Î·È ÌÂÛ·›ˆÓ Î˘Ì¿ÙˆÓ (AM).
∞À∆√ª∞∆∏ ∞¡∞∑∏∆∏™∏ ƒ∞¢π√ºø¡π∫ø¡ ™∆∞£ªø¡ / Ã∂πƒ√∫π¡∏∆∏ ∞¡∞∑∏∆∏™∏
∫·Ù¿ ЩЛУ ·˘ЩfiМ·ЩЛ ·У·˙‹ЩЛЫЛ Ъ·‰ИФКˆУИОТУ ЫЩ·ıМТУ Л Ы˘¯УfiЩЛЩ· ·˘Н¿УВЩ·И ‹ МВИТУВЩ·И, М¤¯ЪИ У· ‚ЪВıВ›
¤Ó·˜ ÛÙ·ıÌfi˜ Ì ·Ú΋ ¤ÓÙ·ÛË Ï‹„˘.
01) ∫Ú·Ù‹ÛÙ ·ÙË̤ÓÔ ÙÔ Ï‹ÎÙÚÔ ÂÌÚfi˜ ) ‹ ›Ûˆ 8 БИ· ВЪ›Ф˘ 1 ‰В˘ЩВЪfiПВЩФ – ∏ ·У·˙‹ЩЛЫЛ НВОИУ¿ВИ
Î·È ÛÙ·Ì·Ù¿ÂÈ ·˘ÙfiÌ·Ù·.
02) °И· У· НВОИУ‹ЫВИ Л ·У·˙‹ЩЛЫЛ ВО У¤Ф˘, ОЪ·Щ‹ЫЩВ ВО У¤Ф˘ ·ЩЛМ¤УФ ЩФ П‹ОЩЪФ
ÂÌÚfi˜ ) ‹ ›Ûˆ 8
БИ· ВЪ›Ф˘ 1 ‰В˘ЩВЪfiПВЩФ.
ªФЪВ›ЩВ У· ¯ЪЛЫИМФФИ‹ЫВЩВ ЩЛУ ¯ВИЪФО›УЛЩЛ ·У·˙‹ЩЛЫЛ БИ· ЩФУ ·ОЪИ‚‹ Ы˘УЩФУИЫМfi ‹ fiЩ·У БУˆЪ›˙ВЩВ
ЩЛУ Ы˘¯УfiЩЛЩ· ЩФ˘ Ъ·‰ИФКˆУИОФ‡ ЫЩ·ıМФ‡.
01) ¶·Ù‹ÛÙÂ Û‡ÓÙÔÌ· ÙÔ Ï‹ÎÙÚÔ
ÂÌÚfi˜ ) ‹ ›Ûˆ 8, БИ· У· ·˘НФМВИТЫЩВ МВ МИОЪ¿ ‚‹М·Щ· ЩЛУ Ы˘¯УfiЩЛЩ·.
02) ∫Ú·Ù‹ÛÙ ·ÙË̤ÓÔ ÙÔ Ï‹ÎÙÚÔ ÂÌÚfi˜ ) ‹ ›Ûˆ 8, ̤¯ÚÈ Ó· ÏËÛÈ¿ÛÂÙ ÛÙËÓ ÂÈı˘ÌËÙ‹ Û˘¯ÓfiÙËÙ·.
∞¶√£∏∫∂À™∏ ƒ∞¢π√ºø¡π∫ø¡ ™∆∞£ªø¡ [ » MEMORY « ]
∆Ô Ë¯ÔÛ‡ÛÙËÌ· Design KH 2300 ÌÔÚ› Ó· ·ÔıË·ÛÂÈ ÛÙË ÌÓ‹ÌË ÙÔ˘ ̤¯ÚÈ 40 Ú·‰ÈÔʈÓÈÎÔ‡˜ ÛÙ·ıÌÔ‡˜
(20 ÛÙ· FM / 20 ÛÙ· ÌÂÛ·›· ·̷ٷ MF).
01) ∞У·˙ЛЩ‹ЫЩВ ЩФУ ВИı˘МЛЩfi Ъ·‰ИФКˆУИОfi ЫЩ·ıМfi, fiˆ˜ ВЪИБЪ¿КВЩ·И ЫЩЛУ ·Ъ¿БЪ·КФ «∞˘ЩfiМ·ЩЛ ·У·˙‹ЩЛЫЛ
Ъ·‰ИФКˆУИОТУ ЫЩ·ıМТУ / ¯ВИЪФО›УЛЩЛ ·У·˙‹ЩЛЫЛ».
02) ¶·Ù‹ÛÙÂ ÌÈ· ÊÔÚ¿ ÙÔ Ï‹ÎÙÚÔ MEMORY/CLK-ADJ
\. ™ÙËÓ ÔıfiÓË @ ВМК·У›˙ВЩ·И ЫЩЛУ ·ЪИЫЩВЪ‹ ПВ˘Ъ¿
БИ· 5 ‰В˘ЩВЪfiПВЩ· Л ¤У‰ВИНЛ БИ· ЩЛ ı¤ЫЛ ЪФБЪ·ММ·ЩИЫМФ‡. ª¤Ы· ЫВ 5 ‰В˘ЩВЪfiПВЩ· Ъ¤ВИ У· ВОЩВП¤ЫВЩВ
ЩФ ВfiМВУФ ‚‹М·, ‰И·КФЪВЩИО¿ Л Ы˘ЫОВ˘‹ МВЩ·‚·›УВИ Н·У¿ ЫВ О·Щ¿ЫЩ·ЫЛ О·УФУИО‹˜ ¤У‰ВИНЛ˜. ™В ·˘Щ‹У ЩЛУ ВЪ›ЩˆЫЛ
·Щ‹ЫЩВ ВО У¤Ф˘ ЩФ П‹ОЩЪФ MEMORY/CLK-ADJ
\.
03) ¶·Ù‹ÛÙ ÙÔ Ï‹ÎÙÚÔ M-UP/REPEAT = ЩfiЫВ˜ КФЪ¤˜, М¤¯ЪИ У· ВМК·УИЫЩВ› Л ВИı˘МЛЩ‹ ı¤ЫЛ ЪФБЪ·ММ·ЩИЫМФ‡
(1 ¤ˆ˜ 20).
∂·Ó·Ï¿‚ÂÙ ·˘Ù‹ ÙËÓ ‰È·‰Èηۛ· ÁÈ· fiÏÔ˘˜ ÙÔ˘˜ ÂfiÌÂÓÔ˘˜ ÂÈı˘ÌËÙÔ‡˜ Ú·‰ÈÔʈÓÈÎÔ‡˜ ÛÙ·ıÌÔ‡˜ Ô˘ ı¤ÏÂÙÂ
Ó· ·ÔıË·ÛÂÙ ÛÙË ÌÓ‹ÌË.
∂¶π§√°∏ ∞¶√£∏∫∂Àª∂¡ø¡ ƒ∞¢π√ºø¡π∫ø¡ ™∆∞£ªø¡
™В О·Щ¿ЫЩ·ЫЛ ПВИЩФ˘ЪБ›·˜ Ъ·‰ИФКТУФ˘ ·Щ‹ЫЩВ ЩФ П‹ОЩЪФ M-UP/REPEAT = ЩfiЫВ˜ КФЪ¤˜, М¤¯ЪИ
У· ВМК·УИЫЩВ› ЫЩЛУ ФıfiУЛ @ Ë ÂÈı˘ÌËÙ‹ ı¤ÛË ÚÔÁÚ¿ÌÌ·ÙÔ˜ Ì ÙÔÓ ÂÈı˘ÌËÙfi ·ÔıËÎÂ˘Ì¤ÓÔ Ú·‰ÈÔʈÓÈÎfi ÛÙ·ıÌfi.
CD-PLAYER
∫π¡¢А¡√™ ! ª¤Ы· ЫЩФ CD-Player, МИ· ·ЫıВУ‹˜ ·ПП¿ ˘ОУ‹ ‰¤ЫМЛ ·ОЩИУТУ П¤И˙ВЪ Ы·ЪТУВИ ЩЛУ ВИК¿УВИ· ЩФ˘
ЩФФıВЩЛМ¤УФ˘ CD. ™В МЛ ВУ‰В‰ВИБМ¤УЛ ¯Ъ‹ЫЛ, ·˘Щ‹ Л ·ОЩ›У· МФЪВ› У· ·ФЩВП¤ЫВИ О›У‰˘УФ БИ· Щ· М¿ЩИ· –
ЫВ О·М›· ВЪ›ЩˆЫЛ МЛУ ·УФ›БВЩВ ЩЛ Ы˘ЫОВ˘‹!
∆√¶√£∂∆∏™∏ CD
01) °È· Ó· ·ÓÔ›ÍÙ ÙË ı‹ÎË ÙÔ˘ CD ! ÙÚ·‚‹ÍÙ ÙÔ ¿Óˆ ¿ÎÚÔ ÚÔ˜ Ù· ÂÌÚfi˜.
02) ∆ÔÔıÂÙ‹ÛÙ ÙÔ CD Ì ÙËÓ Ù˘ˆÌ¤ÓË ÂÈÊ¿ÓÂÈ· ÚÔ˜ ÙË Û˘Û΢‹, ‰ËÏ·‰‹ fiÙ·Ó ¤¯ÂÈ ÙÔÔıÂÙËı› ÛˆÛÙ¿ ÙÔ CD
‚ϤÂÙ ÙËÓ Ù˘ˆÌ¤ÓË ÏÂ˘Ú¿ ÙÔ˘. ∆Ô CD Ú¤ÂÈ Ó· ÙÔÔıÂÙËı› ÛÙ·ıÂÚ¿ ¿Óˆ ÛÙÔÓ ¿ÍÔÓ· Ô˘ ‚Ú›ÛÎÂÙ·È ÛÙË Ì¤ÛË.
49
Page 50

03) ∫Ï›ÛÙ ÙË ı‹ÎË ÙÔ˘ CD !.
04) ∂ÈϤÍÙ Ì ÙÔ Ï‹ÎÙÚÔ ÂÈÏÔÁ‹˜ Û˘Û΢ÒÓ * ÙÔ CD-Player. ™ÙËÓ ÔıfiÓË @ ВМК·У›˙ФУЩ·И Ф Ы˘УФПИОfi˜ ¯ЪfiУФ˜
·Ó··Ú·ÁˆÁ‹˜ ηıÒ˜ Î·È Ô ·ÚÈıÌfi˜ ÙˆÓ Ù›ÙψÓ.
À¶√¢∂π•∏: ™В ВЪ›ЩˆЫЛ Ф˘ МВЩ¿ ЩЛУ ЩФФı¤ЩЛЫЛ ЩФ˘ CD ‰ВУ ВМК·У›˙ФУЩ·И ЫЩЛУ ФıfiУЛ Ф ·ЪИıМfi˜ ЩˆУ
Щ›ЩПˆУ О·И Ф Ы˘УФПИОfi˜ ¯ЪfiУФ˜ ·У··Ъ·БˆБ‹˜, ˘¿Ъ¯ВИ Иı·УfiЩЛЩ· ЩФ CD У· ¤¯ВИ ЩФФıВЩЛıВ› ·У¿Ф‰· ‹
У· МЛУ В›У·И О·ı·Ъfi. ∫·ı·Ъ›ЫЩВ ЩФ CD МВ ВИ‰ИОfi ·У¿ОИ БИ· CD ‹ / О·И ЩФФıВЩ‹ЫЩВ ЩФ ЫˆЫЩ¿ О·И ВП¤БНЩВ ВО
У¤Ф˘ ЩИ˜ ВУ‰В›НВИ˜ ЫЩЛУ ФıfiУЛ.
µ∞™π∫∂™ §∂π∆√Àƒ°π∂™ ∆√À CD-PLAYER
ñ ∂¡∞ƒ•∏ ∞¡∞¶∞ƒ∞°ø°∏™: ¶·Ù‹ÛÙ ÙÔ Ï‹ÎÙÚÔ & PLAY/PAUSE – Л ·У··Ъ·БˆБ‹ НВОИУ¿ВИ.
с ¶∞À™∏ ∞¡∞¶∞ƒ∞°ø°∏™: ¶·Ù‹ÛÙ ÙÔ Ï‹ÎÙÚÔ & PLAY/PAUSE – Ë ·Ó··Ú·ÁˆÁ‹ ÛÙ·Ì·Ù¿ÂÈ. ™ÙËÓ ÔıfiÓË @
·Ó·‚ÔÛ‚‹ÓÂÈ Ë ‰È¿ÚÎÂÈ· ·Ó··Ú·ÁˆÁ‹˜. ªÂ ÂÎ Ó¤Ô˘ ¿ÙËÌ· ÙÔ˘ Ï‹ÎÙÚÔ˘ & PLAY/PAUSE Ë ·Ó··Ú·ÁˆÁ‹
Û˘Ó¯›˙ÂÙ·È.
ñ ¢π∞∫√¶∏ ∞¡∞¶∞ƒ∞°ø°∏™: ¶·Ù‹ÛÙ ÙÔ Ï‹ÎÙÚÔ
7 STOP – Ë ·Ó··Ú·ÁˆÁ‹ ‰È·ÎfiÙÂÙ·È.
ñ ª∂∆∞∫π¡∏™∏ ∫∞∆∞ ∂¡∞¡ ∆π∆§√ ∂ª¶ƒ√™: ªÂ οı ¿ÙËÌ· ÙÔ˘ Ï‹ÎÙÚÔ˘ ÌÂٷΛÓËÛË ÂÌÚfi˜ )
Á›ÓÂÙ·È ‚‹Ì· ÂÓfi˜ Ù›ÙÏÔ˘ ÂÌÚfi˜.
ñ ª∂∆∞∫π¡∏™∏ ∫∞∆∞ ∂¡∞¡ ∆π∆§√ ¶π™ø: ªÂ οı ¿ÙËÌ· ÙÔ˘ Ï‹ÎÙÚÔ˘
ÌÂٷΛÓËÛË ›Ûˆ 8 Á›ÓÂÙ·È
‚‹Ì· ÂÓfi˜ Ù›ÙÏÔ˘ ›Ûˆ.
ñ °Àƒπ™ª∞ ∂ª¶ƒ√™: ∫Ú·Ù‹ÛÙ ÙÔ Ï‹ÎÙÚÔ Á‡ÚÈÛÌ· ÂÌÚfi˜ ) ·ÙË̤ÓÔ, ÁÈ· Ó· Á˘Ú›ÛÙ ÂÌÚfi˜ ÂÓÙfi˜ ÂÓfi˜ Ù›ÙÏÔ˘.
ñ °Àƒπ™ª∞ ¶π™ø: ∫Ú·Ù‹ÛÙ ÙÔ Ï‹ÎÙÚÔ Á‡ÚÈÛÌ· ›Ûˆ 8 ·ÙË̤ÓÔ, ÁÈ· Ó· Á˘Ú›ÛÙ ›Ûˆ ÂÓÙfi˜ ÂÓfi˜ Ù›ÙÏÔ˘.
∏ ı‹ÎË ÙÔ˘ CD
! МФЪВ› У· ·УФИ¯ıВ› ·У¿ ¿Ы· ЫЩИБМ‹. ™ЩЛУ ВЪ›ЩˆЫЛ ·˘Щ‹ Л ·У··Ъ·БˆБ‹ ЫЩ·М·Щ¿ВИ ·˘ЩfiМ·Щ·.
∞Ê·ÈÚ¤ÛÙ ÙÔ CD ÌfiÓÔ, fiÙ·Ó ¤¯ÂÈ ÛÙ·Ì·Ù‹ÛÂÈ ÙÂÏ›ˆ˜.
¶ƒ√°ƒ∞ªª∞∆π™ª√™ ™∂πƒ∞™ ∞¡∞¶∞ƒ∞°ø°∏™ ∆π∆§ø¡ [ » TRACK MEMORY « ]
√ ÚÔÁÚ·ÌÌ·ÙÈÛÌfi˜ Ù˘ ÛÂÈÚ¿˜ ·Ó··Ú·ÁˆÁ‹˜ ÙˆÓ Ù›ÙÏˆÓ Â›Ó·È ‰˘Ó·Ùfi˜ ÌfiÓÔ fiÙ·Ó ÙÔ CD Â›Ó·È ÛÙ·Ì·ÙË̤ÓÔ.
ªÔÚÔ‡Ó Ó· ÚÔÁÚ·ÌÌ·ÙÈÛıÔ‡Ó Ì¤¯ÚÈ 20 Ù›ÙÏÔÈ.
01. ∆ÔÔıÂÙ‹ÛÙÂ ÙÔ CD
02. ∂ÈϤÍÙ Ì ÙÔ Ï‹ÎÙÚÔ ÂÈÏÔÁ‹˜ Û˘Û΢‹˜
* ÙÔ CD ·Ó··Ú·ÁˆÁ‹˜.
03. ¶·Ù‹ÛÙ ÙÔ Ï‹ÎÙÚÔ MEMORY/CLK-ADJ \. ™ÙËÓ ÔıfiÓË @ ÂÌÊ·Ó›˙ÂÙ·È Ë ¤Ó‰ÂÈÍË TRACK MEMORY.
04. ∂ÈϤÍÙ Ì ٷ Ï‹ÎÙÚ· ÂÌÚfi˜ ) Î·È ›Ûˆ 8 ÙÔÓ ·ÚÈıÌfi ÙÔ˘ Ù›ÙÏÔ˘ Ô˘ ı¤ÏÂÙ ӷ ·Ó··Ú·¯ı› ÚÒÙÔ˜.
05. ¶·Ù‹ÛÙÂ ÙÔ Ï‹ÎÙÚÔ MEMORY/CLK-ADJ
\. √ Щ›ЩПФ˜ ¤¯ВИ ·ФıЛОВ˘ıВ› ЫЩЛУ ЪТЩЛ ı¤ЫЛ ЪФБЪ·ММ·ЩИЫМФ‡ (ƒ-01).
∂·Ó·Ï¿‚ÂÙ ٷ ‚‹Ì·Ù· 3) ¤ˆ˜ 5) ÁÈ· ̤¯ÚÈ 20 Ù›ÙÏÔ˘˜. ŒÓ·˜ Ù›ÙÏÔ˜ ÌÔÚ› Ó· ÚÔÁÚ·ÌÌ·ÙÈÛı› Î·È ÔÏÏ·Ï¿.
∏ ÚÔÁÚ·ÌÌ·ÙÈṲ̂ÓË ÛÂÈÚ¿ ·Ó··Ú·ÁˆÁ‹˜ ÙˆÓ Ù›ÙÏˆÓ ‰È·ÙËÚÂ›Ù·È ÁÈ· ÙfiÛÔ ‰È¿ÛÙËÌ·, ̤¯ÚÈ Ó· ·Ê·ÈÚÂı› ÙÔ CD
·fi ЩЛУ ı‹ОЛ ЩФ˘, У· ВИПВБВ› МИ· ¿ППЛ ПВИЩФ˘ЪБ›· ‹ У· ·ВУВЪБФФИЛıВ› Л Ы˘ЫОВ˘‹.
∂¡∞ƒ•∏ ¶ƒ√°ƒ∞ªª∞∆π™ª∂¡∏™ ™∂πƒ∞™ ∞¡∞¶∞ƒ∞°ø°∏™ ∆π∆§ø¡
01. ¶·Ù‹ÛÙ ÙÔ Ï‹ÎÙÚÔ MEMORY/CLK-ADJ \. ™ÙËÓ ÔıfiÓË @ ÂÌÊ·Ó›˙ÔÓÙ·È Ë ¤Ó‰ÂÈÍË TRACK MEMORY Î·È ÔÈ
ÚÔÁÚ·ÌÌ·ÙÈṲ̂ÓÔÈ Ù›ÙÏÔÈ.
02. ¶·Ù‹ÛÙÂ ÙÔ Ï‹ÎÙÚÔ PLAY/PAUSE & – Л ·У··Ъ·БˆБ‹ НВОИУ¿ВИ О·И ‰ИВН¿БВЩ·И МВ ЩЛУ ЪФБЪ·ММ·ЩИЫМ¤УЛ
·fi ÂÛ¿˜ ÛÂÈÚ¿.
03. °È· Ó· ‰È·ÁÚ¿„Ù ¤Ó· ÚfiÁÚ·ÌÌ·, ·Ù‹ÛÙ ÙÔ Ï‹ÎÙÚÔ STOP
7.
§∂π∆√Àƒ°π∂™ ∂¶∞¡∞§∏æ∏™ [ » REPEAT « ]
ñ °È· ÙËÓ Â·Ó¿ÏË„Ë fiÏˆÓ ÙˆÓ Ù›ÙÏˆÓ ÙÔ˘ CD, ·Ù‹ÛÙ ÙÔ Ï‹ÎÙÚÔ M-UP/REPEAT
=. ™ÙËÓ ÔıfiÓË @ ÂÌÊ·Ó›˙ÂÙ·È
REPEAT ALL.
ñ °È· ÙËÓ Â·Ó¿ÏË„Ë ÂÓfi˜ Ù›ÙÏÔ˘, ·Ù‹ÛÙ ÙÔ Ï‹ÎÙÚÔ M-UP/REPEAT = ‰‡Ô ÊÔÚ¤˜, ÙËÓ ÒÚ· Ô˘ Ô ÂÈı˘ÌËÙfi˜
Ù›ÙÏÔ˜ ·Ó··Ú¿ÁÂÙ·È. ™ÙËÓ ÔıfiÓË
@ ÂÌÊ·Ó›˙ÂÙ·È REPEAT ONE.
ñ °È· ÙËÓ Â·Ó¿ÏË„Ë ÌÈ·˜ ÚÔÁÚ·ÌÌ·ÙÈṲ̂Ó˘ ÛÂÈÚ¿˜ Ù›ÙψÓ, ·Ù‹ÛÙ ÙÔ Ï‹ÎÙÚÔ M-UP/REPEAT =, ÙËÓ ÒÚ·
Ô˘ ·Ó··Ú¿ÁÂÙ·È Ë ÚÔÁÚ·ÌÌ·ÙÈṲ̂ÓË ÛÂÈÚ¿ Ù›ÙψÓ. ™ÙËÓ ÔıfiÓË @ ÂÌÊ·Ó›˙ÂÙ·È Ë ¤Ó‰ÂÈÍË REPEAT.
ñ °И· ЩЛУ ·ВУВЪБФФ›ЛЫЛ МИ·˜ ПВИЩФ˘ЪБ›· В·У¿ПЛ„Л˜, ·Щ‹ЫЩВ ЩФ П‹ОЩЪФ M-UP/REPEAT = ÙfiÛ˜ ÊÔÚ¤˜ ̤¯ÚÈ
Ó· Û‚‹ÛÂÈ ÛÙËÓ ÔıfiÓË
@ ÙÔ REPEAT ALL ‹ ÙÔ REPEAT ONE.
∞¡∞¶∞ƒ∞°ø°∏ ∆π∆§ø¡ ª∂ ∆ÀÃ∞π∞ ™∂πƒ∞ [ » RANDOM « ]
™ЩЛУ ПВИЩФ˘ЪБ›· RANDOM Л ЫВИЪ¿ ·У··Ъ·БˆБ‹˜ ЩˆУ Щ›ЩПˆУ ЩФ˘ ЩФФıВЩЛМ¤УФ˘ CD ВИП¤БВЩ·И Щ˘¯·›·.
01. ∆ÔÔıÂÙ‹ÛÙÂ ÙÔ CD
02. ∂ÈϤÍÙ Ì ÙÔ Ï‹ÎÙÚÔ ÂÈÏÔÁ‹˜ Û˘Û΢‹˜
* ÙËÓ Û˘Û΢‹ ÙÔ˘ CD ·Ó··Ú·ÁˆÁ‹˜.
03. ¶·Ù‹ÛÙ ÙÔ Ï‹ÎÙÚÔ RANDOM (. ™ÙËÓ ÔıfiÓË @ ÂÌÊ·Ó›˙ÂÙ·È Ë ¤Ó‰ÂÈÍË RANDOM.
04. ¶·Ù‹ÛÙÂ ÙÔ Ï‹ÎÙÚÔ
& PLAY/PAUSE – Л ·У··Ъ·БˆБ‹ ЩˆУ Щ›ЩПˆУ НВОИУ¿ВИ МВ Щ˘¯·›· ЫВИЪ¿.
50
Page 51

∫∞™∂∆√ºø¡√
∆√¶√£∂∆∏™∏ ∫∞™∂∆∞™
01. ∞ÓÔ›ÍÙ ÙÔ ÚÔÛٷ٢ÙÈÎfi Î¿Ï˘ÌÌ· + ЪФ˜ Щ· ВМЪfi˜. ¶›Ыˆ ·fi ·˘Щfi ‚Ъ›ЫОФУЩ·И Щ· П‹ОЩЪ· ¯ВИЪИЫМФ‡ ЩФ˘
ηÛÂÙfiʈÓÔ˘ (ηıÒ˜ Î·È Ô ·ÎÚÔ‰¤ÎÙ˘ ÁÈ· Ù· ·ÎÔ˘ÛÙÈο).
02. °È· Ó· ·ÓÔ›ÍÙ ÙËÓ Î·ÛÂÙÔı‹ÎË ·Ù‹ÛÙ ÙÔ Ï‹ÎÙÚÔ
`. ∏ ηÛÂÙÔı‹ÎË ·ÓÔ›ÁÂÈ ·˘ÙfiÌ·Ù·.
03. ∆ФФıВЩ‹ЫЩВ ЩЛ О·Ы¤Щ· МВ ЩЛУ ПВ˘Ъ¿ ЩЛ˜ М·БУЛЩФЩ·ИУ›·˜ ЪФ˜ Щ· О¿Щˆ. ∏ М·БУЛЩФЩ·ИУ›· Ъ¤ВИ У·
Â›Ó·È ÙÂÓو̤ÓË Î·È Ó· ÌËÓ Û¯ËÌ·Ù›˙ÂÈ ıËÏȤ˜.
04. ∫Ï›ÛÙ ÙËÓ Î·ÛÂÙÔı‹ÎË.
05. ∂ÈϤÍÙ Ì ÙÔ Ï‹ÎÙÚÔ ÂÈÏÔÁ‹˜ Û˘Û΢ÒÓ
* TAPE Ùo ηÛÂÙfiʈÓÔ.
µ∞™π∫∂™ §∂π∆√Àƒ°π∂™ ∆√À ∫∞™∂∆√ºø¡√À
ñ ∂¡∞ƒ•∏ ∞¡∞¶∞ƒ∞°ø°∏™: ¶·Ù‹ÛÙ ÙÔ Ï‹ÎÙÚÔ 3 – Л ·У··Ъ·БˆБ‹ НВОИУ¿ВИ.
с ¶∞À™∏ ∞¡∞¶∞ƒ∞°ø°∏™: ¶·Ù‹ÛÙ ÙÔ Ï‹ÎÙÚÔ | – Ë ·Ó··Ú·ÁˆÁ‹ ÛÙ·Ì·Ù¿ÂÈ. ªÂ ÂÎ Ó¤Ô˘ ¿ÙËÌ·
ÙÔ˘ Ï‹ÎÙÚÔ˘ | Ë ·Ó··Ú·ÁˆÁ‹ Û˘Ó¯›˙ÂÙ·È.
ñ ¢π∞∫√¶∏ ∞¡∞¶∞ƒ∞°ø°∏™: ¶·Ù‹ÛÙ ÙÔ Ï‹ÎÙÚÔ
` – Ë ·Ó··Ú·ÁˆÁ‹ ÙÂÚÌ·Ù›˙ÂÙ·È.
ñ °Àƒπ™ª∞ ∂ª¶ƒ√™: ¶·Ù‹ÛÙ ÙÔ Ï‹ÎÙÚÔ 1.
ñ °Àƒπ™ª∞ ¶π™ø: ¶·Ù‹ÛÙ ÙÔ Ï‹ÎÙÚÔ 2.
∂°°ƒ∞º∏ ∫∞™∂∆∞™
∆Ô Ë¯ÔÛ‡ÛÙËÌ· Design KH 2300 Â›Ó·È ÂÊԉȷṲ̂ÓÔ Ì ·˘ÙfiÌ·ÙË Ú‡ıÌÈÛË ÛÙ¿ıÌ˘. ªÂÙ·‚ÔϤ˜ Ù˘ ¤ÓÙ·Û˘
Î·È ÙÔ˘ ›‰Ô˘˜ ÙÔ˘ ‹¯Ô˘ ‰ÂÓ ¤¯Ô˘Ó ÂÈÚÚÔ‹ ÛÙËÓ ÂÁÁÚ·Ê‹.
01. ∆ФФıВЩ‹ЫЩВ ЩЛ О·Ы¤Щ· О·И Б˘Ъ›ЫЩВ ЩЛУ ВУ‰В¯ФМ¤Уˆ˜ ЫЩФ ЫЛМВ›Ф ·fi fiФ˘ ı¤ПВЩВ У· НВОИУ‹ЫВИ Л ВББЪ·К‹.
02. ¶·Ù‹ÛÙÂ ÙÔ Ï‹ÎÙÚÔ
| PAUSE.
03. ¶·Ù‹ÛÙ ÙÔ Ï‹ÎÙÚÔ ÂÁÁÚ·Ê‹˜ 4 (RECORD). ª·˙› ·ÙÈ¤Ù·È ·˘ÙfiÌ·Ù· ÙÔ Ï‹ÎÙÚÔ 3.
04. ¶·Ù‹ÛÙ ÙÔ ·ÓÙ›ÛÙÔȯ· ÂÈÛËÌ·Ṳ̂ÓÔ Ï‹ÎÙÚÔ
* ÁÈ· Ó· ÂÈϤÍÙ ÌÈ· Û˘Û΢‹ ‹ ÌÈ· ËÁ‹ ‹¯Ô˘ ÁÈ· ÙËÓ ÂÁÁÚ·Ê‹.
05. ∏ ВББЪ·К‹ НВОИУ¿ВИ МВ ЩЛУ ·ВПВ˘ı¤ЪˆЫЛ ЩФ˘ П‹ОЩЪФ˘ PAUSE |.
06. ∏ ÂÁÁÚ·Ê‹ ÙÂÚÌ·Ù›˙ÂÙ·È ÌÂ ¿ÙËÌ· ÙÔ˘ Ï‹ÎÙÚÔ˘ `.
∫∞£∞ƒπ™ª√™ ∫∂º∞§ø¡ ∫∞™∂∆ø¡
°И· ЩФУ О·ı·ЪИЫМfi ЩˆУ ОВК·ПТУ О·И ЩˆУ ВН·ЪЩЛМ¿ЩˆУ Ы˘БОЪ¿ЩЛЫЛ˜ ЩЛ˜ М·БУЛЩФЩ·ИУ›·˜ ¯ЪЛЫИМФФИ‹ЫЩВ
Щ·ОЩИО¿ МИ· ·УЩ›ЫЩФИ¯Л О·Ы¤Щ· О·ı·ЪИЫМФ‡.
¢∏§ø™∏ π™√¢À¡∞ªπ∞™
∂МВ›˜, Komperna› Handelsgesellschaft mbH, Burgstr. 21, D-44867 Bochum, Germany, ‰ЛПТУФ˘МВ МВ ЩФ ·ЪfiУ
ЩЛУ ИЫФ‰˘У·М›· ЩФ˘ ЪФ˚fiУЩФ˜ ·˘ЩФ‡ МВ ЩИ˜ ·ОfiПФ˘ıВ˜ О·ЩВ˘ı˘УЩ‹ЪИВ˜ БЪ·ММ¤˜ ЩЛ˜ ∂˘Ъˆ·˚О‹˜ ∫ФИУfiЩЛЩ·˜:
∏ПВОЩЪФМ·БУЛЩИОfi˜ Ы˘М‚И‚·ЫМfi˜: 89/336 EEC (EMC Directive)
∂К·ЪМФ˙fiМВУФИ ВУ·ЪМФУИЫМ¤УФИ
О·УФУИЫМФ›: EN 55013:06.90+A12:08.94+A13:12.96
EN 55020:12.94+A11:12.96
EN 61000-3-2:04.95+A1:1998+A2:1998
EN 61000-3-3:01.95
∆‡Ô˜ Ì˯·Ó‹˜/∆‡Ô˜: KH2300
√ÓÔÌ·Û›· ÂÚÁ·Ï›Ԣ: ∏¯ÔÛ‡ÛÙËÌ· Design Ì ηٷÎfiÚ˘ÊÔ CD-Player
Bochum, 31.08.2002
Hans Komperna›
- ¢È¢ı˘ÓÙ‹˜ ηٷÛÙ‹Ì·ÙÔ˜ -
51
Page 52

WA˚NE WSKAZÓWKI BEZPIECZE¡STWA
Podczas stosowania urzàdzeƒ elektrycznych nale˝y przestrzegaç nast´pujàcych podstawowych wskazówek
bezpieczeƒstwa:
Prosz´ uwa˝nie przeczytaç nast´pujàce informacje dotyczàce bezpieczeƒstwa i w∏aÊciwego u˝ytkowania.
Przed przystàpieniem do czytania prosz´ roz∏o˝yç stron´ z rysunkami, a nast´pnie zapoznaç si´ z wszystkimi
funkcjami urzàdzenia. Nale˝y zachowaç niniejsze wskazówki i przekazaç je ewentualnie nast´pnemu
u˝ytkownikowi.
Nie nale˝y uruchamiaç urzàdzenia, jeÊli uszkodzona jest wtyczka sieciowa, kabel sieciowy wzgl´dnie urzàdzenie.
JeÊli urzàdzenie spad∏o z pó∏ki, zanim zostanie ponownie uruchomione nale˝y oddaç je do sprawdzenia do
specjalistycznego warsztatu serwisowego.
We wn´trzu urzàdzenia wyst´pujà niebezpieczne napi´cia. Nigdy nie otwieraç obudowy ani nie wk∏adaç przedmiotów
przez otwory wentylacyjne.
Nie nale˝y dopuÊciç do tego, aby jakiekolwiek ciecze przedosta∏y si´ do urzàdzenia. W razie koniecznoÊci natychmiast
wyjàç wtyczk´ z gniazdka.
JeÊli podczas pracy urzàdzenia wystàpià zak∏ócenia nale˝y natychmiast wyjàç wtyczk´ z gniazdka sieciowego.
Podobnie nale˝y postàpiç przed czyszczeniem urzàdzenia.
Nie nale˝y przeprowadzaç samodzielnie ˝adnych zmian ani napraw urzàdzenia. Równie˝ przewodu pod∏àczeniowego
nie nale˝y samodzielnie wymieniaç. Napraw´ urzàdzenia wzgl´dnie przewodu pod∏àczeniowego nale˝y powierzaç
wyspecjalizowanemu warsztatowi wzgl´dnie serwisowi. Nieprawid∏owa naprawa mo˝e spowodowaç znaczne
zagro˝enie dla u˝ytkownika.
Dzieci cz´sto nie doceniajà zagro˝enia, jakie stwarza pos∏ugiwanie si´ z urzàdzeniami elektrycznymi. Prosz´ nie
pozostawiaç dzieci bez nadzoru w pobli˝u urzàdzeƒ elektrycznych.
Nie nale˝y pozostawiaç uruchomionego urzàdzenia bez nadzoru.
Urzàdzenie nie mo˝e byç u˝ytkowane w wilgotnych pomieszczeniach (np. w ∏azienkach) wzgl´dnie w pomieszczeniach,
w których dochodzi do znacznego zakurzenia.
Nagromadzone we wn´trzu urzàdzenia ciep∏o mo˝e prowadziç do uszkodzenia urzàdzenia wzgl´dnie do po˝aru.
Nie nale˝y nara˝aç urzàdzenia na dzia∏anie znacznej temperatury z zewnàtrz, tj.:
– nale˝y unikaç bezpoÊredniego dzia∏ania promieni s∏onecznych wzgl´dnie êróde∏ ciep∏a
– nie nale˝y zakrywaç otworów wentylacyjnych urzàdzenia
– nale˝y pozostawiç wolnà przestrzeƒ wokó∏ urzàdzenia na odleg∏oÊç ok. 10 cm.
Urzàdzenie nie mo˝e byç ustawiane w bezpoÊrednim sàsiedztwie ∏atwopalnych materia∏ów (np.: zas∏on, ∏atwopalnych
cieczy itp.).
JeÊli wie˝a trafi bezpoÊrednio z zimnego otoczenia do ciep∏ego (np. po przetransportowaniu), w jej wn´trzu mo˝e
kondensowaç si´ woda. Aby uchroniç wie˝´ od uszkodzenia, nale˝y w∏àczyç jà najwczeÊniej po 2 godzinach
przetrzymywania w pomieszczeniu.
Podczas burzy urzàdzenia pod∏àczone do sieci elektrycznej mogà ulec uszkodzeniu. Podczas burzy nale˝y zawsze
wyciàgaç wtyczk´ z gniazdka sieciowego, a tak˝e wtyczk´ anteny.
Aby urzàdzenia ca∏kowicie odciàç od dop∏ywu pràdu, nale˝y wyjàç wtyczk´ z gniazdka. Nale˝y wówczas chwytaç za
wtyczk´, a nie za kabel.
Nale˝y chroniç przewód pod∏àczeniowy przed goràcymi powierzchniami oraz innymi uszkodzeniami, a tak˝e nie nale˝y
go zginaç.
Prosz´ regularnie sprawdzaç przewód pod∏àczeniowy pod kàtem ewentualnych uszkodzeƒ.
Przed u˝yciem przewód pod∏àczeniowy nale˝y ca∏kowicie rozwinàç.
Prosz´ uwa˝aç, aby nie potykaç si´ o przewód pod∏àczeniowy.
W przypadku d∏u˝szej nieobecnoÊci nale˝y wyjàç wtyczk´ z gniazdka, a baterie z pilota.
Urzàdzenie przystosowane jest do u˝ytku prywatnego.
Uwaga:
Wie˝a wyposa˝ona jest w gumowe nó˝ki, chroniàce przed poÊlizgiem. Ze wzgl´du na to, i˝ powierzchnie,
na których stawiana jest zwykle wie˝a, zbudowane sà z ró˝nych materia∏ów i konserwowane sà przy pomocy ró˝nych
Êrodków piel´gnacyjnych, nie mo˝na ca∏kowicie wykluczyç, ˝e niektóre z tych substancji zawierajà sk∏adniki szkodliwe
dla gumy wzgl´dnie zmi´kczajàce gum´. Prosz´ ewentualnie pod∏o˝yç pod nó˝ki podk∏adki chroniàce przed poÊlizgiem.
Ochrona Êrodowiska:
Nigdy nie stosowaç razem nowych i u˝ywanych baterii. Ze wzgl´du na ochron´ Êrodowiska
prosz´ nie wyrzucaç zu˝ytych baterii do Êmieci, tylko zdawaç je do odpowiednich punktów zbiorczych.
USTAWIENIE I POD¸ÑCZENIE
Zanim po raz pierwszy uruchomià Paƒstwo wie˝´, prosz´ post´powaç zgodnie z niniejsza instrukcjà i dopiero na koniec
w∏o˝yç wtyczk´ do gniazdka sieciowego.
1) Prosz´ ostro˝nie wyjàç wie˝´ oraz g∏oÊniki z opakowania.
2) Prosz´ wybraç odpowiednie miejsce na wie˝´; powinno byç ono
… poziome
… suche i nie zakurzone
… nie powinno znajdowaç si´ w pobli˝u êróde∏ ciep∏a ani nie powinno byç nara˝one na palàce s∏oƒce.
3) WA˚NE: Prosz´ usunàç wszystkie zabezpieczenia transportowe /taÊmy klejàce na kieszeni odtwarzacza CD
oraz kieszeni magnetofonu!
Prosz´ otworzyç kieszeƒ odtwarzacza CD
! pociàgajàc za górnà kraw´dê i usunàç czerwone zabezpieczenie
(nast´pnie zamknàç kieszeƒ odtwarzacza CD).
52
Page 53

4) Prosz´ pod∏àczyç oba g∏oÊniki. Przy∏àcza g∏oÊników Y sà odpowiednio oznaczone (L=LEWY / R=PRAWY).
Wskazówki dotyczàce ustawienia g∏oÊników:
G∏oÊniki ustawiç mo˝liwie na wysokoÊci g∏owy.
Nie zas∏aniaç g∏oÊników zas∏onami ani jakimikolwiek przedmiotami.
Tak ustawiç g∏oÊnik na pó∏ce, aby jego przednia os∏ona pokrywa∏a si´ z przednià kraw´dzià pó∏ki.
Aby uniknàç drgaƒ, pod∏o˝yç ewentualnie pod g∏oÊnik gumowà podk∏adk´.
5) W celu pod∏àczenia zewn´trznego urzàdzenia (np. adaptera) nale˝y u˝yç przy∏àczy typu cinch (zaciskowych)
U.
6) Do odbioru fal ultrakrótkich pod∏àczyç do przy∏àcza anteny
O anten´ o impedancji 75 Ohm (anten´ domowà wzgl´dnie
przy∏àcze kablowe). JeÊli nie dysponujà Paƒstwo takà antenà, do Êrodkowego kontaktu przy∏àcza anteny O pod∏àczyç
dostarczonà w komplecie anten´ kablowà.
Antena do odbioru fal Êrednich wbudowana jest w urzàdzenie.
7) Pod∏àczyç wtyczk´ do gniazdka o napi´ciu 230 V.
8) W∏o˝yç baterie (do kupienia osobno) do pilota (2x AA Mignon LR6 1,5 V):
– Otworzyç pokryw´ z ty∏u pilota.
– W∏o˝yç baterie. Pami´taç o w∏aÊciwej polaryzacji (patrz oznaczenie na dnie przegrody na baterie).
– Zamknàç pokryw´.
MONTA˚ NA ÂCIANIE
Wie˝a mo˝e zostaç zamontowana razem z g∏oÊnikami na Êcianie.
Odpowiednie Êruby oraz mocowania Êcienne dostarczone sà w komplecie. Urzàdzenie mocowaç pionowo
na stabilnej Êcianie.
Otwory na Êruby nale˝y wywierciç w odst´pie 14 cm.
Aby Êruby prawid∏owo zahacza∏y o mocowanie P z ty∏u wie˝y oraz g∏oÊników, g∏ówki Êrub winny wystawaç ze Êciany
na odleg∏oÊç ok. 3 mm.
ELEMENTY OBS¸UGI
! Kieszeƒ na p∏yt´ CD 6 Kieszeƒ na kaset´
@ WyÊwietlacz 7 Przycisk “stop” (CD)
# Odbiornik sygna∏ów z pilota 8 Przycisk „do ty∏u“ (*)
$ Przycisk mono/stereo (tylko do obs∏ugi radia na falach FM (UKW)) 9 Prze∏àczanie wskazania
% Przycisk wyboru dêwi´ku 0 Przycisk TIMER
^ Wy∏àczanie dêwi´ku - Przycisk SLEEP
& Odtwarzanie CD / przerwa = Przycisk M-UP/REPEAT (*)
* Przycisk wyboru urzàdzenia \ Przycisk MEMORY/CLK-ADJ (*)
( Przycisk RANDOM Q Zmniejszanie g∏oÊnoÊci
) Przycisk „do przodu“ W Zwi´kszanie g∏oÊnoÊci
_ Przycisk wyboru zakresu fal (FM (UKW)/MW (AM)) E Przycisk w∏àczania/wy∏àczania (Stand-By)
+ Klapa ochronna R Wskaênik pracy
| Przycisk „przerwa“ (tylko magnetofon) T Wtyczka sieciowa
` Przycisk „stop/eject“ (tylko magnetofon) Y Przy∏àcza g∏oÊników
1 Przewijanie do przodu (tylko magnetofon) U Przy∏àcza typu cinch dla urzàdzenia zew. (AUX)
2 Przewijanie do ty∏u (tylko magnetofon) I Redukcja szumów / nagrywanie (tylko magnetofon)
3 Przycisk odtwarzania (tylko magnetofon) O Przy∏àcze anteny
4 Przycisk nagrywania (tylko magnetofon) P Element do mocowania urzàdzenia na Êcianie
5 Przy∏àcze s∏uchawek
Elementy oznaczone (*) spe∏niajà ró˝ne funkcje, zale˝nie od wyboru urzàdzenia (np. radia wzgl´dnie odtwarzacza
p∏yt CD). Prosz´ przeczytaç odpowiednie rozdzia∏y.
Elementy od
| do 4 oraz I s∏u˝à jedynie do obs∏ugi magnetofonu.
OBS¸UGA
W¸ÑCZANIE I WY¸ÑCZANIE [ » POWER / STAND-BY « ]
• JeÊli wtyczka jest w∏o˝ona do gniazdka, urzàdzenie znajduje si´ w trybie wyczekiwania „stand by”. Wskaênik pracy R
Êwieci si´ na czerwono.
• Po wciÊni´ciu przycisku w∏àczania/wy∏àczania
E urzàdzenie znajduje si´ w trybie pracy. Wskaênik pracy R Êwieci
si´ na zielono.
• Aby prze∏àczyç z powrotem na tryb wyczekiwania, nale˝y ponownie wcisnàç przycisk w∏àczania/wy∏àczania E.
• W przypadku d∏u˝szej nieobecnoÊci wyciàgnàç wtyczk´ z gniazdka sieciowego.
53
Page 54

WYBÓR URZÑDZENIA /èRÓD¸A DèWI¢KU [ » CD / TUNER / TAPE / AUX « ]
• Aby wybraç urzàdzenie wzgl´dnie zmieniç êród∏o dêwi´ku, prosz´ wcisnàç odpowiednio oznaczony przycisk *:
CD = odtwarzacz CD TUNER = radio TAPE = magnetofon AUX = urzàdzenie zewn´trzne, np. adapter
NASTAWIANIE G¸OÂNOÂCI [ » VOLUME / MUTE « ]
• G∏oÊnoÊç zwi´kszana jest przy u˝yciu przycisku W.
• G∏oÊnoÊç zmniejszana jest przy u˝yciu
Q.
• G∏oÊniki oraz s∏uchawki wy∏àczane sà przy u˝yciu przycisku wy∏àczania dêwi´ku
^.
NASTAWIANIE DèWI¢KU [ » CLASSIC / ROCK / POP « ]
Przy u˝yciu przycisku wyboru dêwi´ku % mogà Paƒstwo dostosowaç jakoÊç dêwi´ku do rodzaju odtwarzanej muzyki,
a tym samy zwi´kszyç przyjemnoÊç ze s∏uchania. Wybrane ustawienie - CLASSIC, ROCK wzgl´dnie POP – pokazywane
jest na wyÊwietlaczu @ (brak wskazania = dêwi´k neutralny).
S¸UCHAWKI [ » PHONES « ]
Do przy∏àcza s∏uchawek 5 mogà zostaç pod∏àczone s∏uchawki o impedancji 8-32 Ohm, wyposa˝one we wtyczk´ o
Êrednicy 3,5 mm. Po pod∏àczeniu s∏uchawek g∏oÊniki wy∏àczajà si´ automatycznie. Prosz´ pami´taç, ˝e zbyt du˝a
g∏oÊnoÊç prowadzi do uszkodzenia s∏uchu.
NASTAWIANIE ZEGARA
01) Aby mo˝na by∏o nastawiç zegar, urzàdzenie musi znajdowaç si´ w trybie „stand by” (wskaênik pracy R Êwieci si´
na czerwono).
02) Wcisnàç raz przycisk MEMORY/CLK-ADJ
\ – miga wskaênik godziny.
03) Nastawiç godzin´ przy u˝yciu przycisków „do przodu“ ) wzgl´dnie „do ty∏u“ 8.
04) Wcisnàç ponownie przycisk MEMORY/CLK-ADJ \ – miga wskaênik minut.
05) Nastawiç minuty przy u˝yciu przycisków „do przodu“ ) wzgl´dnie „do ty∏u“ 8.
06) Wcisnàç ponownie przycisk MEMORY/CLK-ADJ
\ – Wskaênik przestaje migaç i zegar zaczyna chodziç (miga
„dwukropek”).
NASTAWIANIE CZASU W¸ÑCZANIA I WY¸ÑCZANIA [ » TIMER « ]
Uruchamiajàc funkcj´ czasu w∏àczania mogà Paƒstwo wykorzystaç wie˝´ do budzenia.
01) Wybraç przy u˝yciu odpowiedniego przycisku * urzàdzenie / êród∏o dêwi´ku (CD, TAPE lub TUNER).
02) Przygotowaç êród∏o dêwi´ku, tzn. w przypadku radia (TUNER) nastawiç ˝àdanà stacj´ radiowà, w przypadku
magnetofonu (TAPE) w∏o˝yç kaset´ i przewinàç na ˝àdane miejsce, a w przypadku odtwarzacza CD w∏o˝yç p∏yt´
i ewentualnie zaprogramowaç kolejnoÊç utworów.
03) Wcisnàç przycisk TIMER
0. Na wyÊwietlaczu @ pojawia si´ napis TIMER.
UWAGA: Na wykonanie poni˝szych kroków majà Paƒstwo 5 sekund czasu. W przeciwnym razie procedura zostanie
przerwana.
Wówczas prosz´ ponownie rozpoczàç od kroku 4).
04) Dwa razy wcisnàç przycisk MODE/REMAIN
9. Na wyÊwietlaczu @ pojawia si´ wskaênik czasu i miga napis TIMER ON.
05) Wcisnàç raz przycisk MEMORY/CLK-ADJ
\ – miga wskaênik godziny.
06) Nastawiç godzin´ przy u˝yciu przycisków „do przodu“ ) wzgl´dnie „do ty∏u“ 8.
07) Wcisnàç ponownie przycisk MEMORY/CLK-ADJ \ – miga wskaênik minut.
08) Nastawiç minuty przy u˝yciu przycisków
„do przodu“ ) wzgl´dnie „do ty∏u“ 8.
09) Wcisnàç ponownie przycisk MEMORY/CLK-ADJ-Taste
\ – czas w∏àczania jest zapami´tany.
10) JeÊli chcà byç Paƒstwo obudzeni przez kaset´ magnetofonowà: wcisnàç przycisk odtwarzania 3.
11) Nast´pnie wy∏àczyç wie˝´ (przycisk w∏àczania/wy∏àczania E).
JeÊli majà Paƒstwo uruchomionà funkcj´ czasu wy∏àczania, wie˝a wy∏àczy si´ sama o nastawionym czasie.
01) Prosz´ wcisnàç przycisk „Timer“
0, na wyÊwietlaczu @ poka˝e si´ napis TIMER.
UWAGA: Na wykonanie poni˝szych kroków majà Paƒstwo 5 sekund czasu. W przeciwnym razie procedura zostanie
przerwana.
Wówczas prosz´ ponownie rozpoczàç od kroku 2).
02) Trzy razy wcisnàç przycisk MODE/REMAIN
9. Na wyÊwietlaczu pojawia si´ wskaênik czasu i miga napis TIMER OFF.
03) Wcisnàç raz przycisk MEMORY/CLK-ADJ
\ – miga wskaênik godzin.
04) Nastawiç godzin´ przy u˝yciu przycisków „do przodu“ ) wzgl´dnie „do ty∏u“ 8.
05) Wcisnàç ponownie przycisk MEMORY/CLK-ADJ \ – miga wskaênik minut.
06) Nastawiç minuty przy u˝yciu przycisków „do przodu“ ) wzgl´dnie „do ty∏u“ 8.
07) Wcisnàç ponownie przycisk MEMORY/CLK-ADJ-Taste
\ – czas wy∏àczania jest zapami´tany.
Aby wy∏àczyç funkcj´ TIMER, tyle razy wciskaç przycisk TIMER 0, a˝ z wyÊwietlacza @ zniknie napis TIMER.
54
Page 55

URUCHAMIANIE FUNKCJI USYPIANIA [ » SLEEP « ]
Mogà Paƒstwo nastawiç czas w zakresie od 90 do 10 minut, po up∏yni´ciu którego urzàdzenie wy∏àczy si´ jednorazowo.
• Aby uruchomiç funkcj´ wy∏àczenia po up∏ywie 90 minut, wcisnàç raz krótko przycisk SLEEP -.
• Aby nastawiç krótszy czas wy∏àczenia, tak d∏ugo wciskaç przycisk SLEEP
-, a˝ na wyÊwietlaczu nie pojawi si´ ˝àdany
czas.
• Aby wy∏àczyç funkcj´ usypiania, tyle razy wcisnàç przycisk SLEEP -, a˝ z wyÊwietlacza @ nie zniknie napis SLEEP.
RADIO
USTAWIANIE ANTENY
JeÊli do odbioru fal ultrakrótkich (FM (UKW)) wykorzystywana jest antena kablowa:
• antena powinna byç ca∏kowicie rozwini´ta
• metodà prób i b∏´dów nale˝y wybraç optymalnà pozycj´ anteny
• prosz´ ewentualnie przymocowaç anten´ do Êciany, np. taÊmà klejàcà.
Do odbioru fal Êrednich (MW [AM]) nale˝y metodà prób i b∏´dów wybraç optymalnà pozycj´ anteny wbudowanej
w urzàdzenie.
RADIO / WYBÓR ZAKRESU FAL RADIOWYCH (FM (UKW)/MW (AM))
01) Przyciskiem wyboru urzàdzenia wybraç * TUNER (=radio).
02) Wciskajàc przycisk wyboru zakresu fal
_ radiowych wybraç pomi´dzy falami ultrakrótkimi (FM (UKW)) a falami
Êrednimi (MW (AM)).
AUTOMATYCZNE / R¢CZNE WYSZUKIWANIE STACJI RADIOWYCH
Podczas automatycznego wyszukiwania stacji radiowych, cz´stotliwoÊç jest tak d∏ugo zwi´kszana wzgl´dnie
zmniejszana, a˝ nie zostanie znaleziona stacja radiowa o wystarczajàcej sile odbioru.
01) Wciskaç ok. 1 sek. przycisk
„do przodu“ ) wzgl´dnie „do ty∏u“ 8 – zaczyna si´ wyszukiwanie stacji radiowych,
które koƒczy si´ automatycznie po znalezieniu stacji.
02) Aby ponownie rozpoczàç wyszukiwanie, nale˝y ponownie wcisnàç na ok. 1 sek. przycisk „do przodu“ )
wzgl´dnie „do ty∏u“ 8.
R´czne wyszukiwanie stacji radiowych mogà Paƒstwo stosowaç do dostrajania odbioru wzgl´dnie jeÊli znana jest
Paƒstwu cz´stotliwoÊç nadawania.
01) Przycisk
„do przodu“ ) wzgl´dnie „do ty∏u“ 8 wciskaç krótko, aby nieznacznie zwi´kszyç wzgl´dnie zmniejszyç
cz´stotliwoÊç.
02) Tak d∏ugo wciskaç przycisk
„do przodu“ ) wzgl´dnie „do ty∏u“ 8, a˝ znajdà si´ Paƒstwo w pobli˝u ˝àdanej
cz´stotliwoÊci.
ZAPAMI¢TYWANIE STACJI RADIOWYCH [ » MEMORY « ]
Wie˝a KH 2300 mo˝e zapami´taç do 40 stacji radiowych (20 FM (UKW) / 20 MW (AM)).
01) Nastawiç ˝àdanà stacj´ radiowà zgodnie z metodà opisanà w rozdziale “Automatyczne / r´czne wyszukiwanie stacji
radiowych”.
02) Wcisnàç raz przycisk MEMORY/CLK-ADJ
\. Na wyÊwietlaczu @ pojawi si´ z lewej strony na 5 sekund wskaênik
miejsca zapisu stacji. W ciàgu tych 5 sekund muszà Paƒstwo wykonaç nast´pny krok, w przeciwnym razie na
wyÊwietlaczu pojawi si´ standardowe wskazanie. W takim przypadku prosz´ ponownie wcisnàç przycisk
MEMORY/CLK-ADJ
\.
03) Tyle razy wcisnàç przycisk M-UP/REPEAT =, a˝ nie pojawi si´ ˝àdane miejsce zapisu stacji (1 do 20).
Prosz´ powtórzyç tà procedur´ dla wszystkich ˝àdanych stacji radiowych.
WYBÓR ZAPAMI¢TANYCH STACJI RADIOWYCH
Podczas pracy radia tyle razy wcisnàç przycisk M-UP/REPEAT =, a˝ nie pojawi si´ na wyÊwietlaczu @ miejsce zapisu
˝àdanej stacji radiowej.
ODTWARZACZ CD
OSTRO˚NIE! W odtwarzaczu CD dêwi´k z p∏yty CD odczytuje s∏aby, ale silnie zogniskowany promieƒ lasera.
W przypadku niew∏aÊciwego pos∏ugiwania si´ urzàdzeniem promieƒ lasera mo˝e stanowiç zagro˝enie dla oczu –
w ˝adnym razie nie otwieraç urzàdzenia!
WK¸ADANIE P¸YTY CD
01) Aby otworzyç kieszeƒ na p∏yt´ CD !, pociàgnàç do przodu za górnà kraw´dê kieszeni.
02) W∏o˝yç p∏yt´ CD odpowiednià stronà do urzàdzenia. Gdy p∏yta CD jest prawid∏owo w∏o˝ona, widaç jej zadrukowanà
stron´. P∏yt´ CD nale˝y nasunàç na (znajdujàcà si´ poÊrodku) oÊ.
03) Zamknàç kieszeƒ na p∏yt´ CD !.
55
Page 56

04) Przyciskiem wyboru urzàdzenia * wybraç odtwarzacz CD. Na wyÊwietlaczu @ pokazuje si´ ca∏kowity czas odtwarzania
oraz liczba utworów.
UWAGA: JeÊli po w∏o˝eniu p∏yty CD na wyÊwietlaczu nie pojawi si´ liczba utworów ani ca∏kowity czas odtwarzania,
oznacza to, ˝e prawdopodobnie p∏yta CD jest êle w∏o˝ona wzgl´dnie zabrudzona. Nale˝y oczyÊciç p∏yt´ CD Êciereczkà
do czyszczenia p∏yt CD wzgl´dnie w∏o˝yç prawid∏owo p∏yt´ CD i ponownie sprawdziç wskazanie wyÊwietlacza.
PODSTAWOWE FUNKCJE ODTWARZACZA CD
• ROZPOCZ¢CIE ODTWARZANIA: Wcisnàç przycisk PLAY/PAUSE & – rozpoczyna si´ odtwarzanie.
• PRZERWANIE ODTWARZANIA (PRZERWA): Wcisnàç przycisk PLAY/PAUSE
& – odtwarzanie zostaje przerwane.
Na wyÊwietlaczu miga czas odtwarzania @. Ponowne wciÊni´cie przycisku PLAY/PAUSE & powoduje wznowienie
odtwarzania.
• ZAKO¡CZENIE ODTWARZANIA: Wcisnàç przycisk
7 STOP – odtwarzanie zostaje zakoƒczone.
• PRZESKAKIWANIE UTWORÓW DO PRZODU: Z ka˝dym wciÊni´ciem przycisku „do przodu“ ) przeskakuje
si´ do przodu jeden utwór.
• PRZESKAKIWANIE UTWORÓW DO TY¸U: Z ka˝dym wciÊni´ciem przycisku
„do ty∏u“ 8 przeskakuje si´
do ty∏u jeden utwór.
• PRZEWIJANIE DO PRZODU: Przytrzymaç przycisk „do przodu“ ), aby przewinàç utwór do przodu.
• PRZEWIJANIE DO TY¸U: Przytrzymaç przycisk
„do ty∏u“ 8, aby przewinàç utwór do ty∏u.
Kieszeƒ na p∏yt´ CD ! mo˝e zostaç w ka˝dej chwili otwarta. Odtwarzanie przerywane jest wówczas automatycznie.
P∏yt´ CD mo˝na wyjàç dopiero wówczas, gdy si´ ona ca∏kowicie zatrzyma.
PROGRAMOWANIE KOLEJNOÂCI UTWORÓW [ » TRACK MEMORY « ]
Programowanie kolejnoÊci utworów mo˝liwe jest tylko wówczas, gdy p∏yta CD nie jest odtwarzana. Mogà Paƒstwo
zaprogramowaç kolejnoÊç do 20 utworów.
01) W∏o˝yç p∏yt´ CD
02) Przyciskiem wyboru urzàdzenia
* wybraç odtwarzacz CD.
03) Wcisnàç przycisk MEMORY/CLK-ADJ \. Na wyÊwietlaczu @ pojawi si´ napis TRACK MEMORY.
04) Przy u˝yciu przycisków
„do przodu“ ) wzgl´dnie „do ty∏u“ 8 wybraç numer utworu, który ma byç wykonywany
jako pierwszy.
05) Wcisnàç przycisk MEMORY/CLK-ADJ \. Utwór zapisany zostaje na pierwszym miejscu (P-01).
Prosz´ powtórzyç kroki od 3) do 5) dla maksymalnie 20 utworów. Mogà Paƒstwo zaprogramowaç jeden utwór
wielokrotnie.
Zaprogramowana kolejnoÊç utworów pozostaje tak d∏ugo zachowana, a˝ nie wyjmà Paƒstwo p∏yty CD z przegrody CD,
nie wybiorà innej funkcji wzgl´dnie nie wy∏àczà urzàdzenia.
URUCHAMIANIE ODTWARZANIA UTWORÓW W ZAPROGRAMOWANEJ KOLEJNOÂCI
01) Wcisnàç przycisk MEMORY/CLK-ADJ \. Na wyÊwietlaczu @ pojawi si´ napis TRACK MEMORY oraz
zaprogramowane utwory.
02) Wcisnàç przycisk PLAY/PAUSE
& – rozpoczyna si´ odtwarzanie i przebiega w zaprogramowanej przez Paƒstwa
kolejnoÊci.
03) Aby skasowaç zaprogramowanà kolejnoÊç, nale˝y wcisnàç przycisk STOP 7.
FUNKCJA POWTARZANIA [ » REPEAT « ]
• Aby powtórzyç wszystkie utwory z danej p∏yty CD, nale˝y wcisnàç przycisk M-UP/REPEAT =. Na wyÊwietlaczu @
pojawia si´ napis REPEAT.
• Aby powtórzyç pojedynczy utwór, nale˝y 2 razy wcisnàç przycisk M-UP/REPEAT
=, gdy ˝àdany utwór jest odtwarzany.
Na wyÊwietlaczu
@ miga napis REPEAT.
• Aby powtórzyç utwory w zaprogramowanej kolejnoÊci, nale˝y wcisnàç przycisk M-UP/REPEAT
=, gdy utwory
odtwarzane sà w zaprogramowanej kolejnoÊci.
Na wyÊwietlaczu @ pojawia si´ napis REPEAT.
• Aby wy∏àczyç funkcj´ powtarzania, nale˝y tyle razy wcisnàç przycisk M-UP/REPEAT =, a˝ z wyÊwietlacza @zniknie
napis REPEAT.
ODTWARZANIE UTWORÓW W PRZYPADKOWEJ KOLEJNOÂCI [ » RANDOM « ]
Przy u˝yciu funkcji RANDOM wybierana jest przypadkowa kolejnoÊç utworów.
01) W∏o˝yç p∏yt´ CD.
02) Przyciskiem wyboru urzàdzenia * wybraç odtwarzacz CD.
03) Wcisnàç przycisk RANDOM
(. Na wyÊwietlaczu @ pojawia si´ napis RANDOM.
04) Wcisnàç przycisk PLAY/PAUSE & – rozpoczyna si´ odtwarzanie utworów w dowolnej kolejnoÊci.
56
Page 57

MAGNETOFON
WK¸ADANIE KASETY
01) Otworzyç do przodu klap´ ochronnà +. Za klapà znajdujà si´ przyciski obs∏ugi magnetofonu (oraz przy∏àcze s∏uchawek).
02) Aby otworzyç kieszeƒ na kaset´, wcisnàç przycisk `. Kieszeƒ na kaset´ otwiera si´ automatycznie.
03) W∏o˝yç kaset´ taÊmà magnetofonowà do do∏u. TaÊma magnetofonowa powinna byç napi´ta i nie poplàtana.
04) Zamknàç kieszeƒ na kaset´.
05) Przyciskiem wyboru urzàdzenia
* wybraç magnetofon (TAPE).
PODSTAWOWE FUNKCJE MAGNETOFONU
• ROZPOCZ¢CIE ODTWARZANIA: Wcisnàç przycisk 3 – rozpoczyna si´ odtwarzanie.
• PRZERWANIE ODTWARZANIA (PRZERWA): Wcisnàç przycisk | – odtwarzanie zostaje przerwane. Ponowne
wciÊni´cie przycisku
| powoduje wznowienie odtwarzania.
• ZAKO¡CZENIE ODTWARZANIA: Wcisnàç przycisk ` STOP – odtwarzanie zostaje zakoƒczone.
• PRZEWIJANIE DO PRZODU: Wcisnàç przycisk 1.
• PRZEWIJANIE DO TY¸U: Wcisnàç przycisk
2.
NAGRYWANIE NA KASET¢
Wie˝a KH 2300 wyposa˝ona jest w automatyczny system regulowania nagrywania. Zmiana g∏oÊnoÊci wzgl´dnie
wybór dêwi´ku nie ma wp∏ywu na nagrywanie.
01) W∏o˝yç kaset´ i ewentualnie przewinàç jà do miejsca, od którego winno rozpoczàç si´ nagrywanie.
02) Wcisnàç przycisk (PRZERWA-) |.
03) Wcisnàç przycisk (NAGRYWANIE-)
4. Automatycznie w∏àczony zostaje równie˝ przycisk 3.
04) Wcisnàç odpowiednio oznaczony przycisk *, aby wybraç urzàdzenie wzgl´dnie êród∏o dêwi´ku, z którego ma
odbywaç si´ nagrywanie.
05) Zwolnienie przycisku (PRZERWA-) | powoduje rozpocz´cie nagrywania.
06) Nagrywanie mo˝na zakoƒczyç wciskajàc przycisk
`.
CZYSZCZENIE G¸OWIC
Do czyszczenia g∏owic oraz prowadnicy taÊmy magnetofonowej nale˝y stosowaç regularnie odpowiednià kaset´
czyszczàcà.
DEKLARACJA ZGODNOCI
My, tzn. Kompernaß Handelsgesellschaft mbh, Burgstr. 21, D-44867 Bochum, Niemcy
oÊwiadczamy niniejszym zgodnoÊç niniejszego produktu z nast´pujàcymi dyrektywami EG:
OdpowiednioÊç elektromagnetyczna: 89/336 EEC (EMC Directive)
Stosowane normy zharmonizowane: EN 55013:06.90+A12:08.94+A13:12.96
EN 55020:12.94+A11:12.96
EN 61000-3-2:04.95+A1:1998+A2:1998
EN 61000-3-3:01.95
OkreÊlenie: KH 2300
WIE˚A DESIGN Z PIONOWYM ODTWARZACZEM CD
Bochum, 31.08.2002
Hans Kompernaß, dyrektor
57
Page 58

TÄRKEITÄ TURVALLISUUSOHJEITA
Seuraavat perustavanlaatuiset turvallisuusohjeet täytyy ottaa huomioon elektronisten laitteiden käytössä jokaisessa tapauksessa:
Lue seuraavat tiedot tarkkaan läpi turvallisuutta ja asianmukaista käyttöä varten. Käännä ennen lukemista kuvien kanssa
oleva sivu esiin ja tutustu myöhemmin laitteen kaikkiin toimintoihin. Säilytä tämä ohje huolellisesti ja anna se tarvittaessa
edelleen kolmannelle henkilölle.
Älä ota laitetta käyttöön, jos verkkopistoke, verkkokaapeli tai laite on vaurioitunut.
Jos laite on pudonnut, annan sähköalan ammattimiehen tarkistaa se ensin, ennen kuin otat sen jälleen käyttöön.
Laitteen sisällä on vaarallisia jännitteitä. Älä milloinkaan avaa koteloa tai laita esineitä sisään tuuletusaukkojen kautta.
Vältä nesteen joutumista laitteeseen. Vedä hätätapauksessa verkkopistoke heti irti.
Vedä samoin pistoke pistorasiasta, jos käytön aikana esiintyy häiriöitä, sekä myös ennen laitteen puhdistamista.
Älä suorita itse muutoksia tai korjauksia laitteella. Myöskään liitäntäjohtoa ei saa itse vaihtaa. Anna vain ammattikorjaamon
tai huoltokeskuksen suorittaa korjaukset laitteelle tai liitäntäjohdolle.
Asiaankuulumattomista korjauksista voi aiheutua käyttäjälle huomattavia vaaroja.
Lapset usein aliarvioivat sähkölaitteisiin liittyvät vaarat. Älä milloinkaan jätä lapsia yksin sähkölaitteiden läheisyyteen.
Älä käytä laitetta ilman silmälläpitoa.
Laitetta ei saa käyttää kosteissa tiloissa (esim. kylpyhuone) tai hyvin pölyisissä olosuhteissa.
Laitteen sisälle patoutunut kuumuus voi johtaa vikaan tai laitteen palamiseen.
Älä siksi aseta tätä laitetta alttiiksi äärimmäisille lämpötiloille:
– vältä suoraa auringonsäteilyä ja kuumentamista
– laitteen tuuletusrakoja ei saa peittää
– jätä sivuille tyhjää tilaa n. 10 cm, jos suinkin mahdollista
Laitetta ei saa asettaa syttyvän materiaalin välittömään läheisyyteen (esim. ikkunaverhot, palavat nesteet, jne.).
Kun Design-laitteisto joutuu kylmästä lämpimään (esim. kuljetuksen jälkeen), voi sisään muodostua kondenssivettä.
Jotta Design-laitteisto suojellaan vahingoilta, kytke se päälle aikaisintaan 2 tunnin kuluttua.
Ukkossäällä sähköverkkoon liitetyt laitteet voivat vaurioitua. Vedä siksi ukkossäällä pistoke aina irti pistorasiasta.
Laitteen täydellistä virransyötöstä erottamista varten pistoke täytyy vetää irti pistorasiasta. Ota tällöin aina kiinni pistokkeesta eikä
milloinkaan kaapelista.
Suojaa liitäntäjohto kuumilta pinnoilta tai muilta vaurioilta, äläkä kurista johtoa.
Tarkasta liitäntäjohto säännöllisesti mahdollisten vaurioiden varalta.
Pura liitäntäjohto kokonaan käyttöön.
Huolehdi, ettei liitäntäjohtoon kompastella.
Pidempien poissaolojen yhteydessä vedä verkkopistoke irti ja ota paristot pois kauko-ohjaimesta.
Laite on suunniteltu yksityiskäyttöön.
Ohje: Design-laitteisto on varustettu liukumattomilla kumijaloilla. Koska alustat ovat mitä erilaisimmista materiaaleista ja niitä
käsitellään mitä erilaisimmalla hoitoaineilla, ei voida täysin sulkea pois, että monet näistä aineista sisältävät aineosia, joihin kumijalat
tarttuvat ja pehmittävät niitä. Laita tarvittaessa liukumaton alusta jalkojen alle.
Ympäristönsuojelu:
Älä milloinkaan käytä yhdessä käytettyjä ja uusia paristoja. Älä hävitä käytettyjä paristoja talousjätteessä
luontomme säästämiseksi, vaan toimita ne asianmukaisiin keräyspaikkoihin.
ASENTAMINEN JA LIITTÄMINEN
Noudata ehdottomasti esitettyjä ohjeita ennen kuin Design-laitteisto otetaan ensimmäisen kerran käyttöön. Pistä verkkokaapeli
vasta lopuksi pistorasiaan.
01) Ota Design-laitteisto ja kovaääniset varovasti pois paketista.
02) Valitse Design-laitteistoa varten sopiva paikka, jonka tulee olla
… vaakasuora
… kuiva ja pölytön
… erillään lämmityslaitteista tai auringonpaisteesta.
03) TÄRKEÄÄ: Poista kaikki kuljetusvarmistimet /teipit CD- ja kasettilokerosta !
Avaa CD-lokero
! vetämällä yläreunasta ja poista punainen kuljetusvarmistin (sulje sen jälkeen CD-lokero uudelleen).
04) Liitä molemmat kovaääniset. Kovaäänisliitännät Y on merkitty (L=VASEN / R=OIKEA).
Neuvoja kovaäänisten sijoitteluun:
Kovaääniset on asetettava mahdollisuuksien mukaan päänkorkeudelle
Kovaäänisiä ei tule peittää ikkunaverhoilla tai esineillä
Kovaääniset on yleensä asetettava hyllyyn niin, että etuaukko päättyy etummaiseen hyllynreunaan.
Kumisemisen välttämiseksi mahdollisesti on syytä laittaa kumilevy kovaäänisten alle.
05) Käytä ulkoisen laitteen (esim. levysoitin) liittämiseen Cinch-liitäntöjä U.
06) Liitä ULA-radiovastaanottoa varten 75 ohmin antenni (taloantenni tai kaapeliliitäntä) antenniliitäntään O. Jos tätä ei ole
käytettävissä, pistä mukana toimitettu heittoantenni antenniliitännän keskikosketukseen O.
MW-vastaanottoantenni on asennettu laitteen sisään.
58
Page 59

7) Liitä nyt verkkopistoke 230 V pistorasiaan.
8) Laita paristot (eivät sisälly toimituslaajuuteen) sisään kauko-ohjaimeen (2x AA Mignon LR6 1,5 V):
– Avaa kauko-ohjaimen takapuolella oleva kansi
– Laita paristot sisään. Huomioi tällöin oikea napaisuus (katso paristokotelon pohjamerkintä)
– Sulje kansi uudelleen
SEINÄASENNUS
Design-laitteisto siihen kuuluvine kovaäänisineen voidaan asentaa seinään.
Asianmukaiset ruuvit ja seinäkiinnittimet sisältyvät toimitukseen. Asenna laite kiinteään seinään.
Ruuvin reiät on porattava 14 cm välein toisistaan.
Jotta ruuvit voivat tarttua oikein Design-laitteiston ja kovaäänisten takaosan pidikkeisiin P, ruuvinkantojen täytyy pistää esiin
noin 3 mm seinästä.
KÄYTTÖELEMENTIT
! CD-lokero 6 Kasettilokero
@ Näyttö 7 Stop-painike (CD)
# Vastaanotin kauko-ohjaimen signaaleille 8 Taaksepäin-painike (*)
$ Painike Mono/Stereo (vain ULA-radiokäyttö) 9 Näytön vaihto
% Äänivalintakytkin 0 TIMER-painike
^ Äänen pysäytys/mykistämiskytkentä (Mute) - SLEEP-painike
& CD-esitys/Pause = M-UP/REPEAT-PAINIKE (*)
* Laitevalintapainikkeet \ MUISTI (MEMORY) /CLK-ADJ-painike (*)
( RANDOM-painike Q Äänenvoimakkuuden vähentäminen
) Eteenpäin-painike W Äänenvoimakkuuden lisääminen
_ Aaltoalueen valinta (ULA/MW) E PÄÄLLE-/POIS-valmiina (Stand-By) –painike
+ Suojakotelo R Tilailmaisin
| Tauko-painike (Pause) (vain kasetti) T Vahvavirtapistoke
` Stop/ulosheitto -painike (vain kasetti) Y Kovaäänisliitännät
1 Eteenpäinkelaus (vain kasetti) U Cinch-liitännät ulkoiselle laitteelle (AUX)
2 Takaisinkelaus (vain kasetti) I Kohinan vaimennuksen kiinnitys (vain kasetti)
3 Esitys-painike (vain kasetti) O Antenniliitäntä
4 Nauhoitus-painike (vain kasetti) P Ripustuslaite seinäasennukseen
5 Kuulokeliitäntä
Tällä merkillä (*) merkityt käyttöelementit on kytketty aina laitevalinnan mukaan (esim. radio- tai CD-käyttö) useisiin erilaisiin
toimintoihin. Lue vastaavat kappaleet.
Käyttöelementit
| - 4 ja I ovat yksinomaan kasettinauhurikäyttöä varten.
KÄYTTÖ
PÄÄLLE – JA POISKYTKEMINEN [ » POWER / STAND-BY « ]
• Kun verkkopistoke laitetaan sisään, laite on Valmiustilassa (Stand-By). Käyttönäyttö R palaa punaisena.
• Paina PÄÄLLE-/POIS-painiketta E. Laite on nyt Käyttötilassa. Käyttönäyttö R palaa vihreänä.
• Palauta valmiustila painamalla PÄÄLLE-/POIS-painiketta E uudelleen.
• Pidempien poissaolojen yhteydessä vedä verkkopistoke irti.
LAITTEEN /ÄÄNILÄHTEEN VALITSEMINEN [ » CD / TUNER / TAPE / AUX « ]
• Laitetta valitessasi ja äänilähdettä vaihtaessasi paina vastaavasti merkittyä painiketta *:
CD = CD-soitin TUNER = Radio TAPE = Kasettinauhuri AUX = ulkoinen laite, esim. levysoitin
ÄÄNENVOIMAKKUUDEN ASETTAMINEN [ » VOLUME / MUTE « ]
• Äänenvoimakkuutta nostetaan painikkeella W.
• Äänenvoimakkuutta lasketaan painikkeella Q.
• Tonstop-painikkeen
^ painalluksella kovaääninen ja kuuloke kytketän pois päältä (mykistäminen).
59
Page 60

SOINNIN ASETTAMINEN [ » CLASSIC / ROCK / POP « ]
Soinninvalintapainikkeella % voidaan sovittaa tiettyyn musiikkisuuntaan kuuluvan kappaleen soinnin laatu ja siten nostaa
kuuntelunautintoa. Kulloinenkin valittu asetus CLASSIC, ROCK tai POP näytetään näytössä
@ (ei näyttöä = neutraali sointi).
KUULOKKEET [ » PHONES « ]
Kuulokeliitäntään 5 voidaan kytkeä stereokuuloke 8-32 Ohmin 3,5 mm jakkipistoke. Heti kun kuuloke on pistetty sisään, kovaääniset
kytketään pois päältä. Ota huomioon, että liian korkea äänenvoimakkuus johtaa vakaviin kuulovaurioihin.
KELLON ASETUS
01) Jotta voit asettaa kellonajan, laitteen täytyy olla Valmiustilassa (Stand-By) (Käyttönäyttö R palaa punaisena).
02) Paina MEMORY/CLK-ADJ-painiketta \ kerran – tuntinäyttö vilkkuu.
03) Tunnit asetetaan painikkeilla
eteenpäin ) ja taaksepäin 8.
04) Paina MEMORY/CLK-ADJ-painiketta \ uudelleen – minuuttinäyttö vilkkuu.
05) Minuutit asetetaan näyttöön painikkeilla eteenpäin ) ja taaksepäin 8.
06) Paina MEMORY/CLK-ADJ-painiketta
\ uudelleen – näyttö lopettaa vilkkumisen ja kello käy ( ”Kaksoispiste” vilkkuu).
PÄÄLLE- JA POISKYTKENTÄAJAN ASETTAMINEN [ » TIMER « ]
Kun aktivoit päälle kytkentäajan, voit joka hetki antaa Design-laitteen herättää sinut.
01) Valitse vastaavalla painikkeella * haluamasi laite/äänilähde (CD, TAPE tai TUNER).
02) Valmistele äänilähde, t.s. aseta TUNERilla (RADIO) haluttu asema, pane kasetti sisään nauhuria (TAPE) käyttäessäsi ja kelaa
haluamaasi paikkaan tai pane CD sisään ja ohjelmoi tarvittaessa kappalejärjestys.
03) Paina TIMER-painiketta
0. Näytössä @ näytetään TIMER.
OHJE: Seuraavia vaiheita varten sinulla 5 sekuntia aikaa kutakin varten. Muussa tapauksessa tapahtuma keskeytetään.
Aloita sitten uudelleen vaiheesta 4).
04) Paina painiketta
9 MODE/REMAIN 2 kertaa. Näyttöön @ ilmestyy aikanäyttö ja siinä näkyy vilkkuen TIMER ON.
05) Paina MEMORY/CLK-ADJ-painiketta \ kerran – tuntinäyttö vilkkuu.
06) Aseta tunnit painikkeilla
eteenpäin ) ja taaksepäin 8.
07) Paina uudelleen MEMORY/CLK-ADJ-painiketta \ – minuuttinäyttö vilkkuu.
08) Aseta minuutit painikkeilla eteenpäin ) ja taaksepäin 8.
09) Paina MEMORY/CLK-ADJ-painiketta \ uudelleen – päälle kytkentäaika on nyt tallennettu.
10) Jos haluat kasettiherätyksen: paina Esitys-painiketta
3.
11) Kytke lopuksi Design-laite pois päältä (PÄÄLLE-/POIS-painike E).
Kun aktivoit poiskytkentäajan, Design-laite kytkee laitteen aina pois päältä kytkemisaikaan.
01) Paina TIMER-painiketta
0. Näytössä @ näytetään TIMER.
OHJE: Seuraavia vaiheita varten käytettävissä on 5 sekuntia aikaa kutakin varten. Muussa tapauksessa tapahtuma
keskeytetään. Aloita sitten uudelleen vaiheesta 2).
02) Paina painiketta
9 MODE/REMAIN 3 kertaa. Näyttöön @ ilmestyy aikanäyttö ja TIMER OFF vilkkuu.
03) Paina MEMORY/CLK-ADJ-painiketta \ kerran – tuntinäyttö vilkkuu.
04) Aseta tunti painikkeilla eteenpäin ) ja taaksepäin 8.
05) Paina MEMORY/CLK-ADJ-painiketta
\ uudelleen – minuuttinäyttö vilkkuu.
06) Aseta minuutit painikkeilla eteenpäin ) ja taaksepäin 8.
07) Paina MEMORY/CLK-ADJ-painiketta \ uudelleen – poiskytkentäaika on nyt tallennettu.
Paina TIMER-toimintojen poiskytkemistä varten TIMER-painiketta
0 niin usein, kunnes näytössä @ TIMER himmenetään.
UNI-TOIMINNON AKTIVOIMINEN [ » SLEEP « ]
Voit määrittää ajan välillä 90 ja 10 minuuttia, minkä jälkeen laite pannaan pois päältä.
• Poiskytkentäajan aktivoimiseksi 90 minuutin kuluttua paina SLEEP-painiketta - lyhyesti kerran.
• Lyhyemmän poiskytkentäajan voit asettaa pitämällä SLEEP-painiketta
- painettuna, kunnes haluttu aika ilmestyy näyttöön.
• Uni-toiminnon voit kytkeä pois päältä painamalla SLEEP-painiketta - niin usein, kunnes näytössä @ SLEEP on himmennetty.
60
Page 61

RADIO
ANTENNIN SUORISTAMINEN
ULA-vastaanottoon käytetään heittoantennia:
• heittoantennin täytyy olla kokonaan rullattu auki
• määritä kokeilemalla heittoantennin paras sijainti
• kiinnitä heittoantenni tarvittaessa liimanauhalla seinään.
Määritä MW-vastaanottoa varten paras sijainti laitteeseen sisäänrakennetulle antennille niin ikään kokeilemalla.
RADIOKÄYTÖN / TAAJUUSALUEEN (ULA/MW) VALITSEMINEN
01) Valitse laitevalintapainikkeella * TUNER (=Radio).
02) Vaihda taajuusvalintapainikkeella
_ välillä ULA (FM) ja keskiaallot (AM).
AUTOMAATTINEN ASEMANHAKU / KÄSIHAKU
Automaattisessa asemanhaussa taajuutta nostetaan tai lasketaan niin pitkään, kunnes löydetään riittävällä vastaanottovoimakkuudella
oleva asema.
01) Pidä painiketta eteenpäin ) tai taaksepäin 8 noin 1 sekunti painettuna – haku alkaa ja loppuu automaattisesti.
02) Haun uudelleen käynnistämistä varten pidä painiketta
eteenpäin ) tai taaksepäin 8 vielä kerran n. 1 sekunti painettuna.
Manuaalista asemanhakua voit käyttää hienoviritykseen tai jos tiedät aseman taajuuden.
01) Paina painiketta eteenpäin ) tai taaksepäin 8 kerrallaan vain lyhyesti, jotta nostat tai lasket taajuutta pienin askelin.
02) Pidä päiniketta
eteenpäin ) tai taaksepäin 8 niin kauan painettuna, kunnes olet tullut halutun taajuuden läheisyyteen.
ASEMAN TALLENTAMINEN [ » MEMORY « ]
Design-laite KH 2300 voi tallentaa 40 asemaan saakka (20 ULA / 20 MW).
01) Aseta haluttu asema, kuten alla kuvataan kohdassa “Automaattinen asemanhaku / käsihaku ”.
02) Paina MEMORY/CLK-ADJ-painiketta \ kerran. Näyttöön @ ilmestyy 5 sekunnin ajaksi vasemmalle puolelle näyttö ohjelmapaikkaa
varten. Tämän 5 sekunnin kuluessa täytyy suorittaa seuraava askel, muutoin laite vaihtaa jälleen normaalinäyttöön. Paina tässä
tapauksessa uudelleen MEMORY/CLK-ADJ -painiketta
\ .
03) Paina M-UP/REPEAT-painiketta = niin usein, kunnes haluttu ohjelmapaikka (1 - 20) näytetään.
Toista tämä menettely kaikille muille halutuille asemille, jotka pitää tallentaa.
TALLENNETUN ASEMAN VALINTA
Paina radiokäytössä M-UP/REPEAT-painiketta = niin usein, kunnes haluttu ohjelmapaikka tallennetun aseman kanssa ilmestyy
näyttöön @.
CD-SOITIN
VAARA! CD-soittimessa heikko, mutta teräväksi niputettu lasersäde pyyhkii sisäänlaitetun CD-levyn pintaa. Asiaankuulumattomassa
käytössä tämä säde voi olla vaaraksi silmälle – älä missään tapauksessa avaa laitetta!
CD:N SISÄÄNLAITTO
01) CD-lokero ! avataan vetämällä yläreuna eteen.
02) Laita CD sisään äänitetty puoli laitetta kohden. Näet oikein sisäänlaitetulla CD:llä myös painetun puolen. CD täytyy työntää kestävästi
akselille (keskellä sijaitseva).
03) Sulje CD-lokero !.
04) Valitse laitevalintapainikkeella
* CD-soitin. Näytössä @ esitetään kokonaissoittoaika ja kappaleiden lukumäärä.
OHJE: Jos CD:n sisäänlaittamisen jälkeen näytössä ei esitetä kappaleiden lukumäärää eikä CD kokonaissoittoaikaa, CD on
mahdollisesti laitettu sisään ylösalaisin käännettynä tai se on likaantunut. Puhdista CD-levy CD-puhdistusliinalla tai laita CD
oikein sisään ja tarkista näyttö uudelleen.
61
Page 62

CD-SOITTIMEN PERUSTOIMINNOT
• ESITYKSEN KÄYNNISTÄMINEN: Paina & PLAY/PAUSE – esitys käynnistyy.
• ESITYKSEN KESKEYTTÄMINEN (PAUSE): Paina painiketta & PLAY/PAUSE – esitys keskeytetään. Näytössä @ vilkkuu soiton
kestoaika. Esitys jatkuu painamalla uudelleen painiketta & PLAY/PAUSE.
• ESITYKSEN PYSÄYTTÄMINEN: Paina painiketta 7 STOP – esitys lopetetaan.
• KAPPALEEN HYPPY ETEENPÄIN: Painikkeella
eteenpäin ) jokaisella painalluksella hypätään yksi kappale eteenpäin.
• KAPPALEEN HYPPY TAAKSEPÄIN: Painikkeella taaksepäin 8 jokaisella painalluksella hypätään yksi kappale taaksepäin.
• ETEENPÄIN: Pidä eteenpäin ) -painiketta painettuna siirtyäksesi kesken kappaletta eteenpäin.
• TAAKSEPÄIN: Pidä
taaksepäin 8 -painiketta painettuna siirtyäksesi kesken kappaletta taaksepäin.
CD-lokero ! voidaan avata joka hetki. Esitys pysähtyy silloin automaattisesti. Ota CD pois vasta, kun se on täysin pysähtynyt.
KAPPALEJÄRJESTYKSEN OHJELMOIMINEN [ » TRACK MEMORY « ]
Kappalejärjestyksen ohjelmointi on mahdollista vain pysäytetyllä CD:llä. Enintään 20 kappaletta voidaan ohjelmoida.
01) Laita CD sisään
02) Valitse CD-soitin laitevalintapainikkeella CD
*.
03) Paina MEMORY/CLK-ADJ-painiketta \. Näyttöön @ ilmestyy TRACK MEMORY.
04) Valitse painikkeella eteenpäin ) tai taaksepäin 8 kappaleen numero, joka pitää soittaa ensiksi.
05) Paina MEMORY/CLK-ADJ-painiketta
\. Kappale on nyt ensimmäisellä ohjelmapaikalla (P-01) tallennettuna.
Toista vaiheet 3) - 5) aina 20 kappaleeseen saakka. Voit ohjelmoida saman kappaleen myös useamman kerran.
Ohjelmoitu kappalejärjestys pysyy tallennettuna niin pitkään, kunnes CD poistetaan, CD-lokerolle valitaan toinen toiminto tai
laite kytketään pois päältä.
OHJELMOIDUN KAPPALEJÄRJESTYKSEN KÄYNNISTÄMINEN
01) Paina MEMORY/CLK-ADJ-painiketta \. Näyttöön @ ilmestyy TRACK MEMORY ja ohjelmoidut kappaleet.
02) Paina & PLAY/PAUSE-painiketta – esitys käynnistyy ja tapahtuu ohjelmoidussa järjestyksessä.
03) Poista ohjelmointi painamalla painiketta 7 STOP.
TOISTO-TOIMINNOT [ » REPEAT « ]
• CD:n kaikkien kappaleiden toistamista varten paina, M-UP/REPEAT-painiketta =. Näyttöön @ ilmestyy REPEAT.
Yhden ainoan kappaleen toistamista varten paina, M-UP/REPEAT-painiketta
= 2 kertaa halutun kappaleen soidessa. Näytössä @
vilkkuu REPEAT.
• Ohjelmoidun kappalejärjestyksen toistoa varten paina M-UP/REPEAT-painiketta = ohjelmoidun kappalejärjestyksen esityksen aikana.
Näyttöön
@ ilmestyy REPEAT.
• Toisto-toiminnon poiskytkemistä varten paina M-UP/REPEAT-painiketta = niin usein, kunnes näytössä @ REPEAT himmennetään.
KAPPAALEEN SOITTAMINEN SATUNNAISESSA JÄRJESTYKSESSÄ [ » RANDOM « ]
RANDOM-toiminnolla valitaan sisään laitetun CD:n kappalejärjestys satunnaiseksi.
01) Laita CD sisään
02) Valitse CD-soitin laitevalintapainikkeella CD
*.
03) Paina RANDOM-painiketta (. Näyttöön @ ilmestyy RANDOM.
04) Paina painiketta & PLAY/PAUSE – esitys käynnistyy satunnaisessa järjestyksessä.
KASETTINAUHURI
KASETIN SISÄÄN LAITTO
01) Avaa suojakotelo + eteenpäin. Sen takana ovat kasettinauhurin käyttöpainikkeet (ja kuulokeliitäntä).
02) Kasettilokero avataan painamalla painiketta `. Kasettilokero avautuu automaattisesti.
03) Laita kasetti sisään nauhapuoli alaspäin. Nauhan tulee olla kireä ja ilman mutkia.
04) Sulje kasettilokero.
05) Valitse kasettinauhuri laitevalintapainikkeella
* TAPE.
62
Page 63

KASETTINAUHURIN PERUSTOIMINNOT
• ESITYKSEN KÄYNNISTÄMINEN: Paina painiketta 3 – esitys käynnistyy.
• ESITYKSEN KESKEYTTÄMINEN (PAUSE): Paina painiketta | – esitys keskeytetään. Esitys jatkuu painamalla painiketta |
uudelleen.
• ESITYKSEN PYSÄYTTÄMINEN: Paina painiketta ` STOP – esitys pysäytetään.
• ETEENPÄINKELAUS: Paina painiketta
1.
• TAKAISINPÄINKELAUS: Paina painiketta 2.
KASETTIEN NAUHOITUS
Design-laitteisto KH 2300 on varustettu automaattisella ohjauksella. Äänenvoimakkuuden tai äänenvärin muutoksilla ei ole vaikutusta
nauhoitukseen.
01) Laita kasetti sisään ja kelaa tarvittaessa paikkaan, josta nauhoituksen tulee alkaa.
02) Paina (PAUSE-) painiketta
|.
03) Paina NAUHOITUS- painiketta 4. Painike 3 pysyy automaattisesti painettuna.
04) Nauhoitukseen tarkoitettu laite tai äänilähde valitaan painamalla vastaavasti merkittyä painiketta
*.
05) Vapauttamalla TAUKO- (PAUSE-) painike | nauhoitus aloitetaan.
06) Nauhoitus päätetään painamalla painiketta `.
ÄÄNIPÄIDEN PUHDISTUS
Käytä äänipäiden ja nauhaohjausosien puhdistukseen säännöllisesti vastaavaa puhdistuskasettia.
KONFORMITEETTISELVITYS
Me, Kompernaß Handelsgesellschaft mbH, Burgstr. 21, D-44867 Bochum, selitämme tämä tuotteen yhdenmukaisuuden
seuraavien EY-ohjesääntöjen kanssa:
Sähkömagneettinen mukautuvaisuus: 89/336 EEC (EMC Directive)
Sovelletut harmonisoidut normit: EN 55013:06.90+A12:08.94+A13:12.96
EN 55020:12.94+A11:12.96
EN 61000-3-2:04.95+A1:1998+A2:1998
EN 61000-3-3:01.95
Konetyyppi/tyyppi/Koneen määritelmä: KH 2300
DESIGN-LAITTEISTO PYSTY-CD-SOITTIMELLA
Bochum, 31.08.2002
Hans Kompernaß - toimitusjohtaja -
63
Page 64

VIKTIGA SÄKERHETSANVISNINGAR
Följande grundläggande säkerhetsanvisningar skall alltid iakttas vid hantering av elektrisk utrustning och apparater:
Läs noga igenom nedanstående säkerhetsinformation och information för avsedd användning. Vik ut sidan med bilderna
och ha den till hands när du läser igenom anvisningarna och gör dig bekant med anläggningens funktioner. Förvara dessa
anvisningar lättillgängliga och låt dem följa med apparaten om den lämnas vidare till tredje man.
Använd inte anläggningen om nätkontakten, nätsladden eller anläggningen är skadad.
Låt en radiohandlare kontrollera anläggningen innan du använder den om anläggningen av misstag ramlat i golvet eller på annat sätt
fått stötskador.
Anläggningens inre har stark spänning. Öppna aldrig anläggningen och stoppa inte in föremål genom ventilationsöppningarna.
Se till att inte vätska tränger in i anläggningen. Dra omedelbart ut nätkontakten vid nödfall.
Dra ut nätkontakten om störningar förekommer i anläggningen och före rengöring av anläggningen.
Gör inte själv förändringar eller reparationer på anläggningen. Du skall heller inte byta anslutningssladden själv. Låt alltid en
radiohandlare eller kundtjänst utföra reparationer eller sladdbyten på anläggningen. Icke sakkunnigt genomförda reparationer
kan medföra svåra risker för användaren.
Mindre barn förstår inte farorna som lurar i samband med elektriska apparater. Håll därför alltid mindre barn på tryggt avstånd.
Använd aldrig anläggningen utan uppsikt.
Anläggningen får inte användas i fuktiga utrymmen (t.ex. badrum) eller rum med stark dammbildning.
Värmen som samlas inne i anläggningen kan medföra fel eller brand i anläggningen.
Utsätt inte anläggningen för extrema temperaturer:
– Undvik direkt solljus eller värmepåverkan.
– Täck inte över anläggningens ventilationsöppningar.
– Lämna minst 10 cm frirum på varje sida om anläggningen.
Placera inte anläggningen i omedelbar närhet till eldfarliga material (t.ex. draperier, brännbara vätskor osv.).
Använd inte anläggningen direkt när du kommer in i varmare rum t.ex. utifrån kyla till uppvärmd lägenhet (kondensproblem). Använd
anläggningen först efter två timmar för att undvika skador.
En ansluten anläggning kan ta skada av strömstötar under åskväder. Dra alltid ut nätkontakten och ta ur antennens kontakt när det
åskar.
Nätkontakten måste dra ur vägguttaget helt och hållet för att strömtillförseln skall vara bruten. Dra inte i sladden för att dra ut
kontakten, ta tag i kontakten.
Skydda anslutningssladden för varma ytor eller annan skada och se till att sladden inte kommer i kläm.
Kontrollera regelbundet att inte anslutningssladden skadad.
Veckla ut anslutningssladden helt och hållet före användning.
Se till att inte anslutningssladden blir snubbeltråd.
Dra ut nätkontakten och ta ur batterierna ur fjärrkontrollen om anläggningen inte skall användas under längre tid.
Anläggningen är konstruerad för privat bruk.
T
ips: Design-anläggningen är utrustad med stadiga gummifötter. Eftersom golvytor kan bestå av olika material och behandlas
med olika rengöringsmedel, kan man inte utgå från att dessa material eller medel innehåller ämnen som angriper och skadar
gummifötterna. Lägg eventuellt ett stadigt underlag under fötterna.
Tänk på miljön:
Använd aldrig förbrukade och nya batterier samtidigt. Avfallshantera förbrukade batterier enligt miljölagen,
kasta inte
förbrukade batterier i hushållssoporna utan lämna dem på därför avsedd uppsamlingsplats.
PLACERING OCH ANSLUTNING
Följ absolut nedanstående anvisningar innan du använder Design-anläggningen första gången. Anslut alltid nätsladden sist.
01) Ta ur Design-anläggningen och högtalarna försiktigt ur förpackningen.
02) Placera din Design-anläggningen på lämplig plats, den bör vara
… horisontal
… torr och dammfri
… och inte i närheten av värmekällor eller i direkt solljus.
03) VIKTIGT: Ta bort alla transportsäkringar och tejpbitar på CD-spelaren och kassettfacket.
Öppna CD-facket
! genom att dra i den övre kanten och ta bort den röda transportsäkringen (stäng CD-facket igen).
04) Anslut de båda högtalarna. Anslutningarna Y för högtalarna är märkta med L=LEFT/VÄNSTER / R=RIGHT/HÖGER.
T
ips vid placering av högtalare:
Placera högtalarna i huvudhöjd.
Häng inga gardiner eller draperier framför högtalarna.
Skjut in högtalarna i en hylla och låt inte högtalarens framkant hänga över hyllkanten.
Lägg ev. en gummiplatta under högtalarna för att undvika störande buller.
64
S
Page 65

05) Använd Cinch-anslutningarna U för anslutning av extern utrustning, t.ex. en skivspelare.
06) Anslut en 75 Ohm antenn (husets antenn eller kabelantenn) till antennuttaget
O för radiomottagning FM. Finns ingen husantenn
eller kabelantenn, anslut den medlevererade antennen till uttaget O.
Antenn för mottagning av AM finns inbyggd i anläggningen.
07) Anslut nätkontakten till vägguttag med 230 V.
08) Lägg in batterier i fjärrkontrollen (2 x AA Mignon LR6 1,5 V)(medlevereras inte).
– Öppna locket på fjärrkontrollens baksida.
– Lägg in batterierna. Kontrollera att polerna placeras riktigt (se beskrivning i batterifackets botten).
– Stäng locket igen.
VÄGGMONTERING
Design-anläggningen med tillhörande högtalare kan monteras på vägg.
Skruvar och väggfästen finns medlevererade. Montera anläggningen vertikalt på en stabil vägg.
Skruvhålen skall borras med 14 cms mellanrum
.
För att skruvarna skall hamna rätt i fästena P på Design-anläggningens baksida och högtalarna sitta stadigt måste skruvhuvudet
sticka ut 3 mm från väggen.
DE OLIKA DELARNA
! CD-fack 6 Kassettfack
@ Display 7 Stoppknapp (CD)
# Mottagare för signal från fjärrkont. 8 Bakåtknapp (*)
$ Knapp Mono/Stereo (endast FM) 9 Växla läge
% Equalizer 0 TIMER-knapp
^ Tonstopp/Stummkoppling - SLEEP-knapp
& CD Uppspelning/Paus = M-UP/REPEAT-knapp (*)
* Växla funktion \ MEMORY/CLK-ADJ-knapp(*)
( RANDOM-knapp Q Minska volym
) Framåtknapp W Öka volym
_ Stationsknapp (FM/AM) E PÅ/AV (Stand-By) -knapp
+ Skydd R Indikator
| Pausknapp (endast kassett) T Nätkontakt
` Stopp/Kassett ut (endast kassett) Y Högtalaranslutningar
1 Spola framåt (endast kassett) U Cinch-anslutning för extern utrustning (AUX)
2 Spola tillbaka (endast kassett) I Brusreducering inspelning (endast kassett)
3 Uppspelningsknapp (endast kassett) O Antennanslutning
4 Inspelningsknapp (endast kassett) P Fästen för väggmontering
5 Anslutning för hörlurar
Knapparna märkta med (*) har, beroende på vald funktion, (t.ex. radio eller CD) flera olika funktioner. Läs igenom de olika kapitlen
ordentligt.
Knapparna
| till 4 och I används uteslutande för kassettspelaren.
ANVÄNDNING
PÅ/AV [ » POWER / STAND-BY « ]
• Om nätkontakten är ansluten står anläggningen i Stand-By-läge. Indikatorn R lyser röd.
• Tryck PÅ/AV E. Anläggningen är nu färdig för användning. Indikatorn R lyser grön.
• Tryck på PÅ/AV E igen för att återgå till Stand-By-läge.
• Dra ut nätkontakten om inte anläggningen skall användas under längre tid.
VÄLJA LÄGE [ » CD / TUNER / TAPE / AUX « ]
• Tryck på motsvarande knapp * för att välja funktion:
CD = CD-spelare, TUNER = Radio, TAPE = kassettspelare, AUX = extern utrustning, t.ex. skivspelare.
65
S
Page 66

STÄLLA IN VOLYM [ » VOLUME / MUTE « ]
• Du ökar volymen med knappen W.
• Du minskar volymen med
knappen Q.
• Tryck tonstoppsknappen ^, högtalarna och hörlurar kopplas ur (stummkoppling).
STÄLLA IN LJUDNIVÅ/EQUALIZER [ » CLASSIC / ROCK / POP « ]
Med Equalizer-knappen % kan du anpassa ljudkvaliteten till den musik du spelar och därmed öka musiknöjet. Den valda inställningen
CLASSIC, ROCK eller POP visas i displayen @ (ingen visning = neutral kvalitet).
HÖRLURAR [ » PHONES « ]
Stereohörlurar med 8-32 Ohm och 3,5 mms kontakt kan anslutas till hörlursuttaget 5. När hörlurarna ansluts, tystnar högtalarna
Kontrollera att volymen inte är för hög. Hög volym kan medföra hörselskador.
STÄLLA IN KLOCKA
01) Anläggningen skall stå i Stand-By-läge (indikatorn R lyser röd) för att du skall kunna ställa in klockan.
02) Tryck MEMORY/CLK-ADJ-knappen \ en gång – timmarna blinkar.
03) Ställ in timmar med knapparna framåt ) resp. bakåt 8.
04) Tryck MEMORY/CLK-ADJ-knappen
\ igen – minuterna blinkar.
05) Ställ in minuter med knapparna framåt ) resp. bakåt 8.
06) Tryck MEMORY/CLK-ADJ-knappen \ igen – displayen slutar att blinka och klockan går normalt (kolon blinkar).
STÄLLA IN TIMERN [ » TIMER « ]
Om du har ställt in timern kan du låta dig väckas av din Design-anläggning.
01) Välj läge med motsvarande knapp
* (CD eller TUNER ).
02) Förbered musik, dvs. ställ in önskad station på TUNER (RADIO), lägg i en kassett i kassettspelaren (TAPE) och spola fram till valfri
musik eller lägg in en CD och programmera ett CD-spår.
03) Tryck TIMER-knappen
0. Displayen @ visar TIMER.
OBS: Du har fem sekunder på dig att utföra inställningarna. Annars avbryts inställningarna.
Börja om från steg 4 om inställningarna avbryts.
04) Tryck knapp
9 MODE/REMAIN 2 gånger. Displayen @ visar tiden och TIMER ON blinkar.
05) Tryck MEMORY/CLK-ADJ-knappen \ en gång – timmarna blinkar.
06) Ställ in timmar med knapparna framåt ) resp. bakåt 8.
07) Tryck MEMORY/CLK-ADJ-knappen
\ igen – minuterna blinkar.
08) Ställ in minuter med knapparna framåt ) resp. bakåt 8.
09) Tryck MEMORY/CLK-ADJ-knappen \ igen – starttiden sparas.
10) När du vill väckas av musik från en kassett: Tryck uppspelningsknappen 3.
11) Stäng sedan av Design-anläggningen med PÅ/AV-knappen
E.
När du aktiverar avstängningstiden, stänger anläggningen av på inställd tid.
01) Tryck TIMER-knappen
0. Displayen @ visar TIMER.
OBS: Du har fem sekunder på dig att utföra inställningarna. Annars avbryts inställningarna.
Börja om från steg 2 om inställningarna avbryts.
02) Tryck MODE/REMAIN
9 tre gånger. Displayen @ visar tiden och TIMER OFF blinkar.
03) Tryck MEMORY/CLK-ADJ-knappen \ en gång – timmarna blinkar.
04) Ställ in timmar med knapparna framåt ) resp. bakåt 8.
05) Tryck MEMORY/CLK-ADJ-knappen \ igen – minuterna blinkar.
06) Ställ in minuter med knapparna framåt
) resp. bakåt 8.
07) Tryck MEMORY/CLK-ADJ-knappen \ igen – avstängningstiden sparas.
Tryck TIMER-knappen
0 tills TIMER slocknar i displayen @ för att stänga av TIMER-funktionen.
AKTIVERA INSOMNINGSFUNKTION [ » SLEEP « ]
Du kan välja en tid mellan 90 minuter och 10 minuter när anläggningen skall stänga av.
• Tryck SLEEP-knappen - en gång kort för att aktivera en avstängningstid efter 90 minuter.
• Håll SLEEP-knappen - intryckt tills önskad tid visas i displayen för att ställa in en kortare avstängningstid.
• Tryck SLEEP-knappen
- tills SLEEP slocknar i displayen @ för att stänga av insomningsfunktionen.
66
S
Page 67

RADIO
RIKTA ANTENNEN
Om du använder en antenn för mottagningen av UKW (FM)-radio:
• Antennen måste vara helt utrullad.
• Ställ in antennen för bästa mottagning.
• Sätt fast antennen i väggen, ev. med en tejpbit.
I anläggningen finns en inbyggd mellanvågsantenn. Flytta ev. på anläggningen för att uppnå bästa mottagning.
VÄLJ RADIOLÄGE / BAND (FM/AM)
01) Välj radioläge med knappen * TUNER (=Radio).
02) Växla mellan UKW (FM) och mellanvåg (AM) med stationsknappen
_.
AUTOMATISK STATIONSSÖKNING / MANUELL SÖKNING
Den automatiska stationssökningen letar efter en station med bästa mottagning uppåt och nedåt i frekvenserna.
01) Håll knappen framåt ) resp. bakåt 8 intryckt i ca. 1 sekund – sökningen startar och stannar automatiskt.
02) Tryck knapparna framåt ) resp. bakåt 8 igen ca. 1 sekund för att starta sökningen igen.
Den manuella sökningen används när du vill finjustera inställningen eller när du vet vilken frekvens du vill ställa in.
01) Tryck kort på framåt
) resp. bakåt 8 för att öka eller minska frekvensen stegvis.
02) Håll knapparna framåt ) resp. bakåt 8 så länge intryckta tills du kommer i närheten av den önskade frekvensen.
SPARA STATION [ » MEMORY « ]
Design-anläggningen KH 2300 kan spara upp till 40 stationer (20 UKW(FM) / 20 MW(AM)).
01) Ställ in önskad station som i avsnitt "Automatisk stationssökning/Manuell sökning.
02) Tryck MEMORY/CLK-ADJ-knappen
\ en gång. I displayens vänstra sida @ visas programplatsen i fem sekunder.
Utför nästa steg inom fem sekunder annars återgår displayen till normal visning igen.
Tryck i detta fall på MEMORY/CLK-ADJ-knappen
\ igen.
03) Tryck M-UP/REPEAT-knappen = tills önskad programplats (1 till 20) visas.
Upprepa detta för alla stationer som skall ställas in.
VÄLJ SPARAD STATION
Tryck M-UP/REPEAT-knappen = i radioläge tills önskad sparad programplats visas i displayen @.
CD-SPELARE
FARA! CD-spelaren använder en svag men starkt koncentrerad laserstråle för uppspelning av CD-spår. Vid inkorrekt hantering
av denna laserstråle kan ögonskador uppstå – Öppna aldrig anläggningen !
LÄGGA IN CD
01) Dra i CD-fackets övre kant för att öppna CD-facket !.
02) Lägg in CD:n i spelaren med den inspelade sidan nedåt. En korrekt inlagd CD har den tryckta sidan uppåt. CD:n skall skjutas
över axeln (i mitten).
03) Stäng CD-facket
!.
04) Välj CD-läge med knappen *. Den totala uppspelningstiden och antalet CD-spår visas i displayen @.
TIPS: Om inte antalet CD-spår eller den totala uppspelningstiden visas i displayen är CD:n antingen inlagd åt fel håll eller smutsig.
Rengör CD:n med en rengöringsduk för CD-skivor resp. lägg in CD ordentligt och starta igen. Kontrollera att displayen visar korrekt
CD-spår och uppspelningstid.
GRUNDFUNKTIONER FÖR CD-SPELAREN
• STARTA UPPSPELNING: Tryck knappen PLAY/PAUSE & – uppspelningen startar.
• AVBRYT UPPSPELNINGEN (PAUSE): Tryck knappen & PLAY/PAUSE – uppspelningen avbryts. Uppspelningstiden för CD-spåret
blinkar i displayen
@. Tryck knappen PLAY/PAUSE & igen och uppspelningen fortsätter.
• STOPPA UPPSPELNINGEN: Tryck knappen STOP 7 – uppspelningen stoppas.
• HOPPA ÖVER CD-SPÅR FRAMÅT: Tryck knappen framåt ), vid varje knapptryckning hoppar CD-spelaren till nästa spår.
• HOPPA ÖVER CD-SPÅR BAKÅT: Tryck knappen bakåt
8, vid varje knapptryckning hoppar CD-spelaren tillbaka till föregående
spår.
67
S
Page 68

• SNABBSPOLA FRAMÅT: Tryck knappen framåt ) intryckt för att snabbspola framåt i ett CD-spår.
• SNABBSPOLA BAKÅT: Tryck knappen bakåt 8 intryckt för att snabbspola bakåt i ett CD-spår.
CD-facket
! kan öppnas när som helst. Uppspelningen stannar då automatiskt. Ta ur CD:n när den stannat helt.
PROGRAMMERA CD-SPÅR [ » TRACK MEMORY « ]
Du kan endast programmera CD-spår om CD-spelaren står stilla. Du kan programmera in upp till 20 CD-spår.
01) Lägg in en CD.
02) Välj CD-läge med knappen *.
03) Tryck MEMORY/CLK-ADJ-knappen
\. Displayen @ visar TRACK MEMORY.
04) Välj siffran för det CD-spår som skall spelar först med knapparna framåt ) resp. bakåt 8.
05) Tryck MEMORY/CLK-ADJ-knappen \. CD-spåret sparas nu på första programplats (P-01).
Upprepa steg 3) till 5) för upp till 20 CD-spår. Du kan också programmera ett CD-spår flera gånger.
Den programmerade ordningsföljden för CD-spåren sparas så länge CD:n ligger i CD-facket, en annan funktions väljs eller
anläggningen stängs av.
STARTA PROGRAMMERADE CD-SPÅR
01) Tryck MEMORY/CLK-ADJ-knappen \. Displayen @ visar TRACK MEMORY och de programmerade CD-spåren.
02) Tryck knappen PLAY/PAUSE
& – uppspelningen börjar och fortsätter i programmerad ordningsföljd.
03) Tryck knappen STOPP 7 för att radera programmeringen.
REPEATFUNKTION [ » REPEAT « ]
• Tryck knappen M-UP/REPEAT = för att upprepa alla CD-spår. Displayen @ visar REPEAT.
• Tryck knappen M-UP/REPEAT = två gånger när det önskade CD-spåret spelas upp för att upprepa det igen. Displayen @ blinkar
REPEAT.
• Tryck knappen M-UP/REPEAT
= när den programmerade ordningsföljden spelas upp för att upprepa de programmerade CD-spåren
igen. Displayen @ visar REPEAT.
• Tryck M-UP/REPEAT-knappen
= tills REPEAT slocknar i displayen @ för att stänga av Repeatfunktionen.
SPELA UPP CD-SPÅR SLUMPVIS [ » RANDOM « ]
Med RANDOM-funktionen spelas CD-spåren upp i slumpvis ordning.
01) Lägg in en CD.
02) Välj CD-läge med knappen *.
03) Tryck RANDOM-knappen
(. Displayen @ visar RANDOM.
04) Tryck knappen PLAY/PAUSE & – uppspelningen startar med slumpvis ordning.
KASSETTSPELARE
LÄGGA IN KASSETT
01) Öppna skyddet + framåt. Där bakom ligger knapparna för kassettspelaren (och anslutningen för hörlurar).
02) Tryck knappen ` för att öppna kassettfacket. Kassettfacket öppnas automatiskt.
03) Lägg in kassetten med bandsidan nedåt. Bandet skall vara spänt och utan slingor.
04) Stäng kassettfacket.
05) Välj kassettspelaren med knappen TAPE
*.
GRUNDFUNKTIONER FÖR KASSETTSPELAREN
• STARTA UPPSPELNING: Tryck knappen 3 – uppspelningen startar.
• AVBRYT UPPSPELNINGEN (PAUSE): Tryck knappen | – uppspelningen stoppas. Tryck knappen | igen och uppspelningen
fortsätter.
• STOPPA UPPSPELNINGEN: Tryck knappen STOP
` – uppspelningen stoppas.
• SPOLA FRAMÅT: Tryck knappen 1.
• SPOLA TILLBAKA: Tryck knappen 2.
68
S
Page 69

SPELA IN EN KASSETT
Design-anläggningen KH 2300 är utrustad med automatisk styrning. Om volymen eller musikkvaliteten förändras påverkas inte
inspelningen.
01) Lägg in en kassett och spola ev. fram till det ställe där inspelningen skall börja.
02) Tryck knappen (PAUSE-) |.
03) Tryck knappen (INSPELNING)
4. Knappen 3 trycks automatiskt med.
04) Tryck på motsvarande knapp * för att välja funktion:
05) Inspelningen startar när (PAUSE-) knappen | trycks upp.
06) Tryck knappen
` för att avsluta inspelningen.
RENGÖRA TONHUVUDET
Använd regelbundet en rengöringskassett för att rengöra tonhuvudena och bandstyrande delar i kassettspelaren.
KONFORMITETSDEKLARATION
Vi, Kompernaß Handelsgesellschaft mbH, Burgstr. 21, DE- 44867 Bochum, Tyskland förklarar härmed att denna produkt
överensstämmer med följande EU-riktlinjer:
Elektromagnetiske tolerans: 89/336 EEC (EMC Directive)
Använda harmoniserade normer: EN 55013:06.90+A12:08.94+A13:12.96
EN 55020:12.94+A11:12.96
EN 61000-3-2:04.95+A1:1998+A2:1998
EN 61000-3-3:01.95
Maskintyp/Typ: KH 2300
DESIGN-ANLÄGGNING MED VERTIKAL CD-SPELARE
Bochum, 2002-08-31
Hans Kompernaß - Verkställande Direktör-
69
S
Page 70

© graphic design, photos and translations
by ORFGEN Marketing & Communication · Essen, Germany
www.orfgen-nm.de
 Loading...