

Page 1

KOMPERNASS GMBH · BURGSTRASSE 21 · D-44867 BOCHUM
www.kompernass.com
ID-Nr.: KH2297-07/08-V2
KH 2297
CD CLOCK RADIO
3B
CD CLOCK RADIO
Operating instructions
PAΛIO-ΡΟΛΟΪ ΜΕ CD
Οδηγίες χρήσης
CV_KH22987_AR4456_LB3B.qxd 09.07.2008 10:18 Uhr Seite 1
Page 2
KH 2297
j
h
g
qwer ty u
i
o
a
s
df
kl;2)2!2@2#2$2%2^ 2& 2*
2(
3)
3! 3@ 3# 3$
CV_KH22987_AR4456_LB3B.qxd 09.07.2008 10:19 Uhr Seite 4
Page 3
INDEX PAGE
Safety instructions 2
Items supplied 3
Utilisation 3
Technical data 3
Operating elements 3
Providing the appliance with electricity 4
Operating the appliance 4
Playback of CDs 4
Listening to the radio 6
The alarm function 6
The sleep function 7
AUX Operation 7
Cleaning and Care 7
Troubleshooting 7
Disposal 8
CE- Conformity 8
Importer 8
Warranty and Service 8
Read these operating instructions carefully before using the appliance for the first time and preserve this booklet
for later reference. Pass this booklet on to whoever might acquire the appliance at a future date.
- 1 -
Page 4
Safety instructions
Danger
NEVER open the housing of the CD Clock-Radio. •
There are no operating elements inside. Arrange
for repairs to be carried out by qualified specialist
workshops that are approved and authorised by
us.
Do not place your CD Clock-Radio …•
... where it would be subject to direct sunlight!
Otherwise, the appliance could overheat and
be irreparably damaged. There is also a risk of
fire!
... in close adjacency to sources of heat. These
include for example fan heaters, stoves and
similar appliances as well as the ventilation
apertures of other electrical appliances! The
appliance could become irreparably damaged.
There is also a risk of fire!
... in damp environments or in the vicinity of water.
Do not place objects containing liquids, e.g.
flower vases, on or adjacent to the appliance.
Moisture could permeate into the appliance.
This could result in the risk of an electric shock
and/or of a fire!
... in places subject to intensive shocks or constant
vibrations. Intensive shocks and constant
vibrations can lead to temporary malfunctions
or permanent damage.
... in closed shelving or where curtains or furniture
could block the ventilation apertures. To ensure
sufficient ventilation for the appliance, allow for
a minimum distance on all sides of 10 cm from
other objects.
... on thick carpets or on a bed when it is in ope-
ration.
This appliance is not intended for use by individuals •
(including children) with restricted physical,
physiological or intellectual abilities or deficiences
in experience and/or knowledge unless they are
supervised by a person responsible for their safety
or receive from this person instruction in how the
appliance is to be used.
Children should be supervised to ensure that they •
do not play with the appliance. Packaging materials
can also be dangerous for children. Ensure that the
appliance packaging materials do not come into
the hands of children.
Caution:
Listening to music with headphones for
long periods and at high volume levels
can lead to hearing damage!
To avoid risks, arrange for defective power •
plugs and/or cables to be replaced at once by
qualified technicians or our Customer Service
Department. Always take hold of the power cable
by the plug. NEVER pull on the power cable itself.
NEVER take hold of the power cable with wet
hands, this could cause a short circuit or even a
potentially fatal electric shock. Do NOT place the
appliance itself, furniture items or similar objects
on the power cable and take steps to ensure it
cannot become jammed or trapped in any way.
NEVER make a knot in the power cable and do
NOT bind it together with other cables. Place the
power cable so that no one can stumble over it. A
damaged power cable can cause a fire or give
someone an electric shock.
This appliance is designed for operation with
an alternating current power supply of 230V/
50Hz. NEVER attempt to operate the appliance
with a different power source rating.
Should metallic objects or liquids penetrate into •
the appliance, immediately remove the plug
from the power socket and seek advice from a
specialist.
This CD Clock-Radio does not have a power switch. •
Thus, remove the plug from the power socket if
you do not intend to use it for an extended period.
To completely separate the appliance from mains
power, the plug MUST be removed from the wall
socket. The appliance should be positioned so that
you have unrestricted access to the power socket
at all times, enabling the plug to be immediately
withdrawn should an emergency situation arise.
Before a storm and/or a thunderstorm with a risk •
of lightning, please separate the appliance from
the electrical power source.
This appliance employs an invisible “Class 1
Laser” to scan the recorded material. NEVER
subject your eyes to direct contact with this
dangerous laser beam.
- 2 -
Page 5

Items supplied
CD Clock Radio•
Operating instructions•
Utilisation
This CD Clock-Radio is intended for exclusive
utilisation …
as an electronic entertainment appliance,•
for the reception of FM/VHF and AM/medium •
wave radio broadcasts,
for the playback of Compact Discs, •
and for domestic use only, it is not intended for •
commercial applications.
Technical data
Power supply :
Mains operation: 230 V ~ 50 Hz
Battery for data preservation: 9 V block battery
(6LR61)
Reception range:
VHF: 88 - 108 MHz
MW: 540– 1600 KHz
Power consumption:
in operation 9 W
in Standby: 2,5 W
Operating temperature: +5 ~ +35°C
Humidity: 5 ~ 90 %
(no condensation)
Dimensions (L x W x H): 22,5 x 17 x 9 cm
Weight : 1.2 kg approx.
Protection class: II /
Loudspeaker power output: 2 x 400 mW
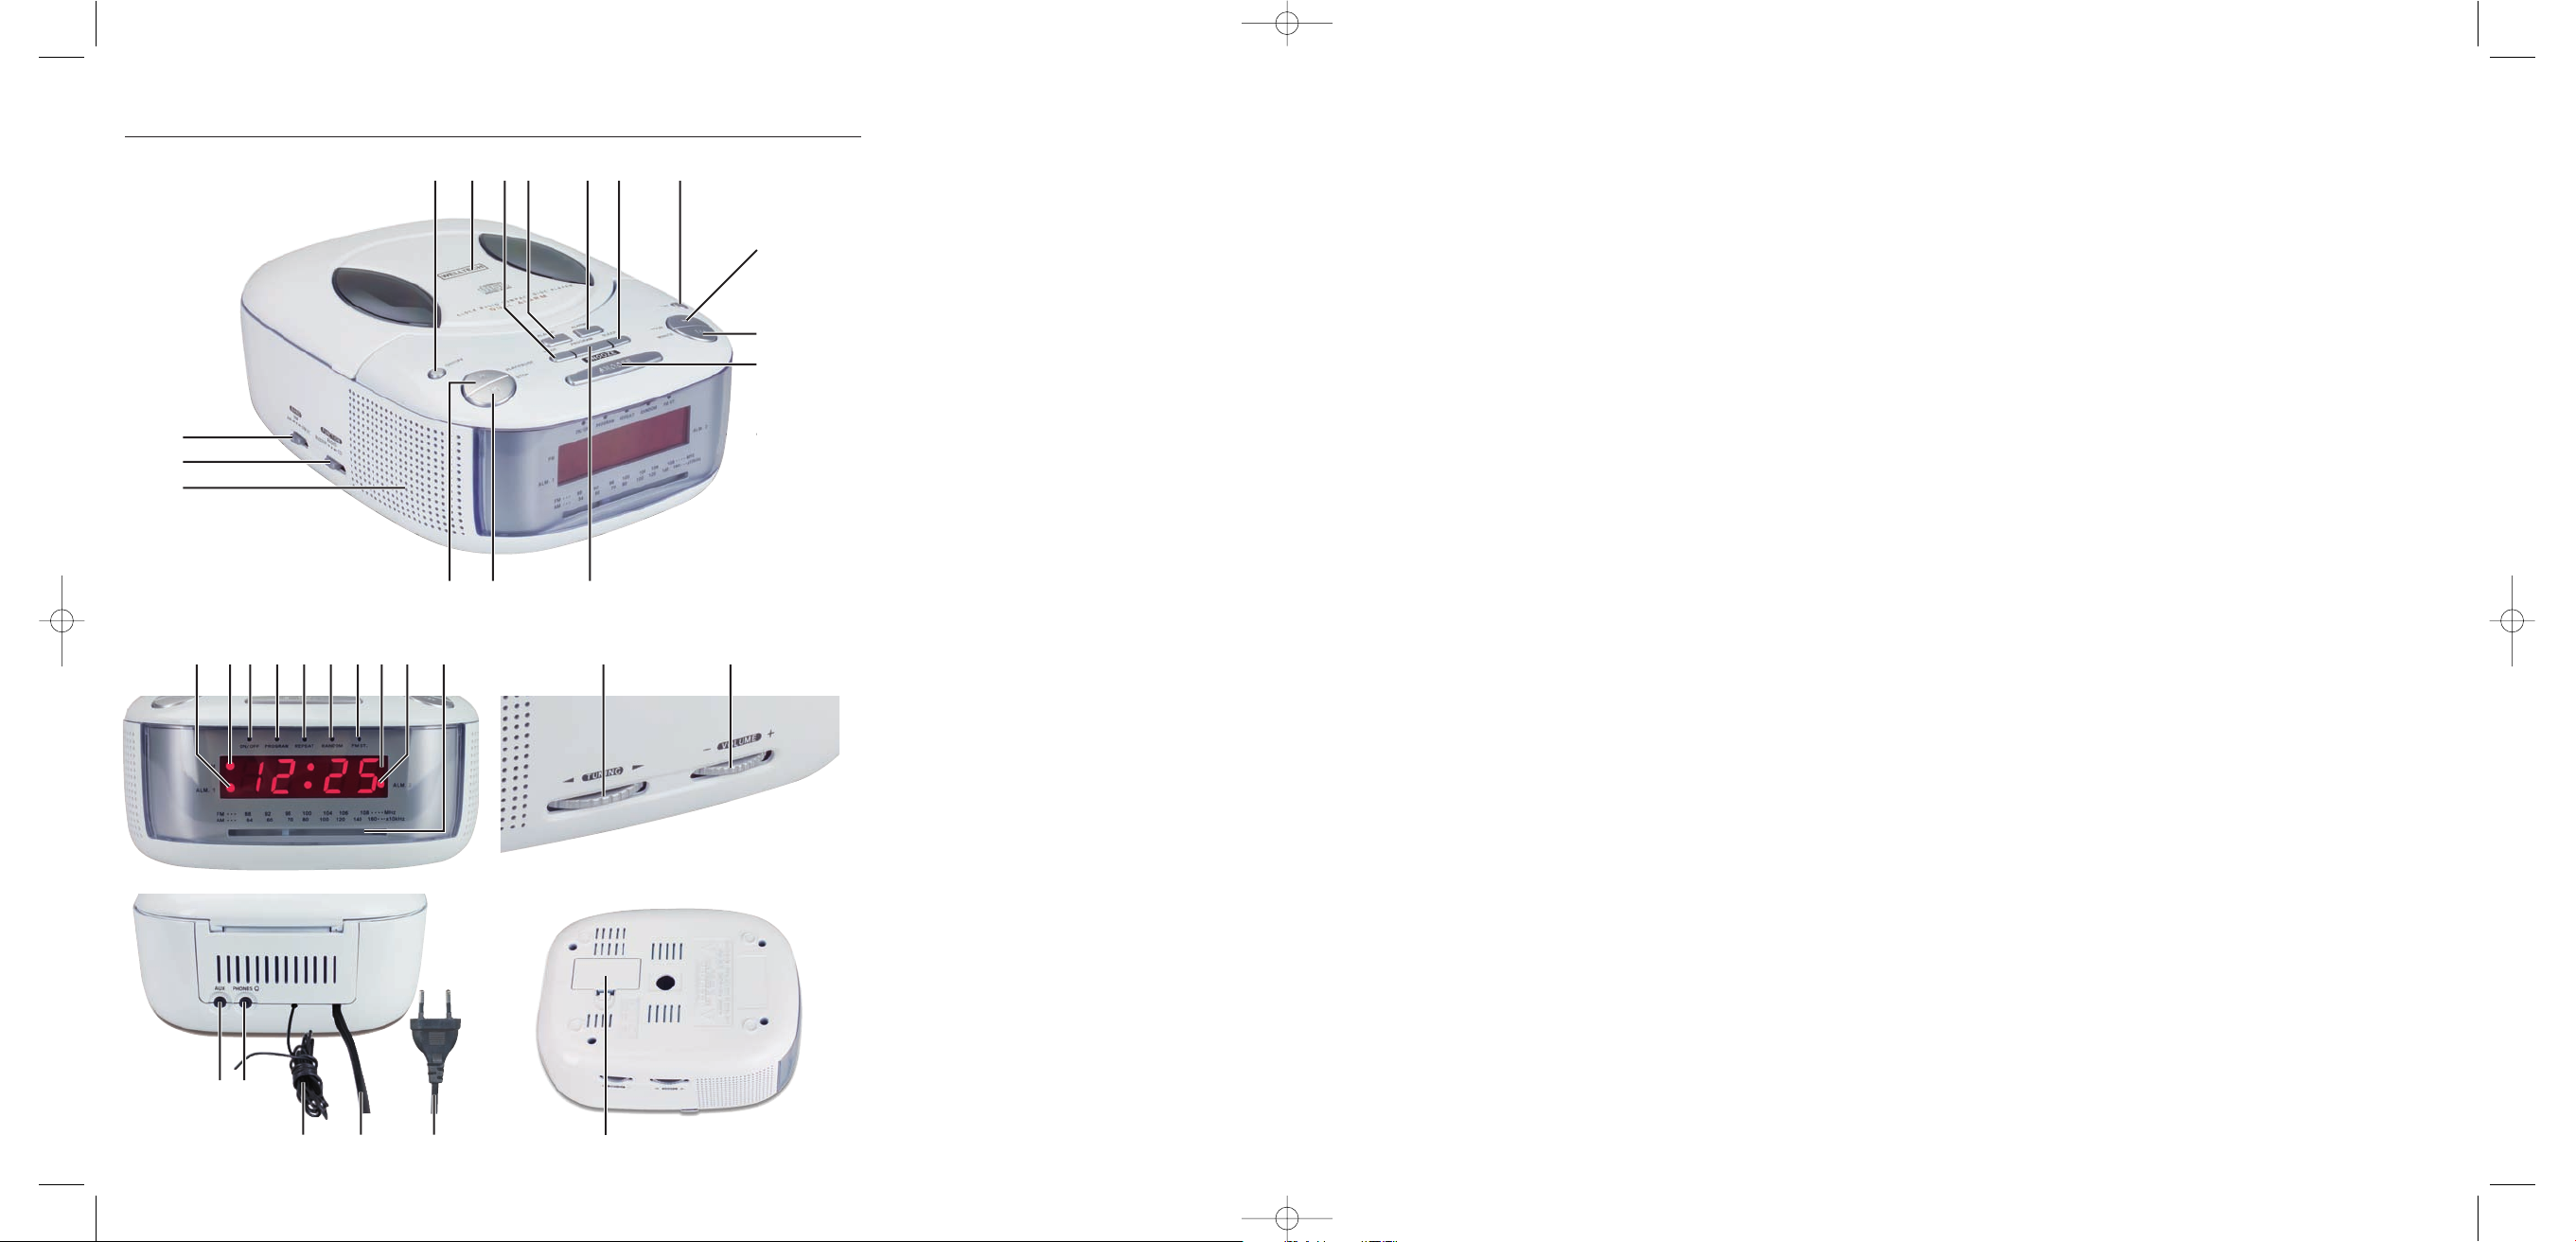
Operating elements
q Button - ON/OFF
w CD compartment lid
e Button - MODE
r Button - ALARM 1
t Button - ALARM 2
y Button - SLEEP
u Button - TIME
i Button - HOUR /
o Button - MINUTE /
1) Button - SNOOZE
1! Button - PROGRAM
1@ Button - STOP
1# Button - PLAY/PAUSE
1$ Loudspeaker
1% Switch - FUNCTION
1^ Switch - BAND
1& Display - ALM. 1
1* Display - PM
1( Display - ON/OFF
2) Display - PROGRAM
2! Display - REPEAT
2@ Display - RANDOM
2# Display - FM ST.
2$ Display
2% Display - ALM. 2
2^ Tuning scale
2& TUNING - Regulator
2* VOLUME - Regulator
2( AUX - Input
3) PHONES - Headphone connector
3! UKW - Wire aerial
3@ Power cable
3# Power plug
3$ Battery compartment lid
- 3 -
Page 6
Providing the appliance with
electricity
First of all, remove all packaging material from the
appliance. This appliance is designed for operation
with an alternating current power supply of 230V /
50 Hz. Connect the power cable
installed domestic power socket. The appliance is
now ready for use.
Battery for data preservation
Should the appliance be separated from the power
source, the programmings for time and alarm times
will be lost. If this happens during the night, then
the appliance will not be able to wake you in the
morning as wished. To avoid this eventuality, you
can place a 9V battery (not supplied) into the
battery compartment
appliance that, during a power failure, will preserve
the programmed data. Take note that during a
power failure the appliance cannot be used, even
with a battery in place, the battery serves only the
preservation of the time and the alarm settings. The
battery should be renewed annually.
3$ on the underside of the
3@ with a correctly
Switching the appliance on
If you wish to listen to the radio or play a CD, press
the button ON/OFF
In the display the operational indicator (ON/OFF,
q to switch the appliance on.
1() appears. Slide the function switch (FUNCTION
1%) to the position of the programme source that is to
be played by the appliance:
“CD” for CD playback, or•
„RADIO“ for radio reception.•
Press the button ON/OFF
radio off.
q again to switch the
Adjusting the volume
The volume regulator (VOLUME, 2*) is used to
set the desired playback sound volume. Turn the
regulator in the direction of the "+" sign to increase
the sound volume. Turn it in the direction of the "—"
sign to reduce the sound volume.
Using headphones
At the headphone socket (PHONES , 3)) you
can connect headphones with a 3.5 mm jack plug.
When they are connected, the built-in loudspeaker
1$ is automatically switched off.
Operating the appliance
Setting the time
After you have connected the appliance with the
power source, “12:00” blinks in the display
appliance can display the time in either the 12 hour
(AM/PM) or the 24 hour format. From the factory
it is set in the 12 hour format. To switch over to the
other format, press and hold the button TIME
ca. 2 seconds. Following this, the display
shows which time format you have just switched
over to.
Repeatedly press the button HOUR
pressed down, until the number of the current hour
is shown. Now repeatedly press the button MINUTE
o, or keep it pressed down, until the number of the
current minute is shown. Then press the button TIME
u. The programming of the time is now finished, the
numbers glow constantly.
2$. The
u for
2$ briefly
i, or keep it
Playback of CDs
In principle, this appliance plays back both AudioCDs and also CD-R(W) media produced on a
computer. However, due to the great variations in
blank discs, computer types, operating systems,
burning software and burning processes, we cannot
guarantee that every “burnt” disc can be played
back without problem.The appliance cannot play
back CD-ROM or DVD media.
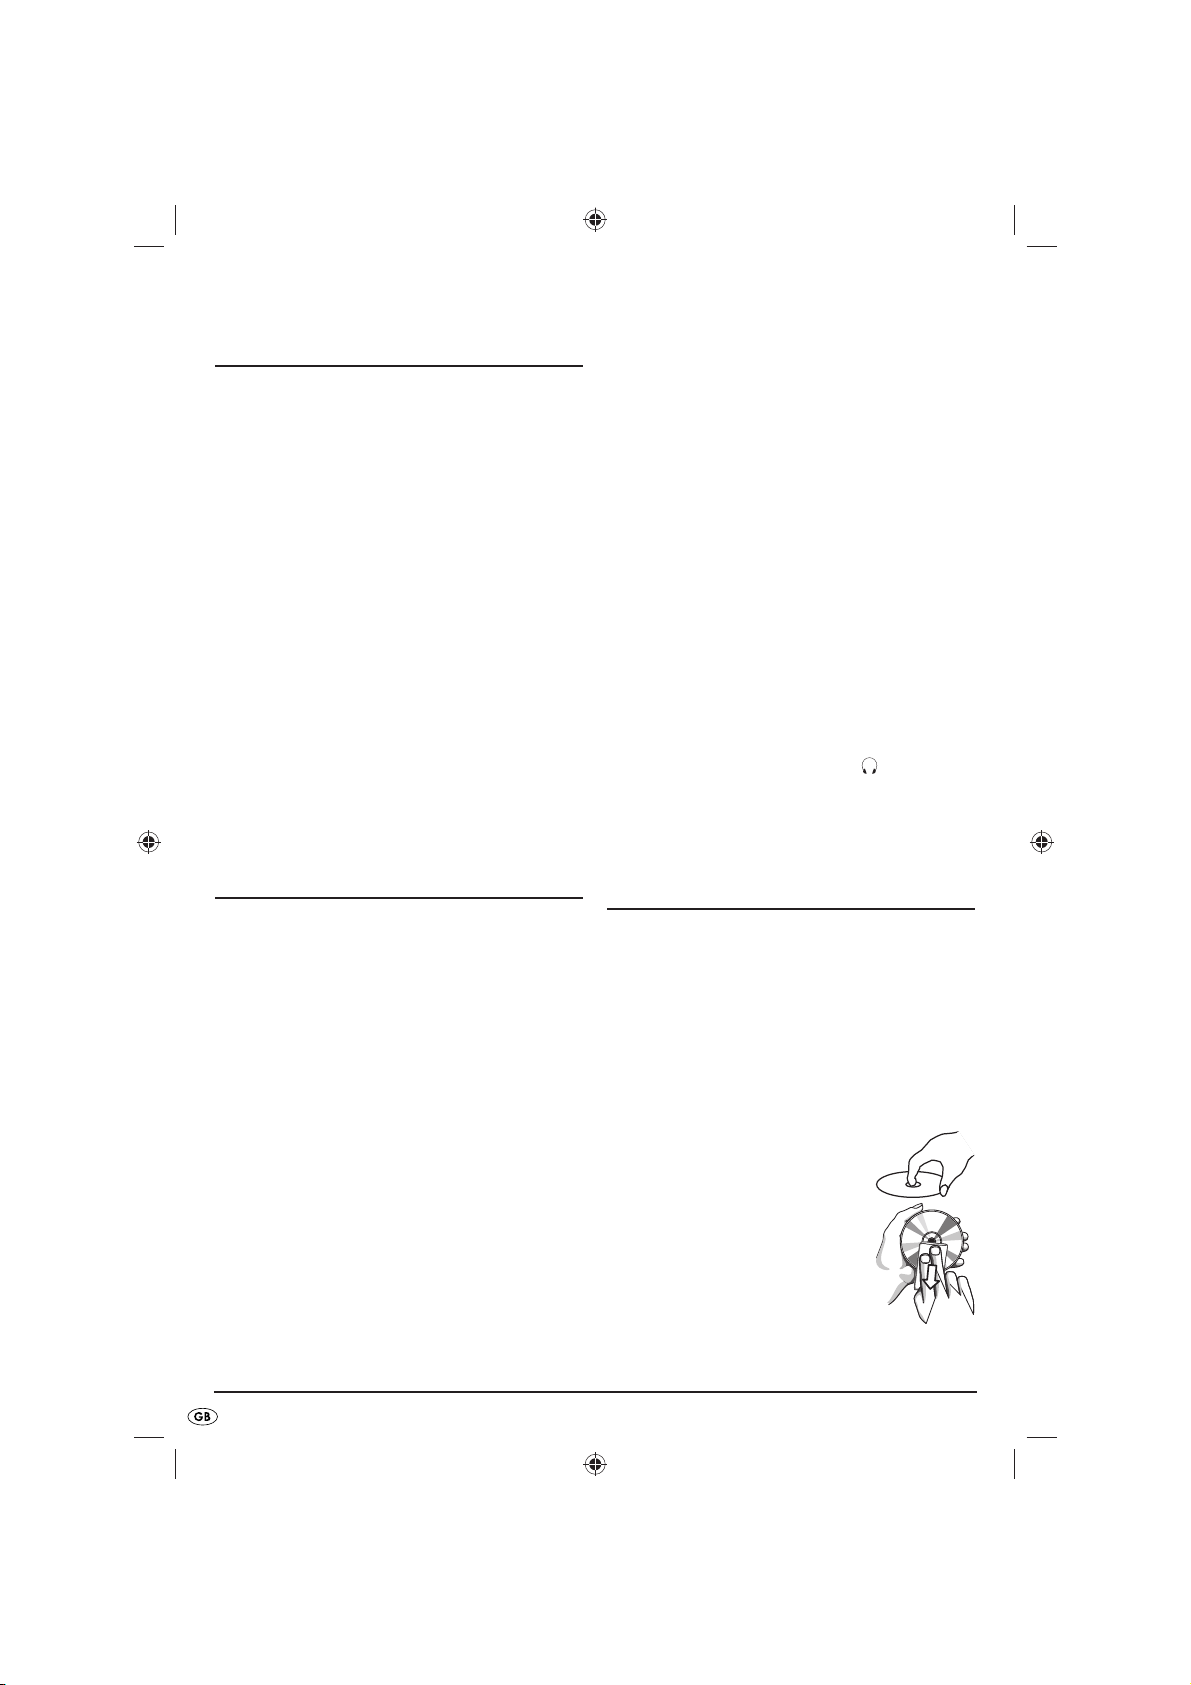
Optimal handling of CD’s
To avoid finger traces and •
contamination, take hold of CDs
only on the edges.
Carefully wipe dirtied CDs with •
a lightly moistened lint-free cloth,
from the middle to the edges.
Avoid circular movements! Do not
use solvents, they can damage the
CD.
- 4 -
Page 7

Abstain from putting labels and •
stickers on your CDs. They can cause
imbalances which will negatively
affect the playback and the
appliance.
Playback of CDs
Slide the function switch (FUNCTION • 1%) into the
CD position.
Open the CD compartment by •
lifting the CD compartment lid
w by its two lateral grips on
the sides.
Lay the CD with the printed
side upwards on the cone of
the CD tray. Press the centre
of the disc carefully with two
fingers onto the cone of the CD
tray, until it engages with an
audible click.
Close the CD compartment by •
carefully lowering the CD compartment lid
with your hand . The appliance now reads the
CD. When it has finished, the Display
the number of titles on the CD for ca. 3 seconds.
The appliance then displays the time once again.
To start playback, press the button PLAY/PAUSE •
1#. The display 2$ now briefly shows
the individual title number being played. If you
press this button again, playback is stopped and
the title number blinks for ca. 3 seconds in the
display
2$. The appliance then displays the time
once again. Playback continues by pressing the
button once more. The current title number is then
once again briefly displayed.
Playback is stopped when you once again press •
the button STOP
title is once again shown, and then the time.
1@. The number of the CD
2$ shows
w
Searching for a passage
During playback, press and hold down the o
or
i buttons to start a fast forward, () resp. fast
reverse (), in the search for a particular passage
in a title. The current title number is displayed during
the search. Playback continues when the button is
released, the title display extinguishes ca. 3 seconds
later.
Title repetition
During playback, if the button MODE e is pressed
once, the repetition indicator (REPEAT
display and the title currently being played back will
be repeated when it reaches the end. Nevertheless,
with the
different title.
If during playback you press the button MODE e twice,
the repeat indicator (REPEAT
in the display
repeated after it has been played through to the end.
Additionally, you can switch the appliance into the
desired repeat operation, with the button MODE
o or i buttons you can select a
2$ and the whole of the disc will be
2!) blinks in the
2!) glows constantly
e, before starting playback. You stop the individual
playback mode by pressing the button MODE
three times. You stop the disc-repeat playback mode
by pressing the button MODE
is then continued as normal. The appliance also
cancels the repeat modes when you finish playback
with the button STOP
1@.
e twice. Playback
e
Playback of titles in a random order
If the appliance is required to playback the titles of
a disc in random order, before or during playback
press the button MODE
indicator (RANDOM
cancel the random playback and return to normal
playback, press the button MODE
e three times. The random
2@) glows in the display. To
e once more.
Title selection
During playback briefly press the o or i
buttons to select the previous or the forthcoming
titles. The CD display shows the title number of your
choice for ca. 3 seconds.
If you wish to select a title before starting playback,
repeatedly press the
the desired title number appears in the display
To start playback of this selected title, press the
PLAY/PAUSE button
before the title display extinguishes.
o or i buttons until
2$.
1# within ca. 3 seconds, i.e.
- 5 -
Page 8

Programme playing order
You can arrange playback of the CD titles in a selfprogrammed sequence with up to 20 titles.
Stop the playback and press the button •
PROGRAM
1!. In the display the PROGRAM
2) indicator blinks and for ca. 2 seconds "P 01"
glows. This informs you that you can now enter
in the first title of the programme sequence.
Subsequently, the indicator “00” blinks.
With the buttons •
first title. The number of the individually selected title
blinks in the display
Confirm your entry by pressing the button •
PROGRAM
Now "P 02" glows for ca. 2 seconds in the display •
o and i now select the
2$.
1!.
2$, inviting you to enter the second title of the
sequence. Subsequently, the indicator “00” blinks
again.
Repeat these steps until all of the desired titles •
have been programmed in.
When all of the titles have been programmed in, •
press the button PLAY/PAUSE
playback of the programme.
You stop the programme playback by pressing the •
button STOP
still valid. If need be, stop the programme and
press the button PROGRAM
reactivate the programme.
The programme is erased by either opening
the CD compartment or switching over to
radio reception. The indicator PROGRAM
extinguishes in the display
1@, the programme itself is however
2$.
1# to start
1! once more to
2)
Listening to the radio
This appliance receives radio programmes transmitted
over the Medium Wave (MW) or Very High
Frequency (UKW) ranges.
For VHF reception, unwrap the wire aerial •
the rear of the appliance and, when the radio is in
use, determine its best alignment.
The appliance has a built-in aerial for the reception •
of MW transmitters. In the event of disrupted MW
reception, turn the whole appliance back and forth
to find the best alignment.
Slide the function switch (FUNCTION •
position "RADIO".
With the switch BAND •
frequency range (AM = MW, FM = UKW). In the
1^ select the desired
3! at
1%) into the
positon FM ST. the appliance only reproduces
radio stations transmitting in stereo.
Select a radio station with the tuning regulator •
TUNING
orientation.
With the reception of VHF radio stations •
transmitting in stereo, the indicator FM ST.
glows. Should the reception of these stations be
impaired by too much static noise, slide the switch
BAND
interference.
2&. Use the tuning scale 2^ for
1^ into the position "FM" to suppress the
The alarm function
You can programme your CD Clock Radio so that
appliance switches itself on and back off at one resp.
two specified times. You can be woken by either
radio or CD playback or by a signal tone. Proceed
as follows.
Entering alarm time 1
1. To start the programming of alarm time 1, press
the button “ALARM 1”
now blinks for 5 seconds in the display
the indicator ALM. 1
2. Within this period, use the buttons HOUR/
MINUTE
minutes of the desired alarm time 1.
3. Press the button "ALARM 1"
programmed alarm time. The display returns to
the standard time display.
4. Slide the function switch (FUNCTION
the position of the mode that is to be used at the
alarm time: CD, radio or signal tone (Buzzer).
5. Should you wish to use as the alarm function
"CD" or "Radio", set the desired volume level.
Also, do not forget to insert a CD or to tune in to
the preferred radio station. Should you forget to
insert a CD in the alarm function "CD", the signal
tone will sound as the wake-up call.
6. At the programmed time the appliance will
switch on with the desired function and the
indicator ALM. 1
period of the alarm amounts to 60 minutes.
- 6 -
i/o to programme in the hours and
r. The indicator "12:00”
2$ and
1& glows.
r to save the
1%) into
1& will blink. The maximum
2#
Page 9

Note:
With the alarm function “CD”, in addition to the
indicator ON/OFF
also glow. The automatically activated repeat function
will ensure that the alarm can sound for a full hour,
even with CDs having a shorter programme.
7. To stop the alarm, press the button “ALARM 1”
1(, the indicator REPEAT 2! will
r. The indicator ON/OFF 1( extinguishes, but
the indicator ALM. 1
that the alarm can sound again on the following
day. If you do not wish this, and want to switch
the alarm function off, press the button "ALARM
1"
r once more.
Entering alarm time 2
The programming of alarm time 2 is identical to the
programming of alarm time 1. Instead of pressing the
button “ALARM 1”
and orientate on the display ALM. 2
The snooze function
Should you wish to snooze for an extra six minutes
after the alarm goes off, press the button SNOOZE
1& continues to glow, so
r press the button "ALARM 2" t
2%.
1). On expiration of the six minutes the appliance
switches itself back on. You can activate the snooze
repeatedly until the maximum alarm time (60
minutes) has expired.
The sleep function
You can fall asleep with the accompaniment of a CD
or a radio station - the appliance switches off at the
time you have programmed in.
1. With the function switch (FUNCTION
the preferred operational mode.
2. Press the button SLEEP
OFF
1( glows and the display 2$ shows "90".
This indicates that the appliance will switch itself
off automatically after 90 minutes.
3. To reduce this running time to 60, 30 or 15
minutes, press correspondingly on the button
SLEEP
y. The selected time value is shown for
two seconds in the display.
4. Press the button SLEEP
appliance will set the running time back to 90
minutes.
y. The indicator ON/
y once more and the
1%) select
5. To prematurely end the sleep automatic, press
the button ON/OF
q.
AUX Operation
You can connect an external audio source to the
radio, such as an MP3 Player or similar.
1. Connect the Line audio output or the headphone
output of the preferred appliance, via a shielded
cable fitted with a 3.5mm jack plug, to the AUXInput
2( at the rear of the appliance.
2. The positioning of the function switch
(FUNCTION
soon as this connection is made, the appliance
deactivates the radio and CD elements. Only the
signal at the AUX-Input will be played back.
3. Start playback on the connected appliance,
regulate the sound level with the volume
regulator (VOLUME
1%) is not important here. As
2*).
Cleaning and Care
Attention!
When you have withdrawn the plug from the wall •
power socket you can clean the housing with a
soft dry cloth. Do not use agressive detergents!
Do not permit fluids to permeate into the interior •
of the appliance. This would cause irreparable
damage to the appliance.
Do not use moist cloths or anything similar.•
Troubleshooting
No or poor radio reception
Check to ensure that the VHF wire aerial > 3! is
unwound and optimally aligned.
If need be, slide the switch BAND >
the position FM ST. to the position FM, so
that the appliance can also receive weaker
transmissions.
Change the position and alignment of the CD >
Clock Radio until you get a better reception of
MW transmitters.
1^ from
- 7 -
Page 10

The appliance does not make a sound
Is the plug > 3# sitting firmly in the power socket?
Have you switched the appliance on with the >
button ON/OFF
Is there a plug in the AUX-Input >
deactivate the CD and radio elements.
Is there a plug in the headphone connector >
This would switch the loudspeakers off.
q?
2( ? This would
3) ?
Disposal
Do not dispose of the device in your
normal domestic waste. This appliance
is subject to the European Guidelines
2002/96/EG.
Dispose of the appliance through an approved
disposal centre or at your community waste facility.
Observe the currently applicable regulations.
In case of doubt, please
contact your waste disposal centre.
Disposal of batteries
Batteries must not be disposed of in the household
waste. Every consumer is legally obliged to dispose
of batteries at a collection site of his community/city
district or at a retail store.
This obligation is intended to ensure that batteries
are disposed of in an environmentally safe fashion.
Only dispose of batteries when they are fully
discharged.
Dispose of packaging materials in an
environmentally responsible manner.
CE- Conformity
This consumer electronics appliance, being in
conformity with their fundamental requirements and
directions, complies with the relevant regulations of
both the EMC Guidelines 2004/108/EG and the
Guidelines for Low Voltage Appliances 2006/95/
EG.
Importer
KOMPERNASS GMBH
BURGSTRASSE 21
44867 BOCHUM, GERMANY
www.kompernass.com
Warranty and Service
The warranty for this appliance is for 3 years
from the date of purchase. The appliance has
been manufactured with care and meticulously
examined before delivery. Please retain your receipt
as proof of purchase. In the case of a warranty
claim, please make contact by telephone with our
service department. Only in this way can a post-free
despatch for your goods be assured.
The warranty covers only claims for material and
maufacturing defects, not for wearing parts or for
damage to fragile components, e.g. buttons or
batteries. The appliance is intended solely for private
domestic use, not for commercial applications.
The warranty is void in the case of abusive and
improper handling, use of force and internal
tampering not carried out by our authorized service
branch.
Your statutory rights are not restricted in any way by
this warranty.
DES Ltd
Units 14-15
Bilston Industrial Estate
Oxford Street
Bilston
WV14 7EG
Tel.: 0870/787-6177
Fax: 0870/787-6168
e-mail: support.uk@kompernass.com
Irish Connection
Harbour view
Howth
Co. Dublin
Tel: 00353 (0) 87 99 62 077
Fax: 00353 18398056
e-mail: support.ie@kompernass.com
- 8 -
Page 11

ΠΕΡΙΕΧΟΜΕΝΑ ΣΕΛΙΔΑ
Υποδείξεις ασφαλείας 9
Σύνολο αποστολής 10
Χρήση 10
Τεχνικές πληροφορίες 10
Τα στοιχεία χειρισμού 10
Τροφοδοσία της συσκευής με ρεύμα 11
Χειρισμός της συσκευής 11
Αναπαραγωγή CD 11
Ακρόαση ραδιοφώνου 13
Η λειτουργία του ξυπνητηριού 13
Ο αυτόματος ύπνου 14
Λειτουργία AUX 14
Καθαρισμός και φροντίδα 14
Διόρθωση βλαβών λειτουργίας 15
Απομάκρυνση 15
Πιστοποίηση συμμόρφωσης Ε.Ε. 15
Εισαγωγέας 15
Εγγύηση και σέρβις 15
Διαβάστε το εγχειρίδιο χειρισμού πριν από την πρώτη χρήση προσεκτικά και φυλάξτε το για μια μελλοντική
χρήση. Παραδώστε το εγχειρίδιο σε όποιον παραδοθεί στη συνέχεια η συσκευή.
- 8 -
Page 12

Υποδείξεις ασφαλείας
Κίνδυνος
Ποτέ μην ανοίγετε το περίβλημα του ραδιοφώνου •
με ρολόι και CD. Δεν υπάρχουν εκεί μέσα
στοιχεία χειρισμού. Επιτρέπετε ενδεχόμενες
επισκευές να διεξάγονται από εξειδικευμένο και
εξουσιοδοτημένο από εμάς συνεργείο.
Μην τοποθετείτε το ραδιόφωνο με ρολόι και CD …•
... σε σημεία τα οποία εκτίθενται σε απευθείας
ηλιακή ακτινοβολία! Αλλιώς μπορεί η συσκευή
να υπερθερμανθεί και να πάθει ανεπανόρθωτη
βλάβη. Υπάρχει κίνδυνος πυρκαγιάς!
... πολύ κοντά σε πηγές θερμότητας. Εδώ
συμπεριλαμβάνονται φούρνοι, αερόθερμα και
παρόμοιες συσκευές καθώς και ανοίγματα
αερισμού άλλων ηλεκτρικών συσκευών! Αλλιώς
μπορεί η συσκευή να πάθει ανεπανόρθωτη
βλάβη.Υπάρχει κίνδυνος πυρκαγιάς!
... σε υγρά περιβάλλοντα ή κοντά σε νερό. Επίσης
μην τοποθετείτε αντικείμενα γεμάτα με υγρά,
π.χ. βάζα επάνω ή δίπλα στη συσκευή. Αλλιώς
μπορεί να διεισδύσει υγρασία στη συσκευή.
Τότε υπάρχει κίνδυνος ηλεκτροπληξίας και
πυρκαγιάς!
...σε σημεία με δυνατούς κραδασμούς ή συνεχείς
δονήσεις. Οι δυνατοί κραδασμοί και οι
συνεχείς δονήσεις μπορούν να οδηγήσουν
σε σποραδικές βλάβες λειτουργίας ή και σε
συνεχείς βλάβες.
... σε ράφια ή εκεί όπου υπάρχουν κουρτίνες
ή έπιπλα τα οποία καλύπτουν την εγκοπή
αερισμού και αφήνετε τουλάχιστο 10
απόσταση προς όλες τις πλευρές έτσι ώστε να
εξασφαλίζεται πάντα επαρκής αερισμός.
... επάνω σε παχύ χαλί ή κρεβάτι κατά τη διάρκεια
της λειτουργίας.
Αυτή η συσκευή δεν προορίζεται για χρήση •
από άτομα (συμπεριλαμβανομένων παιδιών)
με περιορισμένες φυσικές, αισθητηριακές ή
πνευματικές δυνατότητες ή με έλλειψη εμπειρίας
και/ ή με έλλειψη γνώσεων, εκτός εάν επιτηρούνται
μέσω ενός υπεύθυνου ατόμου για την ασφάλειά
τους ή εάν έχουν λάβει υποδείξεις για το πως
χρησιμοποιείται η συσκευή.
εκ.
Τα παιδιά πρέπει να επιτηρούνται ώστε να •
εξασφαλίζεται ότι δεν παίζουν με τη συσκευή.
Επίσης τα υλικά συσκευασιών μπορούν να είναι
επικίνδυνα για παιδιά. Βεβαιώνεστε ότι το υλικό
συσκευασία της συσκευής δεν φτάνει στα χέρια
παιδιών.
Προσοχή!
Η ακρόαση μουσικής με ακουστικά για μεγάλο
χρονικό διάστημα και σε πλήρη ένταση μπορεί
να οδηγήσει σε βλάβες της ακοής!
Τα βύσματα ή καλώδια δικτύου με βλάβη πρέπει •
να αντικαθίστανται αμέσως από εξουσιοδοτημένο
ειδικό προσωπικό ή από το τμήμα εξυπηρέτησης
πελατών, ώστε να αποφεύγονται κίνδυνοι. Πιάνετε
πάντα το καλώδιο δικτύου από το βύσμα.
Μην τραβάτε από το ίδιο το καλώδιο και ποτέ
μην πιάνετε το καλώδιο δικτύου με βρεγμένα
χέρια, διότι κάτι τέτοιο μπορεί να προκαλέσει
βραχυκύκλωμα ή ηλεκτροπληξία. Μην τοποθετείτε
επάνω στο καλώδιο δικτύου ούτε τη συσκευή, ούτε
έπιπλα ή παρόμοια αντικείμενα και προσέχετε ώστε
το καλώδιο δικτύου να μην μαγκώνει πουθενά.
Ποτέ μην κάνετε κόμπο στο καλώδιο δικτύου και
μην το συνδέετε με άλλα καλώδια. Το καλώδιο
δικτύου πρέπει να είναι έτσι τοποθετημένο ώστε
να μην σκοντάψει κανένας εκεί. Ένα χαλασμένο
καλώδιο δικτύου μπορεί να προκαλέσει πυρκαγιά
ή ηλεκτροπληξία.
Η συσκευή προβλέπεται για τη λειτουργία με
μια εναλλασσόμενη τάση A
Ποτέ μη δοκιμάζετε να λειτουργείτε τη συσκευή με
μια άλλη τάση.
Εάν φτάσουν μεταλλικά αντικείμενα ή υγρά μέσα στη •
συσκευή, τραβήξτε αμέσως το βύσμα δικτύου από
την πρίζα και συμβουλευτείτε το κατάστημα σας.
Τα ραδιόφωνα με ρολόι και CD δεν έχουν διακόπτη •
ισχύος. Για το λόγο αυτό όταν δε χρησιμοποιείτε
τη συσκευή για μεγάλο χρονικό διάστημα,
τραβάτε πάντα το βύσμα από την πρίζα. Για να
αποσυνδέσετε τη συσκευή πλήρως από το δίκτυο,
πρέπει το βύσμα να τραβηχτεί από την πρίζα. Για
το λόγο αυτό πρέπει η συσκευή να τοποθετηθεί
έτσι ώστε να εξασφαλίζεται πάντα μια ανεμπόδιστη
πρόσβαση προς την πρίζα για να μπορεί να
τραβηχτεί αμέσως το βύσμα σε μια επείγουσα
περίπτωση.
C230V/50Hz.
- 9 -
Page 13

Πριν από μια καταιγίδα και/ή κακοκαιρία με •
κίνδυνο αστραπών αποσυνδέστε τη συσκευή από
το δίκτυο ρεύματος!
Αυτή η συσκευή λειτουργεί με ένα αόρατο
„Λέιζερ Κατηγορίας 1” για τη σάρωση μιας
φέρουσας ήχου. Ποτέ μην εκθέτετε τα μάτια σας σε
αυτή την ακτίνα λέιζερ η οποία είναι επικίνδυνη για
το ανθρώπινο μάτι.
Σύνολο αποστολής
Ραδιόφωνο με ρολόι και CD•
Εγχειρίδιο χειρισμού•
Χρήση
Το ραδιόφωνο με ρολόι και CD προορίζεται
αποκλειστικά …
ως ψυχαγωγική ηλεκτρονική συσκευή•
για τη λήψη ραδιοπομπών υπερβραχέων •
κυμάτων/FM και μεσαίων κυμάτων/AM
για την αναπαραγωγή Compact Discs•
για την ιδιωτική, μη εμπορική χρήση.•
Τεχνικές πληροφορίες
Παροχή ρεύματος:
Λειτουργία με παροχή
ρεύματος: 230 V ~ 50 Hz
Μπαταρία για την
αποθήκευση: Μπαταρία 9 V
(6LR61)
Ζώνες λήψης:
UKW (υπερβραχέα): 88 – 108 MHz
MW (μεσαία): 540 – 1600 KHz
Κατανάλωση ρεύματος:
σε λειτουργία 9 W
στην αναμονή: 2,5 W
Θερμοκρασία λειτουργίας: +5 ~ +35°C
Υγρασία: 5 ~ 90 %
(καμία υγροποίηση)
Διαστάσεις (Μ x Π x Υ): 22,5 x 17 x 9 cm
Βάρος : περίπου 1,2 κιλά
Κατηγορία προστασίας : II /
Απόδοση εξόδου ηχείων: 2 x 400 mW
Τα στοιχεία χειρισμού
q Πλήκτρο ON/OFF
w Καπάκι χώρου CD
e Πλήκτρο MODE
r Πλήκτρο ALARM 1
t Πλήκτρο ALARM 2
y Πλήκτρο SLEEP
u Πλήκτρο TIME
i Πλήκτρο HOUR /
o Πλήκτρο MINUTE /
1) Πλήκτρο SNOOZE
1! Πλήκτρο PROGRAM
1@ Πλήκτρο STOP
1# Πλήκτρο PLAY/PAUSE
1$ Ηχείο
1% Διακόπτης λειτουργίας FUNCTION
1^ Διακόπτης ζώνης BAND
1& Ένδειξη ALM. 1
1* Ένδειξη PM
1( Ένδειξη ON/OFF
2) Ένδειξη PROGRAM
2! Ένδειξη REPEAT
2@ Ένδειξη RANDOM
2# Ένδειξη FM ST.
2$ Οθόνη
2% Ένδειξη ALM. 2
2^ Κλίμακα πομπών
2& Ρυθμιστής TUNING
2* Ρυθμιστής VOLUME
2( Είσοδος AUX
3) Έξοδος ακουστικών PHONES
3! Κεραία υπερβραχέων UKW
3@ Καλώδιο δικτύου
3# Βύσμα δικτύου
3$ Καπάκι χώρου μπαταριών
- 10 -
Page 14

Τροφοδοσία της συσκευής με
ρεύμα
Πρώτα απομακρύνετε όλα τα υλικά συσκευασίας
από τη συσκευή. Αυτή η συσκευή προβλέπεται για
τη λειτουργία στο δίκτυο με μια εναλλασσόμενη τάση
230V/50Hz. Για αυτό συνδέστε το καλώδιο δικτύου
3@ της συσκευής με μια σωστά συνδεδεμένη οικιακή
πρίζα. Η συσκευή είναι τώρα έτοιμη για λειτουργία.
Μπαταρία για λήψη μνήμης
Όταν η συσκευή αποσυνδέεται από το δίκτυο
ρεύματος, οι ρυθμίσεις για την ώρα και το χρόνο
ξυπνητηριού χάνονται. Εάν αυτό συμβεί τη νύχτα,
η συσκευή δεν θα σας ξυπνήσει το πρωί όπως
επιθυμείτε. Για να μη συμβεί αυτό, μπορείτε να
τοποθετήσετε στο χώρο μπαταριών
πλευρά της συσκευής μια μπαταρία 9V (δεν
περιλαμβάνεται στο σύνολο αποστολής), η οποία θα
διατηρήσει τη μνήμη σε περίπτωση διακοπής ρεύματος.
Ωστόσο η συσκευή, ακόμα και με τοποθετημένη
μπαταρία κατά τη διάρκεια μιας διακοπής ρεύματος
δεν θα μπορεί να λειτουργεί, θα παραμείνουν μόνο η
ώρα και ο χρόνος ξυπνητηριού.Η μπαταρία πρέπει να
αντικαθίσταται μια φορά ετησίως.
3$ στην κάτω
Ενεργοποιήστε τη συσκευή.
Εάν θέλετε να ακούσετε ραδιόφωνο ή να αναπαράγετε
ένα CD, πιέστε για την ενεργοποίηση της συσκευής
το πλήκτρο ON/OFF
η ένδειξη λειτουργίας (ON/OFF,
διακόπτη λειτουργίας (FUNCTION
πηγής προγράμματος την οποία πρέπει να αναπαράγει
η συσκευή:
„CD” για αναπαραγωγή CD ή•
„RADIO” για ραδιοφωνική λήψη.•
Για να απενεργοποιήσετε πάλι τη συσκευή, πιέστε εκ
νέου το πλήκτρο ON/OFF
q. Στην οθόνη εμφανίζεται
1(). Ωθήστε το
1%) στη θέση της
q.
Ρύθμιση της έντασης
Ο ρυθμιστής έντασης (VOLUME, 2*) διευκολύνει
τη ρύθμιση της επιθυμητής έντασης. Περιστρέψτε
το ρυθμιστή στην κατεύθυνση του συμβόλου „+”,
έτσι αυξάνετε την ένταση. Εάν τον περιστρέψετε στην
κατεύθυνση του συμβόλου „—”, θα μειώσετε την ένταση.
Λειτουργία με ακουστικά
Στην υποδοχή ακουστικών (PHONES , 3)) μπορείτε
να συνδέσετε ακουστικά με ένα βύσμα 3,5 χιλ.. Σε αυτή
την περίπτωση απενεργοποιούνται τα ενσωματωμένα
ηχεία
1$.
Χειρισμός της συσκευής
Ρυθμίστε την ώρα
Αφότου έχετε συνδέσει τη συσκευή με την παροχή
ρεύματος, αναβοσβήνει το „12:00” στην οθόνη
Η συσκευή μπορεί να προβάλει την ώρα σε μορφή
12 ωρών (AM/PM) ή 24 ωρών. Εξ εργοστασίου έχει
ρυθμιστεί η μορφή 12 ωρών. Για εναλλαγή στην άλλη
μορφή, κρατήστε το πλήκτρο TIME
περ. 2 δευτερόλεπτα. Στη συνέχεια η οθόνη προβάλει
για λίγο το
γυρισει.
Πατήστε επανειλημμένα το πλήκτρο HOUR
κρατήστε το τόσο πατημένο έως ότου εμφανιστεί ο
αριθμός ωρών της τρέχουσας ώρας. Τώρα πατήστε
επανειλημμένα το πλήκτρο MINUTE
τόσο πατημένο έως ότου εμφανιστεί ο αριθμός
λεπτών της τρέχουσας ώρας. Στη συνέχεια πατήστε
το πλήκτρο TIME
ρύθμιση, τα ψηφία ανάβουν τώρα συνεχώς.
2$, τη μορφή χρόνου οτην οποία έχετε
u. Έτσι ολοκληρώνεται η χρονική
u πατημένο για
o, ή κρατήστε
2$.
i, ή
Αναπαραγωγή CD
Αυτή η συσκευή παίζει κατά βάση τόσο CDs ήχου
όσο και μέσα τα οποία έχουν δημιουργηθεί σε CDR(W). Λόγω των διαφορετικών ειδών δίσκων, τύπων
υπολογιστών, λειτουργικών συστημάτων, λογισμικού και
διαδικασιών εγγραφής δεν μπορούμε να εγγυηθούμε
ότι κάθε δίσκος που έχει „εγγραφεί” αναπαράγεται
άψογα. Η συσκευή δεν αναπαράγει CD-ROM ή μέσα
DVD.
Πως θα μεταχειρίζεστε με τον
καλύτερο τρόπο τα CD
Πιάνετε τα CD μόνο από τις άκρες, •
ώστε να αποφεύγετε δαχτυλικά
αποτυπώματα και βρομιές.
Τα CD με βρομιές μπορείτε να τα •
σκουπίζετε με ένα ελαφρά νωπό πανί
χωρίς χνούδια προσεκτικά από το
κέντρο προς τα έξω.Αποφεύγετε
τις κυκλικές κινήσεις! Μη χρησιμοποιείτε διαλυτικά
μέσα, αλλιώς το CD μπορεί να χαλάσει.
- 11 -
Page 15

Αποφεύγετε επιγραφές και •
αυτοκόλλητα στα CD σας. Κάτι
τέτοιο θα μπορούσε να οδηγήσει σε
ζημιές οι οποίες θα επηρεάσουν την
αναπαραγωγή και τη συσκευή.
o ή i, έως ότου εμφανιστεί ο επιθυμητός τίτλος
στην οθόνη
μετά από περ. 3 δευτερόλεπτα, πιέστε το πλήκτρο
PLAY/PAUSE
αναπαραγωγή του επιλεγμένου τίτλου.
2$. Έως ότου σβήσει η ένδειξη τίτλων
1#, ώστε να εκκινήσετε την
Αναπαραγωγή CD
Ωθήστε το διακόπτη •
λειτουργίας (FUNCTION
στη θέση CD.
Ανοίξτε το χώρο CD, •
σηκώνοντας το καπάκι χώρου
CD
w στις δύο μικρές
πλευρικές λαβές.
Τοποθετήστε το CD με την
πλευρά επιγραφής προς τα
επάνω στον αξονίσκο του
πιάτου CD. Πιέστε προσεκτικά
με τα δύο δάχτυλα το κέντρο
του δίσκου στον αξονίσκο του
πιάτου CD, έως ότου κουμπώσει με έναν ήχο εκεί
πάνω.
Κλείστε το χώρο CD, κατεβάζοντας το καπάκι •
χώρου CD
διαβάζει τώρα το CD. Στη συνέχεια η οθόνη
προβάλει για περ. 3 δευτερόλεπτα τον αριθμό των
τίτλων στο CD. Στη συνέχεια η συσκευή δείχνει
πάλι την ώρα.
Για να εκκινήσετε την αναπαραγωγή, πιέστε το •
πλήκτρο PLAY/PAUSE
w προσεκτικά με το χέρι. Η συσκευή
1%)
2$
1#. Τώρα η οθόνη
2$ δείχνει για λίγο τον εκάστοτε αναπαραγόμενο
αριθμό τίτλου.Εάν πιέσετε αυτό το πλήκτρο εκ
νέου, σταματά η αναπαραγωγή και ο αριθμός
τίτλων αναβοσβήνει για περ. 3 δευτερόλεπτα
στην οθόνη
πάλι την ώρα. Ένα νέο πάτημα συνεχίζει την
αναπαραγωγή. Στη συνέχεια εμφανίζεται πάλι για
λίγο ο τρέχων αριθμός τίτλου.
Τερματίζετε την αναπαραγωγή, πατώντας το •
πλήκτρο STOP
λίγο ο αριθμός των τίτλων του CD, στη συνέχεια
η ώρα.
2$. Στη συνέχεια η συσκευή δείχνει
1@. Τώρα εμφανίζεται πάλι για
Επιλογή τίτλων
Πατήστε κατά την αναπαραγωγή για λίγο το πλήκτρο
o ή i, ώστε να επιλέξετε τον προηγούμενο
ή τον επόμενο τίτλο. Η οθόνη του CD δείχνει την
εκάστοτε επιλογή για περ. 3 δευτερόλεπτα.
Εάν θέλετε να επιλέξετε έναν τίτλο, προτού εκκινήσετε
την αναπαραγωγή, πιέστε τόσο συχνά το πλήκτρο
Αναζήτηση τροχιών
Κατά την αναπαραγωγή μπορείτε, κρατώντας
πατημένα τα πλήκτρα
γρήγορη κίνηση προς τα εμπρός () ή προς τα πίσω
(), ώστε να αναζητήσετε συγκεκριμένες τροχιές
ενός τίτλου.Κατά την αναζήτηση εμφανίζεται ο τρέχων
αριθμός τίτλου. Όταν αφήσετε το εκάστοτε πλήκτρο,
συνεχίζεται η αναπαραγωγή, η ένδειξη τίτλων σβήνει
μετά από περ. 3 δευτερόλεπτα.
o ή i να διεξάγετε μια
Επανάληψη τίτλων
Εάν κατά την αναπαραγωγή πατήσετε μια φορά
το πλήκτρο MODE
επανάληψης (REPEAT
μόλις αναπαραχθείς τίτλος, μετά τη λήξη του,
αναπαράγεται επανειλημμένα. Ωστόσο μπορείτε με
τα πλήκτρα
Εάν κατά την αναπαραγωγή πατήσετε δύο φορές το
πλήκτρο MODE , ανάβει η ένδειξη επανάληψης (RE-
PEAT
2!) συνεχώς στην οθόνη 2$, και ολόκληρος
ο δίσκος αναπαράγεται επανειλημμένα μετά την
επίτευξη του τέλους του.
Ακόμα και πριν από την έναρξη της αναπαραγωγής
μπορείτε να θέσετε τη συσκευή με το πλήκτρο MODE
e, αναβοσβήνει η ένδειξη
2!) στην οθόνη και ο
o ή i να επιλέξετε άλλους τίτλους.
e στην επιθυμητή λειτουργία επανάληψης. Τερματίζετε
τη μονή λειτουργία επανάληψης, πατώντας τρεις φορές
το πλήκτρο MODE
επανάληψης δίσκου, πατώντας δύο φορές το πλήκτρο
MODE
e. Η αναπαραγωγή συνεχίζεται στη συνέχεια
φυσιολογικά. Η συσκευή αποχωρεί επίσης και
από τη λειτουργία επανάληψης, εάν τερματίσετε την
αναπαραγωγή με το πλήκτρο STOP
e. Τερματίζετε τη λειτουργία
1@.
Αναπαραγωγή τίτλων σε τυχαία σειρά
Εάν η συσκευή πρέπει να αναπαράγει τους τίτλους
του δίσκου σε μια τυχαία σειρά, πιέστε πριν ή κατά
τη διάρκεια της αναπαραγωγής τρεις φορές το
πλήκτρο MODE
τυχαίου (RANDOM
τυχαία αναπαραγωγή και για να συνεχίσετε με τη
φυσιολογική αναπαραγωγή, πατήστε μια φορά το
πλήκτρο MODE
- 12 -
e. Στην οθόνη ανάβει η ένδειξη
2@). Για να τερματίσετε την
e.
Page 16

Προγραμματισμός ακολουθίας τίτλων
Μπορείτε να επιτρέψετε την αναπαραγωγή των τίτλων
CD σε μια προγραμματισμένη από εσάς σειρά έως και
20 τίτλων.
Για αυτό σταματήστε εάν χρειάζεται πρώτα την •
αναπαραγωγή και πιέστε το πλήκτρο PROGRAM
1!. Στην οθόνη αρχίζει να αναβοσβήνει η ένδειξη
PROGRAM
το „P 01”. Αυτό σας δείχνει ότι τώρα μπορείτε να
εισάγετε τον πρώτο τίτλο της σειράς προγράμματος.
Στη συνέχεια αναβοσβήνει η ένδειξη "00".
Τώρα επιλέξτε με τα πλήκτρα •
πρώτο τίτλο. Τότε ανάβει ο αριθμός του εκάστοτε
επιλεγμένου τίτλου στην οθόνη
Επιβεβαιώστε την επιλογή σας μέσω πατήματος του •
πλήκτρου PROGRAM
Τώρα ανάβει για περ. 2 δευτερόλεπτα το „P 02” •
στην οθόνη
δεύτερου τίτλου για τη ροή προγράμματος. Στη
συνέχεια αναβοσβήνει πάλι η ένδειξη "00".
Επαναλάβετε αυτά τα βήματα έως ότου εισαχθούν •
όλοι οι επιθυμητοί τίτλοι.
Εάν έχετε προγραμματίσει όλους τους επιθυμητούς •
τίτλους, πιέστε το πλήκτρο PLAY/PAUSE
2) και ανάβει για περ. 2 δευτερόλεπτα
o και i τον
2$.
1!.
2$ και σας ζητά την εισαγωγή του
1#, ώστε να εκκινήσετε την αναπαραγωγή του
προγράμματος.
Τερματίζετε την αναπαραγωγή προγράμματος, •
πατώντας το πλήκτρο STOP
πρόγραμμα παραμένει αποθηκευμένο. Εάν
χρειάζεται τερματίζετε την αναπαραγωγή και
πιέζετε εκ νέου το πλήκτρο PROGRAM
να ενεργοποιήσετε πάλι το πρόγραμμα.
Διαγράφετε το πρόγραμμα, ανοίγοντας το χώρο
των CD ή γυρίζοντας στη ραδιοφωνική λήψη. Η
ένδειξη PROGRAM
1@, ωστόσο το
1!, ώστε
2) στην οθόνη 2$ σβήνει.
Ακρόαση ραδιοφώνου
Αυτή η συσκευή λαμβάνει ραδιοφωνικά προγράμματα
τα οποία εκπέμπονται μέσω μεσαίων κυμάτων (MW) ή
υπερβραχέων (UKW).
Για τη λήψη υπερβραχέων UKW ξετυλίξτε την •
κεραία
3! στην πίσω πλευρά της συσκευής και
διακριβώστε αργότερα κατά τη λειτουργία τη σωστή
της ρύθμιση.
Για τη λήψη πομπών μεσαίων κυμάτων MW, η •
συσκευή έχει μια ενσωματωμένη κεραία. Σε λήψη
μεσαίων κυμάτων με παρεμβολές, περιστρέψτε τη
συσκευή σε μια αντίστοιχα αποδοτική κατεύθυνση.
Ωθήστε το διακόπτη λειτουργίας (FUNCTION • 1%)
στη θέση „RADIO”.
Επιλέξτε με το διακόπτη BAND •
ραδιοφωνική ζώνη (AM = MW, FM = UKW). Στη
θέση FM ST. η συσκευή μεταφέρει μόνο αυτούς
τους πομπούς υπερβραχέων οι οποίοι εκπέμπουν
στέρεο.
Με τη βοήθεια του συντονισμού πομπών TUNING •
1^ την επιθυμητή
2& επιλέξτε τώρα τους πομπούς. Εδώ μπορείτε να
προσανατολιστείτε στην κλίμακα πομπών
Κατά τη λήψη εκπομπών υπερβραχέων σε στέρεο •
ανάβει η ένδειξη FM ST.
πομπών επηρεάζεται μέσω πολλών παρεμβολών,
ωθήστε το διακόπτη BAND
να μειώσετε τις παρεμβολές.
2#. Εάν η λήψη τέτοιων
1^ στη θέση „FM”, ώστε
Η λειτουργία του ξυπνητηριού
Μπορείτε να ρυθμίσετε το ραδιόφωνο με ρολόι
και CD έτσι ώστε η συσκευή να ενεργοποιείται ή
απενεργοποιείται σε μια ή δύο καθορισμένες ώρες.
Έτσι μπορείτε να ξυπνάτε π.χ. με αναπαραγωγή
ραδιοφώνου ή CD ή και μέσω ήχου αφύπνισης. Για
αυτό ακολουθήστε την εξής διαδικασία.
Εισαγωγή του χρόνου ξυπνητηριού 1
1. Πατήστε το πλήκτρο „ALARM 1” r, ώστε να
ξεκινήσετε με τη ρύθμιση του χρόνου ξυπνητηριού
1.Τώρα αναβοσβήνει για 5 δευτερόλεπτα η ένδειξη
„12:00” στην οθόνη
ανάβει.
2. Εντός αυτού του χρόνου ρυθμίστε με τα πλήκτρα
HOUR/MINUTE
επιθυμητού χρόνου ξυπνητηριού 1.
3. Πιέστε το πλήκτρο „ALARM 1”
αποθηκεύσετε το δοθέντα χρόνο ξυπνητηριού.
Η ένδειξη γυρίζει μετά πίσω στην ένδειξη ώρας.
4. Ωθήστε το διακόπτη λειτουργίας (FUNCTION
1%) στη θέση του είδους λειτουργίας, η οποία θα
ενεργοποιήσει τη συσκευή στο χρόνο ξυπνητηριού.
CD, ραδιόφωνο ή ήχος αφύπνισης (Buzzer).
5. Εάν επιθυμείτε ως λειτουργία ξυπνητηριού „CD” ή
„Ραδιόφωνο” ρυθμίστε και την επιθυμητή ένταση.
Μην ξεχάσετε εάν χρειάζεται να τοποθετήσετε
ένα CD ή να ρυθμίσετε τον επιθυμητό πομπό.
Εάν σε επιθυμητή λειτουργία ξυπνητηριού „CD”
ξεχάσατε να τοποθετήσετε ένα CD, θα ακουστεί
ως ξυπνητήρι ένας ήχος αφύπνισης.
- 13 -
2$ και η ένδειξη ALM. 1 1&
i/o τις ώρες και τα λεπτά του
r, ώστε να
2^.
Page 17

6. Στον ρυθμισμένο χρόνο θα ενεργοποιηθεί η
συσκευή με το επιθυμητό είδος λειτουργίας και η
ένδειξη ALM. 1
διάρκεια του ξυπνητηριού ανέρχεται στα 60
λεπτά.
1& θα αναβοσβήνει. Η μέγιστη
Σημείωση:
Σε λειτουργία ξυπνητηριού „CD” μαζί με την ένδειξη
ON/OFF
αυτόματα ενεργοποιημένη λειτουργία επανάληψης
θα εξασφαλίσει ότι το ξυπνητήρι ακόμα και σε CD με
συντομότερο πρόγραμμα θα συνεχίσει να ακούγεται
για μια ώρα.
7. Για να τερματίσετε το ξυπνητήρι, πιέστε το
1( θα ανάψει και η ένδειξη REPEAT 2!. Η
πλήκτρο „ALARM 1”
r. Η ένδειξη ON/OFF
1( σβήνει αλλά η ένδειξη ALM. 1 1& συνεχίζει
να ανάβει έτσι ώστε το ξυπνητήρι να ακουστεί εκ
νέου και την επόμενη ημέρα. Εάν δεν το επιθυμείτε
αυτό και θέλετε να απενεργοποιήσετε εντελώς τη
λειτουργία ξυπνητηριού, πιέστε άλλη μια φορά το
πλήκτρο „ALARM 1”
r.
Εισαγωγή του χρόνου ξυπνητηριού 2
Ο χειρισμός της λειτουργίας ξυπνητηριού 2 είναι
πανομοιότυπος με το χειρισμό της λειτουργίας
ξυπνητηριού 1.
Πατήστε μόνο αντί του πλήκτρου „ALARM 1”
πλήκτρο „ALARM 2”
ένδειξη ALM. 2
t και προσανατολιστείτε στην
2%.
r το
Εάν θέλετε να χουζουρέψετε λίγο ακόμα
Εάν μετά τη χρήση του ξυπνητηριού θέλετε να
χουζουρέψετε και άλλα έξι λεπτά, πιέστε το
πλήκτρο SNOOZE
λεπτών, η συσκευή θα ενεργοποιηθεί εκ νέου. Αυτή
τη λειτουργία ύπνου μπορείτε να την πατήσετε
τόσες φορές, έως ότου λήξει ο μέγιστος χρόνος
ξυπνητηριού (60 λεπτά).
1). Μετά τη λήξη των έξι
Ο αυτόματος ύπνου
Μπορείτε να κοιμηθείτε με τον ήχο ενός CD ή
με ένα ραδιοφωνικό πρόγραμμα - η συσκευή θα
απενεργοποιηθεί στον από εσάς ρυθμισμένο χρόνο.
1. Επιλέξτε με το διακόπτη λειτουργίας (FUNCTION
1%) το επιθυμητό είδος λειτουργίας.
2. Πιέστε το πλήκτρο SLEEP y. Η ένδειξη ON/
OFF
1( ανάβει και στην οθόνη 2$ προβάλλεται
το „90”. Αυτό σημαίνει ότι η συσκευή θα
απενεργοποιηθεί αυτόματα μετά από 90 λεπτά.
3. Για να μειώσετε αυτό τον υπόλοιπο χρόνο σε
60, 30 ή 15 λεπτά, πιέστε αντίστοιχα συχνά το
πλήκτρο SLEEP
εμφανίζεται για 2 δευτερόλεπτα στην οθόνη.
4. Εάν πιέσετε το πλήκτρο SLEEP
συσκευή επαναφέρει τον υπόλοιπο χρόνο πάλι
στα 90 λεπτά.
5. Για να τερματίσετε τον αυτόματο ύπνου πρόωρα,
πιέστε το πλήκτρο ON/OFF
y. Η εκάστοτε επιλεγμένη τιμή
y εκ νέου, η
q.
Λειτουργία AUX
Μπορείτε να συνδέσετε στο ραδιόφωνο μια εξωτερική
πηγή ήχου, όπως για παράδειγμα ένα MP3-Player ή
παρόμοια.
1. Συνδέστε την έξοδο ήχου Line ή την έξοδο ακουστικών
της επιθυμητής συσκευής μέσω ενός θωρακισμένου
καλωδίου με ένα βύσμα 3,5mm στην υποδοχή AUX
στο πίσω μέρος της συσκευής.
2. Στη θέση του διακόπτη λειτουργίας (FUNCTION
2(
1%) δεν μπορεί να μπει τίποτα. Μόλις καταληφθεί
αυτή η υποδοχή, η συσκευή απενεργοποιεί το
ραδιόφωνο και το τμήμα CD.Μεταφέρονται μόνο
τα σήματα στην είσοδο AUX.
3. Εκκινήστε την αναπαραγωγή της συνδεδεμένης
συσκευής, ρυθμίστε την ένταση μέσω της ρύθμισης
έντασης (VOLUME
2*).
Καθαρισμός και φροντίδα
Προσοχή!
Αφότου έχετε τραβήξει το βύσμα από την πρίζα, •
μπορείτε να καθαρίσετε το περίβλημα συσκευής
με ένα μαλακό, στεγνό πανί. Μη χρησιμοποιείτε
επιθετικά απορρυπαντικά!
Μην αφήνετε υγρά να φτάνουν στο εσωτερικό της •
συσκευής. Αυτό οδηγεί σε ανεπανόρθωτες βλάβες
στη συσκευή!
Μη χρησιμοποιείτε νωπά πανιά ή παρόμοια.•
- 14 -
Page 18

Διόρθωση βλαβών λειτουργίας
Καμία ή άσχημη ραδιολήψη
Ελέγξτε εάν η κεραία υπερβραχέων UKW > 3! έχει
ξετυλιχτεί και εάν έχει ευθυγραμμιστεί σωστά.
Ωθήστε το διακόπτη BAND >
από τη θέση FM ST. στη θέση FM, ώστε η συσκευή
να μπορεί να λάβει και πιο αδύναμούς πομπούς.
Αλλάζετε τη θέση και την ευθυγράμμιση >
του ραδιοφώνου με ρολόι και CD έως ότου
λαμβάνετε τους πομπούς μεσαίων κυμάτων
καλύτερα.
1^ εάν χρειάζεται,
Η συσκευή δεν βγάζει κανένα ήχο
Το βύσμα > 3# είναι καλά στην πρίζα;
Ενεργοποιήσατε τη συσκευή με το πλήκτρο >
ON/OFF
Υπάρχει ένα βύσμα στην είσοδο AUX >
Αυτό θα απενεργοποιούσε το τμήμα των CD και
του ραδιοφώνου.
Υπάρχει ένα βύσμα στην έξοδο ακουστικών >
Αυτό θα απενεργοποιούσε τα ηχεία.
q;
2( ;
3) ;
Απομάκρυνση
Ποτέ μην πετάτε τη συσκευή στα
συνηθισμένα σκουπίδια Αυτό το προϊόν
υπόκειται στην Ευρωπαϊκή Οδηγία
2002/96/E.Κ.
Απομακρύνετε τη συσκευή μέσω μιας εγκεκριμένης
επιχείρησης απόρριψης ή μέσω της κοινοτικής
επιχείρησης απόρριψης.
Να τηρείτε τους ισχύοντες κανονισμούς.
Σε περίπτωση αμφιβολιών ελάτε σε επαφή με την
επιχείρηση απόρριψης.
Απομάκρυνση μπαταριών/ συσσωρευτών
Οι μπαταρίες/ συσσωρευτές δεν επιτρέπεται να
απομακρύνονται μέσω των οικιακών απορριμμάτων.
Κάθε χρήστης είναι από το νόμο υποχρεωμένος να
παραδίδει τις μπαταρίες/ συσσωρευτές σε ένα σημείο
συλλογής της κοινότητας / της περιοχής του ή στο
κατάστημα.
Αυτή η υποχρέωση εξυπηρετεί στο να
απομακρύνονται οι μπαταρίες / συσσωρευτές με
έναν φιλικό προς το περιβάλλον τρόπο. Επιστρέφετε
τις μπαταρίες/ τους συσσωρευτές μόνο σε
εκφορτισμένη κατάσταση.
Απομακρύνετε όλα τα υλικά συσκευασίας με
έναν φιλικό προς το περιβάλλον τρόπο.
Πιστοποίηση συμμόρφωσης Ε.Ε.
Αυτή η συσκευή ελέγχθηκε και εγκρίθηκε σε συμφωνία
με τις βασικές απαιτήσεις και με τις άλλες σχετικές
προδιαγραφές της Οδηγίας EMV 2004/108/Ε.Κ.
καθώς και με την Οδηγία περί χαμηλής τάσης (LVD)
2006/95/Ε.Κ.
Εισαγωγέας
KOMPERNASS GMBH
BURGSTRASSE 21
44867 BOCHUM, ΓΕΡΜΑΝΙΑ
www.kompernass.com
Εγγύηση και σέρβις
Έχετε για αυτή τη συσκευή 3 χρόνια εγγύηση από
την ημερομηνία αγοράς. Η συσκευή κατασκευάστηκε
και ελέγχθηκε προσεκτικά πριν από την αποστολή.
Παρακαλούμε φυλάξτε την απόδειξη ταμείου ως
απόδειξη για την αγορά. Σε περίπτωση εγγύησης
ελάτε σε επικοινωνία με το τμήμα του σέρβις τηλεφωνικά.
Μόνο έτσι μπορεί να εξασφαλιστεί μια δωρεάν
αποστολή του εμπορεύματός σας.
Η απόδοση εγγύησης ισχύει μόνο για σφάλματα
υλικού ή κατασκευής, όχι όμως για εξαρτήματα
φθοράς ή για βλάβες σε εύθραυστα εξαρτήματα, π.χ.
διακόπτες ή συσσωρευτές. Το προϊόν προορίζεται
μόνο για την ιδιωτική και όχι για την επαγγελματική
χρήση.
Σε περίπτωση κακής μεταχείρισης και ακατάλληλης
χρήσης, σε χρήση βίας και σε παρεμβάσεις οι οποίες
δεν διεξήχθησαν από το εξουσιοδοτημένο μας τμήμα
σέρβις, η εγγύηση παύει να ισχύει.
Τα νομικά σας δικαιώματα δεν περιορίζονται μέσω
αυτής της εγγύησης.
- 15 -
Page 19

Kompernass Service EëëÜäa
Kalothanassi G. Amalia · 10-12 Thiatiron Str.
14231 N.Ionia Athens
Tel.: 210 2790865
Fax: 210 2796982
e-mail: support.gr@kompernass.com
- 16 -
 Loading...