

Page 1

UK
KOMPERNASS GMBH · BURGSTRASSE 21 · D-44867 BOCHUM
www.kompernass.com
ID-Nr.: KH1410-06/07-V2
Page 2
Cyclone vacuum cleaner KH 1410
Operating instructions
Page 3

Page 4
q
2#
2@
2!
2)
1(
l
k
2$
w
r
e
2%
tyu
i
j
h
g
s
a
df
o
Page 5

Index Page
Intended Usage 4
Safety instructions 4
Items supplied 5
Technical data 5
Appliance description 5
Unpacking and assembly 5
Operation 6
Emptying the dust collector 7
Storage 8
Filters 8
Cleaning and care 10
Disposal 10
Warranty and Service 10
Importer 10
Troubleshooting 11
Read the operating instructions carefully before using the appliance for the first time
and preserve this manual for later reference. Pass this manual on to whoever might
acquire the appliance at a later date.
- 3 -
Page 6

Cyclone vacuum cleaner
KH 1410
Intended Usage
The vacuum cleaner is intended exclusively for the suction of dry dust and refuse
particles from dry upper surfaces in
domestic households. Any other usage
of, or modification to, the appliance is
deemed to be improper usage and carries the risk of serious personal injury.
The manufacturer accepts no liability for
damages that result from improper use
of the appliance or are caused by the
incorrect operation of it.
Safety instructions
Danger of injuries
• Plastic bags can constitute a danger.
To avoid the risks of suffocation, store
the bags out of the reach of babies
and small children.
• Inform your children about the appliance and its potential dangers so that
they do not play with it.
• This appliance is not intended for use
by individuals (including children) with
restricted physical, physiological or
intellectual abilities or deficiences in
experience and/or knowledge unless
they are supervised by a person responsible for their safety or receive from this
person instruction in how the appliance
is to be used.
• Ensure that no humans or animals are
likely to be caught by the vacuum
cleaner!
• Before connecting to the power supply
check that the electricity type and mains
voltage matches the information given
on the type plate.
• Disconnect the appliance from the
power source before carrying out
assembly, maintenance and care
tasks!
• Prevent the appliance from coming
into contact with moisture! Otherwise,
there is the risk of receiving a fatal
electric shock!
• Do not attempt to vacuum up liquids!
If you do, there is the risk of receiving
a fatal electric shock!
• Do not place the appliance close to
fires, sources of heat or prolonged
ambient temperatures of over 50° C!
There is the risk of an explosion!
• When not in use, disconnect the
appliance from the power source and
pack the power cord away! This reduces the risk of injury from stumbling!
• Arrange for defective power plugs and/
or cables to be replaced at once by
qualified technicians or our Customer
Service Department.
Warning about damage to the appli-
ance!
• Before taking it into use, ensure that
all components are assembled as per
the operating instructions! If not, there
is a risk of it being damaged!
• Do not vacuum up burning, glowing
or smouldering materials or hot substances! Risk of fire!
- 4 -
Page 7

• Do not vacuum up easily inflammable
or explosive substances or use the
appliance at locations where they are
present! Explosion hazard!
• Do not vacuum up plaster, cement or
toner dust. It could block the filters.
This would lead to irreparable damage
to the appliance.
• Do not cover the appliance! This could
cause damage due to heat concentration!
• Never use the appliance without filters!
• When in use, pull out the power cable
to at least the yellow marking, as a
maximum to the red marking!
• Disconnect the power cable from the
mains supply only with the plug!
• Immediately separate the appliance
from the mains supply in the event
of a malfunction!
Items supplied
Cyclone Vacuum cleaner
Suction hose
Telescopic tube
Floor tool
Accessory holder
Crevice tool
Upholstery brush
Operating instructions
Warranty card
Technical data
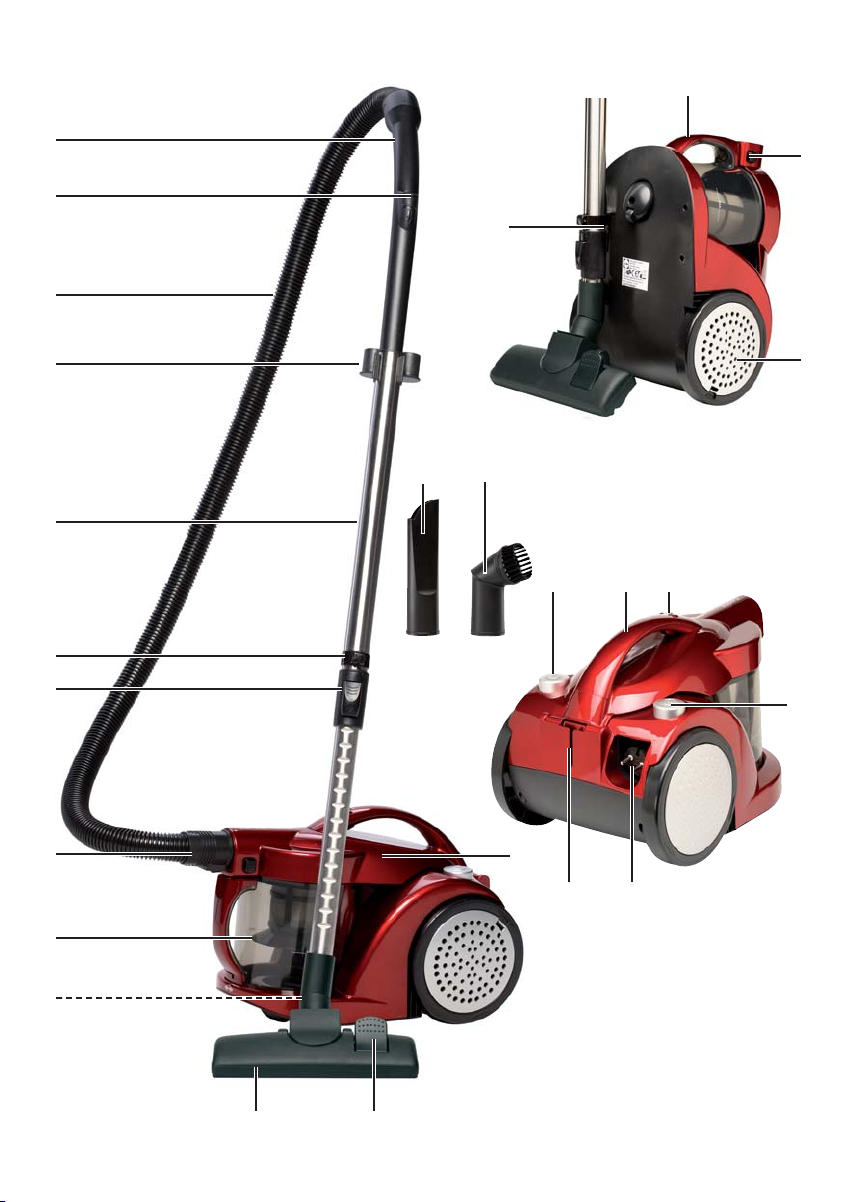
Appliance description
Dust collector carrying grip
q
Unlock button for housing lid
w
Exhaust filter cover
e
Storage bracket for floor tool
r
On / Off switch
t
Vacuum cleaner carrying grip
y
Suction power regulator
u
Foot button for power cable rewind
i
Power cable with power plug
o
Storage bracket for floor tool
a
Housing cover
s
Selector switch for carpet / hard surface
d
Floor tool
f
Storage hook
g
Dust collector
h
Suction pipe connector
j
Height adjuster for telescope tube
k
Storage hook
l
Telescope tube
1(
Accessory bracket
2)
Suction hose
2!
Secondary air regulator
2@
Hand grip
2#
Crevice tool
2$
Upholstery brush (rotatable through
2%
360°)
Unpacking and assembly
Unpacking
• Unpack the appliance and the accessories and check that all listed items
are available.
Power supply: 220 - 240 V ~ 50 Hz
Power rating: min: 1400 W
max: 1800 W
Protection class: II
Assembly
Attention! Assemble the appliance
with the plug
the power supply. The appliance
could be inadvertantly switched on.
- 5 -
disconnected from
o
Page 8

1. Insert the suction pipe connector
into the socket on the vacuum cleaner
until the locking device engages.
2. Insert the hand grip
end of the telescope tube
firmly seated.
3. Place the desired tool (floor tool
crevice tool
see chapter "Changing tools") on the
lower end of the telescope tube
4. Adjust the telescope tube
desired length: Press the height
adjustor
tube
1(
When you have the desired length
release the height adjuster
the telesopic tube
until it audibly engages.
The Cyclone Vacuum Cleaner is now
ready for use.
Changing tools
When you want to change the tool,
proceed as follows:
1. Select the desired tool:
Floor tool
Crevice tool 2$: To vacuum dust from
Upholstery
brush
2. Switch the machine off at the On/Off
: To vacuum dust from
2%
switch
t
or upholstery brush 2%,
2$
down. Pull the telescope
1&
apart on the hand grip 2#.
: To vacuum carpets or
f
hard floors.
difficult to reach locations.
upholstery
or other fabric
surfaces.
.
into the upper
2#
a little further
1(
until it is
1(
to the
1(
. Pull
1&
1(
f
j
,
.
Attention! Remove the plug
the wall socket. The appliance could
be inadvertantly switched on.
3. Remove the fitted tool from the telescopic tube
4. Place the desired tool on the lower
end of the telescopic tube
5. Store the no longer required tools as
far as practicable in the accessory
bracket
2)
.
1(
.
1(
from
o
.
Operation
Attention! Before every utilisation
check to ensure that all filters are
correctly inserted and that no openings are blocked. The filters must
show no sign of damage and must
be dry. If not, there is a risk of overheating!
1. Fit the required tool (see chapter
"Changing tools").
2. Pull the power cable
cable storage up to the yellow marking.
from the
o
Attention! Should the red marking
on the power cable
rewind the power cable
sing on the foot button for power
cable rewind
marking. Otherwise, the power
cable
o
3. Press the On / Off switch
4. Adjust the suction power with the
suction power regulator
i
could break off.
be visible,
o
, by pres-
o
, back to the yellow
.
t
.
u
- 6 -
Page 9

5. If you are using the floor tool f,
adjust the setting for carpet/hard
floor
• Press the carpet/hard floor selector
switch dto the rear for hard floor
surfaces such as laminates, tiles and
PVC etc.
with the selector switch:
d
Emptying the dust collector
• Press the carpet/hard floor selector
switch
surfaces, such as long or short pile
carpets and rugs etc.
6. Pull the vacuum cleaner after you like
a sledge. When vacuuming, pay heed
to the information providet by the
floor covering manufacturer.
to the front for carpeted
d
Notice: Should you need to reduce
the suction power, e.g. if a curtain is
sucked in, open the secondary air
regulator
7. Press the On/Off switch
the vacuum cleaner off.
8. Remove the power plug
wall socket.
9. Hold the power plug
press on the foot button for power
cable rewind
cable
o
.
2@
to switch
t
from the
o
firmly and
o
. Allow the power
i
to pull itself in slowly.
Empty the dust collector hat the latest
when the MAX marking is reached or
the suction power has noticeably diminished.
Attention! Before emptying the dust
collector
the power socket.
1. Press the unlock button wand open
the housing lid
2. Turn the dust collector
so that it can be lifted out.
3. Hold the dust collector
dustbin and press the dust collector
unlock button .
4. Carefully knock the dust deposits out.
5. Close the bottom .
6. Replace the dust collector
vacuum cleaner. The lateral lugs
must fit into the recesses in the vacuum
cleaner.
7. Turn the dust collector
can no longer be lifted up.
8. Close the housing lid
, remove the plug ofrom
h
.
s
to the side
h
low over a
h
into the
h
so that it
h
.
s
- 7 -
Page 10

Storage
• During work breaks place the storage
hook
• If you do not intend to use the vacuum
cleaner for an extended period, shorten
the telescopic tube
sible and place the storage hook
the storage bracket
• If you do not intend to use the vacuum
cleaner for an extended period, empty
the dust collector
it and the filters (see the chapters
"Filters" and "Cleaning and care").
• Store the vacuum cleaner at a cool
and dry location.
in the storage bracket a.
g
as much as pos-
1(
.
r
and clean both
h
l
Filters
The vacuum cleaner has the following
filters:
The filters can become blocked after a
period of time. The suction power is
thereby reduced. Observe absolutely
the given time periods for cleaning and
checking. Should a filter be damaged,
exchange it immediately.
in
Attention! Do not clean the filters
in a dishwasher! They could become
irreparably damaged.
Lamellen filter
To take the lamellen filter out, proceed
as follows:
Attention! Before taking the filter
out, remove the plug
power socket.
from the
o
• Lamellen filter:
For the filtering out of light dust particles. This filter should be cleaned
every two months (see chapter
"Lamellen filter").
• Motor protection filter:
Should the lamellen filter not function properly, the motor protection
filter prevents larger dust particles
from damaging or destroying the
motor. This filter should be checked
every 6 months.
• Exhaust filter:
For filtering the smallest dust particles
from the blown-out exhaust air. This
filter should be checked every 6
months.
1. Remove and empty the dust collector
as described in the chapter "Emptying
the dust collector".
2. Take off the cover of the dust collector
and the filter grill .
3. Turn the filter grill , until it can be
removed.
4. Turn the lamellen filter , until it can
be removed.
- 8 -
with the lamellen filter
h
h
Page 11

Should the lamellen filter and the filter
grill be heavily soiled, rinse them both
thoroughly under clean running water.
Attention! Do not use a brush for
cleaning! The lamellen filter
could be damaged!
Afterwards allow the lamellen filter
and the filter grill to dry out (ca. 15
hours at room temperature).
Replace the lamellen filter and the
filter grill only when they are both
completely dry.
5. To reassemble the dust collector
proceed in the opposite sequence.
Motor protection filter
h
Attention! Before taking the filter
out, remove the plug
power socket.
from the
o
1. Open the housing lid s.
2. Take out the motor protection filter
and remove the vacuumed in particles
from the filter and the grill lying behind
it.
Notice: Should the motor protection
filter be heavily soiled, rinse it
thoroughly under clean running
water. Afterwards allow it to dry out
( ca. 15 hours at room temperature).
Replace it only when it is completely
dry.
3. Replace the motor protection filter .
4. Close the housing lid
Exhaust filter
s
.
Attention! Before taking the filter
out, remove the plug
power socket.
from the
o
1. Press the locking device of the
exhaust filter cover
and at the same time pull the exhaust
filter cover
cleaner to open it.
2. Remove the grill as well as the
exhaust filter .
- 9 -
away from the vacuum
e
in the middle
e
e
Page 12

3. Remove the dust particles from the
exhaust filter .
Notice: Should the exhaust filter
be heavily soiled, rinse it thoroughly
under clean running water. Afterwards
allow it to dry out ( ca. 15 hours at
room temperature). Replace it only
when it is completely dry.
4. Replace the exhaust filter and the
grill .
5. Slide both of the lugs of the exhaust
filter cover
vacuum cleaner.
6. Press the exhaust filter cover
until it audibly engages.
into the recesses on the
e
e
to
Cleaning and care
Attention! Before cleaning the
appliance, remove the plug
the power socket. Risk of electric
shock!
Clean the housing with a lightly moistened
cloth. Do not use abrasive or aggressive
cleaning materials. These could damage
the upper surfaces.
o
from
Disposal
Do not dispose of the appliance in
your normal domestic waste.
Dispose of the appliance through an
approved disposal centre or at your
community waste facility.
Observe the currently applicable regulations. In case of doubt, please contact
your waste disposal centre.
Dispose of the packaging materials
in an environmentally responsible
manner.
Warranty and Service
The warranty conditions and the service
address can be found on the warranty
slip.
Importer
KOMPERNASS GMBH
BURGSTRASSE 21
D-44867 BOCHUM
www.kompernass.com
Take note of the chapter "Filters" for
the cleaning of the filters.
- 10 -
Page 13

Troubleshooting
Attention! Before starting to trace the error on the appliance yourself, absolutely
remove the power plug
Defect Possible cause Solution
from the wall socket. Risk of electric shock!
o
Appliance does not
switch on.
The appliance does not pick
up dirt
Appliance makes a strange
noise
• The power plug ois not
inserted.
• Wall power socket is
defective.
• Power cable ois damaged.
• Dust collecter his full or
blocked.
• A filter is badly soiled.
• A tool
• Vacuumed in particles
f, 2$, 2%
scope tube
tion hose
block the air route.
the tele-
or the suc-
1(
are blocked.
2!
• Insert the power plug
into the power socket.
• Use a different wall
power socket.
• Arrange for the power
cable
by authorised specialists.
• Empty the dust collector
h
• Clean the appropriate
filter.
• Remove the blockage.
If necessary, use a long
wooden stick for this.
• Remove the blockage.
If necessary, use a long
wooden stick for this.
to be exchanged
o
.
o
- 11 -
 Loading...