

Page 1

COFFEE MAKER
KH 1098
KOMPERNASS GMBH · BURGSTRASSE 21 · D-44867 BOCHUM
www.kompernass.com
ID-Nr.: KH1098-01/09-V2
COFFEE MAKER
Operating instructions
Page 2
KH 1098
1(
q
w
e
l
k
j
h
g
f
d
s
a
r
t
u
y
io
Page 3
INDEX PAGE
Safety information 2
Technical data 2
Items supplied 3
Correct Usage 3
Appliance description 3
Preparation 3
Before the First Use 3
Setting the Time 3
Making coffee 4
Coffee servings 4
Timer-Function 5
Cleaning 5
Removing scale 6
Storage 6
Troubleshooting 6
Disposal 7
Warranty and Service 7
Importer 7
Read the operating instructions carefully before using the appliance for the first time and preserve this booklet
for future reference. Pass this booklet on to whoever might acquire the appliance at a later date.
- 1 -
Page 4

COFFEE MAKER
KH 1098
Safety information
Danger of electric shock!
• Connect the appliance only to correctly installed
and properly earthed power sockets.
• Remove the plug from the wall socket when you
move the appliance, fill it with water, if it malfunctions,
before cleaning it and when it is not in use.
Risk of personal injury!
• NEVER use the glass jug in a microwave oven.
• Lay the power cable in such a way that no one
can tread on or trip over it.
• This appliance is not intended for use by individuals
(including children) with restricted physical,
physiological or intellectual abilities or deficiences
in experience and/or knowledge unless they are
supervised by a person responsible for their safety
or receive from this person instruction in how the
appliance is to be used.
• Children should be supervised to ensure that
they do not play with the appliance..
NEVER submerse the appliance in liquids.
Should liquids nonetheless permate into the
appliance housing, immediately remove the
plug from the wall socket. Arrange for it to be
repaired by a qualified specialist.
• NEVER grasp the appliance, power cable or power
plug with wet hands.
• To disconnect, always pull out the plug itself out
of the power socket, do not pull the power cable.
• Do not fold or crush the power cable.
• Arrange for defective power plugs and/or cables
to be replaced at once by qualified technicians
or our Customer Service Department.
Risk of fire!
• Do not leave the appliance unattended when in use.
• Never operate the appliance without mains tapwater.
• Never place the appliance near sources of heat.
• Do not use an extension cable. In the event of
danger, the plug must be quickly and easily
accessible.
• Do not use an external timing switch or a separate remote control system to operate the appliance.
Do not touch the keep-warm plate. Hot surfaces!
Risk of Burns!
Risk of scalding!
• Never open the lid during the brewing process.
• Do not touch the hot filter. Remove the filter bag
when all of the coffee has drained away and the
bag has cooled down somewhat.
• Do not hold your hands in the rising steam.
• Never move/transport the appliance during the
brewing process.
To avoid damage to the appliance!
• Fill the water tank of the appliance exclusively
with freshly drawn mains water.
• Never subject the glass jug to large temperature
fluctuations. The glass may be damaged.
• No liabilty will be accepted for damage caused
by glass breakage!
Technical data
Mains voltage: 220-240V ~50Hz
Power consumption: 1050 W
- 2 -
Page 5

Items supplied
Preparation
• Coffee Maker
• Glass jug
• Measuring spoon
• Operating Instructions
Before taking the appliance into use check to ensure
that all of the items listed have been supplied and
that there are no visible signs of damage.
Note:
On delivery, the measuring spoon is to be
found in either the water tank or the glass jug.
Correct Usage
The coffee maker is intended exclusively for brewing
coffee. This coffee maker is intended exclusively for
use in private households. Do not use it commercially. This appliance in intended only for indoor use.
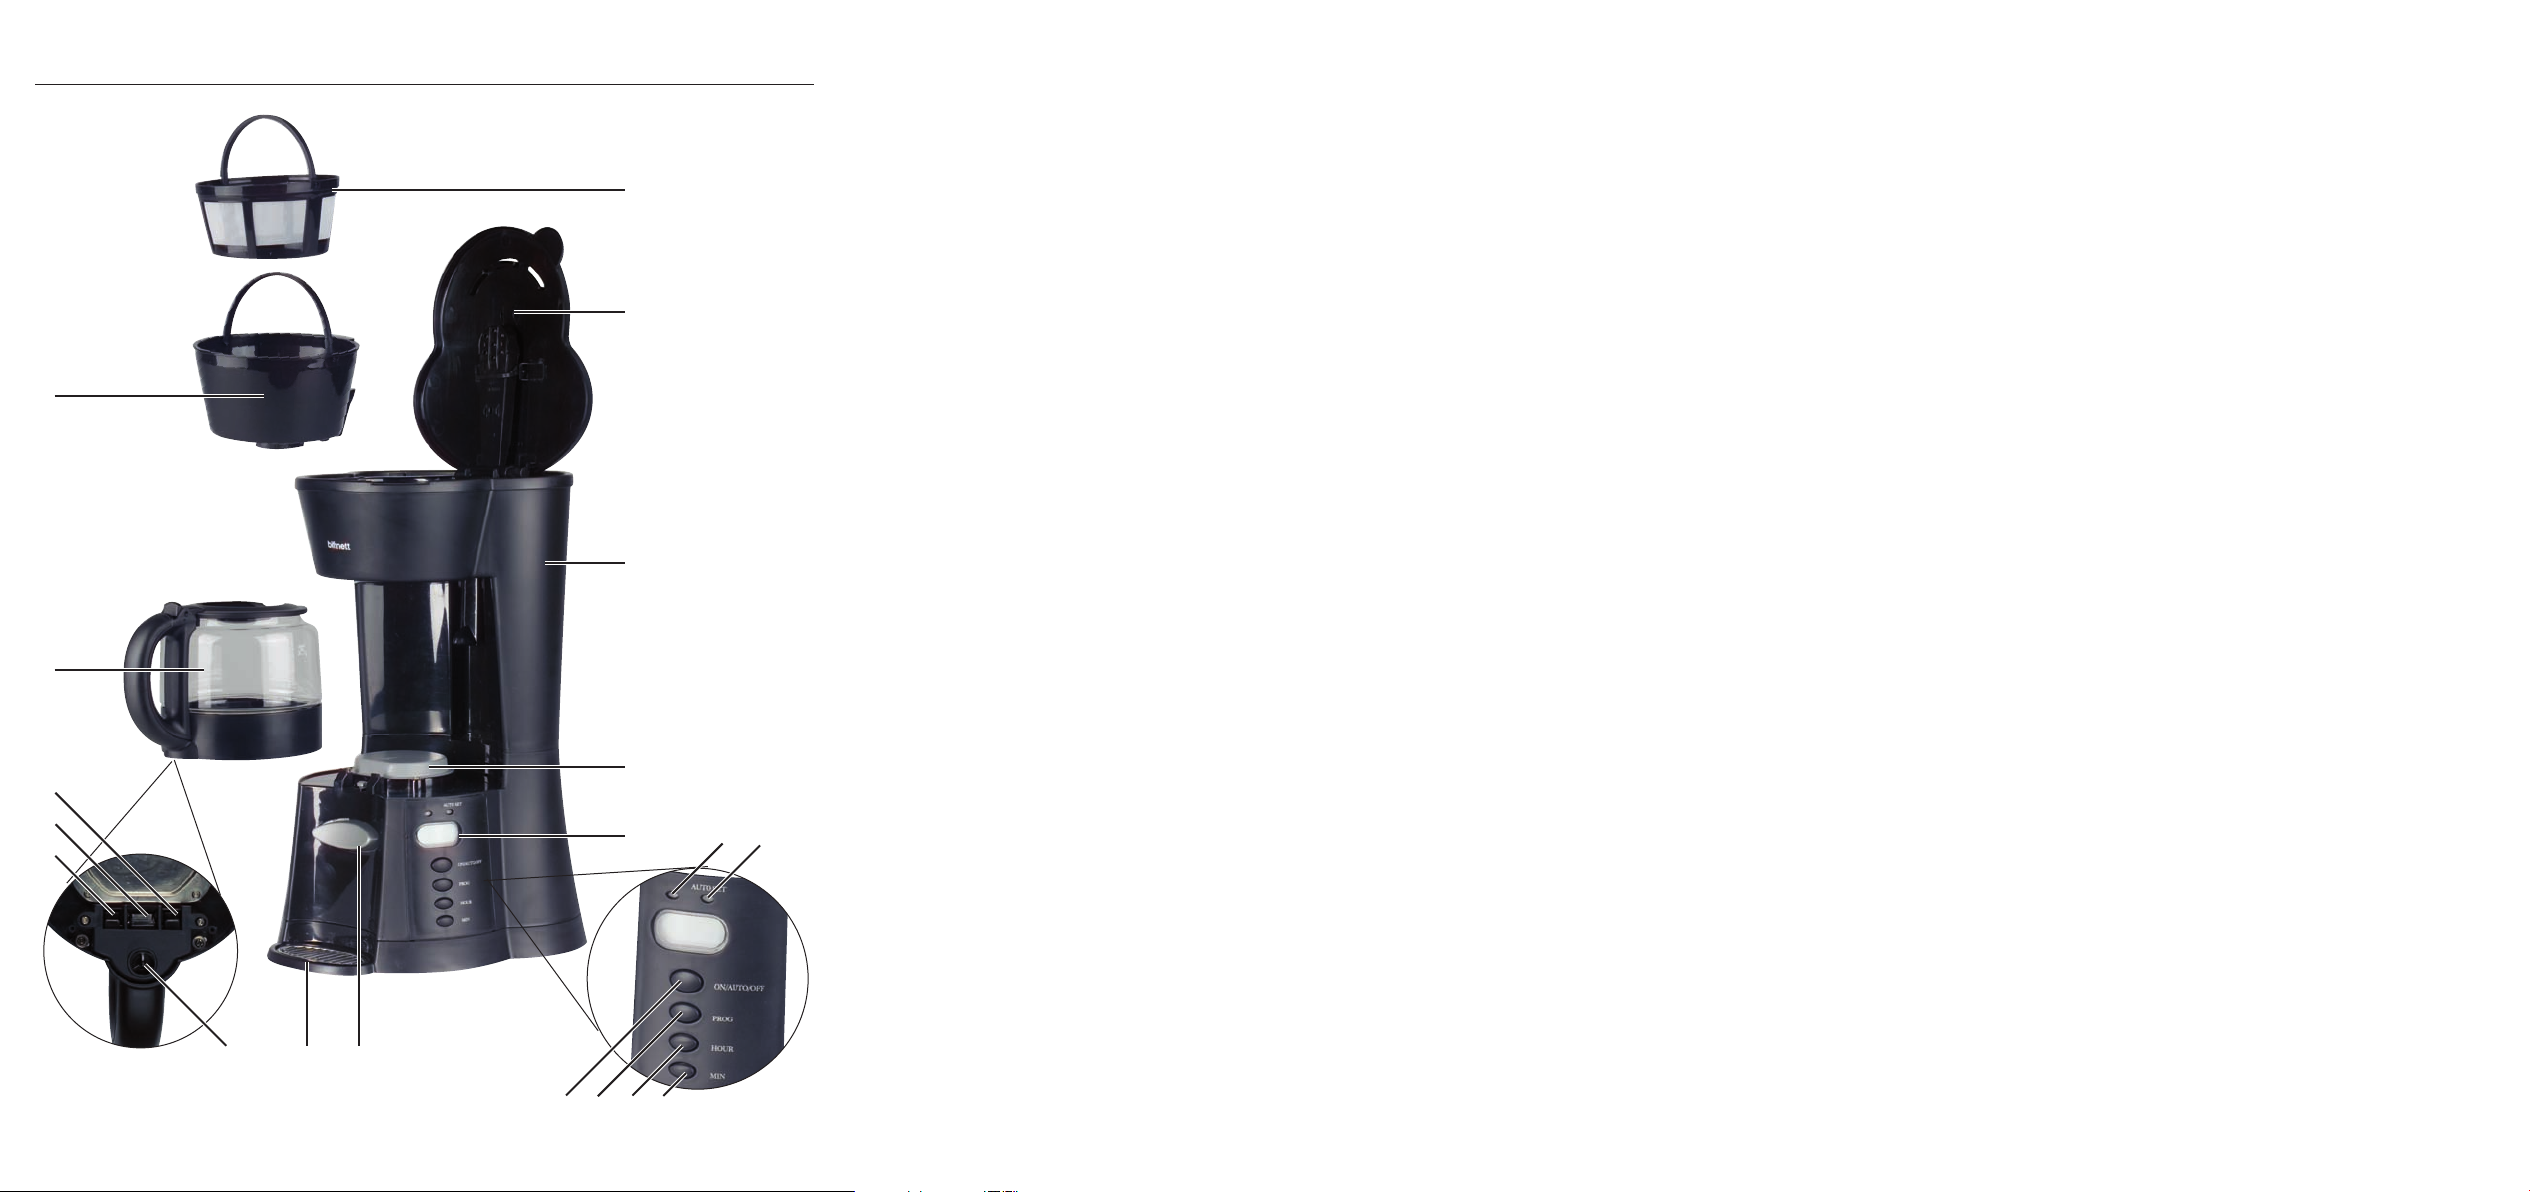
Appliance description
Filter
q
Lid
w
Water tank
e
Keep-warm plate
r
Display
t
red indicator lamp
y
green indicator lamp AUTO SET
u
Button MIN
i
Button HOUR
o
Button PROG
a
Button ON/AUTO/OFF
s
Coffee button
d
Driptray grill
f
Coffee passage
g
Outer lock
h
Coffee passage lock
j
Outer lock
k
Glass jug
l
Filter basket
1(
• Remove all packaging material from the appliance
and the accessories.
• Clean the appliance and all accessories (see
chapter "Cleaning").
• Place the coffee maker on a level and slip-free
surface.
• Open the lid
• Install the filter basket
into the recess on the coffee maker.
• Place the filter
• Lay the driptray grill
coffee maker.
• Insert the power plug into a power socket.
.
w
so that the lever settles
1(
in the filter basket 1(.
q
in the driptray on the
f
Before the First Use
Note:
When filling the appliance with water, never
exceed the MAX marking in the water tank
The appliance could overflow!
• To remove possible production residues, before
the first use brew up 10 cups of plain water,
without coffee, and allow it to flow through the
appliance.
Setting the Time
• Press the button PROG aonce, so that CLOCK
appears in the display
• Repeatedly press the button HOUR
resp. the button MIN
time is programmed in. If you hold the buttons
down, the numbers run through faster.
• Press the button PROG
display is now programmed,
or
• if you do not press any other button for ca. 10
seconds, the indicator CLOCK extinguishes in
the display
and the time is programmed.
t
.
t
for hours,
o
for minutes, until the correct
i
twice. The time
a
e
.
- 3 -
Page 6

Making coffee
• Open the lid w.
• Using the measuring spoon, place coffee powder
(coarse to medium ground) into the filter
A level measuring spoon of coffee approximates
to ca. 6 gr of coffee powder.
Note:
Should you use finely ground coffee powder it
could block the filter
through it and the coffee maker could overflow!
• Fill the water tank
of water. For this, use the glass jug
scale. When filling the appliance with water, never
exceed the MAX marking in the water tank
• Close the lid
, water can no longer flow
q
with the required amount
e
.
w
l
.
q
with the
e
Risk of scalding!
After the brewing process the coffee machine must
first cool down, for at least 10 minutes, before you
start another brew. If you do not, there is a risk of
being scalded by escaping steam!
Coffee servings
With this coffee maker you can fill a cup with coffee
using only one hand:
• When there is coffee in the glass jug
and hold your cup against the coffee button
Coffee flows into the cup.
• When the cup is full, remove the cup from the
coffee button
• Any drips that might fall will be caught by the
.
driptray grill
f
d
.
.
l
, press
d
.
Note:
After brewing, there is always somewhat less coffee
in the glass jug
you filled the water tank
absorbs some of the water.
• Place the glass jug
• Press the button ON/AUTO/OFF
The red indicator lamp
begins the brewing process.
• When the brewing process is complete, the coffee
is kept warm by the keep-warm plate
hours. On the expiry of this period the coffee
maker switches itself.
• Should you wish to switch the coffee maker off
earlier, repeatedly press the button
ON/AUTO/OFF
are extinguished.
u
than the amount of water that
l
with. The coffee powder
e
in the coffee maker.
l
once.
s
glows. The coffee maker
y
r
until the indicator lamps y/
s
for two
Note:
Empty the driptray below the driptray grill
Otherwise it could overflow.
Note:
If you pour coffee using the coffee button
small amount of coffee will always be left in the
glass jug
You can also pour coffee from the glass jug
the usual manner:
• Lift the glass jug
If, before you lift the glass jug lout, you have
activated the coffee button
few drops of coffee will drip from the glass jug
Note:
l
.
and then pull it to the front.
l
, it can happen that a
d
regularly.
f
d
, a
l
in
l
.
- 4 -
Page 7

Timer-Function
By use of the button PROG a, you can programme
the coffee maker so that it starts the brewing process at
a pre-determined time (Timer function). First, always
fill the filter
and the water tank
jug
l
is empty and the water tank eis not filled beyond
l
the Max marking.
• Press the button PROG atwice, so that TIMER
appears in the display
desired start time with the button HOUR
the button MIN
• When the desired start time has been entered in,
press the button PROG
time is now programmed. The display
the normal time.
• To activate the timer, press twice on the button
ON/AUTO/OFF
AUTO SET
start the brewing process at the programmed
time.
• If you want to deactivate the timer, press the button
ON/AUTO/OFF
AUTO SET
in the filter basket 1(with coffee powder
q
with water. Place the glass
e
in the coffee maker. Ensure that the glass jug
. Programme in the
t
and
o
(see chapter "Setting the Time").
i
once more. The start
a
shows
t
. The green indicator lamp
s
glows. The coffee maker will now
u
. The green indicator lamp
s
extinguishes.
u
Cleaning
Before cleaning, ALWAYS remove the plug from the
wall power socket.
Risk of burns!
Always wait until the coffee maker has cooled
down before cleaning it.
• Wipe the housing with a damp cloth. For stubborn
soiling use a mild detergent on the cloth.
• Clean the glass jug
in mild sudsy water and rinse them with lots
1(
of clean and clear water.
Note:
Clean the Filter
later, it will be more difficult to clean.
If coffee powder or something similar has deposited
itself in the coffee sieve of the glass jug
as follows:
• Upturn the glass jug l.
• Press the two outer locks
hold them firmly.
• You can now slide the coffee passage lock
inwards. The coffee passage gopens itself.
Hold it open.
q
, filter qand filter basket
l
immediately after use. If left until
, proceed
l
inwards and
h/k
j
Risk of electric shock!
Before you clean the Coffee Maker you MUST
remove the plug from the power socket.
Attention!
NEVER submerge the Coffee Maker in water.
This would irreparably damage the appliance.
• You can release the outer locks h/k.
• Allow water to flow through the opened coffee
passage
washed out with the water. Should they still not
dissolve/detach themselves, gently scrub the sieve
with a soft brush.
- 5 -
. The residues in the sieve should be
g
Page 8

• When the sieve is free of residues, release the
coffee passage lock
is now closed.
. The coffee passage
j
g
Removing scale
Scale removal is already necessary after ca.
30 brewing processes with hard water, after
ca. 60 brewing processes with soft water.
Use only scale removal products that are suitable
for coffee makers and pay heed to the instructions
for use.
The procedure for scale removal is:
• Place the scale removal product in the water
tank
.
e
• Fill it with enough water for max. 12 cups.
• Press the button ON/AUTO/OFF
The brewing process starts, the red indicator
lamp
• Wait until the solution has completely run through
the Coffee Maker.
• After descaling, rinse the Coffee Maker through
twice with 12 cups of clean water each time.
y
glows.
s
once.
Storage
Troubleshooting
The Coffee Maker does not function:
• The plug is not inserted into a power socket.
Connect the appliance with the mains.
Push the power plug into the wall socket.
• The power socket is defective. Try another wall
socket.
• The Coffee Maker is still hot from the previous
brewing process. Wait until the Coffee Maker
has cooled down.
The brewing process does not start at the
desired time:
• The timer is not activated. To activate the timer,
press twice on the button ON/AUTO/OFF
• The time is not correctly programmed. Check the
time entered and, if necessary, re-programme it.
The coffee is too strong/too weak:
• There is too little/too much water in the water
tank
. Fill it with the correct amount of water.
e
• It is filled with too much/too little coffee powder.
Fill it with less/more coffee powder.
• The coffee powder is too finely/too coarsely
ground. Select a different grade of grinding for
your coffee powder.
s
.
• If you do not intend to use the Coffee Maker for
an extended period, remove the plug from the
power socket.
• Store the power cable in the cable shaft on the
rear of the Coffee Maker.
Water collects in the filter
over:
• The coffee powder is too finely ground, causing
a blockage of the filter
ground coffee powder.
The brewing process takes unusually long.
The appliance switches itself off during the
brewing process.
The appliance is becoming louder when brewing.
There is excessive steam.
• The brewing system of the appliance is calcified.
Descale the appliance as described under
"Removing scale".
- 6 -
and it then flows
q
. Use a more coarsely
q
Page 9

Disposal
Do not dispose of the appliance in your
normal domestic waste. This product is
subject to the European guideline
2002/96/EC.
Dispose of the appliance through an approved disposal centre or at your community waste facility.
Observe the currently applicable regulations.
In case of doubt, please contact your waste disposal
centre.
Dispose of all packaging materials in an
environmentally friendly manner.
Warranty and Service
The warranty for this appliance is for 3 years from
the date of purchase. The appliance has been manufactured with care and meticulously examined before
delivery. Please retain your receipt as proof of purchase.
In the case of a warranty claim, please make contact
by telephone with our service department. Only in
this way can a post-free despatch for your goods
be assured.
The warranty covers only claims for material and
maufacturing defects, not for wearing parts or for
damage to fragile components, e.g. buttons or batteries. The appliance is intended for domestic use
only, NOT for commercial purposes.
If this product has been subjected to improper or
inappropriate handling, abuse, or modifications not
carried out by one of our authorised sales and service
outlets, the warranty will be considered void. Your
statutory rights are not restricted in any way by this
warranty.
DES Ltd
Units 14-15
Bilston Industrial Estate
Oxford Street
Bilston
WV14 7EG
Tel.: 0870/787-6177
Fax: 0870/787-6168
e-mail: support.uk@kompernass.com
Irish Connection
Harbour view
Howth
Co. Dublin
Tel: 00353 (0) 87 99 62 077
Fax: 00353 18398056
e-mail: support.ie@kompernass.com
Importer
KOMPERNASS GMBH
BURGSTRASSE 21
44867 BOCHUM, GERMANY
www.kompernass.com
- 7 -
 Loading...