

Page 1
KH1
Coffee machine with timer KH 1
Page 2
Page 3

Operating Instructions
Page 4

Table of Contents
Safety instructions . . . . . . . . . . . . . .3
Proper use . . . . . . . . . . . . . . . . . . . . .4
Description . . . . . . . . . . . . . . . . . . . .4
Appliance overview . . . . . . . . . . . . .4
The operating panel . . . . . . . . . . . . .5
Installation and connection . . . . . . .5
Before initial use . . . . . . . . . . . . . . . .5
Setting the time . . . . . . . . . . . . . . . .5
Preparing the coffee . . . . . . . . . . . .5
Filling with ground coffee . . . . . . . . . .5
Filling with water . . . . . . . . . . . . . . . .6
Starting the brewing process . . . . . . .6
Setting the start of brewing . . . . . . . .6
Activating automatic start
of brewing . . . . . . . . . . . . . . . . . . . . .6
Switching-off and rolling up
power cord . . . . . . . . . . . . . . . . . . . .6
Cleaning . . . . . . . . . . . . . . . . . . . . . .6
Decalcifying . . . . . . . . . . . . . . . . . . .7
Rectifying malfunctions . . . . . . . . . .8
Safety instructions
Danger of electric shock!
• Plug the appliance only into correctly installed and earthed power
sockets rated to 230 V and 50 Hz.
• Always pull the mains plug from the
socket before moving, filling or
cleaning the appliance, if it shows
signs of malfunction and when it is
not required.
• Never immerse the appliance in
water, expose it to moisture or use
outdoors. Should liquid happen to
penetrate the appliance's casing,
unplug the appliance immediately
and have it repaired by a qualified
electrician.
• Never touch the appliance, power
cord or plug with wet hands.
• Always unplug the power cord at
the plug, do not pull on the cord
itself.
• Do not fold or squeeze the power
cord.
• Should the power cord or appliance housing be damaged, have the
appliance repaired by a qualified
professional before using it again.
Never open the appliance housing.
Doing so may compromise safety
and will invalidate the warranty.
• Do not use an extension cable.
Disposal . . . . . . . . . . . . . . . . . . . . . . .8
Technical data . . . . . . . . . . . . . . . . . .8
Warranty and service . . . . . . . . . . . .8
3
Page 5

Fire hazard!
• Never leave the appliance unsupervised while it is in operation.
• Never operate the appliance without water. Always keep the water
level between 0.35 and 1,4 litres.
•Never place the appliance near a
heat source.
Danger of injury!
• Never use the glass jug in the
microwave.
• Do not allow children to use the
appliance unless under the supervision of an adult. Explain the dangers associated with using the
appliance.
• Place the power cord in such a way
that no one will step or trip on it.
Danger of burning!
• Never touch hot surfaces on the
appliance, in particular the hot
plate and the glass jug.
Danger of scalding!
• Never open the filter holder during
the brewing process.
• Do not touch the hot filter bag. Do
not remove the filter bag until the
all the liquid has drained through
and the bag has cooled down.
• Do not place your hands in the
rising steam.
• Never move the appliance during
the brewing process.
• Do not remove the pot until the
brewing process has finished and
the filter has run empty.
• Before switching on, always close
the filter holder to avoid being scalded by escaping steam and hot
water.
Caution!
• Always fill the water container of
the appliance with clean tap water.
Use of other liquids may cause
damage.
Proper use
The coffee machine is designed exclusively for the preparation of coffee.
This coffee machine is designed exclusively for use in private households.
Please observe all the information in
these operating instructions, particularly the safety instructions. All other uses
are regarded as improper.
Description
The coffee machine can be used to
prepare hot filter coffee. You can program the coffee machine to start
brewing and keep the freshly prepared
coffee warm by leaving the glass jug
on the hot plate with the appliance
switched on.
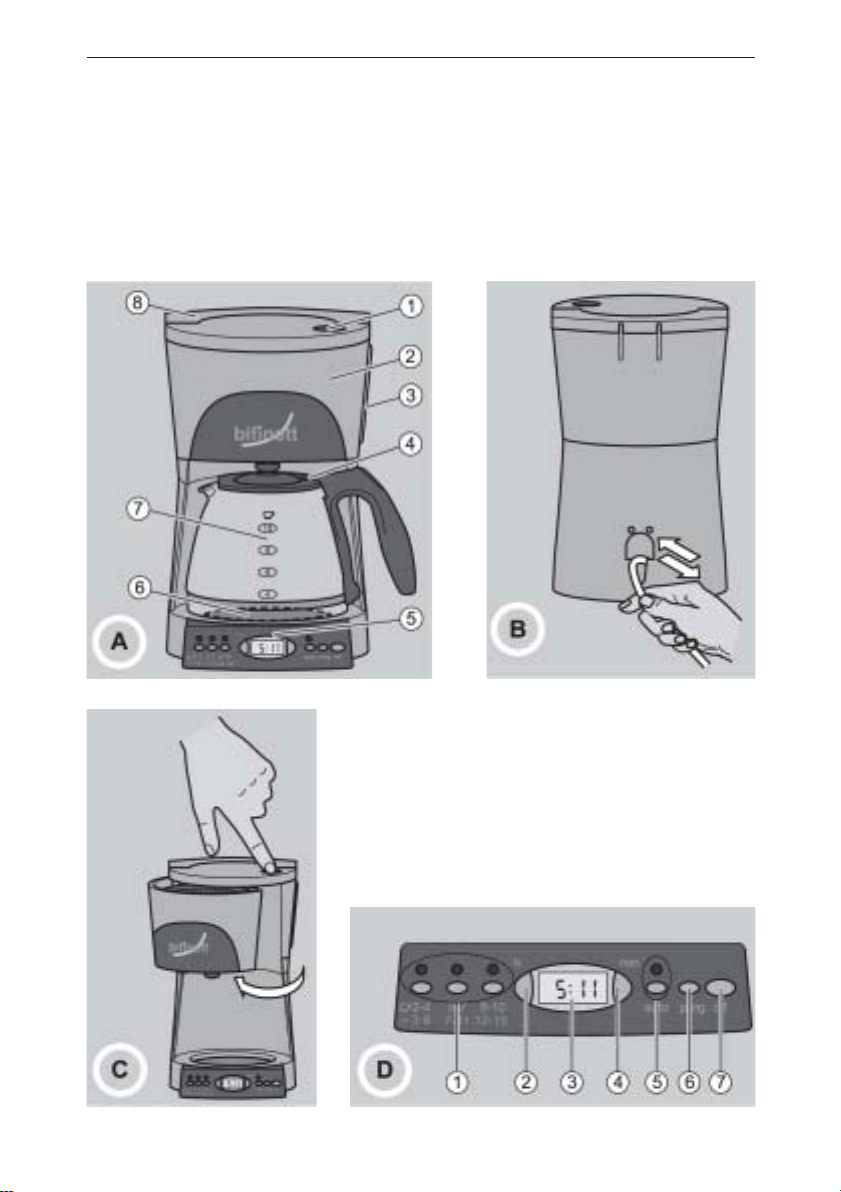
Appliance overview
Figure A:
Filter holder release
Filter holder
Water level indicator
Lid opener
Operating panel
Hot plate
Glass jug with level markings
Water container lid
4
Page 6

The operating panel
Figure D:
Buttons and LEDs for the
number of cups
Button for setting the “Hours” (h)
Clock
Button for setting the “Minutes”
(min)
Auto. button and LED
Program button
Switching off and clearing settings
(off)
Installation and connection
➪ Always place the coffee machine
on a flat, even surface.
➪ When you want to connect up the
coffee machine, pull out the power
cord from its holder (Figure B).
➪ Plug in the power cord.
Before initial use
➪ Open the glass jug (Figure A; +
) and the water container.
➪ Carefully rinse out the water contai-
ner and glass jug with tap water.
➪ Fill the glass jug with 1.4 litres of
tap water.
➪ Empty the jug into the water con-
tainer.
➪ Place the empty glass jug on the
hot plate (Figure A; ).
➪ Select the required number of cups
“2-4”.
The corresponding LED illuminates and
the brewing process begins.
➪ When the brewing process has
finished, empty the glass jug.
➪ Press the “off” button
(Figure D; ), until the LED for the
number of cups extinguishes.
You can now use your coffee machine.
Setting the time
➪ Press the “h” and “min” buttons
repeatedly
(Figure D; ‚ until ), you reach
the desired time.
➪ Now briefly press the “prog” button
(Figure D; ).
The two vertical dots in the display
flash. The clock is working.
Preparing the coffee
When configuring all settings on the
control panel (Figure A; ) apart from
setting the clock and programming the
machine to start brewing, you will hear
a beep when you have correctly pressed a button. At the end of the
brewing process, a LED flashes and
you will hear four beeps. Do not remove the jug until the beeps finish.
Filling with ground coffee
➪ Push the filter holder release
(Figure C).
The filter holder swivels out to the side
(Figure C).
➪ Place an opened, size 4 filter into
the filter holder.
➪ Pour ground coffee into the filter bag.
5
Page 7

For each cup of strong filter coffee,
you will need approx. one level measuring spoon (supplied) of ground coffee.
If you prefer a weaker taste, you can
reduce the amount of ground coffee
per cup.
➪ Close the filter holder.
Filling with water
➪ Open the water container lid (Figure
A; ).
➪ Fill the glass jug with tap water.
➪ Fill the water container with the
correct volume of tap water for the
required number of cups to the
water level indicator.
Starting the brewing process
➪ Select an aroma setting in line with
the required number of cups
(Figure D; ).
The corresponding LED illuminates and
the brewing process begins.
WARNING: The lid of the water container becomes hot during the brewing
process. Allow the device to cool before starting another brewing process.
Activating automatic start
of brewing
➪ Press the “auto” button (Figure D;
), until the LED illuminates.
➪ Now select the desired number of
cups
(“Starting the brewing process”)
➪ The brewing process starts at the
programmed time.
➪ If you want to deactivate automatic
start of brewing again, press the
“off” button (Figure D; ).
Switching-off and winding up
power cord
➪ When you want to switch off the
coffee machine, press the “off” button until all LEDs extinguish.
➪ Now pull the plug from the mains
socket.
➪ Push the cable into its holder
(Figure B) at the back of the appliance.
➪ Push the metal contacts on the
mains plug into the two holes
above the cable holder as required.
Cleaning
Setting the start of brewing
You can use the “prog” button (Figure
D; ) to set the coffee machine to
start brewing at a certain time. First,
always fill the coffee machine with
water and ground coffee and place the
glass jug onto the hot plate.
➪ Press and hold the “prog” button.
➪ Program the desired start time
using the “h” and “min” buttons
(“Setting the time”)
6
To achieve the best possible brewing
results, the coffee machine should be
cleaned each time it is used.
➪ Pull the plug from the mains
socket.
Page 8

Danger of electric shock!
Before cleaning the coffee machine,
always unplug from the power socket.
Never immerse the appliance in water
or hold under running water.
Danger of burning!
Always wait until the coffee machine
has cooled down before cleaning it.
Otherwise you could damage the
appliance.
Caution!
Do not use household detergents or
sharp objects to remove marks. Doing
so could damage the coffee machine.
➪ Wipe the coffee machine housing
and glass jug with mild soapsuds
using a slightly damp cloth, remo-
ving any deposits inside the glass
jug.
➪ Remove the filter insert from its
holder after each use (Figure A; ).
➪ Remove the filter bag and rinse out
the filter holder and glass jug under
running water.
Decalcifying
Find out about the hardness of your
water by asking your water provider. If
your water is particularly hard, you will
need to decalcify after approx. 30 uses
and after approx. 60 uses if it has a
lower degree of hardness. Use a
decalcifier suitable for household
appliances. Observe the instructions
for use on the decalcifier.
➪ Switch off your coffee machine and
leave to cool completely.
➪ Pour the decalcifier into the water
tank.
➪ Fill up with water to the max. 1.4
litre mark.
➪ Place the glass jug on the hot
plate.
➪ Switch on the coffee machine at
the switch for the number of cups
(Figure D; ).
➪ Wait until the brewing process has
finished.
➪ Press the “off” button (Figure D; ).
➪ Let the coffee machine brew twice
containing only water, see “Before
initial use”.
➪ Rinse out the glass jug thoroughly
several times with tap water.
Over the period of use, the amount of
calcium (hardness) in the water will
cause calcium deposits in your coffee
machine. Calcium affects the function
of the appliance and impairs the quality of the brewed filter coffee.
7
Page 9

Rectifying malfunctions
The coffee machine
will not switch on.
A household fuse is defective.
Check the fuses and replace
them if necessary.
The power socket is defective. Try
another power socket.
The coffee machine may be defective.
Have the coffee machine inspected by
a qualified electrician.
The quality of the
brewed coffee falls.
The coffee machine becomes calcified.
Decalcify the coffee machine.
LED for aroma setting flashes.
Four beeps.
The brewing process has finished.
Remove the glass jug.
No water in the container. Fill with
water and replace the glass jug on the
hot plate.
Disposal
Technical data
Voltage: 230 V, 50 Hz
Rated power: 1400 W
Coffee filters: Size 4
Maximum filling level on glass jug and
water container: 1.4 litres, equivalent
to 10 large or 15 small cups
Warranty and service
Please see the supplementary sheet
for warranty conditions and the service
address.
Do not on any account throw the coffee machine away with your household
waste. Ask your local authority how
you can dispose of your coffee machine in an environmentally-friendly and
proper manner.
8
Page 10

Kompernaß Handelsgesellschaft mbH · Burgstraße 21 · 44867 Bochum · www.kompernass.com
IDNr.: KH1-02/04
 Loading...