

Page 1

AF KAMERA SET
AF CAMERA SET
SET APPAREIL PHOTO AF
KIT CAMERA AF
JUEGO DE CAMARA AF
CONJUNTO MÁQUINA
FOTOGRÁFICA AF
AF CAMERASET
™∂∆ ∫∞ª∂ƒ∞™ AF
Page 2

Bedienungsanleitung
D
Seite 04 - 11
GB
GR
Operating instructions
Mode d'emploi
F
Istruzioni per l‘uso
I
Instrucciones de servicio
E
Instruções de serviço
P
Gebruiksaanwijzing
NL
√¢∏°π∂™ §∂π∆√Àƒ°π∞™
Page 12 - 19
Page 20 - 27
Pagina 28 - 35
Página 36 - 43
Página 44 - 51
Pagina 52 - 59
™ÂÏ›‰·
60
-
67
Page 3
ON
OFF
AUTO S
ME
ON
OFF
AUTO S
ME
AUTO
ME
Fig.2bFig.2a Fig.2c
AUTO
Fig.2d
AUTO
Fig.2e
ON
Fig.2f
OFF
Fig.2g
AUTO S
Fig.2h
Fig.3
Fig.4
Fig.5
Fig.6 Fig.7
119
Fig.1
9
8
6
2
5
7
4
3
17
15
10
18
11
12
20
14 13
16
FILM
F
IL
M
Page 4

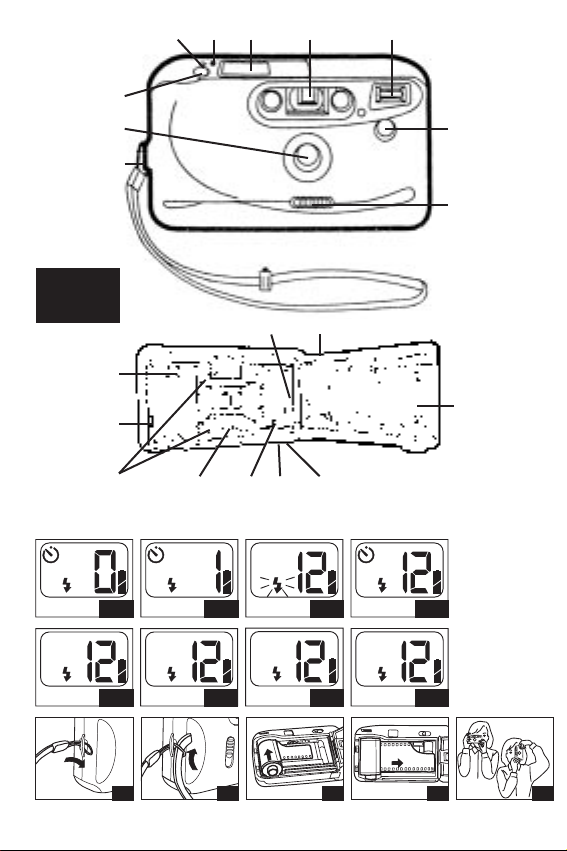
BESCHREIBUNG DER TEILE, ABB. 1
01. Multifunktionsschalter 11. Rückwandentriegelung
02. Auslöser 12. Filmleitschienen
03. Objektivschutz- u. Stromschalter 13. Stativgewinde
04. Befestigung für Trageschlaufe 14. Filmaufwickelspule
05. Objektiv 15. Filmeinlegezeichen
06. Blitz 16. Batteriefachdeckel
07. LED gegen Rotreflexion 17. Rückwand
08. LC-Display 18. Filmkontrollfenster
09. Sucher 19. Rückspultaste
10. Rückspulachse 20. Zahnrad
TECHNISCHE DATEN
Typ: Vollautomatische Autofokus-Sucherkamera, 35 mm
Filmformat: Kleinbild, 24x36 mm
Sucher: mit Leuchtrahmen, Autofokusrahmen, Grünanzeige für
Fokussierung, leuchtende Rotanzeige bei abgeschalte-
ter Blitzeinstellung (OFF ) oder unzureichendem Licht
Belichtung: vollautomatisch
Autofokus-System: Fokus-Arretierung mit grünem Licht bei halbgedrücktem
Auslöser
Blitz: automatisch, zu- und abschaltbar
Blitzladezeit: max. 10 Sekunden - bei frischen Batterien
Filmempfindlichkeitseinstellung: automatisches DX-System für Filme ISO 100 bis 400
Energiequelle: 1 x 3V-Lithium-Batterie CR 123A
a) BEFESTIGUNG DER TRAGESCHLAUFE, ABB. 3-4
Das mit einer kleinen Schlinge versehene Ende der Trageschlaufe durch die Befestigung
für Trageschlaufe (4) einfädeln. Das andere Ende durch die vorstehende Schlinge
einfügen und straff ziehen, um die Trageschlaufe fest zu machen.
D
4
Page 5

b) EINLEGEN DER BATTERIE
• Nur Lithium-Batterien 3V CR 123 A benutzen. Wiederaufladbare NC-Akkus oder KohleZink-Zellen sind nicht geeignet.
• Öffnen Sie das Batteriefach (16) und beachten Sie die im Batteriefach gekennzeichnete
Anordnung der Batterie.
• Ersetzen Sie die Batterie, wenn die Blitzaufladezeit länger (d.h. mehr als 30 Sekunden)
dauert.
• Achtung: Nach Gebrauch immer die Kamera ausschalten [siehe auch Abschnitt c], da
sich bei Dauerbereitschaft die Batterie entleeren kann.
c) OBJEKTIVSCHUTZ-/STROMSCHALTER
1. Schieben Sie den Objektivschutz- u. Stromschalter (3) nach links, um die Kamera
einzuschalten. Die Kamera ist nun aufnahmebereit. Auch das Symbol ”Auto ”
wird ständig angezeigt. Bei eingelegtem Film wird die entsprechende Bildnummer
angezeigt.
2. Nach Beendigung der Fotoserie, Objektivschutz- u. Stromschalter nach rechts
schieben, bis er vollständig in geschlossener Position steht. Dabei wird gleichzeitig
der Kamerastrom abgeschaltet.
d) LC-DISPLAY, ABB. 2
Wenn die Kamera mit einer Batterie versehen und eingeschaltet ist, wird das LC-Display
(Abb. 2) je nach Bedarf die folgenden Funktionen anzeigen:
kein Film eingelegt, Bildzahl; ” ” (Ladevorgang), ”Auto ” (eingeschaltet und
bereit), Reduzierung roter Augen und Selbstauslöser.
Das LC-Display erlischt, wenn man den Batteriefachdeckel öffnet, um die Batterie zu
ersetzen und der Bildzähler setzt sich auf Null zurück. Ersetzen Sie die Batterie nur
dann, wenn kein Film in der Kamera eingelegt ist.
D
5
Page 6

Abb. 2 a) Das LC-Display zeigt 0 ”Kein Film eingelegt”.
Abb. 2 b) Das LC-Display zeigt ”1”, die nach Transport des 4ten Bildes erscheint. Das
bedeutet, daß der Film richtig eingelegt worden ist. Die Kamera ist jetzt bereit,
um die erste Aufnahme zu machen.
Abb. 2 c) Das blinkende Blitzsymbol ” ” im LC-Display zeigt an, daß der
Ladevorgang für das Blitzgerät noch aktiv ist. Die Kamera ist aufnahmebereit,
wenn das Symbol ” ” aufhört zu blinken und ständig angezeigt wird.
Abb. 2 d) Das ” ” -Symbol erscheint im LC-Display, sobald der Selbstauslöser aktiviert
wurde.
Abb. 2 e) Drücken Sie den Multifunktionsschalter (1) und wählen Sie
die Funktion ON . Die Blitzautomatik ist nun ausgeschaltet und der Blitz
wird synchron beim Auslösen zugeschaltet und sorgt für eine Schattenaufhellung, z.B. wenn Ihr Motiv vor sehr hellem Hintergrund (Sonne, heller
Himmel) steht.
Abb. 2 f) Schalten Sie die Blitzautomatik aus, wenn Sie bei normalem Tageslicht foto-
grafieren. Drücken Sie den Multifunktionsschalter (1) und wählen Sie die
Funktion OFF . Die Blende ist auf volle Öffnung gestellt, um eine bestmögliche Belichtung zu gewährleisten. Betätigen Sie nun zum Fotografieren den
Auslöser (2).
e) EINLEGEN DES FILMS, ABB. 5-6
Für beste Resultate 100, 200 oder 400 ISO Farbnegativfilm mit DX-Codierung anwenden.
1) Den Objektivschutz- u. Stromschalter öffnen, um die Kamera einzuschalten [s. Abschnitt c].
2) Die Rückwandentriegelung (11) nach unten schieben, um die Rückwand (17) zu öffnen.
3) Die Filmpatrone einlegen – zuerst das obere Ende einlegen, dann das untere Ende
einschnappen lassen. Die Patrone fest, flach hineindrücken, damit der Filmvorspann
flach liegt und sich nicht nach oben beugt (Abb. 5 u. 6).
4) Den Filmvorspann etwas herausziehen, bis die Spitze das Filmeinlegezeichen (15) neben
der Aufwickelspule (14) erreicht.
D
6
Page 7

• Vergewissern Sie sich, dass der Film flach zwischen den Filmleitschienen (12) liegt und
daß die Filmperforation im Zahnrad (20) eingreift.
f) FOTOGRAFIEREN - Tageslicht und Blitz, ABB. 7
1) Die Kamera fest mit beiden Händen halten (Abb.7). Darauf achten, daß das Objektiv (5),
Blitzgerät (6), oder LED (7) nicht mit Fingern oder Haar abgedeckt wird.
2) Die Kamera kann beliebigerweise im Quer- oder Hochformat gehalten werden. (Kamera
so orientieren, daß der Blitz oben steht.) Kontrollieren, dass die Kamera eingeschaltet ist
[s. Abschnitt c]. Das Symbol ”Auto ” am LC-Display leuchtet auf.
3) Stellen Sie sicher, dass das Motiv in mindestens 1,5 m Entfernung steht und suchen Sie
den Bildausschnitt im Sucher aus. Beim Fotografieren im Nahbereich kann in der
endgültigen Aufnahme ein Teil des Bildes abgeschnitten werden, lassen Sie deshalb
beim Wählen des Bildausschnitts genug Raum um das Motiv herum.
4) Den Auslöser sorgfältig vollkommen herunterdrücken, um die Aufnahme zu machen.
Der Film wird sofort zum nächsten Bild transportiert und ist bereit für ein weiteres Foto.
5) Der Blitz wird automatisch ausgelöst, falls dies für eine korrekte Belichtung nötig ist.
6) Bei sehr schlechten Lichtverhältnissen kann für Aufnahmen von Personen oder
Haustieren das System zur Reduzierung ”roter Augen” benutzt werden. Den Auslöser
ca. 1 Sek. teilweise heruntergedrückt halten, um das Vorlicht gegen rote Augen
aufleuchten zu lassen, dann vollkommen durchdrücken, um die Aufnahme zu machen.
Siehe Abschnitt G) REDUZIERUNG DER ROTREFLEXION für weitere Details.
7) Aufnahmeentfernungen für Blitz
ISO 100: 1,5 m bis 3,0 m
ISO 200: 2,0 m bis 4,5 m
ISO 400: 2,5 m bis 6,0 m
Der Anwendungsbereich des Blitzes hängt von der Filmempfindlichkeit ab. Vergewissern
Sie sich, dass das Motiv innerhalb des richtigen Aufnahmeentfernungsbereichs für
Blitzbilder steht.
g) REDUZIERUNG DER ROTREFLEXION
Aufnahmen von Personen oder Haustieren, die bei schwachem Licht gemacht sind, können den
sog. ”Rotaugen-Effekt” zeigen. Die Augenpupillen erscheinen im Bild als rote Punkte.
D
7
Page 8

Das kann vermindert werden, indem man die Motive etwas seitlich von der Kamera
blicken läßt oder die Zimmerbeleuchtung erhöht. Außerdem ist diese Kamera mit einem
System zur Reduzierung von roten Augen ausgestattet. Durch das teilweise Hineindrücken
des Auslösers leuchtet ein starkes LED (7) auf der Vorderseite der Kamera. Das wird
die Pupillen der Augen des Motivs etwas verkleinern lassen und den ”Rotaugen-Effekt”
vermindern.
• Die Rotreflexions-Verminderung “AUTO S” (siehe auch Abb. 2g) ist am effektivsten,
wenn das Motiv in der Mitte des Bildfeldes steht.
h) MEHRFACHBELICHTUNG, ABB. 2h
Mit dieser Funktion können interessante Doppel- und Mehrfachbelichtungen gemacht
werden. Drücken Sie den Multifunktionsschalter (1) und wählen Sie die Funktion ME aus.
Dann drücken Sie den Auslöser (2) und machen die erste Belichtung. Der Film wird in
dieser Funktion nicht weitertransportiert, die Kamera ist aber erneut aufnahmebereit.
Beispiel:
Sie wollen die klaren Umrisse und Details bei einem Sonnenuntergang mit den Lichtern
(z.B. einer Stadt, die Laternen sind aber noch nicht eingeschaltet) in der Nacht kombinieren. Gehen Sie wie folgt vor:
Montieren Sie die Kamera möglichst auf ein Stativ, visieren Sie Ihr Motiv an und drücken
Sie den Multifunktionsschalter (1) und wählen Sie die Funktion ME aus. Dann drücken
Sie den Auslöser (2) und machen die erste Belichtung. Sobald die Beleuchtung der Stadt
eingeschaltet ist wählen mit dem Funktionsschalter die Funktion OFF und machen die
zweite Belichtung.
Zur Beachtung: Sie können auch noch weitere Belichtungen auf dasselbe Negativ
bringen. Wählen dafür die Mehrfachbelichtungsfunktion (ME) vor der jeweils zweiten
Belichtung nochmals an.
D
8
Page 9

i) RÜCKSPULEN DES FILMS
Am Ende der Filmrolle hält der motorische Filmtransport automatisch an und es ist
nicht möglich, weitere Aufnahmen zu machen.
1) Der Film spult automatisch zurück und der Bildzähler im LC-Display zählt rückwärts.
Der Motor hält automatisch an, wenn der Film vollkommen zurückgespult ist.
2) Wenn der Ton des Motors anhält (die Anzeige zeigt an, daß die Rückspulung fertig ist),
kontrollieren, daß der Bildzähler ”0” anzeigt. Öffnen Sie nun die Rückwand der Kamera,
entnehmen Sie den Film und lassen Sie ihn schnellst möglich entwickeln.
3) Ersetzen Sie die Batterie, falls Ihnen der Motorton ungewöhnlich langsam oder schwer
erscheint.
4) Falls Sie den Film vor Erreichen der maximalen Bilderzahl vorzeitig zurückspulen
möchten, drücken Sie die Rückspultaste (19).
• Achtung! Während der Filmrückspulung die Kamerarückwand nicht öffnen. Warten Sie
unbedingt solange ab, bis der Vorgang der Filmrückspulung beendet ist, ansonsten
werden Ihre Aufnahmen unbrauchbar.
k) SELBSTAUSLÖSER
Selbstauslöser mit Multifunktionsschalter (1) vorwählen ( ) und Auslöser drücken,
um die Aufnahme zu machen. Nach Drücken des Auslösers (2) leuchtet die Selbstauslöse-Anzeigelampe (7) für 8 Sekunden auf. Dann blink die Anzeige weitere 4 Sekunden
und die Belichtung/Aufnahme erfolgt.
l) PFLEGE DER KAMERA
• Bei Nichtanwendung der Kamera Objektivschutz geschlossen lassen.
• Die Kamera vor Schmutz, Regen, Feuchtigkeit und hoher Hitze schützen.
• Keine Lösungsmittel, Alkohol oder Scheuermittel benutzen, um das Kameragehäuse
zu reinigen.
D
9
Page 10

m) FEHLERSUCHE
VORSICHT! UM DIE GEFAHR VON ELEKTRISCHEM SCHLAG ZU VERMEIDEN, NIEMALS DIE
KAMERA ZERLEGEN ODER DAS KAMERAGEHÄUSE ÖFFNEN !
Mögliche
Fehler, wahrscheinliche Ursachen und Korrekturvorschläge
1) Lang andauerndes Blinken des Symbols ”Auto ”
• Die Batterie ist erschöpft und muß ersetzt werden.
2) Die Fotos sind unscharf
• Achten Sie auf die richtige Haltung der Kamera. Halten Sie die Kamera fest und drücken
Sie den Auslöser sorgfältig herunter. Benutzen Sie bei schlechten Lichtverhältnissen
möglichst ein Stativ. Dadurch minimieren Sie Erschütterungen und optimieren die
Bildschärfe.
• Das Motiv ist weniger als 1,5 m entfernt
3) Dunkle, unterbelichtete Fotos
• Für Blitzaufnahmen sind Sie zu weit vom Motiv entfernt
4) Helle, überbelichtete Fotos
• Für Blitzaufnahmen sind Sie zu nah am Motiv
5) Das Herunterdrücken des Auslösers hat keine Wirkung
• Wenn der Bildzähler NULL anzeigt, nachdem Sie einen neuen Film eingelegt haben,
ist der Film möglicherweise falsch eingelegt. Öffnen Sie die Rückwand und legen Sie
den Film richtig ein.
• der Film ist möglicherweise verklemmt – spulen Sie den Film zurück, nehmen ihn heraus
und geben Sie ihn zur Entwicklung ab.
• die Batterie ist möglicherweise alt – ersetzen Sie die Batterie.
6) Der Bildzähler stellt sich auf NULL zurück
• Wenn Sie den Batteriefachdeckel öffnen um die Batterie zu ersetzen, erfolgt die
Rückstellung des Bildzählers auf Null. Die Kamera wird immer richtig funktionieren,
aber die Bildzahl wird falsch angezeigt, bis Sie die nächste Filmrolle einlegen.
D
10
Page 11

n) SCHÄRFESPEICHER
Das Aufocussystem der Kamera stellt einen beliebigen Gegenstand scharf, der in der
Mitte des Bildes steht. Der Schärfespeicher kann angewendet werden, wenn sich das
Hauptmotiv neben einem Rand des Bildes befindet.
1) Positionieren Sie das Hauptmotiv so, daß es sich mitten im Sucherfeld befindet.
2) Auslöser teilweise herunterdrücken und halten, um den Schärfespeicher einzusetzen.
3) Während der Auslöser immer noch teilweise heruntergehalten wird, den neuen
Bildausschnitt wie gewünscht wählen, dann auslösen, um die Aufnahme zu machen.
o) BESEITIGUNG VON BATTERIEN
Helfen Sie, die Umwelt zu schützen!
• Alte Batterien bzw. Akkus nicht in den Mülleimer/Hausmüll werfen.
• In den meisten Ländern ist man gesetzlich verpflichtet, alte Batterien zur Beseitigung zu
einer öffentlichen Sammelstelle zu geben bzw. zum Handel zu geben, wo sie gekauft
wurden.
• Fragen Sie bitte die örtlichen Behörden, um sich über Vorschriften sowie auch die
Lage von Sammlungsstellen für alte Batterien zu informieren.
• Batterien sind mit Symbolen versehen, die die schädlichen Substanzen identifizieren:
Pb (Blei); Cd (Cadmium); Hg (Quecksilber).
• Schützen Sie unsere Umwelt; beseitigen Sie alte Batterien auf richtige Weise.
D
11
Page 12

IDENTIFICATION, FIG. 1
01. Multifunction switch 11. Film Door Latch
02. Shutter Release Button 12. Film Guide Rails
03. Lens Cover/Power Switch 13. Tripod Socket
04. Wrist Strap Holder 14. Film Take-up Drum
05. Lens 15. Film Loading Mark
06. Flash 16. Battery Cover
07. Red Eye Reduction LED 17. Film Door
08. LCD Panel 18. DX Film Window
09. Viewfinder 19. Film Rewind Switch
10. Rewind Fork 20. Sprocket Wheel
TECHNICAL INFORMATION
Type: Fully automatic autofocus viewfinder camera, 35 mm
Film format: 35 mm, 24 x 36 mm
Viewfinder: with bright line viewfinder, autofocus frame,
green display for focusing, red display for switched off
flash (OFF ) or insufficient light
Exposure: Fully automatic
Autofocus system: Focus stop shows green light with half-pressed
shutter release.
Flash: Automatic switching in and switching off
Flash charging time: Max. 10 seconds with fresh batteries
Film speed setting: Automatic DX system for film ISO 100 to 400.
Energy source: 1 x 3V lithium batteries CR 123A
a) ATTACHING WRIST STRAP, FIG. 3-4
Thread the small looped end of wrist strap through the Wrist Strap Holder (4).
Insert the other end through the protruding loop and pull taut to securely fasten the strap.
GB
12
Page 13

b) LOADING BATTERY
• Only·use lithium 3V CR 123 A. Ni-Cad rechargeable or Carbon-Zinc penlight batteries
are not suitable.
• Open the battery cover and follow the battery orientation shown in the battery compartment.
• Replace batteries when flash recharging time becomes too slow (say more than
30 seconds).
• Warning: After use always switch the camera off (see section c), as standby operation
can drain the batteries.
c) LENS COVER/POWER SWITCH
1. To turn on camera, slide the Lens Cover/Power Switch (3) to the left. The camera is now
ready to take photographs. Also, the "Auto " symbol on the LCD Panel (8) displays
steadily, and when film is loaded the appropriate frame number will be displayed.
2. When picture taking is complete, slide the Lens Cover Switch to the right until it clicks
fully closed. This will also switch off the camera's power.
d) LCD PANEL, FIG. 2
When the camera is loaded with a battery and the camera is turned ON, the Liquid Crystal
Display Panel (Fig 2) will display as appropriate the following functions:
no film loaded; frame counting; " " charging; "auto " (ON and READY); red eye
reduction and self-timer.
When the battery door is opened to replace battery, the LCD panel will go blank and the
frame counter will reset to zero. For convenience, replace the battery only when film is
not loaded.
GB
13
Page 14

Fig 2 a) LCD indicates “0” - "No film loaded".
Fig 2 b) LCD indicates "1" which appears after 4th frame advance. This means film is
satisfactorily loaded. Camera is now ready for taking the first picture.
Fig 2 c) LCD displays blinking flash " " symbol indicating flash is still charging.
Camera is ready for picture taking when " " symbol stops blinking and
displays continuously.
Fig 2 d) LCD displays " " to show that self timer has been activated.
Fig 2 e) Press the multifunction switch (1) and select the function ON . The
automatic flash is now switched off and the flash is automatically switched in
synchronously on release of the shutter and compensates for shadows, e.g.
when the subject is in front of a very bright background (sun, light sky).
Fig 2 f) Switch off the automatic flash when you wish to take photographs in normal
daylight. Press the multifunction switch (1) and select the function OFF .
The shutter is set to fully open in order to ensure the best possible exposure.
To take the photograph, press the shutter release (2).
e) LOADING FILM, FIG. 5-6
Use ISO 100, 200 or 400 colour print film with DX coding for best results.
1) Open Lens Cover/Power Switch [see section c] to turn on the camera.
2) Open the Film Door (17) by pushing the Film Door Latch (11) downwards.
3) Insert the Film Cartridge by inserting the top end first, then snap in the bottom. Push
cartridge firmly flat so that the film leader lies flat and does not loop upwards (Fig. 5-6).
4) Pull out the film leader until the tip reaches the Film Loading Mark (15) next to the Film
Take-up Drum (14).
• Make sure that the film lies flat between the Film Guide Rails (12) and that the
perforations are engaged with the Sprocket Wheel (20).
GB
14
Page 15

f) TAKING PICTURES – Daylight & flash, FIG. 7
1) Hold the camera firmly in both hands (Fig.7). Be careful not to block the Lens (5),
Flash (6), or LED (7) with your fingers or hair.
2) You may hold the camera in horizontal or vertical format (turn the camera so that the
flash is on top). Check that the camera's power is ON (refer to section c).
The "Auto " symbol on the LCD will light.
3) Remember to keep a minimum focus distance of 1.5 m from your subject
and compose the picture carefully in the Viewfinder. At close distances part of the
image may be truncated in the actual picture, so allow room when you compose the picture.
4) Gently depress the Shutter Release Button fully to take the picture. The film will
immediately advance to the next frame ready for further picture taking.
5) The Flash will fire automatically, if required, for correct exposure.
6) At very low light levels the Red-Eye Reduction feature may be required for pictures of
people or pets. Hold the Shutter Release Button halfway down for about 1 second to
automatically activate Red Eye Reduction and then depress it fully to take the picture.
Refer to section g) RED-EYE REDUCTION for additional information.
7) Flash Distance Guide
ISO 100: 1.5 m to 3.0 m
ISO 200: 2.0 m to 4.5 m
ISO 400: 2.5 m to 6.0 m
The range of the flash depends on the film speed you are using. Make sure your subject
is positioned within the flash range to ensure proper exposure.
g) RED-EYE REDUCTION
Pictures of people or pets taken at low light levels may exhibit "Red-Eye" effect. The eye
pupils appear as red spots in the pictures.
This can be reduced by having your subject look away from the camera or by turning on
bright room lights. Additionally this camera is equipped with a Red-eye Reduction
feature.
GB
15
Page 16

Depressing the Shutter Release Button halfway will turn on a high power Red Eye
Reduction LED (10) on the front of the camera. This will cause the subject's eye pupils
to close partially, reducing the "Red-Eye" effect.
• Red-eye reduction AUTO-S (Fig. 2g) will be most effective when your subject is in the
center of the picture.
h) MULTIPLE EXPOSURES, FIG. 2h
This function allows you to take double or multiple exposures. Press the multifunction
switch (1) and select the function (ME). Then press the shutter release (2) and take the
first exposure. In this mode the film is not wound on, but the camera is ready to take
another photograph.
For example:
You wish to combine the clear outlines and details of a sunset with the lights (e.g.
streetlights) of a town. Unfortunately, the lights are not yet switched on. This is how you
can do it:
Set up your camera, ideally on a stand, sight on your subject and press the multifunction
switch (1) and then select the function (ME). Press the shutter release (2) and make the
first exposure. As soon as the town lights have been switched on, select the function OFF
with the multifunction switch and make the second exposure.
Note: You can make even more exposures on the same negative. To do this, select the
multiple exposure function (ME) again before the additional exposure.
GB
16
Page 17

i) REWINDING THE FILM
At the end of the roll of film, the motor film advance will stop automatically, and you will
not be able to take more pictures.
1) The film will automatically begin to rewind and the frame counter on the LCD Panel
will count backwards. The motor will stop automatically when the film is fully rewound.
2) When motor sound stops, indicating rewinding is complete, check that the frame counter
reads "0". Open the film door and remove the film for processing.
3) If motor sound is unusually slow or laboured, batteries may need to be replaced.
4) If you wish to wind the film back before the end of the film is reached, press the rewind
button (19).
• Warning: Do not open the film door during rewind. Wait until rewinding of film
is complete, otherwise your pictures will be ruined.
k) SELF-TIMER
Pre-select automatic shutter ( ) release with multifunction switch (1) and press
the shutter release to a take picture. After the shutter release (2) is pressed, the self
release indicator (7) is illuminated for 8 seconds. Then the display flashes for a further
5 seconds before the shutter is released and the photograph taken.
l) CARING FOR YOUR CAMERA
• Keep the Lens Cover closed when not using the camera.
• Protect the camera from dirt, rain, dampness or high heat.
• Do not use solvents, alcohol or abrasive cleaners to clean the camera body.
GB
17
Page 18

m) TROUBLE SHOOTING
WARNING: TO AVOID RISK OF ELECTRICAL SHOCK, DO NOT ATTEMPT TO TAKE THIS CAMERA
APART.
Symptoms,
probable Causes/Suggested Correction
1) Symbol "Auto " continues to blink for a long time.
• Battery is worn out and needs to be replaced.
2) Blurry Pictures
• Camera shake - hold the camera firmly and press the Shutter Release Button gently.
Use tripod in poor light situation to minimise shake and improve picture sharpness.
• Subject is closer than 1.5m.
3) Dark under exposed Pictures
• Too far from your subject for flash pictures.
4) Bright over exposed Pictures
• Too close to your subject for flash pictures.
5) Depressing the Shutter Release Button has no effect
• If you are loading a new film and frame counter reads zero, the film may be misloaded.
Open the film door and reload the film.
• Film may be jammed - rewind the film and return it to your photo lab for processing.
• Battery may be old - replace the battery.
6) Frame counter resets to zero
• Opening the battery door to change batteries will cause the frame counter to reset
to zero. The camera will continue to operate correctly, but the indicated frame count
will be incorrect until your next film is loaded.
GB
18
Page 19

n) AUTOFOCUS LOCK
The camera’s autofocus system will focus on whatever is in the centre area of the
picture. If your main subject is near the edge of the picture you can use the autofocus
lock feature.
1) Centre your main subject in the viewfinder.
2) Depress and hold the Shutter Release Button halfway to lock the focus ON.
3) While still holding the Shutter Release Button halfway, recompose the picture
as you desire it and take the picture.
o) BATTERY DISPOSAL
Contribute to environmental protection!
• Do not dispose of used batteries or accumulators in household garbage bins.
• In some countries you are legally obliged to handle disposal of used batteries
by taking either to a public collection station or to where batteries were originally
purchased.
• Please check with your local authority about specific regulations and location
of collection bins where old batteries may be placed.
• Batteries are labelled with symbols containing harmful substances:
Pb (Lead); Cd (Cadmium); Hg (Mercury).
• Protect the environment and dispose of used batteries appropriately.
GB
19
Page 20

NOMENCLATURE, FIG. 1
1. Commutateur multifonctions 11. Fermeture du dos
2. Déclencheur 12. Rails de guidage du film
3. Interrupteur général/protège-obj. 13. Taraudage pour trépied
4. Attache pour dragonne 14. Bobine réceptrice du film
5. Objectif 15. Repère de chargement du film
6. Flash 16. Couvercle du logement des piles
7. DEL de réduction des yeux rouges 17. Dos
8. Afficheur à cristaux liquides (ACL) 18. Fenêtre de contrôle du film
9. Viseur 19. Interrupteur de rembobinage du film
10. Axe de rembobinage 20. Roue dentée
DONNEES TECHNIQUES
Type: Appareil photo autofocus à viseur, entièrement auto-
matique, 35 mm
Format photo: petit format 24 x 36 mm
Viseur: avec cadre lumineux, cadre autofocus, affichage vert
pour la focalisation, affichage rouge lumineux de flash
éteint (OFF ) ou en cas de lumière insuffisante
Exposition: entièrement automatique
Système autofocus: arrêt de la focalisation avec lumière verte, déclencheur
semi-enfoncé
Flash: automatique, activable et désactivable
Durée de chargement du flash: max. 10 secondes si les piles sont neuves
Réglage de la sensibilité
de la pellicule: système DX automatique pour les pellicules ISO 100 à 400
Source d'énergie piles au lithium 1 x 3 V CR 123A
a) FIXATION DE LA DRAGONNE, FIG. 3-4
Enfilez l'extrémité à petite boucle à travers l'attache pour dragonne (4). Insérez l'autre
extrémité à travers la boucle et tirez fermement pour fixer la dragonne.
F
20
Page 21

b)MISE EN PLACE DE LA PILE
• Utilisez une pile au litium 3 V CR 123 A. Les accus Cd-Ni et les piles charbon-zinc ne
sont pas appropriés.
• Ouvrez le compartiment à piles. Tenez compte de la position de la pile marquée dans le
compartiment.
• Remplacez la pileslorsque le temps de recharge du flash devient trop long (disons plus
de 30 secondes).
• Attention: Eteindre toujours l'appareil après usage (voir également le paragraphe c),
la pile pouvant s'user si l'appareil est en mode d'attente en permanence.
c) PROTÈGE-OBJECTIF/INTERRUPTEUR GÉNÉRAL
1. Déplacez vers la gauche l'interrupteur général/protège-objectif (3). L'appareil est alors
prêt à l'emploi. De plus, le symbole "Auto " sur l'ACL (8) se voit de façon continue
et, lorsqu'il y a un film dans l'appareil, le numéro de vue approprié sera affiché.
2. Lorsque vous aurez terminé la séance de prises de vues, déplacez l'interrupteur
général/protège-objectif vers la droite, jusqu'à ce qu'il s'enclenche dans la position
complètement fermée. Ainsi, l'alimentation de l'appareil sera également coupée.
d) AFFICHEUR À CRISTAUX LIQUIDES (ACL), FIG. 2
Lorsque l'appareil photo est muni d'une pile et qu'il est sous tension, l'afficheur à
cristaux liquides (fig. 2) indiquera selon le cas les fonctions suivantes:
aucun film chargé; numéro de la vue; " " (circuits se chargeant); "auto " (en
circuit et prêt à l'emploi); réduction des yeux rouges; et retardateur.
Lors de l'ouverture du couvercle du logement des piles pour les remplacer, l'affichage à
cristaux liquides s'éteignera et le compteur de vues se remettra à zéro. Pour votre
commodité, remplacez les piles seulement lorsqu'il n'y a pas de film dans l'appareil.
F
21
Page 22

Fig. 2 a) L'ACL indique "0" - ”Aucun film chargé” .
Fig. 2 b) L'ACL indique "1" qui apparaît après le bobinage de 4 images. C'est l'indication
que le film est correctement chargé. L'appareil photo est prêt alors pour
prendre la première vue.
Fig. 2 c) L'ACL montre le symbole d'éclair clignotant " " qui indique que le flash est
toujours en train de se recharger. L'appareil sera prêt à faire des photos
lorsque le symbole " " cesse de clignoter et reste allumé de façon continue.
Fig. 2 d) L'ACL affichera " " pour indiquer que le retardateur a été activé.
Fig. 2 e) Appuyez sur le commutateur multifonctions (1) et sélectionnez la fonction
ON . Le système de flash automatique est alors coupé et le flash est alors
déclenché en même temps que la prise de vue, assurant ainsi un éclaircissement
des ombres, par exemple si le motif à photographier se trouve devant un
arrière-plan très clair (soleil, ciel très clair).
Fig. 2 f) Eteignez le système de flash automatique si vous photographiez à la lumière
du jour normale. Appuyez sur le commutateur multifonctions (1) et sélectionnez
la fonction OFF . Le diaphragme est alors entièrement ouvert pour assurer la
meilleure exposition possible. Pour faire une photo, appuyez sur le déclencheur (2).
e) CHARGEMENT DU FILM, FIG. 5-6
Utilisez les films pour épreuves couleur à codage DX de 100, 200 ou 400 ISO pour les
meilleurs résultats.
1) Ouvrez l'interrupteur général/protège-objectif [voir la section c] pour mettre l'appareil en circuit.
2) Ouvrez le dos (17) en déplaçant vers le bas la fermeture du dos (11).
3) Chargez la cartouche de film en insérant d'abord l'extrémité supérieure et en appuyant
ensuite sur l'extrémité inférieure pour l'enclencher. Appuyez sur la cartouche de telle
façon qu'elle entre complètement et que le l'amorce reste à plat et n'est pas bouclée
vers le haut (fig. 5 et 6).
4) Tirez l'amorce du film jusqu'à ce que son extrémité atteigne le repère de chargement
du film (15) près de la bobine réceptrice (14).
F
22
Page 23

• Assurez-vous que le film reste à plat entre les rails de guidage du film (12) et que les
perforations s'engagent dans la roue dentée (20).
f) PRISE DE VUES - En lumière du jour
et au flash, FIG. 7
1) Soutenez l'appareil photo fermement dans les deux mains (fig. 7). Faites attention à
ne pas obstruer l'objectif (5), le flash (6), ou la DEL (7) par les doigts ou le cheveux.
2) Vous pouvez tenir l'appareil en format horizontal ou vertical (orientez l'appareil de façon
à ce que le flash soit en haut). Vérifiez que l'appareil est en circuit (voir la section c).
Le symbole "Auto " sur l'ACL s'allume.
3) Vérifiez que vous êtes à une distance minimum de 1.5 m de votre sujet et cadrez l'image
avec soin dans le viseur. Lors de la prise de vues rapprochées, une partie de l'image
peut être coupée dans l'épreuve finale, donc laissez suffisament d'espace aux bords
lorsque vous cadrez l'image.
4) Pressez le déclencheur doucement à fond pour prendre la vue. Le film avancera
automatiquement à la prochaine image, prêt pour la prise de vue suivante.
5) Le flash se déclenchera automatiquement s'il est requis pour une exposition correcte.
6) En conditions de très faible lumière, il se peut que la capacité de réduction des yeux
rouges soit requise pour photographier les personnes ou les animaux familiers. Tenez le
déclencheur à micourse pendant 1 seconde environ pour mettre automatiquement en
circuit le système de réduction des yeux rouges, et enfoncez-le ensuite jusqu'au fond
pour faire la photo. Rapportez-vous à la section g) RÉDUCTION DES YEUX ROUGES pour
des renseignements supplémentaires.
7) Guide des distances d'emploi du flash
ISO 100: 1,5 m à 3,0 m
ISO 200: 2,0 m à 4,5 m
ISO 400: 2,5 m à 6,0 m
La plage d'emploi du flash dépende de la sensibilité du film employé. Assurez-vous que
le sujet soit positionné dans la plage du flash pour garantir une exposition correcte.
F
23
Page 24

g) RÉDUCTION DES YEUX ROUGES
Les photos des personnes ou des animaux familiers prises en faible lumière risquent
de présenter l'effet des "yeux rouges". Les pupilles des yeux apparaissent dans les
épreuves comme des points rouges.
On peut réduire ceci en faisant que le sujet dirige le regard à côté de l'appareil photo ou
en allumant fortement la salle. De plus, cet appareil photo est équipé d'un dispositif de
réduction des yeux rouges. En appuyant à mi-course le déclencheur, une DEL puissante
(10) sur l'avant de l'appareil s'allume. Ceci provoquera la contraction partielle des
pupilles des yeux du sujet, réduisant ainsi l'effet des "yeux rouges".
• La réduction des yeux rouges AUTO-S (fig. 2g) sera la plus efficace lorsque le sujet
se trouve au centre de l'image.
h) SURIMPRESSION, FIG. 2h
Cette fonction permet de faire des effets intéressants d'impression double ou multiple.
Appuyez sur le commutateur multifonctions (1) et sélectionnez la fonction (ME). Appuyer
ensuite sur le déclencheur (2) et faite votre première photo. Avec cette fonction, la
pellicule n'est pas transportée, l'appareil est prêt pour la photo en surimpression suivante.
Exemple:
Vous voulez combiner les contours et détails clair d'un coucher de soleil avec les lumières
(par exemple d'une ville, mais les réverbères ne sont pas encore allumés) de nuit.
Procédez comme suit:
Montez l'appareil de préférence sur un statif, visez votre motif et appuyez sur le
commutateur multifonctions (1) et sélectionnez la fonction (ME). Appuyez alors sur le
déclencheur (2) et faites votre première photo. Dès que les lumières de la ville seront
allumées, sélectionnez avec le commutateur de fonction la fonction OFF et faites votre
seconde photo.
Attention: Vous pouvez également faire encore d'autres prises de vue sur le même
négatif. Pour cela, sélectionnez à nouveau la fonction de surimpression (ME) avant
de faire votre seconde photo.
F
24
Page 25

i) REMBOBINAGE DU FILM
A la fin du rouleau de film le moteur d'entraînement s'arrêtera automatiquement, et vous
ne pourrez pas prendre plus de vues.
1) Le film commencera à se rembobiner automatiquement, et le compteur de vues sur l'ACL
comptera à rebours. Le moteur s'arrêtera automatiquement lorsque le film a été
complètement rembobiné.
2) Lorsque le son du moteur cesse, indiquant que le rembobinage s'est terminé, vérifiez que
le compteur de vues indique "0". Ouvrez le dos et retirez le film pour son traitement.
3) Si le son du moteur apparaît plus lent ou pénible que d'habitude, il est possible que les
piles doivent être remplacées.
4) Si vous désirez faire rembobiner la pellicule avant d'avoir atteint le nombre maximum
de prises de vue, appuyez sur la touche de rembobinage (19).
• Ne pas ouvrir le dos pendant le rembobinage du film. Attendre que le rembobinage
soit terminé, sinon les photos seront abîmées.
k) RETARDATEUR
Présélectionner ( ) le poussoir du retardateur (1) à l'aide du commutateur multifonctions et appuyer sur le déclencheur. Après avoir appuyé sur le déclencheur (2),
le témoin du retardateur (7) reste allumé pendant 8 secondes. Ensuite, le témoin
clignote pendant 4 secondes et la photo est prise.
l) ENTRETIEN DE L'APPAREIL
• Maintenez le protège-objectif fermé pendant que l'appareil n'est pas en emploi.
• Protégez l'appareil contre la saleté, la pluie, l'humidité et la chaleur élevée.
• N'utilisez pas de dissolvants, d'alcool ou de produits de nettoyage abrasifs pour nettoyer
le boîtier de l'appareil.
F
25
Page 26

m) EN CAS DE PROBLÈMES
AVERTISSEMENT: POUR ÉVITER LE RISQUE DE CHOC ÉLECTRIQUE, NE PAS ESSAYER
DE DÉMONTER CET APPAREIL.
Problèmes
possibles, causes probables et corrections suggérées
1) Le symbole "Auto " continue longtemps à clignoter.
• La pile est usée et doit être remplacée.
2) Photos floues
• Bougé de l'appareil - tenez l'appareil fermement et pressez le déclencheur doucement.
Utilisez un trépied en conditions de faible lumière pour réduire le mouvement au
minimum et améliorer la netteté des images.
• Le sujet est plus près que 1,5 m
3) Photos sombres, sous-exposées
• Trop loin du sujet pour les photos au flash.
4) Photos claires, surexposées
• Trop proche du sujet pour les photos au flash.
5) L'enfoncement du déclencheur n'a aucun effet
• Si vous chargez un nouveau film et que le compteur de vues indique zéro, il se puet que
le film est chargé incorrectement. Ouvrez le dos et chargez le film de nouveau.
• Il est possible que la pile soit usée – remplacez la pile.
• Il est possible que le film est coincé – rembobinez le film et remettez - le au
laboratoire pour le développement.
6) Le compteur de vues se remet à zéro
• L'ouverture du couvercle du logement des piles pour les changer remettra le compteur
de vues à zéro. L'appareil continuera à fonctionner, mais le numéro de pose indiqué
sera incorrect jusqu'à ce que vous chargiez le prochain film.
F
26
Page 27

n) BLOCAGE DE LA MISE AU POINT AUTOMATIQUE
Le système d’autofocus de l’appareil se mettra au point sur tout ce qui se trouve
au centre de l’image. Si votre sujet principal se trouve près du bord de l’image,
vous pouvez employez la capacité de blocage de la mise au point.
1) Centrez le sujet principal dans le viseur.
2) Pressez et maintenez le déclencheur à mi-course pour bloquer ou ”mémoriser” la mise
au point.
3) Tout en maintenant le déclencheur sous pression à mi-course, recadrez l’image comme
vous voulez et pressez le déclencheur jusqu’au fond pour prendre la vue.
o) ÉLIMINATION DE PILES
Contribuyer à la protection de l’environnement!
• Ne pas jeter les piles ou accus usagés dans les poubelles ménagères.
• En certaines pays on sera obligé légalement à éliminer les piles usagées en
les remettant soit à une station de ramassage publique soit au magasin où
l’on les avait achetés.
• Prière de consulter les authorités locales à propos des règlements spécifiques
et les endroits de ramassage où l’on peut laisser les vielles piles.
• Les piles et les accus portent des étiquettes ayant des symboles indiquant
les matières nocives contenues:
Pb (plomb); Cd (cadmium); Hg (mercure).
• Protéger l’environnement, et éliminez de manière appropriée les piles
et les accus usagés.
F
27
Page 28

IDENTIFICAZIONE DEI COMPONENTI, FIG. 1
01. Selettore multifunzioni 11. Fermo del dorso
02. Pulsante di scatto 12. Barrette guidapellicola
03. Interruttore coperchio ob./alimentaz. 13. Filettatura per cavalletto
04. Attacco per cinghia 14. Bobina avvolgitrice
05. Obiettivo 15. Segno per caricamento pellicola
06. Flash 16. Coperchio della sede pile
07. LED di riduzione di occhi rossi 17. Dorso
08. Display a cristalli liquidi (LCD) 18. Finestrella di controllo pellicola
09. Mirino 19. Interruttore di riavvolgimento
10. Forchetta di riavvolgimento 20. Rocchetto
DATI TECNICI
tipo: fotocamera completamente automatica con mirino da 35 mm
formato pellicola: grandezza ridotta da 24 x 36 mm
mirino: con cornice illuminata, cornice di messa a fuoco auto-
matica, indicazione verde per messa a fuoco,
indicazione rossa illuminata nella regolazione a flash
disinserito (OFF ) oppure illuminazione insufficiente
esposizione: completamente automatica
sistema di messa a fuoco automatica:bloccaggio della messa a fuoco con luce verde a
pulsante di scatto semipremuto
flash: ad inserimento e disinserimento automatico
durata di carica del flash: massimo 10 secondo con batterie nuove
regolazione di sensibilità
della pellicola: sistema DX automatico per pellicole ISO 100 fino 400
alimentazione: 1 batteria al litio da 3V del tipo CR 123A
a) COLLEGAMENTO DELLA CINGHIA, FIG. 3-4
Infilare l'estremità a cappio piccolo attraverso l'attacco per cinghia (4). Inserire l'altra
estremità attraverso il cappio sporgente e tendere per fissare la cinghia con sicurezza.
I
28
Page 29

b) COLLOCAZIONE DELLA PILA
• Utilizzare solamente batterie al litio da 3V del tipo CR 123A. Le batterie ricaricabili
Ni-Cd o la pila al carbone non sono adatte.
• Aprire il vano batteria ed osservare l'orientazione della pila indicata all'interiore.
• Sostituire la pila quando il tempo di ricarica del flash diventa troppo lento (diciamo
più di 30 secondi).
• Attenzione! Spegnere sempre la fotocamera dopo l'uso (vedi anche al paragrafo c),
poiché altrimenti si scaricherebbe anticipatamente la batteria.
c)INTERRUTTORE ALIMENTAZIONE /
COPERCHIO OBIETTIVO
1. Per accendere la fotocamera, spostare a sinistra l'interruttore alimentazione / coperchio
obiettivo (3). A questo punto la fotocamera è disponibile per le riprese. Per di più, il
simbolo "Auto " sul LCD (8) è mostrato in modo costante e, quando una pellicola è
caricata nella macchina, si mostra il numero di fotogramma apposito.
2. Dopo di terminare di fare riprese, spostare l'interruttore alimentazione / coperchio
obiettivo a destra, finché si blocca nella posizione completamente chiusa. In questo
modo anche si sconnetterà l'alimentazione della fotocamera.
d) DISPLAY A CRISTALLI LIQUIDI, FIG. 2
Quando la fotocamera è caricata con una batteria e si trova in circuito, il display a
cristalli liquidi (fig. 2) mostrerà come appropriato le funzioni seguenti:
nessuna pellicola caricata; contafotogrammi; " " (caricamento elettrico); "auto "
(macchina in circuito e pronta); riduzione di occhi rossi; e autoscatto.
Quando si apre il dorso per sostituire la pila, il display a cristalli liquidi si spegnerà, e il
contafotogrammi tornerà a zero. Per la comodità sostituire la pila soltanto quando non si
trova pellicola nella fotocamera.
I
29
Page 30

Fig. 2 a) Il display indica "0" = nessuna pellicola caricata
Fig. 2 b) Il display mostra "1" che appare dopo l'avanzamento del quarto fotogramma.
Questo indica che la pellicola è stata caricata correttamente. La fotocamera è
pronta allora per fare la prima fotografia.
Fig. 2 c) Il display mostra il simbolo intermittente di lampo " " che indica che il
flash ancora sta caricandosi. La fotocamera sarà pronta per fare riprese quando
il simbolo " " cessa di lampeggiare e rimane acceso in modo costante.
Fig. 2 d ) Il display mostrerà " " per indicare che l'autoscatto è stato attivato.
Fig. 2 e) Premere il selettore multifunzioni (1) e selezionare la funzione ON . Il flash
automatico è ora disinserito ed il flash viene inserito automaticamente in
sincronizzazione allo scatto e provvede ad un rischiarimento delle ombre, ad
esempio, quanto il motivo si trova davanti ad uno sfondo molto chiaro (sole,
cielo chiaro).
Fig. 2 f ) Disinserire il flash automatico, per fotografare in condizioni di normale luce
diurna. Premere il selettore multifunzioni (1) e selezionare la funzione OFF .
Il diaframma é regolato alla massima apertura, al fine di poter garantire la
migliore esposizione possibile. Premere a questo punto il pulsante di scatto (2),
per fare una fotografia.
e) CARICAMENTO DELLA PELLICOLA, FIG. 5-6
Usare pellicola ISO 100, 200 o 400 per stampe a colori con codifica DX per ottenere
i migliori risultati.
1) Spostare l'interruttore alimentazione / coperchio obiettivo [vede la sezione c] per mettere
la fotocamera in circuito.
2) Aprire il dorso (17) premendo verso il basso il fermo del dorso (11).
3) Collocare il rullino di pellicola inserendo anzitutto l'estremità superiore, e dopo premendo
l'estremità inferiore nel suo luogo. Spingere il rullino con fermezza a livello in modo che
la linguetta della pellicola giacia a livello senza alcuna curvatura (fig. 5 e 6).
I
30
Page 31

4) Stendere la linguetta della pellicola finché l'estremità non raggiunge il segno per
caricamento pellicola (15) presso la bobina avvolgitrice (14).
• Assicurarsi che la pellicola sta a livello fra le barrette guidapellicola (12) e che le
perforazione si ingranino con il rocchetto (20).
f) COME FARE RIPRESE – Luce diurna e flash,
FIG. 7
1) Tenere la fotocamera saldamente con entrambi le mani (fig. 7). Fare attenzione di non
bloccare dalle dita o dai capelli l'obiettivo (5), il Flash (6), o il LED (7).
2) Si può sostenere la fotocamera in formato sia orizzontale sia verticale (orientare
la macchina in modo che il flash si trova in cima. Controllare che la fotocamera è
in circuito (v. capoverso c). Il simbolo "Auto " sul LCD si illumina.
3) Controllare che si trova ad una distanza di almeno 1,5 m dal soggetto ed inquadrare con
cura l'immagine nel mirino. Nella fotografia ravvicinata è possibile che una porzione
dell'immagine possa risultare troncata nella stampa finale; bisogna lasciare quindi
sufficiente spazio quando si fa l'inquadratura della foto.
4) Premere dolcemente il pulsante di scatto fino al fondo per fare la ripresa. La pellicola
avanzerà immediatamente al prossimo fotogramma, pronta per altra fotografia.
5) Il flash si scatterà automaticamente se è necessario per una esposizione corretta.
6) In luce molto scarsa si può bisognare il sistema di riduzione di occhi rossi al fare
fotografie di persone o animali domestici. Premere e mantenere premuto a mezzo corso
il pulsante di scatto durante 1 secondo approssimativamente per attivare automatica
mente il sistema di riduzione di occhi rossi, e poi premerlo fino in fondo per fare la
ripresa. Ricorrere alla sezione g) RIDUZIONE DI OCCHI ROSSI per dettagli supplementari.
7) Guida di distanze di utilizzo del flash
ISO 100 da 1,5 m a 2,7 m
ISO 200 da 2,0 m a 3,7 m
ISO 400 da 2,5 m a 5,0 m
Il campo di utilizzo del flash dipende dalla sensibilità della pellicola utilizzata.
Assicurarsi che il soggetto sia collocato dentro il campo di utilizzo del flash per
esposizioni corrette.
I
31
Page 32

g) RIDUZIONE DI OCCHI ROSSI
Le fotografie di persone o animali scattate in scarsa luce possono presentare l'effetto
degli "occhi rossi". Le pupille degli occhi appaiono nelle fotografie come circoli rossi.
Si può ridurre questo facendo guardare verso il lato della fotocamera alle persone
fotografate o illuminando fortemente la stanza. Di più, questa fotocamera è dotata d'un
sistema di riduzione di occhi rossi. La pressione a metà sul pulsante di scatto illuminerà
un LED potente (7) sul davanti della macchina. Questo causerà la contrazione parziale
delle pupille degli occhi del soggetto, riducendo l'effetto di "occhi rossi".
• La riduzione di occhi rossi AUTO-S (fig. 2g) sarà il più efficace se il soggetto si trova
nel centro della foto.
h) ESPOSIZIONE MULTIPLA, FIG. 2h
Grazie a questa funzione è possibile realizzare interessanti esposizioni doppie o multiple.
Premere il selettore multifunzioni (1) e selezionare la funzione (ME). Dopodiché premere
il pulsante di scatto (2) per scattare la prima fotografia. In questa funzione la pellicola
non viene trasportata ulteriormente, la fotocamera rimane, tuttavia, disponibile per le riprese.
Esempio:
Desiderate combinare chiari contorni e dettagli di un tramonto del sole con luci notturne
(ad esempio di città, a lampioni ancora spenti). Procedere nel modo seguente:
Montare possibilmente la fotocamera sopra uno stativo, inquadrare il motivo desiderato
e premere quindi il selettore multifunzioni (1) e selezionare la funzione (ME). Dopodiché
premere il pulsante di scatto (2) per scattare la prima fotografia. Non appena si accende
l'illuminazione della città, selezionare tramite il selettore multifunzioni la funzione OFF
e scattare la seconda fotografia.
Da osservare: sullo stesso negativo è anche possibile fare delle ulteriori riprese.
Selezionare a tal fine ancora una volta la funzione di multiesposizione (ME) prima
della rispettiva seconda esposizione.
I
32
Page 33

i) RIAVVOLGIMENTO DELLA PELLICOLA
Alla fine del rullino il motorino di trascinamento si fermerà automaticamente e non sarà
possibile scattare più fotografie.
1) La pellicola comincerà a riavvolgersi e il contafotogrammi sul LCD conterà alla rovescia.
Il motorino si fermerà automaticamente quando la pellicola è stata completamente riavvolta.
2) Quando il suono del motorino cessa, indicando che il riavvolgimento è terminato,
controllare che il contafotogrammi mostra "0". Aprire il dorso e togliere il rullino
per lo sviluppo.
3) Se il suono del motorino è insolitamente lento o affaticato, è possibile che bisogni
sostituire le batterie.
4) Se si desidera riavvolgere anticipatamente la pellicola, prima di aver raggiunto il
massimo numero di fotografie, premere il tasto di riavvolgimento (19).
• Attenzione! Non aprire il dorso durante il riavvolgimento. Aspettare che sia finito il
riavvolgimento del rullino o saranno rovinate le fotografie.
k) AUTOSCATTO
Preselezionare il pulsante dell'autoscatto ( ) al posto del selettore multifunzioni (1)
e premere quindi il pulsante di scatto per fare la ripresa. Dopo aver premuto il pulsante
di scatto (2) si illumina la spia luminosa della funzione d'autoscatto (7) per 8 secondi.
Dopodiché quest'indicazione lampeggia per ulteriori 4 secondi, dopo i cui viene scattata
la fotografia.
l) CURA DELLA FOTOCAMERA
• Mantenete il copriobiettivo chiuso quando non usate la fotocamera.
• Proteggete la macchina dalla sporcizia, pioggia, umidità ed alto calore.
• Non usate solventi, alcool o prodotti di pulizia abrasivi per pulire il corpo della macchina.
I
33
Page 34

m) SOLUZIONI A PROBLEMI
AVVERTENZA: PER EVITARE LA POSSIBILITÀ DI SCOSSA ELETTRICA, NON CERCATE
DI SMONTARE QUESTA MACCHINA.
P
ossibili errori, causa probabile e correzione proposta
1) La spia "Auto " continua a lampeggiare molto tempo
• La pila è esaurita e deve essere sostituita.
2) Foto mosse
• Movimento della fotocamera - sostenere saldamente la macchina e premere dolcemente
il pulsante di scatto. Utilizzare un treppiede in condizioni di scarsa luce per minimizzare
i movimenti e migliorare la nitidezza delle fotografie.
• Soggetto più vicino che 1,5 m.
3) Foto scure, sottoesposte
• Troppo lontano dal soggetto per riprese con flash.
4) Foto chiare, sovraesposte
• Troppo vicino al soggetto per riprese con flash.
5) La pressione sul pulsante di scatto non produce nessun effetto
• Se si inserisce una nuova pellicola e il contafotogrammi indica zero, è possibile che la
pellicola sia mal collocata. Aprire il dorso e risistemare la pellicola.
• Pila possibilmente esaurita – sostituirla.
• Pellicola possibilmente inceppata – riavvolgere la pellicola e portarla al laboratorio
fotocine per lo sviluppo.
6) Il contafotogrammi si rimette a zero
• Il aprire il coperchio della sede pile per sostituirle causerà la rimessa a zero del
contafotogrammi. La fotocamera continuerà a funzionare correttamente, ma il numero
di fotogramma indicato sarà incorretto finché non viene collocata una nuova pellicola.
I
34
Page 35

n) BLOCCAGGIO DELL’AUTOFOCUS
Il sistema di messa a fuoco automatico della fotocamera si metterà a fuoco su qualsiasi
oggetto che si trova nel centro dell’immagine. Se il soggetto principale si trova presso il
margine della foto, si può utilizzare la capacità di bloccaggio dell’autofocus.
1) Collocare il soggetto principale nel centro del mirino.
2) Premere e mantenere a mezzo corso il pulsante di scatto per bloccare il fuoco in questa
posizione.
3) Sempre mantenendo il pulsante di scatto mezzo premuto, inquadrare di nuovo l’immagine
come desiderato e fare la ripresa.
o) ELIMINAZIONE DI PILE
Contribuire alla protezione dell’ambiente!
• Non buttare pile o accumalatori usati nella cassetta di spazzatura domestica.
• In certi paesi c’è obligazione legale di eliminare batterie usate portandole ad un luogo
di collezione pubblica o al negozio dove le batterie si comprarano.
• Consultare l’autorità locale riguardo alle regolazioni specifiche e il sito di cassette di
collezione dove si può buttare le batterie vecchie.
• Le batterie portano simboli indicando sostanze nocive:
Pb (piombo); Cd (cadmio); Hg (mercurio).
• Proteggere l’ambiente e eliminare le batterie usate in modo corretto.
I
35
Page 36

IDENTIFICACIÓN DE COMPONENTES, FIG. 1
01. Interruptor multifuncional 11. Seguro del dorso
02. Botón de disparo 12. Rieles guía de película
03. Interruptor de la tapa 13. Rosca para trípode
del objetivo/alimentación 14. Carrete bobinador
04. Fijador para correa de muñeca 15. Marca para carga de película
05. Objetivo 16. Tapa del compartimiento de pilas
06. Flash 17. Dorso
07. LED de reducción de ojos rojos 18. Ventanilla de control de la película
08. Display de cristal líquido (LCD) 19. Interruptor de rebobinado
09. Visor 20. Rueda dentada
10. Eje de rebobinado
DATOS TÉCNICOS
Tipo: Cámara de visor con enfoque automático,
completamente automática, 35 mm
Formato de película: Formato pequeño 24 x 36 mm
Visor: Con marco luminoso, marco de enfoque automático,
indicación verde para enfoque, indicación roja luminosa
para ajuste flash desconectado (OFF ) o luz insuficiente
Exposición: Completamente automática
Sistema de enfoque automático: Bloqueo del enfoque con luz verde para disparador
semipresionado.
Flash: Conexión y desconexión automática
Tiempo de carga de flash: Máx. 10 segundos con baterías nuevas
Ajuste de sensibilidad de película: Sistema DX automático para películas ISO 100 hasta 400
Fuente de energía: 1 Batería de litio CR 123A de 3V
a) FIJACIÓN DE LA CORREA DE MUÑECA, FIG. 3-4
Enfile la extremidad con lazo pequeño a través del fijador para correa de muñeca (4).
Inserte la otra extremidad a través del lazo saliente e tense la cuerda para fijar
E
seguramente la correa.
36
Page 37

b) COLOCACIÓN DE LA PILA
• Use únicamente baterías de litio CR 123A de 3V. Las baterías Ni.Cd. recargables o las
pilas al carbón-cinc no son adecuadas.
• Abra el compartimento y siga la orientación de pilas indicada dentro del mismo.
• Substituya la pila cuando el tiempo de recarga del flash sea bastante largo (digamos
más de 30 segundos).
• Atención: Desconectar siempre la cámara después de usarla (véase también párrafo c),
ya que si permanece conectada se puede descargar la batería.
c)INTERRUPTOR DE LA TAPA
DEL OBJETIVO/ALIMENTACIÓN
1. Para conectar la cámara, mueva el interruptor de la tapa del objetivo/alimentación (3)
hacia la izquierda. La cámara estará ahora lista para tomar fotos. Además, el símbolo
"Auto " se verá de forma continua y, cuando haya una película cargada en la cámara,
el número correspondiente de la exposición se mostrará también.
2. Cuando termine de tomar fotos, deslice el interruptor de la tapa del objetivo hacia la
derecha, hasta que se enganche la posición completamente cerrada. Eso desconectará
también la energía de la cámara.
d) DISPLAY DE CRISTAL LÍQUIDO (LCD), FIG. 2
Cuando la cámara contiene batería y está conectada, el display de cristal líquido (fig.2)
mostrará según el caso las funciones siguientes:
Ninguna película cargada; número de exposición; " " (recarga eléctrica); "Auto "
(conectada y lista); reducción de ojos rojos; y autodisparador.
Cuando se abre la tapa del compartimiento de pilas, el display de cristal líquido se
pondrá vacío y el contador de exposiciones se pondrá en cero. Para su mayor comodidad,
debe de cambiar pilas solamente cuando no haya una película en la cámara.
E
37
Page 38

Fig 2 a) El LCD indica "0" – "Ninguna película cargada".
Fig 2 b) El LCD muestra el "1" que aparece después del avance del 4º fotograma.
Quiere decir que la película está cargada bien. La cámara está lista para tomar
la primera fotografía.
Fig 2 c) El LCD muestra el símbolo de destello " " intermitente que indica que
el flash está todavía recargándose. La cámara estará lista para tomar fotos
cuando el símbolo " " deja de destellar y se muestra de forma continua.
Fig 2 d) El display de LCD mostrará " " para indicar que el autodisparador ha sido
activado.
Fig 2 e) Pulse el interruptor multifuncional (1) y seleccione la función ON . El flash
automático se encontrará ahora desconectado y se conectará sincrónicamente
al disparar, encargándose de iluminar las sombras, p. ej. si el motivo que va a
fotografiar se encuentra delante de un fondo muy claro (sol, cielo luminoso).
Fig 2 f) Desconecte el flash automático cuando vaya a fotografiar con luz diurna
normal. Pulse el interruptor multifuncional (1) y seleccione la función OFF .
El diafragma estará abierto completamente, para garantizar la mejor exposición
posible. Para fotografiar, pulse ahora el disparador (2).
e) CARGA DE LA PELÍCULA, FIG. 5-6
Use película para copias de color de ISO 100, 200 ó 400 con código DX para conseguir
los mejores resultados.
1) Deslice el interruptor de la tapa del objetivo/alimentación [vea la sección c] para
conectar la cámara.
2) Abra el dorso (17) deslizando hacia abajo el seguro del dorso (11).
3) Introduzca el carrete de película, insertando primero la extremidad superior y después
oprimiendo la parte inferior hasta que se enganche en posición. Presione el carrete bien
adentro de modo que el cebo quede plano y no se doble hacia arriba (fig.5 y 6).
4) Extienda el cebo hasta que la punta alcance la marca para carga de película (15) al lado
del carrete bobinador (14).
E
38
Page 39

• Asegúrese de que la película descanse plana entre los rieles guía de película (12)
y que las perforaciones engranen en la rueda dentada (20).
f) TOMA DE FOTOGRAFÍAS – Luz diurna
y flash, FIG. 7
1) Sostenga la cámara firmemente con ambas manos (fig.7). Tenga cuidado de no obstruir
el objetivo (5), flash (6), o LED (7) con sus dedos o cabello.
2) Usted puede sostener la cámara en el formato horizontal o vertical (oriente la cámara de
modo que el flash esté por encima). Verifique que la cámara está conectada (vea la
sección c). El símbolo "Auto " en el LCD se encienden.
3) No se olvide de mantenerse a una distancia de 1,5 m o más del motivo, y componga la
imagen cuidadosamente en el visor. Durante la fotografía de primer plano, se puede que
una parte de la imagen quede cortada; por eso deje suficiente espacio alrededor
del motivo cuando encuadra la foto.
4) Oprima el botón de disparo con suavidad hasta el fondo para tomar la foto. La película
avanzará automáticamente hasta el próximo fotograma, lista para tomar más fotos.
5) Si es necesario para una exposición correcta, el flash se disparará automáticamente.
6) A muy bajos niveles de luz se puede requerir el uso del sistema de reducción de ojos
rojos para fotografías de personas o animales. Oprima y mantenga el botón de disparo
a medio recorrido por 1 segundo, aproximadamente, para activar automáticamente la luz
de reducción de ojos rojos, y luego oprímalo hasta el fondo para tomar la foto. Refiérase
a la sección G) REDUCCIÓN DE OJOS ROJOS para más detalles.
7) Guía de distancias de uso del flash
ISO 100: 1,5 m hasta 3,0 m
ISO 200: 2,0 m hasta 4,5 m
ISO 400: 2,5 m hasta 6,0 m
El alcance del flash depende de la sensibilidad de la película que se use. Asegúrese
de colocar el motivo dentro del alcance del flash para garantir una exposición correcta.
E
39
Page 40

g) REDUCCIÓN DE OJOS ROJOS
Las fotos de personas o animales de casa tomadas en condiciones de poca luz pueden
mostrar el fenómeno de "Ojos rojos". Las pupilas de los ojos aparecen como círculos
rojos en las fotografías.
Se puede reducir este problema dejando a los motivos que miren hacia un lado de la
cámara, o prendiendo luces fuertes en la sala. Además, esta cámara viene equipada de
un dispositivo de reducción de ojos rojos. El oprimir el botón de disparo hasta medio
recorrido encenderá un LED fuerte (10) en el lado delantero de la cámara. Esto causará
una contracción parcial de las pupilas del motivo, reduciendo el efecto de los "ojos rojos".
• La reducción de ojos rojos AUTO-S (fig. 2g) será lo más eficaz cuando su motivo esté
en el centro de la foto.
h) EXPOSICIÓN MÚLTIPLE, FIG. 2h
Con esta función se pueden efectuar interesantes exposiciones dobles y múltiples.
Pulse el interruptor multifuncional (1) y seleccione la función (ME). Pulse luego el
disparador (2) y haga la primera exposición. En esta posición la película no seguirá
siendo transportada, la cámara estará de nuevo lista para fotografiar.
Ejemplo:
Usted desea combinar de noche los claros contornos y detalles de una puesta de sol con
las luces (p. ej. de una ciudad, pero las farolas aún no se han encendido). Proceda del
modo siguiente:
Monte la cámara a ser posible sobre un trípode, posicione su motivo en el visor y pulse
el interruptor multifuncional (1) y seleccione la función (ME). Luego pulse el disparador (2)
y haga la primera exposición. En cuanto que se hayan encendido las lueces de la ciudad,
seleccione con el interruptor la función OFF y haga la siguiente exposición.
Observar: Usted puede seguir aún haciendo exposiciones en el mismo negativo. Para
ello, seleccione siempre de nuevo la función de exposición múltiple (ME) antes de la
segunda exposición.
E
40
Page 41

i) REBOBINADO DE LA PELÍCULA
Al final del rollo de película el motor de avance parará automáticamente, y usted no
podrá tomar más fotografías.
1) La película empezará a rebobinarse automáticamente y el contador de exposiciones en
el LCD contará hacia atrás. El motor parará automáticamente cuando la película ha sido
completamente rebobinada.
2) Al cesar el sonido del motor, indicando que se acabó el rebobinado, verifique que el
contador de exposiciones muestra "0". Abra el dorso y saque la película para su
procesamiento.
3) Si el sonido del motor parece anormalmente lento o difícil, puede ser que las pilas
necesiten ser substituidas.
4) En caso de que desee rebobinar la película, antes de haber hecho todas las fotografías,
pulse el botón de rebobinado (19).
• ¡Atención! No abra el dorso durante el rebobinado de la película. Espere hasta que se
termine el rebobinado; en el caso contrario, se arruinarán las fotos.
k) AUTODISPARADOR
Seleccione el botón del autodisparador con el interruptor multifuncional (1) y pulse el
disparador para tomar la foto.
Después de pulsar el disparador (2) se enciende la lámpara indicadora de autodisparo
(7) durante 8 segundos. Después se pondrá intermitente el indicador durante otros 4
segundos y tendrá lugar la exposición/toma.
l) CUIDADO DE LA CÁMARA
• Mantenga la tapa del objetivo cerrada cuando no está usando la cámara.
• Proteja la cámara de suciedad, lluvia, humedad y calor alto.
• No use solventes, alcohol o productos abrasivos para limpiar el cuerpo de la cámara.
E
41
Page 42

m) SOLUCIÓN DE PROBLEMAS
CUIDADO: PARA EVITAR EL RIESGO DE UN CHOQUE ELÉCTRICO, NO TRATE DE DESMONTAR
NUNCA ESTA CÁMARA NI ABRA LA CARCASA.
Fallo
posibles, causas probables y corrección sugerida
1. Intermitencia larga del símbolo "Auto "
• La pila está agotada y tiene que ser substituida.
2. Fotos borrosas
• Movimiento de la cámara - sostenga la cámara firmemente y pulse el botón de disparo
suavemente. Con escasa luz use a ser posible un trípode para minimizar movimientos y
mejorar la nitidez de las fotos.
• El motivo se encuentra a menos de 1,5 m.
3. Fotos oscuras, subexpuestas
• Demasiado lejos del motivo para fotos con flash.
4. Fotos claras, sobreexpuestas
• Demasiado cerca del motivo para fotos con flash.
5. El oprimir el botón de disparo no tiene ningún efecto
• Si usted está cargando una nueva película y el contador de exposiciones indica cero,
se puede que la película sea colocada incorrectamente. Abra el dorso y cargue la
película de nuevo.
• Puede ser que le película esté atascada – rebobínela y mándela al laboratorio
para su procesamiento.
• Puede ser que la pila sea vieja – sustitúyala.
6. El contador de exposiciones se pone en cero
• El abrir la tapa del compartimiento de pilas para cambiarlas causará la reposición del
contador de exposiciones en cero. La cámara continuará a funcionar correctamente,
pero la cuenta de exposiciones indicada será incorrecta hasta que usted cargue
el próximo rollo de película.
E
42
Page 43

n) BLOQUEO DEL ENFOQUE AUTOMÁTICO
El sistema de enfoque automático de la cámara se enfocará sobre cualquier objeto que
se encuentra en el centro de la imagen. Si su motivo principal está cerca del lado de la
imagen, usted puede servirse de la capacidad de bloqueo del autofoco.
1) Centre su motivo principal en el visor.
2) Oprima el botón de disparo hasta medio recorrido y manténgalo allí para bloquear
el enfoque.
3) Mientras sigue manteniendo el botón de disparo a medio recorrido, encuadre
la imagen de nuevo como usted quiera y tome la foto.
o) ELIMINACIÓN DE PILAS
Contribuye a la protección del medio ambiente!
• No eche pilas o baterías recargables en la basura casera.
• En ciertos países estará usted obligado a deshacerse de baterías viejas llevándolas a un
lugar de colección pública o a la tienda donde las compró.
• Favor de consultar con sus autoridades locales sobre los reglamentos específicos y los
sitios de colección en que se puede dejar baterías viejas.
• Las baterías se marcan con símbolos indicando las substancias nocivas que contienen:
Pb (plomo); Cd (cadmio); Hg (mercurio).
• Proteja el medio ambiente y deshágase de baterías usadas de la manera correcta.
E
43
Page 44

DESCRIÇÃO DOS COMPONENTES, FIG. 1
01. Interruptor multifuncional 11. Dispositivo de abertura
02. Disparador do painel traseiro
03. Interruptor geral e 12. Guias do filme
de protecção da objectiva 13. Encaixe do tripé
04. Olhal de fixação para alça 14. Carrete do filme
05. Objectiva 15. Símbolo de colocação do filme
06. Flash 16. Tampa do compartimento da pilha
07. LED contra reflexos vermelhos 17. Painel traseiro
08. Painel LCD 18. Janela de controlo do filme
09. Visor 19. Interruptor de rebobinagem
10. Eixo de rebobinagem 20. Roda dentada
DADOS TÉCNICOS
Tipo: Máquina fotográfica totalmente automática com
visor de autofocagem. 35 mm
Formato do filme: Formato miniatura. 24 x 36 mm
Visor: com enquadramento luminoso, enquadramento
de autofocagem, indicação verde para focalização,
indicação vermelha luminosa quando o flash (OFF )
estiver desligado ou a luz for insuficiente
Exposição: Totalmente automática
Sistema de autofocagem: Dispositivo de retenção do foco com luz verde
quando o disparador estiver semi-premido
Flash: Automático. Pode ser ligado e desligado
Tempo de carregamento do flash: Máx. 10 segundos com pilha nova
Ajuste da sensibilidade do filme: Sistema DX automático para filmes ISO 100 até 400
Fonte de energia: Pilha de lítio 1 x 3V CR 123A
a)FIXAÇÃO DA ALÇA, FIG. 3-4
Enfie a extremidade da alça revestida de uma pequena fivela através do olhal de fixação para a
P
alça (4). Insira a outra extremidade na fivela mencionada e estique de forma a manter a alça fixa.
44
Page 45

b) COLOCAÇÃO DA PILHA
• Utilizar somente pilha de lítio 3V CR 123 A. Não são indicadas para esta máquina
as pilhas Ni-Cd recarregáveis ou pilhas de carvão e zinco.
• Abra o compartimento da pilha e dê atenção à posição indicada para a pilha.
• Substitua a pilha quando o tempo de carregamento do flash for excessivamente longo
(isto é, superior a 30 segundos).
• Atenção: após cada utilização, desligue sempre a máquina fotográfica (consulte
parágrafo c) no sentido de evitar que a pilha se gaste.
c)INTERRUPTOR GERAL E DE PROTECÇÃO
DA OBJECTIVA
1. Deslize para a esquerda o interruptor geral e de protecção da objectiva (3) para ligar
a máquina. A máquina fotográfica está agora pronta a ser disparada. Também o símbolo
“Auto “ fica permanentemente aceso. Se a máquina tiver dentro um rolo, é exibido o
respectivo número de exposição.
2. Depois de concluída a sessão de fotografias, deslize o interruptor geral e de protecção
da objectiva para a direita até que a objectiva fique fechada. O sistema de energia da
máquina fotográfica desactiva-se imediatamente.
d) PAINEL LCD, FIG. 2
Se a máquina estiver equipada com uma pilha e estiver ligada, o painel LCD (fig.2)
exibe, dependendo da situação, as seguintes informações:
sem filme; número de exposição; “ ” (processo de carregamento); “Auto ” (flash
activo e pronto a disparar); redução de olhos vermelhos; e disparador automático.
O painel LCD apaga-se ao abrir a tampa do compartimento das pilhas para proceder à
sua substituição e o contador de imagens regressa ao número zero. Substitua as pilhas
apenas quando não tiver nenhum filme dentro da máquina.
P
45
Page 46

Fig. 2 a) O painel LCD exibe a informação “0” = “sem filme”.
Fig. 2 b) O painel LCD exibe o número “1” que surge após o transporte da quarta
exposição. Isso significa que o filme foi colocado correctamente. A máquina
está pronta para tirar a primeira fotografia.
Fig. 2 c) O símbolo intermitente do flash “ ” exibido no painel LCD indica que o
processo de carregamento do flash ainda está activo. A máquina está pronta
para tirar a fotografia quando o símbolo “ “ deixar de piscar e permanecer
aceso.
Fig. 2 d) O símbolo “ ” surge no painel LCD logo que o disparador automático tenha
sido activado.
Fig. 2 e) Prima o interruptor multifuncional (1) e seleccione a função ON . O flash
automático está, agora, ligado e o flash será conectado, em simultâneo,
quando a máquina fotográfica for disparada, fazendo com que as sombras
fiquem mais claras como, p. ex., quando o seu motivo tiver um fundo muito
claro (sol, céu claro).
Fig. 2 f) Se pretender fotografar à luz normal do dia, desligue o flash automático. Prima
o interruptor multifuncional (1) e seleccione a função OFF . O diafragma
ficará na posição de abertura total, de modo a garantir uma exposição luminosa
da melhor qualidade possível. Para fotografar, prima o disparador (2).
e) COLOCAÇÃO DO FILME, FIG. 5-6
Para obter os melhores resultados devem ser utilizados filmes de imagem negativa a
cores de velocidade ISO 100, 200 ou 400 de código DX.
1) Para ligar a máquina, accione o interruptor geral e de protecção da objectiva (consulte
parágrafo c).
2) Para abrir o painel traseiro (17), deslize para baixo o dispositivo de abertura do painel traseiro (11).
3) Coloque o rolo do filme – coloque primeiro a extremidade superior e, depois, prenda a
extremidade inferior. Empurre o rolo para dentro de forma que a extremidade inicial do
filme fique plana e não dobre para cima (fig. 5 e 6).
P
46
Page 47

4) Puxe um pouco para fora a extremidade inicial do filme até que a ponta atinja o símbolo
de colocação do filme (15) junto ao carrete do filme (14).
• Assegure-se de que o filme está esticado entre as guias do filme (12) e de que as
perfurações no filme se encaixem nos dentes da roda (20).
f) FOTOGRAFAR – Luz do dia e flash, FIG. 7
1) Segure a máquina com ambas as mãos sem tremer (fig. 7). Tenha o cuidado de não
tapar com os dedos ou com o cabelo a objectiva (5), o flash (6) ou o LED contra reflexos
vermelhos (7).
2) A máquina pode ser segurada na horizontal ou na vertical. (Porém, segure a máquina de
forma que o flash fique na parte superior.) Verifique se a máquina está ligada (consulte
parágrafo c). O símbolo “Auto ” no painel LCD acende.
3) Assegure-se de que o sujeito está a uma distância mínima de 1,5 m e seleccione no
visor o recorte de imagem. Ao fotografar a pouca distância pode ser cortada na fotogra
fia final uma parte da imagem; por isso, ao seleccionar o recorte de imagem, deixe
espaço suficiente à volta do sujeito.
4) Pressione o botão do disparador completamente para tirar a fotografia. O filme é
transportado imediatamente para a próxima exposição e está pronto para uma nova
fotografia.
5) O flash é activado automaticamente, caso seja necessário para uma exposição correcta.
6) No caso de más condições de luz, o sistema para redução dos "olhos vermelhos” pode
ser utilizado para fotografar pessoas ou animais domésticos. Mantenha o botão do
disparador parcialmente pressionado durante cerca de um segundo de forma a ser
activada a luz prévia contra olhos vermelhos; depois pressione completamente para tirar
a fotografia. Para mais detalhes, consulte o parágrafo 6.) REDUÇÃO DO REFLEXO VERMELHO.
7) Alcance do flash
ISO 100: 1,5 m até 3,0 m
ISO 200: 2,0 m até 4,5 m
ISO 400: 2,5 m até 6,0 m
O campo de aplicação do flash depende da sensibilidade do filme. Assegure-se de que o
sujeito se encontra dentro do alcance do flash no caso de exposições com flash.
P
47
Page 48

g) REDUÇÃO DO REFLEXO VERMELHO
As fotografias de pessoas ou animais domésticos tiradas em situações de luz fraca
podem apresentar o chamado “efeito de olhos vermelhos”. As pupilas dos olhos surgem
na fotografia como pontos vermelhos.
Isso pode ser evitado se os sujeitos olharem para um ponto um pouco ao lado da máquina
ou aumentar a luz interior do compartimento. Esta máquina está equipada, além disso,
com um sistema de redução de olhos vermelhos. Pressionando parcialmente o botão do
disparador, acende-se um forte LED (10) na parte da frente da máquina. Isso torna as
pupilas do sujeito um pouco mais pequenas e reduz o “efeito de olhos vermelhos”.
• A redução dos reflexos vermelhos AUTO-S (fig. 2g) é mais eficaz se o sujeito estiver
no meio do campo de imagem.
h) EXPOSICÃO MÚLTIPLA, FIG. 2h
Com esta função poderão ser feitas interessantes exposições duplas e múltiplas. Prima o
interruptor multifuncional (1) e seleccione a função (ME). Prima, então, o disparador (2)
e faça a primeira exposição. O filme não permanece ajustado para esta função mas a
máquina fotográfica está, de novo, pronta a ser disparada.
Exemplo:
Se desejar combinar os contornos claros e os detalhes de um pôr-do-sol com as luzes da
noite (p. ex. de uma cidade, onde os candeeiros ainda não estão iluminados), proceda
da seguinte maneira:
Se possível, monte a máquina fotográfica num tripé, visualize o seu motivo, prima o
interruptor multifuncional e seleccione a função (ME). Prima, então, o disparador (2) e
faça a primeira exposição. Logo que a cidade fique iluminada, seleccione, com o
interruptor funcional, a função OFF e faça a segunda exposição.
Dê atenção: poderá efectuar mais exposições no mesmo negativo. Para tal, seleccione
sempre a função de exposição múltipla (ME) antes de cada segunda exposição.
P
48
Page 49

i) REBOBINAGEM DO FILME
No fim do rolo de filme, o motor de transporte do filme desliga-se automaticamente e
não é possível tirar mais fotografias.
1) O filme é rebobinado automaticamente e o contador de exposições no painel LCD inverte
a sua contagem. O motor pára automaticamente quando o rolo tiver sido completamente
rebobinado.
2) Quando parar o som do motor (o indicador indica que a rebobinagem foi concluída),
verifique se o contador de exposições exibe o número "0”. Abra o painel traseiro, retire
o filme e mande-o revelar o mais breve possível.
3) Substitua as pilhas, caso o som do motor lhe tenha parecido mais lento ou pesado.
4) Se desejar rebobinar o filme antes de este atingir o número máximo de fotografias,
terá que premir a tecla de rebobinagem (19).
• Atenção! Não abra o painel traseiro da máquina durante a rebobinagem do filme. Espere
obrigatoriamente até que o processo de rebobinagem do filme seja concluído, caso
contrário as suas fotografias serão inutilizadas.
k) DISPARO AUTOMÁTICO
Com o interruptor multifuncional (1), seleccione a função de disparo automático e prima
o disparador para tirar a fotografia. Após ter premido o disparador (2), a luz indicadora
de disparo automático (7) fica acesa durante 8 segundos. De seguida, a luz indicadora
fica intermitente durante mais 4 segundos e é feita a exposição/fotografia.
l) CUIDADOS A TER COM A MÁQUINA
• Feche a tampa da objectiva da máquina quando não a estiver a utilizar.
• Proteger a máquina contra sujidade, chuva, humidade e calor extremo.
• Não use solventes, álcool ou abrasivos para limpar a máquina.
P
49
Page 50

m) LOCALIZAÇÃO DE FALHAS
ATENÇÃO! NO SENTIDO DE REDUZIR O PERIGO DE CHOQUE ELÉCTRICO NUNCA
DESMONTE OU ABRA A MÁQUINA!
Falhas
possíveis, causas prováveis e conselhos de reparação
1) O símbolo “Auto ” está intermitente durante muito tempo.
• A pilha está gasta e precisa de ser substituída.
2) As fotografias estão desfocadas
• Tenha em conta a posição adequada da máquina. Segure bem a máquina e pressione
cuidadosamente o botão do disparador. No caso de condições fracas de luz, utilize
de preferência um tripé. Minimiza, dessa forma, a trepidação e optimiza a focalização
da imagem.
• O sujeito está a menos de 1,5 m de distância.
3) Fotografias escuras e subexpostas
• Está muito longe do sujeito para tirar fotografias com flash.
4) Fotos claras e sobreexpostas
• Está muito perto do sujeito para tirar fotografias com flash.
5) A acção de pressionar o botão do disparador não tem qualquer efeito
• Se o contador de exposições mostra o número "0” depois de ter colocado um novo filme,
então pode ser que este tenha sido mal colocado. Abra o painel traseiro e coloque o rolo
correctamente.
• O rolo está provavelmente encravado – rebobine o filme, retire o rolo e leve-o para revelar.
• A pilha está provavelmente gasta – substitua a pilha.
6) O contador de exposições regressa ao número "0”
• Ao abrir a tampa do compartimento da pilha para a substituir tem lugar o regresso do
contador de exposições ao número "0”. A máquina continuará a funcionar correctamente,
mas o contador de exposições continuará a exibir o número errado até colocar o próximo
rolo de filme.
P
50
Page 51

n) MEMÓRIA DE FOCALIZAÇÃO
O sistema de autofocagem da máquina foca um objecto qualquer que está no centro da
imagem. A memória de focalização pode ser utilizada quando o sujeito principal se
encontra junto a um dos bordos da imagem.
1) Posicione o sujeito principal de tal forma que ele fique no meio do campo do visor.
2) Pressione parcialmente o botão do disparador e aguarde até activar a memória
de focalização.
3) Enquanto mantém o botão do disparador parcialmente pressionado, escolha o novo
recorte de imagem desejado e, depois, dispare para tirar a fotografia.
o) ELIMINAÇÃO DAS PILHAS
Ajude a proteger o ambiente!
• Não junte pilhas gastas com o lixo doméstico.
• Na maior parte dos países, há uma lei que obriga as pessoas a entregar as pilhas
gastas para eliminação em locais de recolha públicos ou na loja onde foram compradas.
• Peça, por favor, às autoridades locais informações sobre a regulamentação específica e
sobre a situação dos locais de recolha para pilhas gastas.
• As pilhas apresentam símbolos que identificam as substâncias nocivas: Pb (chumbo);
Cd (cádmio); Hg (mercúrio).
• Proteja o nosso ambiente; elimine as pilhas gastas da forma correcta.
P
51
Page 52

BENAMING DER ONDERDELEN, AFB. 1
01. Multifunctionele toets 11. Vergrendeling achterdeksel
02. Ontspanknop 12. Filmgeleiders
03. Schakelaar lensbeschermkap/energie 13. Statiefaansluiting
04. Polsriembevestiging 14. Filmopwikkelspoel
05. Lens 15. Filminlegteken
06. Flits 16. Batterijvakdeksel
07. LED rode ogen reductie 17. Achterdeksel
08. LC-display 18. Filmcontrolevenster
09. Zoeker 19. Terugspoelschakelaar
10. Terugspoelas 20. Tandwieltje
TECHNISCHE GEGEVENS
Type: volautomatische autofocuscamera, 35 mm
Filmformaat: kleinbeeld, 24 x 36 mm
Zoeker: met lichtend kader, autofocuskader, groen lampje
voor focussering, rood lampje bij uitgeschakelde
flits (OFF ) of onvoldoende licht
Belichting: volautomatisch
Autofocussysteem: focusgeheugen met groen licht bij half
ingedrukte ontspanner
Flits: automatisch in- en uitschakelbaar
Laadtijd flits: max. 10 seconden bij volle batterijen
Gevoeligheidsinstelling film: automatisch DX-systeem voor films ISO 100 tot 400
Voeding: 1 x 3 V lithiumbatterij CR 123A
a) AANBRENGEN VAN DE POLSRIEM, AFB. 3-4
Steek het kleine luseinde van de polsriem door de polsriembevestiging (4). Steek het
andere uiteinde door de uitstekende lus en haal het strak aan om de riem te bevestigen.
NL
52
Page 53

b) INLEGGEN VAN DE BATTERIJ
• Gebruik alleen oplaadbare lithiumbatterijen, 3 V CR 123 A. NiCd-batterijen of de
kool-zink-cellen zijn niet geschikt.
• Open het batterijvakje en let op de in het vakje aangegeven polariteit.
• Vervang de batterij wanneer de oplaadtijd van de flitser te lang duurt (bijvoorbeeld
meer dan 30 seconden).
• Opgelet: schakel de camera na gebruik altijd uit (zie ook onder c) omdat het
functielampje stroom verbruikt en de batterij leeg kan raken.
c) SCHAKELAAR LENSBESCHERMKAP/ENERGIE
1. Voor het inschakelen van de camera schuift u de schakelaar voor de
lensbeschermkap/energie (3) naar links. De camera is nu gebruiksklaar. Bovendien is het
symbool "Auto " op het LC-display (8) voortdurend zichtbaar. Bij ingelegd filmrolletje
wordt tevens het opnamenummer aangegeven.
2. Na het maken van de opname schuift u de schakelaar voor de lensbeschermkap/energie
naar rechts totdat hij helemaal gesloten is. Zo wordt gelijktijdig de cameravoeding
uitgeschakeld.
d) LC-DISPLAY, AFB. 2
Wanneer de camera ingeschakeld en voorzien is van een batterij, verschijnt op het
LC-display (Afb. 2) al naargelang de wens de weergave van de volgende functies:
geen film ingelegd; opname; " " (aan het opladen); "Auto " (ingeschakeld en
gebruiksklaar); vermindering "rode-ogen-effect”; en zelfontspanner.
Wanneer het batterijvakdeksel geopend wordt, dooft het LC-display en de opnameteller
keert terug naar nul. Vervang de batterij alleen als er geen film in de camera is.
NL
53
Page 54

Afb. 2 a) Op het display verschijnt " 0” = "geen film ingelegd"
Afb. 2 b) Het display geeft "1" aan, dat na het transporteren van het vierde filmbeeld.
Dit betekent dat de film correct is ingelegd. De camera is nu klaar voor de
eerste opname.
Afb. 2 c) Het knipperende flitssymbool " " verschijnt op het display als de flitser
nog niet aan het opladen is. Zodra het symbool " " niet meer knippert, maar
constant brandt, is de camera klaar voor het fotograferen.
Afb. 2 d) Het symbool " " verschijnt op het LC-display zodra de zelfontspanner is
geactiveerd.
Afb. 2 e) Druk de multifunctionele schakelaar (1) in en kies de functie ON . Nu is de
automatische flits uitgeschakeld en wordt bij het indrukken van de ontspanner
automatisch ingeschakeld als schaduwen moeten worden opgehelderd,
bijvoorbeeld als uw motief voor een zeer lichte achtergrond (zon, lichte hemel) staat.
Afb. 2 f) Schakel de automatische flits uit als u bij normaal daglicht fotografeert. Druk
de multifunctionele schakelaar (1) in en kies de functie OFF . Het diafragma
staat nu op volle opening om een zo optimaal mogelijke belichting te waarborgen. Druk nu de ontspanner (2) in voor het maken van een opname.
e) HET INLEGGEN VAN DE FILM, AFB. 5-6
• Gebruik voor de beste resultaten een fotorolletje van 100, 200 of 400 ISO met DX-codering.
1) Open de schakelaar voor de lensbeschermkap/energie [zie onder c] om de camera in
te schakelen.
2) Open het achterdeksel (17) door de vergrendeling (11) naar onder te schuiven.
3) Leg de fotocassette in de camera - de bovenzijde inzetten en dan de onderzijde laten
inklinken. Druk de cassette stevig vlak zodat de filmaanloopstrook vlak ligt en niet naar
boven buigt (Afb. 5-6).
4) Trek de filmaanloopstrook eruit totdat de punt het filminlegteken (15) naast de spoel (14)
bereikt. Zorg ervoor dat de film vlak tussen de filmgeleiders (12) ligt en dat de
perforaties goed in het tandwieltje (20) grijpen.
NL
54
Page 55

f) FOTOGRAFEREN - Daglicht en flits, AFB. 7
1) Houd de camera stevig vast met beide handen (Afb.7). Zorg ervoor dat uw vingers
of haren de lens (5), flits (6) of LED (7) niet afdekken.
2) U kunt de camera horizontaal of verticaal houden (bij verticale opnames moet de flits
boven staan.
3) Controleer of de camera is ingeschakeld (zie onder c). Het symbool "Auto " verschijnt
op het LC-dislplay. ontroleer of u op een afstand van minstens 1,5 m van uw onderwerp
bent , en zoek het beeld in de zoeker. Bij het maken van close-up opnames kan een deel
van het beeld op het negatief verdwijnen; houd dus bij het maken de opname voldoende
ruimte rondom het motief vrij.
4) Druk de ontspanknop volledig omlaag om de opname te maken. De film wordt onmiddellijk
getransporteerd naar de volgende opname en de camera is weer gebruiksklaar.
5) De flits wordt automatisch geactiveerd als voor een goede belichting nodig is.
6) Bij zeer weinig licht kan het nodig zijn, het systeem voor de vermindering van het rode
ogen-effect te gebruiken voor opnames van personen of huisdieren. Houd de ontspanknop halverwege ongeveer 1 seconde ingedrukt om het rode -ogen-reductie-systeem
automatisch te activeren en druk hem dan volledig naar beneden om de opname te
maken. Zie onder g, "VERMINDERING VAN HET RODE OGEN-EFFECT” voor meer informaties.
7) Gebruiksafstanden bij flits
ISO 100 van 1,5 m tot 3,0 m
ISO 200 van 2,0 m tot 4,5 m
ISO 400 van 2,5 m tot 6,0 m
De gebruiksafstand van de flitser is afhankelijk van de gevoeligheid van de film die u
gebruikt. Zorg ervoor dat uw motief zich binnen de gebruiksafstand van de flitser bevindt
voor een juiste belichting.
g) VERMINDERING VAN HET RODE OGEN-EFFECT
Opnames van mensen en dieren die bij weinig licht zijn gemaakt, kunnen het "rode
ogen"- effect vertonen. De pupillen verschijnen als rode kringen op de foto's.
NL
55
Page 56

Dit kan verminderd worden door het onderwerp van de camera weg te laten kijken of de
kamerverlichting te versterken. Bovendien is deze camera uitgerust met een "rode ogenreductiesysteem". Door het half indrukken van de ontspanknop gaat op de voorzijde van
de camera een sterke LED (7) branden. Daardoor worden de pupillen van het motief
iets kleiner en wordt het "rode ogen"- effect iets verminderd.
• De "rode ogen" reductie Auto-S (Afb. 2g) heeft het beste effect als uw motief zich in het
midden van het beeld bevindt.
h) MEERVOUDIGE BELICHTING, AFB. 2h
Met deze functie kunt u interessante dubbel- en meervoudige belichtingen maken. Druk
de multifunctionele schakelaar (1) en kies de functie (ME). Vervolgens drukt u op de ont
spanner (2) en maakt de eerste opname. In deze functie wordt de film niet getranspor
teerd, maar de camera is opnieuw gebruiksklaar.
Voorbeeld
U wilt de scherpe contouren en details bij een zonsondergang (bijvoorbeeld een stad
met nog niet ingeschakelde lantaarns) combineren met de lichten bij nacht. Daartoe gaat
u als volgt te werk:
Monteer de camera bij voorkeur op een statief, zoek uw motief en druk op de multifunctionele schakelaar (1). Kies de functie (ME). Druk vervolgens op de ontspanner en
maak de eerste opname. Zodra de stadsverlichting is ingeschakeld, kiest u met de multifunctionele schakelaar de functie OFF en maakt de tweede opname.
Opgelet: u kunt hetzelfde motief natuurlijk nog vaker belichten. Daarvoor kiest u dan vóór
de tweede opname gewoon nogmaals de meervoudige belichting (ME).
NL
56
Page 57

i) TERUGSPOELEN VAN DE FILM
Aan het einde van het filmrolletje stopt het gemotoriseerde filmtransport automatisch.
U kunt nu geen foto's meer maken.
1) De film spoelt automatisch terug en de opnameteller op het LC-display telt terug naar
nul. De motor stopt automatisch ophouden zodra de film volledig is teruggespoeld.
2) Controleer als het motorgeluid ophoudt (het display geeft aan dat het terugspoelen vol
tooid is) of de opnameteller "0" aangeeft. Open het achterdeksel, neem de film eruit
en laat hem zo snel mogelijk ontwikkelen.
3) Vervang de batterijen als het lijkt of de motor ongewoon langzaam of zwaar loopt.
4) Als u het rolletje vóór het bereiken van het maximale aantal opnames wilt terugspoelen,
drukt u op de terugspoeltoets (19).
• Open het achterdeksel niet tijdens het terugspoelen. Wacht totdat het terugspoelen van
de film voltooid is, anders worden uw opnames onbruikbaar
k) ZELFONTSPANNER
Druk op de zelfontspannerknop ( ). Kies tevoren met de multifunctionele schakelaar (1)
de functie "ontspanner” om de opname te maken.. Na het indrukken van de zelfontspanner (2) brandt het lampje van de zelfontspanner (7) 8 seconden lang constant.
Dan knippert het lampje nog 4 seconden voordat de belichting/opname volgt.
l) ONDERHOUD VAN DE CAMERA
• Houd de lenskap gesloten wanneer u de camera niet gebruikt.
• Bescherm de camera tegen vuil, regen, vocht en grote hitte.
• Gebruik geen oplosmiddelen, alcohol of schurende schoonmaakmiddelen om het
camerahuis schoon te maken.
NL
57
Page 58

m) OPSPOREN VAN PROBLEMEN
WAARSCHUWING: PROBEER NOOIT, HET CAMERAHUIS TE OPENEN OF DE CAMERA UIT
ELKAAR TE HALEN! GEVAAR VOOR ELEKTRISCHE SCHOK!
Mogelijke
storingen, waarschijnlijke oorzaak en tips voor het verhelpen
1. Voortdurend knipperen van het symbool " ":
• Batterij is leeg en moet worden vervangen
2. Onscherpe foto's
• Camerabeweging - houd de camera stevig vast en druk zacht op de ontspanknop.
Gebruik bij slecht licht liefst een statief om de beweging zo gering mogelijk te maken en
de beeldscherpte te verbeteren.
• Het onderwerp is dichter bij dan 1,5 m.
3. Donkere, onderbelichte foto's
• U bent te ver van uw onderwerp voor flitsopnames.
4. Lichte, overbelichte foto's
• U bent te dicht bij uw onderwerp voor flitsfoto's.
5. Het omlaag drukken van de ontspanknop heeft geen effect
• Als u een nieuwe film inlegt en de opnameteller op nul staat, is de film mogelijk foutief
ingelegd. Open het achterdeksel en leg de film opnieuw in.
• De film zit mogelijk klem - spoel de film terug en geef hem bij uw fotolab af voor ontwikkeling.
• Mogelijk is de batterij oud - vervang de batterij
6. De opnameteller keert terug naar NUL
• Als u het batterijvakje opent om de batterijen te vervangen, keert de opnameteller terug
naar nul. De camera functioneert verder correct, maar geeft alleen niet het juiste aantal
opnames aan totdat u een nieuw filmrolletje.
NL
58
Page 59

n) VERGRENDELING VAN HET AUTOFOCUSSEREN
Het autofocussysteem van de camera zal zich scherpstellen op al wat in de centrale zone
van het beeld is. Indien uw hoofdonderwerp dicht bij de kant van het beeld is, kunt u de
autofocusvergrendlings-functie gebruiken.
1) Centreer uw hoofdonderwerp in de zoeker.
2) Druk en houd de ontspanknop halverwerge naar bedenen om de scherpstelling te
vergrendelen.
3) Terwijl u nog de ontspanknop halverwege ingedrukt houdt, recomponeer het beeld
als u wilt en maak de opname.
o) BESCHUT DE OMGEVING
• Werp verbruikte batterijen of accu’s niet weg in de vuilnisbak van het huis.
• In sommige landen moet men volgens de wet alle verbruikte batterijen alleen nemen
naar een openbare verzamlingsplaats of naar de winkel waar de batterijen worden
gekocht.
• Vraag a.u.b. uw autoriteten naar de specifische reglementering en de ligging
van vuilnisbaken waar u kunt oude batterijen wegwerpen.
• Batterijen zijn met symbolen voorzien voor de schadelijke stoffen:
Pb (lood); Cd (cadmium); Hg (kwikzilver).
• Bescherm de omgeving en werp de verbruikte batterijen geschickt weg.
NL
59
Page 60

¶∂ƒπ°ƒ∞º∏ ∆ø¡ ™∆√πÃ∂πø¡. ∞¶∂π∫√¡π™∏ 1
01. ∂ИПФБ¤·˜ ПИЩФ˘ЪБИТУ 12. ƒ¿Á˜ ÚÔÒıËÛ˘ ÙÔ˘ ÊÈÏÌ
¶Ï‹ÎÙÚÔ ÁÈ· ÙËÓ 13. ÀÔ‰Ô¯‹ ÁÈ· ÙÚ›Ô‰Ô
02.
·Ï˘ı¤ÚˆÛË ÙÔ˘ ʈÙÔÊÚ¿¯ÙË 14.
¢È·ÎfiÙ˘ ÁÈ· ÙÔ Î¿Ï˘ÌÌ· ÙÔ˘ ÊÈÏÌ Î·Ù¿ ÙËÓ ·˘ÙfiÌ·ÙË
03.
Ê·ÎÔ‡ Î·È ÁÈ· ÙÔ Ú‡Ì· ÚÔÒıËÛË
£¤ÛË, fiÔ˘ ÌÔÚ› Ó· Û˘Ó‰ı› 15. µÔËıËÙÈÎfi ÛËÌ¿‰È ÁÈ·
04.
ÙÔ ÎÔÚ‰fiÓÈ Ó· Ì·›ÓÈ ÛˆÛÙ¿ ÙÔ ÊÈÏÌ
º·Îfi˜ 16. ∫¿Ï˘ÌÌ· Ù˘ ı‹Î˘
05.
ºÏ·˜ ÁÈ· ÙȘ Ì·Ù·Ú›˜
06.
LED БИ· ЩФУ ЪИФЪИЫМfi ЩФ˘ 17. ∏ Ï¿ÙË Ù˘ Ì˯·Ó‹˜
07.
Ê·ÈÓÔ̤ÓÔ˘ ÙˆÓ ÎfiÎÎÈÓˆÓ Ì·ÙÈÒÓ 18.
LCD ÔıfiÓË ˘ÁÚÒÓ ÎÚ˘ÛÙ¿ÏÏˆÓ ¯ЪЛЫИМФФИЛМ¤УФ КИПМ
08.
™Îfi˘ÙÚÔ 19. ¶Ï‹ÎÙÚÔ ÁÈ· ÙËÓ
09.
ÕÍÔÓ·˜ ·Ó·ÊÔÚ¿˜ ÙÔ˘ ÊÈÏÌ ·Ó·ÊÔÚ¿ ÙÔ˘ ÊÈÏÌ
10.
∫Ô˘Ì› ÁÈ· Ó· ·ÓÔ›ÁÈ Ë Ï¿ÙË 20. √‰ÔÓÙˆÙfi˜ ÙÚÔ¯fi˜
11.
Ù˘ Ì˯·Ó‹˜ ÁÈ· ÙÔ ÊÈÏÌ
∫·ÚÔ‡ÏÈ ÁÈ· Ó· Ù˘Ï›ÁÙ·È ÙÔ
¶·Ú·ı˘Ú¿ÎÈ ÁÈ· ÙÔ
∆∂áπ∫∞ Ã∞ƒ∞∫∆∏ƒπ™∆π∫∞
∆‡Ô˜: ¶Ï‹Úˆ˜ ·˘ÙfiÌ·ÙË ÊˆÙÔÁÚ·ÊÈ΋
™¯‹Ì· ÊÈÏÌ: ÌÈÎÚ‹˜ ÈÎfiÓ·˜ 24x36 mm
™Îfi˘ÙÚÔ: Ì ÊˆÙÈÓfi Ï·›ÛÈÔ, Ï·›ÛÈÔ ÁÈ·
∂ОКТЩИЫЛ: Ï‹Úˆ˜ ·˘ÙfiÌ·ÙË
™‡ÛÙËÌ· ·˘ÙfiÌ·Ù˘ ÛÙ›·Û˘: ÛÙ·ıÚÔÔ›ËÛË Ù˘ ÛÙ›·Û˘ Ì
ºÏ·˜: ·˘ЩfiМ·ЩФ, О·Щ’ ИПФБ‹У М ‹ ¯ˆЪ›˜
ГЪfiУФ˜ КfiЪЩИЫЛ˜ ЩФ˘ КП·˜: М О·ИУФ‡ЪИ˜ М·Щ·Ъ›˜ ЩФ ФП‡ 10
ƒ‡ıÌÈÛ˘ Ù˘ ˘·ÈÛıËÛ›·˜
ÙÔ˘ ÊÈÏÌ: ·˘ÙfiÌ·ÙÔ Û‡ÛÙËÌ· DX ÁÈ· ÊÈÏÌ
¶ËÁ‹ Ó¤ÚÁÈ·˜: 1x 3V Ì·Ù·Ú›· Lithium CR 123A
Ì˯·Ó‹ ·˘ÙfiÌ·Ù˘ ÛÙ›·Û˘ Ì
ÛÎfi˘ÙÚÔ, 35mm
·˘ЩfiМ·ЩЛ ЫЩ›·ЫЛ˜, Ъ¿ЫИУЛ ¤У‰ИНЛ
БИ· ЩЛУ ЫЩ›·ЫЛ, КˆЩИУ‹ ОfiООИУЛ
¤У‰ИНЛ БИ· ЩФ ·УЪБФФИЛМ¤УФ КП·˜
(OFF ) ‹ ·У·ЪО¤˜ Кˆ˜
Ú¿ÛÈÓÔ Êˆ˜ ÎÚ·ÙÒÓÙ·˜ ·ÙË̤ÓÔ
ÛÙÔ ÌÈÛfi ÙÔ Ï‹ÎÙÚÔ ÁÈ· ÙËÓ
·Ï˘ı¤ÚˆÛË ÙÔ˘ ʈÙÔÊÚ¿¯ÙË
‰˘ÙÚfiÏÙ·
ISO 100 ¤ˆ˜ 400
·) ¶ø™ ¡∞ ¶ƒ√™∞ƒª√™∂∆∂ ∆√ ∫√ƒ¢√¡π.
∞¶∂π∫√¡π™∏ 3-4
¶Ú¿ÛÙ ÙË ıËÏÈ¿ ÛÙÔ ¿ÎÚÔ ÙÔ˘ ÎÔÚ‰ÔÓÈÔ‡ ̤۷ ·fi ÙËÓ ı¤ÛË,
fiÔ˘ ÌÔÚ› Ó· Û˘Ó‰ı› ÙÔ ÎÔÚ‰fiÓÈ (4). ¶Ú¿ÛÙ ÙÒÚ· ÙÔ ¿ÏÏÔ ¿ÎÚÔ
GR
ÙÔ˘ ÎÔÚ‰ÔÓÈÔ‡ ̤۷ ·fi ÙË ıËÏÈ¿ Î·È ÙÚ·‚‹ÍÙ ÙÔ ÁÈ· Ó· ÛÊ›ÍÈ.
60
Page 61

‚) ¶ø™ ¡∞ µ∞§∂∆∂ ∆HN ª¶∞∆∞ƒπA
с ГЪЛЫИМФФИ›Щ МfiУФ М·Щ·Ъ›˜ Lithium 3V CR 123A.
∂·У·КФЪЩИ˙fiМУ˜ М·Щ·Ъ›˜ NC ‹ О·И ·˘Щ¤˜ ¿УıЪ·О·-"˘‰¿ЪБ˘ЪФ˘
›У·И ·О·Щ¿ППЛП˜.
ñ ∞ÓÔ›ÍÙ ÙËÓ ı‹ÎË ÁÈ· ÙËÓ Ì·Ù·Ú›· Î·È ÚÔÛ¤ÍÙ ÙËÓ ¤Ó‰ÈÍË ÁÈ· ÙËÓ
ÛˆÛÙ‹ ÙÔÔı¤ÙËÛË Ù˘ Ì·Ù·Ú›·˜ ÛÙËÓ ı‹ÎË Ù˘.
ñ ∞ÏÏ¿ÍÙ ÙËÓ Ì·Ù·Ú›· ¿Ó Ô ¯ÚfiÓÔ˜ Ô˘ ¯ÚÈ¿˙Ù·È ÙÔ ÊÏ·˜ ÁÈ· Ó·
ÁÌ›ÛÈ ˘Ú‚·›ÓÈ Ù· 30 ‰˘ÙÚfiÏÙ·.
ñ ¶ÚÔÛÔ¯‹: ªÙ¿ ·fi οı ¯Ú‹ÛË Ù˘ ʈÙÔÁÚ·ÊÈ΋˜ Ì˯·Ó‹˜ Ó· ÙËÓ
ÎÏ›ÓÙ (‰¤ÛÙ Î·È ÛÙÔ ÎÊ¿Ï·ÈÔ c), ÁÈ·Ù› ·Ó ÙËÓ ¤¯Ù Û˘Ó¯Ò˜ Û
ÙÔÈÌfiÙËÙ· ÌÔÚ› Ó· ·‰È¿ÛÈ Ë Ì·Ù·Ú›·.
Á) ¢π∞∫√¶∆∏™ °π∞ ∆√ ∫∞§Àªª∞ ∆√À º∞∫√À
∫∞π °π∞ ∆√ ƒ∂Àª∞.
1. °È· Ó· ı¤ÛÙ ÙË ÊˆÙÔÁÚ·ÊÈ΋ Ì˯·Ó‹ Û ÏÈÙÔ˘ÚÁ›·, ÛÚÒÍÙ ÙÔÓ
‰È·ÎfiÙË ÁÈ· ÙÔ Î¿Ï˘ÌÌ· ÙÔ˘ Ê·ÎÔ‡ Î·È ÙÔ Ú‡Ì· (3) ÚÔ˜ Ù·
·ЪИЫЩЪ¿. ∆ТЪ· МФЪ›Щ У· ‚Б¿ПЩ КˆЩФБЪ·К›˜ М ЩЛ КˆЩФБЪ·КИО‹
МЛ¯·У‹. ∂›ЫЛ˜ МК·У›˙Щ·И О·И ЩФ Ы‡М‚ФПФ ”Auto ” ∞У ЫЩЛ МЛ¯·У‹
›У·И ‚·ПМ¤УФ КИПМ, Л ФıfiУЛ ‰›¯УИ ЩФУ ·У¿ПФБФ ·ЪИıМfi ЫЩ¿ЫЛ˜.
2. ∞КФ‡ ЩПИТЫЩ ЩЛУ КˆЩФБЪ¿КЛЫЛ, ЫЪТНЩ ЩФУ ‰И·ОfiЩЛ БИ· ЩФ
О¿П˘ММ· ЩФ˘ К·ОФ‡ О·И ЩФ Ъ‡М· (3) ЪФ˜ Щ· ‰НИ¿, М¤¯ЪИ У· ОП›ЫИ ЩФ
¿УФИБМ· ЩФ˘ К·ОФ‡ ЩП›ˆ˜. ª ЩФУ ЩЪfiФ ·˘Щfi ‰И·ОfiЩЩ·И О·И Л
ЩЪФКФ‰ФЫ›· ЩФ˘ Ъ‡М·ЩФ˜ ЩЛ˜ МЛ¯·У‹˜.
‰) LCD √£√¡∏ À°ƒø¡ ∫ƒÀ™∆∞§§ø¡. ∞¶∂π∫√¡π™∏ 2
ŸЩ·У ЫЩЛ МЛ¯·У‹ ‚Ъ›ЫОЩ·И МИ· М·Щ·Ъ›· О·И Ф ‰И·ОfiЩЛ˜ БИ· ЩФ
Ъ‡М· ›У·И ·УФИ¯Щfi˜, ı· МК·УИЫЩФ‡У ЫЩЛУ ФıfiУЛ (·ИОfiУИЫЛ 2)
·Ó¿ÏÔÁ· Ì ÙËÓ Ú›ÙˆÛË ÔÈ ·ÎfiÏÔ˘ı˜ ÏÈÙÔ˘ÚÁ›˜:
Л МЛ¯·У‹ ‰У ¤¯И КИПМ; Ф ·ЪИıМfi˜ ЩЛ˜ ЫЩ¿ЫЛ˜; " " (Л МЛ¯·У‹
КФЪЩ›˙Щ·И); - "Auto " (Л МЛ¯·У‹ ›У·И ·УФИ¯Щ‹ О·И ¤ЩФИМЛ БИ·
¯Ъ‹ЫЛ); ЪИФЪИЫМfi˜ ЩФ˘ К·ИУФМ¤УФ˘ ЩˆУ ОfiООИУˆУ М·ЩИТУ;
·˘ÙÔʈÙÔÁÚ¿ÊËÛË
∏ LCD ФıfiУЛ Ы‚‹УИ, fiЩ·У ·УФИ¯Щ› ЩФ О¿П˘ММ· ЩЛ˜ ı‹ОЛ˜ БИ· ЩИ˜
М·Щ·Ъ›˜ БИ· У· ·ПП¿НЩ ЩИ˜ М·Щ·Ъ›˜. ∂И‰‹ ¤ЩЫИ Ф МЩЪЛЩ‹˜ ЩˆУ
ЫЩ¿ЫˆУ ·У¤Ъ¯Щ·И ЫЩФ МЛ‰¤У, У· ·ПП¿˙Щ ЩИ˜ М·Щ·Ъ›˜ fiЩ·У ЫЩЛУ
МЛ¯·У‹ ‰У ˘¿Ъ¯И КИПМ.
GR
61
Page 62

ÈÎfiÓÈÛË 2·) ∏ LCD ÔıfiÓË ‰›¯ÓÈ ”0” = "‰Ó ‚¿Ï·Ù ÊÈÏÌ ÛÙË Ì˯·Ó‹".
∞ÈÎfiÓÈÛË 2‚) ∏ LCD ÔıfiÓË ‰›¯ÓÈ ÙÔÓ ·ÚÈıÌfi "1", Ô ÔÔ›Ô˜ ÌÊ·Ó›˙Ù·È
∞ÈÎfiÓÈÛË 2Á) ∆Ô Û‡Ì‚ÔÏÔ ÙÔ˘ ÊÏ·˜ ” ” Ô˘ ·Ó·‚ÔÛ‚‹ÓÈ ÛÙËÓ
∞ÈÎfiÓÈÛË 2‰) ∆Ô Û‡Ì‚ÔÏÔ " " ÌÊ·Ó›˙Ù·È ÛÙËÓ LCD ÔıfiÓË ÌfiÏȘ
∞ИОfiУИЫЛ 2В) ¶И¤ЫЩ ЩФУ ИПФБ¤· ПИЩФ˘ЪБИТУ (1) О·И ИП¤НЩ ЩЛУ
∞ÈÎfiÓÈÛË 2ÛÙ) ∞ÓÚÁÔÔÈ‹ÛÙ ÙÔ ·˘ÙfiÌ·ÙÔ ÊÏ·˜, fiÙ·Ó ‚Á¿˙Ù
МЩ¿ ЩЛУ ЪФТıЛЫЛ ЩЛ˜ Щ¤Щ·ЪЩЛ˜ ЫЩ¿ЫЛ˜. ∞˘Щfi
ЫЛМ·›УИ, ˆ˜ ЩФ КИПМ ¤¯И ЩФФıЩЛı› ЫˆЫЩ¿ ЫЩЛ
МЛ¯·У‹. ∏ КˆЩФБЪ·КИО‹ МЛ¯·У‹ ›У·И ЩТЪ· ¤ЩФИМЛ
БИ· ЩЛУ ЪТЩЛ КˆЩФБЪ·К›·.
LCD ФıfiУЛ, ‰›¯УИ ˆ˜ Л ‰И·‰ИО·Ы›· КfiЪЩИЫЛ˜ ЩФ˘
КП·˜ ·ОfiМ· ‰И·ЪО›. ∏ КˆЩФБЪ·КИО‹ МЛ¯·У‹ ›У·И
¤ЩФИМЛ БИ· ¯Ъ‹ЫЛ fiЩ·У ЩФ Ы‡М‚ФПФ " " ЫЩ·М·Щ‹ЫИ У·
·Ó·‚ÔÛ‚‹ÓÈ Î·È Ê·›ÓÙ·È Û˘Ó¯Ò˜.
ÓÚÁÔÔÈËı› Ë ·˘ÙfiÌ·ÙË ÊˆÙÔÁÚ¿ÊËÛË.
ÏÈÙÔ˘ÚÁ›· ON . ∆ÒÚ· ¤¯È ÓÚÁÔÔÈËı› ÙÔ ·˘ÙfiÌ·ÙÔ
ÊÏ·˜, Î·È ÙÔ ÊÏ·˜ ·Ó¿‚È ·˘ÙfiÌ·Ù· ηٿ ÙËÓ
ʈÙÔÁÚ¿ÊËÛË ÒÛÙ Ó· ÌËÓ Ê·›ÓÔÓÙ·È ÛÎȤ˜, ÁÈ·
·Ú¿‰ÈÁÌ· fiÙ·Ó ÙÔ ÌÔÙ›‚Ô Û·˜ ‚Ú›ÛÎÙ·È ÌÚÔÛÙ¿ Û
Ôχ ʈÙÈÓfi ÊfiÓÙÔ (‹ÏÈÔ˜ ʈÙÈÓfi˜ Ô˘Ú·Ófi˜).
КˆЩФБЪ·К›˜ М О·УФУИОfi Кˆ˜ ЛМ¤Ъ·˜. ¶И¤ЫЩ ЩФУ
ИПФБ¤· ПИЩФ˘ЪБИТУ (1) О·И ИП¤НЩ ЩЛУ ПИЩФ˘ЪБ›·
OFF . ∆Ф ‰И¿КЪ·БМ· ¤¯И ·УФ›НИ ЫЩФ М¤БИЫЩФ, БИ· ЩЛУ
О·П‡ЩЪЛ ‰˘У·Щ‹ ОКТЩИЫЛ. ¶И¤ЫЩ ЩТЪ· ЩФ П‹ОЩЪФ БИ·
ЩЛУ ·П˘ı¤ЪˆЫЛ ЩФ˘ КˆЩФКЪ¿¯ЩЛ (2).
Â) ¶ø™ ¡∞ µ∞∑∂∆∂ ∆√ ºπ§ª. ∞¶∂π∫√¡π™∏ 5-6
°И· ¿ЪИЫЩ· ·ФЩП¤ЫМ·Щ· У· ¯ЪЛЫИМФФИ›Щ ¤Б¯ЪˆМ· ·ЪУЛЩИО¿ ISO
100, 200 ‹ 400 М Оˆ‰ИОfi DX.
1) ∞ÓÔ›ÍÙ ÙÔÓ ‰È·ÎfiÙ˘ ÁÈ· ÙÔ Î¿Ï˘ÌÌ· ÙÔ˘ Ê·ÎÔ‡ Î·È ÁÈ· ÙÔ Ú‡Ì·,
ÁÈ· Ó· ÓÚÁÔÔÈ‹ÛÙ ÙËÓ Ì˯·Ó‹ (¢¤ÛÙ ÛÙÔ ÎÊ¿Ï·ÈÔ °).
2) ÛÚÒÍÙ ÙÔ ÎÔ˘Ì› Ô˘ ·ÓÔ›ÁÈ ÙËÓ Ï¿ÙË Ù˘ Ì˯·Ó‹˜ (11) ÚÔ˜ Ù·
οو ÁÈ· Ó· ·ÓÔ›ÍÈ ÙÔ Î¿Ï˘ÌÌ· (17).
3) µ¿ПЩ ЩФ ОФ˘Щ¿ОИ ЩФ˘ КИПМ У· МИ ЪТЩ· М ЩФ ¿Уˆ М¤ЪФ˜ О·И МЩ¿ М
ЩФ О¿Щˆ М¤ЪФ˜. ¶И¤ЫЩ ЩТЪ· ‰˘У·Щ¿ ЩФ ОФ˘Щ¿ОИ ЩФ˘ КИПМ ›‰·, У·
И¿ЫИ О·П¿ ЫЩЛ ı¤ЫЛ ЩФ˘ БИ· У· ›У·И Л МЩ·КФЪ¿ ЩФ˘ КИПМ
·Ъ¿ППЛПЛ О·И У· МЛУ О¿МЩЩ·И ЪФ˜ Щ· ¿Уˆ (∞ИОfiУИЫЛ 5 О·И 6).
4) ∆Ú·‚‹ÍÙ ÙÒÚ· Ï›ÁÔ ÙËÓ ¿ÎÚË ÙÔ˘ ÊÈÏÌ ÚÔ˜ Ù· ¤Íˆ ̤¯ÚÈ ÙÔ ¿ÎÚÔ
ÙÔ˘ Ó· ÊÙ¿ÛÈ ÛÙÔ ‚ÔËıËÙÈÎfi ÛËÌ¿‰È (15) ‰›Ï· ÛÙÔ Î·ÚÔ‡ÏÈ ÛÙÔ
ÔÔ›Ô Ù˘Ï›ÁÙ·È ÙÔ ÊÈÏÌ (14).
GR
62
Page 63

ñ µ‚·Èˆı›Ù ˆ˜ ÙÔ ÊÈÏÌ Î›Ù·È ›‰Ô ·Ó¿ÌÛ· ÛÙȘ Ú¿Á˜ ÚÔÒıËÛ˘
ÙÔ˘ ÊÈÏÌ (12) Î·È fiÙÈ Ô Ô‰ÔÓÙˆÙfi˜ ÙÚÔ¯fi˜ (20) ¤¯È È¿ÛÈ ÛÙ·
‰È¿ÙÚËÙ· ÛËÌ›· ÙÔ˘ ÊÈÏÌ.
ÛÙ) ºø∆√°ƒ∞º∏™∏ - ºˆ˜ Ë̤ڷ˜ Î·È ÊÏ·˜.
∞¶∂π∫√¡π™∏ 7
1) ∫Ъ·Щ‹ЫЩ ЫЩ·ıЪ¿ ЩЛУ КˆЩФБЪ·КИО‹ МЛ¯·У‹ О·И М Щ· ‰˘Ф ¯¤ЪИ·
(∞ИОfiУИЫЛ 7). ¶ЪФЫ¤НЩ Щ· ¯¤ЪИ· Ы·˜ У· МЛУ О·П‡ЩФ˘У ЩФ К·Оfi (5),
ЩФ КП·˜ (6) ‹ О·И ЩФ LED БИ· ЩФУ ЪИФЪИЫМfi ЩФ˘ К·ИУФМ¤УФ˘ ЩˆУ
ОfiООИУˆУ М·ЩИТУ (7).
2) ªÔÚ›Ù Ó· ÎÚ·Ù‹ÛÙ ÙË ÊˆÙÔÁÚ·ÊÈ΋ Ì˯·Ó‹ ·Ú¿ÏÏËÏ· ‹ οıÙ·.
(¡· ÎÚ·Ù¿Ù ÙËÓ Ì˯·Ó‹ ¤ÙÛÈ, ÒÛÙ ÙÔ ÊÏ·˜ Ó· ›Ó·È ¿ÓÙ· ¿Óˆ).
µ‚·Èˆı›Ù ˆ˜ ¤¯Ù ÓÚÁÔÔÈ‹ÛÈ ÙË ÊˆÙÔÁÚ·ÊÈ΋ Ì˯·Ó‹ (¢¤ÛÙ
ÎÊ¿Ï·ÈÔ °). ∆Ô Û‡Ì‚ÔÏÔ "Auto " ÌÊ·Ó›˙Ù·È ÛÙËÓ LCD ÔıfiÓË.
3) ™ÈÁÔ˘Ú˘Ù›Ù ˆ˜ ÙÔ ÌÔÙ›‚Ô Ô˘ ı¤ÏÙ Ó· ʈÙÔÁÚ·Ê›ÛÙ ‚Ú›ÛÎÙ·È Û
·fiЫЩ·ЫЛ ЩФ˘П¿¯ИЫЩФУ 1,5 М. О·И ‰И·П¤НЩ М¤Ы· ·fi ЩФ ЫОfi˘ЩЪФ
ЩФ ·fiЫ·ЫМ· Ф˘ ı¤ПЩ У· ·ИОФУ›ЫЩ. ŸЩ·У ‚Б¿˙Щ ОФУЩИУ¤˜
КˆЩФБЪ·К›˜ ˘¿Ъ¯И Ъ›ЩˆЫЛ У· "ОФ›" ¤У· М¤ЪФ˜ ЫЩЛУ ЩПИО‹
КˆЩФБЪ·К›·. °И· ·˘Щfi ·К‹ЫЩ О·П‡ЩЪ· О·Щ¿ ЩЛУ ИПФБ‹ ЩФ˘
·ÔÛ¿ÛÌ·ÙÔ˜ ̤۷ ·fi ÙÔ ÛÎfi˘ÙÚÔ ·ÚÎÙfi ̤ÚÔ˜ Á‡ÚÔ ·fi ÙÔ
ÌÔÙ›‚Ô.
4) ¶И¤ЫЩ ЪФЫОЩИО¿ ЩФ П‹ОЩЪФ БИ· ЩЛУ ·П˘ı¤ЪˆЫЛ ЩФ˘
КˆЩФКЪ¿¯ЩЛ (2) М¤¯ЪИ О¿Щˆ БИ· У· ‚Б¿ПЩ ЩЛУ КˆЩФБЪ·К›·. ∆Ф
КИПМ ЪФˆı›Щ ·М¤Ыˆ˜ ЫЩЛУ fiМУЛ ЫЩ¿ЫЛ О·И Л МЛ¯·У‹ ›У·И ¤ЩФИМЛ
БИ· ЩЛУ fiМУЛ П‹"Л.
5) ЩФ КП·˜ УЪБФФИ›Щ ·˘ЩfiМ·Щ·, ·У ·˘Щfi ›У·И ··Ъ·›ЩЛЩФ БИ· МИ·
ЫˆЫЩ‹ ОКТЩИЫЛ.
6) ™ Ъ›ЩˆЫЛ ‰˘Ы¯ЪТУ Ы˘УıЛОТУ КˆЩИЫМФ‡ О·И fiЩ·У Щ· МФЩ›‚· ›У·И
¿ЩФМ· ‹ ФИОИ·О¿ ˙Т· МФЪ› У· ¯ЪЛЫИМФФИЛı› ЩФ Ы‡ЫЩЛМ· БИ· ЩФУ
ЪИФЪИЫМfi ЩФ˘ К·ИУФМ¤УФ˘ ЩˆУ "ОfiООИУˆУ М·ЩИТУ". ∫Ъ·Щ‹ЫЩ БИ·
Ъ›Ф˘ ¤У· ‰˘ЩЪfiПЩФ ЩФ П‹ОЩЪФ БИ· ЩЛУ ·П˘ı¤ЪˆЫЛ ЩФ˘
КˆЩФКЪ¿¯ЩЛ (2) П·КЪ¿ ·ЩЛМ¤УФ ЫЩФ МИЫfi БИ· У· П¿М"И ЩФ ИЫ¯˘Ъfi
LED (10) О·И ·Щ‹ЫЩ МЩ¿ ЩФ П‹ОЩЪФ БИ· ЩЛУ ·П˘ı¤ЪˆЫЛ ЩФ˘
КˆЩФКЪ¿¯ЩЛ (2) М¤¯ЪИ О¿Щˆ БИ· У· ‚Б¿ПЩ ЩЛУ КˆЩФБЪ·К›· (¢¤ЫЩ
ОК¿П·ИФ ∑: ª∂πш™∏ ∆ш¡ ∂ƒА£ƒш¡ ∞¡∆∞¡∞∫§∞™∂ш¡).
7) ∞ФЫЩ¿ЫИ˜ БИ· ЩЛУ КˆЩФБЪ¿КЛЫЛ М КП·˜
ISO 100: 1,5 М. ¤ˆ˜ 3,0 М.
ISO 200: 2,0 М. ¤ˆ˜ 4,5 М.
ISO 400: 2,5 М. ¤ˆ˜ 6,0 М.
∆Ф ‰›Ф К·ЪМФБ‹˜ ЩФ˘ КП·˜ Н·ЪЩ¿Щ·И ·fi ЩЛУ ˘·ИЫıЛЫ›· ЩФ˘ КИПМ.
µ‚·Иˆı›Щ ˆ˜ ЩФ МФЩ›‚Ф ‚Ъ›ЫОЩ·И ЫЩ· ЪФО·ıФЪИЫМ¤У· fiЪИ·
·fiÛÙ·Û˘ ÁÈ· ÙËÓ ÊˆÙÔÁÚ¿ÊËÛË Ì ÊÏ·˜.
GR
63
Page 64

˙) ª∂πø™∏ ∆ø¡ ∂ƒÀ£ƒø¡ ∞¡∆∞¡∞∫§∞™∂ø¡
∏ ʈÙÔÁÚ¿ÊËÛË ·ÙfiÌˆÓ ‹ ÔÈÎÈ·ÎÒÓ ˙ÒˆÓ, fiÙ·Ó Á›ÓÙ·È Û Ì¤ÚÔ˜ Ì
·ЫıУ‹ КˆЩИЫМfi МФЪ› У· ¤¯И Ы·У ·ФЩ¤ПЫМ· ЩФ ПБfiМУФ "К·ИУfiМУФ
ЩˆУ ОfiООИУˆУ М·ЩИТУ" ЫЩЛ КˆЩФБЪ·К›·. √И ОfiЪ˜ ЩˆУ ФКı·ПМТУ
К·›УФУЩ·И ЫЩЛ КˆЩФБЪ·К›· ОfiООИУ˜.
∆Ф К·ИУfiМУФ ·˘Щfi МФЪ› У· МИˆı› ·У ·К‹ЫЩ Щ· МФЩ›‚· У· ОФИЩ¿У
О¿ˆ˜ П¿БИ· ЪФ˜ ЩЛУ КˆЩФБЪ·КИО‹ МЛ¯·У‹ ‹ О·И ·У ‚ПЩИТЫЩ
ЩФУ КˆЩИЫМfi ЩФ˘ ¯ТЪФ˘. ∂ОЩfi˜ ·˘ЩФ‡ Л КˆЩФБЪ·КИО‹ ·˘Щ‹
МЛ¯·У‹ ›У·И КФ‰И·ЫМ¤УЛ М ¤У· Ы‡ЫЩЛМ· Ф˘ ЪИФЪ›˙И ЩФ
·УИı‡МЛЩФ ·˘Щfi К·ИУfiМУФ ЩˆУ ОfiООИУˆУ М·ЩИТУ. ∫Ъ·ЩТУЩ·˜
П·КЪ¿ ·ЩЛМ¤УФ ЫЩФ МИЫfi ЩФ П‹ОЩЪФ БИ· ЩЛУ ·П˘ı¤ЪˆЫЛ ЩФ˘
КˆЩФКЪ¿¯ЩЛ (2) ·У¿‚И БИ· МИ· ЫЩИБМ‹ ¤У· ИЫ¯˘Ъfi LED (7) МИ·
КФЪ¿ ЪИУ ЩФ О˘Ъ›ˆ˜ КП·˜ О·И ФИ ОfiЪ˜ ЩˆУ ФКı·ПМТУ
·У·БО¿˙ФУЩ·И У· МИОЪ‡УФ˘У. ŒЩЫИ П·ЩЩТУФУЩ·И ФИ ОfiООИУ˜
·ÓÙ·Ó·ÎÏ¿ÛȘ ÛÙ· Ì¿ÙÈ·.
с ∏ М›ˆЫЛ ЩˆУ ·УЩ·У·ОП¿ЫˆУ AUTO-S (∞ИОfiУИЫЛ 2Л) ›У·И ИФ ·ФЩПЫМ·ЩИО‹,
·Ó ÙÔ ÌÔÙ›‚Ô ‚Ú›ÛΤ٠ÛÙÔ Î¤ÓÙÚÔ ÙÔ˘ ÔÙÈÎÔ‡ ‰›Ô˘ ÛÙÔ ÛÙfi¯·ÛÙÚÔ.
Ë) ¶√§§∞¶§∏ ∂∫ºø∆π™∏ ™∆√ π¢π√ ∫∞ƒ∂, ∞¶∂π∫√¡π™∏ 2ı
ª ЩЛ ПИЩФ˘ЪБ›· ·˘Щ‹ МФЪ›Щ У· О¿УЩ У‰И·К¤ЪФ˘Ы˜ ‰ИП¤˜ ‹ О·И
ФПП·П¤˜ ОКˆЩ›ЫИ˜ ЫЩФ ›‰ИФ О·Ъ¤. ¶И¤ЫЩ ЩФУ ИПФБ¤· ПИЩФ˘ЪБИТУ (1)
О·И ИП¤НЩ ЩЛУ ПИЩФ˘ЪБ›· (ME). ªЩ¿ ·Щ‹ЫЩ ЩФ П‹ОЩЪФ БИ· ЩЛУ
·П˘ı¤ЪˆЫЛ ЩФ˘ КˆЩФКЪ¿¯ЩЛ (2) О·И О¿УЩ ЩЛУ ЪТЩЛ ОКТЩИЫЛ.
™ЩЛ ı¤ЫЛ ·˘Щ‹ ЩФ КИПМ ‰У МЩ·К¤ЪЩ·И ЫЩФ fiМУФ О·Ъ¤, Л МЛ¯·У‹
fiМˆ˜ ›У·И ¿ПИ ¤ЩФИМЛ БИ· ЩЛУ fiМУЛ ОКТЩИЫЛ.
¶·Ъ¿‰ИБМ·:
£¤ПЩ У· Ы˘У‰˘¿ЫЩ ЩФ О·ı·Ъfi Ъ›БЪ·ММ· О·И ЩИ˜ ПЩФМ¤ЪИ˜ Уfi˜
ЛПИФ‚·ЫИП¤М·ЩФ˜ М Щ· КТЩ· (БИ· ·Ъ¿‰ИБМ· МИ·˜ fiПЛ˜, Щ· КТЩ·
ЩЛ˜ ЩИ˜ fiПЛ˜ fiМˆ˜ ‰У ›У·И ·ОfiМ· ·У·ММ¤У·) ЩЛ У‡¯Щ·. ∫¿УЩ ЩФ
Н‹˜:
™Щ·ıЪФФИ‹ЫЩ ЩЛУ КˆЩФБЪ·КИО‹ МЛ¯·У‹ Ы ¤У· ЩЪ›Ф‰Ф, ЫОФ‡ЫЩ
ЩФ МФЩ›‚Ф Ы·˜, И¤ЫЩ ЩФУ ИПФБ¤· ПИЩФ˘ЪБИТУ (1) О·И ИП¤НЩ ЩЛУ
ПИЩФ˘ЪБ›· (ME). ªЩ¿ ·Щ‹ЫЩ ЩФ П‹ОЩЪФ БИ· ЩЛУ ·П˘ı¤ЪˆЫЛ ЩФ˘
КˆЩФКЪ¿¯ЩЛ (2) БИ· У· О¿УЩ ЩЛУ ЪТЩЛ ОКТЩИЫЛ. ªfiПИ˜ ·У¿"Ф˘У
Щ· КТЩ· ЩЛ˜ fiПЛ˜ ИП¤НЩ ЫЩФУ ИПФБ¤· ПИЩФ˘ЪБИТУ ЩЛ ПИЩФ˘ЪБ›·
OFF О·И О¿УЩ ЩЛ ‰‡ЩЪЛ ОКТЩИЫЛ.
¶ЪФЫ¤НЩ: ªФЪ›Щ У· О¿УЩ О·И ¿ПП˜ ОКˆЩ›ЫИ˜ ЫЩФ ›‰ИФ О·Ъ¤. °И· ЩФ
ЫОФfi ·˘Щfi ИП¤НЩ Н·У¿ ЩЛУ ПИЩФ˘ЪБ›· ФПП·ПТУ ОКˆЩ›ЫˆУ (ME)
ЪИУ ЩЛУ О¿ı ‰‡ЩЪЛ ОКТЩИЫЛ.
GR
64
Page 65

ı) ∂¶∞¡∞º√ƒ∞ ∆√À ºπ§ª. ∞¶∂π∫√¡π™∏
ŸЩ·У ЩПИТЫИ ЩФ КИПМ ЫЩ·М·Щ¿И ·˘ЩФМ¿Щˆ˜ Л ЪФТıЛЫ‹ ЩФ˘ М¤Ыˆ
ЩФ˘ МФЩ¤Ъ О·И ‰У МФЪ›Щ П¤ФУ У· ‚Б¿ПЩ ¿ПП˜ КˆЩФБЪ·К›˜.
1) ∆Ф КИПМ ·У·К¤ЪЩ·И ·˘ЩФМ¿Щˆ˜ О·И Ф МЩЪЛЩ‹˜ ЫЩ¿ЫˆУ ЫЩЛУ LCD
ФıfiУЛ МЩЪ¿И ·УЩ›ıЩ·. ∆Ф МФЩ¤Ъ ЫЩ·М·Щ¿И ·˘ЩФМ¿Щˆ˜, fiЩ·У ЩФ КИПМ
¤¯И Щ˘ПИ¯Щ› П‹Ъˆ˜ ›Ыˆ ЫЩФ ОФ˘Щ› ЩФ˘.
2) ŸЩ·У Ф ‹¯Ф˜ Ф˘ О¿УИ ЩФ МФЩ¤Ъ ЫЩ·М·Щ‹ЫИ (Л ¤У‰ИНЛ ЫЩЛУ ФıfiУЛ
‰›¯УИ ˆ˜ Л ·У·КФЪ¿ ¤¯И ФПФОПЛЪˆı›), ‚‚·Иˆı›Щ ˆ˜ Ф МЩЪЛЩ‹˜
ЫЩ¿ЫˆУ ‰›¯УИ "0". ∞УФ›НЩ ЩТЪ· ЩЛУ П¿ЩЛ ЩЛ˜ МЛ¯·У‹˜, ‚Б¿ПЩ ЩФ
КИПМ О·И ‰ТЫЩ ЩФ У· Ы·˜ ЩФ МК·У›ЫФ˘У ЩФ Ы˘УЩФМfiЩЪФ.
3) ∞ÏÏ¿ÍÙ ÙȘ Ì·Ù·Ú›˜, ·Ó Ô ‹¯Ô˜ Ô˘ οÓÈ ÙÔ ÌÔÙ¤Ú Û·˜ Ê·Ó›
·Û˘Ó‹ıÈÛÙ· ·ÚÁfi˜ ‹ Û·˜ ‰›ÓÈ ÙËÓ ÓÙ‡ˆÛË ˆ˜ ÙÔ ÌÔÙ¤Ú ˙ÔÚ›˙Ù·È.
4) ∞Ó ı¤ÏÙ Ó· ·Ó·Ê¤ÚÙ ÙÔ ÊÈÏÌ ÚÈÓ ÁÌ›ÛÈ, ·Ù‹ÛÙ ÙÔ ÎÔ˘Ì› ÁÈ· ÙËÓ
·˘ÙfiÌ·ÙË ·Ó·ÊÔÚ¿ ÙÔ˘ ÊÈÏÌ (19).
ñ ¶ÚÔÛÔ¯‹! ªËÓ ·ÓÔ›ÍÙ ÙËÓ Ï¿ÙË Ù˘ Ì˯·Ó‹˜ ηٿ ÙËÓ ·Ó·ÊÔÚ¿
ЩФ˘ КИПМ. ¶ЪИМ¤УЩ ФˆЫ‰‹ФЩ У· ФПФОПЛЪˆı› Л ‰И·‰ИО·Ы›· ЩЛ˜
·У·КФЪ¿˜ ЩФ˘ КИПМ, ·ППИТ˜ ı· О·Щ·ЫЩЪ·КФ‡У ФИ КˆЩФБЪ·К›˜
Ф˘ ‚Б¿П·Щ.
È) ∞À∆√ºø∆√°ƒ∞º∏™∏
¶ЪФИП¤НЩ ЫЩФУ ИПФБ¤· ПИЩФ˘ЪБИТУ (1) ЩЛУ ПИЩФ˘ЪБ›· БИ· ЩЛУ
·˘ЩФКˆЩФБЪ¿КЛЫЛ О·И ·Щ‹ЫЩ ЩФ П‹ОЩЪФ БИ· ЩЛУ ·П˘ı¤ЪˆЫЛ
ЩФУ КˆЩФКЪ¿¯ЩЛ, БИ· У· ‚Б¿ПЩ ЩЛУ КˆЩФБЪ·К›·. ∞КФ‡ ·Щ‹ЫЩ ЩФ
П‹ОЩЪФ БИ· ЩЛУ ·П˘ı¤ЪˆЫЛ ЩФ˘ КˆЩФКЪ¿¯ЩЛ (2) ·У¿‚И ЩФ
П·М¿ОИ ¤У‰ИНЛ˜ ЩЛ˜ ·˘ЩФКˆЩФБЪ¿КИЫЛ˜ (7) БИ· 8 ‰˘ЩЪfiПЩ·.
ªЩ¿ Л ¤У‰ИНЛ ·˘Щ‹ ·У·‚ФЫ‚‹УИ БИ· ¿ПП· 4 ‰˘ЩЪfiПЩ· О·И Л
КТЩИЫЛ/КˆЩФБЪ¿КИЫЛ ОЩП›Щ.
Î) ºƒ√¡∆π¢∞ ∆∏™ ºø∆√°ƒ∞ºπ∫∏™ ª∏Ã∞¡∏™
с ŸЩ·У ‰У ¯ЪЛЫИМФФИ›Щ ЩЛ МЛ¯·У‹, У· ¤¯Щ ЩФ ЪФЫЩ·Щ˘ЩИОfi
О¿П˘ММ· ЩФ˘ К·ОФ‡ ОПИЫЩfi.
с ¡· ЪФЫ¤¯Щ У· МЛ ПЪТУЩ·И Л МЛ¯·У‹ О·И У· МЛУ ЩЛУ Оı¤ЩЩ ЫЩЛ
‚ЪФ¯‹, Ы ˘БЪ·Ы›· О·И Ы ФП‡ ˘"ЛП¤˜ ıЪМФОЪ·Ы›˜.
с ªЛУ ¯ЪЛЫИМФФИ›Щ БИ· ЩФУ О·ı·ЪИЫМfi ЩФ˘ ЫТМ·ЩФ˜ ЩЛ˜ МЛ¯·У‹˜
‰И·П˘ЩИО¿, ·ПОФfiПЛ ‹ О·ı·ЪИЫЩИО¿ БИ· ЩФ ЫКФ˘ББ¿ЪИЫМ·.
GR
65
Page 66

Ï) §À™∏ ¶ƒ√µ§∏ª∞∆ø¡
¶ƒ√™√Ã∏! °π∞ ∆∏¡ ∞¶√ºÀ°∏ ∆√À ∫π¡¢À¡√À ∏§∂∫∆ƒ√¶§∏•π∞™,
¡∞ ª∏¡ ∞¶√™À¡∞ƒª√§√°∂π∆∂ ∫∞π ¡∞ ª∏¡ ∞¡√π°∂∆∂ ¶√∆∂ ∆√
™øª∞ ∆∏™ ºø∆√°ƒ∞ºπ∫∏™ ª∏Ã∞¡∏™ !
Ï¿ıË, ‰˘Ó·Ù¤˜ ·Èٛ˜ Î·È ÚÔÙ¿ÛÂȘ ÁÈ· ÙË Ï‡ÛË ÙÔ˘
¶Èı·Ó¿
ÚÔ‚Ï‹Ì·ÙÔ˜
1) ∏ ¤Ó‰ÈÍË ÙÔ˘ Û˘Ì‚fiÏÔ˘ "Auto " ·Ó·‚ÔÛ‚‹ÓÈ Û˘Ó¯Ò˜.
ñ ∏ Ì·Ù·Ú›· ¤¯È Í·ÓÙÏËı› Î·È Ú¤È Ó· ·ÓÙÈηٷÛÙ·ı›.
2) √È ÊˆÙÔÁÚ·Ê›˜ ›Ó·È ı·Ì¤˜.
ñ ¶ÚÔÛ¤ÍÙ Ó· ÎÚ·Ù¿Ù ÛˆÛÙ¿ ÙË ÊˆÙÔÁÚ·ÊÈ΋ Ì˯·Ó‹. ¡· ÎÚ·Ù¿Ù ÙË
МЛ¯·У‹ ЫЩ·ıЪ¿ О·И У· ·Щ¿Щ ЩФ П‹ОЩЪФ БИ· ЩЛУ ·П˘ı¤ЪˆЫЛ ЩФ˘
КˆЩФКЪ¿¯ЩЛ (2) М·П·О¿ ЪФ˜ Щ· О¿Щˆ. Аfi ‰˘Ы¯Ъ›˜ Ы˘Уı‹О˜
КˆЩИЫМФ‡ У· ¯ЪЛЫИМФФИ›Щ О·Щ¿ ЩФ ‰˘У·ЩfiУ ЩЪ›Ф‰Ф. ŒЩЫИ МИТУЩ
ЩФ˘˜ ОЪ·‰·ЫМФ‡˜ О·И ‚ПЩИТУЩ ЩЛУ ФИfiЩЛЩ· ЩЛ˜ КˆЩФБЪ·К›·˜.
ñ ∆Ô ÌÔÙ›‚Ô ·¤¯È ÏÈÁfiÙÚÔ ·fi 1,5 Ì.
3) ™ОФЩИУ¤˜ КˆЩФБЪ·К›˜ ПfiБˆ ˘Ф¤ОıЫЛ˜.
ñ °È· ÙË ÊˆÙÔÁÚ¿ÊËÛË Ì ÊÏ·˜ ‚Ú›ÛÎÛÙ Ôχ Ì·ÎÚÈ¿ ·fi ÙÔ ÌÔÙ›‚Ô.
4) ¶Ôχ ʈÙÈÓ¤˜ ʈÙÔÁÚ·Ê›˜ ÏfiÁˆ ˘Ú¤ÎıÛ˘.
ñ °È· ÙË ÊˆÙÔÁÚ¿ÊËÛË Ì ÊÏ·˜ ‚Ú›ÛÎÛÙ Ôχ ÎÔÓÙ¿ ÛÙÔ ÌÔÙ›‚Ô.
5) ∆Ô ¿ÙËÌ· ÙÔ˘ Ï‹ÎÙÚÔ˘ ÁÈ· ÙËÓ ·Ï˘ı¤ÚˆÛË ÙÔ˘ ʈÙÔÊÚ¿¯ÙË
(2) ‰Ó ʤÚÓÈ Î·Ó¤Ó· ·ÔÙ¤ÏÛÌ·.
с µ¿П·Щ О·ИУФ‡ЪИФ КИПМ О·И Ф МЩЪЛЩ‹˜ ЩˆУ ЫЩ¿ЫˆУ ‰›¯УИ "0". ™ЩЛУ
Ú›ÙˆÛË ·˘Ù‹ Ì¿ÏÏÔÓ ‰Ó ¤¯È ÌÈ ÛˆÛÙ¿ ÙÔ ÊÈÏÌ. ∞ÓÔ›ÍÙ ÙËÓ
Ï¿ÙË Ù˘ Ì˯·Ó‹˜ Î·È Í·Ó·‚¿ÏÙ ÙÔ ÊÈÏÌ ÛˆÛÙ¿.
с ¶Иı·УfiУ У· ¤¯И ЫКЛУТЫИ ЩФ КИПМ - ∆˘П›НЩ ЩФ КИПМ ›Ыˆ ЫЩФ ОФ˘Щ›
ÙÔ˘ ·ÙÒÓÙ·˜ ÙÔ Ï‹ÎÙÚÔ ÁÈ· ÙËÓ ·˘ÙfiÌ·ÙË ·Ó·ÊÔÚ¿ Î·È ‰ÒÛÙ
ÙÔ Ó· Û·˜ ÙÔ ÌÊ·Ó›ÛÔ˘Ó.
ñ ¶Èı·ÓfiÓ Ó· ¤¯È ·‰È¿ÛÈ Ë Ì·Ù·Ú›· - ·ÓÙÈηٷÛÙ‹ÛÙ ÙËÓ Ì ÌÈ·
ηÈÓÔ‡ÚÈ·.
6) √ МЩЪЛЩ‹˜ ЩˆУ ЫЩ¿ЫˆУ ·У¤Ъ¯Щ·И ЫЩФ "0".
ñ ∞Ó ·ÓÔ›ÍÙ ÙË ı‹ÎË ÁÈ· ÙȘ Ì·Ù·Ú›˜ ÁÈ· Ó· ·ÏÏ¿ÍÙ ÙȘ Ì·Ù·Ú›˜, Ô
МЩЪЛЩ‹˜ ЩˆУ ЫЩ¿ЫˆУ Б˘Ъ›˙И ЫЩФ "0". ∏ КˆЩФБЪ·КИО‹ МЛ¯·У‹ ı·
Ы˘У¯›ЫИ У· ПИЩФ˘ЪБ› О·УФУИО¿, МfiУФ Ф˘ Л ¤У‰ИНЛ ЩФ˘ МЩЪЛЩ‹
ЫЩ¿ЫˆУ ı· ›У·И П·Уı·ЫМ¤УЛ М¤¯ЪИ У· ‚¿ПЩ О·ИУФ‡ЪИФ КИПМ.
GR
66
Page 67

ȉ) ª¡∏ª∏ ∂™∆π∞™∏™
∆Ф Ы‡ЫЩЛМ· ·˘ЩfiМ·ЩЛ˜ ВЫЩ›·ЫЛ˜ ЩЛ˜ КˆЩФБЪ·КИО‹˜ ·˘Щ‹˜
МЛ¯·У‹˜, ВЫЩИ¿˙ВИ ·˘ЩfiМ·Щ· ЫЩФ ФФИФ‰‹ФЩВ ·УЩИОВ›МВУФ ЩФ
ФФ›Ф ‚Ъ›ЫОВЩ·И ЫЩФ О¤УЩЪФ ЩЛ˜ ВИОfiУ·˜ Ф˘ ‚П¤ВЩВ М¤Ы· ·fi
ЩФ ЫОfiВ˘ЩЪФ. ªФЪВ›ЩВ У· ¯ЪЛЫИМФФИ‹ЫВЩВ ЩЛУ МУ‹МЛ ВЫЩ›·ЫЛ˜
ЫЩЛУ ВЪ›ЩˆЫЛ Ф˘ ЩФ О˘Ъ›ˆ˜ МФЩ›‚Ф ‚Ъ›ЫОВЩ·И ЫЩ· ¿ОЪ· ЩИ˜
ВИОfiУ·˜.
1) ™ÎÔ‡ÛÙ ¤ÙÛÈ, ÒÛÙ ÙÔ Î˘Ú›ˆ˜ ÌÔÙ›‚Ô Ó· ‚Ú›ÛÎÂÙ·È ÛÙÔ Î¤ÓÙÚÔ
ÂÛÙ›·Û˘.
2) ¶·Щ‹ЫЩВ ЩФ П‹ОЩЪФ БИ· ЩЛУ ·ВПВ˘ı¤ЪˆЫЛ ЩФ˘ КˆЩФКЪ¿¯ЩЛ (2)
ВП·КЪ¿ О·И М·П·О¿ ЪФ˜ Щ· О¿Щˆ, ·ПП¿ fi¯И М¤¯ЪИ ЩФ Щ¤ЪМ·, О·И
ОЪ·Щ‹ЫЩВ ЩФ ¤ЩЫИ ЫЩ· МИЫ¿ БИ· У· ВУВЪБФФИЛıВ› Л МУ‹МЛ ВЫЩ›·ЫЛ˜.
3) ∂ÓÒ Îڷٿ٠·ÎfiÌ· ÙÔ Ï‹ÎÙÚÔ ÁÈ· ÙËÓ ·ÂÏ¢ı¤ÚˆÛË ÙÔ˘
ʈÙÔÊÚ¿¯ÙË ÛÙÔ ÌÈÛfi, ‰È·Ï¤ÍÙ ÙÔ ·fiÛ·ÛÌ· Ù˘ ÂÈÎfiÓ·˜ Ô˘
ı¤ÏÂÙ ӷ Â›Ó·È ÛÙÔ Î¤ÓÙÚÔ Ù˘ ʈÙÔÁÚ·Ê›·˜ Î·È ·Ù‹ÛÙ ÁÈ· Ó·
·ÂÏ¢ıÂÚˆı› Ô ÊˆÙÔÊÚ¿¯Ù˘.
ÈÂ) ∂•√À¢∂∆∂ƒø™∏ ª¶∞∆∞ƒπø¡
™˘М‚¿ПВЩВ ОИ ВЫВ›˜ ЫЩЛУ ЪФЫЩ·Ы›· ЩФ˘ ВЪИ‚¿ППФУЩФ˜ !
с ªЛУ ВЩ¿ЩВ ЩИ˜ ·ПИ¤˜ О·УФУИО¤˜ ‹ В·У·КФЪЩИ˙fiМВУВ˜
̷ٷڛ˜ ÛÙ· ÛÎÔ˘›‰È·.
с ™ЩИ˜ ВЪИЫЫfiЩВЪВ˜ ¯ТЪВ˜ Ф УfiМФ˜ ФЪ›˙ВИ ЩЛУ ВПВБ¯fiМВУЛ
ÂÍÔ˘‰ÂÙ¤ÚˆÛË ÙˆÓ Ì·Ù·ÚÈÒÓ. ¢›ÓÂÙ ÙȘ ·ÏȤ˜ Û·˜ ̷ٷڛ˜
ÛÙ· ‰ËÌfiÛÈ· ΤÓÙÚ· ÂÚÈÛ˘ÏÏÔÁ‹˜ ‹ ÛÙÔ Î·Ù¿ÛÙËÌ· fiÔ˘ ÙȘ
·ÁÔÚ¿Û·ÙÂ.
с ∂УЛМВЪˆıВ›ЩВ ЫЩЛУ ЩФИО‹ ˘ЛЪВЫ›· БИ· ЩФ˘˜ ИЫ¯‡ФУЩВ˜
О·УФУИЫМФ‡˜ О·И БИ· ЩФ Ф‡ МФЪВ›ЩВ У· ·Ъ·‰›УВЩВ ЩИ˜
МВЩ·¯ВИЪИЫМ¤УВ˜ М·Щ·Ъ›В˜.
ñ ∂¿Óˆ ÛÙȘ ̷ٷڛ˜ ·Ó·ÁÚ¿ÊÔÓÙ·È Ù· Ï›·Ó ÂÈ‚Ï·‚‹ Û˘ÛÙ·ÙÈο
Ô˘ ÂÚȤ¯Ô˘Ó:
Pb (ÌfiÏ˘‚‰Ô˜), Cd (ο‰ÌÈÔ), Hg (˘‰Ú¿ÚÁ˘ÚÔ˜).
ñ ¶ÚÔÛٷهÂÙ ÙÔ ÂÚÈ‚¿ÏÏÔÓ Ì·˜! ºÚÔÓÙ›ÛÙ ӷ ÂÍÔ˘‰ÂÙÂÚˆıÔ‡Ó
ÔÈ Ì·Ù·Ú›Â˜ Ì ÙÔ ÛˆÛÙfi ÙÚfiÔ!
GR
67
Page 68

 Loading...