

Page 1

KD 625/3 - 626/3
WORKSHOP MANUAL
Page 2

- 2 -
CUSE/ATLO
REGISTRATION OF MODIFICATIONS TO THE DOCUMENT
Any modications to this document must be registered by the drafting body, by completing the following table.
Drafting
body
Document
code
Edition Issue date
Review
date
Model
N°
Revision Endorsed
PREFACE
- Every attempt has been made to present within this service manual, accurate and up to date technical information.
However, development on the KOHLER series is continuous.
Therefore, the information within this manual is subject to change without notice and without obligation.
- The information contained within this service manual is the sole property of KOHLER.
As such, no reproduction or replication in whole or part is allowed without the express written permission of
KOHLER.
Information presented within this manual assumes the following:
1 - The person or people performing service work on KOHLER series engines is properly trained and equipped to
safely and professionally perform the subject operation;
2 - The person or people performing service work on KOHLER series engines possesses adequate hand and
KOHLER special tools to safely and professionally perform the subject service operation;
3 - The person or people performing service work on KOHLER series engines has read the pertinent information
regarding the subject service operations and fully understands the operation at hand.
- This manual was written by the manufacturer to provide technical and operating information to authorised KOHLER
after-sales service centres to carry out assembly, disassembly, overhauling, replacement and tuning operations.
- As well as employing good operating techniques and observing the right timing for operations, operators must
read the information very carefully and comply with it scrupulously.
- Time spent reading this information will help to prevent health and safety risks and nancial damage.
Written information is accompanied by illustrations in order to facilitate your understanding of every step of the
operating phases.
02/07/20121° 0
ED0053029350
51261 02/07/2012
KD Workshop Manual_cod. ED0053029350_1° ed_ rev. 00
Page 3

- 3 -
This manual contains the most important information for the repair of KOHLER air cooled, direct injection Diesel
engines type KD 625/3 and 626/3. This information is current upto 02/07/2012
CHAPTER INDEX
CHAPTER INDEX
California emission control warranty statement ................................................................................................................. 6
Your warranty rights and obligations
.................................................................................................................................. 6
GENERAL REMARKS AND SAFETY INFORMATION ........................................................................................... 7
Safety and warning decals ................................................................................................................................................. 7
Limited 3 year kohler® diesel engine warranty .................................................................................................................... 7
General service manual notes
............................................................................................................................................ 7
Glossary and terminology
................................................................................................................................................... 7
Safety regulations ............................................................................................................................................................... 8
General safety during operating phases ............................................................................................................................ 9
Safety and environmental impact ...................................................................................................................................... 9
TECHNICAL INFORMATION .................................................................................................................................. 10
Possible causes and trouble shooting ...............................................................................................................................10
Manufacturer and motor identication data .......................................................................................................................12
The identication plate shown in the gure can be found directly on the engine. .............................................................12
Approval data .....................................................................................................................................................................12
Techinical specications ....................................................................................................................................................13
Performance diagrams ......................................................................................................................................................14
Overall dimensions ............................................................................................................................................................16
MAINTENANCE - PRESCRIBED LUBRICANT - REFILLING ............................................................................. 17
Routine engine maintenance .............................................................................................................................................17
Extraordinary maintenance ...............................................................................................................................................17
Ordinary maintenance .......................................................................................................................................................17
Lubricant ............................................................................................................................................................................18
Prescribed lubricant ...........................................................................................................................................................19
Fuel specications ............................................................................................................................................................ 20
DISASSEMBLY/REASSEMBLY .............................................................................................................................. 22
Recommendations for disassembling and assembling .................................................................................................... 22
Recommendations for overhauls and tuning .................................................................................................................... 22
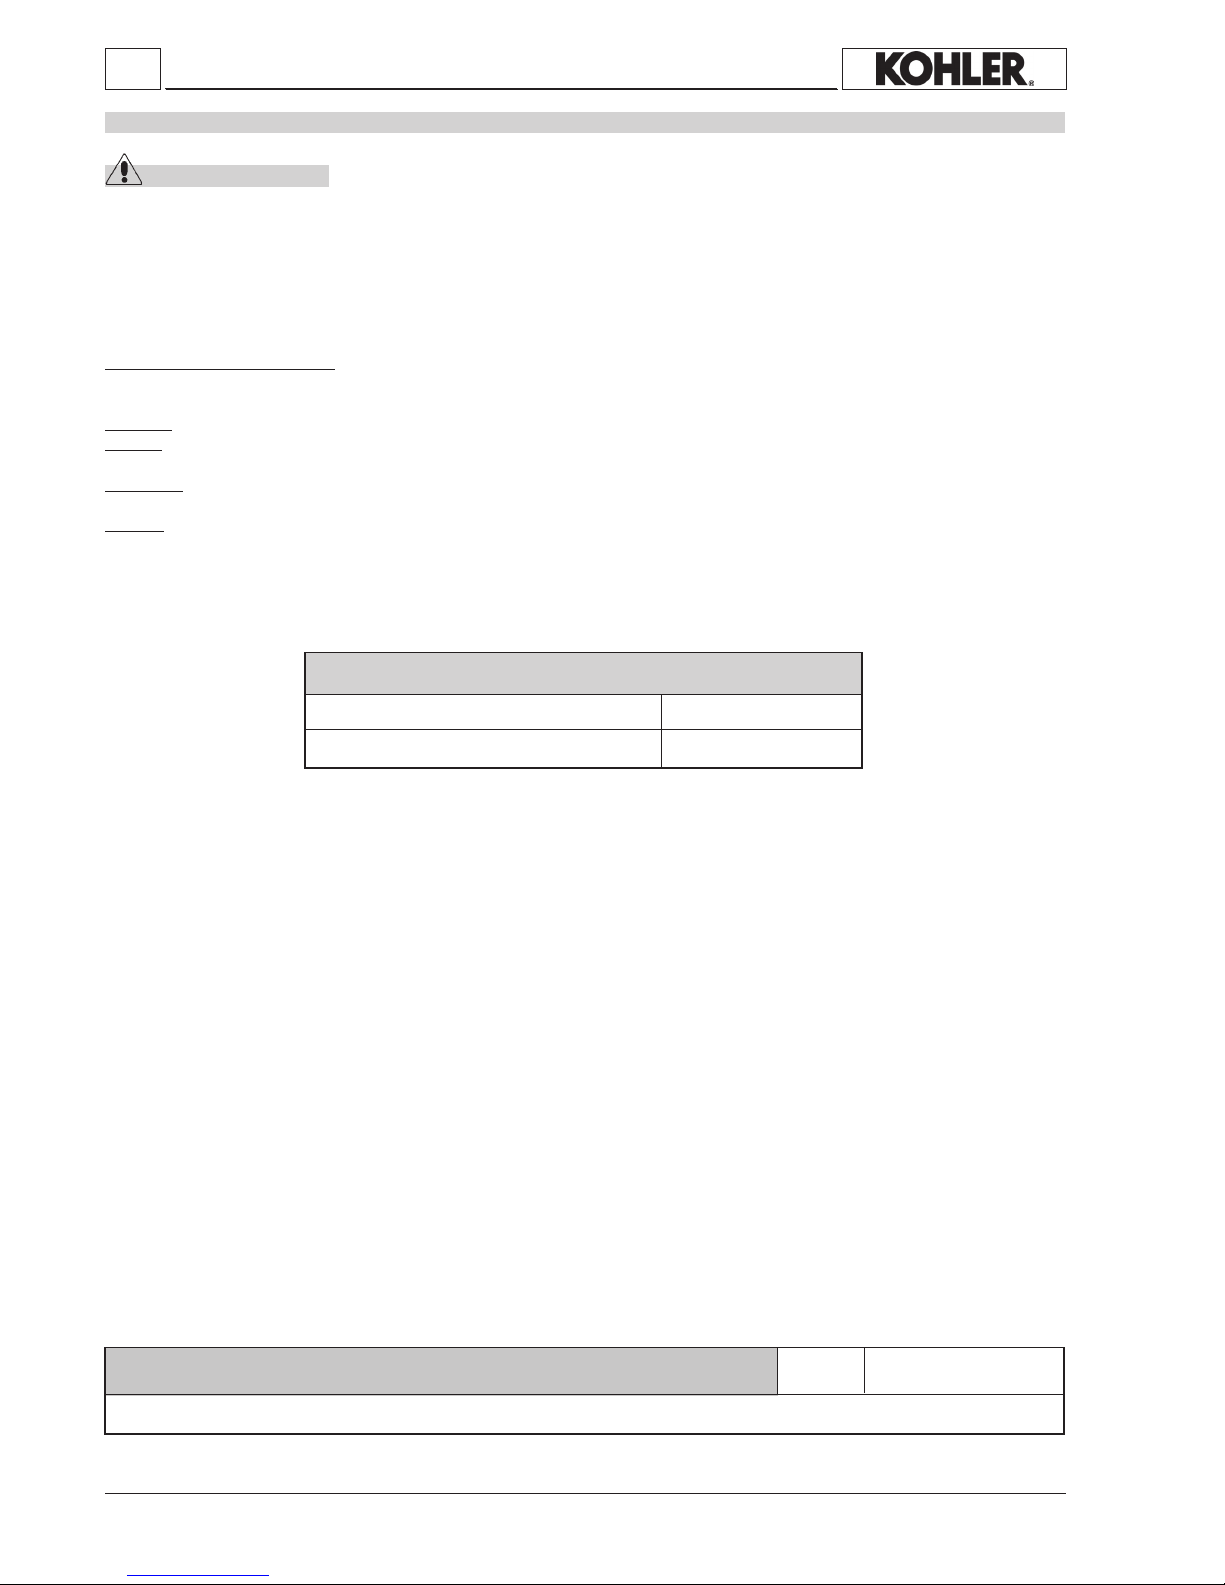
Oil-bath air cleaner ........................................................................................................................................................... 23
Oil-bath air cleaner components ...................................................................................................................................... 23
Exhaust manifold .............................................................................................................................................................. 23
Intake manifold .................................................................................................................................................................. 24
Blower belt alternator ........................................................................................................................................................ 24
Belt tension adjustment .................................................................................................................................................... 24
Half-pulley - Reassembly .................................................................................................................................................. 24
Blower belt alternator - Reassembly
................................................................................................................................. 25
Tension check
................................................................................................................................................................... 25
Air shroud and bafes - Disassembly ............................................................................................................................... 25
Blower assembly ............................................................................................................................................................... 25
Blower assembly components with 14 A alternator .......................................................................................................... 26
Blower assembly components with 21 A alternator
.......................................................................................................... 26
Blower control pulley - Disassembly
................................................................................................................................ 26
Crankshaft pulley .............................................................................................................................................................. 27
Blower control pulley diameter ......................................................................................................................................... 27
Timing cover ..................................................................................................................................................................... 27
Tank
.................................................................................................................................................................................. 28
Flywheel
............................................................................................................................................................................ 28
Valve / rocker arm clearance ............................................................................................................................................ 28
Compression release (optional) ........................................................................................................................................ 29
Rocker arm assembly ....................................................................................................................................................... 29
Disassembling size P injector
........................................................................................................................................... 29
Injector protrusion
..............................................................................................................................................................31
KD Workshop Manual_cod. ED0053029350_1° ed_ rev. 00
Page 4

- 4 -
Chapter index
Cylinder Head ....................................................................................................................................................................31
Valves ................................................................................................................................................................................31
Valve stem sealing rings - Reassembly ........................................................................................................................... 32
Valve springs..................................................................................................................................................................... 32
Valve material .................................................................................................................................................................. 32
Valve guides and cylinder head housings ........................................................................................................................ 32
Valve guide insertion ........................................................................................................................................................ 33
Dimensions and clearance between guides and valves ................................................................................................. 33
Valve seats and housings ................................................................................................................................................. 33
Valve seat lapping ............................................................................................................................................................. 33
Pushrod tube spring tting ................................................................................................................................................ 34
Cylinder ............................................................................................................................................................................. 34
Checks and cyiinder roughness ....................................................................................................................................... 34
Piston ................................................................................................................................................................................ 34
Piston weight ..................................................................................................................................................................... 35
Metal snap rings - End gaps ........................................................................................................................................... 35
Metal snap rings - Piston grooves .................................................................................................................................. 35
Metal snap rings - Fitting sequence ................................................................................................................................. 35
Piston - Retting ............................................................................................................................................................... 36
Piston clearance ............................................................................................................................................................... 36
Connecting rod ................................................................................................................................................................. 36
Connecting rod small end bearing and pin ....................................................................................................................... 37
Connecting rod alignment ................................................................................................................................................. 37
Connecting rod weight ...................................................................................................................................................... 37
Connecting rod big end bearing ....................................................................................................................................... 37
Camshaft gear .................................................................................................................................................................. 38
Oil pump gear ................................................................................................................................................................... 38
Timing gear ....................................................................................................................................................................... 38
Main bearing support, gear side ...................................................................................................................................... 38
Main bearing support, ywheel side ................................................................................................................................. 39
Crankshaft ......................................................................................................................................................................... 39
Center main bearing support, locating bolts ..................................................................................................................... 39
Crankshaft removal ........................................................................................................................................................... 39
Crankshaft center main bearing supports ........................................................................................................................ 39
Crankshaft lubrication ducts ............................................................................................................................................. 40
Crankshaft journal radius .................................................................................................................................................. 40
Checking main journals and crank pins ............................................................................................................................ 40
Main journal and crank pin diameter ............................................................................................................................... 40
Diameter of main bearings .................................................................................................................................................41
Main bearing and connecting rod big end bearing inside diameter ..................................................................................41
Clearance between main journals/crank pins and connecting rod bearings ....................................................................41
Main bearing supports .......................................................................................................................................................41
Main bearing housings .......................................................................................................................................................42
Crankshaft end play ...........................................................................................................................................................42
Camshaft ............................................................................................................................................................................42
Camshaft removal ..............................................................................................................................................................42
How to measure camshaft bearing and journal inside diameter .......................................................................................42
Dimensions of camshaft journals and housings ............................................................................................................... 43
Checking intake/exhaust cam height ................................................................................................................................ 43
Intake/exhaust cam height ................................................................................................................................................ 43
Camshaft end play ............................................................................................................................................................ 43
Camshaft timing ................................................................................................................................................................ 44
Valve timing without considering timing marks ................................................................................................................. 44
Valve timing check ............................................................................................................................................................ 44
Hydraulic pump p.t.o. group 1 ........................................................................................................................................... 46
Hydraulic pump 3rd p.t.o., group 2 .................................................................................................................................... 46
Hydraulic pump 4th p.t.o., group 1 ................................................................................................................................... 46
Use of 3rd and 4th p.t.o. ................................................................................................................................................... 46
Mechanical speed governor ..............................................................................................................................................47
Mechanical speed governor components (standard) ........................................................................................................47
Mechanical speed governor operation (standard) .............................................................................................................47
Mechanical speed governor components for special generating sets ............................................................................. 48
Mechanical speed governor setting .................................................................................................................................. 48
Spring for extra fuel supply at starting ............................................................................................................................. 48
KD Workshop Manual_cod. ED0053029350_1° ed_ rev. 00
Page 5

- 5 -
Chapter index
LUBRICATION SYSTEM ......................................................................................................................................... 49
Oil pump ............................................................................................................................................................................ 50
Oil pressure relief valve
.................................................................................................................................................... 50
Oil lter cartridge .............................................................................................................................................................. 50
Oil pressure check ............................................................................................................................................................ 50
Oil pressure curve at idling speed
.....................................................................................................................................51
Oil pressure curve at full speed .........................................................................................................................................51
FUEL SYSTEM ........................................................................................................................................................52
Fuel feeding/injection circuit ............................................................................................................................................. 52
Fuel lter ........................................................................................................................................................................... 52
Fuel feeding pump
............................................................................................................................................................ 52
Injection pump ................................................................................................................................................................. 52
Injection pump only for EPA engines
................................................................................................................................ 53
Injection pump only for standard and 97/68 Ce engines .................................................................................................. 53
Plunger .............................................................................................................................................................................. 54
How to check plunger and barrel for internal leakage
...................................................................................................... 54
How to check injection pump delivery valve sealing ........................................................................................................ 54
Test data for injection pump delivery at the test bench only for EPA engines
................................................................. 55
Test data for injection pump delivery at the test bench for standard and 97 / 68 CE engines ......................................... 55
Injection pump replacement ............................................................................................................................................. 56
Size S injector
................................................................................................................................................................... 56
Size S nozzle
................................................................................................................................................................... 57
Size P injector
................................................................................................................................................................... 57
Size P nozzle
................................................................................................................................................................... 57
Injector setting .................................................................................................................................................................. 58
(Static) Injection timing
..................................................................................................................................................... 58
ELECTRIC SYSTEM ................................................................................................................................................ 62
Standard electric equipment ............................................................................................................................................. 62
Electric starting layout without battery charging light
....................................................................................................... 62
Electrical starting layout with battery charging Iight ......................................................................................................... 62
12,5 V, 14 A Alternator
...................................................................................................................................................... 62
Alternator battery charger curve (12.5 V, 14A)
................................................................................................................. 63
12 V, 21 A Alternator
......................................................................................................................................................... 63
Alternator battery charger curve (12 V, 21 A)
................................................................................................................... 63
Magnetization checking tool (Part No. 7000-9727-001) ................................................................................................... 64
Checking for cable continuity
........................................................................................................................................... 64
Voltage regulator
............................................................................................................................................................... 64
How to check voltage regulator for proper operation
....................................................................................................... 65
Alternator type Bosch G1 14 V, 33 A
................................................................................................................................ 66
Alternator type Bosch Gil 14 V, 33 A layout ...................................................................................................................... 66
14 V, 33 A Bosch G1 alternator battery charger curve
..................................................................................................... 66
Starting motor type Bosch JF (R) 12 V, class 2.5 ............................................................................................................. 67
Characteristic curves for starting motor type Bosch JF (R) 12 V
..................................................................................... 67
Starting motor layout ......................................................................................................................................................... 67
SETTINGS ............................................................................................................................................................... 68
Settings ............................................................................................................................................................................. 68
Injection pump delivery setting ......................................................................................................................................... 68
Stop setting
....................................................................................................................................................................... 68
APPENDIX FOR ENGINE WITH ADVANCE VARIATOR ..................................................................................... 71
ADVANCE VARIATOR OPERATING PRINCIPLE ................................................................................................. 72
Injection timing device operation ...................................................................................................................................... 72
KD Workshop Manual_cod. ED0053029350_1° ed_ rev. 00
Page 6

- 6 -
CALIFORNIA EMISSION CONTROL WARRANTY STATEMENT
YOUR WARRANTY RIGHTS AND OBLIGATIONS
The California Air Resources Board and Kohler Co. are pleased to explain the emission control system warranty on your 2012 engine. In
California, new heavy-duty off-road engines must be designed, built and equipped to meet the State’s stringent anti-smog standards. Kohler Co.
must warrant the emission control system on your engine for the time period listed below provided there has been no abuse, neglect or improper
maintenance of your engine.
Your emission control system may include parts such as the fuel-injection system and the air induction system. Also included may be hoses,
connectors and other emission related assemblies.
Where a warrantable condition exists, Kohler Co. will repair your heavy-duty off-road engine at no cost to you including diagnosis, parts and labor.
MANUFACTURER’S WARRANTY COVERAGE:
Your off-road, diesel engine emission control system is covered under warranty for a period of ve (5) years or 3,000 hours, whichever occurs rst,
beginning on the date the engine or equipment is delivered to an ultimate purchaser for all constant speed engines with maximum power 19≤kW<37
and rated speed less than 3,000 rpm, all variable speed engines with maximum power 19≤kW<37, and all variable or constant speed engines with
maximum power greater than 37 kW. Your off-road, diesel engine emission control system on variable or constant-speed engines with maximum
power less than 19 kW, and for constant speed engines with maximum power 19≤kW<37 and rated speed equal to or greater than 3,000 rpm is
covered under warranty for a period of two (2) years or 1,500 hours, whichever
occurs rst. If any emission related part on your engine is defective, the part will be repaired or replaced by Kohler Co.
OWNER’S WARRANTY RESPONSIBILITIES:
As the heavy-duty off-road engine owner, you are responsible for the performance of the required maintenance listed in your Kohler Co.
owner’s manual. Kohler Co. recommends that you retain all receipts covering maintenance on your heavy-duty off-road engine, but Kohler Co.
cannot deny warranty solely for the lack of receipts or for your failure to ensure the performance of all recommended scheduled maintenance.
As the heavy-duty off-road engine owner, you should however be aware that Kohler Co. may deny you warranty coverage if your heavy-duty offroad engine or emission control related component has failed due to abuse, neglect, improper maintenance or unapproved modications.
Your engine is designed to operate on commercial diesel fuel (No. 1 or No. 2 low sulfur or ultra low sulfur diesel fuel) only. Use of any other fuel
may result in your engine no longer operating in compliance with California’s emissions requirements.
You are responsible for initiating the warranty process. The Air Resources Board suggests that you present your heavy-duty off-road engine to a
Kohler Co. dealer as soon as a problem exists. The warranty repairs should be completed by the dealer as expeditiously as possible.
Please review the document titled, “Kohler Co. Federal and California Emission Control Systems Limited Warranty Off-Road Diesel Engines”, for
complete details of your heavy-duty off-road engine warranty. If you have any questions regarding your warranty rights and responsibilities or the
location of the nearest Kohler Co. authorized service location, you should contact Kohler Co. at 1-800-544-2444 or access our website at www.
kohlerengines.com.
Chapter index
DISASSEMBLY/REASSEMBLY .............................................................................................................................. 74
Solenoid valve assembly diagram .....................................................................................................................................74
Speed sensor and variator assembly diagram
................................................................................................................. 78
Blower belt alternator - Disassembly ................................................................................................................................ 80
Blower control pulley - Disassembly .................................................................................................................................81
Angular position sensor and AC pump assembly diagram
.............................................................................................. 88
Phase sensor assembly diagram ..................................................................................................................................... 90
Resetting the dial indicator
............................................................................................................................................... 92
Sensor test ........................................................................................................................................................................ 92
Resetting the dial indicator ............................................................................................................................................... 93
Measuring the depth between the sensor support and the camshaft
............................................................................. 93
Air gap adjustment ............................................................................................................................................................ 93
Example of adhesive plate on the control panel
............................................................................................................... 98
STORAGE ............................................................................................................................................................. 100
Storage ........................................................................................................................................................................... 100
External engine protection:
............................................................................................................................................. 100
Injection systems protection: .......................................................................................................................................... 100
External engine protection:
............................................................................................................................................. 100
Procedures to be carried out before start the engine ......................................................................................................101
MAIN TORQUE SPECIFICATIONS AND USE OF SEALANTS .......................................................................... 102
Main torque specications ...............................................................................................................................................102
Use of sealants only for engines with variator
.................................................................................................................103
Table of tightening torques for standard screws (coarse thread)
................................................................................... 104
Table of tightening torques for standard screws (ne thread)
........................................................................................ 104
SPECIAL TOOLS .................................................................................................................................................. 105
KD Workshop Manual_cod. ED0053029350_1° ed_ rev. 00
Page 7

- 7 -
1
GENERAL REMARKS AND SAFETY INFORMATION
WARRANTY CERTIFICATE
GLOSSARY AND TERMINOLOGY
For clarity, here are the denitions of a number of terms used
recurrently in the manual.
- Cylinder number one: is the piston timing belt side «viewed
from the ywheel side of the engine».
- Rotation direction: anticlockwise «viewed from the ywheel
side of the engine».
GENERAL SERVICE MANUAL NOTES
1
- Use only genuine Kohler repair parts.
Failure to use genuine Kohler parts could result in sub-
standard performance and low longevity.
2
- All data presented are in metric format. That is, dimensions
are presented in millimeters (mm), torque is presented in
Newton-meters (Nm), weight is presented in kilograms
(Kg), volume is presented in liters or cubic centimeters (cc)
and pressure is presented in barometric units (bar).
LIMITED 3 YEAR KOHLER® DIESEL ENGINE WARRANTY
Kohler Co. warrants to the original retail consumer that each new KOHLER Diesel engine sold by Kohler Co. will be free from manufacturing
defects in materials or workmanship in normal service for a period of three (3) years or 2000 hours whichever occurs rst from the date of
purchase, provided it is operated and maintained in accordance with Kohler Co.’s instructions and manuals. If no hour meter is installed as original
equipment then 8 hours of use per day and 5 days per week will be used to calculate hours used.
Our obligation under this warranty is expressly limited, at our option, to the replacement or repair at Kohler Co., Kohler, Wisconsin 53044, or at a
service facility designated by us of such parts as inspection shall disclose to have been defective.
This warranty does not apply to defects caused by unreasonable use, including faulty repairs by others and failure to provide reasonable and
necessary maintenance.
The following items are not covered by this warranty:
Engine accessories such as fuel tanks, clutches, transmissions, power-drive assemblies and batteries, unless supplied or installed by Kohler Co.
These are subject to the warranties, if any, of their manufacturers.
KOHLER CO. AND/OR THE SELLER SHALL NOT BE LIABLE FOR SPECIAL, INDIRECT, INCIDENTIAL OR CONSEQUENTIAL DAMAGES
OF ANY KIND, including but not limited to labor costs or transportation charges in connection with the repair or replacement of defective parts.
IMPLIED OR STATUTORY WARRANTIES, INCLUDING WARRANTIES OF MERCHANTABILITY OR FITNESS FOR A PARTICULAR PURPOSE,
ARE EXPRESSLY LIMITED TO THE DURATION OF THIS WRITTEN WARRANTY. We make no other express warranty, nor is any one authorized
to make any on our behalf.
Some states do not allow limitations on how long an implied warranty lasts, or the exclusion or limitation of incidental or consequential damages,
so the above limitation or exclusion may not apply to you.
This warranty gives you specic legal rights, and you may also have other rights, which vary from state to state.
To obtain warranty service
Purchaser must bring the engine to an authorized Kohler service facility. To locate the nearest facility, visit our website, www.kohlerengines.com,
and use the locator function, consult your Yellow Pages or telephone 1-800-544-2444.
ENGINE DIVISION, KOHLER CO., KOHLER, WISCONSIN 53044
- Important remarks and features of the text are highlighted
using symbols, which are explained below:
Danger – Attention
This indicates situations of grave danger which, if ignored,
may seriously threaten the health and safety of individuals.
SAFETY AND WARNING DECALS
Caution – Warning
This indicates that it is necessary to take proper precautions
to prevent any risk to the health and safety of individuals
and avoid nancial damage.
Important
This indicates particularly important technical information
that should not be ignored.
KD Workshop Manual_cod. ED0053029350_1° ed_ rev. 00
Page 8

- 8 -
1
GENERAL NOTES
.
Kohler engines are built to provide safe and longlasting
performances, but in order to obtain these results it is
essential that the maintenance requirements described in
the manual are observed along with the following safety
recommendations.
. The engine has been built to the specications of a
machine manufacturer, and it is his responsibility to ensure
that all necessary action is taken to meet the essential
and legally prescribed health and safety requirements.
Any use of the machine other than that described cannot
be considered as complying with its intended purpose
as specied by Kohler, which therefore declines all
responsibility for accidents caused by such operations.
. The following instructions are intended for the user of the
machine in order to reduce or eliminate risks, especially
those concerning the operation and standard maintenance
of the engine.
. The user should read these instructions carefully and get
to know the operations described. By not doing so he may
place at risk his own health and safety and that of anyone
else in the vicinity of the machine.
. The engine may be used or mounted on a machine only
by personnel suitably trained in its operation and aware of
the dangers involved. This is particularly true for standard
and, above all, special maintenance work. For special
maintenance contact personnel trained specically by
Kohler. This work should be carried out in accordance with
existing literature.
. Kohler declines all responsibility for accidents or for failure
to comply with the requirements of law if changes are made
to the engine’s functional parameters or to the fuel ow rate
adjustments and speed of rotation, if seals are removed,
or if parts not described in the operating and maintenance
manual are removed and reassembled by unauthorized
personnel.
WARNING
. In addition to all other machine specications, ensure that
the engine is in a near horizontal position when starting. lf
starting manually, ensure that the necessary operations
can be performed without any risk of striking against walls
or dangerous objects. Rope starting (except for recoil rope
starting) is not permitted even in emergencies.
. Check that the machine is stable so that there is no risk of it
overturning.
. Get to know the engine speed adjustment and machine
stop operations.
. Do not start the machine in closed or poorly ventilated
environments. The internal combustion process generates
carbon monoxide, an odourless and highly toxic gas, so
spending too long a time in an environment where the
engine discharges its exhaust products freely can lead to
loss of consciousness and even death.
. The engine may not be used in environments containing
ammable materials, explosive atmospheres or easily
combustible powders, unless adequate and specic
precautions have been taken and are clearly stated and
certied for the machine.
. To prevent the risk of re, keep the machine at a distance of
at least one metre from buildings or other machines.
SAFETY REGULATIONS
.
Children and animals must be kept at a sufcient distance
from the machine to prevent any danger resulting from its
operation.
. Fuel is ammable, so the tank must be lled only when the
engine is turned off. Dry carefully any fuel that may have
spilled, remove the fuel container and any cloths soaked
in fuel or oil, check that any sound-absorbing panels made
of porous material are not soaked with fuel or oil, and make
sure that the ground on which the machine is located has not
absorbed fuel or oil.
. Before starting, remove any tools that have been used for
carrying out maintenance work to the engine and/or the
machine and check that any guards removed have been
replaced. In cold climates it is possible to mix kerosene with
the diesel fuel to make the engine easier to start. The liquids
must be mixed in the tank by pouring in rst the kerosene
and then the diesel fuel. Consult Kohler technical ofce for
mixture proportions. Petrol may not be used because of the
risk of it forming ammable vapours.
. During operation the surface of the engine reaches
temperatures that may be dangerous. Avoid in particular all
contact with the exhaust system.
. The liquid cooling circuit is under pressure. Do not carry out
any checks before the engine has cooled down, and even
then open the radiator cap or the expansion tank cautiously.
Wear protective clothing and glasses. lf there is an electric
fan, do not approach the engine while it is still hot as the fan
may come on even when the engine is not running. Clean the
cooling system with the engine turned off.
. While cleaning the oil bath air lter, check that the oil is
disposed of in such a way as not to harm the environment.
Any ltering sponges in the oil bath air lter should not be
soaked with oil. The cyclone pre-lter cup must not be lled
with oil.
. Since the oil must be emptied out while the engine is still hot
(approx. 80°C), particular care should be taken in order to
avoid burns. In any case make sure that oil does not come
into contact with your skin because of the health hazards
involved.
. Fuel vapours are highly toxic, so ll up only in the open air or
in well ventilated environments.
. During operations which involve access to moving parts of
the engine and/or removal of the rotary guards, disconnect
and insulate the positive cable of the battery so as to prevent
accidental short circuits and activation of the starter motor.
. Check the belt tension only when the engine is turned off.
IMPORTANT
.
To start the engine follow the specic instructions provided
in the engine and/or machine operating manual. Do not
use auxiliary starting devices not originally installed on the
machine (e.g. Startpilot systems which utilise ether etc.)
. Before carrying out any work on the engine, turn it off and
allow it to cool down. Do not perform any operation while the
engine is running.
.
Check that the discharged oil, the oil lter and the oil
contained in the oil lter are disposed of in such a way as not
to harm the environment.
.
Close the fuel tank ller cap carefully after each fílling
operation. Do not ll the tank right up to the top, but leave
sufcient space to allow for any expansion of the fuel.
.
Do not smoke or use naked ames while lling.
General remarks and safety information
KD Workshop Manual_cod. ED0053029350_1° ed_ rev. 00
Page 9

- 9 -
1
GENERAL SAFETY DURING OPERATING PHASES
– The procedures contained in this manual have been
tested and selected by the manufacturer’s technical
experts, and hence are to be recognised as authorised
operating methods.
– Some tools are normal workshop ones, while others are
special tools designed by the Manufacturer of the engine.
– All tools must be in good working condition so that engine
components are not damaged and that operations are
carried out properly and safely.
– It is important to wear the personal safety devices
prescribed by work safety laws and also by the standards
of this manual.
– Holes must be lined up methodically and with the aid of
suitable equipment. Do not use your ngers to carry out
this operation to avoid the risk of amputation.
SAFETY AND ENVIRONMENTAL IMPACT
Every organisation has a duty to implement procedures to
identify, assess and monitor the inuence of its own activities
(products, services, etc.) on the environment.
Procedures for identifying the extent of the impact on the environment must consider the following factors:
- Liquid waste;
- Waste management;
- Soil contamination;
- Atmospheric emissions;
- Use of raw materials and natural resources;
- Regulations and directives regarding environmental impact.
In order to minimise the impact on the environment, the manufacturer now provides a number of indications to be followed by all
persons handling the engine, for any reason, during its expected
lifetime.
- All packaging components must be disposed of in accordance
with the laws of the country in which disposal is taking place.
- Keep the fuel and engine control systems and the exhaust
pipes in efcient working order to limit environmental and noise
pollution.
- When discontinuing use of the engine, select all components
according to their chemical characteristics and dispose of them
separately.
– Some phases may require the assistance of more than
one operator. If so, it is important to inform and train them
regarding the type of activity they will be performing in
order to prevent risks to the health and safety of all persons
involved.
– Do not use ammable liquids (petrol, diesel, etc.) to
degrease or wash components. Use special products.
– Use the oils and greases recommended by the manufacturer.
Do not mix different brands or combine oils with different
characteristics.
– Discontinue use of the engine if any irregularities arise,
particularly in the case of unusual vibrations.
– Do not tamper with any devices to alter the level of
performance guaranteed by the manufacturer.
.
Take care when removing the oil lter as it may be hot.
. The operations of checking, lling up and replacing the
cooling liquid must be carried out with the engine turned off
and cold. Take particular care if liquids containing nitrites
are mixed with others not containing these compounds
as this may give rise to the formation of nitrosamines
which are a health hazard. The cooling liquid is polluting,
so dispose of in a manner that does not damage the
environment.
. In order to move the engine simultaneously use the
eyebolts tted for this purpose by Kohler. These lifting
points are however not suitable for the entire machine, so
in this case use the eyebolts tted by the manufacturer.
General remarks and safety information
KD Workshop Manual_cod. ED0053029350_1° ed_ rev. 00
Page 10
- 10 -
2
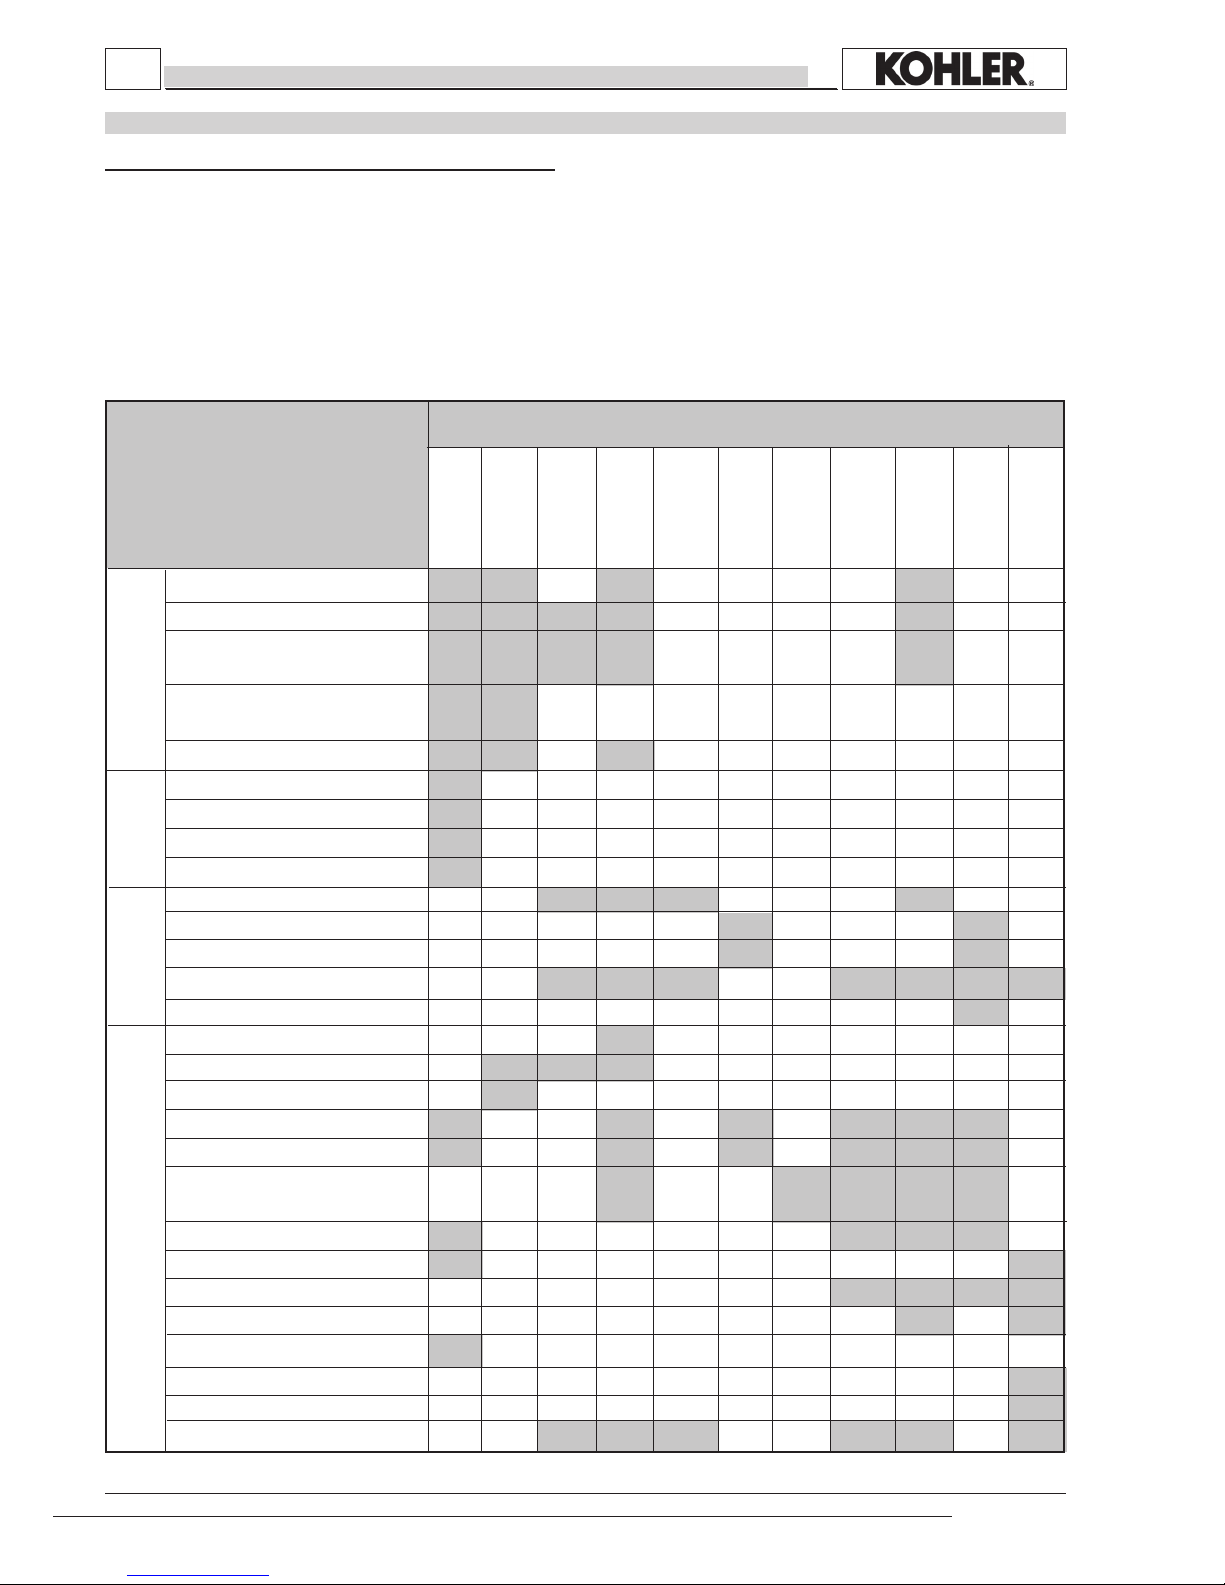
FUEL
CIRCUIT
POSSIBLE CAUSE
ELECTRIC
SYSTEM
MAINTENANCE
SETTINGS REPAIRS
In adequat e
performance
High noise
level
Overheats
TROUBLE
Engine does
not start
Engine starts
but stops
No acceleration
Non -unif orm
speed
Black smoke
White smoke
Too low oil
pressure
Excessive oil
consumption
Obstructed fuel line
Fuel lter clogged
Air or water leaks in fuel system
The tank cap vent hole is clogged
No fuel
Discharged battery
Cable connection uncertain or incorrect
Faulty starting switch
Faulty starting motor
Clogged air lter
Excessive idle operation
Incomplete run-in
Overloaded engine
Non-conforming engine oil
Incorrect governor linkage adjustment
Governor spring broken or unhooked
Low idle speed
Rings worn or sticking
Worn cylinder
Worn main con rod-rocker arm
bearings
Badly sealed intake valve
Head tightening nuts loose
Damaged cylinder head gasket
Excessive valve-rocker arm clearance
No clearance between valves and rocker arms
Valves sticking
Defective timing system
Bent rods
POSSIBLE CAUSES AND TROUBLE SHOOTING
THE ENGINE MUST BE STOPPED IMMEDIATELY WHEN:
1) - The engine rpms suddenly increase and decrease
2) - A sudden and unusual noise is heard
3) - The colour of the exhaust fumes suddenly darkens
4) - The oil pressure indicator light turns on while running.
TABLE OF LIKELY ANOMALIES AND THEIR SYMPTOMS
The following table contains the possible causes of some failures which may occur during operation.
Always perform these simple checks before removing or replacing any part.
TECHNICAL INFORMATION
KD Workshop Manual_cod. ED0053029350_1° ed_ rev. 00
Page 11

- 11 -
2
INJECTION
LUBRICATION
CIRCUIT
COOLING
CIRCUIT
Damaged injector
Injection pump valve damaged
Injector not adjusted
Faulty fuel feeding pump
Hardened pump control rod
Broken or loose supplementary start-
up spring
Worn or damaged pumping element
Incorrect tuning of injection components
(delivery balancing advance)
Extra fuel control level sticking
Oil level too high
Oil level low
Oil pressure valve blocked or dirty
Oil pressure regulator not adjusted
Worm oil pump
Oil sump suction line clogged
Faulty pressure gauge or pressure switch
Blocked draining pipe
Worn or broken blower belt
Cooling circuit clogged
POSSIBLE CAUSE
In adequat e
performance
High noise
level
Overheats
TROUBLE
Engine does
not start
Engine starts
but stops
No acceleration
Non -unif orm
speed
Black smoke
White smoke
Too low oil
pressure
Excessive oil
consumption
Technical information
KD Workshop Manual_cod. ED0053029350_1° ed_ rev. 00
Page 12

- 12 -
2
Technical information
EPA Label Shown on the Recoil Starter or on Air Shroud
MANUFACTURER AND MOTOR IDENTIFICATION DATA
The identication plate shown in the gure can be found directly on the engine.
It contains the following information:
A) Manufacturer’s identity
B) Engine type
C) Engine serial number
D) Maximum operating speed
E) Number of the customer version (form K)
F) Approval data
Approval data
The approval reference directives EC are on the engine plate (F).
s/n
MADE IN ITALY
rpm
XX XX XXXX
XX XX XXXX
XXXX
XXXXXX
e9 • 97/68/CE • 00/000xx • xxxx •xx
Xx
0.00
xxx xxx xx
Model
Spec.
C
A
F
D
E
B
KD Workshop Manual_cod. ED0053029350_1° ed_ rev. 00
Page 13

- 13 -
2
ENGINE TYPE
Only for 97/68 CE and EPA approved engines
* Referred to max. NB power
** At NA power
*** Depending on the application
Technical information
TECHINICAL SPECIFICATIONS
KD Workshop Manual_cod. ED0053029350_1° ed_ rev. 00
3
95
88
1870
17:1
3000
28/38
26/35,4
24/32,7
104/10,6
@2000
13/17,7
7,98/10,8
190/258.5
15
0,017
5
170
2400
38000
300
35°
25°
****
1 - 3 - 2
N.
mm
mm
Cm³
kW/CV
kW/CV
kW/CV
Nm/kgm
kW/CV
kW/CV
g/CV.h - g/kW.h
l.
kg/h
l.
kg
l./min'
l./min'
kg
α
α
α
Number of cylinders
Bore
Stroke
Displacement
Compression ratio
R.P.M.
N (80/1269/CEE) ISO 1585
Power kW/HP NB ISO 3046 IFN
NA ISO 3046 ICXN
Max. torque
Max. torque at 3rd p.t.o. at 3200 r.p.m.
Max. torque at 4th p.t.o. at 3200 r.p.m.
Specic fuel consumption *
Tank capacity
Oil consumption **
Oil sump capacity
Dry weight
Combustion air volume at 3000 r.p.m.
Cooling air volume at 3000 r.p.m.
Max. permissible driving shaft axial load in
both directions
momentary
Max. inclination lasting up to 1 h.
permanent
Firing Order
KD
625-3
Page 14

- 14 -
2
Technical information
PERFORMANCE DIAGRAMS
KD 625-3 @ 3000 r.p.m.KD 626-3 @ 3000 r.p.m.
KD 626-3 NR @ 3000 r.p.m. KD 626-3 B2 NR @ 2800 r.p.m.
KD Workshop Manual_cod. ED0053029350_1° ed_ rev. 00
Page 15

- 15 -
2
Technical information
N (80/1269/EEC - ISO 1585) - AUTOMOTIVE RATING: Intermittent operation with variable speed and variable load.
NB (ISO 3046 - 1 IFN) - RATING WITH NO OWERLOAD CAPABILITY: continuos ligth duty operation with constant speed and
variable load.
NA (ISO 3046 - 1 ICXN) - CONTINUOS RATING WITH OVERLOAD CAPABILITY: continuos heavy duty with constant speed
and constant load.
MN Torque at N power.
MB (NB curve)
MA (NA curve).
C Specic fuel consumption at NB power.
The above power values refer to an engine tted with air cleaner and standard mufer, after testing and at the environmental
conditions of 20°C and 1 bar.
Max. power tolerance is 5%. Power decreases by approximately 1% every 100 m di altitude and by 2% every 5°C above
25°C.
Important
Non-approval by KOHLER for any modications releases the company from any damages incurred by the engine.
Note: Consult KOHLER for power, torque curves and specic consumptions at rates differing from those given above.
KD 625 - 3 / 626 - 3 EPA
@ 2400 r.p.m. @ 2600 r.p.m.
KD Workshop Manual_cod. ED0053029350_1° ed_ rev. 00
Page 16
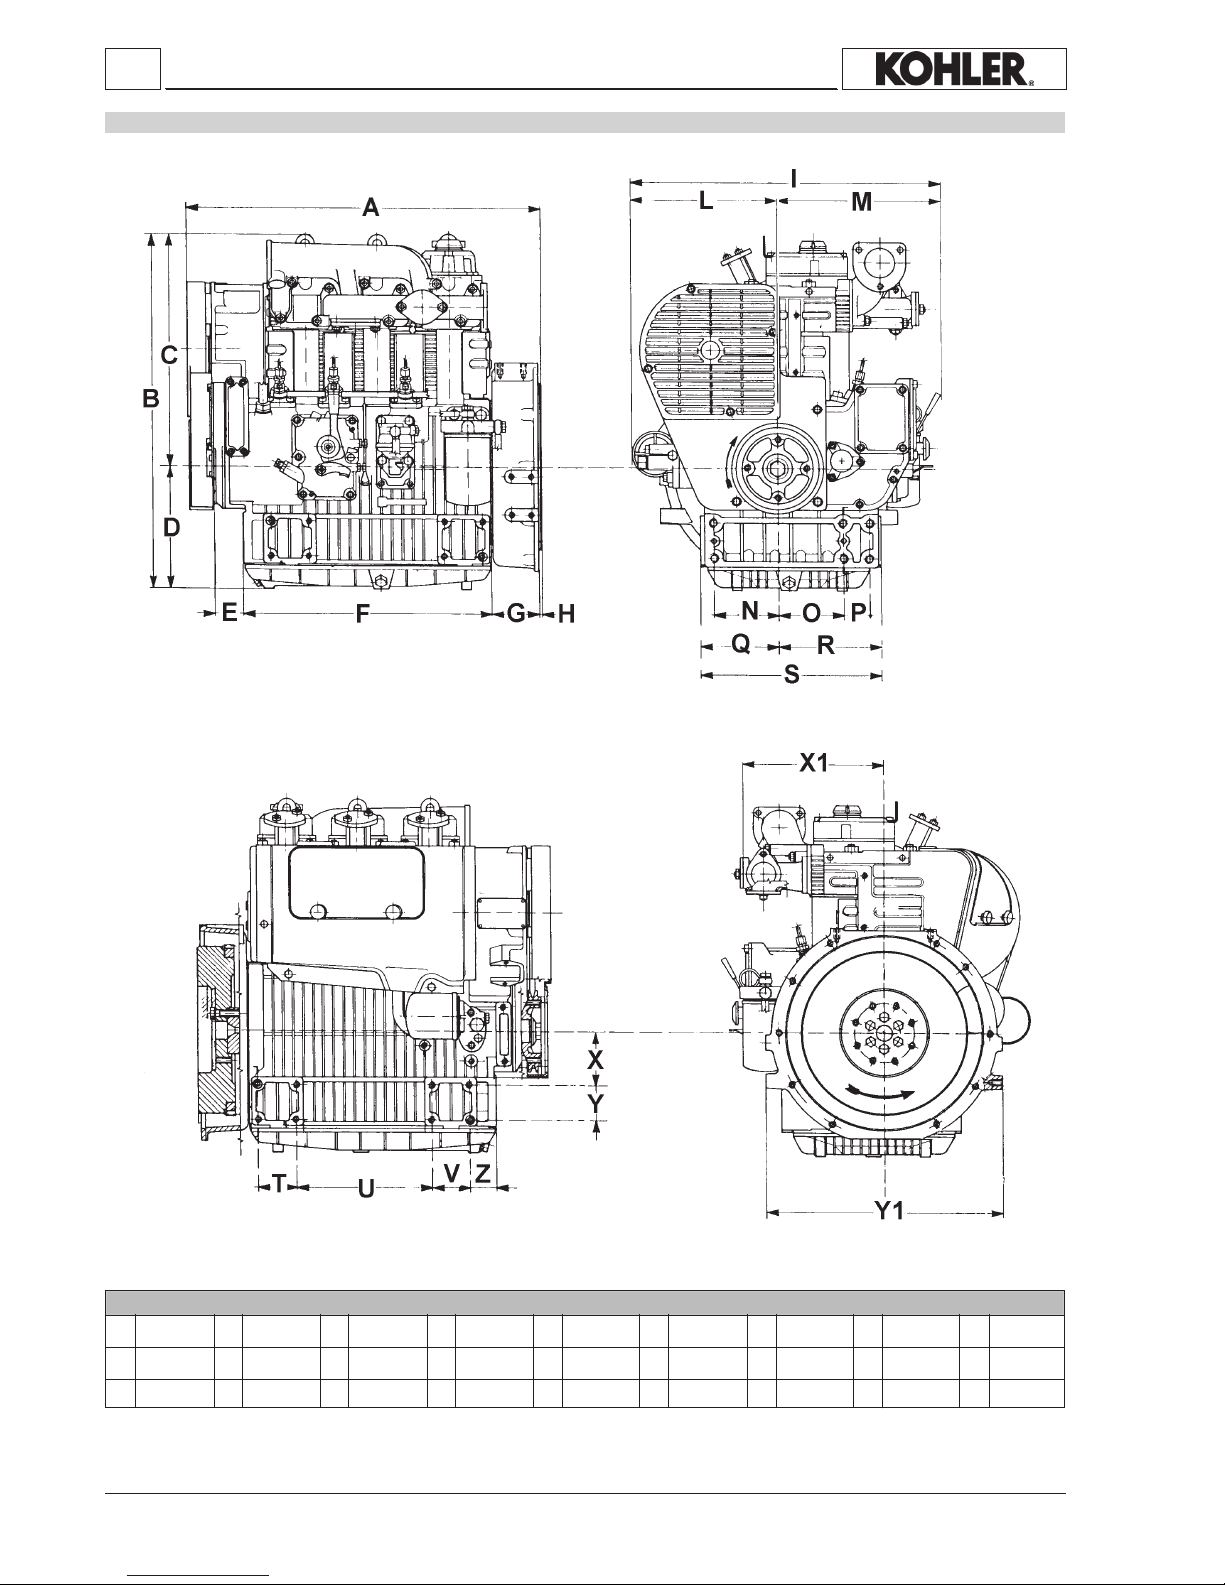
- 16 -
2
A
B
C
D
E
F
601
612
400
DIMENSIONI mm - MESURES mm - DIMENSION mm - EINBAUMAßE mm - DIMENSIONE mm - DIMENÇÕES (mm)
G
H
I
212
47
421
L
M
N
82
4
525
O
P
Q
247
278
110
R
S
T
110
45
132
U
V
Z
173
305
65
X
Y
230
65
46
X1
Y1
94
60
237
400
OVERALL DIMENSIONS
Note : Dimensions shown in mm
Technical information
KD Workshop Manual_cod. ED0053029350_1° ed_ rev. 00
Page 17
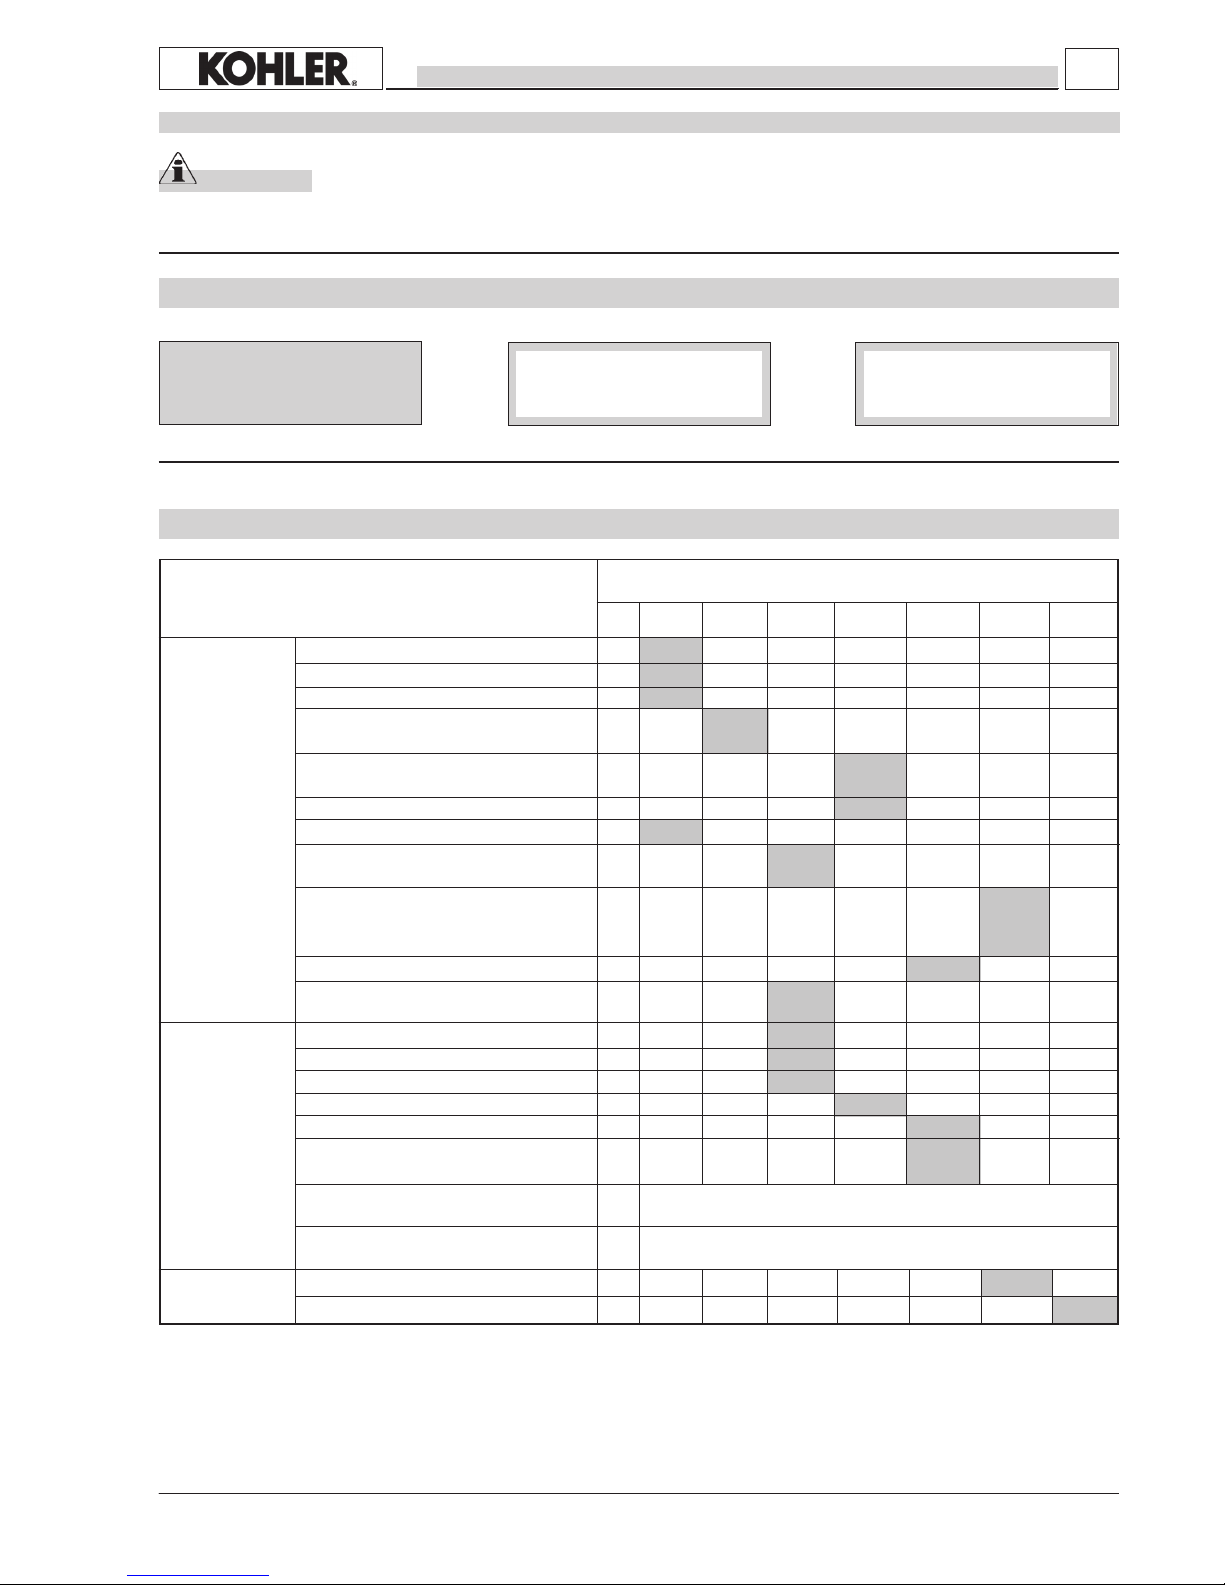
- 17 -
10 125 250 500 1000 2500 5000
(***)
(*)
(*)
(*)
(**)
(**)
(***)
(***)
3
MAINTENANCE - PRESCRIBED LUBRICANT - REFILLING
Engine oilreplacement.
Oil lter replacement.
OPERATION DESCRIPTION
FREQUENCY x HOURS
LEVEL ENGINE LUBRICANT
DRY AIR CLEANER
OIL BATH AIR CLEANER
BLOWER BELT TENSION
VALV E/R OC KER A RM S CLE ARA NC E
ADJUSTMENT
SETTING AND INJECTORS CLEANING
FUEL PIPES
RUBBER INTAKE HOSE (AIR FILTER – IN-
TAKE MANIFOLD)
ENGINE OIL RADIATOR CLEANING (IN THE
APPLICATIONS WHERE IT IS PRESENT)
FUEL TANK CLEANING
COOLING SYSTEM CLEANING
ENGINE LUBRICANT
OIL FILTER
FUEL FILTER
BLOWER BELT
FUEL PIPES
RUBBER INTAKE HOSE (AIR FILTER – IN-
TAKE MANIFOLD)
DRY AIR CLEANER EXTERNAL CAR-
TRIDGE
DRY AIR CLEANER INTERNAL CARTRID-
GE
PARTIAL OVERHAUL
TOTAL OVERHAUL
Important
Failure to carry out the operations described in the table may lead to technical damage to the machine and/or system
AFTER THE FIRST 50 WORKING
HOURS
CHECK
REPLACEMENT
OVERHAUL
INSPECTION
(*) - In case of low use: every year.
(**) - In case of low use: every 2 years.
(***) - The period of time that must elapse before cleaning or replacing the lter element depends on the environment in which the
engine operates. The air lter must be cleaned and replaced more frequently in very dusty conditions.
AFTER 6 CHECKS WITH CLEANING
AFTER 3 CHECKS WITH CLEANING
ROUTINE ENGINE MAINTENANCE
EXTRAORDINARY MAINTENANCE
ORDINARY MAINTENANCE
KD Workshop Manual_cod. ED0053029350_1° ed_ rev. 00
Page 18

- 18 -
3
SAE 20W*
SAE 30*
SAE 40*
SAE 10W-30**
SAE 10W-40**
SAE 10W-60**
SAE 15W-40 **
SAE 15W-40 **
SAE 20W-60 **
SAE 5W-30 ***
SAE 0W-30 ***
-30-2520
-
15
-105
0+5+10+15+20
+
25
+30+
35
+40+
45
SAE 10W*
+
50
-35-
40
SAE 5W-40 ***
Maintenance - Prescribed lubricant - Relling
International specications
They dene testing performances and procedures that the lubricants need to successfully respond to in several engine testing and
laboratory analysis so as to be considered qualied and in conformity to the regulations set for each lubrication kind.
A.P.I : ( American Petroleum Institute )
MIL : Engine oil U.S. military specications released for logistic reasons
ACEA : European Automobile Manufacturers Association
Tables shown are of useful reference when buying a kind of oil.
Codes are usually printed-out on the oil container and the understanding of their meaning is useful for comparing different brands
and choosing the kind with the right characteristics.
Usually a specication showing a following letter or number is preferable to one with a preceding letter or number.
An SF oil, for instance, is more performing than a SE oil but less performing than a SG one.
PETROL
A1 = Low-viscosity, for frictions reduction
A2 = Standard
A3 = High performances
LIGHT DUTY DIESEL ENGINES
B1 = Low-viscosity, for frictions reduction
B2 = Standard
B3 =High performances (indirect injection)
B4 = High quality (direct injection)
HEAVY DUTY DIESEL ENGINES
E1 = OBSOLETE
E2 = Standard
E3 = Heavy conditions (Euro 1 - Euro 2 engines )
E4 = Heavy conditions (Euro 1 - Euro 2 - Euro 3 engines )
E5 = High performances in heavy conditions (Euro 1 - Euro 2 -
Euro 3 engines )
ACEA Regualtions - ACEA Sequences
LUBRICANT
SAE Classication
In the SAE classication, oils differ on the basis of their
viscosity, and no other qualitative characteristic is taken
into account.
The rst number refers to the viscosity when the engine
is cold (symbol W = winter), while the second considers
viscosity with the engine at régime.
The criteria for choosing must consider, during winter, the
lowest outside temperature to which the engine will be
subject and the highest functioning temperature during
summer.
Single-degree oils are normally used when the running
temperature varies scarcely.
Multi-degree oil is less sensitive to temperature changes.
* Mineral base
** Semi-synthetic base
*** Synthetic base
SAE- Grade
KD Workshop Manual_cod. ED0053029350_1° ed_ rev. 00
Page 19
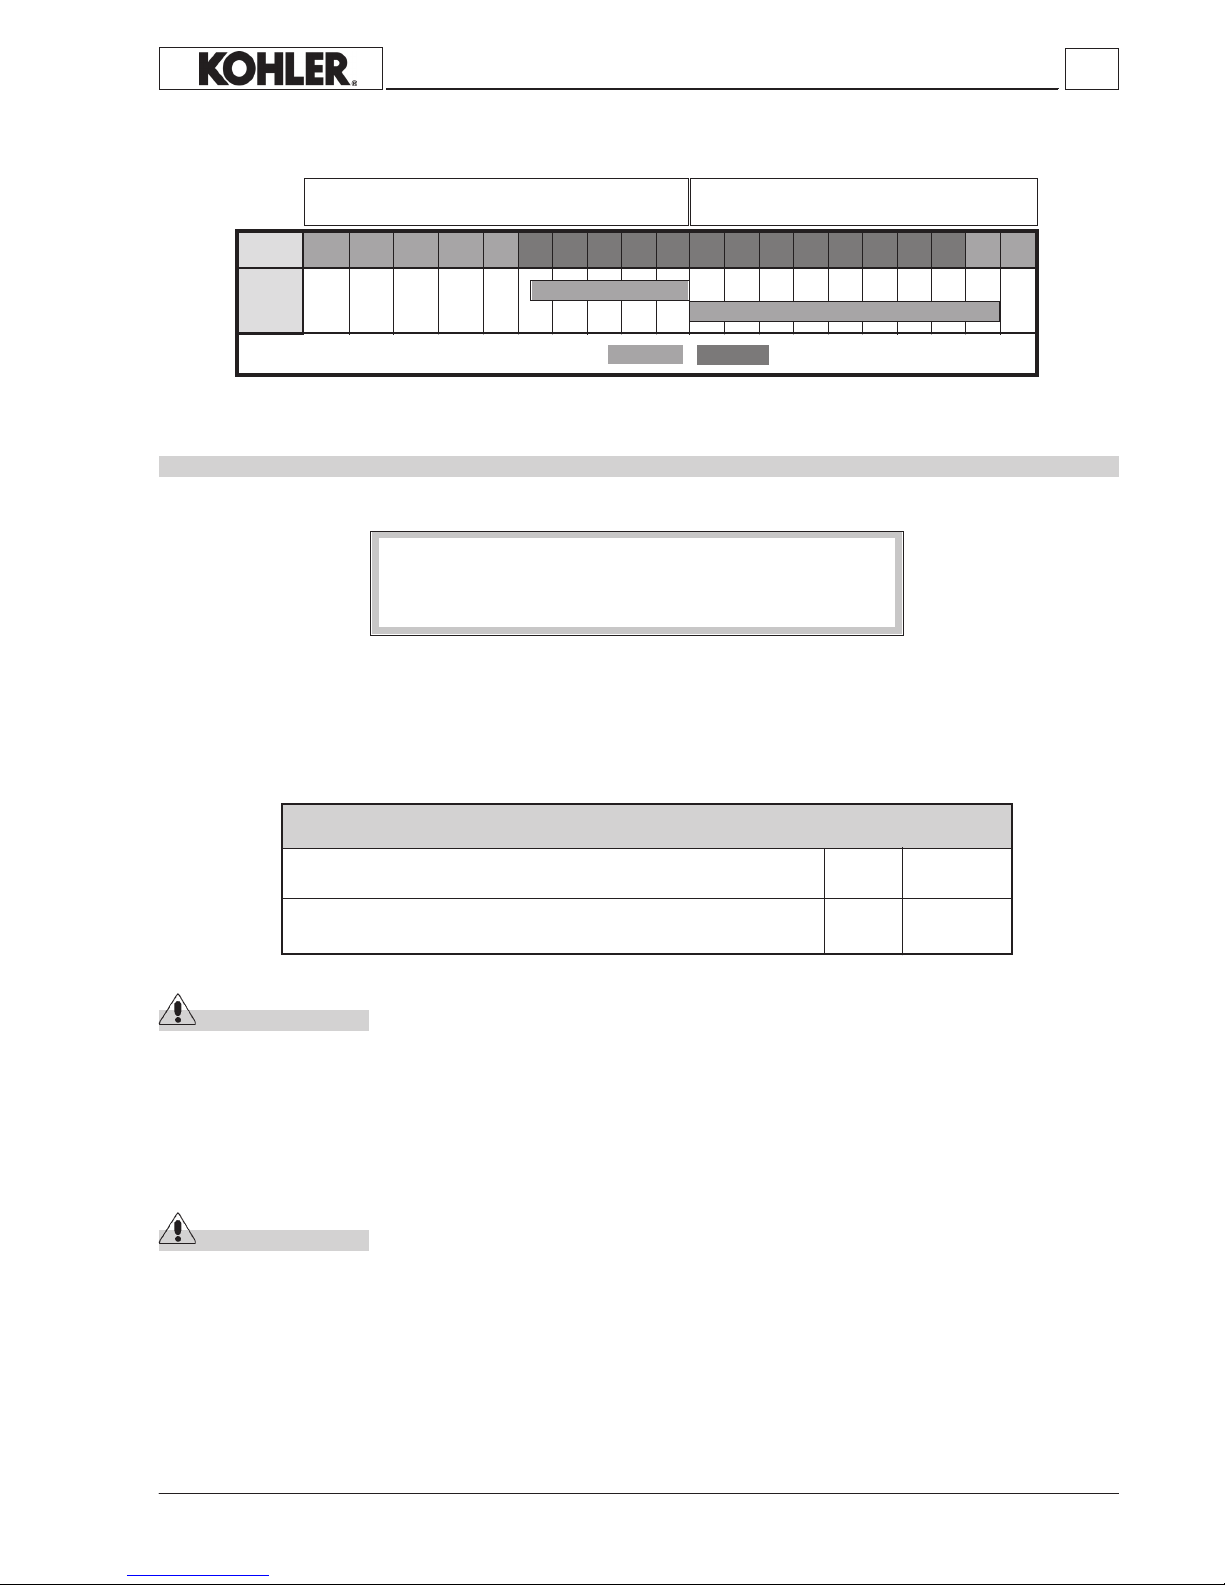
- 19 -
CF CE CD CC CB CA SA SB SC SD SE SF SG
L - 2104 D / E
L - 46152 B / C / D / E
SH
API
SJ
SLCH-4 CG-4 CF-4 CF-2
MIL
5,5
5
DIESEL
AGIP SUPERDIE-
SEL
MULTIGRADE
15W40
API CF 4
ACEA B2 - E2
MIL - L-2104 D/E
3
Maintenance - Prescribed lubricant - Relling
Litres
Litres
API / MIL Sequences
OBSOLETE
PETROL
CURRENT
specications
PRESCRIBED LUBRICANT
In the countries where AGIP products are not available, use oil API SJ/CF for Diesel engines or oil corresponding to the military
specication MIL-L-2104 D/E.
For a temperature of -10°C an oil with a 5W40 viscosity is recommended. For a temperature of -15°C an oil with a 0W30 viscosity is recommended.
OIL VOLUME AT MAX LEVEL (OIL FILTER INCLUDED)
OIL VOLUME AT MAX LEVEL (WITHOUT OIL FILTER)
Danger – Attention
- The engine may be damaged if operated with insufcient lube oil.
- It is also dangerous to supply too much lube oil to the engine because a sudden increase in engine rpm could be caused
by its combustion.
- Use proper lube oil preserve your engine.
Good quality or poor quality of the lubricating oil has an affect on engine performance and life.
- If inferior oil is used, or if your engine oil is not changed regularly, the risk of piston seizure, piston ring sticking, and
accelerated wear of the cylinder liner, bearing and other moving components increases signicantly.
- Always use oil with the right viscosity for the ambient temperature in which your engine is being operated.
Danger – Attention
- The used engine oil can cause skin-cancer if kept frequently in contact for prolonged periods.
- If contact with oil cannot be avoided, wash carefully your hands with water and soap as soon as possible.
- Do not disperse the oil in the ambient, as it has a high pollution power.
KD Workshop Manual_cod. ED0053029350_1° ed_ rev. 00
Page 20
- 20 -
15
3
API CF4 - CG4
API CF - CD - CE
Fuels for low temperatures
It is possible to run the engine at temperatures below 0°C using special winter fuels.
These fuels reduce the formation of parafn in diesel at low temperatures.
If parafn forms in the diesel, the fuel lter becomes blocked interrupting the ow of fuel.
Fuel can be: - Summer up to 0°C
- Winter up to -10°C
- Alpine up to -20°C
- Arctic up to -30°C
For all fuel types, the cetane number cannot be lower than 51.
Aviation kerosene and RME fuels (biofuels)
The only Aviation fuels that may be used in this engine are: JP5, JP4, JP8 and JET-A if 5% oil is added.
For more information on Aviation fuels and Biofuels (RME, RSME) please contact the KOHLER applications department.
Capacities standard fuel tank
Litres
Maintenance - Prescribed lubricant - Relling
Fuel with low sulphur content
Fuel with high sulphur content
PRESCRIBED LUBRICANT
FUEL SPECIFICATIONS
Danger – Attention
- To avoid explosions or re outbreaks, do not smoke or use naked ames during the operations.
- Fuel vapours are highly toxic. Only carry out the operations outdoors or in a well ventilated place.
- Keep your face well away from the plug to prevent harmful vapours from being inhaled.
- Dispose of fuel in the correct way and do not litter as it is highly polluting.
To achieve optimum performance of the engine, use good quality fuel with certain characteristics:
Cetane number (minimum 51): indicates the ignition quality.
A fuel with a low cetane number may cause problems when starting from cold and have a negative
effect on combustion.
Viscosity
(2.0/4.5 centistokes at 40°C): this is the resistance to ow and performance may decline if not within the limits.
Density (0.835/0.855 Kg/litre): a low density reduces the power of the engine, and density that is too high increases performance
and opacity of the exhaust
Distillation (85% at 350°): this is an indication of the mixture of different hydrocarbons in the fuel.
A high ratio of light hydrocarbons may have a negative effect on combustion.
Sulphur (maximum 0.05% of the weight): high sulphur content may cause engine wear.
In those countries where diesel has a high sulphur content, it is advisable to lubricate the
engine with a high alkaline oil or alternatively to replace the lubricating oil recommended
by the manufacturer more frequently.
The countries in which diesel normally has a low sulphur content are: Europe, North America and Australia.
As for lters, tanks and special crankcases please refer to KOHLER instructions.
KD Workshop Manual_cod. ED0053029350_1° ed_ rev. 00
Page 21

- 21 -
3
........................................................................................................................................................
........................................................................................................................................................
........................................................................................................................................................
........................................................................................................................................................
........................................................................................................................................................
........................................................................................................................................................
........................................................................................................................................................
........................................................................................................................................................
........................................................................................................................................................
........................................................................................................................................................
........................................................................................................................................................
........................................................................................................................................................
........................................................................................................................................................
........................................................................................................................................................
........................................................................................................................................................
........................................................................................................................................................
........................................................................................................................................................
........................................................................................................................................................
........................................................................................................................................................
........................................................................................................................................................
........................................................................................................................................................
........................................................................................................................................................
........................................................................................................................................................
........................................................................................................................................................
........................................................................................................................................................
........................................................................................................................................................
........................................................................................................................................................
........................................................................................................................................................
KD Workshop Manual_cod. ED0053029350_1° ed_ rev. 00
Page 22

- 22 -
4
RECOMMENDATIONS FOR OVERHAULS AND TUNING
Important
To locate specic topics, the reader should refer to the index.
– Before any intervention, the operator should lay out all equipment and tools in such a way as to enable him to carry out ope-
rations correctly and safely.
– The operator must comply with the specic measures described in order to avoid errors that might cause damage to the engine.
– Before carrying out any operation, clean the assemblies and/or components thoroughly and eliminate any deposits or residual
material.
– Wash the components with special detergent and do not use steam or hot water.
– Do not use ammable products (petrol, diesel, etc.) to degrease or wash components. Use special products.
– Dry all washed surfaces and components thoroughly with a jet of air or special cloths before reassembling them.
– Apply a layer of lubricant over all surfaces to protect them against oxidation.
– Check all components for intactness, wear and tear, seizure, cracks and/or faults to be sure that the engine is in good working
condition.
– Some mechanical parts must be replaced en bloc, together with their coupled parts (e.g. valve guide/valve etc.) as specied
in the spare parts catalogue.
Danger - Attention
During repair operations, when using compressed air, wear eye protection.
RECOMMENDATIONS FOR DISASSEMBLING AND ASSEMBLING
DISASSEMBLY/REASSEMBLY
Important
To locate specic topics, the reader should refer to the index.
– Besides disassembly and reassembly operations this chapter also includes checking and setting specications, dimensions,
repair and operating instructions.
– Always use original KOHLER spare parts for proper repair operations.
– The operator must wash, clean and dry components and assemblies before installing them.
– The operator must make sure that the contact surfaces are intact, lubricate the coupling parts and protect those that are prone
to oxidation.
– Before any intervention, the operator should lay out all equipment and tools in such a way as to enable him to carry out ope-
rations correctly and safely.
–
For safety and convenience, you are advised to place the engine on a special rotating stand for engine overhauls.
– Before proceeding with operations, make sure that appropriate safety conditions are in place, in order to safeguard the operator
and any persons involved.
– In order to x assemblies and/or components securely, the operator must tighten the fastening parts in a criss-cross or alter-
nating pattern.
– Assemblies and/or components with a specic tightening torque must initially be fastened at a level lower than the assigned
value, and then subsequently tightened to the nal torque.
KD Workshop Manual_cod. ED0053029350_1° ed_ rev. 00
Page 23
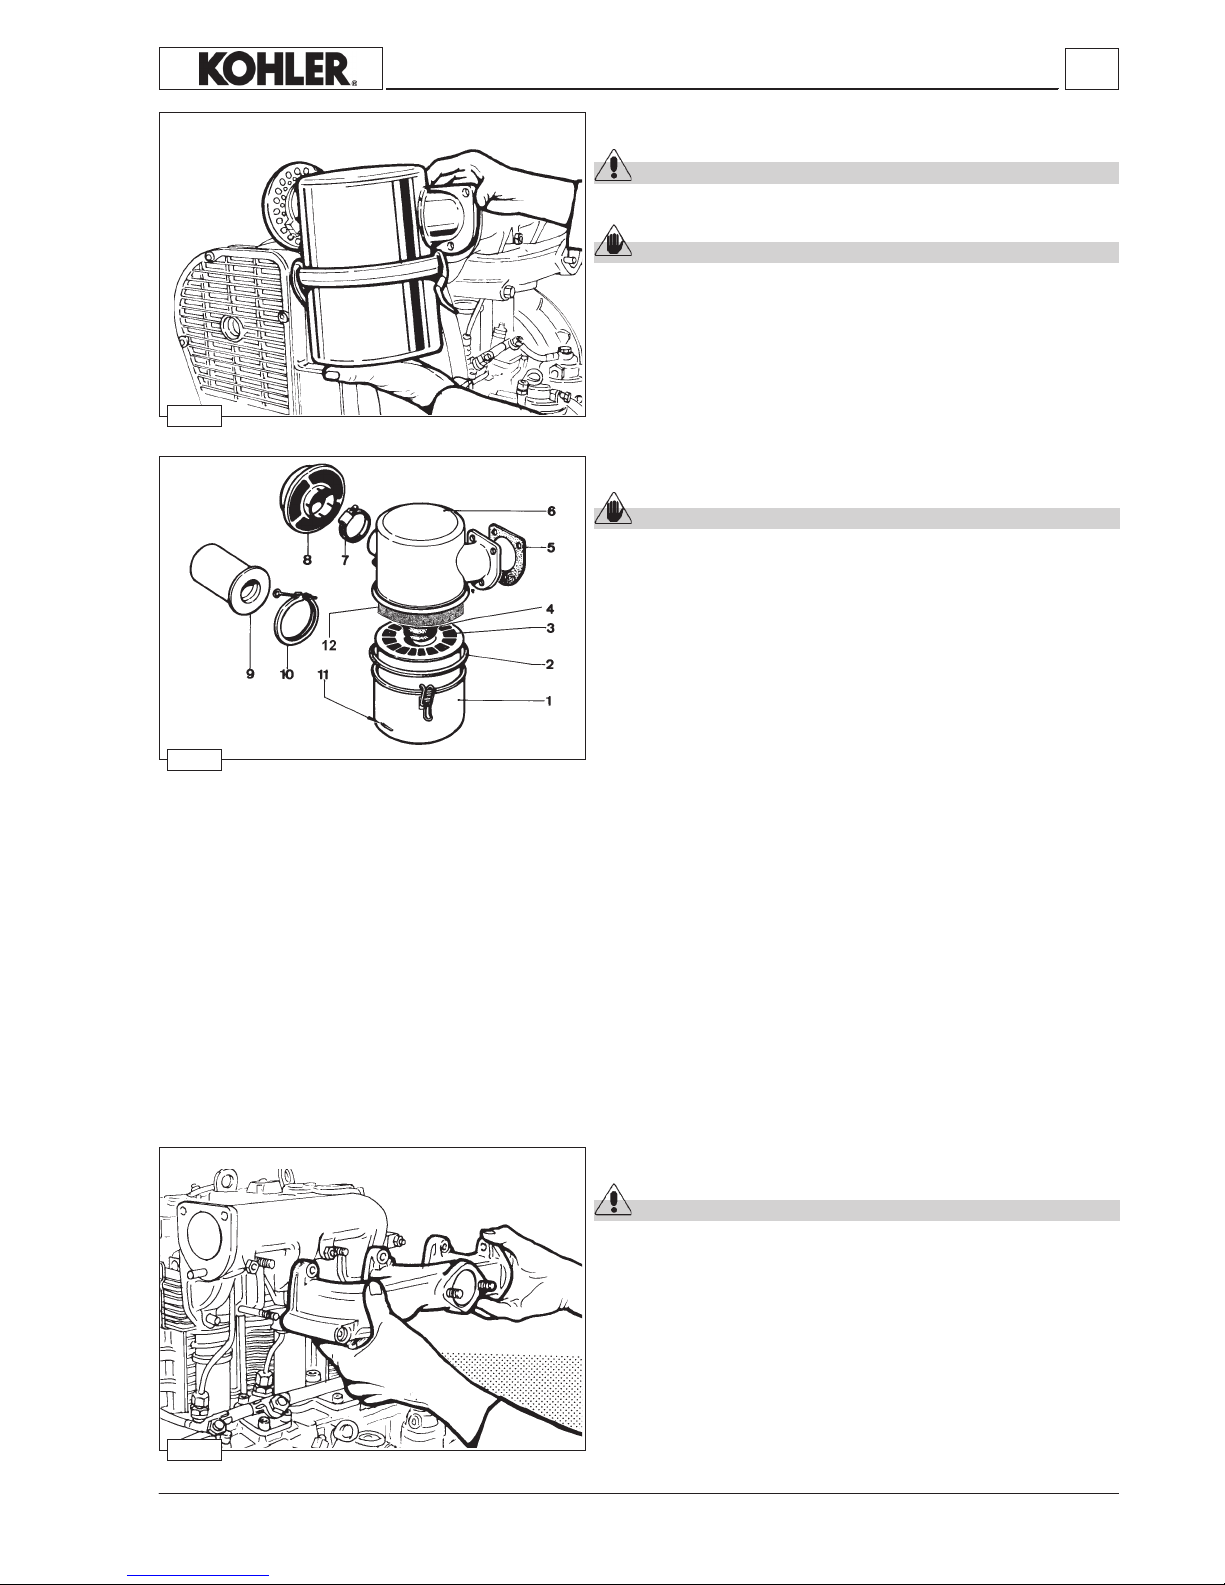
- 23 -
4
1
2
3
Disassembly / Reassembly
Oil-bath air cleaner
Danger – Attention
Do not blow the paper lter element with compressed air to clean.
Caution – Warning
Check gaskets and replace as necessary.
Check that ange welds are free of defective spots.
When reassembling, tighten the fastening nuts of the air lter to the
intake manifold to 25 Nm.
Exhaust manifold
Danger – Attention
Allow the exhaust manifold to cool before demounting it in order
to prevent scorching and burns.
Make sure that the inside is properly clean and is free from cracks or
breakage.
Always replace the seals between the manifold and the exhaust pipes.
When assembling, tighten the nuts in sequence and gradually be-
fore the nal torque to 20 Nm.
Oil-bath air cleaner components
Caution – Warning
Replace if irreparably clogged.
1 Bowl 7 Cover clamp
2 External seal ring 8 Cap
3 Lower ltering element 9 Centrifugal pre-lter
4 Internal seal ring 10 Centrifugal pre-lter clamp
5 Gasket 11 Oil level mark
6 Cover 12 Upper ltering element
(polyurethan sponge)
Note: Thoroughly clean the lower tank and the metal lter element
using diesel fuel then blow compressed air into them.
The upper lter element in polyurethane foam is cleaned by
washing it in soapy water; after washing, dry completely using
compressed air.
After cleaning rell the engine oil tank up to the indicated level.
See page 17 for the maintenance or replacement instructions.
KD Workshop Manual_cod. ED0053029350_1° ed_ rev. 00
Page 24
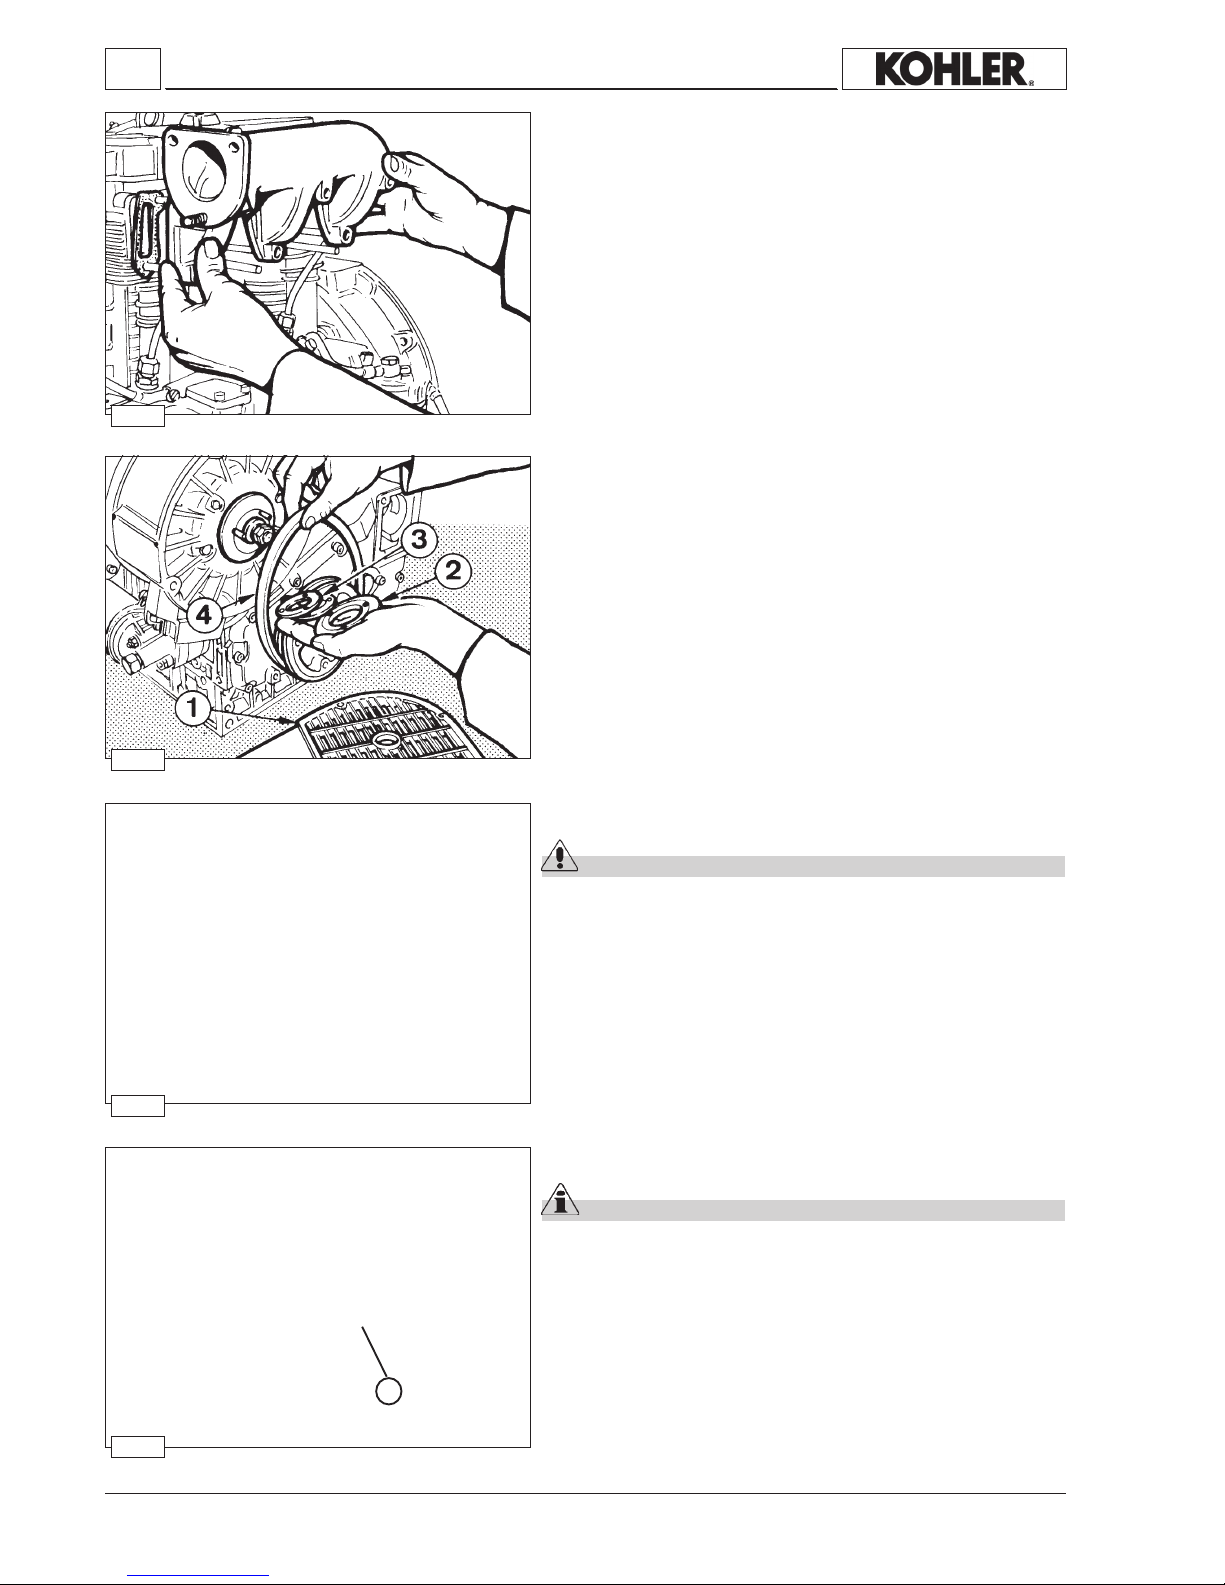
- 24 -
4
4
5
6
7
A
Intake manifold
Before reassembling the manifold check the levelness of the anges.
Always replace the seals between the manifold and the intake pipes.
Tighten the nuts gradually to 25 Nm.
Note: In case of low temperature starting we can supply a manifold
with provision for a glow plug for air preheating.
Disassembly / Reassembly
Half-pulley - Reassembly
Important
The three stop nuts of the half-pulley should never be tightened
simultaneously.
Turn the pulley so that, whenever you tighten a nut, this is in the position
indicated A in the gure 7.
Tightening should be carried out gradually.
Belt tension adjustment
Danger – Attention
Check the belt tension only when the engine is not running
The belt tension is adjusted by adding (to reduce tension) or removing (to increase tension) spacers between the half-pulleys.
Spacers are available in thicknesses of 0.5, 1 and 2 mm.
Blower belt alternator
Components:
1 Guard
2 Pulley
3 Spacers
4 'V'-belt
Unscrew the fastening screws of the belt guard and remove it, then
take out the nuts on the three stud bolts on the half-pulley.
Remove the V belt and check for wear.
See page 17 for periodic maintenance details.
KD Workshop Manual_cod. ED0053029350_1° ed_ rev. 00
Page 25
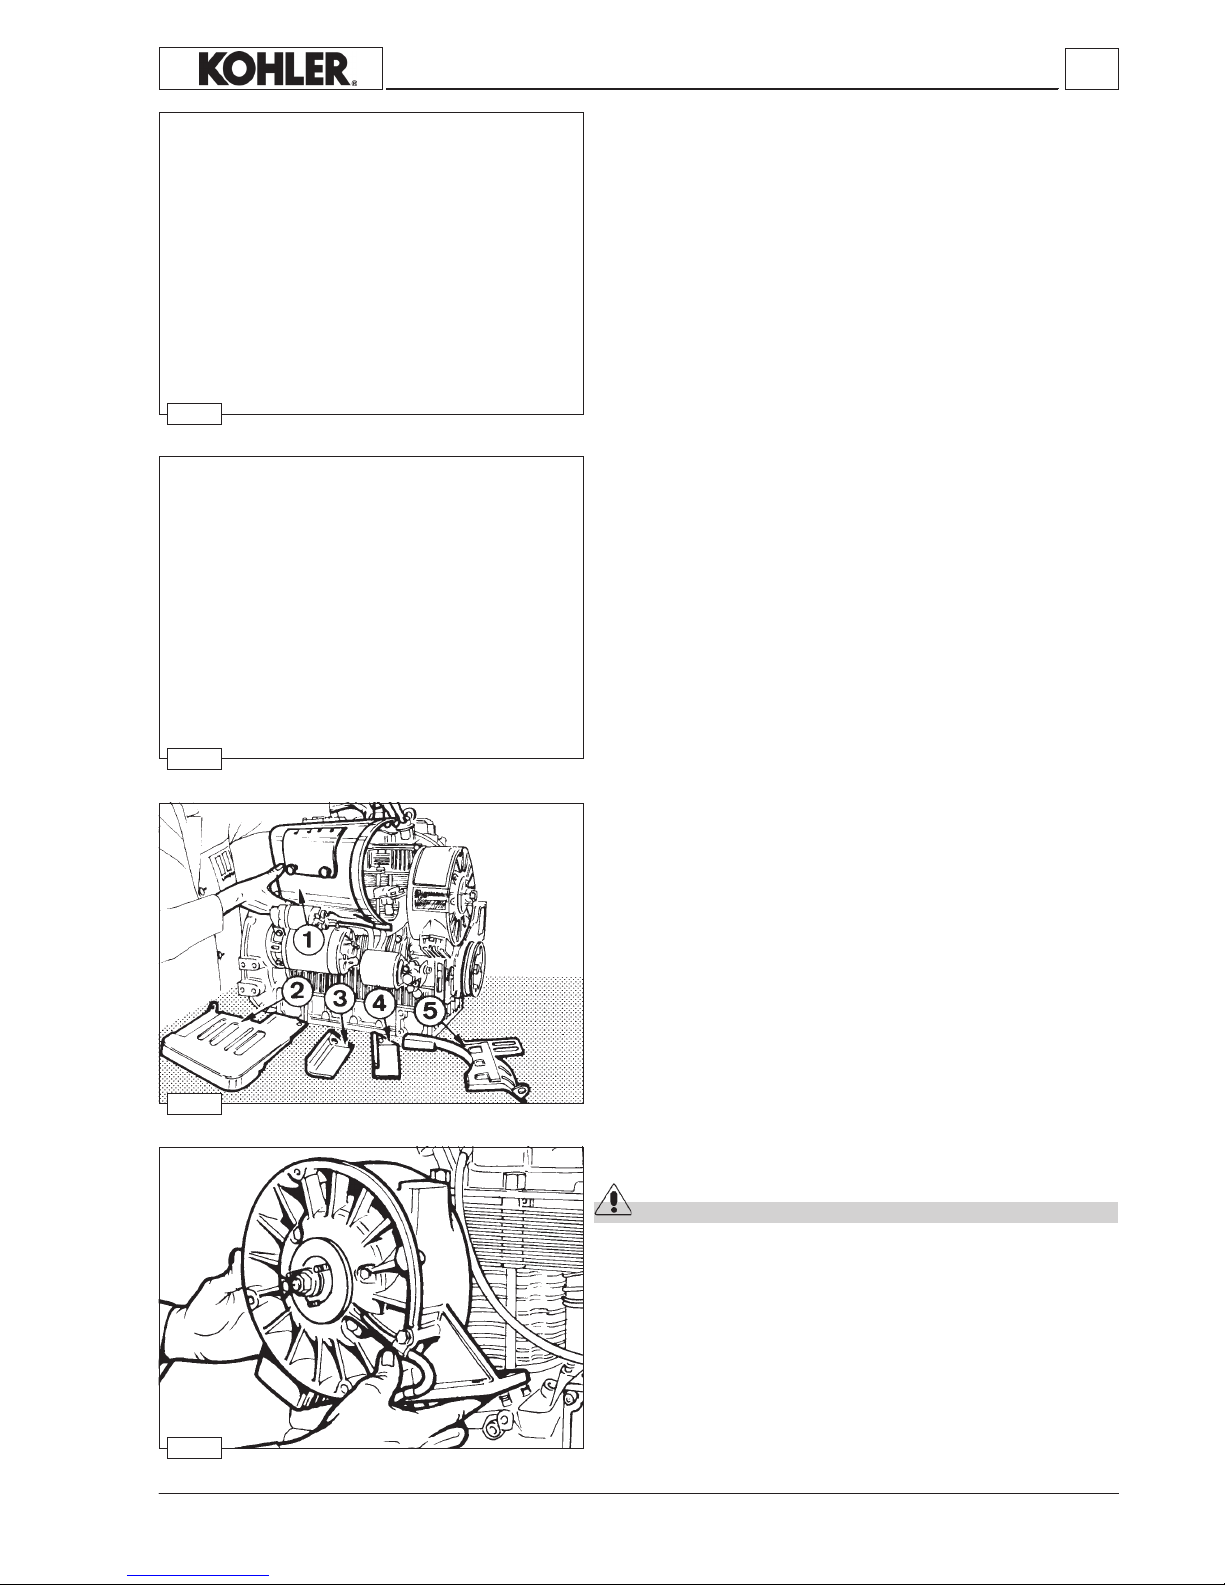
- 25 -
4
8
9
10
11
Disassembly / Reassembly
Blower belt alternator - Reassembly
The half-pulley fastening nuts must be tightened using the torque
wrench to a nal torque of 10 Nm.
Again during this phase the nut must be in position A when tightened
as in g. 7 – page 22.
Blower assembly
Danger – Attention
Before demounting the cooling fan, disconnect the positive battery cable to prevent accidental short-circuits which could consequently energize the starter motor.
The plate and tension regulator are xed to the outside of the blower
fan stator.
A 14 A or 21 A alternator is housed inside the stator.
See page 60 - 61 for the alternator technical data.
See page 13 for the cooling air volume.
Air shroud and bafes - Disassembly
The air shroud 1 and the bafes 2, 3, 4, 5 are shaped in such a way
as to direct the ow of air onto the cylinders in order to cool them.
As the shroud is completely covered in noise-absorbent material, it
also has the function of reducing the amount of noise generated by
the blower fan and vibrations.
Tension check
A 4 Kg load located halfway between the pulleys should cause the
belt to bend 5 ÷ 15 mm.
The correct belt tension can also be checked with special tools that
are available on sale.
KD Workshop Manual_cod. ED0053029350_1° ed_ rev. 00
Page 26
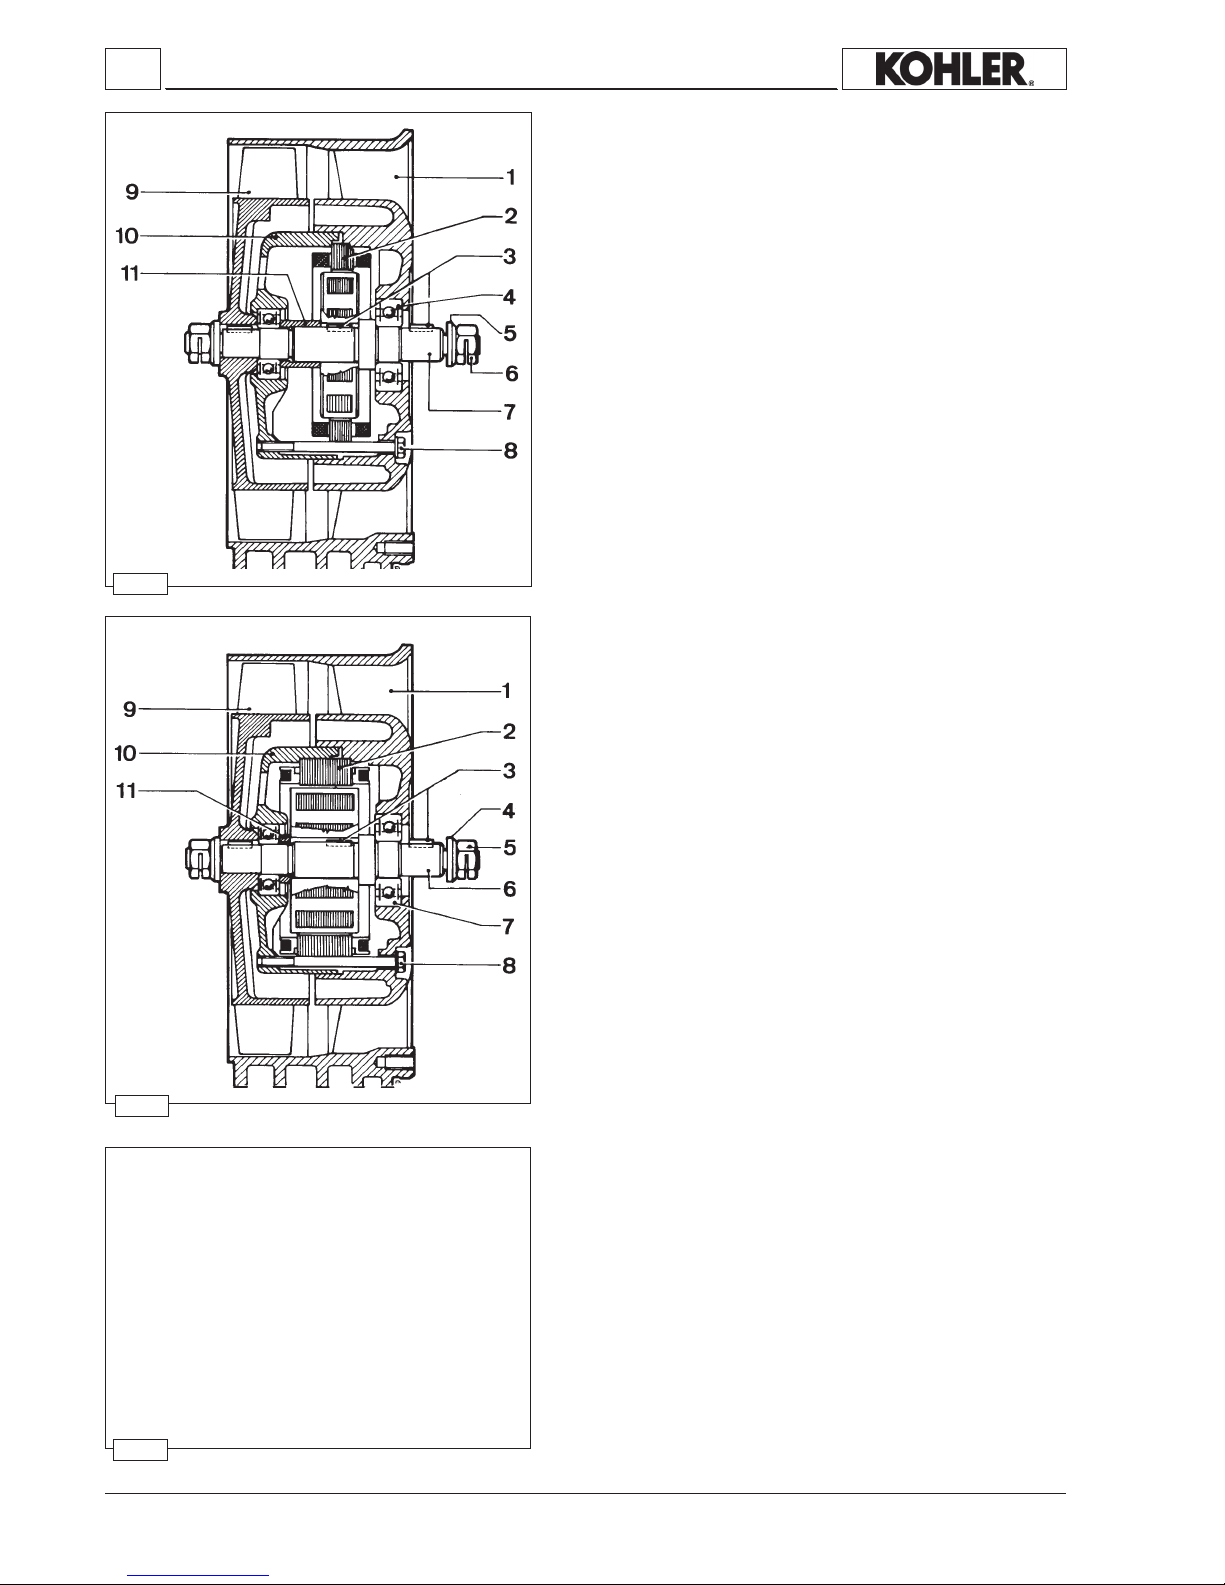
- 26 -
4
12
14
13
Blower assembly components with 14 A alternator
1 Housing
2 14 A alternator
3 Key
4 Ball bearing
5 Washer
6 Nut
7 Shaft
8 Bolt
9 Fan
10 14 A alternator bell
11 Spacer
Disassembly / Reassembly
Blower control pulley - Disassembly
The blower control pulley is installed on and is driven by the crankshaft.
To disassemble the pulley unscrew the left-handed bolt (clockwise) after blocking the crankshaft.
When reassembling, tighten the bolt using a torque wrench to a
torque of 300 Nm.
Blower assembly components with 21 A alternator
1 Housing
2 21 A alternator
3 Key
4 Washer
5 Nut
6 Shaft
7 Bearing
8 Bolt
9 Fan
10 21 A alternator bell
11 Spacer
KD Workshop Manual_cod. ED0053029350_1° ed_ rev. 00
Page 27

- 27 -
A = 142 mm
A1 = 147 mm
A2 = 163 mm
4
15
16
17
18
Crankshaft pulley
Remove the pulley using extractor serial no. 1460.200.
Disassembly / Reassembly
Timing cover
Loosen the screws and remove the cover.
When retting tighten screws at 25 Nm.
Check oil seal ring 1 and replace if warped, hardened or worn-out.
Replace gasket 2.
Blower control pulley diameter
There are three pulleys with different diameters A which take account
of engine settings:
( from 2401 to 3000 r.p.m. )
( from 2001 to 2400 r.p.m. )
( from 1500 to 1800 r.p.m. )
Check S surface in contact with oil seal ring and, if necessary, rub
with a ne grain emery cloth.
Components:
1 Left-handed bolt
2 Washer
3 Blower control pulley
Note:
It is only possible to check crankshaft axial clearance after
tightening the pulley.
KD Workshop Manual_cod. ED0053029350_1° ed_ rev. 00
Page 28
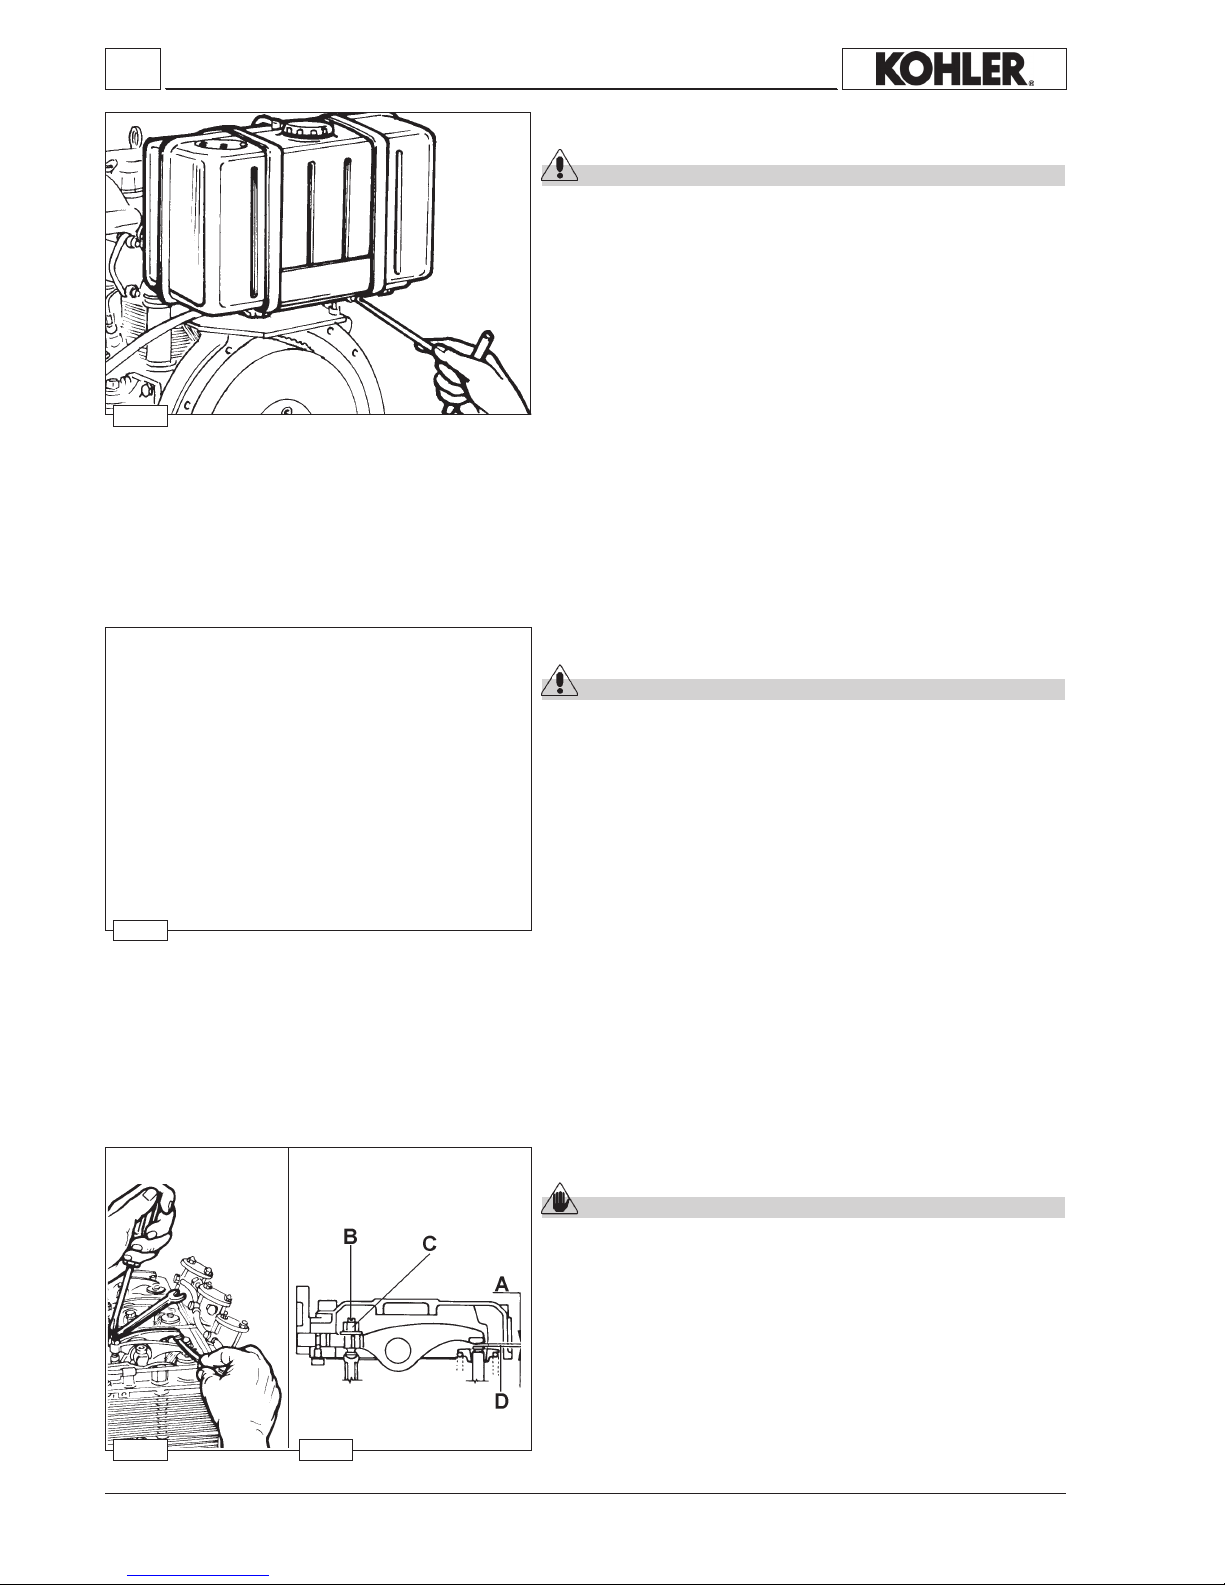
- 28 -
4
19
20
21 22
Tank
Danger – Attention
Do not smoke or use naked ames during the demounting operations as these could cause explosions or re outbreaks.
Fuel fumes are highly toxic. Only carry out the operations outdoors or in a well ventilated place.
Keep your face well away from the ller cap or you could inhale
harmful fumes. Dispose of fuel in the correct way as it is highly
polluting. Do not litter.
Remove fuel lter and loosen clamp screws.
Completely empty the tank and check that no impurities are found inside.
Check that cap breather is not clogged.
Disassembly / Reassembly
Flywheel
Danger – Attention
During the demounting phases, pay particular attention to prevent the ywheel from dropping as this could seriously injure
the operator.
Wear protective goggles when removing the ywheel ring.
Remove the bolts which attach the ywheel to the crankshaft.
To replace starter ring gear heat it up to 300°C for 15 ÷ 20 minutes.
Drive it onto the ywheei caretully checking that it perfectly ts into its
seat.
Let it cool down slowly.
When reassembling gradually tighten the fastening screws to 140
Nm on the crankshaft using a torque wrench.
Valve / rocker arm clearance
Caution – Warning
Make settings when the engine is cold.
Remove the rocker arm covers and make sure the seals are intact,
otherwise replace them. Bring the cylinder piston that is to be adjusted to the compression top dead centre.
Loosen the fastening nut C, insert the thickness gauge D between the
rocker arm and the top of the valve stem, then, using a cross-head
screwdriver turn the adjusting screw B to set clearance.
Tighten the fastening screw C and check valve clearance A again to
ensure that it is between 0,15 and 0,2 mm for intake and 0,3 ÷ 0,35
mm for exhaust.
When retting tighten cover screws to 20 Nm.
If necessary place a 0,30 or 0,40 mm shim at B.
KD Workshop Manual_cod. ED0053029350_1° ed_ rev. 00
Page 29
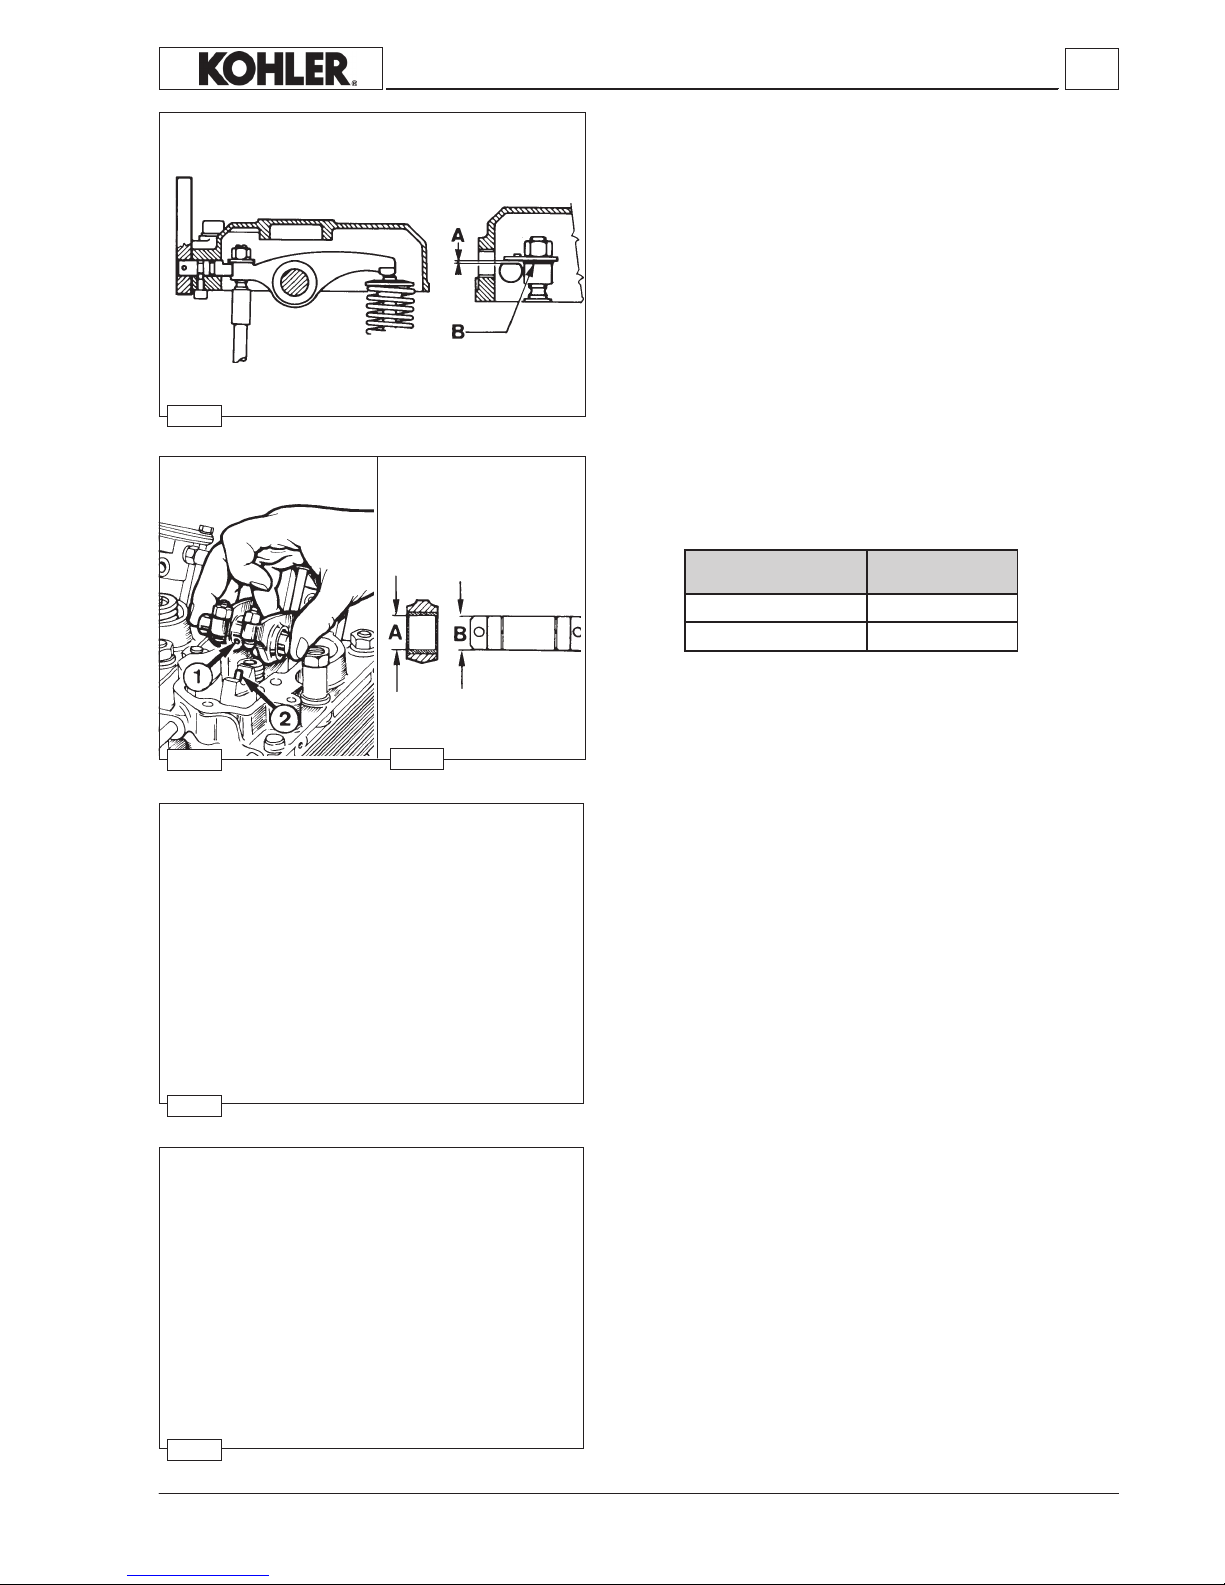
- 29 -
4
24
25
27
28
26
A 18.032 ÷ 18.050
B 17.989 ÷ 18.000
Rocker arm assembly
Components: 1 Rocker arm axle lubrication hole
2 Lubrication tube
Replace the axle and the rocker arm if clearance (A-B) is greater
than 0,135 mm.
When retting check that lubrication tube 2 perfectly ts into centering
bore 1.
Tighten screws at 25 Nm.
Disassembly / Reassembly
To release the injector union from the high-pressure pipe, use two box
wrenches (14 and 17 mm).
Disassembling size P injector
The injector is attached to the cylinder head via a forked bracket.
Compression release (optional)
Bring piston to top dead center on the compressìon stroke.
Unscrew rocker arm cover side plug and measure clearance A should
be 0,30 ÷ 0,40 mm.
Ref.
Dimensions
(mm)
KD Workshop Manual_cod. ED0053029350_1° ed_ rev. 00
Page 30

- 30 -
4
29
30
31
32
Remove the forked bracket xing the injector to the cylinder head
using a 5 mm hexagon screwdriver (see photo 29 - 30).
Disassembly / Reassembly
The xing bracket screws must be tightened to 10 Nm using a tor-
que wrench.
These operations are necessary when checking injector calibration or
when replacing it.
Unscrew the screw fastening the clamp of the high-pressure pipe
using a 4 mm hexagon screwdriver.
KD Workshop Manual_cod. ED0053029350_1° ed_ rev. 00
Page 31

- 31 -
4
33
34
35
36 37
The high-pressure pipe union must be tightened to the injector
union to 20 ÷ 25 Nm using a torque wrench.
Disassembly / Reassembly
Valves
Components:
1 Intake valve
1a Exhaust valve
2 Lower spring collar
3 Valve stem sealing ring
4 Spring
5 Upper spring collar
6 Three-groove half collets
Te remove half collets rmly press down the special tool 1460 - 113
as shown in the gure 36.
Cylinder Head
Caution – Warning
Do not demount or remount while hot as this could lead to deformations.
If the head surface is distorted, grind it by removing up to 0.3 mm
thickness. When reassembling, before tightening, make sure that the
rocker arm lubrication hose is rmly lodged into holes. The cylinder
heads must be tightened with the exhaust or intake manifold mounted
to keep them lined up. Always replace the copper seal between the
cylinder head and the cylinder that determines clearance volume; see
page 34 for the choice of thickness. See page 32 for how to mount
the spring on the tappet rod protection pipe.
The cylinder head fastening nuts must be tightened gradually to 55
Nm and in the sequence 1, 2, 3, 4; see g. 35.
Injector protrusion
It is only possible to check injector protrusion with the cylinder head
disassembled.
The end of the nozzle must be 3 ÷ 3,5 mm with respect to the head
surface A.
Protrusion is adjusted by adding or removing copper seals B which
are supplied at a thickness of 0,5 and 1 mm.
KD Workshop Manual_cod. ED0053029350_1° ed_ rev. 00
Page 32

- 32 -
4
38
40
41
43
39
42
A 42.00
B 48.00
C 14.00 ÷ 14.018
D 14.045 ÷ 14.056
Valve stem sealing rings - Reassembly
Lubricate the inside of the sealing ring with Molikote BR2 Plus and insert them all the way onto the guides using tool 1460 – 108.
To prevent deformation of the sealing ring 1 as it is inserted onto the
valve guide 2 insert it onto tool 3.
Lubricate valve stem with the same type of grease; insert the valves
into the guides rotating them particularly as they enter the sealing ring.
Disassembly / Reassembly
Valve guides and cylinder head housings
Intake and exhaust valve guides are both made of phosphoric cast
iron.
Components: 1 = Exhaust valve guide
2 = Intake valve guide
Valve guides with outside diameter increased by 0,5 mm are also
available; in such cases valve guide bore C should also be increased
by 0,5 mm.
Valve material
Intake valves A
- Material: X 45 Cr Si 9 - 3 UNI EN 10090
1 = Chromium-plated portion
α = 45°15' ÷ 45°25'
Exhaust valve B
Shaft and head are made of 2 different materials.
2 = Welded portion
3 = Chromium-plated portion
4 = Portion made of X 45 Cr Si 9 - 3 UNI EN 10090
5 = Portion made of X 53 Cr Mn Ni N 21 - 9 UNI EN 10090
α = 45°15' ÷ 45°25'
Valve springs
Measure free length with a gauge.
Using a spring tester check that the spring length under two different
loads corresponds to the values below:
Free length A = 52 mm
Length B compressed by a 21 Kg weight = 34.8 mm
Length C compressed by a 32 Kg weight = 25.8 mm.
Ref. Dimensions (mm)
KD Workshop Manual_cod. ED0053029350_1° ed_ rev. 00
Page 33

- 33 -
4
44
45
46
47
A 30.80 ÷ 31.20
B 24.80 ÷ 25.20
A 8.025 ÷ 8.040
0.025 ÷ 0.055 1.15
B 7.985 ÷ 8.000
D 0.75 ÷ 1.25 1.65
A 40.000 ÷ 40.016
B 40.120 ÷ 40.140
A 34.000 ÷ 34.016
B 34.120 ÷ 34.140
Valve guide insertion
Heat cylinder head up to 160 ÷ 180°C.
Thread guides considering the A e B distances from the head plane.
Note: If the guides are supplied with the housing for the lock ring C,
insert the ring, then drive the guides until the lock ring is stopped without worrying about A and B.
INTAKE
VALVE
EXHAUST
VALVE
Disassembly / Reassembly
Valve seat lapping
After cutting, lap valve seats with ne emery paste in oil suspension.
The sealing surface S should not exceed 2 mm.
Valve recess after grinding
Valve seats and housings
Dimensions and clearance between guides and valves
Ref. Dimensions (mm)
Ref. Dimensions (mm)
Ref. Dimensions (mm) Clearance (mm) Limit value (mm)
Ref. Dimensions (mm) Limit value (mm)
KD Workshop Manual_cod. ED0053029350_1° ed_ rev. 00
Page 34

- 34 -
4
49
51
53
54
50
52
55
Pushrod tube spring tting
Components:
1 Spring
2 Tool Part No 1460-009
3 Rocker arm lubrication tube
4 Gasket
5 Pushrod tube
6 Gasket
To mount the spring 1 on the tappet rod protection pipe 5 insert it into
the tool 2 with the help of a vice.
Make sure that the rocker arm lubrication hose 3 and the seals 4 and
6 are fully in place.
Disassembly / Reassembly
Piston
Remove the Sieger stop rings and extract the pin.
After removing the snap rings from the piston, clean the grooves if
necessary.
Measure the diameter at 2 mm from the base using an external micrometer.
Replace the piston and the snap rings if the diameter of the wear is
greater than 0,05 mm of the minimum value prescribed.
Note: Oversize pistons of 0,5 and 1,0 mm are available.
Checks and cyiinder roughness
The cylinder should show no blowholes or porosities.
Seal both ends of cylinder and pressurize with compressed air at 4
bar for 30 sec.
Fins must be intact.
Cross hatch pattern must range between 115° ÷ 140°: they must be
uniform and clear in both directions.
Average roughness should range between 0,5 and 1 µm.
Cylinder
Measure diameter sìze between two diametrically opposed points at
three different heights.
In case wear exceeds 0,10 mm, bore the cyIinder and t oversize piston and rings.
In case of less wear replace piston rings only.
Ref. Ø Cylinder (mm)
Ref. Ø Piston (mm)
625/3 - 626/33 34.00 ÷ 34.016
625/3 - 626/33 94.90 ÷ 94.92
KD Workshop Manual_cod. ED0053029350_1° ed_ rev. 00
Page 35

- 35 -
4
56
57
58
60
59
A 0,07 ÷ 0,11 0,20
B 0,05 ÷ 0,09 0,16
C 0,04 ÷ 0,08 0,15
Piston weight
Weigh pistons when replacing them in order to avoid unbalance.
The difference in weight should not exceed 6 g.
Disassembly / Reassembly
Metal snap rings - Fitting sequence
A = Compression snap ring (chrome-plated)
B = Snap ring (conical internal torsional)
C = Ring (oil scraper)
Note: before inserting the piston in the cylinder, rotate snap rings so
that cuts are misaligned by 120° from one to the next.
Important
Assemble the segments with TOP facing the piston crown.
Metal snap rings - Piston grooves
Metal snap rings - End gaps
Insert the snap rings in the lower part of the cylinder, then measure
the distance between the tips.
Ref. Dimensions (mm) Limit value (mm)
KD 625/3-626/3 Limit value
KD Workshop Manual_cod. ED0053029350_1° ed_ rev. 00
1°
Compression snap ring
(chrome-plated)
A
0.40 ÷ 0.65
1 mm
2°
Snap ring
(conical internal
torsional)
A
3°
Ring (oil scraper)
A 0.25 ÷ 0.50
Page 36

- 36 -
4
61
63
65
62
64
66
Piston - Retting
Caution – Warning
Lubricate the following parts with oil before mounting: the piston
pin, the piston, the cylinder and the big-end bearing
Connect piston to connecting rod in a way that the combustion chamber center b is under nozzle tip a.
Lubricate piston pin and introduce it into the piston by exerting pressure with your thumb.
Check that both circlips are well inside their seats.
Seal thickness
Position
Disassembly / Reassembly
Connecting rod
Caution – Warning
When remounting the big-end bearings, remember to thoroughly
clean the parts and generously lubricate them to prevent seizure
when the engine is started up for the rst time
Remove the oil sump and internal oil lter.
Remove connecting rocis and check as follows.
Important
All connecting rod/piston units should be tted back into the
corresponding cylinders; mark them to avoid mistakes.
See page 35 g. 71 for specications as to the tightening of the
connecting rod big end bearing.
Piston clearance
A = Clearance volume is 0,65 ÷ 0,7 mm for size S injectors and 0,55
÷ 0,6 mm for size P injectors
B = Copper seal with various thicknesses
The piston crown in the TDC (top dead centre) position may vary, and
extend or be short of the upper surface of the cylinder.
Use a dial indicator to measure the positive or negative difference
between the two surfaces (piston crown and upper cylinder surface)
and use a suitable thickness copper gasket B for the cylinder head
to adjust the clearance volume A between the cylinder head and the
piston crown, and which must be between 0,65 and 0,7 mm for size S
injectors and 0,55 ÷ 0,6 mm for size P injectors.
The table below shows how to choose the most suitable cylinder
head copper seal according to the position of the piston in relation to
the upper surface of the cylinder.
KD Workshop Manual_cod. ED0053029350_1° ed_ rev. 00
Page 37

- 37 -
4
67
68
......6970 ......71
A 141.95 ÷ 142.05
B 25.020 ÷ 25.030
0.020 ÷ 0.035 0.070
C 24.995 ÷ 25.000
Connecting rod small end bearing and pin
* with driven and machined bearing.
When retting the bearing of the connecting rod small end, as you drive in, make sure that the lubrication hole on the connecting rod coincides with the hole on the bearing.
Disassembly / Reassembly
Connecting rod big end bearing
Both centering notches A and B must be on the same side when retting.
Tighten bolts at 40 Nm.
See page 39 for dimensions.
Connecting rod weight
Weight connecting rods when replacing them in order to avoid unbalance.
The difference in weight should not exceed 10 g.
Connecting rod alignment
Check alignment of small end and big end bearing bores using tted
mandrels; axial mis-alignment A = 0,02 mm; maximum limit 0,05 mm.
Moderale warpage may be corrected by gradually working with a
press.
Ref. Dimensions (mm)
Clearance
(C-D) (mm)
Limit value
(C-D) (mm)
KD Workshop Manual_cod. ED0053029350_1° ed_ rev. 00
Page 38

- 38 -
4
72
73
74
75
Camshaft gear
Remove nut 1 and washer 2. Then remove camshaft gear 3.
The cylindrical type of coupling makes gear removal easier since no
puller is required.
Tighten nut 1 at 25 Nm.
See Page 42 for timing.
Disassembly / Reassembly
Main bearing support, gear side
Remove crankshaft key and thrust bearing.
Loosen the three xing bolts and remove the main bearing support on
gear side using two M 8x1,25 screws with fully threaded length of 60
mm.
Note: To avoid distortion it is not recommended to repiace the bea-
ring bushing.
Complete assemblies of bushing and support are available in
standard, 0,25 and 0,50 mm undersíze congurations as spare
parts.
When retting tighten screws at 25 Nm.
Timing gear
The timing gear can be easily pulled out thanks to the cylindrical type
of coupling.
However, if resistance is felt use a bearing puller.
Oil pump gear
Remove nut 1 and washer 2. Then remove oil pump gear using a puller with two M 8x1,25 bolts (length: 60 mm).
Tighten the nut at 35 Nm.
KD Workshop Manual_cod. ED0053029350_1° ed_ rev. 00
Page 39

- 39 -
4
76
77
78
79
Main bearing support, ywheel side
Loosen nuts and extract main bearing support using two M 8x1.25
screws with fully threaded length of 40 mm.
Check oil seal ring and replace if warped, hardened or worn-out.
When retting tighten nuts at 25 Nm.
See Page 40 for dimensions.
Disassembly / Reassembly
Crankshaft center main bearing supports
Main bearing supports 2 and 3 have a different diameter size (see
page 40 for dimensions).
When retting, both centering notches A and B must be located on
the same side.
Tighten screws at 30 Nm.
Crankshaft removal
To pull out the crankshaft tap lightly on the gear side end using a copperheaded hammer.
When retting align center main bearing supports so that the locating
bolt holes coincide with the crankcase holes.
Crankshaft
Center main bearing support, locating bolts
Before removing the crankshaft, straighten the safety stop 1 and unscrew the bolts 2 of the central main bearings.
KD Workshop Manual_cod. ED0053029350_1° ed_ rev. 00
Page 40

- 40 -
4
80
81
82
83
A 80.781 ÷ 80.800
B 45.500 ÷ 45.516
C 55.350 ÷ 55.370
D 54.931 ÷ 54.950
Crankshaft lubrication ducts
Important
During repair operations, when using compressed air, wear eye
protection.
Remove the caps, clean ducts A, B and C using a drill bit with the
same diameter and blow with compressed air.
After cleaning, replace the new caps in their seats and make sure
they are sealed.
Disassembly / Reassembly
Main journal and crank pin diameter
Checking main journals and crank pins
Use an outside micrometer gauge.
Crankshaft journal radius
The radius R connecting journal to shoulders is 2,8 ÷ 3,2 mm.
Note:
When grinding main journals or crank pins restore the R value
to original specication.
Ref. Dimensions (mm)
KD Workshop Manual_cod. ED0053029350_1° ed_ rev. 00
Page 41

- 41 -
4
84
85
86
87
E 80,870 ÷ 80,890
F 45,548 ÷ 45,578
G 55,430 ÷ 55,460
H 55,000 ÷ 55,020
E-A 0,070÷0,109 0,195
F-B 0,032÷0,078 0,150
G-C 0,060÷0,110 0,195
H-D 0,050÷0,089 0,180
I 85,785 ÷ 85,815
L 152,000 ÷ 152,020
M 60,000 ÷ 60,020
N 150,000 ÷ 150,020 *
O 148,000 ÷ 148,020 *
P 77,990 ÷ 78,010
Diameter of main bearings
Use an inside micrometer to measure the inside.
Disassembly / Reassembly
* with tightened bearing
Main bearing supports
1 Flywheei side 3 2nd central
2 1st central 4 Gear side
Clearance between main journals/crank pins and connecting
rod bearings
Main bearing and connecting rod big end bearing inside diameter
The above dimensions refer to driven in or tightened bearings.
Note: Both main bearings and connecting rod big end bearings are
available with inside diameter size measuring 0,25 and 0,50
less than the standard version.
Ref. Dimensions (mm)
Ref. Dimensions (mm) Limit value (mm)
Ref. Dimensions (mm)
KD Workshop Manual_cod. ED0053029350_1° ed_ rev. 00
Page 42

- 42 -
4
88
89
91
92
90
93
A 150.000 ÷ 150.020
B 152.000 ÷ 152.020
C 148.000 ÷ 148.020
D 78.000 ÷ 78.020
A 48.200 ÷ 48.250
B 47.950 ÷ 48.000
A 44.000 ÷ 44.025
0.040 ÷ 0.085 0.170
B 43.940 ÷ 43.960
Crankshaft end play
Check crankshaft end play after retting the crankshaft pulley and
tightening its nut at 300 Nm; the crankshaft end play is equal to 0,20 ÷
0,30 mm and is not adjustable. lf this value cannot be obtained check
A and B, and possibly replace the parts whose size is inadequate.
Main bearing housings
Disassembly / Reassembly
How to measure camshaft bearing and journal inside diameter
Measure A using an internal dial indicator and B with an external micrometer.
When repiacing the bearing make the lubrication hole 1 match with
the corresponding crankcase bore.
Camshaft
Camshaft removal
To pull out the camshaft simply remove bell 1, gear 2, fuel feeding
pump 3, injection pumps 4 and tilt the engine; in this position the cam
followers is not in contact with the camshaft thus making its removal
possible.
Ref. Dimensions (mm)
Ref. Dimensions (mm)
Ref. Dimensions (mm) Clearance (mm)
Limit value
(mm)
KD Workshop Manual_cod. ED0053029350_1° ed_ rev. 00
Page 43

- 43 -
4
94
95
96
97
A 42.000 ÷ 42.025
B 41.000 ÷ 41.025
C 33.200 ÷ 33.220
D 41.940 ÷ 41.960
E 40.940 ÷ 40.960
F 33.140 ÷ 33.160
A-D
0.040 ÷ 0.085 0.170
B-E
C-F 0.040 ÷ 0.085 0.160
Dimensions of camshaft journals and housings
Disassembly / Reassembly
Camshaft end play
Check camshaft end play after removing cylinder head, injection
pump and fuel feed pump from the engine.
Check that the three cover 1 screws are tightened at 25 Nm.
Place the dial gauge on the camshaft gear outer part; push and pull
same gear as required.
Camshaft end play should be 0,15 ÷ 0,30 mm.
Intake/exhaust cam height
A1= 1st cylinder intake cam
S1 = 1st cylinder exhaust cam
A2 = 2nd cylinder intake cam
S2 = 2nd cylinder exhaust cam
A3 = 3rd cylinder intake cam
S3 = 3rd cylinder exhaust cam
H = 33,65 ÷ 33,55 for engines EPA 97/68 CE
Exhaust and intake cams feature the same height H.
Replace camshaft if H is 0.1 mm below the given value.
Checking intake/exhaust cam height
Use an outside micrometer gauge to measure camshaft lobe height.
Ref. Dimensions (mm)
Ref.
Cleatance
(mm)
Limit value
(mm)
KD Workshop Manual_cod. ED0053029350_1° ed_ rev. 00
Page 44

- 44 -
4
98
99
100
Camshaft timing
Fit camshaft gear by making timing mark 2 coincide with timing marks
1.
Tighten camshaft bolt at 250 Nm.
Disassembly / Reassembly
Valve timing check
Check using an index plate suitable for reading angles, integral with
the crankshaft. Readings are taken in degrees.
Set valve clearance at 0,65 ÷ 0,70 mm (after checking restore the value al 0,15 ÷ 0,20 mm). Set dial gauge on intake valve to a zero value;
by rotating the driving shaft according to its direction of rotation you
can measure α (intake valve opening advance referred to top dead
centre PMS) and ß (intake valve closing delay referred to bottom 1
dead centre).
Follow the same procedure for exhaust valves checking γ (exhaust
valve opening advance) and δ (exhaust valve closing delay).
Valve timing without considering timing marks
Locate piston 1 (on ywheeI side) at the top dead center. Position two
small cylinders A of the same height onto the tappets.
Rotate camshaft stopping when cylinder 1 tappets are in overlap position (intake open, exhaust closed).
By means of ruler B check that tappets are at the same height.
KD Workshop Manual_cod. ED0053029350_1° ed_ rev. 00
Page 45

- 45 -
4
101
Value expressed in degrees of the timing angles. (valves clearance = 0.65 ÷ 0.70 mm)
α = open 2° before P.M.S.
β = close 34° after P.M.I.
γ = open 34° before P.M.I.
δ = close 2° after P.M.S.
Disassembly / Reassembly
Legend
S =
piston at top dead center
I = piston at bottom dead center
α = intake valve open
β = intake valve closed
γ = exhaust valve open
δ = exhaust valve closed
KD Workshop Manual_cod. ED0053029350_1° ed_ rev. 00
Page 46

- 46 -
4
102
103
104
105
Hydraulic pump p.t.o. group 1
A hydraulic pump of group 1 or 2 can be installed on the gear side A,
3rd p.t.o.
A group 1 hydraulic pump can be installed at the 4th p.t.o. B.
Disassembly / Reassembly
Use of 3rd and 4th p.t.o.
1 Hydraulic pump, group 2, mounted at 3rd p.t.o.
2 Hydraulic pump, group 1, mounted at 4th p.t.o.
Total power obtainable from 3rd and 4th plo. is 13 kW ( 17.7 HP).
Ratio for both p.t.o. compared to the engine r.p.m. is 1:1 for 4th PTO is
1 : 1,067 for 3th PTO.
Hydraulic pump 4th p.t.o., group 1
Components:
1
Drive 7 Seal ring
2 Control shaft 8 Seal ring
3 Pin 9 Centering ring
4 Gear 10 Bracket
5 Washer 11 Gasket
6 Nut 12 Cover
A max. torque of 243 Nm can be obtained from this p.t.o.
Hydraulic pump 3rd p.t.o., group 2
Components:
1 Gear
2 Gear support
3 Bearing
4 Drive
5 Flange
6 Washer
7 Seal ring
8 Circlip
A max torque of 39,6 Nm can be obtained from this p.t.o.
KD Workshop Manual_cod. ED0053029350_1° ed_ rev. 00
Page 47

- 47 -
4
106
108
109
106
Mechanical speed governor
The governor (with centrifugal weights) is housed inside the crankcase and is controlled by a camshaft gear.
To remove speed governor 1 remove camshaft bell 2 and speed governor control gear 3.
Disassembly / Reassembly
Mechanical speed governor operation (standard)
Weights 1 are moved to the periphery by the centrifugal force and
thus axially shift the washer 2 and the drive rod 3 which, by means of
a linkage, move injection pump control lever 4.
The governor springs 5 placed under tension by the accelerator control lever 6 offset the weights 1 centrifugal force.
Balance between the two forces keeps speed at an almost constant
level in spite of load variations.
Mechanical speed governor components (standard)
1
Drive rod 9 Key
2 Stop ring 10 Thrust washer
3 Bearing 11 Bearings
4 Washer 12 Shaft support
5 Pin 13 Gear
6 Weights 14 Spring washer
7 Weight support 15 Flat washer
8 Shaft 16 Nut
KD Workshop Manual_cod. ED0053029350_1° ed_ rev. 00
Page 48

- 48 -
4
110
111
112
Mechanical speed governor components for special generating sets
1 Spring anchoring rocker arm
2 Governor springs
3 Journal
4 Governor control lever
5 Governor control lever ball bearing
6 Lever
7 Bearing
8 Plate
Note: Two types of governor springs 2 are available: one for full spe-
ed regulation at 1500 r.p.m. and the other for full speed regulation at 1800 r.p.m.; in this case governor weights are heavier.
Disassembly / Reassembly
Spring for extra fuel supply at starting
The device is operated automatically: when the engine is stopped
spring 1 acts on injection pump control yoke 2 providing maximum
fuel delivery, until the speed governor starts operating.
Mechanical speed governor setting
Lift nkage A.
Loosen screw B.
Push lever C to the right and check that speed governor weights are
closed.
Shift injection pump delivery control yoke D to the right (for maximum
delivery).
Tighten screw B.
KD Workshop Manual_cod. ED0053029350_1° ed_ rev. 00
Page 49

- 49 -
5
113
Components:
1) Rocker arm shaft 6) Oil pump 11) Oil pressure relief valves
2) Connecting rod big end bearìng 7) Drain plug 12) Pump intake pipe
3) Oil dipstick 8) Crankshaft main journal 13) Internal strainer
4) Camshaft 9) Crankshaft 14) Drain plug
5) Crankshaft journal 10) Cartridge lter
Danger – Attention
The engine can be damaged if allowed to operate with insufcient oil. It is also dangerous to add too much oil because
its combustion may lead to a sharp increase in the rotation speed.
Use suitable oil in order to protect the engine.
Nothing more than lubrication oil can inuence the performances and life of an engine.
Use of an inferior quality oil or failure to regularly change the oil will increase the risk of piston seizure, will cause the
piston rings to jam and will lead to rapid wear on the cylinder liner, the bearings and all other moving parts.
Engine life will also be notably reduced.
The oil viscosity must suit the ambient temperature in which the engine operates.
Danger – Attention
Old engine oil can cause skin cancer if repeatedly left in contact with the skin and for long periods of time.
If contact with the oil is unavoidable, you are advised to wash your hands with soap and water as soon as possible.
Dispose of old oil in the correct way as it is highly polluting.
LUBRICATION SYSTEM
KD Workshop Manual_cod. ED0053029350_1° ed_ rev. 00
Page 50

- 50 -
5
114
116
118
119
115
117
Oil pump
Check that gear teeth are intact and that clearance between gear
edge and pump body is 0,041 ÷ 0,053 mm with limit value 0,10 mm.
Furthermore check that control shaft is tree to rotate with end oat of
0,040 ÷ 0,090 mm with limit value of 0,170 mm.
Oil pump delivery at 3000 r.p.m. is 18 liters/min.
Lubrication system
Oil pressure check
Once the engine is tted ll with oil and fuel, connect a 10 bar pressure gauge to the oil lter tting.
Start the engine and check pressure as a function of the oil temperature (see page. 49).
Oil lter cartridge
Components: 1 Retainer 6 Upper cover
2 Plate 7 Blade
3 Valve 8 Filtering element
4 Gasket 9 Assembly
5 Gasket 10 Belleville washer
11 Tank
Characteristics:
Max. working pressure ....................................13 bar
Filtering area....................................................955 cm2
Type of ltration ...............................................20 µm
By-pass valve opening pressure .....................1,4 ÷ 1,8 bar.
Oil pressure relief valve
Components:
1 Plug 5 Rubber gasket
2 Copper gasket 6 Ring
3 Bushing 7 Hole for pressure switch connection
4 Piston 8 Spring
Note: Blow-by at an oil temperature of 40 ÷ 50°C and pressure of 3
bar should be less than 1 I/min.
When retting screw bushing 3 so that it touches gasket 5.
Do not tighten excessively since gasket 5 might break causing
an oil pressure drop in the system.
KD Workshop Manual_cod. ED0053029350_1° ed_ rev. 00
Page 51

- 51 -
5
120
121
Oil pressure curve at idling speed
The curve is obtained at the oil lter level with constant engine speed
of 1200 r.p.m. in no-Ioad conditions and at a room temperature of +
25°C.
Pressure is given in bar and temperature in centigrades.
Lubrication system
Oil pressure curve at full speed
The curve is obtained at the oil lter level with engine working al 3000
r.p.m. al the N power. Room temperature is +25°C.
Lube oil peak temperature should be below 120°C for engines without
oil cooler and below 110°C for engines with oil cooler. Pressure is given in bar and temperature in centigrades.
KD Workshop Manual_cod. ED0053029350_1° ed_ rev. 00
Page 52

- 52 -
6
122
123
124
125
Injection pump
The Bosch injection system consists of three pumps each feeding one
cylinder.
The pumps mounted on the crankcase, corresponding to their proper
cylinder, are directly operated by the camshaft.
Fuel feeding/injection circuit
Components:
1 Tank
2 Filter
3 Fuel feeding tube
4 Fuel feeding pump
5 Injection pump
6 Injection line
7 Injector
8 Injector leak off line and self bleeding system
9 Bowl
FUEL SYSTEM
Fuel feeding pump
The fuel feeding pump is of the diaphgragm type operated by a
camshaft eccentric through a drive rod.
It features an external lever for manual operation.
Components:
1 Drive rod : shelf 1,470 ÷ 2,070 mm
2 Gasket
3 Camshaft eccentric
Characteristics: when the control eccentric rotates at 1500 r.p.m. mini-
mum delivery is 64 l/h while self-regulation pressure
is 4 ÷ 5 m water column.
Fuel lter
Components: 1 Bleeder
2 Cap
3 Seal element
4 Union
5 Cartridge
Cartridge characteristics:
Filtering paper......................PF 904
Filtering area........................5000 cm2
Degree of ltraon ...............2 ÷ 3 µm
Max.,working pressure:...... 4 bar
See page 17 for periodical maintenance details.
KD Workshop Manual_cod. ED0053029350_1° ed_ rev. 00
Page 53

- 53 -
6
126
127
128
Fuel system
Injection pump only for standard and 97/68 Ce engines
1
Delivery union
2 Rubber ring
3 Delivery valve
4 Pump housing
5 Piston
6 Plunger
7 Rack rod
8 Spring
9 Tappet body
10 Roller
11 Journal
12 Pin
13 Spring retainer
14 Eccentric
15 Copper gasket
16 Spring
17 Filler
1 Delivery union
2 PRV valve
3 O-Ring
4 Pump housing
5 Pumping piston
6 Pumpung plunger
7 Elastic pin
8 Rack rod
9 Superior retainer
10 Spring tappet
11 Tappet body
12 Inferior retainer
13 Roller
14 Journal guide tappet
15 Elastic pin
16 Adjustment hose
17 Plunger stop pin
18 Cap
Injection pump only for EPA engines
19 Threaded plug
20 Adjustment rod locking device
21 Area in which the pump delivery class is stamped
In this engine the injection pumps are preset by the manufacturer who
supplies them stamped with alphabetical classes (A, Ax, B, Bx, C, Cx
or D) for standard and 97/68 EC engines, while for EPA2 engines the
classes are numerical (5, 6, 7, 8, 9, 10, 11, 12, 13 and 14).
The adjustment rod is locked via the bayonet device.
KD Workshop Manual_cod. ED0053029350_1° ed_ rev. 00
Page 54

- 54 -
6
129
130
131
132
C 1,000 ÷ 1,100
D 7,445 ÷ 7,455
E 7,500
F 3,000 ÷ 3,025
G 7,225 ÷ 7,275
Fuel system
How to check plunger and barrel for internal leakage
This operation is only diagnostic since pressure changes depend on
the pumping speed.
Connect the delivery union with a 600 bar pressure gauge with safety
valve.
Adjust rack rod at half-stroke.
Turn ywheeI according to its direction so that the plunger puts the
circuit under pressure.
Replace plunger if the displayed pressure is below 300 bar.
Repeat the same operation for the other plungers.
Plunger
How to check injection pump delivery valve sealing
Components:
1 Valve
2 Seat
Adjust pump rack at half-stroke.
Turn ywheeI according to its direction of rotation so that the plunger
puts the circuit under pressure.
During this operation the displayed pressure will gradually reach a
peak followed by a sudden drop which corresponds to valve closing.
Pressure drop should be 30 ÷ 50 bar.
Replace the valve if pressure drop is below this value.
Repeat the same operation for the other two pumps.
Ref. Dimensions (mm)
KD Workshop Manual_cod. ED0053029350_1° ed_ rev. 00
Page 55

- 55 -
0,45
- 2
- 2
max
27,5 ÷ 30,5
90 ÷ 100
500
1500
150
3 ÷ 4
4 ÷ 5
5 ÷ 6
6 ÷ 7
7 ÷ 8
8 ÷ 9
9 ÷ 10
6
133
0,45
0
0
max
38 ÷ 40
90 ÷ 100
500
1500
150
3 ÷ 4
4 ÷ 5
5 ÷ 6
6 ÷ 7
7 ÷ 8
8 ÷ 9
9 ÷ 10
Fuel system
Test data for injection pump delivery at the test bench for
standard and 97 / 68 CE engines
1 Rack rod lock to be removed after pump tting to the engine
2 Injection pump axis
Test data:
The above test data refer to pump with plunger dia. of 7,500 mm.
Test data for injection pump delivery at the test bench only for EPA engines
Test data:
The pump class is indicated by the full delivery value * at 1 mm
3
/ stroke from 5 to 14.
Plunger diameter size: 7,500 mm.
Note: All pumps are tested and set in order to obtain the same delivery at full speed.
After the tests carried out at idIe speed pumps are subdivided into classes marked with references in letters or numbers.
These reference marks are very clearly stamped on the upper pump body.
If replacing, make sure that the new pumps have the same references (letters or numbers) as the previous ones.
Camshaft
r.p.m.
Delivery
mm3/stroke
Rod stroke from
pump axis (mm)
+ towards max
- towards stop
Control rod
max. force
(N)
Camshaft
r.p.m.
Delivery
mm
3
/stroke
Rod stroke from
pump axis (mm)
+ towards max
- towards stop
Control rod
max. force
(N)
stamped A
stamped Ax
stamped B
stamped Bx
stamped C
stamped Cx
stamped D
stamped A
stamped Ax
stamped B
stamped Bx
stamped C
stamped Cx
stamped D
KD Workshop Manual_cod. ED0053029350_1° ed_ rev. 00
Page 56

- 56 -
6
127
129
130
128
Injection pump replacement
1 Rack rod lock
2 Reference mark pump class
A = 82.80 mm
C = Injection cam radius
D = Injection pump support
Important
Whe replacing this type of injection pump check that the new
one has a same reference mark as the old one.
The reference marks of injection pumps must be the same.
Replace as follows:
Fit pump into the crankcase and tighten screws at 25 Nm.
Remove lock 1 and check that rack rod is free to move.
If pump removal is required t lock 1 to its original position: the rack
rod centre should coincide with the pump axis (see g. 126).
When replacing the crankcase or the camshaft preserve the same distance A between D, injection pump support, and C, injection cam radius; add shims G on D to obtain the right A value if required.
Seals G are supplied with different thicknesses: 0,05 – 0,1 – 0,3 and
0,5 mm.
Fuel system
Size S injector
Components:
1 Intake tting
2 Nozzle holder
3 Shim
4 Spring
5 Pressure rod
6 Intermediate ange
7 Nozzle
8 Needle valve
9 Fixing ange
10 Taper pin
11 Gasket
12 System duct
13 Sump
14 Cup
KD Workshop Manual_cod. ED0053029350_1° ed_ rev. 00
Page 57

- 57 -
6
131
132
133
Size S nozzle
Features:
Hole number and diameter ........4x0,28 mm
Jet angles ..................................160°
Needle valve elevation ..............0,20 ÷ 0,22 mm
Hole length ................................0,7 mm
Sump diameter and length
........1x1,5 mm
Clean nozzle tip with a brass brush.
Check that holes are not obstructed using a mandrel with steel wìre
with 0,28 mm diam.
When retting tighten ring nut at 70 Nm.
Fuel system
Size P nozzle
Features:
Hole number and diameter ............. 5 x 0,23 mm.
Jet angles ....................................... 150°.
Needle valve elevation ................... 0,200 ÷ 0,205 mm
Hole length ..................................... 1 mm
Sump diameter and length ............. 2 x 2,5 mm
Clean nozzle tip with a brass brush.
Check that holes are not obstructed using a mandrel with steel wìre
with 0,23 mm diam.
When retting tighten ring nut at 55 ÷ 65 Nm.
Size P injector
Components:
1
Injector housing
2 Intake tting
3 Shim
4 Spring
5 Pressure rod
6 Taper pin
7 Nozzle
8 Cup
9 Needle valve
10 Sump
11 System duct
12 Overow pipe
When retting tighten ring 8 nut at 50 Nm.
KD Workshop Manual_cod. ED0053029350_1° ed_ rev. 00
Page 58

- 58 -
6
134
135
136
137
Injector setting
Connect injector to high pression pump and check that setting pressure is 210 ÷ 220 bar for size S injector and 245 ÷ 255 bar for size P
injector.
To change injector setting replace the shim over the spring.
When replacing the spring, setting should be performed at a 10 bar
greater pressure to allow for bedding during operation.
Check needIe valve sealing by slowly moving hand pump until approximately 180 bar.
Replace nozzle in case of dripping (only for size S injectors).
Fuel system
Use a 19 mm box wrench to lock the injection pump union and a 17
mm box wrench to loosen the union of the injector pump high-pressure pipe.
Use a 14 mm box wrench to lock the injector union and a 17 mm box
wrench to loosen the union of the injector pump high-pressure pipe.
(Static) Injection timing
Remove the rocker arm cover.
KD Workshop Manual_cod. ED0053029350_1° ed_ rev. 00
Page 59

- 59 -
6
138
139
140
141
Assemble tool serial no. 1460 - 266 made up of lever 2 serial no.
1460 - 275, of a dial indicator 1 serial no. 1460 - 274 inserted in a dial
indicator holder serial no. 1460 - 270.
The function of lever 2 is to reduce the effort required against the resistance of the spring when the valve lowers and comes into contact
with the piston crown near the top dead centre.
The dial indicator tracer 1 rests against the upper spring bearing ring
of the valve.
To sum up, as pressure is placed on lever 2 the valve goes into contact with the piston since the dial indicator 1 is applied to the valve,
allowing to know precisely every movement of the piston from and towards the TDC, which is very important for the following operation.
Fuel system
Insert the capillary tester serial no. 1460 - 024 onto the injection pump
union where the high-pressure pipe is usually connected from the
pump to the injector.
To the injection pump connect the high-pressure pump serial no. 1460
- 273 supplied by a tank whose fuel level is at least 100 mm above
the injection pump.
Unscrew the fuel supply union for the injection pump of the cylinder
which is to be worked on.
KD Workshop Manual_cod. ED0053029350_1° ed_ rev. 00
Page 60

- 60 -
6
142
143
144
145
Components:
1 Fuel supply pipe from the tank
2 High-pressure pipe
3 Capillary tester
4 Valve-lowering lever with dial indicator showing piston movement
Fuel system
Rotate the crankshaft anticlockwise until diesel starts to ow out from
the capillary when the high-pressure lever is pressed.
Change direction of rotation of the crankshaft to clockwise from the
timing belt side.
Press the high-pressure lever and rotate the crankshaft until fuel
stops owing from the capillary.
Press the lever to bring the valve into contact with the piston crown.
By joggling back and forth clockwise and anticlockwise, nd the dead
centre via the dial indicator and then reset to zero.
Rotate the crankshaft clockwise on the timing belt side and position
the relevant cylinder piston at top dead centre.
KD Workshop Manual_cod. ED0053029350_1° ed_ rev. 00
Page 61

- 61 -
6
146
147
97-68 CE
2400 9° ± 1°
8° --> 0.56
9° --> 0.71
10° --> 0.87
2500 ÷ 2800 8° ± 1°
7° --> 0.43
8° --> 0.56
9° --> 0.71
3000 9° ± 1°
8° --> 0.56
9° --> 0.71
10° --> 0.87
EPA 2400 ÷ 2800 5° ± 1°
4° --> 0.14
5° --> 0.22
6° --> 0.32
1500 ÷ 2200 14° ± 1°
13° --> 1.47
14° --> 1.71
15° --> 1.96
2201 ÷ 3000 16° ± 1°
15° --> 1.47
16° --> 1.71
17° --> 1.96
α
(mm)
0° 0.00
1° 0.01
2° 0.04
3° 0.08
4° 0.14
5° 0.22
6° 0.32
7° 0.43
8° 0.56
9° 0.71
10° 0.87
11° 1.06
12° 1.26
13° 1.47
14° 1.71
15° 1.96
16° 2.22
17° 2.51
18° 2.81
19° 3.12
20° 3.45
The capillary tube shows when the fuel is owing out, thanks to its
small transparent slot.
Table static advance values for engines with P size injectors
Fuel system
Table static advance values for engines with S size injectors
Conversion table from degrees
into millimetres
After nding the delivery start point (when fuel stops owing from the
capillary), press the lever and use the dial indicator to check how
many millimetres the piston has moved from the top dead centre.
Check static injection advance using the conversion table from millimetres to degrees.
If it is necessary to change static advance add the seals G in gure
129 (to delay) or remove the seals G in gure 129 (to advance) from
between the injection pump surface and the crankcase surface.
The same operation must be performed for each cylinder.
R.p.m.
α
Piston lowering (mm)
R.p.m.
α
Piston lowering (mm)
KD Workshop Manual_cod. ED0053029350_1° ed_ rev. 00
Page 62

- 62 -
7
148
150
149
A 111,701 ÷ 111,788
B 31,000 ÷ 33,500
C 76,226 ÷ 76,300
D 77,400 ÷ 77,474
Standard electric equipment
Electric starting layout without battery charging light
Components:
1 Alternator
2 Starting motor
3 Voltage regulator
4 Battery
5 Pressure switch
6 Oil pressure warning light
7 Key switch
12,5 V, 14 A Alternator
Features a xed armature winding, housed in the bell inside the blower stator. The rotating permanent magnet inductor is located in the
fan spindle. See page 24.
Note:
Clearance between armature winding and inductor (air gap)
should be 0,55 ÷ 0,63 mm.
ELECTRIC SYSTEM
Electrical starting layout with battery charging Iight
Components:
1 Alternator
2 Starting motor
3 Voltage regulator
4 Battery
5 Pressure switch
6 Oil pressure warning light
7 Key switch
8 Battery charging light
Ref. Dimensions (mm)
KD Workshop Manual_cod. ED0053029350_1° ed_ rev. 00
Page 63

- 63 -
7
151
153
152
A 111,701 ÷ 111,788
B 49,500 ÷ 52,000
C 76,226 ÷ 76,300
D 77,400 ÷ 77,474
Alternator battery charger curve (12.5 V, 14A)
The curve was obtained at room temperature of + 25°C with 12.5V
battery voltage.
Note: The r.p.m. shown in the table refers to the engine.
Electric system
Alternator battery charger curve (12 V, 21 A)
The curve was obtained at room temperature of + 25°C with 12.5V
battery voltage.
Note: The r.p.m. shown in the table refers to the engine.
12 V, 21 A Alternator
Features a xed armature winding housed in the bell inside the blower stator.The rotating permanent magnet inductor is located in the
fan spindle. See page 24.
Note: Clearance between armature winding and inductor (air gap)
should be 0,47 ÷ 0,63 mm.
Ref. Dimensions (mm)
KD Workshop Manual_cod. ED0053029350_1° ed_ rev. 00
Page 64

- 64 -
~
R
+
LE
O O
6.25
9.50
9.50
4.75
6.25
0.8
1.12
1.12
0.5
0.8
7
154
155
156
157
Magnetization checking tool (Part No. 7000-9727-001)
Components:
1 Casing
2 Slider
3 Casing reference line
4 Slider reference line
Rest the tool end horizontally onto the magnetic poles.
Hold sder so that its reference line coincides with the casing reference line.
Release slider: if no attraction occurs the rotor is demagnetized; therefore replace alternator.
Electric system
Connection size (mm)
Width Thickness
Ref.
To avoid wrong connections 3 different sizes are supplied.
Voltage regulator
Supplied by SAPRISA : Voltage 12 V, max. current 26A.
Checking for cable continuity
Check that stator windings have no unsoldered connections, burnt
areas or grounded wires.
Using an ohmmeter check for continuity between the red cable and
the two yellow ones.
Furthermore, check that they are insulated from the ground.
KD Workshop Manual_cod. ED0053029350_1° ed_ rev. 00
Page 65

- 65 -
7
158
Electric system
How to check voltage regulator for proper operation
Check that connections correspond to the layout.
Disconnect the terminal from the battery positive poie.
Connect a d.c. voltmeter between the two battery poles.
Fit an ammeter between the positive pole and the corresponding cable 1 terminal.
The ammeter should be suitabie for reading the required value (14 or
21 A) and for withstanding the starting motor peak absorption (400 ÷
450 A).
Start a couple of times until battery voltage drops below 13 V.
When battery voltage reaches 14,5 V the ammeter current suddeniy
drops down to almost zero.
Replace regulator if recharge current is zero with voltage below 14 V.
Important
When the engine is running do not disconnect battery cables or
remove the key from the control panel.
Keep regulator away from heat sources since temperatures above 75°C mmght damage it.
No electric welding on engíne or application.
KD Workshop Manual_cod. ED0053029350_1° ed_ rev. 00
Page 66

- 66 -
7
159
160
161
Alternator type Bosch G1 14 V, 33 A
The alternator is ot the claw-pole rotor type with built-in voltage reguiator.
The rotating motion is conveyed by the engine through a 'V' belt and
sheave.
Features: 12V rated voltage. Max. current 33A at 7000 alternator
r.p.m. RH direction of rotation.
Electric system
14 V, 33 A Bosch G1 alternator battery charger curve
The curve was obtained at room temperature of +25°C.
Battery terminal voltage is 12.5 V.
The r.p.m. shown on the table refers to the engine.
Alternator type Bosch Gil 14 V, 33 A layout
Components:
1 Alternator
2 Starting motor
3 Battery
4 Key switch
5 Pressure switch
6 Oil pressure warning light
7 Battery charging light
KD Workshop Manual_cod. ED0053029350_1° ed_ rev. 00
Page 67

- 67 -
7
162
163
164
Starting motor type Bosch JF (R) 12 V, class 2.5
RH direction of rotation
A = 23 ÷ 24 mm
B = Ring gear plane
C = Flange plane
Vorsicht - Warnung
The ywheel should not project from ring gear plane B.
Note: Apply to Bosch Service Centers for any type of repair.
Electric system
Starting motor layout
A = Parking lights
B = Stop
C = Run
D = Start
Characteristic curves for starting motor type Bosch JF (R) 12 V
Curves were obtained at room temperature of + 20°C with 88 Ah batteries.
V = Motor terminal voltage in Volt
P = Power in kW
C = Torque in N/m
N = Motor speed in r.p.m.
J (A) = Absorbed current in Ampere
KD Workshop Manual_cod. ED0053029350_1° ed_ rev. 00
Page 68

- 68 -
8
165
166
167
168
SETTINGS
Settings
1 - ldling speed setting in no-load conditions (standard)
After lling with oil and fuel, start the engine and let it warm up for 10
minutes. Adjust idling speed at 800 ÷ 900 r.p.m. by turning setscrew
1; then tighten lock nut.
Stop setting
Remove fuel feeding pump and cover.
1) Loosen both bolts xing plate A.
2) Push injection pump B control rod to the right and keep it in this
position.
3) Push plate A to the right until it touches rod B and stop.
4) Release rod B and push plate A to the right so that rod B has a
stroke of 1 mm.
Tighten both bolts.
Note: Under these conditions no damage can be caused to the injec-
tion pump rack rod stops by sudden impacts due to the available control solenoids.
Injection pump delivery setting
This setting should be performed at the torque dynamometer.
lf not, setting is only approximate.
The following steps are required:
Loosen delivery limiting device C by 5 turns.
Bring engine to full speed in no-load conditions i.e. 3200 r.p.m..
Tighten limiting device until the engine shows a drop in r.p.m.. Unscrew limiting device C by 1½ turn. Tighten lock nut.
Note: lf the engine, under full load, generates too much smoke tighten
C; if no smoke is observed at the exhaust and the engine can-
not reach its full power unscrew C.
2 - Full speed setting in no-load conditions (standard)
After setting idle speed turn screw 2 and set full speed in no-load conditions at 3200 r.p.m.; then tighten lock nut.
Note: When the engine reaches the pre-set power full speed stabili-
zes at 3000 r.p.m.
KD Workshop Manual_cod. ED0053029350_1° ed_ rev. 00
Page 69

- 69 -
........................................................................................................................................................
........................................................................................................................................................
........................................................................................................................................................
........................................................................................................................................................
........................................................................................................................................................
........................................................................................................................................................
........................................................................................................................................................
........................................................................................................................................................
........................................................................................................................................................
........................................................................................................................................................
........................................................................................................................................................
........................................................................................................................................................
........................................................................................................................................................
........................................................................................................................................................
........................................................................................................................................................
........................................................................................................................................................
........................................................................................................................................................
........................................................................................................................................................
........................................................................................................................................................
........................................................................................................................................................
........................................................................................................................................................
........................................................................................................................................................
........................................................................................................................................................
........................................................................................................................................................
........................................................................................................................................................
........................................................................................................................................................
........................................................................................................................................................
........................................................................................................................................................
NOTES
KD Workshop Manual_cod. ED0053029350_1° ed_ rev. 00
Page 70

- 70 -
........................................................................................................................................................
........................................................................................................................................................
........................................................................................................................................................
........................................................................................................................................................
........................................................................................................................................................
........................................................................................................................................................
........................................................................................................................................................
........................................................................................................................................................
........................................................................................................................................................
........................................................................................................................................................
........................................................................................................................................................
........................................................................................................................................................
........................................................................................................................................................
........................................................................................................................................................
........................................................................................................................................................
........................................................................................................................................................
........................................................................................................................................................
........................................................................................................................................................
........................................................................................................................................................
........................................................................................................................................................
........................................................................................................................................................
........................................................................................................................................................
........................................................................................................................................................
........................................................................................................................................................
........................................................................................................................................................
........................................................................................................................................................
........................................................................................................................................................
........................................................................................................................................................
NOTES
KD Workshop Manual_cod. ED0053029350_1° ed_ rev. 00
Page 71

- 71 -
APPENDIX FOR ENGINE WITH ADVANCE VARIATOR
KD 625/3 - 626/3 ENGINE
with advance variator
KD Workshop Manual_cod. ED0053029350_1° ed_ rev. 00
Page 72

- 72 -
I
ADVANCE VARIATOR OPERATING PRINCIPLE
INJECTION TIMING DEVICE OPERATION
In order to meet EPA tier 2 limits, the engine KD 625-3 has been equipped with a variable injection timing device.
The system consists of an electro–hydraulic actuated mechanical device, that allows changing the injection timing by rotating
the camshaft against its driving gear.
The change takes place using the oil whose pressure is regulated by a pair of electric valves, which allow a rotation between 0
and 4.5°. The maximum variation of the injection timing is 4.5° (camshaft degrees).
Oil is taken from the engine oil circuit and its pressure acts on a sort of hydraulic piston that moves from one side to the other.
The hydraulic plunger is attached on the inside by means of a straight groove and on the outside via a spiral-shaped groove.
Thus movement from left to right (or vice versa) causes rotation from the driving gear and the camshaft.
In other words, the plunger translates and, at the same time, rotates and thus varying the angular position of camshaft that is
connected to it.
The gear timing variation is managed by an ECU which receives electric signals from two speed sensors, the temperature sensor and the load sensor, which reads the position of the injection pump control.
The ECU memory contains the maps of the injection timing variation strategies.
Fig. A_1. Injection timing device: in "Resting position"
KD Workshop Manual_cod. ED0053029350_1° ed_ rev. 00
Page 73

- 73 -
I
Fig. A_2. Injection timing device: during actuation of an advance (max value 4.5°).
The oil (yellow) goes into the system and moves the plunger (blue) that activates the camshaft anticlockwise.
Fig. A_3. Injection timing device: moving from actuation of an advance to resting position.
The oil (yellow) goes out and releases the spring to move the plunger (blue), which in turn activates the camshaft
clockwise.
Our system is able to actuate any intermediate advance, regulating the oil pressure. When the set level is reached, the oil exerts
the right force to compress the spring at the right height to move the plunger appropriately, thus achieving the required rotation
(angular advance).
Advance variator operating principle
KD Workshop Manual_cod. ED0053029350_1° ed_ rev. 00
Page 74

- 74 -
II
Solenoid valve assembly diagram
DISASSEMBLY/REASSEMBLY
COMPONENTS TABLE
1 Cylindrical 1/4" gas union
2 Union bolt M 12x1.5
3 Connection screw M 14x1.5
4 Nut M 5
5 Copper seal 13.5x19x2
6 Seal
7 Seal 14x19x1.5
8 Adjustable union d. 12
9 Screw TCEI M 5x65
10 Pressure switch
11 Spacer
12 Bolt for two adjustable unions M 12x1.5
13 OilSistem solenoid valve block
14 Variator lubrication jet
15 Pressure switch union
16 Solenoid valve block support
17 Solenoid valve block oil lter pipe
18 Variator oil loading pipe
19 Variator oil bypass pipe
20 Variator oil draining pipe
21 "OTECO clic 66" clamp
KD Workshop Manual_cod. ED0053029350_1° ed_ rev. 00
Page 75

- 75 -
II
A_5
A_6
A_7
A_4
Disassembly / Reassembly
After loosening the screws, remove the alternator belt guard.
Components:
1 Variator oil loading pipe
2 Variator oil bypass pipe
3 Variator oil draining pipe
4 Solenoid valve block oil lter pipe
Components:
1 Pressure switch
2 Pressure switch union
3 Solenoid valve block oil lter pipe
Overall view of variator speed sensor and hydraulic circuit.
KD Workshop Manual_cod. ED0053029350_1° ed_ rev. 00
Page 76

- 76 -
II
A_8
A_9
A_10
A_11
Components:
1 Variator load solenoid valve
2 Variator unload solenoid valve
Important
Do not invert cables during reassembly.
Disassembly / Reassembly
On the opposite end of the block of pipe 19 is the variator lubrication
jet attached to the pipe by a click clamp.
Refer to page 78 to identify the pipes.
Loosen the union screw of pipes 17 and 19.
To remove connectors, press the stop tabs and draw upwards.
KD Workshop Manual_cod. ED0053029350_1° ed_ rev. 00
Page 77

- 77 -
II
A_12
A_13
A_14
A_15
Variator lubrication jet complete with banjo union.
Disassembly / Reassembly
View of the unassembled solenoid valve block with two spacers
between the block and the bracket.
To remove the solenoid valve block from the support bracket, unscrew
the two screws M 5.
Unscrew the union of variator oil discharge pipe 20.
KD Workshop Manual_cod. ED0053029350_1° ed_ rev. 00
Page 78

- 78 -
II
Speed sensor and variator assembly diagram
COMPONENTS TABLE
1 Oil seal ring 20x30x7
2 Washer 6x12xSp1
3 Screw TCEI M 5x10
4 Screw TCEI UNI 5931 M 6x10
5 Screw TCEI UNI 5931 M 6x14
6 Lid seal (rev. counter)
7 Oil seal support ring
8 Variator oil bush
9 Special tab for variator
10 Advance variator device
11 Timing cover side cover for variator
12 Speed and phase sensors
13 Cylindrical pin 5x16
14 Speed sensor support
Disassembly / Reassembly
KD Workshop Manual_cod. ED0053029350_1° ed_ rev. 00
Page 79

- 79 -
II
A_16
A_17
A_18
A_19
To remove the speed sensor cable connector press the spring as
shown in gures A_16 and A_17 and draw upwards.
Disassembly / Reassembly
Loosen screw M6 to remove the speed sensor from its support.
Loosen the two screws M8 to disassemble the solenoid valve support
bracket.
KD Workshop Manual_cod. ED0053029350_1° ed_ rev. 00
Page 80

- 80 -
II
A_20
A_21
A_22
A_23
Draw he speed sensor outwards, being careful not to damage the
rubber seal ring.
Disassembly / Reassembly
Blower belt alternator - Disassembly
See page 22 - 23.
View of speed sensor housing.
KD Workshop Manual_cod. ED0053029350_1° ed_ rev. 00
Page 81

- 81 -
II
A_24
A_26
A_27
A_25
Blower control pulley - Disassembly
See page 24 - 25.
Disassembly / Reassembly
Pay attention to the oil seal support ring when disassembling the timing cover.
After loosening the screws, remove the timing cover.
Components:
1 Left-handed bolt
2 Washer
3 Blower control pulley
KD Workshop Manual_cod. ED0053029350_1° ed_ rev. 00
Page 82

- 82 -
II
A_28
A_29
A_30
A_31
A
B
Remove the timing cover seal.
Disassembly / Reassembly
Remove the variator.
The gure shows the camshaft pin for correct variator timing.
A Cylindrical pin Ø 5x16
B Pin housing
Remove screw M10.
Unscrew screws M10 on the variator to the camshaft.
KD Workshop Manual_cod. ED0053029350_1° ed_ rev. 00
Page 83

- 83 -
II
A_32
A_33
View of the camshaft ends with pin inserted.
Disassembly / Reassembly
Remove the shoulder housing of the idle gear that drives the speed
governor.
KD Workshop Manual_cod. ED0053029350_1° ed_ rev. 00
Page 84

- 84 -
II
A_34
A_35
A_36
A_37
After retting the housing tighten the screws to 20 Nm using a tor-
que wrench.
Disassembly / Reassembly
Assemble the timing control gear onto the crankshaft so that reference mark A is lined up with the two reference marks B on the idle gear
installed on the camshaft.
Assemble the variator onto the end of the camshaft taking care to
properly insert the timing pin into place and ensuring that the variator
comes into contact with the surface of the speed governor idle gear.
Tighten screw M10 to 65 Nm using a torque wrench.
Remove the distribution control gear from the crankshaft.
KD Workshop Manual_cod. ED0053029350_1° ed_ rev. 00
Page 85

- 85 -
II
A_38
A_39
A_40
A_41
Replace the timing cover, placing a new seal and lining up with the
two centring pins.
Disassembly / Reassembly
Replace the speed sensor taking care not to damage the O-ring.
Ret the oil feed bushing to the variator, placing the oil seal support
ring in between.
Replace the seal.
Tighten the three screws M6 to an 8 Nm torque.
Tighten the screws to a 25 Nm torque.
KD Workshop Manual_cod. ED0053029350_1° ed_ rev. 00
Page 86

- 86 -
II
A_42
A_43
A_44
A_45
Attach the sensor using screw M6 to a torque of 8 Nm.
Disassembly / Reassembly
Replace the variator circuit oil pipes. If in doubt consult the diagram
on page 78.
Replace and check the belt tension (see page 22-23).
Reassemble the blower control pulley onto the crankshaft.
Tighten the left-handed fastening bolts to torque of 300 Nm.
Components:
1 Left-handed bolt
2 Washer
3 Blower control pulley
KD Workshop Manual_cod. ED0053029350_1° ed_ rev. 00
Page 87

- 87 -
II
A_46
A_47
Insert the solenoid valve connectors following the references (IN and
OUT) shown on the cables and on the solenoid valve block.
Disassembly / Reassembly
Replace the built guard and tighten to 15 Nm.
KD Workshop Manual_cod. ED0053029350_1° ed_ rev. 00
Page 88

- 88 -
II
Angular position sensor and AC pump assembly diagram
Disassembly / Reassembly
KD Workshop Manual_cod. ED0053029350_1° ed_ rev. 00
Page 89

- 89 -
II
COMPONENTS TABLE
1 Stud bolt M8x20
2 Silicone O-ring
3 Snap pin 2x10
4 Conical screw STEI M 10x1.5
5 Self-locking anged hex nut
6 Copper washer
7 Crinkled spring washer
8 Screw TCEI UNI 5931 M 4x35
9 Screw STEI M 8x20
10 Fuel supply pump
11 Screw TCEI M 8x18
12 Fuel supply pump seal
13 Sensor pump connection rod
14 AC pump and angular position sensor cover
15 Sensor control lever
16 Connecting pin between rod and sensor
17 Discharge stop plate
18 Angular position sensor
19 Flathead screw
Disassembly / Reassembly
KD Workshop Manual_cod. ED0053029350_1° ed_ rev. 00
Page 90

- 90 -
II
COMPONENTS TABLE
1 Silicone O-ring
2 Washer 6x12xSp1
3 Screw TCEI UNI 5931 M 6x10
4 Screw TCEI UNI 5931 M 6x25
5 Speed and phase sensors
6 Phase sensor air gap adjustment shim
7 Phase sensor support
Phase sensor assembly diagram
Adjust with 0.2 mm shims
Disassembly / Reassembly
KD Workshop Manual_cod. ED0053029350_1° ed_ rev. 00
Page 91

- 91 -
II
A_48
A_49
A_50
A_51
To assemble the phase sensor connector press the locking spring.
Disassembly / Reassembly
Remove the sensor from the support taking care not to damage the
O-ring.
Loosen screw M6. When retting, tighten to 8 Nm.
Remove the connector from the sensor.
KD Workshop Manual_cod. ED0053029350_1° ed_ rev. 00
Page 92

- 92 -
II
A_52
A_53
A_54
A_55
30.24 ÷ 30.26 mm
Components:
1 Dial indicator
2 Support for dial indicator
3 Sensor control gauge measurement: 30,24 ÷ 30,26 mm
4 Control master measurement: 30,24 ÷ 30,26 mm for sensor
gauge
If replacing the phase sensor, check the length of the sensor pin
using the tool in gure A_52.
Check by measuring the distance between magnetic end and the
sensor support surface (30,24 ÷ 30,26 mm).
The serial numbers of special tools are on page 103.
Disassembly / Reassembly
Sensor test
Remove the master 4 from the gauge 3; insert the phase sensor and
check that the sensor falls within tolerance measurements of 30,015 ÷
30,035 mm.
See g. A_53 -A_ 54.
Resetting the dial indicator
Assemble the dial indicator 1 onto support 2.
Attach the support with the dial indicator to the gauge 3.
Insert the master 4 into the gauge 3 and reset the dial indicator.
KD Workshop Manual_cod. ED0053029350_1° ed_ rev. 00
Page 93

- 93 -
II
1
4
2
3
5
30.24 ÷ 30.26 mm
6
A_56
A_57
A_58
A_59
Resetting the dial indicator
Components:
1 Dial indicator
2 Support for dial indicator
3 Camshaft sensor support surface control gauge
measurement: 30,24 ÷ 30,26 mm
4 Resetting master measure: 30,24 ÷ 30,26 mm for gauge
5 Resetting reference base
If replacing the sensor, camshaft or engine block via the tool see gure 56.
Make sure that the support surface of the sensor on the camshaft
support measures 30,24 ÷ 30,26 mm. Assemble the dial indicator 1
in the support 2. Insert the support 2 complete with dial indicator 1
into the gauge 3. Set the master 4 and reset the dial indicator while
resting on the base 5 as in 6.
Disassembly / Reassembly
Example of where to insert the air gap adjustment shims.
Air gap adjustment
The air gap is adjusted using shims measuring 0,2 mm in thickness
which are placed between the sensor surface and its support.
The air gap must be between 0,3 and 0,5 mm (see phase sensor assembly diagram page 94).
When adjusting the air gap with shims, it is important to consider any
difference between the measurements taken (length of the sensor pin
and depth between the sensor support surface and the camshaft) and
specications.
Measuring the depth between the sensor support and the
camshaft
Insert the gauge complete with dial indicator onto the sensor support
and attach using the three screws.
Make sure the measurements taken are within the specic tolerance
limits 30.24 ÷ 30.26 mm.
The three screws for the phase sensor support screws must be
tightened to 8 Nm using a torque wrench.
KD Workshop Manual_cod. ED0053029350_1° ed_ rev. 00
Page 94

- 94 -
II
A_60
A_61
A_62
A_63
Remove the connector from the position sensor on the injection pump
control rod.
Disassembly / Reassembly
When reassembling, replace the sealing gasket.
Unscrew the two screws to disassemble the fuel pump;
when retting, tighten the athead screws, the nuts and hexagonal-
head screws to 25 Nm.
KD Workshop Manual_cod. ED0053029350_1° ed_ rev. 00
Page 95

- 95 -
II
A_64
A_65
A_66
A_67
Remove the conical inspection plug.
Disassembly / Reassembly
Unscrew the last screw (athead) after rotating the sensor anticlockwise.
Remove the three anged nuts and the athead screw.
Unscrew the two screws to disassemble the injection pump rod position sensor.
KD Workshop Manual_cod. ED0053029350_1° ed_ rev. 00
Page 96

- 96 -
II
A_68
A_69
A_70
A_71
Remove the cover supporting the sensor and the fuel pump.
Disassembly / Reassembly
Tighten only one screw on the position sensor to keep it in the right
position.
Insert the fork into the slot in the support.
Rotate the sensor body 180°, keeping the fork in the position shown
in gure A _70.
Rotate the position sensor shaft to direct the fork on the side opposite
the connector.
KD Workshop Manual_cod. ED0053029350_1° ed_ rev. 00
Page 97

- 97 -
II
A_72
A_73
A_74
A_75
Set the cover against the crankcase so that the injection pump rod
drive pin 1 is inserted between the two prongs of the fork 2.
Disassembly / Reassembly
Replace the screws and nuts in the cover in the opposite order to
when they were removed and
tighten to 25 Nm.
Operate the stop control lever repeatedly to make sure the system is
running smoothly.
Look through the upper inspection hole on the cover to make sure
that the pin 1 is correctly inserted into the fork 2.
KD Workshop Manual_cod. ED0053029350_1° ed_ rev. 00
Page 98

- 98 -
II
A_76
A_77
A_78
Ret the fuel pump after replacing the seal; tighten the screws to 25
Nm.
Disassembly / Reassembly
Example of adhesive plate on the control panel
1 Engine type
2 Control panel serial number
3 Version number (form K)
4 SN plus engine serial number plus date
Correct assembly position of the control unit that runs the engine variator.
s/n
MADE IN ITALY
rpm
XX XX XXXX
XX XX XXXX
XXXX
XXXXXX
e9 • 97/68/CE • 00/000xx • xxxx •xx
Xx
0.00
xxx xxx xx
Model
Spec.
1
3
4
2
XXXX XXX-X
XXXXXX
XXXX.XXX/X
XXXXXXX
XX/XXXX
KD Workshop Manual_cod. ED0053029350_1° ed_ rev. 00
Page 99

- 99 -
........................................................................................................................................................
........................................................................................................................................................
........................................................................................................................................................
........................................................................................................................................................
........................................................................................................................................................
........................................................................................................................................................
........................................................................................................................................................
........................................................................................................................................................
........................................................................................................................................................
........................................................................................................................................................
........................................................................................................................................................
........................................................................................................................................................
........................................................................................................................................................
........................................................................................................................................................
........................................................................................................................................................
........................................................................................................................................................
........................................................................................................................................................
........................................................................................................................................................
........................................................................................................................................................
........................................................................................................................................................
........................................................................................................................................................
........................................................................................................................................................
........................................................................................................................................................
........................................................................................................................................................
........................................................................................................................................................
........................................................................................................................................................
........................................................................................................................................................
........................................................................................................................................................
NOTES
KD Workshop Manual_cod. ED0053029350_1° ed_ rev. 00
Page 100

- 100 -
13
169
170
171
STORAGE
When the engines are not used for more than 3 months, they must be protected by the measures described
below:
STORAGE
External engine protection:
- Start the engine and heat it.
- Remove the drain plug and let the oil ow completely.
- Replace the oil lter with a new one (screw manually the new lter).
- Clean the oil drain plug and after having assembled a new gasket,
tighten it.
- Carry out the oil relling to the upper level of the rod, using AGIP
RUSTIA C (for Countries in which this product is not available nd an
equivalent product on the market).
- Start for about 10 minutes and verify any possible oil leakage, then
stop the engine.
External engine protection:
- Clean carefully cylinder cooling system ns and the blowing fan.
- Loosen the drive belt of the blowing fan.
- Protect the external non-painted surfaces with AGIP RUSTIA 100/F.
- Seal with adhesive tape the intake and exhaust systems
- Coat the engine with a nylon or plastic sheet.
- Keep in a dry place. If possible not in direct contact with the ground
and away from high voltage electric lines.
Injection systems protection:
- Empty the fuel tank.
- Replace the fuel lter with a new one.
- Carry out the lling of fuel using 10% of AGIP RUSTIA NT special
additives.
- After having performed the air bleeding, start the engine, verify any
possible fuel leakage, then stop the engine.
KD Workshop Manual_cod. ED0053029350_1° ed_ rev. 00
 Loading...