

Page 1
Installation Guide
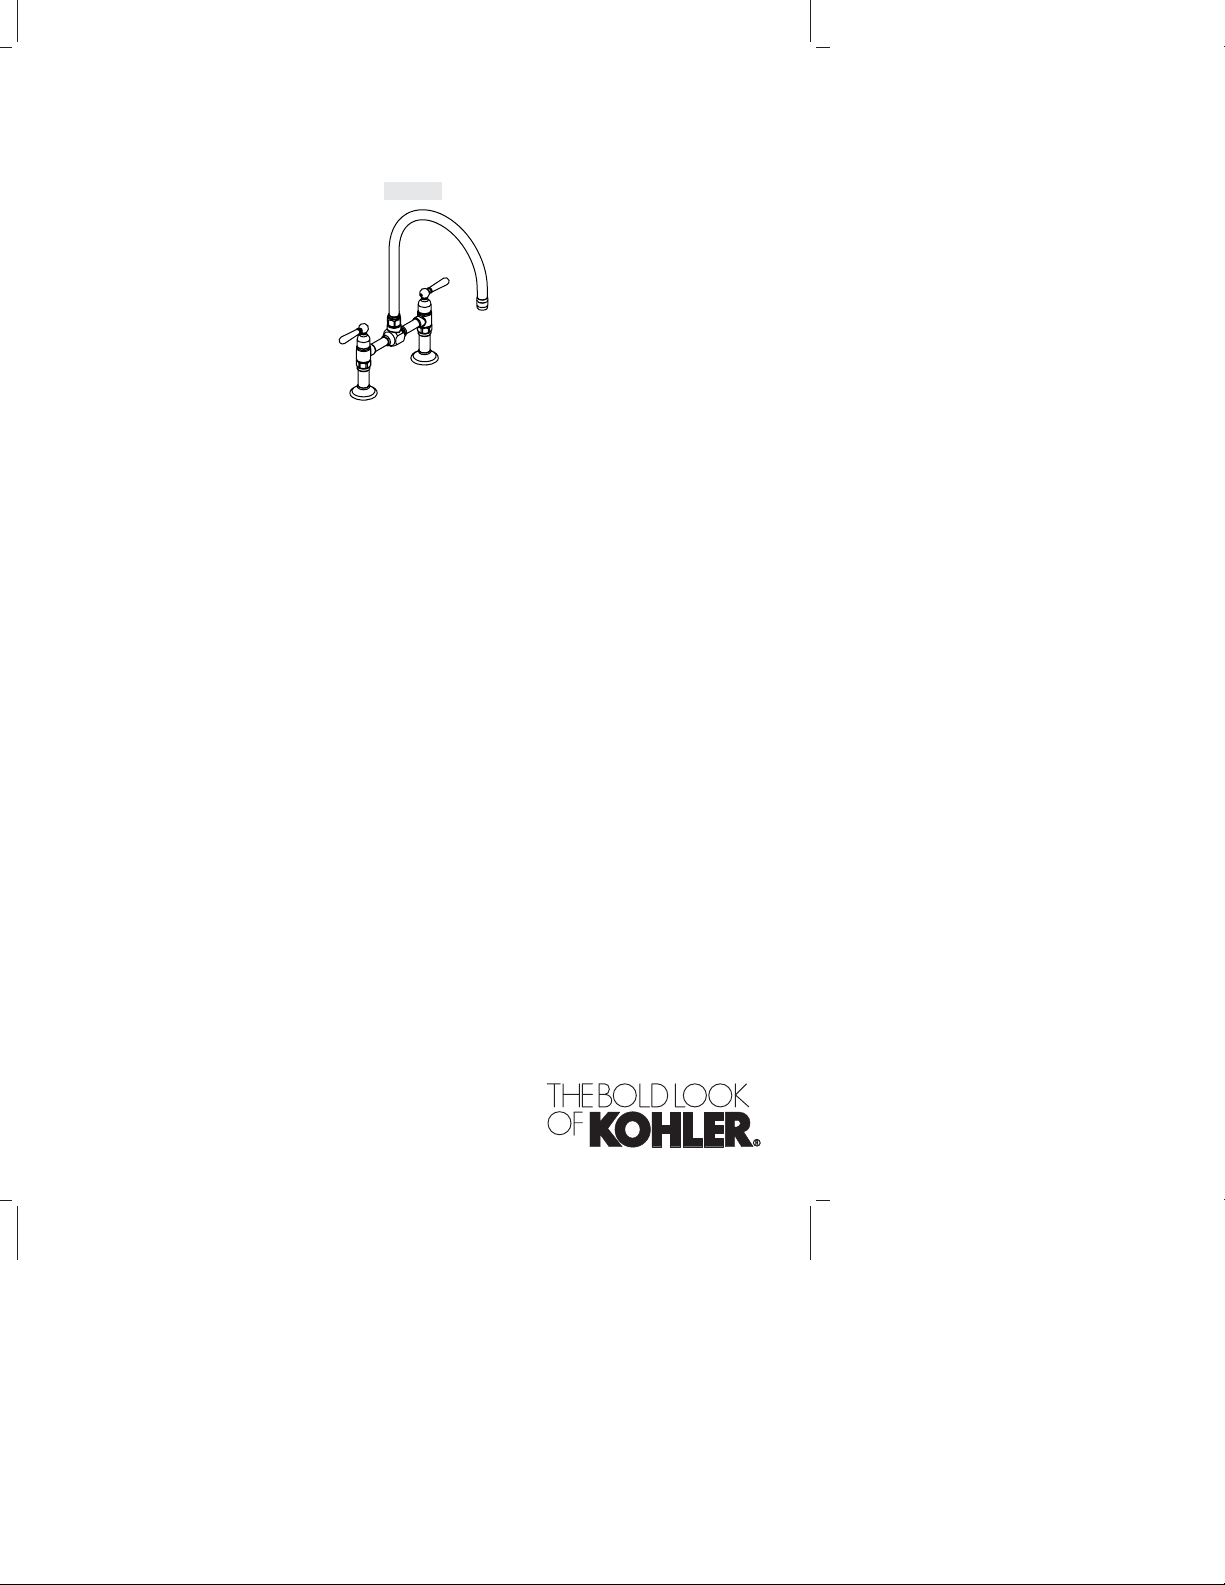
Kitchen Sink Faucet
K-7337
M product numbers are for Mexico (i.e. K-12345M)
Los números de productos seguidos de
M corresponden a México (Ej.
K-12345M)
Français, page “Français-1”
Español, página “Español-1”
1069104-2-B
Page 2
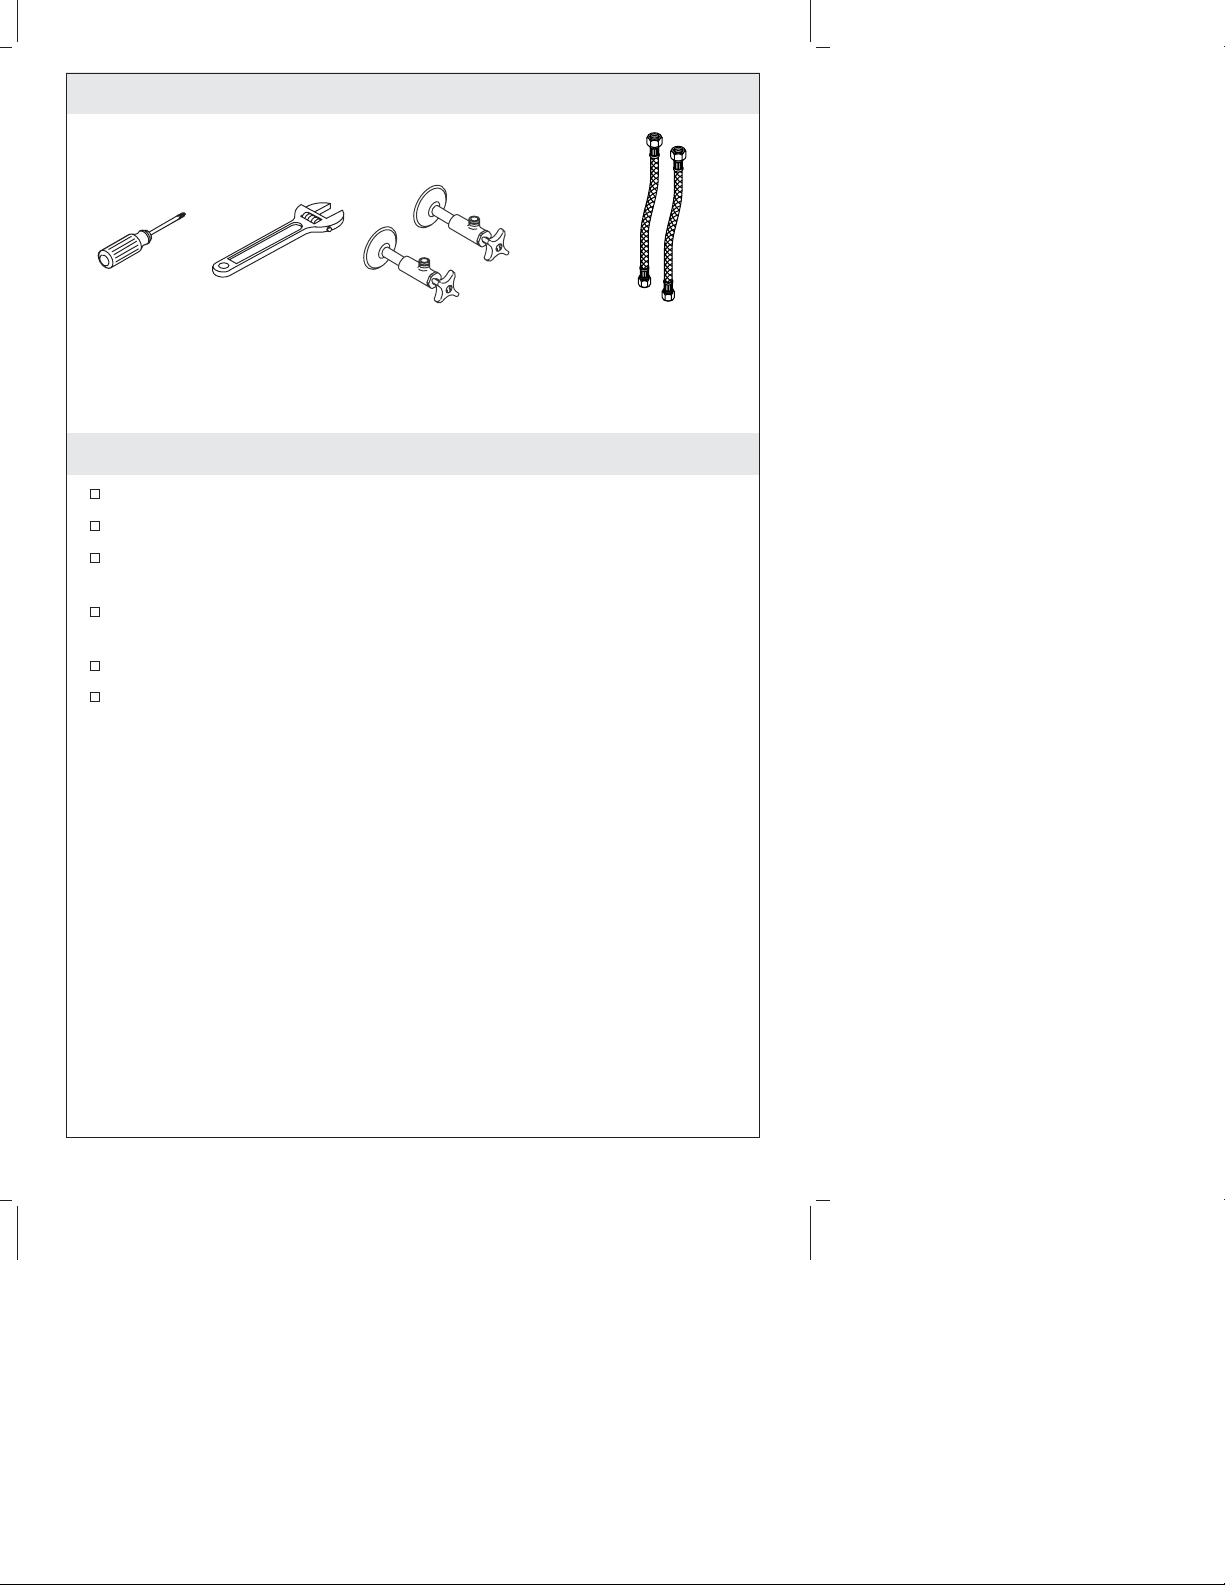
Tools and Materials
Phillips
Screwdriver
Adjustable
Wrench
Two 3/8" Male
Supply Connections
Supply Hoses
Before You Begin
Observe all local plumbing and building codes.
Shut off the water supplies.
Carefully inspect waste and supply tubing for any sign of
damage and replace if necessary.
For new installations, assemble the faucet to the sink before
installing the sink.
Do not use petroleum based products on this faucet.
Kohler Co. reserves the right to make revisions in the design of
faucets without notice, as specified in the Price Book.
1069104-2-B 2 Kohler Co.
Page 3
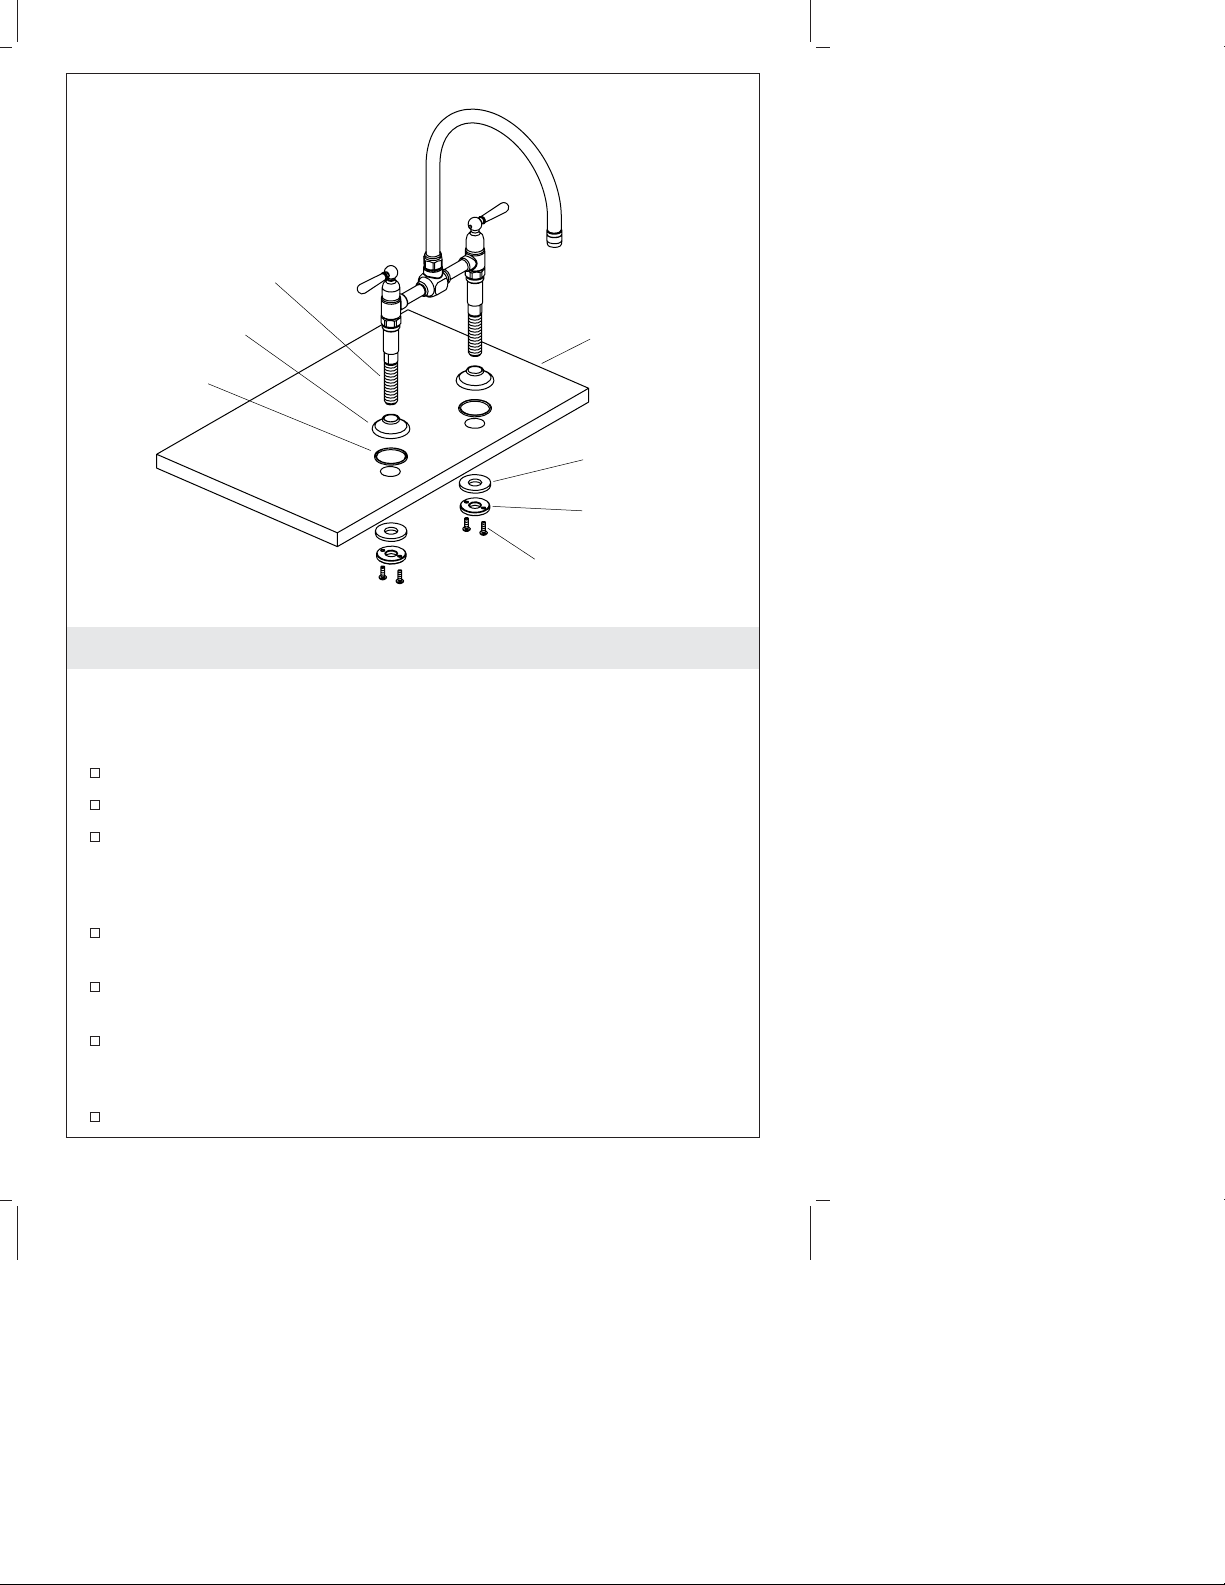
Threaded
Shank
Escutcheon
O-Ring
Mounting
Surface
Metal
Washer
Threaded
Ring
Screw
1. Install the Faucet
IMPORTANT! If you are mounting the faucet to an uneven surface
(such as tile grout lines), apply a suitable sealant in addition to the
O-rings provided. Do not use petroleum based sealant.
Insert the O-ring into groove of each escutcheon.
Slide an escutcheon over each of the threaded shanks.
Position the faucet through the mounting surface.
NOTE: The handles will rotate toward the user when properly
installed.
Partially thread two screws into the threaded ring until the
screws barely protrude from the backside of the threaded ring.
Slide a metal washer onto each threaded shank from underneath
the mounting surface.
Thread the threaded ring onto the shank until the threaded ring
is about 1/4″ (6 mm) away from the underside of the mounting
surface.
Turn the threaded ring so the screws are to the front and back.
Kohler Co. 3 1069104-2-B
Page 4
Install the Faucet (cont.)
Using a Phillips screwdriver, tighten the screws securely and
evenly.
Ensure the handles are in the OFF position, as shown.
1069104-2-B 4 Kohler Co.
Page 5
Cold
3" (7.6 cm)
or Larger
Cold
Hot
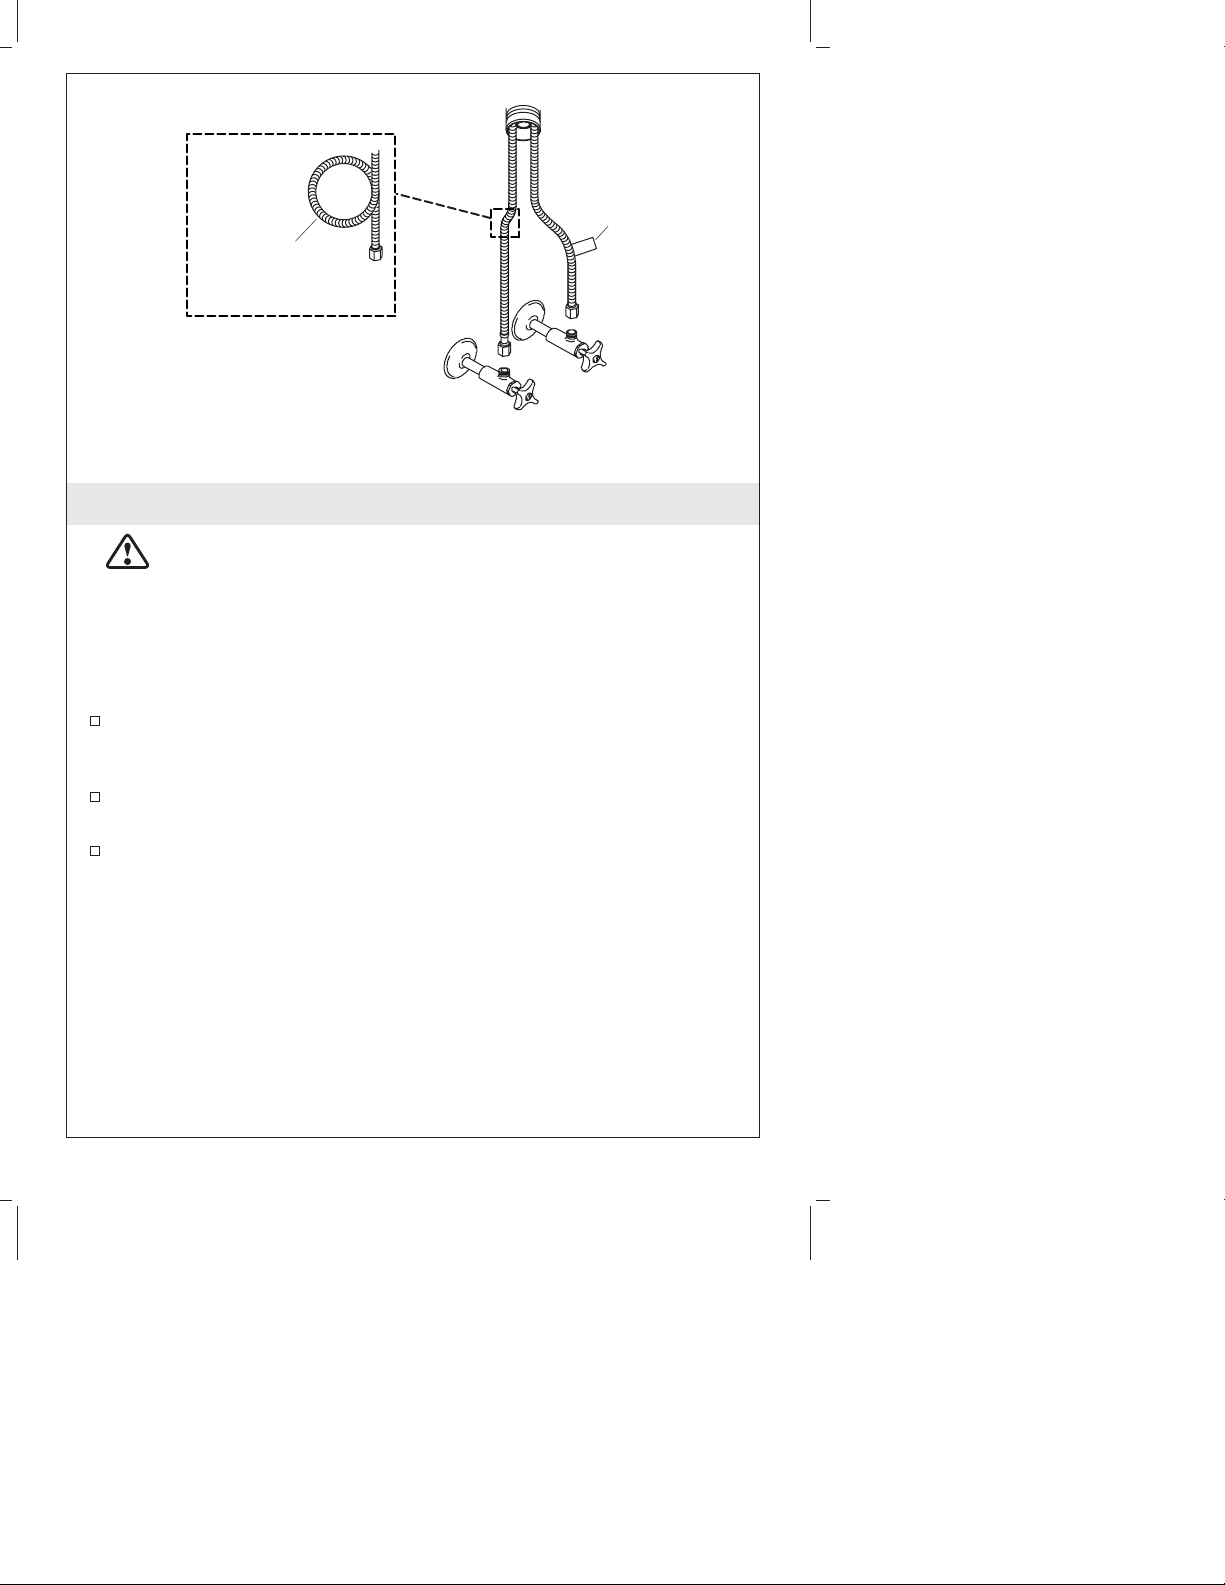
2. Install the Supplies
CAUTION: Risk of restricted waterflow and product
damage. Use extreme care to avoid kinking and twisting the
supply hoses. The supply hoses must not be taut after
installation.
NOTE: If the sink installation requires that you coil the supply hoses
to obtain a good connection, maintain an inside coil diameter of at
least 3″ (7.6 cm).
Carefully position the hot and cold water supplies so they will
not interfere with other hoses or items below the mounting
surface.
Connect the supply hoses to the supply stops. Left is hot, right is
cold.
Tighten all connections.
Kohler Co. 5 1069104-2-B
Page 6
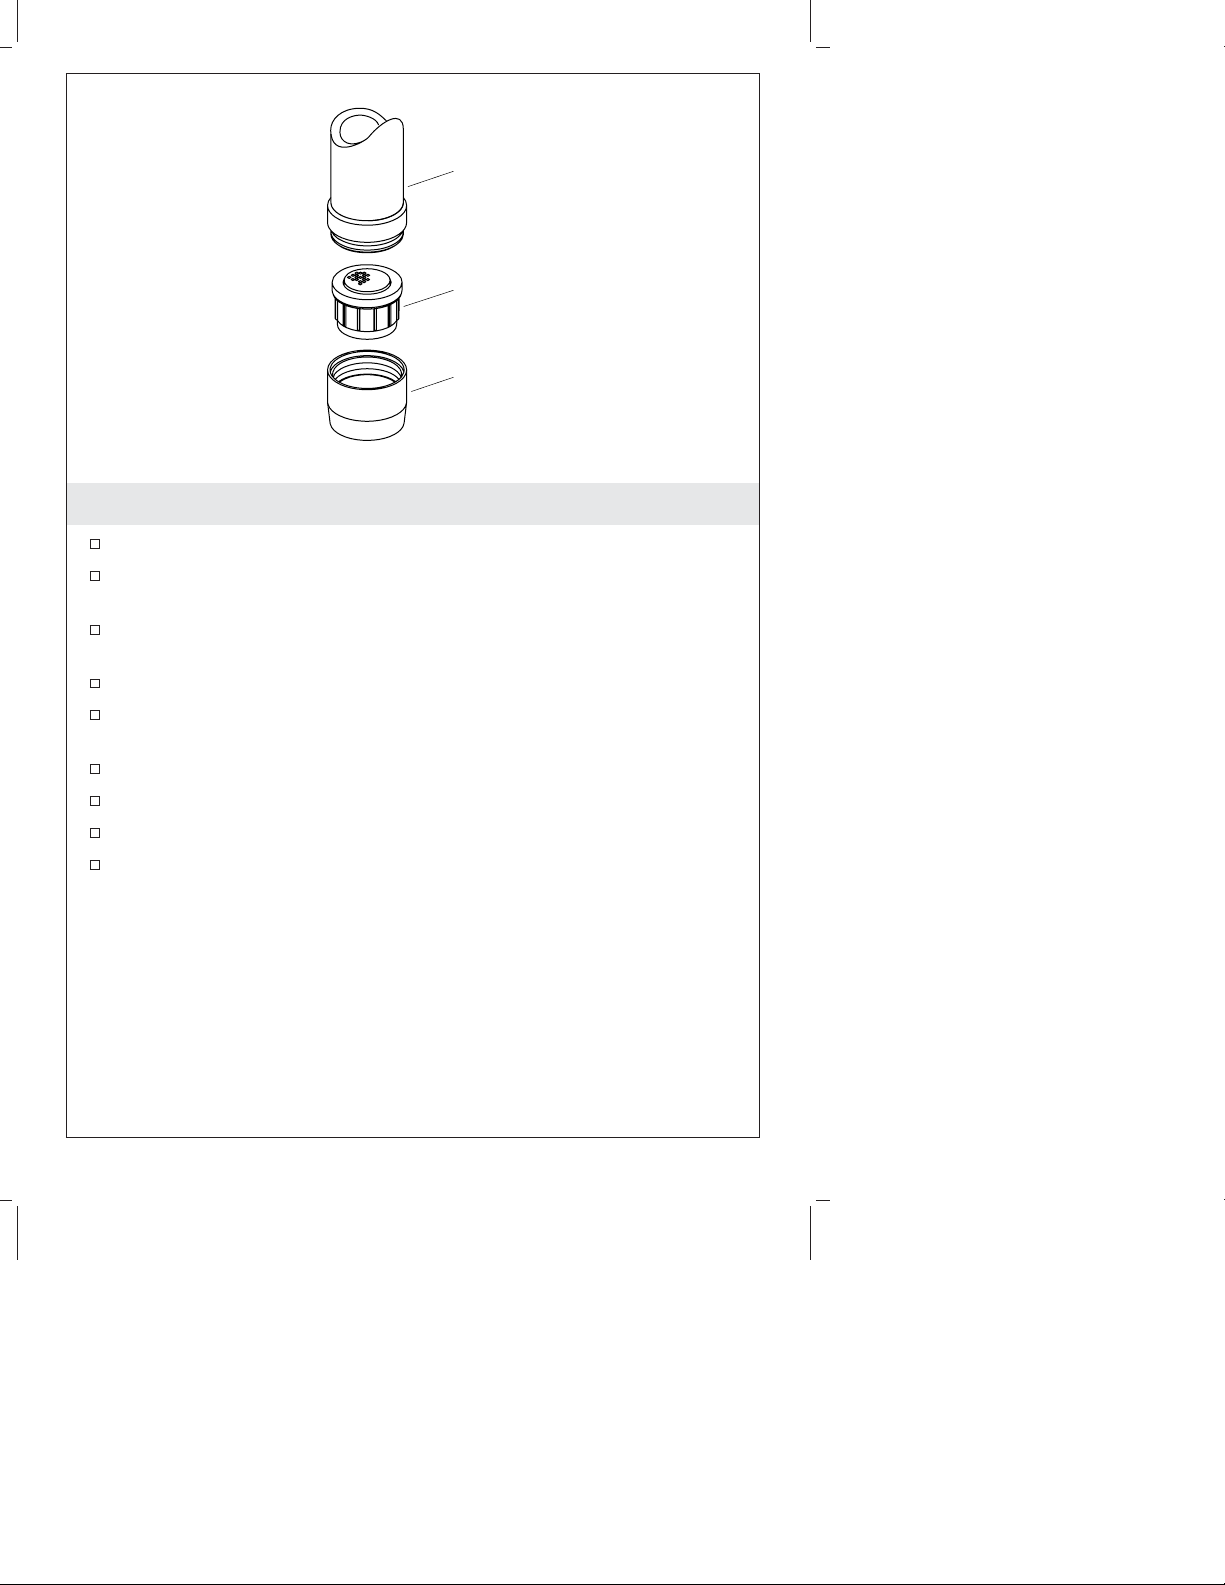
Spout
Aerator
Housing
3. Installation Checkout
Verify all connections are tight.
Remove the aerator from inside the spout by turning the housing
counterclockwise.
Verify the handles are in the OFF position, then turn on the main
water supply.
Check all connections for leaks; repair as needed.
Turn the handles to the ON position to run water through the
faucet.
Check all connections for leaks. Make any adjustments as needed.
Allow water to run through the spout to remove any debris.
Turn the handles to the OFF position.
Reinstall the aerator into the spout, then turn the housing
clockwise to secure the aerator to the spout.
1069104-2-B 6 Kohler Co.
Page 7

Guide d’installation
Robinet d’évier de cuisine
Outils et matériels
Tournevis
cruciforme
Clé à
molette
Deux connexions
d'alimentation mâles
de 3/8"
Flexibles
d'alimentation
Merci d’avoir choisi la compagnie Kohler
Nous apprécions votre engagement envers la qualité Kohler. Veuillez
prendre s’il vous plaît quelques minutes pour lire ce manuel avant de
commencer l’installation. Ne pas hésiter à nous contacter en cas de
problème d’installation ou de performance. Nos numéros de téléphone
et notre adresse du site internet sont au verso. Merci encore d’avoir
choisi la compagnie Kohler.
Avant de commencer
Respecter tous les codes de plomberie et de bâtiment locaux.
Couper les alimentations d’eau.
Vérifier avec soin si l’évacuation ou les tubes d’alimentation pour
déceler tout signe d’endommagement et remplacer si nécessaire.
Pour de nouvelles installations, installer le robinet sur l’évier
avant d’installer ce dernier.
Ne pas utiliser de produits à base de pétrole sur ce robinet.
Kohler Co. se réserve le droit d’apporter toutes modifications au
design des robinets et ceci sans préavis, comme spécifié dans le
catalogue des prix.
Kohler Co. Français-1 1069104-2-B
Page 8

Manche
fileté
Applique
Joint torique
Surface de
montage
Rondelle
métallique
Bague
filetée
Vis
1. Installer le robinet
IMPORTANT ! Dans le cas de montage du robinet sur une surface
inégale (telle que joint de ciment de carrelage), appliquer du mastic
adéquat en plus des joints-toriques fournis. Ne pas utiliser
d’étanchéité à base de pétrole.
Insérer le joint torique dans la rainure de chaque applique.
Glisser une applique sur chacun des manches filetés.
Positionner le robinet dans la surface de fixation.
REMARQUE : Les poignées pivoteront vers l’utilisateur lorsqu’elles
sont correctement installées.
Visser partiellement deux vis dans l’anneau fileté jusqu’à ce
qu’elles dépassent légèrement de l’arrière de l’anneau fileté.
Glisser la rondelle en métal sur chaque manche fileté
d’en-dessous de la surface de fixation.
Visser l’anneau fileté sur le manche jusqu’à ce que l’anneau fileté
soit à environ 1/4″ (6 mm) de distance du bas de la surface de
fixation.
1069104-2-B Français-2 Kohler Co.
Page 9

Installer le robinet (cont.)
Tourner l’anneau fileté pour que les vis soient à l’avant et
l’arrière.
À l’aide d’un tournevis cruciforme, serrer les vis de manière
sécurisée et égale.
S’assurer que les poignées sont en position ARRÊT, tel
qu’indiqué.
Kohler Co. Français-3 1069104-2-B
Page 10

Froid
3" (7,6 cm)
ou plus large
Froid
Chaud
2. Installer les alimentations
ATTENTION : Risque de restriction du débit d’eau et
d’endommagement du produit. Faire extrêmement attention
afin d’éviter de plier ou coincer les tuyaux d’alimentation. Ne
pas tendre fortement les tuyaux d’alimentation après
l’installation.
REMARQUE : Si l’installation nécessite d’enrouler les tuyaux
d’alimentation pour une bonne connexion, maintenir une boucle
d’un Ø Int. d’au moins 3″ (7,6 cm).
Positionner avec soin les alimentations d’eau chaude et froide de
façon à ce qu’elles n’interfèrent pas avec d’autres tuyaux ou
parties sous la surface de fixation.
Connecter les tuyaux d’alimentation aux arrêts. Gauche est chaud,
droite est froid.
Serrer toutes les connexions.
1069104-2-B Français-4 Kohler Co.
Page 11

Bec
Aérateur
Logement
3. Vérification de l’installation
Vérifier que toutes les connexions sont bien serrées.
Retirer l’aérateur de l’intérieur du bec en pivotant le logement
vers la gauche.
Vérifier que les poignées soient en position ARRÊT, puis ouvrir
l’alimentation principale d’eau.
Vérifier s’il y a des fuites dans les connexions; réparer au besoin.
Tourner les poignées en position MARCHE pour faire couler l’eau
dans le robinet.
Vérifier s’il y a des fuites dans les connexions. Faire les
ajustements si nécessaire.
Permettre à l’eau de s’écouler à travers le bec pour en retirer tout
débris.
Tourner les poignées en position ARRÊT.
Réinstaller l’aérateur dans le bec, puis pivoter le logement vers la
droite pour sécuriser l’aérateur au bec.
Kohler Co. Français-5 1069104-2-B
Page 12

Guía de instalación
Grifería de fregadero de cocina
Herramientas y materiales
Destornillador
Phillips
Llave
ajustable
Dos conexiones
macho de
suministro de 3/8"
Mangueras de
suministro
Antes de comenzar
Cumpla con todos los códigos locales de plomería y construcción.
Cierre los suministros de agua.
Revise con cuidado los tubos de suministro y de desagüe para
ver si están dañados y cámbielos de ser necesario.
Para instalaciones nuevas, ensamble la grifería en el fregadero
antes de instalar el fregadero.
No utilice productos derivados del petróleo en esta grifería.
Kohler Co. se reserva el derecho de modificar el diseño de la
grifería sin previo aviso, tal como se especifica en la lista de
precios.
Kohler Co. Español-1 1069104-2-B
Page 13

Vástago
roscado
Chapetón
Arosello
Superficie
de montaje
Arandela de
metal
Anillo
roscado
Tornillo
1. Instale la grifería
¡IMPORTANTE! Si va a instalar la grifería en una superficie
dispareja (como líneas de boquilla del azulejo), aplique un sellador
adecuado además de los arosellos provistos. No utilice selladores
derivados del petróleo.
Inserte el arosello (O-ring) en la ranura de cada chapetón.
Deslice un chapetón en cada uno de los vástagos roscados.
Coloque la grifería a través de la superficie de montaje.
NOTA: Las manijas girarán hacia el usuario cuando estén bien
instaladas.
Enrosque parcialmente dos tornillos en el anillo roscado hasta que
sobresalgan muy poco de la parte posterior del anillo roscado.
Por debajo de la superficie de montaje, deslice una arandela de
metal en cada vástago roscado.
Enrosque el anillo roscado en el vástago hasta que el anillo
roscado quede a aproximadamente 1/4″ (6 mm) del lado inferior
de la superficie de montaje.
Kohler Co. Español-2 1069104-2-B
Page 14

Instale la grifería (cont.)
Gire el anillo roscado de manera que los tornillos estén orientados
hacia el frente y hacia atrás.
Con un destornillador Phillips, apriete bien los tornillos de forma
uniforme.
Asegúrese de que las manijas estén en la posición cerrada, como
se ilustra.
1069104-2-B Español-3 Kohler Co.
Page 15

Fría
3" (7,6 cm)
o mayor
Fría
Caliente
2. Instale los suministros
PRECAUCIÓN: Riesgo de flujo limitado de agua y daños al
producto. Tenga mucho cuidado para evitar que las
mangueras de suministro se tuerzan y doblen. Las mangueras
de suministro no deben quedar tensionadas después de la
instalación.
NOTA: Si la instalación del fregadero requiere enrollar las
mangueras de suministro a fin de obtener una buena conexión,
mantenga un diámetro interno de al menos 3″ (7,6 cm) al enrollarlas.
Coloque con cuidado los suministros de agua fría y caliente de
manera que no interfieran con las otras mangueras o artículos
debajo de la superficie de montaje.
Conecte las mangueras de suministro a las llaves de paso. El lado
izquierdo corresponde al agua caliente, y el derecho, al agua fría.
Apriete todas las conexiones.
Kohler Co. Español-4 1069104-2-B
Page 16

Surtidor
Aireador
Alojamiento
3. Verificación de la instalación
Verifique que todas las conexiones estén apretadas.
Retire el aireador del interior del surtidor girando el alojamiento
hacia la izquierda.
Verifique que las manijas estén en la posición cerrada, luego abra
el suministro principal de agua.
Revise todas las conexiones para asegurarse que no haya fugas y
repare según sea necesario.
Gire las manijas a la posición abierta para que corra agua por la
grifería.
Revise que no haya fugas en las conexiones. Haga los ajustes
necesarios.
Deje correr el agua por el surtidor para eliminar las partículas
que pueda haber.
Gire las manijas a la posición cerrada.
Vuelva a instalar el aireador en el surtidor, luego gire el
alojamiento hacia la derecha para asegurar el aireador al surtidor.
1069104-2-B Español-5 Kohler Co.
Page 17

1069104-2-B
Page 18

1069104-2-B
Page 19

1069104-2-B
Page 20

USA: 1-800-4-KOHLER
Canada: 1-800-964-5590
México: 001-877-680-1310
kohler.com
©2007 Kohler Co.
1069104-2-B
 Loading...