

Page 1
-1-
, 2013
Copyright Kohler China Ltd., 2013
BRISTOL
INSTALLATION INSTRUCTIONS
BATHROOM CABINETS
K-45775T/K-45773T
BEFORE YOU BEGINBEFORE YOU BEGIN
·
·
·
·
·
·
·
Please read these instructions carefully to familiarize
yourself with the required tools, materials, and installation
sequences. Follow the sections that pertain to your
particular installation. This will help you avoid costly
mistakes. In addition to proper installation, read all
operating and safety instructions.
All information in these instructions is based upon the
latest product information available at the time of
publication. Kohler China. reserves the right to make
changes in product characteristics, packaging, or
availability at any time without notice.
These instructions contain important care, cleaning, and
warranty information-
Turn off the water supply.
The pluming installation must comply with Water Supply
Regulations/Bye-laws, Building Regulations or any
particular regulations and practices, specified by the local
water company or water undertakers. The installation
should be carried out by a plumber.
Before installation carefully inspect the new fixture for any
signs of damage.
please leave instructions for the
consumer.
BRISTOL bathroom cabinet adopts America imported
solid cherry wood and E1 grade wood-based panel of high
quality, and with further processing, its harmful emissions
will be less than 1.5mg/L.
·
·
·
·
·
·
·
-
E1
1.5mg/L
ORDERING INFORMATION
This installation covers the following products in the BRISTOL
range:
BRISTOL 1000mm Bathroom Cabinet ...............K-45775T
BRISTOL 1600mm Bathroom Cabinet ...............K-45773T
1000mm ....................................K-45775T
1600mm ....................................K-45773T
SAFETY: WARNINGS
Kohler products are precision-engineered and should give
continued superior and safe performance, provided:
1. They are installed, commissioned, operated and
maintained in accordance with the recommendations given
in this Manual.
2. Periodic attention is given, as necessary, to maintain the
product in good functional order. Recommended guidelines
are given in the section.
Carefully inspect the new fixture for any signs of damage.
When installing Kohler Products, manufacturers guidelines for
power tool safety should be followed.
MAINTENANCE
1.
2.
()
158 200436
1202483-T01-B
Page 2
-2-
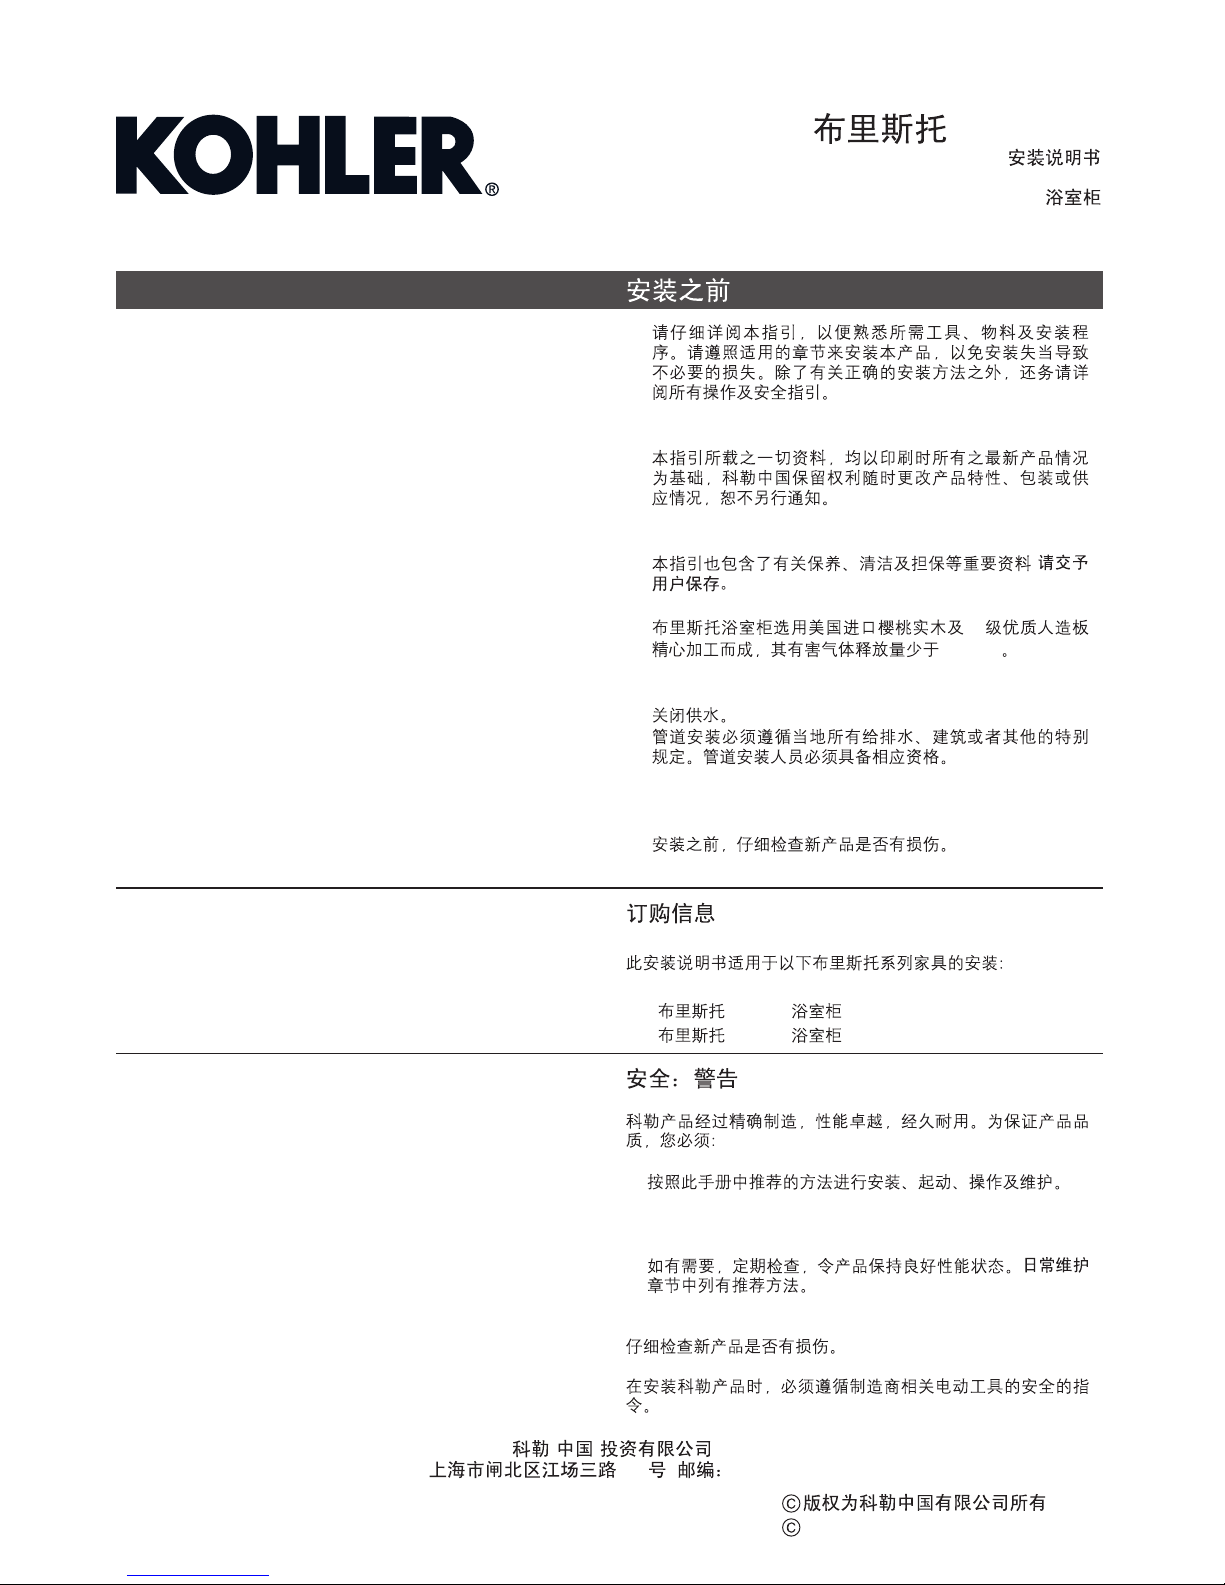
ROUGHING-IN
UNIT : mm
K-45775T
1000mm Bathroom Cabinet
1000mm
K-45773T
1600mm Bathroom Cabinet
1600mm
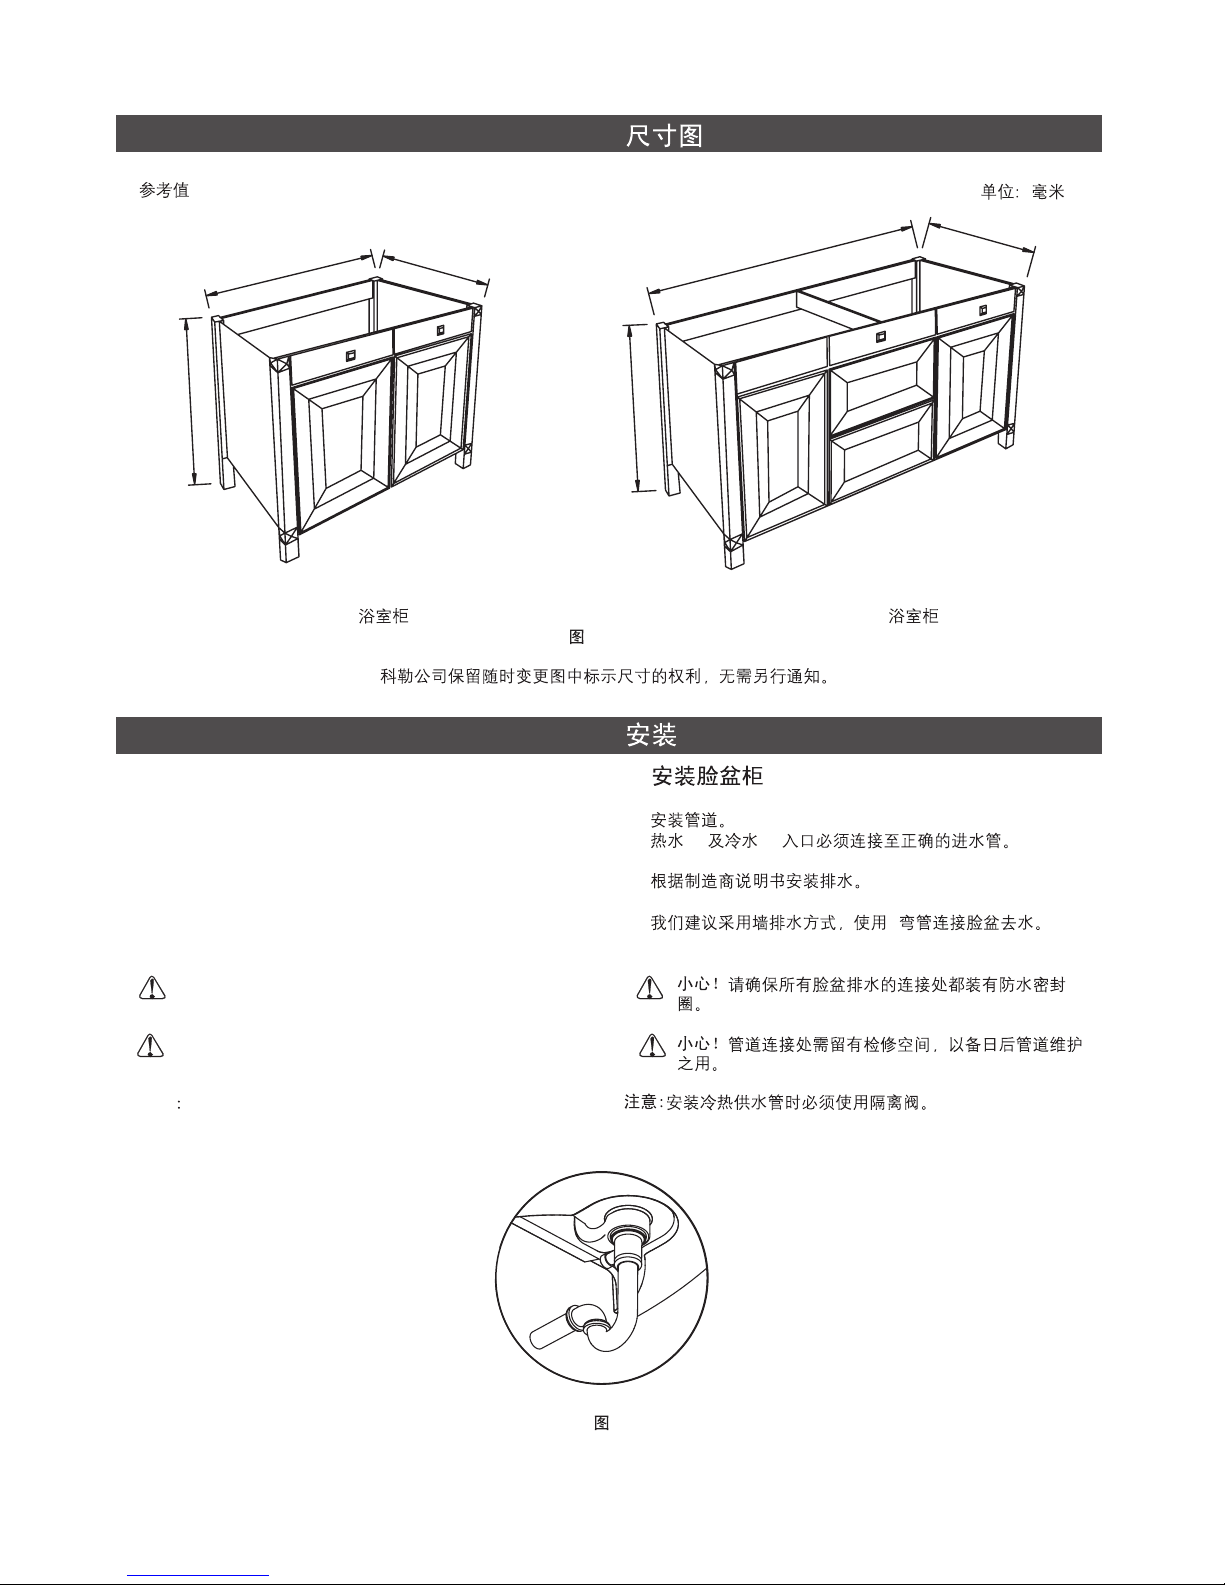
INSTALLATION
A. Install Washbasin Cabinet
Install the services.
Hot (H) and Cold (C) inlets must be connected to the
correct inlet pipes.
Install the drain in accordance with the manufacturer's
instructions.
We suggest using P-trap drain. Connect P-trap pipe with
washbasin drain.
Make sure a watertight seal exisits on all
washbasin drain connections.
Provide access to the plumbing
connections for future plumbing maintenance.
The hot and cold water supplies must be installed
with isolating valves.
CAUTION !
CAUTION !
NOTE
·
·
·
·
A.
·
·
·
·
(H) (C)
P
Fig.2
2
Reference Value
Kohler reserves the right to change marked dimensions without prior notice.
Fig.1
1
1000
590
590
820
820
1600
1202483-T01-B
Page 3

-3-
Fig.3
3
Fig.4
4
Fig.5
5
1. 3
1. After unpacking, screw out adjustable feet (see Fig.3).
Place the cabinet at a desired position in the bathroom,
and then adjust the four adjustable feet to put the cabinet in
place.
2. Pre-drill the floor drainage hole if the bathroom is suitable
for floor drainage.
Position the cabinet against the finished wall.
Mark the drain location on the bottom panel. Move the
cabinet away from the wall.
Drill floor drainage hole on the bottom panel with a
suitable drill.
Put the cabinet against the wall and align the drainage
hole with the drainage pipe.
·
·
·
·
3. Take out the handle, buffer and shelf support to prepare
for installation.
Install the handle and buffer as shown in the picture below.·
· Install the shelf support to the desired height as shown in
the picture below, and put the adjustable shelf downwards
and clip into place.
2.
·
·
·
·
3.
·
·
Go up
Go down
2
2
1
1
1202483-T01-B
Page 4

Adjustment
·
·
Slide the drawer out on the rails until fully extended.
Turn the drawer height adjustment wheels to adjust the
drawer height. To lower the drawer, turn the wheel on the
left side of the drawer clockwise and/or the wheel on the
right side of the drawer counterclockwise. Turn the
wheel(s) in the opposite direction to raise the drawer.
·
·
()
Drawer
1. Inner Drawer
NOTE:
Removal
Reinstallation
A drawer height adjustment wheel and release latch
are located underneath the front of the drawer at each corner.
Slide the drawer out on the rails until fully extended.
Pull both release latches toward you, then pull the front of
the drawer up off of the rails.
Set the drawer aside.
Fully extend the rails.
Align the grooves on the underside of the drawer with the
rails and set into place.
Hold the drawer in place on the rails with one hand. With
your other hand, pull the tab on the bottom front of the rail
toward you until you hear the rail "snap" into place.
Repeat this step for the remaining rail.
Ensure the drawer is locked into place by lightly lifting the
front of the drawer upward. If the drawer does not lift up, it
is engaged. If the drawer lifts up, repeat the above
procedure.
Slide the drawer in and out of the cabinet to ensure
smooth operation.
·
·
·
·
·
·
·
·
1.
·
·
·
·
·
·
·
·
-4-
B. Remove/Adjust the Door(s) and Hinges
B. /
Door
Adjustment
Note: Refer to the hinge assembly illustration above to select
the screw that corresponds to the adjustment needed.
Height-to move the door up or down.
Side-to move the door to the left or to the right.
Depth-to move the door in or out.
·
·
·
·
·
·
-
-
-
Fig.6
6
1202483-T01-B
Page 5

1
2
1
2
Fig.7
7
Fig.8
8
Fig.10
10
Fig.9
9
Fig.11
11
-5-
2. Metal Drawer
Removal
Reinstallation
Adjustment
·
·
·
·
·
·
·
·
·
·
·
Fully extend the rails.
Slightly lift the drawer and then pull the drawer out
towards yourself.
Set the drawer aside.
Push the rails towards inside.
Align the drawer on the rails and push forward until you
hear the rails "snap" into place.
Ensure the drawer is installed into place. Repeatedly pull
and push the drawer to see if it functions smoothly.
Fully extend the drawer.
Remove the decorative logo cover.
See Fig.12a for left and right adjustment.
See Fig.12b for up and down adjustment.
See Fig.12c for forward and backward adjustment.
2.
logo
12a
12b
12c
·
·
·
·
·
·
·
·
·
·
·
1202483-T01-B
Page 6

C
1. ,
2.
3.
4.
C. Finish Installation
1. Install the faucet and lavatory in accordance with the
manufacturer s instructions.
2. Connect the hot and cold water supplies.
3. Attach the waste, and tighten securely.
4. Turn on the hot and cold water valves and check the
supply connections for any leaks.
a. (P )
/
a. Inwall drainage (P-Trap)
Please install the drain assembly and faucet as shown.
Please set the water supply and drainage position
according to the suppliers instructions. You can adjust the
height of shelf to fit the drain assembly.
Fig.13
13
-6-
1
1
2
1
1
2
Fig.12b
12b
Fig.12c
12c
Fig.12a
12a
Door
Faucet
Supply Lines
Shut-off Valve
Drain Assembly
Back Board
1202483-T01-B
Page 7

b. Sb. Floor drainage (S-Trap)
Please install the drain assembly and faucet as shown.
Please set the water supply and drainage position
according to the suppliers instructions. You can adjust the
height of shelf to fit the drain assembly.
-7-
Note: For installation of 1600mm cabinet, if the drainage
hole is in the middle of the cabinet, please first remove the
middle drawer and reinstall it onto the rail after fixing the
drainage.
Fig.14
14
1600mm
5.
7.
6.
5. Run water into the washbasin or vanity top, and check the
drain connections for any leaks.
6. Adjust all doors and drawers in three-way as illustrated in
Fig 8, and make sure that the door is level and neat.
Clearance between doors is even, and that between doors
and cabinet is tight.
7. Install the decorative cover and buffer.
Faucet
Supply Lines
Door
Shut-off Valve
Back Board
Outlet
Drain Assembly
1202483-T01-B
Page 8

1.
2.
3.
4.
5.
6.
7.
DAILY MAINTENANCE
WARNING! Risk of product damage.
1.
2.
3.
4.
5.
6. Please do not sit, lean or step on the basin cabinet.
7. If any fixtures caused by abnormal reasons, Kohler China
can supply paid replacement for service parts caused by
abnormal reasons in the limited duration of warranty.
Many cleansers contain abrasive and chemical substance
which is not suitable for cleaning stainless steel, enamel,
plating or plastic products. You may use mild cleansers or
soaps to clean the surfaces. Wipe any splashes of cleaner
solutions from the surface with clean soft cloth.
Maintain ventilation in the bathroom, and separate the dry
area from the damp one if conditions permit. Try to open
the door and windows of the bathroom and maintain good
ventilation.
Kohler bathroom cabinet are dealt with strict procedures
for damp-proof, whose good damp-proof function ensures
good performance even in bathroom of huge humidity. Yet
do not splash and pour water directly on the bathroom
cabinet. Make sure that the bathroom is not over damp
and wipe any splashes from surfaces immediately.
Maintenance of door board: Clean and wipe door board
regularly,
Keep PVC doors away from fire or high
temperature.
Ensure that electrical connections for appliances such as
head lamp is insulated wipe mirror surface with chamois
regularly to guarantee the persistent excellent performance.
and wipe the condensation vapor with dry and
soft cloth.
-8-
1202483-T01-B
 Loading...