

Page 1
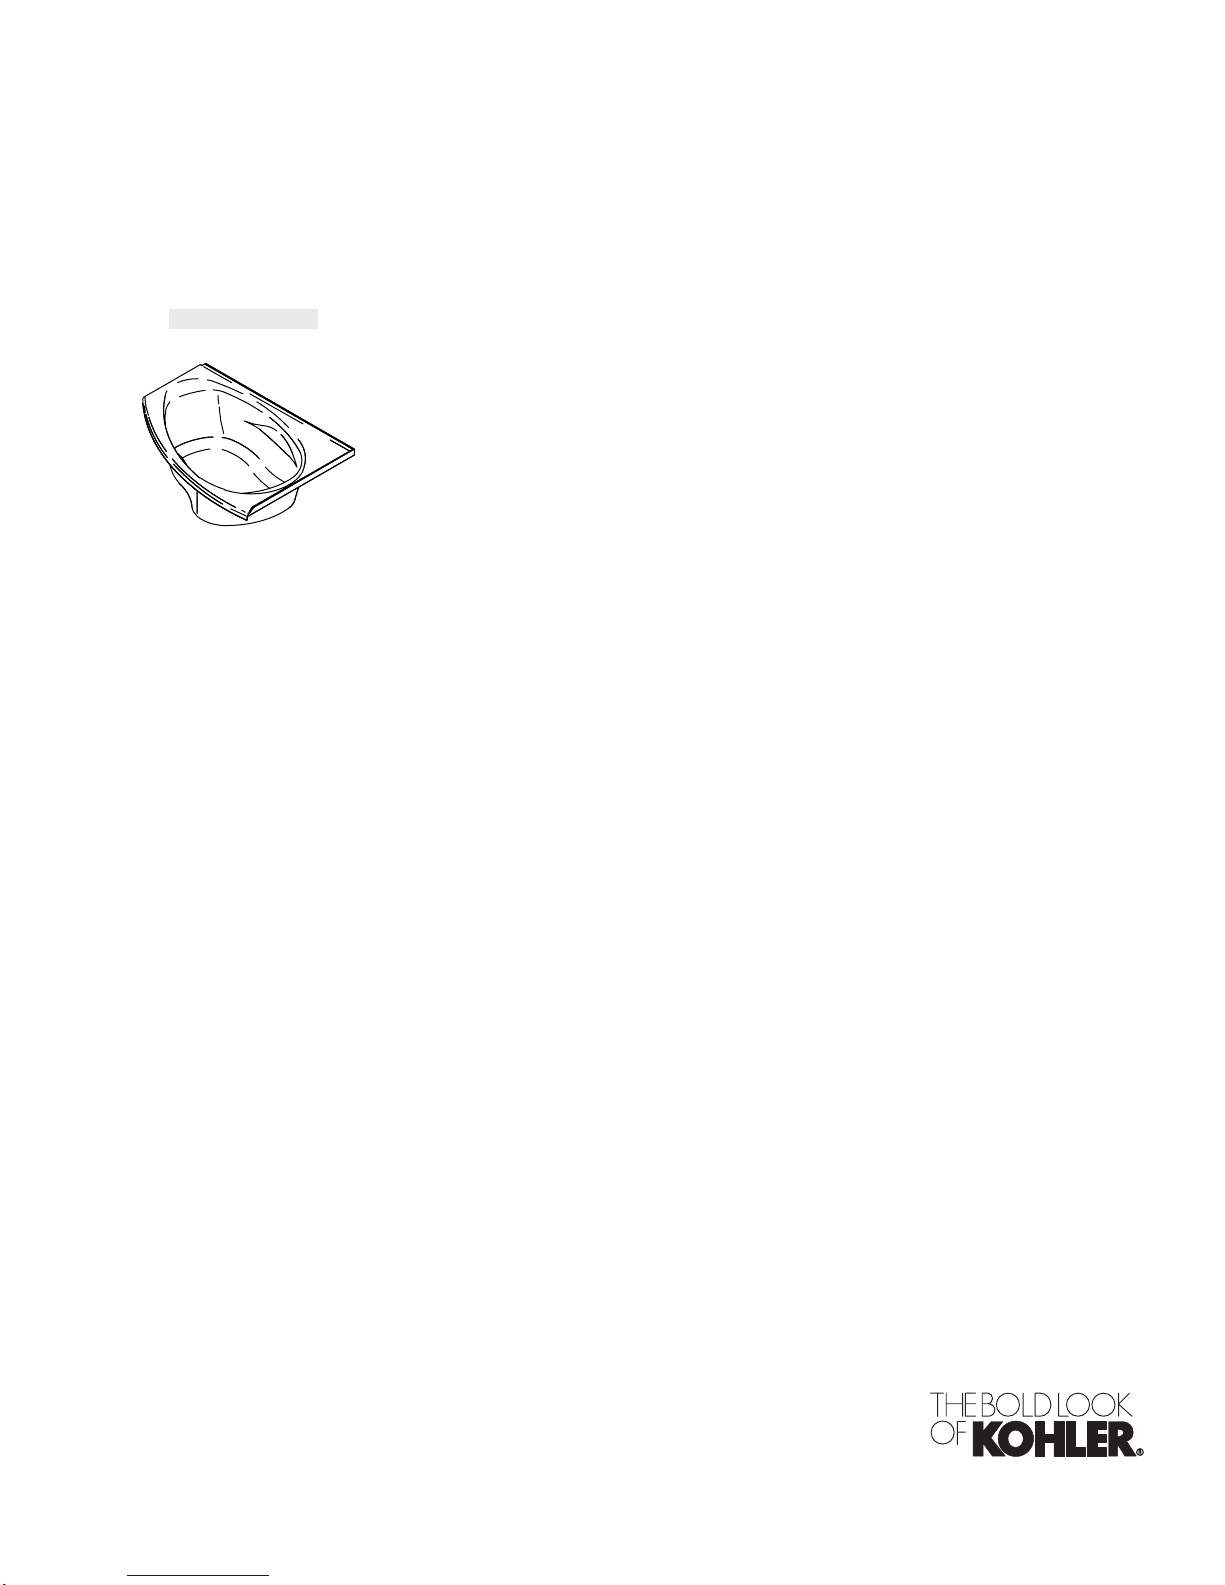
K-1313, K-1314
Installation Guide
Acrylic Baths
M product numbers are for Mexico (i.e. K-12345M)
Los números de productos seguidos de M corresponden a México
(Ej. K-12345M)
Français, page “Français-1”
Español, página “Español-1”
1023717-2-B
Page 2
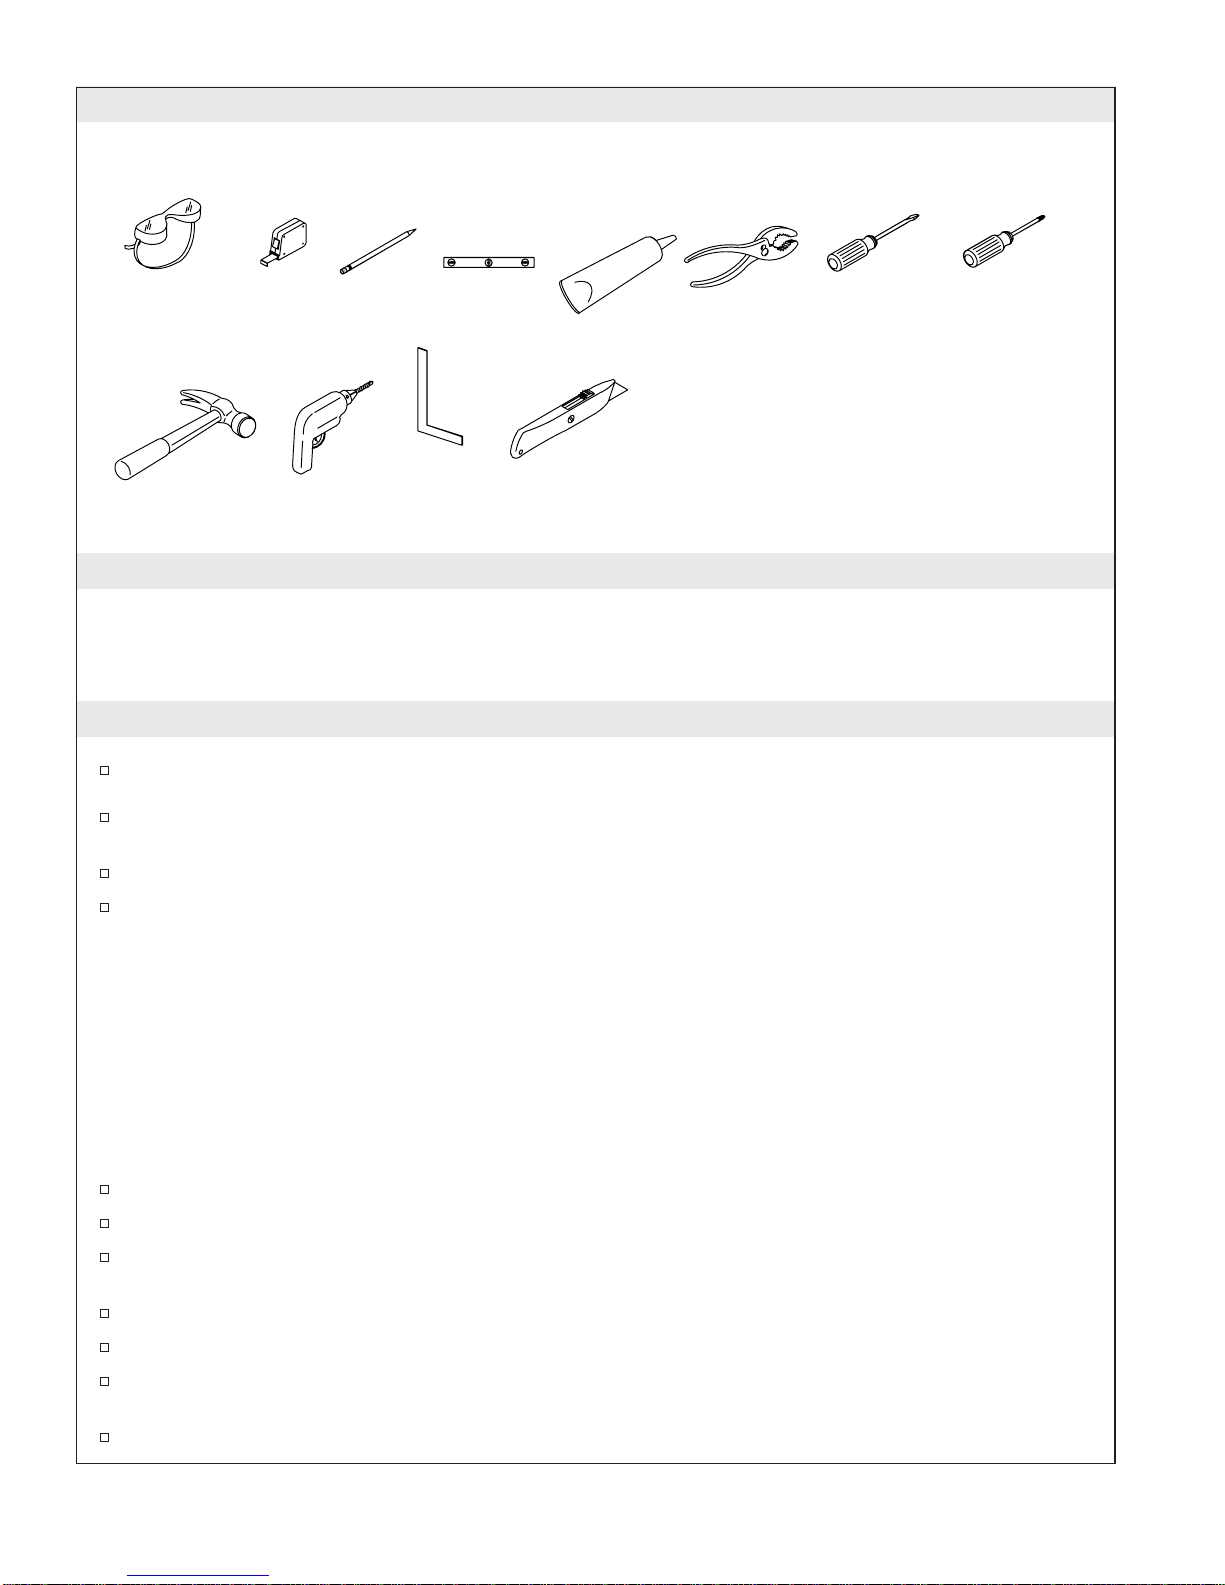
Tools and Materials
Safety
Glasses
Claw
Hammer
Tape
Measure
Pencil
Drill /
Drill Bits
Square
Level
Knife
Sealant
Pliers
Plus:
#6 Large-head galvanized nails
Conventional woodworking tools and materials
Drop cloth
2x4’s or 2x6’s
Water-resistant wall material
Combination of socket wrenches
Rags
Blade
Screwdriver
Phillips
Screwdriver
Thank You For Choosing Kohler Company
We appreciate your commitment to Kohler quality. Please take a few minutes to review this manual before
you start installation. If you encounter any installation or performance problems, please don’t hesitate to
contact us. Our phone numbers and website are listed on the back cover. Thanks again for choosing Kohler
Company.
Before You Begin
Observe all local plumbing and building codes.
Unpack and inspect the bath for damage. Return the bath to the carton until you are ready to
install.
Corner installation is required for this bath.
You must have all the required components (bath, receptor, bench, apron and/or end panel) before
beginning the installation. When this bath is combined with a receptor, bench, apron and/or end
panel, the required assembly sequence is:
•
Attach the bench (if used) to the receptor
•
Install the receptor
•
Install the bath
•
Attach the end panel (if used)
•
Install the apron
•
Tighten the hardware and secure the flanges
•
Install the shower door
Provide properly dimensioned framing.
Install the bath to an adequately supported, level subfloor.
The basin area requires no additional support when the subfloor is level and square with the stud
framing. Consider using shims for additional support if the subfloor is uneven.
Before installation, ensure proper access to the final plumbing connections.
Verify adequate mounting and connection space for the faucet.
Confirm adequate support for the faucet. Large deck-mounted faucets that may be inadvertently
used as a means of support are not appropriate or safe for this installation.
This bath conforms to ANSI Standard Z124.1. All dimensions are nominal.
1023717-2-B 2 Kohler Co.
Page 3
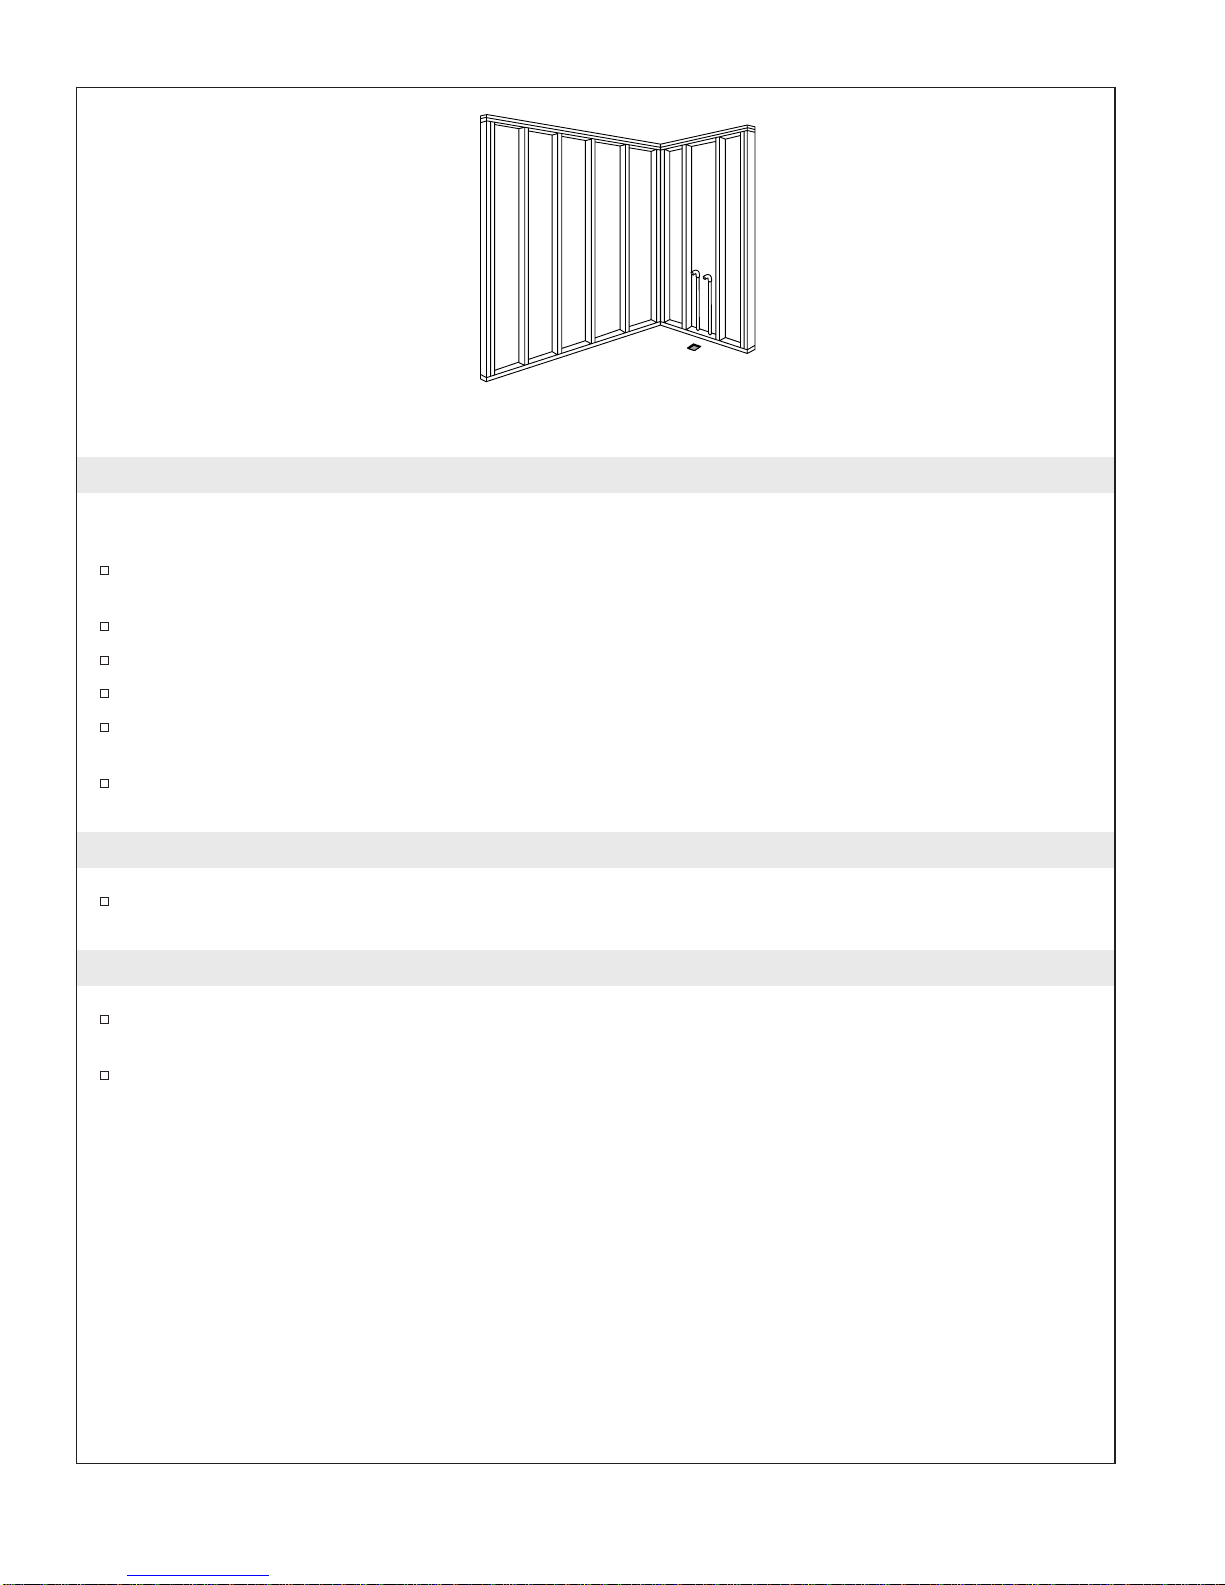
Construct 2x4
or 2x6 stud
framing
according to
the roughing-in
information
Position
the rough
plumbing
Verify that the subfloor offers
adequate support, and is flat and level
1. Prepare the Site
NOTICE: Adequate floor support must be provided. Consult the roughing-in sheet packed with your bath
for specific floor loading requirements.
Make sure the flooring offers adequate support for your bath, and verify that the subfloor is flat and
level.
This bath must be installed in a corner.
When constructing the framing, allow for the thickness of the finished wall materials.
Construct 2x4 or 2x6 stud framing according to the roughing-in information packed with the bath.
Position the plumbing according to the roughing-in information. Cap the supplies and check for
leaks.
Unless the bath is elevated for an above-floor drain installation, a hole will need to be cut to
accommodate the drain connections. Refer to the roughing-in information.
2. Install the Receptor (if used)
If this installation requires a receptor, install it now according to the instructions packed with the
receptor.
3. Prepare the Bath
Install the drain to the bath according to the drain manufacturer’s instructions. Do not connect the
trap at this time.
Position a clean drop cloth or similar material in the bottom of the bath. Be careful not to scratch the
surface of the bath.
Kohler Co. 3 1023717-2-B
Page 4

Top
Flange
Bench
Side Flange
Three
Fastener
Holes
Corner Post
Screws
Three
Large
Holes
Corner Post
Bath Front Corner
Wood Block
Predrilled Holes
Adjustable Bracket
Screw
Two Hex Nuts
4. Install the Bath
If the subfloor is not level, use shims between the bath and the subfloor as needed.
With help, carefully lift the bath into place.
Verify that the bath is level and resting on all support feet.
Insert the drain tailpiece into the trap.
NOTE: An access panel will simplify future maintenance.
Groove
Underneath
Bath Rim
Lift
Square
Install the Corner Post
CAUTION: Risk of product damage. Do not force the corner post into place, or use it to adjust the
height or level of the bath.
Position the corner post in the unsupported front corner of the bath so the three large holes are
toward the side of the bath. Identify the predrilled holes in the wood block on the underside of the
bath.
Secure the corner post to the block with the two screws provided. Tighten securely.
If it is necessary to adjust the height of the corner post, loosen the two hex nuts securing the corner
post top bracket in place. Slide the adjustment bracket up or down as needed to achieve a good fit.
You may need to repeat this step for the bottom bracket. Hand tighten the hex nuts.
For bath only installations: If used, attach the end panel at this time according to the packed
instructions.
Attach the Receptor/Bench to the Bath
For Bath/Receptor Combinations Only
If the bench is not assembled to the receptor, attach it according to the instructions included with
the receptor before proceeding.
Lift the bath slightly along the outside end, and insert the bench top flange into the groove
underneath the bath rim.
Position the bench so the side flange is behind the corner post. Align the three fastener holes in the
bench with the holes in the corner post, and loosely fasten the bolts and hex nuts.
Use a carpenter’s square to square the corner bracket, bath, receptor and bench with the floor.
Secure the bottom corner bracket firmly to the floor with two screws.
1023717-2-B 4 Kohler Co.
Page 5

Nailing-In
Flange
Stud
Install furring strips to the wall studs to
shim out to the edge of the nailing-in flange.
5. Secure the Bath to the Stud Framing
Insert the drain tailpiece into the trap. Make sure the bath is level and resting on all support feet.
Drill 1/8″ (3 mm) pilot holes through the back nailing-in flange at each stud location.
Securely tighten the bench/end panel bolts and the hex nuts previously assembled to the corner
post.
Securely tighten the corner post adjustment bracket nuts.
Drill 1/8″ (3 mm) pilot holes through the nailing-in flanges of the bath side and receptor/bench or
end panel wherever they contact a stud.
Secure all the nailing-in flanges to the studs with screws or galvanized nails.
Nail 1/4″ (6 mm) thick furring strips to the studs to shim out to the edge of the nailing-in flange.
6. Install the Plumbing
CAUTION: Risk of personal injury. Bath rim-mounted faucets that may be inadvertently used as a
means of support are not appropriate or safe for this installation.
CAUTION: Risk of property damage. Make sure a watertight seal exists on all bath drain connections.
NOTE: Provide access to all plumbing connections to simplify future maintenance.
Connect the trap to the drain according to the drain manufacturer’s instructions.
Install the faucet valving according to the faucet manufacturer’s instructions. Do not install the
faucet trim at this time.
Open the hot and cold water supplies and check all connections for leaks.
Run water into the bath and check the drain connections for leaks.
Fill the bath to the overflow and check for leaks.
Kohler Co. 5 1023717-2-B
Page 6
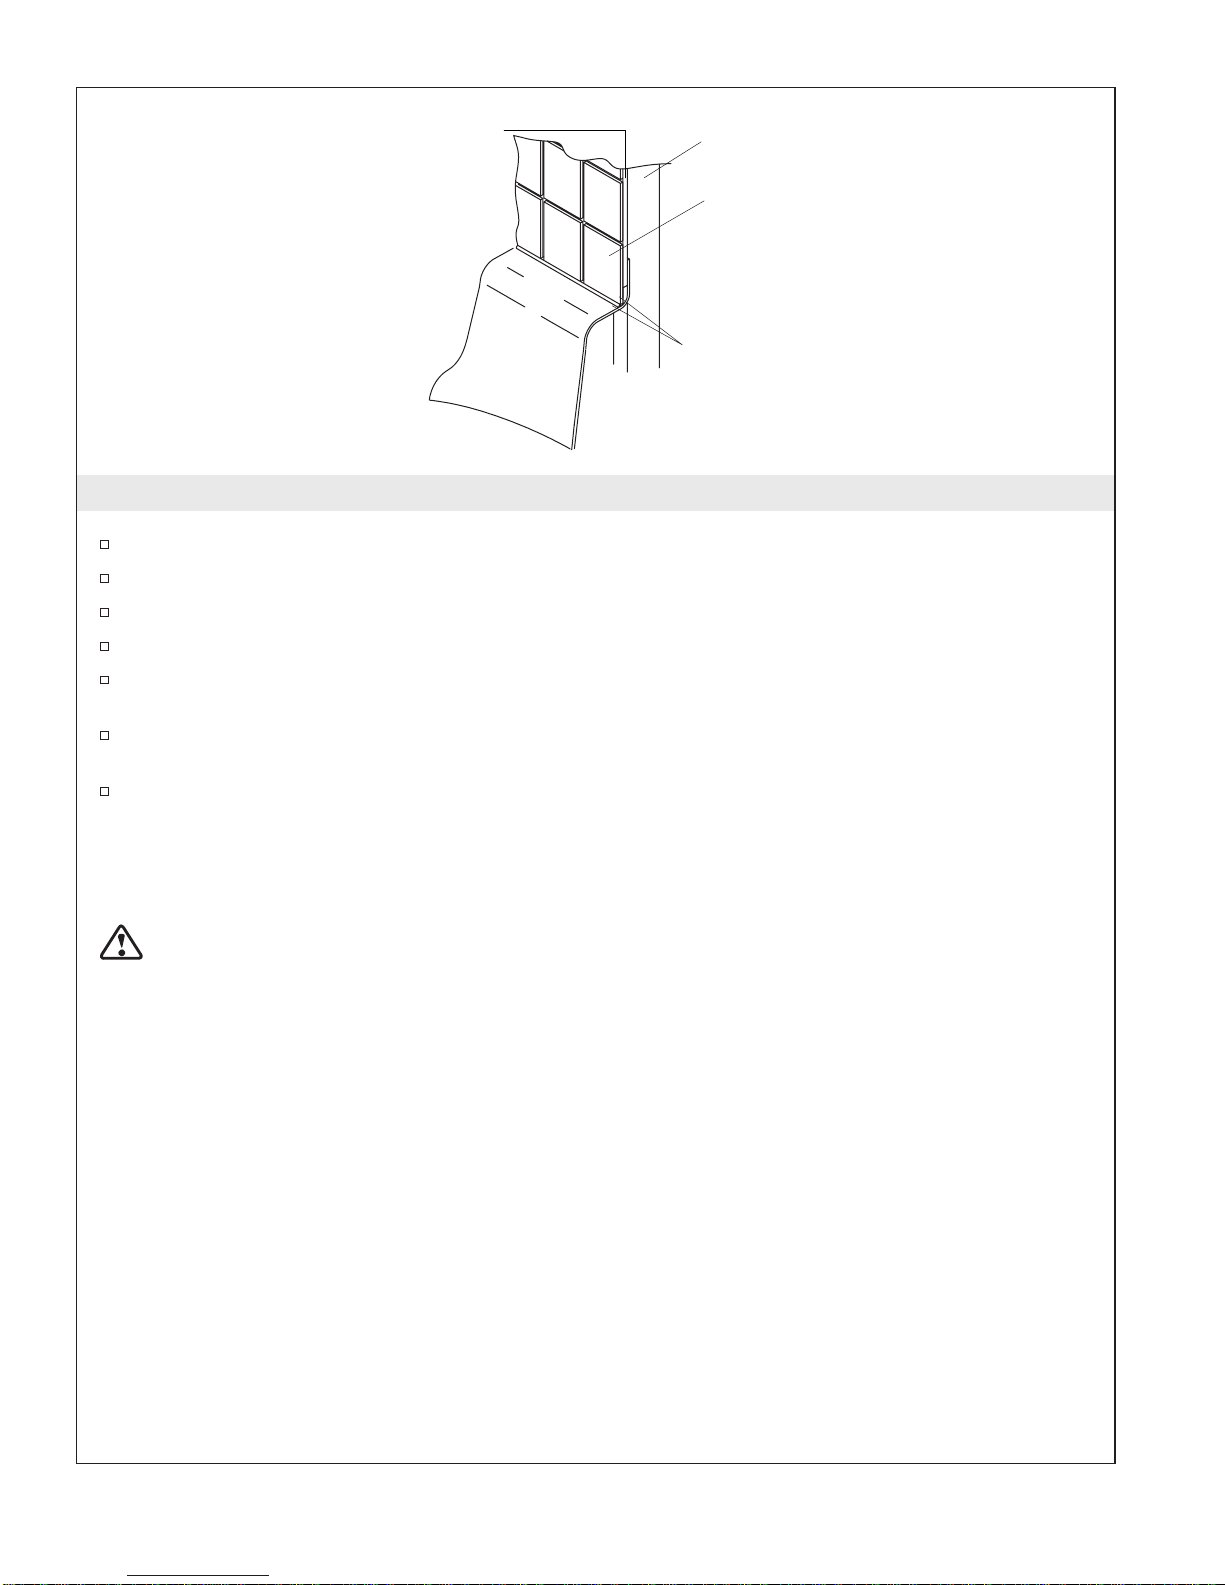
Water-Resistant
Wall Material
Bath
Framing
Finished
Wall
Apply silicone
sealant to the
joint between the
bath and the
finished wall
7. Complete the Installation
Install the apron according to the packed instructions.
Carefully remove the protective tape from the bath rim.
Apply a bead of silicone sealant to the nailing-in flange.
Install water-resistant wall material a maximum of 1/4″ (6 mm) above the bath deck.
Seal the joints between the bath rim edges and the water-resistant wall material with silicone
sealant. Tape and mud the water-resistant wall material.
Install the finished wall. Seal the joints between the bath rim and the finished wall with silicone
sealant. RTV (Room Temperature Vulcanizing) sealant is recommended.
Install the faucet trim according to the faucet manufacturer’s instructions.
Clean-Up
When cleaning up after installation, do not use abrasive cleaners, as they may scratch and dull the bath
surface. Use warm water and a liquid, non-abrasive detergent to clean the surface.
CAUTION: Risk of product damage. Do not allow cleaners containing petroleum distillates to remain
in contact with the surface for long periods of time.
Remove stubborn stains, paint, or tar with turpentine or paint thinner. Remove plaster by scraping with a
wood edge. Do not use metal scrapers, wire brushes, or other metal tools. You can use a powder-type
detergent on a damp cloth to provide mild abrasive action to any residual plaster.
1023717-2-B 6 Kohler Co.
Page 7

Guide d’Installation
Baignoire
Outils et Matériaux
Merci d’avoir choisi un produit KOHLER
Nous apprécions votre engagement envers la qualité KOHLER. S’il vous plait, prenez quelques minutes et
lisez attentivement ce guide avant de commencer votre installation. N’hésitez pas à nous contacter en cas de
problème d’installation ou de fonctionnement. Nos numéros de téléphones et notre adresse du site Internet
sont au verso. Merci encore d’avoir choisi un produit KOHLER.
Avant De Commencer
Respectez tous les codes locaux de plomberie et de bâtiment.
Déballez la baignoire et examinez la soigneusement pour en déceler tout dommage. Remettre la
baignoire dans son emballage de protection en attendant de commencer l’installation.
Installation dans un angle et requis pour cette Baignoire.
Vous devez avoir tous les composants requis (Baignoire à Hydromassage, receveur/banc, bandeau et
panneau d’extrémité) avant de commencer l’installation. Quand cette Baignoire et combinée avec un
receveur, banc, bandeau ou panneau de fin, la séquence de l’assemblage et comme ce qui suit :
•
Attachez le banc (le cas échéant) au receveur.
•
Installez le receveur
•
Installez la baignoire
•
Attachez le panneau de fin (le cas échéant).
•
Installez le bandeau
•
Serrez les vis et fixez les brides.
•
Installez la porte de douche
Prévoyez un cadre aux dimensions appropriées.
Cette baignoire doit avoir le support nécessaire sur un sol de niveau.
L’espace de la cuve ne nécessite pas de support additionnel si le sol est de niveau et d’aplomb avec
le cadre. Utilisez des cales pour un support additionnel si le sol n’est pas de niveau.
Kohler Co. Français-1 1023717-2-B
Page 8

Avant De Commencer (cont.)
Avant l’installation, assurez-vous d’avoir suffisamment d’accès pour les raccords finaux.
Vérifiez le montage correct et l’espacement pour le robinet.
Assurez-vous du montage correct du robinet. Les larges robinets ayant été utilisés par inadvertance
comme moyen de support ne sont pas appropriés ou sécuritaires pour cette installation.
Les dimensions de la Baignoire sont nominales et conformes aux tolérances données par la norme
ANSI Z124.1.
1023717-2-B Français-2 Kohler Co.
Page 9

1. Préparez le Site
AVIS : Le sol doit être adéquatement préparé. Consultez le plan de construction emballé avec votre
Baignoire, pour les spécifications de la préparation de votre sol.
Assurez-vous que le podium constitue un support adéquat pour votre baignoire et que le fond soit
plat et de niveau.
Cette Baignoire doit être installée dans un angle.
Pendant la construction du cadre, tenez compte de l’épaisseur des matériaux du mur.
Construisez le cadre avec des montants de2x4oude2x6suivant l’information du diagramme de
raccordement
Positionnez la plomberie, selon le plan du raccordement. Bouchez les robinets des arrivées et
vérifiez s’il y a des fuites.
A moins que la Baignoire soit installée sur un podium, un trou sera nécessaire pour y accommoder
la connexion du drain. Consultez le plan de raccordement.
2. Installez le Receveur
Si l’installation nécessite un receveur, installez le à ce moment, selon la notice incluse avec le
receveur.
3. Préparez la Baignoire
Installez le drain à la Baignoire selon la notice du fabricant qui accompagne le produit. Ne pas
brancher le siphon à ce moment.
Placez un linge ou une matière similaire à la base de la Baignoire. Travaillez soigneusement pour ne
pas égratigner la surface du produit.
Kohler Co. Français-3 1023717-2-B
Page 10

4. Installation de la Baignoire
Si le sol n’est pas de niveau, placer des cales sous la baignoire au besoin.
Avec de l’aide, positionner soigneusement la baignoire à sa place.
Assurez-vous que la baignoire est de niveau et qu’elle s’appuie sur ses pieds.
Introduisez l’about du drain dans la trappe.
REMARQUE : Une ouverture d’accès facilitera un entretien futur.
Installez le Support d’Angle
ATTENTION : Risque d’endommagement du produit. Ne pas forcer le support du coin en place, ne
l’utilisez pas pour régler la hauteur ou l’alignement de la baignoire.
Positionnez le support du coin sous l’angle frontal sans appui de la baignoire, pour que les trois
orifices larges soient orientés vers le côté de l’unité. Indentifiez les trous pilotes dans le bloc en bois,
sous la baignoire.
Fixez le support du de coin au bloc avec les deux vis. Serrez bien.
Si vous devez régler la hauteur du support du coin, désserrez les deux écrous hexagonaux qui
tiennent le support supérieur. Coulissez le support réglable vers le haut ou vers le bas jusqu’à ce
que la position appropriée soit obtenue. Il sera peut être nécessaire de répéter cette procédure pour
le support inférieur. Serrez les écrous à la main.
Installation pour Baignoire Uniquement : Attachez le panneau de fin si vous l’utilisez et en suivant
les instructions.
Installez le Receveur/Banc à la Baignoire à Hydromassage
Combinaisons pour Baignoire avec Receveur Seulement
Si la Baignoire n’est pas assemblée avec le Receveur, attachez la accordement aux instructions avec
le receveur avant de procéder.
Soulevez la Baignoire par l’extrémité extérieure, puis insérez la collerette du banc dans la rainure
sous le rebord.
Positionnez le banc de façon à ce que la bride latérale soit derrière le montant de l’angle. Alignez les
trois orifices de fixation du banc avec les orifices du montant de l’angle, puis serrer partiellement les
boulons et les écrous hexagonaux.
1023717-2-B Français-4 Kohler Co.
Page 11

Installation de la Baignoire (cont.)
A l’aide d’une équerre de Charpantier, mettez d’aplomb le support du coin, la Baignoire, le
Receveur par rapport au sol. Fixez le support du coin fermement au sol avec deux vis.
Kohler Co. Français-5 1023717-2-B
Page 12

5. Fixez la Baignoire aux Montants du Cadre
Introduisez l’about du drain dans la trappe. Assurez-vous que la Baignoire est de niveau et qu’elle
s’appuie sur les pieds de renfort.
Percez des trous de 1/8″ (3 mm) à travers la collerette de cloutage sur les montants.
Serrez le banc ou le panneau de fin, ainsi que les écrous hexagonaux au montant dans l’angle.
Serrez fortement les écrous de réglage du support de l’angle.
Percez des trous pilotes de Ø 1/8″ (3 mm) sur la collerette de cloutage, là ou le contact se fera avec
le support.
Fixez la bride de cloutage aux montants, à l’aide de vis ou de clous galvanisés.
Clouez des planchettes de 1/4″ (6 mm) sur les montants de façon à ce qu’elles soient en contact
avec la collerette.
6. Installez la Plomberie
ATTENTION : Risques de blessures corporelles. Les robinets de Baignoire ayant été utilisés par
inadvertance comme moyen de support ne sont pas appropriés pour cette installation.
ATTENTION : Risque de dommages matériels. Préparez un joint étanche sur les raccords du drain.
REMARQUE : Prévoir l’accès de chaque connection de la tuyauterie pour l’entretien future.
Connectez la trappe au drain selon la notice du fabricant.
Assemblez le robinet conformément à la notice du fabricant. Ne pas installer le robinet à ce stade.
Ouvrez les robinets d’arrêt et vérifiez s’il y a des fuites.
Laissez couler l’eau dans la baignoire et vérifiez s’il y a des fuites dans les raccords du drain.
Remplissez la baignoire et vérifiez s’il y a des fuites.
1023717-2-B Français-6 Kohler Co.
Page 13

7. Complétez l’Installation
Installez le bandeau comme indiqué sur le plan de construction.
Enlevez la pellicule protectrice du rebord.
Appliquez du mastic sur la collerette de cloutage.
Installez le mur hydrofuge à un maximum de 1/4″ (6 mm) au-dessus du podium de la baignoire.
Fixez les joints entre le rebord de la baignoire et le mur hydrofuge à l’aide d’un silicone. Posez et
collez le mur hydrofuge.
Installez le mur terminé. Fixez les joints entre le rebord de la baignoire et le mur terminé à l’aide du
silicone. Le silicone RTV (Vulcanisation à Température Ambiante) est conseillé.
Installez le robinet. Assemblez le jeu du robinet conformément à la notice du fabricant.
Nettoyage
Quand nettoyant après l’installation, n’utilisez pas de produits abrasifs. Les nettoyants abrasifs égratignent
et abîment la surface. Nettoyez la surface avec un savon doux et de l’eau tiède.
ATTENTION : Risque d’endommagement du produit. Ne pas laisser longtemps des produits à base
de pétrole sur la surface de la baignoire.
Les taches difficiles, la peinture ou le goudron peuvent être nettoyés en utilisant de la térébenthine ou du
solvant à peinture. Les résidus de plâtre peuvent être nettoyés au moyen d’un bord en bois. Ne pas utiliser
un grattoir en métal, une brosse en fer ou d’autres outils en métal. Il est possible d’utiliser des nettoyants en
poudre sur un linge mouillé pour une action abrasive douce.
Kohler Co. Français-7 1023717-2-B
Page 14

Guía de Instalación
Bañeras acrílicas
Herramientas y materiales
Gracias por elegir los productos de Kohler
Apreciamos su elección por la calidad de Kohler. Por favor, tome unos minutos para leer este manual antes
de comenzar la instalación. En caso de problemas de instalación o de funcionamiento, no dude en
contactarnos. Nuestros números de teléfono y nuestra página web se encuentran en la solapa posterior.
Gracias nuevamente por escoger a Kohler.
Antes de comenzar
Cumpla con todos los códigos locales de plomería y de construcción.
Desembale la bañera y revise que no tenga daños. Coloque la bañera en la caja hasta el momento de
la instalación.
Esta bañera requiere la instalación en esquina.
Antes de comenzar la instalación se deben tener todos los componentes necesarios (bañera, base,
asiento, faldón y panel). Cuando se combina esta bañera con una base, asiento, faldón y/o panel, la
secuencia necesaria de montaje es la siguiente:
•
Monte el asiento (si es pertinente) en la base.
•
Instale la base
•
Instale la bañera
•
Monte el panel (si es pertinente)
•
Instale el faldón
•
Apriete el material de ferretería y fije las bridas
•
Instale la puerta de la ducha
Escoja una estructura que tenga las medidas correctas.
Es necesario instalar la bañera en un piso nivelado y con suficiente soporte.
Kohler Co. Español-1 1023717-2-B
Page 15

Antes de comenzar (cont.)
El área interior de la bañera no requiere ningún soporte adicional siempre que el subpiso esté a
plomo y a escuadra con la estructura de travesaños. Considere el uso de cuñas como soporte
adicional, en caso de que el subpiso no esté nivelado.
Antes de instalar, asegúrese de tener acceso adecuado a las conexiones finales.
Compruebe que haya el espacio adecuado para montar y conectar la grifería.
Confirme que haya un soporte adecuado para la grifería. Las griferías grandes montadas sobre
cubierta que puedan ser utilizadas involuntariamente como medio de soporte no son apropiadas ni
seguras para esta instalación.
La bañera cumple con la norma Z124.1 del ANSI. Todas las dimensiones son nominales.
Kohler Co. Español-2 1023717-2-B
Page 16

1. Preparación del sitio
AVISO: Se debe proporcionar un piso con el soporte adecuado. Consulte el diagrama de instalación
incluido con su bañera para obtener los requisitos de carga específicos para el piso.
Verifique que el piso proporcione el soporte adecuado para su bañera y que el subpiso esté plano y
nivelado.
Esta bañera debería instalarse en una esquina.
Cuando se construya la estructura, deje espacio para los materiales de la pared acabada.
Construya una estructura de travesaños de 2x4 o de 2x6 conforme al diagrama de instalación
incluido con la bañera.
Trace la plomería según las dimensiones del diagrama de instalación. Cierre la alimentación y
verifique que no haya fugas.
A menos que la bañera se eleve para poder instalar el drenaje sobre el piso, será necesario perforar
un orificio para acomodar las conexiones del drenaje. Consulte el diagrama de instalación.
2. Instale la base (si se utiliza)
Si esta instalación requiere una base, instálela ahora conforme a las instrucciones incluidas.
3. Prepare la bañera
Instale el drenaje en la bañera según las instrucciones del fabricante. No instale el sifón en este
momento.
Coloque una lona limpia o un material similar en el fondo de la bañera. Tenga cuidado de no dañar
la superficie de la bañera.
1023717-2-B Español-3 Kohler Co.
Page 17

Tres
orificios
grandes
Pilar de la esquina
Esquina delantera
de la banera
Bloque de madera
Orificios perforados
Soporte ajustable
Tornillo
Dos tuercas
hexagonales
Reborde
superior
Asiento
Reborde lateral
Tres orificios
de fijación
Pilar de la esquina
Tornillos
4. Instale la bañera
Si el subpiso no está nivelado, utilice cuñas entre la bañera y el subpiso según sea necesario.
Obtenga ayuda para levantar con cuidado la bañera y colocarla en su lugar.
Verifique que la bañera esté nivelada y apoyada sobre todos los pies de soporte.
Inserte la pestaña del drenaje en el sifón.
NOTA: Construya un panel de acceso para facilitar el mantenimiento futuro.
Ranura debajo
del borde de la
banera
Levante
Escuadra
Instale el pilar de esquina
PRECAUCIÓN: Riesgo de daños al producto. No fuerce el pilar de la esquina al colocarlo en su lugar,
ni lo utilice para ajustar la altura o el nivel de la bañera.
Coloque el pilar en la esquina delantera sin soporte de la bañera, de manera que los tres orificios
grandes queden orientados hacia un lado de la bañera. Identifique los orificios perforados en el
bloque de madera por debajo de la bañera.
Fije el pilar de la esquina en el bloque con los dos tornillos incluidos. Apriete bien.
Si es necesario ajustar la altura del pilar de la esquina, afloje las dos tuercas hexagonales que
sostienen el soporte superior. Deslice el soporte de ajuste hacia arriba o abajo según sea necesario
para que encaje bien. Puede que necesite repetir este paso con el soporte inferior. Apriete las tuercas
hexagonales con la mano.
Para las instalaciones de bañeras solamente: Monte el panel en este momento (de ser el caso)
según las instrucciones incluidas.
Monte la base/asiento en la bañera
Para las combinaciones de bañera/base solamente
Si el asiento no está montado en la base, instálelo según las instrucciones incluidas con la base antes
de continuar.
Levante la bañera ligeramente por el extremo exterior, e inserte el reborde superior del asiento en la
ranura por debajo del borde de la bañera.
Coloque el asiento de manera que el reborde lateral quede detrás del pilar de la esquina. Alinee los
tres orificios de los sujetadores en el asiento con los del pilar de la esquina y fije los pernos y las
tuercas hexagonales sin apretar.
Kohler Co. Español-4 1023717-2-B
Page 18

Instale la bañera (cont.)
Utilice una escuadra de carpintero para cuadrar el soporte de la esquina, la bañera, la base y el
asiento con el piso. Fije bien el soporte inferior de la esquina al piso con dos tornillos.
1023717-2-B Español-5 Kohler Co.
Page 19

5. Fije la bañera a la estructura de travesaños
Inserte la pestaña del drenaje en el sifón. Verifique que la bañera esté nivelada y apoyada sobre
todos los pies de soporte.
Perfore orificios pilotos de 1/8” (3 mm) a través del reborde de clavado posterior a la altura de cada
travesaño.
Apriete los pernos del asiento/panel así como las tuercas hexagonales montadas en el pilar de la
esquina.
Apriete bien las tuercas del soporte de ajuste en el pilar de la esquina.
Perfore orificios piloto de 1/8″ (3 mm) a través de los rebordes de clavado del lado de la bañera y
base/asiento o panel en los emplazamientos donde se crucen con los travesaños.
Fije todos los rebordes de clavado a los travesaños con tornillos o clavos galvanizados.
Clave los listones de empotrar de 1/4″ (6 mm) de espesor en los travesaños para eliminar el filo del
reborde de clavado.
6. Instale la plomería
PRECAUCIÓN: Riesgo de lesiones personales. Las griferías de bañera montadas sobre el borde que
puedan ser utilizadas involuntariamente como medio de soporte no son apropiadas ni seguras para
esta instalación.
PRECAUCIÓN: Riesgo de daños a la propiedad. Asegúrese que no haya ninguna fuga en las
conexiones del drenaje.
NOTA: Proporcione acceso a todas las conexiones de la plomería para facilitar el mantenimiento futuro.
Conecte el sifón al drenaje según las instrucciones del fabricante del drenaje.
Instale la válvula de la grifería según las instrucciones del fabricante de la grifería. No instale la
guarnición de la grifería en este momento.
Abra los suministros de agua caliente y fría y compruebe que no haya fugas en las conexiones.
Deje que el agua fluya en la bañera, y compruebe que no haya fugas en las conexiones del drenaje.
Llene la bañera hasta el rebosadero y compruebe que no haya fugas.
Kohler Co. Español-6 1023717-2-B
Page 20

7. Termine la instalación
Instale el faldón según las instrucciones incluidas.
Retire con cuidado la cinta protectora del borde de la bañera.
Aplique una tira de sellador de silicona en el reborde de clavado.
Instale el material impermeable de la pared a 1/4” (6 mm) como máximo sobre la cubierta de la
bañera.
Selle las uniones entre el borde de la bañera y el material impermeable de la pared con sellador de
silicona. Adhiera el material impermeable a la pared con cinta y yeso.
Instale el revestimiento de la pared acabada. Selle las uniones entre el borde de la bañera y la pared
acabada con sellador de silicona. Se recomienda utilizar sellador RTV (Vulcanizado a temperatura
ambiente).
Instale la guarnición de la grifería según las instrucciones del fabricante de la grifería.
Limpieza
Al limpiar después de la instalación, no utilice productos de limpieza abrasivos, pues pueden rayar y
opacar la superficie de la bañera. Utilice agua tibia y un detergente líquido no abrasivo para limpiar la
superficie.
PRECAUCIÓN: Riesgo de daños al producto. No permita que los productos de limpieza que
contienen destilados de petróleo permanezcan en contacto con la superficie por largos períodos de
tiempo.
Las manchas difíciles de quitar, la pintura y el alquitrán se pueden limpiar con aguarrás y diluyente de
pintura. El yeso se puede eliminar raspando con un canto de madera. No utilice raspadores de metal,
cepillos de alambre ni otras herramientas metálicas. Se puede utilizar un detergente en polvo con un trapo
húmedo para proporcionar una acción abrasiva suave en los residuos de yeso.
1023717-2-B Español-7 Kohler Co.
Page 21

1023717-2-B
Page 22

1023717-2-B
Page 23

1023717-2-B
Page 24

USA: 1-800-4-KOHLER
Canada: 1-800-964-5590
México: 001-877-680-1310
kohler.com
©2004 Kohler Co.
1023717-2-B
 Loading...