

Page 1
BEFORE YOU BEGINBEFORE YOU BEGIN
WAKE UP
INSTALLATION INSTRUCTIONS
MIRRORS
K-13013T/K-13014T/K-13015T
·
Please read these instructions carefully to familiarize
yourself with the required tools, materials, and installation
sequences. Follow the sections that pertain to your
particular installation . This will help you avoid costly
mistakes. In addition to proper installation, read all
operating and safety instructions.
·
All information in these instructions is based upon the
latest product information available at the time of
publication. Kohler Co. reserves the right to make
changes in product characteristics, packaging, or
availability at any time without notice.
·
These instructions contain important care, cleaning, and
warranty information-
consumer.
·
Obey all electrical regulations in force at the time of
installation.
Warning! Risk of personal injury and product
damage.
not be lifted or installed by just one person.
Mirrored cabinets are very heavy and should
please leave instructions for the
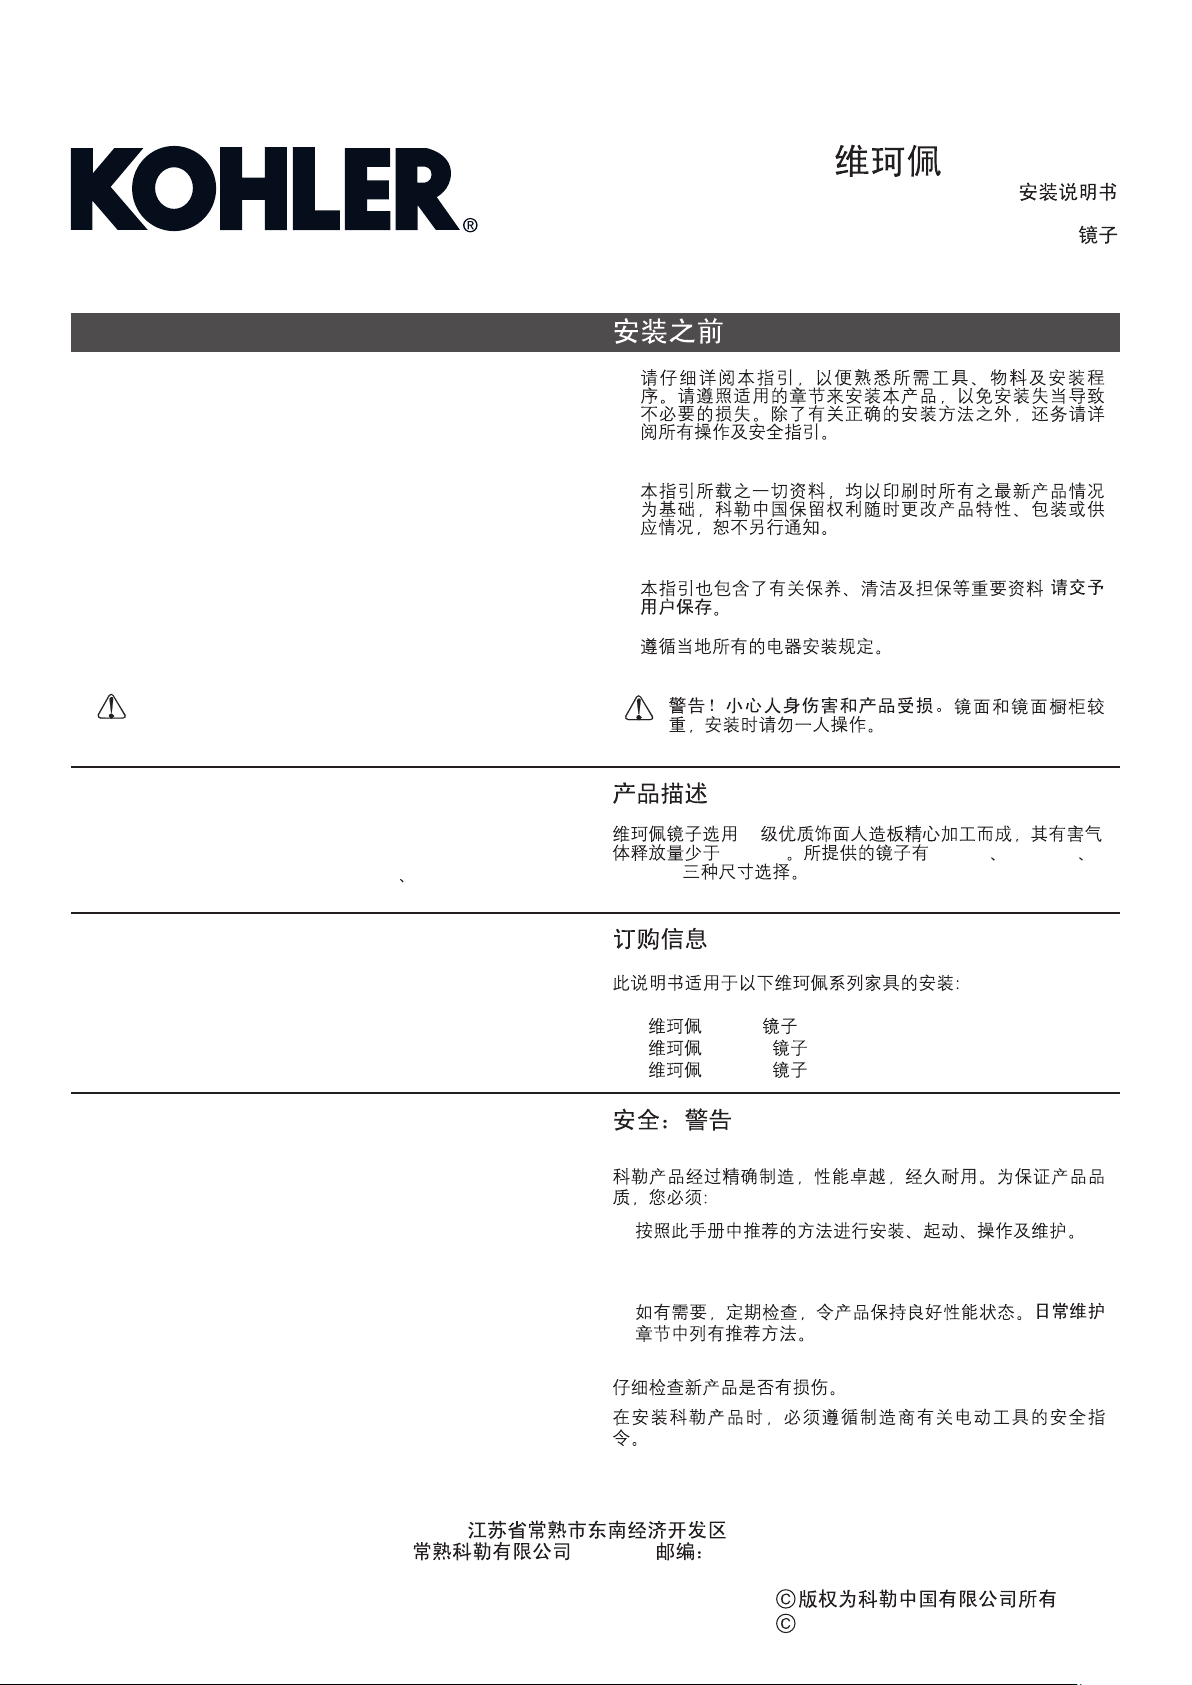
DESCRIPTION
Wake up mirror adopts E1 grade wood-based panel of high
quality, and with further processing. It,s harmful emissions will
be less than 1.5mg/L. We have 800mm 1000mm and
1200mm available for mirror.
ORDERING INFORMATION
·
·
·
·
1200mm
-
E1
1.5mg/L 800mm 1000mm
This installation covers the following products in the
UP
range:
WAKE UP F
WAKE UP F
WAKE UP F
ace Lift 800mm Mirror......................K-13013T
ace Lift 1000mm Mirror....................K-13014T
ace Lift 1200mm Mirror....................K-13015T
WAKE
SAFETY: WARNINGS
Kohler products are precision engineered and should give
continued superior and safe performance, provided:
1. They are installed, commissioned, operated and
maintained in accordance with the recommendations given
in this Manual.
2. Periodic attention is given, as necessary, to maintain the
product in good functional order. Recommended
guidelines are given in the section.
Carefully inspect the new fixture for any signs of damage.
When installing Kohler Products, manufacturers guidelines for
power tool safety should be followed.
MAINTENANCE
800mm .............................................
1000mm ...........................................
1200mm ...........................................
1.
2.
K-13013T
K-13014T
K-13015T
215500
1047424-T01-E
-1-
, 2009
Copyright Kohler China Ltd., 2009
Page 2
ROUGHING-IN
UNIT : mm
800
20
920
32
600
15442T-WT/WG 525mm(width)
800mm
Mirror Cabinet
800 167 920(LDH)
32
167
32
20
920
920
32
15440T-WT/WG 700mm(width)
1000 167 920(LDH)
INSTALLATION
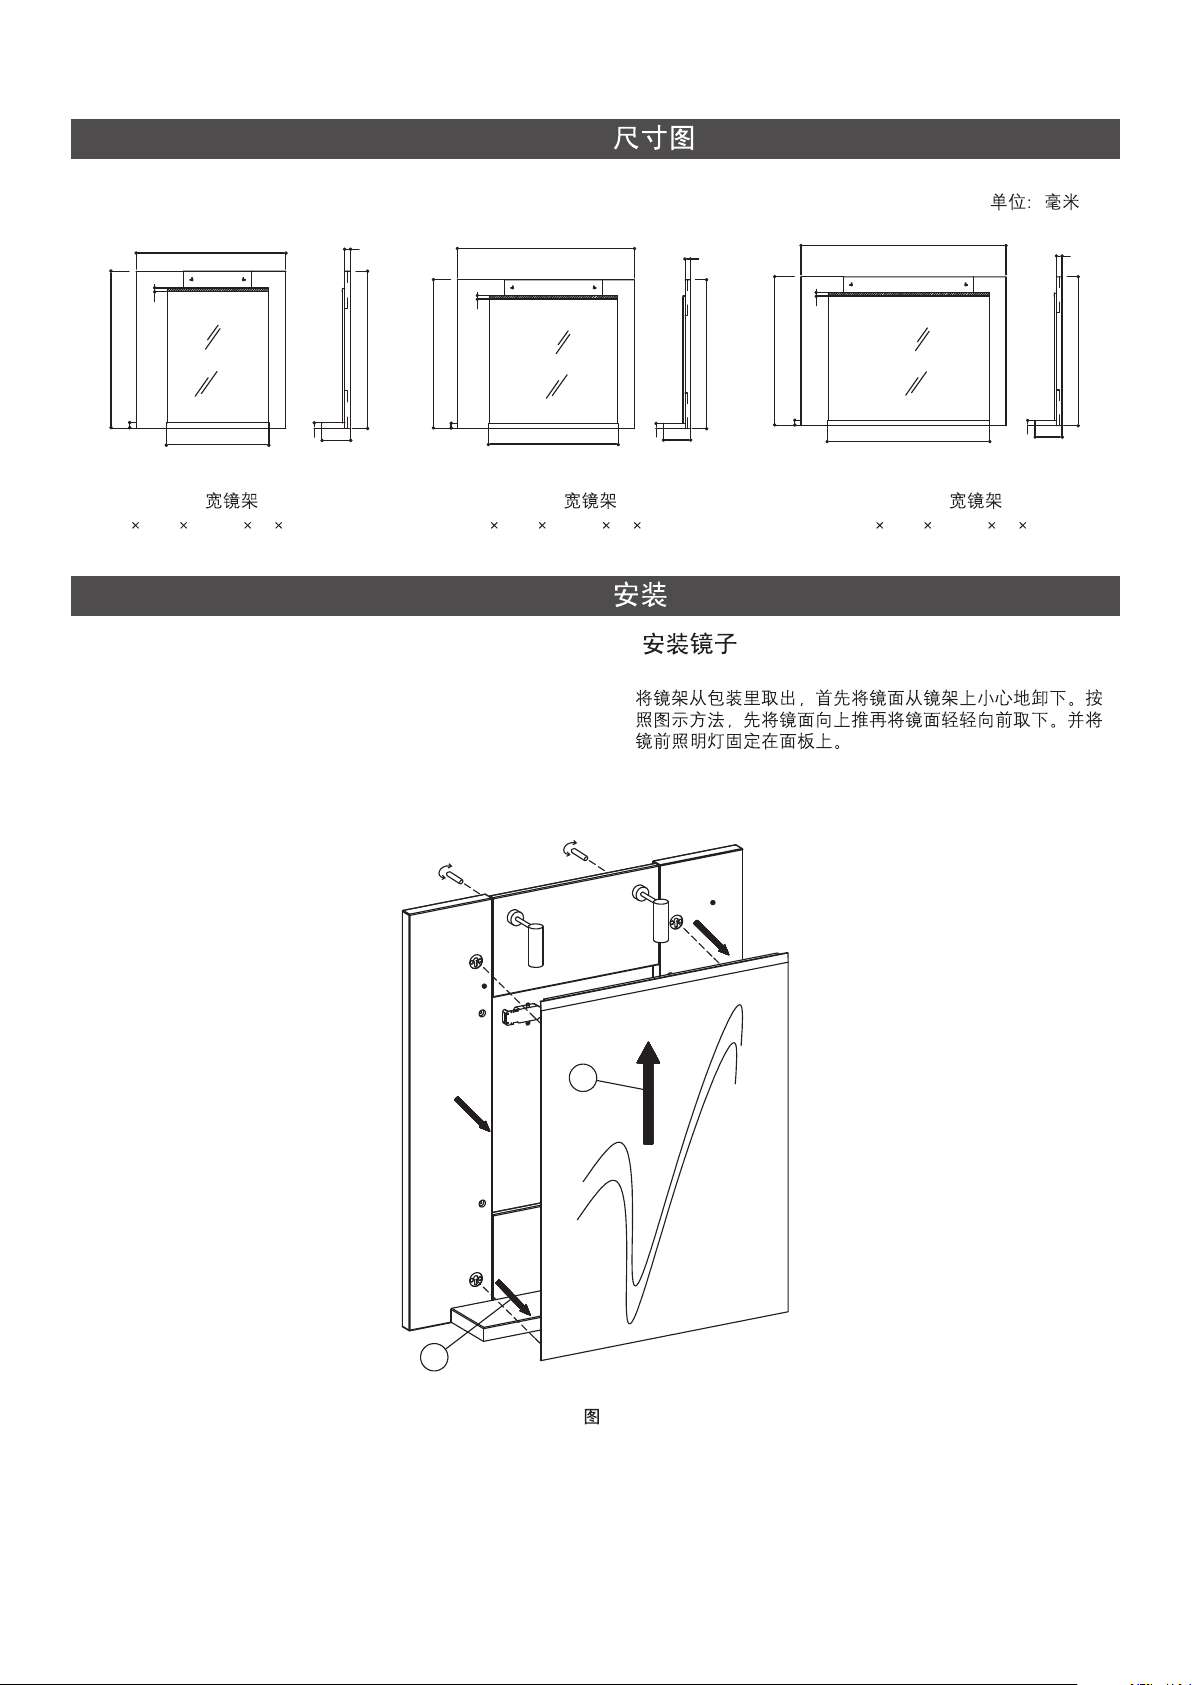
A. Install Mirror
from the frame carefully. As shown in Fig.1, push the
mirror upwards and take it down fronted lightly. Then fix
the lamps on the panel.
Caution!
drilling in the wall.
Avoid the cables and pipes inner set when
1000
800
1000mm
K-13014T K-13015TK-13013T
Mirror
A.
1.1. Take the mirror out of package, demounting the mirror
1200
32
20
920
920
32
167
32
1000
32
32
920
167
15441T-WT/WG 1050mm(width)
1200mm
Mirror
1200 167 920(LDH)
Different types of bolts are required for different
Note:
decoration boards. Please apply suitable bolts and board nuts.
2
1
Fig.1
1
1047424-T01-E
-2-
Page 3

2. Mark the position of the hole for installation on the wall
according to dimensions as illustrated. X dimension means
the width of mirror you will install. Using the level to make
sure that the holes is level.
Level
X
UNIT: mm
Caution!
Avoid the cables and pipes inner set when
drilling in the wall.
Note:
Different types of bolts are required for different
decoration boards. Please apply suitable bolts and board nuts.
2.
X
3. Ensure that the electricity supply cables (three cores) for
illumination are installed.
4. Using suitable bolts and board nuts fixed the mirror shelf
on the wall and make sure the mirror is level.
3.
4.
2075
X/2
920
175 175
300
220-240V
Fig.2
250
420
Level
2
5. If you have mirror light, please connect circuit as shown.
Warn! Risk of Electric Shock.
All circuit connections should
be made by licensed electricians, and please observe all local
electricity codes.
Warn! Risk of Electric Shock.
Cut off power before
connecting circuit.
Connect electrical source with suitable connector and put the
cable in the middle of mirror shelf.
5.
X
Fig.3
3
Fig.4
4
1047424-T01-E
-3-
Page 4

6. Installed the mirror on the shelf according to the sequence
as shown. Make sure fixed the mirror safely.
6.
B. Complete the installation
1. If you have mirror light, please connect circuit as shown.
2
1
Fig.5
5
Warn! Risk of Electric Shock.
should be made by licensed electricians, and please
observe all local electricity codes.
Warn! Risk of Electric Shock.
connecting circuit.
All circuit connections
Cut off power before
B.
1.
Fig.6
6
1047424-T01-E
-4-
Page 5

USER MAINTENANCEUSER MAINTENANCE
Warn! Risk of product damage.
1. Many cleansers contain abrasive and chemical substance
which is not suitable for cleaning stainless steel, enamel,
plating or plastic products. You may use mild cleansers or
soaps to clean the surfaces. Wipe any splashes of cleaner
solutions from the surface with clean soft cloth.
2. Maintain ventilation in the bathroom, and separate the dry
area from the damp one if conditions permit. Try to open
the door and windows of the bathroom and maintain good
ventilation.
3. Kohler bathroom cabinet are dealt with strict procedures
for damp-proof, whose good damp-proof function ensures
good performance even in bathroom of huge humidity. Yet
do not splash and pour water directly on the bathroom
cabinet. Make sure that the bathroom is not over damp
and wipe any splashes from surfaces immediately.
4. Maintenance of door board: Clean and wipe door board
regularly, and wipe the condensation vapor with dry and
soft cloth.
5. Ensure that electrical connections for appliances such as
head lamp is insulated ; wipe mirror surface with chamois
regularly to guarantee the persistent excellent performance.
6. If any fixtures caused by abnormal reasons, Kohler China
can supply paid replacement for service parts caused by
abnormal reasons as shown in the next page in the limited
duration of warranty.
1.
2.
3.
4.
5.
6.
1047424-T01-E
-5-
 Loading...