

Page 1
Installation Guide
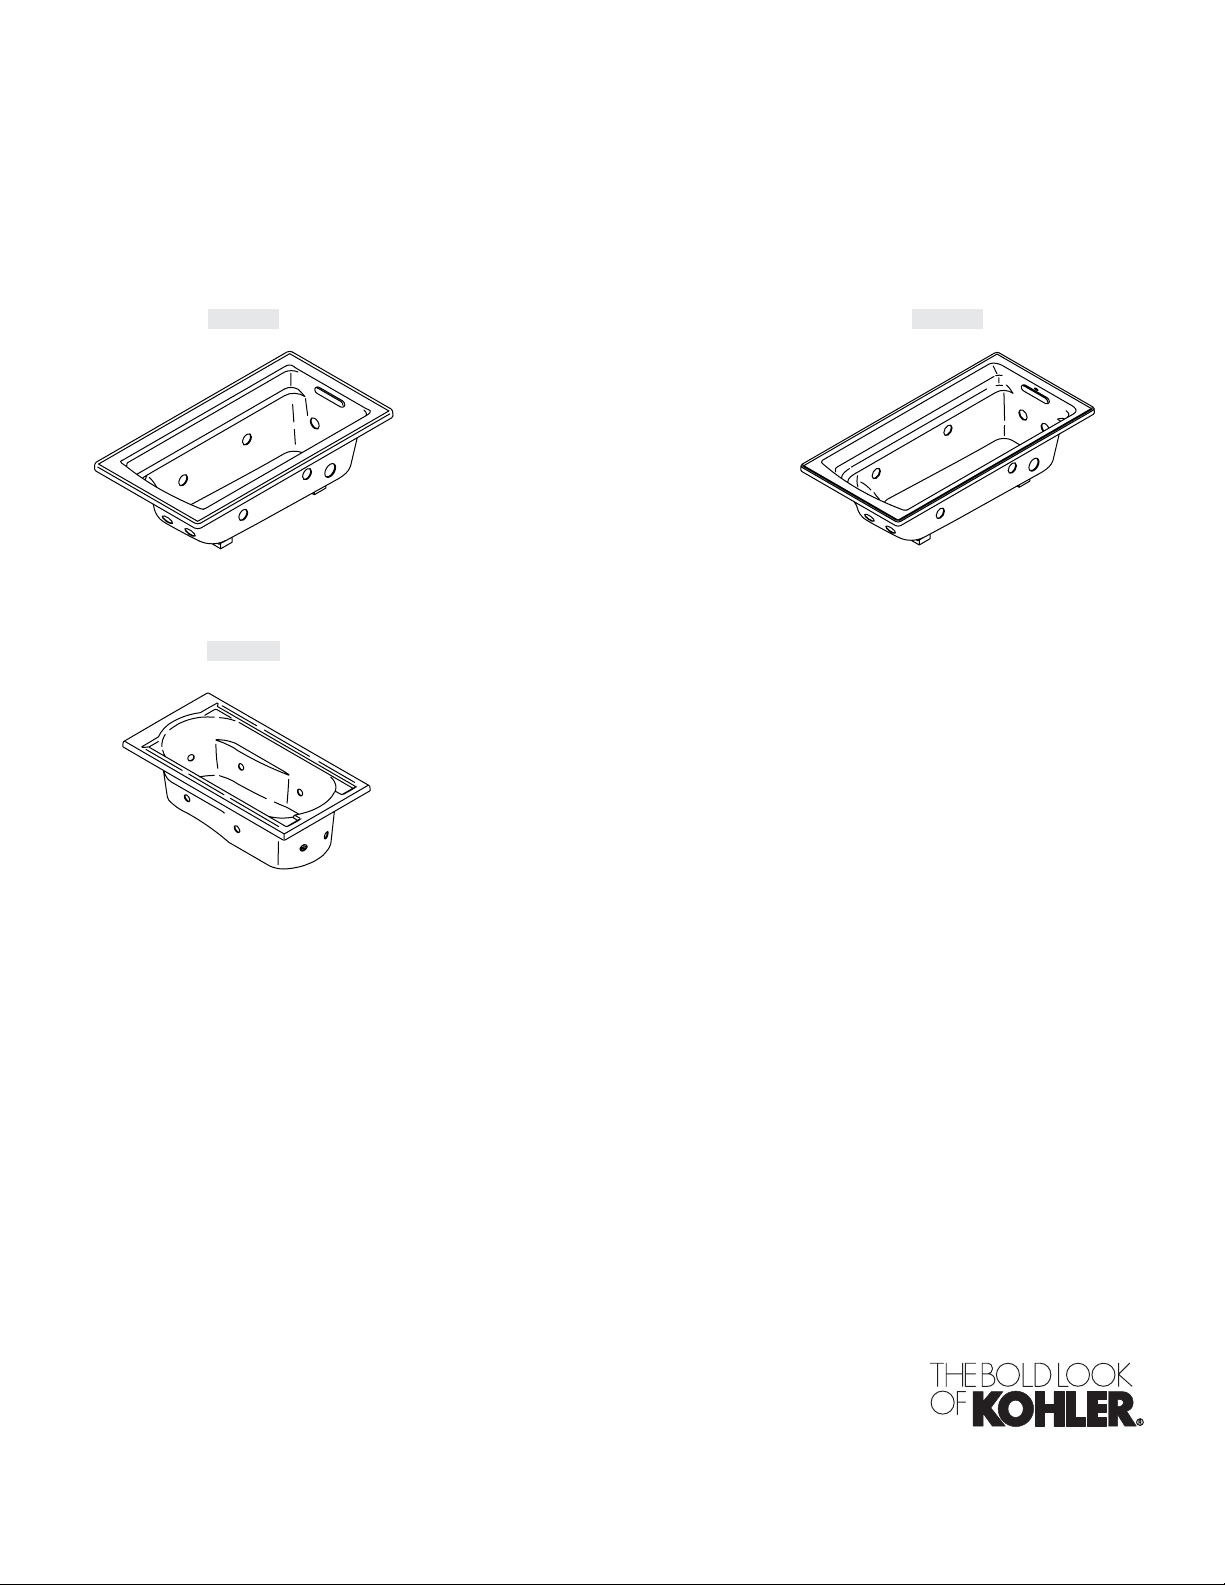
Bath Whirlpool
K-1122 K-1124
K-1357
M product numbers are for Mexico (i.e. K-12345M)
Los números de productos seguidos de M corresponden a México
(Ej. K-12345M)
Français, page “Français-1”
Español, página “Español-1”
1010997-2-F
Page 2
Important Information
WARNING: When using electrical products, basic precautions should always be followed,
including the following:
DANGER: Risk of electric shock. Connect only to a circuit protected by a Ground-Fault
Circuit-Interrupter (GFCI).
Building materials and wiring should be routed away from the pump body and other heat-producing
components of the unit.
Install to permit access for servicing.
Grounding is required. The unit should be installed by a qualified service representative, and grounded.
WARNING: Risk of electric shock. A qualified electrician should make all electrical connections.
WARNING: Risk of electric shock. Disconnect power before servicing.
WARNING: Risk of injury or property damage. Please read all instructions thoroughly before
beginning installation, including the following requirements.
NOTICE: Follow all local plumbing and electrical codes.
Product Information
Electrical Requirements
The installation must have a Class A Ground-Fault Circuit-Interrupter (GFCI) or Residual Current Device
(RCD). The GFCI or RCD protects against line-to-ground shock hazard. Use a 120 V, 15 A, 60 Hz dedicated
service for the whirlpool.
″H″ models require a separate 120 V, 15 A, 60 Hz dedicated circuit for the in-line heater.
NOTE: If the pump supply cord is damaged, it must be replaced by the manufacturer, its service agent or
similarly qualified persons in order to avoid a hazard. The heater supply cord cannot be replaced. If the
cord is damaged the heater should be replaced.
Product Notices
WARNING: Unauthorized modification may cause unsafe operation and poor performance of the
whirlpool. Do not relocate the whirlpool pump, or make other modifications to the whirlpool
system, as this could adversely affect the performance and safe operation of the whirlpool. Kohler
Co. shall not be liable under its warranty or otherwise for personal injury or damage caused by any
such unauthorized modification.
WARNING: Risk of electrical shock. Disconnect power before servicing.
WARNING: Risk of electrical shock. A qualified electrician should make all electrical connections.
WARNING: Risk of injury or property damage. Please read all instructions thoroughly before
beginning installation.
NOTICE: Follow all local plumbing and electrical codes.
Factory-Assembled Features
Factory installed components include pump with power supply cord and air switch transmitter. No
installation is needed.
″H″ models are supplied with a factory assembled in-line heater.
The whirlpool pump and piping are factory-assembled.
1010997-2-F 2 Kohler Co.
Page 3

Product Information (cont.)
Connections and Service Access
Before installation, ensure proper access to the final connections.
NOTICE: Provide unrestricted service access to the pump. You must provide access for servicing the
pump and controls. The access must be located immediately next to the pump. Study the Roughing-In
Guide packed with the whirlpool.
Table of Contents
Important Information .............................................................. 2
Product Information ............................................................... 2
Tools and Materials ............................................................... 3
Before You Begin ................................................................. 3
Prepare the Site ................................................................. 4
Prepare the Whirlpool ............................................................. 4
Secure the Unit .................................................................. 5
Cut the Pump Banding Straps ....................................................... 6
Install the Plumbing ............................................................... 6
Make Electrical Connections ......................................................... 7
Test Run the Whirlpool ............................................................. 7
Complete the Finished Deck ......................................................... 8
Clean-Up After Installation .......................................................... 8
Confirm Proper Operation .......................................................... 9
Troubleshooting .................................................................. 9
Tools and Materials
Plus:
• Conventional woodworking tools
and materials
Sealant
Safety
Glasses
Ta pe
Measure
Pipe Wrench
Pencil
Level
Tin Snips
Drill
• Drop cloth
• #6 large-head galvanized nails
• 2x4's
• Screws or lag bolts
• Construction Adhesive (optional)
• Cement or mortar (optional)
Before You Begin
Inspect the whirlpool for damage before you begin installation.
Confirm adequate mounting and connection space for the faucet specified for your installation.
Kohler Co. reserves the right to make revisions in the design of products without notice, as specified
in the Price Book.
Kohler Co. 3 1010997-2-F
Page 4
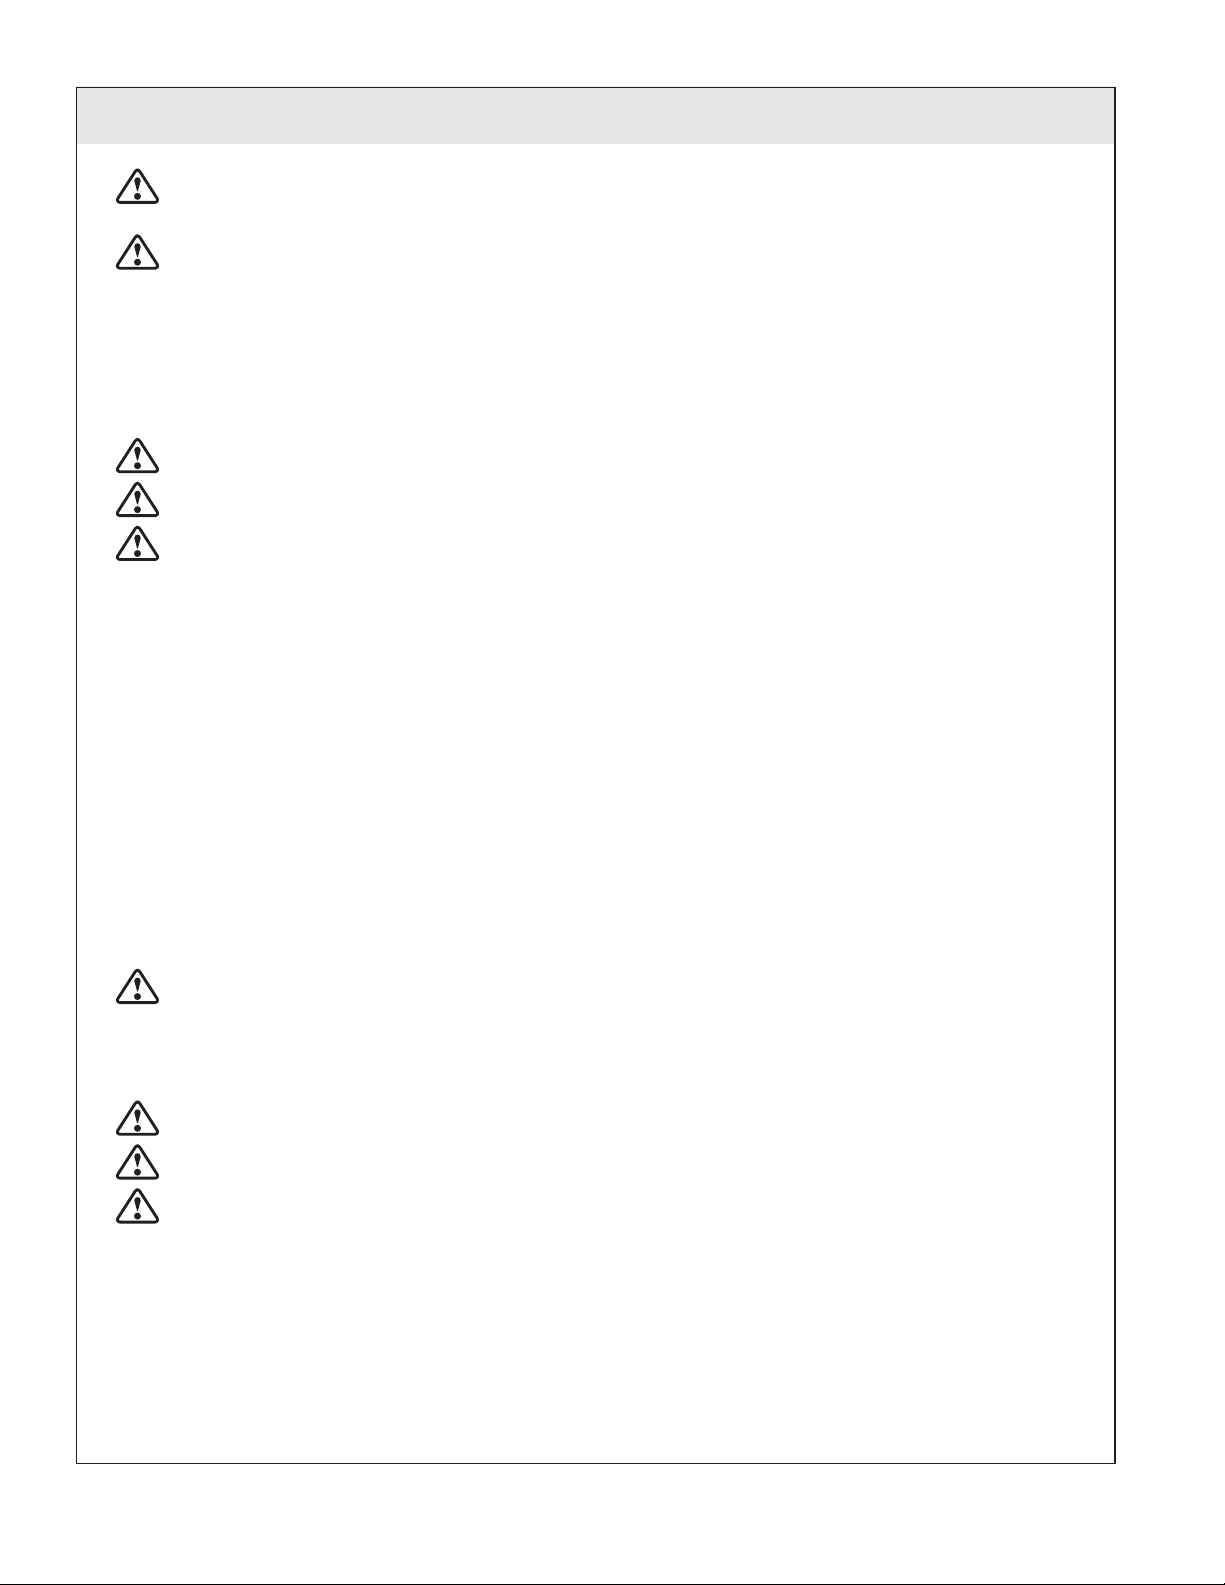
Frame the floor
Position the rough
plumbing.
Construct 2x4 or 2x6
stud framing according
to the roughing-in
information.
according to the
roughing-in information.
Verify that the subfloor
offers adequate support,
and is flat and level.
1. Prepare the Site
NOTICE: Refer to the Roughing-in Guide packed with your whirlpool for the required minimum
lb/square foot (kg/square meter) floor support loading.
Make sure the flooring offers adequate support for your whirlpool, and verify that the subfloor is
flat and level.
NOTICE: The whirlpool should be installed in a drop-in installation.
Construct 2x4 or 2x6 stud framing for your installation.
NOTICE: The whirlpool must be supported by its feet or base. Do not support the load weight of the
whirlpool by the perimeter of the rim.
For a raised installation: Frame the floor or construct a frame in accordance with the roughing-in
information packed with the whirlpool.
Position the plumbing according to the roughing-in information packed. Cap the supplies, and
check for leaks.
2. Prepare the Whirlpool
Install the drain to the whirlpool according to the drain manufacturer’s instructions. Do not connect
the trap at this time.
Position a clean drop cloth or similar material in the bottom of the whirlpool. Be careful not to
scratch the surface of the whirlpool.
1010997-2-F 4 Kohler Co.
Page 5
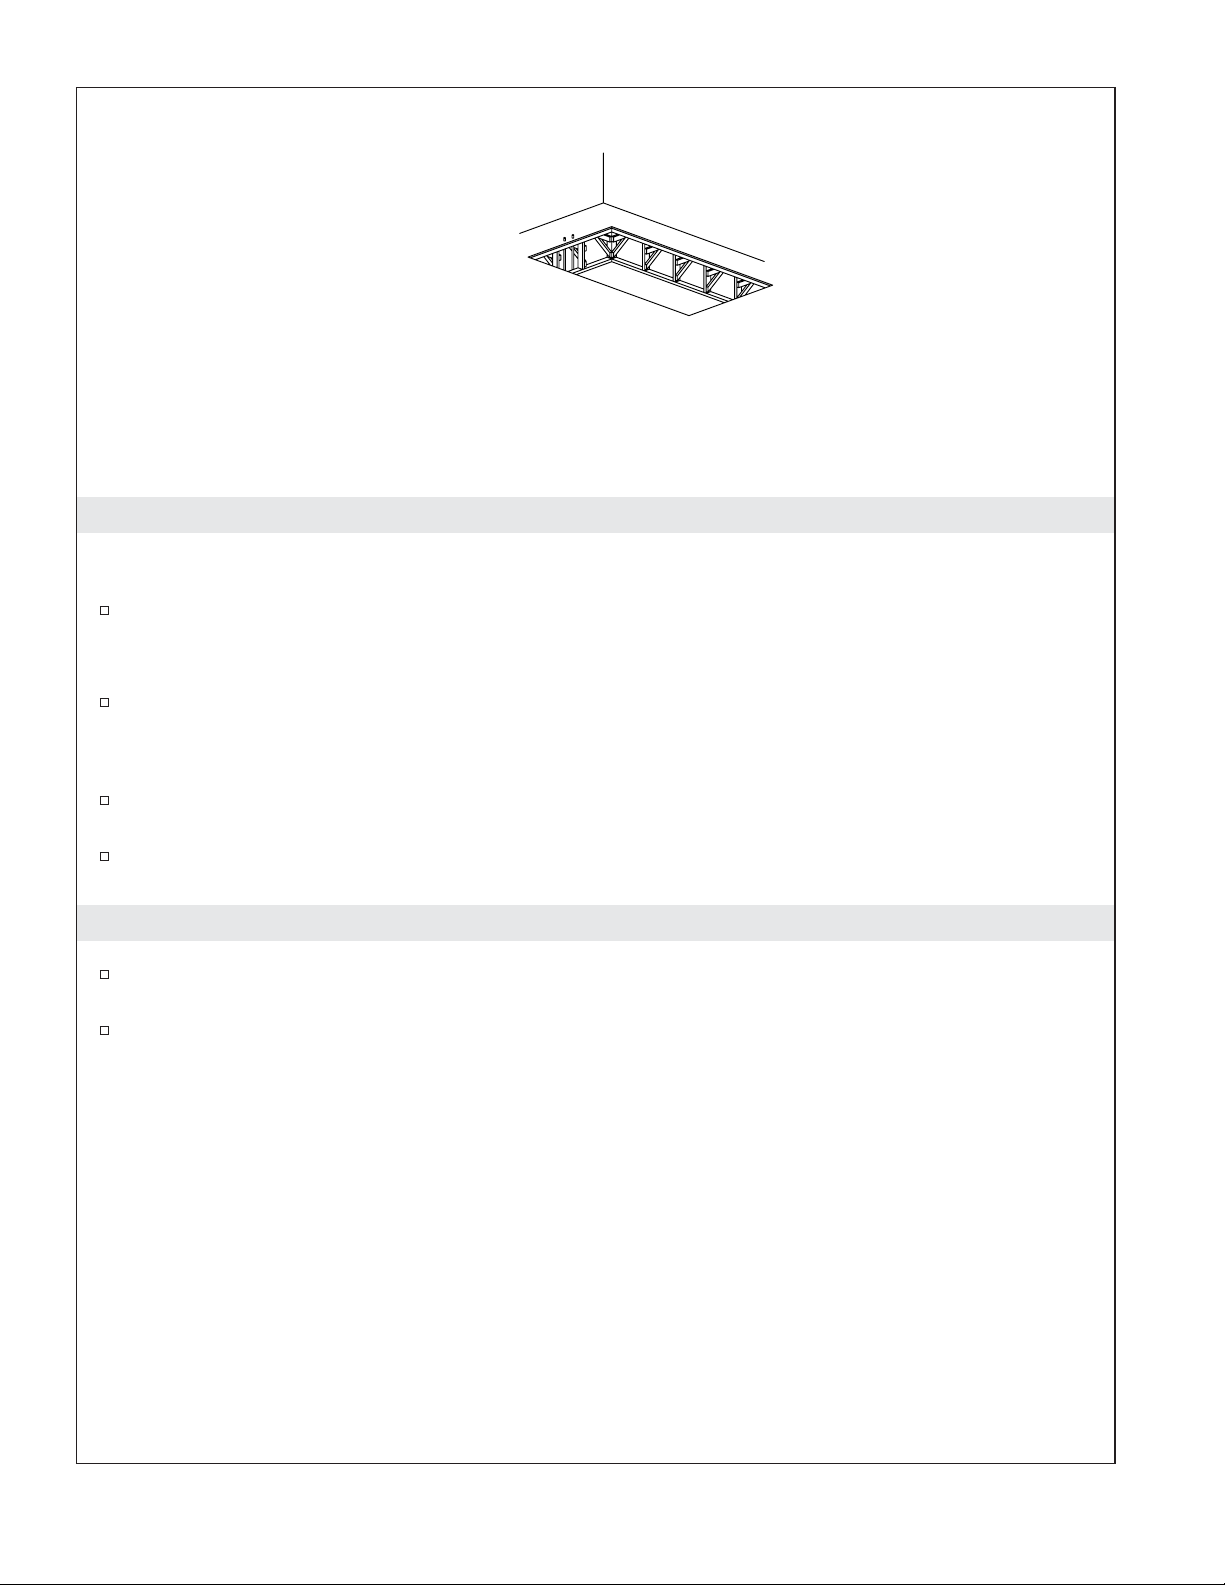
Spread a 2" (5.1 cm) layer of
cement or mortar bed material.
Apply a bead of silicone
sealant around the entire rim.
Clear space for pump.
Clear spaces for
support blocks.
Apply construction adhesive
to the support blocks.
3. Secure the Unit
NOTICE: Do not lift the whirlpool by the piping or pump, or use the piping or pump for structural
support of the whirlpool. To avoid damage to the whirlpool, lift at the sides of the whirlpool.
NOTICE: Do not support the load weight of the whirlpool by the perimeter of the rim. The rim perimeter
must be adequately supported, but must not support the load weight of the whirlpool.
If the subfloor is not level, shim the whirlpool support blocks as necessary.
Choose the installation option that best applies to your particular installation. Follow the appropriate
instructions.
Option Using a Cement or Mortar Bed
NOTE: Do not use gypsum cement or drywall compound for this application, as they will not provide an
acceptable, durable bond.
NOTE: The pump support bracket (when the pump banding straps are cut) and support blocks must
rest directly on the subfloor.
Spread a 2″ (5.1 cm) thick layer of cement or mortar on the subfloor where the whirlpool will be set.
This will help secure, level, and support the unit. Clear all the material away from the pump
support bracket and support block locations.
Position a piece of plastic drop cloth material on top of the cement or mortar bed. With help,
carefully lift the whirlpool into place, and make sure the pump support bracket and support blocks
do not rest in the bed material.
Secure the drain tailpiece to the trap. Ensure the whirlpool is level and resting on all support blocks.
Option Using Construction Adhesive
Apply a generous amount of high-quality construction adhesive to the bottom of the support blocks.
With help, carefully lift the whirlpool into position.
Insert the drain tailpiece into the trap. Ensure the whirlpool is level and resting on all support
blocks.
Option Using Silicone Sealant
With help, carefully lift the whirlpool into position.
Insert the drain tailpiece into the trap. Ensure the whirlpool is level and resting on all support
blocks.
Remove the protective tape from the rim. Apply a continuous bead of high-quality silicone sealant
around the entire rim of the whirlpool.
Kohler Co. 5 1010997-2-F
Page 6
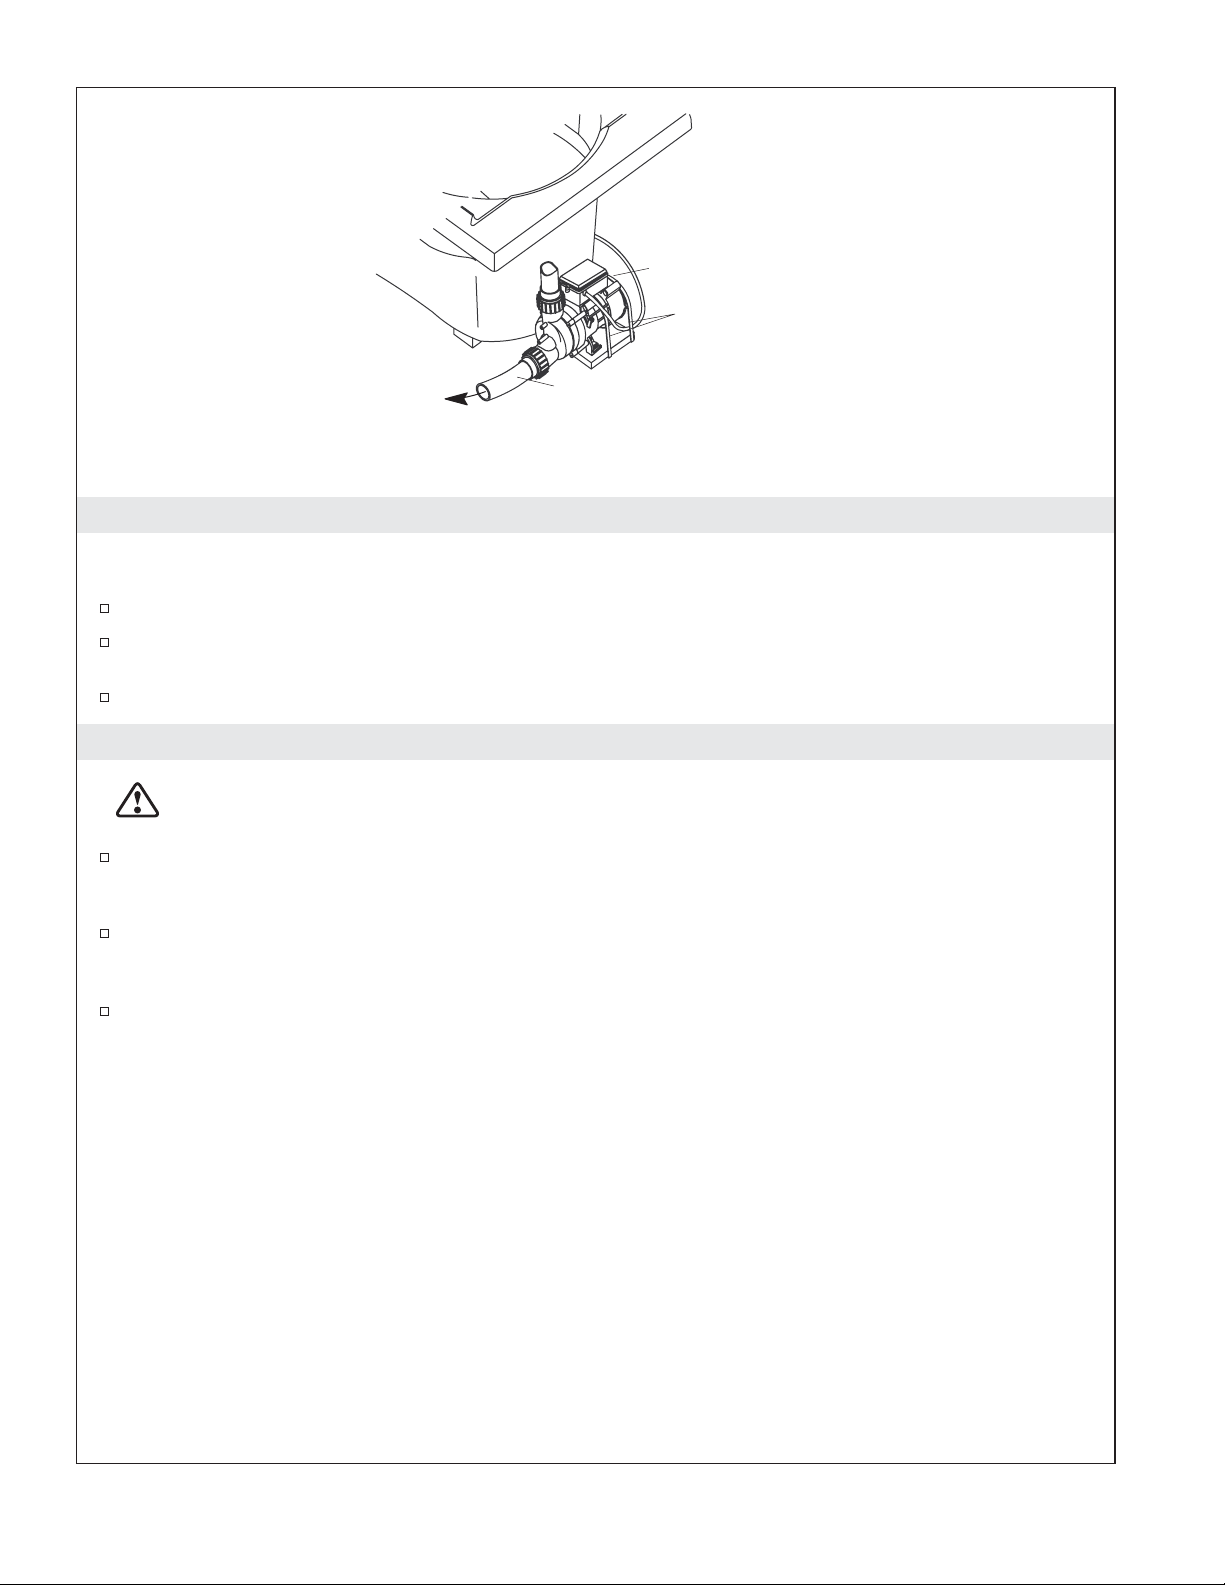
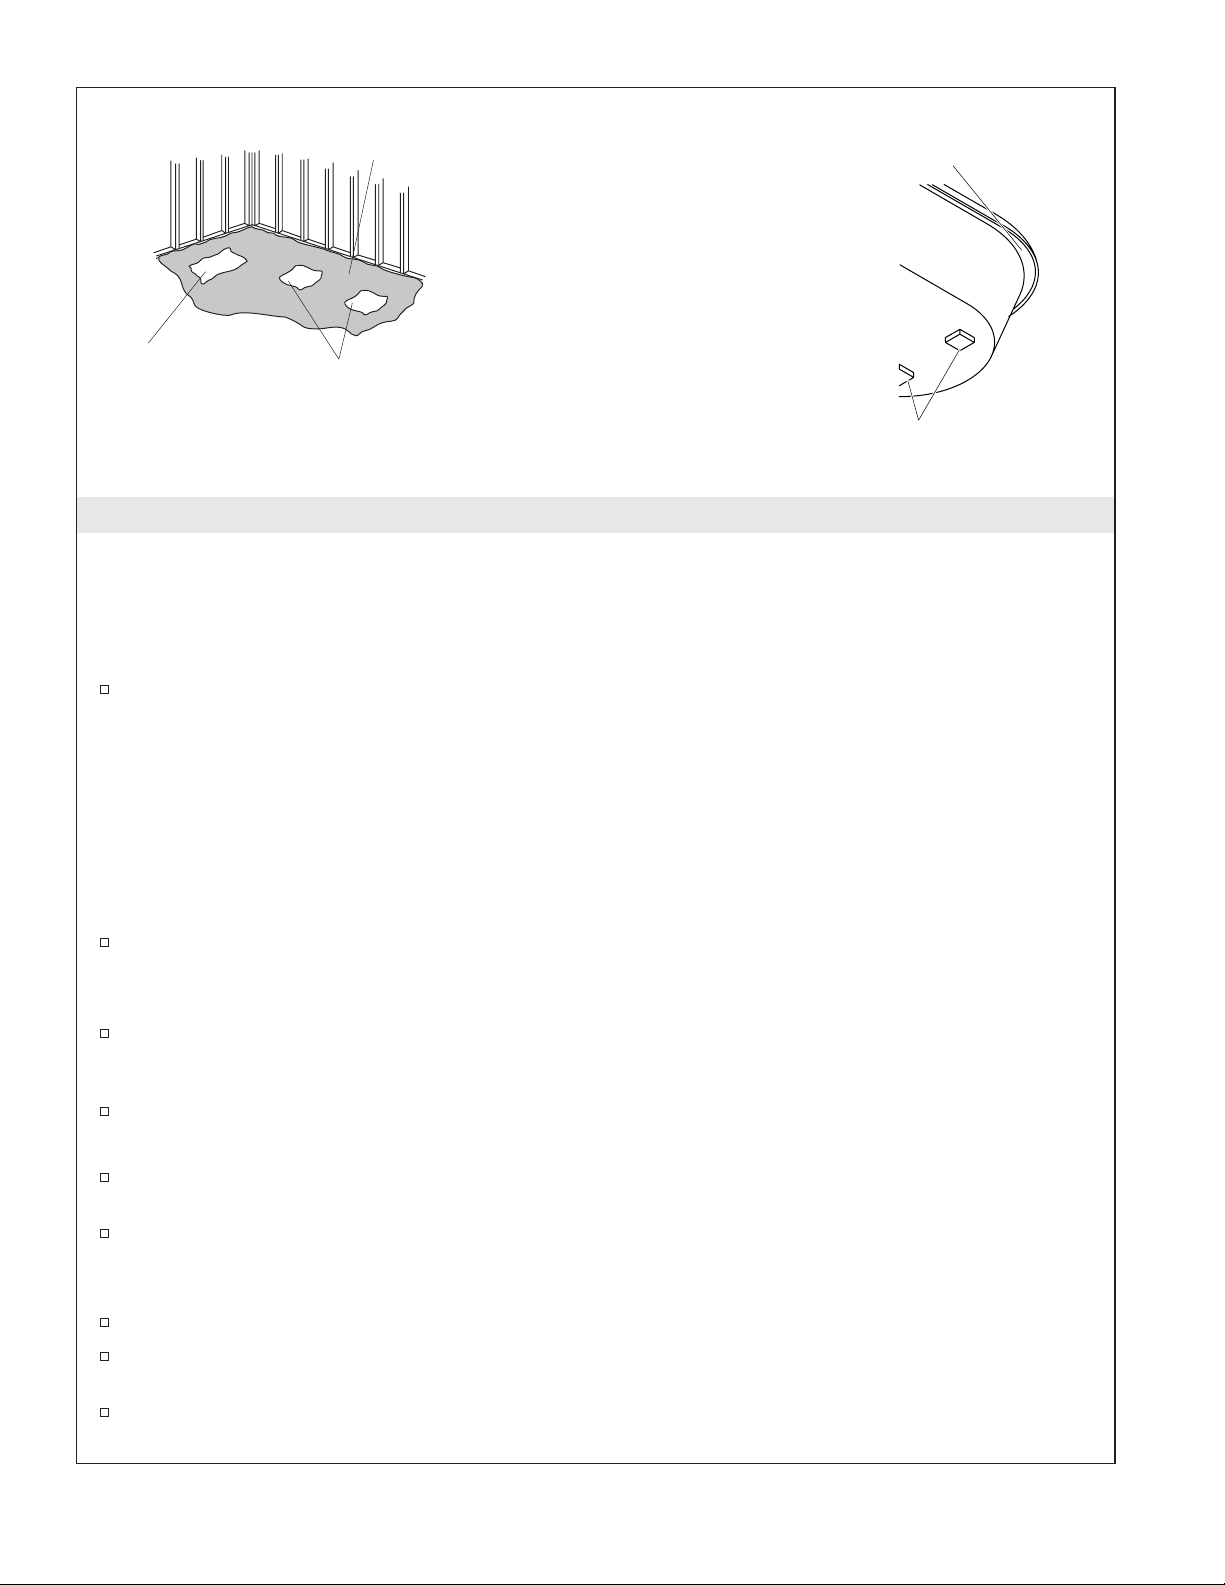
Pump
Cut the pump
banding straps.
Drainage
NOTE:
Pump model illustrated may differ from your
actual product.
Suction Line
4. Cut the Pump Banding Straps
IMPORTANT! This step is necessary to make your Kohler whirlpool operate more quietly.
Use tin snips to cut the two pump banding straps.
To minimize whirlpool noise and vibration, be sure the pump is not in direct contact with the
shipping bracket after the pump banding straps are cut.
Remove and discard the straps.
5. Install the Plumbing
CAUTION: Risk of property damage. A watertight seal must exist on the whirlpool drain. The
watertight seal will prevent property damage.
Connect the drain to the trap according to the drain manufacturer’s instructions.
NOTICE: An access panel will simplify future maintenance.
Install the faucet valving according to the faucet manufacturer’s instructions. Do not install the
faucet trim until instructed. Open the hot and cold water supplies, and check the supply
connections for leakage.
Run water into the whirlpool, and check the drain connections for leakage.
1010997-2-F 6 Kohler Co.
Page 7
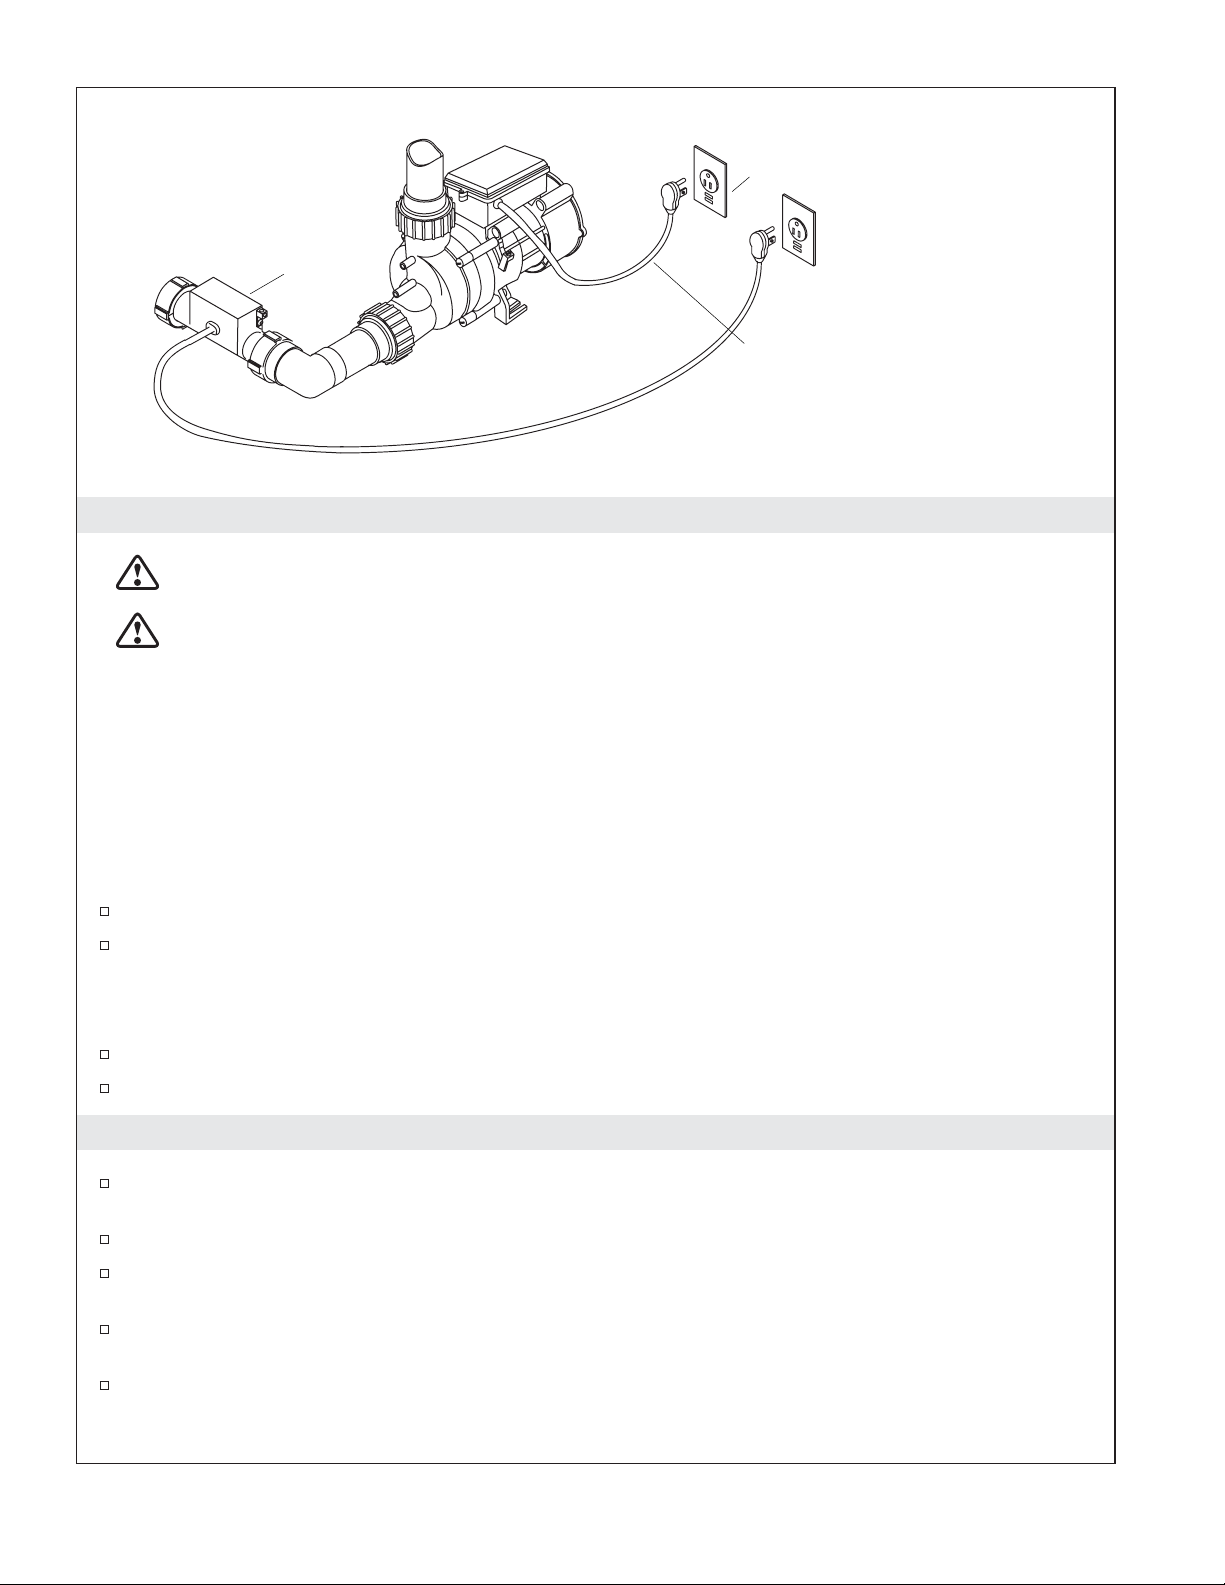
Plug the pump
Bond in accordance
with applicable codes.
Heater
into this outlet.
Install second GFCIprotected outlet for "H"
models for the in-line heater.
Install a GFCIprotected 120 V, 15 A
grounded outlet.
6. Make Electrical Connections
WARNING: Risk of electric shock. Make sure the power has been disconnected before performing
the following procedures.
WARNING: Risk of electric shock. Connect the pump and in-line heater (if included) to properly
grounded, grounding-type receptacles protected by Ground-Fault Circuit-Interrupters (GFCI’s) or
Residual Current Devices (RCD’s). Do not remove the grounding pins from the plug. Do not use
grounding adapters.
NOTE: A label identifying the model number and electrical rating of the whirlpool is located near the
whirlpool pump.
NOTICE: The pump (supplied) and heater (if supplied) are equipped with a cord and plug. All wiring for
the heater has been completed at the factory. A qualified electrician must install a GFCI- or RCD-protected,
120 V, 15 A, grounded outlet. No other load should be on this circuit.
Pump Wiring
Locate the outlet behind the whirlpool, and within 24″ (61 cm) of the pump.
Plug the pump into this outlet.
NOTE: Make sure the air actuator tubing is securely attached to the pump, and is not kinked or damaged.
Heater Wiring – “H” Models
Locate the outlet behind the whirlpool, and within 24″ (61 cm) of the heater.
Plug the heater into this outlet.
7. Test Run the Whirlpool
Check all electrical connections, and make sure the electrical power to the whirlpool and heater (if
equipped) is on.
Make sure all union connections to the pump and heater are securely hand tightened.
Verify that the pump banding straps have been cut (if applicable), and that the pump is resting
directly on the subfloor or whirlpool base.
Fill the whirlpool to a level at least 2″ (5.1 cm) above the top of the highest jet. Refer to ″Confirm
Proper Operation″ section for additional information.
Operate the whirlpool for 5 minutes, and check all whirlpool piping connections for leaks.
Kohler Co. 7 1010997-2-F
Page 8
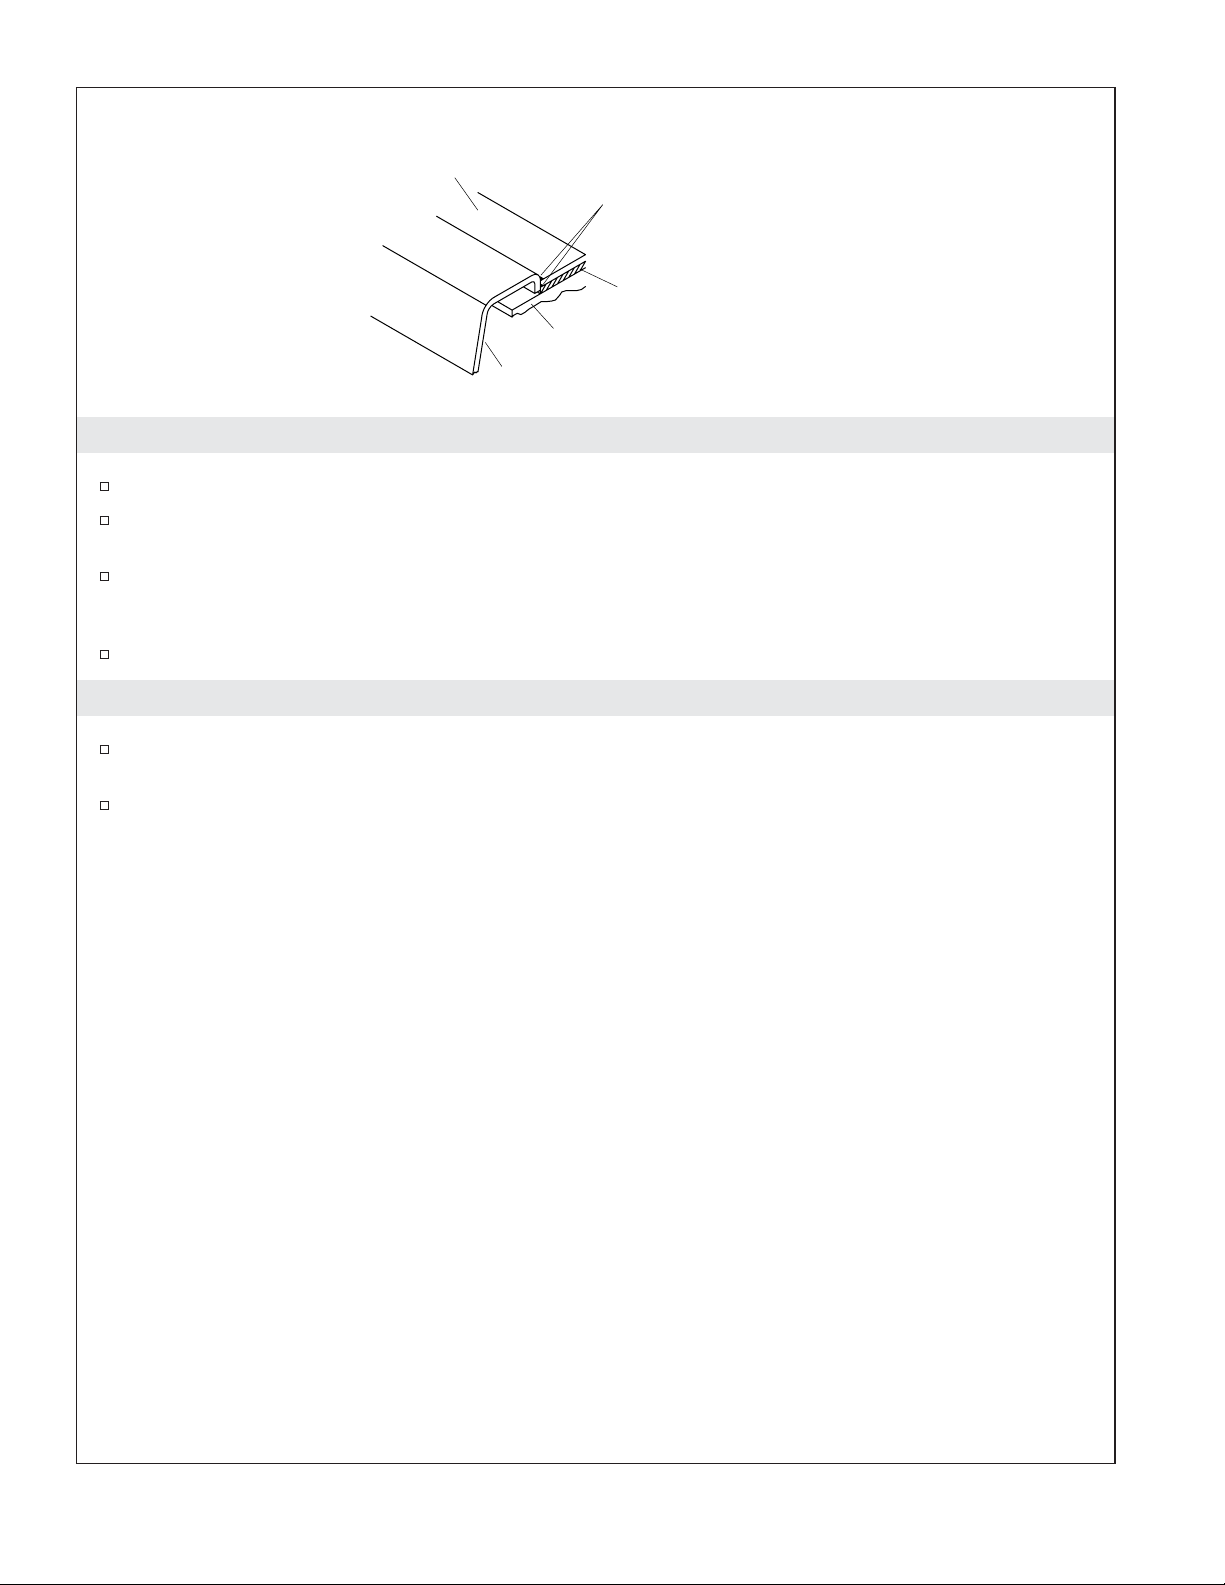
Finished Deck
Material
Whirlpool
Apply silicone sealant to the
edges of the water-resistant
deck material and the
finished deck
Water-Resistant
Deck Material
Framing
8. Complete the Finished Deck
If you have not already done so, carefully remove the protective tape from the whirlpool rim.
Cover the framing with water-resistant deck material. Seal the joints between the whirlpool rim
edge and the water-resistant deck material with silicone sealant.
Tape and mud the water-resistant deck material. Install the finished deck to the water-resistant deck
material. Seal the joints between the whirlpool rim and the finished deck material with silicone
sealant.
Install the faucet trim according to the trim manufacturer’s instructions.
9. Clean-Up After Installation
When cleaning up after installation, do not use abrasive cleansers, as they may scratch and dull the
whirlpool surface. Use warm water and a liquid detergent to clean the surface.
Remove stubborn stains, paint, or tar with turpentine or paint thinner. Do not allow cleaners
containing petroleum distillates to remain in contact with any whirlpool surfaces for long periods
of time. Remove plaster by carefully scraping with a wood edge. Do not use metal scrapers, wire
brushes, or other metal tools. Use a powder-type detergent on a damp cloth to provide mild
abrasive action to any residual plaster.
1010997-2-F 8 Kohler Co.
Page 9
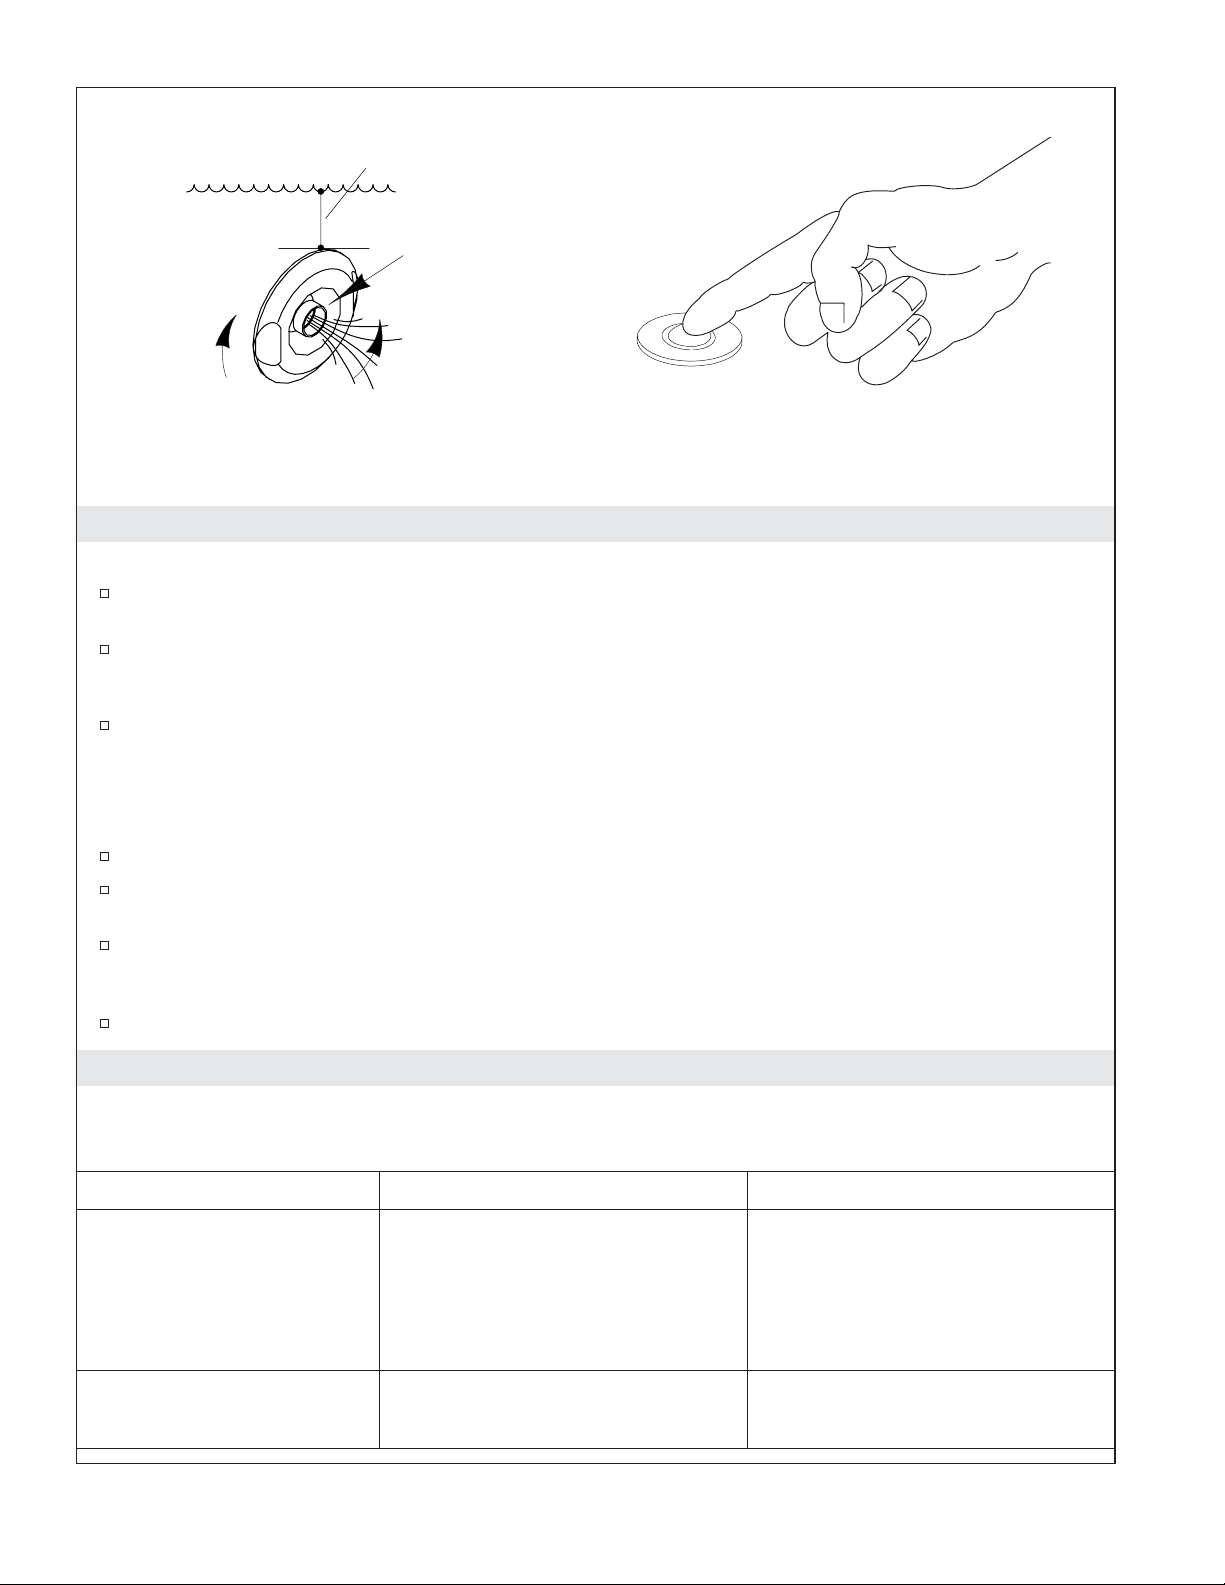
Turn the jet trim ring
clockwise to
decrease the flow.
Fill with water at least 2" (5.1 cm)
above the highest jet.
Position the jet
nozzles to direct
the water flow as
desired.
Turn the jet trim ring counterclockwise
to increase the flow.
Press the air actuator to turn
on and off the whirlpool.
10. Confirm Proper Operation
Fill the Whirlpool
Position the jet nozzles so they face down toward the basin. Turn the jet trim rings fully
counterclockwise.
Fill the whirlpool to a water level at least 2″ (5.1 cm) above the top of the highest jet.
NOTE: The water temperature in the whirlpool should not exceed 104°F (40°C).
To service orifices insert a pencil into the end of the jet nozzle and push the orifice out. After
removing any blockage, check the orifice to make sure it is clear and press it into the jet housing.
NOTE: Orifices are only installed in whirlpool jets when there are six or more jets in the whirlpool system.
Operating Sequence
Press the air actuator to turn on the whirlpool jets.
Adjust each jet for optimum air/water mixture. Turn the trim ring clockwise to reduce the air flow,
and counterclockwise to increase the air flow.
If equipped with a heater, the heater will engage automatically when the pump is turned on and
will disengage when the pump is turned off. The heater will not turn on if the water temperature
exceeds 104°F (40°C).
Press the air actuator a second time to turn off the whirlpool.
Troubleshooting
NOTICE: This section is for general aid only. A Kohler Authorized Service Representative or qualified
electrician should correct any electrical problems. For warranty service, contact your dealer or wholesale
distributor.
Symptoms Probable Causes Recommended Action
1. Whirlpool does not start
or stop.
2. Motor starts, not all jets
are functioning.
Kohler Co. 9 1010997-2-F
A. No power to motor. A. Set/reset the GFCI or RCD;
B. Air actuator does not work. B. Replace air actuator.
C. Air actuator tubing is
disconnected, loose, kinked,
plugged, or damaged.
D. Motor/pump does not work. D. Rebuild or replace motor/pump.
A. Jet is closed. A. Rotate jet trim ring
B. Jets are blocked. B. Remove blockage.
check wiring.
C. Connect, straighten, clean, or
replace air actuator tubing.
counterclockwise to open.
Page 10
Troubleshooting (cont.)
Symptoms Probable Causes Recommended Action
3. Whirlpool stops
A. The GFCI or RCD trips. A. Identify fault source and correct.
automatically before 18
minutes.
B. Suction blocked. B. Remove obstruction.
C. Jets are blocked. C. Remove blockage.
D. Motor overheated and protection
device activated.
D. Check for blockage at motor
vents. Remove blockage and
allow motor to cool.
Check for suction blockage.
Remove blockage and allow
motor to cool.
Check for jet blockage. Remove
blockage and allow motor to
cool.
4. Noisy operation. A. Pump banding straps have not
been cut. (Models with support
A. Cut pump banding straps with
tin snips.
blocks only.)
5. Heater does not operate.
A. No power to heater. A. Reset the GFCI or RCD.
(“H” models only)
B. Water temperature exceeds 104° F
(40° C).
B. Allow water to cool and heater
will reengage.
C. Heater does not work. C. Replace heater.
1010997-2-F 10 Kohler Co.
Page 11
Guide d’installation
Baignoire à hydromassage
Informations importantes
AVERTISSEMENT : Lors de l’utilisation des produits électriques, des précautions de base
doivent toujours être observées, incluant ce qui suit :
DANGER : Risque d’électrocution. Raccorder uniquement à un circuit protégé par un disjoncteur
de fuite de terre (GFCI).
Les matériaux de construction et le câblage devraient être acheminés loin du corps de la pompe et des autres
composants qui dégagent de la chaleur de l’unité.
Installer de façon à permettre l’accès pour l’entretien.
Une mise à la terre est requise. L’unité doit être installée par un représentant qualifié, et mise à la terre.
AVERTISSEMENT : Risque d’électrocution. Un électricien qualifié devrait effectuer toutes les
connexions électriques.
AVERTISSEMENT : Risque d’électrocution. Débrancher l’alimentation avant de procéder à
l’entretien.
AVERTISSEMENT : Risque de blessures ou d’endommagement du matériel. Veuillez s’il vous
plaît lire avec attention toutes les instructions avant de commencer l’installation, y compris les
conditions suivantes:
AVIS : Respecter tous les codes de plomberie et électriques locaux.
Information sur le produit
Branchements électriques requis
L’installation électrique doit avoir un Disjoncteur de Fuite de Terre (GFCI) ou un appareil de courant
résiduel (RCD) de classe A. Le GFCI ou le RCD protège contre une électrocution par la mise à la terre.
Utiliser une alimentation de 120 V, 15 A, 60 Hz dédiée à la baignoire à hydromassage.
Les modèles«H»nécessitent une alimentation dédiée de 120 V, 15 A, 60 Hz pour le chauffe-eau en ligne.
REMARQUE : Si le câble d’alimentation de la pompe est endommagé, il doit être remplacé par le
fabricant, son représentant ou autre personnel similaire qualifié pour éviter tout danger. Le cordon
d’alimentation du chauffe-eau ne peut pas être remplacé. Si le cordon est endommagé, le chauffe-eau
devrait être remplacé.
Notices du produit
AVERTISSEMENT : Des modifications non approuvées pourraient provoquer un fonctionnement
dangereux ou un mauvais fonctionnement de la baignoire à hydromassage. Ne pas déplacer la
pompe d’hydromassage ou effectuer d’autres modifications au système d’hydromassage car cela
pourrait affecter les performances et la sécurité de la baignoire à hydromassage. Kohler Co. décline
toute responsabilité sous ses garanties quant à toutes blessures ou dommages causés par des
modifications non autorisées.
AVERTISSEMENT : Risque d’électrocution. Débrancher l’alimentation avant de procéder à
l’entretien.
Kohler Co. Français-1 1010997-2-F
Page 12

Information sur le produit (cont.)
AVERTISSEMENT : Risque d’électrocution. Un électricien qualifié devrait effectuer toutes les
connexions électriques.
AVERTISSEMENT : Risque de blessures ou d’endommagement du matériel. Veuillez lire toutes
les instructions avant de commencer l’installation.
AVIS : Respecter tous les codes de plomberie et électriques locaux.
Pièces assemblées en usine
Les composants installés en usine comprennent la pompe avec câble d’alimentation électrique et
l’interrupteur d’air. Aucune installation n’est nécessaire.
Les modèles«H»sont fournis avec un chauffe-eau en ligne assemblé en usine.
La pompe et la tuyauterie de la baignoire à hydromassage ont été assemblées en usine.
Connexions et accès pour l’entretien
S’assurer d’avoir suffisamment d’accès pour les connexions finales avant l’installation.
1010997-2-F Français-2 Kohler Co.
Page 13

Information sur le produit (cont.)
AVIS : Fournir un panneau d’accès libre à la pompe. Il faut prévoir un accès pour l’entretien de la pompe
et des contrôles. L’accès doit être situé tout près de la pompe. Étudier le guide de raccordement
accompagnant la baignoire à hydromassage.
Sommaire
Informations importantes ........................................................... 1
Information sur le produit ........................................................... 1
Outils et matériels ................................................................ 3
Avant de commencer .............................................................. 3
Préparer le site .................................................................. 4
Préparer la baignoire à hydromassage ................................................. 4
Sécuriser l’Unité ................................................................. 5
Sectionner les sangles de retenue de la pompe .......................................... 7
Installer la plomberie .............................................................. 7
Faire les connexions électriques ...................................................... 8
Tester la baignoire à hydromassage ................................................... 8
Compléter le comptoir fini .......................................................... 10
Nettoyage après installation ........................................................ 10
Confirmer le bon fonctionnement .................................................... 11
Dépannage .................................................................... 11
Outils et matériels
Plus:
• Outils conventionnels de
menuiserie et matériels
• Bâche de protection
Matériau
d'étanchéité
Lunettes de
protection
Mètre
ruban
Clé à tuyau
Crayon
à papier
Niveau à bulle
Cisaille de
ferblantier
Perceuse
• Clous galvanisés #6 à tête large
• 2x4
• Vis ou tire-fonds
• Adhésif de construction (optionnel)
• Ciment ou mortier (optionnel)
Avant de commencer
Avant de commencer l’installation, examiner la baignoire à hydromassage pour y déceler tout
dommage.
S’assurer que l’espace de montage et de raccordement du robinet soit adéquat pour l’installation.
Kohler se réserve le droit d’apporter des modifications à la conception de ses produits sans préavis
comme cela est indiqué dans le catalogue des prix.
Kohler Co. Français-3 1010997-2-F
Page 14

Cadrer le sol selon
Positionner la
plomberie.
Construire un cadrage de
montants de 2 x 4 ou de
2 x 6 suivant l'instruction
du plan de raccordement.
l'instruction du plan
de raccordement.
Vérifier que le sousplancher offére un
support adquat et
qu'il soit plat et nivelé.
1. Préparer le site
AVIS : Se référer au guide de raccordement emballé avec la baignoire à hydromassage pour la charge de
support de sol minimum requis lb/pied carré (kg/mètre carré).
S’assurer que le sol constitue un support adéquat pour la baignoire à hydromassage et que le
plancher soit plat et nivelé.
AVIS : La baignoire à hydromassage devrait être installée dans un espace encastré.
Construire un cadre de support de 2x4 ou de 2x6 pour votre installation.
AVIS : La baignoire à hydromassage doit être supportée par ses pieds ou la base. Ne pas supporter le
poids de charge de la baignoire à hydromassage par le périmètre du rebord.
Pour une installation surélevée : Encadrer le plancher ou construire un cadre conforme aux
informations du plan de raccordement qui accompagne la baignoire à hydromassage.
Déterminer l’emplacement de la plomberie selon le plan de raccordement fourni. Boucher les
alimentations et vérifier s’il y a des fuites.
2. Préparer la baignoire à hydromassage
Installer le drain sur la baignoire à hydromassage selon les instructions du fabricant. Ne pas
connecter le siphon à ce moment.
Placer un chiffon propre ou matière similaire à la base de la baignoire à hydromassage. S’assurer de
ne pas rayer la surface de la baignoire à hydromassage.
1010997-2-F Français-4 Kohler Co.
Page 15

Étendre une couche
de béton ou mortier
Appliquer un boudin d'étanchéité
tout autour du rebord.
de 2" (5,1 cm).
Dégagement
pour la pompe.
Dégagement pour
les blocs de support.
Appliquer du mastic adhésif
de construction aux blocs de renfort.
3. Sécuriser l’Unité
AVIS : Ne pas soulever la baignoire à hydromassage par la tuyauterie ou par la pompe ou utiliser la
tuyauterie ou la pompe pour supporter la baignoire à hydromassage. Afin d’éviter d’endommager la
baignoire à hydromassage, soulever sur les côtés de la baignoire.
AVIS : Ne pas supporter le poids de charge de la baignoire à hydromassage par le périmètre du rebord. Le
périmètre du rebord doit être soutenu de manière adéquate, mais il ne doit pas supporter le poids de
charge de la baignoire à hydromassage.
Si le sous-plancher n’est pas à niveau, placer des blocs de renfort sous la baignoire à hydromassage,
si nécessaire.
Choisir l’option d’installation qui s’applique le mieux à votre installation. Suivre les instructions
correspondantes.
Option pour utilisation de lit de ciment ou de mortier
REMARQUE : Ne pas utiliser de plâtre dur ou un mélange pour cloison sèche pour cette installation, car
ces produits ne fourniront pas un scellement acceptable et durable.
REMARQUE : Le support de pompe (une fois les sangles de retenue coupées) et les blocs de support
doivent reposer directement sur le sol.
Étendre une couche de ciment ou mortier de 2″ (5,1 cm) d’épaisseur sur le sous-plancher à l’endroit
d’installation de la baignoire. Ceci aidera à sécuriser, niveler et supporter l’unité. Écarter tout
matériau de l’emplacement du montant de la pompe et des blocs de support.
Positionner une bâche en plastique sur le lit de ciment ou de mortier. Avec de l’assistance, soulever
et mettre soigneusement la baignoire à hydromassage en place et s’assurer que le support de pompe
et les blocs de renfort ne reposent pas sur le matériau de l’embase.
Fixer l’about du drain sur le siphon. S’assurer que la baignoire à hydromassage soit nivelée et
qu’elle s’appuie sur tous les blocs de renfort.
Option pour l’utilisation de mastic adhésif de construction
Appliquer un adhésif de construction de haute qualité à la base des blocs de renfort. Avec de
l’assistance, soulever et mettre la baignoire à hydromassage en place avec précaution.
Insérer la pièce de raccordement du drain dans le siphon. S’assurer que la baignoire à
hydromassage soit nivelée et qu’elle s’appuie sur tous les blocs de renfort.
Option d’utilisation de mastic d’étanchéité à la silicone
Avec de l’assistance, soulever et mettre la baignoire à hydromassage en place avec précaution.
Kohler Co. Français-5 1010997-2-F
Page 16

Sécuriser l’Unité (cont.)
Insérer la pièce de raccordement du drain dans le siphon. S’assurer que la baignoire à
hydromassage soit nivelée et qu’elle s’appuie sur tous les blocs de renfort.
Retirer la pellicule protectrice du rebord. Appliquer du mastic à la silicone de bonne qualité tout
autour du rebord de la baignoire à hydromassage.
1010997-2-F Français-6 Kohler Co.
Page 17

Pompe
Couper les
sangles de
retenue de la
pompe.
Drainage
REMARQUE:
Le modèle de pompe illustré peut varier
du produit actuel.
Ligne d'aspiration
4. Sectionner les sangles de retenue de la pompe
IMPORTANT ! Cette étape est nécessaire pour que votre baignoire à hydromassage Kohler fonctionne
plus silencieusement.
Couper les sangles de retenue de la pompe avec une cisaille de ferblantier.
Pour réduire les bruits et vibrations émanant de la baignoire à hydromassage, s’assurer que la
pompe ne soit pas en contact direct des supports d’expédition après que les sangles aient été
sectionnées.
Retirer et jeter les sangles.
5. Installer la plomberie
ATTENTION : Risque d’endommagement du matériel. Un joint d’étanchéité doit être présent sur
le drain de la baignoire à hydromassage. Le joint étanche doit prévenir tout dommage.
Connecter le drain au siphon selon les instructions du fabricant.
AVIS : Un panneau d’accès facilitera une maintenance future.
Installer les valves du robinet conformément aux instructions du fabricant. Ne pas installer la
garniture du robinet avant l’instruction de le faire. Ouvrir les alimentations d’eau chaude et froide et
vérifier qu’il n’y ait pas de fuites.
Laisser couler l’eau dans la baignoire à hydromassage et vérifier s’il y a des fuites dans les
connexions du drain.
Kohler Co. Français-7 1010997-2-F
Page 18

Brancher le cordon d'alimentation
Sceller en fonction des
codes en vigueur.
Chauffe-eau
de la pompe à cette prise.
Installer une seconde prise
protégée par un disjoncteur
GFCI pour des modèles "H"
de chauffe-eau en ligne.
Installer une prise
protegée par un
disjoncteur différenciel
GFCI et mise à la terre
de 120V, 15 A.
6. Faire les connexions électriques
AVERTISSEMENT : Risque d’électrocution. S’assurer que l’alimentation ait été débranchée avant
d’effectuer les procédures suivantes.
AVERTISSEMENT : Risque d’électrocution. Connecter la pompe et le chauffe-eau en ligne (si
inclus) à des prises de terre correctement mises à la terre et protégées par des disjoncteurs
différentiels (GFCI) ou des appareils de courant résiduel (RCD). Ne pas retirer les broches de mise à
la terre de la fiche. Ne pas utiliser d’adaptateurs de mise à la terre.
REMARQUE : Une étiquette qui identifie le numéro de modèle et les caractéristiques électriques de la
baignoire à hydromassage est située à proximité de la pompe de la baignoire à hydromassage.
AVIS : La pompe (fournie) et le chauffe-eau (si fourni) sont munis d’un cordon et d’une fiche. Tous les
câblages du dispositif de chauffage ont été effectués en usine. Un électricien qualifié doit installer une prise
mise à la terre de 120 V et 15 A protégée par un GFCI ou un RCD. Aucune autre charge ne doit être
montée sur ce circuit.
Câblage de pompe
Localiser la prise de courant derrière la baignoire à hydromassage, dans les 24″ (61 cm) de la
pompe.
Brancher le cordon d’alimentation de la pompe à cette prise.
REMARQUE : S’assurer d’attacher fermement l’interrupteur d’air à la pompe, et qu’il ne soit ni pincé ou
endommagé.
Câblage de chauffe-eau – Modèles « H” »
Localiser la prise de courant derrière la baignoire à hydromassage, à [24″ (61 cm)] de distance du
chauffe-eau.
Brancher le chauffe-eau sur cette prise.
7. Tester la baignoire à hydromassage
Contrôler toutes les connexions électriques et s’assurer que la baignoire à hydromassage et que le
chauffe-eau soient alimentés.
S’assurer que tous les raccords à la pompe et au chauffe-eau soient fermement serrés à la main.
S’assurer également que les sangles de retenue des pompes ont été sectionnés (si applicable) et que
la pompe repose directement sur le sol ou sur la base de baignoire.
1010997-2-F Français-8 Kohler Co.
Page 19

Tester la baignoire à hydromassage (cont.)
Remplir la baignoire à hydromassage à au moins 2″ (5,1 cm) au-dessus du jet le plus élevé. Se
référer à la section « Confirmer le bon fonctionnement » pour obtenir de l’information
supplémentaire.
Faire fonctionner la baignoire à hydromassage pendant 5 minutes et, vérifier que tous les raccords
des tuyaux de la baignoire à hydromassage n’aient pas de fuites.
Kohler Co. Français-9 1010997-2-F
Page 20

Matériau du
comptoir fini
Appliquer du mastic à la silicone
aux bords du matériau
hydrorésistant du comptoir et au
comptoir fini.
Matériau du
comptoir hydrorésistant
Cadrage
Baignoire à
hydromassage
8. Compléter le comptoir fini
Retirer soigneusement la pellicule de protection recouvrant la surface de la baignoire à
hydromassage si cela n’a pas déjà été fait.
Recouvrir le cadre avec du matériau hydrorésistant. Sceller les joints entre le rebord de la baignoire
à hydromassage et le matériau hydrorésistant du comptoir à l’aide de mastic à la silicone.
Appliquer le matériau hydrorésistant du comptoir. Installer le comptoir fini sur le matériau
hydrorésistant. Sceller les joints entre le rebord de la baignoire à hydromassage et le matériau du
comptoir fini à l’aide de mastic à la silicone.
Installer la garniture du robinet conformément aux instructions du fabricant.
9. Nettoyage après installation
Lors du nettoyage après installation, ne pas utiliser de nettoyant abrasif, car il pourrait rayer et
abîmer la surface de la baignoire à hydromassage. Utiliser de l’eau tiède et un détergent liquide
pour nettoyer la surface.
Retirer les taches résistantes, peinture, ou goudron avec de l’essence de térébenthine ou un diluant
pour peinture. Ne pas laisser de nettoyants à base de distillats de pétrole rester en contact avec
les surfaces de la baignoire à hydromassage pendant une longue période. Retirer les résidus de
plâtre en raclant au moyen d’un bord en bois. Ne pas utiliser de grattoirs en métal, une brosse en
fer ou d’autres outils en métal. Utiliser des nettoyants en poudre sur un chiffon humide pour une
action abrasive douce sur les résidus de plâtre.
1010997-2-F Français-10 Kohler Co.
Page 21

Tourner la bague
du jet vers la
droite pour
diminuer le débit.
Remplir d'eau au-moins à 2" (5,1 cm)
au-dessus du jet le plus élevé.
Orienter les jets
pour diriger le
débit d'eau en
position désirée.
Tourner la bague du jet vers la gauche
pour augmenter le débit d'eau.
Appuyer sur l'interrupteur d'air pour activer
ou arrêter la baignoire à hydromassage.
10. Confirmer le bon fonctionnement
Remplir la baignoire à hydromassage
Orienter les buses des jets vers le fond du bassin. Tourner les bagues de garniture du jet
complètement vers la gauche.
Remplir la baignoire à hydromassage au moins à 2″ (5,1 cm) au-dessus du jet le plus élevé.
REMARQUE : La température de la baignoire à hydromassage ne devrait pas excéder 104°F (40° C).
Pour l’entretien des orifices, introduire un crayon dans l’extrémité de la buse du jet et pousser
l’orifice vers l’extérieur. Après avoir retiré tout blocage, inspecter l’orifice pour s’assurer qu’il soit
dégagé et le presser dans le logement du jet.
REMARQUE : Ces orifices ne sont installés dans les jets de baignoire à hydromassage que lorsque le
système contient six jets ou plus.
Séquence d’opération
Appuyer sur l’interrupteur d’air pour activer les jets.
Ajuster chaque jet pour un mélange optimal d’eau et d’air. Tourner l’anneau à droite pour réduire le
débit d’air, ou à gauche pour l’augmenter.
Si équipé d’un chauffe-eau, celui-ci s’activera automatiquement avec la mise en marche de la
pompe, et s’arrêtera quand la pompe est éteinte. Le chauffe-eau ne s’activera pas si la température
de l’eau excède 104°F (40°C).
Appuyer sur l’interrupteur d’air une seconde fois pour arrêter la baignoire à hydromassage.
Dépannage
AVIS : Cette section est seulement destinée à une aide générale. Seul un agent agréé de Kohler ou un
électricien qualifié devrait corriger tous les problèmes électriques. Pour une réparation sous garantie,
contacter le vendeur ou distributeur.
Symptômes Causes probables Action recommandée
1. La baignoire à
hydromassage ne
démarre/s’arrête pas.
Kohler Co. Français-11 1010997-2-F
A. Pas de courant au moteur. A. Régler/réinitialiser le GFCI ou le
B. L’interrupteur d’air ne fonctionne
pas.
C. La tuyauterie de l’interrupteur
d’air est débranchée, desserrée,
pincée, bouchée ou endommagée.
RCD; vérifier le câblage.
B. Remplacer l’actionneur.
C. Brancher, serrer, nettoyer ou
remplacer la tuyauterie de
l’interrupteur d’air.
Page 22

Dépannage (cont.)
Symptômes Causes probables Action recommandée
2. Le moteur démarre, tous
les jets ne fonctionnent
D. Le moteur/pompe ne fonctionne
pas.
A. Le jet est fermé. A. Tourner la bague du jet vers la
D. Reconstruire ou remplacer le
moteur/pompe.
gauche pour l’ouvrir.
pas.
B. Les jets sont bloqués. B. Retirer le blocage.
3. La baignoire à
hydromassage s’arrête
automatiquement avant
A. Le GFCI ou RCD se déclenchent. A. Identifier la source du problème
et effectuer les rectifications
nécessaires.
18 minutes.
B. L’aspiration est bloquée. B. Retirer l’obstruction.
C. Les jets sont bloqués. C. Retirer le blocage.
D. Moteur surchauffé et système de
protection activé.
D. Vérifier s’il y a blocage aux
prises d’air du moteur. Retirer
l’obstruction et laisser le moteur
refroidir.
Vérifier si la conduite
d’aspiration n’est pas bouchée.
Retirer l’obstruction et laisser le
moteur refroidir.
Vérifier si les jets sont bouchés.
Retirer l’obstruction et laisser le
moteur refroidir.
4. Fonctionnement bruyant. A. Les sangles de retenue de la
pompe n’ont pas été coupées.
A. Couper les sangles de retenue
avec des cisailles de ferblantier.
(Modèles avec des blocs de
support uniquement.)
5. Le chauffe-eau ne
A. Pas de courant au chauffe-eau. A. Réinitialiser le GFCI ou le RCD.
fonctionne pas. (Modèles
“H” uniquement)
B. La température de l’eau excède
104°F (40°C).
B. Laisser refroidir et le chauffe-eau
redémarrera.
C. Le chauffe-eau ne fonctionne pas. C. Remplacer le chauffe-eau.
1010997-2-F Français-12 Kohler Co.
Page 23

Guía de instalación
Bañera de hidromasaje
Información importante
ADVERTENCIA: Al usar aparatos eléctricos, siga siempre las precauciones básicas, incluyendo
las siguientes:
PELIGRO: Riesgo de descarga eléctrica. Conecte sólo a un circuito protegido con un interruptor de
circuito con pérdida a tierra (GFCI).
El material de construcción y el cableado se deben colocar lejos del cuerpo de la bomba y de otros
componentes que produzcan calor.
Instale la unidad de manera que se permita el acceso para darle servicio.
La conexión a tierra es un requisito. Un representante de servicio autorizado debe instalar esta unidad y
conectarla a tierra.
ADVERTENCIA: Riesgo de descarga eléctrica. Un electricista calificado debe realizar todas las
conexiones eléctricas.
ADVERTENCIA: Riesgo de descarga eléctrica. Desconecte el suministro eléctrico antes de dar
servicio.
ADVERTENCIA: Riesgo de lesiones personales o daños a la propiedad. Lea atentamente todas las
instrucciones antes de comenzar la instalación, incluyendo los requisitos detallados a continuación.
AVISO: Cumpla con todos los códigos locales de electricidad y de plomería.
Información sobre el producto
Requisitos eléctricos
La instalación debe contar con un interruptor de circuito con pérdida a tierra (GFCI) de Clase A o dispositivo
de corriente residual (RCD). El GFCI o RCD protege contra el peligro de descarga eléctrica de línea a tierra.
Utilice un circuito dedicado de 120 V, 15 A y 60 Hz para la bañera de hidromasaje.
Los modelos ″H″ requieren un circuito dedicado de 120 V, 15 A y 60 Hz para el calentador en línea.
NOTA: Si el cable eléctrico de la bomba está dañado, debe ser reemplazado por el fabricante, un agente de
servicio autorizado por el fabricante o personas igualmente calificadas para así evitar un peligro. El cable
eléctrico del calentador no se puede reemplazar. Si el cable eléctrico está dañado, el calentador se debe
reemplazar.
Avisos sobre el producto
ADVERTENCIA: Las modificaciones no autorizadas pueden causar un funcionamiento peligroso
y bajo rendimiento de la bañera de hidromasaje. No cambie la ubicación de la bomba de la bañera
de hidromasaje, ni haga otras modificaciones en el sistema de hidromasaje, ya que esto podría tener
un efecto adverso en el rendimiento y en el funcionamiento seguro de la bañera de hidromasaje.
Kohler Co. no se hace responsable bajo esta garantía o de ninguna otra forma, de las lesiones
personales o los daños provocados por modificaciones no autorizadas.
ADVERTENCIA: Riesgo de descarga eléctrica. Desconecte el suministro eléctrico antes de dar
servicio.
Kohler Co. Español-1 1010997-2-F
Page 24

Información sobre el producto (cont.)
ADVERTENCIA: Riesgo de descarga eléctrica. Un electricista calificado debe realizar todas las
conexiones eléctricas.
ADVERTENCIA: Riesgo de lesiones personales o daños a la propiedad. Por favor, lea atentamente
todas las instrucciones antes de comenzar la instalación.
AVISO: Cumpla con todos los códigos locales de electricidad y de plomería.
Componentes ensamblados en fábrica
Los componentes instalados en la fábrica incluyen la bomba con cable de alimentación eléctrica y el
interruptor de aire. No es necesario instalarlos.
Los modelos ″H″ vienen equipados con un calentador en línea ensamblado en fábrica.
La bomba y las tuberías de la bañera de hidromasaje están montadas en fábrica.
Acceso de servicio y a las conexiones
Antes de instalar, asegúrese de proveer el acceso adecuado a las conexiones finales.
1010997-2-F Español-2 Kohler Co.
Page 25

Información sobre el producto (cont.)
AVISO: Provea acceso sin restricciones para dar servicio a la bomba. Se debe proveer acceso para dar
servicio a la bomba y los controles. El panel de acceso se debe ubicar justo al lado de la bomba. Consulte
el diagrama de instalación que viene con la bañera de hidromasaje.
Contenido
Información importante ............................................................. 1
Información sobre el producto ....................................................... 1
Herramientas y materiales .......................................................... 3
Antes de comenzar ............................................................... 3
Prepare el sitio .................................................................. 4
Prepare la bañera de hidromasaje .................................................... 4
Fije la unidad .................................................................... 5
Corte las cintas metálicas que sujetan la bomba .......................................... 7
Instale la plomería ................................................................ 7
Realice las conexiones eléctricas ..................................................... 8
Pruebe el funcionamiento de la bañera de hidromasaje ..................................... 8
Termine la cubierta acabada ........................................................ 10
Limpieza después de la instalación ................................................... 10
Confirme el funcionamiento correcto .................................................. 11
Procedimiento para resolver problemas ................................................ 11
Herramientas y materiales
Más:
• Herramientas y materiales
convencionales para trabajar la madera
• Lona
Sellador
Lentes de
seguridad
Cinta para
medir
Llave para
tubo
Lápiz
Nivel
Tijeras para
chapa
Taladro
• Clavos grandes galvanizados del #6
• Postes de 2x4
• Tornillos o pernos de fijación
• Adhesivo de construcción (opcional)
• Cemento o mortero (opcional)
Antes de comenzar
Verifique que la bañera de hidromasaje no esté dañada antes de iniciar la instalación.
Confirme que haya suficiente espacio para montar y conectar la grifería especificada para su
instalación.
Kohler Co. se reserva el derecho de modificar el diseño de los productos sin previo aviso, tal como
se especifica en la lista de precios.
Kohler Co. Español-3 1010997-2-F
Page 26

Coloque las tuberías
de plomería.
Construya una estructura
de postes de 2x4 o de 2x6,
conforme al diagrama
de instalación.
Encuadre el piso
conforme al diagrama
de instalación.
Verifique que el subpiso
proporcione el soporte
adecuado, y que esté
plano y nivelado.
1. Prepare el sitio
AVISO: Consulte la Guía del diagrama de instalación embalada con su bañera de hidromasaje para el
soporte mínimo requerido del piso en libras/pie cuadrado (kg/metro cuadrado).
Asegúrese de que el piso ofrezca suficiente soporte para su bañera de hidromasaje y que el subpiso
esté plano y nivelado.
AVISO: La bañera de hidromasaje debe instalarse sobrepuesta.
Construya una estructura de postes de 2x4 ó 2x6 para su instalación.
AVISO: Los pies o base de la bañera de hidromasaje deben soportarla. No apoye el peso de la bañera de
hidromasaje por el perímetro del borde.
Para una instalación elevada: Construya una estructura de postes de madera en el piso o construya
una estructura conforme a la información de instalación provista con la bañera de hidromasaje.
Instale las tuberías de plomería según el diagrama de instalación provisto. Tape los suministros y
verifique que no haya fugas.
2. Prepare la bañera de hidromasaje
Instale el desagüe en la bañera de hidromasaje según las instrucciones del fabricante del desagüe.
Aún no conecte la trampa.
Coloque una lona gruesa limpia o un material similar en el fondo de la bañera de hidromasaje.
Tenga cuidado de no rayar la superficie de la bañera de hidromasaje.
1010997-2-F Español-4 Kohler Co.
Page 27

Extienda una capa de
concreto o mortero de
Aplique una tira de sellador de silicona
alrededor de todo el borde.
2" (5,1 cm).
Limpie el espacio
para la bomba.
Limpie el espacio para
los bloques de soporte.
Aplique adhesivo de contrucción
a los bloques de soporte.
3. Fije la unidad
AVISO: No levante la bañera de hidromasaje por los tubos o la bomba, ni use los tubos o la bomba como
soporte estructural de la bañera de hidromasaje. Para evitar daño a la bañera de hidromasaje, levántela por
los lados.
AVISO: No apoye el peso de la bañera de hidromasaje por el perímetro del borde. El perímetro del borde
debe tener el soporte adecuado, pero no debe soportar el peso de la bañera de hidromasaje.
Si el subpiso no está nivelado, acuñe los bloques de soporte de la bañera de hidromasaje según sea
necesario.
Elija la opción de instalación más apropiada para su instalación en particular. Siga las instrucciones
correspondientes.
Opción que utiliza una capa de cemento o mortero
NOTA: No utilice cemento de yeso o pasta para paneles de yeso con esta aplicación, puesto que no
proporcionarán una adherencia aceptable ni duradera.
NOTA: El soporte de la bomba (cuando las cintas metálicas están cortadas) y los bloques de soporte
deben descansar directamente sobre el subpiso.
Extienda una capa de 2″ (5,1 cm) de espesor de cemento o mortero en el subpiso donde se instalará
la bañera de hidromasaje. Esto ayudará a fijar, nivelar y dar soporte a la unidad. Limpie todo el
material de la zona donde se instalarán los soportes de la bomba y los bloques de soporte.
Coloque un pedazo de lona gruesa de plástico sobre el cemento o mortero. Obtenga ayuda para
colocar la bañera de hidromasaje en su lugar y verifique que el soporte de la bomba y los bloques
de soporte no se apoyen sobre la capa de material.
Fije el tubo final del desagüe en la trampa. Asegúrese de que la bañera de hidromasaje esté a nivel y
apoyada en todos los bloques de soporte.
Opción que utiliza adhesivo de construcción
Aplique una cantidad abundante de adhesivo de construcción de alta calidad en la parte inferior de
los bloques de soporte. Obtenga ayuda para colocar con cuidado la bañera de hidromasaje en su
lugar.
Inserte el tubo final en la trampa. Asegúrese de que la bañera de hidromasaje esté a nivel y apoyada
en todos los bloques de soporte.
Opción que utiliza sellador de silicona
Obtenga ayuda para colocar con cuidado la bañera de hidromasaje en su lugar.
Kohler Co. Español-5 1010997-2-F
Page 28

Fije la unidad (cont.)
Inserte el tubo final en la trampa. Asegúrese de que la bañera de hidromasaje esté a nivel y apoyada
en todos los bloques de soporte.
Retire la cinta protectora del borde. Aplique una tira continua de sellador de silicona de buena
calidad alrededor de todo el borde de la bañera de hidromasaje.
1010997-2-F Español-6 Kohler Co.
Page 29

Bomba
Corte las cintas
metálicas de la
bomba.
Desagüe
NOTA:
Es posible que el modelo de bomba ilustrado
sea diferente al producto que haya adquirido.
Línea de succión
4. Corte las cintas metálicas que sujetan la bomba
¡IMPORTANTE! Este paso es necesario para que su bañera de hidromasaje Kohler funcione más
silenciosamente.
Utilice tijeras de chapa para cortar las dos cintas metálicas de la bomba.
Para minimizar el ruido y la vibración de la bañera de hidromasaje, asegúrese de que la bomba no
esté en contacto directo con el soporte de transporte una vez cortadas las cintas metálicas.
Quite y deseche las cintas.
5. Instale la plomería
PRECAUCIÓN: Riesgo de daños a la propiedad. Debe existir un sello hermético en el desagüe de
la bañera de hidromasaje. Este sello hermético evitará daños a la propiedad.
Conecte el desagüe a la trampa según las instrucciones del fabricante del desagüe.
AVISO: Un panel de acceso facilitará el mantenimiento futuro.
Instale las válvulas de la grifería según las instrucciones del fabricante de la grifería. No instale la
guarnición de la grifería hasta que se le indique. Abra los suministros del agua caliente y fría, y
compruebe que no haya fugas en las conexiones de suministro.
Haga que el agua circule en la bañera de hidromasaje y compruebe que no haya fugas en las
conexiones del desagüe.
Kohler Co. Español-7 1010997-2-F
Page 30

Enchufe la bomba en
Cumpla con los códigos
correspondientes.
este tomacorriente.
Instale un segundo
tomacorriente protegido por un
Calentador
GFCI para el calentador en
línea de los modelos "H".
Instale un tomacorriente
conectado a tierra, de 120 V y
15 A, protegido por un GFCI.
6. Realice las conexiones eléctricas
ADVERTENCIA: Riesgo de descarga eléctrica. Asegúrese de desconectar la corriente eléctrica antes
de realizar el siguiente procedimiento.
ADVERTENCIA: Riesgo de descarga eléctrica. Conecte la bomba y el calentador en línea (si
provisto) a un tomacorriente con conexión a tierra que tenga protección mediante un interruptor de
circuito con pérdida a tierra (GFCI) o dispositivo de corriente residual (RCD). No retire las clavijas
de conexión a tierra del enchufe. No utilice adaptadores de conexión a tierra.
NOTA: Esta etiqueta identifica el número de modelo y la capacidad nominal eléctrica de la bañera de
hidromasaje que se encuentra cerca de la bomba de hidromasaje.
AVISO: La bomba (provista) y el calentador (si provisto) están equipados con un cable y un enchufe. Todo
el cableado del calentador se ha realizado en fábrica. Un electricista calificado debe instalar un
tomacorriente conectado a tierra, de 120 V, 15 A con protección mediante un interruptor GFCI o RCD. Este
circuito no debe tener ninguna otra carga.
Cableado de la bomba
Coloque el tomacorriente detrás de la bañera de hidromasaje y a menos de 24″ (61 cm) de la bomba.
Enchufe la bomba en este tomacorriente.
NOTA: Asegúrese de que el tubo del accionador de aire esté bien conectado a la bomba y que no esté
doblado o dañado.
Cableado del calentador – Modelos ″H″
Coloque el tomacorriente detrás de la bañera de hidromasaje y a menos de 24″ (61 cm) del
calentador.
Enchufe el calentador en este tomacorriente.
7. Pruebe el funcionamiento de la bañera de hidromasaje
Revise todas las conexiones eléctricas y asegúrese de que la bañera de hidromasaje y el calentador
(de estar equipado) tengan alimentación eléctrica.
Asegúrese de que todas las conexiones de unión de la bomba y el calentador estén bien apretadas a
mano.
Verifique que las cintas metálicas de la bomba estén cortadas (de ser pertinente) y que la bomba
descanse directamente en el subpiso o la base de la bañera de hidromasaje.
Llene la bañera de hidromasaje al menos 2″ (5,1 cm) por encima del jet más alto. Consulte la sección
″Verifique el funcionamiento correcto″ para obtener información adicional.
1010997-2-F Español-8 Kohler Co.
Page 31

Pruebe el funcionamiento de la bañera de hidromasaje (cont.)
Deje funcionar la bañera de hidromasaje durante 5 minutos y revise que no haya fugas en las
conexiones de todas las tuberías.
Kohler Co. Español-9 1010997-2-F
Page 32

Material de
la cubierta
acabada
Bañera de
hidromasaje
Aplique sellador de
silicona a los bordes del
material resistente al agua
y de la cubierta acabada.
Material resistente al
agua de la cubierta
Estructura de
postes de madera
8. Termine la cubierta acabada
Retire con cuidado la cinta protectora del borde de la bañera de hidromasaje, si aún no lo ha hecho.
Cubra la estructura con material de cubierta resistente al agua. Selle las juntas entre el borde de la
bañera de hidromasaje y el material de cubierta resistente al agua con sellador de silicona.
Adhiera el material de cubierta resistente al agua con cinta y yeso. Instale la cubierta acabada con el
material de cubierta resistente al agua. Selle las juntas entre el borde de la bañera de hidromasaje y
el material de la cubierta acabada con sellador de silicona.
Instale la guarnición de la grifería según las instrucciones del fabricante.
9. Limpieza después de la instalación
Al limpiar después de la instalación, no utilice productos de limpieza abrasivos, pues pueden
rayar y opacar la superficie de la bañera de hidromasaje. Utilice agua tibia y detergente líquido para
limpiar la superficie.
Limpie las manchas difíciles de quitar, la pintura y el alquitrán con aguarrás o diluyente de pintura.
No permita que los productos de limpieza que contengan destilados de petróleo permanezcan en
contacto con la superficie de la bañera de hidromasaje por periodos prolongados. El yeso se puede
eliminar raspando con un canto de madera. No utilice raspadores de metal, cepillos de alambre ni
otras herramientas metálicas. Se puede utilizar un detergente en polvo con un trapo húmedo para
proporcionar una acción abrasiva suave en los residuos de yeso.
1010997-2-F Español-10 Kohler Co.
Page 33

Llene de agua por lo menos 2" (5,1 cm)
arriba del jet más alto.
Gire el anillo
decorativo del jet hacia
la derecha para
disminuir el flujo.
Oriente las
boquillas de los
jets para dirigir el
flujo de agua en
la dirección
deseada.
Gire el anillo decorativo del jet hacia la
izquierda para aumentar el flujo.
Presione el accionador de aire para encender
o apagar la bañera de hidromasaje.
10. Confirme el funcionamiento correcto
Llene la bañera de hidromasaje
Coloque las boquillas de los jets de manera que miren hacia abajo en la bañera. Gire los anillos
decorativos de los jets totalmente hacia la izquierda.
Llene la bañera de hidromasaje con agua al menos 2″ (5,1 cm) por encima de la parte superior del
jet más alto.
NOTA: La temperatura del agua en la bañera de hidromasaje no debe exceder de 104°F (40°C).
Para dar servicio a los diafragmas, introduzca un lápiz en la boquilla del jet y saque el diafragma.
Después de eliminar la obstrucción que pueda haber, verifique que el diafragma esté limpio y
presiónelo en el alojamiento del jet.
NOTA: Los diafragmas sólo se instalan en los jets de bañeras de hidromasaje que tienen seis o más jets en
el sistema de hidromasaje.
Secuencia de funcionamiento
Presione el accionador de aire para encender los jets de la bañera de hidromasaje.
Ajuste cada jet para obtener una mezcla óptima de aire/agua. Gire el anillo decorativo hacia la
derecha para reducir el flujo de aire, y hacia la izquierda para aumentarlo.
Si está equipado con un calentador, el calentador se activará automáticamente al encenderse la
bomba y se desactivará cuando se apague la bomba. El calentador no se activará si la temperatura
del agua excede 104°F (40°C).
Vuelva a oprimir el accionador de aire por segunda vez para apagar la bañera de hidromasaje.
Procedimiento para resolver problemas
AVISO: Esta sección es sólo para ayuda general. Un representante de servicio autorizado de Kohler o un
electricista calificado debe resolver todos los problemas eléctricos. Para obtener servicio cubierto por la
garantía, póngase en contacto con el vendedor o el distribuidor mayorista.
Síntomas Causas probables Acción recomendada
1. La bañera de hidromasaje no
se enciende o apaga.
Kohler Co. Español-11 1010997-2-F
A. El motor no tiene alimentación
eléctrica.
B. El accionador de aire no
funciona.
A. Presione el botón (reset) de
restablecer la corriente eléctrica
del GFCI o RCD; revise el
cableado.
B. Reemplace el accionador de
aire.
Page 34

Procedimiento para resolver problemas (cont.)
Síntomas Causas probables Acción recomendada
C. El tubo del accionador de aire
está desconectado, flojo,
doblado, tapado o dañado.
C. Conecte, enderece, limpie o
reemplace el tubo del
accionador de aire.
D. El motor/bomba no funciona. D. Repare o reemplace el
motor/bomba.
2. El motor se enciende, no
todos los jets funcionan.
A. El jet está cerrado. A. Gire el anillo decorativo del jet
hacia la izquierda para abrirlo.
B. Los jets están obstruidos. B. Elimine la obstrucción.
3. La bañera de hidromasaje se
detiene automáticamente
A. El interruptor GFCI o RCD se
dispara.
A. Identifique la causa de la falla
y corrija.
antes de 18 minutos.
B. La succión está obstruida. B. Elimine la obstrucción.
C. Los jets están obstruidos. C. Elimine la obstrucción.
D. El motor se ha sobrecalentado,
activando el dispositivo de
protección.
D. Verifique que no haya
obstrucciones en las
ventilaciones del motor.
Elimine la obstrucción y deje
enfriar el motor.
Verifique que no haya
obstrucciones en la succión.
Elimine la obstrucción y deje
enfriar el motor.
Verifique que no haya
obstrucciones en los jets.
Elimine la obstrucción y deje
enfriar el motor.
4. Funcionamiento ruidoso. A. Las cintas metálicas de la bomba
no se han cortado. (Modelos con
A. Corte las cintas metálicas con
unas tijeras para chapa.
bloques de soporte únicamente).
5. El calentador no funciona.
(Modelos ″H″ solamente)
A. El calentador no tiene
alimentación eléctrica.
B. La temperatura del agua
sobrepasa los 104°F (40°C).
A. Oprima el botón de restablecer
el interruptor GFCI o RCD.
B. Deje que el agua se enfríe y el
calentador se activará.
C. El calentador no funciona. C. Reemplace el calentador.
1010997-2-F Español-12 Kohler Co.
Page 35

1010997-2-F
Page 36

USA/Canada: 1-800-4KOHLER
México: 001-877-680-1310
kohler.com
©2009 Kohler Co.
1010997-2-F
 Loading...