

KOGAN ULTRAFREEZE
ICE CUBE MAKER (1.9L)
KA19LICEMKA


SAFETY & WARNINGS
• Read all instructions before using the appliance and retain for reference.
• This appliance is not intended for use by persons (including children) with reduced
physical, sensory or mental capabilities, or lack of experience and knowledge,
unless they have been given supervision or instruction concerning use of the
appliance by a person responsible for their safety.
• Do not use outside of indoor household use as described in this manual.
• Do not use with an extension cord unless necessary, and if so, ensure it is suitably
rated and it is handled safely as is the product's own power cord:
• Do not allow the power cord to be exposed to water, heat, direct sunlight or
overhang where it can be pulled or otherwise be damaged or pose a hazard.
• This appliance contains no user-serviceable parts. If it suffers any failure or
damage, cease usage and contact Kogan Support after consulting the
Troubleshooting section of this manual.
• Do not touch the evaporator while making ice to avoid frostbite.
• Unplug while not in use.
• Never store or use gas and other flammable articles near the ice maker.
1
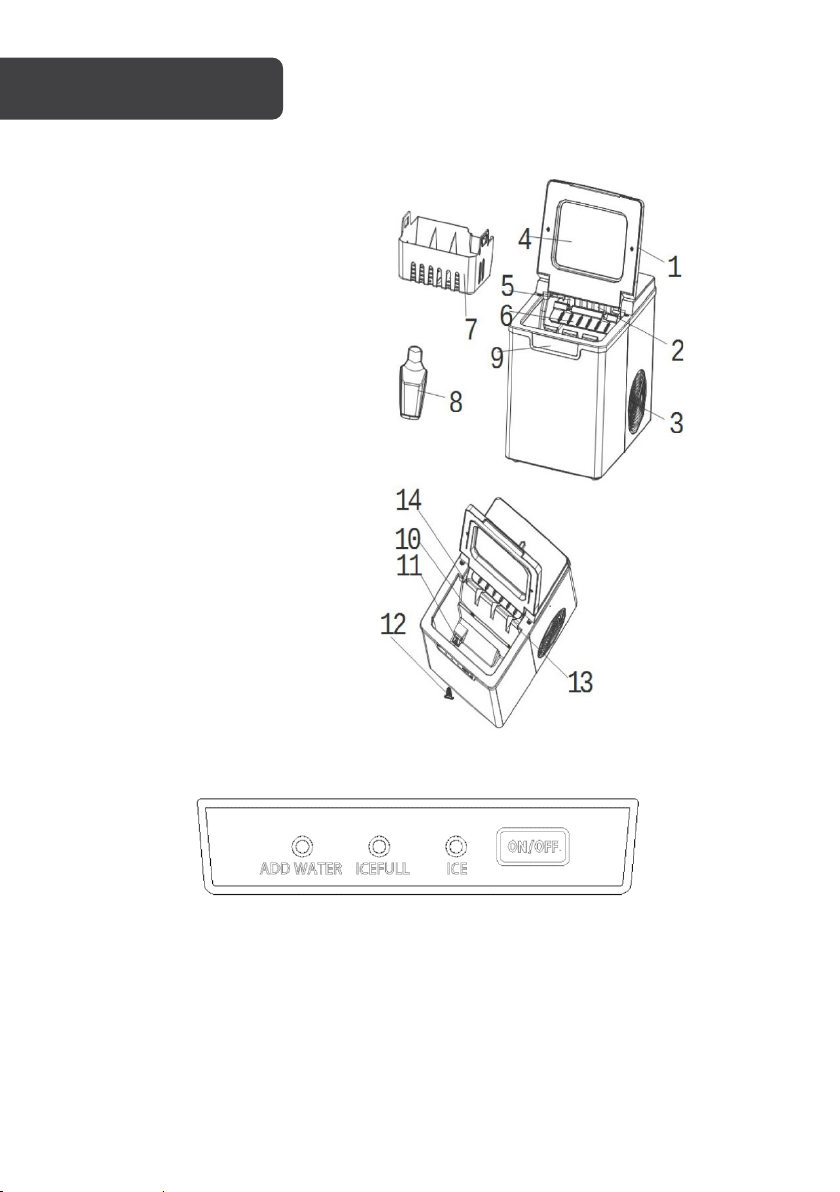
To p l id
2
Evaporator
3
Air outlet
4
Viewing window
5
Ice tray
6
Ice shovel
7
Ice basket
8
Ice scoop
9
Control panel
10
Max level indicator
11
Water reservoir
12
Drain plug
13
Infrared LED
OVERVIEW
14 Infrared receiver
ON/OFF ICE ICE FULL ADD WATER
Start or stop
appliance
Blinks in standby
mode, solid when
operating
Lit when ice basket
is full
Lit when water reservoir
is empty

Notes:
OPERATION
Before first use
1. Unpack the appliance, then check to ensure that all the accessories are included. If
not, contact Kogan Support.
2. Install the ice maker on stable, level surface with sufficient ventilation (at least
25cm), far from heat sources such as ovens, heaters and corrosive gases to ensure
good operation.
3. The ice maker cabinet should never exceed 45°. Do not turn upside down. This can
cause the compressor or refrigerating system to operate incorrectly. Please allow
time for the fluids in the compressor to settle after the ice maker is moved or
transported (at least 30 minutes). Before using the ice maker for the first time,
please wait for 2 hours after installation.
• Clean before first use. (See “Cleaning & Care”)
• Do not fill the water reservoir with hot water. This may damage the ice maker. It is
best to fill the water reservoir with water of room temperature or lower.
• Do not use the appliance in very cold environments (lower than 5°C).
How to use
Ensure that the drain plug at the bottom of water reservoir is closed well.
1. Plug the ice maker into the wall outlet: the “Ice” indicator will blink.
2. Open the top lid and remove the ice basket.
3. Fill the water reservoir with drinking water.
4. Replace the ice basket and close the top lid.
5. Press “On/Off” and the “Ice” indicator will become solid.
6. The ice-making cycle will last approximately 7-15 minutes, depending on the
ambient temperature and water temperature.
7. The ice-making cycle starts with water being pumped into the ice tray situated
below the evaporator. Over the next 7-15 minutes ice forms on the evaporator. Once
this has completed, the ice tray will tilt backwards and the remaining water in the
ice tray is drained back into the water reservoir. The ice cubes are then dropped
from the evaporator and pushed forward into the ice basket by the ice shovel. The
ice tray will automatically move back into position under the evaporator and start
the next cycle.

8. The “Ice Full” indicator will light up when the ice basket is full and the ice maker will
SPECIFICATIONS
stop the ice-making cycle automatically. Gently remove the ice from the ice basket
with the ice scoop. About 5 seconds later, the ice maker will restart its ice making
function automatically.
9. The “Add Water” indicator will light up when the water reservoir is out of water and
the ice-making cycle will stop automatically. At that time, remove the ice basket
and add water to the water reservoir, and then press “On/Off” again to restart the
ice-making cycle.
10. When the desired amount of ice has been made, stop the ice making cycle by
pressing “On/Off” and unplug the unit from the wall outlet.
11. Open the top lid and transfer the ice to a freezer. Note: The ice will last in the ice
maker for up to 18 hours, depending on ambient temperature.
12. Allow the ice maker to reach room temperature. 14. It is best to replace the water
once a week. Empty the water reservoir if the ice maker will not be used for a long
time.
Power source 220-240V/50Hz
Rated power 105W
Refrigerant R134a/68g
Foaming agent C5H10
Net weight 9.03kg
Housing material ABS
Dimensions (D x W x H) 348 x 248 x 295mm
Notes:
for a long time.
CLEANING & CARE
To keep your ice tasting fresh and your ice maker looking great, it is recommended to clean
the ice maker once per week.
1. Stop the ice-making cycle by pressing “On/Off”, unplug the ice maker from the wall
outlet and allow it to warm up to room temperature.
2. If residual water is found in the ice tray, gently push the ice tray back so that all
water drains into the water reservoir.
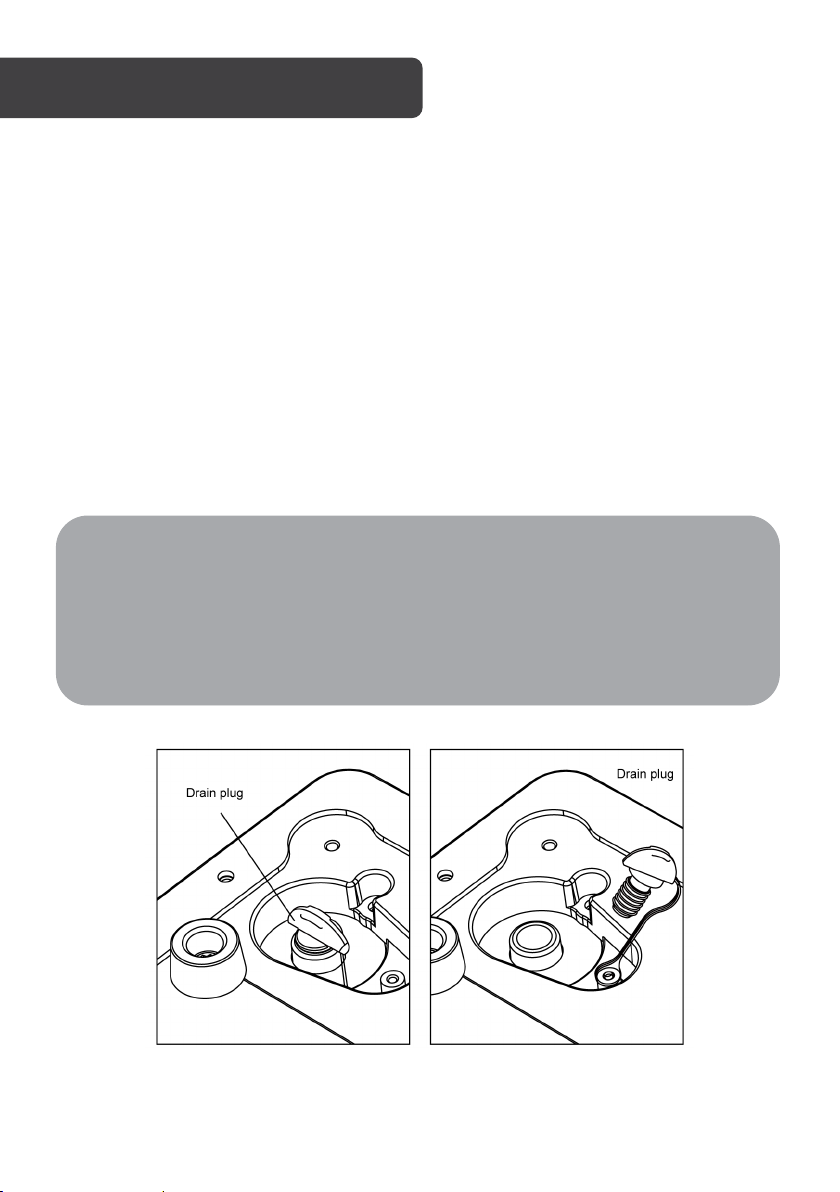
3. Move the appliance 75mm away from the working table and open the drain plug
to drain out excess water (see images below).
4. Remove the ice basket.
5. Clean the ice maker interior with a soft cloth soaked with warm water and vinegar,
then rinse with clean water and then drain all the water.
6. Replace the drain plug firmly. Wash the ice basket and ice scoop in warm soapy
water. Rinse and dry.
7. Clean the exterior of the ice maker with a soft damp cloth. Use a mild dishwashing
soap, if necessary.
• Do not use organic solvent, boiled water, detergent, strong acid and strong alkali
etc. for cleaning.
• Do not clean the evaporator.
• Please empty the water reservoir and dry it for storage if the ice maker is not use
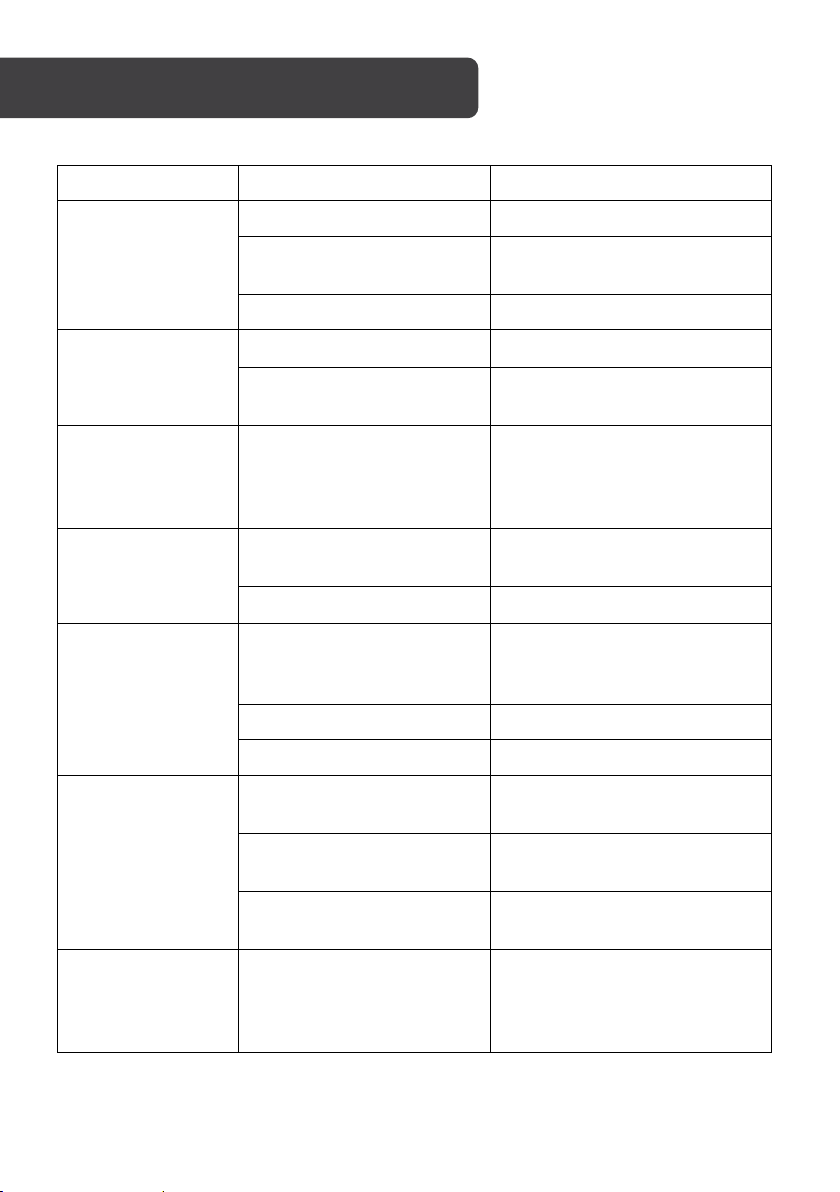
Issue
Possible cause
Steps to resolve
Pump malfunction
Contact Kogan support
Refill, ensure water is between 825°C
TROUBLESHOOTING
Insufficient water Refill water reservoir and restart
“Add Water”
indicator lit
“Ice Full” indicator
lit
“Add Water” and
“Ice Full” indicators
lit
Ice clumps together
Icemaking cycle
runs as normal but
no ice produced
Water screen at the bottom
of water reservoir blocked
Ice basket is full Remove ice from ice basket
Infrared LED and receiver not
working
The ice tray is not in the
correct position
Icemaking taking too long
Water temperature too low
Ambient temperature or
water temperature too high
Refrigeration system leaking Contact Kogan support
Refrigeration system blocked Contact Kogan support
Poor heat dissipation
Clean
Clean infrared LED and receiver,
then restart ice maker
1. Ensure the ice tray is
unobstructed
2. Unplug, reconnect and
restart the appliance
Stop icemaking and restart the
cycle after the ice melts
Restart in environment with
ambient temperature less than
32°C and refill with cold water
Leave at least 25cm clearance
on all sides for proper ventilation
Poor icemaking
results
Ice getting stuck
If the above steps do not resolve an issue you are facing, contact Kogan support.
Excessive water temperature
Excessive ambient
temperature
Occasional occurrence in
low temperatures
Refill, ensure water is between 825�°C
Restart in environment with
ambient temperature >32°C
The unit will automatically enter
standby after three instances of
ice sticking, and will run again
automatically after 20mins

NOTES


Need more information?
This is a Quick Start Guide, and we hope that this
has given you the assistance needed for a simple set-up.
For the most up-to-date guide for your product,
as well as any additional assistance you may require,
head online to help.kogan.com
 Loading...