

Page 1
Page 2

Contents
1 Overview . . . . . . . . . . . . . . . . . . . . . . . . . . . . . . . . . . . . . . . . . . . . . . . . . . . 1-1
Supported network protocols . . . . . . . . . . . . . . . . . . . . . . . . . . . . . . . . . . . 1-2
Operating system requirements . . . . . . . . . . . . . . . . . . . . . . . . . . . . . . . . .1-3
Dependencies . . . . . . . . . . . . . . . . . . . . . . . . . . . . . . . . . . . . . . . . . . . . 1-3
Administrative configuration and setup . . . . . . . . . . . . . . . . . . . . . . . . . . .1-4
Administrative configuration files. . . . . . . . . . . . . . . . . . . . . . . . . . . . . . 1-4
User configuration files . . . . . . . . . . . . . . . . . . . . . . . . . . . . . . . . . . . . . 1-5
User types . . . . . . . . . . . . . . . . . . . . . . . . . . . . . . . . . . . . . . . . . . . . . . . . .1-6
Scan Station security . . . . . . . . . . . . . . . . . . . . . . . . . . . . . . . . . . . . . . . . . 1-6
What’s in the box . . . . . . . . . . . . . . . . . . . . . . . . . . . . . . . . . . . . . . . . . . . . 1-7
Unpacking and setting up the Scan Station . . . . . . . . . . . . . . . . . . . . . . . .1-8
Installing the power cord . . . . . . . . . . . . . . . . . . . . . . . . . . . . . . . . . . . . 1-8
Installing the network cable . . . . . . . . . . . . . . . . . . . . . . . . . . . . . . . . . . 1-8
Attaching the input tray . . . . . . . . . . . . . . . . . . . . . . . . . . . . . . . . . . . . .1-8
Attaching the output tray and special document feeder. . . . . . . . . . . . .1-9
Powering up the Scan Station . . . . . . . . . . . . . . . . . . . . . . . . . . . . . . . .1-9
2 Pre-installation checklist . . . . . . . . . . . . . . . . . . . . . . . . . . . . . . . . . . . . . . 2-1
3 Initial Setup and Verification . . . . . . . . . . . . . . . . . . . . . . . . . . . . . . . . . . .3-1
Installing the Configuration Organizer . . . . . . . . . . . . . . . . . . . . . . . . . . . .3-1
Installing the optional fax modem. . . . . . . . . . . . . . . . . . . . . . . . . . . . . . . .3-4
Configuring your Scan Station . . . . . . . . . . . . . . . . . . . . . . . . . . . . . . . . . . 3-5
Password protecting the configuration file . . . . . . . . . . . . . . . . . . . . . . . . .3-6
Language setting . . . . . . . . . . . . . . . . . . . . . . . . . . . . . . . . . . . . . . . . . . . . 3-7
Device settings. . . . . . . . . . . . . . . . . . . . . . . . . . . . . . . . . . . . . . . . . . . . . .3-8
E-mail settings . . . . . . . . . . . . . . . . . . . . . . . . . . . . . . . . . . . . . . . . . . . . . 3-11
SMTP settings . . . . . . . . . . . . . . . . . . . . . . . . . . . . . . . . . . . . . . . . . . . 3-11
LDAP settings . . . . . . . . . . . . . . . . . . . . . . . . . . . . . . . . . . . . . . . . . . . 3-16
Return Email Address . . . . . . . . . . . . . . . . . . . . . . . . . . . . . . . . . . . . . 3-19
Maximum Attachment Size . . . . . . . . . . . . . . . . . . . . . . . . . . . . . . . . .3-20
Fax settings . . . . . . . . . . . . . . . . . . . . . . . . . . . . . . . . . . . . . . . . . . . . . . .3-21
Outgoing faxes . . . . . . . . . . . . . . . . . . . . . . . . . . . . . . . . . . . . . . . . . .3-26
Transaction Log settings . . . . . . . . . . . . . . . . . . . . . . . . . . . . . . . . . . . . . 3-27
Time settings . . . . . . . . . . . . . . . . . . . . . . . . . . . . . . . . . . . . . . . . . . . . . .3-28
Setting the Scan Station clock . . . . . . . . . . . . . . . . . . . . . . . . . . . . . . . . . 3-29
Date settings . . . . . . . . . . . . . . . . . . . . . . . . . . . . . . . . . . . . . . . . . . . . . . 3-30
Setting the Scan Station date. . . . . . . . . . . . . . . . . . . . . . . . . . . . . . . . . .3-30
Configuration options . . . . . . . . . . . . . . . . . . . . . . . . . . . . . . . . . . . . . . . . 3-32
QWERTY keyboard. . . . . . . . . . . . . . . . . . . . . . . . . . . . . . . . . . . . . . .3-32
Allow customer Email Addresses . . . . . . . . . . . . . . . . . . . . . . . . . . . . 3-32
Allow File Naming . . . . . . . . . . . . . . . . . . . . . . . . . . . . . . . . . . . . . . . . 3-33
Allow Saving to Flash Drive. . . . . . . . . . . . . . . . . . . . . . . . . . . . . . . . .3-33
Allow Force User Login . . . . . . . . . . . . . . . . . . . . . . . . . . . . . . . . . . . . 3-33
Allow Adding Pages to a Scan Job . . . . . . . . . . . . . . . . . . . . . . . . . . .3-34
Hide Network Folder Location . . . . . . . . . . . . . . . . . . . . . . . . . . . . . . .3-34
Allow FAST Scanning . . . . . . . . . . . . . . . . . . . . . . . . . . . . . . . . . . . . . 3-34
Remote Configuration settings. . . . . . . . . . . . . . . . . . . . . . . . . . . . . . . . . 3-35
Saving your configuration settings . . . . . . . . . . . . . . . . . . . . . . . . . . . . . . 3-36
Updating your Scan Station settings. . . . . . . . . . . . . . . . . . . . . . . . . . . . . 3-37
Verifying your Scan Station setup. . . . . . . . . . . . . . . . . . . . . . . . . . . . . . .3-39
A-61588 July 2008 i
Page 3

4 Configuring the Scan Station. . . . . . . . . . . . . . . . . . . . . . . . . . . . . . . . . . .4-1
Selecting your default Scan Station settings . . . . . . . . . . . . . . . . . . . . . . .4-1
Scan As . . . . . . . . . . . . . . . . . . . . . . . . . . . . . . . . . . . . . . . . . . . . . . . . .4-2
File Type . . . . . . . . . . . . . . . . . . . . . . . . . . . . . . . . . . . . . . . . . . . . . . . .4-3
Setting Shortcuts . . . . . . . . . . . . . . . . . . . . . . . . . . . . . . . . . . . . . . . . . . 4-5
File Name Settings . . . . . . . . . . . . . . . . . . . . . . . . . . . . . . . . . . . . . . . . 4-7
Input Document Is . . . . . . . . . . . . . . . . . . . . . . . . . . . . . . . . . . . . . . . . . 4-8
Resolution . . . . . . . . . . . . . . . . . . . . . . . . . . . . . . . . . . . . . . . . . . . . . . .4-9
Document Type . . . . . . . . . . . . . . . . . . . . . . . . . . . . . . . . . . . . . . . . . . .4-9
Black and White Adjustments . . . . . . . . . . . . . . . . . . . . . . . . . . . . . . .4-10
Copies for Printing. . . . . . . . . . . . . . . . . . . . . . . . . . . . . . . . . . . . . . . . 4-11
Advanced option . . . . . . . . . . . . . . . . . . . . . . . . . . . . . . . . . . . . . . . . . 4-11
Saving your configuration settings . . . . . . . . . . . . . . . . . . . . . . . . . . . . . . 4-12
Updating your Scan Station settings. . . . . . . . . . . . . . . . . . . . . . . . . . . . . 4-13
Managing your Destination groups. . . . . . . . . . . . . . . . . . . . . . . . . . . . . .4-15
Toolbar. . . . . . . . . . . . . . . . . . . . . . . . . . . . . . . . . . . . . . . . . . . . . . . . .4-15
Creating grouping and adding items . . . . . . . . . . . . . . . . . . . . . . . . . .4-16
Editing items within a group. . . . . . . . . . . . . . . . . . . . . . . . . . . . . . . . .4-17
Deleting items with a group . . . . . . . . . . . . . . . . . . . . . . . . . . . . . . . . .4-18
Renaming groups . . . . . . . . . . . . . . . . . . . . . . . . . . . . . . . . . . . . . . . . 4-18
Deleting groups . . . . . . . . . . . . . . . . . . . . . . . . . . . . . . . . . . . . . . . . . .4-19
Moving groups and items within groups. . . . . . . . . . . . . . . . . . . . . . . . . .4-20
Importing an email address book . . . . . . . . . . . . . . . . . . . . . . . . . . . . . . .4-22
Adding addresses using LDAP. . . . . . . . . . . . . . . . . . . . . . . . . . . . . . . . .4-24
Configuring FTP destinations. . . . . . . . . . . . . . . . . . . . . . . . . . . . . . . . . .4-25
Specifying Proxy settings . . . . . . . . . . . . . . . . . . . . . . . . . . . . . . . . . . . . .4-26
Configuring printers . . . . . . . . . . . . . . . . . . . . . . . . . . . . . . . . . . . . . . . . . 4-27
Connecting to a printer that is connected to a print server on a
network domain . . . . . . . . . . . . . . . . . . . . . . . . . . . . . . . . . . . . . . . . . . . 4-27
Connecting to a printer shared by another computer on the
network workgroup. . . . . . . . . . . . . . . . . . . . . . . . . . . . . . . . . . . . . . . . .4-28
Connecting to a network printer that is directly connected to the netwo rk4-29
5 Scan Station Adminis tration Specifics
Scan As settings. . . . . . . . . . . . . . . . . . . . . . . . . . . . . . . . . . . . . . . . . . . . .5-1
File Naming settings. . . . . . . . . . . . . . . . . . . . . . . . . . . . . . . . . . . . . . . . . . 5-2
E-mail groups . . . . . . . . . . . . . . . . . . . . . . . . . . . . . . . . . . . . . . . . . . . . . . .5-3
Securing your Scan Station . . . . . . . . . . . . . . . . . . . . . . . . . . . . . . . . . . . .5-4
Password protecting your configuration file. . . . . . . . . . . . . . . . . . . . . .5-4
Password protecting your Scan Station (user access) . . . . . . . . . . . . .5-5
Loading and saving configurations. . . . . . . . . . . . . . . . . . . . . . . . . . . . . . .5-5
Updating your Scan Station . . . . . . . . . . . . . . . . . . . . . . . . . . . . . . . . . . . . 5-6
Network configuration details . . . . . . . . . . . . . . . . . . . . . . . . . . . . . . . . . . .5-9
6 Maintenance . . . . . . . . . . . . . . . . . . . . . . . . . . . . . . . . . . . . . . . . . . . . . . . .6-1
Cleaning procedures . . . . . . . . . . . . . . . . . . . . . . . . . . . . . . . . . . . . . . . . . 6-1
Opening the cover . . . . . . . . . . . . . . . . . . . . . . . . . . . . . . . . . . . . . . . . . 6-1
Cleaning the rollers . . . . . . . . . . . . . . . . . . . . . . . . . . . . . . . . . . . . . . . . 6-2
Cleaning the feed module . . . . . . . . . . . . . . . . . . . . . . . . . . . . . . . . . . .6-2
Cleaning the imaging guides . . . . . . . . . . . . . . . . . . . . . . . . . . . . . . . . .6-3
Replacement procedures . . . . . . . . . . . . . . . . . . . . . . . . . . . . . . . . . . . . . .6-4
Replacing the feed module . . . . . . . . . . . . . . . . . . . . . . . . . . . . . . . . . .6-4
Replacing the USB connector . . . . . . . . . . . . . . . . . . . . . . . . . . . . . . . .6-5
Supplies and consumables . . . . . . . . . . . . . . . . . . . . . . . . . . . . . . . . . . . . 6-8
ii A-61588 July 2008
Page 4

7 Troubleshooting . . . . . . . . . . . . . . . . . . . . . . . . . . . . . . . . . . . . . . . . . . . . .7-1
Indicator lights and error codes . . . . . . . . . . . . . . . . . . . . . . . . . . . . . . . . . 7-1
Clearing a document jam . . . . . . . . . . . . . . . . . . . . . . . . . . . . . . . . . . . . . . 7-2
Saving error log files. . . . . . . . . . . . . . . . . . . . . . . . . . . . . . . . . . . . . . . . . . 7-3
Problem solving . . . . . . . . . . . . . . . . . . . . . . . . . . . . . . . . . . . . . . . . . . . . .7-4
8 Glossary. . . . . . . . . . . . . . . . . . . . . . . . . . . . . . . . . . . . . . . . . . . . . . . . . . . . 8-1
Appendix A Specifications . . . . . . . . . . . . . . . . . . . . . . . . . . . . . . . . . . . . .A-1
Appendix B Warranty - US and Canada only . . . . . . . . . . . . . . . . . . . . . . .B-1
A-61588 July 2008 iii
Page 5

1 Overview
The Kodak Scan Station 100 is designed as a walk-up scanner that
requires minimal user training. The Scan Station 100 is a standalone
solution requiring no host PC or application software. It works with an
existing network (Ethernet, 10/100 Base T) and makes use of existing
network shared services such as TCP/IP, FTP and SMTP in order to
communicate with other network devices or destinations. The color
touch screen offers a simple, graphical user interface (GUI) to operate
the device and direct the output. More than just a scanner, the Kodak
Scan Station 100 is a robust capture solution that lets you quickly send
your documents via email, the network, networked printers, USB flash
drives or fax (optional) with a simple touch.
This Administrator’s Guide provides the information you need to setup
and administer the Kodak Scan Station 100, Kodak Scan Station 100
Plus and the Kodak Scan Station 120EX.
For the purpose of this manual the Kodak Scan Station 100, Kodak
Scan Station 100 Plus and the Kodak Scan Station 120EX will be
referred to as Kodak Scan Station 100. Any differences between these
models will be noted.
Chapter 1, Overview — provides system requirements, general
information you should know before setting up the Scan Station, and
instructions for unpacking and setting up the Scan Station.
Chapter 2, Pre-Installation Checklist — it is highly recommended that
you fill in this Pre-Installation Checklist before you begin setting up the
Scan Station, as it will save you time and make the setup procedures
easier.
Chapter 3, Initial Setup and Verification — provides installation and
setup procedures to get your Scan St ation up and running. This chapter
provides basic procedures for setting the language, IP address, email,
etc. all the way through saving your configuration settings and verifying
the Scan Station is operational. When you are using the procedures in
this chapter, it is suggested that you have the completed PreInstallation Checklist available for reference.
Chapter 4, Configuring the Scan Station — once your Scan S tation is
successfully setup, this chapter provides procedures for customizing
scanner settings (e.g. document type, file type, scan resolution, etc.)
managing your destination groups, (e.g. email addresses, network
shares, printers), and creating setting shortcuts and tasks.
A-61588 July 2008 1-1
Page 6

Chapter 5, Scan Station Administration Specifics — provides
detailed information regarding configuring your office network to allow
easy integration of the Scan Station, how to properly configure login
credentials and general network configuration details.
Chapter 6, Maintenance — provides cleaning and maintenance
procedures for the Scan Station.
Chapter 7, Troubleshooting — provides a problem solving chart that
you should refer to before calling Kodak Support.
Chapter 8, Glossary — provides descriptions for terms used
throughout this document.
Supported network protocols
The Scan St ation 100 plugs directly into an Ethernet-ba sed IP network,
using a standard RJ45 connection, working independently within the
following environments:
• Microsoft Windows Server 2000 and Server 2003 (TCP/IP, MS
sharing, SMTP, FTP, Printing)
• NetWare 3.x and 4.x with MS services for NetWare (TCP/IP, MS
Sharing, SMTP, FTP)
• Unix/Linux environments (SMTP and FTP only)
NOTE:Your network environment may or may not support all of the
network protocols mentioned above.
The Scan St ation 100 supports sending att ached images by email using
the Simple Mail Transfer Protocol (SMTP) and authenticated SMTP
protocols. Methods supported for authenticated SMTP include: simple
password, NTLM and Challenge Response.
NOTE: Kerberos support is not included at this time.
Anonymous File Transfer Protocol (FTP) and authenticated FTP are
also supported, including proxy support. To use either form of
authenticated FTP (with or without proxy), the FTP configuration will
need sufficient credentials to access the FTP site. This information
should be available from your network administrator.
While the Scan Station 100 can be used in heterogeneous networks
with SMTP and FTP, printing to network printers and scanning to
network shared folders requires Microsoft printer drivers and SMB
(Server Message Block) drive access respectively. When used within a
Microsoft NT Domain, the Scan Station accesses domain resources
(shared drives and printers) with a standard domain user account,
provided by the administrator . When used within a Microsoft wo rkgroup,
the Scan Station may access workgroup resources (share drives and
printers) without any login credentials providing workgroup PCs have
been configured to allow guest access to their shared resources.
1-2 A-61588 July 2008
Page 7

Most of the Scan Station’s features can be successfully used in
heterogeneous network environments. On the Scan Station, printers
are accessed via Microsoft printer drivers, which are installed on the
Scan Station using Microsoft Point-and-Print technology. See the
section entitled, “Configuring printers” in Chapter 4 for more
information.
Operating system requirements
Dependencies Each of the features of the Scan Station are dependent on the
The Configuration Organizer which is installed on a separate PC,
requires one of the following operating systems:
• Windows 2000 Service Pack 4 and above
• Windows XP Service Pack 2
Both require Microsoft .Net 2.0 Framework and Microsoft Installer v3.0,
which will automatically be installed if not detected.
presence of the network services shown below.
• Scan to e-mail — to scan and send documents to an email recipient,
the Scan Station must have access to a SMTP-MIME server. If your
SMTP server requires authentication before use, you also need to
supply credentials to the Scan Station. Supported SMTP
authentication types include: simple passwords, NTLM and
Challenge Response.
• Scan to shared folder — a Windows 98SE, Windows 2000,
Windows XP, Windows Server 2000 or Windows Server 2003 based
computer must publish their shared folder (the Scan Station’s
destination) on the TCP/IP network, and the Scan Station network
user must have permissions to access the folder.
• Scan to printer — a printer supported by Windows XP must be
available on the network.
• Scan to FTP folder — the Scan Station can scan documents and
send them to an FTP site using either authenticated or anonymous
FTP and can also deliver files through a network proxy. Both network
proxy and authenticated FTP require login credentials.
A-61588 July 2008 1-3
Page 8

Administrative
Create the Administrative
configuration file
Save the configuration file
to a USB flash drive
Insert a USB flash drive to
update the Scan Station
configuration and
setup
The Configuration Organizer is the center of all Scan Station
administration. With the Configuration Organizer you can create
administrative configuration files and user configuration files. Setting up
the Scan St ation requires the creation of an administrative configuratio n
file. The Configuration Organizer must first be installed on a separate
computer to properly setup and configure the Scan Station.
Administrative configuration files
Once installed, the Configuration Organizer is used to create an
administrative configuration file, which is written to a USB flash drive
(the Scan St ation 100 comes with three USB flash drives). To create an
administrative configuration file, check Administrator on the File menu
of the Configuration Organizer. The administrative configuration file is
named KSS100.XML and is written to the flash drive (or any other
location) as an encrypted file. Because this file is encrypted, it can only
be decoded and read by the Kodak Scan Station 100 or the
Configuration Organizer. This f ile can also be password protected, both
on the USB flash drive and when it is written to the Scan Station. Once
the file is written to the USB flash drive, the configuration file can be
transported and installed on the Scan Station (see the following
diagram).
1-4 A-61588 July 2008
The Scan Station automatically detects the presence of a USB flash
drive and will search the drive for a KSS100.XML file. If the file is valid,
the contents are examined for further actions. If the contents of the
configuration file do not match the exact contents of the configuration
currently stored on the Scan St ation, the administrator will be prompted
to update the Scan Station with the contents of the configuration file on
the flash drive. The administrator may or may not choose to update the
Scan Station at this time.
If the OK button is selected, the administrator will be prompted, through
a sequence of screens, to allow the configuration of the Scan Station.
Page 9

If the Cancel button is selected, the Scan Station will be placed into
administrative configuration mode. In this mode, the Scan Station
automatically displays the Settings mode screen. The administrator can
scroll through each of the setting groups and make modifications to
each of the values. Any setting that requires more than a simple
selection (e.g. a typed entry) will display a virtual keyboard that allows
the entry of more complex data.
All changes to the Scan Station settings are saved to the Scan Station
immediately and requires no further action on the part of the
administrator. For more information about updating your Scan Station,
see the section entitled, “Updating your Scan Station” in Chapter 5.
NOTE: Be careful when using the Scan Station in this mode, as it is
easy to inadvertently change settings. The Scan Station will
remain in administrative configuration mode as long as the USB
flash drive is inserted in the Scan Station. When the flash drive
is removed, the Scan S t ation ret urns to “walk-up” mode and the
Destinations screen will automatically be displayed.
User configuration files Advanced users can create their own configuration files that contain
personal scanning preferences. These users can start the
Configuration Organizer, make the necessary changes to destinations
and settings and save it on their USB flash drive. The main differences
between a user and administrative configuration are:
• Only user configuration files can define flash drive folders.
• Only administrative configuration files can define printers.
• Only administrative configuration files can be used to modify the
default settings on a Scan Station.
Once a user configuration file has been created and stored on a USB
flash drive, the flash drive can be taken to a Scan Station and inserted
into the USB port. The Scan Station automatically recognizes the
presence of the flash drive and loads the settings found in the
configuration file. Because it is a “User” configuration file, the user will
not be asked or allowed to make any permanent changes to the Scan
St ation’s configuration. Instead, all of the user’s destinations will appear
on the Scan Station’s display and will be merged with the default
destination groups.
The user’s personal destinations will appear in the top toolbar in the
same order as the Scan Station’s default groups, except that each of
the user’s personal groups will appear with a “User” profile image as
part of the icon background.
If the user’s personal configuration contains changes to the scanner
settings (all the values found in “Settings” mode), these settings
temporarily replace the scanner’s default settings.
A-61588 July 2008 1-5
Page 10

When a scan job is complete, the user’s USB flash drive can be
removed from the Scan Station and the Scan Station display returns to
the normal state with all of the default settings restored.
NOTE: For more information about configuring your Scan Station refer
to Chapters 3 and 4. For more information on password
protection of the configuration file, refer to the section entitled,
“Securing your Scan Station” in Chapter 5.
User types The Scan Station supports three different user types: Administrative,
Advanced and Walkup.
• Administrative users are responsible for setting up and maintaining
the device.
• Advanced users create and carry their custom settings on a USB
flash drive that they can use with the Scan Station to make scanning
possible with one touch.
• Walkup users use the device by navigating through the default
options the administrator has setup. Scanning is very easy but the
walkup user may not have access to their personal email address
book or custom scan settings the way an Advanced user does.
Scan Station security To ensure adequate security, the Scan Station will not read any
program or file from a USB flash drive, or any other removable USB
device, other than a valid, encrypted configuration file created by the
Configuration Organizer and a firmware update file created by Kodak.
The Scan St ation uses a firewall and blocks nearly all incoming ne twork
traffic. It will only respond to an Echo (also known as a ping).
By design, the underlying operating system is not available to the
administrator or user . Updates to the operating system and/or the Scan
Station firmware will be made available on Kodak’s web site (http://
www.kodak.com/go/disupport) as needed.
The administrator can require a user to login before a scan session. For
more information, see the section entitled, “Configuration options” in
Chapter 3.
For more information regarding security, see the section entitled,
“Securing your Scan Station” in Chapter 5.
1-6 A-61588 July 2008
Page 11

What’s in the box Before you begin open the box and check the contents:
• Kodak Scan Station 100
• Input tray
• Output tray
• Special document feeder
• Power cord bundle
• Feed module
• Portable USB flash drives
• Welcome Folio which includes:
- Installation CD
- Registration sheets
- Printed User’s Guide, English
-Quick Tips Guide
- Quick Installation Guide
- Service Contact sheets
- Miscellaneous flyers
A-61588 July 2008 1-7
Page 12

Unpacking and setting up the Scan Station
Installing the power cord 1. Select the appropriate AC power cord.
Installing the network cable 1. Select a (customer provided) 10/100 Base T drop cable.
Attaching the input tray 1. Locate the input tray slots on the Scan Station.
Carefully unpack the Scan Station 100 and place it on a clean, dry and
level surface. Locate and attach the power cord, network cable and the
input and output trays. Make sure the Scan Station cover is closed.
2. Plug one end of the power cord into the Scan Station.
3. Plug the other end of the power cord into the wall outlet.
2. Plug one end of the network cable into the network port of the Scan
Station located on the back of the scanner.
3. Plug the other end of the network cable into the network drop’s wall
outlet.
2. Align the input tray pins with the slots.
3. Push down on the input tray until it snaps into place.
1-8 A-61588 July 2008
Page 13

Attaching the output tray and special document feeder
1. Locate the output tray holes on the Scan Station.
2. Insert the pin on the left side of the output tray/special document
feeder in the hole, then press the ribbed button on the right side of
the output tray/special document feeder and insert the pin in the
hole on the right side of the Scan Station.
Powering up the Scan Station
Turn the power on and wait a few moments while the device completes
it’s self tests.
The Scan S ta tion is now ready to have a config uration file downlo aded.
See Chapter 3, Initial Setup and Verification and Chapter 4, Configuring
the Scan Station, for information on setting up the Scan Station and
how create and download configuration files.
A-61588 July 2008 1-9
Page 14
2 Pre-installation Checklist
It is recommended that you fill out this worksheet before installing the Kodak Scan Station 100. You will
need this information about your network to create an administrative configuration for your Scan Station
using the Configuration Organizer (provided with the Scan Station) and to complete the installation.
Research any information you are unsure of before creating the administrative configuration file. If you
have trouble filling out this worksheet, see the person who manages your network.
NOTE: This installation shows what you will need to install the Scan Station as of the date of this
document. As we improve our products from time to time, check the Kodak website
(http://www.Kodak.com/go/disupport) for the latest version.
Language Settings — found under the Settings button in the Configuration Organizer or
Administration GUI.
Parameter Name Description/Sample Your Setting Notes
Language Name of GUI/OCR language Default: English.
Device Settings — found under the Settings button in the Configuration Organizer or
Administration GUI
Parameter Name Description/Sample Your Setting Notes
Device Name NETBIOS name of the Scan
Stat ion. The default is the Scan
Station’s unique serial number
(e.g., KSSXXXX-XXXX, where
X=the serial number)
IP Address Settings — Automatic
Automatic (DHCP) This is the default. If selected, the IP address, subnet
IP Address Settings — Static
Static (IPv4)
• IP Address
• Subnet Mask
• Default Gateway
• Preferred DNS
Server
• Alternate DNS
Server
• Preferred WINS
Server
Standard IPv4 address
(e.g., 192.0.0.1)
Scan Station’s IP address
Scan Station’s Subnet Mask (e.g.,
255.255.255.0)
IP of default gateway on the
network
IP of domain name Server #1 If this number is incorrect, you may
IP of the alternate domain name
Server #2
IP of Windows Internet Name
Server #1
.
It is recommended that you do not
change this setting. Must be unique
(up to 15 characters) on the network/
subnet. You can leave this field
unchanged as ”Scan-Station” to
avoid overwriting an existing device
name. See Chapter 5, Scan Station
Administration Specifics for more
information.
mask, and DNS server of the Scan
Station are set automatically by the
DHCP server.
Complete this and the other
network sections only if you are
not using DHCP.
Only these numbers are allowed: 0,
128, 192, 224, 248, 252, 254 and 255.
not be able to reach some network
locations.
A-61588 July 2008 2-1
Page 15

Device Settings (continued) — found under the Settings button in the Configuration
Organizer or Administration GUI
Parameter Name Description/Sample Your Setting Notes
• Alternate WINS
Server
Device Password Optional numeric password to
Network User Name Account on the Microsoft Server
Network Password Domain password for network user
Network Domain Name of Microsoft Server 2000 or
IP of Windows Internet Name
Server #2
restrict access to the Scan Station.
4 digits (e.g. 1234).
2000 or Server 2003 domain the
Scan Station uses for access to the
network driver and printers.
name (e.g., 1Df4781).
Server 2003 domain the network
user name belongs to (e.g.,
Mycompany).
.
Entered via the virtual keyboard at
each access.
Novell eDirectory and Linux/Unix are
not supported for login at this time.
This is required to access shared
folders and network printers.
Must be a valid Microsoft format.
This is not necessarily the same as an
Internet domain (company.com). For
more on domain naming conventions,
see http://support.microsoft.com/kb/
909264/en-us.
2-2 A-61588 July 2008
Page 16

Email Server Settings — found under the Settings button in the Configuration Or ganizer or
Administration GUI.
Parameter Name Description/Sample Your Setting Notes
SMTP Settings
• Server Address
• Credentials
•Port
• SSL
LDAP Settings
• Server Address
• Credentials
•Port
• Base DN
• Common Name
Tag
• Email Address
Tag
Return Email
Address
Maximum
Attachment Size
Custom Email
Addresses
Fully qualified domain name or
IPv4 address of the SMTP server
(e.g., smtp-server.
company.com or 192.0.0.1).
User name, password and network
domain. Required to access the
SMTP server.
Default: 25 Only change if your email server
Secure Socket Layer Typically unchecked. Check only if
Fully qualified domain name or
IPv4 address of the LDAP server
(e.g., ldap-server.
company.com or 192.0.0.1).
User name, password and network
domain. Required to access the
LDAP server.
Default: 389 Only change if your LDAP server
Base Distinguished Name Contact your corporate LAN
Default: cn Contact your corporate LAN
Default: email Contact your corporate LAN
This is the address that bounced
emails are returned to (e.g.,
bounce@company.com). This
address will also appear as the
“From” address when sending
email.
1-99 MB
Default: 10 MB
Enables/disables the custom Email
address option, allowing the entry
of email addresses that do not
appear in your address book.
Use IPv4 to eliminate any DNS issues
when troubleshooting.
Required for authenticated SMTP.
NOTE: This is not necessarily the
same as the credentials defined
under Device Settings.
communicates on an IP port that is
not Port 25.
you are sure your email server
requires it.
Use IPv4 to eliminate any DNS issues
when troubleshooting.
Required for authenticated LDAP.
NOTE: This is not necessarily the
same as the credentials defined
under Device Settings.
communicates on an IP port that is
not Port 389.
administrator for more details on this
setting.
administrator for more details on this
setting.
administrator for more details on this
setting.
Select a person who will receive
notification that an email address
could not be reached.
Email operations that create files
larger than this will fail. This should
match the limitations defined by
your email server.
Typically enabled; may be disabled in
more secure environments.
A-61588 July 2008 2-3
Page 17

3 Initial Setup and Verification
This chapter provides instructions for installing the Configuration
Organizer and procedures for setting up your Scan Station to work
properly on your office network. Before you begin, you need to know
some basic information about your network configuration as well as
network addresses (e.g., your Email server and any shared folders you
may want to access from your Scan Station). Refer to the PreInstallation Checklist in Chapter 2 as you are configuring your Scan
Station.
Installing the Configuration Organizer
1. Insert the CD. The installation software starts up automatically.
NOTE: If .NET Framework 2.0 and MSI 3.x is not already installed,
the Configuration Organizer installer will install them before
installing the Configuration Organizer application.
2. Click Next. The Welcome screen will be displayed.
A-61588 July 2008 3-1
Page 18

3. Click Next. The License Agreement screen will be displayed.
4. Read the license agreement, click I Agree and then click Next. The
Select Installation Folder screen will be displayed.
5. Enter, or browse to, the folder where you want to install the
Configuration Organizer or keep the default setting. You may also
install the application for Everyone or Just Me (yourself), then click
Next.
NOTE: It is recommended that you accept the default settings.
3-2 A-61588 July 2008
Page 19

The Confirm Installation screen will be displayed.
6. Click Next. The installation will start and progress will be displayed.
A-61588 July 2008 3-3
Page 20

7. When the installation is complete, the Installation Complete screen
will be displayed.
8. Click Close.
Installing the optional fax modem
To install the optional Kodak Scan Station Fax Modem Accessory
(CAT No. 128 0528):
NOTES:
• Before installing the optional fax modem accessory, verify that you
are running Version 2.0 or greater. Go to www.kodak.com/go/
disupport for more information about updating.
• The Kodak Scan Station Fax Modem Accessory is only available on
the Scan Station 100 and Scan station 100 Plus with serial numbers
higher than (or equal to): 45325000 and Scan Station 120EX’s with
serial numbers higher than (or equal to) 45334500.
1. Plug in the standard RJ-1 1 phone line into the p hone connector port
on the front of the modem. Be sure the other end of the phone line is
connected to your fax line outlet.
2. Plug in the USB connector to the back of the modem.
3. Plug the other end of the USB connector into the back of the Scan
Station.
NOTE: The USB connectors on the back of the Scan Station may
be covered by a black rubber plug. Remove this plug to
expose the two USB ports (located below the ethernet
port).
3-4 A-61588 July 2008
Page 21

Configuring your Scan Station
This section provides procedures for configuring your Scan Station to
connect to your office network environment. You will need to enter
network-specific settings. This information should already be filled in on
the Pre-installation Checklist in Chapter 2.
NOTE: Using the PC keyboard to enter information is faster than
clicking letters and numbers on the virtual keyboard/keypad.
1. Double-click the Configuration Organizer icon on your desktop to
launch the application. Because you are setting up the Scan S tation,
select the Administrator option under the File menu.
2. Click the Settings button to display the Configuration screen.
A-61588 July 2008 3-5
Page 22
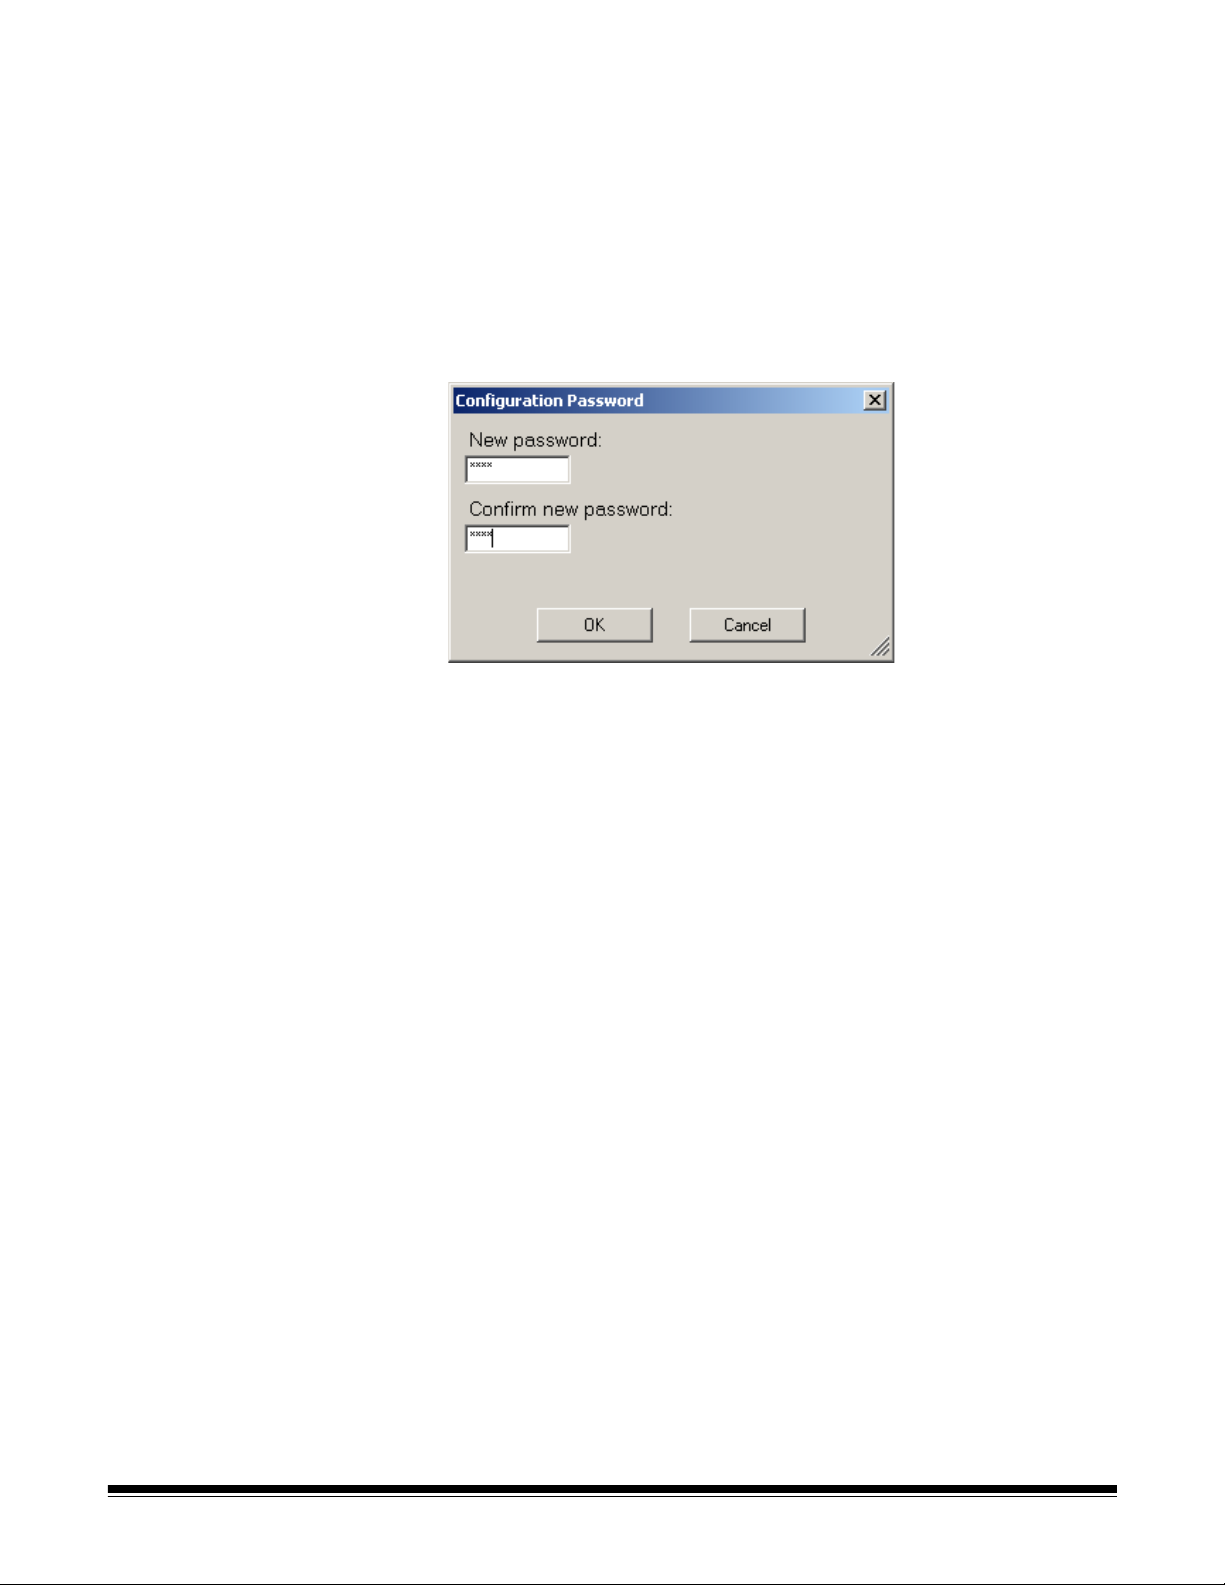
Password protecting the configuration file
As an administrator , you want to p assword protect the co nfiguration file
from being inadvertently overwritten. Other users who have access to
the Configuration Organizer can create an Administrator version of a
configuration file and without knowing it, replace the Scan Station
settings with their own. If you password protect the configuration file,
then only an administrator who knows the password can overwrite the
settings on the Scan Station.
To password protect your configuration file:
1. Select User>Configuration Password. The Configuration
Password dialog box will be displayed.
2. Enter a New password (up to 4 digits).
3. Enter the password again to confirm it.
4. Click OK.
NOTE:After applying the configuration file to the Scan Station,
future attempts to modify the configuration file will require
the entry of this password. If you lose or forget this
password, you will need to cont act Kodak service to unlock
your Scan Station and provide the latest KSS100.XML file.
3-6 A-61588 July 2008
Page 23

Language setting The language you select will be used to configure the Scan Station’s
user interface as well as the language that will be used for the Optical
Character Recognition function (e.g., when creating a searchable PDF
file).
• Click the desired language.
A-61588 July 2008 3-7
Page 24

Device settings The Device icon displays a list of settings which will be used to
configure the Scan Station to work on your office network.
1. Click the Device icon.
2. Enter a device name that is not already assigned to a device on
your office network. Your Device Name must be unique. If you
attempt to enter a name that already exists on your of fice network, a
warning message will be displayed, and, as a result, one of the
devices will be removed from the network. When finished, click
Done on the keyboard.
NOTE: The Scan Station is configured with a unique device name.
If you do not want to change this device name, leave this
field unchanged with the default information called “ScanStation”.
3-8 A-61588 July 2008
Page 25

3. Select IP Address to configure the device’s network address.
Select one of the following:
• If your network uses dynamic IP addresses, click Automatic
(DHCP), and proceed to the next section, “E-mail settings”.
• If your network uses static IP addresses, click Static (IPv4) and
continue with Step 3.
• If all the static IP Address options are not displayed, use the up
and down arrows.
• All of the options on the Static IP Address screen will display a
keyboard/keypad for entering information. When finished making
an entry in the following fields, click Done on the keyboard/
keypad to accept the values and close the screen.
- Click IP Address and enter the address.
- Click Subnet Mask and enter the mask.
- Click Default Gateway and enter the gateway address.
- Click Preferred DNS Server and enter the server address.
- Click Alternate DNS Server and enter the server address.
- Click Preferred WINS Server and enter the server address.
- Click Alternate WINS Server and enter the server address.
NOTE: Configuring the DNS and WINS servers may not be
required.
A-61588 July 2008 3-9
Page 26

4. If you want to protect access to the Scan Station with a password,
select Device/Administrator Password to display the keypad.
Enter a 32-character alphanumeric password. You will be asked to
re-enter the password. When finished, click Done.
NOTES:
• If you assign a device password, all users will be prompted to enter
this password every time they use the Scan Station. This does not
take the place of password protecting your Scan Station’s
configuration file.
• If Force User Login is enabled, this password will be used as the
administrator account password.
5. Click Default Credentials to define the Username, Password, and
Domain required to access network resources.
• Click Username to display the k eybo ard. Enter the network user
name assigned to the Scan Station’s computer and click Done.
For more information see the section entitled, “Network
Configuration details“ in Chapter 5.
NOTE: If you want the Scan Station to have access to network
printers or network shared folders, the user name must be
associated with a network account that has sufficient
privileges to access these resources.
•Click Password to enter the password for the network user
name. Y ou will be asked to re-enter the p assword. When finished,
click Done.
NOTE: This password is only used by the Scan Station and it will
never be displayed in readable form.
•Click Domain. Enter the Microsoft NT network domain name
which the Scan Station will be connected to. In a workgroup
environment, this field can be left blank.
3-10 A-61588 July 2008
Page 27

6. Click Remote Configuration to allow your Scan Station to be
remotely configured. Refer to the section entitled “Updating your
Scan Station” (Method 3) in Chapter 5 for more information. When
selected, the Remote Configuration Settings screen will be
displayed.
- Enter a network folder where the Scan Station will find updated
configuration settings.
- Select which days of the week and time of day this operation will
be performed.
- Select the time of day you want your Scan Station to check for
updates.
7. Click Done.
A-61588 July 2008 3-11
Page 28

E-mail settings For the Scan Station to send documents to email recipients, you must
define how the Scan Station will access your email server.
• Click the E-mail icon. The E-mail settings will be displayed.
You can set the SMTP Settings, LDAP Settings, Return Email Address,
and the Maximum Attachment Size from the E-mail screen. Refer to the
sections that follow for detailed information and procedures.
SMTP settings 1. From the E-mail screen, click the SMTP Settings option. The
following screen will be displayed.
2. Select the SMTP Server Address. The virtual keyboard is
displayed allowing you to enter information. You can enter either a
fully qualified domain name (e.g., mailserver.mycompany.com) or
an IP address. When finished entering the SMTP Server Address,
click Done.
3-12 A-61588 July 2008
Page 29

3. Select Credentials to define the email server credentials.
NOTE: If you are using an unauthenticated SMTP server, you do
not need to make any selections in the Credentials fields.
The Credentials screen will be displayed.
Enter a Username, Password and an optional Domain name for
the email server account that the Scan Station will log into. Even
though these credentials may be the same as the Default
Credentials, they must still be defined here.
For each of these settings the virtual keyboard will be displayed.
When finished, click Done.
A-61588 July 2008 3-13
Page 30

4. Most email servers communicate on Port 25. If your email server
communicates on a different port, click on Port.
The virtual keyboard will be displayed where you can enter a new
port number. When finished, click Done.
5. The default for SSL is Do not use SSL. If your email server requires
Secure Socket Layer (SSL), click SSL and enable the Use SSL
option, then click Done to return to the E-mail screen.
3-14 A-61588 July 2008
Page 31

6. Click Authentication Scheme to select the specific SMTP
Authentication Scheme used by your mail server.
Select from the following options:
• Use Strongest
• None
•Plain
• Login
• MDS Challenge Response
• NTLM
NOTE: Use Strongest will select the strongest available
authentication scheme reported by the mail server. For
more information on authentication schemes, consult your
network administrator.
A-61588 July 2008 3-15
Page 32

7. When your SMTP connection is configured, use the Test
Connection option to test whether your settings are correct. The
Scan Station will test your settings and will display a “Success” or
“Failed” message. If the test connection failed, verify that all of your
settings are correct and make any necessary changes, until a
Success message is displayed.
After running the test connection, click OK on the message box to
return to the SMTP Setting screen. Then click Done to return to the
E-mail screen.
3-16 A-61588 July 2008
Page 33

LDAP settings Connecting to an LDAP server allows the Scan Station and the
Configuration Organizer Software to connect to a network address
directory. This connection can be used to import one or more email
addresses into an email address group. It can also be used to look up
addresses on the Scan S tation to temporarily add an email a ddress to a
group list.
1. From the E-mail screen, click the LDAP Settings option. The LDAP
Settings screen will be displayed.
2. Select the LDAP Server Address. The virtual keyboard is
displayed allowing you to enter information. You can enter either a
fully qualified domain name (e.g., directoryserver.mycompany.com)
or an IP address. When finished entering the LDAP Server Address,
click Done.
3. Define the LDAP Credentials.
A-61588 July 2008 3-17
Page 34

The Credentials screen will be displayed.
Provide a Username, Password and an option al Domain name for
the LDAP server account that the Scan Station will log into. Even
though these credentials may be the same as the Default
Credentials, they must still be defined here.
For each of these settings the virtual keyboard will be displayed.
When finished, click Done.
4. Most LDAP servers communicate on Port 389. If your LDAP server
communicates on a different port, click on Port.
The virtual keyboard will be displayed where you can enter a new
port number. When finished, click Done.
3-18 A-61588 July 2008
Page 35

5. The Base DN (Distinguished Name), Search Field Tag, Email
Address Tag, and Full Name Field Tag are strings that define the
search criteria for the LDAP server. See your network administrator
for the specific format of these strings. When you have the correct
format, enter the Base DN, the Search Field Tag, Email Address
Tag and Full Name Field Tag.
6. Select Search Results To Return to set the maximum number of
records to display when performing a search. Select a number from
1 to 1000.
7. Click Done.When your LDAP connection is configured, use the Test
Connection option to test whether your settings are correct. The
Scan Station will test your settings and will display a “Success” or
“Failed” message. If the test connection failed, verify that all of your
settings are correct and make any necessary changes, until a
Success message is displayed
After running the test connection, click OK on the message box to
return to the LDAP Setting screen. Then click Done to return to the
E-mail screen.
A-61588 July 2008 3-19
Page 36

Return Email Address Setting the Return E-mail Address allows you to receive notification if
an email or fax sent by the Scan Station could not be delivered. This
address is also used as the “From” email address when sending
documents via email.
IMPORTANT: Be careful about setting this option as every
undeliverable email and/or fax notification will be sent to
this address and the same address will appear as the
Sender address for every email sent from the Scan
Station.
NOTE: If fax service is available, it is suggested that you configure the
Device Email Address to ensure you are capturing
unsuccessful fax transaction. The E-mail Fax function of sendng
notification will not work with fax if there is no SMTP e-mail
services or server set up
3-20 A-61588 July 2008
Page 37

Maximum Attachment Size This option allows you to set the maximum size of an email attachment
that can be successfully sent. This value should match the limitations
defined by your email server.
8. Click Maximum Attachment Size.
The following screen will be displayed.
9. Select the size (0 to 99 MB in 1 MB increments) using the up and
down arrows, then click the green button to the left of the selected
number. When you have mad e your selection, the E-mail screen will
be redisplayed.
A-61588 July 2008 3-21
Page 38

Fax settings You must have the optional fax modem accessory fCAT No. 128 0528)
for the Scan Station 100 and it must be properly connected before
configuring fax settings. For instructions on installing the fax modem,
see the section entitled, “Installing the optional fax modem” earlier in
this chapter.
1. Click the Fax icon. The Fax screen will be displayed.
2. From the Fax screen, click the LDAP Fax Field Tag option. The
virtual keyboard will be displayed allowing you to enter information.
Enter the LDAP Fax Field Tag for the tag to use when searching
LDAP for fax numbers. For more information, contact your network
administrator for the exact string to use (e.g., faxnumber). When
finished entering the LDAP Fax Field Tag, click Done.
NOTES:
• LDAP may be used to search for fax numbers that are stored on
a corporate address book. LDAP is not required to use the fax
option.
• The Sender’s FAX Number is informational and can also contain
text information. This field may be left blank.
• LDAP credentials for E-mail LDAP must be set up to propertly
use LDAP for faxing. For more information refer to the section
entitled, “LDAP settings” earlier in this chapter.
3-22 A-61588 July 2008
Page 39

3. If desired, select Sender’s Fax Number from the Fax screen to
enter the sender’s fax number.
The virtual keyboard will be displayed allowing you to enter a
number. Click Done when finished.
4. Select Outside Line Prefix to enter the desired prefix that the user
needs to enter to access an outside line.
When selected, the virtual keyboard will be displayed. Enter the
number you want the user to enter to access an outside lin e (e.g., 9,
is frequently used and a comma “,” may be used to insert a pause).
Each comma pauses the dialing sequence for about 3 seconds. You
can use multiple commas to increase the pause time. When
finished, click Done.
5. Select Modem Country Code to display a list of countries and the
associated codes that configure the modem for use in the selected
country.
A-61588 July 2008 3-23
Page 40

6. Select the desired country/code and click Done.
7. Select Incoming Fax Settings to display the Incoming Fax Settings
screen. If you want to configure your Scan Station to receive faxes,
the following settings can be used to define where incoming faxes
will be delivered. You can select a network folder and/or a network
printer for fax delivery.
8. If you want to select a network folder to receive incoming faxes,
select Incoming Fax Folder to display the virtual keyboard.
3-24 A-61588 July 2008
Page 41

9. Enter a fully qualified path name to a network folder where incoming
faxes will be delivered.
10.When finished, click Done.
1 1.If you want to select a network printer for incoming fax delivery, click
Incoming Fax Printer to display the list of installed printers.
NOTES:
• If no printers are installed, None will be displayed on the Select
Printer for Incoming Fax screen.
•Do not delete a printer destination that is assigned to incoming
faxes. If the incoming fax printer destination is deleted, a
message will be sent to the administrator’s Email ID.
• To install a printer, refer to the section entitled, “Configuring
printers” in Chapter 4.
A-61588 July 2008 3-25
Page 42

12.Select a printer from the list and click Done to return to the Incoming
Fax Settings screen.
13.Click Receive Fax to allow faxes to be received at the configured
device.
NOTES:
• The Incoming Fax option is only available if the administrator’s Email
ID is configured (see the section entitled, “Return Email Address”
earlier in this chapter). If the Email ID is not configured, the following
message will be displayed: Before Incoming FAX can be enabled,
you must provide a return E-mail address. Please refer to
Settings>E-mail>Return E-mail Address and define a valid
return E-mail address.
If for some reason the Email ID is removed after you configure the
incoming fax or the Email ID is invalid, there may be some loss of
data.
• If the destination(s) (e.g. printer and/or network folder) have not been
configured correctly , fax error email(s) will be sent to the Email I D you
provided for every incoming fax.
• Receive Fax must be configured after connecting the fax modem.
• If a fax is processed to any of the destinations or an error email is
sent, it is deleted from the queue and logged as “successful”.
Destination failures will also be logged.
• All corrupt fax(es) will result in an email to you (the administrator) and
deleted from the fax queue.
• If the user’s credentials are not configured correctly, the Scan S tation
will make multiple attempts. The user could be locked out because of
multiple network access errors.
• If there are incorrect configurations for the printer or output folders, or
if both the configurations are missing, then incoming fax messages
will stay in the fax queue and require you to update the Scan Station
to process the faxes.
3-26 A-61588 July 2008
Page 43

Outgoing faxes Three attempts will be made to send a fax. These attempts will be
made at intervals of 3 minutes each.
If the fax service is not able to send a fax to the recipient, an email will
be sent to the sender (User Email Address) if that email address is
available. Otherwise, the message will be sent to administrator’s email
address. Included in the message will be: the fax TIFF image, the
sender and recipient’s fax number and the error response from the MS
Fax Service.
A-61588 July 2008 3-27
Page 44

Transaction Log settings The Scan Station can log all transactions to a separate transaction file.
This file is in XML format and can be exported from the Scan Station.
This is useful in environments that are security-minded or where
transactions are used for billing. By default, all transactions are logged
(checked). You can disable logging on any or all of the transaction
types listed on the Transaction Log Settings screen by unchecking the
appropriate box.
1. Click the Transaction Log Setting icon to display the following
screen.
2. Check or uncheck any or all of the destination types you want to log.
NOTE: If you want to save these files, refer to the section entitled,
“Saving error log files” in Chapter 7.
3-28 A-61588 July 2008
Page 45

Time settings 1. Click the Time icon. The Time screen will be displayed.
2. Click Time Zone and select your time zone.
3. Click Daylight Savings and select Automatically Adjust or No
Adjustment.
4. Click Clock and select either a 12 Hour or 24 Hour time format.
5. Click Separator and select the separator symbol.
6. Click Format and select the hours, minutes, and seconds format.
A-61588 July 2008 3-29
Page 46

Setting the Scan Station clock
The time clock on the Scan Station can only be set when the Scan
Station is in local Administrative mode.
To set the time clock on the Scan Station:
1. Insert a flash drive with an administrative configuration file into the
Scan Station.
2. If prompted to update the Scan Station settings, press the No button
on the control panel. The scanner will now be in Settings mode.
3. Use the arrows to scroll to the Time settings icon.
4. Click on the Set option to display the Time Entry keypad.
5. Enter the time for the Scan Station and click Done.
NOTE: Time is entered in 24-hour mode.
3-30 A-61588 July 2008
Page 47

Date settings If the Calendar icon is not displayed, use the arrows on the toolbar at
the top of the Configuration Organizer screen to view the Calendar
icon.
1. Click the Date icon. The Date settings will be displayed.
2. Click Separator and select the desired separator symbol.
3. Click Format and select the desired day, month, year format.
A-61588 July 2008 3-31
Page 48

Setting the Scan Station date
The date on the Scan Station can only be set when the Scan Station is
in local Administrative mode.
To set the date on the Scan Station:
1. Insert a flash drive with an administrative configuration file into the
Scan Station.
2. If prompted to update the Scan S tation settings, press the No button
on the control panel. The scanner will now be in Settings mode.
3. Use the arrows to scroll to the Date settings icon.
4. Click on the Set option to display the Date Entry keypad.
5. Enter the date for the Scan Station and click Done.
3-32 A-61588 July 2008
Page 49

Configuration options The Configuration Options screen provides a variety of options.
To access the Configuration Options screen:
• Click the Configuration options icon
QWERTY keyboard By default, the Scan Station will display the virtual keyboard in
QWERTY format. You may optionally select an alphabetically-sorted
keyboard format, by deselecting the QWERTY Keyboard option.
Allow custom Email Addresses
Allow File Naming File Naming is a feature that allows a user to name both the folder and
Allow Saving to Flash Drive This feature allows an administrator to disable scanning to a USB flash
The Allow custom E-mail Addresses option allows a walk-up user to
enter an email address that is not currently in the address book. By
selecting Allow custom E-mail Addresses (this is the default), users
can enter new email addresses in an ad-hoc manner. Email addresses
are added temporarily to the currently selected list and will be removed
at the end of the users scan session.
the file name prefix used when scanning to either a network folder or a
USB flash drive. The folder will be appended to the path of the selected
destination and the file name will be used to create the actual file. The
user will optionally be able to turn on or off the date and time stamp
used when creating the file name. Unchecking this option will disable
the file naming feature.
drive. This may be useful in more secure environments where tighter
control is required.
A-61588 July 2008 3-33
Page 50

Allow Force User Login When enabled, this option requires the user to login before a scan
session.
When this option is enabled, the user will be presented with a Login
screen at the Scan Station requiring the user to enter a user name,
password and domain. When Force User Login checked, you must
apply LDAP settings. See the section entitled “LDAP Settings” earlier in
this chapter.
A default Administrator account is available for logging onto the Scan
St a tion after enabling Force User Login. Initially the password will be
“blank” and is up to you to set this password to prevent user access to
Administrative functions. For more information refer to the device
password option in the section entitled “Device Settings”.
3-34 A-61588 July 2008
Page 51

Allow Adding Pages to a Scan Job
When this option is enabled, the user can continue to add pages to a
scan job. After all pages in the input tray have been scanned, a
message will be displayed asking if they want to add more pag es. If the
user selects Yes, the additional pages will be scanned and the
message will be displayed again until the user selects No, or the 30second timeout has occurred.
Hide Network Folder Location
Allow FAST Scanning To allow a user to scan instantly without waiting for the 10-second delay
This option is available if you want to provide a more secure
environment by partially hiding the location of the network folder. If this
option is enabled, only the end of the network folder path will be
displayed on the Scan Station touchscreen. For example:
\\server\myfolder will be displayed as: ...\myfolder.
and the Settings Review screen to be displayed, enable the FAST
Scanning option.
A message will only be displayed if the scan session was unsuccessful.
A-61588 July 2008 3-35
Page 52

Saving your configuration
After configuring your Scan Station, save your configuration settings.
Be sure to insert your USB flash drive into the USB port on your PC
after the Configuration Organizer is running. This will allow the
Configuration Organizer to recognize the presence of the flash drive. If
the flash drive is inserted before the application is launched, the flash
drive option will not be available on the Save Configuration To dialog
box.
1. Click the Save to USB flash drive icon at the top of the screen to
save the configuration file.
The Save Configuration To dialog box will be displayed. By default
the Local backup option is selected. If you choose to create a loca l
backup, a copy of the settings will be saved in the same directory as
the Configuration Organizer.
2. Select where you want to save the configuration settings and click
Save.
NOTES:
• If the flash drive was inserted before the application is launched,
remove the flash drive and re-insert it.
• If Remote Configuration is enabled, check the Folder option
and Browse to the network location where configuration files are
stored.
• If all three options are selected, the configuration file will be
saved to three different locations at the same time.
3-36 A-61588 July 2008
Page 53

Updating your Scan Station settings
When you have saved your administrative configuration on your flash
drive, you can take these settings to a Scan Station and update the
Scan Station.
1. Insert your USB flash drive in the USB port on the Scan Station.
2. If the Scan Station configuration previously had a password
assigned to it, you will be prompted to enter that password before
proceeding with any changes.
If the configuration settings on the USB flash drive are different than
those found on the Scan Station, the following screen will be
displayed.
3. Click Yes. The Select Settings To Replace screen will be displayed.
4. By default, all listed settings will be selected for update; therefore,
unselect the setting(s) you do not want to update. Use the arrows to
scroll through the list to display additional settings.
5. Click Update.
A-61588 July 2008 3-37
Page 54

NOTES:
• If there are additional settings on the Scan Station (e.g. email are
new settings on the flash drive that are not on the Scan Station,
you will be prompted to either add or remove these settings.
• If you do not want to change settings at this time, click Skip.
• At this point, you have either skipped or saved your settings. The
Scan Station will now be in “local administrator” mode.
Any changes made to any of the settings while in “local
administrator” mode will be saved immediately to the Scan Station.
3-38 A-61588 July 2008
Page 55

Verifying your Scan Station setup
The following steps help you to verify that your Scan Station installation
was successful and is operational.
1. Insert a blank flash drive in the Scan Station’s USB port.
When the Scan Station recognizes the flash drive, an icon is
displayed showing the flash drive with the user profile.
2. Click Save to Flash Drive.
3. Place a document into the input tray and press the green Go button.
The Destination Review screen will be displayed.
NOTE: If you enabled FAST Scanning, the Scan Station will start
automatically and the Settings Review screen will not be
displayed. Otherwise, the Scan Station will begin scanning
after 10 seconds (or you can press the green Go button
again to start scanning immediately).
As the Scan Station begins to feed and process documents, a
Status screen will be displayed. The page number and a preview
image will be displayed as each page is being scanned.
A-61588 July 2008 3-39
Page 56

When the document has been scanned, the Status screen will be
displayed as it sends your document to each selected destination.
When all destinations have been processed, the following screen
will be displayed.
NOTE: This screen will list all the destinations you have selected (if you
had more than one). Successful destinations will be shown with
a green check mark. Unsuccessful destinations will be shown
with a red X, and the message, One or more saved
destinations failed will be displayed. To review detailed error
messages, download the error logs.
3-40 A-61588 July 2008
Page 57

4 Configuring the Scan Station
Chapter 4 provides step-by-step procedures for configuring the Scan
Station. Some of these procedures require more detailed information.
Specific section references are made throughout this chapter as to
where to find more detailed information in Chapter 5, Scan Station
Administration Specifics.
Selecting your default Scan Station settings
The Scan Station can be configured with default values for settings
such as; Scan As, File Type, File Name Settings, etc. These defaults
will be used when scanning documents unless they are changed by the
user prior to scanning. If your organization typically scans black and
white documents into PDF files, you may want to change the default
settings to Scan As: Black and White.
1. Double-click the Configuration Organizer icon on your desktop to
launch the application. Because you are setting up your Scan
Station, you should select the Administrator option under the File
menu.
2. Select the Settings button to display the Configuration screen.
A-61588 July 2008 4-1
Page 58

Scan As 1. If the Scan As icon is not visible on the toolbar, click the right arro w
until it is displayed.
NOTE: Certain selections will modify the content of other screens. For
example, if you select Black and White, you cannot select
JPEG output on the File Type screen.
2. Select the type of document (Color, Grayscale, Black and White)
that will most typically be scanned by your organization.
NOTE: If Black and White is selected, a dialog box will be
displayed allowing you to select Best (iThresholding) or
Normal (ATP). It is recommended that the default, Best
(iThresholding) is selected. If Best is selected, you can
change the values on the Black and White Adjustments
screen. For more information, see the section entitled,
“Black and White Adjustments“ later in this chapter.
4-2 A-61588 July 2008
Page 59

File Type 1. If the File Type icon is not visible o n the toolbar, click the right arrow
until it is displayed.
2. Select the file type (PDF, TIFF, JPEG) that will most typically be
created by your organization.
• PDF - Searchable (Image + Text) — creates a single- or multi-
page document that contains both text and image data. This type
of document uses OCR technology to read the scanned page
and extracts text information from the image data. When you
select this option, a screen is displayed allowing four different
options for creating PDF files.
- Quality, will display a screen which allows you to select a
Good, Better or Best quality option. Selecting Good, Better,
or Best, presets the dpi settings. As a result, the separate dpi
settings will not have any effect when scanning in PDF mode.
- Language, this option is only available when you select PDF Searchable (Image + Text). When you select Language, the
Language screen will be displayed. This screen allows you to
select the language you want used in the Optical Character
Recognition employed to generate the PDF file which can be
subsequently searched.
- Single Pages allows you to create a PDF file for every page
scanned. If scanning a two-sided document, a file will be
created for both the front and back page.
- Secure allows you to enter a password that will be used to
encrypt the file before the file can be delivered. The password
will be sent in a separate email when Email is one of the
destination selection.
A-61588 July 2008 4-3
Page 60

• PDF - Image Only — creates a single- or multi-page document
that contains only scanned data as a bitmap image. PDF files
created with this option are not text searchable. When you select
this option, a screen is displayed allowing three different options
for creating PDF files.
- Quality, will display a screen which allows you to select a
Good, Better or Best quality option. When saving a file as
PDF, predefined scanner resolution settings will be used
when selecting Good (150 dpi), Better (200 dpi), and Best
(300 dpi). The scanner dpi settings will not be used and will
be ignored when scanning in PDF mode.
- Single Pages allows you to create a PDF file for every page
scanned. If scanning a two-sided document, a file will be
created for both the front and back page.
- Secure allows you to enter a password that will be used to
encrypt the file before the file can be delivered. The password
will be sent in a separate email when Email is one of the
destination selection.
• JPEG — this option is only available if your Scan As selection is
Color or Grayscale. JPEG creates multiple files, one for each
side of a scanned page. If you select this option, you can select a
JPEG quality of Draft, Good, Better, Best or Superior.
NOTE: The quality settings will greatly impact the final size of the
file (Draft producing the smallest file size and Superior
producing the largest file size).
• TIFF - Multi Page — creates a single file that contains all of the
scanned pages.
• TIFF - Single Page — creates multiple files, one for each side of
a scanned page.
NOTES:
• Color/Grayscale TIFF documents can only be Uncompressed
or JPEG compressed. Black and white documents can either
be uncompressed, JPEG compressed or compressed with
Group 4 compression.
• All faxed documents will be delivered as black and white,
Group 4 compressed TIFF images.
• PDF files are not effected by the dpi settings used, and are
affected only by the Good, Better, or Best options.
4-4 A-61588 July 2008
Page 61

Setting Shortcuts Setting Shortcuts are a way for you to create personalized groups of
scanner settings to make scanning easier. If the re are se ttings that you
use frequently, you can create a shortcut for these settings and save
them to your configuration. The Scan Station application software
provides six predefined Setting Shortcuts.
• Defaults
• Black and White Document
• Black and White Document (OCR Quality)
• Color Document
• Color Document (OCR Quality)
• Color Photograph
These shortcuts are provided for your convenience and cannot be
deleted. They can be used as a template to create other shortcuts.
1. If the Setting Shortcuts icon is not visible on the toolbar, click the
right arrow until it is displayed.
Changing the Scan Station default settings
2. Click the Defaults Setting Shortcut.
3. Scroll through each of the scanner setting icons (e.g., File Naming,
Scan As, etc.) and make any necessary changes. As you scroll
through the other settings, the name of the selected shortcut will be
displayed in the title bar as a reminder of which shortcut you are
editing.
4. Select File>Save to save the new default settings to the
configuration file.
A-61588 July 2008 4-5
Page 62

Creating a new Setting Shortcut
1. Select the Setting Shortcut icon.
2. Select Edit>Add Item. The Add New Setting Shortcut dialog box
will be displayed.
3. Enter a shortcut name in the Description field.
4. Select the shortcut that best defines the settings you want to begin
with from the Create From drop-down list.
5. Click OK.
NOTE: The new shortcut will appear at the top of the list. You can
edit and save any changes to the shortcut in the same way
as previously described.
Deleting a Setting Shortcut
1. Select the Setting Shortcut that you want to delete.
2. Select Edit>Delete Item. The message, Are you sure you want to
delete this item will be displayed.
3. Click Yes to delete the shortcut.
NOTE: The six predefined Setting Shortcuts cannot be deleted.
Modifying a Setting Shortcut
1. Select the Setting Shortcut you want to modify.
2. Scroll through the scanner setting icons (e.g., Scan As, File
Naming, etc.) you want to change and make any desired changes.
3. When finished, click File>Save.
4-6 A-61588 July 2008
Page 63

File Name Settings The Configuration Organizer allows you to define values that determine
the location and file name used when creating scanned documents.
The File Name Settings option allows you to define a Folder Name
where all scanned documents will be placed when scanning to either a
network folder or a USB flash drive destination. You can also define the
File Name Prefix that will be applied to every scanned document
created. Scanned documents are typically created with this prefix and
have an optional date and time stamp appended to the prefix. For
example, if you define a prefix of receipts and a folder name of 2007,
the scanned document file name will have the format:
receipts_20070117_092219.tif and will be placed in a folder called
2007.
1. Define the Folder Name where all scanned documents will be
placed when scanning to a network shared folder, FTP location or
flash drive destination.
2. Define the File Name Prefix that will be used for creating each
scanned document. This prefix will be used as the file name with a
date and time stamp appended. The appropriate file name
extension will be appended (.pdf, .jpg, .tif).
NOTE: You can define the default Folder Name where scanned
documents will be placed if scanning to a network or USB flash
drive destination. If you leave the Folder Name blank, the file
will be created in the root directory of the configured destination.
You can also define the default File Name Prefix that will be
used to create each scanned document. If no changes are
made, the default file name prefix will be used.
A-61588 July 2008 4-7
Page 64

The Advanced option provides access to two additional options:
Interactively Name Scanned Files and Add Date/Time Stamp.
• Interactively Name Scanned Files — selecting this option will
require the user to enter a file name for each destination selected
during a scan job. This option should be used with caution as it will
require an extra step each time a document is scanned.
• Add Date/Time Stamp — by default, Date and Time Stamps are
appended to each file name the Scan Station creates. If the user
wants, they can turn this option off. When turning this option off, only
the file name prefix and the appropriate file name extension will be
used to create the file name.
For more information, see the section entitled, “File Name settings” in
Chapter 5, Scan Station Administration Specifics.
Input Document Is If your organization typically scans one-sided documents, select One
Sided as the default. If Two Sided is selected, the Scan Station will
simultaneously scan the front and back of a document in a single p ass.
•NOTES:
This setting can be changed by a walk-up user for a single scan
session if required. The setting will be changed back to the default a t
the end of the scan session.
• The two-sided option can be used in conjunction with blank page
detection for better performance. See the section entitled,
“Advanced options” later in this chapter to enable blank page
detection.
4-8 A-61588 July 2008
Page 65

Resolution Select a default resolution from 75 to 600 d pi. 200 dpi is the default. For
best OCR results, if you are creating a PDF.
Document Type If your documents typically contain a mixture of b oth te xt with g r aphics,
keep this option as the default. Otherwise, select the document type
that will most frequently be scanned by your organization.
A-61588 July 2008 4-9
Page 66

Black and White Adjustments
If you selected Black and White as your Scan As setting, the Black
and White Adjustments screen will be enabled.
• If you selected Normal, you can select and change the Contrast and
Threshold setting.
• If you selected Best (default, recommended), you can only select
and change the Contrast setting.
• Use the up and down arrows to select the desired values and then
click the green button next to the value. This selects the value and
closes the dialog box.
NOTE: If your Scan As selection is Color or Grayscale, the Contrast
and Threshold settings are disabled.
4-10 A-61588 July 2008
Page 67

Copies for Printing This option is not intended to be used during the configuration setup.
Any changes to this during configuration will be ignored. This value is
intended to be set for each scan session by the user. The default is 1.
Advanced option The Advanced option allows you to select the Blank Image Detection
option. This option is used to detect blank pages (i.e., the back side of a
document), so these pages can be discarded. This is typically used
when scanning black and white documents to either TIFF or PDF. For
black and white documents the default is 5 KB. The default threshold
changes depending on the Scan As setting. Document images that fall
below the threshold will be discarded.
NOTE: The Blank Page Detection feature should not be used when
scanning color documents, as it will not accurately detect blank
pages in this mode.
A-61588 July 2008 4-11
Page 68

Saving your configuration settings
After configuring your Scan Station, save your configuration settings.
Insert your USB flash drive into the USB port on your PC after the
Configuration Organizer is running. This allows the Configuration
Organizer to recognize the presence of the flash drive. If the flash drive
is inserted before the application is launched, the flash drive option will
not be available on the Save Configuration To dialog box.
1. Click the Save to USB flash drive icon at the top of the screen to
save the configuration file.
The Save Configuration To dialog box will be displayed. By default
the Local backup option is selected. If you choose to create a loca l
backup, a copy of the settings will be saved in the same directory as
the Configuration Organizer.
2. Select where you want to save the configuration settings and click
Save.
NOTES:
• If the flash drive was inserted before the application is launched,
remove the flash drive and re-insert it.
• If Remote Configuration is enabled, check the Folder option
and Browse to the network location where configuration files are
stored.
• If all three options are selected, the configuration file will be
saved to three different locations at the same time.
4-12 A-61588 July 2008
Page 69

Updating your Scan Station settings
When you have saved your administrative configuration on your flash
drive, you can take these settings to a Scan Station and update the
Scan Station.
1. Insert your USB flash drive in the USB port on the Scan Station.
2. If the Scan Station configuration previously had a password
assigned to it, you will be prompted to enter that password before
proceeding with any changes.
If the configuration settings on the USB flash drive are different than
those found on the Scan Station, the following screen will be
displayed.
3. Click Yes. The Select Settings To Replace screen will be displayed.
4. By default, all listed settings will be selected for update; therefore,
unselect the setting(s) you do not want to update. Use the arrows to
scroll through the list to display additional settings.
5. Click Update.
A-61588 July 2008 4-13
Page 70

NOTES:
• If there are additional settings on the Scan Station (e.g. email
group, etc.) that are not on the flash drive configuration or if there
are new settings on the flash drive that are not on the Scan
Station, you will be prompted to either add or remove these
settings.
• If you do not want to change settings at this time, click Skip. If
you click Skip, the Configuration mode with the Settings screen
displayed.
When the settings are saved, the Scan Station will still be in
Configuration mode with the Settings screen displayed.
Any changes made to any of the settings while in “local
administrator” mode will be saved immediately to the Scan S tation.
4-14 A-61588 July 2008
Page 71

Managing your destination groups
This section provides procedures for adding, renaming, deleting, and
reordering groups (e.g., email, network folder, printer and FTP) as well
as procedures for managing items in each of the group types. For
simplicity purposes, only the procedures for managing an email group
will be displayed. The steps required to manage other group types and
their entries are the same, unless otherwise noted.
This section describes the creation and use of an administrative
configuration file. The Configuration Organizer can also be used to
create user configuration files. For more information about creating
user configuration files, see the User’s Guide for the Kodak Scan
St a tion 100, A-61544.
For more information about the specifics of the other destination types
(e.g. networking, printing, FTP), refer to Chapter 5, Scan Station
Administration Specifics.
Toolbar The Toolbar provides quick access to commonly used features. The
toolbar is always displayed and you cannot add, delete or move toolbar
buttons.
NOTE: For the purpose of this manual, procedures are indicated by
using the menu options. Depending on what method is easiest
for you, you can use the toolbar buttons or shortcut keys for any
desired action.
Icon Description
Saves the configuration file to the USB flash drive or
hard drive.
Creates a new item in the selected group.
Searches for an item in the selected group.
Renames the selected item.
Deletes the selected item.
Moves the selected item up one position in the list.
Moves the selected item down one position in the list.
A-61588 July 2008 4-15
Page 72

Creating groups and adding items
1. In the Configuration Organizer window, access Destination mode
and select Edit>Add Group>E-Mail. An Email icon is added to the
toolbar on the Configuration Organizer window.
2. To add an email address to a specific email group, select the email
group icon you want to add an address(es) to and select Edit>Add
Item or press the Ins key. The Add dialog box will be displayed.
3. Enter the name and address.
NOTE: If you do not want the email address placed in alphabetical
order, uncheck Add to list alphabetically; otherwise the
email address will be listed alphabetically.
4. Click OK.
4-16 A-61588 July 2008
Page 73

The email address will be added to the selected email group and
the address will be listed on the Configuration Organizer window.
5. Repeat Steps 2 - 4 for each email address you want to add to a
specific email group.
Editing items within a group
Existing items within a group can be edited. You can change the
description as well as the address.
1. Select an item within a group.
2. Select Edit>Rename Item to display the Rename dialog box.
3. Make any desired changes in the Description or Address fields.
4. Click OK.
A-61588 July 2008 4-17
Page 74

Deleting items within a group
Renaming groups By default, when you add an email group, the group is named E-mail.
To delete an item within a group:
1. Select the group that you want to delete the item from.
2. Select the item from the list that you want to delete.
3. Select Edit>Delete Item.
NOTE:Y ou will not be prompted to confirm the deletion of the item. If
you delete an item by mistake, you can close the application
and the following message will be displayed.
Click Yes to discard the changes. The application will close
but your changes will not be saved.
1. Access Destination mode and select the email group that you want
to rename and select Edit>Rename Group. The Rename Group
dialog box will be displayed.
2. Make the desired change in the Description field and click OK. The
updated change will be displayed on the main Configuration
Organizer window.
3. Click OK.
4-18 A-61588 July 2008
Page 75

Deleting groups 1. Access Destination mode and select the email group you want to
delete.
2. Select Edit>Delete Group. The following message will be
displayed.
NOTE: Use caution when deleting groups as all items associated
with the selected group will be deleted. This operation
cannot be undone.
3. Click Yes to continue.
A-61588 July 2008 4-19
Page 76

Moving groups and items within groups
The order in which the groups are displayed in the Configuration
Organizer is the same order they will be displayed on the Scan Sta tion.
If you want a specific group to be displayed as the first se lection or in a
special order, you can reorder the groups the way you want them
displayed.
1. Click the group you want to move.
2. Select Layout>Move Group Left or Layout>Move Group Right
(or click Ctrl-left arrow, Ctrl-right arrow). The group will be moved
one position to the left or right.
4-20 A-61588 July 2008
Page 77

Moving items within groups
1. Select the item within the list that you want to move.
2. Select Layout>Move Item Down or Layout>Move Item Up (or
click Ctrl-down arrow, Ctrl-up arrow). The item will be moved up or
down one position.
NOTE: If you want to move items/groups many times, it is
recommended that you use the Ctrl key sequences as this will
be faster .
A-61588 July 2008 4-21
Page 78

Importing an email address book
CSV (comma separated value) files are data files that represent
database information. Each row contains individual dat a values that are
separated by a comma. Each comma found on a line of text represents
a column of data from the original dat abase. The example below shows
typical data exported from Microsoft’s Outlook Express. Note that the
first row contains the data column header information and not actual
data.
First Name,Last Name,E-mail Address
Smith,John,johnsmith@rochester.rr.com
Tom,Brown,Tombrown123@yahoo.com
William,Doe,wdoe@msn.com
Outlook Express allows you to export your email address book to a
comma-separated file. When exporting your email address book a
dialog box will be displayed that provides the selection of which data
columns to export.
Other mail programs may or may not provide this selection capability.
To simplify the process it is recommended that only the first name, last
name, and email address be exported. Once the file is exported, it can
then be imported into the Configuration Organizer.
Many email client applications will automatically export the column
headings as the first row of data. When using the Configuration
Organizer, the Import Email Addresses dialog box p rovides you with the
ability to “skip first row” of data. Some email applications will also export
the data with additional quote characters surrounding the data. The
Configuration Organizer will remove these quotes prior to importing the
data.
The following data:
“First Name”,”Last Name”,”E-mail Address”
"John","Smith","johnsmith@rochester.rr.com"
"Tom","Brown","Tombrown@yahoo.com"
"William","Doe","wdoe@msn.com"
will be changed to:
First Name,Last Name,E-mail Address
John,Smith,johnsmith@rochester.rr.com
Tom,Brown,Tombrown@yahoo.com
William,Doe,wdoe@msn.com
After browsing and selecting a CSV file, a preview will be displayed
showing the results of the file Column Location selections. As the
column selections are changed, the preview will reflect these changes.
For example, if the three file Column Location values are 1, 2, and 3,
then based on the example data shown above, the preview would
display the following:
First Name Last Name Email Address
The first name and last name are combined to form the email address
display name. The email address is used to create the actual email
address.
4-22 A-61588 July 2008
Page 79

To further illustrate, if all three Column Location values were set to 1,
then the preview would look like:
First name First Name First Name
To import your email address book:
1. In the Configuration Organizer window, access Destination mode
and select the email group you want to import your email address
book to.
2. Select Edit>Import E-mail Addresses. The Import E-mail
Addresses dialog box will be displayed.
3. Specify the file containing the addresses. If necessary, use the
Browse button to help locate the file.
4. If your list has a title row and you do not want to import the title row
information, check Skip first row of data.
A-61588 July 2008 4-23
Page 80

5. Specify the columns in the CSV file that contain data for First
Name, Last Name, and Email Address.
The First Name, Last Name, and E-mail Address fields allow you to
map these values to the columns in which they appear in the CSV
file.
6. Click Import. The email addresses from the CSV file are added to
the Email group that you selected on the Configuration Organizer
window.
The Configuration Organizer will report the number of email
addresses successfully imported.
Adding addresses using LDAP
If you have the LDAP server correctly configured, you can use this
connection to search the network address book for email addresses.
Any addresses found while searching can be added to the currently
selected email group. To add an email address:
1. Click the Search icon on the main Configuration Organizer
toolbar. The keyboard will be displayed.
2. Enter the last name of the person you are searching for and click
Done. The Address Search Results list will be displayed.
3. Select one or more of the addresses found in the list and click
Done. The addresses will be added to the email group.
NOTE: If more than 20 addresses are found that match the search
criteria, you may want to refine your search by adding more
information, such as the first name of the person you are
searching. e.g., “smith joe” instead of just “smith”.
4-24 A-61588 July 2008
Page 81

Configuring FTP destinations
FTP destinations require a slightly different configuration than the o ther
destinations. The Configuration Organizer allows you to configure both
FTP and proxy server settings. Depending on your network
configuration you may or may not have to communicate with FTP sites
through a proxy server. For each FTP destination you can specify
individual username and password settings. This is important as you
may be communicating with FTP sites located at different comp anies or
on different company servers.
1. Select Edit>Add Group>FTP. The Add: Ftp Folder dialog box will
be displayed.
2. Make an entry in the Description, Folder, Username and Password
fields. The Folder field should contain a complete path to the FTP
site including the subfolder into which scanned documents will be
placed. For example, //ftp.acme.com/documents would connect to
the FTP site ftp.acme.com and place the scanned documen ts in the
folder documents.
NOTE: Any additional folders defined in the File Naming Settings
screen will also be used when creating the scanned
documents. See the section entitled, “File Name Settings”
earlier in this chapter.
3. If the FTP site communicates on a port other than Port 21, change
the value using the up and down arrows.
4. You may optionally select Passive if required by the FTP server.
Passive is most commonly used if the FTP site is outside the
firewall.
5. If you do not want the address added to the list alphabetically, click
Add to list alphabetically to uncheck it. This will add the item to
the list in chronological order.
6. If your company requires the use of proxy servers, click the Proxy
button and go to the next section; otherwise click OK.
A-61588 July 2008 4-25
Page 82

Specifying Proxy settings If your company requires the use of a proxy server before
communicating with an FTP site, you must define these proxy settings
by clicking on the Proxy button. The Proxy Settings dialog box will be
displayed.
1. Select the Proxy Type. USER after login and None are the only
two supported options at this time.
2. If USER after login is selected, the rest of the fields are available.
Enter the Proxy Address in the form of a Fully Qualified Domain
Name (e.g., FTP.acme.com) or as an IP address.
3. Enter the Username and Password required to access the proxy
server.
4. If the proxy server is configured to communicate on a port other
than Port 21, change or enter the value using the up and down
arrows or keyboard.
5. Click OK.
4-26 A-61588 July 2008
Page 83

Configuring printers The Scan Station uses the Microsoft “Point and Print” technology for
installing print drivers and connecting to network printers. Typically,
network printers are attached to print servers which manage the
scheduling of print jobs for one or more network printers. These print
servers manage print queues for each connected printer and can also
deliver and install print drivers to other network PCs or devices.
The Scan Station can connect to printers in the following ways:
• Connect to a printer that is connected to a print server on a network
domain.
• Connect to a printer that is shared by another computer on a network
workgroup.
• Connect to a network printer that is directly connected to the network
via an Ethernet cable plugged directly into a router or hub.
In each of these scenarios, Microsoft Windows may also require login
credentials for any device requesting access to a network printer. Each
of the scenarios listed above is described in more detail below.
Connecting to a printer that is connected to a print server on a network domain
1. Enter any text that describes the printer in the Description field.
2. Enter the fully qualified path to the print server and print queue (e.g.,
\\printservername\printqueue or \\192.168.1.101\printqueue).
NOTE: The use of IP addresses when accessing a print server is
guaranteed to resolve the path to the printer . Fully qualified
domain names may not resolve in certain network
environments.
3. If the network domain is configured to require authentication to
install a printer driver, enter the Username, Password, and
Network Domain names.
4. When finished, click OK.
NOTE: If proper authentication is not provided, the printer and its driver
may not be installed on the Scan Station.
A-61588 July 2008 4-27
Page 84

Connecting to a printer shared by another computer on the network workgroup
1. Enter any text that describes the printer in the Description field.
2. Enter the fully qualified path to the Shared computer and the share
name assigned to the printer (e.g., \\mypc\sharedprinter or
\\192.168.1.101\sharedprinter).
NOTE: The use of IP addresses when accessing a print server is
guaranteed to resolve the path to the printer . Fully qualified
domain names may not resolve in certain network
environments.
3. If the PC requires authentication credentials to access the shared
printer, enter the Username and Password. Leave the Domain
Name blank.
4. When finished, click OK.
4-28 A-61588 July 2008
Page 85

Connecting to a network printer that is directly connected to the network
This option is more complicated than the other two in that it requires the
printer to be shared by a PC on the network at least temporarily, while
the printer drivers are downloaded and installed on the Scan Station.
Before setting up a printer that is directly connected to the network, the
printer must first be “shared” from a computer on the network. The
shared printer must also be configured to provide a Windows XP driver
for the printer. Once shared, there are two pieces of information you
must gather from this computer: the driver name and the port name.
On the PC that is sharing the printer:
1. Click Start>Settings>Printers and Faxes and select the installed
Printer. The control panel for this printer will be displayed.
2. Write down the Driver Name as it appears on the Control Panel.
The location of this information may be different for each printer.
A-61588 July 2008 4-29
Page 86

3. On the Ports tab of the Control Panel, write down the exact text that
appears on the selected Port value.
NOTE: As shown below, this would be “IP_192.168.2.137”.
4. Return to the Configuration Organizer and select or create a printer
group and select Edit>Add Item.
5. Enter any text that describes the printer in the Description field.
6. Enter the IP address of the network printer (e.g., \\192.168.2.137).
7. Enter the Username and Password and optional Network Domain
that will be used as credentials on the PC that is temporarily sharing
the network printer.
4-30 A-61588 July 2008
Page 87

8. Click the Advanced button to display the Advanced dialog box.
9. Enter the fully qualified address to the PC that is sharing the printer
(see Step 1) including the share name (e.g.
\\workgrouppc\BrotherH).
10.With the information gathered in Steps 1 and 2, enter the driver
name and the port name in their respective fields.
11.Click OK on both the Advanced and Add: Printer dialog boxes.
The printer driver will be installed from the sharing PC. A connection
will be made between the printer and the Scan Station using the IP
address entered on the Add: Printer dialog box. After the initial
installation, the shared printer connection is no longer required and
the Scan Station will be able to communicate directly with the
network printer.
12.Click Advanced to display the Advanced dialog box.
The Advanced dialog box allows you to enter the information
required to access the printer driver on the shared PC. This
information will be used to install the printer driver on the Scan
Station.
13.Enter the fully qualified address to the shared PC and the printer
share name.
(e.g. \\workgroupPC\BrotherH, \\192.168.2.137\BrotherH)
A-61588 July 2008 4-31
Page 88

5 Scan Station Administration Specifics
This chapter provides detailed administrative information about your
Scan Station including:
• in-depth information regarding Scan As settings, File naming settings
and E-mail group settings.
• securing your Scan Station and the various password options
available.
• loading and saving configuration files.
• updating your Scan Station.
• network configuration details.
Scan As settings When selecting a Scan As setting, note that each selection has an
impact on the settings that are available on other screens in the
Settings mode. The following table describes how each Scan As
selection will impact other selections.
Scan As setting File Type setting Black and White Adjustments
Color PDF (Searchable/Image only)
PDF (Multi/Single page)
TIFF (Multi/Single page)
JPEG (Single page)
Grayscale PDF (Multi/Single page)
JPEG (Single page)
PDF (Searchable/Image only) Not available
Black and White
TIFF (Multi/Single page)
Best (iThresholding)
Normal (ATP)
Not available
Not available
Contrast available
Contrast and Threshold
available
A-61588 July 2008 5-1
Page 89

File Naming settings The Scan Station offers several ways you can customize how scanned
documents are delivered to their final destinations. While in Settings
mode you can select the File Name Settings icon which provides three
options for naming and delivering your scanned documents:
• Folder Name
• File Name Prefix
• Advanced: provides two additional settings that allow you to
optionally add a date and time stamp to the resulting scanned file
name, and allows the user to interactively name files as they are
delivered to each destination.
Folder Name — allows you to define the final folder(s) where scanned
documents are deposited. This option only pertains to documents that
are being scanned to either a Network destination (FTP or shared
folder) or a USB flash drive. If a folder name is defined, it will be
appended to the full path selected in the destination. For example, if a
network folder defined as: \\myserver\myfolder\docs is selected and the
Folder Name is set to “designdocs” then the scanned document is
placed in the following folder: \\myserver\myfolder\docs\designdocs.
If multiple folder levels are defined in the Folder Name field, the
scanned documents will be placed in the full path defined by the
destination and the “Folder Name”. In the previous example, if the
“Folder Name” was defined as “designdocs\worddocs” then the
scanned document is placed in
\\myserver\myfolder\docs\designdocs\worddocs.
In either case, if the path to the final destination does not exist, then the
Scan Station attempts to create the full path to the destination. This is
true for network destinations as well as USB flash drive destinations. As
in the previous example, if the sub-folders docs and/or worddocs did
not exist, they would be created prior to copying the scanned document
providing the Scan Station account has appropriate user rights.
File Name Prefix — allows the user to define the file name used when
copying the scanned document to it’s destination. If this field is left
blank, the default file name KSS100 will be used. However, if a special
file name needs to be defined, then the user can enter the file name of
their choice. For example, if the following entry is made for File Name
Prefix: “Receipt” then all files created would take on the form of
“Receipt_20070120_100155.xxx” where the .xxx represents the
appropriate file name extension (either .jpg, .tif or .pdf) and
“20070120_100155” represents the date and time the file was created.
5-2 A-61588 July 2008
Page 90

Advanced — provides two additional settings that allow you to
optionally add a date and time stamp to the resulting scanned file
name, and allows the user to interactively name files as they are
delivered to each destination. The Add Date and Time St amp option is
the default. This is the default so when documents are scanned and
delivered to the selected destination, they will always have a unique
name. This also avoids inadvertently overwriting existing files. The
Interactively Name Files option allows the user to name the scanned
document just before it is delivered to each destination. Before copying
the document to the selected destination, the Scan S t ation displays the
virtual keyboard on the display and allows the user to enter a new file
name.
NOTE: Be careful when enabling the Interactively Name Files option,
as it requires user interaction for each selected destination. For
example, if the user selects five different destinations, they will
be prompted five times to enter a file name.
E-mail groups Chapter 4 provided procedures for creating, modifying and deleting
groups of destinations and the items within destination groups.
Examples were provided that were pertinent to all groups of
destinations. This section discusses a special case for creating email
groups. Ordinarily, email groups contain a list of entries that consist of
one e-mail address per entry. However, you can create a list within a
single entry within the email group. The following illustration describes
both the typical case of one email address per item, followed by an
example that has multiple addresses per entry.
Example 1
The Description field cont ains a mail re cipient’ s name, and the Address
field contains a single email address.
Description: John Doe
Address: john.doe@acme.com
Example 2
The Description field contains a group name, and the Address field
contains multiple email addresses separated by commas.
Description: John Doe Family Group
Address: john.doe@acme.com, jane.doe@hypernet.net,
juniordoe@statecollege.edu
By separating a list of email addresses with a comma, a gro up o f email
addresses is created. As this entry is created, each email address in
the Address field is validated to ensure the proper format. If an
improper email address is entered, the following message will be
displayed:
A-61588 July 2008 5-3
Page 91

Securing your Scan Station
Network security is an important part of every day business and it is
important that network devices do not allow intrusions from outside
sources. The Scan S tation 100 is configured to prevent externa l attacks
from the Internet, and from direct access by users. With this in mind,
several steps were taken to block access to the Scan Station’s
operating system.
• First, the Scan Station has an internal firewall active that only allows
a response to an “echo (ping)” command. Inbound ports are blocked
and will not respond to queries from the network.
• Second, the Scan St ation is protected f rom external intrusions via the
USB ports found on the front and back of the device. The operating
system is configured to disable any auto-run action that could occur
when presenting a new USB device to the system. The Scan Station
application recognizes the presence of a USB removable device, but
will only open and read files that have been created and encrypted
specifically for use by the Scan Station. Any file found on a
removable device that is not properly encrypted will be ignored. This
makes it almost impossible to introduce a virus from inserting a
removable device with an infected executable.
• Finally, viruses frequently find their way into a network-connected
computer via email. Most viruses are spread as email attachments
and infect a computer after the email has been opened and the
attachment executed. The Scan Station does not receive any
incoming emails, therefore, it cannot be infected in this manner.
Password protecting your configuration file
There are several ways an administrator can secure the Scan Station
using passwords. As previously described in Chapter 3, the
administrator can add a password (32-character alphanumeric PIN) to
any administrative configuration file created (select
User>Configuration Password and enter a password). This prevents
access to the configuration file in the following ways:
• If the configuration file is saved with this password, it cannot be read
by a user running the Configuration Organizer without knowing the
password. Upon insertion of a flash drive that contains a passwordprotected configuration file, the user will be prompted to enter the
password. Failure to correctly enter the password forces the
Configuration Organizer to ignore the file and proceed as if no file
exists.
• When a password configuration file is used to update a Scan S t ation,
the password is applied to the configuration on the Scan Station and
any attempts to modify the Scan Station’s configuration requires the
entry of the correct password before any changes can be made.
Because of this protection it is imperative that the password be kept
in a safe place and not forgotten. If the password is forgotten, it will
require you to contact Kodak Service to unlock the Scan Station.
5-4 A-61588 July 2008
Page 92

Password protecting your Scan Station (user access)
Another password protection feature is assigning a 32-character
alphanumeric password directly to the Scan Station. This requires any
user wanting to use the Scan S tation to know the p assword prior to use.
This is intended for use in companies or departments that have
sensitive material that they want to prevent being scanned and
distributed. The device password setting is found on the Configuration
Organizer while in “Settings” mode. By clicking on the Device icon and
selecting Device Password, you can enter a password that blocks
access to all users who do not know the password. On a Scan Station
that is password-protected, users will be given three tries to correctly
enter the password. After the third failed attempt, the Scan Station will
display a warning message for several minutes and return to the
password entry screen.
The Device password also works in conjunction with the inactivity timer
built into the Scan St ation. In normal operation, af ter a Scan Station has
been used and has remained idle for one minute, a wa rning screen will
be displayed asking the user if they want to reset all Scan Station
settings to the default state. If no selections are made, then after two
more minutes of inactivity , the device will be returned to its defau lt state.
If the user selects OK when the initial warning is displayed, the Scan
Station will be returned to its default state immediately. If Cancel is
selected, the current configuration settings are maintained, the timer is
reset and the Scan Station will start monitoring for inactivity again.
Loading and saving configurations
In addition to assigning a 32-character alphanumeric password, you
can require the user to login before starting a scan session. See
Chapter 3, “Configuration options” for more information.
The Configuration Organizer is designed to monitor the Windows
operating system for removable device events, which signal the
insertion and removal of USB devices (e.g., the USB Flash Memory
device supplied with each Scan Station). Because of this, the
Configuration Organizer cannot detect a flash drive unless the
application is running. Follow the recommendations below when
creating and modifying configuration files:
1. Always start the Configuration Organizer before inserting a USB
flash drive. If the flash drive is inserted before starting the
Configuration Organizer, remove the flash drive and reinsert it.
2. If you insert a USB flash drive that has a configuration file on it, prior
to making any edits, the configuration file will be recognized and
loaded into the Configuration Organizer.
3. When saving your configuration, you will have an option of saving
the configuration file to a flash drive AND to a local backup. Using
the Save to local backup option only creates a backup of the last
edited configuration file.
4. The configuration file is always named KSS100.xml. If you want to
save different versions of this file, it is recommended that you create
multiple folders which are named appropriately.
A-61588 July 2008 5-5
Page 93

5. If you start by editing a new configuration file and insert a flash drive
after edits have been made, any configuration file on the flash drive
will be ignored and not loaded.
6. When saving to any location, if a configuration file is present, you
will be asked if it is OK to overwrite the file.
7. If you started the Configuration Organizer, made changes and
select File>Open, you will be notified that Changes ha ve not been
saved and will be lost. Are you sure you want to continue?
Selecting No will stop the Configuration Open process.
Updating your Scan Station
Chapter 4 provides information and procedures for setting up and
configuring your Scan Station. This section provides more detailed
procedures for updating your Scan Station.
An administrative configuration file can be created using the
Configuration Organizer and saved to a USB flash drive. There are
three methods of updating the Scan Station.
1. Method 1. The administrative configuration file is stored on a flash
drive, inserted into a Scan Station, which is then updated. This
method is manual and must be repeated for each Scan Station on
the network. This method was previously described in Chapter 3.
See the section entitled, “Updating your Scan Station settings” for
procedures.
2. Method 2. The administrative configuration file is stored on a flash
drive, with an update package. This causes the Scan Station
configuration to be updated and installed with new software to the
Scan Station. See the information later in this section for more
information.
3. Method 3. The administrative configuration file and optional update
package is stored on a network drive and the Scan Station is
configured to poll this drive (shared folder) for updates. The Scan
Station will automatically recognize the new configuration data or
update package and execute an update automatically. See the
information later in this section for more information.
5-6 A-61588 July 2008
Page 94

Method 2 — requires an update package and an administrative
configuration file to be copied to a USB flash drive. When the flash drive
is inserted into the Scan Station, the internal software recognizes the
administrative configuration file and the update package. Once
recognized, if the update package is a different version than the
currently installed version, the user is prompted to update the Scan
Station software. Both the old version number and the version number
of the update package will be displayed. If the administrator decides to
update the software, all the data found in the update package will be
copied to the Scan Station and installed. When the installation is
complete, click OK or remove the flash drive and the Scan Station will
automatically be restarted.
If the Scan St ation does not rest art, press the green “sof t” button on the
back of the Scan Station. The Scan Station will shutdown in a normal
manner. This is very important because the final installation of files
occurs when the Scan Station is being shut down. Without the
shutdown and restart, the Scan Station may not be properly updated
and configured.
NOTES:
• It is important to make the distinction between the green “soft” but ton
found on the back of the Scan Station and the main power switch.
The main power switch should only be used after the Scan Station
has been shutdown via the green “soft” butto n. Using the main power
switch will cause an abrupt shutdown of the Scan Station and may
occasionally corrupt data files on the Scan Station. This is not
recommended.
• You can obtain Update packages from the Kodak website or from
your Kodak service representative. Update p ackages will always be a
file called KSS100UPDATE.EXE.
A-61588 July 2008 5-7
Page 95

Method 3 — the Scan Station software can be configured to monitor a
network folder where configuration files and software updates are
installed. To set this up:
1. From the Configuration Organizer Settings mode, select the
Advanced icon and click Remote Configuration Settings.
From this screen, you can select and define the following values:
• Path to the folder where updates can be found.
• Which day of the week (Daily, or Every Monday, Tuesday,
Wednesday, Thursday, Friday, Saturday, and Sunday).
• The time of day to check for updates (a 24-hour clock).
For example, you may want to monitor the folder
\\myserver\updates\myscanstationID on Every Monday, at 7:00 a.m.
There are two ways to remotely configure and update your Scan
Station:
• Single file/folder update — the administrator creates a sin gle folder
on the network from which all Scan Stations are configured to
monitor for updated configuration files. This allows the administrator
to push a single configuration to all of the Scan S tations on a net work
at one time. This is the recommended method when all of your Scan
Stations share the same configuration.
• Multiple file/folder update — if each of your Scan Stations require a
different configuration, it is recommended that a common folder is
created on the network with subfolders underneath to store individual
configuration files for each of the Scan Stations on your network.
Each Scan Station should then be configured to monitor the
appropriate folder for updates.
5-8 A-61588 July 2008
Page 96

On the defined day of the week and time, the Scan Station checks for
the specified folder on the network, and if found, examines the contents
of the folder looking for a KSS100.XML file and an optional
KSS100UPDATE.EXE file. If the KSS100.XML file is found, the
modification date and time will be compared to the last time a
configuration was executed on the Scan Station. If the KSS100.XML
file is more current, the configuration settings in the file are applied to
the Scan Station. Be sure to carefully select a time of day when the
Scan Station will be idle for automatic updates.
When new configuration files are found, the following sequence of
events will occur.
1. If a new update file is found, the contents of the update will be
applied to the Scan Station.
2. If newer settings are found, the settings will be applied to the Scan
Station as the new default settings.
3. If required, the Scan Station will be restarted. A restart will always
occur when an update file is found. The Scan Station will be
restarted if the network settings for the Scan Station are modified.
NOTE: Any changes to the device name will be ignored when
using the remote configuration.
Network configuration details
If the Scan Station software and the KSS100UPDATE software are at
the same revision level, no action will be taken.
NOTE: You can “roll-back” to an older version or update to a newer
version of the Scan Station software. If an older version of the
KSS100UDPATE file is placed in the remote configuration
folder, the Scan Station will be rolled back to use the older
version of the software. If a newer version is found, the Scan
Station will be updated with this newer software. These
methods are also available using the manual update procedure
(Method 1). If a Scan Station is updated back to version 1.5,
(the first commercial release), the remote configuration facility
will no longer be available, as this option was not yet
implemented in version 1.5.
When installing and configuring your Scan Station, there are some
things you can do, as an administrator, to prepare for an easier
installation. Chapter 2 provides a checklist of information you need to
connect the Scan Station to your network. This section details what
additional steps you can take to set up your network environment for a n
easier Scan Station integration. Because the Scan Station is a network
device, a basic knowledge of networking principals and terminology will
be helpful. You should be familiar with the concept of creating user
accounts (on domains), sharing folders, setting access privileges, the
Universal Naming Convention (UNC), using IP addresses, fully
qualified domain names (FQDNs) and creating user groups. The rest of
this section contains a list of Best Practices to be used when
administering Scan Stations.
A-61588 July 2008 5-9
Page 97

NOTE: Some of the concepts covered in this chapter assume
knowledge of Microsoft NT Domains and permissions. Refer to
your documentation for Microsoft Windows Server 2000 or
Windows Server 2003 for more information.
Scan Station user groups — for network domain environments, the
administrator should create a user group for all Scan Stations. This
group will be used to hold account names that are assigned to each
Scan Station. Minimally, there should be one account name that is
assigned to each Scan St ation. Optima lly, each Scan Station should be
assigned its own unique username and password and these accounts
should be contained within a group that is reserved specifically for Scan
St ations. These account names will be used when configuring the Scan
Station’s network settings and entered into the Username, Password,
and Network Domain fields.
NOTE: The Scan Station groups and login names must be given
appropriate privileges to access the network resources that the
user will see as Destination choices at the Scan Station.
Workgroup environments — for network environments that use the
Microsoft “Workgroup” configuration, you may minimally be required to
create an account name and password to be assigned to Scan
St ations. These account names will be used when configuring the Scan
Station’s Network settings and entered into the Username, Password
fields. The Network Domain field should be left blank in Workgroup
environments.
Network folders — it is recommended that you create network folders,
for either Destination or Remote Configuration, that can be accessed
(minimally read, write, change access) by any Scan Station login
account or by the user group created for Scan Stations.
UNC names for folders — as an administrator, you will need to know
the fully qualified UNC name for each network folder that will be used
by your Scan Station(s). When configuring network destinations, this
will be the information entered into the Address field of the Destination
Entry dialog box. For example, you could create a folder called
“scanfolder” on a server called “acmeserver” that would be reserved for
Scan Station access. You would reference it by the following UNC
name: \\acmeserver\scanfolder.
NETBIOS usage — in network environments that use routers it is
common practice to block NETBIOS traffic on your router. You may
need to know the IP address of the server to which you want to scan
documents. By substituting the IP address of the server instead of the
NETBIOS computer name, you can bypass the network traffic
restrictions that may cause network scanning to fail. For example, the
previously defined network address: \\AcmeServer\scanfolder should
be replaced with something similar to: \\192.168.2.10\scanfolder.
5-10 A-61588 July 2008
Page 98

6 Maintenance
This chapter provides cleaning and replacement procedures for the
Kodak Scan Station 100.
Cleaning procedures Your Scan Station needs to be cleaned periodically. If your documents
do not feed easily, if several documents feed at the same time or if
streaks appear on your images, it is time to clean your Scan Station.
The section entitled, “Supplies and consumables” at the end of this
chapter provides a listing of the supplies required to clean your Scan
Station.
IMPORT ANT:Use only non-flammable cleaners such as those provided
through Kodak Parts Services. Do not use household
cleaners.
Do not use cleaners in confined areas, use with adequate
ventilation.
Do not use cleaners on hot surfaces. Allow surfaces to
cool to ambient temperature before use.
Opening the cover 1. Open the cover by pressing the release lever.
2. When finished with the cleaning procedures, close the Scan St atio n
cover.
A-61588 July 2008 6-1
Page 99

Cleaning the rollers 1. With a roller cleaning pad, wipe the feed roller from side to side.
Rotate the feed rollers to clean the entire surface.
IMPORTANT: The roller cleaning pad contains sodium lauryl ether
sulfate which can cause eye irritation. Refer to the MSDS
for more information.
2. Dry the rollers with a lint-free cloth.
Cleaning the feed module 1. Squeeze the plastic clamps that hold the feed module in place and
lift the feed module out of position.
2. Wipe the feed module from top to bottom with a roller cleaning pad.
3. Reinsert the feed module into position, by aligning it into the slots
and pushing it in until it snaps into place.
6-2 A-61588 July 2008
Page 100

Cleaning the imaging guides
1. Remove dust and debris from this area by using a Staticide wipe or
a small brush. Be careful not to scratch the imaging guides when
cleaning.
IMPORTANT :Staticide wipes contain isoprop anol which can cause eye
irritation and dry skin. Wash your hands with soap and
water after performing maintenance procedures. Refer to
the MSDS for more information
2. Wipe the upper and lower imaging guides with an almost dry
Staticide wipe to remove any streaks.
A-61588 July 2008 6-3
 Loading...