

Page 1

Page 2

Scanning Setup Guide for the ISIS Driver
Contents Scan Validation Tool dialog box.........................................................2
Configuring Image settings................................................................4
Main tab......................................................................................... 6
Layout tab...................................................................................... 8
Scan Area dialog box.....................................................................9
Image Processing tab.................................................................. 10
Dropout tab.................................................................................. 12
Adjustments tab........................................................................... 13
Image Edge Fill tab......................................................................15
Blank Image Detection tab...........................................................16
Configuring Scanner settings...........................................................17
Scanner tab .................................................................................18
Multifeed Detection tab................................................................ 19
About tab .....................................................................................20
The Kodak ScanMate i900 Series Scanners provide the ability to
process scanned images to improve their quality by using image
processing features.
Image processing refers to features of the scanner that allow you to
automatically adjust each image that may improve the resulting images
(i.e., correcting any skew in the fed document, cutting the edges of the
image off to remove unneeded borders or cleaning up extraneous
“noise” on the image).
The information in this guide provides procedures for using the ISIS
Driver as well as descriptions of the features. The same features should
be available on the user interface of the scanning application you are
using.
A-61734 March 2012 1
Page 3

The Scan Validation Tool dialog box
The Scan Validation Tool (SVT) is a diagnostic application provided by
Kodak. The SVT user interface allows access to all the features of the
scanner and is a good way to verify that the scanner is working
properly. The Scan Validation Tool allows you to verify scanner
functionality using the ISIS Driver.
Toolbar buttons
Setup — displays the user interface for the selected driver.
Destination — allows you to select a directory to stor e scanned
images and their file names. This option is only available when
Save Images to Files is selected.
Start Scanning — scans the documents in the input tray.
Scan One Page — scans only one page.
Stop Scanning — ends the scan session.
License Key — displays the License Key window.
No Image Display mode — closes the Image Viewer window
(no images will be displayed).
One Image Display mode — displays one image at a time.
Two Image Display mode — displays two images at a time.
Four Image Display mode — displays four images at a time.
Eight Image Display mode — displays eight images at a time.
About — displays the version of the Scan Validation Tool.
2 A-61734 March 2012
Page 4

Save Images to Files — when selected, will save the images to the
specified directory.
Display Every ⎯ enter the sampling rate of the images you want to
display while scanning. For example, to see every image, enter a value
th
of 1. To see every 10
image, enter a value of 10.
Total ⎯ displays the total number of images scanned during the
current Scan Validation Tool session.
• To access the ISIS Driver double-click the Setup icon on the Scan
Validation Tool dialog box to access the main Kodak Scanner
window.
Last File ⎯ displays the full path and file name for the last stored
image.
A-61734 March 2012 3
Page 5

Configuring Image settings
The main ISIS Driver window provides a set of default tabs for
configuring images. You can select each of these tabs and make any
choices necessary to meet your scanning needs.
This section describes the ISIS Driver default interface.
NOTE: The Image Mode selections are available with all of the Image
tabs (i.e., Main, Layout, Image Processing, etc.).
Image Mode — select one of the camera options:
• Camera — the selections in the Camera box list the available sides
(front and back) of an image where you can define individual image
processing values. Options include: Front Image #1, Front Image
#2, Back Image #1 and Back Image #2.
The Kodak Scanner drivers allow you to control the camera settings
independently. Some settings apply only to black and white images,
others apply to color/grayscale images.
• Mode — select one of the following modes:
- Black and White: if you want your electronic image to represen t all
elements of your document in black and white.
- Grayscale: if you want your electronic image to have a range of
varying shades of gray from black to white.
- Color: if you want your electronic image to be in color.
4 A-61734 March 2012
Page 6

Buttons — the buttons on the bottom of the window apply to all tabs:
• Copy ⎯ this function is only available when scanning two-sided
documents. The Copy button provides a convenient way to set up the
color, grayscale or black and white image settings on one side and
transfer them to the other. For example, if you highlight and set up
Front Image #1, you can use the Copy button to duplicate those
settings for Back Image #1.
• OK ⎯ saves the values set on all tabs.
• Cancel ⎯ closes the window without saving any changes.
• Help — displays on-line help about the options available on the
selected window.
• Default ⎯ resets the values on all tabs to the factory defaults.
A-61734 March 2012 5
Page 7

Main tab The Main tab provides the following options.
Dots per inch (dpi) or resolution ⎯ indicates the scanning resolution,
which largely determines the quality of the scanned image. The greater
the resolution, the better the reproduction. However, scanning at a
higher resolution also increases scanning time and file size.
Choose a resolution value from the drop-down list. The default is 200
dpi. Available resolutions are: 100, 150, 200, 240, 300, 400, 600 and
1200 dpi.
Cropping ⎯ allows you to capture a portion of the document being
scanned. All cropping options can be used with color/grayscale and
black and white images. Front and Back cropping are independent,
however, for dua l stream scanning, color/grayscale and black and white
cropping must be the same per side. Only one cropping option can be
assigned per image. Select one of the following options:
• Automatic: dynamically adjusts the cropping window for different
sizes based on the edges of the image.
• Aggressive: eliminates any residual black border on any image
edges. In order to achieve this, there is a possibility that a small
amount of image data from the edge of the document may be lost.
• Fixed to Transport: (used for batches of same-sized documents)
allows you to define the area to be imaged. Fixed to Transport
cropping is used in conjunction with paper size and page layout and
assumes you are center-feeding your documents. If you are not using
center feeding, you must select the Layout tab to define your scan
area. See the section entitled, “Layout tab” later in this guide for more
information.
6 A-61734 March 2012
Page 8

• Relative to Document: (zone processing): (used for batches of
same-sized documents) — zone processing is a floating fixed crop
window (the zone) located relative to the upper left corner of a
document. It allows you to select an area on the document to be
delivered in either color/grayscale or black and white format (a
separate window for both black and white and color/grayscale may
be defined). Different parameters may be selected for both the front
and back of the image.
This option may be used in conjunction with Automatic cropping
where a separate color/grayscale or black and white area to be
saved is desired. It is useful in applications where a photograph,
signature, embossment or seal appears in a consistent area for an
application (you may want that small area in color/grayscale and the
rest in black and white). To define a zone, select the Layout tab.
Binarization — these options work on grayscale images and outputs a
black and white electronic image. Their strength lies in the ability to
separate the foreground information from the background information
even when the background color or shading varies, and the foreground
information varies in color quality and darkness. Different types of
documents may be scanned using the same image processing
parameters and results in excellent scanned images.
• iThresholding: allows the scanner to dynamically evaluate each
document to determine the optimal threshold value to produce the
highest quality image. This allows scanning of mixed document sets
with varying quality (i.e., faint text, shaded backgrounds, color
backgrounds) to be scanned using a single setting thus reducing the
need for document sorting. When using iThresholding, only Contrast
can be adjusted.
• Fixed Processing (FP): used for black and white and other high
contrast documents.
• Adaptive Thresholding (ATP): separates the foreground
information in an image (i.e., text, graphics, lines, etc.) from the
background information (i.e., white or non-white paper background).
Threshold — changes the amount of white in the color and grayscale
image. Use the slider to select a value from 0 to 255. The default is 90.
Contrast ⎯ adjusts the difference between black and white, thereby
making an image sharper or softer.
The difference between black and white is small with a low contrast
setting, so the image is softer. With a high contrast setting, the
difference between black and white is large, so the image is clearer.
Select a contrast value from -50 to 50. The default is 0.
A-61734 March 2012 7
Page 9

Layout tab The Layout tab provides these options.
Page Size ⎯ the default page size is set when a scanner is first
selected. You can choose a different page size using the drop-down
list. Page size should be set to the Scanner’s Maximum when using
the Automatic or Aggressive cropping option.
Image Orientation
• Portrait: displays the image orientation in the shape of a
conventional portrait, where height is greater than width.
• Landscape: displays the image orientation in the shape of a
conventional landscape painting, where width is greater than height.
Page Orientation — allows you to select the way you place your
documents in the scanner, Top edge first, Bottom edge first, Left
edge first or Right edge first.
Scan Area — displays the Scan Area dialog box. The Scan Area
options are only available for images when the cropping option is Fixed
to Transport or Relative to Document. See the next section, “Scan
Area dialog box” for more information.
8 A-61734 March 2012
Page 10

Scan Area dialog box The Scan Area dialog box allows you to define the amount of image
data which is returned to your PC.
NOTE: Select the side and image to be defined by highlighting Front
Image #1, Front Image #2, etc. based on the cropping option
(either Fixed to Transport or Relative to Document) selected
for each of these in the Main tab. The scan areas defined for all
camera selections are independent.
Page Size ⎯ the default paper size is set when a scanner is selected.
You can choose a different paper size using the drop-down list.
NOTE: Page Size and Page Layout selections also appear on the
Layout tab. If you make a change on the Scan Area dialog box,
the same selections will be displayed on the Layout tab and vice
versa.
Page Layout
• Portrait: displays the image orientation in the shape of a
conventional portrait, where height is greater than width.
• Landscape: displays the image orientation in the shape of a
conventional landscape painting, where width is greater than height.
Area
• Snap ⎯ enable this option to control the dimensions of the preview
area to fixed 1/8-inch increments. This option is not available in
Pixels mode.
• X: the distance from the left end of the scanner to the lef t-edge of the
scanning area.
• Y: the position from the top end of the document to the top end of the
scanning area.
• Width: the width of the scanning area.
• Height: the height of the scanning area.
Units — select whether you want the area to be defined in Pixels,
Inches or Centimeters.
A-61734 March 2012 9
Page 11

Image Processing tab The Image Processing tab provides these options.
General Options
• Deskew ⎯ automatically straightens a document within ±0.3
degrees of the leading edge of the document. Deskew can detect up
to a 45-degree skew and correct up to a 24-degree angle at 200 dpi
or a 10-degree skew angle at 300 dpi. This option is not available
when Fixed to Transport or Relative to Document is selected.
NOTE:To prevent data loss, the document must have all four
corners within the image path.
• Halftone Removal ⎯ enhances images containing dot matrix text
and/or images with shaded or colored backgrounds using halftone
screens and effectively eliminates noise caused by the halftone
screen.
• Invert Image ⎯ allows you to select how the black pixels will be
stored in the image. By default the black pixels are stored as black
and the white pixels are stored as white. Turn this option on if you
want the black pixels stored as white and the white pixels stored as
black.
NOTE:You may want to change this option if your application
misinterprets the image data and stores your image in
reverse of what you expect.
• Add Border — allows you to add a fixed amount of border to the lef t,
right, top and bottom edge of the image.
10 A-61734 March 2012
Page 12

Document Type
• Text: the documents contain mostly text.
• Text with Graphics: the documents contain a mix of text, business
graphics (bar graphs, pie charts, etc.) and line art.
• Photographs: the documents are comprised mainly of photos.
Media type — select one of the following options based upon the
texture/weight of the paper you are scanning. Available options are:
Plain Paper, Thin Paper, Glossy Paper, Card Stock, Magazine.
JPEG (Joint Photographic Editor Group) Quality — if you choose
JPEG compression, select one of the quality options:
• Draft: maximum compression which produces the smallest image
size.
• Good: a fair amount of compression but still produces acceptable
image quality.
• Better: some compression which produces decent image quality.
• Best: minimal compression which produces very good image quality.
• Superior: the least amount of compression which produces the
largest image size.
Noise Filter
•(none)
• Lone Pixel: reduces random noise by converting a single black pixel
to white when it is completely surrounded by white pixels or by
converting a single white pixel to black when it is completely
surrounded by black pixels.
• Majority Rule: sets each pixel based on its surrounding pixels. The
pixel will become white if the majority of the surrounding pixels are
white and vice versa.
A-61734 March 2012 11
Page 13

Dropout tab The Dropout tab provides these options.
The Dropout tab is used to eliminate a form's background so that only
the entered data is included in the electronic image (i.e., remove the
form’s lines and boxes). For black and white images, these settings
effect the grayscale version of the document which the scanner
analyzes to produce that electronic image.
Color Dropout ⎯ the i920 Scanner can drop out Red, Green or Blue.
None is the default.
12 A-61734 March 2012
Page 14

Adjustments t ab The Adjustments tab provides the following options.
Brightness and Contrast
•(none)
• Manual: allows you to set specific values that will be used for all
images.
- Brightness — changes the amount of white in the color/grayscale
image. The values range from -50 to 50. The default is 0.
- Contrast — makes the image sharper or softer. The values range
from -50 to 50. The default is 0.
Color Balance (not available for grayscale images)
•(none)
• Manual: allows you to set specific values that will be used for all
images.
- Red — changes the amount of red in the color image. The values
range from -50 to 50. The default is 0.
- Green — changes the amount of green in the color image. The
values range from -50 to 50. The default is 0.
- Blue — changes the amount of blue in the color image. The values
range from -50 to 50. The default is 0.
A-61734 March 2012 13
Page 15

• Automatic: adjusts the white background of each document to pure
white. This option compensates for the variations that occur between
different weights and brands of paper. This is not recommended for
use with photographs.
• Automatic - advanced: for advanced users that want to further
adjust the Automatic option.
- Aggressiveness - allows you to adjust the extent of the variation.
Increasing this value can help with documents that have yellowed
due to age. The values range from -2 to 2
Sharpen — increases the contrast of edges within the image. Options
are: Normal, High and Exaggerated.
.
14 A-61734 March 2012
Page 16
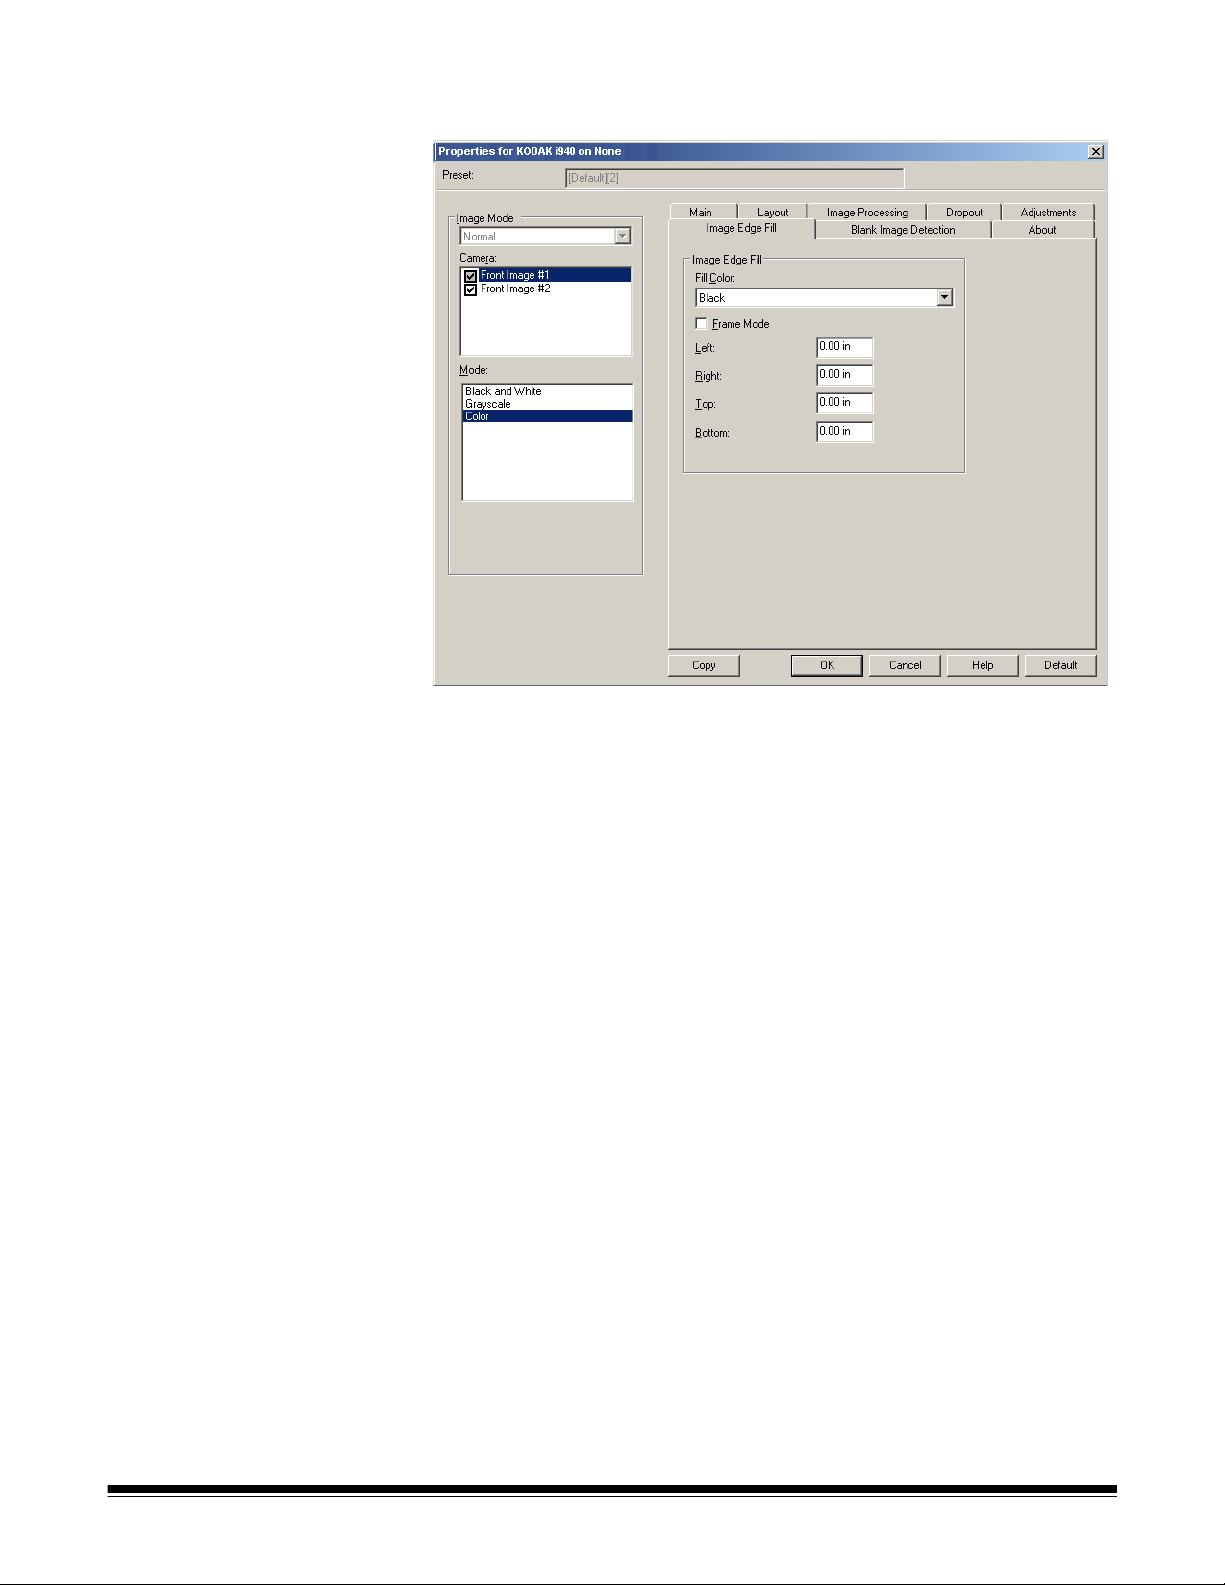
Image Edge Fill tab The Image Edge Fill tab provides the following options.
Image Edge Fill — fills the edges of the final electronic image by
covering the area with the specified color.
NOTE: When using Image Edge Fill, be careful not to enter a value too
large as it could fill in image data that you want to keep.
• Fill Color: allows you to select the color to fill the edges with.
- (none)
-White
-Black
• Frame Mode — fills in an equal amount of the selected color from
the Fill Color drop-down list on all sides of the image, or you can
select a value in the Left, Right, Top and/or Bottom area(s) from
each side of the scanned image to be filled.
A-61734 March 2012 15
Page 17

Blank Image Detection tab
Blank Image Detection provides the following options.
Blank Image Detection — allows you to configure the scanner to not
give blank images to the scanning application.
• Off: all images are given to the scanning application.
• Size: images will be considered blank based on the size of the image
that would be given to the scanning application (i.e., after all other
settings have been applied). Select the image size (KB), below which
an image is determined to be blank. Images with sizes less than the
number you select will not be created. If you use this option, you
must specify a blank image size for each image type (Black and
White, Grayscale and Color) you want to delete. If you do not make
an entry in these fields, all images are kept.
• Content: images will be considered blank based on the document
content within the image. Select Black and White, Grayscale or
Color to choose the maximum amount of content that the scanner
will consider to be blank. Any image that has more content than this
value will be considered non-blank and will be given to the scanning
application. The values range from 0 to 100 percent.
Learn Content — allows the scanner to determine the content amount
based on the documents to be scanned. Click Learn to use this
function.
NOTE: Learn mode cannot be applied to both the front and back sides
simultaneously. You must select the side you want to configure.
16 A-61734 March 2012
Page 18

Configuring Scanner settings
To access scanner settings from the ISIS Driver, go into the Scan
Validation Tool as described earlier in this guide and access the ISIS
Driver.
• Click Scanner to configure settings associated with the scanner . The
following sections provide descriptions and procedures for
configuring Scanner settings. See the section entitled, “Configuring
Image settings” earlier in this guide for image configuration
procedures.
A-61734 March 2012 17
Page 19
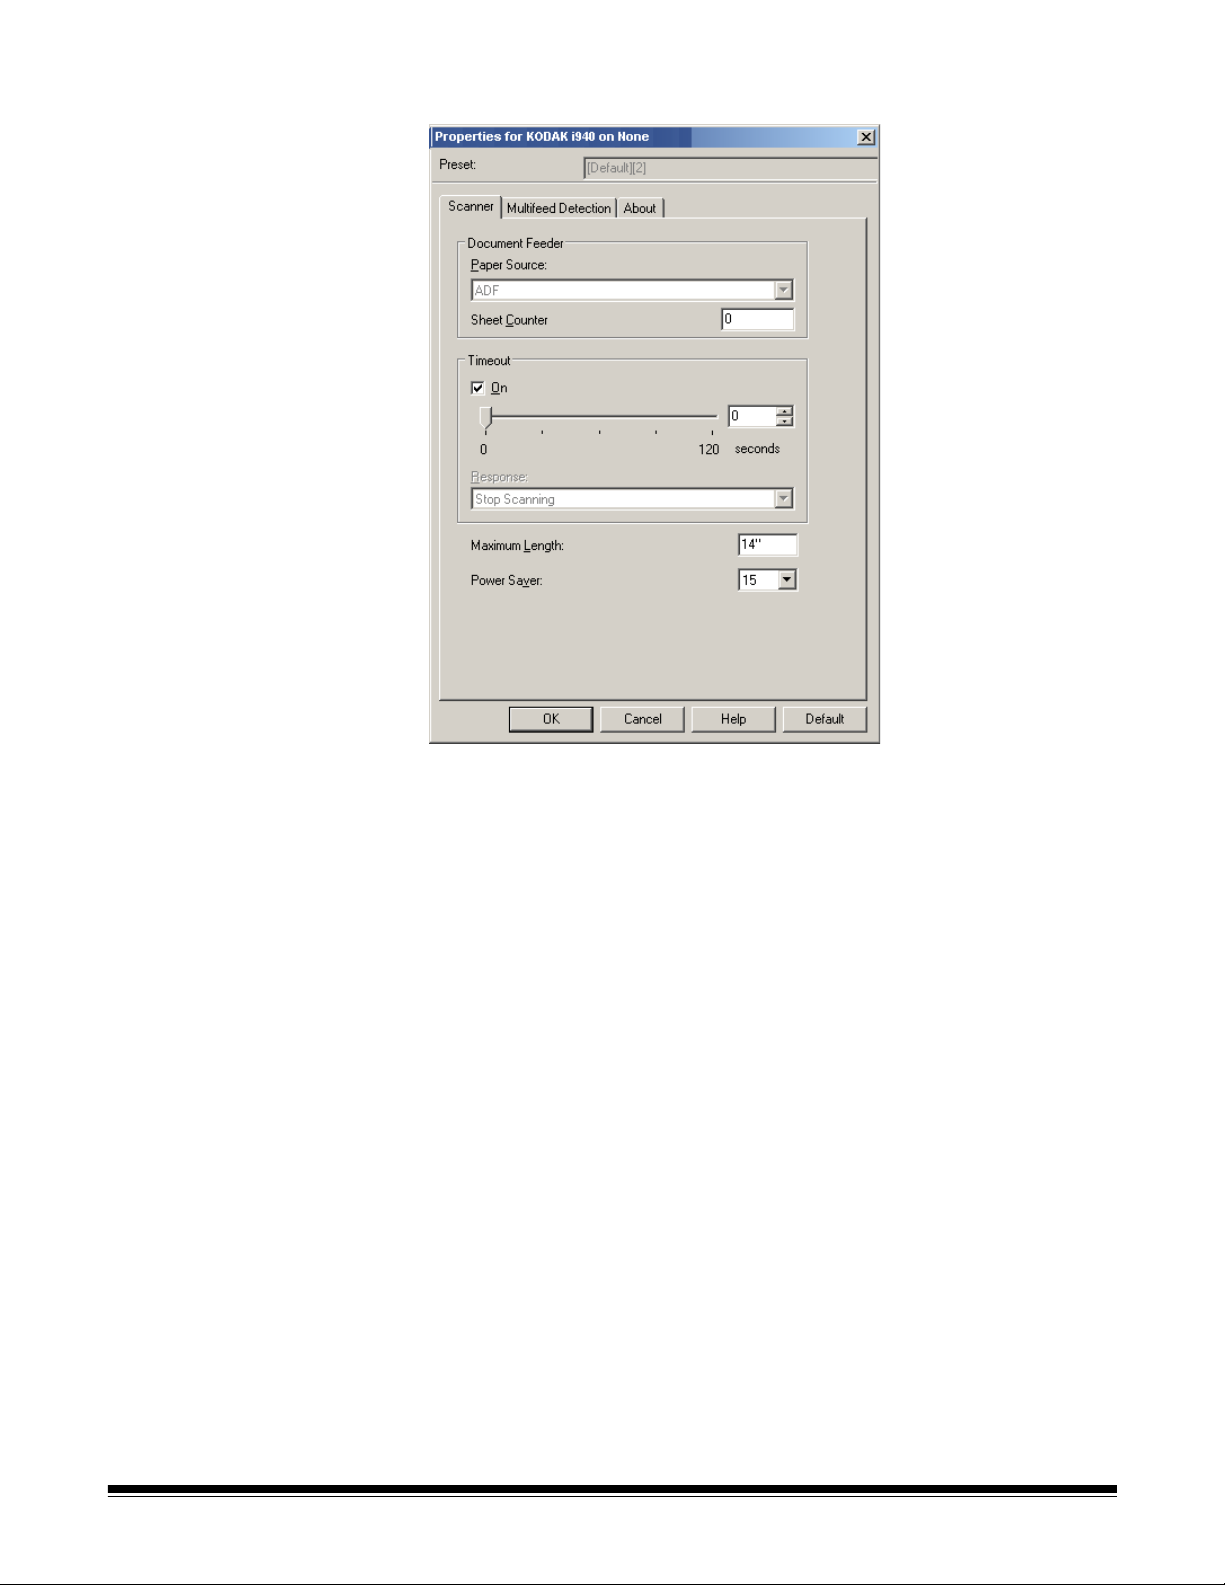
Scanner tab The Scanner tab provides the following options.
Document Feeder
Paper Source: ADF — the scanner will only scan documents from the
input tray.
Sheet Counter — enter the number to be assigned to the next physical
sheet of paper entering the scanner. This is incremented sequentially
by the scanner and is returned in the image header.
Timeout
• On — click On to set the amount of time, in seconds, the scanner will
wait once the last document enters the feeder before the timeout
occurs.
• Response — indicates the action that will be taken when the timeout
has been reached. Stop Scanning is the only selection. When the
timeout has been reached, scanning will stop and control will return
to the scanning application (i.e., ends the job).
Maximum Length — enter a value that indicates the length of the
longest document in your document set.
NOTES:
• Not all combinations of settings for Mode and Resolution are
supported at the larger lengths.
• The scanner’s throughput may be reduced for large lengths.
Power Saver — allows you to set the amount of time, in minutes, the
scanner has to be inactive before going into power saver mode.
18 A-61734 March 2012
Page 20
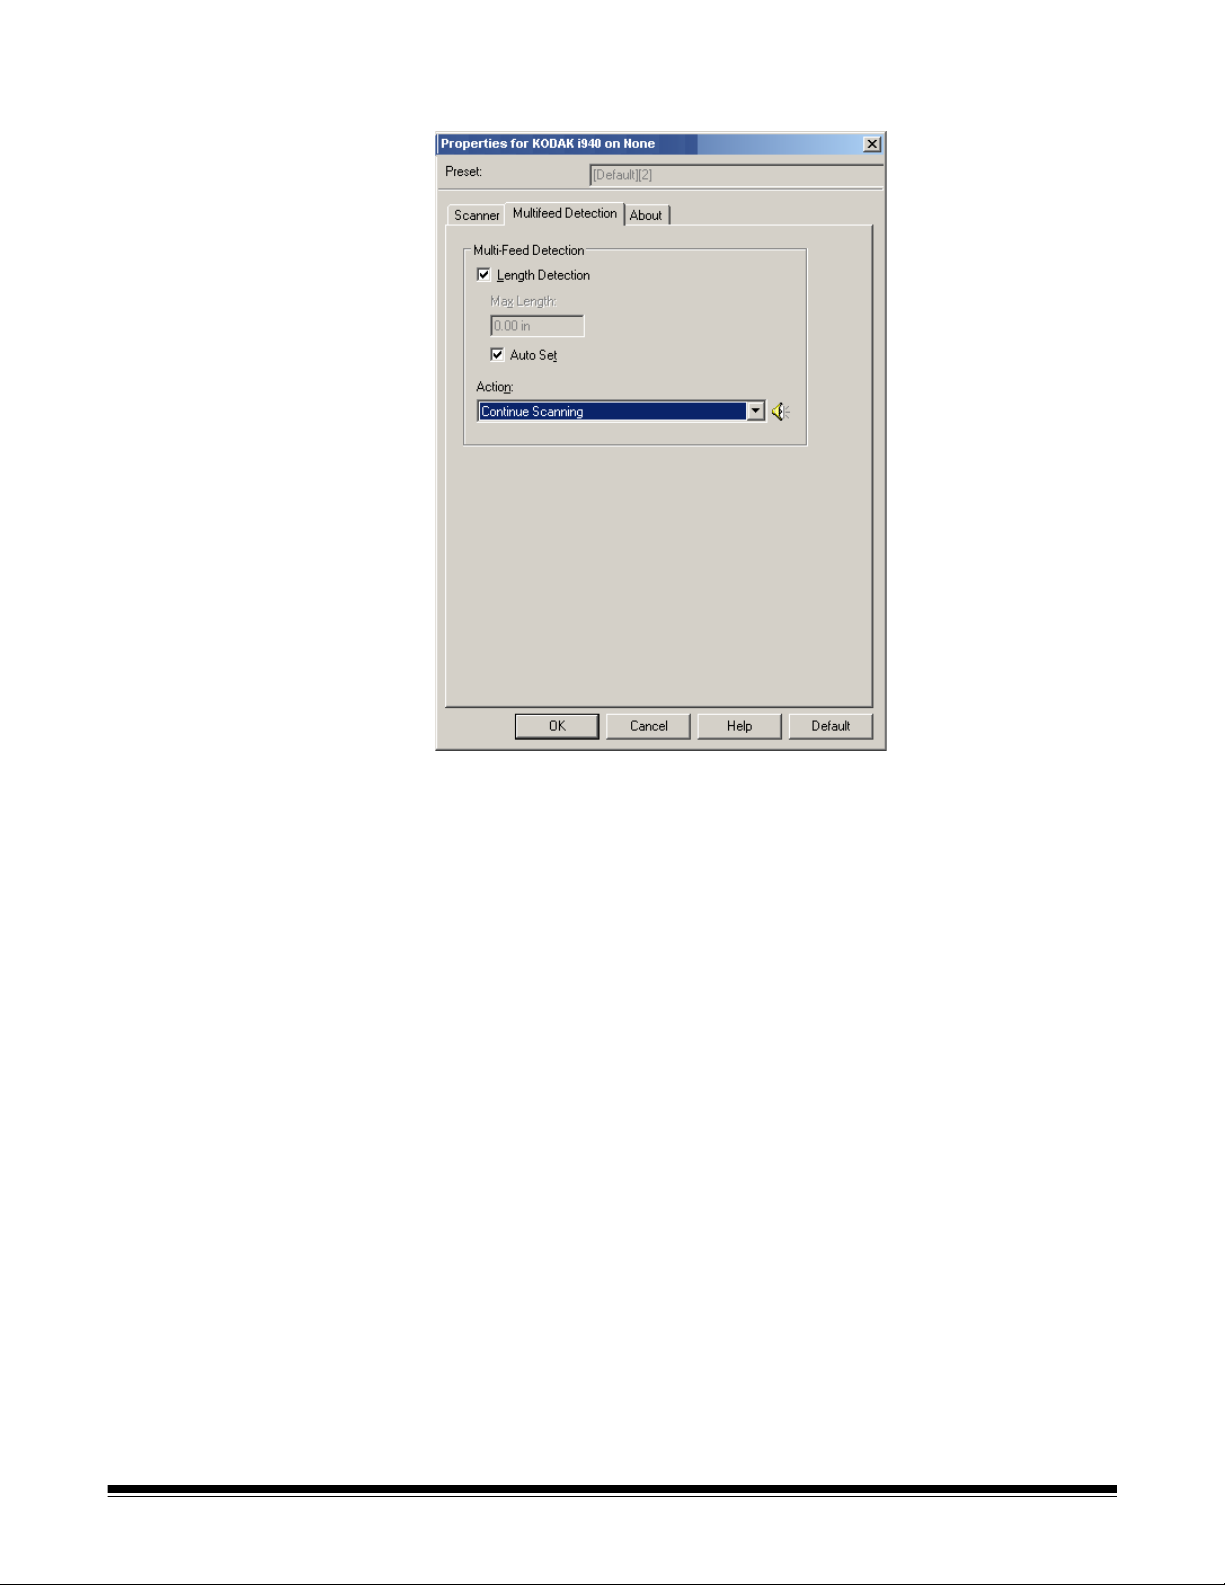
Multifeed Detection tab The Multifeed tab provides the following options.
Multifeed Detection
Length Detection ⎯ this option can be enabled or disabled. The
default is disabled. If enabled, select the maximum length of the
document that can be scanned without a multi-feed being detected.
Length detection is used when scanning same-sized documents to
check for overlap. For example, if you are scanning 8.5 x 11-inch (A4)
documents in portrait mode, enter a value of 11.25 inches (28.57 cm) in
the Max Length field.
• Auto Set: automatically sets the maximum length value to .50-inch
(1.27 cm) greater than the length of the currently selected page size.
Action — select what action you want the scanner to take when a
multifeed is detected.
• Continue Scanning: the scanner will continue to scan. The user-
configured multifeed sound will be made by the scanner.
NOTE: Clicking the Speaker icon will display the Open dialog box
allowing you to select the desired tone (.wav file) for your alarm.
A-61734 March 2012 19
Page 21

About tab Displays information about your scanner and driver.
20 A-61734 March 2012
Page 22

 Loading...