

Page 1
Page 2

© 2006 Beta Systems AG
All rights reserved.
Page 3

Contents
1 Introduction . . . . . . . . . . . . . . . . . . . . . . . . . . . . . . . . . . . . . . . . . . . . . . . . 1-1
System requirements . . . . . . . . . . . . . . . . . . . . . . . . . . . . . . . . . . . . . . . . . . 1-1
Using this manual . . . . . . . . . . . . . . . . . . . . . . . . . . . . . . . . . . . . . . . . . . . . 1-2
Starting the s1700 Operating System Software. . . . . . . . . . . . . . . . . . . . . . 1-3
Exiting the operating system software . . . . . . . . . . . . . . . . . . . . . . . . . . . . . 1-4
2 Getting Started. . . . . . . . . . . . . . . . . . . . . . . . . . . . . . . . . . . . . . . . . . . . . . 2-1
The main window . . . . . . . . . . . . . . . . . . . . . . . . . . . . . . . . . . . . . . . . . . . . . 2-2
Turning the scanner off . . . . . . . . . . . . . . . . . . . . . . . . . . . . . . . . . . . . . . . . 2-1
SCAN . . . . . . . . . . . . . . . . . . . . . . . . . . . . . . . . . . . . . . . . . . . . . . . . . . . . . . 2-3
Menu bar. . . . . . . . . . . . . . . . . . . . . . . . . . . . . . . . . . . . . . . . . . . . . . . . . . 2-3
Tray menu. . . . . . . . . . . . . . . . . . . . . . . . . . . . . . . . . . . . . . . . . . . . . . . . . 2-3
Machine Control menu . . . . . . . . . . . . . . . . . . . . . . . . . . . . . . . . . . . . . . . 2-4
View menu . . . . . . . . . . . . . . . . . . . . . . . . . . . . . . . . . . . . . . . . . . . . . . . . 2-5
Extras menu . . . . . . . . . . . . . . . . . . . . . . . . . . . . . . . . . . . . . . . . . . . . . . . 2-6
Information menu . . . . . . . . . . . . . . . . . . . . . . . . . . . . . . . . . . . . . . . . . . . 2-8
Context Selection bar. . . . . . . . . . . . . . . . . . . . . . . . . . . . . . . . . . . . . . . . . 2-10
Toolbar buttons . . . . . . . . . . . . . . . . . . . . . . . . . . . . . . . . . . . . . . . . . . . . . 2-11
The Display area . . . . . . . . . . . . . . . . . . . . . . . . . . . . . . . . . . . . . . . . . . . . 2-12
Status bar. . . . . . . . . . . . . . . . . . . . . . . . . . . . . . . . . . . . . . . . . . . . . . . . . . 2-14
Changing table properties and global fields. . . . . . . . . . . . . . . . . . . . . . . . 2-15
Description of special system on the Document List . . . . . . . . . . . . . . . . . 2-15
TOOLS. . . . . . . . . . . . . . . . . . . . . . . . . . . . . . . . . . . . . . . . . . . . . . . . . . . . 2-18
Menu bar. . . . . . . . . . . . . . . . . . . . . . . . . . . . . . . . . . . . . . . . . . . . . . . . . 2-19
Processing menu . . . . . . . . . . . . . . . . . . . . . . . . . . . . . . . . . . . . . . . . . . 2-19
Task menu. . . . . . . . . . . . . . . . . . . . . . . . . . . . . . . . . . . . . . . . . . . . . . . . 2-20
View, Extras and Information menus . . . . . . . . . . . . . . . . . . . . . . . . . . . 2-20
Toolbar buttons . . . . . . . . . . . . . . . . . . . . . . . . . . . . . . . . . . . . . . . . . . . . . 2-21
The Task table . . . . . . . . . . . . . . . . . . . . . . . . . . . . . . . . . . . . . . . . . . . . . . 2-22
Task table for Convert and Transfer . . . . . . . . . . . . . . . . . . . . . . . . . . . . 2-22
Task table for Statistics . . . . . . . . . . . . . . . . . . . . . . . . . . . . . . . . . . . . . . 2-23
Message panel. . . . . . . . . . . . . . . . . . . . . . . . . . . . . . . . . . . . . . . . . . . . . . 2-25
Property panel . . . . . . . . . . . . . . . . . . . . . . . . . . . . . . . . . . . . . . . . . . . . . . 2-25
Status bar. . . . . . . . . . . . . . . . . . . . . . . . . . . . . . . . . . . . . . . . . . . . . . . . . . 2-27
A-61593 September 2007 i
Page 4

3 Using the Software and Clearing Document Jams. . . . . . . . . . . . . . . . . 3-1
Starting the s1700 Operating System Software. . . . . . . . . . . . . . . . . . . . . . 3-1
Finishing a run . . . . . . . . . . . . . . . . . . . . . . . . . . . . . . . . . . . . . . . . . . . . . . . 3-3
Handling document jams . . . . . . . . . . . . . . . . . . . . . . . . . . . . . . . . . . . . . . . 3-5
Extended jam clearing . . . . . . . . . . . . . . . . . . . . . . . . . . . . . . . . . . . . . . . . . 3-6
Jam clearing colors . . . . . . . . . . . . . . . . . . . . . . . . . . . . . . . . . . . . . . . . . . 3-7
Using the No Jam function . . . . . . . . . . . . . . . . . . . . . . . . . . . . . . . . . . . . 3-7
Controlled runs. . . . . . . . . . . . . . . . . . . . . . . . . . . . . . . . . . . . . . . . . . . . . . . 3-9
Second pass encoding . . . . . . . . . . . . . . . . . . . . . . . . . . . . . . . . . . . . . . . 3-9
Fine sort (optional) . . . . . . . . . . . . . . . . . . . . . . . . . . . . . . . . . . . . . . . . . 3-12
Colors in Lookahead . . . . . . . . . . . . . . . . . . . . . . . . . . . . . . . . . . . . . . . . 3-15
Jam handling in Controlled runs . . . . . . . . . . . . . . . . . . . . . . . . . . . . . . . 3-15
The Lookahead window and buttons . . . . . . . . . . . . . . . . . . . . . . . . . . . 3-16
Performing a Print test . . . . . . . . . . . . . . . . . . . . . . . . . . . . . . . . . . . . . . . . 3-17
4 Troubleshooting. . . . . . . . . . . . . . . . . . . . . . . . . . . . . . . . . . . . . . . . . . . . . 4-1
Compare Module errors . . . . . . . . . . . . . . . . . . . . . . . . . . . . . . . . . . . . . . . . 4-1
Scanner Module errors . . . . . . . . . . . . . . . . . . . . . . . . . . . . . . . . . . . . . . . . 4-1
Encoder errors . . . . . . . . . . . . . . . . . . . . . . . . . . . . . . . . . . . . . . . . . . . . . . . 4-3
Endorser errors . . . . . . . . . . . . . . . . . . . . . . . . . . . . . . . . . . . . . . . . . . . . . . 4-3
Format Module errors . . . . . . . . . . . . . . . . . . . . . . . . . . . . . . . . . . . . . . . . . 4-6
Logic Module errors . . . . . . . . . . . . . . . . . . . . . . . . . . . . . . . . . . . . . . . . . . . 4-6
Control of the Operating System Software errors . . . . . . . . . . . . . . . . . . . . 4-7
Operating System Software Document List errors. . . . . . . . . . . . . . . . . . . 4-11
Run and Jam Management errors . . . . . . . . . . . . . . . . . . . . . . . . . . . . . . . 4-11
OCX Interface errors . . . . . . . . . . . . . . . . . . . . . . . . . . . . . . . . . . . . . . . . . 4-12
5 Troubleshooting - Tools . . . . . . . . . . . . . . . . . . . . . . . . . . . . . . . . . . . . . . 5-1
Convert errors . . . . . . . . . . . . . . . . . . . . . . . . . . . . . . . . . . . . . . . . . . . . . . . 5-1
PCN - Native Converter errors. . . . . . . . . . . . . . . . . . . . . . . . . . . . . . . . . . . 5-2
PSE - Split errors . . . . . . . . . . . . . . . . . . . . . . . . . . . . . . . . . . . . . . . . . . . . . 5-6
PTE - Transfer errors . . . . . . . . . . . . . . . . . . . . . . . . . . . . . . . . . . . . . . . . . . 5-6
PTN - Native Transfer errors . . . . . . . . . . . . . . . . . . . . . . . . . . . . . . . . . . . . 5-8
PTW - Transfer warnings . . . . . . . . . . . . . . . . . . . . . . . . . . . . . . . . . . . . . . 5-10
PXE - Tools errors . . . . . . . . . . . . . . . . . . . . . . . . . . . . . . . . . . . . . . . . . . . 5-11
PXW - Tools errors . . . . . . . . . . . . . . . . . . . . . . . . . . . . . . . . . . . . . . . . . . . 5-11
Appendix A Table Properties and Global Fields . . . . . . . . . . . . . . . . . . . . .A-1
Table Properties Column descriptions . . . . . . . . . . . . . . . . . . . . . . . . . . . . .A-3
ii A-61593 September 2007
Page 5

1 Introduction
The Kodak s1700 Operating System Software controls the Kodak
s1740 Capture System and provides the following features:
• An easy to use interface allows you to easily access the tools you
need via icons, toolbars and pull-down menus.
• Captures the information that enables automatic post-sorting into 2,
6, 8 or 12 pockets based on smart imaging.
• For document completeness, easy separation and tracking, you can
encode MICR data on documents. With the barcode encoding option,
you can imprint the same barcode (up to three barcodes in one run),
on every page of a document to keep pages from the same file
together.
• For electronic distribution or archiving you can define tags to facilitate
the sharing of data and choose the image format (JPEG or TIF) that
best meets your needs.
• Specify up to six different images (color, grayscale and black and
white; both front and back) in one pass.
• Statistical information is easy accessed on the documents
processed.
System requirements See the Installation Planning Guide, A-61595 for software and
hardware requirements.
A-61593 September 2007 1-1
Page 6

Using this manual This User’s Guide describes the functions and procedures of the Kodak
s1700 Operating System Software.
Chapter 1, Introduction — provides a brief overview of product
features, a description of what information you will find in other chapters
of this User’s Guide and procedures to logging into the software and
how to exit the software.
Chapter 2, Getting Started — describes the windows, menus, and
toolbars that are available when using the Kodak s1700 Operating
System Software.
NOTE: Most options on the menus can also be performed by using the
toolbar, icon bar or a Ctrl key sequence. For the purpose of this
manual, all procedures are described using the menu options.
Chapter 3, Using the Software and Clearing Document Jams —
provides procedures using the Scan, Convert and Transfer modules
and how they all work together to run a job. Also provides procedures
for clearing a document jam.
Chapter 4, Troubleshooting and Chapter 5, Troubleshooting Tools — provides a listing of errors that you may encounter when using
the Scan or Tools modules.
Appendix A, Table Properties and Global Fields — provides a
description of available table properties and how to change them.
1-2 A-61593 September 2007
Page 7
Starting the s1700
Operating System
Software
1. If the scanner is not turned on, turn the scanner on before you turn
on the host PC.
2. Turn on the host PC.
3. Double-click on the s1700 Operating System Software icon. The
Login screen will be displayed.
4. Enter your Account name and Password and click Login. The Run
Selection dialog box will be displayed.
A-61593 September 2007 1-3
5. Select the job you want to run and click Select.
Page 8

When you select the job you want to run, the main screen will be
displayed.
NOTE: The following screen may appear differently depending on
your system configuration.
Exiting the operating
system software
To exit the operating system software:
• Click Exit on the icon bar.
1-4 A-61593 September 2007
Page 9

2 Getting Started
This chapter describes the windows, menus and toolbars that are
available when using the Kodak s1700 Operating System Software.
The Kodak s1700 Operating System Software includes the following
modules:
Scan — the majority of your work will be done using Scan. Detailed
information regarding the menus, tools and windows in Scan follows
the general description of the main window.
Convert — works on the output of Scan, generates individual text and
outputs the scanned images to the desired file format.
Transfer — sends the scanned information to the receiving application.
Run Definition — this is where the job definitions are defined.
Statistics — allows statistical evaluations of former operating system
software sessions.
Split — this module allows you to calculate the runs for fine sorts.
You will use the Scan, Convert and Transfer modules when processing
a run. The windows and toolbars associated with all of these modules
are described in this chapter. Many of the menu and toolbar buttons are
the same for all modules.
See Chapter 3, Using the Software for procedures on how these
modules are used and work together.
A-61593 September 2007 2-1
Page 10
The main window The main Kodak s1700 Operating System Software window contains
the following elements:
1
2
3
4
5
6
1 Title bar — provides the official name of the operating system
software.
2 Menu bar — provides the available options within each module.
The View, Extras and ? menu items are the same within all
modules.
3 Toolbar — frequently used menu options are also available as
toolbar buttons. These buttons are different based upon which
module you are using.
4 Context Selection bar — provides a listing of the available
modules within the operating system software. The icon
highlighted is the module that is currently being used. The modules
associated with running a run are Scan, Convert and Transfer. Run
Definition and User are available for system maintenance.
5 Display area — shows the progress of the current module. The
display area of Scan contains the Document List and image
monitors. The display area of Convert and Transfer display the
task table, property panel and message panel.
6 Status bar — displays the status of the current run.
2-2 A-61593 September 2007
Page 11
.
Menu bar The following summarizes the functions associated with each menu.
Tray — provides options that allow you to control the start and finish of
trays and runs.
Machine Control — provides options that allow you to control the
scanner.
View — allows you to change the way information is displayed on the
main screen.
Extras — allows you to change the language, change a password, and
save a log file. Suite configuration (if displayed) is for System
Administrator use only.
? (Information) — displays the About window which allows you to view
operating system information, allows you customize the colors used in
the Document List and provides access to PDF files of supporting
documentation.
Tray menu This menu provides tray-grouping options of documents within a run.
Multiple trays of documents may be scanned within a run.
Finish Run — the current run will be finished and a task for the
operating system software will be created. If a document jam has
occurred and the current batch is not closed, this option will not be
available.
Interrupt — allows you to pause a run in progress. Only runs that are
triggered by task files can be interrupted.
Cancel Run — stops the run that is currently running and the output
files will be discarded.
A-61593 September 2007 2-3
Next Tray — the current tray will be finished and the next tray will be
started.
Exit — closes the operating system software. This is only available if
the run is closed.
Page 12
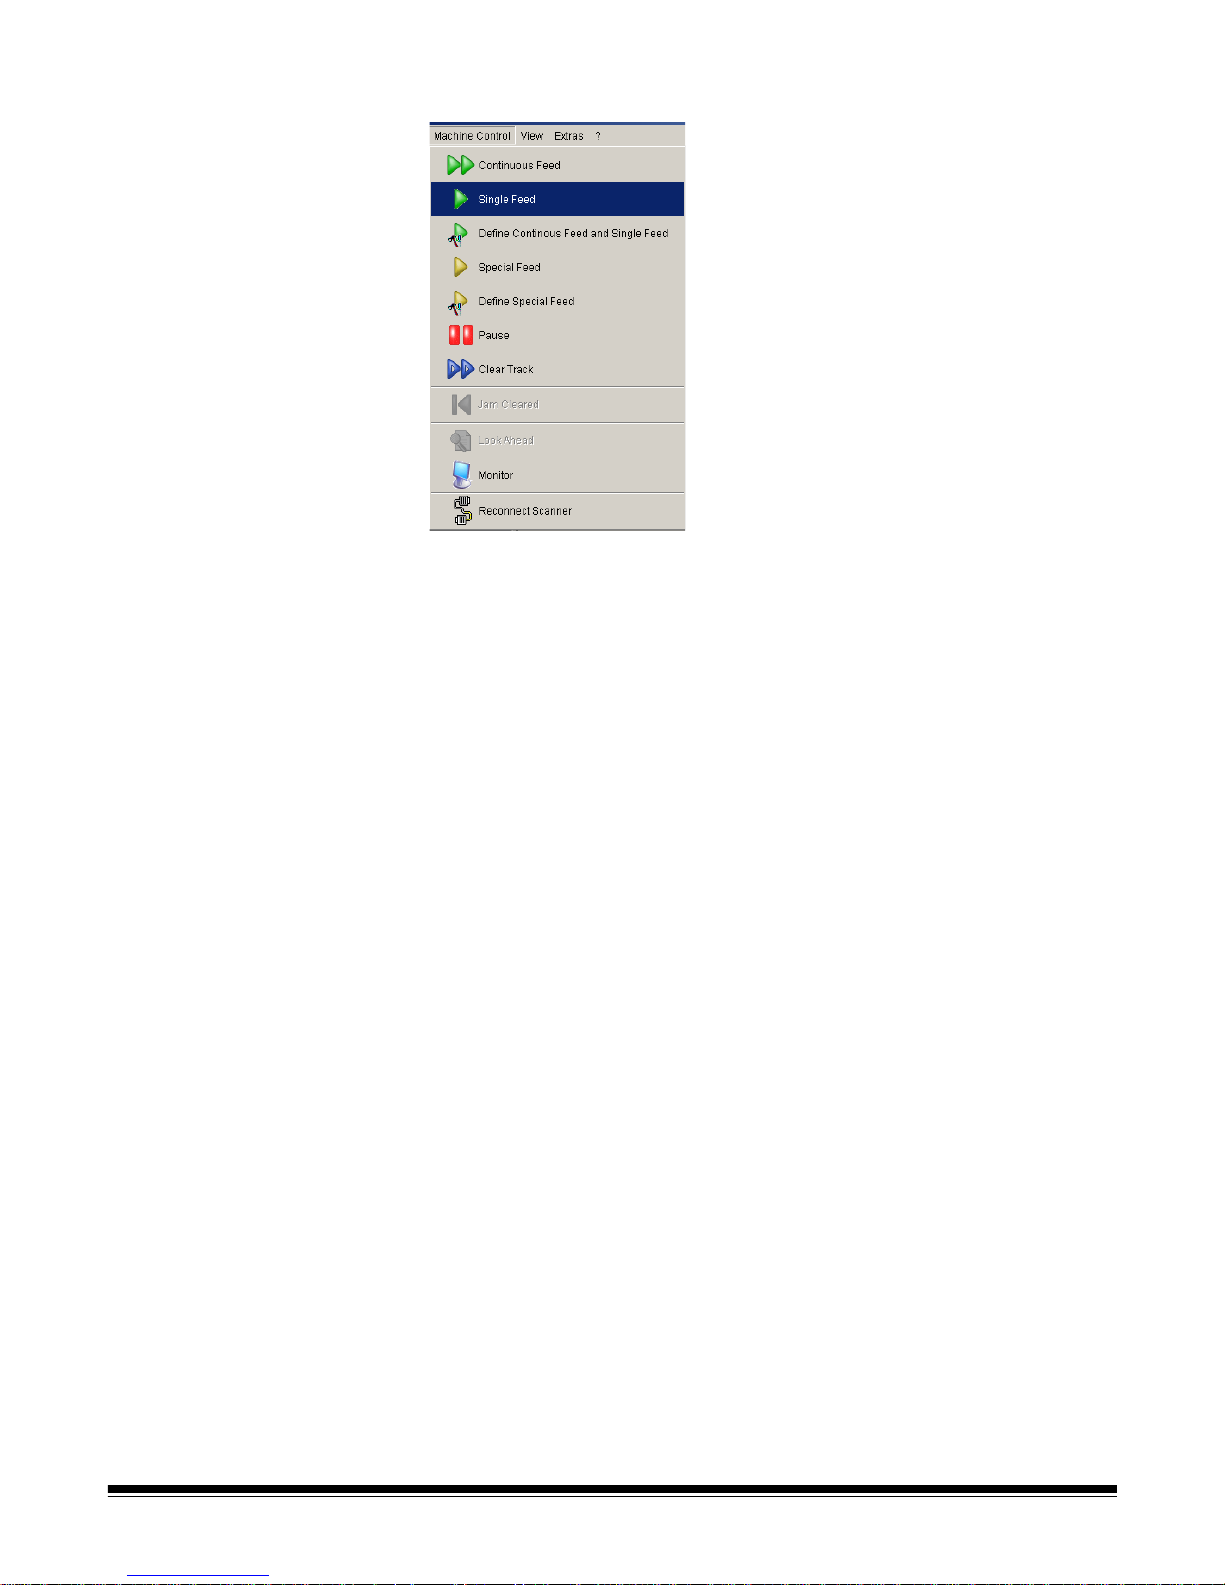
Machine Control menu The Machine Control menu provides the following options.
Continuous Feed — starts the feeder and will continue feeding
documents until no more documents are on the continuous feeder.
Single Feed — starts the feeder and feeds one document.
Define Continuous Feed and Single Feed — allows you to enable or
disable double feed detection.
Thick Feed/Special Feed — this menu item will be Thick Feed if
double feed detection is disabled (default). If double feed detection is
enabled, it will be Special Feed. This button allows you to disable
endorsing, encoding or double feed detection on the next document.
Define Special Feed — allows you to enable or disable double feed
detection so you can process unusual documents.
Pause — pauses the scanner. The transport will stop when all
documents have been deposited in a pocket/tray.
Clear Track — when a document jam occurs, before manually
removing documents, select Clear Track. This will deposit any
documents in the track to the overflow pocket. Any remaining
documents will need to be removed manually.
Jam Cleared — when a document jam has been cleared, select Jam
Cleared to return the scanner to the Idle state.
Look Ahead — displays the Look Ahead table when you are using
controlled runs.
Monitor — displays an additional image window which allows you to
view the front and rear of an image at the same time.
2-4 A-61593 September 2007
Page 13
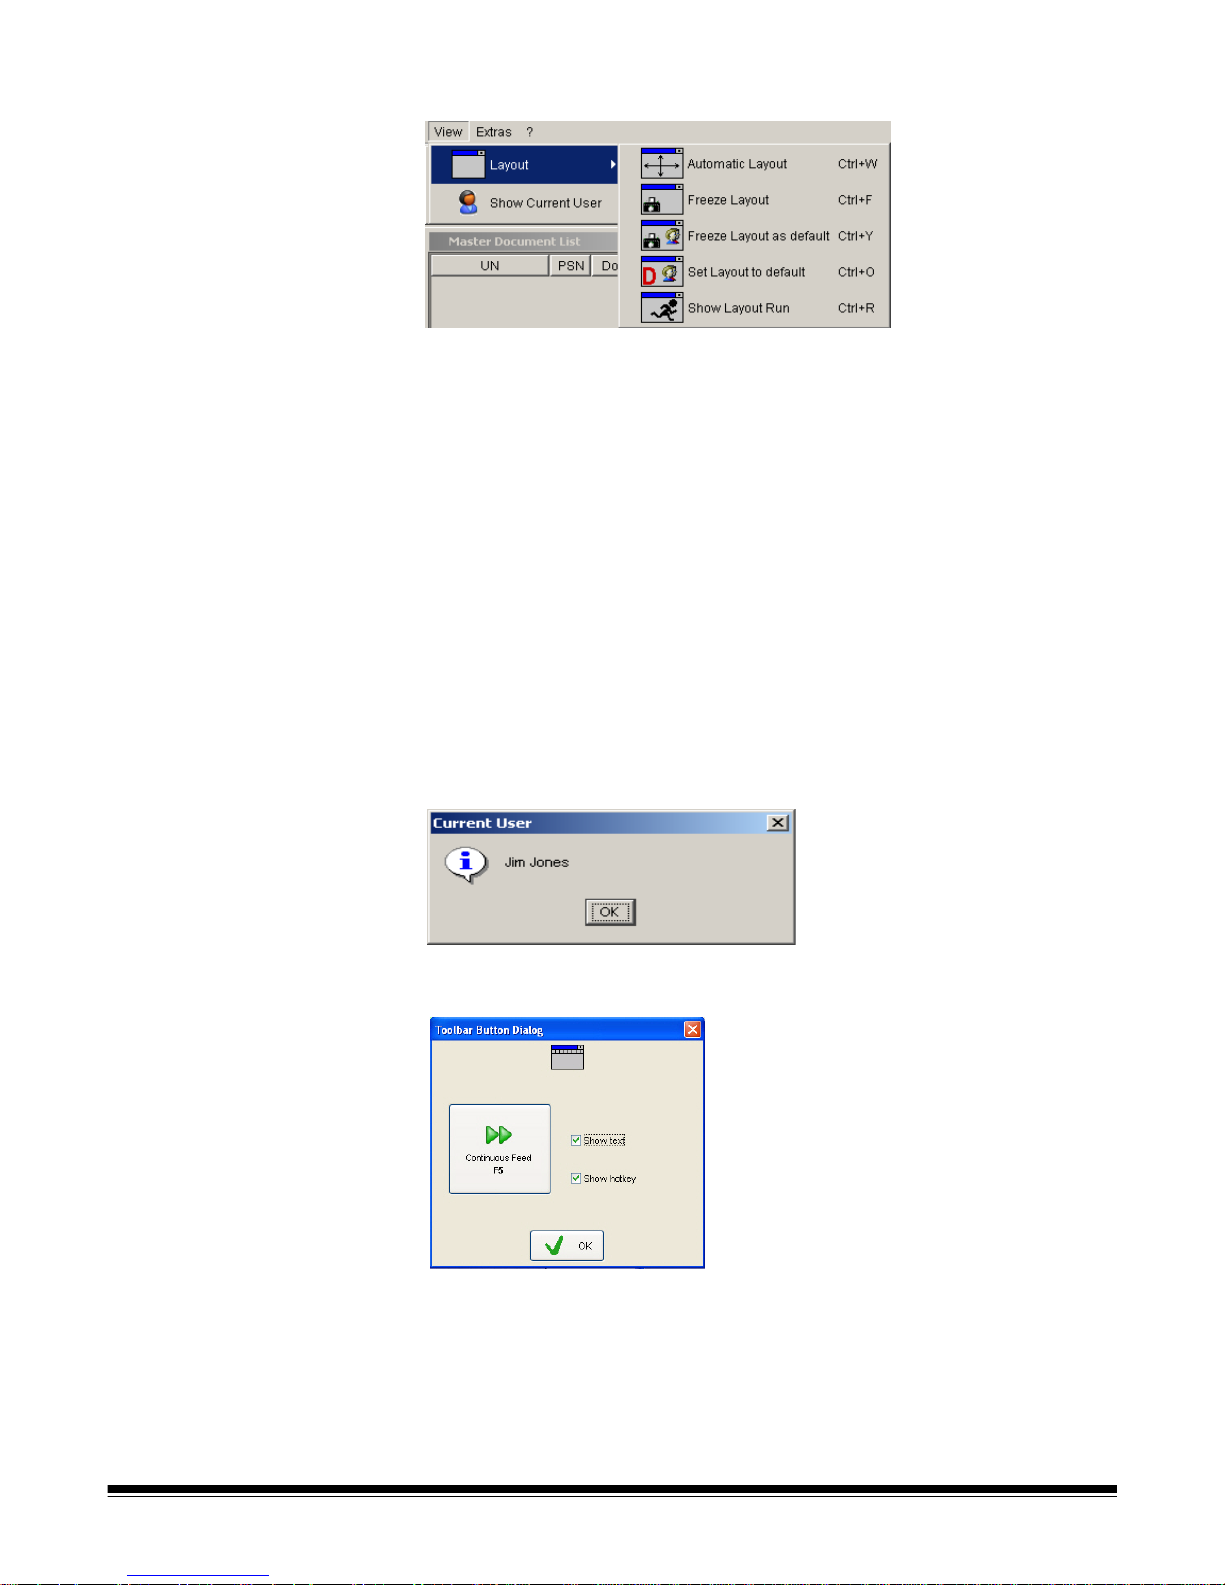
View menu The View menu provides the following options.
Layout — provides a listing of optional window layouts.
• Automatic Layout: places all the open windows on the screen in an
orderly fashion without any overlapping.
• Freeze Layout: you can move the windows around the screen into a
layout that works best for you. Once you have them the way you want
them, you can select Freeze Layout and the windows will stay in this
position until you change them again.
• Freeze Layout as default: saves the window layout as the default
for all users. This option is available for System Administrators only.
• Set Layout to default: the user layout is deleted and the default
layout will be used instead.
• Show Layout Run: switches the screens between Run view and Idle
view, allowing you to arrange the layout of both screens.
Show Current User — displays the name of the user that is currently
logged into the operating system.
Set toolbar button display — allows you to customize the appearance
of the toolbar buttons.
A-61593 September 2007 2-5
• Depending on what you want displayed on the button, check or
uncheck Show text and/or Show hotkey and click OK.
Page 14
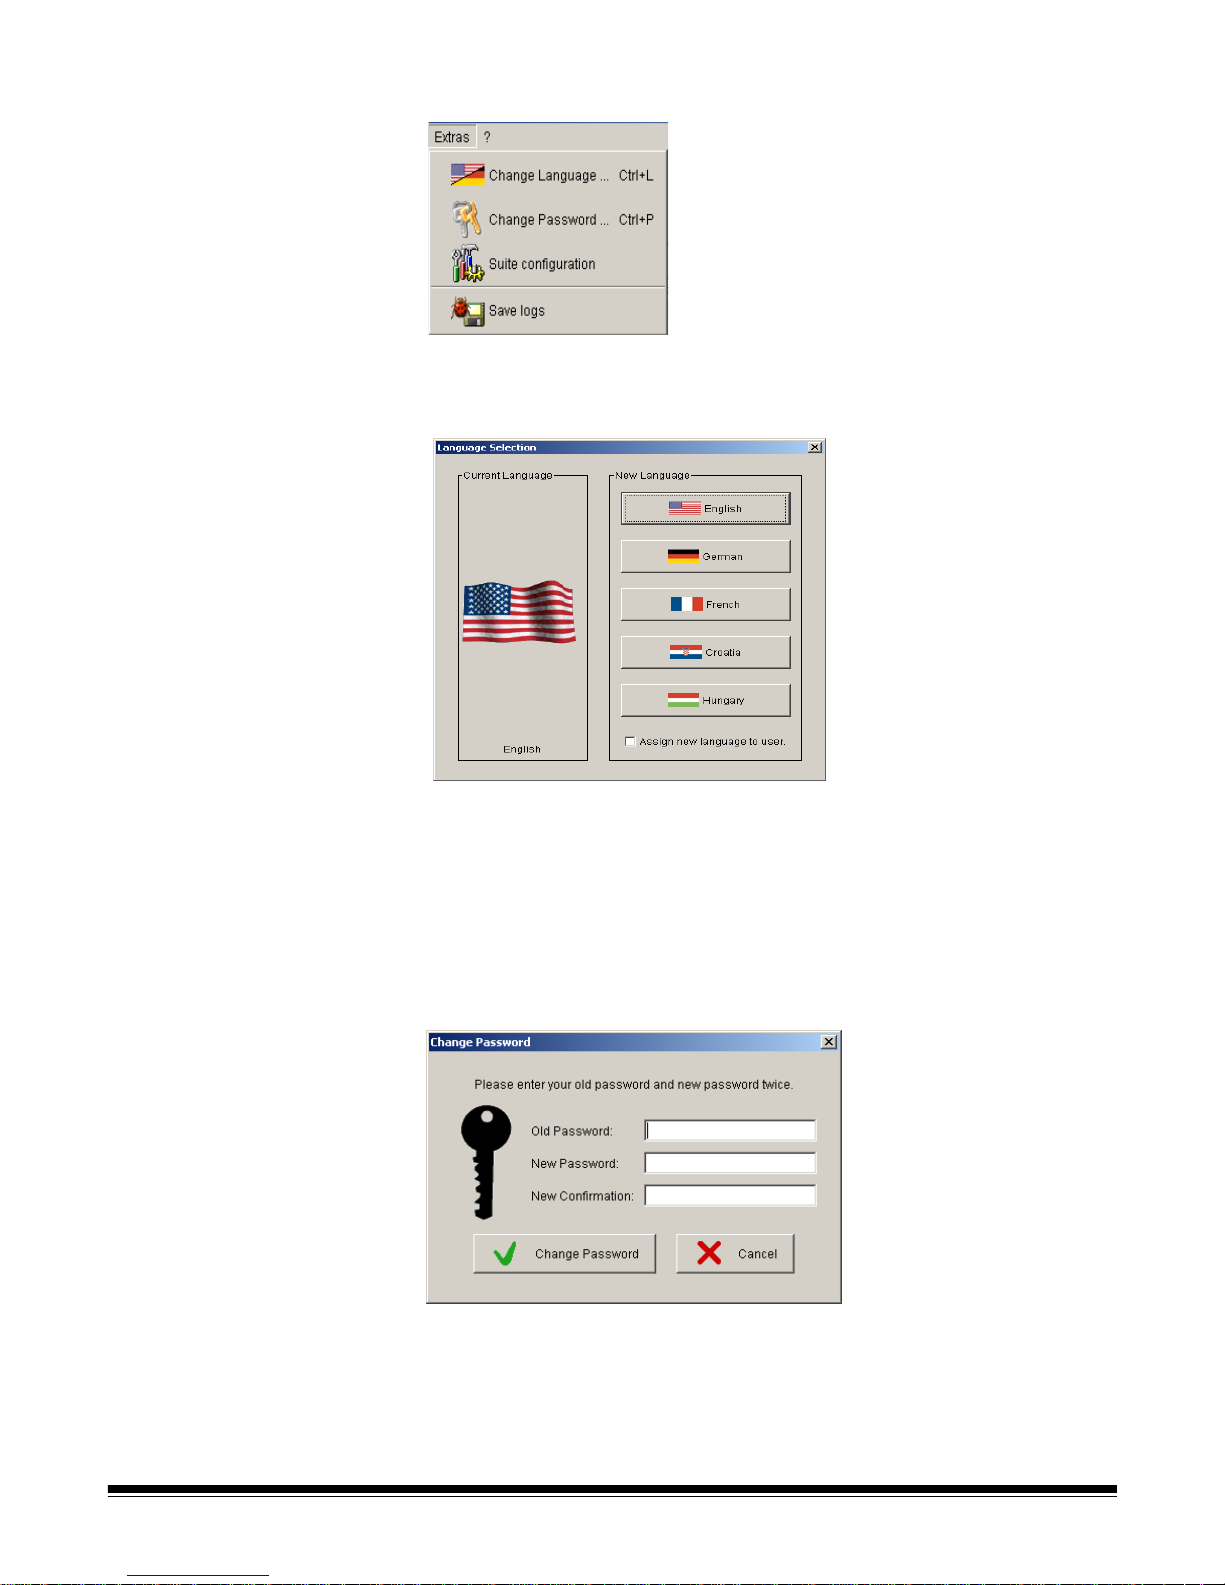
Extras menu The Extras menu provides the following options.
Change Language — displays the Language Selection window which
allows you to change the language of the operating system software.
The language can be changed at any time without closing the run.
• Select the language of choice. Once selected, the window will close
and the operating system software will be displayed in the selected
language.
NOTE: Select Assign new language to user to assign the selected
language permanently to the current user.
Change Password — displays the Change Password window which
allows you to change the password of the current user. Passwords are
case-sensitive.
1. Enter the current password in the Old Password field.
2. Enter the new password in the New Password and New
Confirmation fields.
2-6 A-61593 September 2007
3. Click Change Password.
Page 15
Suite configuration — this option is for System Administrator’s only.
See the Administrator’s Guide, A-61598 for more information.
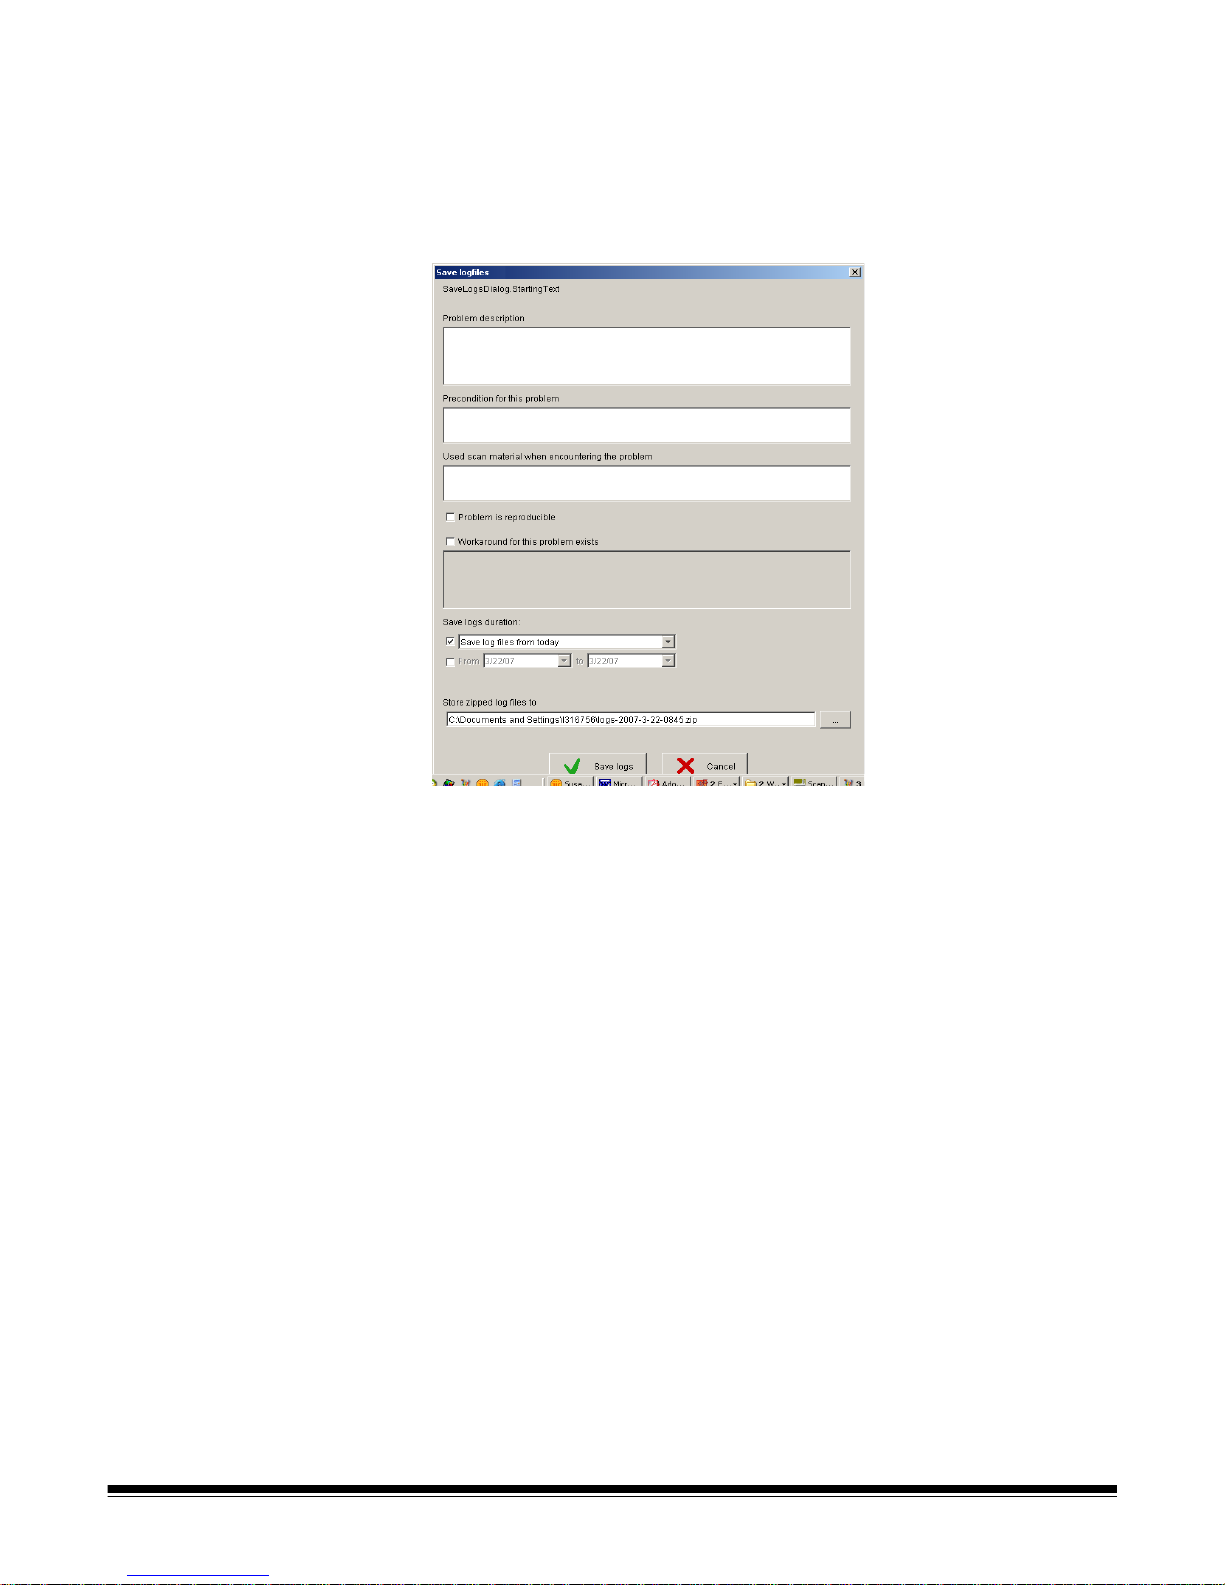
Save Logs — when selected, the operating system software will
retrieve the log files. When the files have been retrieved, the Save
Logfiles window will be displayed allowing you to enter pertinent
information about the run and save it to a log file.
1. Enter any information that will help diagnose the problem in the
Problem Description, Precondition for this problem, and the Used
scan material when encountering the problem fields.
2. Check any of the other fields that apply to the problem.
3. Click Save logs. Your comments, all log files, the configuration files
and the run definition will be saved to the .zip file displayed in the
Store zipped log file to path.
A-61593 September 2007 2-7
Page 16

Information menu The Information menu provides the following options.
About — displays the About window which provides the current version
of the operating system software, the name, version and date of the
modules, the scanner configuration and the installation settings.
The Module Versions tab provides an overview of the operating system
software modules.
If any entries are color-coded, see the table below for a description of
the color.
Color Description
Black The version is the same version as the original
release.
Red This module is patched.
Yellow The version of this module is not defined in the
release.
NOTE: If you send an error report, include these version numbers.
2-8 A-61593 September 2007
Page 17
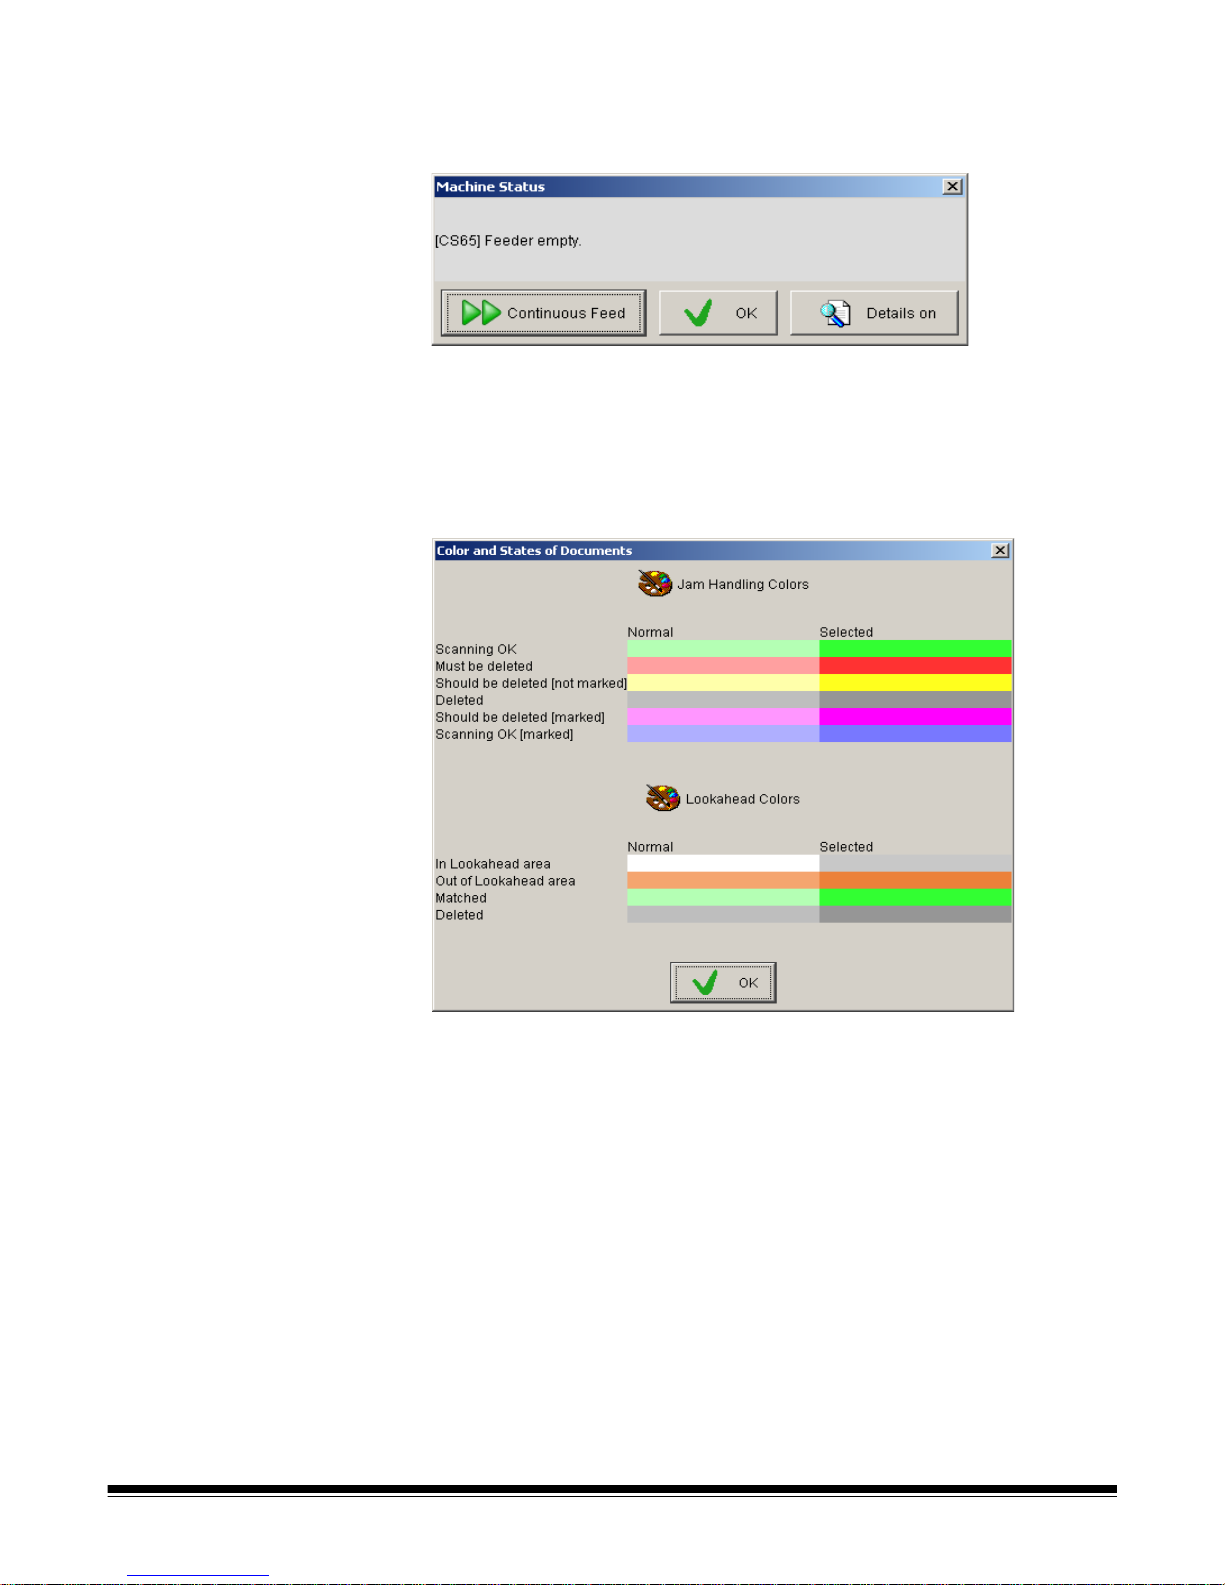
Machine Status — when the scanner stops, the Machine Status is
automatically displayed. If you need to display the status, select this
option.
• Review the message and click on Continuous Feed to continue
scanning or OK to close the dialog box. If you want more details
regarding the message, click Details on.
Jam Handling Colors — displays the Color and States of Documents
window which provides an overview of the colors used in the Document
List.
A-61593 September 2007 2-9
Page 18
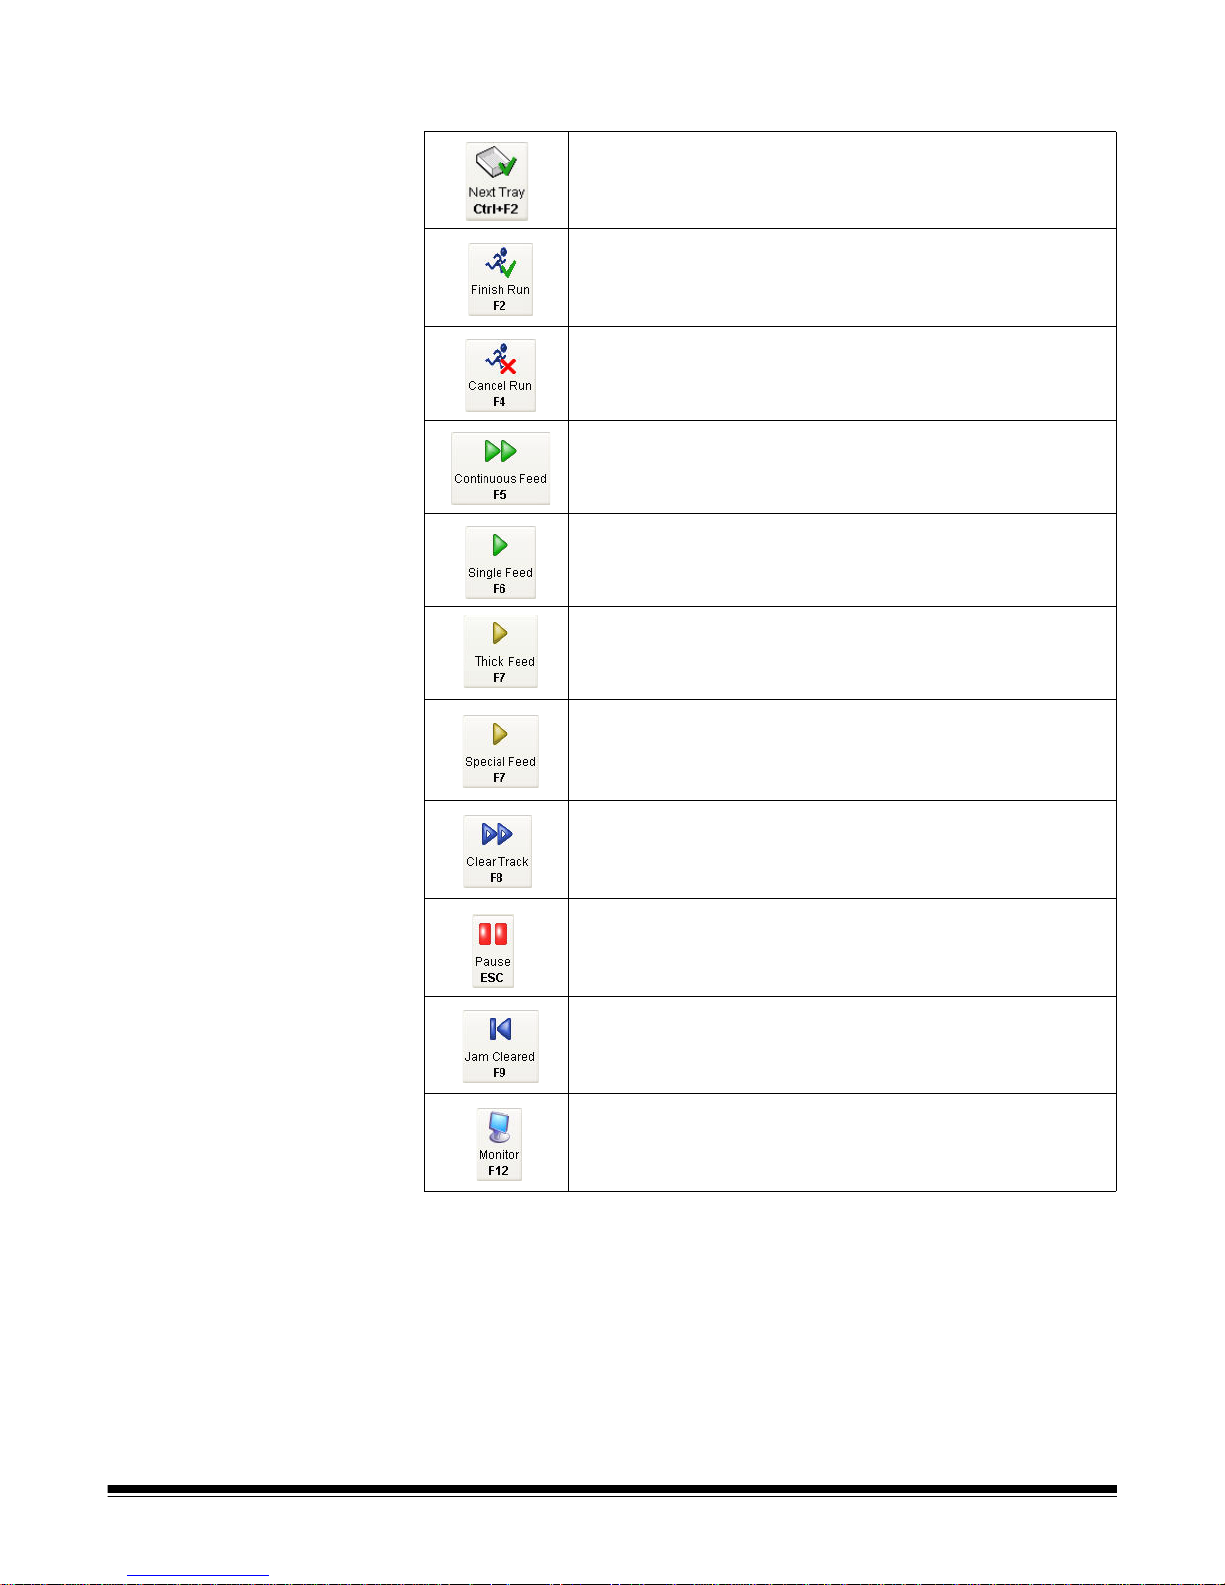
Context Selection bar The Context Selection bar provides a listing of the modules within the
Kodak s1700 Operating System Software. Several modules can be run
at one time and you can easily navigate from one module to another by
clicking on the desired module. The available modules depend on the
operating system configuration.
Split — this module allows you to calculate the runs for fine
sorts.
Scan — this is the main module. It controls the scanner and
creates a native output file.
Statistics — this module allows statistical evaluations of the
actions in Scan.
Convert — receives the output from Scan and generates a
text file and image output. The indicators show the status of
the tasks.
Transfer — sends the generated files to the defined output
destination directory. The indicators show the status of the
tasks.
Run Definition — allows you to manage (create, edit, copy
and delete) your runs.
User — allows you to manage users of the operating system
software (i.e., create a new user, edit existing user rights, and
remove a user).
Exit — closes the s1700 Operating System Software.
2-10 A-61593 September 2007
Page 19
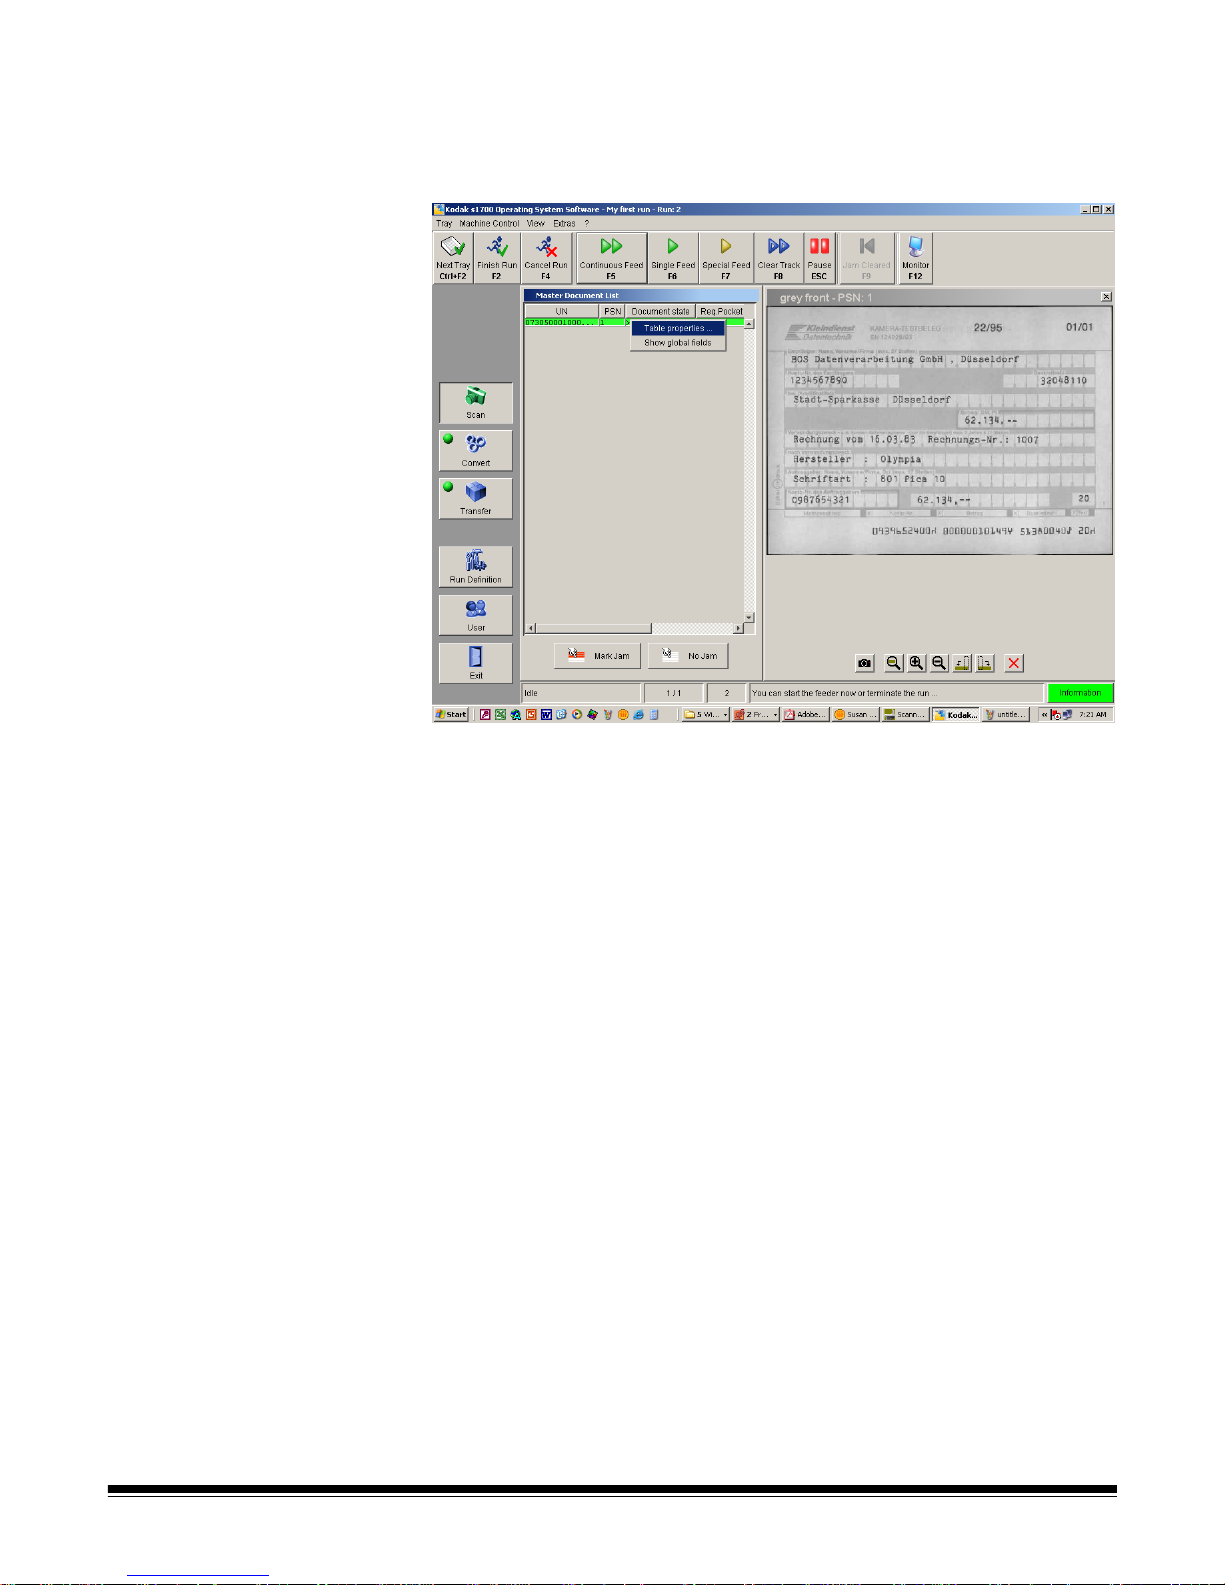
Toolbar buttons The toolbar provides easy access to commonly used functions.
Next Tray — the current tray will be finished and the next tray
will be started.
Finish Run — the run will be finished. This option is not
available when a document jam occurs or if the current batch
is not closed.
Cancel Run — cancels the current run. If you cancel a run,
any output files will be discarded.
Continuous Feed — document feeding will start and
continue until all documents on the continuous feeder have
been fed.
Single Feed — one document will be fed.
Thick Feed — if double feed detection is disabled (default)
this option will be available.
Special Feed — allows you to disable endorsing, encoding
or double feed detection on the next document.
Clear Track — deposits any documents in the track to the
overflow pocket. Any remaining documents will need to be
removed manually.
Pause — pauses the scanner. The transport will stop when
all documents have been deposited in a pocket/tray.
Jam Cleared — when a document jam has been cleared,
select Jam Cleared to return the scanner to the Idle state.
Monitor — displays an additional image window so you can
view the front and rear of the image at the same time.
A-61593 September 2007 2-11
Page 20
The Display area The display area provides an overview about the scanned documents.
It contains the Document List and image monitors. If you select a
document in the list, the images associated with this document will be
displayed on the image monitor.
Document List — the Document List can be displayed in Idle mode or
when a document jam has occurred. Each line represents a document.
There are a number of columns that can be displayed. The columns
selected in the Table Properties window determine the columns
displayed. See Appendix A, Table Properties and Global fields for more
information.
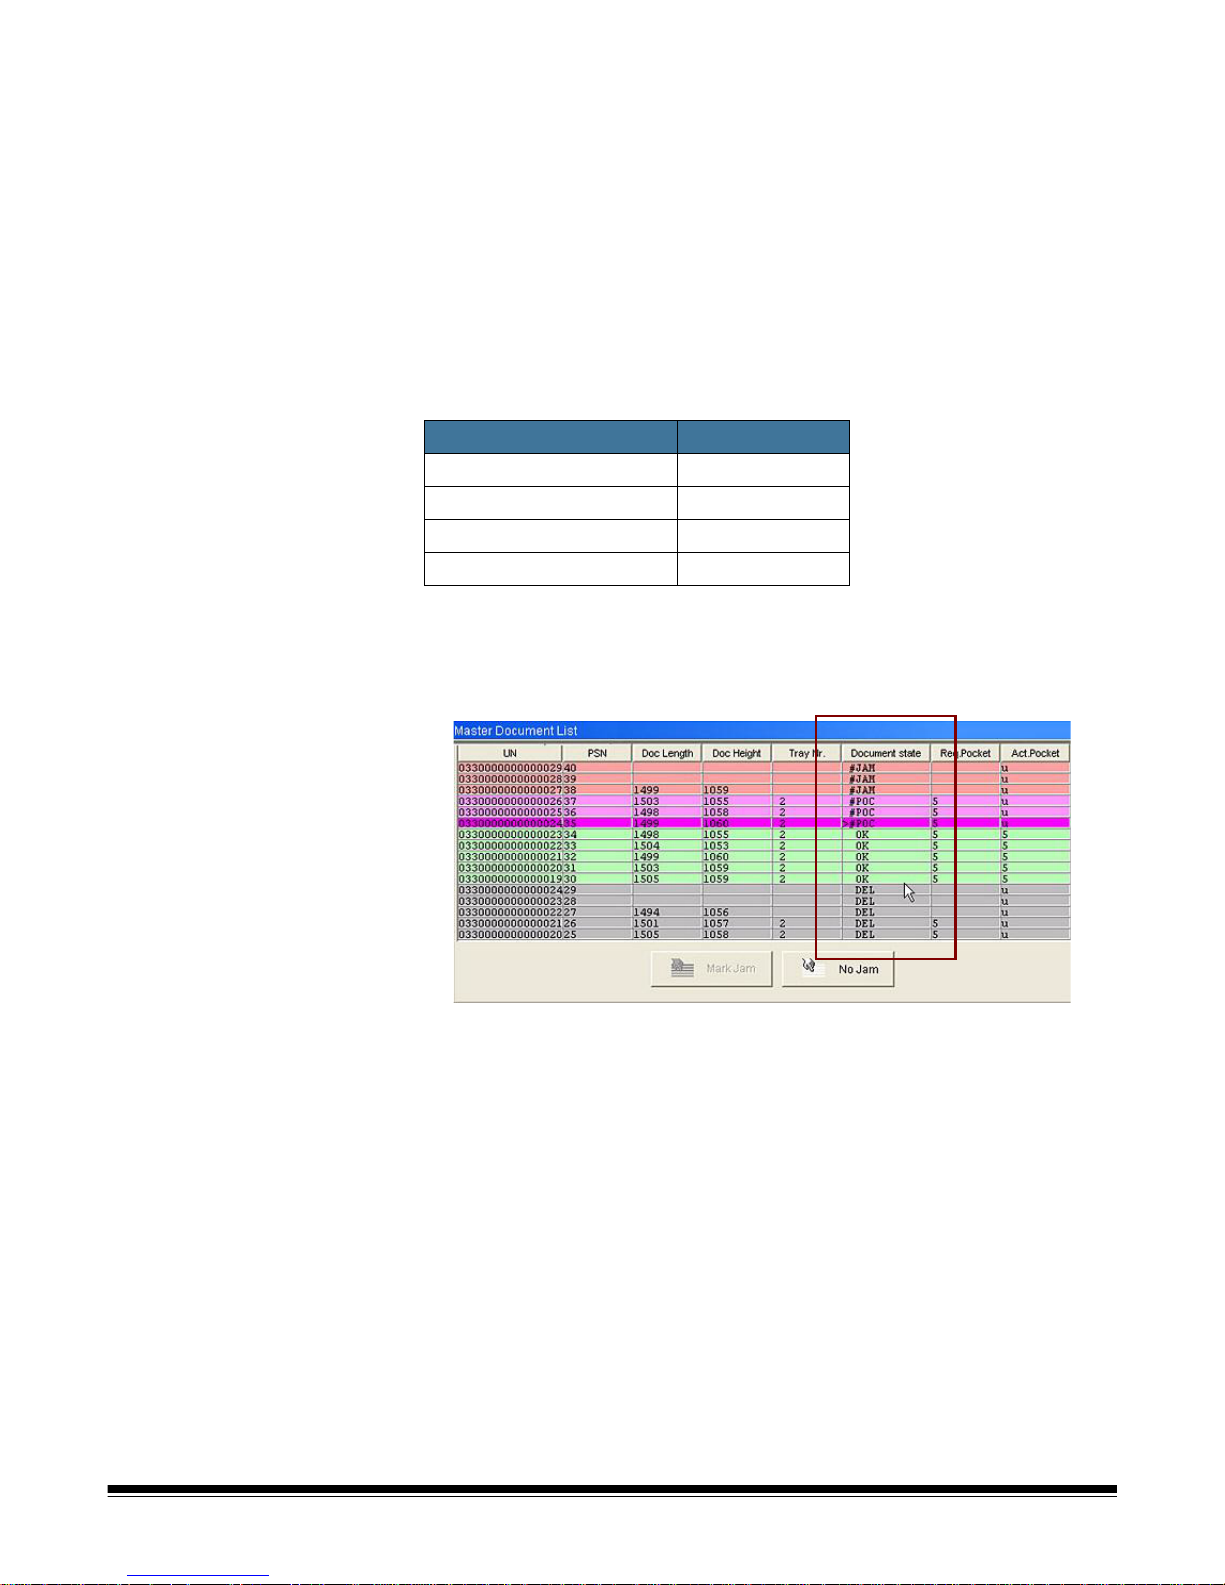
Buttons — the Mark Jam and No Jam buttons are only available if it is
setup in your user profile. When a jam occurs, you need to verify
whether the document has been scanned correctly and been deposited
in the correct pocket.
• Mark Jam: use this button when a document was scanned correctly
but has not been deposited in the correct pocket. The selected item
will be Blue.
• No Jam: the selected item will be Yellow.
For more information about clearing a document jam, see the section
entitled, “Handling Document Jams” in Chapter 3.
2-12 A-61593 September 2007
Page 21
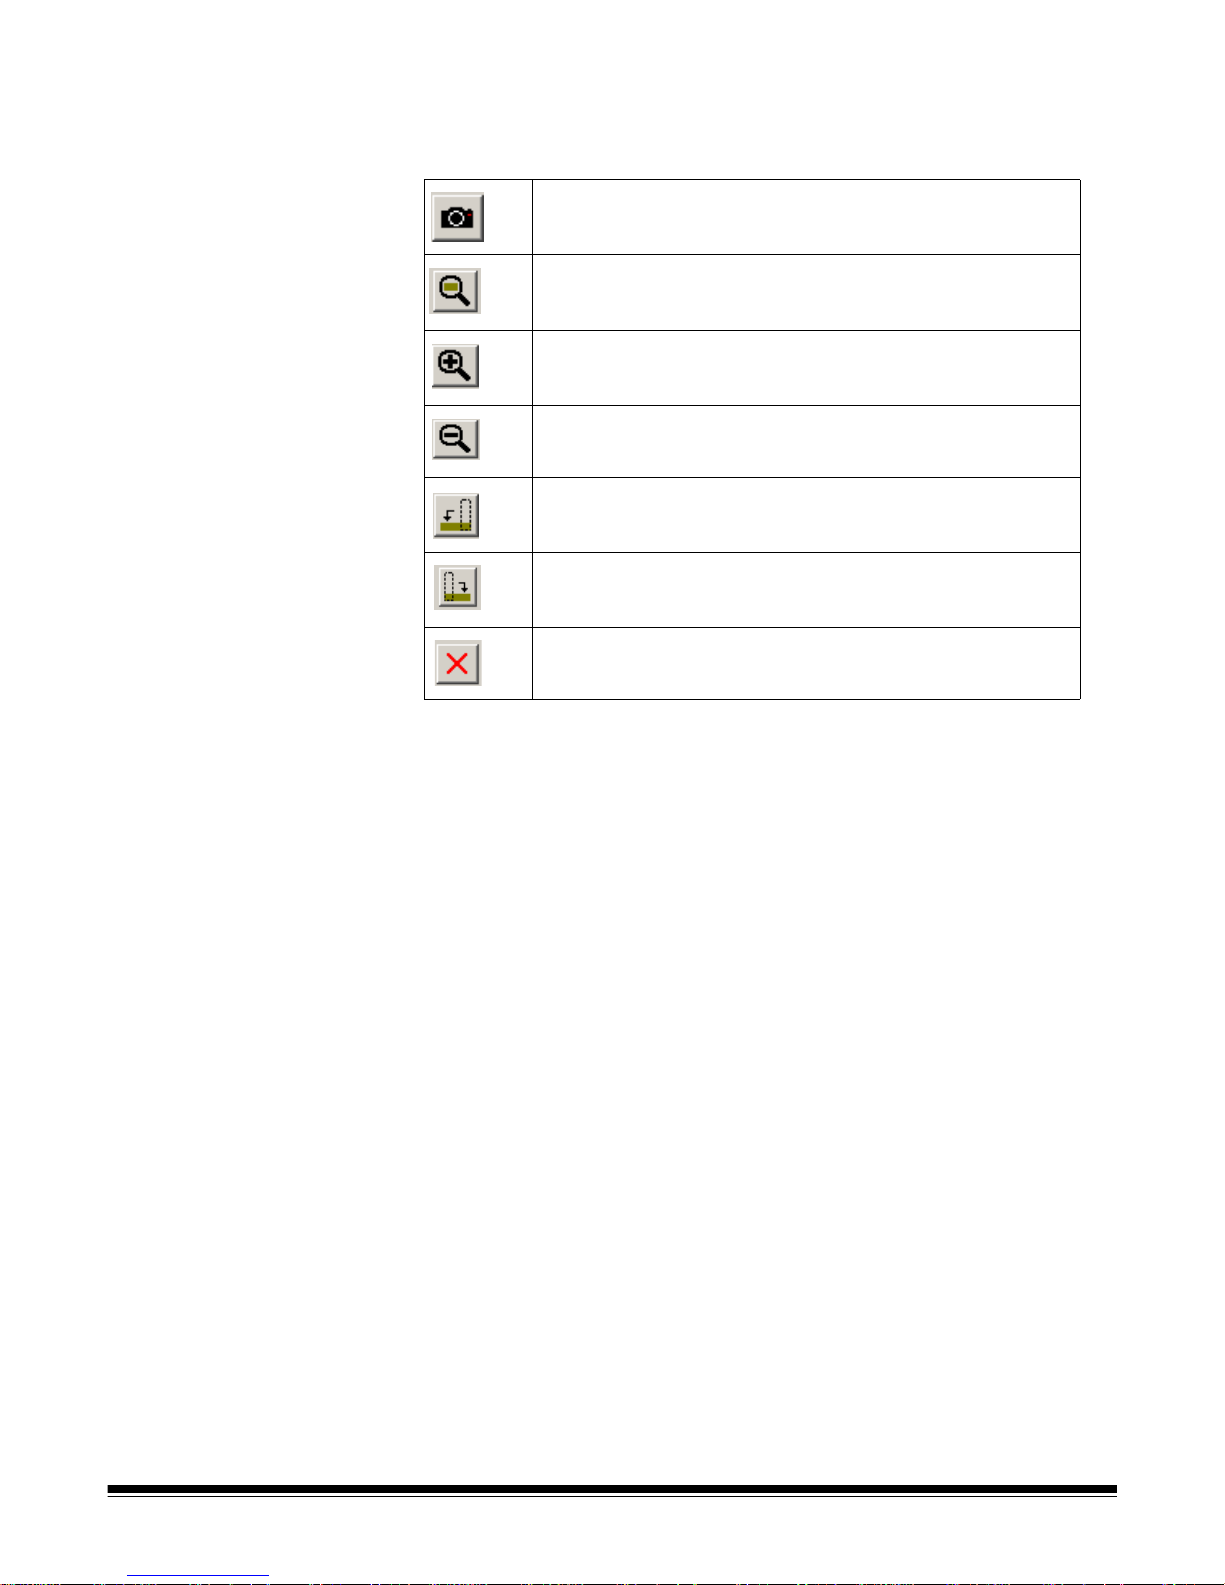
Image Monitor — when you select an item from the Document List, the
image will be displayed in the window to the right. Once displayed, you
can use these Toolbar buttons.
displays the front or back side of the scanned document.
redisplays the image to the original size.
magnifies the image by X%.
reduces the image by X%.
rotates the image 90 degrees to the left.
rotates the image 90 degrees to the right.
closes the Image Display window.
A-61593 September 2007 2-13
Page 22
Status bar The status bar provides the current status of the scanner and is divided
into 5 areas.
Scanner State — the scanner can be in one of the following states:
Scanner State Description
Idle
Active
Jam
Track Clearing
Jam Handling
• When the scanner is not feeding documents.
• If you press the Pause button.
• If the feeder is empty.
NOTE:You can close or cancel a run or
manually change the tray in the Idle
state.
Documents are being fed and scanned.
A physical jam has occurred (e.g., a paper clip
is on one or more documents) and the transport
has been blocked. The track must be cleared of
documents before proceeding.
After a physical jam, press the Clear Track
button to start the transport and deposit any
remaining documents within the track to the
overflow pockets. Any documents that are still
jammed must be manually removed.
This state requires you to verify the Document
List. Any documents that are jammed must be
fed and scanned again. After all documents
have been verified, they need to be marked as
OK or deleted.
NOTE: For more information see the section entitled, “Handling
Document Jams” in Chapter 3.
Current tray status — provides the number of documents in the
current tray and the number of documents fed during the current run.
ID number — provides the identification number of the current tray.
Message line — provides a message to the operator regarding the
current state of the scanner.
Messages button — displays the machine status messages. These
messages are color coded:
Severity Error Warning Information
Color Red Yellow Green
2-14 A-61593 September 2007
Page 23
Changing table
properties and global
fields
The columns that are displayed in the Document List can be changed
to list the information that is important to you. This is done by using the
Table Properties dialog box. For more information, see Appendix A,
Table Properties and Global Fields.
Description of special
system fields on the
Document List
The following provides descriptions of the special system fields on the
Master Document List.
Document State column
In addition to colored backgrounds, you can also define the text you
want to appear in the Document State column. The following values are
allowed:
State Shortcut
OK OK
IS_DELETED DEL
SHOULD_BE_DELETED POC
MUST_BE_DELETED JAM
• The greater than sign (>) in front of the Document state indicates the
selected document.
• The number sign (#) in front of the Document state indicates a
“marked” document.
A-61593 September 2007 2-15
Page 24
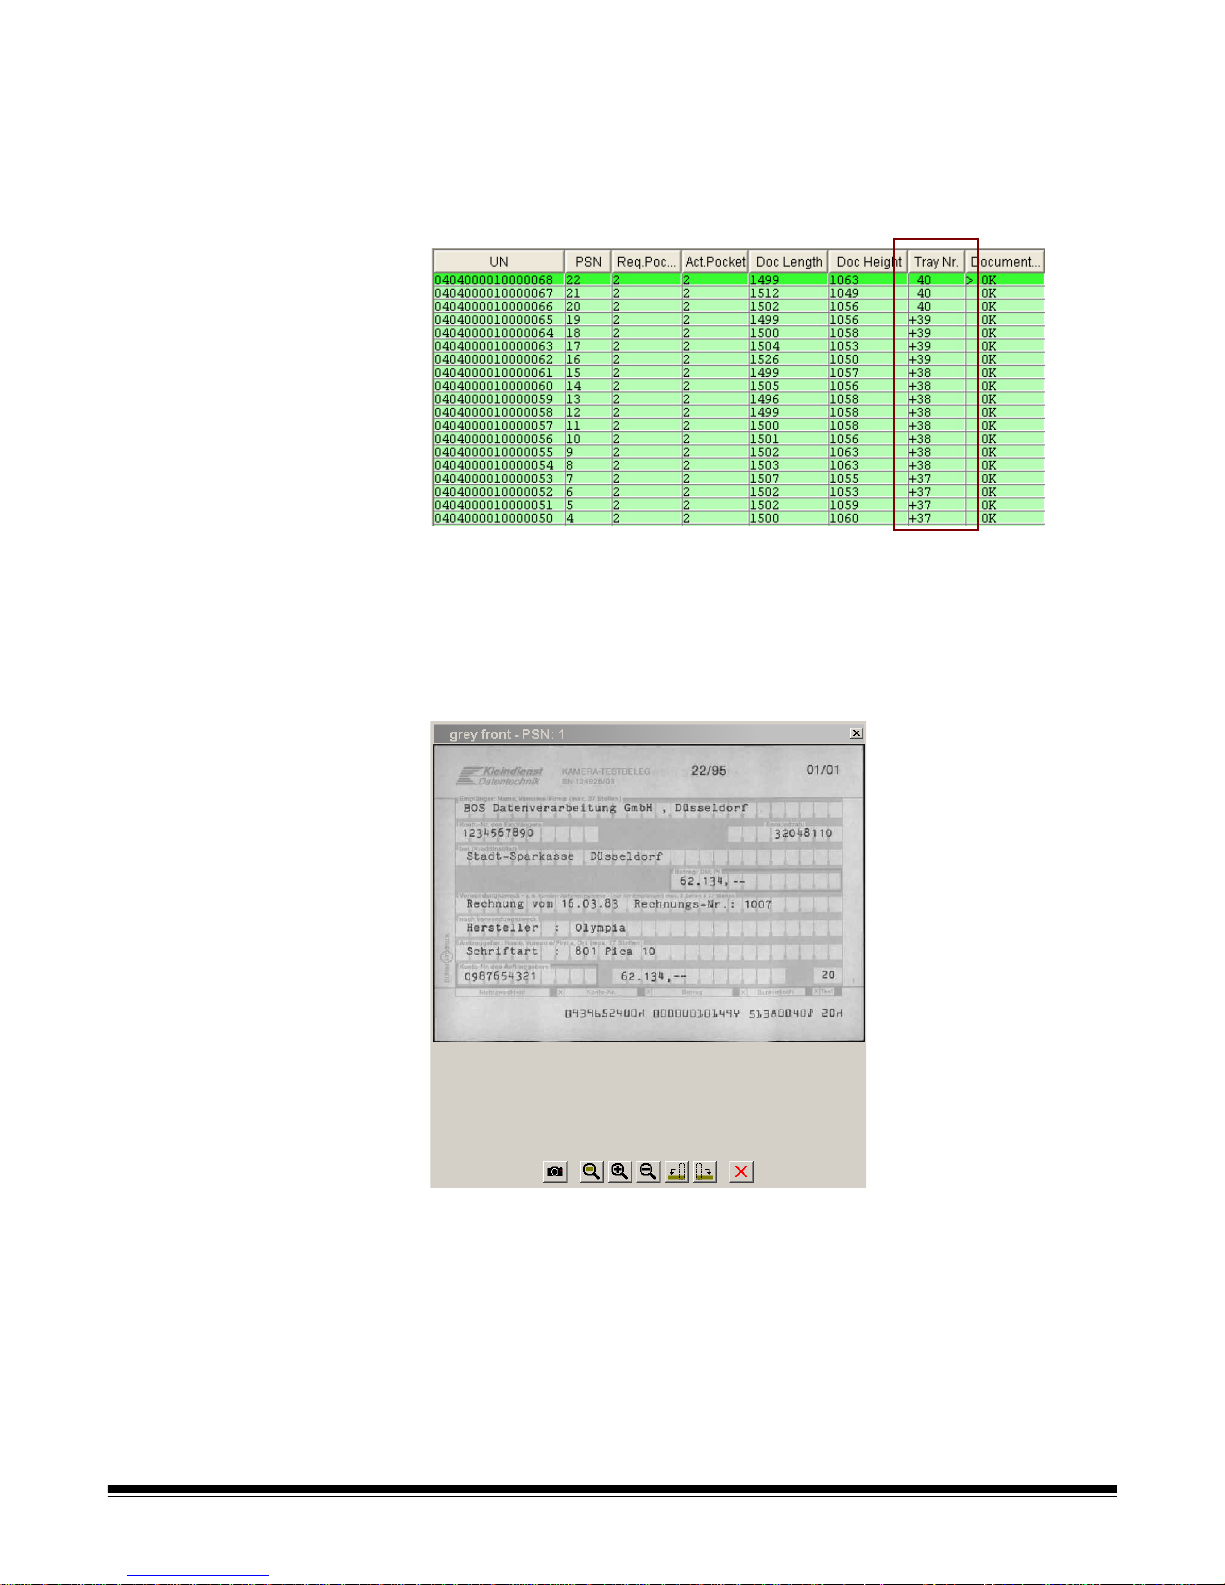
Tray Column
The plus sign (+) in front of the Tray Nr. (system field: TRAY) indicates
that the tray of the document is closed; therefore documents cannot be
deleted. In the following example, Trays 37, 38 and 39 are closed. Tray
40 is still open and documents can still be deleted.
Image Monitors Column
To identify documents quickly during jam clearing, image monitors are
available. The image monitors show the image related to the selected
document and surrounding documents. If no offset is defined, the
displayed image corresponds to the selected line in the Document List.
The displayed button can be configured in the run definition.
2-16 A-61593 September 2007
• To open another image monitor click the Monitor tool. You can resize
and move this window to meet your needs. Several image monitors
can be opened at one time. Rearrange your desktop the way you
want, then select View>Layout>Freeze layout as default.
Page 25

• To view all images in a run, place your cursor on the Image Monitor
window, right-click the mouse button and select Image. All images
defined in your run definition will be displayed.
Function Description
Image... allows you to select the camera where the
image of this document is shown.
e.g., front side, black/white
Zoom to fit in window displays the entire length and width of the image
so it fits in the Image Monitor window.
Zoom in enlarges the displayed image.
Zoom out reduces the displayed image.
Rotate left rotates the image 90 degrees to the left.
Rotate right rotates the image 90 degrees to the right.
Next document displays the next image in the run.
Previous document displays the previous image in the run.
Close monitor closes the Image Monitor window.
A-61593 September 2007 2-17
Page 26

Tools includes the following modules:
• Convert
• Transfer
•Statistics
• Split (optional)
The screen layout is the same for these modules. This section provides
information about the menus, toolbars and windows that will be used
when using these modules.
2-18 A-61593 September 2007
1 Menu bar — provides the available options within each module.
2 Toolbar — frequently used menu options are also available as
toolbar buttons. These buttons are different based upon which
module you are using.
3 Task table — provides all current runs and their status.
4 Message panel — provides information about the processing of
the tasks.
5 Property panel — if only one dispatch run is selected in the Task
table, the Property panel shows information regarding the selected
task.
6 Status line — displays the number of runs in each state and
indicates any problems with disk space.
Page 27

Menu bar The following summarizes the functions associated with each menu.
Processing — allows you to start and pause batch processing. You
can also refresh the Task table and exit Tools.
Task — provides options that allow you to control the task processing.
View — allows you to change the way information is displayed on the
main screen.
Extras — allows you to change the language, change a password, and
save a log file. Suite configuration (if displayed) is for System
Administrator use only.
? (Information) — displays the About window which allows you to view
operating system information, customize the colors used in the
Document List and provides access to PDF files of supporting
documentation.
NOTES:
• In Test mode of Convert and Statistics there is an additional menu
item: Diagnostics which allows you to import and export data.
• In Test mode of Split there is an additional menu item which provides
demonstration examples.
Processing menu The Processing menu provides the following options:
Refresh — updates the Task table immediately. Depending on how
your system is configured, the Task table may be set to automatically
refresh periodically.
Start Batch Processing — when selected, the module looks for open
runs after each refresh and starts batch processing.
Pause Batch Processing — pauses the batch that is currently being
processed.
Filter — allows you to display all tasks, those less than 1 hour old or
only tasks that are not closed.
A-61593 September 2007 2-19
Exit — closes the module.
Page 28

Task menu The Task menu provides the following options.
Start Selection — starts processing the selected task.
Stop Selection — stops processing the selected task.
Pause Selection — interrupts processing of the selected task.
Reset Selection — a task that was closed, will be opened and
processed again.
View, Extras and
Information menus
Delete Selection — the selected task will be deleted.
Select all tasks — all tasks will be selected.
Select closed tasks — all closed tasks will be selected.
The View, Extras and Information (?) menus are the same as in Scan.
For detailed information about these menu items, see the sections
entitled, “View menu”, “Extras menu” and “Information menu” earlier in
this chapter.
2-20 A-61593 September 2007
Page 29

Toolbar buttons The toolbar provides easier access to commonly used functions.
Refresh — updates the Task table immediately. Depending
on how your system is configured, the Task table may be set
to automatically refresh periodically.
Start Batch Processing — when selected, the module looks
for open runs after each refresh and starts batch processing.
Pause Batch Processing — pauses the batch that is
currently being processed.
Start Selection — starts processing the selected task.
Pause Selection — interrupts processing of the selected
task.
Stop Selection — stops processing the selected task.
Reset Selection — a task that was closed, will be opened
and processed again.
Delete Selection —
the selected task will be deleted.
A-61593 September 2007 2-21
Page 30

The Task table Each row in the Task table corresponds to a run. A column can be
sorted in ascending or descending order by clicking on the table
header.
Default (no arrow)
Ascending order (up arrow)
Descending order (down arrow)
Task table for Convert
and Transfer
The Task table below represents what the Task table looks like when
you are using Convert or Transfer and is followed by column
descriptions.
Task name — unique name of the run.
Action — indicates the action being taken by the run depending on the
module in use.
• Convert: converts output format
• Transfer: transfers the files to the output destination folder
• Split: Secondary run
Status — provides the current state of the run. The number of tasks
processed at one time depends on the system configuration. In batch
mode, the task is put into the P2 queue; in manual mode, the task is put
into the P1 queue.
2-22 A-61593 September 2007
Status Description
open a run is in the queue and waiting to be
processed
processing a run is currently in process
closed a run was successfully completed
failed a run could not be processed
Page 31

The indicator on the Context Selection button summarizes the state of
the runs.
Button Color State of run
Green All runs in the Task table are closed.
Yellow There is at least one run open in the Task table.
Red There is at least one failed run in the Task table.
Blue A task is processing.
Creation Date — date and time the run was created.
Last Modified — date and time the run was last processed.
Destination — the next destination where the task file will be sent.
A-61593 September 2007 2-23
Page 32

Task table for Statistics The Task table below represents what the Task table looks like when
you are using Statistics and is followed by column descriptions.
Task name — name of the task.
#_Sheets — number of processed sheets.
T_Prep — time needed for the run to reach the Idle state.
T_Feed — time the operating system software spent in the Active state.
T_Idle — time the operating system software spent in the Idle state.
#_Idle — number of times the operating system software was in the
Idle state.
T_Phys Jam — the time required to clear a physical jam.
#_Phys Stops — number of physical jams.
T_Logic Jam — the time required to clear the logical jams.
#_Logic Stops — number of logical jams.
#_Recov. Stops — number of recoveries made.
2-24 A-61593 September 2007
Page 33

Message panel The Message panel provides information and errors about the module.
Property panel The Property panel provides information about the selected task in the
Task table. Following are descriptions of the Types listed in the
Property panels of Convert, Transfer and Statistics.
Convert Property Panel
Type Description
RUN_DEF Name of the run definition used. It contains the rules for the
conversion.
UN_FIRST Identification number of the first document.
UN_LAST Identification number of the last document.
DOC_FIRST Sequence number of the first document.
DOC_COUNT Number of documents in the selected batch.
TIME_START Time when the module was started.
TIME_END Time when the module was finished.
A-61593 September 2007 2-25
Page 34

Transfer Property Panel
Type Description
RUN_DEF Name of the run definition used. It contains the destination of the
files.
UN_FIRST Identification number of the first document.
UN_LAST Identification number of the last document.
SHEETS Number of documents in the selected batch.
FILE Path of the corresponding files.
Statistics Property Panel
Type Description
RUN_DEF Name of the run definition.
UN_FIRST Identification number of the first document.
UN_LAST Identification number of the last document.
DOC_FIRST Sequence number of the first document.
DOC_LAST Sequence number of the last document.
DOC_COUNT Number of processed documents.
TIME_START Time when the run was started.
TIME_END Time when the run was finished.
MACHINE_PREPARETIME Time needed to reach the Idle state.
MACHINE_FEEDTIME Time the operating system software spent in the Active state.
MACHINE_IDLETIME Time the operating system software spent in the Idle state.
MACHINE_PHYSICAL JAMTIME Time necessary to clear the physical jams.
MACHINE_PHYSICAL
Number of physical jams.
JAMSTOPS
MACHINE_LOGICALJAMTIME Time necessary to clear the logical jams.
MACHINE_LOGICALJAMSTOPS Number of logical jams.
MACHINE_RECOVERYSTOPS Number of recoveries executed.
MACHINE Type of scanner.
MACHINENUM Number of the scanner.
HOSTNAME TCP/IP host name.
USERACCOUNT Account of the user.
OCR1_DOC_REJECTS Number of documents containing at least 1 reject in the OCR1
codeline.
OCR1_CHAR_REJECTS Number of rejects in all OCR1 codelines of this tray.
OCR1_CHAR_VALID Number of valid characters in all OCR1 codelines of this tray.
OCR2_DOC_REJECTS Number of documents containing at least 1 reject in the OCR2
codeline.
2-26 A-61593 September 2007
Page 35

Statistics Property Panel
Type Description
OCR2-CHARS_REJECTS Number of rejects in all OCR2 codelines of this tray.
OCR2_CHAR_VALID Number of valid characters in all OCR2 codelines of this tray.
MICR_DOC_REJECTS Number of documents containing at least 1 reject in the MICR
codeline.
MICR_CHARS_REJECTS Number of rejects in all MICR codelines of this tray.
MICR_CHAR_VALID Number of valid characters in all MICR codelines of this tray.
Split Property Panel
Type Description
RUN_DEF Name of the run definition used. It contains the rules for splitting.
SPLIT_DEF Name of the Split definition. This is part of the run definition.
VCT Name of the vct file. This is the text output file of the entrance sort.
RUNS Number of runs necessary in this fine sort.
RUNx rct file (run control table) for the run number x.
Status bar The status bar provides an overview about the process of all tasks in
the Task table.
The Status line displays the number of runs in each state. The Memory
fields is red when there is not enough disk space available.
A-61593 September 2007 2-27
Page 36

3 Using the Software and Clearing Document Jams
The Kodak s1700 Operating System Software controls the s1700
Capture System.
This chapter provides procedures for running a job and clearing
document jams.
Starting the s1700
Operating System
Software
1. If the scanner is not turned on, turn the scanner on before you turn
on the host PC.
2. Turn on the host PC.
3. Double-click on the s1700 Operating System Software icon. The
Login screen will be displayed.
4. Enter your Account name and Password and click Login.
The Run Selection dialog box will be displayed.
A-61593 September 2007 3-1
Page 37

5. Select the job you want to run and click Select.
When you select the job you want to run, the main screen will be
displayed.
6. Insert one or more documents into the feeder of your scanner.
7. Click Continuous Feed to start the scanner. The scanner will feed
one document at a time and continue unless you pause scanning or
a document jam occurs.
3-2 A-61593 September 2007
Page 38

As the documents are being scanned, images will be displayed in
the Image Monitor.
When scanning has completed successfully, a message will be
displayed asking if you want to continue the run or finish. Click OK
to finish the run, or Continue to continue feeding more documents.
The documents listed in the Document list will be highlighted in
green. Any other highlighted color indicates a scanning problem.
To process more documents:
8. Insert more documents into the feeder and click Continuous Feed.
All documents will be fed until the stack is finished.
Finishing the run When you finish a run, you are storing the output files of the scanned
documents.
1. When the scanner has stopped, click Finish Run. A confirmation
message will be displayed. The operating system software will
process the output files and create a task for Convert.
NOTES:
• Output files are created in native format. Convert allows you to
save the files in the desired format.
• Depending on how the Run Definition is configured the Convert
and Transfer tasks may be performed automatically. If these
tasks do not automatically run, follow Steps 3-5 to finish
processing the jobs, then go to Step. 6.
A-61593 September 2007 3-3
Page 39

2. Select Convert. The following window is displayed.
3. If the task does not start processing automatically, select the task
that you want to convert to a different output and click Start
Selection. Convert will create your output as defined in the Run
Definition. When Convert is finished, it creates a task for Transfer.
4. Select Transfer. The following window is displayed. The Transfer
module copies the output files to the directory specified in the Run
Definition.
3-4 A-61593 September 2007
5. Select the task you want to transfer and click Start Batch
Processing.
6. When the task is finished processing, verify the output with your
processed documents.
Page 40

Handling document
jams
Occasionally a document jam occurs that needs to be cleared before
you can proceed. It is very important to handle document jams
correctly. This avoids documents being scanned twice or not at all.
There are two types of jams:
Logical jam: the operating system software has recognized a problem
(e.g., sequence error). The document with the error will be sent to the
overflow pocket, scanning will stop, the track will be cleared and a
message will be displayed (refer to Steps 3-7 below).
Physical jam: a document has been jammed in the scanner (e.g.,
document was blocked, a cover was not closed, etc.). When this type of
jam occurs, the scanner stops immediately and documents will remain
on the transport. A message will be displayed via the operating system
software which provides the location of the jam.
Any documents on the Master Document List that are highlighted in any
color other than green should be rescanned.
To clear a physical jam:
1. Remove any jammed documents from the scanner and click Clear
Track. Any document left in the scanner will be deposited in one of
the overflow pockets.
When the track is clear, the main window will display the documents
that went through the scanner. The documents will either be in the
feeder or in the overflow pockets.
2. Be sure all documents are removed from the track either by
manually removing them, or verifying that the Clear Track function
deposited them in an overflow pocket. Be sure ALL jammed
documents are removed before continuing scanning.
3. Look at the Document List in the main window. Documents that
have been processed correctly have a green background.
Documents that were not processed correctly will have a violet or
red background.
4. Remove all of the documents that are highlighted in red or violet
from their pockets and put them back into the feeder. Be sure to
compare the documents with the listing on the Document List.
A-61593 September 2007 3-5
NOTE: If you want to see the scanned document, click on the line
on the Document List and the image will be displayed on
the image monitor.
Page 41

5. Find the last document with an OK state and verify that it was
deposited in the pocket correctly.
6. If the document jam has been cleared correctly, all the documents
on the Document List will be highlighted in green and are in the
requested pocket; and all documents effected by the document jam
will be in the feeder ready to be rescanned.
7. Click Jam Cleared. The documents in the feeder will be rescanned
and displayed in the Document List (highlighted in green).
NOTE: Jammed documents that were highlighted in red or violet
are deleted and marked gray. These documents are not
stored in the output file.
Extended jam clearing During extended jam clearing additional states and colors appear in the
Document List. Extended jam clearing can only be performed by a
System Administrator or someone who has permission for this task.
Documents marked for extended jam clearing are highlighted in blue or
yellow.
Blue — indicates that the document was scanned correctly and is
labeled with Mark Jam. Mark Jam indicates that you can delete this
document.
Yellow — indicates that the document was scanned correctly but did
not get deposited in the correct pocket. You can use No Jam or Mark
Jam in a row above to unmark it. After selecting Jam Cleared, the
document will be marked as OK.
• No Jam — use if the document scanned properly and you want to
manually move it to the correct pocket without rescanning it.
• Mark Jam — use if you want to change status of some documents
marked as the wrong pocket to OK. You will manually have to move
the documents to the correct pocket.
3-6 A-61593 September 2007
Page 42

Jam clearing colors To review the Jam Handling Colors, select ?>Jam Handling Colors
from the menu bar.
Using the No Jam
function
To set all documents that Should be Deleted to the OK state:
1. Click No Jam. When you click No Jam, all documents highlighted in
violet will be highlighted in yellow and will be unmarked.
2. Click the Jam Cleared toolbar button. All documents will be
highlighted in green.
NOTE: All documents effected by the jam will need to be manually
placed in the correct pockets.
A-61593 September 2007 3-7
Page 43

Using the Mark Jam
function
To set some of the documents that are marked Should be Deleted to
the OK state:
1. Click Mark Jam. When you click Mark Jam, all documents
highlighted in violet below the selected document will be highlighted
in yellow. The selected document and all of the documents above it
will remain in violet.
2. Click the Jam Cleared toolbar button. All documents highlighted in
yellow will be highlighted in green, all documents highlighted in
violet will turn gray.
NOTE: All documents that are set to OK need to be manually
placed into the correct pocket and the deleted documents
need to be placed back into the feeder.
Special Feed mode Special Feed mode allows you to scan irregularly shaped documents
(e.g. pages with large holes or cutouts in them) which could produce
unexpected results such as truncated images or jams. Before feeding
documents like this, disable double-document detection, endorsing and
encoding.
1. Select Machine Control>Define Special Feed. The Define Special
Feed window will be displayed.
3-8 A-61593 September 2007
2. Select the options you want to disable for the next single feed and
click OK.
Page 44

Controlled runs A controlled run is when you have a run that you want to scan while the
scanner communicates with another host system. The Kodak s1700
Operating System Software can be programmed to search for the
control file (.rct). During second pass encoding Scan retrieves the
amount field to be encoded from the control file. In fine sorts, it retrieves
the requested pocket. This section describes the operation of controlled
runs.
NOTE: The sample Run Definitions in this section may need to be
modified to meet your needs.
Second pass
encoding
Second pass encoding may be used to encode an amount on a check.
The first pass you will encode the OnUs and Transit fields. The second
pass you will encode the amount belonging to this document.
NOTE: You must have the following accessories for second pass
encoding: Multi Line Endorser / for Kodak s1700 Capture
System and the Encoder for E13B Fonts / for Kodak s1700
Capture System.
1. Log into the s1700 Operating System Software. The Run Selection
window will be displayed.
A-61593 September 2007 3-9
2. Select the USA_ENC_PREPARATION run. The Text to be printed
dialog box will be displayed.
Page 45

3. Select Encode codeline without amount and click OK.
4. Insert some blank documents into the feeder and click Continuous
Feed. The scanner will start feeding the documents and encoding
them with OnUs and Transit.
5. When you have encoded enough documents, click OK.
The Document List will be displayed.
NOTES:
• The Encoding field displays the text to be encoded. If this field is
blank, no encoding will be done.
• Successful encoding is indicated by +ENC in the
OPTIONSSTATUS field.
The documents that were just encoded can now be used for second
pass encoding.
6. Click Finish Run.
7. Select Convert. When the Convert main screen is displayed, click
Refresh to update the Task Table.
8. Click Start Batch Processing to start the conversion. A task file
and rct file will be created for second pass encoding. The task file is
named “Tray000000nPass2.task.xml” and the rct file is named
“Trayn.RCT.xml”, where n is the number of the tray in both names.
9. Click Transfer. When the Transfer main screen is displayed, click
Refresh to update the Task Table.
10.Click Start Batch Processing to start the transfer. A task file will be
copied to the ProSort\Task\Scan directory. The rct file will be copied
to the ProSort\Table\Scan directory.
11. Click Scan. When the Run Selection window is displayed, click
Refresh to update the Document List.
12.Select the TraynPass2 (1/1) run (where n is the number of the tray).
NOTE: If there is no Run Definition for a given task file, the run is
marked with an asterisk (*). The highlighted color shows the
state of the task file.
Color State Description
Black Open You can open the run.
Green Closed The run is finished and the task file can
be deleted.
Red Hard-locked The run is in progress.
3-10 A-61593 September 2007
Page 46

• The display area is divided in two parts. The upper part shows the
Lookahead. This is the view in the rct file (the expected documents).
The lower part is the Document List.
• The Look Ahead button will also be displayed on the toolbar. Clicking
on the Look Ahead button will make the Lookahead information
disappear. If you click on the Look Ahead button again, the
Lookahead information will be redisplayed.
13.Feed some documents. The fields of the scanned documents
appear in the Document List. If the document matched an entry in
the Lookahead, the line Lookahead is also highlighted in green.
NOTES:
• If the document was matched, the RCT field will have the number
of the entry in the rct file and the Encoding field will have the text
to be encoded.
• If the document was not matched, the codeline quality may be
poor. The RCT field will be 0 and the Encoding field will be blank.
Nothing was encoded.
A-61593 September 2007 3-11
Page 47

Fine Sort (optional) Fine Sort is only available if you have the Enhanced Sorting module.
Fine sort allows you to run documents, which are out of order, through
the scanner more than once with the expectation of putting the
documents in the correct order and in the correct pocket. The
documents will only be scanned once even though they have been run
through the scanner more than once.
1. Log into the s1700 Operating System Software. The Run Selection
window will be displayed.
2. Select DE_FineSortDemo_Pass1 and click Select. The main
window will be displayed.
3. Place your documents in the feeder and click Continuous Feed.
4. When the documents have been processed, note the number of the
run and tray, and click Finish Run.
5. Click Convert and process the created task.
6. Click Transfer and process the created task.
7. Click Split and process the created task.
3-12 A-61593 September 2007
Page 48

8. In the Property Panel above, there are three runs necessary to sort
the sheets. The next run is the first one. The rct file
Tray20Pass2_RCT_Run1.xml will be used. Open this file in the
ProSort/Table/Scan directory.
<?xml version=”1.0” encoding=”UTF-8” ?>
-<FOLDER>
- <SHEET ID=”0418700010000225” TYPE=”German check”>
<INFO TYPE=”TXT”>20</INFO>
<INFO TYPE=”BLZ”>513800040</INFO>
<INFO TYPE=>KTO”>0939652400</INFO>
<INFO TYPE=”MZF”/>
<INFO TYPE=”DOC_LENGTH”>1494</INFO>
<INFO TYPE=”DOC_HEIGHT”>1059</INFO>
- <INFO TYPE=”OCR1_DATA”>
<![CDATA[ 0939652400>0000001049= 51380040< 20> ]]>
</INFO>
<INFO TYPE=”
<INFO TYPE=””DESTINATION”>102</INFO>
</SHEET>
</FOLDER>
_Split_VirtualDestination”>25</INFO>
The Destination field has been inserted by Split which is needed
for the next run.
9. Select Scan and open the created task in Run Selection. In the
following example, it is called Tray20Pass2_Run(1/3). The first of
three runs of the secondary sort is Tray 20. The following window is
displayed.
A-61593 September 2007 3-13
Page 49

• The display area is divided in two parts. The upper part shows the
Lookahead. This is the view in the rct file (the expected documents).
The lower part is the Document List.
• The Look Ahead button will also be displayed on the toolbar. Clicking
on the Look Ahead button will make the Lookahead information
disappear. If you click on the Look Ahead button again, the
Lookahead information will be redisplayed.
10.Feed some documents. The fields of the scanned documents
appear in the Document List. If the document matched an entry in
the Lookahead, the line Lookahead is also highlighted in green.
11. Feed in all documents. If a document could not find a match, the
scanner will stop and display the following message, Too many
mismatches and the documents will be transported to the overflow
pockets.
12.Compare the documents in white on the Lookahead with the
documents that caused the jam. These documents must match. Put
the jammed documents in the feeder in the correct order again,
select the document in white in the Lookahead and select Match
selected item, then select Continuous Feed.
When all documents are successfully processed, the Lookahead
will be all green and the message Last Doc in Lookahead
matched will be displayed.
13.Close the run and remove the documents in ascending pocket
number out of the pockets and put them back into the feeder.
14.Select Next Run of this fine sort, in this example:
Tray20Pass2_Run(2/3), and process the documents again.
3-14 A-61593 September 2007
Page 50

15.When finished, close the run and remove the documents in
ascending pocket number out of the pockets and put them back into
the feeder.
16.Select Next Run of this fine sort, in this example:
Tray20Pass2_Run(3/3), and process the documents again.
17.When finished, remove the documents in ascending pocket order,
paying attention to the sequence.
18.Check the order of the documents; they are sorted according to
BLZ. If the BLZ matches, according to KTO, the fine sorting was
successful.
Colors in the Lookahead There are four colors in Lookahead:
Color Meaning
White The Lookahead interval is the white area. This is where
the scanned documents are searched. The size of the
area is fixed in the Run Definition.
Orange If the Lookahead interval does not include the entire .rct
file, the remaining part of the .rct file is orange. The
documents in this area are not searched.
Green Documents belonging to this entry in the .rct file are
already processed.
Gray This entry in the.rct file is deleted.
Jam handling in
Controlled runs
The following jam situations may occur with controlled runs.
• The document does not match — the processed document has too
many rejects or substitutions to be identified.
Machine Status: Too many mismatches
• The documents appear in the wrong sequence — if the processed
documents do not appear in the correct sequence, a jam will occur.
Machine Status: Detected wrong sequence.
NOTE: Using the options of the Compare control jams can be avoided.
Then documents which are not matchable or in the wrong
sequence will be sorted out to a defined pocket.
A-61593 September 2007 3-15
Page 51

The Lookahead window
and buttons
Following is a controlled runs window showing the Lookahead
information.
The three buttons you will access when using Lookahead are described
below. Use these buttons if the document(s) can not be identified
because of poor quality of if something is missing.
Mark Lookahead — the documents highlighted in white (Lookahead
interval) below the selected document will be deleted.
Create selected item — the expected document is damaged and
cannot be processed. Put the document (or a substitute) into the
requested pocket and click Create selected item. The information will
be copied from the control file and placed in the correct fields. By doing
this, the text output of this document will be written and a substitute
image will be created in the image output. The value of the system field
MANUAL_MATCHED is incremented.
Match selected item — the expected document is damaged and
cannot be processed. Identify the document and click Match selected
item. The information will be copied from the control file and placed in
the correct fields. By doing this, unmatched documents can be
processed and encoded or endorsed.
3-16 A-61593 September 2007
Page 52

Performing a Print
test
If you have the optional Multi-Line Endorser / Kodak s1700 Capture
System periodically you may need to perform a print test to ensure that
the ink jets are functioning properly. To run a print test.
From the Run Selection window:
1. Select MZI Demo and click Select.
2. Place approximately 10 blank documents (larger than check-size) in
the feeder.
3. Click Run.
4. Visually inspect the pattern of the print test.
• If the pattern is complete, the endorser is working properly.
• If the pattern is incomplete, be sure the ink cartridge is installed
correctly and run the test again.
A-61593 September 2007 3-17
Page 53

4 Troubleshooting
Following is a list of error numbers, messages and corrective actions
you can take if one of the following messages is encountered.
Error Code Message Reason
Compare Module errors
CMP01 Last Doc in Lookhead
match
CMP02 Init error Invalid data in the Compare Control in the Run Definition.
CMP03 Too many mismatches More documents than the “Maximum number of wrong documents”
CMP04 Detected wrong
sequence
CMP05 Rejected previous The previous document caused an error.
CMP06 Init error An error occurred while a run was open. The Compare control of the Run
CMP07 Bad run context Internal program error.
CMP08 Command compare
error
CMP10 Not enough separators More separators are required.
CMP12 Compare deselected Unacceptable Compare state.
CMP13 Multiple matched sheet
not permitted by
confirmation
Scanner Module errors
CS05 Scanner is offline The connection to the scanner is lost.
CS06 Scanner was switched
off
CS10 Diagnostic run required Diagnostic run is required.
Informational. There are no more documents in Lookahead.
Solution: Finish the run.
Solution: Check the definition of the Compare, Command and Display
fields in the Control Run Definition.
could not be assigned.
Solution: Skip the incorrect documents in the preview.
The detected document is located in the Lookahead interval, but another
document is assigned with the same requested pocket.
Solution: Manually check the document sequence. Reassign the correct
starting point in the preview list.
Solution: Clear the document jam.
Definition may not contain valid data.
Solution: Check the definition of the Compare, Command and Display
fields in the Control Run Definition.
Solution: Check the Compare Control in the Run Definition.
Internal error.
Solution: Cancel the run.
Solution: Put more separators on the feeder.
Solution: Internal error. Check the Run Definition.
Your configuration does not allow multiple matched sheets.
Solution: Check the rct file. Check the configuration (Compare Control;
Strategy for handling multiple matches).
Solution: Turn the scanner on and restart the PC.
The connection to the scanner is lost.
Solution: Turn the scanner on and restart the PC.
Solution: Call Service
A-61593 September 2007 4-1
Page 54

CS20 Gate at pocket (2).(3)
was opened
(Sensor{1})
There is a problem at the pocket access door.
Solution: Check the pocket access door to be sure it is securely latched
and there are no jammed documents. If the problem persists, call
Service.
CS21 Gate at pocket (2).(3)
was opened
(Sensor{1})
There is a problem at the pocket access door.
Solution: Check the pocket access door to be sure it is securely latched
and there are no jammed documents. If the problem persists, call
Service.
CS22 Document jam at light
sensor (1) in module
(0)
CS26 Gap between two
documents too small
CS27 Document is skewed,
too short to too long
Document jam detected.
Solution: Check for a document jam and clear the jam. If there is no
document jam, call Service to have the light sensor checked.
The gap between two documents was too small.
Solution: Collect the two documents and refeed.
There is a skewed document on the track.
Solution: Collect the skewed document and rescan.
CS30 Double feed Two documents have been fed together.
Solution: Collect the two documents and refeed.
CS35 Pocket code Pocket command invalid.
Solution: Check the Destination field in the Document List. Avoid
running other programs simultaneously.
CS36 Pocket (2).(3) are full A pocket is full or a document did not get deposited correctly.
Solution: Empty the full pocket or inspect the pockets to see which
document did not get deposited correctly and fix it.
CS40 Speed not achieved
(check cover switches)
Cover is not closed properly.
Solution: Check all covers and access doors to be sure they are closely
securely.
CS50 Internal error found in
module (0)
CS55 Feeder stopped
Internal error.
Solution: Call Service.
Informational. You have stopped the operating system software.
because of user
command
CS60 Transport not empty There are documents on the track.
Solution: Clear the documents from the track.
CS65 Feeder empty There are no documents in the feeder.
Solution: Put documents in the feeder and continue feeding the
documents or finish the run.
CS70 Machine is ready Informational. The scanner is ready.
CS99 Control error. Reason
unknown
CS221 Document jam in
module pocket at
pocket (2).(3)
CS222 Document jam in
module pocket
Internal error.
Solution: Close or cancel the run.
Document jam detected.
Solution: Clear the document jam. If there are no jammed documents,
call Service.
Document jam detected.
Solution: Clear the document jam. If there are no jammed documents,
call Service.
4-2 A-61593 September 2007
Page 55

Encoder errors
ECS10 Encoder module was
switched off
ECS15 Encoder module not
available
ECS20 Encoder: no ink
available
ECS25 Encoder. Print head not
in print position
ECS26 Encoder. Print head not
in home position
ECS27 Encoder. No voltage
available at print head
ECS30 Encoder. Data received
too late
The encoder did not initialize after it was reset.
Solution: Restart the run.
The encoder is not responding.
Solution: Cancel the run and restart.
The ribbon cartridge is out of ink.
Solution: Change the ribbon cartridge.
The print head is not in the print position.
Solution: Call Service.
The print head is not in the home position.
Solution: Call Service.
The print head is not connected properly.
Solution: Call Service.
The command to start encoding was received too late or the encoding
string is too long relative to the length of the document.
Solutions:
• If possible, shorten the encoding text.
• Place the encoding text in the middle of the document instead of the
beginning. The value of the field position should not be 0; there should
not be blanks at the beginning.
• Place the print command in an earlier hook within the Run Definition.
ECS32 Encoder. Gap too small The gap between two documents was too small.
Solution: Collect the two documents and refeed.
ECS35 Encoder. Ink supply
reaching end
ECS40 Encoder. Too much
data
The ink is running out.
Solution: Load a new ribbon cartridge after the current run has finished.
The encoding string is too long.
Solution: Shorten the encoding string.
ECS60 Encoder not ready The encoder is not ready.
Solution: Feed again.
ECS99 Encoder error. Reason
unknown
Internal error.
Solution: Close the run.
Endorser errors
EDS10 Endorser module not
switched on
EDS15 Endorser module not
available
EDS20 Endorser: no ink
available
EDS25 Endorser. Print head
not in print position
The Endorser module did not initialize after it was reset.
Solution: Restart the run.
The Endorser is not responding.
Solution: Cancel the run and restart.
The ink cartridge is empty.
Solution: Change the ink cartridge.
The print head is not in print position.
Solution: Close the operating system software and restart it. If the
problem still exists, turn the scanner off and after 15 seconds, turn it
back on and start the operating system software again.
EDS26 Endorser. Print head
not in home position
The print head is not in home position.
Solution: Close the operating system software and restart it. If the
problem still exists, turn the scanner off and after 15 seconds, turn it
back on and start the operating system software again.
EDS27 Endorser. No current
available at print head
The print head is not connected properly.
Solution: Call Service.
A-61593 September 2007 4-3
Page 56

EDS30 Endorser. Data
received too late
The command to start the endorser was received too late or the
encoding string is too long relative to the length of the document.
Solutions:
• If possible, shorten the endorsing text.
• Place the endorsing text in the middle of the document instead of the
beginning. The value of the field position should not be 0; there should
be no blanks at the beginning.
• Place the print command in an earlier hook.
EDS32 Endorser. Gap too
small
EDS35 Endorser. Ink supply
reaching end
EDS40 Endorser. Too much
data
The gap between two documents was too small.
Solution: Collect the two documents and refeed.
The ink is running out.
Solution: Load a new ink cartridge after the current run has finished.
The encoding string is too long.
Solution: Shorten the encoding string.
EDS60 Endorser not ready. The endorser is not ready.
Solution: Wait a minute and try feeding again.
EDS99 Endorser error. Reason
unknown
Internal error.
Solution: Close the run and try again.
EDS101 MZI, was offline The MLE (Multi Line Endorser) is offline.
EDS102 MZI, parity error Internal error.
Solution: Call Service.
EDS103 MZI, order not allowed
in this state
EDS104 MZI, invalid command
number
Internal error.
Solution: Call Service.
Internal error.
Solution: Call Service.
EDS105 MZI, invalid parameter Internal error.
Solution: Call Service.
EDS109 MZI, command too late Internal error.
Solution: Call Service.
EDS110 MZI, buffer overflow Internal error.
Solution: Call Service.
EDS111 MZI, timeout Internal error.
Solution: Call Service.
EDS120 MZI, option not
available
EDS121 MZI, too much lines to
print in output text
EDS122 MZI, output can’t be
placed on document
The Endorser may not be installed.
Solution: Check parameters.
Too many lines.
Solution: Reduce the number of lines.
The coordinates are not in the valid area.
Solution: Check to be sure the alignment of the coordinates match with
the physical size of the document.
EDS123 MZI, invalid font ID There are problems with the font.
Solution: Check the font.
EDS124 MZI, invalid graphic ID There are problems with the graphic.
Solution: Check the graphic.
EDS125 MZI, invalid fixtext ID There is a problem with the fixed text.
Solution: Check the fixed text.
EDS126 MZI, invalid printing
quality
The default printing quality of the endorser or the printing quality from the
application is not valid.
Solution: Check the print quality.
4-4 A-61593 September 2007
Page 57

EDS130 MZI, invalid sequence
in document numbers
EDS131 MZI, count of printing
commands wrong
EDS132 MZI, overflow print
actions
EDS133 MZI, overflow printing
commands
EDS134 MZI, action command
too late
EDS140 MZI, error in line
processor 1
EDS141 MZI, error in line
processor 2
EDS142 MZI, overload in line
processor 1
Internal error.
Solution: Call Service.
Internal error.
Solution: Call Service.
Internal error.
Solution: Call Service.
There are too many print commands.
Solution: Reduce the number of print commands.
Internal error.
Solution: Call Service.
Internal error.
Solution: Call Service.
Internal error.
Solution: Call Service.
Problems with processor 1.
Solution: Reduce the complexity of the print commands. See the MLE
application programs guide. Contact your system administrator.
EDS143 MZI, overload in line
processor 2
Problems with processor 2.
Solution: Reduce the complexity of the print commands. See the MLE
application programs guide. Contact your system administrator.
EDS144 MZI, overload in
master processor
Internal error.
Solution: Call Service.
EDS146 MZI, error in print head 1Internal error.
Solution: Call Service.
EDS147 MZI, error in print head 2Internal error.
Solution: Call Service.
EDS150 MZI, security loop
opened
Internal error.
Solution: Call Service.
EDS151 MZI, voltage error Internal error.
Solution: Call Service.
EDS152 MZI, hardware /
logicware incompatible
EDS160 MZI, ink steering,
common error
EDS161 MZI, no ink box
available
Internal error.
Solution: Call Service.
Internal error.
Solution: Call Service.
Internal error.
Solution: Call Service.
EDS162 MZI, ink run out The ink cartridge is empty.
Solution: Replace the ink cartridge.
EDS163 MZI, ink: reference
sensor to be tested
EDS164 MZI, ink voltage sensor
error
EDS165 MZI, sensor signals too
little pressure
EDS166 MZI, sensor signals
under pressure
EDS167 MZI, a valve does not
open.
Internal error.
Solution: Call Service.
Internal error.
Solution: Call Service.
Internal error.
Solution: Call Service.
Internal error.
Solution: Call Service.
Internal error.
Solution: Call Service.
A-61593 September 2007 4-5
Page 58

EDS168 MZI, please wait: print
head cleaning
EDS170 MZI, print head
steering: common error
EDS171 MZI, print head: home
position not received
EDS172 MZI, print head position
not received
EDS173 MZI, print head motor
current error
EDS180 MZI, use lower vertical
head-position for this
document
EDS181 MZI, use horizontal
print position that fits
The print head is being cleaned.
Solution: When the print head has been cleaned, you may continue.
The ink cartridge is empty.
Solution: Replace the ink cartridge.
Internal error.
Solution: Call Service.
Internal error.
Solution: Call Service.
Internal error.
Solution: Call Service.
Print head is located above document.
Solution: Check the document height and decrease the print head
position.
Horizontal position exceeds document length.
Solution: Check the horizontal (x-) position of the print command.
with document
EDS182 MZI, use vertical print-
position that fits with
document.
EDS183 MZI, too many print
jobs
Vertical position exceeds document height.
Solution: Check the vertical (y-) position of the print command and/or
print head offset.
Too many single commands are sent to the endorser.
Solution: If possible, combine several print fields to one field separated
by blanks.
Format Module errors
FOR01 General error in parser
module
FOR02 Initialization error in
parser module
FOR03 Document was not
recognized
Internal program error.
Solution: Select another parser module in the Run Definition.
Internal program error.
Solution: Select another parser module in the Run Definition.
The operating system software could not assign a type of document.
Solution: Check the Run Definition.
Logic Module errors
LOG01 Common logic error Not exactly specified error during the handling of the assignments,
decisions and sequence control.
Solution: Check the specifications in the Run Definition.
LOG02 Error in DocDetect Not exactly specified error during the handling of the assignments,
decisions and sequence control.
Solution: Close the run and start it again.
LOG11 Batch was not
completed
The current batch did not finish.
Solution: Either delete the documents in the batch or feed the missing
documents to complete the batch.
LOG15 Unknown field used An unknown text field is used in an assignment respectively in a
decision.
Solution: Check the Run Definition.
LOG20 Item-Buffer overflow The text output is not working or is working slowly. The number of
documents scanned, but not saved, has caused an internal program
error.
Solution: Jam handling.
LOG21 Pause forced by logic
error
According to the defined logic, the Stop system field has the value of
_True. While the next “Start Feed” commands it to be reset.
Solution: Review the Document List to see why this happened.
4-6 A-61593 September 2007
Page 59

LOG22 Sequence error According to the defined sequence control, the document does not fit the
sequence.
Solution: Submit an acceptable document.
LOG32 Initialization error in
logic
While the run is open, the assignments or decisions may not relate to the
base text fields.
Solution: Check the assignments and decisions of the Run Definition.
LOG40 Pause forced by logic
order - clear pockets
LOG41 Pause forced by logic
order - pockets full
LOG50 Leaving max.
document to be
scanned: (0) in this run
Logic caused a stop.
Solution: Empty the pockets.
Logic caused a stop.
Solution: Empty the pockets.
Only 65534 documents can be scanned in one run.
Solution: Close the run, be sure you have less than 65534 documents in
the run and start again.
- please close run
LOG52 DoubleFeed detected
by logic at document
A double feed was detected.
Solution: Find the double fed document and rescan.
(1)
Control of the Operating System Software errors
NBM01 General error from
MachineManager
Undefined fields from the Machine Manager.
Solution: See what other scanner “state” messages are being
displayed.
NBM03 Pockets not empty or
machine parameter
Parameter error.
Solution: Check the Run Definition.
error
NBM04 Machine init error There is an initialization problem at the scanner interface.
Solution: Close the operating system software, turn off the scanner and
turn it back on. Then restart the software.
NBM05 Wrong parameter in
Run Definition
NBM10 Item could not taken to
Item Buffer
NBM11 Some options failed for
Doc (1)
NBM12 Actual Pocket error for
Doc (1)
No valid Run Definition.
Solution: Check the Run Definition.
The Document List is full.
Solution: Close the run and restart it.
Options such as, Gray Front, OCR1, are not executed successfully.
Solution: Refeed the document.
Destination pocket is not defined, therefore the document cannot be
identified.
Solution: Check the dimensions of the document and the Run Definition.
With secondary sorts, check the number of the effective pockets in Split.
NBM13 Document (1) has
incorrectly detected
Scanner error.
Solution: Close the run and restart.
DocData
NBM14 Missing OCR1-Data for
Doc (1)
NBM15 Missing OCR2-Data for
Doc (1)
NBM16 Missing MICR-Data for
Doc (1)
NBM17 Missing BCR-Data for
Doc (1)
NBM18 Missing Image-Data for
Doc (1)
Scanner error.
Solution: Close the run and restart.
Scanner error.
Solution: Close the run and restart.
Scanner error.
Solution: Close the run and restart.
Scanner error.
Solution: Close the run and restart.
Scanner error.
Solution: Close the run and restart.
A-61593 September 2007 4-7
Page 60

NBM19 Unexpected Textdata-
Data received for Doc
OCR2 not initialized.
Solution: Close the run and reset the scanner.
(1)
NBM20 Missing ink for encoder Ink cartridge is empty.
Solution: Change the ink cartridge.
NBM21 Missing ink for
endorser
NBM22 Wrong pocket
command Doc (1)
NBM23 Document height ({0}
mm) more than 115
mm for Doc (1)
Ink cartridge is empty.
Solution: Change the ink cartridge.
Value in the Destination field is invalid.
Solution: Check the Run Definition.
A document with a height more than 115 mm had a destination for a
small pocket.
Solution: Check the Run Definition to be sure that the assignments are
correct for large documents.
NBM24 Stop forced by logic The Stop field is set to _TRUE.
Solution: Check the Run Definition. The reason for this message is
probably displayed in the GUI_Message field.
NBM25 Destination set to
Overflow by logic for
An assignment in the Run Definition in the Destination system field is set
to w or u.
Doc (1).
NBM26 Removal of Doc (1)
and above requested
Informational. The customer logic requested a complete removal of all
documents in the tray (JAM=TRAY).
by Logic
NBM27 Can’t remove actual
tray. Doc (1) is not in
scope.
The customer logic requested a complete removal of all documents in
the tray cannot be performed (REMOVE=TRAY) because the start tray is
no longer in the scope of the item buffer. The processing will change to
standard handling (REMOVE=_TRUE).
NOTE: Be aware of the limitations of the buffer size, tray size of the logic
request (REMOVE=TRAY).
NBM28 Machine recovery
aborted. Can’t proceed.
The machine recovery was stopped before completion. The recovery of
the run failed.
Solution: Check for additional status information for the cause of the
problem.
NBM30 Endorser 1 failed for
Doc (1)
NBM31 Endorser 2 failed for
Doc (1)
NBM32 Encoder 1 failed for
Doc (1)
NBM36 Deposit data missing at
Doc (1)
NBM40 Missing image (0) data
for Doc (1)
NBM41 Paused for
synchronizing with text
output
NBM42 Paused for
synchronizing with
image output
The scanner did not endorse the document.
Solution: Refeed the document.
The scanner did not endorse the document.
Solution: Refeed the document.
The scanner did not encode the document.
Solution: Refeed the document.
The document does not have any deposit data available.
Solution: Refeed the document.
An image for a document was not delivered properly.
Solution: Scan the document using Single Feed.
The scanner paused because the text output was too slow.
Solution: Check for active processes which may not be part of the
application.
The scanner paused because the image server was too slow.
Solution: Check for active processes which may not be part of the
application.
4-8 A-61593 September 2007
Page 61

NBM43 Recovery finished.
Synchronize most
recent items with
The scanner paused because the image server was too slow.
Solution: Check for active processes which may not be part of the
application.
pocket contents
NBM44 Camera (0) lamp OK
Informational. The lamp of this camera is okay.
again
NBM45 Camera (0) lamp too
dark
NBM46 Endorser (0) ink OK
The lamp of this camera is too dark.
Solution: Check the lamp. Call Service if necessary.
Informational. There is enough ink in the ink cartridge for the endorser.
again
NBM47 Endorser (0) ink low The ink cartridge for the endorser is running low.
Solution: Change the ink cartridge.
NBM48 Endorser (0)
requested, but not
present
NBM49 Encoder requested, but
not present
The current Run Definition needs an endorser, but the endorser is not
activated.
Solution: Change the Run Definition or activate the endorser.
The current Run Definition needs an encoder, but the encoder is not
activated.
Solution: Change the Run Definition or activate the encoder.
NBM50 Image/Text output not
present for Doc (1)
NBM51 No license granted for
controlled runs
NBM52 No license granted for
capture runs
NBM53 Double feed or gap too
small or skew identified
for Doc (1)
An output file is missing.
Solution: Jam handling.
You do not have a license for controlled runs.
Solution: Check your license.
You do not have a license to capture runs.
Solution: Check your license.
Double feed or Gap Detection logic has detected a problem.
Solutions:
• Check the document thickness.
• Scanner: adjust the scanner double feed detection parameters; adjust
the feeder to solve problems with gaps.
• Operating Software: Turn off double feed detection.
NBM54 Bar code capture
requested, but not
present
The scanner hardware has no barcode module but barcode capture is
defined by the logic and the usage is not optional.
Solutions:
• Scanner: change or upgrade the scanner hardware.
• Operating Software: remove barcode usage or set to optional.
NBM55 OCR (0) capture
requested, but not
present
The scanner hardware has no OCR reading module but OCR capture is
defined by the logic and the usage is not optional.
Solutions:
• Scanner: change or upgrade the scanner hardware.
• Operating Software: remove OCR usage or set to optional.
NBM56 MICR capture
requested, but not
present
The scanner hardware has no MICR reading module but MICR capture
is defined by the logic and the usage is not optional.
Solutions:
• Scanner: change or upgrade the scanner hardware.
• Operating Software: remove MICR usage or set to optional.
NBM57 Count of auto matches
(0) exceeded for Doc
(1)
The configured number of subsequent auto matches was exceeded. The
documents were matched manually in a preceding run.
Solution:
• Check the number of auto matches in Compare Control.
• Check/adjust the parameters of parsing and compare it to prevent auto
matching.
A-61593 September 2007 4-9
Page 62

NBM58 Endorser (0):single
commands not
Single commands are not supported on all type scanners (e.g., TWAIN).
Solution: Use scanner-specific endorser actions only.
supported
NBM59 Endorser (0):error in
command line
Error during paring of endorser command line.
Solution: Check the command line.
NBM60 Pockets not empty A check on empty pockets was requested by the run configuration and a
pocket is not empty.
Solution: Clear the pockets and disable Check on empty pockets in
the run configuration.
NBM101 ScanControl: Can’t
start feed
NBM102 ScanControl: Can’t
stop feed
NBM103 ScanControl: Can’t get
parameters
NBM104 ScanControl: Can’t set
parameters
NBM105 ScanControl: Can’t set
overflow
NBM106 ScanControl: Can’t
clear track
NBM107 ScanControl: Can’t
rollback
NBM108 ScanControl: Can’t get
state
NBM109 ScanControl: Can’t set
action
NBM110 ScanControl: Can’t get
license
NBM111 Scan Control: No
command/event
Consecutive error
Solution: See the first entry in Machine Status.
Consecutive error
Solution: See the first entry in Machine Status.
Consecutive error
Solution: See the first entry in Machine Status.
Consecutive error
Solution: See the first entry in Machine Status.
Consecutive error
Solution: See the first entry in Machine Status.
Consecutive error
Solution: See the first entry in Machine Status.
Consecutive error
Solution: See the first entry in Machine Status.
Consecutive error
Solution: See the first entry in Machine Status.
Consecutive error
Solution: See the first entry in Machine Status.
Consecutive error
Solution: See the first entry in Machine Status.
No response from machine interface layer. Idle state forced by timeout.
Solution: Internal problem. Capture and send Logs.
response. Check for
scanning documents
not shown in Document
List
NBM112 Scan Control: Can’t set
machine log
The machine logging cannot be done due to an initialization error.
Solution: Check the scanner .dll file and the log parameter.
4-10 A-61593 September 2007
Page 63

Operating System Software Document List errors
NIB01 General error in Item
Buffer
NIB02 Initialization error in
Item Buffer
NIB03 High level in Item
Buffer. CPU too slow
Invalid response; incomplete definition of a text field.
Solution: Check the text field definitions.
Invalid response; incomplete definition of a text field.
Solution: Check the text field definitions.
High level of unprocessed items in the buffer.
Solution: Check whether the processor has loaded an illegal item state.
e.g., the error, no deposit data received, may also cause this problem.
NIB04 Item Buffer full The Item buffer is filled with items that have not been processed.
Solution: Internal error. There is an overrun of the high level threshold.
Run and Jam Management errors
NSO01 General error in
SortMgr
NSO02 Initialization error in
SortMgr
Non-specific internal error.
Solution: Close the operating system software and start it again.
No defined error during the opening of a run.
Solution: Try another run. Check the current Run Definition.
NSO03 No RunDef serialized The operating system software GUI and NAOMI are not compatible.
Solution: Update the operating system software.
NSO04 Error creating recovery
checkpoint
NSO05 Error destroying
recovery checkpoint
Internal error.
Solution: Call Service.
Internal error.
Solution: Call Service.
NSO06 RAM: Memory low RAM is low.
Solution: Check the RAM.
NSO07 Operation rejected by
user logic (field JAM)
NSO10 Startfeed not allowed
as (0)
NSO20 ListField (2): file not
found
The application logic does not permit RunOpen. Field JAM is set.
Solution: Check the application logic in hook OnRunOpen.
A logical jam has happened.
Solution: Jam handling.
The file with the external list for a list field could not be found.
Solution: Check the path.
NSO21 ListField (2): error (0) Error encountered when accessing the list field.
Solution: Check the list.
NSO22 DictionaryField (2): file
not found
NSO23 DictionaryField (2):
error (0)
NSO24 UserField (2): function
not found
NSO25 UserField (2): file not
found
NSO26 UserField (2):
Exception
NSO27 Field (2): overflow or
illegal operation
The file with the external dictionary for a list field could not be found.
Solution: Check the path.
Error encountered when accessing the dictionary field.
Solution: Check the list.
This function could not be found in the user dll.
Solution: Check the dll.
User DLL not found.
Solution: Check the path.
Error (Exception) while the user DLL was running.
Solution: Correct the user function.
An arithmetic overflow or an illegal operation was performed on a logic
field.
Solution: Check the input parameters of this field. Turn off Error
Handling in the operating system software configuration.
NSO28 Too many items to
delete
You want to delete too many items.
Solution: Do not delete all of the item at one time.
A-61593 September 2007 4-11
Page 64

NSO29 Recovery of terminated
run (0) completed
NSO30 UserField (2): access
error.
UserDIIWrapper.exe
Informational. Termination of the previous run has been continued
successfully by the recovery.
The wrapper process for all user fields has been terminated.
Solution: Check for ‘UserDLLWrapper.exe’ in the Task Manager. If it
does not exist, an unstable user function has terminated it.
unloaded
NSO31 UserField (2): contains
illegal characters
NSO40 Compare:Mandatory
field (2) not present in
Illegal control characters contained in data returned from a user function.
Solution: Check the User function.
A mandatory field for the compare module / configuration is not defined.
Solution: Check the logic.
logic
NSO41 Compare:Mandatory
field (2) not present in
RCT file (2)
A mandatory field for the compare module / configuration is missed in the
rct file.
Solution: Check for completeness of the rct file or deactivate field check
(see Compare options: Run Open validation on Compare fields).
NSO42 Compare:Read/Access
error RCT file (2)
The rct file cannot be read.
Solution: Check to be sure the rct file exists and that you have
permission to read/access the file. Verify that the rct file has an xml file
structure.
NSO43 Compare:Field(s) not
present in RCT file: (2)
The field is not present in any record of the rct file.
Solution: Check the usage of the Compare field or deactivate field
check (see Compare options: Run Open validation on Compare fields).
NSO44 Compare:Field(s)
inconsistent in RCT
file: (2)
The field content does not match with the Run Definition (e.g., there is no
doctype list supplied if multiple parsers are defined).
Solution: Check the usage of the Compare field or deactivate field
check (see Compare options: Run Open validation on Compare fields).
OCX Interface errors
OCX001 Machine/Module was
Solution: Turn the scanner on and restart the PC.
switched off
OCX002 Parity error Machine interface problem.
Solution: Check the connection to the scanner to be sure it is securely in
place.
OCX003 Command in this
condition not allowed
OCX004 Command with
unknown ID
OCX005 Command with
unknown parameter
Tuning problem.
Solution: Jam handling.
Internal error or unsupported function of the scanner.
Solution: Adapt definitions to the scanner.
Wrong parameter in the Run Definition.
Solution: Compare the scanner specific parameters with the current
Run Definition.
OCX006 Machine is offline The scanner has been turned off.
Solution: Turn on the scanner.
OCX007 Machine not ready There is a problem with a specific module.
Solution: Jam handling. If this error happens again, restart the operating
system software.
OCX008 Action not on selected
module
OCX009 Command came too
late
Internal error.
Solution: Reset the scanner.
Control computer overloaded.
Solution: Jam handling. If this error happens again, restart the operating
system software.
4-12 A-61593 September 2007
Page 65

OCX010 Command document
number invalid
Internal error in document processing.
Solution: Jam handling.
OCX011 Pockets not empty At least one pocket is not empty.
Solution: Check the pockets and empty them if required.
OCX012 Optic-Module does not
react
OCX013 Endorser-Module does
not react
OCX014 Encoder-Module does
not react
An optic module does not react.
Solution: Reset the scanner.
The Endorser module does not react.
Solution: Reset the scanner.
The Encoder module does not react.
Solution: Reset the scanner.
OCX015 Control does not react The machine control does not react.
Solution: Reset the scanner.
OCX016 Black and White-
Module does not react
OCX017 Gray-Module does not
react
OCX019 OCR-, MICR-, or BCR-
Module does not react
OCX020 Download memory
overflow
OCX021 Download not desired
because version does
The module for black and white images does not react.
Solution: Reset the scanner.
The module for gray images does not react.
Solution: Reset the scanner.
The OCR-, MICR- or BCR- module does not react.
Solution: Reset the scanner.
Download memory overflow.
Solution: Reset the scanner.
Version does not match.
Solution: Reset the scanner.
not match
OCX022 Error while initialization An error occurred during the initialization. See the log for more
information.
Solution: Check the settings and retry.
OCX023 Scanctrl is still running Scan Control is already running or is still running.
Solution: Wait until the running program has finished and start it again.
OCX024 Invalid parameter Invalid parameter. See the log for more information.
Solution: Wait until the program is finished running and start it again.
OCX025 Selected image is not
available
There is an image expected and the scanner is not receiving it.
Solution: Check the settings and retry.
OCX026 Unknown image type You have selected an invalid image type.
Solution: Check the settings and retry.
OCX027 Error while saving data Error occurred while saving data.
Solution: Finish the program.
OCX028 Wrong path The path is not valid. See the log for more information.
Solution: Enter the correct path.
OCX029 Command not allowed
in this state
OCX030 No document in
Internal state
The scanner received a command which is only allowed in the Idle state.
Solution: Jam handling.
The number of the document is invalid.
Solution: Jam handling.
OCX031 General error Solution: Restart the scanner.
OCX032 Communication error
with machine
OCX033 Error in machine
acknowledge
The communication with the scanner has been interrupted.
Solution: Restart the scanner.
The scanner command received something unacceptable.
Solution: Restart the scanner.
A-61593 September 2007 4-13
Page 66

OCX034 No scan license
available
OCX035 OCX-Server and
Client: Version
There is no license available.
Solution: Obtain a license and restart the scanner.
There is a version mismatch between the server and client.
Solution: Install the correct versions.
mismatch
OCX036 Fatal machine error
(StartFeed/ClearTrack
reinitializes the
The scanner has encountered a fatal error. See the log for more details.
Solution: Turn the PC and the scanner off. Wait about 15 seconds and
turn the scanner and PC back on.
machine up to 3 times
OCX037 Abort (application
should unload the
Error in the scanner control.
Solution: Restart the scanner.
OCX)
OCX038 Scanner.DLL: unknown
scanner type or invalid
Invalid scanner type.
Solution: Check the settings.
machine number
OCX039 Scanner.DLL: Internal
pipe not open
Internal error.
Solution: Restart the PC.
OCX040 Scanner.DLL: Wrong IDInternal error.
Solution: Jam handling.
OCX041 Scanner.DLL:
Buffersize insufficient
OCX042 Scanner.DLL: Invalid
operation at
Internal error.
Solution: Jam handling.
Internal error.
Solution: Jam handling.
OpenScsiId /
CloseScsiId
OCX043 Scanner.DLL: Invalid
parameter in registry
OCX044 Scanner.DLL: Registry
entry not found.
OCX045 Scanner.DLL: SCSI
read with long entry
OCX046 Scanner.DLL: SCSI
read length longer 32K
OCX047 Scanner.DLL: SCSI
read length is zero
OCX048 Doublefeed or gap too
small
Internal error.
Solution: Jam handling.
Internal error.
Solution: Jam handling.
Internal error.
Solution: Jam handling
Internal error.
Solution: Jam handling.
Internal error.
Solution: Jam handling.
A double feed has been detected or the gap between two documents is
too small.
Solution: Jam handling.
OCX049 Command too late The scanner received the command too late.
Solution: Jam handling.
OCX050 Data overhaul A data fragment for the following document was available before the data
fragment of the current document was available.
Solution: Jam handling.
OCX051 Missing data A data fragment for the document is missing.
Solution: Jam handling.
OCX052 Tried to deactivate a
module which does not
support deactivation
OCX053 Pocket command too
late
The scanner tried to deactivate a scanner module which does not
support this option.
Solution: Jam handling.
There may be a double feed or skewed document.
Solution: Refeed the document.
4-14 A-61593 September 2007
Page 67

OCX054 Too little disk space The hard disk is full.
Solution: Make disk space available.
OCX055 Container-Queue
overflow
OCX056 Error opening machine
log (COM1/COM2)
The document data is incomplete.
Solution: Jam handling.
While reading the scanner log over the serial port an error occurred. The
serial port may have been in use by another program (e.g.,
HyperTerminal) or the wrong port was selected.
Solution: Check to see whether another program is blocking the serial
port. Check the serial port connection.
OCX058 Error reading
parameter from
Parameter in ScanCtrl.ini is incorrect.
Solution: Check the parameter file.
ScanCtrl.ini
OCX059 Error: environment
Solution: Use the correct file (prosort.bat).
PS_HOME not set
OS - Optic Module errors
OSn01 Optics Parameter error Parameter error.
Solution: Check the Run Definition.
OSn02 Document too skew The document is skewed on the track.
Solution: Jam handling.
OSn03 Document too high The document height is larger than value in the Maximum height field.
Solution: Check the Run Definition.
OSn04 Document too low The document height is smaller than value in the Minimum height field.
Solution: Check the Run Definition.
OSn05 Document too long The document width is larger than value in the Maximum width field.
Solution: Check the Run Definition.
OSn06 Document too short The document height is smaller than value in the Minimum width field.
Solution: Check the Run Definition.
OSn07 Optics: document
processing has been
stopped
There are problems with the interpretation of the current document.
Solution: Process this document without double-feed detection on
(Special Feed button). If the problem persists, cancel the run and exit the
Operating System Software. Turn the scanner on and off and try again.
OSn08 Optics: compressing of
data has stopped
There are problems with the interpretation of the current document.
Solution: Process this document using the Thick Feed button. If the
problem persists, cancel the run and exit the Operating System
Software. Turn the scanner on and off and try again.
OSn09 Damaged document
edge
The damaged document could not be processed.
Solution: Capture Sort: Use a correction envelope, or use the Match
Selected Item function.
OSn10 Optics/OMAR:
Hardware board defect
Internal problem.
Solution: Call Service.
or not inserted
OSn11 Optics: Lamp too dark
or not inserted
OSn12 Optics: Software state
not correct.
There is a problem with the lamp(s).
Solution: Call Service.
Firmware error.
Solution: Call Service.
OSn13 Optics: Download error The last optic download was not successful.
Solution: Try to download the optics firmware again.
OSn14 Optics: Communication
problems between
Problems with the communication.
Solution: Call Service.
scanner and PC
A-61593 September 2007 4-15
Page 68

OSn15 Optics: Firmware error Firmware error.
Solution: Call Service.
OSn16 Optics: Action too late The Sort command for creating image was too late.
Solution: Start the feed again
OSn17 Optics: Firmware error Firmware error.
Solution: Call Service.
OSn18 Optics: Firmware error Firmware error.
Solution: Call Service.
OSn99 Optics Error, Reason
unknown
Problems with the optic module.
Solution: Call Service.
OUT - Text Output Module errors
OUT01 General error in text
output module
OUT02 Initialization error in
text output module
Error occurs during the writing of the text output.
Solution: Close the run and check the text output.
Inconsistent Sort Definition, file access error.
Solution: Check output directory. Try another sort resp. run, check the
current run definition.
OUT03 Disk for text output is
full
OUT04 Disk for text output is
low
No space is left on the disk for text output.
Solution: Delete some files.
There is not much space left on the disk for text output.
Solution: Delete some files.
OUT10 Error writing text output Internal Error
Solution: Jam handling.
OUT13 Too less disk space for
text output. Only {0}
MB free
OUT14 Disk space low for text
output. Only {0} MB
free
There may be too many trays stored on the scanner PC.
Solution: Check the disk space. Delete old trays using the Transfer
module.
There may be too many trays stored on the scanner PC.
Solution: Check the disk space. Delete old trays using the Transfer
module
4-16 A-61593 September 2007
Page 69

Additional
The following are additional troubleshooting situations that may arise.
troubleshooting
Situation Solution
General problems with the
scanner (Endorser,
Encoder, etc.) and the
specific troubleshooting
does not work
Doctype unknown in the
Document List.
The text output file contains
just the UN and blanks.
Machine is blocked. Use the Force Jam or Force Jam Handling
Machine status: Run in use The Operating System Software cannot start the
Scan module in the Context
Selection list is not
available.
1. Cancel the run, and start it again.
2. Exit the Operating System Software, and
start it up again.
If this does not work:
3. Exit the Operating System Software. Turn
the scanner off; wait about 15 seconds and
turn the scanner back on. Then restart the
computer and start the Operating System
Software again.
No Run Definition of the current run fits with the
current document.
Check the type of the document in the
Document List. If it is unknown, there may be an
error in the Run Definition.
buttons to store the processing documents
before turning off the scanner.
selected run. There may not be a suitable Run
Definition for the run.
Check the license server.
A-61593 September 2007 4-17
Page 70

5 Troubleshooting in Tools
Following is a list of error numbers, messages and corrective actions
you can take if one of the following messages is encountered.
Message Reason Solution
Refresh found {0,number,integer}
modified file(s)
Refresh found {0,number,integer}
new file(s)
Refresh deleted {0,number,integer}
old task(s)
Task “{0}” is not {1} The state of the task has changed. No error
Error Code Message Reason
Convert errors
PCE1000 Task “{0}” failed during
conversion
PCE1002 Task “{0}” failed
because free disk
space is too low: {1}
PCE1003 Task “{0}” failed
because of unknown
format
PCE1004 Task “{0}” failed
because of unknown
scope
PCE1005 Task “{0}” failed
because of unknown
compression
PCE1006 Task “{0}” failed
because of different
type definitions (AODs)
for one file
PCE1007 Task “{0}” failed
because deletion of old
files
PCE1010 Task “{0}” failed
because of invalid
output path: SHEET in
tray output
n files are modified by another
application.
There are n new files since the last
refresh.
Automatically deleting old tasks. No error
Internal error.
Solution: Save the log files of this Convert task and Scan and send
them to Service.
The available disk space on the destination disk is smaller than the
defined threshold.
Solution: Delete files on the destination disk or change the threshold
value in the Run Definition for Transfer for this destination.
The format being used is not supported.
Solution: Select another format in the Run Definition.
The scope being used is not supported.
Solution: Select another scope in the Run Definition.
The compression being used is not supported.
Solution: Select another compression in the Run Definition.
You cannot merge output of different types into one single file.
Solution: Change the AODs to use either the same type or write to
separate files.
Before a task can be reprocessed, all old output needs to be deleted.
This deletion was not possible.
Solution: Make sure the deletion of the old Convert output can be
performed (e.g., close all programs that could have open file handles to
some of those files).
File names related to a tray cannot contain the system field: SHEET.
Solution: Delete the system field SHEET in the name of the path in the
Run Definition.
No error
No error
A-61593 September 2007 5-1
Page 71

PCE1011 Task “{0}” failed
because of invalid
output path:
IMAGE_CHANNEL in
tray output
PCE1012 Task “{0}” failed
because of invalid
output path: Malformed
Symbol: {1}
PCE1013 Task “{0}” failed
because of invalid
output path: Undefined
Symbol {1}
PCE2001 Task “{0}” contains
inconsistent Scan data:
DOC_IN_TRAY not
incremented by 1 after
sheet
PCE2002 Task “{0}” contains
inconsistent Scan data:
UN not incremented by
1 after sheet {1}
PCE2003 Task “{0}” contains
inconsistent Scan data:
Not enough sheets
PCE3001 Task “{0}” references
undefined converter
class
PCE3002 Task “{0}” contains
malformed converter
class parameters
PCE4000 Task “{0}” failed
because of invalid xml
file: {1}
PCE6000 Task “{0}” failed
because of invalid
“extended” parameter:
{1}
PCN - Native Converter errors
PCN5000 Task “{0}” failed
because of error in
NativeConverter {1}
PCN5001 Task “{0}” failed
because of error in
NativeConverter {1} I/O
error
PCN5002 Task “{0}” failed
because of error in
NativeConverter {1}:
file already exists
File names related to a tray cannot contain the system field:
IMAGE_CHANNEL.
Solution: Delete the system field IMAGE_CHANNEL in the name of the
path in the Run Definition.
The Run Definition is invalid for Convert because of the wrong syntax.
Solution: Validate the Run Definition with the Convert Editor.
The Run Definition is invalid for Convert because an unknown symbol
was used.
Solution: Validate the Run Definition with the Convert Editor.
Internal error in the Scan module and its output.
Solution: Save the log files of this task of Convert and Scan and send
them to Kodak Service.
Internal error in the Scan module and its output.
Solution: Save the log files of this task of Convert and Scan and send
them to Kodak Service.
Internal error.
Solution: Export Scan data using the Convert diagnostics function and
send the file to Kodak Service for further analysis.
The defined converter class does not exist. There may be a typo in the
Converter class field of the Run Definition.
Solution: Check and correct the spelling of the Converter class field.
The syntax of the Converter class field in the Run Definition is
malformed.
Solution: Check and correct the spelling of the Converter class field.
Internal error because of a corrupt .xml file from Scan.
Solution: Analyze the log files. Save the Scan data for reproduction.
An unexpected parameter was used in some Output definition.
Solution: Correct the Run Definition regarding the “extended” fields of
the output definitions of Convert and refer to the manual for a valid
parameter.
Informational: No error; successful.
Error in file handling.
Solution: Close all programs (i.e., Viewer, etc.).
One output file already exists.
Solution: Delete this file.
5-2 A-61593 September 2007
Page 72

PCN5003 Task “{0}” failed
because of error in
NativeConverter {1}: no
Handle
PCN5004 Task “{0}” failed
because of error in
NativeConverter {1}:
init error
PCN5005 Task “{0}” failed
because of error in
NativeConverter {1}:
file is write protected
PCN5006 Task “{0}” failed
because of error in
NativeConverter {1}:
general error, see log
PCN5007 Task “{0}” failed
because of error in
NativeConverter {1}:
unsupported output
format
PCN5008 Task “{0}” failed
because of error in
NativeConverter {1}:
illegal output path
PCN5009 Task “{0}” failed
because of error in
NativeConverter {1}:
out of memory
PCN5010 Task “{0}” failed
because of error in
NativeConverter {1}: no
HWREF but PND
PCN5011 Task “{0}” failed
because of error in
NativeConverter {1}: no
license
PCN5012 Task “{0}” failed
because of error in
NativeConverter {1}:
error in BFL init
PCN5013 Task “{0}” failed
because of error in
NativeConverter {1}:
BFL already active
PCN5014 Task “{0}” failed
because of error in
NativeConverter {1}:
Exception, see log
Internal error.
Solution: Save the log files of this task in Convert and Scan and send
them to Kodak Service.
Internal error.
Solution: Save the log files of this task in Convert and Scan and send
them to Kodak Service.
File was protected.
Solution: Remove the write protection.
Internal error.
Solution: Save the log files of this task in Convert and Scan and send
them to Kodak Service.
The selected format is not available.
Solution: Use a different file output format in the Run Definition.
The path is invalid.
Solution: Use a different output path in the Run Definition.
Internal error.
Solution: Save the log files of this task in Convert and Scan and send
them to Kodak Service.
Error in the Run Definition. The format PND requires a hardware
reference number.
Solution: Correct the Run Definition.
There is no license.
Solution: Close the license server and the Operating System Software;
then restart the software.
Internal error.
Solution: Save the log files of this task in Convert and Scan and send
them to Kodak Service.
Internal error.
Solution: Save the log files of this task in Convert and Scan and send
them to Kodak Service.
Internal error.
Solution: Save the log files of this task in Convert and Scan and send
them to Kodak Service.
A-61593 September 2007 5-3
Page 73

PCN5015 Task “{0}” failed
because of error in
NativeConverter {1}:
unknown command
from client received
PCN5016 Task “{0}” failed
because of error in
NativeConverter {1}:
error sending to server
PCN5016 Task “{0}” failed
because of error in
NativeConverter {1}:
error sending to server
PCN5016 Task “{0}” failed
because of error in
NativeConverter {1}:
PCN5017 Task “{0}” failed
because of error in
NativeConverter {1}:
error creating ACI-file
PCN5018 Task “{0}” failed
because of error in
NativeConverter {1}:
error instantiating class
Convlmg
PCN5019 Task “{0}” failed
because of error in
NativeConverter {1}:
error working with
CleanUp
PCN5020 Task “{0}” failed
because of error in
NativeConverter {1}:
error working with PND
PCN5021 Task “{0}” failed
because of error in
NativeConverter {1}:
error working with BFL
PCN5022 Task “{0}” failed
because of error in
NativeConverter {1}:
error calling a
snowbound function
PCN5023 Task “{0}” failed
because of error in
NativeConverter {1}:
error working with
GraylmgEnhancement
PCN5024 Task “{0}” failed
because of error in
NativeConverter {1}:
illegal format of InputDaten
Internal error.
Solution: Save the log files of this task in Convert and Scan and send
them to Kodak Service.
Internal error.
Solution: Save the log files of this task in Convert and Scan and send
them to Kodak Service.
Internal error.
Solution: Save the log files of this task in Convert and Scan and send
them to Kodak Service.
Internal error.
Solution: Save the log files of this task in Convert and Scan and send
them to Kodak Service.
Internal error.
Solution: Save the log files of this task in Convert and Scan and send
them to Kodak Service.
Internal error.
Solution: Save the log files of this task in Convert and Scan and send
them to Kodak Service.
Internal error.
Solution: Save the log files of this task in Convert and Scan and send
them to Kodak Service.
Internal error.
Solution: Save the log files of this task in Convert and Scan and send
them to Kodak Service.
Internal error.
Solution: Save the log files of this task in Convert and Scan and send
them to Kodak Service.
Internal error.
Solution: Save the log files of this task in Convert and Scan and send
them to Kodak Service.
Internal error.
Solution: Save the log files of this task in Convert and Scan and send
them to Kodak Service.
Internal error.
Solution: Save the log files of this task in Convert and Scan and send
them to Kodak Service.
5-4 A-61593 September 2007
Page 74

PCN5025 Task “{0}” failed
because of error in
NativeConverter {1}:
error working with
Bitonal
PCN5026 Task “{0}” failed
because of error in
NativeConverter {1}:
connect with server
broken
PCN5027 Task “{0}” failed
because of error in
NativeConverter {1}:
invalid parameter:
nullptr
PCN5500 Task “{0}” failed
because of error in
NativeConverter {1}:
error working with
handle for existence
verification
PCN5501 Task “{0}” failed
because of error in
NativeConverter {1}:
server already started
PCN5502 Task “{0}” failed
because of error in
NativeConverter {1}:
error opening logfile
PCN5503 Task “{0}” failed
because of error in
NativeConverter {1}:
error instantiating class
ProConvWrap
Internal error.
Solution: Save the log files of this task in Convert and Scan and send
them to Kodak Service.
Error in ProConverSrv.
Solution: Restart the Kodak s1700 Operating System Software.
Internal error.
Solution: Save the log files of this task in Convert and Scan and send
them to Kodak Service.
Internal error.
Solution: Save the log files of this task in Convert and Scan and send
them to Kodak Service.
Internal error.
Solution: Restart the Kodak s1700 Operating System Software.
Internal error.
Solution: Save the log files of this task in Convert and Scan and send
them to Kodak Service.
Internal error.
Solution: Save the log files of this task in Convert and Scan and send
them to Kodak Service.
A-61593 September 2007 5-5
Page 75

PSE - Split errors
PSE1001 Task “{0}” failed
because RUN_DEF
undefined
PSE1002 Task “{0}” failed
because SPLIT_DEF
undefined
PSE1003 Task “{0}” failed
because VCT
undefined
PSE1011 Task “{0}” failed
because RUN_DEF not
found
PSE1012 Task “{0}” failed
because SPLIT_DEF
not found
PSE1013 Task “{0}” failed
because VCT not
found
PSE1014 Task “{0}” failed
because
SORTGROUP_DEF
not found
PSE1103 Task “{0}” failed
because VCT is invalid
PTE - Transfer errors
PTE1000 Error: Task “{0}” failed
during transfer to “{1}”
PTE1001 Error: Task “{0}”failed
because file already
exists: “{1}”
PTE1002 Error: Task “{0}” failed
because disk space is
too low for file: “{1}”
PTE1003 Task “{0}” failed
because disk space is
undefined for
destination: “{1}”
PTE1004 Task “{0}” failed
because could not
create directory
structure: “{1}”
The task file for Split does not contain the mandatory RUN_DEF field.
Solution: Create the task file by adding the missing element.
The task file for Split does not contain the mandatory SPLIT_DEF field.
Solution: Create the task file by adding the missing element.
The task file for Split does not contain the mandatory VCT field.
Solution: Create the task file by adding the missing element.
The referenced RunDef could not be found. The file may be missing or
the reference is incorrect.
Solution: Make sure the RunDef file exists and that the reference is
correct.
The referenced SplitDef could not be found. The file may be missing or
the reference is incorrect.
Solution: Make sure the SplitDef file exists and that the reference is
correct.
The referenced VCT could not be found. The file may be missing or the
reference is incorrect.
Solution: Make sure the VCT file exists and that the reference is
correct.could not be found. The file may b e missing or the reference is
incorrect.
The SORT_GROUP is not present.
Solution: Verify in Split that SORT_GROUP is set up.
The parsing of the VCT file failed because of a incorrect format.
Solution: Correct the VCT file.
General error while sending.
Solution: Check the server or destination directory to be sure it is
available and restore it if necessary. Otherwise, send the logs to Kodak
Service.
The file already exists and should not be overwritten. The file may have
already been sent or the file names of different trays are equal.
Solution: Check the definition of the files names. Delete the files on the
server and send them again.
The threshold value of the minimal free disk space is reached.
Solution: Delete the files on the destination directory or change the
threshold value.
Disk space can only be determined for mapped destinations.
Solution: Modify the destination path by using a mapped drive,
(i.e., X:\...)
Could not create the required directories on the destination disk.
Solution: Make sure that the destination can be accessed and the
correct privileges are provided to create the directories.
5-6 A-61593 September 2007
Page 76

PTE2000 Error: Registration at
EBS20 for task “{0}”
failed. “{1}”
PTE2001 Error: Registration at
EBS20 for task “{0}”
failed. “{1}”
PTE2002 Error: Registration at
EBS20 for task “{0}”
failed, because tray
already exists
PTE3000 Task “{0}” failed
because of FTP-Open
error
PTE3001 Task “{0}” failed
because of FTP_Put
Error
PTE4001 Task “{0}” failed
because of
DZV_REQUEST
_ERROR
PTE4002 Task “{0}” failed
because of DZV_
REG_ERROR
PTE4003 Task “{0}” failed
because of DZV_
REFRESH_ERROR
PTE4004 Task “{0}” failed
because of
DZV_STATUS
_ERROR
PTE4202 Task “{0}” failed
because tray already
exists
PTE4205 Task “{0}” failed
because of unknown
user
PTE5000 Task “{0}” failed
because of
STL_CONNECT_
ERROR
PTE5001 Task “{0}” failed
because of
STL_DISCONNECT_E
RROR
PTE5002 Task “{0}” failed
because of
STL_PUT_ERROR
The message is from the EBS20 system. It is displayed only in
connection with document tracking.
Solution: Send details to the EBS20 Administrator.
The message is from the EBS20 system. It is displayed only in
connection with document tracking.
Solution: Send details to the EBS20 Administrator.
The message is from the EBS20 system. The batch or at least one
document number already exists in the database.
Solution: Delete the batch in the database and send it again.
General FTP - Open-Error.
Solution: See PTN* detail messages, should be combined with this
error.
General FTP Put-Error.
Solution: See PTN* detail messages, should be combined with this
error.
General DZV Server Access error.
Solution: See PTN* detail messages, should be combined with this
error.
General DZV Server access error.
Solution: See PTN* detail messages, should be combined with this
error.
General DZV Server access error.
Solution: See PTN* detail messages, should be combined with this
error.
General DZV Server access error.
Solution: See PTN* detail messages, should be combined with this
error.
DZV Server access error: tray already present.
Solution: See PTN* detail messages, should be combined with this
error.
DZV Server access error: unknown user.
Solution: See PTN* detail messages, should be combined with this
error.
Connection error for secure transmissions.
Solution: Check access parameters.
Close/disconnect error for secure transmissions.
Solution: Check on the remote host for more information and for
completion of the transmission. Send the logs to Kodak Service.
Transfer error for secure transmission.
Solution: Check on the remote host for more information. Send the logs
to Kodak Service.
A-61593 September 2007 5-7
Page 77

PTN - Native Transfer errors
PTN1001 Task “{0}” detail error in
NativeTransfer {2}: Too
many tasks
PTN1002 Task “{0}” detail error in
NativeTransfer {2}: Out
of memory
PTN1003 Task “{0}” detail error in
NativeTransfer {2}:
Request without init.
PTN1004 Task “{0}” detail error in
NativeTransfer {2}:
Illegal handle value
PTN1005 Task “{0}” detail error in
NativeTransfer {2}: All
pages filled
PTN1006 Task “{0}” detail error in
NativeTransfer {2}:
Committed with
missing filled pages
PTN1007 Task “{0}” detail error in
NativeTransfer {2}:
Error during processing
of SendDocvAuftrag
PTN1008 Task “{0}” detail error in
NativeTransfer {2}:
Unknown status info
received
PTN1009 Task “{0}” detail error in
NativeTransfer {2}:
Error status request
PTN1010 Task “{0}” detail error in
NativeTransfer {2}:
exception, see log
PTN1011 Task “{0}” detail error in
NativeTransfer {2}:
invalid hostname
PTN1012 Task “{0}” detail error in
NativeTransfer {2}:
exception while free
mem
PTN1013 Task “{0}” detail error in
NativeTransfer {2}:
exception while request
state of a tray
PTN1014 Task “{0}” detail error in
NativeTransfer {2}: no
state for the tray
available
There are too many threads working at the same time.
Solution: Change the maximum thread count in the Run Definition.
Internal error.
Solution: Save the log files of this task in Convert and Scan and send
them to Kodak Service.
Internal error.
Solution: Save the log files of this task in Convert and Scan and send
them to Kodak Service.
Internal error
Solution: Save the log files of this task in Convert and Scan and send
them to Kodak Service.
Internal error.
Solution: Save the log files of this task in Convert and Scan and send
them to Kodak Service.
Internal error.
Solution: Save the log files of this task in Convert and Scan and send
them to Kodak Service.
Internal error.
Solution: Save the log files of this task in Convert and Scan and send
them to Kodak Service.
Internal error.
Solution: Save the log files of this task in Convert and Scan and send
them to Kodak Service.
Internal error.
Solution: Save the log files of this task in Convert and Scan and send
them to Kodak Service.
Internal error.
Solution: Save the log files of this task in Convert and Scan and send
them to Kodak Service.
Hostname invalid.
Solution: Check the hostname; change the Run Definition.
Internal error
Solution: Save the log files of this task in Convert and Scan and send
them to Kodak Service.
Internal error.
Solution: Save the log files of this task in Convert and Scan and send
them to Kodak Service.
No tray was deleted on the host; there is no new state.
Solution: Save the log files of this task in Convert and Scan and send
them to Kodak Service.
5-8 A-61593 September 2007
Page 78

PTN1015 Task “{0}” detail error in
NativeTransfer {2}: file
sizes different
PTN1016 Task “{0}” detail error in
NativeTransfer {2}:
error getting filesize of
the input file
PTN1017 Task “{0}” detail error in
NativeTransfer {2}: Init
was incorrect
PTN1018 Task “{0}” detail error in
NativeTransfer {2}:
error renaming a local
file
PTN1019 Task “{0}” detail error in
NativeTransfer {2}:
error init of class FTP
PTN1020 Task “{0}” detail error in
NativeTransfer {2}:
error FTP-connect
PTN1021 Task “{0}” detail error in
NativeTransfer {2}:error
FTP-change directory
PTN1022 Task “{0}” detail error in
NativeTransfer {2}:
invalid sourcefilename
PTN1023 Task “{0}” detail error in
NativeTransfer {2}:error
FTP-put
PTN1024 Task “{0}” detail error in
NativeTransfer {2}:error
FTP-progress
PTN1025 Task “{0}” detail error in
NativeTransfer {2}:
error FTP-get
PTN1026 Task “{0}” detail error in
NativeTransfer {2}:
error FTP-rename
PTN1027 Task “{0}” detail error in
NativeTransfer {2}:
error FTP-findfirst
PTN1028 Task “{0}” detail error in
NativeTransfer {2}:
error FTP-findnext
PTN1029 Task “{0}” detail error in
NativeTransfer {2}:
error FTP-delete
PTN1030 Task “{0}” detail error in
NativeTransfer {2}:
invalid values for FTPquery
The size of the file that was sent is different from the original.
Solution: Retry the transfer.
Internal error.
Solution: Save the log files of this task in Convert and Scan and send
them to Kodak Service.
Internal error.
Solution: Save the log files of this task in Convert and Scan and send
them to Kodak Service.
The file may have been opened by a viewer.
Solution: Close the viewer.
Internal error.
Solution: Save the log files of this task in Convert and Scan and send
them to Kodak Service.
Wrong user name, wrong hostname, no connection.
Solution: Check the connection and the Run Definition.
Directory does not exist.
Solution: Create the directory on the host or change the Run Definition.
Error in the Run Definition.
Solution: Change the Run Definition.
No connection.
Solution: Check the connection.
No connection.
Solution: Check the connection.
No connection.
Solution: Check the connection.
Internal error.
Solution: Save the log files of this task in Convert and Scan and send
them to Kodak Service.
Internal error.
Solution: Save the log files of this task in Convert and Scan and send
them to Kodak Service.
Internal error.
Solution: Save the log files of this task in Convert and Scan and send
them to Kodak Service.
The file is “read only”. You may not have permission to “write” to this file.
Solution: Change the file attributes and check the permissions.
Internal error.
Solution: Save the log files of this task in Convert and Scan and send
them to Kodak Service.
A-61593 September 2007 5-9
Page 79

PTN1031 Task “{0}” detail error in
Native transfer {2}:
invalid values for FTPtimeout
PTN1032 Task “{0}” detail error in
Native transfer {2}:
error socket-connect
PTN1033 Task “{0}” detail error in
Native transfer {2}:
error socketcommunication
PTN1034 Task “{0}” detail error in
Native transfer {2}:
error internet-open
PTN1035 Task “{0}” detail error in
Native transfer {2}:
error input/output
PTN1036 Task “{0}” detail error in
Native transfer {2}:
invalid parameter:
nullptr
PTW - Transfer warnings
PTW0001 Warning: There are no
destinations defined for
task “{0}”
PTW2000 Warning: Optional
Registration at EBS20
for task “{0}” failed. {1}
PTW2001 Warning: Optional
Registration at EBS20
for task “{0}” failed. {1}
PTW2002 Warning: Optional
Registration at EBS20
for task “{0}” failed,
because tray already
exists.
A timeout has occurred.
Solution: Check the connection with the host.
Internal error.
Solution: Save the log files of this task in Convert and Scan and send
them to Kodak Service.
Internal error.
Solution: Save the log files of this task in Convert and Scan and send
them to Kodak Service.
Internal error.
Solution: Save the log files of this task in Convert and Scan and send
them to Kodak Service.
Internal error.
Solution: Save the log files of this task in Convert and Scan and send
them to Kodak Service.
Internal error.
Solution: Save the log files of this task in Convert and Scan and send
them to Kodak Service.
The Run Definition does not contain a copy order. This is not typical.
Solution: If you want to send, add a copy order to the Run Definition.
Error message from EBS20 System. This error is displayed only in
connection with document tracking.
Solution: Send details to the EBS20 Administrator.
Error message from EBS20 System. This error is displayed only in
connection with document tracking.
Solution: Send details to the EBS20 Administrator.
Error message from EBS20 System. The batch, or at least one
document number, already exists in the database.
Solution: Delete the batch in the database and send it again.
5-10 A-61593 September 2007
Page 80

PXE - Tools errors
PXE0001 Error: Task file “{0}” is
not valid.
PXE0002 Error: RunDef “{0}” for
Task “{1}” not found
PXE0003 Error: Task file “{0}” this
file was not found “{1}”
PXE0004 Recovery of task file
“{0}” failed
PXE0005 Task file “{0}” is
unreadable (invalid xml
file)
PXW - Tools errors
PXW0001 Warning: task filename
“{0}” not matching to ID
“{1}”
PXW0002 Warning: Deleting of
Task “{0}” failed
PXW0003 Deleting of Task “{0}
finished incompletely
The xml file is not correct or its contents do not correspond to the
specification.
Solution: Correct the error in the program by creating the task file (e.g.,
application for Split/Scan, Convert for Transfer).
The Run Definition referenced in the task file could not be found.
Solution: Copy the file with the Run Definition (*.rud.xml) to the defdirectory.
The file is missing. It may have been deleted by mistake.
Solution: Make the file available (e.g., by rescanning or copying the Run
Definition).
The renaming or deletion of broken task files failed.
Solution: Analyze the task directory of Convert and Tools.log or .zip it
and send it to Kodak Service.
Internal error.
Solution: Send the task file to Kodak Service.
File name does not correspond to the file intern ID.
Solution: Correct the error in the program creating the task file (e.g.,
application for Split/Scan, Convert for Transfer).
Internal error or problems with the access permission.
Solution: Check the logs and try to delete the task later.
The task is only partially deleted.
Solution: Forward the logs to Kodak Service.
A-61593 September 2007 5-11
Page 81

Appendix A Table Properties and Global Fields
This appendix provides information regarding the Table Properties and
Global fields. There are three global fields — Date, Time and State.
Additional fields (columns) can be added to the Document List via the
Table Properties dialog box.
To access the Table Properties dialog box:
1. From the main Scan window, place your cursor on a document in
the Document List and right-click the mouse button.
2. Click Table Properties.
The Table Properties dialog box will be displayed.
A-61593 September 2007 A-1
Page 82

3. You can add or remove any of the column names you want to
display on the Document List. When you have all the column names
you wish to display in the Visible Column list, click Accept.
4. Arrange and resize the columns as you want them.
5. Select View>Layout>Freeze Layout.
A-2 A-61593 September 2007
Page 83

Table Properties
Column descriptions
Field Name Description
BCR_DATA Data from the barcode module. The following information will be displayed:
Value; Type; x-position; y-position; height and width.
CMPSTATE_INTERNAL The internal state of a document used by ProScan.
CTRL_RUNS_CURRENT Number of the current run of a fine sort.
CTRL_RUNS_TOTAL Number of runs of a fine sort.
DESTINATION Requested (destination) pocket of the document. The RCT-file in a secondary run
must contain the field Destination if the operating system software has to monitor the
sequence in the pockets.
DOC_HEIGHT Height of the document in tenths of a millimeter.
DOC_IN_TRAY Serial counter for documents within a tray.
DOC_LENGTH Length of the document in tents of a millimeter.
DOC_STATE The state of the document:
•OK
•IS_DELETED
• SHOULD_BE_DELETED
This field is not available when the scanner is in the Active state.
DOC_STATE_INTERNAL The internal state of a document used by ProScan.
DOC_THICK_AVERAGE Measured averaged thickness of a processed document.
DOC_THICK_MAX Maximum thickness of the document.
DOC_THICK_MIN Minimum thickness of the document.
DOC_TYPE Name of the physical type of the document in the definition of the parser.
DOC_TYPES_LOGICAL Names of the logical document definitions of this document.
DOUBLE_FEED If you set the value of this field to _TRUE, you will cause a jam with the scanner state
of “double feed”
ENC_DATA Text to be written by the encoder.
END1_DATA Text to be written by the endorser 1.
END2_DATA Text to be written by the endorser 2.
ENDTRAY If you set this value to _TRUE, the current tray will be closed.
GUI_MESSAGE A message displayed as a dialog box after the scanner has stopped. If the text starts
with [MODAL], this dialog box is switched to modal.
HOSTNAME TCP/IP host name.
JAM If you set its value to _TRUE, the scanner will provoke a logical jam.
MACHINE Type of the scanner (e.g., SC100HC)
MACHINE_NUM Number of the scanner. This field is equal to SCANNERID.
MANUAL_DEPOSITED If you use the No Jam function to set a document OK,? the value of this field will be 1
for this document. The default is 0.
MANUAL_MATCHED This field is for controlled runs only. The default is 0. If you use Match selected item
or Create selected item to process this document, the value of this field will be
incremented.
MICR_DATA Data from the MICR reading module.
NEWTRAY This field manages initiating tray changes.
The following table provides the available Column fields and their
meaning.
MUST_BE _DELETED
A-61593 September 2007 A-3
Page 84

Field Name Description
OCR1_DATA Data from the OCR reading module 1.
OCR2_DATA Data from the OCR reading module 2.
OCRMICR_DATA The Merge codelines before parsing options is used in the merge window. This
means that the codelines are merged and then parsed. This merge is then stored in
the system field OCRMICR_DATA.
OPTIONSSTATUS This field contains the required and done option actions in a specially coded manner.
POCKET Actual pocket of the document.
PSN This is a unique sequence number within the operating system software. The PSN
increments for each captured document.
RCT This field exists in controlled runs only.
• If a document has been successfully matched, this field contains the number of the
entry in the RCT file.
• If a document has not be successfully matched, this field contains 0.
REMOVE If you assign a value of:
• _TRUE, the current document gets the state MUST_BE_DELETED.
• TRAY, all sheets of this tray get the state MUST_BE_DELETED. If the first
document entering this tray is not in the document list, i.e., it cannot be deleted, the
handling will be: REMOVE=_TRUE and the scanner will stop with the machine
state, [NBM27] Can’t remove actual tray. Doc (1) is not in the scope. The
scanner will stop with the machine state, NBM26 Remove of Doc (1) and above
requested by Logic.
RUN Ascending number of the run instance.
RUN_ID This field exists in controlled runs only. It contains the prefix of the file name of the
task file and value of the tag ID in the task file.
RUN_STATE States of the run:
• OPEN: state of the run form OnRunOpen to OnRunClose.
• RECOVERY: this state is set in the recovery mode until StartFeed or until the end of
the machine recovery. Afterwards the state of the run will change to OPEN. If the
hook RunOpen fails in the recovery mode, the run state RECOVERY will be set in
the hook OnRunClose as well.
• CLOSE: state of the run after using the Finish Run button.
• CANCEL: state of the run after using the Cancel Run button if the last tray was
closed.
• CANCEL_TRAY: state of the run after using the Cancel Run button if the last tray
was not closed.
Use the system field RUN_STATE you need to undo the state-based actions in the
user fields. For example:
• The tray was registered externally but cancelled later.
• Suppression of the input dialog during recovery.
• Special handling of the user logic during recovery, e.g., multiple registrations can be
tolerated or prevented.
SCANNERID The ID number of the machine. This field is equal to MACHINE_NUM.
STOP If you sets this value to _TRUE, the scanner will stop. This is a global field.
SYSDATE System date in the format: jjjj-mm-dd. This is a global field, therefore, it cannot be
written to the output.
SYSTIME System date in the format: hhmmss. This is a global field, therefore, it cannot be
written to the output.
TRAY 7-digit serial counter for trays.
A-4 A-61593 September 2007
Page 85

Field Name Description
TRAY_STATUS The value of this field is:
• MANUAL: if this tray was closed manually (you used Next Tray or Finish Run, no
automatic tray change).
• MANUAL FORCED: if the tray was closed although the batch was not complete.
UN Unique Number. This is the unique serial number for the application. The UN
increments for each document with the state OK and is reset during jam clearing (so
the UN does not have gaps).
Format: jjdddmmmmnnnnnnn
• jj: year (2 digits)
• ddd: Julian date
• mmmm: machine number (system field: MACHINE_NUM)
• nnnnnnn: serial counter for documents (7 digits)
USERACCOUNT Name of the account of the user.
USERNAME Name of the user.
A-61593 September 2007 A-5
Page 86

 Loading...