

Page 1

. . . . . . . . . . . . . . . . . . . . . . . . . . . . .
. . . . . . . . . . . . . . . . . . . . . . . . . . . . .
. . . . . . . . . . . . . . . . . . . . . . . . . . . . .
User’s Manual
KODAK Professional
RFS 3570 Film Scanner
© Eastman Kodak Company, 1997.
This manual and the accompanying software are protected by United States and international
copyright laws. You may make one backup copy of the enclosed software and one copy of this
manual. Do not make additional copies of the software or copies of the manual or electronically
transmit them in any form whatsoever, in whole or in part, without the prior written permission
of Eastman Kodak Company.
Page 2

. . . . . . . . . . . . . . . . . . . . . . . . . . . . .
ii
Page 3
. . . . . . . . . . . . . . . . . . . . . . . . . . . . .
Important Safeguards and
Precautions
WARNING: To prevent fire or shock hazard, do not expose unit to rain
or moisture.
CAUTION
RISK OF ELECTRIC
SHOCK DO NOT OPEN
CAUTION: TO REDUCE THE RISK
OF ELECTRIC SHOCK, DO NOT
REMOVE COVER. NO USERSERVICEABLE PARTS INSIDE.
REFER SERVICING TO QUALIFIED
SERVICE PERSONNEL.
Read Instructions — Read all the safety and operating instructions
before operating the unit.
Retain Instructions and Packing Materials — Retain the safety and
operating instructions for future reference. Retain the packing case for
use if the equipment must be shipped.
Heed Warnings — Heed all warnings on the equipment and in the
operating instructions.
Follow Instructions — Follow all operating and use instructions.
Controls — Adjust only those controls that are covered by the operating instructions.
iii
Page 4

. . . . . . . . . . . . . . . . . . . . . . . . . . . . .
Cleaning — Unplug the unit before cleaning. Clean only the outside
cabinet with a damp cloth. Do not use liquid cleaners or aerosol
cleaners.
Attachments — Do not use attachments that are not recommended.
The use of such attachments may cause hazards and serious damage
to the equipment.
WARNING: Water and Moisture — Do not use the equipment near
water — for example, near a sink, or in a wet room or basement, etc.
Do not expose the unit to rain or moisture and do not immerse the
equipment in water or other liquids; contact Kodak for servicing if this
occurs.
Dust — Excessive dust levels may damage internal parts. Be certain to
cover the scanner with the supplied dust cover whenever the scanner
is off. Because dust can build up in the scanner and affect image
quality, we recommend that you follow the procedure at the beginning of each work session that is described at the end of “Appendix
C — Trouleshooting.” Doing so will help to ensure that you remove
dust buildup before scanning.
Power Sources — You should operate the unit only from the type of
power source indicated on the back of the unit. If you are not sure of
the type of power supply that will be used, consult a dealer or local
power company.
Replaceable Fuse — There is one replaceable fuse in the unit. Be sure
that the fuse meets the power requirements listed on the fuse-rating
label on the unit.
Grounding — The unit is equipped with a three-wire grounding-type
plug with a third (grounding) pin. The three-wire plug will fit into a
grounding-type power outlet. This is a safety feature. If you are unable
to insert the plug into an outlet, contact an electrician to replace the
obsolete outlet. Do not defeat the safety purpose of the grounding-type
plug.
iv
Page 5

. . . . . . . . . . . . . . . . . . . . . . . . . . . . .
Power-Cord Protection — Route power-supply cords so that they are
not likely to be walked on or pinched by items placed on or against
them; pay particular attention to cords at plugs, receptacles, and the
point where they leave the unit.
Operating Range — If the Scanner has been stored or transported
outside its operating ambient temperature range (refer to
“Appendix J — Specifications”), allow it to return to within its operating range before turning it on.
Lightning — For added protection of the equipment during a lightning
storm, or any time when you will leave the equipment unattended
and unused for long periods of time, unplug the unit from the power
outlet. This will protect the equipment from damage caused by
lightning or power-line surges.
Overloading — Do not overload power outlets and extension cords;
this can result in a risk of fire or electric shock.
Object or Liquid Entry — Never push foreign objects of any kind into
the equipment openings. Never spill liquid of any kind on the equipment; contact Kodak for servicing if this occurs.
Servicing — Do not attempt to service the unit yourself, except to
change the fuse (see instructions in “Appendix E — Replacing the
Fuse”). Opening or removing covers may expose you to dangerous
voltage or other hazards.
Damage Requiring Service — Unplug the unit from the wall outlet
and refer all servicing to the manufacturer under the following conditions. (Refer to “Appendix B — Warranty” for additional information.)
– When the power-supply cord or plug is damaged (send cord
only). Power cords are available as a spare part; refer to
“Appendix I — Optional Equipment & Spare Parts List.”
– If liquid has been spilled or if objects have fallen into the equip-
ment.
v
Page 6

. . . . . . . . . . . . . . . . . . . . . . . . . . . . .
– If the equipment has been exposed to rain or water.
– If the unit does not operate normally according to the operating
instructions.
– If the unit has been dropped or the housing has been damaged.
– When the equipment exhibits a distinct change in performance.
Accessories — Do not place the unit on an unstable cart, stand,
bracket, or table. It can fall, causing serious injury to persons and
serious damage to the unit. Use only with a stable cart, stand, bracket,
or table.
Handling — Handle the equipment with care; do not drop the equipment.
CAUTION: To prevent fire or shock hazard, use only the recommended accessories or attachments.
Electromagnetic Emissions
This equipment has been tested and found to comply with the limits for a
Class A digital device pursuant to Part 15 of the FCC Rules. These limits
are designed to provide reasonable protection against harmful interference when the equipment is operated in a commercial environment. This
equipment generates, uses, and can radiate radio frequency energy and, if
not installed and used in accordance with the instruction manual, may
cause harmful interference to radio communications. Operation of this
equipment in a residential area is likely to cause harmful interference, in
which case the user will be required to correct the interference at his or
her own expense.
This equipment conforms with the requirements of European Standard
EN55022 with respect to radio interference for a Class A device.
vi
Page 7

. . . . . . . . . . . . . . . . . . . . . . . . . . . . .
Le présent appareil numérique n’émet pas de bruits radioélectriques
dépassant les limites applicables aux appareils numériques de la classe A
prescrites dans le règlement sur le broullage radioélectrique édicté par le
Ministère des Communications du Canada.
This digital apparatus does not exceed the Class A limits for radio noise
emissions from digital apparatus set out in the radio interference regulations of the Canadian Department of Communications.
vii
Page 8

. . . . . . . . . . . . . . . . . . . . . . . . . . . . .
Technical Assistance
Refer to the following sources for assistance if you have questions as you
work with the Scanner.
If you encounter difficulties with hardware, with scanned images or
with product performance, refer to “Appendix C — Troubleshooting.”
If you notice circular shaped objects in scanned images — like water
spots or bubbles — be certain that you follow the procedure at the
beginning of each work session that is described at the end of “Appendix C — Troubleshooting.” Doing so will help to ensure that you
remove dust buildup before scanning.
If a message appears on the computer screen that you do not understand, refer to “Appendix D — Messages from KODAK Drivers.”
If you need other assistance from this manual, refer to the “Contents”
and the “Index.”
If you are unable to find answers from this manual, contact your
dealer.
If you are a customer in the United States and you are unable to find
answers to your questions using this manual or from you dealer, call
Kodak at 1-800-CD-KODAK.
If you are a customer in Canada and you are unable to find answers to
your questions using this manual or from your dealer, call Kodak at 1800-465-6325.
If you are a customer outside the United States or Canada and you are
unable to find answers to your questions using this manual, contact
your local Kodak representative for technical assistance.
viii
Page 9

. . . . . . . . . . . . . . . . . . . . . . . . . . . . .
Contents
1 Introduction 1-1
2 Before You Begin — Macintosh Computer 2-1
Required Hardware 2-2
Computer 2-2
Monitor 2-2
Display Card 2-2
Required Software 2-3
Optional Printers 2-4
3 Installation
(Hardware and Software) — Macintosh Computer 3-1
Installing the Scanner Hardware 3-2
Connecting the Scanner to a Power Source 3-2
Connecting the Scanner to Your Computer 3-3
If No External SCSI Devices Are Connected 3-5
If External SCSI Devices Are Connected 3-9
Setting the Scanner SCSI Identification Number 3-19
Installing the KODAK Driver for Adobe Photoshop Software (Macintosh) 3-21
ix
Page 10

. . . . . . . . . . . . . . . . . . . . . . . . . . . . .
4 Loading the Film and Slide Holders — Macintosh Computer 4-1
Loading 35 mm Film and Slides 4-2
Loading 35 mm Film into the 35 mm Film Holder 4-2
Loading 35 mm Slides into the Slide Holder 4-3
Loading 35 mm Film and Slide Holders into the Scanner 4-4
Loading Film Sizes Other Than 35 mm 4-8
Loading Film into the Film Holder 4-8
Loading Film Holders (Other Than 35 mm Sizes) into the Scanner 4-10
5 Using the KODAK Driver for Adobe Photoshop Software —
Macintosh Computer 5-1
Displaying the KODAK Driver Window 5-3
Producing Scanned Images 5-5
Loading the Film Holder 5-5
Operating the KODAK Driver 5-6
Set the Film Type 5-6
Set the Film Size 5-6
PreScan the Image (and Calibrate the Scanner) 5-6
Change the Magnification Adjustment 5-12
PreScan the Image Again 5-14
Select the Image 5-15
Set Auto Balance 5-16
Rotate the Image 5-16
Sharpen the Image 5-16
Set the Image to Black and White 5-17
Focus the Image 5-17
Change Color Levels 5-18
Change Brightness 5-19
x
Page 11

. . . . . . . . . . . . . . . . . . . . . . . . . . . . .
Change Contrast 5-20
Choose the Resolution 5-20
“Crop” the Image 5-21
Scan the Image into Photoshop 5-21
Scan Additional Images 5-23
Turning Off the Scanner 5-24
Reference: Buttons and Indicators 5-25
6 Before You Begin — PC 6-1
Required Hardware 6-2
Computer 6-2
Display 6-2
Display Card (Graphics Adapter) 6-2
SCSI Interface 6-2
Required Software 6-3
Optional Printers 6-4
7 Installation
(Hardware and Software) — PC 7-1
Installing the Scanner Hardware 7-2
Connecting the Scanner to a Power Source 7-2
Installing a SCSI Host Adapter 7-3
For Qualified Technical Personnel Only 7-3
Connecting the Scanner to Your Computer 7-4
If No External SCSI Devices Are Connected 7-5
If External SCSI Devices Are Connected 7-9
Setting the Scanner SCSI Identification Number 7-19
KODAK TWAIN Driver 7-21
Installing TWAIN Compliant KODAK Driver 7-22
xi
Page 12

. . . . . . . . . . . . . . . . . . . . . . . . . . . . .
8 Loading the Film and Slide Holders — PC 8-1
Loading 35 mm Film and Slides 8-2
Loading 35 mm Film into the 35 mm Film Holder 8-2
Loading 35 mm Slides into the Slide Holder 8-3
Loading 35 mm Film and Slide Holders into the Scanner 8-4
Loading Film Sizes Other Than 35 mm 8-8
Loading Film into the Film Holder 8-8
Loading Film Holders (Other Than 35 mm Sizes) into the Scanner 8-10
9 Using KODAK Driver with Windows Applications — PC 9-1
Using a KODAK Driver for TWAIN Compliant PC Applications 9-3
Adobe Photoshop 2.5 and 3.0 for Windows 9-4
Producing Scanned Images 9-6
Loading the Film Holder 9-6
Operating the KODAK Driver 9-7
Set the Film Type 9-7
Set the Film Size 9-7
PreScan the Image (and Calibrate the Scanner) 9-7
Change the Magnification Adjustment 9-13
PreScan the Image Again 9-15
Select the Image 9-15
Set Auto Balance 9-16
Rotate the Image 9-17
Sharpen the Image 9-17
Set the Image to Black and White 9-17
Focus the Image 9-17
Change Color Levels 9-19
Change Brightness 9-20
xii
Page 13

. . . . . . . . . . . . . . . . . . . . . . . . . . . . .
Change Contrast 9-20
Choose the Resolution 9-20
“Crop” the Image 9-21
Scan the Image 9-22
Scan Additional Images 9-23
Turning Off the Scanner 9-24
Reference: Buttons and Indicators 9-25
10 Appendices 10-1
Appendix A — Software License Agreement A-1
Appendix B — Warranty B-1
Appendix C — Troubleshooting C-1
Appendix D — Messages from KODAK Drivers D-1
Appendix E — Replacing the Fuse E-1
Appendix F — Updating the KODAK Driver F-1
Appendix G — Repacking Instructions G-1
Appendix H — Problem Report Form H-1
Appendix I — Optional Equipment & Spare Parts List I-1
Appendix J — Specifications J-1
Appendix K — Glossary K-1
11 Index 11-1
xiii
Page 14

Page 15

. . . . . . . . . . . . . . . . . . . . . . . . . . . . .
. . . . . . . . . . . . . . . . . . . . . . . . . . . . . .
. . . . . . . . . . . . . . . . . . . . . . . . . . . . . . .
. . . . . . . . . . . . . . . . . . . . . . . . . . . . . . . .
1
Introduction
The KODAK Professional RFS 3570 Film Scanner combines high resolution, high speed, and scanning of a variety of film formats from 35 mm to
70 mm (RFS “3570”), in one easy-to-operate desktop scanner.
Once you’ve scanned the image (color negative, color transparency, or
black-and-white negative) you can view it as a color or monochrome
image.
The Scanner works by flashing a filtered (red, green, blue) strobe through
your image against a Charge Coupled Device (CCD). The Scanner provides 6 million pixels per scan — crisp images of 3072 pixels wide by
2048 pixels high.
IntroductionG1-1
Page 16

. . . . . . . . . . . . . . . . . . . . . . . . . . . . .
The features of the Scanner include:
Fast scanning speed.
Quick and easy loading of film—no position adjustments are required.
User-selectable autofocus.
High quality analog-to-digital conversion with 12 bits per RGB color.
Automatic color balance with manual fine-tuning.
User-selectable image sharpening.
Ultra-fast image preview.
Support for a variety of film sizes from 35 mm to 70 mm.
Support for a large variety of film types.
A variety of scanning resolutions.
Automatic calibration.
Magnification adjustments that allow you to optimize the area of the
imager used for your scan.
A KODAK Driver plug-in for Adobe Photoshop (Macintosh Computer).
A KODAK TWAIN Driver that provides access to the Scanner for the
growing number of TWAIN compliant PC applications (PC only).
Support for SCSI host adapters including ASPI Windows host adapters
such as those from Adaptec, Inc. running EZ-SCSI 4.01 or later
(PC only).
If your computer has a video card that supports 24-bit color, the image is
displayed in full color (16.8 million colors) on your monitor. If your video
card supports only 8-bit color, the image is displayed in 256 dithered
colors. If you are using a black-and-white system, the image displays in
black-and-white. Regardless of the monitor you use, the quality of the
scan (in 24-bit color) is not affected. In all cases the best possible image
supported by your hardware is displayed on your monitor.
1-2Introduction
G
Page 17

. . . . . . . . . . . . . . . . . . . . . . . . . . . . .
The KODAK Drivers are used to capture images from the scanned film
(negative or positive), and open that image data in a window in your
supported image editing software. You can then edit images and save
them as files on your computer hard disk.
NOTE: You may be able to use the Scanner on other computer platforms or with
additional operating systems, using drivers prepared by companies other than
Kodak, or by developing your own driver. Contact Kodak for information.
IntroductionG1-3
Page 18

Page 19

. . . . . . . . . . . . . . . . . . . . . . . . . . . . .
. . . . . . . . . . . . . . . . . . . . . . . . . . . . . .
. . . . . . . . . . . . . . . . . . . . . . . . . . . . . . .
. . . . . . . . . . . . . . . . . . . . . . . . . . . . . . . .
2
Before You Begin —
Macintosh Computer
NOTE: Before you continue, complete and submit the enclosed Warranty Registration card. You should also read “Appendix A — Software License Agreement”
and “Appendix B — Warranty.”
Check the following lists to ensure that you have the appropriate hardware
and software.
Before You Begin — Macintosh ComputerG2-1
Page 20

. . . . . . . . . . . . . . . . . . . . . . . . . . . . .
Required Hardware
Computer
Apple Macintosh Computer that: supports 32-Bit QuickDraw software;
has at least 8 megabytes (MB) random access memory (RAM) installed (32
MB RAM or more is recommended for fastest scan times); has 80 MB of
free space on its hard disk. Adobe Photoshop requires three to five times
the size of the scanned image file in combined hard disk space and RAM.
NOTE: Adobe Photoshop 3.0, when run on a Power Macintosh, needs a minimum of 16 MB of RAM (including at least 11 MB of RAM in addition to the
memory used by the operating system), and recommends 24 MB of RAM.
Monitor
Apple Macintosh or compatible monitor, 13” or greater (with a minimum
640 x 480 pixel screen size). A high-quality color monitor displays the
best image. (The quality of the scan is not affected by the monitor in use.)
Display Card
Use the appropriate display card for the monitor to be used; we recommend an 8-bit or, preferably, 24-bit video display card. (The built-in video
capability supplied with some Macintosh Computers may be sufficient.)
2-2Before You Begin — Macintosh Computer
G
Page 21

. . . . . . . . . . . . . . . . . . . . . . . . . . . . .
Required Software
Apple System software 7.0, 7.1, 7.1.2, or 7.5 to 7.5.3 and 32-bit
QuickDraw. Consult your Apple manuals for installation instructions
if this software is not already installed. (If you are using System 7.0 or
System 7.0.1 you should use the System Tuner version 1.1.1, or
consider upgrading to System 7.1 or 7.5; otherwise you may experience system crashes and/or lose folders or files from your hard disk.)
Adobe Photoshop software version 2.0, 2.5, or 3.0 to 3.0.5, and 4.0.
Before You Begin — Macintosh ComputerG2-3
Page 22

. . . . . . . . . . . . . . . . . . . . . . . . . . . . .
Optional Printers
Suggested printers for use with the scanner appear in “Appendix I —
Optional Equipment & Spare Parts List.” In the United States, contact
Kodak at 1-800-CD-KODAK for detailed information on printer options
and accessories and to obtain ordering catalog numbers; in Canada call 1800-465-6325, and elsewhere outside the United States contact your
local Kodak representative.
2-4Before You Begin — Macintosh Computer
G
Page 23

. . . . . . . . . . . . . . . . . . . . . . . . . . . . .
. . . . . . . . . . . . . . . . . . . . . . . . . . . . . .
. . . . . . . . . . . . . . . . . . . . . . . . . . . . . . .
. . . . . . . . . . . . . . . . . . . . . . . . . . . . . . . .
3
Installation
(Hardware and Software) —
Macintosh Computer
Follow the steps in this section to —
Install the Scanner.
Install the KODAK Driver for Adobe Photoshop Software.
Installation (Hardware & Software) — Macintosh ComputerG3-1
Page 24
. . . . . . . . . . . . . . . . . . . . . . . . . . . . .
Installing the Scanner Hardware
Follow these instructions to connect the Scanner to a power source, to
connect the Scanner to your computer, and to set the Scanner SCSI
Identification number.
Connecting the Scanner to a Power Source
Follow these steps to connect your Scanner to a power source:
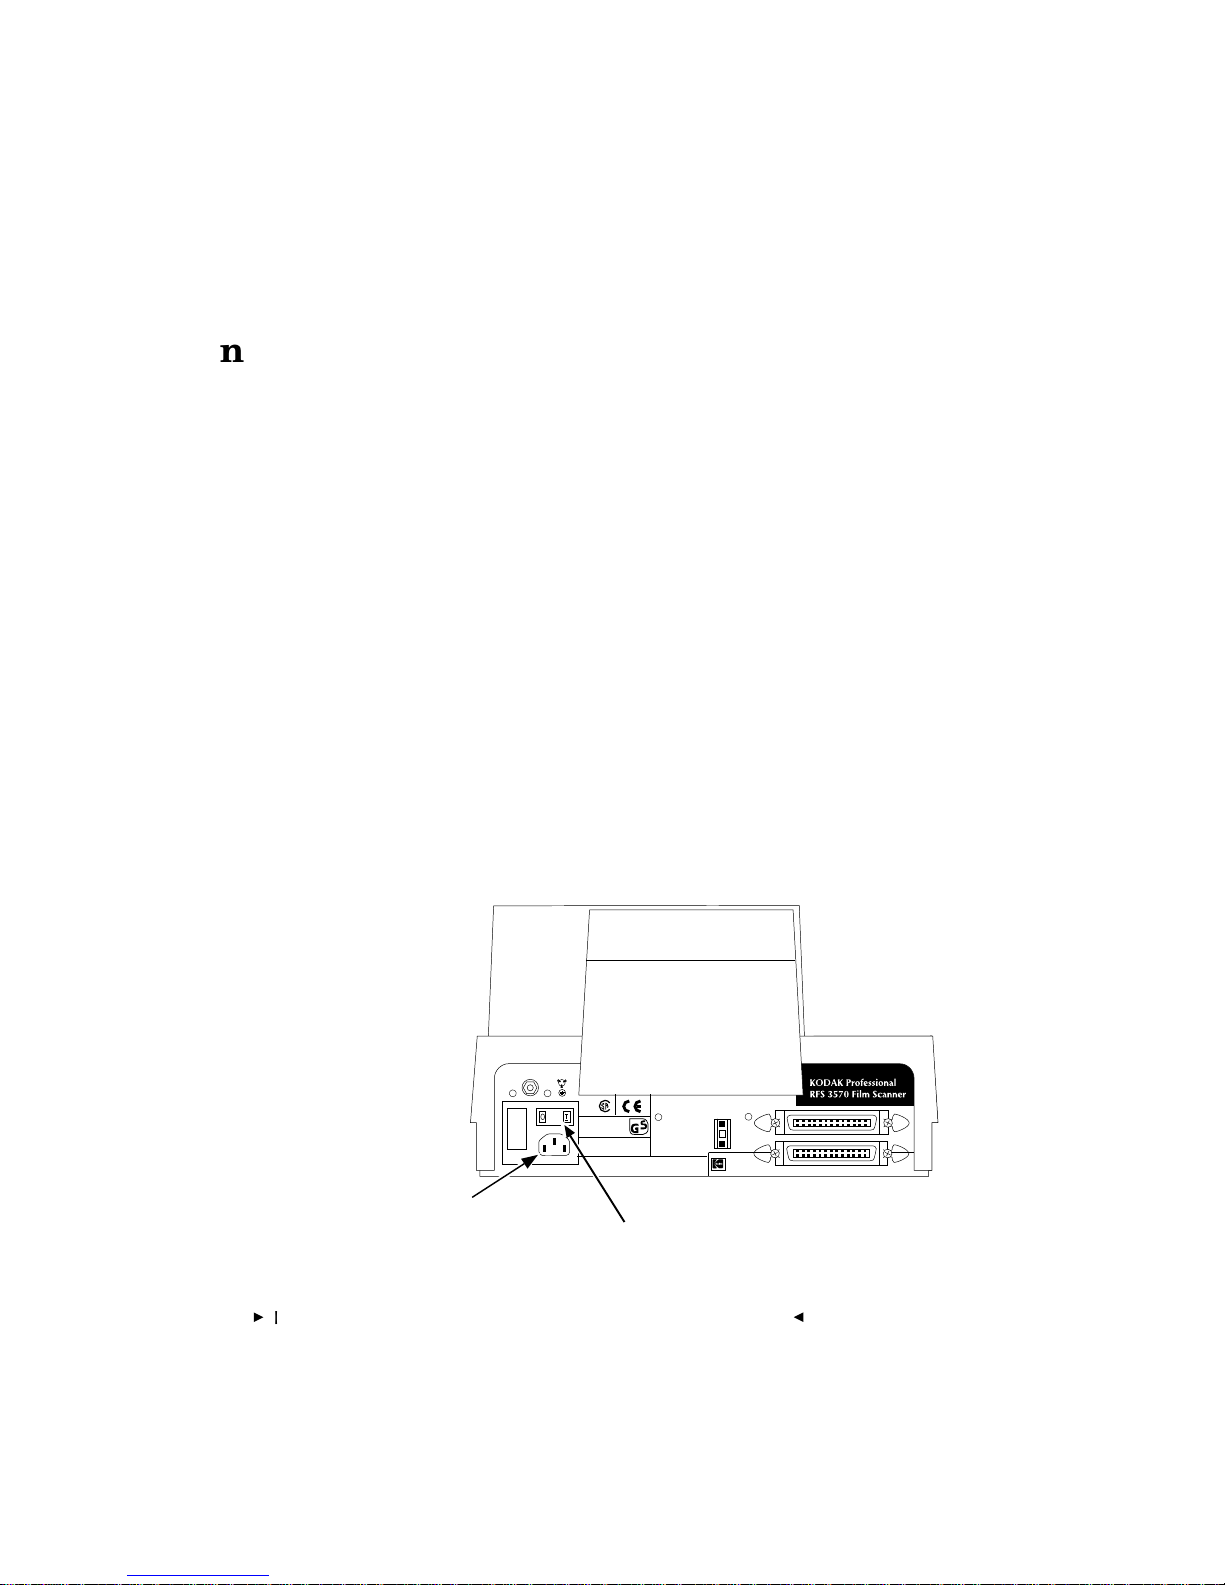
1. Remove any remaining packing material from the Scanner and place
the Scanner on either side of your Macintosh computer. (You should
retain the original shipping carton and packing materials.)
2. Press the O end of the power switch on the back of the Scanner to be
sure that the Scanner power is off.
3. Plug the appropriate end of the supplied power cable into the plug
outlet of the Scanner and the other end into a power source.
BACK OF FILM SCANNER
SCSI ID
2
Plug Outlet
Power Switch
Serial Number
3570
-
3
3-2Installation (Hardware & Software) — Macintosh Computer
G
Page 25

. . . . . . . . . . . . . . . . . . . . . . . . . . . . .
Connecting the Scanner to Your Computer
Follow the instructions in this section to connect the Scanner, a nonterminated SCSI device, to your Macintosh computer by using the supplied cable and terminator.
NOTES: If you are a PowerBook user, consult the manuals supplied with your
computer to determine the cabling and termination requirements needed to
connect the Scanner — a non-terminated SCSI device — to your PowerBook. You
will probably need to supply a PowerBook HDI-30-pin to 50-pin SCSI cable to
complete this connection. Be certain that the cable you obtain is for connecting a
PowerBook computer to a SCSI device, not for connecting a PowerBook computer to a desktop computer.
This manual assumes that you are familiar with the operation of your Macintosh
computer. If you are not, refer to the manuals and other instructions supplied with
that computer before continuing.
1. Turn off the power to your Macintosh computer and all peripherals
(turn off the computer first).
Installation (Hardware & Software) — Macintosh ComputerG3-3
Page 26
. . . . . . . . . . . . . . . . . . . . . . . . . . . . .
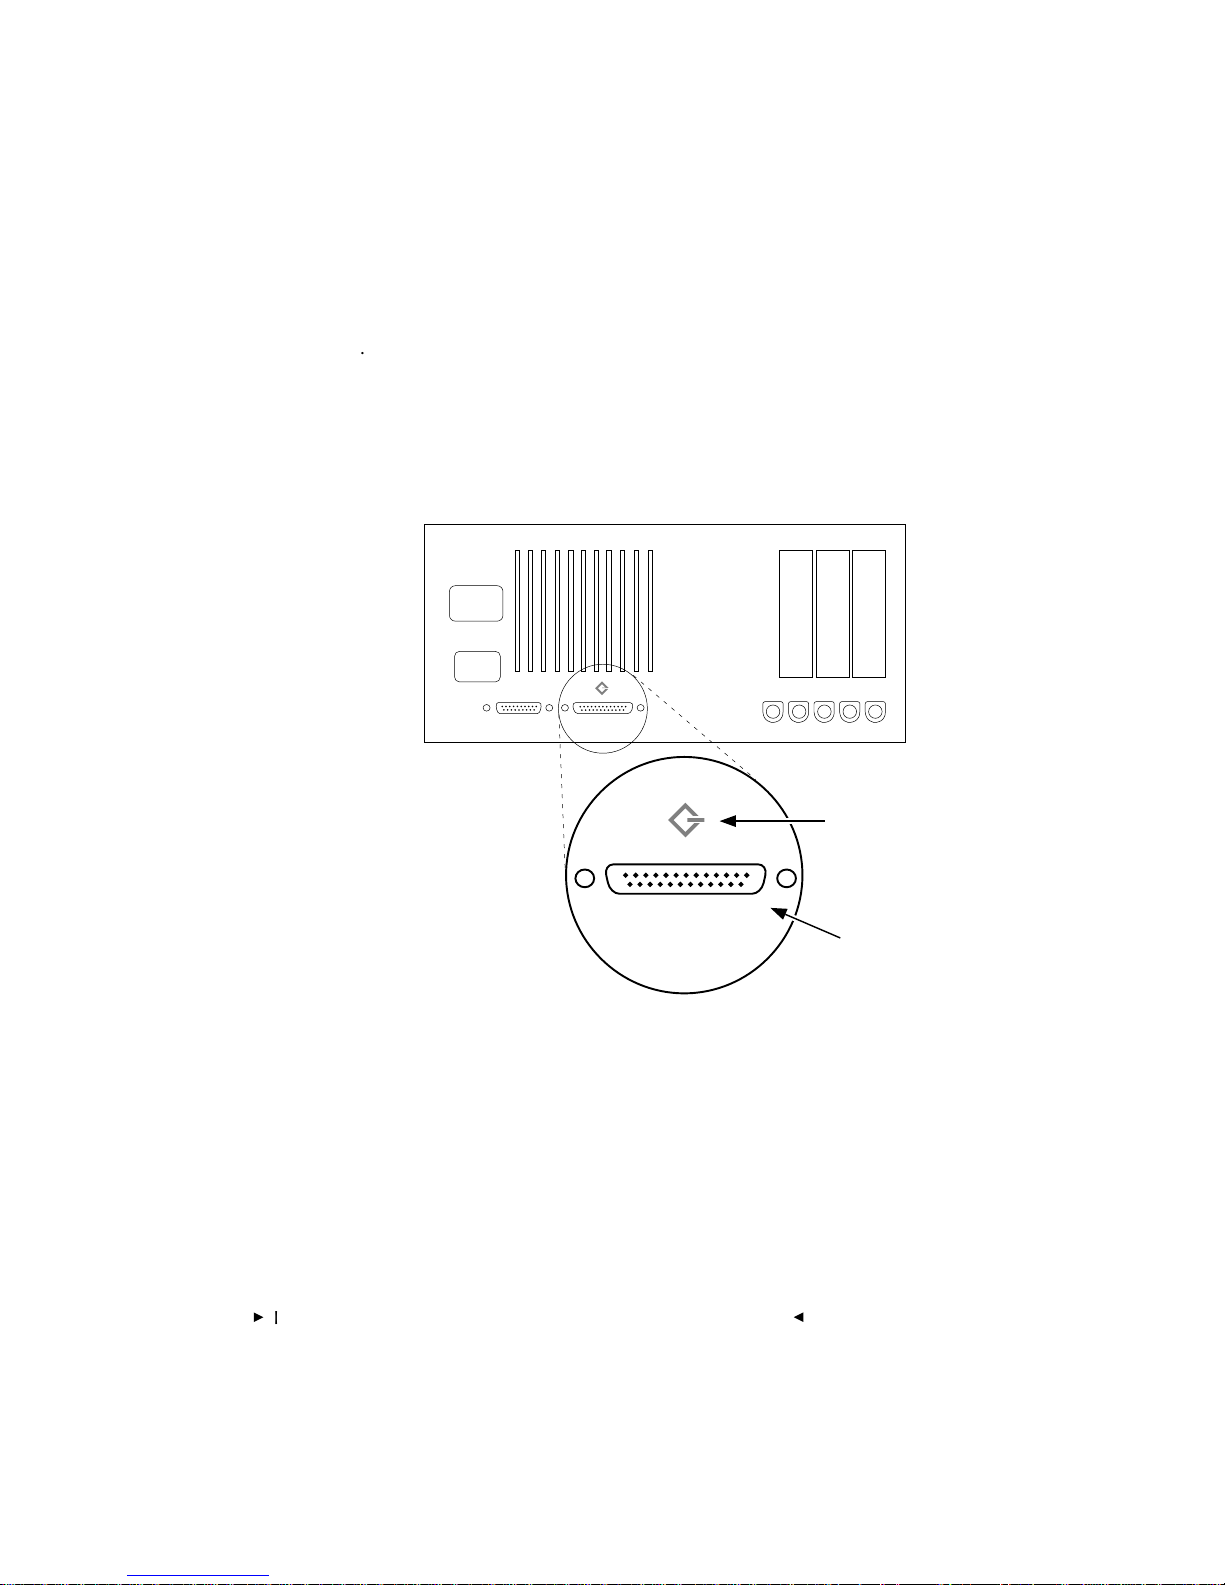
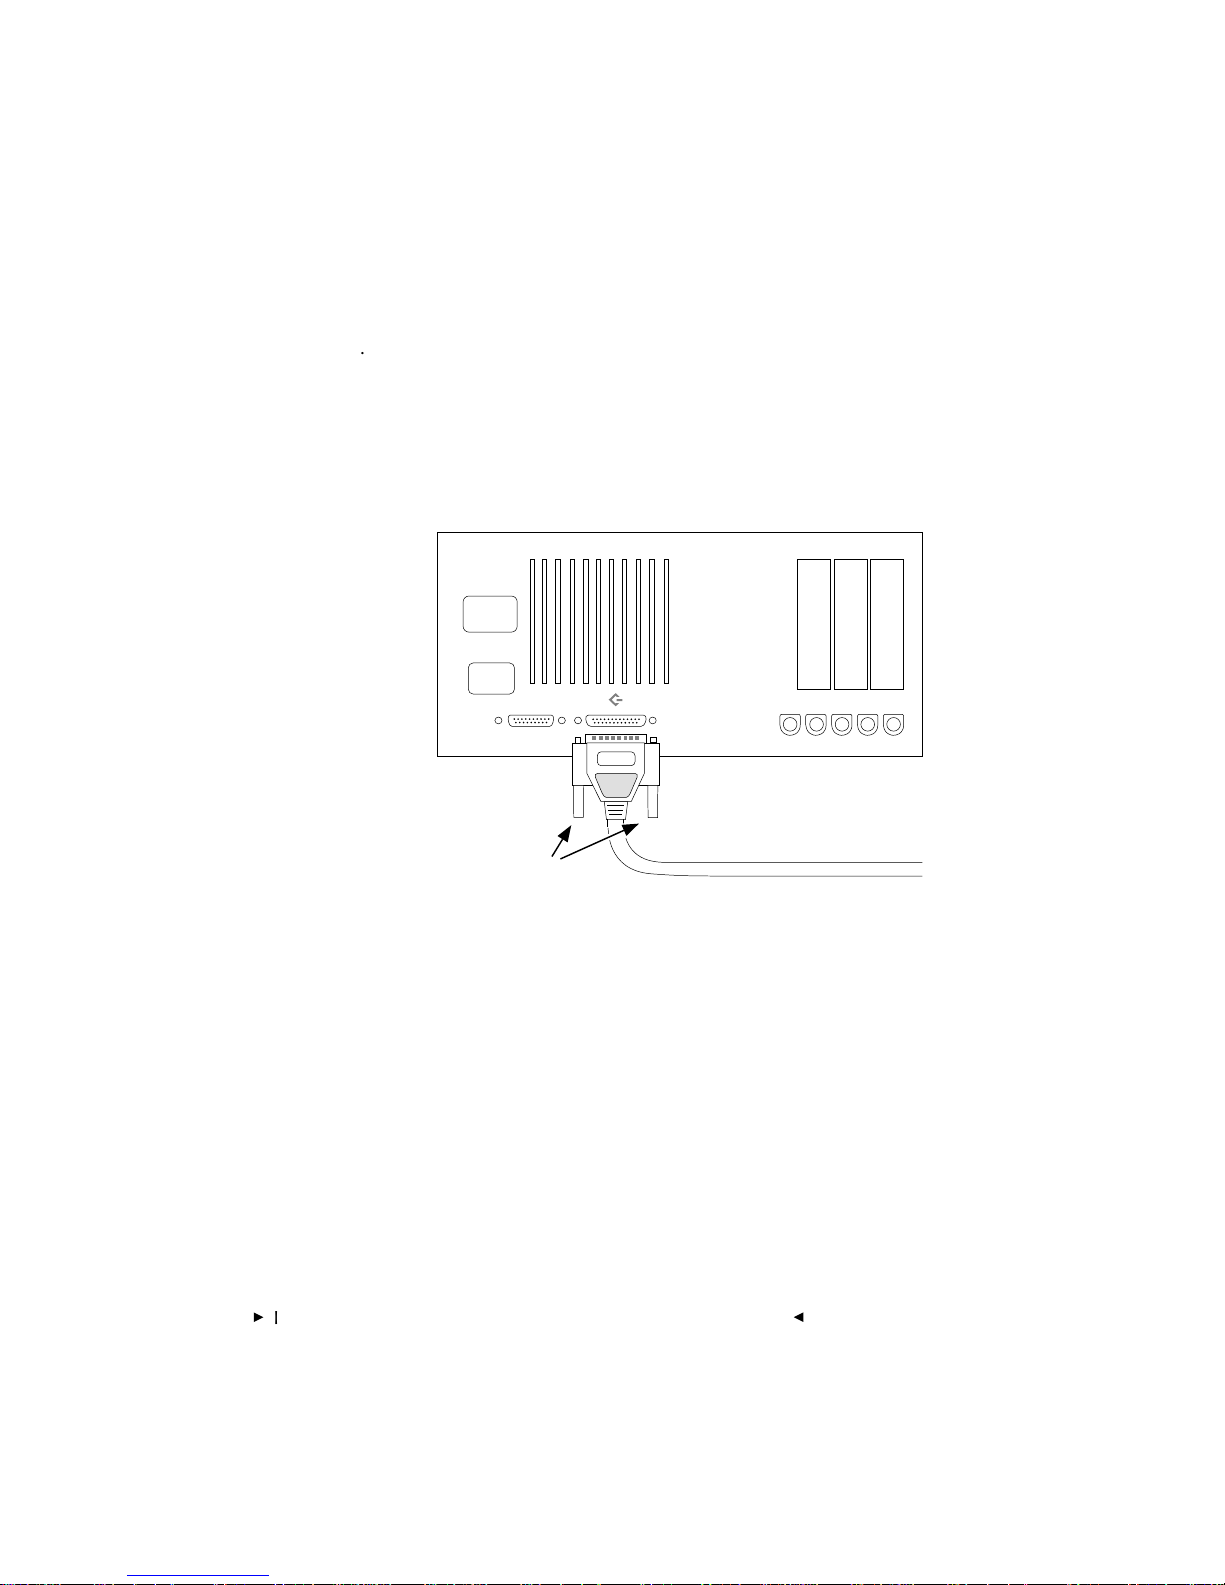
2. Find the SCSI port, also called a SCSI connector, on the back of the
computer (not the back of the Scanner), and determine whether or not
a device (for example a disk drive) is attached. The figures in this
chapter are intended to illustrate a typical Macintosh computer.
BACK OF MACINTOSH COMPUTER
SCSI Icon
3. Select the appropriate instructions from the two sets that follow,
according to whether or not other external SCSI devices are connected.
A. Continue below at “If No External SCSI Devices Are Connected”
if no external SCSI devices are connected.
B. Or continue at “If External SCSI Devices Are Connected” later in
this chapter if external SCSI devices are connected.
3-4Installation (Hardware & Software) — Macintosh Computer
SCSI Port
G
Page 27
. . . . . . . . . . . . . . . . . . . . . . . . . . . . .
If No External SCSI Devices Are Connected
Complete these steps if no SCSI devices are connected to your Macintosh
computer; otherwise proceed to “If External SCSI Devices Are Connected”
later in this chapter.
CAUTION: Whenever connecting or disconnecting SCSI cables,
be sure power is turned off on all devices in the SCSI chain,
including the computer and the Scanner (turn off the computer
first).
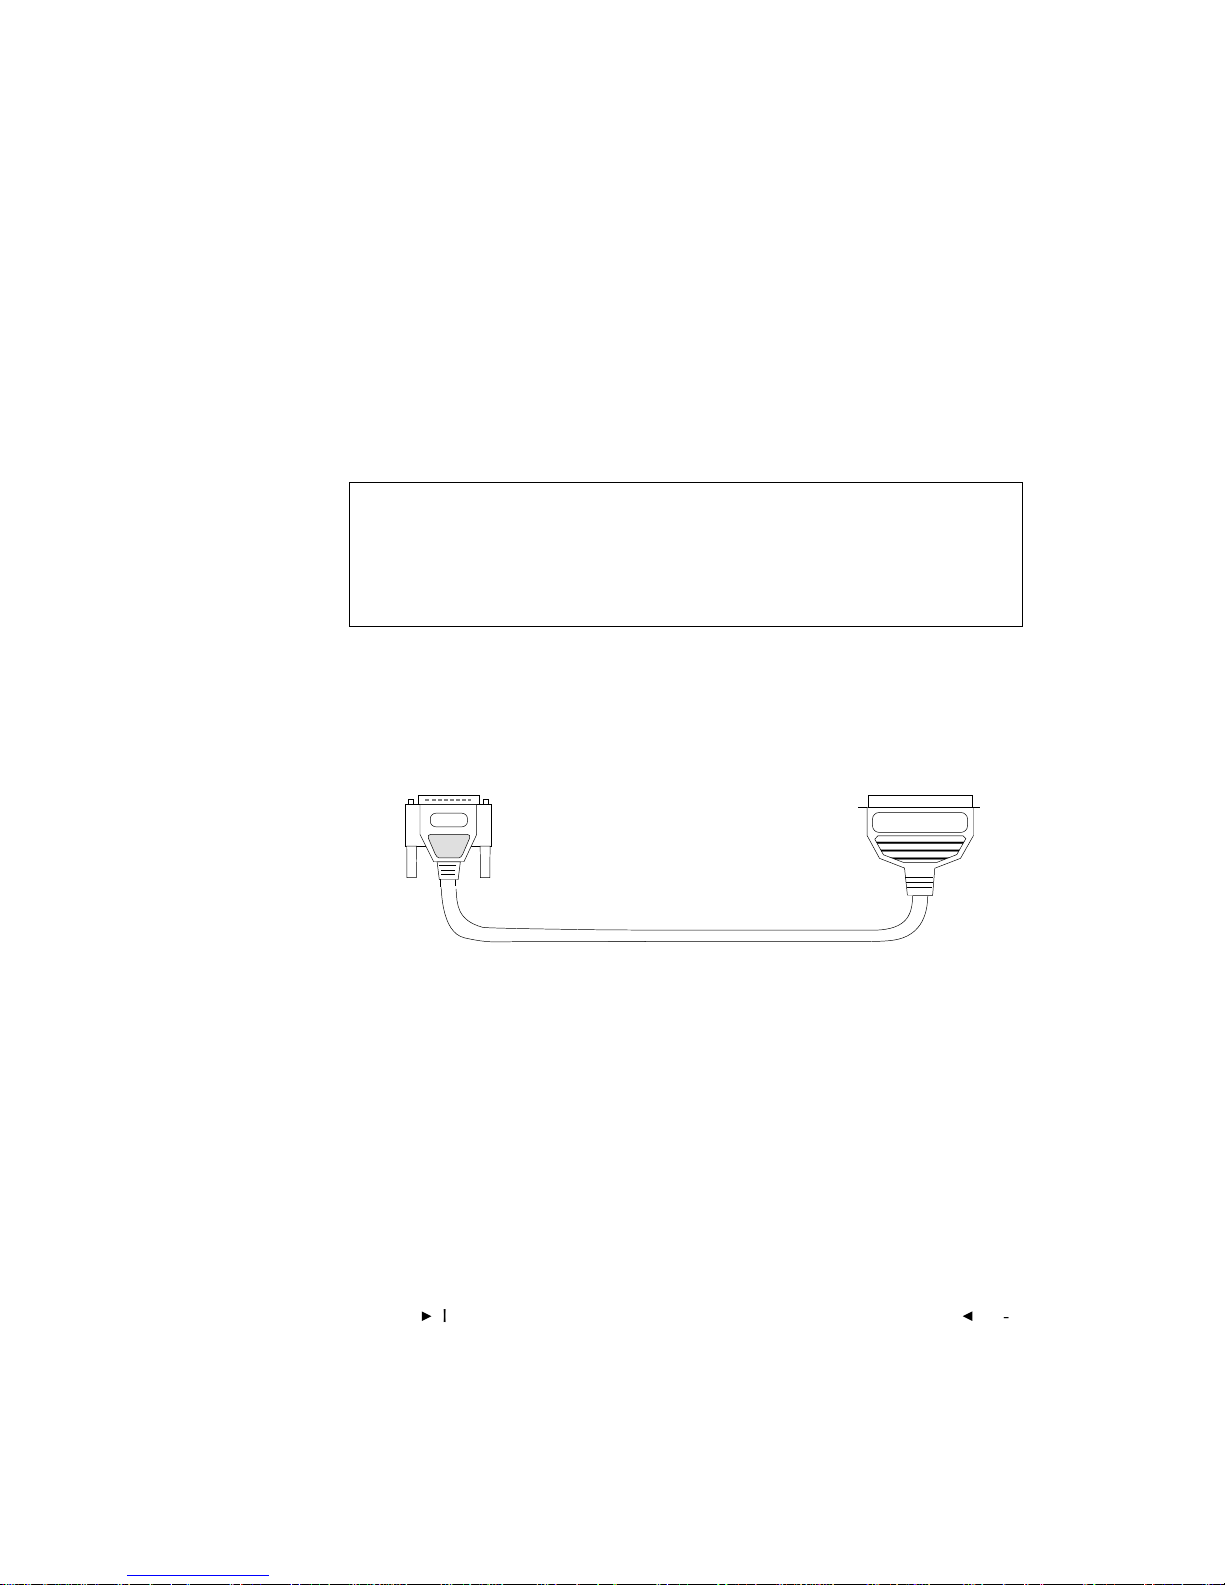
1. Select the cable (supplied with the Scanner) with the 25-pin SCSI
connector at one end and the 50-pin SCSI connector at the other end.
25-pin SCSI Connector 50-pin SCSI Connector
NOTE: If you are using a Macintosh PowerBook computer, you will need to
supply a PowerBook HDI-30-pin to 50-pin SCSI cable to complete this
connection. Be certain that the cable you obtain is for connecting a
PowerBook computer to a SCSI device, not for connecting a PowerBook
computer to a desktop computer.
Installation (Hardware & Software) — Macintosh ComputerG3-5
Page 28
. . . . . . . . . . . . . . . . . . . . . . . . . . . . .
25-pin SCSI Connector
Knobs
BACK OF MACINTOSH COMPUTER
2. Attach the 25-pin SCSI connector of the cable to the SCSI port on the
back of the Macintosh computer. Make sure the cable connector is
well seated by pressing it into place firmly, and then tighten both
knobs on the 25-pin SCSI cable connector.
3-6Installation (Hardware & Software) — Macintosh Computer
G
Page 29
. . . . . . . . . . . . . . . . . . . . . . . . . . . . .
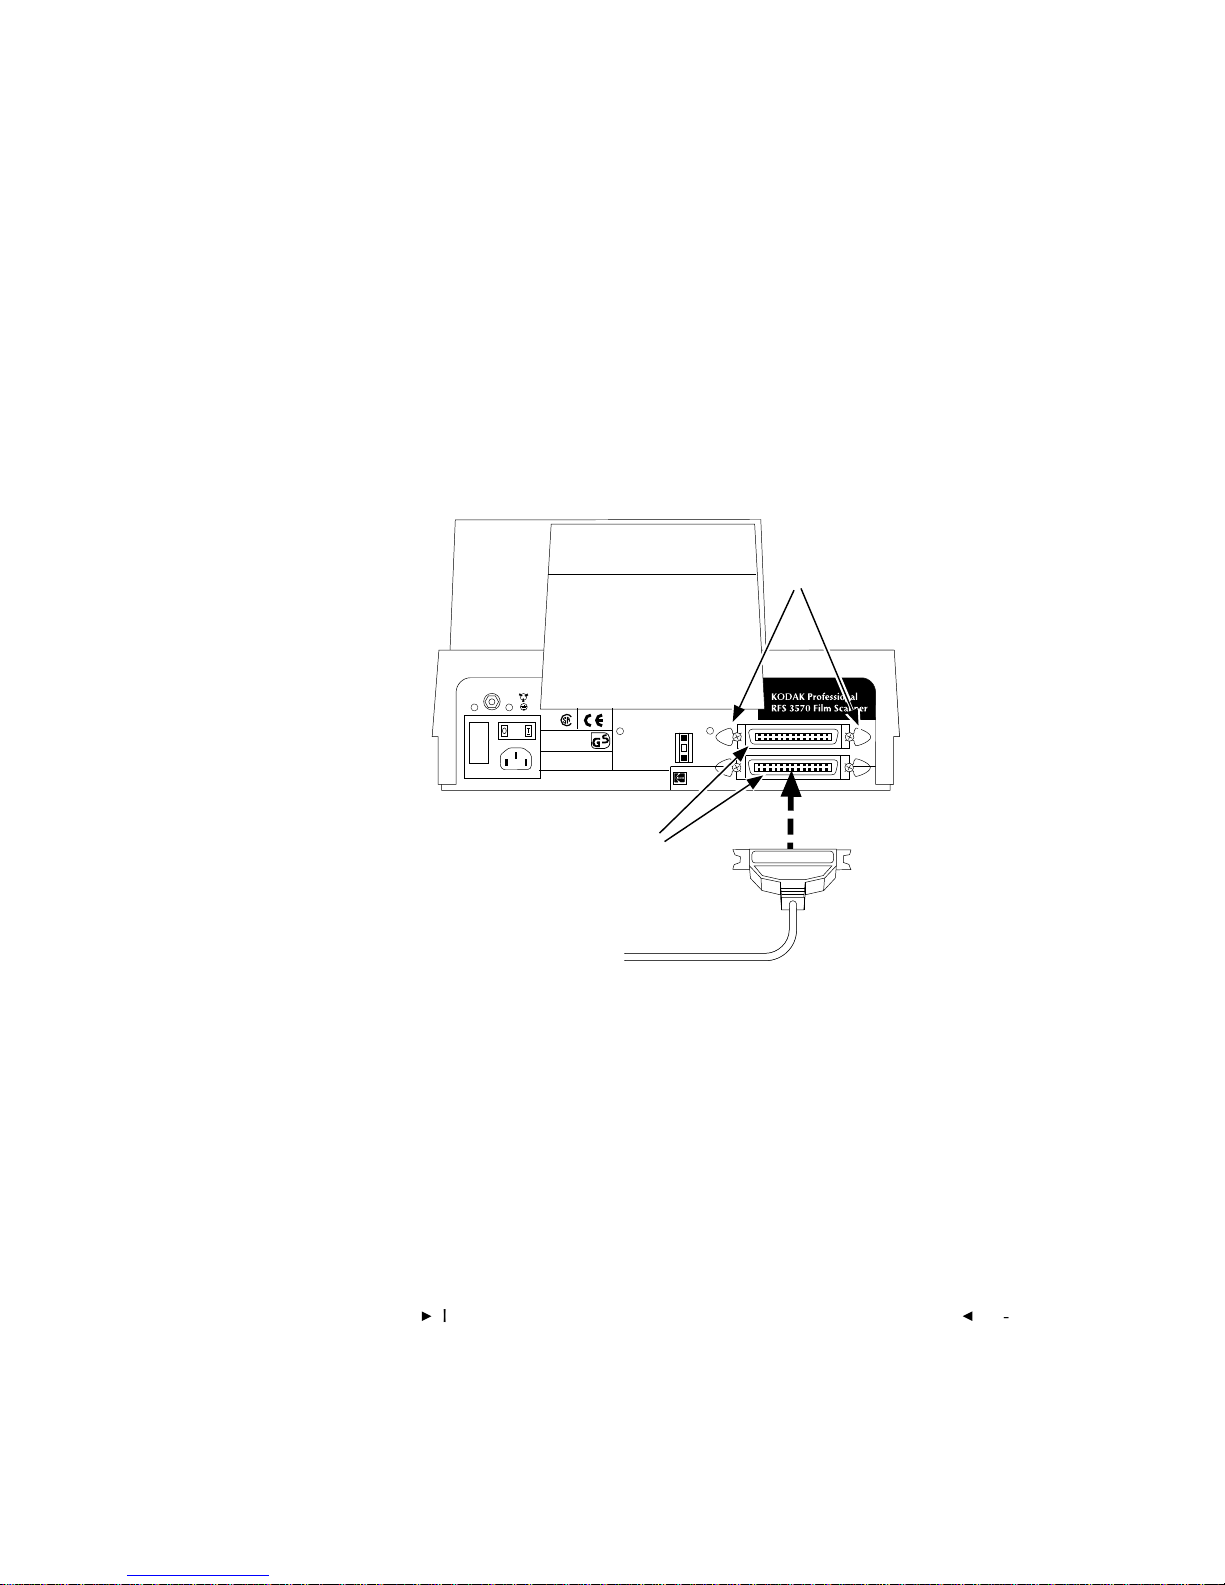
3. Attach the other end of the cable to either of the identical SCSI ports
on the back of the Scanner. Seat the connector firmly and pinch the
thin wire clamps shut.
BACK OF FILM SCANNER
Thin Wire Clamps
SCSI ID
2
Two Identical SCSI Ports
Serial Number
3570
-
3
Installation (Hardware & Software) — Macintosh ComputerG3-7
Page 30
. . . . . . . . . . . . . . . . . . . . . . . . . . . . .
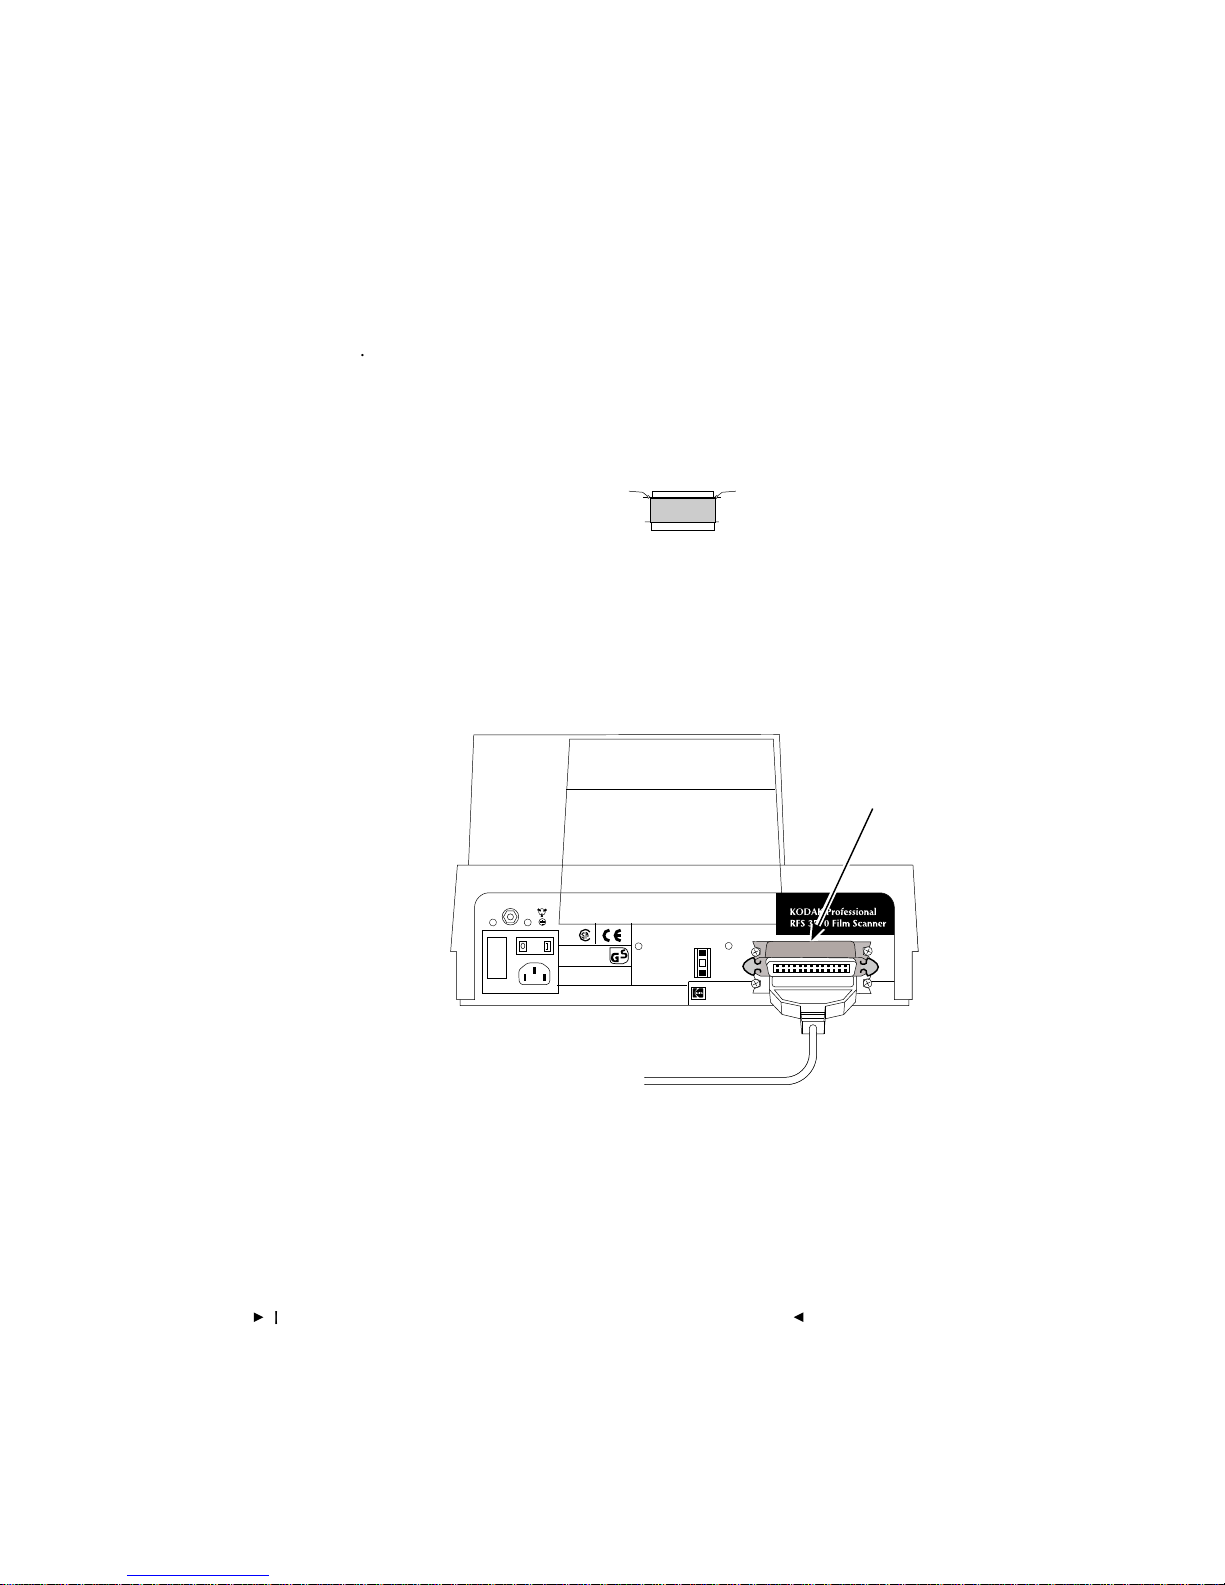
4. Attach the SCSI terminator (supplied with the Scanner) to the empty
SCSI port on the Scanner, seat the terminator firmly, and pinch the
thin wire clamps shut.
Terminator
NOTE: If you are using a Macintosh IIfx computer, use the black terminator
supplied with that computer; it is not interchangeable with the terminator
supplied with the Scanner.
BACK OF FILM SCANNER
SCSI Terminator
SCSI ID
2
Serial Number
3570
-
3
5. Continue at “Setting the Scanner SCSI Identification Number” later in
this chapter.
3-8Installation (Hardware & Software) — Macintosh Computer
G
Page 31

. . . . . . . . . . . . . . . . . . . . . . . . . . . . .
If External SCSI Devices Are Connected
Complete these steps if one or more external SCSI devices are connected
to your Macintosh computer; otherwise continue at “Setting the Scanner
SCSI Identification Number” later in this chapter.
CAUTION: Whenever connecting or disconnecting SCSI cables,
be sure power is turned off on all devices in the SCSI chain,
including the computer and the Scanner (turn off the computer
first).
Multiple SCSI devices are connected to the Macintosh computer in a
chain. The following steps will help you determine where you should
place the Scanner in that chain — either at the end of the chain, or in the
middle of the chain.
NOTE: The total cable length connecting all devices must not exceed 15 feet
(4.6 meters).
1. Select your SCSI cable with identical 50-pin SCSI connectors at each
end.
NOTE: This cable is not packed with the Scanner but is available through
Kodak. Refer to “Appendix I — Optional Equipment & Spare Parts List.” This
cable is also widely available from computer retailers; if you obtain a cable
from one of these sources, be certain to obtain a high quality cable with a
continuous EMI shield over the cable and connectors.
50-pin SCSI Connector 50-pin SCSI Connector
Installation (Hardware & Software) — Macintosh ComputerG3-9
Page 32

. . . . . . . . . . . . . . . . . . . . . . . . . . . . .
2. Locate the two identical SCSI ports and thin wire clamps on the back
of the Scanner.
BACK OF FILM SCANNER
Thin Wire Clamps
SCSI ID
2
Two Identical SCSI Ports
Serial Number
3570
-
3
3. Determine if the connected SCSI devices are terminated or not. The
Scanner is a non-terminated SCSI device. To do so:
A. First look for an external SCSI terminator on the devices; if you
find one, remove it.
B. Because some devices contain internal terminators, also check
the instructions for your devices to determine if they are terminated internally.
NOTE: The Scanner does not have an internal terminator.
3-10Installation (Hardware & Software) — Macintosh Computer
G
Page 33

. . . . . . . . . . . . . . . . . . . . . . . . . . . . .
4. Select the appropriate instructions from the two sets that follow,
according to whether or not an external device is terminated internally.
A. Continue on the next page if none of the connected devices is
terminated internally.
B. Or continue at “Follow these steps if one of the connected devices
is terminated internally” later in this chapter if one of the connected devices is terminated internally.
Installation (Hardware & Software) — Macintosh Computer
G
3-11
Page 34

. . . . . . . . . . . . . . . . . . . . . . . . . . . . .
Follow these steps if none of the connected devices is
terminated internally (and any external terminator found in the
SCSI chain has been removed):
NOTE: In the following steps, you will place the Scanner at the end of the chain
of connected devices. (You can place the Scanner anywhere in the chain as long
as you add a terminator to the last device in the chain.)
1. Attach one end of your 50-pin to 50-pin SCSI cable to the empty SCSI
port on the last device in the chain. Seat the connector firmly and
pinch the thin wire clamps shut.
NOTE: This cable is not packed with the Scanner but is available through
Kodak. Refer to “Appendix I — Optional Equipment & Spare Parts List.” This
cable is also widely available from computer retailers; if you obtain a cable
from one of these sources, be certain to obtain a high quality cable with a
continuous EMI shield over the cable and connectors.
Back of
Macintosh Computer
Back of One or More SCSI Devices
3-12Installation (Hardware & Software) — Macintosh Computer
Step 1
G
Page 35

. . . . . . . . . . . . . . . . . . . . . . . . . . . . .
2. Attach the other end of the cable to either of the identical SCSI ports
on the back of the Scanner. Seat the connector firmly and pinch the
wire clamps shut.
Back of
Macintosh Computer
Back of Film Scanner
Back of One or More SCSI Devices
Step 2
Installation (Hardware & Software) — Macintosh Computer
G
3-13
Page 36

. . . . . . . . . . . . . . . . . . . . . . . . . . . . .
Back of
Macintosh Computer
Back of One or More SCSI Devices
Step 3
Back of Film Scanner
3. Attach the SCSI terminator (supplied with the Scanner) to the empty
SCSI port on the Scanner, seat the terminator firmly, and pinch the
wire clamps shut.
NOTE: If you are using a Macintosh IIfx Computer, use the black terminator
supplied with the computer; it is not interchangeable with the terminator
supplied with the Scanner.
4. Continue at “Setting the Scanner SCSI Identification Number” later in
this chapter.
3-14Installation (Hardware & Software) — Macintosh Computer
G
Page 37

. . . . . . . . . . . . . . . . . . . . . . . . . . . . .
Back of
Macintosh Computer
Back of One or More SCSI Devices
Step 1
Internally
Terminated
Device
Follow these steps if one of the connected devices is terminated
internally:
NOTE: In the following steps, you will place the Scanner in the chain just before
the terminated device. (You can place the Scanner anywhere in the chain between the terminated device and the Macintosh Computer.)
1. Locate the cable leading to the internally terminated device. (The
terminated device should be the last device.)
Installation (Hardware & Software) — Macintosh Computer
G
3-15
Page 38

. . . . . . . . . . . . . . . . . . . . . . . . . . . . .
2. Disconnect the end of that cable from the internally terminated
device. Do not disconnect the other end of the cable.
Back of
Macintosh Computer
Internally
Terminated
Device
Step 2
3. Position the Scanner so that you can connect it in the chain before the
terminated device.
Back of
Macintosh Computer
Back of Film Scanner
3-16Installation (Hardware & Software) — Macintosh Computer
G
Internally
Terminated
Device
Step 3
Page 39

. . . . . . . . . . . . . . . . . . . . . . . . . . . . .
4. Attach the end of the cable you just disconnected to either of the
identical SCSI ports on the back of the Scanner. Seat the connector
firmly, and pinch the thin wire clamps shut.
Back of
Macintosh Computer
Back of Film Scanner
Internally
Terminated
Device
Step 4
Installation (Hardware & Software) — Macintosh Computer
G
3-17
Page 40

. . . . . . . . . . . . . . . . . . . . . . . . . . . . .
5. Attach the Scanner to the internally terminated device by plugging
one end of your 50-pin to 50-pin SCSI cable into the empty SCSI port
on the Scanner and the other end into the empty SCSI port on the
terminated device. Seat both connectors firmly and pinch both wire
clamps shut.
NOTE: This cable is not supplied with the Scanner but is available through
Kodak. Refer to “Appendix I — Optional Equipment & Spare Parts List.” This
cable is also widely available from computer retailers; if you obtain a cable
from one of these sources, be certain to obtain a high quality cable with a
continuous EMI shield over the cable and connectors.
Back of
Macintosh Computer
Back of Film Scanner
Step 5
3-18Installation (Hardware & Software) — Macintosh Computer
G
Internally
Terminated
Device
Page 41

. . . . . . . . . . . . . . . . . . . . . . . . . . . . .
Setting the Scanner SCSI Identification
Number
Follow the steps below to set the SCSI identification (ID) number for the
Scanner. You set the number by gently pushing buttons at the top and
bottom of the SCSI ID switch on the back of the Scanner as described in
this section.
BACK OF FILM SCANNER
SCSI ID
2
Serial Number
3570
-
3
3
SCSI ID Switch
(Do not use 0, 7, 8, or 9)
Installation (Hardware & Software) — Macintosh Computer
G
3-19
Page 42

. . . . . . . . . . . . . . . . . . . . . . . . . . . . .
Each SCSI device connected to the same computer must have a different
SCSI ID number. Your Macintosh Computer is number 7, and your
internal hard disk is probably 0. If your computer has a CD-ROM drive,
be certain to avoid its number also; it may be number 3 if it is an internal
drive supplied by Apple Computer, Inc. Therefore avoid numbers 0, 3,
and 7 since the Scanner must have a unique SCSI ID.
1. If SCSI devices other than the Scanner are connected to your Macintosh Computer, determine their SCSI identification numbers so that
you can select a different number for the Scanner. (If necessary, refer
to the documentation for those devices to determine how to find their
numbers.)
2. Double-check to make sure that the power to the Scanner is off (O).
(The O end of the switch should be pressed in and the green light at
the top left front corner of the Scanner should be off.)
3. Set the Scanner to an unused number from 1 to 6 by pressing the
bottom button to go to a higher number or the top button to go to a
lower number. Do not assign the number of any other attached SCSI
device, and do not assign 0, 7, 8, or 9. If your computer has a CDROM drive, be certain to avoid its number also; it may be number 3 if
it is an internal drive supplied by Apple Computer, Inc. Assign high ID
numbers to devices used most frequently.
NOTE: Make sure the power to the Scanner is off if you change its ID number at a
later time.
3-20Installation (Hardware & Software) — Macintosh Computer
G
Page 43

. . . . . . . . . . . . . . . . . . . . . . . . . . . . .
Installing the KODAK Driver for
Adobe Photoshop Software
(Macintosh)
Follow these steps to install the driver. This is a onetime operation that
you must perform before you can obtain images from the Scanner.
1. Turn on your Macintosh computer; after a short wait, you will be in
the Finder. (If your Macintosh computer has been configured to open
applications other than the Finder, return to the Finder now.)
2. Install Adobe Photoshop (not provided by Kodak) if you have not
already done so.
3. Make sure the gamma for your monitor is calibrated properly, per
instructions in the Photoshop manual.
4. Locate the diskette entitled “KODAK Driver for ADOBE PHOTOSHOP Software for use with KODAK Professional RFS 3570 Film
Scanner.”
5. If the diskette is not locked, lock it by sliding the tab on the back to
reveal a small hole. This will prevent the contents of the disk from
being changed inadvertently, and may aid in preventing the spread of
computer viruses to this diskette.
6. Place the diskette into the internal drive of your Macintosh computer.
If a window does not open for the diskette, double-click on the
diskette icon to display the window.
7. Double-click on the R
information on the Scanner; then choose Q
Installation (Hardware & Software) — Macintosh Computer
EAD ME file, read its contents — the latest
UIT from the FILE menu.
G
3-21
Page 44

. . . . . . . . . . . . . . . . . . . . . . . . . . . . .
8. Complete part A of this step for supported Photoshop versions before
version 2.5, and part B for versions 2.5 and later.
A. Drag the KODAK RFS 3570 and the RFS3570.BIN icons into the
folder on your hard disk that contains the Photoshop PS PREFS
file. Wait while the files are copied; if you are asked if the new
files should replace existing ones, respond affirmatively.
NOTE: If the PS PREFS file does not exist, you must run Photoshop (once)
to create it. If you do not place the KODAK RFS 3570 and RFS3570.BIN
icons into the same folder as PS PREFS, you will not be able to acquire
images from the Scanner.
B. Follow directions in the Photoshop manual regarding placement
of plug-in modules. For example, with Photoshop 2.5 and 3.0,
drag the KODAK RFS 3570 and RFS3570.BIN icons into the P
INS folder created when you installed this version of Photoshop (or
into another folder you have designated with P
REFERENCES to hold
plug-in modules). For Photoshop 2.5, be certain that the two files
are not placed within another folder inside the P
LUG-INS folder.
Wait while the files are copied; if you are asked if the new files
should replace existing ones, respond affirmatively.
LUG-
9. Eject the diskette by dragging its icon to the TRASH icon.
10. Store the diskette. (Although copying the driver files is a onetime
action, you may need to use the diskette again.)
The driver is now installed in your Macintosh computer and the Scanner
is now ready for use as described in Chapter 4 and Chapter 5.
3-22Installation (Hardware & Software) — Macintosh Computer
G
Page 45

. . . . . . . . . . . . . . . . . . . . . . . . . . . . .
. . . . . . . . . . . . . . . . . . . . . . . . . . . . . .
. . . . . . . . . . . . . . . . . . . . . . . . . . . . . . .
. . . . . . . . . . . . . . . . . . . . . . . . . . . . . . . .
4
Loading the Film and Slide
Holders — Macintosh
Computer
NOTE: This chapter is identical with Chapter 8 (in the PC Platform portion of this
manual). It is repeated in both places for your convenience.
This chapter describes how to use the film and slide holders with the
Scanner. You will learn how to:
Load film negatives into the film holder
Load slides into the slide holder
Load each of the holders into the Scanner
The chapter is divided into two sections: loading 35 mm film/slides and
loading film sizes other than 35 mm.
Loading the Film and Slide Holders — Macintosh ComputerG4-1
Page 46

. . . . . . . . . . . . . . . . . . . . . . . . . . . . .
Loading 35 mm Film and Slides
Loading 35 mm Film into the 35 mm Film
Holder
Up to six frames from a strip of 35 mm film of any length can be positioned for scanning at one time. Refer to the diagram below to load film
into the 35 mm film holder.
Latch
Label
KODAK RRR 0000 KODAK
Latch
Film
FEDBAC
Tabs
1. Use the two latches opposite the hinge to open the 35 mm film
holder.
2. Hold the 35 mm film holder in front of you with the label “KODAK
RRR 0000 . . . . KODAK” at the top and facing you.
3. Place your 35 mm film into the 35 mm film holder so that:
Images are facing you as you would see them in real life (not
mirror-imaged).
Any edge printing on the film is readable from left to right.
Hinge
4-2Loading the Film and Slide Holders — Macintosh Computer
G
Page 47

. . . . . . . . . . . . . . . . . . . . . . . . . . . . .
4. Tuck the lower edge of the film under the tabs that run along the
hinge.
5. Center the film so that each frame aligns with a frame in the film
holder.
6. Snap the film holder shut.
The holder is now ready to be placed into the Scanner.
Loading 35 mm Slides into the Slide Holder
The slide holder can accommodate up to four 35 mm slides at a time.
Standard slides up to .12 in. (3 mm) thick will fit into the slide holder.
Refer to the diagram below to load slides.
Slide
Orientation Label
ABC
RR
1. Orient the slide holder as shown above with the orientation labels
facing you.
2. Place your slide into the slide holder so that images are facing you as
you would see them in real life (not mirror-imaged).
3. (Optional) Place additional slides into the holder as desired.
The holder is now ready to be placed into the Scanner.
Loading the Film and Slide Holders — Macintosh ComputerG4-3
Page 48

. . . . . . . . . . . . . . . . . . . . . . . . . . . . .
KODAK Professional
RFS 3570 Film Scanner
Single-frame
Holder Adapter
. . . remove if in Scanner.
Loading 35 mm Film and Slide Holders into the
Scanner
To load a 35 mm film or slide holder into the Scanner:
1. If the single-frame holder adapter is in the Scanner, remove it.
4-4Loading the Film and Slide Holders — Macintosh Computer
G
Page 49

. . . . . . . . . . . . . . . . . . . . . . . . . . . . .
2. If the 35 mm multi-frame holder adapter is not in the Scanner, put it
in place in the Scanner in the orientation shown.
35 mm Multi-frame
Holder Adapter
KODAK Professional
RFS 3570 Film Scanner
Loading the Film and Slide Holders — Macintosh ComputerG4-5
Page 50

. . . . . . . . . . . . . . . . . . . . . . . . . . . . .
3. Orient the film or slide holder as follows:
Film Holder: Make sure that the two orientation labels face you, that
the film images read in the direction of the letter “R,” and that the “R”
is right-side up. In this position, the film will be oriented correctly.
FEDBAC
Slide Holder: Make sure that the two orientation labels face you, that
the slide images read in the direction of the letter “R,” and that the “R”
is right-side up. In this position, the slides will be oriented correctly.
ABC
RR
RR
4-6Loading the Film and Slide Holders — Macintosh Computer
G
Page 51

. . . . . . . . . . . . . . . . . . . . . . . . . . . . .
KODAK Professional
RFS 3570 Film Scanner
E
D
B
C
4. Slide the holder into the left or right opening of the 35 mm multiframe holder adapter.
NOTE: Since the slide holder is thicker than the film holder, you may need to
use more force to move the slide holder from side to side than you will need
for the film holder.
5. As you move the holder from side to side, you will feel it “drop” into
place at each frame; this indicates that the holder is correctly positioned in the gate.
NOTE: If the holder slides freely without dropping into place, you have loaded
the holder backwards or upside-down. Remove the holder, orient it in the proper
direction, and reinsert it.
The 35 mm film or slide holder is now properly inserted into the Scanner.
Loading the Film and Slide Holders — Macintosh ComputerG4-7
Page 52

. . . . . . . . . . . . . . . . . . . . . . . . . . . . .
Loading Film Sizes Other Than
35 mm
Loading Film into the Film Holder
Follow the steps below to load film sizes other than 35 mm into their film
holders.
1. Select the film holder to match the film size you will scan. Notice that
a label on the holder indicates its size.
Supplied with Scanner Optional
2. Separate the selected film holder into its two parts. (The 6x7 cm size
has been used for the illustrations in this section.)
Bottom of Holder
(Refer to Appendix I to order)
Top of Holder
Four HolesFour Pins
4-8Loading the Film and Slide Holders — Macintosh Computer
G
Page 53

. . . . . . . . . . . . . . . . . . . . . . . . . . . . .
3. Place your film in the bottom of the film holder so that:
Images are facing you as you would see them in real life (not
mirror-imaged).
Any edge printing on the film is readable from left to right.
Bottom of Holder
Film in strips can be placed into the film holder, but should be
Top of Holder
handled with extreme care to avoid damaging the film.
4. Center the film so that the frame aligns with the hole in the holder.
5. Place the top of the film holder over the bottom so that to top is
aligned over the four pins.
Loading the Film and Slide Holders — Macintosh ComputerG4-9
Page 54

. . . . . . . . . . . . . . . . . . . . . . . . . . . . .
Loading Film Holders (Other Than 35 mm
Sizes) into the Scanner
1. If the 35 mm multi-frame holder adapter is in the Scanner, remove it.
35 mm Multi-frame
Holder Adapter . . .
. . . remove if in
Scanner.
KODAK Professional
RFS 3570 Film Scanner
4-10Loading the Film and Slide Holders — Macintosh Computer
G
Page 55

. . . . . . . . . . . . . . . . . . . . . . . . . . . . .
2. If the single-frame holder adapter is not in the Scanner, put it in place
in the Scanner.
Single-frame
Holder Adapter
. . . insert if not already
in Scanner.
The slots on both ends . . .
. . . wrap around
the frame in the Scanner.
KODAK Professional
RFS 3570 Film Scanner
Loading the Film and Slide Holders — Macintosh ComputerG4-11
Page 56

. . . . . . . . . . . . . . . . . . . . . . . . . . . . .
3. Place the film holder into the Scanner by sliding it down completely
into place behind the single-frame holder adapter; be certain that the
film holder is aligned with the indentation in the frame in the Scanner.
Single-frame
Holder Adapter
KODAK Professional
RFS 3570 Film Scanner
The film holder is now properly inserted into the Scanner.
4-12Loading the Film and Slide Holders — Macintosh Computer
G
Page 57

. . . . . . . . . . . . . . . . . . . . . . . . . . . . .
. . . . . . . . . . . . . . . . . . . . . . . . . . . . . .
. . . . . . . . . . . . . . . . . . . . . . . . . . . . . . .
. . . . . . . . . . . . . . . . . . . . . . . . . . . . . . . .
5
Using the KODAK Driver for
Adobe Photoshop Software —
Macintosh Computer
This chapter describes how to:
Display the KODAK Driver window.
Use Scanner buttons and indicators to control the scan.
Produce a scan and have it appear in an untitled Adobe Photoshop
window. You can then use Adobe Photoshop to edit the image and
save the image as a file on your Macintosh hard disk.
Turn off the Scanner.
The end of the chapter includes a full reference section of all software
features.
Using the KODAK Driver for Adobe Photoshop (Macintosh)G5-1
Page 58

. . . . . . . . . . . . . . . . . . . . . . . . . . . . .
We assume you are familiar with the operation of your Macintosh Computer and Adobe Photoshop, and that you have your Scanner connected
properly to your Macintosh Computer as described in “Installing the
Scanner Hardware” in Chapter 3.
We also assume you have read and are familiar with the material contained in:
“Important Safeguards and Precautions” at the front of this manual.
“Installing the KODAK Driver for Adobe Photoshop Software” in
Chapter 3.
“Loading the Film and Slide Holders — Macintosh Computer” in
Chapter 4.
5-2Using the KODAK Driver for Adobe Photoshop (Macintosh)
G
Page 59

. . . . . . . . . . . . . . . . . . . . . . . . . . . . .
Displaying the KODAK Driver
Window
Follow the steps in this section each time that you want to acquire data
from the Scanner from within Adobe Photoshop.
1. With your computer, Scanner, and other SCSI devices (if present)
turned off, turn on the Scanner by pressing the (I) end of the power
switch on the back of the Scanner. The POWER indicator light, a
small green light at the top front left corner of the Scanner, turns on.
You’ll hear the system perform a self-test by moving its internal
mechanism. Then the Scanner is ready for use—no warm-up is
required.
CAUTION: Always turn on the Scanner before you turn on
your computer; it is important that you follow this procedure.
2. If other SCSI devices are present, turn them on. (SCSI devices can be
turned on in any order.)
3. Turn on your Macintosh Computer.
4. Run Adobe Photoshop.
5. Choose KODAK RFS 3570 from the A
Photoshop F
NOTE: If the Scanner choice does not appear on the submenu, follow the
directions in “Installing the KODAK Driver for Adobe Photoshop Software” in
Chapter 3 to ensure that the driver files are properly installed on you hard
disk.
If you see a message that “The Scanner was not found . . .” refer to this
message in “Appendix D — Messages from KODAK Drivers.”
ILE menu. (The submenu may show other options.)
Using the KODAK Driver for Adobe Photoshop (Macintosh)G5-3
CQUIRE submenu of the Adobe
Page 60

. . . . . . . . . . . . . . . . . . . . . . . . . . . . .
6. Wait, and when start-up is complete, the KODAK Driver window
appears.
5-4Using the KODAK Driver for Adobe Photoshop (Macintosh)
G
Page 61

. . . . . . . . . . . . . . . . . . . . . . . . . . . . .
Producing Scanned Images
In this section, you will load your film or slides into the Scanner and then
generate scans by making selections from the KODAK Driver window.
In the following steps you will make a series of adjustments and pre-scans
while working in the KODAK Driver window. When you are satisfied
with the adjustments you have made, you will click S
curs — with the adjustments you have made applied to the resultant
data — and the scan data appears in a Photoshop Window.
IMPORTANT: As you complete the steps below you may be prompted with
instructions requiring that you the remove the film holder and so on to
allow the Scanner to refocus. Two actions — changing the film size and/or
changing the magnification — result in the need for the Scanner to
recalibrate and focus. If you are in an environment where you rarely change
these settings then you will only rarely need to allow the Scanner to
recalibrate and focus; however, if you often change either or both of these
settings then you will need to allow the Scanner to recalibrate and focus
more frequently. In either environment, the Scanner software will prompt
you — as described in more detail in the following steps — with the exact
actions you must complete. Be sure to follow those steps carefully.
CAN; a scan oc-
Loading the Film Holder
Follow directions in Chapter 4 “Loading the Film and Slide Holders —
Macintosh Computer” to:
1. Load the film or slide holder.
2. Place the holder in the Scanner.
NOTE: Do not have a high level of direct light around the film holder area of
the Scanner.
Using the KODAK Driver for Adobe Photoshop (Macintosh)G5-5
Page 62

. . . . . . . . . . . . . . . . . . . . . . . . . . . . .
Operating the KODAK Driver
Follow the steps in this section to use the controls on the KODAK Driver
window.
NOTE: As you use the Scanner, the settings you have in effect each time you
leave the KODAK Driver are retained and will be in effect the next time you use
the driver.
Set the Film Type
1. Set the film type to match your film by choosing the film type from the
large number of choices on the F
Set the Film Size
2. If the FILM SIZE does not match the film you will scan, choose the
correct size from the F
ILM SIZE popup menu.
ILM popup menu.
PreScan the Image (and Calibrate the Scanner)
3. Click PRESCAN. When you have completed parts A through E of this
step, a color image of the photo currently in position will appear in
the KODAK Driver window. You can use this image to determine
whether additional adjustments are needed before final scanning. If
B & W is on (see below), the prescan appears in black-and-white.
5-6Using the KODAK Driver for Adobe Photoshop (Macintosh)
G
Page 63

. . . . . . . . . . . . . . . . . . . . . . . . . . . . .
KODAK Professional
RFS 3570 Film Scanner
35 mm Multi-frame
Holder Adapter . . .
. . . remove if in
Scanner.
Wait as a “Calibration Procedure” alert box appears; follow the
directions it contains as outlined in detail in parts A through E of this
step. (Calibration is required each time the Scanner is turned on.)
IMPORTANT: Image quality will be degraded significantly if the steps
below are not followed with care.
A. If the 35 mm multi-frame holder adapter is in the Scanner,
remove the adapter and film holder.
Using the KODAK Driver for Adobe Photoshop (Macintosh)G5-7
Page 64

. . . . . . . . . . . . . . . . . . . . . . . . . . . . .
B. If a single-frame film holder is in the Scanner, remove it.
Single-frame
Film Holder
KODAK Professional
RFS 3570 Film Scanner
5-8Using the KODAK Driver for Adobe Photoshop (Macintosh)
G
Page 65

. . . . . . . . . . . . . . . . . . . . . . . . . . . . .
C. If the single-frame holder adapter is not in the Scanner, put it in
place in the Scanner. Do so by holding it in the orientation shown
below with the slots (at the left and right of the adapter) facing
forward, and then slide the slots all the way down over the edges
of the front of the metal frame in the Scanner.
Single-frame
Holder Adapter
. . . insert if not already
in Scanner.
The slots on both ends . . .
. . . wrap around
the frame in the Scanner.
KODAK Professional
RFS 3570 Film Scanner
Using the KODAK Driver for Adobe Photoshop (Macintosh)G5-9
Page 66

. . . . . . . . . . . . . . . . . . . . . . . . . . . . .
KODAK Professional
RFS 3570 Film Scanner
Calibration Mask
CALIBRATION MASK
D. Put the calibration mask into the Scanner. As you insert it into the
Scanner, the words “Calibration Mask” should face forward as
shown below. The raised lip on the back of the mask should align
with the indentation in the rear frame in the Scanner. Slide the
mask all the way down in the Scanner; the words “Calibration
Mask” should not be visible.
5-10Using the KODAK Driver for Adobe Photoshop (Macintosh)
G
Page 67

. . . . . . . . . . . . . . . . . . . . . . . . . . . . .
E. Click OK. The Scanner will then display several messages. As
prompted, wait for calibration to complete, reinsert the appropriate film holder — with film in place — and wait while focusing
occurs and your image appears in the Driver window.
NOTE: In addition to calibration, the control program for the Scanner —
called firmware — is now copied from your computer to the Scanner.
This occurs each time you complete this process.
Using the KODAK Driver for Adobe Photoshop (Macintosh)G5-11
Page 68

. . . . . . . . . . . . . . . . . . . . . . . . . . . . .
Change the Magnification Adjustment
4. (Optional) Change the MAGNIFICATION ADJUSTMENT if desired by moving
its slider or typing an integer value from -10 to 10 in the text box to
the right of the slider. The illustrations below for a 6x7 image demonstrate the operation of this adjustment. (The film has been removed
from the holder to emphasize the border in these illustrations.)
NOTES: If you change the magnification adjustment, the Scanner must
refocus. As prompted by the message that occurs, remove a film holder if
present and place the calibration mask into the Scanner as explained in an
earlier step of this section. Follow additional prompts as they appear to:
remove the calibration mask, replace the film holder (with your film in it),
and wait for focusing to complete.
The magnification adjustment for each film size is maintained from work
session to work session.
5-12Using the KODAK Driver for Adobe Photoshop (Macintosh)
G
Page 69

. . . . . . . . . . . . . . . . . . . . . . . . . . . . .
Black borders above
and below the image
indicate underscanning . . .
. . . which occurs at
the negative end of
the slider.
Missing image above
and below the scan
area indicate
overscanning . . .
. . . which occurs at
the positive end of
the slider.
Using the KODAK Driver for Adobe Photoshop (Macintosh)G5-13
Page 70

. . . . . . . . . . . . . . . . . . . . . . . . . . . . .
You determine the “optimal” setting for your images. To ensure that as
many pixels of the imager as possible are used for you images, your
image should fill the scanning area vertically. This will typically occur
with the slider in the middle (nominal) range of the scanner either at,
or within a few percentage points either way, of the center of the
slider.
However you may wish to use other settings. To ensure that you
obtain all of the image for one piece of film after another, you may
wish to leave magnification at the negative end (underscanning) of the
magnification slider. On the other hand if you always have “extra”
space around the portion of the image you want to use, then you may
wish to leave magnification at the positive end (overscanning) of the
magnification slider.
The most recently used magnification setting for each film size is
maintained from one work session to the next in the preferences file
for the Scanner.
PreScan the Image Again
5. If you have changed the MAGNIFICATION ADJUSTMENT in the previous step,
click P
RESCAN to see the result of the changed magnification setting;
repeat steps 4 and 5 as desired.
5-14Using the KODAK Driver for Adobe Photoshop (Macintosh)
G
Page 71

. . . . . . . . . . . . . . . . . . . . . . . . . . . . .
Select the Image
6. A. (Optional) Click SELECT.
NOTE: If you have changed the film size, the Scanner must recalibrate
and focus. As prompted by the messages that appear, remove a film
holder if present and place the calibration mask into the Scanner. Follow
additional prompts as they appear to: remove the calibration mask,
replace the film holder (with your film in it), and wait for recalibration
and focusing to complete.
A low-resolution black-and-white scan occurs every two seconds,
with the image displayed in the window. (The S
changes to S
TOP SELECT. Scanning will stop automatically after 10
minutes if no additional action is taken.)
B. (Optional) If you are using 35 mm film or slides, and you do not
see the image you want, move the film or slide holder to the left
or right — while scans continue — until you see the image you
want. (Because scanning may occur while you are moving the
holder, you may see blurred images until after you stop moving
the holder.)
ELECT button
C. If you are using film sizes other than 35 mm, and you do not see
the image you want, click S
TOP SELECT, remove the film holder,
center the desired image in the holder, reinsert the holder, and
ELECT again.
click S
D. When you see the image you want, click S
E. Click P
RESCAN to obtain a color image in the KODAK Driver
TOP SELECT.
window.
Using the KODAK Driver for Adobe Photoshop (Macintosh)G5-15
Page 72

. . . . . . . . . . . . . . . . . . . . . . . . . . . . .
Set Auto Balance
7. (Optional) Set AUTO BAL. For most customers the AUTO BAL suggested
setting of “on” will automatically provide the proper “scene” balance.
However, you may need to turn off A
as computer generated graphics or scenes with dominant colors. If
you change this setting, click V
change.
NOTE: If the original prescan only needs fine color and/or brightness adjustments, do not turn off A
described in “Change Color Levels” and “Change Brightness” below.
UTO BAL; instead, adjust color and/or brightness as
Rotate the Image
8. (Optional) Click 90° CCW, 180°, or 90° CW to rotate the image 90°
counterclockwise (CCW), 180°, or 90° clockwise (CW), respectively.
Click N
ORMAL to display the image as it is oriented in the film or slide
holder.
Sharpen the Image
UTO BAL for certain images such
IEW CHANGES to see the effect of the
9. (Optional) Use the SHARPEN popup menu to adjust the level of edge
definition between image elements (pixels). Choose O
IGH; HIGH provides the most definition. Later, when you click SCAN,
H
the time required to complete the scan will increase slightly if you
select N
NOTE: There is no immediate response when a SHARPEN option is selected;
instead this choice takes effect later when you click P
5-16Using the KODAK Driver for Adobe Photoshop (Macintosh)
ORMAL or HIGH.
FF, NORMAL or
RESCAN or SCAN.
G
Page 73

. . . . . . . . . . . . . . . . . . . . . . . . . . . . .
Set the Image to Black and White
10. (Optional) Click B & W to have all subsequent actions — including
the final scan — occur in black and white.
Focus the Image
11. (Optional) Use the Scanner to focus your image:
NOTE: You could focus the image without Step A below; however Step A is
helpful when working with an image that contains one area that is sharper
than the rest of the image.
A. Drag the pointer, pulling the selection rectangle around the
portion of the image that is the sharpest (in the best focus); the
area should contain a significant amount of detail.
NOTES: The focusing algorithm operates on the area inside the selection
rectangle, optimizing on your selection and focusing the rest of the
image accordingly.
To change the size of an existing selected area, press and hold down the
Command (Z) key. With the key down, when you move the crossbar
cursor over the edge of the selection rectangle, the crossbar turns into
arrows. Drag the mouse on any corner or side of the selection rectangle,
changing the size of the selection rectangle. Then release the Command
(Z) key and mouse button.
To move an existing selection rectangle, place the crossbar cursor inside
the selection rectangle. Press and hold down the Command (Z) key; the
crossbar becomes a hand. Drag the cursor, moving the selection rectangle to its new location. Then release the Command (Z) key and mouse
button.
Using the KODAK Driver for Adobe Photoshop (Macintosh)G5-17
Page 74

. . . . . . . . . . . . . . . . . . . . . . . . . . . . .
To deselect an area, click once inside or outside the selection rectangle.
B. Click FOCUS. You will hear one buzz after another during the
focusing process. A P
complete, and the image appears.
C. Click once to remove the selection rectangle; this will ensure that
later when you do a scan you obtain the full image, not just the
small portion within the focus rectangle.
RESCAN is done automatically once FOCUS is
Change Color Levels
12. (Optional. For color images only.) Adjust color levels with the automated method (A) and/or manual method (B).
A.
5-18Using the KODAK Driver for Adobe Photoshop (Macintosh)
Use C
LICK WHITE
.
This method automatically adjusts color balance
via a user-selected gray or white portion of the image.
G
Page 75

. . . . . . . . . . . . . . . . . . . . . . . . . . . . .
Click the CLICK WHITE button, then click a neutral spot in the image
known to be gray or white. (Do not click a dark shadow or a
bright highlight or overexposed area.) This action automatically
displays changes in the image window and repositions the color
sliders in the B
NOTES: Once clicked, the name of the CLICK WHITE button changes to
LICK NOW, a prompt indicating that you should click the image. You can
C
also cancel without clicking the image by clicking the C
The B
RIGHTNESS slider may move; however, CLICK WHITE does not optimize
on brightness, and you may still need to adjust brightness as described
next in “Change Brightness.”
B.
Adjust the balance sliders.
known gray or white spot in the image or when additional fine
adjustments are desired after using method A.
Drag the red/cyan, green/magenta, and/or blue/yellow sliders as
desired; then click V
NOTES: If desired, click on the RESET DEFAULTS button to return all balance
settings to 0 (for the current film type selected). Otherwise, current settings
will be saved from one work session to the next for the selected film type
until they are changed.
When you move the pointer over the image, the arrow pointer becomes a
cross-hair pointer, and red (R), green (G), and blue (B) values at the location
of the pointer appear near the lower right-hand corner of the image.
ALANCE area of the window.
LICK NOW button.
Use this method when there is no
IEW CHANGES to see the effect of the changes.
Change Brightness
13. (Optional) Use the scroll bars or type new values (-20 to 20) to adjust
the overall brightness of the image. Click V
result of the new values.
NOTE: If desired, click on the RESET DEFAULTS button to return all balance
settings to 0 for the current film type selected. Otherwise, current settings will
be saved from one work session to the next for the selected film type until
they are changed.
IEW CHANGES to see the
Using the KODAK Driver for Adobe Photoshop (Macintosh)G5-19
Page 76

. . . . . . . . . . . . . . . . . . . . . . . . . . . . .
Change Contrast
14. (Optional) Use the scroll bars or type new values (-10 to 10) to adjust
the contrast among image elements (pixels). Click V
the result of the new values.
NOTES: A contrast adjustment is a gamma adjustment.
If desired, click on the R
for the current film type selected. Otherwise, current settings will be saved
from one work session to the next for the selected film type until they are
changed.
ESET DEFAULTS button to return all balance settings to 0
Choose the Resolution
15. Choose the resolution you want from the RES (resolution) popup
menu. The F
ULL choice provides the greatest resolution and provides
the largest amount of data from the Scanner; if you want a lower
resolution, choose other percentages from this menu.
IEW CHANGES to see
Additionally, you can choose C
USTOM from the RES popup menu and
type a value from 1 to 100 in the text box that appears to the right of
the RES menu.
NOTE: Different resolutions produce different image sizes, as shown in the
IMAGE SIZE information below the image in the KODAK Driver window. Total
scan time will vary with different resolutions, and some resolutions may take
longer to scan on some computers depending on the processor and amount
of memory in the computer.
This text box . . .
. . . appears only when Custom is selected.
5-20Using the KODAK Driver for Adobe Photoshop (Macintosh)
G
Page 77

. . . . . . . . . . . . . . . . . . . . . . . . . . . . .
“Crop” the Image
16. Follow part A or part B of this step depending on whether or not you
want to crop the image.
A. If you do not want to crop the image, click once on the image to
remove the selection (cropping) rectangle.
B. If you want to crop the image, drag the mouse within the image,
pulling the selection rectangle around the portion of the image
you wish to scan; this “crops” the image. Only the cropped area
will be scanned into Photoshop (see next step); if you do not
select a specific portion, the entire image will be scanned. Note
MAGE SIZE, shown below the image, changes to reflect the size
that I
of the area you have selected.
NOTES: To change the size of an existing selected area, press and hold
down the Command (Z) key. With the key down, when you move the
crossbar cursor over the edge of the selection rectangle, the crossbar
turns into arrows. Drag the mouse on any corner or side of the selection
rectangle, changing the size of the selection rectangle. Then release the
Command (Z) key and mouse button.
To move an existing selection rectangle, place the crossbar cursor inside
the selection rectangle. Press and hold down the Command (Z) key; the
crossbar becomes a hand. Drag the cursor, moving the selection rectangle to its new location. Then release the Command (Z) key and mouse
button.
To deselect an area, click once inside or outside the selection rectangle.
Scan the Image into Photoshop
17. Click SCAN. The KODAK Driver window closes, a progress box
appears, and then the scan appears in a Photoshop window.
NOTE: If this is the first time that you are completing a scan during this work
session, or if you notice water spots or bubbles in the scanned image at any
Using the KODAK Driver for Adobe Photoshop (Macintosh)G5-21
Page 78

. . . . . . . . . . . . . . . . . . . . . . . . . . . . .
time while working with the scanner, clean the scanner “diffuser” (a
3 x 4-inch piece of white plastic), as summarized in this note, and as fully
described at the end of “Appendix C — Troubleshooting.”
A. Remove the calibration mask and single frame holder adapter or multi-
frame holder.
B. Orient the dust removal tool as shown below, and with an up and down
motion, clean the surface of the diffuser making sure the fiber strip makes
contact with the diffuser.
THIS SIDE
TOWARD FRONT
OF MACHINE
Dust removal tool
Fiber strip
Diffuser
C. Remove the dust tool, replace the mask and holder, and rescan the
D. If the problem continues, use the scanner software RECALIBRATE button as
5-22Using the KODAK Driver for Adobe Photoshop (Macintosh)
KODAK Professional
RFS 3570 Film Scanner
image.
described in “Appendix C — Troubleshooting.”
G
Page 79

. . . . . . . . . . . . . . . . . . . . . . . . . . . . .
18. (Optional) Edit the image as desired.
Scan Additional Images
19. (Optional) To scan additional images, begin by choosing KODAK RFS
3570 from the A
and then repeat the steps of this section.
CQUIRE submenu of the Adobe Photoshop FILE menu,
Using the KODAK Driver for Adobe Photoshop (Macintosh)G5-23
Page 80

. . . . . . . . . . . . . . . . . . . . . . . . . . . . .
Turning Off the Scanner
When your scans are complete, quit Adobe Photoshop and turn off your
computer and the Scanner as follows:
CAUTION: The Scanner must be turned off (and on) only when
your Macintosh computer is off.
1. (Optional) Save any open Photoshop images to the computer hard
disk.
IMPORTANT: If you click in the close box of the window of an acquired —
but unedited — image (or choose C
close without asking you if you want to save the image and the image will
not be saved. Therefore, be sure you save any acquired images you do not
want to lose before closing image windows.
2. Choose QUIT from the Adobe Photoshop FILE menu.
3. Wait as the application quits and you are returned to the Apple
Finder.
LOSE from the FILE menu), the window will
4. Remove the film or slide holder from the Scanner.
5. Turn off your Macintosh computer.
6. Turn off the Scanner.
7. Cover the scanner with the supplied dust cover.
IMPORTANT: Because dust buildup in the scanner can affect image quality,
it is important to cover the scanner whenever the power is off.
5-24Using the KODAK Driver for Adobe Photoshop (Macintosh)
G
Page 81

. . . . . . . . . . . . . . . . . . . . . . . . . . . . .
Reference: Buttons and Indicators
90° CCW Rotates the image 90° counterclockwise.
90° CW Rotates the image 90° clockwise.
180° Rotates the image 180°.
BOUT PLUG-IN This option, available on the Apple menu ( ) for Adobe
A
Photoshop 2.5 and beyond, displays the version number of
the KODAK Driver. For the same information from earlier
versions of Photoshop, choose ABOUT PHOTOSHOP from the
Apple menu and then click A
UTO BAL For most customers the AUTO BAL suggested setting of “on”
A
will automatically provide the proper “scene” balance.
However, you may need to turn off A
images such as computer generated graphics or scenes with
dominant colors. If you change this setting, click V
CHANGES to see the effect of the change.
NOTE: If the original prescan only needs fine color and/or brightness adjustments, do not turn off A
and/or brightness as described earlier in this chapter.
B & W Obtains only black-and-white data from the Scanner when
on (X appears in the box). Red and blue scanner flashes are
disabled; only green data are obtained from the Scanner.
BOUT PLUG-INS.
UTO BAL for certain
IEW
UTO BAL; instead, adjust color
BALANCE Adjusts color balance for the scan. We recommend that you
NOTE: There is no immediate response when the B & W setting
changes; instead this choice takes effect later when you click
RESCAN or SCAN.
P
make color adjustments in the KODAK Driver window first
and fine-tune color later in Adobe Photoshop, if necessary.
NOTE: Refer to “Change Color Levels” earlier in this chapter for
additional information on this option.
Using the KODAK Driver for Adobe Photoshop (Macintosh)G5-25
Page 82

. . . . . . . . . . . . . . . . . . . . . . . . . . . . .
BRIGHTNESS Adjusts the level of brightness of the entire image.
NOTE: Refer to “Change Brightness” earlier in this chapter for
additional information on this option.
CANCEL Leaves the KODAK Driver and returns you to Adobe
Photoshop without returning any scan data. (Pressing ESC or
holding down the Command (Z) key, pressing the period
key, then releasing both keys produces the same result.)
LICK NOW
C
C
LICK WHITE Automatically adjusts color balance via a user-selected gray
See
CLICK WHITE.
or white portion of the image.
Click the C
LICK WHITE button, then click a neutral spot in the
image known to be gray or white. (Do not click on a dark
shadow or a bright highlight or overexposed area.) This
action automatically displays changes in the image window
and repositions the color sliders in the B
ALANCE area of the
window.
NOTES: Once clicked, the name of the CLICK WHITE button changes
LICK NOW, a prompt indicating that you should click the image.
to C
You can also cancel without clicking the image by clicking the
LICK NOW button.
C
RIGHTNESS slider may move; however, CLICK WHITE does not
The B
optimize on brightness, and you may still need to adjust brightness
as described earlier in this chapter in “Change Brightness.”
CONTRAST Adjusts the level of contrast among the elements of the
image.
NOTES: A contrast adjustment is a gamma adjustment.
Refer to “Change Contrast” earlier in this chapter for additional
information on this option.
Crop Selects a portion of the image you want to scan. To crop,
5-26Using the KODAK Driver for Adobe Photoshop (Macintosh)
drag the cursor around the portion of the image you wish to
G
Page 83

. . . . . . . . . . . . . . . . . . . . . . . . . . . . .
scan — leaving a selection rectangle in the image. Then
click S
CAN to scan the cropped area into Adobe Photoshop,
resulting in a smaller image size.
NOTES: To change the size of an existing selected area, press and
hold down the Command (Z) key. With the key down, when you
move the crossbar cursor over the edge of the selection rectangle,
the crossbar turns into arrows. Drag the mouse on any corner or
side of the selection rectangle, changing the size of the selection
rectangle. Then release the Command (Z) key and mouse button.
To move an existing selection rectangle, place the crossbar cursor
inside the selection rectangle. Press and hold down the Command
(Z) key; the crossbar becomes a hand. Drag the cursor, moving the
selection rectangle to its new location. Then release the Command
(Z) key and mouse button.
To deselect an area, click once inside or outside the selection
rectangle.
FILM Choose the film type you want from this popup menu.
P
OSITIVE, NEGATIVE and many other choices are provided.
Select P
when scanning negative film.
OSITIVE when scanning positive film and NEGATIVE
NOTE: Some film types include a letter code. Use these values to
match the film type from this popup menu to the edgeprint codes
printed on your negatives from KODAK Professional Films.
FILM SIZE Choose the film size from this menu to match the film you
will scan.
NOTE: Refer to “Set the Film Size” earlier in this chapter for
additional information on this option.
FOCUS Focuses the entire image. You can obtain a better overall
focus by first dragging the mouse to create a selection
rectangle around the portion of the image that is in the best
focus (and contains a significant amount of detail). Then
click F
OCUS.
Using the KODAK Driver for Adobe Photoshop (Macintosh)G5-27
Page 84

. . . . . . . . . . . . . . . . . . . . . . . . . . . . .
GAMMA A measure of contrast in photographic images.
MAGE SIZE Displays the quantity of data that will be returned from the
I
See
CONTRAST.
scan. Image size depends on the resolution selected, on
whether B & W is selected, and on whether you’ve cropped
the image. Higher resolutions, color images, and full images
produce more scan data than lower resolutions, B & W
scans, and cropped images. The dots-per-inch (DPI) of the
scan for the selected settings is also displayed.
AGNIFICATION ADJUSTMENT Adjusts the magnification of the image, allowing
M
you to ensure that as many pixels of the imager as possible are
used for your image.
NOTE: Refer to “Change the Magnification Adjustment” earlier in
this chapter for additional information on this option.
NORMAL (rotation) Displays the image as oriented within the film or slide
holder.
RESCAN Produces a scan in the KODAK Driver window that you can
P
view and use to determine whether additional adjustments
are needed before final scanning. Unlike the S
CAN button,
this choice does not load the scanned image data into Adobe
Photoshop.
ECALIBRATE Used as part of the procedure to eliminate “bubbles” or
R
“water spots” from scanned images that may appear as a
result of dust on the scanner diffuser.
NOTE: For full details of eliminating “bubbles” or “water spots”
from scanned images, refer to “Appendix C — Troubleshooting.”
RES Allows you to select from FULL, or a variety of percentages.
Additionally, you can choose C
5-28Using the KODAK Driver for Adobe Photoshop (Macintosh)
USTOM from the RES popup
G
Page 85

. . . . . . . . . . . . . . . . . . . . . . . . . . . . .
menu and type a value from 1 to 100 in the text box that
appears to the right of the RES menu.
NOTES: Different resolutions produce different image sizes, as
shown in the I
time will vary with different resolutions, and some resolutions may
take longer to scan on some computers depending on the processor and amount of memory in the computer.
Image Size for the selected resolution appears beneath the image.
RESET DEFAULTS Resets the color, brightness and contrast levels to zero for
the current film type selected.
CAN Produces the final scan of the image with the current set-
S
tings, closes the KODAK Driver window and creates an
untitled Adobe Photoshop window displaying the scanned
image.
ELECT Generates low resolution black-and-white scans which
S
appear in the KODAK Driver window every two seconds,
thus allowing you to view the image in position in the
Scanner. Scanning will stop automatically after 10 minutes if
no additional action is taken.
MAGE SIZE information below the image. Total scan
NOTE: Refer to “Select the Image” earlier in this chapter for
additional information on this option.
SHARPEN Sharpens the overall image and defines the edges among
image elements (pixels). Choose from H
IGH, NORMAL, or OFF.
Version Number The version number for the KODAK Driver for Adobe
Photoshop software can be obtained while working in the
Finder. Locate and select the KODAK 3570 icon, then
choose G
appears in the G
Using the KODAK Driver for Adobe Photoshop (Macintosh)G5-29
ET INFO from the FILE menu. The version number
ET INFO window.
Page 86

. . . . . . . . . . . . . . . . . . . . . . . . . . . . .
VIEW CHANGES Using the last scanned or prescanned image, this button
produces an image on which you observe the results of any
changes you make to the color, brightness, and/or contrast
settings in the BALANCE area of the KODAK Driver window.
You can use this choice after each set of adjustments to view
changes before final scanning.
NOTE: Normally no scanning occurs, so VIEW CHANGES is faster than
RESCAN. Like PRESCAN, it does not load an image into Adobe
using P
Photoshop. However, VIEW CHANGES does scan the image:
When the Scanner is first accessed and VIEW CHANGES is
selected before S
When the last image scanned or prescanned was black-andwhite and you select V
unchecked.
CAN or PRESCAN has been selected.
IEW CHANGES with the B & W box now
5-30Using the KODAK Driver for Adobe Photoshop (Macintosh)
G
Page 87

. . . . . . . . . . . . . . . . . . . . . . . . . . . . .
. . . . . . . . . . . . . . . . . . . . . . . . . . . . . .
. . . . . . . . . . . . . . . . . . . . . . . . . . . . . . .
. . . . . . . . . . . . . . . . . . . . . . . . . . . . . . . .
6
Before You Begin — PC
NOTE: Before you continue, complete and submit the enclosed Warranty Registration card. You should also read “Appendix A — Software License Agreement”
and “Appendix B — Warranty.”
Check the following lists to ensure that you have the appropriate hardware
and software.
Before You Begin — PCG6-1
Page 88

. . . . . . . . . . . . . . . . . . . . . . . . . . . . .
Required Hardware
Computer
An 80386 or higher computer that has: a minimum of 8 megabytes (MB)
random access memory (RAM) (32 MB RAM or more is recommended for
fastest scan times) that can operate Windows 3.1; a minimum of 25 MB of
free space on its hard disk; a SCSI port (see below).
Display
VGA or higher-resolution Windows-compatible display, minimum
640 x 480 pixel screen size. A high-quality color monitor displays the best
images. (The quality of the scan is not affected by the monitor in use.)
Display Card (Graphics Adapter)
Use the appropriate display card for the display in use; we recommend a
16-bit or 24-bit display card. A 16-bit card can display up to 32,768 or
65,536 colors depending on the card, while a 24-bit card can display
more than 16.7 million colors.
NOTE: The display card must have a Windows-compatible driver.
SCSI Interface
ASPI (Advanced SCSI Programming Interface) Windows host adapter such
as those from Adaptec, Inc. running EZ-SCSI 4.01 or later.
6-2Before You Begin — PC
G
Page 89

. . . . . . . . . . . . . . . . . . . . . . . . . . . . .
Required Software
Microsoft Windows, version 3.1, Windows 95.
A TWAIN compliant software application. The Kodak driver for use
with TWAIN-compliant PC applications can be used with Adobe
Photoshop 3.0.5 or higher with Windows 95, and may also work with
other software applications that support TWAIN specifications.
Before You Begin — PCG6-3
Page 90

. . . . . . . . . . . . . . . . . . . . . . . . . . . . .
Optional Printers
Suggested printers for use with the scanner appear in “Appendix I —
Optional Equipment & Spare parts List.” In the United States, contact
Kodak at 1-800-CD-KODAK for detailed information on printer options
and accessories and to obtain ordering catalog numbers; in Canada call 1800-465-6325, and elsewhere outside the United States contact your
local Kodak representative.
6-4Before You Begin — PC
G
Page 91

. . . . . . . . . . . . . . . . . . . . . . . . . . . . .
. . . . . . . . . . . . . . . . . . . . . . . . . . . . . .
. . . . . . . . . . . . . . . . . . . . . . . . . . . . . . .
. . . . . . . . . . . . . . . . . . . . . . . . . . . . . . . .
7
Installation
(Hardware and Software) —
PC
Follow the steps in this section to —
Install the Scanner hardware.
Install the KODAK TWAIN Driver for use with your PC TWAIN
compliant software.
Installation (Hardware & Software) — PCG7-1
Page 92

. . . . . . . . . . . . . . . . . . . . . . . . . . . . .
Installing the Scanner Hardware
Follow these instructions to connect the Scanner to a power source, to
connect the Scanner to your computer, and to set the Scanner SCSI
identification number.
Connecting the Scanner to a Power Source
Follow these steps to connect your Scanner to a power source:
1. Remove any remaining packing material from the Scanner and place
the Scanner on either side of your computer. (You should retain the
original shipping carton and packing materials.)
2. Press the O end of the power switch on the back of the Scanner to be
sure that the Scanner power is off.
3. Plug the appropriate end of the supplied power cable into the plug
outlet of the Scanner and the other end into a power source.
BACK OF FILM SCANNER
2
Plug Outlet
Power Switch
7-2Installation (Hardware & Software) — PC
SCSI ID
Serial Number
3570
-
3
G
Page 93

. . . . . . . . . . . . . . . . . . . . . . . . . . . . .
Installing a SCSI Host Adapter
CAUTION: Only trained and qualified technical personnel should
perform the following procedures. You should contact a computer
service professional to configure and install an ASPI SCSI host
adapter such as those from Adaptec, Inc. running EZ-SCSI 4.01 or
later.
The installer should read all manufacturers’ instructions for both
the computer and the host adapter before installing the adapter in
your computer.
For Qualified Technical Personnel Only
1. Turn off the power to the computer and all peripherals (turn off the
computer first).
2. If the termination power setting on your SCSI host adapter is disabled,
change its setting to enable it.
Installation (Hardware & Software) — PCG7-3
Page 94

. . . . . . . . . . . . . . . . . . . . . . . . . . . . .
3. Install the SCSI Host Adapter for your PC according to the
manufacturer’s installation instructions. When installation is complete,
a SCSI2 connector should be available on the back of your PC, as
shown in one example below. Different PCs have different connectors. The figures in this chapter are intended to illustrate a typical PC.
BACK OF PC
SCSI2 Port
Connecting the Scanner to Your Computer
Follow the instructions in this section to connect the Scanner, a nonterminated SCSI device, to your computer.
Select the appropriate instructions from the two sets that follow, according
to whether or not other external SCSI devices are connected.
Continue below at “If No External SCSI Devices Are Connected” if no
external SCSI devices are connected.
Or continue at “If External SCSI Devices Are Connected” later in this
chapter if external SCSI devices are connected.
7-4Installation (Hardware & Software) — PC
G
Page 95

. . . . . . . . . . . . . . . . . . . . . . . . . . . . .
If No External SCSI Devices Are Connected
Complete these steps if no SCSI devices are connected to your computer;
otherwise proceed to “If External SCSI Devices Are Connected” later in
this chapter.
CAUTION: Whenever connecting or disconnecting SCSI cables,
be sure power is turned off on all devices in the SCSI chain,
including the computer and the Scanner (turn off the computer
first).
1. Select the cable with the 50-pin SCSI2 HD connector at one end and
the 50-pin SCSI connector at the other end.
NOTE: You will need to obtain this cable if it is not supplied with your host
adapter.
50-pin SCSI Connector50-pin SCSI2 HD Connector
Installation (Hardware & Software) — PCG7-5
Page 96

. . . . . . . . . . . . . . . . . . . . . . . . . . . . .
2. Attach the 50-pin SCSI2 HD connector of the cable to the SCSI port
on the back of the computer. Make sure the cable connector is well
seated by pressing it into place firmly, so that the spring clips on the
connector snap onto the SCSI port.
7-6Installation (Hardware & Software) — PC
G
Page 97

. . . . . . . . . . . . . . . . . . . . . . . . . . . . .
3. Attach the other end of the cable to either of the identical SCSI ports
on the back of the Scanner. Seat the connector firmly and pinch the
thin wire clamps shut.
BACK OF FILM SCANNER
Thin Wire Clamps
SCSI ID
2
Serial Number
3570
-
3
Two Identical SCSI Ports
Installation (Hardware & Software) — PCG7-7
Page 98

. . . . . . . . . . . . . . . . . . . . . . . . . . . . .
4. Attach a SCSI terminator (supplied with the Scanner) to the empty
SCSI port on the Scanner, seat the terminator firmly, and then pinch
the thin wire clamps shut.
Terminator
BACK OF FILM SCANNER
SCSI Terminator
2
5. Continue at “Setting the Scanner SCSI Identification Number” later in
this chapter.
7-8Installation (Hardware & Software) — PC
SCSI ID
Serial Number
3570
-
3
G
Page 99

. . . . . . . . . . . . . . . . . . . . . . . . . . . . .
If External SCSI Devices Are Connected
Complete these steps if one or more external SCSI devices are connected
to your computer; otherwise continue at “Setting the Scanner SCSI Identification Number” later in this chapter.
CAUTION: Whenever connecting or disconnecting SCSI cables,
be sure power is turned off on all devices in the SCSI chain,
including the computer and the Scanner (turn off the computer
first).
IMPORTANT: The SCSI chain mentioned in this section must be connected to a
supported SCSI host adapter. (Refer to “Required Hardware” in Chapter 6.)
Multiple SCSI devices are connected to the computer in a chain. The
following steps will help you determine where you should place the
Scanner in that chain — either at the end of the chain, or in the middle of
the chain.
NOTE: The total cable length connecting all devices must not exceed 15 feet
(4.6 meters).
Installation (Hardware & Software) — PCG7-9
Page 100

. . . . . . . . . . . . . . . . . . . . . . . . . . . . .
1. Select your SCSI cable with identical 50-pin SCSI connectors at each
end.
NOTE: This cable is not packed with the Scanner but is available through
Kodak. Refer to “Appendix I — Optional Equipment & Spare Parts List.” This
cable is also widely available from computer retailers; if you obtain a cable
from one of these sources, be certain to obtain a high quality cable with a
continuous EMI shield over the cable and connectors.
50-pin SCSI Connector 50-pin SCSI Connector
7-10Installation (Hardware & Software) — PC
G
 Loading...