

Page 1
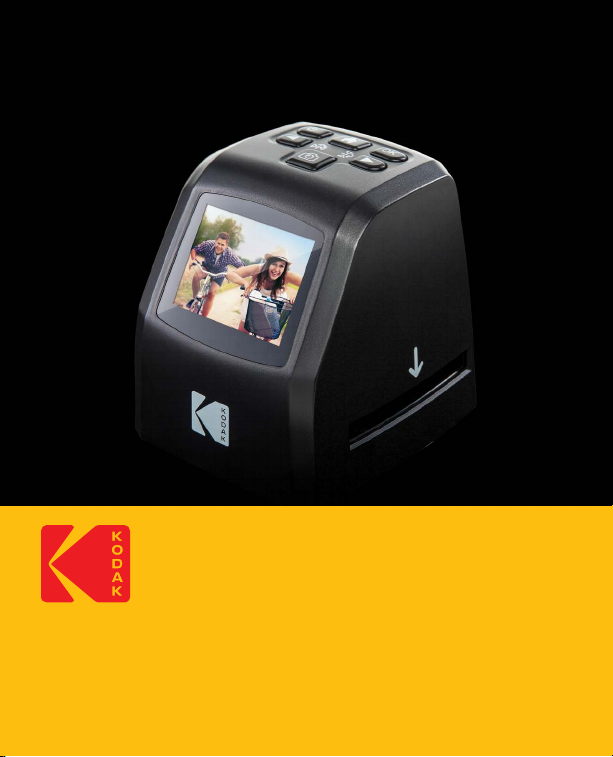
KODAK Mini Digital Film Scanner
Mini scanner numérique de pellicules
Mini Scanner di Rullini Digitale
Digitaler Mini-Filmscanner
Mini escáner digital para película
User Manual
Manuel de l'utilisateur
Manuale Utente
Bedienungsanleitung
Manual del usuario
Page 2

CONTENTS
INTRODUCTION
1
SPECIFICATIONS
2
INCLUDED ACCESSORIES
3
SAFETY PRECAUTIONS
4
PRODUCT OVERVIEW
5
MAIN MENU OVERVIEW
6
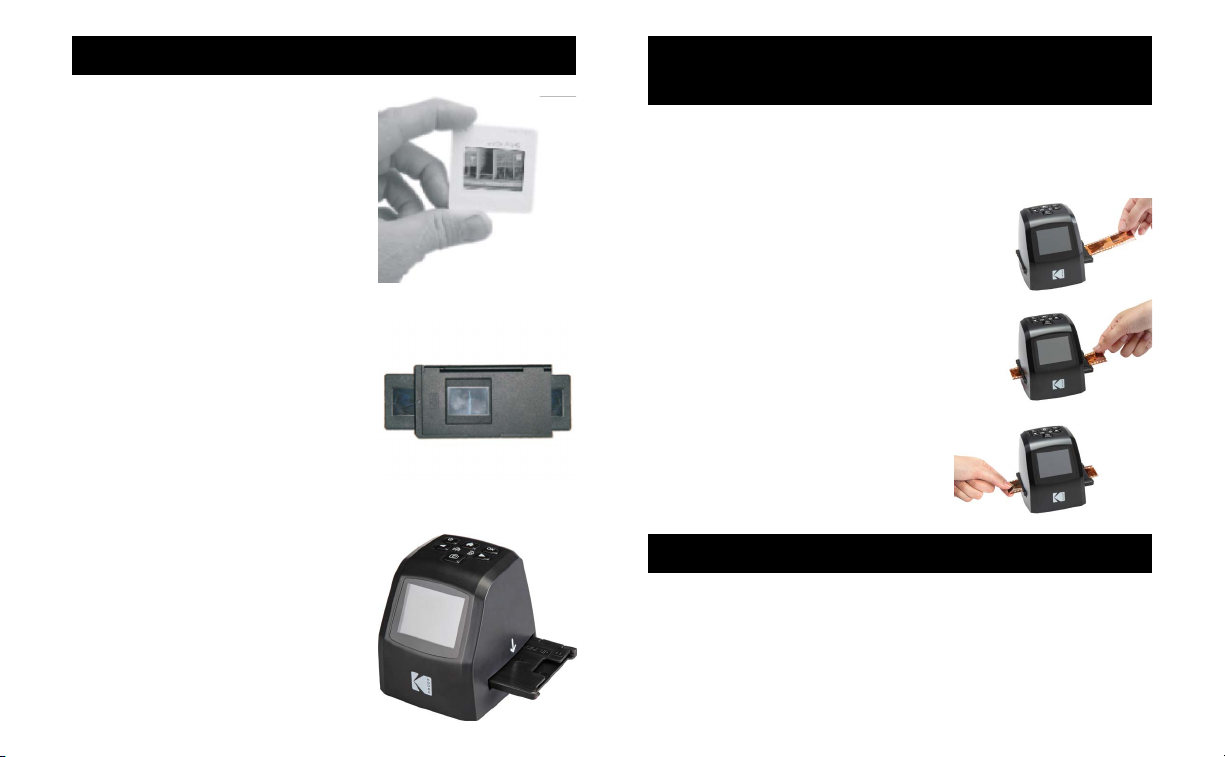
PREPARING MEDIA TO SCAN
7
LOADING NEGATIVES
8
LOADING SLIDES
9
CONTINUOUS LOADING (SLIDES AND/OR FILM)
10
USING THE SCANNER
11
VIEWING SCANNED IMAGES
12
SETTING THE LANGUAGE
13
CHOOSING PHOTO RESOLUTION
14
FORMATTING THE SD™ CARD
15
CONNECTING THE SCANNER TO
16
YOUR COMPUTER
WARRANTY INFORMATION
CUSTOMER SERVICE CONTACT INFORMATION
4
5
6
7
8
9
10
11
12
13
13
18
18
19
20
21
22
24
2
3
Page 3

1. INTRODUCTION
2. SPECIFICATIONS
Thank you for purchasing the KODAK Mini Digital Film
Scanner. This User Guide is intended to provide you
with guidelines to ensure that operation of this product
is safe and does not pose risk to the user. Any use that
does not conform to the guidelines described in this
User Guide may void the limited warranty.
Please read all directions before using the product and
retain this guide for reference. This product is intended
for household use only.
This product is covered by a limited one-year warranty.
Coverage is subject to limits and exclusions. See
warranty for details.
Function Film scanner/USB MSDC
Interface USB 2.0
Image Sensor 14.0 megapixels
(4416x3312)
1/2.33" CMOS sensor
Display 2.4 color TFT LCD
Exposure Control Automatic/Manual (-2.0 ~
+2.0 EV)
White Balance Automatic
Resolution 14 megapixels / 22
megapixels*
Scannable Film Types 135 Film (36 x 24mm)
126 Film (27 x 27mm)
110 Film (17 x 13mm)
Super8 Film (4.01 x 5.79mm)
Monochrome Film
Slides
Scannable Picture Formats B&W, Slides, Negatives
Scanned File Format JPEG
TVOut Type NTSC/PAL
Internal Memory 128MB
External Memory Support SD
included)
Power Supply DC 5V adapter / Mini USB port
Available Languages SChinese / TChinese /
™
card up to 32GB (not
4
5
Page 4
English / French / German /
Italian / Spanish / Japanese
PC Systems Supported Windows
Mac
®
XP / Vista / 7 / 8 / 10
®
OS 10.7.3 and above
Dimensions 3.43" L x 3.41" W x 4.04" H
(87 x 86.5 x 102.5mm)
Weight 8.82 oz. (250g)
*Your KODAK Mini Digital Film Scanner uses a process called
“interpolation” to upgrade and enhance the megapixels of your
scanned photos from 14 – 22MP.
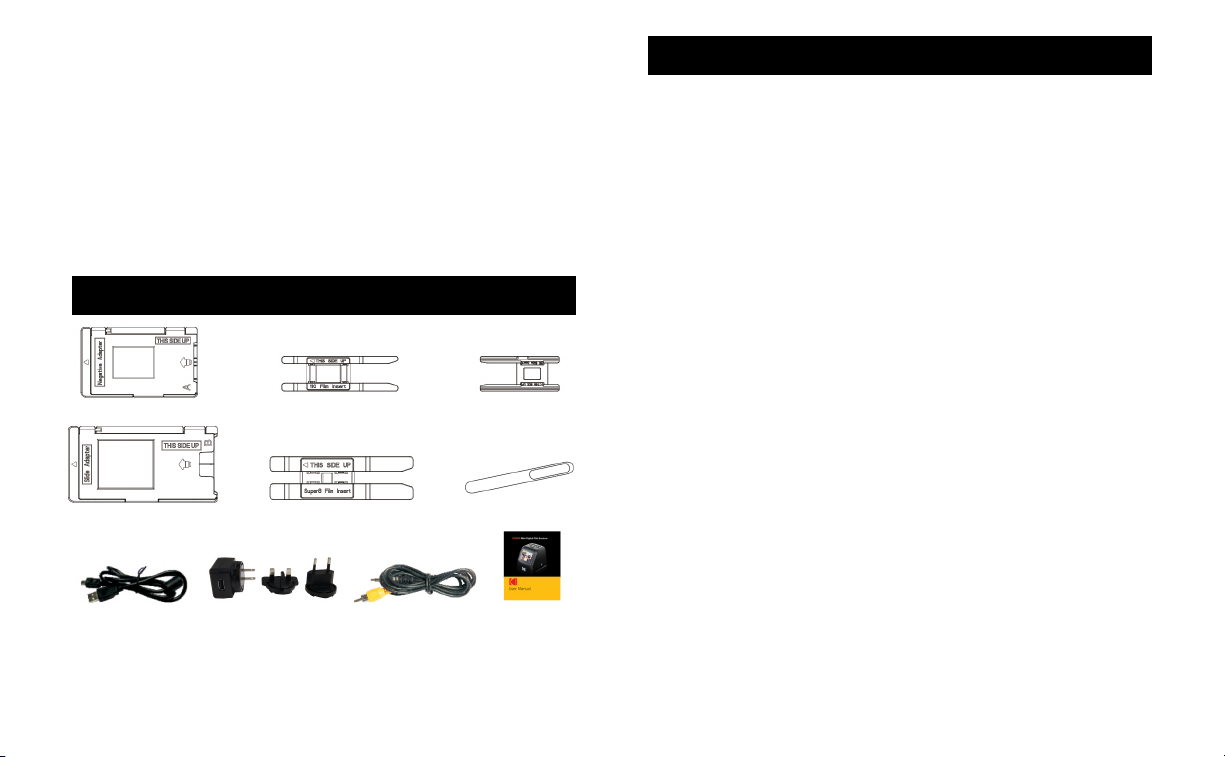
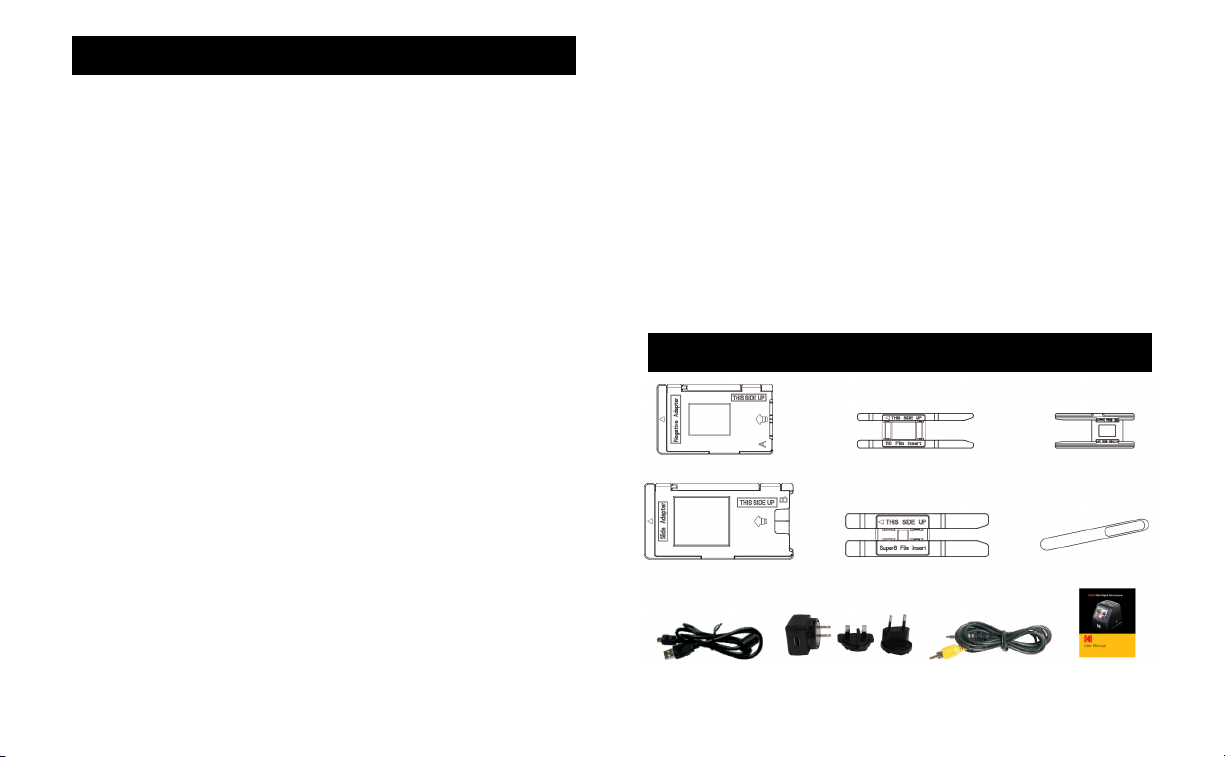
3. INCLUDED ACCESSORIES
Negative holder
Slide holder
Mini USB cable 3-in-1 international
NOTE: An SD Card is not included but highly recommended while
using this product. This device does have an extremely limited
amount of internal memory, but can only hold a few pictures at a time
before you need to transfer them to your computer.
6
110 negative adapter 110 slide adapter
Super 8 adapter Cleaning wand
User manualTV-out cable
power adapter
4. SAFETY PRECAUTIONS
• Do not attempt to disassemble this device for any reason.
• Do not touch the inner part of the scanner after dropping it
or after it has suered any type of damage.
• If you notice smoke or a strange odor coming from the
Digital Film Scanner, immediately turn the power o and
remove any slides, slide trays, and/or ilm negatives from
the product. Do not ever, under any circumstances, attempt
to repair this device on your own.
• Make sure the scanner lens is clean before use in order to
ensure a clear and unblemished image scan.
• Do not use products such as alcohol, gasoline, diluent, or
any other organic solvent when cleaning or attempting to
clean this product.
• Do not use this device in an environment where it will be
exposed to heavy dust or humidity/moisture.
• In order to avoid a scanner malfunction due to USB
overload, do not plug too many USB devices into your
computer at the same time as the scanner.
• Please use ilms of standard size, do not attempt to modify
or adapt the existing adapters and ilm trays.
• To protect the scanner and save energy, it will automatically
shut o after 30 minutes in an idle state. Press the power
button in the top left corner to turn it back on and resume
normal use.
7
Page 5
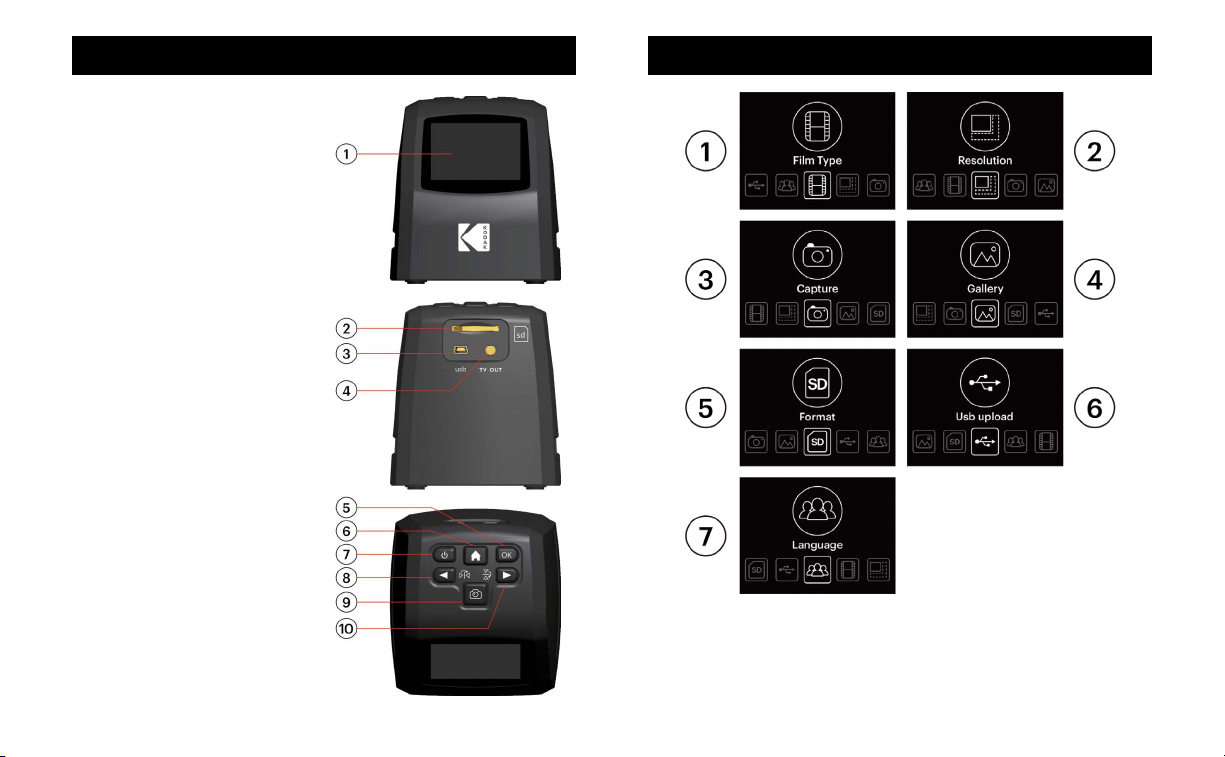
5. PRODUCT OVERVIEW
1. LCD Screen
™
card slot
2. SD
(NOTE: SD
not included)
3. Mini USB power connection
4. TV-out connection
5. OK button
6. Home button (This button
will ALWAYS take you to
the home screen, no matter
where you are in the menu
sequence.)
7. Power button
8. Left arrow/reverse function
9. Scan/Capture button (This
button will ALWAYS scan
and save your image when
pressed.)
10. Right arrow/lip function
™
card
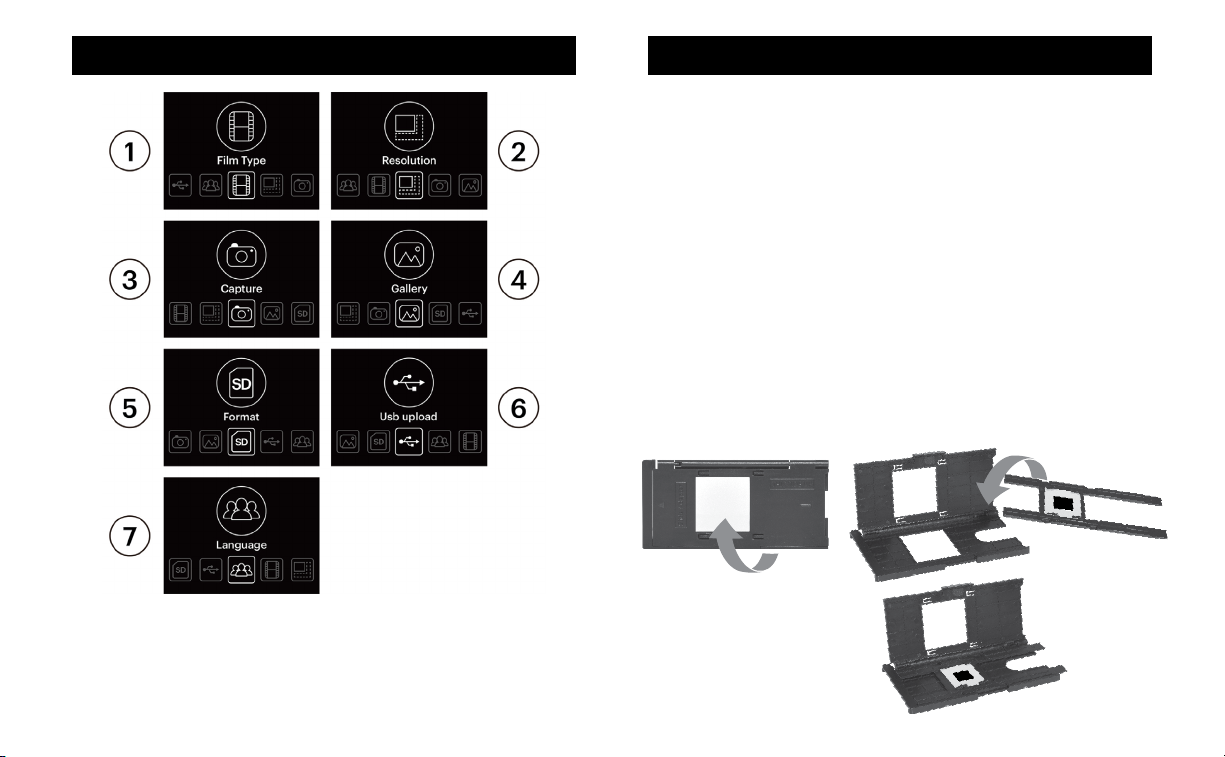
6. MAIN MENU OVERVIEW
1. Film Type
2. Resolution
3. Capture Image
5. Format Memory Card
6. USB Upload
7. Language Selection
4. Gallery
8
9
Page 6
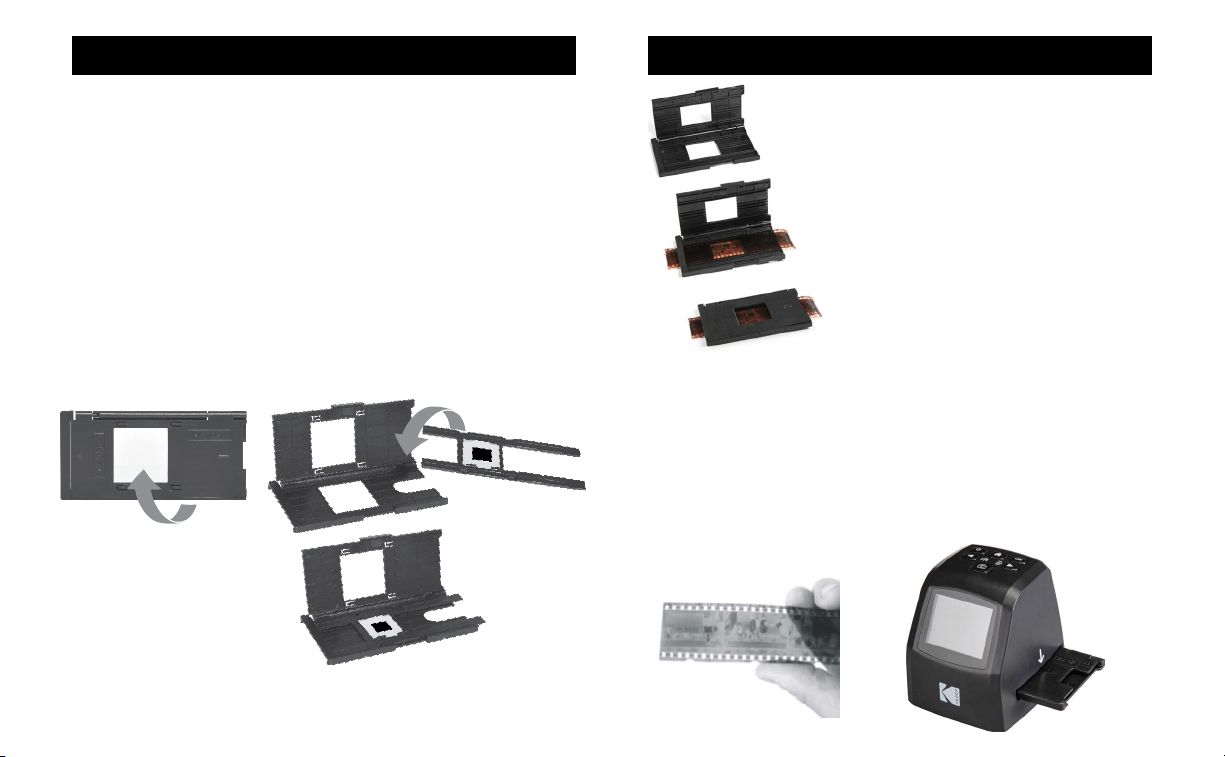
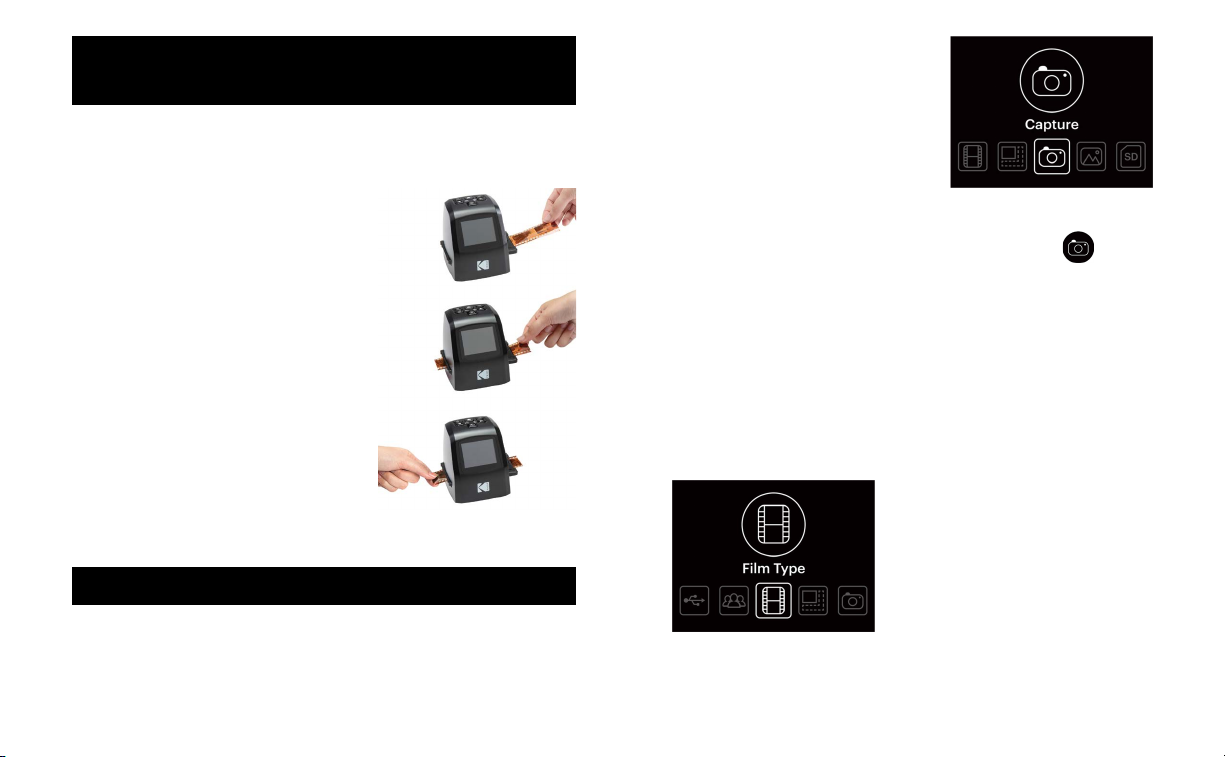
7. PREPARING MEDIA TO SCAN 8. LOADING NEGATIVES
Before using your ilm scanner, you should either insert an SD™
card (not included) as device memory is very limited, or make
sure there is enough room in the very limited device memory to
hold the pictures you want to scan.
Inserting an SD
™
card while the device is in operation will cause
the ilm scanner to restart and you will lose any edits being made
to the image, so if you have a memory card, insert the card prior
to use.
Locate the correct adapter for your ilm or slide, if applicable, and
place it in the correct ilm or slide tray before you load the tray.
Directions for loading the trays into the scanner can be found in
the subsequent sections titled “Loading Negatives” and “Loading
Slides”. These directions also apply to B&W ilm as well. Adapters
and trays are all clearly marked.
Flip up the top cover of
the adapter. Place insert
with your slide or ilm into
adapter.
NOTE: Always handle slide or ilm
negatives with care to avoid getting
scratches or ingerprints on them. We
recommend using cotton gloves to
handle negatives, and using compressed
cotton (q-tips, cotton balls, etc.) to
remove any dust that might be present
before scanning them.
Always make sure that your ilm negatives
are not warped or bent before inserting
them in the scanner. Warped or creased
negatives will not produce clear or
correct images.
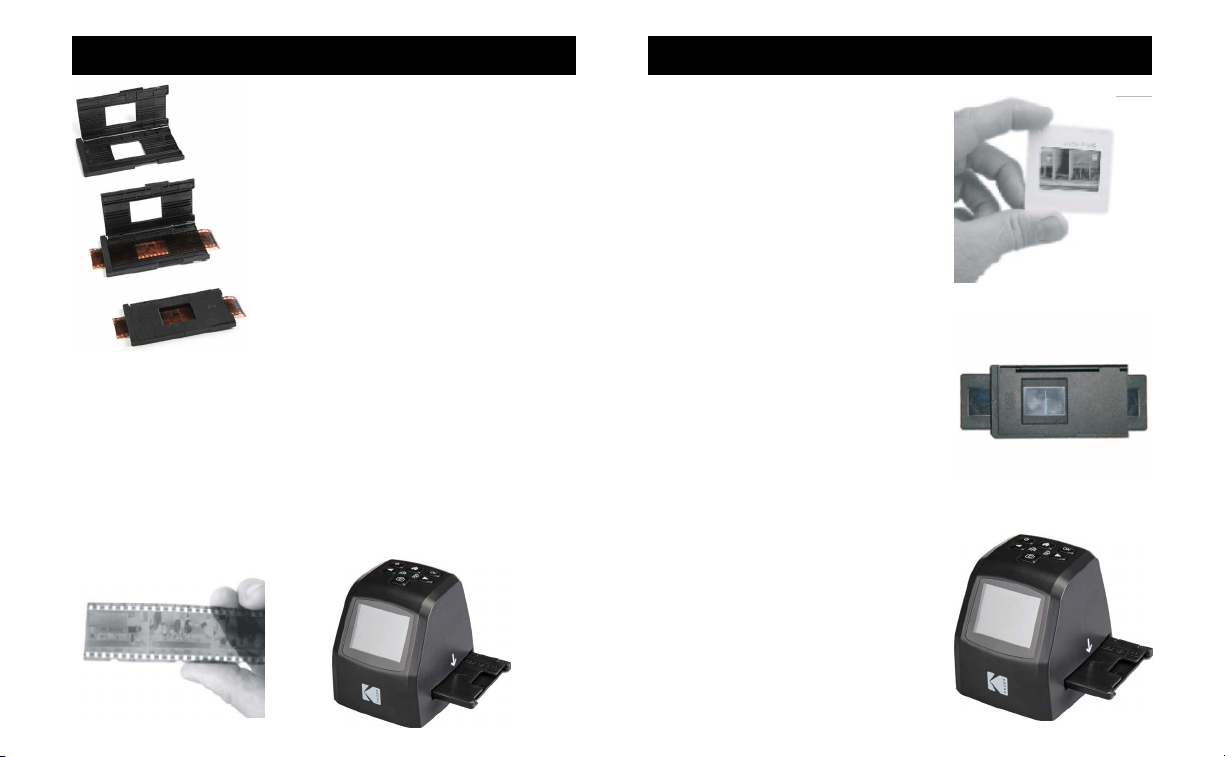
1. Hold the negative up to the light, with the right side facing you.
2. Take the ilm negative holder out (with the correct sized
adapter if necessary) and hold it with the latch facing away
from you so that the loading arrow ◄ points left. Open the
latch; place the negative into the recessed area; and then
close the latch, making sure to press down around the edges
so that it locks into place.
3. Load the negative holder into the slot on the right side of the
ilm scanner.
10
11
Page 7
9. LOADING SLIDES
1. Hold the slide toward the light
and face the front of the slide
toward you.
2. Take the slide holder out and hold
it with the latch facing away from
you so that the loading arrow ◄
points left. Open the latch; place
the slide into the recessed area
(you can also use this area to
hold the dierent size ilm adapters
if necessary); and then close the
latch, making sure to press down
around the edges so that it snaps
securely into place.
3. Insert the slide holder into the slot
on the right side of the ilm scanner
as pictured.
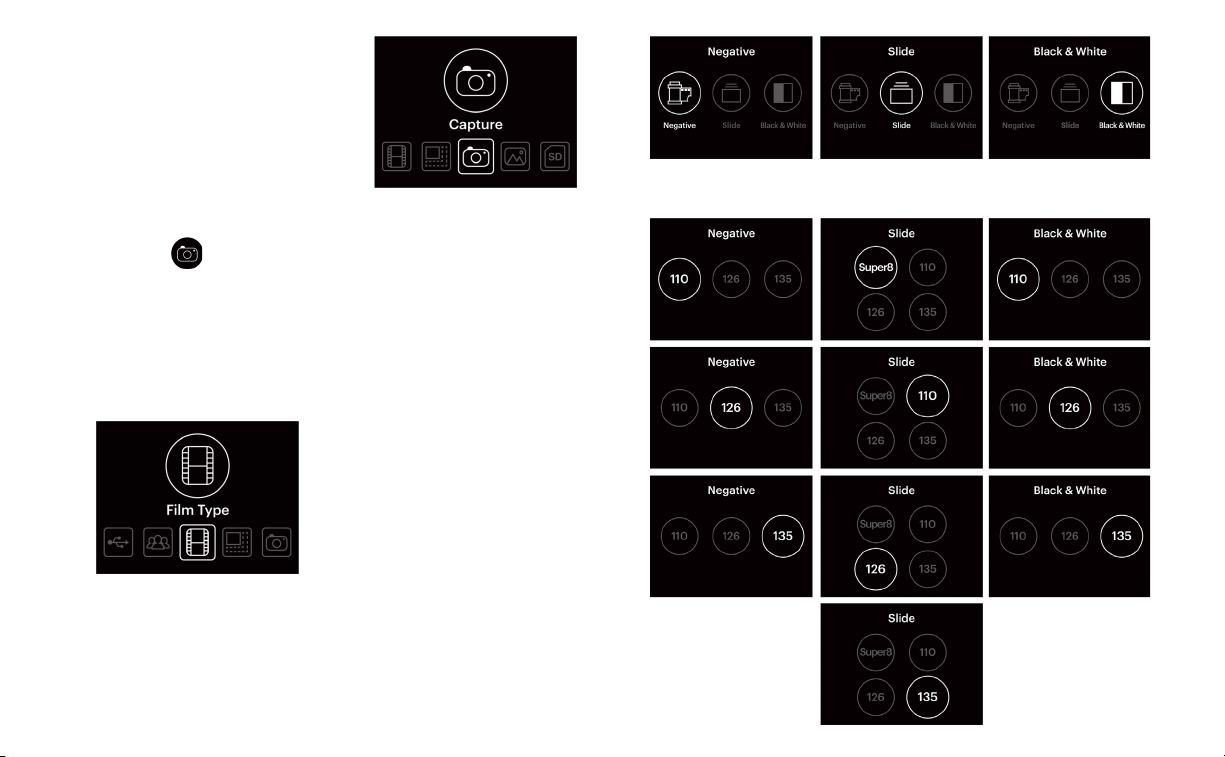
10. CONTINUOUS LOADING (SLIDES
AND/OR FILM)
This useful function allows you to continue feeding new
negatives or slides into the ilm scanner without the messy
and frustrating process of removing the tray and repositioning
your ilm or slides every time.
1. Load the empty ilm negative
or slide holder tray into the
ilm scanner.
2. Feed one end of the ilm into
the tray from the right side.
3. Continue feeding the ilm
through the tray until it
emerges from the left side.
You can stop at each image
along the way and scan if
you’d like, or just keep
feeding the negative until you
ind the image you want to scan.
11. USING THE SCANNER
NOTE: Before loading ilm into the scanner, use the cleaning
wand and gently insert it into the ilm slot to clean o the lens
and backlight panel. This will ensure that the image you capture
turns out clear without any blemishes.
12
13
Page 8
1. After powering on the scanner,
use the arrow keys to navigate to
the Capture screen, then press
the OK button to enter Capture
Mode.
2. Insert your ilm negatives or slides
into the appropriate tray/holder
and into the ilm slot for scanning.
3. If the image displays correctly,
press the
button to capture and save the image to
either the device’s memory or your installed memory card
4. If the image does not display correctly, you may need to
select the correct ilm type.
a. First, press the home key to display the main menu.
b. Use the arrow keys to navigate to the “Film Type” option.
c. Press OK bring up the Film Type menu.
d. Select the correct type of ilm (Negative, Slide, B&W) and
the correct size (110, 135, 126, Super8).
14
15
Page 9
e. You will automatically be returned to Capture Mode.
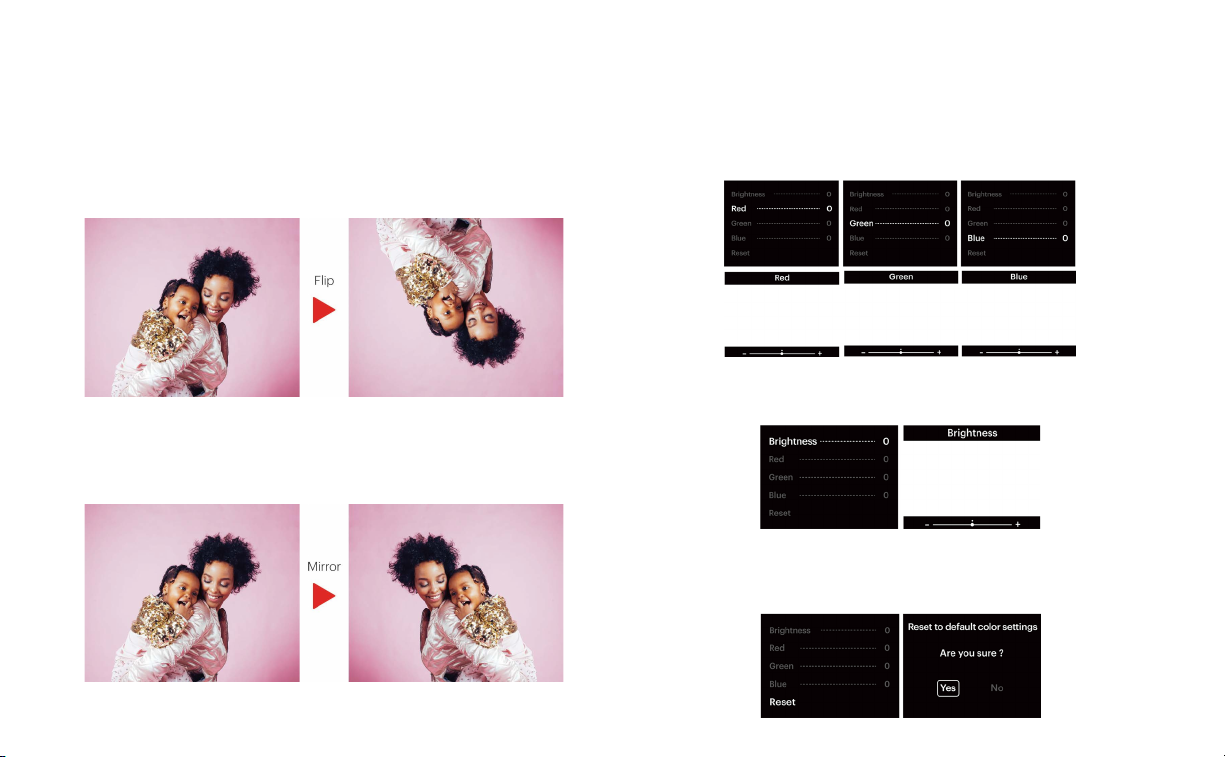
5. Once the correct ilm type is selected, you can choose
to lip or reverse the image by pressing the arrow keys.
This is especially helpful for negatives where text is
displayed backwards.
a. The lip function will invert the image across a horizontal
axis, so the top will become the bottom and the bottom
will become the top.
b. The reverse function (also called the “mirror” function) will
reverse your image across a vertical axis, as if it were held
up to a mirror. If text is displayed backwards, use this
function to make it display correctly.
6. To make edits to the image in terms of brightness or coloration,
press the OK button while in Capture Mode. The screen will
give you the option to adjust brightness and RGB values. Use
the arrow keys to navigate and OK to conirm.
a. To adjust the levels of Red/Green/Blue tones in your image,
use the arrows once you’ve brought up the RGB screen to
select an option and then increase or decrease the values.
b. The option all the way at the top is the Brightness
adjustment. Use the arrows to increase or decrease the
exposure value from -2.0 to +2.0 in increments of 0.5 EV.
c. In the bottom corner you can select “RESET”, if you over adjust the image and can’t get it back to normal, select the
RESET option and press the OK button to reset the image
back to the way it was prior to adjusting.
16
17
Page 10
7. Once you’ve made your adjustments, press the key to
capture the image and save it. Remember: hitting the
Capture button will always scan and save the image you’re
viewing, even if you’re not in capture mode.
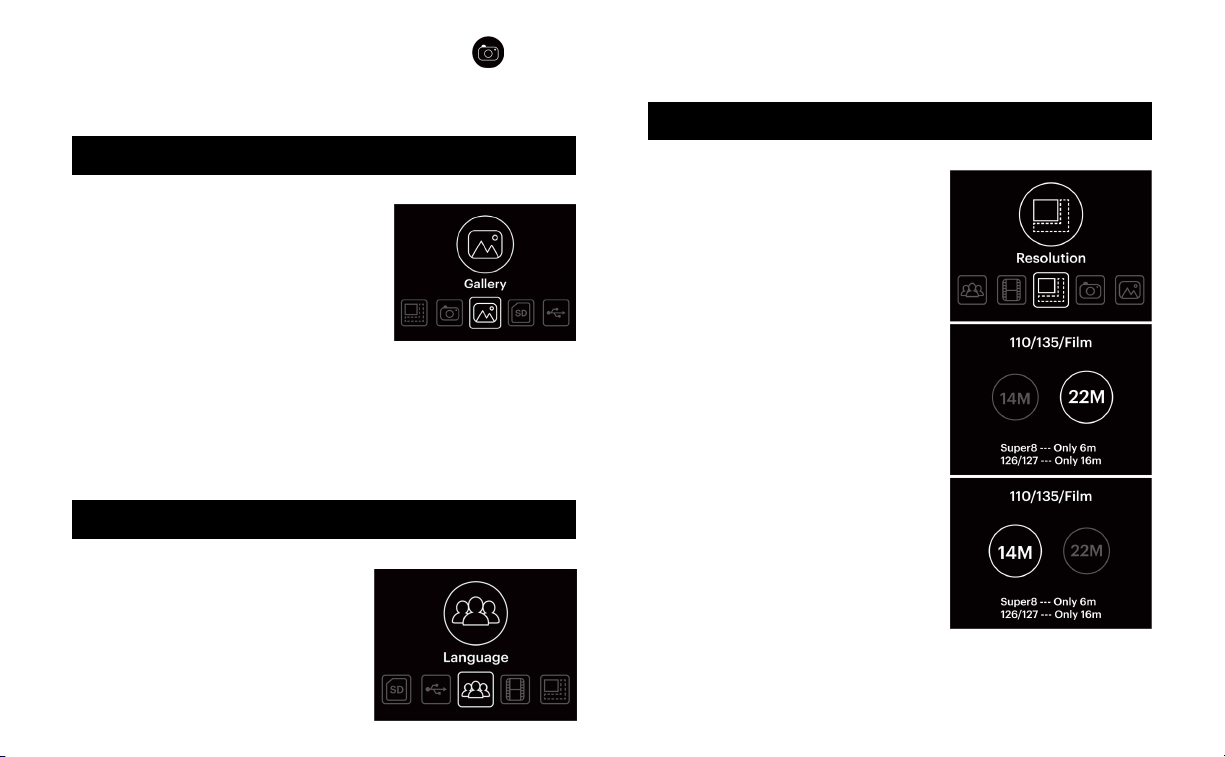
12. VIEWING SCANNED IMAGES
1. From the home screen navigate
using the arrow keys until you reach
the screen that says Gallery. Press
OK to select.
2. The Gallery function will start an
auto-playback slideshow of all the
stored images in memory or on an
inserted SD
stop auto-playback of the slideshow and manually navigate
through the slideshow images, press the OK button, and
then use the arrow keys to navigate.
3. To exit the Gallery, press the home button on top of
the scanner.
™
card (not included). To
13. SETTING THE LANGUAGE
1. From the main menu, use the left
and right arrows to navigate to the
Language option and press the OK
button.
2. Use the arrow keys to select the
correct language from the list and
then press OK.
18
3. Languages available include: English, French, German,
Italian, Spanish, TChinese, SChinese, and Japanese.
14. CHOOSING PHOTO RESOLUTION
1. From the main menu, use the left
and right arrows to navigate to
the Resolution option and press
the OK button.
2. Use the arrow keys to select either
the default size of 14MP or 22MP
through the interpolation process.
Press OK to conirm the new
resolution.
NOTE: certain ilm types, such
as Super8 and 126, are locked into
speciic resolutions and will
produce smaller images. Only the
110/135 sizes have the option of
1422MP resolutions.
19
Page 11
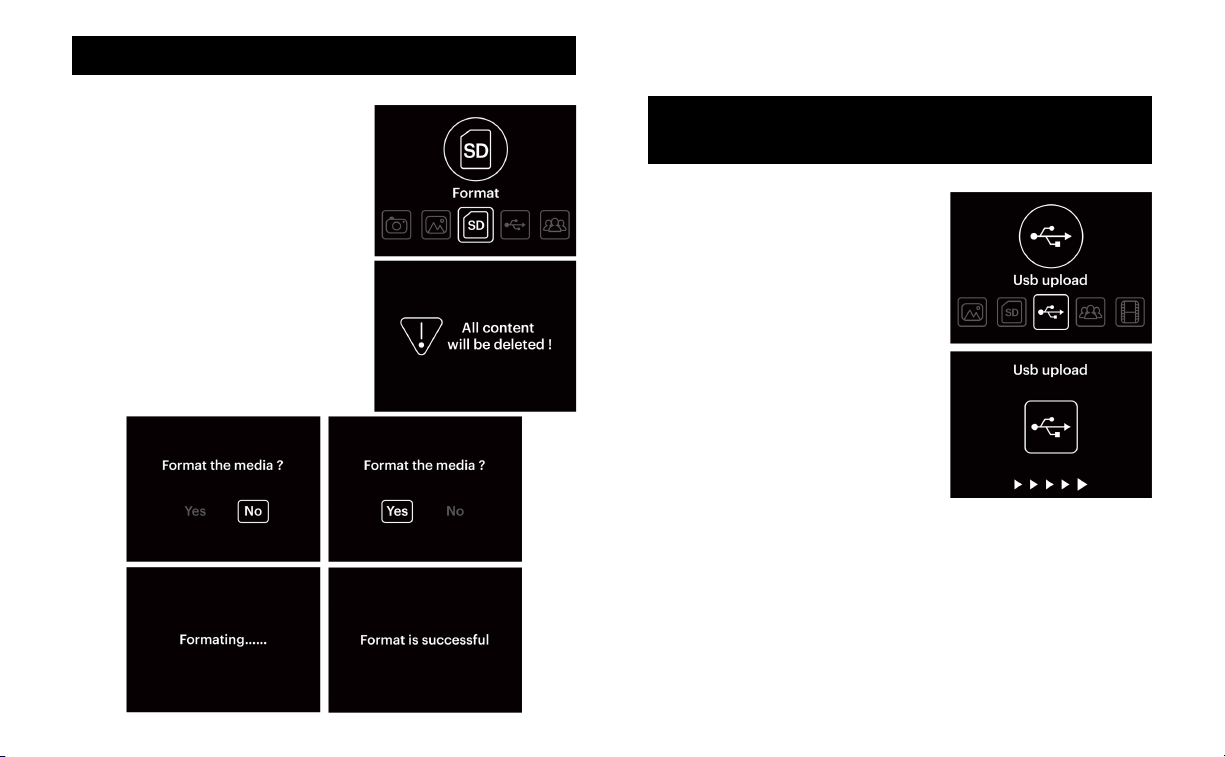
15. FORMATTING THE SD™ CARD
4. After the formatting process completes, press the power
button to turn the scanner o, then turn it back on again.
1. From the main menu, use the
left and right arrows to navigate to
the Format option and press the OK
button.
2. You will receive a conirmation
message letting you know that ALL
DATA WILL BE DELETED. Please
make sure you do not conirm unless
you wish to delete all data from your
memory card.
3. Use the arrows to highlight “YES”
when prompted to format all media.
Press the OK button to conirm and
start the formatting process.
16. CONNECTING THE SCANNER TO
YOUR COMPUTER
1. From the main menu, use the left
and right arrows to navigate to
the USB Upload option and press
the OK button.
2. Connect the mini USB cable to
your scanner and plug it in to
your computer’s USB 2.0 port.
3. The device should connect to
your computer as a removable
drive, allowing you to view your
photos on a larger screen as well
as transfer them from your
memory card (not included) or
device memory to your computer.
NOTE: If you have images saved on a removable memory
card as well as on device memory, you will have to remove
the memory card to access the images stored on device
memory. Images stored in device memory are not
accessible while a memory card is installed.
20
21
Page 12

WARRANTY INFORMATION
LIMITED WARRANTY ON KODAK MINI DIGITAL FILM SCANNER
THIS LIMITED WARRANTY GIVES YOU SPECIFIC LEGAL RIGHTS
AND YOU MAY ALSO HAVE OTHER RIGHTS, WHICH VARY FROM
STATE TO STATE.
WE WARRANT THAT DURING THE WARRANTY PERIOD, THE
PRODUCT WILL BE FREE FROM DEFECTS IN MATERIALS AND
WORKMANSHIP.
LIMITATION OF LIABILITY
TO THE EXTENT NOT PROHIBITED BY LAW, THIS WARRANTY IS
EXCLUSIVE AND IN LIEU OF ALL OTHER WARRANTIES, ORAL,
WRITTEN, STATUTORY, EXPRESS OR IMPLIED. EXCEPT FOR
THE EXPRESS WARRANTIES CONTAINED IN THIS LIMITED
WARRANTY STATEMENT AND TO THE EXTENT NOT PROHIBITED
BY LAW, WE DISCLAIM ALL OTHER WARRANTIES, EXPRESSED
OR IMPLIED, STATUTORY OR OTHERWISE, INCLUDING WITHOUT
LIMITATION, THE WARRANTIES OF MERCHANTABILITY AND
FITNESS FOR A PARTICULAR PURPOSE. SOME STATES DO
NOT ALLOW DISCLAIMERS OF IMPLIED WARRANTIES, SO THIS
DISCLAIMER MAY NOT APPLY TO YOU. TO THE EXTENT SUCH
WARRANTIES CANNOT BE DISCLAIMED UNDER THE LAWS OF
YOUR JURISDICTION, WE LIMIT THE DURATION AND REMEDIES
OF SUCH WARRANTIES TO THE DURATION OF THIS EXPRESS
LIMITED WARRANTY.
OUR RESPONSIBILITY FOR DEFECTIVE GOODS IS LIMITED TO
REPAIR, REPLACEMENT OR REFUND AS DESCRIBED BELOW IN
THIS WARRANTY STATEMENT.
WHO MAY USE THIS WARRANTY? C&A Marketing, Inc. located
at 114 Tived Lane East, Edison, NJ (“we”) extend this limited
warranty only to the consumer who originally purchased the
product (“you”). It does not extend to any subsequent owner or
22
other transferee of the product.
WHAT DOES THIS WARRANTY COVER? This limited warranty
covers defects in materials and workmanship of the KODAK Mini
Digital Film Scanner (the “product”) for the Warranty Period as
deined below.
WHAT DOES THIS WARRANTY NOT COVER? This limited
warranty does not cover any damage due to: (a) transportation;
(b) storage; (c) improper use; (d) failure to follow the product
instructions or to perform any preventive maintenance; (e)
modiications; (f) unauthorized repair; (g) normal wear and tear;
or (h) external causes such as accidents, abuse, or other actions
or events beyond our reasonable control.
WHAT IS THE PERIOD OF COVERAGE? This limited warranty
starts on the date of your purchase and lasts for one year (the
“Warranty Period”). The Warranty Period is not extended if we
repair or replace the product. We may change the availability of
this limited warranty at our discretion, but any changes will not
be retroactive.
WHAT ARE YOUR REMEDIES UNDER THIS WARRANTY? With
respect to any defective product during the Warranty Period,
we will, at our sole discretion, either: (a) repair or replace such
product (or the defective part) free of charge or (b) refund the
purchase price of such product if an exchange unit cannot be
provided.
HOW DO YOU OBTAIN WARRANTY SERVICE? To obtain warranty
service, you must contact us at 8445161539 or by email at
kodak@camarketing.com during the Warranty Period to obtain
a Defective Merchandise Authorization (“DMA”) number. No
warranty service will be provided without a DMA number and
return shipping costs to our facilities shall be assumed by you,
the purchaser. Shipping costs of the replacement unit to you
shall be assumed by us.
23
Page 13

CUSTOMER SERVICE CONTACT
INFORMATION
Should you experience any problems with your product,
please contact us before returning the item to the place of
purchase. We’re here to help!
U.S. Support:
kodak@camarketing.com
8445161539
International Support:
kodakintl@camarketing.com
8445161540
www.kodakphotoplus.com
The Kodak trademark, logo, and trade dress are used under license from
Kodak.
Mac is a trademark of Apple Inc. in the U.S. and other countries.
SD is a trademark of SD3C, LLC in the U.S..
Windows is a trademark of Microsoft Corporation in the U.S. and/or other
countries.
All other products, brand names, company names, and logos are trademarks
of their respective owners, used merely to identify their respective products,
and are not meant to connote any sponsorship, endorsement or approval.
Distributed by: C&A Marketing, Inc., 114 Tived Lane East, Edison, NJ 08837,
USA
C&A Marketing UK LTD, 167 Hermitage Road, Crusader Industrial Estate,
London N4 1LZ, UK
©2018. All Rights Reserved. Made in China.
24
Page 14

CONTENU
10
11
12
13
14
15
16
26
PRÉSENTATION
1
FICHE TECHNIQUE
2
ACCESSOIRES INCLUS
3
CONSIGNES DE SÉCURITÉ
4
VUE D'ENSEMBLE
5
VUE D’ENSEMBLE DU MENU PRINCIPAL
6
PRÉPARATION DU MÉDIA À SCANNER
7
CHARGER DES NÉGATIFS
8
CHARGER DES DIAPOSITIVES
9
CHARGEMENT CONTINU (DIAPOSITIVES ET/OU
PELLICULES)
UTILISER LE SCANNER
VOIR LES IMAGES NUMÉRISÉES
CHOISIR LA LANGUE
CHOISIR LA RÉSOLUTION PHOTO
FORMATER LA CARTE SD
CONNECTER LE SCANNER À
VOTRE ORDINATEUR
INFORMATIONS DE GARANTIE
INFORMATIONS DE CONTACT DU SERVICE À LA
CLIENTÈLE
™
27
28
29
30
31
32
33
34
35
36
36
41
41
42
43
44
45
48
1. PRÉSENTATION
Merci d'avoir acheté un Mini scanner numérique de
pellicules KODAK. Ce manuel contient des instructions
garantissant une utilisation sécuritaire du produit, sans
présenter de risque pour l'utilisateur. Toute utilisation
qui n'est pas conforme aux instructions igurant dans ce
Manuel de l'utilisateur peut annuler la garantie limitée.
Veuillez lire attentivement toutes les instructions avant
d’utiliser le produit et conserver ce manuel aux ins
de consultation ultérieure. Ce produit est uniquement
destiné à un usage domestique.
Ce produit dispose d'une garantie limitée d'une durée
de un an. La portée de cette garantie comporte des
limites et des exclusions. Consultez la garantie pour
plus de détails
27
Page 15
2. FICHE TECHNIQUE
Fonction Scanner pellicule/USB MSDC
Interface USB 2.0
Capteur à image 14.0 mégapixels
(4416x3312)
1/2.33" Capteur CMOS
Aichage 2.4 couleur TFT LCD
Contrôle d'exposition Automatique/Manuel (-2,0 ~ .0
+ 2,0 EV)
Balance des blancs Automatique
Résolution 14 mégapixels / 22
mégapixels*
Types de pellicules numérisables 135 (36 x 24mm)
Pellicule 126 (27 x 27mm)
Pellicule 110 (17 x 13mm)
Pellicule Super8 (4,01 x 5,79 mm)
Pellicule monochrome
Diapositives
Format des images numérisables N&B, Diapositives, Négatifs
Format du ichier scanné JPEG
Type de Sortie TV NTSC/PAL
Mémoire interne 128 Mo
Mémoire externe acceptée Carte SD
incluse)
Alimentation Adaptateur DC 5 V / Mini port
USB
™
jusqu'à 32 Go (non
Langues disponibles Chinois (Simpliié) / Chinois
(Traditionnel) / Anglais /
Français / allemand / Italien /
Espagnol / Japonais
Systèmes d’exploitation PC
pris en charge Windows
Mac
®
XP / Vista / 7 / 8 / 10
®
OS 10.7.3 et supérieur
Dimensions 3.43» L x 3.41» W x 4.04» H
(87 x 86.5 x 102.5mm)
Poids 8.82 oz. (250g)
*Votre Mini scanner numérique de pellicules KODAK utilise un
procédé appelé “interpolation” pour améliorer la résolution de
vos photos numérisées à 14 -22 MP.
3. ACCESSOIRES INCLUS
Support à négatifs
Support à diapositives
Mini Câble USB Adaptateur secteur
Adaptateur à négatifs 110 Adaptateur à diapositives 110
Adaptateur Super 8 Baguette de nettoyage
international 3 en 1
Manuel de l'utilisateurCâble de sortie TV
28
29
Page 16

REMARQUE: Une carte SD n'est pas incluse, mais elle est fortement
recommandée lors de l'utilisation de ce produit. Cet appareil dispose
d'une quantité de mémoire interne extrêmement limitée, mais il
peut stocker quelques images avant d'avoir à les transférer sur votre
ordinateur.
• Pour protéger le scanner et économiser de l'énergie, il s'éteint
automatiquement après 30 minutes d'inactivité. Appuyez sur le
bouton d'alimentation dans le coin supérieur gauche pour le
rallumer et reprendre l'utilisation normale.
4. CONSIGNES DE SÉCURITÉ
• N'essayez pas de démonter cet appareil pour quelque raison que
ce soit.
• Ne touchez pas les parties internes du scanner après l'avoir laissé
tomber ou après qu'il ait subi un quelconque type de dommage.
• Si vous remarquez de la fumée ou une odeur étrange provenant
du scanner numérique de pellicules, mettez-le immédiatement
hors tension et retirez les diapositives, les plateaux de diapositives
et/ou les négatifs de ilm du produit. Ne tentez jamais de réparer
vous-même cet appareil, quelles que soient les circonstances.
• Assurez-vous que l’objectif du scanner est propre avant de
l’utiliser ain de garantir une acquisition d’image claire et sans
tache.
• N'utilisez pas de produits tels que de l’alcool, de l’essence, du
diluant ou tout autre solvant organique lors du nettoyage ou des
tentatives de nettoyage de ce produit.
• N'utilisez pas cet appareil dans un environnement où il sera
exposé à de la poussière en gros volume, à de l'humidité ou
de l'eau.
• Pour éviter un dysfonctionnement du scanner en raison d'une
surcharge USB, ne branchez pas un trop grand nombre de
périphériques USB sur votre ordinateur en même temps que le
scanner.
• Veuillez utiliser des ilms de format standard, n'essayez pas de
modiier les adaptateurs et les plateaux de ilm existants.
30
5. VUE D'ENSEMBLE
1. Écran LCD
2. Emplacement carte SD
(REMARQUE: Carte SD
(non incluse)
3. Connexion alimentation mini USB
4. Connexion sortie TV
5. Bouton OK
6. Bouton Accueil (Ce bouton
vous conduira TOUJOURS à
l'écran d'accueil, peu importe
où vous vous trouvez dans
l'arborescence du menu).
7. Bouton d'alimentation
8. Flèche gauche/Fonction Inverser
9. Bouton Scanner/Capturer (Ce
bouton numérisera et
sauvegardera TOUJOURS votre
image quand vous appuyez
dessus).
10. Flèche droite/Fonction Retourner
™
™
31
Page 17
6. VUE D'ENSEMBLE DU MENU PRINCIPAL
7. PRÉPARATION DU MÉDIA À SCANNER
32
1. Type de pellicule
2. Résolution
3. Capturer l'image
4. Galerie
5. Formater la carte
mémoire
6. Envoyer vers USB
7. Sélection de la langue
Avant d'utiliser votre scanner de pellicules, vous devez soit
insérer une carte SD
™
(non incluse) car la mémoire de l'appareil
est très limitée, ou vous assurer qu'il y a suisamment de place
dans la mémoire de l'appareil pour contenir les images que vous
souhaitez scanner.
L'insertion d'une carte SD
™
alors que l'appareil est en cours de
fonctionnement provoque le redémarrage du scanner, et vous
perdez toutes les modiications apportées à l'image. Si vous avez
une carte mémoire, insérez-la avant utilisation.
Choisissez le bon adaptateur pour votre pellicule ou votre
diapositive, le cas échéant, et placez-le dans le bon plateau à
pellicule ou à ilm avant de charger le plateau. Les instructions
pour charger les plateaux dans le scanner peuvent être trouvées
dans les sections suivantes, intitulées “Charger des négatifs”
et “Charger des diapositives”. Ces instructions s'appliquent
également aux ilms N&B. Les adaptateurs et les plateaux sont
clairement marqués.
Relevez le couvercle supérieur
de l'adaptateur. Placez l'insert
avec votre diapositive ou votre
pellicule dans l'adaptateur.
33
Page 18
8. CHARGER DES NÉGATIFS
9. CHARGER DES DIAPOSITIVES
REMARQUE: Toujours manipuler les
négatifs de diapositives ou de pellicules
avec soin pour éviter d’y faire des rayures
ou de laisser des traces de doigts. Nous
recommandons d'utiliser des gants en
coton pour manipuler les négatifs et
d'utiliser du coton compressé (cotonstiges, boules de coton, etc.) pour enlever la
poussière qui pourrait être présente avant
de les numériser.
Vériiez toujours que vos négatifs de
pellicules ne sont pas déformés ou pliés
avant de les insérer dans le scanner. Les
négatifs déformés ou froissés ne produiront
pas d’images claires ou correctes.
1. Tenez le négatif vers la lumière, avec le côté droit face à vous.
2. Prenez le support de ilm négatif (avec l'adaptateur de taille
appropriée si nécessaire) et maintenez-le avec le loquet
tourné vers l'extérieur de sorte que la lèche de chargement◄
pointe vers la gauche.Ouvrez le verrou, placez le négatif dans
la zone en retrait puis fermez le loquet, en veillant à appuyer
sur les bords pour qu'il se verrouille en place.
3. Chargez le support à négatif dans la fente sur le côté droit du
scanner de pellicules.
1. Tenez la diapositive vers la lumière
et orientez l'avant de la diapositive
vers vous.
2. Sortez le support à diapositives et
tenez-le avec le loquet éloigné de
vous ain que la lèche de
chargement ◄ pointe vers la
gauche. Ouvrez le loquet, placez
la diapositive dans la zone en retrait
(vous pouvez également utiliser
cette zone pour placer les diérents
adaptateurs de ilm si nécessaire),
puis fermez le verrou, en vous
assurant d’appuyer sur les bords
pour qu’il se mette bien en place.
3. Insérez le support à négatif dans la
fente sur le côté droit du scanner
de pellicules, comme indiqué.
34
35
Page 19
10. CHARGEMENT CONTINU
(DIAPOSITIVES ET/OU PELLICULES)
Cette fonction utile vous permet d'alimenter en continu de
nouveaux négatifs ou des diapositives dans le scanner, sans
avoir à retirer le plateau et à repositionner votre pellicule ou
vos diapositives à chaque fois.
1. Chargez le plateau à négatifs
ou à diapositives vide dans le
scanner à pellicules.
2. Introduisez une extrémité de la
pellicule dans le plateau du côté
droit.
3. Continuez à alimenter la pellicule
à travers le plateau jusqu'à ce
qu'elle sorte du côté gauche.
Vous pouvez vous arrêter sur
chaque image tout au long du
processus et numériser si vous le
souhaitez, ou continuer
simplement à alimenter le négatif
jusqu'à ce que vous trouviez
l'image que vous souhaitez
numériser.
11. UTILISER LE SCANNER
1. Après avoir allumé le scanner,
utilisez les touches léchées pour
atteindre l'écran de capture, puis
appuyez sur le bouton OK pour
entrer en mode Capture.
2. Insérez les négatifs de pellicules
ou les diapositives dans le
plateau/support approprié et
dans la fente à pellicule pour
numériser.
3. Si l'image s'aiche correctement, appuyez sur le
bouton Capturer pour capturer et enregistrer l'image, soit
dans la mémoire de l'appareil, soit dans la carte mémoire
installée.
4. Si l'image ne s'aiche pas correctement, vous devrez peut être choisir le type de pellicule correct.
a. D'abord, appuyez sur la touche Accueil pour aicher le
menu principal.
b. Utilisez les touches léchées pour accéder à l'option
“Type de pellicule”.
REMARQUE: Avant de charger la pellicule dans le scanner,
utilisez la baguette de nettoyage et insérez-la délicatement dans
la fente d'emplacement de la pellicule pour nettoyer l'objectif
et le panneau rétroéclairé.Cela permettra de vous assurer que
l'image que vous capturez sera nette et sans aucun défaut.
36
c. Appuyez sur OK pour aicher le menu Type de pellicule.
37
Page 20

d. Sélectionnez le type de pellicule approprié (négatif, diapositive,
noir et blanc) et la taille correcte (110, 135, 126, Super8).
e. Vous serez automatiquement renvoyé en mode Capture.
5. Une fois le type de pellicule sélectionné, vous pouvez
choisir de retourner ou inverser l'image en appuyant sur les
touches léchées. Cela est particulièrement utile avec des
négatifs où le texte est aiché à l'envers.
a. La fonction Retourner inversera l'image sur un axe horizontal,
de sorte que le haut deviendra le bas et le bas deviendra
le haut.
b. La fonction Inverser (également appelée fonction Miroir)
inversera votre image sur un axe vertical, comme si elle
était tenue devant un miroir. Si le texte est aiché à
l'envers, utilisez cette fonction pour le faire apparaître
correctement.
38
39
Page 21

6. Pour modiier l'image en termes de luminosité ou de couleur,
appuyez sur le bouton OK en étant dans le mode Capture.
L'écran vous donne la possibilité d'ajuster la luminosité et les
valeurs RVB. Utilisez les touches léchées pour naviguer dans
les options et appuyez sur OK pour conirmer.
a. Pour ajuster les niveaux des tons rouge / vert / bleu dans
votre image, utilisez les lèches une fois que vous avez aiché
l'écran RVB pour sélectionner une option, puis augmenter ou
diminuer les valeurs.
b. L’option tout en haut est le réglage de la luminosité. Utilisez
les lèches pour augmenter ou diminuer la valeur
d’exposition de -2,0 à +2,0 par incréments de 0,5 IL.
c. Dans le coin inférieur, vous pouvez sélectionner “RESET”
(réinitialiser), si vous modiiez trop l'image et que vous ne
pouvez pas la rétablir, sélectionnez l'option RESET et
appuyez sur le bouton OK pour réinitialiser l'image pour
qu'elle revienne à son état d'origine.
7. Une fois que vous avez eectué vos réglages, appuyez sur la
touche pour capturer l'image et l'enregistrer.
Rappel:quand vous appuyez sur le bouton Capturer, vous
numériserez et sauvegarderez toujours l'image que vous
visualisez, même si vous n'êtes pas en mode Capture.
12. VOIR LES IMAGES NUMÉRISÉES
1. Depuis l'écran d'accueil, naviguez
à l'aide des touches léchées
jusqu'à atteindre l'écran Galerie.
Appuyez sur OK pour le choisir.
2. La fonction Galerie lancera un
diaporama à lecture automatique
de toutes les images stockées en
mémoire ou sur la carte SD
(non incluse). Pour arrêter la lecture automatique du
diaporama et naviguer manuellement dans les images du
diaporama, appuyez sur le bouton OK, puis utilisez les
touches léchées pour passer d'une image à l'autre.
3. Pour quitter la Galerie, appuyez sur le bouton Accueil situé
en haut du scanner.
™
insérée
13. CHOISIR LA LANGUE
1. Dans le menu principal, utilisez
les lèches gauche et droite
pour accéder à l'option Langue et
appuyez sur le bouton OK.
2. Utilisez les touches léchées pour
sélectionner la langue correcte
dans la liste, puis appuyez sur OK.
40
41
Page 22

3. Les langues disponibles sont: Anglais, Français, allemand,
Italien, Espagnol, Chinois (Traditionnel), Chinois (Simpliié),
Japonais.
14. CHOISIR LA RÉSOLUTION PHOTO
1. Dans le menu principal, utilisez
les lèches gauche et droite pour
accéder à l'option Résolution et
appuyez sur le bouton OK.
2. Utilisez les touches léchées pour
sélectionner soit la taille par
défaut de 14 MP, ou 22 MP par le
processus d'interpolation.
Appuyez sur OK pour conirmer
la nouvelle résolution.
REMARQUE: Certains types de
ilm, tels que Super8 et 126, sont
bloqués dans des résolutions
spéciiques et produiront des
images plus petites. Seules les
tailles 0110/135 ont l'option de
résolutions 1422MP
.
15. FORMATER LA CARTE SD
1. Dans le menu principal, utilisez les
lèches gauche et droite pour
accéder à l'option Format et
appuyez sur le bouton OK.
2. Vous recevrez un message de
conirmation vous informant que
TOUTES LES DONNÉES SERONT
EFFACÉES. Assurez-vous de ne
pas conirmer, sauf si vous
souhaitez supprimer toutes les
données présentes sur votre carte
mémoire.
3. Utilisez les lèches pour mettre
en surbrillance "OUI" lorsqu'il vous
est demandé de formater tous
les médias. Appuyez sur le bouton
OK pour conirmer et commencer
le processus de formatage.
™
42
43
Page 23

4. Une fois le processus de formatage terminé, appuyez sur le
bouton d'alimentation pour éteindre le scanner, puis rallumez-le.
16. CONNECTER LE SCANNER À
VOTRE ORDINATEUR
1. Dans le menu principal, utilisez les
lèches gauche et droite pour
accéder à l'option Envoi USB et
appuyez sur le bouton OK.
2. Connectez le mini-câble USB à
votre scanner et branchez-le au
port USB 2.0 de votre ordinateur.
3. L'appareil doit se connecter à votre
ordinateur en tant que lecteur
amovible, ce qui vous permet
d'aicher vos photos sur un écran
plus grand et de les transférer
depuis votre carte mémoire (non
fournie) ou sur l'appareil de
stockage de données de votre
ordinateur.
REMARQUE:Si des images sont
enregistrées sur une carte mémoire amovible ainsi que dans la
mémoire de l'appareil, vous devrez retirer la carte mémoire
pour accéder aux images stockées dans la mémoire de
l'appareil. Les images stockées dans la mémoire de l'appareil
ne sont pas accessibles lorsque la carte mémoire est installée.
44
INFORMATIONS DE GARANTIE
GARANTIE LIMITÉE DU MINI SCANNER NUMÉRIQUE POUR
PELLICULES KODAK
CETTE GARANTIE LIMITÉE VOUS CONFÈRE DES DROITS
SPÉCIFIQUES RECONNUS PAR LA LOI. VOUS POURRIEZ
DISPOSER DE DROITS SUPPLÉMENTAIRES QUI VARIENT D'UNE
PROVINCE À L'AUTRE.
NOUS GARANTISSONS QUE CE PRODUIT SERA EXEMPT DE
TOUT DÉFAUT DE FABRICATION ET DE MATÉRIAUX PENDANT
LA PÉRIODE DE GARANTIE.
LIMITATION DE RESPONSABILITÉ
Dans la mesure où le droit ne l'interdit pas, cette garantie est
exclusive et en lieu et place de toute autre garantie écrite,
orale, légale, expresse ou implicite. À L'EXCEPTION DES
GARANTIES EXPRESSES CONTENUES DANS LA DÉCLARATION
DE GARANTIE LIMITÉE ET DANS LA MESURE OÙ CELA NE
CONTREVIENT PAS À LA LOI, NOUS DÉCLINONS TOUTES LES
AUTRES GARANTIES, EXPLICITES OU IMPLICITES, LÉGALES
OU AUTRES, INCLUANT SANS LIMITATION, LES GARANTIES
COMMERCIALES ET D'USAGE POUR UN BUT PARTICULIER. DANS
LA MESURE OÙ CERTAINES JURIDICTIONS N'AUTORISENT PAS
LA LIMITATION DES GARANTIES TACITES, CES INFORMATIONS
NE VOUS CONCERNENT PAS. DANS LA MESURE OÙ DE TELLES
GARANTIES NE PEUVENT PAS ÊTRE REFUSÉES PAR LES LOIS
EN VIGUEUR DANS VOTRE JURIDICTION, NOUS LIMITONS LA
DURÉE ET LA PRISE EN CHARGE SELON LA DURÉE DE CETTE
GARANTIE LIMITÉE EXPRESSE.
NOTRE RESPONSABILITÉ SUR LES ARTICLES DÉFECTUEUX
SE LIMITE AUX RÉPARATIONS, AU REMPLACEMENT OU AU
REMBOURSEMENT COMME DÉCRIT CIDESSOUS DANS LA
DÉCLARATION DE GARANTIE.
45
Page 24

QUI PEUT BÉNÉFICIER DE CETTE GARANTIE? C&A Marketing,
Inc., situé 114 Tived Lane East, Edison, NJ (“nous”) étend cette
garantie limitée uniquement au client qui a acheté à l'origine le
produit (“vous”). Elle ne s'étend pas au propriétaire suivant ou à
un bénéiciaire du transfert du produit.
QUE COUVRE CETTE GARANTIE ? Cette garantie limitée
englobera toutes les défectuosités de matériels et de
fabrication éventuelles du Mini scanner numérique pour
pellicules KODAK (le “produit”) pendant la période de garantie
déinie ci-dessous.
QU'ESTCE QUI N'EST PAS COUVERT PAR CETTE GARANTIE?
Cette garantie limitée ne couvre pas les dégâts dus aux
cas suivants : (a) transport ; (b) entreposage ; (c) mauvaise
utilisation ; (d) non-respect des consignes d'utilisation du
produit ou omission des opérations d'entretien préventif ; (e)
modiications; (f) réparation non autorisée ; (g) usure standard
; ou (h) causes externes comme des accidents, usage abusif
ou toute autre action ou événement au-delà de notre contrôle.
QUELLE EST LA PÉRIODE DE COUVERTURE? Cette garantie
limitée commence le jour de votre achat et dure pendant un an
(la “Période de garantie”). La Période de garantie ne se prolonge
pas si nous réparons ou remplaçons le produit. Nous pouvons
changer à notre discrétion la disponibilité de cette garantie
limitée, mais les changements ne seront pas rétroactifs.
QUELS SONT VOS RECOURS SOUS CETTE GARANTIE? En
cas de défectuosité du produit pendant la période de garantie,
nous pourrons, à notre entière discrétion : (a) réparer ou
remplacer le produit (ou la pièce défectueuse) gratuitement
ou (b) rembourser le prix d'achat du produit si une unité de
remplacement ne peut être fournie.
COMMENT BÉNÉFICIER DE LA GARANTIE ? Pour bénéicier
du service de garantie, vous devez nous contacter au 8445161539 ou par courriel à l'adresse kodak@camarketing.
46
com pendant la Période de garantie pour obtenir un numéro
d'autorisation de marchandise défectueuse (“AMD”). Aucun
service de garantie ne sera eectué sans numéro AMD et
les frais de retour vers nos installations doivent être pris en
charge par vous, l'acheteur. Les frais d'expédition de l'unité de
remplacement seront pris en charge par nous.
47
Page 25

INFORMATIONS DE CONTACT DE
SERVICE À LA CLIENTÈLE
Si vous rencontrez des problèmes avec votre produit, veuillez
nous contacter avant de ramener le produit au point de vente.
Nous sommes là pour vous aider!
Support technique USA:
kodak@camarketing.com
8445161539
Support technique International:
kodakintl@camarketing.com
8445161540
www.kodakphotoplus.com
La marque commerciale Kodak, le logo et l'habillage sont utilisés sous
licence Kodak.
Mac est une marque commerciale d'Apple Inc., enregistrée aux États-Unis
et d'autres pays.
SD est une marque commerciale de SD3C LLC aux États-Unis.
Windows est une marque commerciale de Microsoft Inc., enregistrée aux
États-Unis et d'autres pays.
Tous les autres produits, noms de produits, noms de sociétés ainsi que
les logos sont des marques de commerce ou des marques déposées de
leur détenteur respectif, et ne signiient aucun parrainage, autorisation ou
approbation.
Distribué par: C&A Marketing, Inc., 114 Tived Lane East, Edison, NJ 08837, USA
C&A Marketing UK LTD, 167 Hermitage Road, Crusader Industrial Estate,
London N4 1LZ, UK
©2018. Tous droits réservés. Fabriqué en Chine.
48
Page 26

CONTENUTO
INTRODUZIONE
1
SPECIFICHE
2
ACCESSORI INCLUSI
3
PRECAUZIONI PER LA SICUREZZA
4
PANORAMICA PRODOTTO
5
PANORAMICA MENU PRINCIPALE
6
PREPARAZIONE MEDIA DA SCANNERIZZARE
7
CARICAMENTO NEGATIVI
8
CARICAMENTO DIAPOSITIVE
9
CARICAMENTO CONTINUO (DIAPOSITIVE E/O
10
RULLINI)
UTILIZZO DELLO SCANNER
11
VISIONE IMMAGINI SCANNERIZZATE
12
IMPOSTARE LA LINGUA
13
SCEGLIERE RISOLUZIONE FOTO
14
FORMATTARE LA SCHEDA SD
15
COLLEGARE LO SCANNER AL
16
TUO COMPUTER
INFORMAZIONI GARANZIA
INFORMAZIONI DI CONTATTO PER IL
SERVIZIO CLIENTI
50
1. INTRODUZIONE
51
52
53
54
55
56
57
58
59
60
60
65
65
66
™
67
68
69
72
Grazie per aver acquistato il Mini Scanner Digitale
per Rullini KODAK. Il Manuale dell'utente è concepito
per fornire indicazioni all’utente per garantire il
funzionamento sicuro del prodotto minimizzando
i rischi. Qualsiasi utilizzo non conforme a quanto
illustrato nel Manuale dell'utente può annullare la
garanzia limitata.
Leggere tutte le istruzioni prima di utilizzare il prodotto
e conservare questo manuale per riferimento futuro. Il
prodotto è concepito per il solo uso domestico.
Il prodotto è coperto da una garanzia limitata di dodici
mesi. La copertura è soggetta a limiti ed esclusioni.
Consultare la garanzia per i dettagli.
51
Page 27

2. SPECIFICHE
Funzione Scanner Rullino/USB MSDC
Interfaccia USB 2.0
Sensore Immagine 14.0 megapixel (4416x3312)
1/2.33" sensore CMOS
Display 2.4’’ LCD TFT a colori
Controllo Esposizione Automatico/Manuale (-2.0 ~
+2.0 EV)
Bilanciamenti Bianco Automatico
Risoluzione 14 megapixel / 22 megapixel*
Tipi di Rullini Scannerizzabili Rullini 135 (36 x 24mm)
Rullini 126 (27 x 27mm)
Rullini 110 (17 x 13mm)
Rullini Super8 (4,01 x 5,79mm)
Rullino Monocromatico
Diapositive
Formati Immagini Scannerizzabili B&W, Diapositive, Negativi
Formato File Scannerizzato JPEG
Tipo TVOut NTSC/PAL
Memoria interna 128MB
Supporto memoria esterna SD
inclusa)
Alimentazione Adattatore DC 5V / porta USB
Mini
Lingue disponibile SCinese/ TCinese/ Inglese /
Francese / Tedesco / Italiano /
Spagnolo / Giapponese
52
™
scheda dino a 32GB (non
Sistemi operativi supportati Windows
Mac
®
XP / Vista / 7 / 8 / 10
®
OS 10.7.3 e oltre
Dimensioni 3.43"L x 3,41"l x 4,04"H
(87 x 86,5 x 102,5mm)
Peso 8.82 oz. (250g)
*Il tuo Mini Scanner Digitale per Rullini KODAK usa un processo
chiamato "interpolazione” per migliorare e potenziare i megapixel
delle tue foto scannerizzate da 14 - 22MP
3. ACCESSORI INCLUSI
Porta negativi
Porta diapositive
Cavo micro USB Adattatore alimentazione
NOTA: Non è inclusa la scheda SD ma la consigliamo fortemente
quando usi questo prodotto. Questo dispositivo ha una piccola
quantità di memoria interna, ma puo’ contenere poche foto alla volta
prima che tu abbia bisogno di spostarle sul computer.
Adattatore negativi 110 Adattatore diapositive 110
Adattatore super 8 Bacchetta per Pulizia
internazionale 3-in-.1
Manuale UtenteCavo TVOut
53
Page 28

4. PRECAUZIONI PER LA SICUREZZA
5. PANORAMICA PRODOTTO
• Non provare per alcun motivo a disassemblare questo dispositivo
• Non toccare la parte interna dello scanner dopo che è caduto o
dopo che ha subito alcun tipo di danno.
• Se noti del fumo o uno strano odore provenire dallo Scanner
Digitale per Rullini, spegnilo immediatamente e rimuovi qualsiasi
diapositiva, vassoio scorrevole e&o negativi dal prodotto. Non
provare mai, sotto nessuna circostanza, a riparare questo
prodotto da te.
• Assicurati che le lenti dello scanner siano pulite prima dell’uso per
avere una scan dell’immagine chiara e precisa.
• Non utilizzare prodotti come alcool, benzina, diluenti o
qualsiasi altro solvente organico quando pulisci o provi a
pulire questo prodotto.
• Non usare questo dispositivo in un ambiente dove viene
esposto a forte polvere o umidità.
• Per evitare un malfunzionamento dello scanner per
sovraccarico USB, non collegare nel computer troppi
dispositivi USB contemporaneamente.
• Assicurati di usare rullini di grandezza standard, non provare a
modiicare o adattare gli adattatori esistenti e i vassoi scorrevoli.
• Per proteggere lo scanner e per risparmiare energia, questo si
spegnerà automaticamente dopo 30 minuti di inattività. Premi il
pulsante d’accensione nell’angolo in alto a sinistra per
riaccenderlo e tornare ad usarlo normalmente.
1. Schermo LCD
2. Slot scheda SD
(NOTA: Scheda SD
™
™
non inclusa)
3. Connessione alimentazione
Micro USB
4. Connessione TVOut
5. Pulsante OK
6. Pulsante HOME (Questo
pulsante ti riporterà sempre
alla schermata iniziale, a
prescindere da dove ti trovi
nella sequenza del menu.)
7. Pulsante di accensione
8. Freccia sinistra/funzione
inverti
9. Pulsante scannerizza/
cattura (Questo pulsante
scannerizzerà e salverà
SEMPRE la tua immagine
quando premuto.)
10. Freccia destra/funzione gira
54
55
Page 29

6. PANORAMICA MENU PRINCIPALE
7. PREPARAZIONE MEDIA DA SCANNERIZZARE
56
1. Tipo Rullino
2. Risoluzione
3. Cattura un’immagine
4. Galleria
5. Formatta Memory Card
6. Caricamento via USB
7. Selezione Lingua
Prima di utilizzare il tuo scanner per rullini, dovresti o inserire
una scheda SD
™
(non inclusa) dato che la memoria del
dispositivo è molto limitata, o assicurarti che ci sia abbastanza
spazio nella memoria molto limitata del dispositivo per
ricevere le immagini che vuoi scannerizzare.
Inserire una scheda SD
™
mentre il dispositivo è attivo causerà
il riavvio dello scanner e perderai qualsiasi modiica fatta
all’immagine, quindi se hai una memory card, inseriscila prima
dell’uso.
Trova l'adattatore corretto per il tuo rullino o la tua diapositiva,
se necessario, e posizionalo nel corretto vassoio scorrevole
per rullini o dispositive prima dell’inserimento. Possono
essere trovate le istruzioni per caricare i vassoi nello scanner
nelle sezioni seguenti intitolate “Caricamento Negativi” e
“Caricamento Diapositive”. Queste direttive valgono anche
per i rullini B&W. Gli adattatori e i vassoi sono chiaramente
segnati.
Capovolgi la parte superiore
dell’adattatore. Posiziona
la diapositiva o rullino
nell'adattatore.
57
Page 30

8. CARICAMENTO NEGATIVI
9. CARICAMENTO DIAPOSITIVE
NOTA: Maneggia sempre con cura i
negativi delle diapositive o dei rullini per
evitare di lasciare grai o impronte sopra
di essi. Ti consigliamo di usare sempre
dei guanti di cotone per maneggiare i
negativi e prima di inserirli nello scanner
usare del cotone compresso (palle di
cotone, ecc.) per rimuovere della polvere
che potrebbe essere presente.
Assicurati sempre che i negativi dei rullini
non siano deformati o piegati prima di
inserirli nello scanner. Negativi deformati
o sgualciti non produrranno delle
immagini chiare o precise.
1. Mantieni i negativi verso la luce, con la parte destra rivolta
verso di te.
2. Tira fuori il porta negativi (con il giusto adattatore se
necessario) e mantienilo con lo scatto rivolto lontano da te in
modo che la freccia di caricamento ◄ punti a sinistra. Apri lo
scatto; posiziona il negativo nell'area di incastro; poi chiudi lo
scatti, assicurandoti di premere in basso i lati così che si
blocchi sul posto.
3. Carica il porta negativi nello slot sul lato destro dello scanner
per rullini.
1. Mantieni la diapositiva rivolta
verso la luce e posiziona il fronte
della diapositiva verso di te.
2. Tira fuori il porta diapositive e
mantienilo con lo scatto rivolto
lontano da te in modo che la
freccia di caricamento◄ punti a
sinistra. Apri lo scatto; posiziona
la diapositiva nell'area di incastro
(puoi anche usare quest’area per
tenere diverse grandezze di
adattatori per rullini se
necessario); poi chiudi lo scatto,
assicurandoti di premere in basso
i lati così che si blocchi in
sicurezza sul posto.
3. Inserisci il porta diapositive nello
slot sul lato destro dello scanner
per rullini come nell’immagine.
58
59
Page 31

10. CARICAMENTO CONTINUO
(DIAPOSITIVE E/O RULLINI)
Questa utile funzione ti permette di caricare continuamente
nuovi negativi o diapositive nello scanner per rullini senza
lo scomodo o frustrante processo di rimozione del vassoio
e di riposizionare il tuo rullino o le
diapositive ogni volta.
1. Carica il vassoio vuoto porta
negativi o diapositive
nello scanner per rullini.
2. Inserisci un lato del rullino nel
vassoio scorrevole sul lato destro.
3. Continua l’inserimento del rullino
attraverso il vassoio inché non
esce dal lato sinistro. Puoi
bloccarlo su ogni immagine lungo
la via e fare una scansione se
preferisci, o semplicemente puoi
continuare l’inserimento del
negativo inché non trovi
l’immagine che vuoi scansionare.
11. UTILIZZO DELLO SCANNER
NO TA: Prima di inserire il rullino nello scanner, usa una
bacchetta per la pulizia e inseriscila con cautela nello slot
per rullini per pulire le lenti e il pannello controluce. Questo
assicurerà una visione chiara e senza macchie dell’immagine
che catturerai.
1. Dopo aver acceso lo scanner,
usa le frecce di navigazione per
spostarti su Cattura schermata,
poi premi il pulsante OK per
entrare in modalità cattura.
2. Inserisci i tuoi negativi del rullino
o le diapositive nell’appropriato
vassoio scorrevole/contenitore
e nello slot per rullini per
eettuare una scansione.
3. Se l’immagine viene mostrata correttamente, premi il
pulsante per catturare e salvare l’immagine sulla
memoria del dispositivo o sulla memory card installata.
4. Se l’immagine non viene mostrata correttamente, potresti
aver bisogno di selezionare il tipo corretto di rullino.
a. Primo, premi il pulsante home per mostrare il menu principale.
b. Usa le frecce di navigazione per andare nell’opzione
“Tipo Rullino”.
c. Premi OK per aprire il menu Tipo Film.
60
61
Page 32

d. Selezione il tipo di rullino corretto (Negativo, Diapositiva,
B&W) e la giusta dimensione (110, 135, 126, Super8).
e. Tornerai automaticamente alla modalità Cattura.
5. Una volta che è stato selezionato il tipo di ilm corretto,
potrai scegliere di girare o invertire l’immagine premendo le
freccette. Questo puo’ tornare utile per i negativi dove il
testo viene mostrato al contrario.
a. La funziona gira inverti l’immagine su un asse orizzontale,
in modo che l’alto diventi il basso e il basso diventi l'alto.
b. La funzione inverti (chiamata anche funzione “specchio”)
invertirà l’immagine su un asse verticale, come se fosse
specchiata. Se il testo viene mostrato al contrario, usa
questa funzione per vederlo correttamente.
62
63
Page 33

6. Per modiicare l’immagine di luminosità o di colorazione, premi
il pulsante OK mentre sei in modalità Cattura Lo schermo di
mostrerà l’opzione regola valori luminosità e RGB. Usa le
freccette per spostarti e premi OK per confermare.
a. Per regolare i livelli dei toni di Rosso/Verde/Blu nella tua
immagine, usa le freccette una volta che sei nella schermata
RGB per selezionare un’opzione e aumentare o diminuire i valori.
b. L’opzione ino in cima è la regolazione della luminosità.
Utilizzare le frecce per aumentare o diminuire il valore di
esposizione da -2,0 a +2,0 in incrementi di 0,5 EV.
c. Nell'angolo in basso puoi selezionare “RESET”, se modiichi
troppo l’immagine e non riesci a riportarla alla normalità
seleziona RESET e premi il pulsante OK per resettare
l’immagine a come era prima delle modiiche.
7. Una volta che hai fatto le tue modiiche, premi la
chiave per catturare l’immagine e salvarla. Ricorda:
premere il pulsante Cattura scannerizzerà e salverà sempre
l’immagine che stai vedendo, anche se non sei in modalità
cattura.
12. VISIONE IMMAGINI SCANNERIZZATE
1. Dalla schermata home naviga
usando le freccette inché non
raggiungi la schermata chiamata
Galleria Premi OK per selezionarla.
2. La funzione Galleria comincerà una
riproduzione automatica di tutte le
immagini conservate nella memoria
o su una scheda SD ù
inclusa). Per bloccare la riproduzione automatica della
galleria e per navigare manualmente tra le immagini, premi
il pulsante OK, e dopo usa le freccette per navigare.
3. Per uscire dalla Galleria, premi il pulsante home in cima
allo scanner.
™
inserita (non
13. IMPOSTARE LA LINGUA
1. Dal menu principale, usa le
freccette sinistra e destra per
navigare verso l’opzione Lingue e
premere il pulsante OK.
2. Usa le freccette per selezionare
la lingua corretta dalla lista e poi
premi OK.
64
65
Page 34

3. Le lingue disponibili includono: Inglese, Francese, Tedesco,
Italiano, Spagnolo, TCinese, SCinese, e Giapponese.
15. FORMATTARE LA SCHEDA SD
™
14. SCEGLIERE RISOLUZIONE FOTO
1. Dal menu principale, usa le
freccette sinistra e destra per
navigare verso l’opzione
Risoluzione e premere il
pulsante OK.
2. Usa le freccette per selezionare o
la grandezza standard di 14MP o
22MP attraverso il processo di
interpolazione. Premi il pulsante
OK per confermare la nuova
risoluzione.
NOTA: Alcuni tipi di rullini, come
i Super8 e 126 sono bloccati
in una risoluzione speciica e
produrranno immagini più
piccole. Solo le dimensioni
110/135 hanno l’opzione di
risoluzioni da 1422MP.
1. Dal menu principale, usa le
freccette sinistra e destra per
navigare verso l’opzione Formatta e
premere il pulsante OK.
2. Riceverai un messaggio di
conferma che ti avvertirà che TUTTI
I DATI SARANNO CANCELLATI.
Assicurati di non confermare a
meno che non desideri cancellare
tutti i dati dalla tua memory card.
3. Usa le freccette per selezionare “SI”
per cancellare tutti i media. Premi
il pulsante OK per confermare e
cominciare il processo di
cancellazione.
66
67
Page 35

4. Dopo che il processo di cancellazione è stato completato,
premi il pulsante accensione per spegnere lo scanner e
dopo riaccendilo.
16. CONNETTERE LO SCANNER AL
TUO COMPUTER
1. Dal menu principale, usa le
freccette sinistra e destra per
navigare verso l’opzione USB
Upload e premere il pulsante OK.
2. Connetti il cavo micro USB allo
scanner e attaccalo alla porta
USB 2.0 del tuo computer.
3. Il dispositivo dovrebbe essere
connesso al tuo computer come
drive rimovibile, permettendoti di
visualizzare le tue foto su uno
schermo più grande e di
transferirle dalla tua memory card
(non inclusa) o dalla memoria del
dispositivo al tuo computer.
NO TA: Se hai immagini salvate su una scheda di memoria
removibile o sulla memoria del dispositivo, dovrai
rimuovere la memory card per avere accesso alle immagini
salvate sulla memoria del dispositivo. Le immagini salvate
sulla memoria del dispositivo non sono accessibili quando
è installata una memory card.
68
INFORMAZIONI GARANZIA
GARANZIA LIMITATA SUL MINI SCANNER DIGITALE PER
RULLINI KODAK.
QUESTA GARANZIA LIMITATA TI FORNISCE DEI SPECIFICI
DIRITTI LEGALI E ALTRI POSSIBILI DIRITTI, CHE VARIANO DA
STATO IN STATO.
TI GARANTIAMO CHE DURANTE IL PERIODO DI GARANZIA, IL
PRODOTTO NON AVRA’ ALCUN DIFETTO NEL MATERIALE O DI
PRODUZIONE.
LIMITAZIONE DI RESPONSABILITA’
IN MISURA NON VIETATA DALLA LEGGE, QUESTA GARANZIA
È ESCLUSIVA E SOSTITUISCE TUTTE LE ALTRE GARANZIE,
A VOCE, SCRITTE, LEGALI, ESPLICITE O IMPLICITE.
ECCEZZIONE SONO LE GARANZIE ESPLICITE CONTENUTE
IN QUESTA DICHIARAZIONE LIMITATA E IN MISURA NON
VIETATA DALLA LEGGE, DISCONOSCIAMO TUTTE LE ALTRE
GARANZIE, ESPLICITE O IMPLICITE, LEGALI O ALTRIMENTI,
INCLUDENDO SENZA LIMITAZIONE, LE GARANZIE DI
COMMERCIALITA’ E IDONIETA’ PER UN PARTICOLARE SCOPO.
ALCUNI STATI NON PERMETTONO IL DISCONOSCERE LE
GARANZIE IMPLICITE, QUINDI QUESTA DICHIARAZIONE
DI LIMITAZIONE DI RESPONSABILITA’ POTREBBE NON
APPLICARSI A TE. IN MISURA IN CUI TALI GARANZIE NON
POSSANO ESSERE DISCONOSCIUTE SOTTO LE LEGGI DELLA
TUA GIURISTRIZIONE, LIMITIAMO LA DURATA E LA CURA
DI QUESTE GARANZIE ALLA DURATA DI QUESTA GARANZIA
ESPLICITA LIMITATA.
LA NOSTRA RESPONSABILITA’ IN CASO DI MERCI DIFETTOSE
È LIMTATA ALLA RIPARAZIONE, RIMPIAZZO O RIMBORSO
COME DESCRITTO SOTTO NELLA DICHIARAZIONE DI QUESTA
GARANZIA.
69
Page 36

CHI PUO’ USARE QUESTA GARANZIA? C&A Marketing, Inc.
localizzata a 114 Tived Lane East, Edison, NJ (“noi”) estendiamo
questa garanzia limitata solo al consumatore che ha comprato
in origine il prodotto (“tu”). Non si estende a qualunque altro
proprietario seguente o al trasferimento del prodotto.
COSA COPRE QUESTA GARANZIA? Questa garanzia limitata
copre possibili difetti nei materiali e nella fattura del mini
scanner digitale per rullini Kodak (il “prodotto”) per il Periodo di
Garanzia deinito qua sotto.
COSA NON COPRE QUESTA GARANZIA? Questa garanzia
limitata non copre alcun danno dovuto a: (a) trasporti; (b)
conservazione; (c) uso improprio; (d) non seguire le istruzioni
del prodotto o fallire a compiere le manutenzioni preventive;
(c) modiiche; (f) riparazioni non autorizzate; (g) normale usura;
o (h) cause esterne come incidenti, abuso, o qualsiasi azione o
evento al di fuori dal nostro ragionevole controllo.
QUANT’È IL PERIODO DI COPERTURA? Questa garanzia
limitata inizia alla data del tuo acquisto e dura per un anno (il
“Periodo di Garanzia"). Il Periodo di Garanzia non viene esteso
se ripariamo o sostituiamo il prodotto. Potremmo cambiare la
disponibilità di questa garanzia limitata a nostra discrezione,
ma i cambiamenti non saranno retroattivi.
QUALI SONO I NOSTRI RIMEDI IN QUESTA GARANZIA? Rispetto
ad ogni prodotto difettoso durante il Periodo di Garanzia, noi ci
impegneremo, a nostra discrezione, a: (a) riparare o sostituire il
prodotto (o la parte difettosa) gratuitamente o (b) rimborsare il
prezzo d’acquisto di tale prodotto se non è possibile compiere
una sostituzione dell’unità.
COME OTTENGO IL SERVIZIO DI GARANZIA? Per ottenere
il servizio di garanzia, dovrai contattarci a 8445161539 o
via email su kodak@camarketing.com durante il Periodo di
Garanzia per ottenere un numero di Autorizzazione Merce
Difettosa (“DMA”). Senza un numero DMA non verrà fornito
70
alcun servizio di garanzia e i costi per rispedire la merce alle
nostre strutture saranno a carico tuo, il compratore. I costi di
spedizione o di sostituzione dell’unità verso di te saranno a
carico nostro.
71
Page 37

INFORMAZIONI DI CONTATTO PER IL
SERVIZIO CLIENTI
Nel caso dovessi avere alcun problema con il prodotto,
contattaci prima di restituire l’articolo al luogo d'acquisto.
Siamo qui per aiutarti!
Supporto USA:
kodak@camarketing.com
8445161539
Supporto Internazionale:
kodakintl@camarketing.com
8445161540
www.kodakphotoplus.com
Il marchio, il logo e l’immagine commerciale di Kodak sono utilizzati
secondo licenza fornita da Kodak.
Apple è un marchio commerciale di Apple Inc., registrato negli USA e in
altri paesi.
SD è un marchio registrato di SD3C, LLC negli USA
Windoes è un marchio commerciale di Microsoft Corporation registrato
negli USA e in altri paesi.
Eventuali ulteriori prodotti, servizi, nomi e logo utilizzati sono marchi di
fabbrica, di proprietà dei rispettivi produttori, utilizzati per identiicare i
prodotti e non per connotare inanziamenti, approvazioni o altri legami.
Distribuito da: C&A Marketing, Inc., 114 Tived Lane East, Edison, NJ 08837
USA; C&A Marketing UK LTD, 167 Hermitage Road, Crusader Industrial
Estate, London N4 1LZ, UK
©2018. Tutti i diritti riservati. Made in China.
72
Page 38

INHALT
EINFÜHRUNG
1
SPEZIFIKATIONEN
2
MITGELIEFERTES ZUBEHÖR
3
SICHERHEITSVORKEHRUNGEN
4
PRODUKTÜBERSICHT
5
ÜBERBLICK ÜBER DAS HAUPTMENÜ
6
VORBEREITUNG DER MEDIEN FÜR DAS
7
SCANNEN
NEGATIVE LADEN
8
DIAS LADEN
9
KONTINUIERLICHES LADEN (DIAS UND/ODER
10
FILM)
DEN SCANNER VERWENDEN
11
GESCANNTE BILDER ANZEIGEN
12
DIE SPRACHE EINSTELLEN
13
DIE BILDAUFLÖSUNG EINSTELLEN
14
DIE SD™-KARTE FORMATIEREN
15
DEN SCANNER MIT IHREM
16
COMPUTER VERBINDEN
GARANTIEINFORMATIONEN
KONTAKTINFORMATIONEN FÜR DEN
KUNDENDIENST
75
76
77
78
79
80
81
82
83
84
84
89
89
90
91
92
93
96
1. EINFÜHRUNG
Vielen Dank, dass Sie sich für den digitalen KODAK
Mini-Filmscanner entschieden haben. Diese
Bedienungsanleitung soll Ihnen Richtlinien an die
Hand geben, die sicherstellen, dass der Betrieb dieses
Produkts sicher ist und keine Gefahr für den Benutzer
darstellt. Jegliche Verwendung, die nicht den in
diesem Benutzerhandbuch beschriebenen Richtlinien
entspricht, kann zum Erlöschen der eingeschränkten
Garantie führen.
Bitte lesen Sie sich alle Anweisungen durch, bevor
Sie das Produkt verwenden, und bewahren Sie diese
Anleitung als Orientierungshilfe auf. Dieses Produkt ist
nur für den Hausgebrauch bestimmt.
Für dieses Produkt gilt eine eingeschränkte einjährige
Garantie. Diese unterliegt bestimmten Beschränkungen
und Ausschlüssen. Nähere Einzelheiten hierzu sind den
Garantiebedingungen zu entnehmen.
74
75
Page 39

2. TECHNISCHE DATEN
Funktion Filmscanner/USB MSDC
Schnittstelle USB 2.0
Bildsensor 14,0 Megapixel
(4416 x 3312)
1/2,33" CMOSSensor
Display 2,4 Farb-TFTLCD
Belichtungssteuerung Automatisch/Manuell (-2,0 ~
+2,0 EV)
Weißabgleich Automatisch
Aulösung 14 Megapixel / 22
Megapixel*
Scannbare Filmarten 135 Film (36 x 24 mm)
126 Film (27 x 27mm)
110 Film (17 x 13 mm)
Super8 Film (4,01 x 5,79 mm)
Monochromer Film
Dias
Scannbare Bildformate Schwarzweiß, Dias, Negative
Gescanntes Dateiformat JPEG
TVAusgangstyp NTSC/PAL
Interner Speicher 128 MB
Unterstützung für externen
Speicher SD
im Lieferumfang enthalten)
Stromversorgung DC 5VAdapter / Mini USB Anschluss
Verfügbare Sprachen v. Chinesisch / t. Chinesisch /
Englisch / Französisch /
Deutsch / Italienisch /
76
™
-Karte bis zu 32 GB (nicht
Spanisch / Japanisch
Unterstützte PCSysteme Windows
Mac
®
XP / Vista / 7 / 8 / 10
®
OS 10.7.3 und höher
Abmessungen 3,43“ L x 3,41“ B x 4,04“ H
(87 x 86,5 x 102,5 mm)
Gewicht 250g (8,82 Unzen)
*Ihr KODAK digitaler Mini-Filmscanner verwendet einen als
„Interpolation“ bezeichneten Prozess, um die Megapixel
Ihrer gescannten Fotos von 14 auf 22 MP zu erhöhen und zu
verbessern.
3. MITGELIEFERTES ZUBEHÖR
Negativ-Halter
Dia-Halter
Mini-USBKabel Internationales 3-in-1Netzteil BedienungsanleitungTVAusgangskabel
HINWEIS: Eine SDKarte ist im Lieferumfang nicht enthalten, wird
jedoch für die Verwendung dieses Produkts nachdrücklich empfohlen.
Dieses Gerät verfügt über einen extrem begrenzten internen Speicher,
kann aber nur wenige Bilder gleichzeitig speichern, bevor Sie sie auf
Ihren Computer übertragen müssen.
110 Negativ-Adapter 110 Dia-Adapter
Super 8Adapter Reinigungsstab
77
Page 40

4. SICHERHEITSVORKEHRUNGEN
5. PRODUKTÜBERSICHT
• Versuchen Sie nicht, dieses Gerät aus irgendeinem Grund
zu zerlegen.
• Wenn der Scanner heruntergefallen ist oder eine
Beschädigung erlitten hat, berühren Sie das Innere des Geräts
nicht.
• Wenn Sie Rauch oder einen seltsamen Geruch aus dem
digitalen Filmscanner bemerken, schalten Sie das Gerät sofort
aus, und entfernen Sie alle Dias, Diahalter und/oder
Filmnegative aus dem Gerät. Versuchen Sie unter keinen
Umständen, dieses Gerät selbst zu reparieren.
• Vergewissern Sie sich vor der Verwendung, dass das
Scannerobjektiv sauber ist, um sicherzustellen, dass das Bild
klar und einwandfrei gescannt wird.
• Verwenden Sie bei der Reinigung oder versuchten
Reinigung dieses Produkts keine Mittel wie Alkohol, Benzin,
Verdünnungsmittel oder andere organische Lösungsmittel.
• Verwenden Sie dieses Gerät nicht in einer Umgebung, in der
es starkem Staub oder Feuchtigkeit ausgesetzt ist.
• Um eine Fehlfunktion des Scanners aufgrund einer USB Überlastung zu vermeiden, schließen Sie nicht zu viele USB Geräte gleichzeitig mit dem Scanner an Ihren Computer an.
• Bitte verwenden Sie Filme in Standardgröße. Versuchen Sie
nicht, die vorhandenen Adapter und Filmhalter zu modiizieren
oder anzupassen.
• Um den Scanner zu schützen und Energie zu sparen, schaltet
er sich im Ruhezustand nach 30 Minuten automatisch ab.
Drücken Sie die Ein-Aus-Taste in der linken oberen Ecke, um
ihn wieder einzuschalten und den normalen Betrieb wieder
aufzunehmen.
1. LCDBildschirm
™
-Kartensteckplatz
2. SD
(HINWEIS: SD
™
-Karte nicht
im Lieferumfang enthalten)
3. Mini-USBStromanschluss
4. TVAusgangsverbindung
5. OKTaste
6. Home-Taste (Diese Taste
bringt Sie IMMER zum
Startbildschirm zurück,
unabhängig davon, wo
Sie sich in der Menüfolge
beinden.)
7. Ein-Aus-Taste
8. Links-Pfeil/Umkehrfunktion
9. Taste Scannen/Erfassen
(Diese Taste scannt und
speichert Ihr Bild IMMER,
wenn sie gedrückt wird.)
10. Rechts-Pfeil/Flip-Funktion
78
79
Page 41

6. ÜBERBLICK ÜBER DAS HAUPTMENÜ
1. Filmtyp
2. Aulösung
3. Bild erfassen
4. Galerie
80
5. Speicherkarte
formatieren
6. USBUpload
7. Sprachauswahl
7. VORBEREITUNG DER MEDIEN FÜR
DAS SCANNEN
Bevor Sie Ihren Filmscanner verwenden, sollten Sie entweder
eine SD™-Karte (nicht im Lieferumfang enthalten) einlegen, da
der Gerätespeicher äußerst begrenzt ist, oder sicherstellen,
dass im sehr begrenzten Gerätespeicher genügend Platz für
die Bilder ist, die gescannt werden sollen.
Wenn Sie während des Betriebs des Geräts eine SD™-Karte
einlegen, wird der Filmscanner neu gestartet, und Sie
verlieren alle am aktuellen Bild vorgenommenen Änderungen.
Wenn Sie also eine Speicherkarte haben, sollten Sie diese vor
dem Gebrauch einlegen.
Suchen Sie den richtigen Adapter für Ihren Film bzw. Ihr
Dia, und legen Sie ihn in das richtige Film- oder Diafach ein,
bevor Sie den Halter einlegen. Anweisungen für das Einlegen
der Halter in den Scanner inden Sie in den nachfolgenden
Abschnitten „Negative laden“ und „Dias laden“. Diese
Anweisungen gelten auch für Schwarz-Weiß-Filme. Alle
Adapter und Halter sind eindeutig gekennzeichnet.
Klappen Sie die obere
Abdeckung des Adapters hoch.
Legen Sie den Einsatz mit Ihrem
Dia oder Film in den Adapter.
81
Page 42

8. NEGATIVE LADEN
9. DIAS LADEN
HINWEIS: Behandeln Sie Dias oder
Filmnegative immer sehr vorsichtig, um
Kratzer oder Fingerabdrücke zu
vermeiden. Wir empfehlen die
Verwendung von Baumwollhandschuhen
für den Umgang mit Negativen und die
Verwendung von komprimierter
Baumwolle (Wattestäbchen,
Wattebällchen, etc.), um eventuell
vorhandenen Staub vor dem Scannen zu
entfernen.
Stellen Sie immer sicher, dass Ihre
Filmnegative nicht verzogen oder
verbogen sind, bevor Sie sie in den
geknickte Negative erzeugen keine klaren oder korrekten Bilder.
1. Halten Sie das Negativ gegen das Licht, so dass die richtige
Seite zu Ihnen zeigt.
2. Nehmen Sie den Filmnegativhalter (gegebenenfalls mit dem
passenden Adapter) heraus, und halten Sie ihn mit dem Riegel
von sich weg, so dass der Ladepfeil ◄ nach links zeigt. Önen
Sie die Verriegelung, legen Sie das Negativ in die Vertiefung ein,
und schließen Sie die Verriegelung wieder. Achten Sie hierbei
darauf, dass Sie sie an den Rändern
damit sie einrastet.
3. Legen Sie den Negativhalter in den Schlitz auf der rechten Seite
des Filmscanners ein.
Scanner einlegen. Gewölbte oder
entlang herunterdrucken,
1. Halten Sie das Dia gegen das
Licht, so dass die Vorderseite des
Dias zu Ihnen zeigt.
2. Nehmen Sie den Diahalter heraus,
und halten Sie ihn mit dem Riegel
von sich weg, so dass der
Ladepfeil ◄ nach links zeigt.
Önen Sie die Verriegelung, legen
Sie das Negativ in die Vertiefung
ein (Sie können diesen Bereich
auch verwenden, um die Adapter
für die unterschiedlichen Größen
einzusetzen), und schließen Sie die
Verriegelung wieder. Achten Sie
hierbei darauf, dass Sie sie an den
Rändern entlang herunterdrucken,
damit sie einrastet.
3. Setzen Sie den Diahalter - wie
abgebildet - in den Schlitz auf der
rechten Seite des Filmscanners ein.
82
83
Page 43

10. KONTINUIERLICHES LADEN (DIAS
UND/ODER FILM)
Mit dieser nützlichen Funktion können Sie immer weiter neue
Negative oder Dias hintereinander einführen, ohne dabei jedes
Mal den Halter herausnehmen und Ihren Film oder Ihre Dias neu
positionieren zu müssen, was ein
unordentlicher und frustrierender
Prozess sein kann.
1. Legen Sie den leeren Filmnegativ-
oder Diahalter in den Filmscanner
ein.
2. Führen Sie ein Ende des Films von
der rechten Seite in den Halter ein.
3. Führen Sie den Film weiter durch
den Halter hindurch, bis er auf der
linken Seite wieder herauskommt.
Sie können zwischenzeitlich bei
jedem Bild eine Pause einlegen
und dieses scannen, wenn Sie
möchten, oder das Negativ einfach
weiter durchführen, bis Sie das Bild
gefunden haben, dass Sie scannen
möchten.
11. DEN SCANNER VERWENDEN
HINWEIS: Bevor Sie Film in den Scanner einlegen,
nehmen Sie den Reinigungsstab, und führen Sie ihn
vorsichtig in den Filmschlitz ein, um das Objektiv und
die Hintergrundbeleuchtung zu reinigen. Hierdurch wird
sichergestellt, dass das Bild, das Sie aufnehmen, klar und
sauber wird.
84
1. Verwenden Sie nach dem
Einschalten des Scanners die
Pfeiltasten, um zum
Aufnahmeschirm zu navigieren,
und drücken Sie dann die OK Taste, um in den Aufnahmemodus
zu gelangen.
2. Legen Sie Ihre Filmnegative oder
Dias in das entsprechende Fach
bzw. den richtigen Halter und anschließend zum Scannen in
den Filmschlitz ein.
3. Wenn das Bild korrekt angezeigt wird, drücken Sie die Taste ,
um das Bild aufzunehmen und entweder im Speicher
des Geräts oder auf der eingelegten Speicherkarte zu
speichern.
4. Wenn das Bild nicht korrekt angezeigt wird, müssen Sie
möglicherweise den richtigen Filmtyp auswählen.
a. Drücken Sie zunächst die Home-Taste, um das Hauptmenü
aufzurufen.
b. Verwenden Sie die Pfeiltasten, um zur Option „Filmtyp“ zu
navigieren.
c. Drücken Sie auf OK, um das Menü „Filmtyp“ aufzurufen.
85
Page 44

d. Wählen Sie den richtigen Filmtyp (Negativ, Dia, S/W) und
die richtige Größe (110, 135, 126, Super8) aus.
e. Sie kehren automatisch in den Aufnahmemodus zurück.
5. Ist der richtige Filmtyp ausgewählt, können Sie das Bild
anhand der Pfeiltasten auf den Kopf stellen oder spiegeln.
Dies ist insbesondere bei Negativen hilfreich, bei denen der
Text rückwärts dargestellt wird.
a. Die Flip-Funktion invertiert das Bild entlang einer
horizontalen Achse, so dass der obere Teil zum unteren
und der untere Teil zum oberen Teil wird.
b. Die Umkehrfunktion (auch „Spiegelfunktion“ genannt)
kehrt Ihr Bild über eine vertikale Achse um, als ob Sie es an
einen Spiegel halten würden. Wenn Text rückwärts angezeigt
wird, können Sie diese Funktion verwenden, damit er richtig
dargestellt wird.
86
87
Page 45

6. Um das Bild in Bezug auf Helligkeit oder Farbgebung zu
bearbeiten, drücken Sie die OKTaste, während Sie sich im
Aufnahmemodus beinden. Auf dem Bildschirm erhalten Sie
Optionen, um die Helligkeit und RGBWerte einzustellen.
Verwenden Sie die Pfeiltasten zum Navigieren und die OKTaste,
um Ihre Auswahl zu bestätigen.
a. Um die Rot/Grün/Blau-Töne in Ihrem Bild anzupassen,
verwenden Sie die Pfeile, nachdem Sie den RGBBildschirm
aufgerufen haben, um eine Option auszuwählen und dann die
Werte zu erhöhen oder zu verringern.
b. Die Option ganz oben ist die Helligkeitseinstellung.
Verwenden Sie die Pfeile, um den Belichtungswert von -2,0
bis +2,0 in Schritten von 0,5 EV zu erhöhen oder zu
verringern.
c. In der unteren Ecke können Sie „RESET“ wählen, wenn Sie
eine Einstellung zu stark angepasst haben und das Bild nicht
wieder normalisieren können. In diesem Fall wählen Sie die
Option RESET aus und drücken anschließend die OKTaste, um
das Bild wieder so einzustellen, wie es vor der Anpassung war.
7. Nachdem Sie Ihre Einstellungen vorgenommen haben,
drücken Sie die Taste
zu speichern. Denken Sie daran: Wenn Sie die Aufnahmetaste
drücken, wird das angezeigte Bild immer gescannt und
espeichert, auch wenn Sie sich nicht im Aufnahmemodus
beinden.
, um das Bild aufzunehmen und
12. GESCANNTE BILDER ANZEIGEN
1. Navigieren Sie vom Startbildschirm
mit den Pfeiltasten, bis Sie den
Bildschirm namens „Galerie“
erreichen. Drücken Sie auf OK, um
diesen auszuwählen.
2. Die Galerie-Funktion startet eine
automatische Diashow aller
gespeicherten Bilder im Speicher
oder auf einer eingelegten SD
enthalten). Um die automatische Wiedergabe der Diashow
zu stoppen und manuell durch die Diashow-Bilder zu
navigieren, drücken Sie die OKTaste, und verwenden Sie dann
die Pfeiltasten zur Navigation.
3. Um die Galerie zu verlassen, drücken Sie die Home-Taste oben
auf dem Scanner.
™
-Karte (nicht im Lieferumfang
13. DIE SPRACHE EINSTELLEN
1. Verwenden Sie im Hauptmenü die
Pfeile nach links und rechts, um zur
Option „Sprache“ zu navigieren,
und drücken Sie die OKTaste.
2. Verwenden Sie die Pfeiltasten, um
die richtige Sprache aus der Liste
auszuwählen, und drücken Sie
88
89
Page 46

dann OK.
3. Die folgenden Sprachen sind verfügbar: Englisch, Französisch,
Deutsch, Italienisch, Spanisch, traditionelles Chinesisch,
vereinfachtes Chinesisch und Japanisch.
14. DIE BILDAUFLÖSUNG EINSTELLEN
1. Verwenden Sie im Hauptmenü
die Pfeile nach links und rechts,
um zur Option „Aulösung“ zu
navigieren, und drücken Sie die
OKTaste.
2. Verwenden Sie die
Pfeiltasten, um entweder die
Standardeinstellung 14 MP oder
22 MP unter Verwendung des
Interpolationsprozesses
auszuwählen. Drücken Sie OK,
um die neue Aulösung zu
bestätigen.
HINWEIS: bestimmte Filmtypen,
wie z.B. Super8 und 126, sind an
bestimmte Aulösungen
gebunden und erzeugen
kleinere Bilder. Nur die Größen
110/135 bieten die Möglichkeit
einer Aulösung von 1422MP.
15. DIE SD™-KARTE FORMATIEREN
1. Verwenden Sie im Hauptmenü die
Pfeile nach links und rechts, um zur
Option „Formatieren“ zu navigieren,
und drücken Sie die OKTaste.
2. Sie erhalten eine Bestätigung, die
Sie darüber informiert, dass ALLE
DATEN GELÖSCHT WERDEN. Bitte
stellen Sie sicher, dass Sie nur dann
bestätigen, wenn Sie wirklich alle
Daten von Ihrer Speicherkarte
löschen möchten.
3. Verwenden Sie die feile, um nach
der Auorderung „JA“ auszuwählen
und alle Medien zu formatieren.
Drücken Sie die OKTaste, um den
Formatierungsvorgang zu
bestätigen und zu starten.
90
91
Page 47

4. Drücken Sie nach Abschluss des Formatierungsvorgangs die
Ein-Aus-Taste, um den Scanner auszuschalten, und schalten
Sie ihn dann wieder ein.
16. DEN SCANNER MIT IHREM
COMPUTER VERBINDEN
1. Verwenden Sie im Hauptmenü
die Pfeile nach links und rechts,
um zur Option „USBUpload“ zu
navigieren, und drücken Sie die
OKTaste.
2. Schließen Sie das Mini-USBKabel
an Ihren Scanner an, und
verbinden Sie es mit dem USB-
2.0Anschluss Ihres Computers.
3. Das Gerät sollte als
Wechseldatenträger mit Ihrem
Computer verbunden werden,
so dass Sie Ihre Fotos auf einem
größeren Bildschirm betrachten
und sie von Ihrer Speicherkarte
(nicht im Lieferumfang enthalten)
oder dem Gerätespeicher auf Ihren Computer übertragen
können.
HINWEIS: Wenn Sie Bilder sowohl auf einer
herausnehmbaren Speicherkarte als auch auf dem
Gerätespeicher gespeichert haben, müssen Sie die
Speicherkarte entfernen, um auf die im Gerätespeicher
gespeicherten Bilder zugreifen zu können. Auf die im
Gerätespeicher gespeicherten Bilder kann nicht zugegrien
werden, während eine Speicherkarte eingelegt ist.
92
GARANTIE-INFORMATIONEN
BESCHRÄNKTE GARANTIE AUF DEN KODAK DIGITALEN MI-
NIFILMSCANNER
DIESE BESCHRÄNKTE GARANTIE GEWÄHRT IHNEN BESTIMMTE
RECHTE. IHNEN KÖNNEN ZUDEM WEITERE RECHTE ZUSTEHEN,
DIE VON STAAT ZU STAAT JEWEILS UNTERSCHIEDLICH SIND.
WIR GARANTIEREN, DASS DAS PRODUKT WÄHREND DER GARANTIEZEIT FREI VON MATERIAL- UND VERARBEITUNGSFEHLERN IST.
HAFTUNGSBESCHRÄNKUNG
SOWEIT NICHT GESETZLICH VERBOTEN, IST DIES DIE AUSSCHLIESSLICHE GARANTIE, UND SIE ERSETZT ALLE ANDEREN
MÜNDLICHEN, SCHRIFTLICHEN, GESETZLICHEN, AUSDRÜCKLICHEN ODER STILLSCHWEIGENDEN GARANTIEN. MIT AUSNAHME DER IN DIESER BESCHRÄNKTEN GARANTIEERKLÄRUNG
ENTHALTENEN AUSDRÜCKLICHEN GARANTIEN UND SOWEIT
NICHT GESETZLICH UNZULÄSSIG, LEHNEN WIR ALLE ANDEREN
AUSDRÜCKLICHEN ODER STILLSCHWEIGENDEN, GESETZLICHEN ODER SONSTIGEN GARANTIEN AB, INSBESONDERE DIE
GARANTIEN DER MARKTGÄNGIGKEIT UND EIGNUNG FÜR EINEN
BESTIMMTEN ZWECK. EINIGE STAATEN ERLAUBEN KEINE HAFTUNGSAUSSCHLÜSSE FÜR STILLSCHWEIGENDE GEWÄHRLEISTUNGEN, SO DASS DIESER HAFTUNGSAUSSCHLUSS AUF SIE
MÖGLICHERWEISE NICHT ZUTRIFFT. SOWEIT SOLCHE GARANTIEN NACH DEN GESETZEN IHRES RECHTSGEBIETS NICHT AUSGESCHLOSSEN WERDEN KÖNNEN, BESCHRÄNKEN WIR DIE DAUER UND DIE RECHTSMITTEL DIESER GARANTIEN AUF DIE DAUER
DIESER AUSDRÜCKLICHEN EINGESCHRÄNKTEN GARANTIE.
UNSERE HAFTUNG FÜR FEHLERHAFTE WAREN BESCHRÄNKT
SICH AUF REPARATUR, ERSATZ ODER RÜCKERSTATTUNG, WIE
NACHFOLGEND IN DIESER GARANTIEERKLÄRUNG BESCHRIEBEN.
93
Page 48

WER DARF DIESE GARANTIE NUTZEN? C&A Marketing, Inc. mit
Sitz in 114 Tived Lane East, Edison, NJ („wir“) gewähren diese
beschränkte Garantie nur dem Verbraucher, der das Produkt
ursprünglich gekauft hat („Sie“). Sie erstreckt sich nicht auf
einen nachfolgenden Eigentümer oder sonstigen Empfänger
des Produkts.
WAS DECKT DIESE GARANTIE AB? Diese beschränkte Garantie
erstreckt sich auf Material- und Verarbeitungsfehler des Kodak
digitalen Mini-Filmscanners (das „Produkt“) während der Garantiezeit, wie nachfolgend deiniert.
WAS DECKT DIESE GARANTIE NICHT AB? Diese beschränkte
Garantie gilt nicht für Schäden aufgrund von: (a) Transport;
(b) Lagerung; (c) unsachgemäßer Verwendung; (d) Nichteinhaltung der Produkthinweise oder der vorbeugenden Wartung; (e) Änderungen; (f) nicht genehmigten Reparaturen; (g)
normaler Abnutzung; oder (h) äußeren Ursachen wie Unfällen,
Missbrauch oder anderen Handlungen oder Ereignissen, die
außerhalb unserer vertretbaren Kontrolle liegen.
WIE LANG IST DER GARANTIEZEITRAUM? Diese beschränkte
Garantie beginnt mit dem Kaufdatum und dauert ein Jahr (die
„Garantiezeit“). Die Garantiezeit verlängert sich nicht, wenn wir
das Produkt reparieren oder ersetzen. Wir können die Verfügbarkeit dieser eingeschränkten Garantie nach eigenem Ermessen ändern, Änderungen werden jedoch nicht rückwirkend
vorgenommen.
WELCHE RECHTSMITTEL STEHEN IHNEN IM RAHMEN DIESER
GARANTIE ZU? Im Fall eines fehlerhaften Produkts werden wir
während der Garantiezeit nach unserem alleinigen Ermessen
entweder: (a) das Produkt (oder das fehlerhafte Teil) kostenlos
reparieren oder ersetzen oder (b) den Kaufpreis des Produkts
zurückerstatten, wenn kein Austauschgerät zur Verfügung gestellt werden kann.
WIE KÖNNEN SIE GARANTIELEISTUNGEN IN ANSPRUCH
94
NEHMEN? Um Garantieleistungen zu erhalten, müssen Sie
uns während der Garantiezeit telefonisch unter der Nummer
8445161539 oder per EMail an kodak@camarketing.com
kontaktieren, um eine DMANummer („Defective Merchandise
Authorization“) zu erhalten. Ohne DMANummer wird keine Garantieleistung erbracht, und die Rücksendekosten werden von
Ihnen, dem Käufer, übernommen. Die Kosten für den Versand
des Ersatzgerätes an Sie werden von uns übernommen.
95
Page 49

KONTAKTINFORMATIONEN FÜR DEN
KUNDENDIENST
Sollten Sie Probleme mit Ihrem Produkt haben, setzen Sie sich
bitte mit uns in Verbindung, bevor Sie den Artikel an den Ort
Ihres Kaufs zurückbringen. Wir sind hier, um zu helfen!
Support in den USA:
kodak@camarketing.com
8445161539
Internationaler Support:
kodakintl@camarketing.com
8445161540
www.kodakphotoplus.com
Die Marke Kodak, das entsprechende Logo und die Aufmachung werden
unter Lizenz von Kodak verwendet.
Mac ist eine in den USA und anderen Ländern eingetragene Marke von
Apple Inc.
SD ist eine in den USA eingetragene Marke von SD3C, LLC.
Windows ist eine in den USA und/oder anderen Ländern eingetragene
Marke der Microsoft Corporation.
Alle anderen Produkte, Markennamen, Firmennamen und Logos sind
Markenzeichen ihrer jeweiligen Eigentümer und dienen lediglich zur
Kennzeichnung ihrer jeweiligen Produkte. Sie sind nicht als Sponsoring,
Billigung oder Zustimmung gedacht.
Vertrieben durch: C&A Marketing, Inc., 114 Tived Lane East, Edison, NJ
08837, USA
C&A Marketing UK LTD, 167 Hermitage Road, Crusader Industrial Estate,
London N4 1LZ, Vereinigtes Königreich
©2018. Alle Rechte vorbehalten. Hergestellt in China.
96
Page 50

CONTENIDO
INTRODUCCIÓN
1
ESPECIFICACIONES
2
ACCESORIOS INCLUIDOS
3
PRECAUCIONES DE SEGURIDAD
4
DESCRIPCIÓN GENERAL DEL PRODUCTO
5
DESCRIPCIÓN GENERAL DEL MENÚ
6
PRINCIPAL
PREPARACIÓN DEL MATERIAL PARA EL
7
ESCANEO
CARGA DE NEGATIVOS
8
CARGA DE DIAPOSITIVAS
9
CARGA CONTINUA (DIAPOSITIVAS O
10
NEGATIVOS)
USO DEL ESCÁNER
11
VISUALIZACIÓN DE LAS IMÁGENES
12
ESCANEADAS
AJUSTE DE IDIOMA
13
ELECCIÓN DE LA RESOLUCIÓN DE LA
14
FOTOGRAFÍA
FORMATEO DE LA TARJETA SD
15
CONEXIÓN DEL ESCÁNER A
16
SU COMPUTADORA
INFORMACIÓN DE LA GARANTÍA
INFORMACIÓN DE CONTACTO DE ATENCIÓN
AL CLIENTE
™
99
100
102
103
104
105
106
107
108
109
109
114
114
115
116
117
118
120
1. INTRODUCCIÓN
Gracias por adquirir el Mini escáner digital para película
KODAK. Esta Guía para el usuario tiene como objeto
brindarle pautas para asegurar que la operación de
este producto sea segura y no plantee riesgos para el
usuario. Todo uso que no guarde conformidad con las
pautas descritas en esta Guía para el usuario podrá
anular la garantía limitada.
Lea todas las indicaciones antes de usar el producto, y
guarde esta guía para referencia futura. Este producto
es solo para uso doméstico.
Este producto está cubierto por una garantía limitada
de un año. La cobertura está sujeta a límites y
exclusiones. Ver la garantía para obtener más detalles.
98
99
Page 51

2. ESPECIFICACIONES
Función Escáner para película/USB para
MSDC
Interfaz USB 2.0
Sensor de imagen 14 megapíxeles
(4416x3312)
Sensor CMOS de 1/2,33
pulgadas
Pantalla LCD TFT color de 2.4 pulgadas
Control de exposición Automático/Manual
(-2,0 ~ +2,0 EV)
Balance de blancos Automático
Resolución 14 megapíxeles/22
megapíxeles*
Tipos de película que
pueden escanearse Película de 135 (36 x 24 mm)
Película de 126 (27 x 27mm)
Película de 110 (17 x 13mm)
Película Super8 (4,01 x 5,79 mm)
Película monocromo
Diapositivas
Formatos de imágenes que
pueden escanearse Blanco y negro, diapositivas,
negativos
Formatos de archivo que
pueden escanearse JPEG
Tipo de salida para TV NTSC/PAL
Memoria interna 128MB
100
Soporte de memoria externa Tarjeta SD
™
de hasta 32GB (que
no se incluye)
Fuente de alimentación Adaptador de CC de 5 V/puerto
Mini USB
Idiomas disponibles Chino simpliicado/chino
tradicional/ inglés/francés/
alemán/italiano/español/
japonés
Sistemas de PC compatibles Windows
Mac
®
XP/Vista/7/8/10
®
OS 10.7.3 y superiores
Dimensiones 3,43 pulgadas de longitud x 3,41
pulgadas de ancho x 4,04
pulgadas de altura (87 x 86,5 x
102,5mm)
Peso 8,82oz (250g)
*Su mini escáner digital para película KODAK utiliza un proceso
denominado “interpolación” para actualizar y mejorar los
megapíxeles de sus fotografías escaneadas de 14 a 22MP.
101
Page 52

3. ACCESORIOS INCLUIDOS
Soporte para negativos
Soporte para diapositivas
Cable miniUSB Adaptador de potencia
NOTA: No se incluye la tarjeta SD, pero se recomienda enfáticamente
contar con una durante el uso del producto. Este dispositivo tiene
una memoria interna sumamente limitada, y solo puede almacenar
algunas imágenes hasta que deba transferirlas a su computadora.
Adaptador para negativos
de 110
Adaptador para Super8 Varilla de limpieza
internacional 3 en 1
Adaptador para
diapositivas de 110
Manual del usuarioCable de salida de TV
4. PRECAUCIONES DE SEGURIDAD
• No intente desarmar este dispositivo por ninguna razón.
• No toque las partes internas del escáner después de que se
caiga al suelo o luego de que haya sufrido algún tipo de daño.
• Si nota que sale humo o un olor extraño del escáner digital
para película, de inmediato apague el dispositivo y retire las
diapositivas, bandejas de diapositivas o negativos del
producto. No intente reparar el dispositivo por su cuenta, bajo
ninguna circunstancia.
• Asegúrese de que el escáner esté limpio antes de utilizarlo
para garantizar un escaneo de imágenes claras e
inmaculadas.
• No utilice productos como alcohol, gasolina, diluyente u otro
solvente orgánico para limpiar este producto.
• No utilice este dispositivo en un ambiente en el que esté
expuesto a polvo o humedad abundante.
• Para evitar el mal funcionamiento del escáner debido a una
sobrecarga de USB, no conecte demasiados dispositivos USB
a su computadora al mismo tiempo que conecta el escáner.
• Utilice películas de tamaño estándar, y no intente modiicar ni
adaptar los adaptadores y bandejas para película existentes.
• Para proteger el escáner y ahorrar energía, este se apagará
automáticamente luego de estar 30 minutos en estado
inactivo. Presione el botón de encendido de la esquina
superior izquierda para volver a encenderlo y continuar con el
uso normal.
102
103
Page 53

5. DESCRIPCIÓN GENERAL DEL PRODUCTO
1. Pantalla de LCD
2. Ranura para tarjetas SD
(NOTA: No se incluye la
tarjeta SD™)
3. Conexión de alimentación
mini USB
4. Conexión para salida de TV
5. Botón OK (Aceptar)
6. Botón de inicio (este botón
SIEMPRE lo llevará a la
pantalla de inicio, sin
importar en que parte de
la secuencia del menú se
encuentre).
7. Botón de encendido
8. Flecha izquierda/función
de inversión
9. Botón Escaneo/Captura
(cuando lo presione, este
botón SIEMPRE escaneará y
guardará sus imágenes).
10. Flecha derecha/función de
volteado
™
6. DESCRIPCIÓN GENERAL DEL MENÚ
PRINCIPAL
104
1. Tipo de película
2. Resolución
3. Captura de imagen
4. Galería
5. Formateo de la tarjeta
de memoria
6. Carga USB
7. Selección de idioma
105
Page 54

7. PREPARACIÓN DEL MEDIO PARA EL
ESCANEO
Antes de utilizar su escáner para película, debe insertar una tarjeta
SD™ (que no se incluye) ya que la memoria del dispositivo es muy
limitada, o bien asegúrese de que haya espacio suiciente en la
limitada memoria del dispositivo para almacenar las imágenes que
desea escanear.
Insertar una tarjeta SD™ mientras el dispositivo se encuentra en
funcionamiento hará que el escáner para película se reinicie y se
perderán las ediciones que haya hecho en la imagen, por eso si tiene
una tarjeta de memoria, debe insertarla antes del uso.
Ubique el adaptador correcto para su película o diapositivas, si
corresponde, y colóquelo en la bandeja para película o diapositivas
adecuada antes de cargar la bandeja. Encontrará instrucciones
sobre cómo cargar las bandejas en el escáner en las secciones
a continuación denominadas “Carga de negativos” y “Carga de
diapositivas”. Estas instrucciones también corresponden a película
en blanco y negro. Los adaptadores y las bandejas están claramente
marcados.
Voltee la cubierta superior
del adaptador hacia arriba.
Inserte la dispositiva o
película en el adaptador.
8. CARGA DE NEGATIVOS
NOTA: Siempre manipule las
diapositivas o los negativos con
cuidado para evitar rayarlos o
dejar marcas de huellas digitales.
Recomendamos que utilice guantes
de algodón para manipular los
negativos, y algodón comprimido
(hisopos, bolas de algodón, etc.) para
eliminar el polvo que pudiera estar
presente antes de escanearlos.
Siempre asegúrese de que los
negativos no estén torcidos o
plegados antes de insertarlos en
el escáner. Los negativos torcidos
o con pliegues no producirán
imágenes claras o correctas.
1. Sostenga el negativo a contraluz, con el lado correcto
hacia usted.
2. Retire el soporte de negativos (con el adaptador del
tamaño correcto, de ser necesario) y sosténgalo con el
compartimiento alejado de usted, de modo que la lecha
de carga ◄ apunte hacia la izquierda. Abra el
compartimiento, coloque el negativo en el área empotrada
y luego cierre el compartimiento, asegurándose de
presionar hacia abajo alrededor de los bordes para que se
trabe en su lugar.
3. Cargue el soporte de negativos en la ranura del lado
derecho del escáner para película.
106
107
Page 55

9. CARGA DE DIAPOSITIVAS
1. Sostenga la diapositiva a
contraluz con la parte frontal de
la diapositiva hacia usted.
2. Retire el soporte de diapositivas
y sosténgalo con el compartimiento
alejado de usted, de modo que
la lecha de carga ◄ apunte hacia
la izquierda. Abra el
compartimiento, coloque la
diapositiva en el área empotrada
(también puede utilizar esta área
para colocar los adaptadores para
película de distintos tamaños, de
ser necesario), y luego cierre el
compartimiento, asegurándose de
presionar hacia abajo alrededor de
los bordes para que se trabe en
su lugar.
10. CARGA CONTINUA (DIAPOSITIVAS
Y/O NEGATIVOS)
Esta útil función le permite seguir colocando nuevos
negativos o diapositivas en el escáner para película sin tener
que retirar la bandeja y volver a posicionar los negativos
o las diapositivas cada vez, un
proceso que resulta desordenado y
frustrante.
1. Cargue la bandeja de soporte de
negativos o diapositivas vacía en
el escáner para película.
2. Coloque un extremo de la película
en la bandeja desde el lado
derecho.
3. Siga colocando la película en la
bandeja hasta que emerja por el
otro lado. Puede detenerse en
cada imagen y escanearla si lo
desea, o simplemente seguir
colocando los negativos hasta
que encuentre la imagen que
desea escanear.
3. Inserte el soporte de diapositivas en
la ranura en el lado derecho del
escáner para película, según se
muestra en la imagen.
108
11. USO DEL ESCÁNER
NO TA: Antes de cargar la película en el escáner, inserte la
varilla de limpieza suavemente dentro de la ranura para
película para limpiar la lente y el panel de retroiluminación.
Esto garantizará que la imagen que capture sea clara y sin
manchas.
109
Page 56

1. Luego de encender el escáner,
utilice las teclas de lechas para
navegar hasta la pantalla Capture
(Captura); luego, presione el botón
OK (Aceptar) para entrar al Capture
Mode (Modo de captura).
2. Inserte sus negativos o diapositivas
en la bandeja/soporte adecuado
y luego dentro de la ranura para
película para el escaneo.
3. Si la imagen se visualiza correctamente, presione el botón
para capturar y guardar la imagen en la memoria del
dispositivo o en la tarjeta de memoria que instaló.
4. Si la imagen no se visualiza correctamente, es posible que
deba seleccionar el tipo de película correcto.
a. Primero, presione la tecla de inicio para ver el menú principal.
b. Utilice las teclas de lechas para navegar hasta la opción Film
Type (Tipo de película).
c. Presione OK (Aceptar) para ver el menú Film Type (Tipo de
película).
d. Seleccione el tipo de película correcto (negativo, diapositiva,
blanco y negro) y el tamaño correcto (110, 135, 126, Super8).
110
111
Page 57

e. El dispositivo lo llevará automáticamente a Capture Mode
(Modo de captura).
5. Una vez que haya seleccionado el tipo de película, puede optar
por voltear o invertir la imagen al presionar las teclas de lechas.
Eso resulta especialmente útil para los negativos en los que el
texto se visualiza al revés.
a. La función de volteado invertirá la imagen sobre un eje
horizontal, de modo que la parte superior se convierte en la
parte inferior, y la parte inferior en la parte superior.
b. La función de inversión (también denominada función de
“espejo”) invertirá su imagen sobre un eje vertical, como si se
visualizara frente a un espejo. Si el texto se visualiza al revés,
utilice esta función para que se visualice correctamente.
6. Para realizar ediciones en la imagen con respecto al brillo o la
coloración, presione el botón OK (Aceptar) mientras se
encuentre en Capture Mode (Modo de captura). La pantalla le
dará la opción de ajustar el brillo y los valores de RGB (rojo verde-azul). Utilice las teclas de lechas para navegar y OK
(Aceptar) para conirmar.
a. Para ajustar los niveles de tonos Rojo/Verde/Azul en su
imagen, utilice las lechas una vez que se encuentre en la
pantalla RGB para seleccionar una opción y luego aumente o
disminuya los valores.
b. La opción en la parte superior es el ajuste de Brillo. Use las
lechas para aumentar o disminuir el valor de exposición de -2.0 a
+2.0 en incrementos de 0.5 EV.
c. En la esquina inferior puede seleccionar RESET (RESTABLECER);
si ajusta demasiado la imagen y no puede volver a la versión
original, seleccione la opción RESET (RESTABLECER) y presione
el botón OK (Aceptar) para restablecer la imagen a su forma
original, antes de realizar los ajustes.
112
113
Page 58

7. Una vez que haya realizado los ajustes, presione la tecla
para capturar la imagen y guardarla. Recuerde: al presionar el
botón Capture (Capturar), escaneará y guardará la imagen que
esté visualizando en ese momento, incluso si no se encuentra en
el modo de captura.
12. VISUALIZACIÓN DE LAS IMÁGENES
ESCANEADAS
1. Desde la pantalla de inicio, navegue
con las teclas de lechas hasta llegar a
la pantalla denominada Gallery
(Galería). Presione OK (Aceptar) para
seleccionar una opción.
2. La función Gallery (Galería) iniciará
una presentación automática de
diapositivas de todas las imágenes
almacenadas en la memoria o en la tarjeta SD
insertado (que no se incluye). Para detener la reproducción
automática de la presentación de diapositivas y navegar en forma
manual por las imágenes de la presentación, presione el botón OK
(Aceptar), y luego utilice las teclas de lechas para navegar.
3. Para salir de la Gallery (Galería), presione el botón de inicio en la
parte superior del escáner.
™
que haya
13. AJUSTE DE IDIOMA
1. Desde el menú principal, utilice las
lechas izquierda y derecha para
navegar hasta la opción Language
(Idioma) y presione el botón OK
(Aceptar).
2. Utilice las teclas de lechas para
seleccionar el idioma correcto en la
lista y luego presione OK (Aceptar).
114
3. Los idiomas disponibles incluyen: inglés, francés, alemán,
italiano, español, chino tradicional, chino simpliicado y japonés.
14. ELECCIÓN DE LA RESOLUCIÓN DE LA
FOTOGRAFÍA
1. Desde el menú principal, utilice
las lechas izquierda y derecha
para navegar hasta la opción
Resolution (Resolución) y
presione el botón OK (Aceptar).
2. Utilice las teclas de lechas para
seleccionar el tamaño
predeterminado de 14MP o
22MP mediante el proceso de
interpolación. Presione OK
(Aceptar) para conirmar la nueva
resolución.
NOTA: Ciertos tipos de película,
como Super8 y de 126, tienen
resoluciones especíicas ijas y
producirán imágenes más
pequeñas. Solo los tamaños de
110/135 brindan la opción de
utilizar las resoluciones de 14 a
22MP.
115
Page 59

15. FORMATEO DE LA TARJETA SD
1. Desde el menú principal, utilice las
lechas izquierda y derecha para
navegar hasta la opción Format
(Formatear) y presione el botón OK
(Aceptar).
2. Recibirá un mensaje de
conirmación que le indicará que
ALL DATA WILL BE DELETED (SE
ELIMINARÁN TODOS LOS DATOS).
Asegúrese de no conirmar a
menos que desee eliminar todos
los datos de su tarjeta de memoria.
3. Utilice las lechas para resaltar la
opción YES (SÍ) cuando el
dispositivo le solicite que formatee
todos los datos. Presione el botón
OK (Aceptar) para conirmar e
iniciar el proceso de formateado.
™
4. Una vez inalizado el proceso de formateado, presione el
botón de encendido/apagado para apagar el escáner, y
luego vuelva a encenderlo.
16. CONEXIÓN DEL ESCÁNER A SU
COMPUTADORA
1. Desde el menú principal, utilice las lechas izquierda y
derecha para navegar hasta la opción USB Upload (Carga
USB) y presione el botón OK (Aceptar).
2. Conecte el cable mini USB a su escáner y conéctelo al
puerto USB 2.0 de su computadora.
3. Debe conectar el dispositivo a su computadora como una
unidad extraíble, lo que le permitirá ver sus fotografías
en una pantalla más grande así como transferirlas desde su
tarjeta de memoria (que no se incluye) o la memoria del
dispositivo a su computadora.
NO TA: Si tiene imágenes almacenadas en una tarjeta de
memoria extraíble o en la memoria del dispositivo, deberá
retirar la tarjeta de memoria para acceder a las imágenes
almacenadas en la memoria del dispositivo. No se puede
acceder a las imágenes almacenadas en la memoria del
dispositivo cuando la tarjeta de memoria está instalada.
116
117
Page 60

INFORMACIÓN DE LA GARANTÍA
GARANTÍA LIMITADA PARA EL MINI ESCÁNER DIGITAL PARA
PELÍCULA KODAK
ESTA GARANTÍA LIMITADA LE OTORGA DERECHOS LEGALES ESPECÍFICOS Y ES POSIBLE QUE TAMBIÉN TENGA OTROS DERECHOS,
QUE VARÍAN DE UN ESTADO A OTRO.
GARANTIZAMOS QUE, DURANTE EL PERÍODO DE LA GARANTÍA, EL
PRODUCTO NO PRESENTARÁ FALLAS DE MATERIALES O DE MANO
DE OBRA.
LIMITACIÓN DE LA RESPONSABILIDAD
EN LA MEDIDA EN QUE NO LO PROHÍBA LA LEY, ESTA GARANTÍA
ES EXCLUSIVA Y REEMPLAZA TODA OTRA GARANTÍA, SEA VERBAL,
ESCRITA, LEGAL, EXPRESA O IMPLÍCITA. CON EXCEPCIÓN DE LAS
GARANTÍAS EXPRESAS QUE FIGURAN EN ESTA DECLARACIÓN DE
GARANTÍA LIMITADA Y EN LA MEDIDA EN QUE NO LO PROHÍBA LA
LEY, NOS EXIMIMOS DE TODA OTRA GARANTÍA, EXPRESA O IMPLÍCITA, LEGAL O DE OTRA ÍNDOLE, INCLUIDAS ENTRE OTRAS, LAS
GARANTÍAS DE COMERCIABILIDAD E IDONEIDAD PARA UN FIN DETERMINADO. ALGUNOS ESTADOS NO PERMITEN DESCARGOS DE
RESPONSABILIDAD DE GARANTÍAS IMPLÍCITAS, DE MODO QUE ES
POSIBLE QUE ESTE DESCARGO NO SEA APLICABLE EN SU CASO.
EN LA MEDIDA EN QUE DICHAS GARANTÍAS NO PUEDAN EXIMIRSE CONFORME A LAS LEYES DE SU JURISDICCIÓN, LIMITAMOS LA
DURACIÓN Y LOS RECURSOS DE DICHAS GARANTÍAS A LA DURACIÓN DE ESTA GARANTÍA LIMITADA EXPRESA.
NUESTRA RESPONSABILIDAD POR PRODUCTOS DEFECTUOSOS
SE LIMITA A LA REPARACIÓN, LA SUSTITUCIÓN O EL REEMBOLSO
SEGÚN SE DESCRIBE A CONTINUACIÓN EN ESTA DECLARACIÓN
DE GARANTÍA.
¿QUIÉN PUEDE USAR ESTA GARANTÍA? C&A Marketing, Inc., ubicado en 114 Tived Lane East, Edison, Nueva Jersey (“nosotros”) extendemos la presente garantía limitada únicamente al consumidor
que adquirió originalmente el producto (“usted”). No abarca a ningún
118
propietario posterior u a otra persona a quien se le transiera el producto.
¿QUÉ CUBRE ESTA GARANTÍA? Esta garantía limitada cubre las fallas de materiales o de mano de obra del mini escáner digital para
película KODAK (el "producto") durante el período de garantía que se
deine debajo.
¿QUÉ NO CUBRE ESTA GARANTÍA? Esta garantía limitada no cubre
ningún daño que se deba a: (a) transporte; (b) almacenamiento; (c)
uso inadecuado; (d) incumplimiento de las instrucciones del producto o falta de mantenimiento preventivo; (e) modiicaciones; (f)
reparación no autorizada; (g) uso y desgaste normales; o (h) causas
externas, como accidentes, uso indebido u otras acciones o sucesos
más allá de nuestro control razonable.
¿CUÁL ES EL PERÍODO DE COBERTURA? La garantía limitada comienza en la fecha de compra y se extiende por un año (el “Período
de garantía”). El período de garantía no se extiende si reparamos o
sustituimos el producto. Es posible que cambiemos la disponibilidad
de esta garantía limitada a nuestro criterio, pero ningún cambio se
aplicará de modo retroactivo.
¿CUÁLES SON LOS RECURSOS DISPONIBLES CONFORME A ESTA
GARANTÍA? En lo que respecta a cualquier producto que resulte defectuoso durante el período de la garantía, aplicaremos, a nuestro
criterio exclusivo, una de las siguientes opciones: (a) reparar o sustituir el producto (o la pieza defectuosa) sin cargo o (b) reembolsar
el precio de compra del producto si no se proporciona una unidad
de cambio.
¿CÓMO SE OBTIENE EL SERVICIO POR LA GARANTÍA? Para obtener el servicio por la garantía, debe comunicarse con nosotros al
8445161539 o por correo electrónico a kodak@camarketing.com
durante el Período de la garantía para obtener un número de Autorización de producto defectuoso (“DMA”, por sus siglas en inglés). No
se brindará servicio alguno por la garantía si no tiene un número de
DMA y será usted, el comprador, quien deba asumir los costos de
envío por devolución a nuestras instalaciones. Nosotros asumiremos
los costos de envío de la unidad de sustitución.
119
Page 61

INFORMACIÓN DE CONTACTO DE
ATENCIÓN AL CLIENTE
En caso de experimentar problemas con su producto,
comuníquese con nosotros antes de devolver el artículo al
lugar de compra. ¡Estamos aquí para ayudarle!
Soporte en EE.UU.:
kodak@camarketing.com
8445161539
Soporte internacional:
kodakintl@camarketing.com
8445161540
www.kodakphotoplus.com
La marca registrada Kodak, el logotipo y la presentación del producto se
usan bajo licencia de Kodak.
Mac es marca registrada de Apple Inc. en EE.UU. y en otros países.
SD es marca registrada de SD3C, LLC en EE. UU.
Windows es marca registrada de Microsoft Corporation en EE.UU. o en
otros países.
Todos los otros productos, nombres de marcas, nombres de compañías y
logotipos son marca registrada de sus respectivos propietarios, se utilizan
solo para identiicar sus correspondientes productos y no pretenden
connotar patrocinio, aprobación o autorización.
Distribuido por: C&A Marketing, Inc., 114 Tived Lane East, Edison, NJ 08837
EE. UU.; C&A Marketing UK LTD, 167 Hermitage Road, Crusader Industrial
Estate, Londres N4 1LZ, Reino Unido.
©2018. Todos los derechos reservados. Fabricado en China.
120
Page 62

122
123
Page 63

 Loading...