

Page 1

Kodak
KB28
Camera
ENGLISH/ESPAÑOL/FRANÇAIS
Page 2

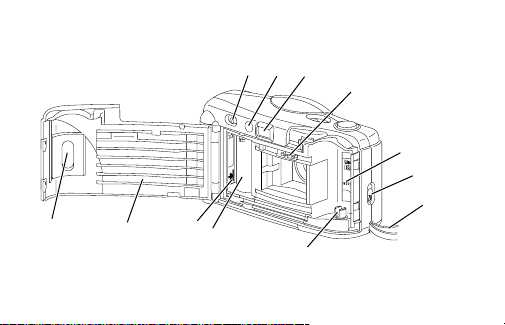
Camera Identification
1
2
3
4
7
Unfold front cover flaps of manual to view camera diagrams.
English/
6
5
Page 3
9
8
10
11
12
13
14
19
18
17
16
15
Page 4

KODAK
NEED HELP WITH YOUR CAMERA?
Visit our Web sites at http://www.kodak.com (for US) or
http://www.kodak.ca (for Canada) or call:
Kodak (USA only) from 9:00 a.m. to 7:00 p.m. (Eastern time) Monday
through Friday at 1-800-242-2424.
Kodak (Canada only) from 8:00 a.m. to 5:00 p.m. (Eastern time) Monday
through Friday at 1-800-465-6325, ext. 36100; for the Toronto area,
call 416-766-8233, ext. 36100.
When you call, please have your camera available.
For warranty purposes, please keep your sales receipt as proof
of the date of purchase.
KB28 Camera
1
ENGLISH
ENGLISH
Page 5

CONTENTS
CAMERA IDENTIFICATION .............. 2
LOADING THE BATTERIES ............. 3
Power shutdown .......................... 4
Battery tips .................................. 4
LOADING THE FILM ......................... 5
TAKING PICTURES.......................... 9
Tips for better pictures................. 11
TAKING FLASH PICTURES ............. 12
UNLOADING THE FILM .................... 14
CARING FOR YOUR CAMERA ........ 15
TROUBLESHOOTING ...................... 16
SPECIFICATIONS ............................ 18
2
CAMERA IDENTIFICA TION
Unfold cover flaps of manual
to view camera diagrams.
1 SHUTTER BUTTON
2 PICTURE COUNTER
3 VIEWFINDER
4 FLASH
5 BATTERY DOOR
6 LENS COVER
7 LENS
8 FILM-REWIND BUTTON
9 FLASH-READY LIGHT
Page 6
10 VIEWFINDER EYEPIECE
11 FILM-SPROCKET TEETH
12 FILM CHAMBER
13 FILM-DOOR LATCH
14 CAMERA STRAP
15 FILM SPINDLE
16 FILM TAKE-UP SPOOL
17 FILM-LOAD MARK
18 FILM DOOR
19 FILM WINDOW
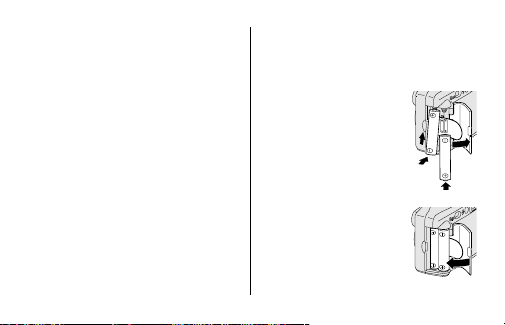
LOADING THE BATTERIES
This camera uses 2 AAA-size
alkaline 1.5 V batteries.
1. Load the batteries
as shown.
• Make sure you tuck
the battery pull
strap into the
battery chamber
before inserting
the batteries.
2. Replace the batteries
with fresh alkaline
batteries when the
FLASH-READY LIGHT
takes more than 30
seconds to come on.
(9)
3
Page 7

Power shutdown
To reduce battery power, the camera
will go into a sleep mode when it is
not operated for more than 1 minute
with the lens cover opened. You can
still take a picture while the
READY LIGHT
turns off, gently press the
BUTTON
LENS COVER
back on.
• Close the lens cover when the
(9) is on. When the light
(1) or close and open the
(6) to turn the camera
camera is not going to be used for
an extended length of time to
further conserve the batteries’ life.
FLASH
SHUTTER
-
4
Battery tips
• Dispose of batteries according to
local and national regulations.
•
Keep spare batteries with you at
all times.
• Read and follow all warnings and
instructions supplied by
the battery manufacturer.
• Keep batteries away
from children.
•
Do not try to take apart,
recharge or short circuit the
batteries, or subject them to
high temperature or fire.
• Store batteries in their original
packaging prior to use.
Page 8
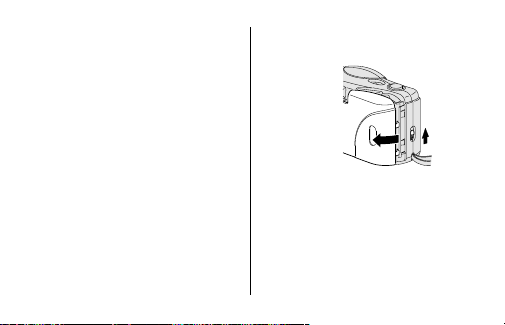
LOADING THE FILM
For excellent all-around results for
indoor and outdoor picture-taking, use
ISO 400-speed film. For use in bright
daylight, you can use ISO 100- or
ISO 200-speed film. If in sunlight, turn
your back to the sun and load the film
in the shade of your body.
1. Push up on the
to open the
FILM DOOR
FILM-DOOR LATCH
(18).
(13)
5
Page 9

2. Insert the flat end of the film
cartridge over the
SPINDLE
the film cartridge down into the
FILM CHAMBER
securely into place.
• Do not force it into the
film chamber.
FILM
(15). Push the other end of
(12) until it fits
6
3. Pull out the film leader until the
tip reaches the
Film-Load
Mark
Film-Guide Rails
4. Lay the film flat between the filmguide rails rotating the film
cartridge in the direction of the
FILM-SPROCKET TEETH
FILM-LOAD MARK
Film Leader
(17).
(11).
Page 10
• Make sure the sprocket teeth
GA24 100/21"
show through the holes on the
upper side of the film.
• If the end of the film extends past
the film-load mark, gently push
the excess back into
the cartridge.
5. Close the film door and check the
FILM WINDOW
• You should see the film informa-
• Do not open the film door after
(19).
tion through the window.
you start taking pictures or you
will ruin the film.
7
Page 11
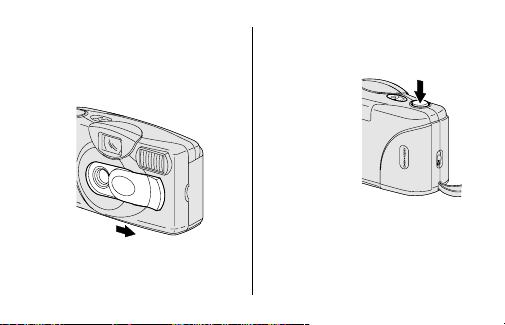
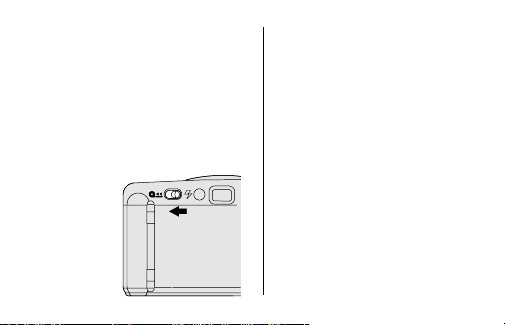
6. Slide the
8
LENS COVER
completely open to uncover
LENS
(7) and to turn on
the
the camera.
(6)
7. Press the
SHUTTER BUTTON
several times until the
COUNTER
(2) shows “1.”
• If the
picture
counter
does not
move,
reload the
film into
the camera
and repeat
the film-loading instructions.
• The picture counter starts at “0”
and each mark within the
increments of 5 represents
one picture.
(1)
PICTURE
Page 12
TAKING PICTURES
This camera features a flash that,
when the flash-ready light glows, will
every time
fire
This all-the-time flash feature provides
consistently brighter pictures by acting
as a fill flash in hazy outdoor pictures
or in bright-light conditions where
shadows may exist.
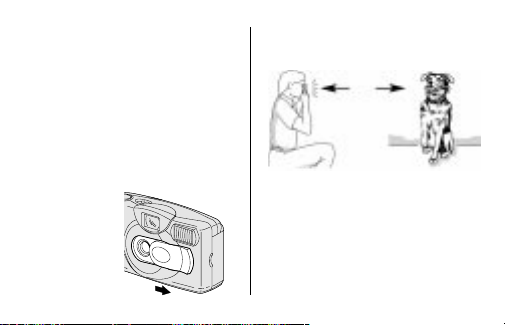
1. Slide the
open to
uncover the
LENS
to turn on
the camera.
you take a picture.
LENS COVER
(7) and
(6) completely
2. For a sharp picture, stand at least
4 ft (1.2 m) from your subject.
4 ft
(1.2 m)
• The flash-recycle time is
approximately 5 seconds
with fresh batteries.
9
Page 13
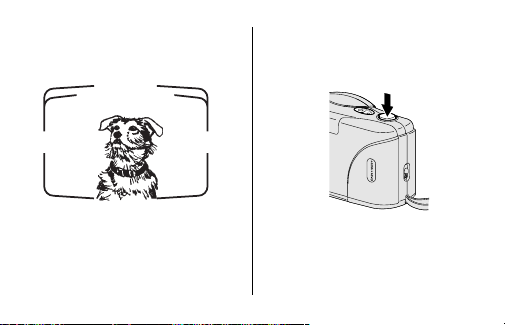
3. Look through the
EYEPIECE
VIEWFINDER
(10) to see your subject.
10
4. Hold the camera steady and gently
5. Close the lens cover when you are
SHUTTER BUTTON
press the
take the picture.
• After you take the picture, the
film automatically advances to
the next picture.
(1) to
done taking pictures.
Page 14

Tips for better pictures
• To avoid blurry pictures, hold your
camera steady by keeping your
elbows close to your body when
you press the shutter button
• Stand close enough to your
subject so that it fills the viewfinder
but not closer than 4 ft (1.2 m).
• Take pictures at the subject’s level.
Kneel down to take pictures of
children and pets.
• Hold your camera vertically to
capture tall, narrow subjects, such
as a waterfall, skyscraper, or a
single person.
• Add interest to your picture by
framing it with a tree branch, a
window, or even the rails of
a fence.
• Keep the sun behind you.
This provides the best
subject illumination.
• Keep your hand, fingers, or object
away from the flash and picturetaking lens.
• Stand at an angle to shiny
surfaces like windows or mirrors to
avoid flash reflection and bright
spots in your pictures.
11
Page 15
TAKING FLASH PICTURES
In dim light, such as indoors or
outdoors in heavy shade, or on dark
overcast days, you need flash. This
camera simplifies your picture-taking
because the flash fires
take a picture.
1. Slide the
completely open to uncover
LENS
(7) and to turn on
the
the camera.
12
LENS COVER
every time
(6)
you
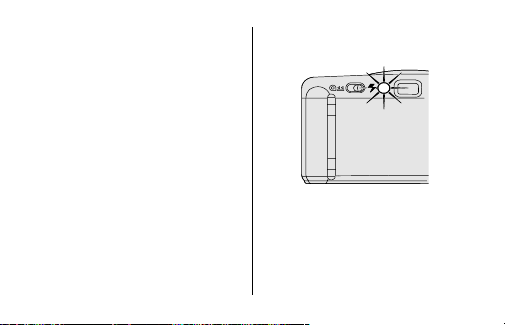
2. Wait for the
to glow.
FLASH- READY LIGHT
(9)
Page 16
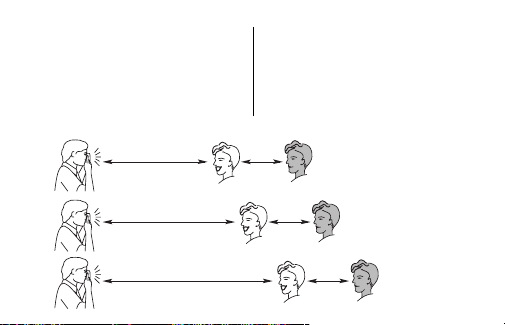
3. Keep the subject within the
distance range for the speed of
film in your camera.
•
Don’t take pictures beyond the
maximum distance or your
pictures will be dark.
4 – 9 ft (1.2 – 2.8 m)
Safe Range
100-speed film
4 – 12 ft (1.2 – 3.7 m)
Safe Range
200-speed film
4 – 17 ft (1.2 – 5.2 m)
Safe Range
400-speed film
4. Hold the camera steady and
gently press the
BUTTON
(1) to take the picture.
• To prevent battery drain, turn
the flash off by closing the lens
cover when you are done
taking pictures.
Beyond
9 ft
Picture
will be dark
Beyond
12 ft
Picture
will be dark
Beyond
17 ft
Picture
will be dark
SHUTTER
13
Page 17
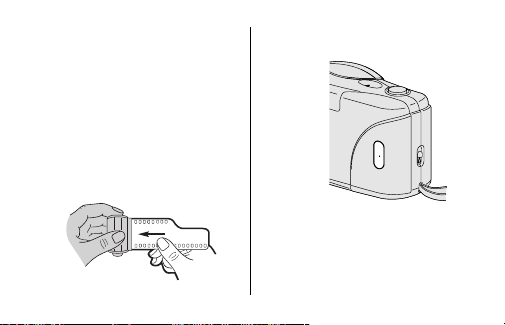
UNLOADING THE FILM
The film will not advance when you
reach the end of the roll. Y ou must rewind
the film before you open the film door
or you will ruin the film. This camera
features full rewind of film into the film
cartridge which prevents the end of the film
from sticking out of the film cartridge.
1. Slide the
14
FILM-REWIND BUTTON
until it
latches to
start the
motorized
film rewind.
(8)
• Wait until the motor stops
before you open the
film door.
FILM DOOR
2. Open the
remove the film and reload with
fresh KODAK Film.
(18) to
Page 18

CARING FOR YOUR CAMERA
• Protect the camera from dust,
moisture, sudden impact, and
excessive heat.
CAUTION: Do not use solvents or
harsh or abrasive cleaners on the
camera body.
• If the lens appears dirty, breathe on
it to form a mist and wipe the
surface gently with a soft, lintless
cloth or camera lens-cleaning
tissue. Never wipe a dry lens.
CAUTION: Use solvents or
solutions designed for cleaning
camera lenses. Do not us e
chemically treated tissues
intended for cleaning eyeglasses.
• Remove the batteries when you
store the camera for an
extended time.
CAUTION: To prevent possible
damage and electrical shock, do
not attempt to disassemble
or repair the camera or flash unit
by yourself.
15
Page 19

TROUBLESHOOTING
What happened Probable cause Solution
Camera will Lens cover closed Open lens cover
not operate completely
Batteries dead or Replace batteries
improperly loaded and insert as shown
in camera on battery door
Flash not ready Wait for flash-ready
Film not properly Reload the film. See
loaded in camera LOADING THE
Film needs to be See UNLOADING
16
rewound/removed THE FILM
light to glow
FILM
Page 20

What happened Probable cause Solution
Flash-ready light Lens cover not Open lens cover
fails to glow within fully opened
30 seconds
Batteries weak Replace with 2 fresh
or dead AAA-size alkaline
Batteries improperly Insert batteries as
loaded in camera shown on battery door
batteries
No film in camera Load film into camera
Camera in sleep mode See Power
Shutter button Lens cover closed Open lens cover
cannot be released
shutdown on page 4
17
Page 21

SPECIFICATIONS
Lens: 30 mm, 2-element
aspheric lens
Shutter speed: Fixed at
1/100 second
Aperture:
f
Film speed: DX (ISO) 100, 200, or
Focus range: Daylight: 4 ft (1.2 m)
/8.0 for flash/daylight
400 print film
to infinity
Viewfinder: Reverse galilean
Flash unit: Built-in, flash every time
Flash-recycle time: 5 seconds with
fresh batteries
Power source: 2-AAA alkaline
1.5 V batteries
Dimensions: 117 x 41 x 63 mm
Weight: 5.3 oz (150 g)
18
Kodak and “e” mark are trademarks.
Page 22

Cámara
¿NECESITA AYUDA CON SU CÁMARA?
Visite nuestro sitio en la red mundial electrónica (world wide web)
a la dirección http://www.kodak.com (solamente en los Estados Unidos)
o http://www.kodak.ca (solamente en el Canadá) o llame a:
Kodak (solamente en los Estados Unidos), al 1-800- 242-2424,
de lunes a viernes de 9:00 a.m. a 7:00 p.m. (hora del este).
Kodak (solamente en el Canadá), al 1-800-465-6325, extensión 36100,
de lunes a viernes de 8:00 a.m. a 5:00 p.m. (hora del este); para el área
de Toronto, llame al 416-766-8233 extensión 36100.
Cuando llame, por favor tenga su cámara disponible.
Para los propósitos de la garantía, sírvase guardar el recibo de venta
como prueba de la fecha de compra.
KODAK
KB28
19
ESPAÑOL
Page 23

CONTENIDO
IDENTIFICACIÓN DE
LA CÁMARA.................................. 21
COMO CARGAR LAS BATERÍAS ... 22
Apagado automático ................... 23
Consejos para usar
las baterías .............................. 24
COMO CARGAR LA PELÍCULA ...... 25
COMO TOMAR FOTOGRAFÍAS ...... 28
Consejos útiles para obtener
mejores fotografías .................. 30
COMO TOMAR FOTOGRAFÍAS
CON FLASH .................................. 31
20
COMO DESCARGAR
LA PELÍCULA................................ 34
CUIDADO DE SU CÁMARA ............ 35
PROBLEMAS Y SOLUCIONES ....... 36
ESPECIFICACIONES ...................... 39
Page 24

IDENTIFICACION DE
LA CÁMARA
Desdoble la cubierta del manual para
ver los diagramas de la cámara.
1 DISPARADOR
2 CONTADOR DE FOTOGRAFÍAS
3 VISOR
4 FLASH
5 PUERTA DEL COMPARTIMIENTO
LAS BATERÍAS
DE
6 CUBIERTA DEL LENTE
7 LENTE
8 BOTÓN DEL REBOBINADO
LA PELÍCULA
DE
9 INDICADOR LUMINOSO DE
LISTO
FLASH
10 OCULAR DEL VISOR
11 DIENTES DE ENGRANAJE DE
PELÍCULA
LA
12 COMPARTIMIENTO DE LA PELÍCULA
13 CERROJO DE LA PUERTA DEL
COMPARTIMIENTO
14 CORREA DE LA CÁMARA
15 HUSO DE LA PELÍCULA
16 CARRETE RECEPTOR DE
PELÍCULA
LA
17 MARCA DEL BORDE DE
PELÍCULA
LA
18 PUERTA DEL COMPARTIMIENTO
LA PELÍCULA
DE
19 VENTANA DE LA PELÍCULA
DE LA PELÍCULA
21
Page 25

COMO CARGAR
LAS BATERÍAS
Esta cámara utiliza 2 baterías
alcalinas de 1,5 V tamaño AAA.
1. Cargue las baterías como aquí
se indica.
• Asegúrese de poner la banda de
remover las baterías dentro del
compartimiento de las baterías
antes de poner las en su
compartimiento.
22
2. Cambie las baterías por baterías
alcalinas nuevas cuando el
INDICADOR LUMINOSO DE FLASH
(9) demora más de
LISTO
30 segundos en encenderse.
Page 26

Características de la conservación
automática de energía
Apagado automático
Para reducir el gasto de la energía de
las baterías, la cámara comenzará el
modo de economía cuando no se usa
por aproximadamente 1 minuto con la
cubierta del lente abierta. Puede
continuar tomando fotografías
mientras que el
DE FLASH LISTO
Cuando el indicador se apague, para
encender la cámara oprima
suavemente el
y abra la
INDICADOR LUMINOSO
(9) este encendido.
DISPARADOR
CUBIERTA DEL LENTE
(1) o cierre
(6).
• Cierre la cubierta del lente cuando
no use la cámara por un período
de tiempo prolongado y de esta
forma conservará la utilidad
de las baterías por un tiempo
más prolongado.
23
Page 27

Consejos para usar las baterías
• Deseche las baterías usadas
según las regulaciones locales y
nacionales.
• Acuérdese de llevar baterías
de repuesto con usted en
todo momento.
• Lea y siga todas las advertencias
e instrucciones del fabricante de
la batería.
• Mantenga las baterías fuera del
alcance de los niños.
24
• No intente desarmar, recargar o
causar un cortocircuito en las
baterías o exponerlas a altas
temperaturas o fuego.
• Antes de usarlas, guarde las
baterías en su empaque original.
Page 28

COMO CARGAR LA PELÍCULA
Para resultados excelentes al tomar
fotografías en interiores y exteriores,
use película con una sensibilidad ISO
de 400. Para uso en días de sol brillante,
puede usar película con un ISO de
100 ó ISO de 200. Bajo luz solar,
colóquese de espaldas al sol y cargue
la película a la sombra de su cuerpo.
1. Deslice hacia arriba el
DE LA PUERTA DEL
COMPARTIMIENTO
LA PELÍCULA
(13)
para abrir la
DEL COMPARTIMIENTO
LA
PELÍCULA
DE
DE
PUERT A
(18).
CERROJO
2. Inserte la parte lisa del cartucho
de película sobre el
(15). Empuje el otro lado
PELÍCULA
del cartucho de la película hacia
abajo en el
LA PELÍCULA
firmemente en su lugar.
• No fuerce la
película para que entre
en su compartimiento.
HUSO DE LA
COMPARTIMIENTO DE
(12) hasta que trabe
25
Page 29

3. Saque suficiente película para que
la punta llegue a la
DE LA
BORDE
Marca del borde
de la película
4. Ponga la película lisa entre los
carriles de guía de la película
dándole vuelta al cartucho de la
película en la dirección de los
DIENTES DE ENGRANAJE DE LA
PELÍCULA
26
PELÍCULA
Guía de la película
Carriles de guía
de la película
(11).
MARCA DEL
(17).
• Asegúrese de que los dientes de
engranaje de la película se vean a
través de los agujeros en la parte
superior de la película.
• Si el extremo de la película se
extiende más allá de la marca del
borde de la película, gentilmente
empuje el sobrante hacia dentro
del cartucho.
Page 30

5. Cierre la puerta del
compartimiento de película y
VENTANA DE LA
verifique la
(19).
PELÍCULA
• Debe poder
leer la
información
de la película
a través de la
ventana.
• No abra la
puerta del
compartimiento
de la película después que
empiece a tomar fotografías
porque arruinará
la película.
GA24 100/21"
6. Deslice completamente la
CUBIERTA DEL LENTE
destapar el
la cámara.
(6) para
LENTE
(7) y encender
27
Page 31

7. Oprima el
28
DISPARADOR
veces hasta que el
FOTOGRAFÍAS
• Si el contador
de fotografías
no se mueve,
vuelva a
cargar la
película en la
cámara y
repita los
pasos
indicados en las instrucciones de
como cargar la película.
• El contador de fotografías
comienza con “0” y cada punto
dentro de los incrementos de 5
(1) varias
CONTADOR DE
(2) demuestre “1”.
representa una fotografía.
COMO TOMAR
FOTOGRAFÍAS
Esta cámara tiene la característica de
un flash que cuando el indicador de
flash listo brilla garantiza que la
cámara funcionará
una fotografía. Esta característica de
flash siempre encendido provee
consistentemente fotografías más
brillantes porque funciona como un
flash de relleno en días nublados o en
condiciones de sol brillante donde
existe la posibilidad de sombras.
cada vez
que tome
Page 32

1. Deslice completamente la
LENTE
(6)
DEL
para destapar el
LENTE
(7) y
encender la
cámara.
2. Para una
fotografía nítida,
manténgase a una distancia
mínima de 4 pies (1,2 m)
del sujeto.
4 ft
(1,2 m)
CUBIERTA
• El tiempo de recuperación del
flash es aproximadamente de
5 segundos cuando usa
baterías nuevas.
3. Mire a través del
VISOR
OCULAR DEL
(10) para ver al sujeto.
29
Page 33

4. Sostenga la cámara estable y
oprima suavemente el
DISPARADOR
la fotografía.
• Después que tome la fotografía,
5. Cierre la cubierta del lente cuando
termine de tomar fotografías.
30
(1) para tomar
la película avanza automáticamente al próximo cuadro.
Consejos útiles para obtener
mejores fotografías
• Para que las fotografías no salgan
borrosas cuando oprima el
disparador, sostenga la cámara
estable manteniendo los codos de
sus brazos cerca del cuerpo.
• Acérquese lo suficiente al sujeto a
fotografiar de modo que éste
ocupe todo el visor, pero no más
cerca de 4 pies (1,2 m).
• Tome fotografías al nivel del
sujeto. Arrodíllese para fotografiar
niños y animales.
• Haga tomas verticales de sujetos
altos y angostos, como cascadas,
rascacielos o una persona sola.
Page 34

• Agregue interés a sus fotografías
incluyendo una rama, una ventana
o una cerca.
• Manténgase de espaldas al sol.
Así se logra la mejor iluminación
al sujeto.
• No obstruya los lentes del flash y
el enfoque con sus manos, dedos,
u otros objetos.
• Párese en ángulo a superficies
brillantes tales como ventanas o
espejos para de esta forma evitar
reflejos del flash o puntos
luminosos en sus fotografías.
COMO TOMAR FOTOGRAFÍAS
CON FLASH
A poca luz, ya sea en interiores, en
exteriores donde hay mucha sombra o
en días obscuros o nublados,
necesitará usar el flash. Esta cámara
hace fácil la toma de fotografías
porque el flash se dispara
que toma una fotografía.
1. Deslice completamente la
LENTE
(6) para destapar el
DEL
LENTE
(7) y encender la cámara.
cada vez
CUBIERTA
31
Page 35

2. Espere hasta que el
LUMINOSO DE FLASH LISTO
3. Mantenga el sujeto a fotografiar
dentro del alcance indicado para
la sensibilidad de la película en
su cámara.
32
INDICADOR
(9) brille.
• No tome fotografías a más
distancia de la indicada o sus
fotografías saldrán obscuras.
4. Sostenga la cámara estable y
oprima suavemente el
DISPARADOR
la fotografía.
• Para evitar que las baterías se
(1) para tomar
descarguen cuando no esté
usando la cámara, apague
el flash cerrando la cubierta
del lente.
Page 36

4 – 9 pies (1,2 – 2,8 m)
Alcance seguro
Película de
sensibilidad 100
4 – 12 pies (1,2 – 3,7 m)
Alcance seguro
Película de
sensibilidad 200
4 – 17 pies (1,2 – 5,2 m)
Alcance seguro
Película de
sensibilidad 400
A más distancia
de 9 pies
(2,8 m)
la fotografía
saldrá obscura.
A más distancia
de 12 pies
(3,7 m)
la fotografía
saldrá obscura.
A más distancia
de 17 pies
(5,2 m)
la fotografía
saldrá obscura.
33
Page 37

COMO DESCARGAR
LA PELÍCULA
La película no avanzará cuando
llegue al final del rollo. Debe
rebobinar la película antes de abrir la
puerta del compartimiento de la
película o la estropeará. Esta cámara
tiene la característica de rebobinar la
película completamente dentro del
cartucho y de esta forma prevenir que
el extremo de la película sobresalga
del cartucho.
1. Para comenzar el rebobinado
motorizado de la película, deslice
BOTÓN DEL REBOBINADO DE LA
el
PELÍCULA
(8) hacia dentro hasta
que trabe y se mantenga trabado.
34
• Espere a que el motor pare
antes de abrir la puerta del
compartimiento de la película.
PUERTA DEL COMPARTIMIENTO
2. Abra la
LA
PELÍCULA
DE
la película y vuelva a cargar la
cámara con una película
KODAK nueva.
(18) para retirar
Page 38

CUIDADO DE LA CÁMARA
• Proteja la cámara del polvo,
humedad, golpe repentino, y
calor excesivo.
PRECAUCIÓN: No use solventes
o soluciones ásperas o abrasivas
en el cuerpo de la cámara.
• Si el lente se ve sucio, cúbralo con
su aliento para empañarlo y limpie
la superficie cuidadosamente con
un paño suave que no tenga
pelusas o con un pañuelo
especialmente diseñado para la
limpieza de lentes. Nunca limpie el
lente en seco.
PRECAUCIÓN: No use solventes
o soluciones que no hayan sido
diseñadas para la limpieza de
lentes de cámaras. No use
pañuelos con químicos diseñados
para la limpieza de gafas.
• Remueva las baterías cuando
vaya a guardar la cámara por un
largo período de tiempo.
PRECAUCIÓN: Para prevenir la
posibilidad de daño y choque
eléctrico, no trate, usted mismo,
de desarmar o reparar la cámara o
la unidad del flash.
35
Page 39

PROBLEMAS Y SOLUCIONES
Problema Causa probable Solución
La cámara La cubierta del lente Abra completamente no
no funciona está cerrada la cubierta del lente
Las baterías están Reemplace las baterías
descargadas o no y póngalas como se
fueron cargadas demuestra en la puerta
correctamente del compartimiento de
en la cámara las baterías
El flash no está listo Espere a que el
36
indicador luminoso de
flash listo brille
Page 40

Problema Causa probable Solución
La cámara La película no Vuelva a cargar la
no funciona fue cargada película. Vea COMO
El indicador de La cubierta del Abra la cubierta
flash listo tarda lente no está del lente
más de completamente abierta
30 segundos
en brillar
correctamente CARGAR LA PELÍCULA
La película necesita Vea COMO
ser rebobinada/retirada DESCARGAR
LA PELÍCULA
37
Page 41

Problema Causa probable Solución
El indicador de Las baterías están Reempláce las con 2 baterías
flash listo tarda débiles o descargadas alcalinas nuevas tamaño AAA
más de 30 segundos Las baterías no fueron Ponga las baterías como
en brillar cargadas correctamente se demuestra en la puerta
en la cámara del compartimiento de
No hay película Cargue un rollo nuevo
las baterías
en la cámara de película en la cámara
La cámara está en el modo Vea Apagado automático
de economía en la página 23
El disparador La cubierta del lente Abra la cubierta
no funciona está cerrada del lente
38
Page 42

ESPECIFICACIONES
Lente: Lente de 30 mm,
2 elementos esférico
Velocidad del disparador: Fija en
1/100 segundos
Abertura de diafragma: ƒ/8,0 para
flash/luz del día
Sensibilidad de película: Película
de impresión con DX (ISO) de
100, 200 ó 400
Enfoque: Luz del día: 4 pies (1,2 m)
a infinito
Visor: Galileo reverso
Unidad del flash: Incorporado,
funciona cada vez
Tiempo de recuperación del flash:
5 segundos con baterías nuevas
Fuente de energía: 2 baterías
alcalinas de 1,5 V tamaño AAA
Dimensiones: 117 x 41 x 63 mm
Peso: 150 g
39
Page 43

40
Kodak y la marca “e” son marcas registradas.
Page 44

Appareil-photo
BESOIN D’AIDE POUR UTILISER VOTRE
APPAREIL-PHOTO?
Visitez nos sites Web à : http://www.kodak.ca (Canada) ou
http://www.kodak.com (États-Unis), ou encore appelez :
Kodak (Canada seulement) du lundi au vendredi, de 8 h à 17 h (heure
normale de l’Est) au numéro 1 800 465-6325, poste 36100. Dans la région
de Toronto, composez le (416) 766-8233, poste 36100.
Kodak (États-Unis seulement) sans frais du lundi au vendredi, de
9 h à 19 h (heure normale de l’Est) au numéro 1 800 242-2424.
Assurez-vous d’avoir en main votre appareil-photo au
moment de téléphoner.
Aux fins de garantie, veuillez conserver votre facture de vente
comme preuve de la date d’achat.
KODAK
KB28
FRANÇAIS
41
Page 45

TABLES DES MATIÈRES
DESCRIPTION DE
L’APPAREIL-PHOTO .................. 43
INSTALLATION DES PILES ............ 44
Arrêt automatique ....................... 45
Conseils au sujet des piles ......... 46
CHARGEMENT DU FILM ................ 47
PRISE DE PHOTOS ........................ 51
Conseils pour faire de
meilleures photos ..................... 53
PRISE DE PHOTOS AU FLASH...... 54
42
RETRAIT DU FILM .......................... 56
ENTRETIEN DE VOTRE
APPAREIL-PHOTO ....................... 57
DÉPANNAGE................................... 58
CARACTÉRISTIQUES..................... 61
Page 46

DESCRIPTION DE
L’APP AREIL-PHOTO
Pour consulter les schémas de
l’appareil, ouvrez les rabats de la
couverture de ce manuel.
1 DÉCLENCHEUR
2 COMPTEUR DE POSES
3 VISEUR
4 FLASH
5 COUVERCLE DU
COMPARTIMENT DES PILES
6 COUVRE-OBJECTIF
7 OBJECTIF
8 BOUTON DE REMBOBINAGE
9 TÉMOIN DU FLASH/
APPAREIL PRÊT
10 OCULAIRE DU VISEUR
11 DENTS D’ENTRAÎNEMENT
12 COMPARTIMENT DU FILM
13 LOQUET DU COMPARTIMENT
DU FILM
14 DRAGONNE
15 AXE DE LA BOBINE DU FILM
16 BOBINE ENROULEUSE
17 REPÈRE DE CHARGEMENT
DU FILM
18 COUVERCLE DU
COMPARTIMENT DU FILM
19 FENÊTRE DU FILM
43
Page 47

INSTALLATION DES PILES
Cet appareil requiert 2 piles alcalines
AAA de 1,5 V.
1. Installez les piles tel qu’il est
indiqué.
• Assurez-vous de replacer le
ruban de retrait dans le
compartiment de piles avant d’y
insérer les piles.
44
2. Remplacez les piles par de
nouvelles piles alcalines quand le
TÉMOIN DU FLASH/APPAREIL PRÊT
prend plus de 30 secondes avant
de s’allumer.
(9)
Page 48

Fonctions automatiques
d’économie d’énergie
Arrêt automatique
Cet appareil-photo se met en mode
veille après plus de 1 minute
d’inactivité pour préserver l’énergie de
la pile lorsque le couvre-objectif est
ouvert. Vous pouvez quand même
prendre une photo pendant que le
TÉMOIN DU FLASH/APPAREIL PRÊT
allumé. Lorsqu’il s’éteint, appuyez
délicatement sur le
Vous pouvez aussi fermer et rouvrir le
COUVRE-OBJECTIF
l’appareil-photo sous tension.
DÉCLENCHEUR
(6) pour remettre
(9) est
(1).
• Refermez le couvre-objectif
lorsque vous n’utilisez pas
l’appareil pendant une longue
période afin de prolonger
davantage la durée de vie
des piles.
45
Page 49

Conseils au sujet des piles
• Jetez les piles épuisées suivant
les réglementations locale et
nationale en vigueur.
• Ayez toujours des piles de
rechange avec vous.
• Lisez le mode d’emploi et
observez les mises en garde
fournies par le fabricant des piles.
• Gardez les piles hors de la portée
des enfants.
46
• N’essayez pas de démonter, de
recharger ou de court-circuiter les
piles, ou de les exposer à des
températures élevées ou aux
flammes.
• Conservez les piles dans leur
emballage d’origine jusqu’à ce que
vous les utilisiez.
Page 50

CHARGEMENT DU FILM
Pour obtenir d’excellents résultats en
tout temps, pour les photos prises à
l’intérieur et à l’extérieur, utilisez un
film ISO 400. En lumière du jour vive,
vous pouvez utiliser un film ISO 100
ou ISO 200. Par temps ensoleillé,
tournez le dos au soleil et chargez
le film dans l’ombrage produit par
votre corps.
1. Faites glisser le
COMPARTIMENT
haut pour ouvrir le
COMPARTIMENT
DU
DU
LOQUET DU
FILM
(13) vers le
COUVERCLE DU
FILM
(18).
47
Page 51

2. Placez l’extrémité plate de la
cassette du film par-dessus
DE LA BOBINE DE FILM
l’autre extrémité de la cassette
du film dans le
FILM
DU
bloque bien en place.
• N’exercez pas de pression pour
l’insérer dans le compartiment
du film.
48
COMPARTIMENT
(12) jusqu’à ce qu’elle
I’AXE
(15). Poussez
3. Tirez sur l’amorce du film de sorte
que l’extrémité du film soit vis-à-
REPÈRE DE CHARGEMENT
vis du
DU FILM
(17).
Amorce du film
Repère du
chargement
Rails de guidage
du film
du film
4. Placez le film à plat entre les rails
de guidage du film en tournant la
cassette de film dans le sens des
DENTS D’ENTRAÎNEMENT
(11).
Page 52

• Assurez-vous que les dents
d’entraînement ressortent des
perforations de la face
supérieure du film.
• Si l’extrémité du film dépasse le
repère de chargement du film,
réinsérez doucement la longueur
excessive de film dans la
cassette.
5. Refermez le couvercle du
compartiment du film. Vous
devriez être en mesure de lire les
renseignements concernant le film
FENÊTRE DU FILM
dans la
• Pour ne pas
endommager le
film, n’ouvrez
pas le
couvercle du
compartiment
du film une fois
que vous avez
commencé à
prendre des photos.
(19).
GA24 100/21"
49
Page 53

6. Faites glisser le
OBJECTIF
(6) pour découvrir
l’
OBJECTIF
(7) et mettre l’appareil
sous tension.
50
COUVRE
-
7. Appuyez sur le
plusieurs fois jusqu’à ce que le
COMPTEUR DE POSES
• Si le
compteur de
poses
n’avance pas,
rechargez le
film dans
l’appareil et
répétez les
instructions
de chargement du film.
• Le compteur de poses
commence à « 0 », et chaque
point à l’intérieur des incréments
de 5 représente une pose.
DÉCLENCHEUR
(2) indique « 1 ».
(1)
Page 54

PRISE DE PHOTOS
Cet appareil possède un flash qui,
lorsque le témoin du flash s’illumine,
est déclenché
prenez une photo. Le flash, présent
en tout temps, permet d’obtenir des
photos plus claires en agissant
comme flash d’appoint lors des
photos prises en lumière diffuse à
l’extérieur ou encore dans des
conditions d’éclairage brillant
susceptibles de projeter des ombres
sur le sujet.
1. Faites glisser le
OBJECTIF
(6) pour découvrir
chaque fois
COUVRE
que vous
-
l’
OBJECTIF
(7) et
mettre l’appareil
sous tension.
2. Pour une photo
nette, placez-vous
à au moins 1,2 m
(4 pi) de votre sujet 1,2 m (4 pi).
1,2 m
(4 pi)
• Le temps de recharge du flash
est d’environ 5 secondes avec de
nouvelles piles.
51
Page 55

3. Regardez dans l’
VISEUR
52
OCULAIRE DU
(10) pour voir votre sujet.
4. Pour prendre une photo, tenez
l’appareil-photo fermement, puis
appuyez délicatement sur le
DÉCLENCHEUR
• Une fois la photo prise, le film
avance automatiquement à la
prochaine pose.
5. Refermez le couvre-objectif après
avoir terminé de prendre des photos.
(1).
Page 56

Conseils pour faire de
meilleures photos
• Pour éviter de prendre des photos
floues, tenez l’appareil-photo
fermement en serrant vos coudes
contre votre corps au moment
d’appuyer sur le déclencheur.
• Approchez-vous suffisamment de
votre sujet pour qu’il remplisse le
viseur, sans toutefois vous placer
à moins de 1,2 m (4 pi).
• Placez-vous au même niveau que
votre sujet. Quand vous
photographiez des enfants ou des
animaux, agenouillez-vous.
• Tenez votre appareil à la verticale
pour mettre en valeur les sujets de
forme allongée, par exemple les
chutes d’eau, les gratte-ciel ou les
personnes isolées.
• Donnez de la dimension à vos
photos en les encadrant avec une
branche d’arbre, une fenêtre ou
encore, avec les traverses
d’une clôture.
• Placez-vous dos au soleil afin
d’obtenir le meilleur éclairage
possible pour votre sujet.
• N’obstruez pas l’objectif ou le
flash avec votre main, vos doigts
ou un objet.
• Placez-vous de biais par rapport
aux surfaces brillantes, comme les
fenêtres ou les miroirs pour éviter
le reflet du flash ou des taches
brillantes dans vos photos.
53
Page 57

PRISE DE PHOTOS
AU FLASH
En lumière faible, par exemple à
l’extérieur dans des lieux ombragés
ou par temps couvert, ou à l’intérieur,
il faut utiliser un flash. Cet appareil
simplifie la prise de vue en raison de
son flash qui est déclenché
que vous prenez une photo.
fois
1. Faites glisser le
OBJECTIF
(6) pour découvrir
l’
OBJECTIF
(7) et mettre l’appareil
sous tension.
54
COUVRE
chaque
-
2. Attendez que le
APPAREIL PRÊT
3. Assurez-vous que votre sujet se
trouve à une distance appropriée,
selon la sensibilité du film chargé
dans votre appareil.
TÉMOIN DU FLASH
(9) s’illumine.
/
Page 58

• Ne prenez pas de photos au-delà
de la distance maximum;
sinon, vos photos seront sombres.
4. Pour prendre une photo, tenez
l’appareil-photo fermement, puis
appuyez délicatement sur le
DÉCLENCHEUR
(1).
1,2 à 2,8 m (4 à 9 pi)
Distance sûre
Film de sensibilité 100
1,2 à 3,7 m (4 à 12 pi)
Distance sûre
Film de sensibilité 200
1,2 à 5,2 m (4 à 17 pi)
Film de sensibilité 400
• Pour éviter que vos piles ne
s’épuisent trop rapidement,
mettez le flash hors tension en
refermant le couvre-objectif
lorsque vous ne l’utilisez pas.
La photo sera
sombre si
elle est
La photo sera
sombre si
elle est
Distance sûre
prise au-delà
de 2,8 m (9 pi)
prise au-delà
de 3,7 m (12 pi)
La photo sera
sombre si
elle est
prise au-delà
de 5,2 m (17 pi)
55
Page 59

RETRAIT DU FILM
Le film cesse d’avancer lorsque vous
avez atteint la fin du rouleau. Pour ne
pas endommager le film, rembobinezle avant d’ouvrir le couvercle du
compartiment du film. Cet appareil
possède la fonction de rembobinage
du film dans la cassette, ce qui
empêche l’amorce de dépasser
de la cassette.
1. Faites glisser le
BOUTON DE
REMBOBINAGE
jusqu’à ce qu’il
bloque pour
amorcer le
rembobinage du film motorisé.
56
(8)
• Attendez que le moteur de
l’appareil se soit arrêté avant
d’ouvrir le couvercle du
compartiment du film.
2. Ouvrez le
COUVERCLE DU
COMPARTIMENT DU FILM
retirez le film et rechargez
l’appareil avec un Film KODAK.
(18), puis
Page 60

ENTRETIEN DE VOTRE
APPAREIL-PHOTO
• Préservez votre appareil-photo de
la poussière, de l’humidité, des
chocs et de la chaleur excessive.
ATTENTION : N’utilisez pas de
solvants ou de produits rugueux ou
abrasifs pour nettoyer le boîtier de
l’appareil-photo.
• Si l’objectif est sale, placez-le
devant votre bouche, puis expirez
légèrement pour former un léger
brouillard; nettoyez ensuite à l’aide
d’un linge doux, sans charpie,
ou d’un tissu nettoyant pour
objectif. N’essuyez jamais un
objectif à sec.
ATTENTION : N’utilisez pas de
solvants ou de produits qui ne sont
pas spécialement conçus pour
nettoyer les objectifs d’appareilphoto. N’utilisez pas non plus de
tissus traités chimiquement et
destinés au nettoyage des verres.
• Retirez les piles lorsque vous
entreposez l’appareil-photo pour
une longue période.
ATTENTION : Pour prévenir tout
dommage ou choc électrique,
n’essayez pas de désassembler
ou de réparer vous-même
l’appareil-photo ou le flash.
57
Page 61

DÉPANNAGE
Problème Cause probable Solution
L’appareil-photo ne Le couvre-objectif Faites glisser le ne
fonctionne pas. est fermé. couvre-objectif.
58
Les piles sont Remplacez les piles et
épuisées ou insérez-les de la façon
mal installées. illustrée sur le couvercle
Le flash n’est pas prêt. Attendez que le témoin
Le film est mal chargé Rechargez le film.
dans l’appareil. (Voir la section
du compartiment
des piles.
du flash/appareil prêt
s’illumine.
CHARGEMENT DU
FILM.)
Page 62

Problème Cause probable Solution
L’appareil-photo ne Le film doit être Voir la section
fonctionne pas. rembobiné/retiré. RETRAIT DU FILM.
Le témoin du flash/ Le couvre-objectif Faites glisser le couvreappareil prêt n’est pas objectif.
s’allume pas entièrement ouvert.
après 30 secondes. Les piles sont faibles Remplacez-les par 2
ou épuisées. nouvelles piles
alcalines AAA.
Les piles sont Réinstallez les piles de
mal installées. la façon illustrée sur le
couvercle du
compartiment des piles.
59
Page 63

Problème Cause probable Solution
Le témoin du flash/ L’appareil ne contient Chargez l’appareil
appareil prêt ne pas de film. avec un film.
s’allume pas après L’appareil est en Voir la section Arrêt
30 secondes. mode veille. automatique à
la page 45.
Le déclencheur ne Le couvre-objectif Faites glisser le
peut être relâché. est fermé. couvre-objectif.
60
Page 64

CARACTÉRISTIQUES
Objectif : lentille asphérique de
30 mm à 2 éléments
Vitesse d’obturation : fixe de
1/100 seconde
Ouverture :
Sensibilité : code DX; film pour
Zone de mise au point : de 1,2 m
f
/8,0 pour photos au
flash ou en lumière du jour
épreuves ISO 100, 200 ou 400
(4 pi) à l’infini, en lumière du jour
Viseur : type Galilée
Flash : intégré; se déclenche
chaque fois
Temps de recharge du flash :
5 secondes avec de nouv
elles piles
Alimentation : 2 piles alcalines AAA
de 1,5 V
Dimensions : 117 x 41 x 63 mm
(4,6 x 1,6 x 2,5 po)
Poids : 150g (5,3 oz)
61
Page 65

Kodak et le symbole « E » sont des marques de commerce.
Page 66

EASTMAN KODAK COMPANY
© Eastman Kodak Company, 1999
Pt. No. 918 7469
Consumer Imaging
Rochester, NY 14650
Printed in U.S.A.
 Loading...