

Page 1
Page 2
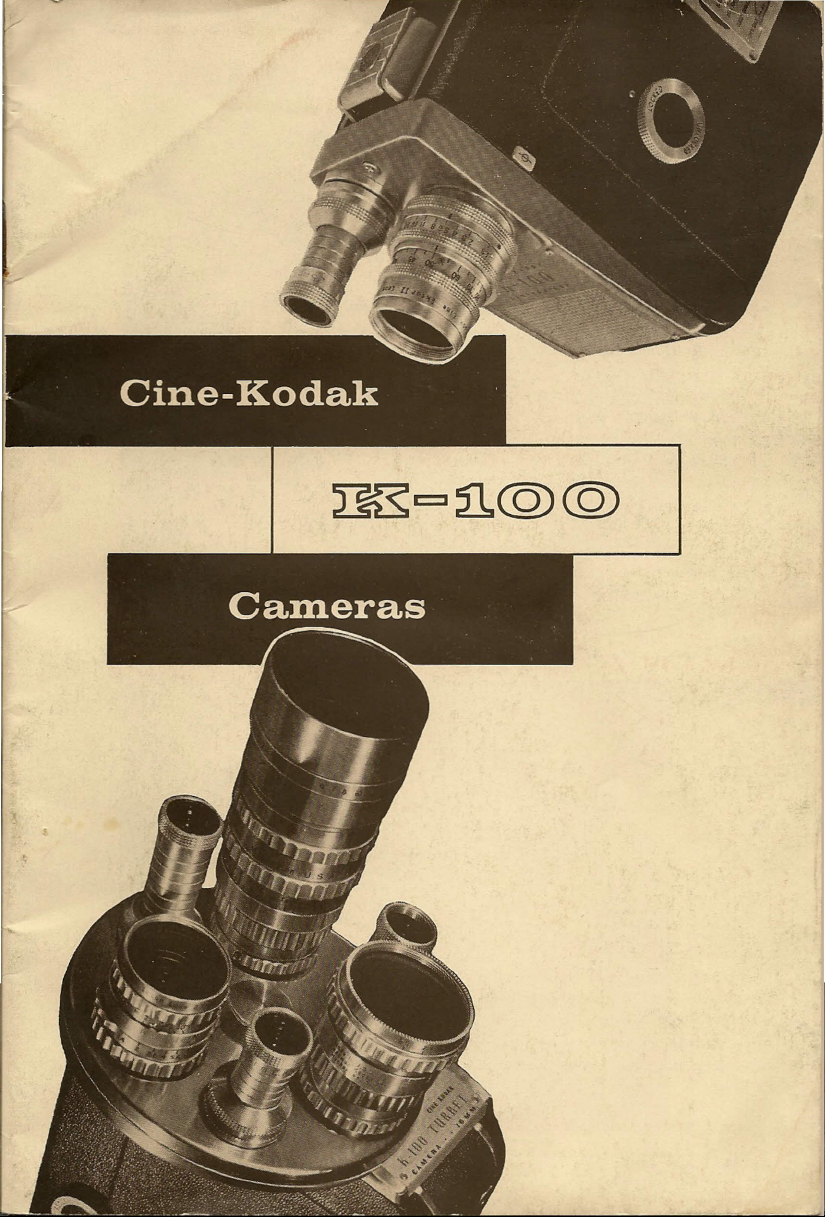
CINE-KODAK
• This instruction manual is for the Cine-
Kodak K-I00 Camera and the Turret Model.
On the turret model you can mount three
picture-taking lenses with matching view-
finder lenses - thus allowing you to change
quickly from wide-angle to medium to tele-
photo shots. The Cine-Kodak ~-100 Camera
has a single taking lens and viewfinder lens.
Any of the lenses, Ifimm to I52mm with C
mounts, can be used. The cameras use either
single- or double-perforated Ifimm film.
Movies are more than just pictures. Mere-
ly following the rules for proper camera op-
eration will produce technically acceptable
pictures. Add to this imagination and artis-
tic effort and your pictures become good
movies - movies that you will be proud to
show and that your friends will really enjoy
seeing.
Simple instructions are given on the next
6 pages. For more detailed information, read
further in the manual.
K-100
CAMERAS
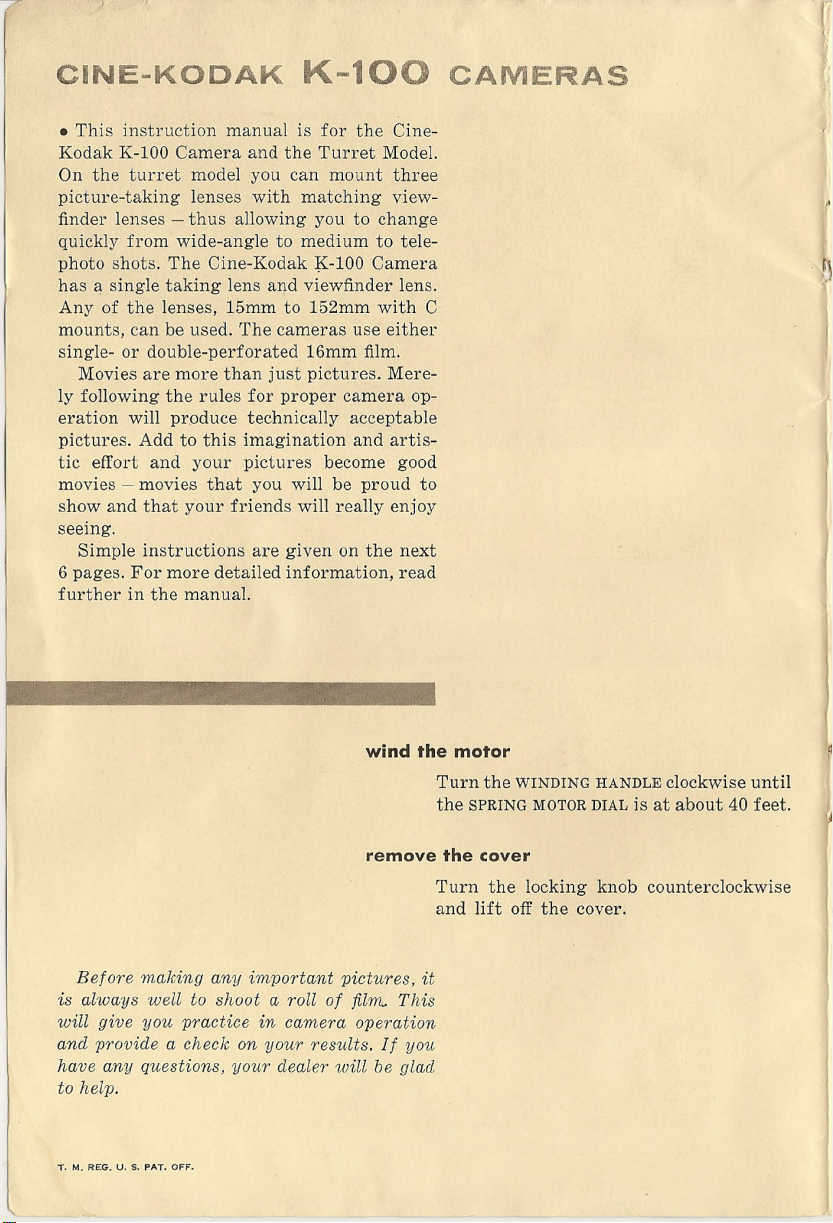
wind the motor
remove the cover
Before making any important pictures, it
is always well to shoot a roll of film. This
will give you practice in camera operation
and provide a check on your results. If you
have any questions, your dealer will be glad
to help.
T. M. REG. U. S. PAT. OFF.
Turn the
the
Turn the locking knob counterclockwise
and lift off the cover.
WINDING HANDLE
SPRING MOTOR DIAL
clockwise until
is at about 40 feet.
p
Page 3

Page 4
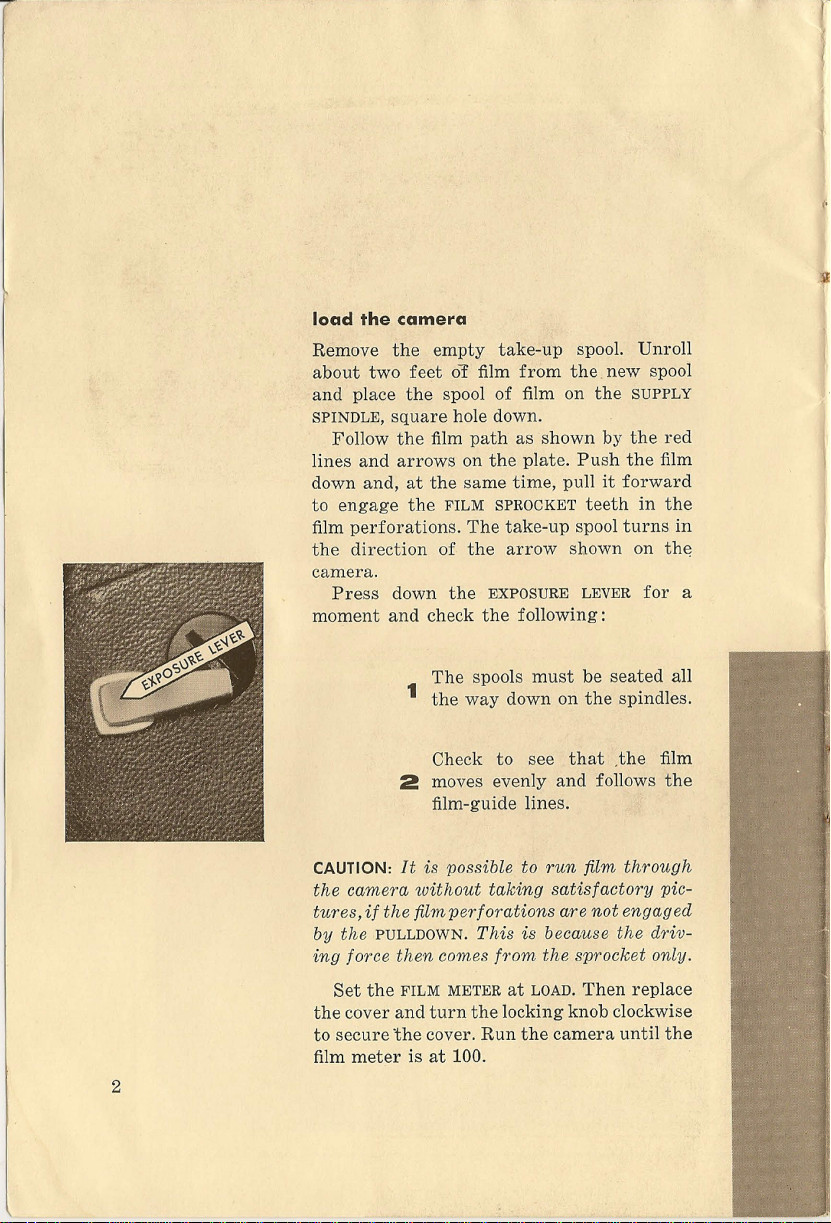
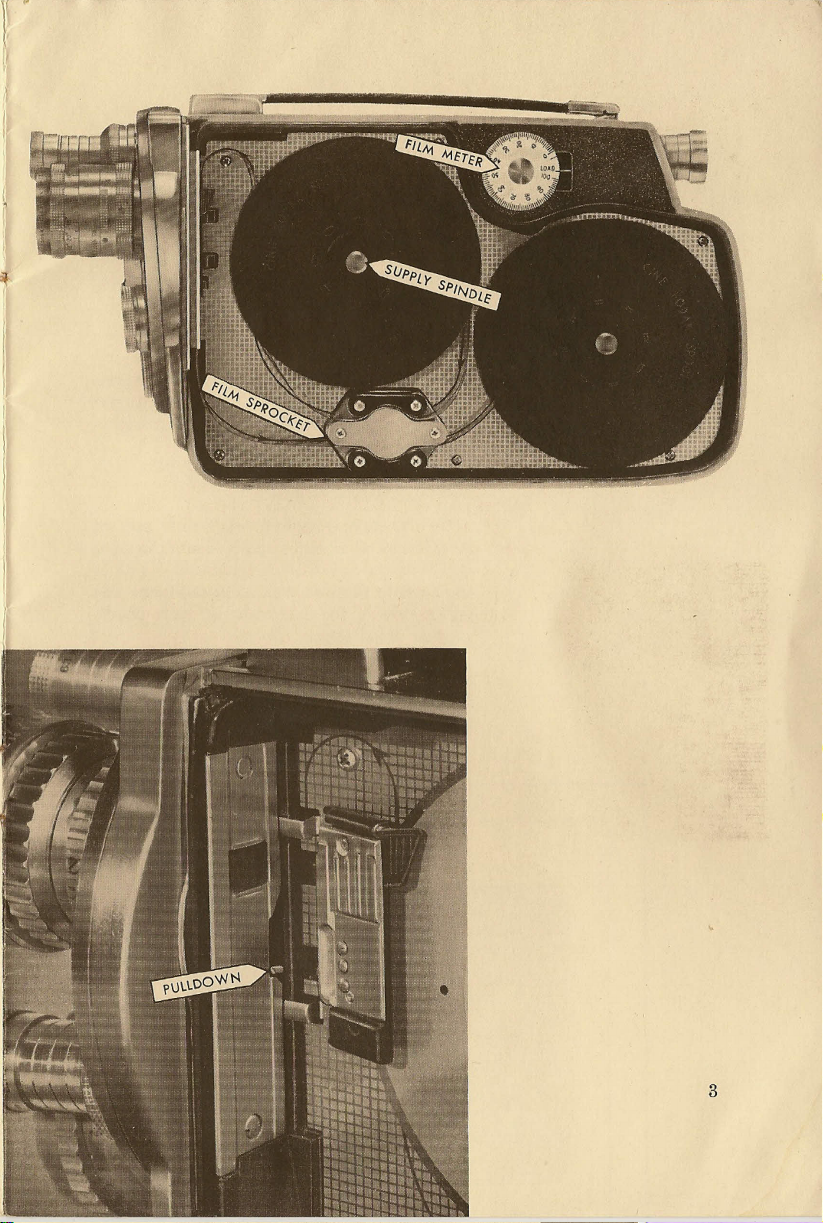
load the camera
Remove the empty take-up spool. Unroll
about two feet01film from the. new spool
and place the spool of film on the
SPINDLE,
lines and arrows on the plate. Push the film
down and, at the same time, pull it forward
to engage the
film perforations. The take-up spool turns in
the direction of the arrow shown on the
camera.
moment and check the following:
square hole down.
Follow the film path as shown by the red
FILM SPROCKET
Press down the
1
EXPOSURE LEVER
The spools must be seated all
the way down on the spindles.
SUPPLY
teeth in the
for a
,II
.It
Check to see that
2
moves evenly and follows the
film-guide lines.
CAUTION: It
the camera without taking satisfactory pic-
tU1"eS,if the film perforations are not engaged
by the PULLDOWN. This is because the driv-
ing force then comes irom the sprocket only.
Set the
the cover and turn the locking knob clockwise
to secure the cover. Run the camera until the
film meter is at 100.
2
is
possible to run film through
FILM METERatLOAD.
.the
film
Then replace
,·'
i
I
Page 5
I
3
Page 6
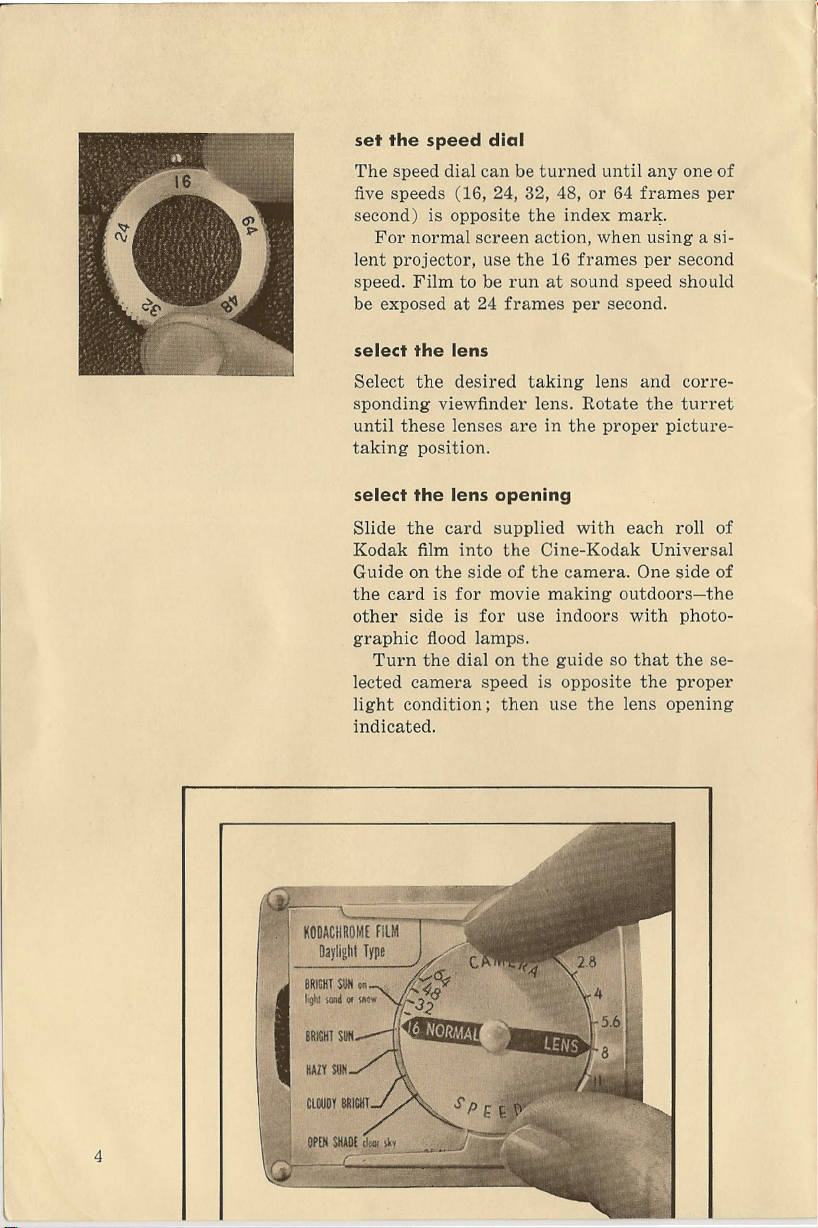
set the speed dial
The speed dial can be turned until anyone of
five speeds (16, 24, 32, 48, or 64 frames per
second) is opposite the index mark.
For normal screen action, when using a si-
lent projector, use the 16 frames per second
speed. Film to be run at sound speed should
be exposed at 24 frames per second.
select the lens
Select the desired taking lens and corre-
sponding viewfinder lens. Rotate the turret
until these lenses are in the proper picture-
taking position.
select the lens opening
Slide the card supplied with each roll of
Kodak film into the Cine-Kodak Universal
Guide on the side of the camera. One side of
the card is for movie making outdoors-the
other side is for use indoors with photo-
graphic flood lamps.
Turn the dial on the guide so that the se-
lected camera speed is opposite the proper
light condition; then use the lens opening
indicated.
;
KODACHROME filM
Oaylight Type
4
Page 7
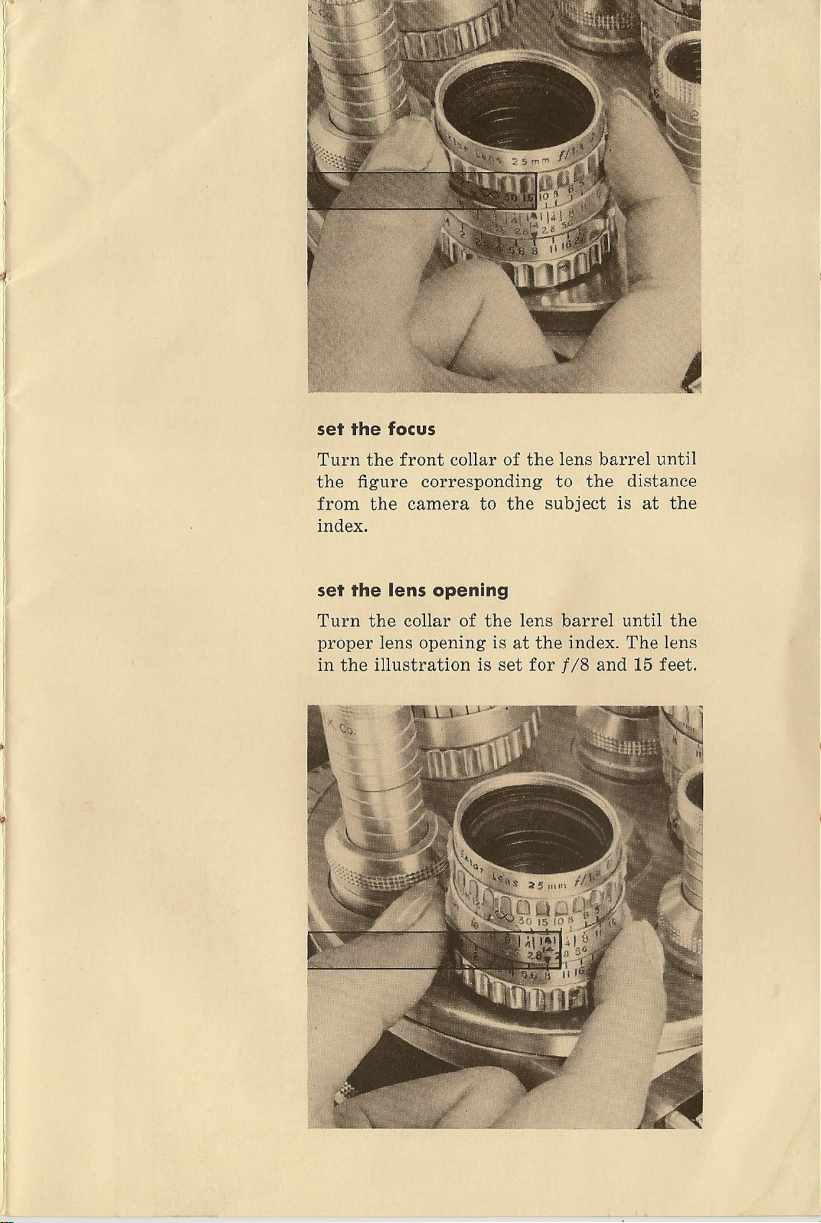
set the focus
Turn the front collar of the lens barrel until
the figure corresponding to the distance
from the camera to the subject is at the
index.
set the lens opening
Turn the collar of the lens barrel until the
proper lens opening is at the index. The lens
in the illustration is set for
1/8
and 15 feet.
n
~
I
I
I
Page 8
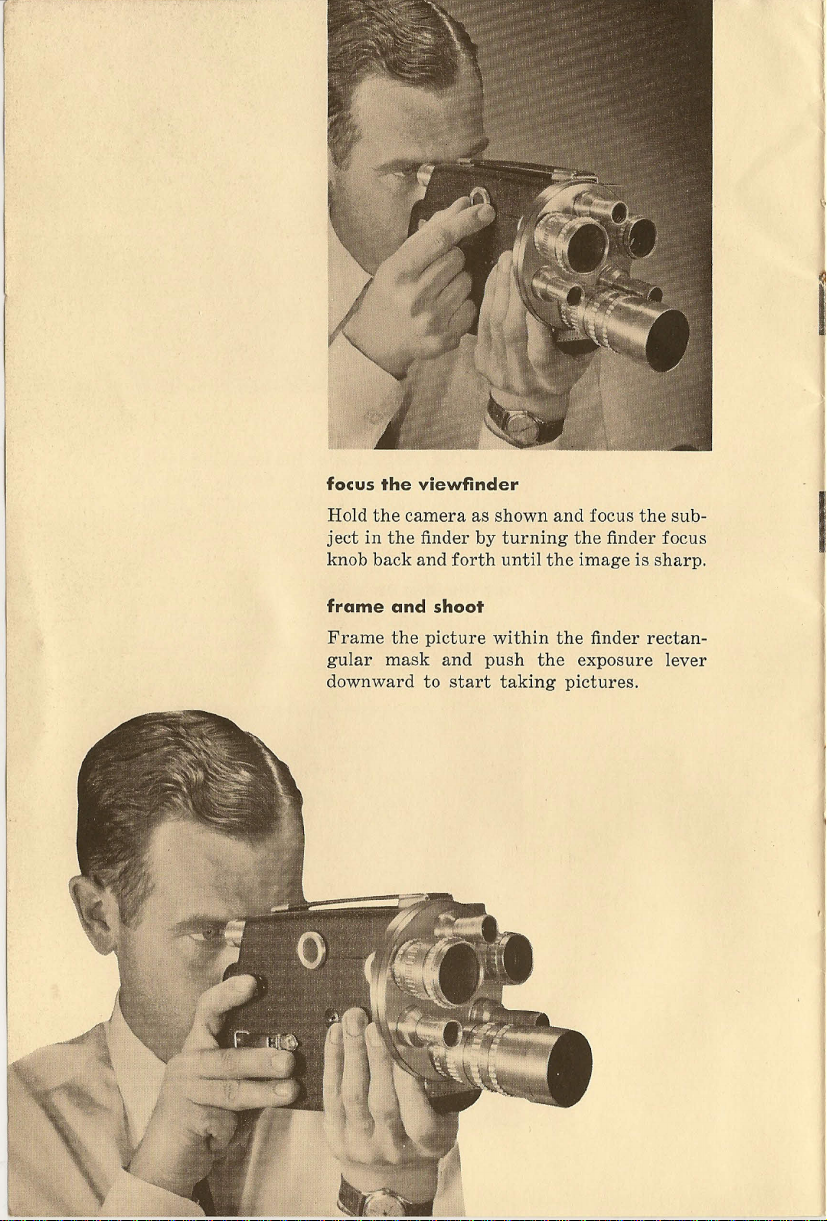
focus the viewfinder
Hold the camera as shown and focus the sub-
ject in the finder by turning the finder focus
knob back and forth until the image is sharp.
frame and shoot
Frame the picture within the finder rectan-
gular mask and push the exposure lever
downward to start taking pictures.
Page 9
complete operating
winding motor
loading
camera speed
using the turret
lenses
focus
setting the lens opening
the viewfinder
correction for close-ups
sighting
making exposures 18
shutter speeds
scene length
unloading and care of exposed film
pictures outdoors at night
animation by single-frame exposures
•
•
•
•
•
8
8
12
12
13
14
14
1S
16
17
18
18
19
19
20
cine-kodak films
cine aids
22
24
Page 10
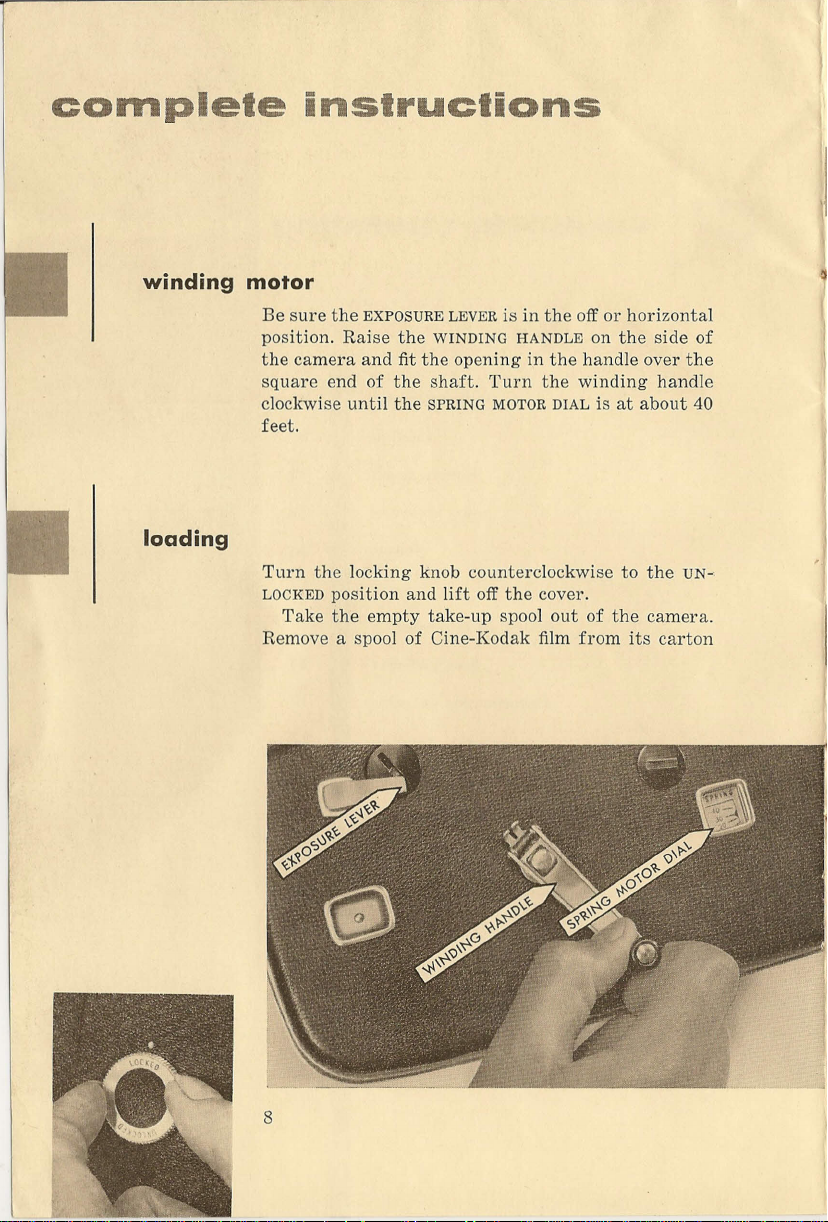
complete instructions
winding motor
Be sure the
position. Raise the
the camera and fit the opening in the handle over the
square end of the shaft. Turn the winding handle
clockwise until the
feet.
loading
Turn the locking knob counterclockwise to the
LOCKED
Take the empty take-up spool out of the camera.
Remove a spool of Cine-Kodak film from its carton
EXPOSURE LEVER
WINDING HANDLE
SPRING MOTOR DIAL
position and lift off the cover.
is in the off or horizontal
on the side of
is at about 40
UN-·
8
Page 11

and metal can. Remove the paper band around the
film. Save the paper band, carton and metal can to
send the film to your dealer for processing.
Pull out about two feet of film, Be especially careful
not to let too much film unwind or the film on the spool
will be fogged. Place the spool of film on the
SPINDLE
with the square hole down. Make sure that the
SUPPLY
spool is properly seated-the end of the supply spindle
should project through the round hole in the spool.
Following the red film-guide lines and arrows, in-
sert the film between the
FILM SPROCKET.
Push the film down and at the same
UPPER FILM GUIDE
and the
time pull it forward to engage the sprocket teeth in
the film perforations. Open the
PRESSURE PLATE
only
enough to make it stay open. Do not push it beyond
this open position. (The illustration below shows the
pressure plate fully opened in order to show the pull-
down.)
between the pressure plate and the
Following the film-guide lines, pass the film
APERTURE PLATE.
Be sure the film is placed all the way into the film
channel.
Close the pressure plate and move the film back and
forth until the
PULLDOWN
engages a film perforation
9
Page 12

NOTE:
It is extremely important that the film
perforations be engaged by the pulldown.
Check again to see if the film is properly lo-
cated in the film channel and follows the red
lines so that correct loops, which are also
important to the functioning of the camera,
are formed. Then inspect the pressure plate to
be sureitis seated correctly with respect to
the film and the film channel.
Follow the red film-guide lines and pass the film
between the
LOWER FILM GUIDE
and the film sprocket.
Engage the sprocket teeth in the film perforations.
Insert the end of the film in the slot in an empty
take-up spool. Turn the spool one turn to securely at-
tach the film to the spool. Place the spool, square hole
down, on the take-up spindle. Turn the take-up spool
clockwise with your finger until the film appears
snug on the spool.
Press down the exposure lever for a moment and
check the following conditions:
1
The spools must be seated all the way
down on the spindles.
~
10
2
The film must move evenly and must
follow the film-guide lines.
film meter
Set the film meter at
and turn the locking knob clockwise to
cure the cover. Run the camera until the film meter
is at 100.
LOAD.
Then replace the cover
LOCKED,
to se-
Page 13

11
Page 14

camera speed
For normal screen action with silent pictures, set the
camera speed at 16 frames per second.
If sound is to be dubbed in, or if you expect to run
the film at sound speed, the camera should be oper-
ated at 24 frames per second. When setting the
camera speed, remember that any camera speed
faster
than-normal action in the projected picture.
The speed dial can be turned until anyone of five
speeds (16, 24, 32, 48, or 64 frames per second) is
opposite the index mark. Intermediate speeds can be
obtained by turning the dial until the index mark is
between any two numbers.
using the turret
The turret rotates on a central axis, and, when
turned, brings each lens successively into picture-
taking position. To make certain that each lens is
correctly positioned, the turret snaps into place for
each lens.
With the turret snapped in place, the taking lens is
at the upper right and lined up with the film plane
mark on the camera cover. The viewfinder lens for
that particular taking lens is at the top of the turret.
If a 15mm lens and 152mm lens are used on the
turret, the 152mm lens must be in the lower position
when the 15mm lens is in the picture-taking position.
To avoid disturbing the lens settings when rotat-
ing the turret, grasp the two adjacent viewfinder
12 lenses.
than projection speed will produce slower-
Page 15

lenses
Kodak Cine Ektar Lenses, 15mm
\!
~
25mm
type C mounts fit directly on this camera. A Kodak
Ektar
1/1.9,
1/1.4
102mm
1/2.7,
Converter, 25mm to 15mm, used with a
converter adapter, is available to fit the 25mm
1/2.5,
and 152mm
25mm
1/4.0
1/1.4,
in
1/1.4
lens with a type C mount. The Kodak Cine Ektar
Lens, 25mm
1/1.4,
with the converter in place, be-
comes a fast, wide-angle lens which covers a field
approximately 60% larger than a 25mm lens. This
reduction in focal length is accomplished without
loss of lens speed or of image quality.
By using a Kodak Cine Lens Adapter Type C the
following interchangeable Kodak Cine
can be used: a 15mm
1/1.6,
a 63mm
1/4.0.
Viewfinder lenses are available for use with
1/2.0,
1/2.5
wide-angle lens, a 40mm
a 102mm
1/2.7,
Ektar
Lenses
and a 152mm
15, 40, 50, 63, 75, 102, and 152mm focal length lenses.
For wider coverage than can be obtained with the
standard 25mm lens, use a 15mm wide-angle lens. The
wide-angle lens covers a larger field, about 60% more
than the 25mm lens. For large, clear pictures at long
range-close-ups of sports, wild life, children at play
-use a telephoto or long-focus lens.
Taking the image produced by a 25mm lens as
normal, the other lenses produce images- magnified
in direct ratio to their focal lengths. Thus the 63mm
lens produces an image 27'2 times larger than a
25mm lens; with the 152mm lens the image will be
6 times larger.
IMPORTANT: For best results when using a long-locus
or telephoto lens, brace the camera against a firm
support. Use a tripod. whenever possible.
These pictures are actual enlargements from a Cine-Kodak film of the
same subject photographed from the same distance with five different
Cine-Kodak lenses: A is 25mm; B is 40mm; C is 63mm; D is l02mm;
and E is 152mm.
13
Page 16

focus
Check the focusing scale before each scene is photo-
graphed. The scale setting must correspond to the
camera-to-subject distance. Accurate focusing is
particularly important when making close-ups. When
the subject is four feet or less from the camera, meas-
ure the distance carefully to the small metal boss
with the¢on the camera cover. This marks the posi-
tion of the film plane. To focus, turn the
collar so that the subject distance is at the index.
setting the lens opening
The lens opening must be set to accommodate changes
in the light conditions. For example, on dull days or
LENS OPENING
1.4
•
1.9
•
2.8
e
4
e
in the shade, a larger lens opening is used, while in
bright sunlight a smaller lens opening is used. Lens
openingf/22 is the smallest opening;f/16 is larger
and admits about twice as much light. Each succeed-
ing marked opening doubles the light passing through
the lens.
opening.
collar until the proper number is at the index.
front
lens
The larger the number, the smaller the lens
Set the lens opening by turning the lens
5.6
22
8
11
16
•
•
•
•
•
Page 17

the viewfinder
The finder is a telescopic type finder. It is designed so
that with the 25mm viewfinder lens, the subject ap-
.pears full size. Adjust the finder focus by turning the
finder focus knob back and forth until the image is
sharp. For most people, proper adjustment of the
finder focus will allow you to change from one turret
position to another without further adjustment of
the finder focus. The rectangular mask which appears
in the finder is in focus at the same time as the sub-
ject so that a sharp definition of the field that is being
photographed can be seen.
action outside the field being photographed can be
observed and the camera moved to include it if
desirable. '
which matches the focal length of the taking lens
must be used. The table on page 17 shows the finder
lenses which are available. To remove the finder lens,
unscrew the retaining collar and lift out the lens.
The field outside the mask is also visible, so that
When other lenses are used, a viewfinder lens
Page 18

When replacing a finder lens, insert the lens into the
lens retaining mount so that the stud on the lens
mount fits in the slot in the lens tube; then tighten
the retaining collar.
correction for close-ups
Because the finder and the taking lens are separated,
they do not always cover the same area and slight
compensations are necessary when filming subjects
very near the camera. To simplify framing for close-
ups, three crosses have been placed within the finder
REFERENCE CROSS
2'12
FT. TO 7 FT.
J;
"
\!
~
16
REFERENCE CROSS
1'12
FT. TO 2% FT.
Page 19

field of view.
erence cross.
For correction when filming a subject 2V2to 7 feet
from the camera, with the 25mm lens, note the posi-
tion of the reference cross with respect to some point
on the subject. Then move the camera so that the
middle cross is at the position previously occupied by
the reference cross. The camera is now in position to
photograph the field previously outlined by the mask.
For correction at 1V2 to 2% feet, with the 25mm
lens, use the lower cross instead of the middle cross.
For other lenses the crosses are to be used for dif-
ferent subject distances. See the table below.
The heavy, upper right cross is the ref-
Viewfinder Lenses
Use Lower Cross
Use Middle Cross
sighting
15mm
1 Foot to 1% Feet to 2% Feet to 3V2Feet to
11/2Feet 2% Feet
1V2Feet to
4Y2Feet
Hold the camera as shown in the illustration. Brace
the elbows against the side of the body to steady the
camera. The Cine-Kodak K-100 Cameras can be hand-
held. However, the pictures, when projected on the
screen, will appear much steadier if the camera is
placed on a tripod while pictures are being taken.
The tripod socket is on the bottom of the camera.
I
25-40-50mml 63-75mm 1102-152mm
When Film-to-Sub.iect Distance is
4 Feet
2% Feet to
7 Feet
4 Feet to 6 Feet to
9
Feet 12% Feet
6 Feet
17
Page 20

making exposures
With the spring motor fully wound, about 40 feet of
film can be exposed. If several consecutive scenes
must be photographed, be sure to wind the spring
when the spring motor dial indicates that the motor
will run about 5 to 10 feet of film. However, it is
best to wind the spring after each scene. In this way
the camera is always ready for use.
To start the motor, push the exposure lever down-
ward. To stop, release the lever. Pressing the lever
all the way down locks it in the running position.
scene length
About 6 feet of film (15 seconds at 16 frames per
second) is sufficient for average scenes in which the
action is continuous. However, the length of a scene
should be governed by the nature of the subject.
Landscape shots, for example, can be of greater
duration than scenes with brief, fast-moving action.
shutter speeds
The exposure data is given on the basis of 16 frames
per second. The use of any faster speed requires a
larger lens opening (stop); for example, at 32 frames
per second, the lens opening should be 1 stop larger;
at 64 frames per second, the lens opening should be
2 stops larger. The Cine-Kodak Universal Guide
shows the proper lens opening for each camera speed.
EXPOSURE TIME
Angle of Opening
in Shutter 165
PE~
FRAME
0
Exposure Time in Seconds
Single Frame
16 Frames per Second
24 Frames per Second
32 Frames per Second
48 Frames per Second
64 Frames per Second
1/20
1/35
1/50
1170
1/100
1/140
Page 21

......-
~
unloading and care of exposed film
The usable length of film has been exposed when the
film meter shows O. Before removing the camera
cover, run off the trailer as follows:
Run the camera until the line below 0 on the film
meter is opposite the pointer. The end of the film can
usually be
the cover; then remove the full spool of exposed film
from the take-up spindle. For best results have the
film processed as soon as possible after it is exposed.
See the directions that accompany your film.
Before rethreading, make sure the gate is free of
dirt, pieces of film, or foreign particles.
heard
as it leaves the film channel. Remove
pictures outdoors at night
Unusual and artistic effects in color or black-and-
white can be obtained at night with your camera.
Brilliantly lighted streets or the theater districts of
large cities make interesting shots. Lighted streets
and squares photographed on wet nights or after a
heavy snow are especially attractive. Animated elec-
tric signs are always good subjects. For best results,
photograph only brightly illuminated scenes.
Use Cine-Kodak Tri-X Reversal or Cine-Kodak
Tri-X Negative Film for sporting events on dull
days, indoor-lighted events, and night-lighted out-
door events.
Page 22

animation
by
single-frame exposures
One of the most absorbing fields made possible by
your camera is animation-the movie method of
breathing life into inanimate objects. You may wish
to try the simpler type where chessmen play their
own game, and books, ash trays, etc., roam around
over a table top. Or you may be sufficiently fascinated
by the almost limitless possibilities of animation to
try your hand at the more complicated types.
To animate a subject, expose a single frame, move
the subject slightly, expose another frame, move the
subject again, and so on. If a
to take place in one second on the screen with the
projector operated at normal (16) speed, 16 single-
frame exposures will be required.
Applications of animation include: animated
titles, graphs that draw themselves, machines, and
other manufactured products that assemble them-
selves.
The Cine-Kodak K-100 Cameras are also excel-
lent for time-lapse photography-a method of greatly
accelerating a period of time. The growth of a flower
to full bloom, rapid movement of street traffic, cloud
formations for an entire day, can all be depicted in
a few seconds' time with time-lapse photography.
Expose one frame at a time at intervals which will
produce the desired effects. The interval between
exposures will vary according to subject matter.
To make single-frame exposures, set the speed dial
at 16 frames per second and push
lever once for each exposure. Each single frame is
exposed for 1/20 of a second. If the Universal Guide
is used for determining the exposure, one stop small-
er than the exposure indicated for 16 frames per sec-
ond should be used; for example, if the exposure
guide reading isf/5.6 for 16 frames per second, the
lens opening should be set at
f/8.
certain
movement is
up
the exposure
20
Page 23

.•
cleaning the lenses
The glass-air surfaces of the lens on your camera.have
been Lumenized to reduce internal reflections, flare,
and scattered light. This increases the brilliance of
black-and-white pictures and the color purity of
Kodachrome pictures. All Lumenized lenses appear
tinted by reflected light but this color has no effect
on the image.
To clean the lens, carefully brush off any dust or
grit with wadded Kodak Lens Cleaning Paper or a
fine camel's-hair brush. If necessary, wipe the sur-
faces gently with a wad of lens cleaning paper or a
clean, soft, lint-free cloth. Always wipe with a circu-
lar motion. Fingerprints, oil spots, or other scum
deposits can be removed with a drop of Kodak Lens
Cleaner on the cloth. DO NOT USE ALCOHOL.
cleaning the film channel
Open the pressure plate as far as it
will go. With the ball of the thumb,
rub off any accumulation of dirt on
the polished tracks of the plate.
With a match covered with a clean
cloth that has been dipped in Stod-
dard's Solvent, such as Sovasol No.
5 (Socony-Vacuum Oil Company) or
Sunoco Spirits (Sun Oil Company),
remove any accumulation on the
tracks of the aperture plate. (Do not
use alcohol as a cleaning agent.) Re-
move any dust or lint on the edges
of the rectangular aperture. Be ex-
tremely careful not to scratch the
polished surfaces over which the
film travels. Never scrape the tracks
with a metallic tool.
21
Page 24

T
Cine-Ko
All16rn11~ films perforaied. one
or two edges can be used.
Kodachrome Film
Kodachrome Film, Daylight Type reproduces colors with
startling realism when exposed under daylight con-
ditions.
Kodachrome Film, Type A is color-balanced for photo-
graphic flood lamps and requires no filter when so
used. The film can also be used for taking pictures
in daylight with a filter such as the Kodak Daylight
Filter for Kodak TypeAColor Films (see page 25).
Processing-Exposed Kodachrome Film may be taken
to a dealer who will arrange for processing at a labo-
ratory of your choice. If you prefer, you may mail it
to a Kodak Laboratory using a Kodak Processing
Mailing Label or to any other laboratory processing
Kodachrome Film. The mailing labels may be ob-
tained from your dealer, and film sent in with these
labels will be returned to the same dealer. Payment
will be made to your dealer who can also order full-
color duplicates of your Kodachrome Films.
ak
ilrns
Cine-Kodak Black-and-White Reversal Films
These films are sold at a price which does not include
processing by the Eastman Kodak Company. They
are intended for processing by independent commer-
ciallaboratories or by the user. Conventional reversal
processing provides a positive image for projection.
Duplicate prints can also be obtained from many
commercial laboratories.
Plus-XReversal is a very fine-grain film used in general
black-and-white picture making. It can be used with
natural or artificial illumination.
22
Page 25

Tri-X Reversal
is a very fast black-and-white film par-
ticularly suitable for commercial, television, indus-
trial, and athletic photography where adverse light-
ing conditions are frequently encountered.
Cine-Kodak Negative Films
Plus-X
Tri-X
The use of these black-and-white films results in a
negative from which positive projection prints can
be obtained. They are intended for processing by
independent commercial laboratories or by the user.
magnetic sound track for 16mm film
Kodak Sonotrack Coating-a
magnetic sound track coat-
ing service-is now available for processed, single-
or double-perforated Kodachrome or black-and-white
I6mm Cine-Kodak film.
Sonotrack Coating can be applied to film taken at
either sound or silent speed. It is placed on the side
of the film that faces the projection lamp.
Kodak Sonotrack Coating is available in three
widths. Single-perforated I6mm film having no
sound track will be Sonotrack coated the full width
of the track area. When an optical sound track is on
the film, it will be Sonotrack coated half the width of
the optical track, unless you specify that the full
width of the optical track be coated. It is available in
edge-coating for double-perforated I6mm film.
Sonotrack Coating must be ordered through
your Kodak dealer. This coating can be or-
dered by your dealer after your 16mm Cine-
Kodak film has been processed. Unexposed
film will not be coated.
23
Page 26

cine aids
combination lens attachments
·
~
,
O
r
Kodak
Lens Hood
The Kodak Combination Lens Attachments permit
the use of any desired combination of Kodak Portra
Lens, Kodak Pola-Screen, and Kodak Wratten Filter.
See table below for attachment series number and
adapter ring number for the various lenses.
Kodak Adapter Rings screw into the lens barrel.
The Kodak Retaining Ring is unscrewed from the
Adapter Ring to admit a filter or Portra Lens. The
retaining ring is then screwed back into place.
To use a filter and a Portra Lens at the same time,
obtain another Kodak Retaining Ring. The Portra
Lens must always be nearer the camera lens.
Kodak Cine Ektar Lenses
("C" Mount)
Kodak
Wratten Filter
Lens
15mm,
(WIDE-ANGLE)
25mm,
25mm,
102mm,f/2.7
152mm,f/4.0
Adapter Ring
1/2.5
1/1.9
1/1.4
Kodak
Attachment
Number
Portra Lens
Series
6 28
5 22
6 26
6
6
Kodak
Adapter Ring
Number
(SCREW-IN)
(SCREW-IN)
(SCREW-IN)
NONE REQUIRED
NONE REQUIRED
JI
n
~
1
I
I
Kodak Cine Ektar
Interchangeable Lenses
("5" Mount)
15mm,
1/2.5
(WIDE-ANGLE)
25mm,
25mm,
102mm,
152mm,
40mm,
63mm,
1/1.9
1/1.4
1/1.6
1/2.0
1/2.7
1/4.0
6 28
6 27
6 27
6 27
6
6
6
NONE REQUIRED
NONE REQUIRED
NONE REQUIRED
(SCREW-IN)
(SCREW-IN)
(SCREW-IN)
(SCREW-IN)
,
I
Page 27

Cine-Kodak Filters
Filters are used in black-and-white photography to
;
obtain correct tone rendering, to create special sky
and moonlight effects, to cut haze, and to obtain con-
trast between areas differing in color. The wise use
of a filter will often make the difference between ex-
cellent photography and mere record.
Correction filters aid in reproducing colors as
grays in the relative brightness that the eye sees
them. Oftentimes blue reproduces too light without
a filter, and there is no contrast between sky and
clouds. Filters also cut bluish atmospheric haze on
distant scenes.
A filter such as the Kodak ND-3 Filter is needed
when Cine-Kodak Tri-X Film is used in sunlight.
Filters such as the K2, G, A, and Xl are recom-
mended for black-and-white photography. All are
supplied as Kodak Combination Lens Attachments in
series sizes. Additional information on filters comes
with your film.
Kodachrome Filters
WITH FILTER
A filter such as the Kodak Skylight Filter
is recommended
for Kodachrome Film Daylight Type, for pictures in
open shade under a clear blue sky, pictures made on
overcast or hazy days, distant scenes (mountain or
marine views), sunlit snow scenes, and aerial photo-
graphs.
A filter such as the Kodak Photoflood Filter No. 80B (for
Kodak Daylight Type CoJor Films)
can be used if regular
daylight Kodachrome is to be exposed indoors with
photographic flood lamp illumination. Type 'A film is
preferred for photographic flood lamp illumination.
A filter such as the Kodak Daylight Filter for Kodak Type A
Color Films
is recommended if Kodachrome Film Type
A is to be exposed outdoors in daylight. Exposures
with this filter are the same as those for Kodachrome
Film Daylight Type.
25
Page 28

hand crank
1"
I
The Cine-Kodak K-IOOCamera can be hand-cranked
either forward or reverse for special effects. No more
than two feet of film should be reverse wound at a
time. This is accomplished by use of the Cine-Kodak
K-IOOHand Crank. See your Cine-Kodak dealer.
electric motor drive
The camera is adaptable to electric motor drive by
using the Cine-Kodak K-IOOMotor Drive Shaft avail-
able from your Cine-Kodak dealer.
field case
A fine instrument deserves good care, and there is no
better way of caring for your camera than to keep it
in a suitable case. Not only will its appearance be
benefited, but the camera will actually take better
pictures longer, if it is properly cared for. The field
case not only protects the camera from scuff-marks
and bangs, but permits it to be ready for picture tak-
ing at a moment's notice. The case will also help keep
your camera clean; dust collecting on the lens sur-
face requires frequent brushing off to maintain pic-
ture clarity, snap, and brilliance.
26
Page 29

,II
.It
Kodascope Proiectors
The Kodascope projectors answer all your needs for
sound or silent motion pictures. The projectors come
equipped with powerful 750-watt lamps amply bright
for average projection. A 1000-watt lamp can be used
for large audiences. The projectors are fitted with a
2-inchf/1.6 Lumenized Kodak Projection Ektanon
Lens. The following Kodak Projection Ektanon
Lenses are also available: a 1Yz-inchf/2.0, a 3-inch
f
/2.0, and a 4-inch
The Kodascope projectors are smartly styled, light,
compact, and easy to operate. All are permanently
lubricated.
f/2.5.
The Kodascope Royal Projector,
signed to give the best in silent movie projection. It
operates on ac or
and in reverse, and has a speed control knob for rapid
rewind.
de,
105 to 125 volts, both forward
illustrated above, is de-
27
Page 30

The Kodascope Pageant Sound Projector,
to 125 volts, has a capacity of 2000 feet of film. It
operates at both sound and silent speeds. An acces-
sory microphone plugged into the amplifier enables
you to narrate your silent movies and to use the
Pageant as a public address system.
The Kodascope Analyst Projector,
project movies in normal fashion on a screen and also
in natural light on its own built-in screen. It also
operates by a remote control switch which provides
immediate
forward or reverse operation. It is ideally
suited for such special applications as sports analysis,
motion study, etc.
Kodak Cine Photoguide
Take the guesswork out of movie making with the
Kodak Cine Photo guide. Here is a 32-page pocket-
sized booklet with a durable leather-like cover. It con-
tains on-the-spot movie-making information for both
common and unusual lighting conditions. Among the
subjects covered by convenient dial computers, tables,
and brief text are: indoor and outdoor exposure,
close-up photography, movie continuity, field size and
depth-of-field tables for many Kodak Cine Lenses and
supplementary lenses, and film and filter data. See
your Kodak dealer.
ac or de, 105
60-cycle ac only, can
28
Page 31

"
Serial Numbers: The serial number of your camera is
stamped on the rear carry handle clip. The serial number
of the lens is stamped on the front of the lens barrel.
Record these numbers with your personal papers for posi-
tive identification of the camera and lens. In case of loss
or theft, report the fact to your Kodak dealer and to the
local police at once.
p
EASTMAN KODAK COMPANY
1-57
ROCHESTER 4, N. Y .
•
PRINTED IN THE UNITED STATES OF AMERiCA
Page 32

~@@1ffifu
~ GUARANTEE ~
Within a year after purchase, any re-
pairs necessary to your Cine-Kodak
K-IOOCamera due to a defect in ma-
terials or workmanship will be made
or, at our option, the camera will be
replaced without charge. No other
warranty or guarantee, express or im-
plied, shall be applicable to this equip-
ment. Nor are we responsible for loss
of film, for other expenses or incon-
veniences, or for any consequential
damages occasioned by the equipment.
In case of a defect, the camera
should be sent directly or through a
Kodak dealer to Eastman Kodak Com-
pany or a repair firm authorized by us
to make such repairs. It should be ac-
companied by a description of the
trouble encountered and other avail-
able information regarding the cam-
era, including the date and place of
purchase.
 Loading...