

Page 1

Kodak
F600 Zoom
Camera
ENGLISH/ESPAÑOL/FRANÇAIS
Page 2
Camera Identification
6
5
4
9
8
7
10
11
12
13
3
2
1
17
14
15
16
Page 3
Camera Identification
24
18
19
P
O
W
E
R
O
N
/
O
F
F
23
OPEN
20
22
21
Page 4
LCD Panel
25
35
34
33
32
ISO
AUTO OFF
+
31
26
27
28
2930
MM
Page 5

This device complies with part 15 of the FCC Rules. Operation is subject to the following two
conditions: (1) this device may not cause harmful interference, and (2) this device must
accept any interference received, including interference that may cause undesired
operation.
NOTE: Your model camera has been tested and found to comply with the limits for a Class B
digital device, pursuant to Part 15 of the FCC Rules. These limits provide reasonable protection
against interference in residential use. The camera generates, uses and can radiate radio
frequency energy and, if not used in accordance with the instructions, may cause interference
to radio communications. There is no guarantee that interference will not occur. If this camera
does cause interference to radio or television reception, which can be determined by turning
the camera off and on, you may reduce the interference by the following:
— Reorient or relocate the receiving antenna.
— Increase the separation between the camera and the receiver.
— Consult the dealer or an experienced radio/television technician for help.
Changes or modifications not approved by the party responsible for compliance could void the
user’s authority to operate the equipment.
This Class B digital apparatus meets all requirements of the Canadian InterferenceCausing Equipment Regulations.
Page 6

KODAK ADV ANTIX
F600 Zoom Camera
NEED HELP WITH YOUR CAMERA OR MORE INFORMA TION
ABOUT THE ADV ANCED PHOTO SYSTEM?
Visit our web site at http://www.kodak.com or call: Kodak (USA only)
from 9:00 a.m. to 7:00 p.m. (Eastern time) Monday through Friday at
1 (800) 242-2424.
Kodak (Canada only) from 8:00 a.m. to 5:00 p.m. (Eastern time)
Monday through Friday at 1 (800) 465-6325, ext. 36100; for the
Toronto area, call (416) 766-8233, ext. 36100. When you call, please
have your camera available.
For warranty purposes, please keep your sales receipt as
proof of the date of purchase.
ENGLISH
Page 7

ADVANCED PHOT O SYSTEM
FEATURES A VAILABLE
WITH THIS CAMERA
Triple format selection
• You can take three different
size pictures: Classic (C),
Group/HDTV (H), and
Panoramic (P) pictures from
the same film cassette. The
frame within the viewfinder
changes to match each
format selection.
2
Date and time imprinting
• You can choose to have date
and time information printed
on the back of your prints.
See your photofinisher for a
full description of available
services.
Double exposure protection
(DEP)
• You don’t need to worry about
accidentally re-exposing your
film. Your camera reads the
Film Status Indicator (FSI) on
the film cassette to prevent
re-exposure.
Page 8

Picture quality information
exchange (PQix)
• Your camera features magnetic
information exchange that
records information about
lighting conditions and
exposure on the film cassette
to assist the photofinishing
lab with color correction and
exposure adjustments, to
provide you with the best
possible results.
Safety-interlock film door
• The safety interlock on the film
door prevents the door from
opening before the film is
completely rewound.
3
Page 9
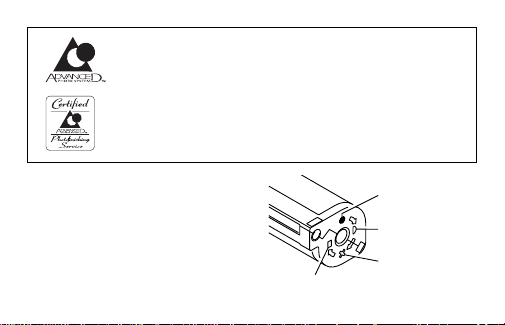
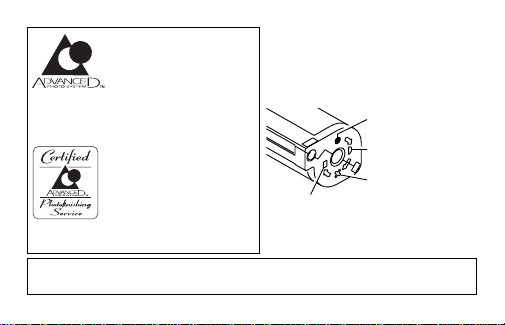
Look for this logo to be certain that the film you buy
is made for this camera.
Look for this logo to select a certified photofinishing
service for developing your film and to assure that you
get all the features of the Advanced Photo System.
Film Status Indicator (FSI)
A highlighted indicator advances
from one symbol to another to
identify the status of the film
inside the cassette.
4
1
4
3
PROCESSED NEGATIVES
UNEXPOSED
PARTIALLY
2
EXPOSED
FULLY EXPOSED
Page 10

CONTENTS
CAMERA IDENTIFICA TION .................. 6
ATTACHING THE STRAP ..................... 7
Control-button activator.................... 7
LOADING THE BATTER Y ..................... 8
Low-battery indicator ...................... 9
Battery tips ................................... 9
Power shutdown .......................... 10
LOADING THE FILM .......................... 10
TAKING PICTURES ........................... 12
Typical print sizes (formats) ......... 13
Using the focus lock .................... 14
Using the zoom lens .................... 15
Tips for better pictures ................. 16
TAKING FLASH PICTURES ............... 17
Flash-to-subject distance ............. 18
SELECTING THE FLASH AND
INFINITY -FOCUS MODES .................. 19
Red-eye reduction........................ 19
Auto flash without
red-eye reduction ......................... 20
Fill flash ...................................... 21
Flash off ...................................... 22
Infinity focus ............................... 23
Night-view ................................... 24
USING THE SELF-TIMER .................. 24
DATE AND TIME IMPRINTING ........... 26
Setting the date and time ............. 26
UNLOADING THE FILM ...................... 27
Automat ic rew ind ......................... 27
Manual rewind ............................. 2 8
CARING FOR YOUR CAMERA ........... 29
TROUBLESHOOTING ......................... 30
SPECIFICATIONS.............................. 3 2
5
Page 11

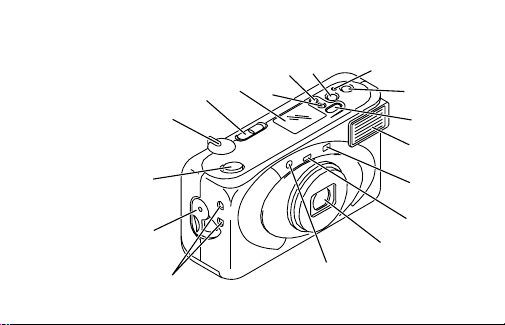
CAMERA IDENTIFICA TION
1 STRAP POST
2 FILM-DOOR LATCH
3 SHUTTER BUTTON
4 ZOOM-DIAL LEVER
5 FORMAT-SELECTOR SWITCH
6 LCD PANEL
7 DATE-SELECT BUTTON
8 DATE-SET BUTTON
9 SELF-TIMER BUTTON
10 FILM-REWIND BUTTON
11 FLASH-SELECT BUTTON
12 DATE-MENU BUTTON
13 FLASH
14 VIEWFINDER
15 LIGHT SENSOR
16 LENS
6
(see inside cover flaps for camera diagrams)
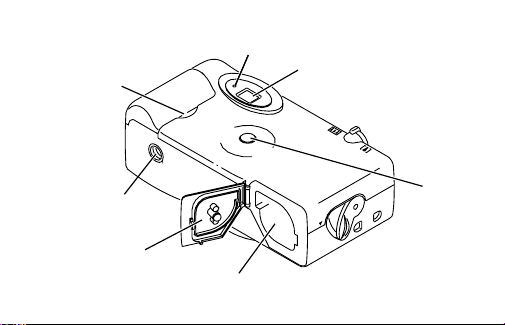
17 SELF-TIMER/
RED-EYE-REDUCTION LAMP
18 FLASH-INDICATOR LAMP
19 VIEWFINDER EYEPIECE
20 ON/OFF BUTTON
21 FILM CHAMBER
22 FILM DOOR
23 TRIPOD SOCKET
24 BATTERY DOOR
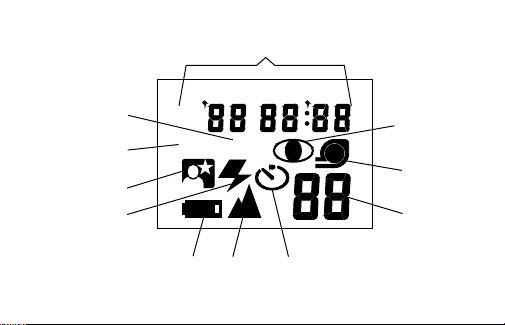
LCD PANEL
25 DATE & TIME/ISO
-SPEED DISPLAY
FILM
26 RED-EYE-REDUCTION INDICATOR
27 FILM-PRESENCE INDICATOR
28 FRAME COUNTER
29 SELF-TIMER INDICATOR
Page 12
30 INFINITY-FOCUS INDICATOR
31 BATTERY SYMBOL
32 FILL-FLASH INDICATOR
33 NIGHTVIEW INDICATOR
34 AUTO-FLASH INDICATOR
35 FLASH-OFF INDICATOR
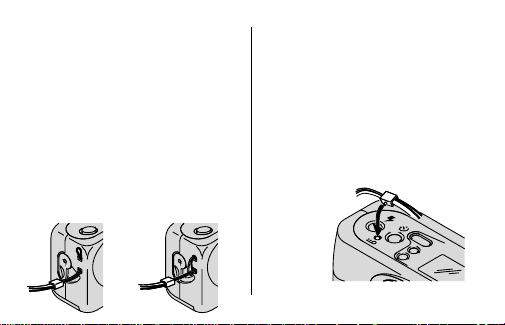
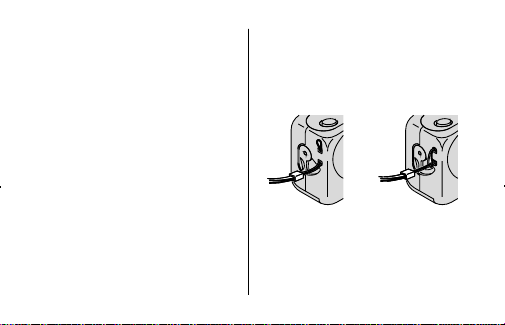
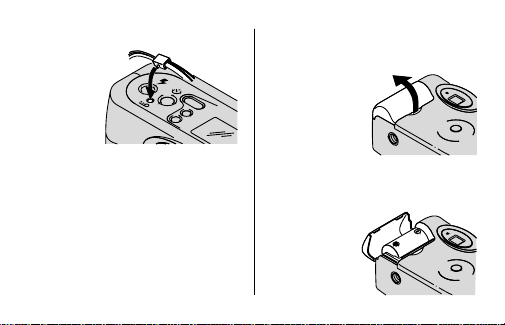
ATTACHING THE STRAP
1. Insert one end of the strap
under the bottom
(1) and pull it up through
POST
the top strap post.
STRAP
2. Thread the longer end of the
strap through the shorter loop.
3. Pull the strap tight.
Control-button activator
Use the knob on the clasp of the
camera strap to activate the
smaller-sized control buttons on
the camera.
DATE
SELECT
SET
7
Page 13
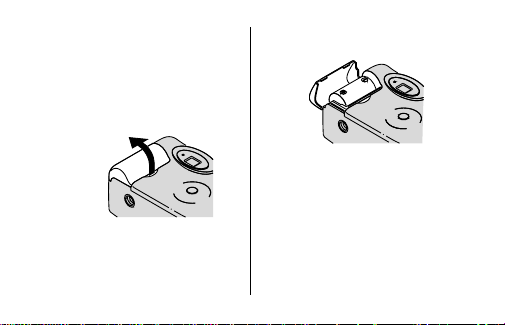
LOADING THE BATTER Y
N
O
F
F
O
/
P
E
W
O
R
This camera uses one 3-volt
lithium KODAK K123LA (or
equivalent) Battery that supplies
power for all camera operations.
1. Open the
BATTERY DOOR
(24).
2. Insert the battery into the
chamber as shown.
• Before you remove the
old battery, turn the
camera off.
8
P
O
W
E
R
O
N
/
O
F
F
3. Snap the battery door closed.
• After you load a new
battery into the camera,
you will need to reset the
date and time.
Page 14

Low-battery indicator
It’s time to replace the battery
when—
• the
BATTERY SYMBOL
“blinks” on the
or
• all indicators on the LCD
panel disappear and the
SHUTTER BUTTON
be released.
(31)
LCD PANEL
(3) cannot
(6)
Battery tips
• Discard dead batteries with
your normal household trash,
unless your community
offers a battery-collection
program (check with the
sponsors of that program
for details).
• Remember to keep a spare
battery with you at all times.
• Read and follow all warnings
and instructions supplied by
the battery manufacturer.
• Keep batteries away
from children.
• Do not try to take apart,
recharge or short circuit the
battery, or subject it to high
temperature or fire.
• Store batteries in their original
packaging prior to use.
9
Page 15
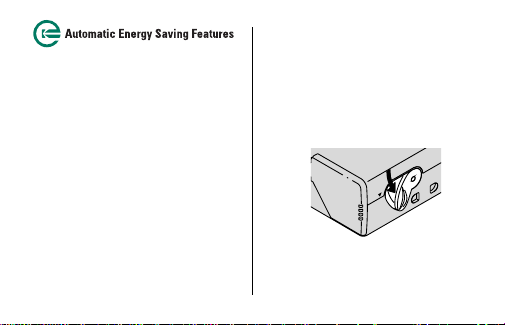
Power shutdown
To reduce battery power, the
camera will automatically go into
a sleep mode when it is not
operated for more than
3 minutes. You can press the
SHUTTER BUTTON
LEVER
(4),
BUTTON
DATE-SET BUTTON
BUTTON
BUTTON
• Use the on/off button to turn
the camera completely off
when it is not being used for
an extended time.
10
(3),
ZOOM-DIAL
DATE-SELECT
(7),
DATE-MENU BUTTON
(8),
(11), or the
(10) to awaken the camera.
(12),
FLASH-SELECT
FILM-REWIND
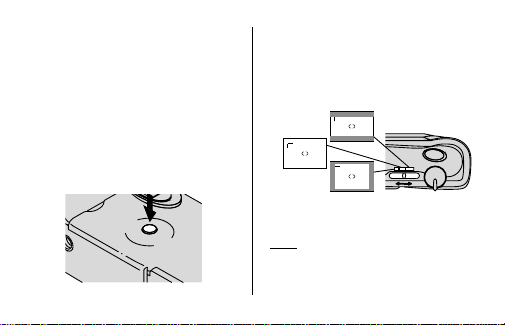
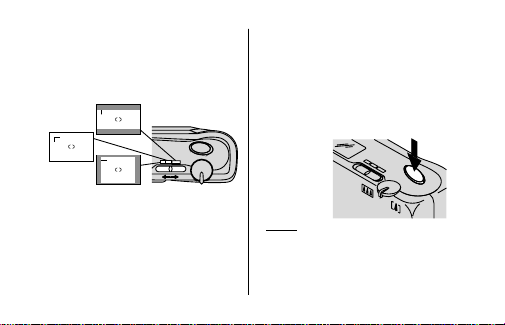
LOADING THE FILM
You can load film into the
camera with the camera ON
or OFF.
1. Turn the
FILM-DOOR LATCH
to open the
FILM DOOR
OPEN
(22).
(2)
Page 16

2. Insert the film cassette
completely into the
CHAMBER
(21).
3
2
1
OPEN
• Make sure the Film Status
Indicator (FSI) on the film
cassette is at ● (#1 position)
for a new cassette.
• Do not force the film
cassette into the film chamber.
FILM
4
3. Close the film door to start
the auto-film advance. The
FRAME COUNTER
LCD PANEL
number of frames remaining
on the film cassette.
• After you close the safety-
interlocked film door, you
cannot open the door until
the film is completely rewound
into the film cassette.
(28) on the
(6) will show the
11
Page 17
TAKING PICTURES
You can take Classic (C), Group/
HDTV (H)
*, and Panoramic (P)
pictures on the same film cassette.
Your photo-processing cost may
be based on the format size(s)
that you use to expose the film.
1. Press the
to turn the camera on and to
uncover the
12
ON/OFF BUTTON
LENS
(16).
P
O
W
E
R
O
N
/
O
F
F
(20)
2. Move the
FORMAT-SELECTOR
(5) to select desired
SWITCH
format (C, H, or P). The
viewfinder will change to show
the selected field of view.
P
H
C H P
C
* High Definition Television (HDTV)
prints are the same aspect ratio as the
TV for CD interface capabilities.
Page 18

3. Frame your subject within the
H
P
EXP
LEFT
C
VIEWFINDER EYEPIECE
sharp picture, stand at least
2 ft (0.6 m) from your subject.
• If you stand closer than
2 ft (0.6 m), the camera will
lock and the flash-indicator
lamp will blink.
(19). For a
4. Press the
(3) to take
BUTTON
the picture.
SHUTTER
Typical print sizes (formats)
CH P
Classic Group (HDTV) Panoramic
3.5 x 5 in. or 4 x 6 in. 3.5 x 6 in. or 4 x 7 in. 3.5 x 8.5 in. to 4 x 11.5 in.
(88.9 x 127 mm or (88.9 x 152 mm or (88.9 x 216 mm to
102 x 152 mm) 102 x 178 mm) 102 x 292.7 mm)
NOTE: Your photofinisher will generally provide 4 x 6, 4 x 7, and 4 x 11.5 in. (102 x 152, 102 x 178,
and 102 x 292.7 mm) sizes. Some local printers may offer 3.5 x 5, 3.5 x 6, and 3.5 x 8.5 in.
(88.9 x 127, 88.9 x 152, and 88.9 x 216 mm) sizes.
13
Page 19

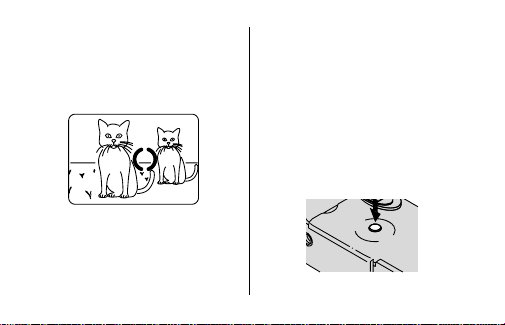
Using the focus lock
This camera automatically
focuses on whatever is within
the auto-focus (AF) circle of the
viewfinder eyepiece. To get a
sharp picture, make sure the AF
circle is on your main subject. If
you want to take a picture with
the subject positioned outside of
the AF circle, use the focus lock
as follows:
14
1. Place the AF circle on the
subject that you want focused
in the picture.
AF CIRCLE
VIEWFINDER
2. Partially depress and hold the
SHUTTER BUTTON
focus position.
(3) to lock the
Page 20
3. While still partially depressing
N
O
E
O
W
P
R
F
F
O
/
the shutter button, move the
camera until your subject is
where you want it within the
VIEWFINDER EYEPIECE
(19).
VIEWFINDER
4. Press the shutter button
completely down to take
the picture.
Using the zoom lens
This camera has a motorized
zoom lens that lets you select
the ideal lens-focal length for
taking pictures. When you turn
the camera on, it is initially set
to the wide-angle position.
1. Press the
to turn the camera on and to
uncover the
ON/OFF BUTTON
LENS
(16).
(20)
15
Page 21

2. Move the
to the right to the telephoto
position to zoom
the subject. Move the lever to
the left to the wide-angle
position to zoom
the subject.
3. Frame your subject within the
VIEWFINDER EYEPIECE
ZOOM-DIAL LEVER
EXP
LEFT
C
H
P
closer
away
(19).
(4)
to
from
16
4. Press the
to take the picture.
• The lens barrel will
SHUTTER BUTTON
automatically return to the
wide-angle position after
approximately 3 minutes.
(3)
Tips for better pictures
• Move close enough to your
subject so it fills the viewfinder but not closer than
2 ft (0.6 m).
• Take pictures at the subject’s
level. Kneel down to take
pictures of children and pets.
• Hold your camera vertically to
capture tall, narrow subjects,
Page 22

such as a waterfall,
N
O
E
O
W
P
R
F
F
O
/
skyscraper,or a single person.
• Add interest to your picture
by framing it with a tree
branch, a window, or even the
rails of a fence.
• Keep the sun behind you to
provide the best subject
illumination.
TAKING FLASH PICTURES
In dim light, such as indoors or
outdoors in heavy shade, or on
dark overcast days, you need
flash. Your camera features an
automatic flash that fires when
you need it.
1. Press the
to turn the camera on and to
uncover the
• The flash-indicator lamp
2. Frame your subject within the
VIEWFINDER EYEPIECE
ON/OFF BUTTON
LENS
“blinks” when the flash is
not ready.
(20)
(16).
(19).
17
Page 23

3. Partially depress the
4. Keep the subject within the
18
(3). When the
BUTTON
INDICATOR LAMP
green, fully depress the
shutter button to take
the picture.
distance range for the speed
of film in your camera (see
Flash-to-subject distance
table). Don’t take pictures
beyond the maximum distance
or your pictures will be dark.
SHUTTER
FLASH
(18) glows
EXP
LEFT
Flash-to-subject distance
-
ISO film Wide Telephoto
speed (30 mm) (60 mm)
50 2 to 13 ft 2 to 7 ft
(0.6 to 3.9 m) (0.6 to 2.1 m)
10 0 2 to 18 ft 2 to 10 ft
(0.6 to 5.5 m) (0.6 to 2.9 m)
20 0 2 to 25 ft 2 to 14 ft
(0.6 to 7.7 m) (0.6 to 4.1 m)
40 0 2 to 36 ft 2 to 19 ft
(0.6 to 11 m) (0.6 to 5.8 m)
80 0 2 to 51 ft 2 to 27 ft
(0.6 to 15.5 m) (0.6 to 8.2 m)
1600 2 to 72 ft 2 to 38 ft
(0.6 to 21.9 m) (0.6 to 11.6 m)
Page 24
SELECTING THE FLASH AND
INFINITY-FOCUS MODES
Besides the auto-flash mode with
red-eye reduction, you can select
auto-flash without red-eye
reduction, fill-flash, flash-off,
infinity-focus, and night-view modes.
FLASH-SELECT BUTTON
Press the
continuously until the desired
indicator appears on the
(6).
PANEL
(11)
LCD
DATE
SELECT
SET
The flash modes will remain
selected after you take the picture.
T o change the flash-mode selection,
press the flash-select button, or turn
the camera off then back on to return
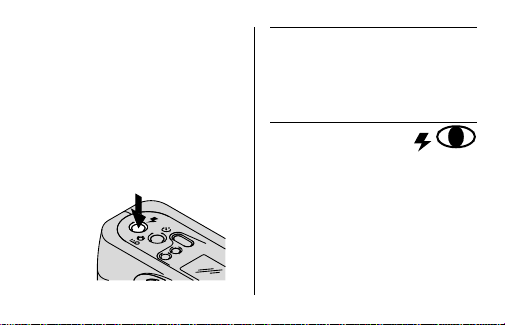
to the flash-default mode.
Red-eye reduction
Some people’s eyes (and some
pets’) can reflect flash with a red
glow. This camera features
automatic flash with red-eye
reduction which is the initial
default setting for this camera.
To minimize red eyes in flash
pictures, turn on all room lights
and follow these steps:
AUTO
19
Page 25

1. Press the ON/
to turn the camera on and to
uncover the
2. Press the
BUTTON
the
EYE-REDUCTION
appear on the
• Disregard step 2 if the
default setting is already set
for red-eye reduction.
3. Frame your subject within the
VIEWFINDER EYEPIECE
4. Have your subject look
directly at the
REDUCTION LAMP
20
OFF BUTTON
LENS
(16).
FLASH-SELECT
(11) repeatedly until
AUTO-FLASH
(34) and
(26)
LCD PANEL
RED-EYE
(17).
(20)
RED
INDICATORS
(6).
(19).
-
-
5. Partially depress the
Auto flash without
red-eye reduction
Use this mode for taking pictures
without people. You can change
the default setting to auto flash
without red-eye reduction by
following these steps:
(3). When the
BUTTON
INDICATOR LAMP
green, fully depress the
shutter button to take
the picture.
• In this mode there will be
a slight delay in the
shutter release.
SHUTTER
FLASH
(18) glows
AUTO
-
Page 26

1. Press the ON/
to turn the camera on and to
uncover the
2. Press the
BUTTON
the
appears on the
3. Frame your subject within the
VIEWFINDER EYEPIECE
4. Partially depress the
BUTTON
INDICATOR LAMP
green, fully depress the shutter
button to take the picture.
• The camera will now default
to the auto-flash mode
without red-eye reduction.
OFF BUTTON
LENS
(16).
FLASH-SELECT
(11) repeatedly until
AUTO-FLASH INDICATOR
LCD PANEL
(19).
(3). When the
SHUTTER
FLASH
(18) glows
(20)
(34)
(6).
-
Fill flash
When bright light indoors or
outdoors comes from behind the
subject (backlighting), dark
shadows (especially on faces)
may occur. Use fill flash to
lighten these shadows.
1. Press the
to turn the camera on and to
uncover the
2. Press the
BUTTON
the
appears on the
3. Frame your subject within the
VIEWFINDER EYEPIECE
ON/OFF BUTTON
LENS
(16).
FLASH-SELECT
(11) repeatedly until
FILL-FLASH INDICATOR
LCD PANEL
(19).
(20)
(32)
(6) .
21
Page 27

4. Partially depress the
(3). When the
BUTTON
INDICATOR LAMP
fully depress the shutter
button to take the picture.
Flash off
When you do not want to use the
flash, especially indoors where
flash is prohibited, such as in
theaters and museums, or when
you want to take twilight scenes
or distant subjects that are
beyond the flash range, or
capture the ambiance of existing
light, use the flash-off mode.
22
SHUTTER
FLASH
(18) glows green,
OFF
-
Use a tripod or place the camera
on other firm support, and use
high-speed film because the
shutter speed in these situations
will most likely be slow.
1. Press the
to turn the camera on and to
uncover the
2. Press the
BUTTON
the
appears on the
3. Frame your subject within the
VIEWFINDER EYEPIECE
4. Press the
to take the picture.
ON/OFF BUTTON
LENS
(16).
FLASH-SELECT
(11) repeatedly until
FLASH-OFF INDICATOR
LCD PANEL
(19).
SHUTTER BUTTON
(20)
(35)
(6).
(3)
Page 28

Infinity focus
OFF
Capture sharp, distant scenery
at any zoom position (for
daylight and outdoor use only).
1. Press the
to turn the camera on and to
uncover the
2. Press the
BUTTON
the
INFINITY-FOCUS
appear on the
ON/OFF BUTTON
LENS
(16).
FLASH-SELECT
(11) repeatedly until
FLASH-OFF
(35) and
(30)
INDICATORS
LCD PANEL
(20)
(6).
3. Frame your subject within the
VIEWFINDER EYEPIECE
4. Press the
to take the picture.
SHUTTER BUTTON
(19).
(3)
23
Page 29

Night-view
In this mode, the camera
balances the flash and existing
light exposure so you can take
beautiful pictures of people at
sunset or at night. Use a tripod
or place the camera on other firm
support, and use high-speed film
because the shutter speed at
night will most likely be slow.
1. Press the
to turn the camera on and to
uncover the
2. Press the
BUTTON
the
appears on the
24
ON/OFF BUTTON
LENS
(16).
FLASH-SELECT
(11) repeatedly until
NIGHTVIEW INDICATOR
LCD PANEL
(20)
(33)
(6).
3. Frame your subject within the
VIEWFINDER EYEPIECE
4. Partially depress the
(3). When the
BUTTON
INDICATOR LAMP
green, fully depress the
shutter button to take
the picture.
(19).
SHUTTER
FLASH
(18) glows
-
USING THE
SELF-TIMER
Use this feature to include
yourself in pictures.
1. Use the
TRIPOD SOCKET
to attach the camera to a
tripod or place it on other
firm support.
(23)
Page 30

2. Press the ON/
to turn the camera on and to
uncover the
3. Press the
4. Frame your subject within the
VIEWFINDER EYEPIECE
5. Press the
The
the front of the camera will
blink for 8 seconds and then
glow during the last 2
seconds of countdown.
OFF BUTTON
LENS
(16).
SELF-TIMER BUTTON
SHUTTER BUTTON
SELF-TIMER LAMP
(20)
(19).
(3).
(17) on
(9).
• To cancel the self-timer
selection before the
shutter releases, turn
the camera off.
• The self-timer automatically
turns off after the shutter
releases and returns to the
auto-flash start position.
25
Page 31

DATE AND TIME IMPRINTING
Traditional cameras print date
and/or time information directly
onto the film. Your camera uses
the film’s magnetic data-recording
capability to record date and
time information which your
photofinisher can imprint on the
back of your photographs. This
camera has a quartz clock
(24-hour time display) and
automatic calendar through the
year 2039. You can record the
date in one of three date formats
(year/month/day, month/day/year
or day/month/year) and one time
format (hour/minute).
26
Setting the date and time
1. Press the
BUTTON
scroll and select desired
date or time format.
2. Press the
BUTTON
to select the “blinking”
month, day, or year, or hour
or minute.
DATE-MENU
(12) repeatedly to
DATE-SELECT
(7) in succession
DATE
SELECT
SET
Page 32

3. Press the
to change the “blinking” number(s).
4. Press the date-select button
to store the selected
number(s) and to activate the
next “blinking” number(s).
5. Follow steps 3 through 5 to
continue your selection, or to
end further options, press the
date-select button repeatedly
until the blinking stops.
DATE-SET BUTTON
DATE
SELECT
SET
(8)
UNLOADING THE FILM
Automatic rewind
The camera automatically
rewinds the film into the cassette
after the last exposure.
1. Wait for the film to completely
rewind into the film cassette.
• When the motor stops
running, the
COUNTER
indicate “0.”
2. Turn the
open the
FRAME
(28) will
FILM-DOOR LATCH
FILM DOOR
(22).
(2) to
27
Page 33

3. Remove the film cassette
from the camera and reload
with new KODAK ADVANTIX
Film.
3
4
2
1
OPEN
• The FSI on the fully-exposed
film cassette will be at ✖
(#3 position) and the
LCD panel will display a
blinking “E.”
28
Manual rewind
If you don’t want to take
pictures on the entire film, you
can manually activate the
automatic rewind.
1. Gently press the
(10) by using the
BUTTON
control-button activator on
the camera-strap clasp to
start the auto-film rewind.
FILM-REWIND
Page 34

2. Follow steps 1–3 from
Automatic Rewind.
NOTE: You cannot reload a partially
exposed film into this camera
to continue picture-taking.
CARING FOR YOUR CAMERA
1. Protect the camera from dust,
moisture, sudden impact, and
excessive heat.
CAUTION: Do not use
solvents or harsh or abrasive
cleaners on the camera body.
2. If the lens appears dirty,
breathe on it to form a mist
and wipe the surface gently
with a soft, lintless cloth or a
camera lens-cleaning tissue.
Never wipe a dry lens.
CAUTION: Do not use
solvents or solutions not
designed for cleaning camera
lenses. Do not use chemically
treated tissues intended for
cleaning eyeglasses.
3. Remove the battery when you
store the camera for an
extended time.
CAUTION: To prevent possible
damage and electrical shock,
do not attempt to disassemble
or repair the camera or flash
unit by yourself.
29
Page 35

TROUBLESHOOTING
What happened Probable cause Solution
Camera will There are no more Remove the film
not operate pictures remaining
Film does not Battery weak, dead, Replace or reload
advance or rewind missing, or the battery
LCD panel is blank Battery weak, dead, Replace or reload
30
Battery weak, dead, Replace or reload
missing, or the battery
improperly loaded
improperly loaded
missing, or the battery
improperly loaded
Page 36

What happened Probable cause Solution
LCD panel is blank Camera in sleep mode Press any control
(continued)
LCD panel No film in camera Load new film into
flashes “E” the camera
Camera locks and Subject too close Move beyond
flash-indicator to camera 2 ft (0.6 m) from
lamp “blinks” your subject
Camera turned off Turn on/off switch ON
button to
awaken camera
31
Page 37

SPECIFICATIONS
Film type: KODAK ADVANTIX Films
for color or black-and-white pictures
Lens: 30–60 mm zoom lens,
hybrid aspheric
Focus system: 87 zones AF
Focus range: Wide/Tele: 2 ft (0.6 m)
(daylight) to infinity
Viewfinder: Real image with
C, H,& P format display
Film speed: DXIX (ISO) 50–1600 for
color or black-and-white films
Flash unit: KODAK SENSALITE™
Flash
Kodak, Sensalite, “e” mark, Advantix, and the
Advanced Photo System symbol and logotype are trademarks.
32
Flash range (ISO 200):
Apertures:
Shutter: Programmed electronic
Power source: Main power: one
Dimensions: 119 x 64 x 39 mm
Weight: 7.2 oz. (205 g) without film
Wide: 2 to 25 ft (0.6 to 7.7 m)
Tele: 2 to 14 ft (0.6 to 4.1 m)
f
/4.5–f/8.5
shutter, 1/4 to 1/360 seconds
3 V lithium KODAK K123LA
(or equivalent) Battery
and battery
Page 38

KODAK ADVANTIX
Cámara
¿NECESITA A YUDA CON SU CÁMARA O MÁS INFORMACIÓN
SOBRE EL ADV ANCED PHOTO SYSTEM?
Visite nuestro sitio en la red mundial electrónica (worldwide web) a la
dirección http://www.kodak.com o llame a: Kodak (en los Estados Unidos
solamente), llamada sin cargo al número 1 (800) 242-2424, de lunes a viernes
de 9:00 a.m. a 7:00 p.m. (hora del este).
Cuando llame, por favor asegúrese de tener la
cámara disponible.
Para hacer válida la garantía, sírvase guardar el recibo de
venta como prueba de la fecha de compra.
Zoom F600
ESPAÑOL
Page 39

Este dispositivo cumple con la parte 15 de las reglamentaciones de la FCC. El manejo está
supeditado a las siguientes dos condiciones: (1) Este dispositivo puede no causar
interferencia dañina, y (2) este dispositivo debe aceptar cualquier interferencia recibida,
incluyendo interferencia la cual pudiese causar un funcionamiento indeseable.
NOTA: El modelo de su cámara ha sido aprobado y cumple con las limitaciones establecidas
para un dispositivo digital Clase B, de acuerdo con la Parte 15 de las reglamentaciones de
la FCC. Estas limitaciones proveen una protección razonable en contra de la interferencia
que se encuentra en uso residencial. La cámara genera, usa, y puede emitir energía de
frecuencia radial y si no es usada de acuerdo con las instrucciones, puede causar interferencia
a comunicaciones de radio. No se puede garantizar que esta interferencia no ocurra. En caso
de que ésta cámara cause interferencia a la recepción de radio o televisión, lo cual puede
ser determinado encendiendo y apagando la cámara, puede reducir la interferencia haciendo
lo siguiente:
– Vuelva a orientar o situar la antena de recepción
– Aumente la distancia entre la cámara y el receptor
– Para recibir ayuda consulte con el distribuidor o un técnico especializado
en radio/televisión
Cambios o modificaciones no aprobadas por el contratante responsable de acatar estas
regulaciones podría anular la autoridad del consumidor para operar éste equipo.
34
Page 40

Busque este logotipo para asegurarse que la
película que usted compre esté hecha para esta
cámara.
Busque este logotipo para seleccionar un servicio
de fotoacabado certificado para revelar su rollo y
para asegurarse de aprovechar todos los beneficios
del Advanced Photo System.
Indicador del estado de la
película (FSI)
El indicador realzado avanzará de
una posición a otra para
identificar el estado de la película
dentro del cartucho.
1
2
4
3
NEGATIVOS PROCESADOS
NO EXPUESTA
PARCIALMENTE
EXPUESTA
COMPLETAMENTE
EXPUESTA
35
Page 41

CARACTERÍSTICAS DEL
ADVANCED PHOTO SYSTEM
DISPONIBLES CON
ESTA CÁMARA
Selección triple de formato
• Usted puede tomar, en el
mismo rollo, fotografías en
tres tamaños diferentes:
Clásico (C), Grupo/HDTV (H), y
Panorámico (P). El marco
dentro del ocular del visor
cambia según el formato
seleccionado.
Impresión de fecha y hora
• Usted puede escoger si quiere
que la información de la fecha
36
y hora sea impresa en la parte
de atrás de sus fotografías.
Vea a su servicio de
fotoacabado para una
descripción total de los
servicios disponibles.
Protección en contra de doble
exposición (DEP)
• No debe preocuparse de la
posibilidad de accidentalmente
volver a exponer su película
ya usada. Su cámara lee el
Indicador del estado de
película (FSI) en el cartucho
de la película y de esta forma
previene la doble exposición.
Page 42

Intercambio de información
sobre la calidad de la fotografía
(PQix)
• Su cámara tiene la
característica de intercambio
de información magnética la
cual registra información, en el
cartucho de la película, acerca
de la condición de iluminación
y exposición. Esta
característica asiste al
laboratorio de fotoacabado en
la rectificación del color y los
ajustes de exposición y de
esta forma se provee el mejor
resultado posible.
Traba de seguridad en la puerta
del compartimiento de película
• La traba de seguridad en la
puerta del compartimiento de
película previene que la puerta
se pueda abrir antes de que la
película esté completamente
rebobinada.
37
Page 43

CONTENIDO
IDENTIFICACIÓN DE LA CÁMARA ......39
COMO AJUST AR LA CORREA
DE LA CÁMARA .............................. 40
Activador de botón de control .... 41
COMO CARGAR LA BA TERÍA .............. 41
Indicador de batería débil .......... 42
Consejos para usar la batería ..... 42
Apagado automático .................. 43
COMO CARGAR LA PELÍCULA ............ 44
COMO TOMAR FOTOGRAFÍAS ............ 45
T amaños típicos de impresión de
fotografía (Formatos) ................... 47
Como usar el cerrojo de enfoque . 48
Como usar el lente de zoom ........ 49
38
Consejos útiles para obtener
mejores fotografías .....................50
COMO TOMAR FOTOGRAFÍAS
CON FLASH ..................................... 51
Distancia del sujeto al flash ...... 53
COMO SELECCIONAR LOS MODOS DE
FLASH Y ENFOQUE INFINITO ........... 54
Reducción de ojos rojos ........... 55
Flash automático sin reducción
de ojos rojos ............................. 56
Flash de relleno ........................ 57
Flash apagado .......................... 58
Enfoque infinito......................... 59
Vista de noche.......................... 59
COMO USAR EL DISP ARADOR
AUTOMÁTICO ................................... 60
Page 44

COMO IMPRIMIR LA FECHA Y HORA .. 61
Como fijar la fecha y hora.......... 62
COMO DESCARGAR LA PELÍCULA .... 63
Rebobinado automático ............ 63
Rebobinado manual .................. 64
CUIDADO DE SU CÁMARA ................. 65
PROBLEMAS Y SOLUCIONES ............ 67
ESPECIFICACIONES .......................... 69
IDENTIFICACIÓN DE
LA CÁMARA
(Vea las partes de adentro de la cubierta
para los diagramas de la cámara)
1
PRESILLA DE LA CORREA
2
SEGURO DE LA PUERTA DEL
COMPARTIMIENTO DE PELÍCULA
3
BOTÓN DEL DISPARADOR
4
PALANCA DEL DISCO SELECTOR DEL ZOOM
5
INTERRUPTOR DE SELECCIÓN DE FORMATO
6
PANEL LCD
7
BOTÓN DE SELECCIÓN DE FECHA
8
BOTÓN DE FIJAR LA FECHA
9
BOTÓN DE DISPARADOR AUTOMÁTICO
10
BOTÓN DE REBOBINADO DE PELÍCULA
11
BOTÓN DE SELECCIÓN DE FLASH
12
BOTÓN DE MENÚ DE FECHA
13
FLASH
14
VISOR
15
DETECTOR DE ILUMINACIÓN
16
LENTE
17
DISPARADOR AUTOMÁTICO/LÁMPARA DE
18
LÁMPARA DE INDICADOR DE FLASH
19
OCULAR DEL VISOR
REDUCCIÓN
DE
OJOS ROJOS
39
Page 45

20
BOTÓN DE ENCENDER/APAGAR
21
COMPARTIMIENTO DE PELÍCULA
22
PUERT A DEL COMPARTIMIENTO
PELÍCULA
DE
23
MONTAJE PARA TRÍPODE
24
PUERT A DEL COMPARTIMIENTO
DE BATERÍA
Panel LCD
25
EXHIBICIÓN DE FECHA Y HORA
SENSIBILIDAD ISO
26
INDICADOR DE REDUCCIÓN DE
ROJOS
OJOS
27
INDICADOR DE LA PRESENCIA
PELÍCULA
DE
28
CONTADOR DE CUADROS
29
INDICADOR DE DISPARADOR AUTOMÁTICO
30
INDICADOR DE ENFOQUE INFINITO
/
40
31
SÍMBOLO DE BATERÍA
32
INDICADOR DE FLASH DE RELLENO
33
INDICADOR DE VISTA DE NOCHE
34
INDICADOR DE FLASH AUTOMÁTICO
35
INDICADOR DE FLASH APAGADO
COMO AJUSTAR LA CORREA
DE LA CÁMARA
1. Pase un extremo de la correa
por debajo de la
CORREA
LA
parte de arriba de la presilla de
la correa.
PRESILLA DE
(1) y a través de la
Page 46

2. Ponga el extremo largo de la
O
N
F
F
/
O
P
E
O
W
R
correa a través del corto.
3. Tire de la correa hasta que
quede ajustada.
Activador de botón de control
Use la perilla en la hebilla de la
correa de la cámara para poder
activar los botones de control
pequeños que se encuentran en
la cámara.
DATE
SELECT
SET
COMO CARGAR LA BA TERÍA
Esta cámara utiliza una batería
de litio de 3 voltios KODAK
K123LA (o su equivalente) que
proporciona la energía necesaria
para todas las funciones de
la cámara.
1. Abra la
PUERTA DEL
COMPARTIMIENTO DE BATERÍA
• Antes de retirar la batería
usada, apague la cámara.
(24).
41
Page 47

2. Coloque la batería en su
compartimiento como aquí
se indica.
P
O
W
E
R
O
N
/
O
F
F
3. Cierre a presión la puerta del
compartimiento de batería.
• Después que cargue la
batería nueva en la cámara,
necesitará volver a poner la
fecha y hora.
42
Indicador de batería débil
Debe cambiar la batería
cuando —
• el
SÍMBOLO DE LA BATERÍA
“parpadea” en el
o
• todos los indicadores en el
panel LCD desaparecen y el
BOTÓN DEL DISPARADOR
funciona.
PANEL LCD
(3) no
(31)
(6)
Consejos para usar la batería
• Deseche las baterías usadas
en la basura de su casa a no
ser que exista un programa de
recaudación de baterías en su
comunidad (para más detalles
Page 48

consulte al patrocinador de
ese programa).
• Acuérdese de llevar una
batería de repuesto con usted
en todo momento.
• Lea y siga todas las
advertencias e instrucciones
del fabricante de la batería.
• Mantenga las baterías fuera
del alcance de los niños.
• No intente desarmar, recargar
o causar un cortocircuito en la
batería o exponerla a altas
temperaturas o fuego.
• Antes de usarlas, guarde
las baterías en su
empaque original.
Características de la conservación
automática de energía
Apagado automático
Cuando la cámara no se usa por
aproximadamente 3 minutos, ésta
se apagará automáticamente para
conservar la energía de la batería.
Para activar la cámara, puede
BOTÓN DISPARADOR
oprimir el
PALANCA DEL DISCO SELECTOR DEL
ZOOM
(4), el
BOTÓN DE SELECCIÓN DE
(7), el
FECHA
FECHA
FECHA
DEL FLASH
REBOBINADO
BOTÓN DE MENÚ DE
(12), el
BOTÓN DE FIJAR LA
(8), el
BOTÓN DE SELECCIÓN
(11), o el
DE
PELÍCULA
BOTÓN DE
(10).
(3), la
43
Page 49

• Cuando no vaya a usar la
cámara por un período de
tiempo prolongado, use el
botón de encender/apagar
para apagar completamente
la cámara.
COMO CARGAR LA PELÍCULA
Puede cargar película en la
cámara cuando la cámara esté
ENCENDIDA o APAGADA.
1. Gire el
SEGURO DEL
COMPARTIMIENTO
DE
PELÍCULA
44
(2)
OPEN
para abrir la
COMPARTIMIENTO
2. Ponga completamente el
cartucho de película dentro del
COMPARTIMIENTO DE PELÍCULA
• Asegúrese que
el Indicador del
estado de
película (FSI)
en el cartucho
de la película
esté en
● (posición #1)
para un cartucho nuevo.
PUERTA DEL
DE
PELÍCULA
3
2
1
OPEN
(22).
(21).
4
Page 50

• No fuerce el cartucho de
película dentro del
compartimiento de película.
3. Cierre la puerta del
compartimiento de película
para comenzar el avance
automático de la misma. El
CONTADOR DE CUADROS
PANEL LCD
el
número de exposiciones restantes.
• Después que cierre la traba
del seguro de la puerta del
compartimiento de película, no
podrá abrirla hasta que toda la
película haya sido rebobinada
en el cartucho.
(6) mostrará el
(28) en
COMO TOMAR FOTOGRAFÍAS
Puede tomar fotografías
Clásicas (C), Grupo/HDTV (H)*, y
Panorámicas (P) usando el mismo
cartucho de película. El costo del
revelado de sus fotografías
puede estar basado en el/los
tamaño(s) del formato que usó
cuando expuso la película.
* Impresiones de Televisión de Alta
Definición (HDTV) son del mismo
aspecto proporcional como las
capacidades interfaciales de la TV
para CD.
45
Page 51

1. Para encender la cámara y
destapar el
el
APAGAR
2. Mueva el
SELECCIÓN DE FORMATO
formato deseado (C, H, o P).
LENTE
BOTÓN DE ENCENDER
(20).
(16), oprima
P
O
W
E
R
O
N
/
O
F
F
INTERRUPTOR DE
/
(5) al
46
El visor cambiará y mostrará
el campo de vista seleccionado.
P
H
C H P
C
3. Encuadre a su sujeto dentro
OCULAR DEL VISOR
del
Para una fotografía nítida,
manténgase a una distancia
mínima de 2 pies (0,6 m) de
su sujeto.
(19).
Page 52

• Si se sitúa a menos de la
H
P
EXP
LEFT
C
distancia mínima de 2 pies
(0,6 m) la cámara no
funcionará y la lámpara
indicadora del flash parpadeará.
Tamaños típicos de impresión
de fotografías (formatos)
4. Oprima el
DISPARADOR
la fotografía.
BOTÓN DEL
(3) para tomar
CH P
Clásica Grupo (HDTV) Panorámico
3.5 x 5” ó 4 x 6” 3.5 x 6” ó 4 x 7” 3.5 x 8.5” a 4 x 11.5”
(88,9 x 127 mm ó (88,9 x 152 mm ó (88,9 x 216 mm hasta
102 x 152 mm) 102 x 178 mm) 102 x 292,7 mm)
NOT A: Su laboratorio de fotoacabado usualmente provee impresiones en los tamaños
de 4 x 6, 4 x 7, y 4 x 11.5 pulgadas (102 x 152, 102 x 178 y 102 x 292,7 mm).
Algunos laboratorios locales de fotoacabado pueden ofrecer impresiones en los
tamaños 3.5 x 5, 3.5 x 6, y 3.5 x 8.5 pulgadas (88,9 x 127, 88,9 x 152 y 88,9 x 216 mm).
47
Page 53

Como usar el cerrojo de enfoque
Esta cámara se enfoca
automáticamente en cualquier
objeto que aparezca en el círculo
de enfoque automático (AF) del
ocular del visor. Para obtener una
fotografía nítida, asegúrese que
el sujeto a fotografiar esté dentro
del círculo de enfoque automático
(AF). Si desea tomar una
fotografía con el sujeto fuera del
círculo de enfoque automático
(AF), use el cerrojo de enfoque
de la siguiente manera:
48
1. Coloque el círculo de enfoque
automático (AF) sobre el
sujeto que quiera enfocar en
la fotografía.
CÍRCULO
DE
ENFOQUE
AUTOMÁTIC
O
VISOR
2. Oprima parcialmente y
mantenga oprimido el
DEL DISPARADOR
asegurar la posición enfocada.
(3) para
BOTÓN
Page 54

3. Con el disparador parcialmente
N
O
E
O
W
P
R
F
F
O
/
oprimido, mueva la cámara
hasta que el sujeto se
encuentre en la posición que
usted desee dentro del
OCULAR DEL VISOR
4. Oprima completamente el
botón del disparador para
tomar la fotografía.
(19).
VISOR
Como usar el lente de zoom
Esta cámara tiene un lente
motorizado de zoom que le
permite seleccionar la distancia
ideal de enfoque del lente al
tomar fotografías. Cuando
encienda la cámara, automáticamente el lente se encuentra
en la posición de gran angular.
1. Para encender la cámara y destapar
LENTE
(16), oprima el
el
DE ENCENDER/APAGAR
(20).
BOTÓN
49
Page 55

2. Deslice hacia la derecha la
PALANCA DEL DISCO SELECTOR
DEL ZOOM
(4), a la posición de
telefotográfico, para
al sujeto. Deslice la palanca
hacia la izquierda, a la
posición de gran angular, para
alejarse
del sujeto.
EXP
LEFT
C
H
P
3. Encuadre al sujeto dentro del
OCULAR DEL VISOR
acercarse
(19).
50
4. Oprima el
• Después de aproximadamente
3 minutos, el cilindro del lente
regresará a la posición de
gran angular.
Consejos útiles para obtener
mejores fotografías
• Acérquese lo suficiente al
sujeto a fotografiar de modo
que éste ocupe todo
el visor, pero no más cerca de
2 pies (0,6 m).
• Tome fotografías al nivel del
sujeto. Arrodíllese para
fotografiar niños y animales.
BOTÓN DEL
DISPARADOR
la fotografía.
(3) para tomar
Page 56

• Haga tomas verticales de
N
O
E
O
W
P
R
F
F
O
/
sujetos altos y angostos,
como cascadas, rascacielos o
una persona sola.
• Agregue interés a sus
fotografías incluyendo una
rama, una ventana o
una cerca.
• Manténgase de espalda al sol.
Así se logra mejor iluminación.
COMO TOMAR FOTOGRAFÍAS
CON FLASH
A poca luz, ya sea en interiores,
en exteriores donde hay mucha
sombra o en días oscuros o
nublados, necesitará usar el
flash. Su cámara incluye un flash
automático el cual se dispara
cuando es necesario.
1. Para encender la cámara y des-
• La lámpara indicadora del
2. Encuadre su sujeto dentro del
LENTE
tapar el
BOTÓN DE ENCENDER/APAGAR
flash “parpadea” cuando el
flash no está listo.
OCULAR DEL VISOR
(16), oprima el
(19).
(20).
51
Page 57

3. Oprima parcialmente el
DISPARADOR
DEL
LÁMPARA DE INDICADOR DE
(18) brille verde, oprima
FLASH
completamente el disparador
para tomar la fotografía.
(3). Cuando la
EXP
LEFT
52
BOTÓN
4. Mantenga el sujeto a
fotografiar dentro del alcance
indicado para la sensibilidad
de la película en su cámara
(vea Distancia del sujeto al
flash). No tome fotografías a
más distancia de la indicada o
sus fotografías saldrán oscuras.
Page 58

Distancia del sujeto al flash
Sensibilidad ISO Gran angular Telefotográfico
de la película (30 mm) (60 mm)
50 2 a 13 pies (0,6 a 3,9 m) 2 a 7 pies (0,6 a 2,1 m)
100 2 a 18 pies (0,6 a 5,5 m) 2 a 10 pies (0,6 a 2,9 m)
200 2 a 25 pies (0,6 a 7,7 m) 2 a 14 pies (0,6 a 4,1 m)
400 2 a 36 pies (0,6 a 11 m) 2 a 19 pies (0,6 a 5,8 m)
800 2 a 51 pies (0,6 a 15,5 m) 2 a 27 pies (0,6 a 8,2 m)
1600 2 a 72 pies (0,6 a 21,9 m) 2 a 38 pies (0,6 a 11,6 m)
53
Page 59

COMO SELECCIONAR LOS
MODOS DE FLASH Y
ENFOQUE INFINITO
Además del modo de flash
automático con reducción de ojos
rojos, puede seleccionar los
modos de flash automático sin
reducción de ojos rojos, flash de
relleno, flash apagado, enfoque
infinito y vista de noche.
Oprima continuamente el
DE SELECCIÓN DE FLASH
que el indicador
que usted desee
aparezca en el
PANEL LCD
(6) .
54
BOTÓN
(11) hasta
DATE
SELECT
SET
Los modos de flash se
mantendrán encendidos después
que se tome la fotografía. Para
cambiar la selección de modos de
flash, oprima el botón de selección
de flash o apague la cámara y
vuelva a encenderla para
regresar a los modos fijos de flash.
Reducción de
ojos rojos
Los ojos de algunas personas
(y algunos animales) se pueden
reflejar en la fotografía, cuando
se usa el flash, como un brillo
rojo. Esta cámara tiene
inicialmente fijada la
AUTO
Page 60

característica de un flash
automático con reducción de ojos
rojos. Para reducir al mínimo los
ojos rojos en fotografías con
flash, encienda todas las luces
en el cuarto y siga las siguientes
instrucciones:
1. Para encender la cámara y
destapar el
oprima el
APAGAR
2. Oprima repetidamente el
BOTÓN DE SELECCIÓN DE
FLASH
INDICADOR DE FLASH
AUTOMÁTICO
LENTE
(16),
BOTÓN DE ENCENDER
(20).
(11) hasta que el
(34) y el
INDICADOR
DE REDUCCIÓN DE OJOS
(26) aparezcan en el
ROJOS
PANEL LCD
• Omita este paso si al
encender la cámara el modo
de reducción de ojos rojos ya
está seleccionado.
3. Encuadre su sujeto dentro del
OCULAR DEL VISOR
/
4. Haga que el sujeto mire
directamente a la
REDUCCIÓN
(6).
DE
OJOS ROJOS
(19).
5. Oprima parcialmente el
LÁMPARA DE
(17).
BOTÓN
55
Page 61

DEL DISPARADOR
LÁMPARA DE INDICADOR DE
FLASH
(18) brille verde, oprima
completamente el disparador para
tomar la fotografía.
• En este modo, habrá una pequeña
demora en el funcionamiento del
obturador.
Flash automático sin
reducción de ojos rojos
Use este modo para tomar
fotografías que no incluyan a
personas. Usted puede cambiar el
modo a flash automático sin
reducción de ojos rojos siguiendo las
siguientes instrucciones:
1. Para encender la cámara y
56
(3). Cuando la
AUTO
LENTE
destapar el
oprima el
ENCENDER/APAGAR
2. Oprima repetidamente el
BOTÓN DE SELECCIÓN DE
(11) hasta que el
FLASH
INDICADOR DE FLASH
AUTOMÁTICO
en el
PANEL LCD
3. Encuadre su sujeto dentro
OCULAR DEL VISOR
del
4. Oprima parcialmente el
BOTÓN DEL DISPARADOR
Cuando la
INDICADOR
brille verde, oprima
completamente el
(16),
BOTÓN DE
(20).
(34) aparezca
(6).
LÁMPARA DE
DE
FLASH
(18)
(19).
(3).
Page 62

disparador para tomar la
fotografía.
• La cámara cambiará al modo
de flash automático sin
reducción de ojos rojos.
Flash de relleno
En escenas interiores o
exteriores de mucho contraste,
sombras (especialmente en las
caras) pueden ser causadas
cuando los sujetos tienen como
iluminación de fondo una luz
brillante (contraluz). Use el
flash de relleno para aclarar
estas sombras.
1. Para encender la cámara y
destapar el
el
APAGAR
2. Oprima repetidamente el
BOTÓN DE SELECCIÓN DE
FLASH
INDICADOR DE FLASH DE
RELLENO
PANEL LCD
3. Encuadre su sujeto dentro del
OCULAR DEL VISOR
4. Oprima parcialmente el
DEL DISPARADOR
LÁMPARA DE INDICADOR DE
FLASH
completamente el disparador
para tomar la fotografía.
LENTE
BOTÓN DE ENCENDER
(20).
(16), oprima
(11) hasta que el
(32) aparezca en el
(6).
(19).
(3). Cuando la
(18) brille verde, oprima
/
BOTÓN
57
Page 63

Flash apagado
Cuando no quiera usar el flash,
especialmente en interiores
donde el uso del flash está
prohibido, como en teatros y
museos, o cuando quiera
fotografiar escenas en
penumbras, o sujetos que se
encuentran fuera del alcance del
flash, o capturar el ambiente con
la luz existente, use la función de
flash apagado. Use un tripié o
coloque la cámara sobre otra
base firme, y use película de alta
sensibilidad de ISO porque la
mayor probabilidad es que de
noche, la abertura del diafragma
será lenta.
58
OFF
1. Para encender la cámara y
destapar el
el
APAGAR
2. Oprima repetidamente el
BOTÓN DE SELECCIÓN DE
FLASH
INDICADOR DE FLASH
APAGADO
PANEL LCD
3. Encuadre su sujeto dentro del
OCULAR DEL VISOR
4. Oprima el
DISPARADOR
la fotografía.
LENTE
BOTÓN DE ENCENDER
(20).
(16), oprima
(11) hasta que el
(35) aparezca en el
(6).
(19).
BOTÓN DEL
(3) para tomar
/
Page 64

Enfoque infinito
OFF
Capture fotografías nítidas de
escenas a mucha distancia en
cualquiera posición del zoom
(para uso en exteriores a la luz
del día).
1. Para encender la cámara y
destapar el
el
APAGAR
2. Oprima repetidamente el
BOTÓN DE SELECCIÓN DE
FLASH
INDICADOR DE FLASH
APAGADO
DE ENFOQUE INFINITO
aparezcan en el
LENTE
BOTÓN DE ENCENDER
(20).
(16), oprima
(11) hasta que el
(35) y el
INDICADOR
(30)
PANEL LCD
/
(6).
3. Encuadre su sujeto dentro del
OCULAR DEL VISOR
4. Oprima el
DISPARADOR
fotografía.
(19).
BOTÓN DEL
(3) para tomar la
Vista de noche
Para que usted pueda tomar
fotografías bellas de personas a
la puesta del sol o por la noche,
en este modo la cámara crea un
balance entre el flash y la luz
presente. Use un tripié o coloque
la cámara sobre otra base firme y
use película de alta sensibilidad
de ISO porque la mayor
probabilidad es que de noche,
la abertura del diafragma será lenta.
59
Page 65

1. Para encender la cámara y
destapar el
el
APAGAR
2. Oprima repetidamente el
BOTÓN DE SELECCIÓN DE
FLASH
INDICADOR DE VISTA DE
NOCHE
PANEL LCD
3. Encuadre su sujeto dentro del
OCULAR DEL VISOR
4. Oprima parcialmente el
DEL DISPARADOR
la
FLASH
completamente el disparador
para tomar la fotografía.
60
LENTE
BOTÓN DE ENCENDER
(20).
(16), oprima
/
(11) hasta que el
(33) aparezca en el
(6).
(19).
BOTÓN
LÁMPARA DE INDICADOR DE
(18) brille verde, oprima
(3). Cuando
COMO USAR EL
DISPARADOR AUTOMÁTICO
Use esta característica para
incluirse en las fotografías.
1. Use el
2. Para encender la cámara y
3. Oprima el
4. Encuadre su sujeto dentro del
MONTAJE PARA
TRÍPODE
(23) para montar la
cámara en el tripié o coloque
la cámara sobre otra
base firme
LENTE
BOTÓN DE
(16), oprima
/
(9).
(19).
destapar el
BOTÓN DE ENCENDER
el
APAGAR
(20).
DISPARADOR AUTOMÁTICO
OCULAR DEL VISOR
Page 66

5. Oprima el
DISPARADOR
DE DISPARADOR AUTOMÁTICO
en el frente de la cámara
parpadeará por 8 segundos y
entonces brillará durante los 2
últimos segundos de la
cuenta regresiva.
• Para cancelar el modo de
disparador automático antes
de tomar la fotografía apague
la cámara.
• Después que tome la
fotografía, el disparador
automático se cancela
automáticamente y regresa al
modo inicial de flash automático.
BOTÓN DEL
(3). La
LÁMPARA
COMO IMPRIMIR LA
FECHA Y HORA
(17)
Las cámaras tradicionales
imprimen la información de la
fecha y/u hora directamente en la
película. Su cámara usa la
característica de la franja
magnética en la película para
registrar la información de fecha
y hora, la cual su fotoprocesador
puede imprimir en la parte de
atrás de sus fotografías. Esta
cámara tiene un reloj de cuarzo
(que muestra un horario de 24
horas) y un calendario automático
hasta el año 2039. Usted puede
registrar la fecha en tres
61
Page 67

formatos distintos: (año/mes/día,
mes/día/año, o día/mes/año) y un
formato para la hora (hora/
minuto).
Como fijar la fecha y hora
1. Oprima repetidamente el
BOTÓN DE MENÚ DE FECHA
para ver la lista y seleccionar
el formato deseado para la
impresión de la fecha.
(12)
2. Oprima sucesivamente el
DATE
SELECT
SET
62
BOTÓN DE SELECCIÓN
FECHA
(7) para seleccionar
DE
el mes, día, año, u hora o
minuto “parpedeantes”.
3. Oprima el
FECHA
número(s) “parpadeante(s)”.
BOTÓN DE FIJAR LA
(8) para cambiar el/los
DATE
SELECT
SET
Page 68

4. Oprima el botón de selección
de fecha para guardar el/los
número(s) seleccionado(s) y
para activar el/los próximo(s)
número(s) “parpadeante(s)”
5. Repita los pasos del 3 al 5
para continuar su selección o
para terminar otras opciones.
Oprima repetidamente el
botón de selección de fecha
hasta que el parpadeo cese.
COMO DESCARGAR
LA PELÍCULA
Rebobinado automático
Esta cámara automáticamente
rebobina la película una vez que
se haya tomado la última
fotografía.
1. Espere a que la película se
rebobine completamente
dentro del cartucho.
• Cuando el motor se detenga,
CONTADOR DE CUADROS
el
indicará “0”.
(28)
63
Page 69

2. Haga girar el
PUERTA
PELÍCULA
PUERTA DEL COMPARTIMIENTO DE
PELÍCULA
3. Retire el
cartucho de
película de la
cámara y
vuelva a
cargarla con un
rollo nuevo de
película KODAK ADVANTIX.
• El FSI en el cartucho de
película completamente
expuesto estará en ✖ (posición #3)
y el panel LCD demostrará una
“E” parpadeante.
64
SEGURO DE LA
DEL COMPARTIMIENTO DE
(2) para abrir la
(22).
3
4
2
1
OPEN
Rebobinado manual
Si no desea tomar el rollo
completo de fotografías, usted
puede manualmente activar el
proceso de rebobinado
automático.
1. Para comenzar el rebobinado
automático de la película
oprima cuidadosamente el
BOTÓN DE REBOBINADO DE
(10) usando el
PELÍCULA
activador
de botón
de
control el
cual se
encuentra
Page 70

en la hebilla de la correa
de la cámara.
2. Siga los pasos 1–3 del
Rebobinado automático.
NOTA: Para la toma continua de
fotografías, no puede volver a
cargar película parcialmente
expuesta en esta cámara.
CUIDADO DE LA CÁMARA
1. Proteja la cámara del polvo,
humedad, golpe repentino, y
calor excesivo.
Precaución: No use
solventes o soluciones
ásperas o abrasivas en el
cuerpo de la cámara.
2. Si el lente se ve sucio,
cúbralo con su aliento para
empañarlo y limpie la
superficie cuidadosamente
con un paño suave que no
tenga pelusas o con un
pañuelo especialmente
65
Page 71

diseñado para la limpieza de
lentes. Nunca limpie el lente
en seco.
Precaución: No use
solventes o soluciones que
no hayan sido diseñadas para
la limpieza de lentes de
cámaras. No use pañuelos
con químicos diseñados para
la limpieza de gafas.
66
3. Remueva la batería cuando
vaya a guardar la cámara por
un largo período.
Precaución: Para prevenir la
posibilidad de daño y choque
eléctrico, no trate, usted
mismo, de desarmar o
reparar la cámara o la unidad
del flash.
Page 72

PROBLEMAS Y SOLUCIONES
Problema Causa probable Solución
La cámara no No quedan más fotografías Retire la película
funciona
La película no La batería está débil, Reemplace o vuelva a
avanza o se descargada, mal cargar la batería
rebobina colocada, o falta colocarla
El Panel LCD La batería está débil, Reemplace o vuelva a
está en blanco descargada, mal cargar la batería
La batería está débil, Reemplace o vuelva a
descargada, mal cargar la batería
colocada, o falta colocarla
colocada, o falta colocarla
La cámara está apagada Ponga el interruptor de
encender/apagar en
ENCENDER
67
Page 73

Problema Causa probable Solución
El panel LCD está La cámara está en el modo Oprima cualquier botón de
en blanco de apagado automático control para activar la cámara
El panel LCD No hay película en la cámera Ponga película nueva
brilla “E” en la cámar a
La cámara se traba El sujeto está muy cerca Muévase a más de 2 pies
y la lámpara de la cáme ra (0,6 m) del sujeto
indicadora del
flash “parpadea”
68
Page 74

ESPECIFICACIONES
Tipo de película: Películas KODAK
ADVANTIX para fotografías a color y
blanco y negro
Lente: Lente zoom de 30–60 mm,
híbrido esférico
Sistema de enfoque: 87
Enfoque (luz del día) : Gran angular/
telefotografico: 2 pies (0,6 m)
a infinito
Visor: Imagen real con formato
C, H, & P
Sensibilidad de película: DXIX (ISO)
50–1600 para fotografías a color y
blanco y negro
Unidad del flash:
Flash KODAK SENSALITE™
zonas AF
Alcance del flash (ISO 200):
Gran angular: 2 a 25 pies (0,6 m)
T elefotografíco 2 a 14 pies
(0,6 a 4,1 m)
Abertura de diafragma: ƒ/4.5–ƒ/8.5
Obturador: Obturador electrónico
programado, 1/4 a 1/360 segundos
Fuente de energía: Primaria: una batería
de litio de 3 voltios KODAK K123LA
(o su equivalente)
Dimensiones: 119 x 64 x 39 mm
Peso (sin película y batería):
7.2 onzas (205 g) sin
ni
batería
película
69
Page 75

El símbolo y logotipo de Kodak, Sensalite, marca “e”, Advantix,
y el Advanced Photo System son marcas registradas.
70
Page 76

Appareil-photo
KODAK ADV ANTIX
F600 Zoom
BESOIN D’AIDE POUR UTILISER VOTRE APP AREIL-PHOTO
OU DE RENSEIGNEMENTS SUR LE SYSTÈME APS?
Visitez notre site Web à l’adresse http://www.kodak.com, ou
appelez Kodak, au Canada seulement, du lundi au vendredi, de 8 h
à 17 h (heure de l’Est) au numéro 1 800 465-6325, poste 36100.
Dans la région de Toronto, composez le (416) 766-8233,
poste 36100. Aux États-Unis, composez sans frais, du lundi au
vendredi, de 9 h à 19 h (heure de l’Est) le 1 800 242-2424. Veuillez
avoir en main votre appareil-photo au moment de téléphoner.
Pour les besoins de la garantie, veuillez conserver votre
facture de vente comme preuve de la date d’achat.
FRANÇAIS
Page 77

FONCTIONS APS OFFERTES
A VEC CET APP AREIL-PHOTO
Choix de trois formats
• Vous avez le choix de trois
formats différents :
classique (C), groupe/HDTV (H)
ou panoramique (P), pour
chacune des photos d’une
même cassette de film. Le
cadre affiché dans le viseur
se modifie en fonction du
format sélectionné.
Impression de la date et de
l’heure
• Vous pouvez choisir de faire
imprimer la date et l’heure au
72
dos de vos photos. Consultez
votre laboratoire de traitement
photo pour connaître les
services offerts.
Protection contre la double
exposition
• Vous ne courez aucun risque
d’exposer accidentellement
votre film une seconde fois.
Votre appareil vérifie
l’indicateur de l’état du film sur
la cassette afin de prévenir
tout risque de réexposition.
Page 78

Échange d’information pour
l’amélioration de la qualité de
l’image
• Votre appareil est doté de la
fonction d’échange
d’information magnétique, qui
permet d’enregistrer sur la
cassette des renseignements
sur les conditions d’éclairage
et sur l’exposition. Le
laboratoire de traitement photo
peut ainsi corriger la couleur
ou régler l’exposition afin que
vos photos soient les plus
réussies possible.
Dispositif de verrouillage du
compartiment du film
• Le dispositif de verrouillage du
compartiment du film empêche
l’ouverture du couvercle avant
que le film ne soit
complètement rembobiné dans
la cassette.
73
Page 79
Ce symbole sur
l’emballage de film
vous garantit qu’il est
compatible avec cet
appareil-photo.
Assurez-vous que le
laboratoire de traitement
auquel vous confiez
vos films affiche ce
symbole; vous
profiterez ainsi de
toutes les caractéristiques
du système APS.
Cet appareil numérique de Classe B répond à toutes les
exigences du Règlement sur le matériel brouilleur du Canada.
Indicateur de l’état du film
Un voyant passe d’un symbole à
l’autre pour indiquer l’état du film à
l’intérieur de la cassette.
NON EXPOSÉ
1
PARTIELLEMENT
2
EXPOSÉ
4
TOTALEMENT
3
NÉGATIFS
DÉVELOPPÉS
EXPOSÉ
74
Page 80

TABLE DES MATIÈRES
DESCRIPTION DE L’APP AREIL-PHOTO ............ 76
FIXATION DE LA DRAGONNE ........................... 77
Activateur du bouton de contrôle ............... 78
INSTALLATION DE LA PILE ................................ 78
Indicateur de pile faible ............................... 7 9
Conseils au sujet des piles ......................... 7 9
Arrêt automatique ....................................... 80
CHARGEMENT DU FILM .................................... 81
POUR PRENDRE DES PHOTOS ....................... 82
Formats des photos ................................... 8 4
Mémorisation de la mise au point .............. 8 5
Utilisation de l’objectif zoom ....................... 8 6
Conseils pour prendre de
meilleures photos ..................................... 8 7
POUR PRENDRE DES PHOTOS AU FLASH ..... 88
Distances entre le sujet et le flash ............ 90
SÉLECTION DES MODES FLASH ET MISE AU
POINT À L’INFINI ............................................ 91
Réduction des yeux rouges ........................ 91
Flash automatique sans réduction
des yeux rouges ...................................... 93
Flash d’appoint ............................................ 94
Flash désactivé ........................................... 95
Mise au point à l’infini ................................. 96
Vue nocturne ............................................... 9 6
UTILISATION DU RET ARDA TEUR ...................... 9 7
IMPRESSION DE LA DA TE ET DE L ’HEURE ..... 9 8
Réglage de la date et de l’heure................. 9 9
75
Page 81

RETRAIT DU FILM ........................................... 100
Rembobinage automatique ........................ 100
Rembobinage manuel ................................ 101
ENTRETIEN DE VOTRE APPAREIL-PHOTO .. 102
DÉPANNAGE ..................................................... 103
CARACTÉRISTIQUES ...................................... 105
DESCRIPTION DE
L’APP AREIL-PHOTO
(Pour consulter les schémas de l’appareil,
ouvrez les rabats des couvertures).
1 TIGE DE LA DRAGONNE
2 LOQUET DU COMPARTIMENT DU FILM
3 DÉCLENCHEUR
4 BARILLET DU ZOOM
5 SÉLECTEUR DU FORMAT DE PHOTO
6 PANNEAU ACL
76
7 BOUTON DE SÉLECTION DE LA DATE
8 BOUTON DE RÉGLAGE DE LA DATE
9 BOUTON DU RETARDATEUR
10 BOUTON DE REMBOBINAGE DU FILM
11 BOUTON DE SÉLECTION DU
MODE
FLASH
12 BOUTON DU MENU DATE
13 FLASH
14 VISEUR
15 CAPTEUR DE LUMIÈRE
16 OBJECTIF
17 TÉMOIN DU RETARDATEUR/
RÉDUCTION DES YEUX ROUGES
18 TÉMOIN DU FLASH
19 OCULAIRE DU VISEUR
20 INTERRUPTEUR MARCHE/ARRÊT
21 COMPARTIMENT DU FILM
22 COUVERCLE DU COMPARTIMENT
DU
FILM
23 ÉCROU DU TRÉPIED
Page 82
24 COUVERCLE DU COMPARTIMENT
DE
LA PILE
Panneau ACL
25 AFFICHAGE DATE ET HEURE/
SENSIBILITÉ ISO
26 INDICATEUR DE RÉDUCTION DES
YEUX
ROUGES
27 INDICATEUR DE LA PRÉSENCE
D
’UN FILM
28 COMPTEUR DE POSES
29 INDICATEUR DU RETARDATEUR
30 INDICATEUR DE MISE AU POINT
À
L’INFINI
31 SYMBOLE DE LA PILE
32 INDICATEUR DU FLASH D’APPOINT
33 INDICATEUR DE VUE NOCTURNE
34 INDICATEUR DE FLASH
AUTOMATIQUE
35 INDICATEUR DE FLASH DÉSACTIVÉ
FIXA TION DE LA DRAGONNE
1. Enfilez une extrémité de la
dragonne sous la
DRAGONNE
vers le haut.
2. Glissez ensuite la longue
boucle de la dragonne dans
la petite.
3. Tirez fermement.
TIGE DE LA
(1), puis tirez-la
77
Page 83
Activateur du bouton de contrôle
N
O
F
F
O
/
P
E
W
O
R
Utilisez le
bouton du
fermoir de la
dragonne
pour activer
les petits
boutons de
contrôle de l’appareil-photo.
DATE
SELECT
SET
INSTALLA TION DE LA PILE
Cet appareil-photo utilise 1 Pile
au lithium KODAK K123LA (ou
l’équivalent) de 3 volts qui fournit
l’alimentation nécessaire à toutes
les fonctions de l’appareil.
78
1. Ouvrez le
COMPARTIMENT
• Avant de
retirer la pile,
veuillez
mettre
l’appareilphoto hors
tension.
2. Insérez la pile dans le
compartiment de la façon
illustrée.
COUVERCLE DU
DE LA
PILE
(24).
O
N
/
O
F
F
P
O
W
E
R
Page 84

3. Refermez bien la porte du
compartiment de la pile.
• Après avoir chargé une
nouvelle pile, vous devez
régler la date et l’heure
de nouveau.
Indicateur de pile faible
Il faut remplacer la pile lorsque
SYMBOLE DE LA PILE
• le
clignote sur le
ou
• tous les indicateurs du
panneau ACL disparaissent et
DÉCLENCHEUR
que le
peut être enclenché.
(31)
PANNEAU ACL
(3) ne
Conseils au sujet des piles
• Jetez les piles épuisées
normalement avec vos
déchets domestiques, à moins
que votre communauté n’offre
un programme de récupération
des piles (vérifiez auprès des
commanditaires du programme
pour plus de détails).
• Ayez toujours des piles de
(6)
rechange avec vous.
• Lisez le mode d’emploi et
observez les mises en garde
fournies par le fabricant des
piles.
79
Page 85

• Gardez les piles hors de la
portée des enfants.
• N’essayez pas de démonter,
de recharger ou de courtcircuiter les piles, ou de les
exposer à des températures
élevées ou aux flammes.
• Conservez les piles dans leur
emballage d’origine jusqu’à ce
que vous les utilisiez.
Fonctions automatiques
d’économie d’énergie
Arrêt automatique
Cet appareil-photo se met
automatiquement en mode veille
après plus de 3 minutes
80
d’inactivité pour préserver
l’énergie de la pile. Pour réactiver
l’appareil, il suffit d’appuyer sur
l’un des boutons suivants :
DÉCLENCHEUR
ZOOM
LA DATE
DATE
LA DATE
MODE FLASH
DU
REMBOBINAGE DU FILM
• Utilisez l’interrupteur
marche/arrêt pour mettre
l’appareil hors tension
lorsque vous ne l’employez
pas pendant une longue
période.
(3),
(4),
(7),
(12),
(8),
BARILLET DU
BOUTON DE SÉLECTION DE
BOUTON DU MENU
BOUTON DE RÉGLAGE DE
BOUTON DE SÉLECTION
(11) ou
BOUTON DE
(10).
Page 86

CHARGEMENT DU FILM
OPEN
2
3
1
4
Vous pouvez charger le film dans
l’appareil-photo, que ce dernier
soit SOUS TENSION ou HORS
TENSION.
1. Faites glisser le
COMPARTIMENT
ouvrir le
COMPARTIMENT
LOQUET DU
DU
FILM
COUVERCLE DU
DU
FILM
OPEN
(2) pour
(22).
2. Insérez complètement la
cassette de film dans le
COMPARTIMENT DU FILM
• Assurez-vous que l’indicateur
de l’état du film sur la cassette
de film est bien vis-à-vis
● (position 1) s’il s’agit d’une
nouvelle cassette.
• N’exercez pas de pression
excessive pour insérer la
(21).
81
Page 87

cassette dans le
N
O
E
O
W
P
R
F
F
O
/
compartiment du film.
3. Refermez le couvercle du
compartiment du film pour
déclencher le mécanisme
d’avance automatique du film.
COMPTEUR DE POSES
Le
PANNEAU ACL
sur le
affichera le nombre de poses
restantes.
• Une fois que vous avez
refermé le couvercle du
compartiment du film avec
verrouillage de sécurité, il ne
pourra être rouvert que lorsque
le film sera complètement
rembobiné dans la cassette
de film.
82
(6)
(28)
POUR PRENDRE DES PHOTOS
Vous pouvez prendre des photos
de formats classique (C), groupe/
HDTV (H)* et panoramique (P) sur
la même cassette de film. Vos
frais de traitement photo peuvent
varier en fonction des formats
choisis pour le
développement.
1. Appuyez sur
INTERRUPTEUR
l’
/
MARCHE
ARRÊT
(20)
pour mettre l’appareil-photo
sous tension et découvrir
OBJECTIF
(16) .
l’
2. Déplacez le
SÉLECTEUR DU
Page 88
FORMAT DE PHOTO
H
P
EXP
LEFT
C
choisir le format désiré (C, H
ou P). Le cadre du viseur
s’ajustera pour délimiter la
prise de vue sélectionnée.
(5) pour
P
H
C H P
C
3. Cadrez votre sujet en
regardant dans l’
(19). Pour une photo
VISEUR
nette, placez-vous à au moins
0,6 m (2 pi) de votre sujet.
OCULAIRE DU
• Si vous vous placez à moins
de 0,6 m (2 pi), l’appareil se
verrouillera et le témoin du
flash clignotera.
4. Appuyez sur le
DÉCLENCHEUR
prendre la photo.
* Les photos HDTV (télévision haute
définition) présentent le même
rapport hauteur/largeur que la
télévision, pour des capacités
d’interface CD.
(3) pour
83
Page 89

Formats des photos
CHP
Classique Groupe (HDTV) Panoramique
88,9 mm x 127 mm ou 88,9 mm x 152 mm ou 88,9 mm x 216 mm à
102 mm x 152 mm 102 mm x 178 mm 102 mm x 292,7 mm
(3 ½ po x 5 po ou (3 ½ po x 6 po ou (3 ½ po x 8 ½ po à
4 po x 6 po) 4 po x 7 po) 4 po x 11 ½ po)
NOTA : V otre laboratoire de traitement photo offre généralement des photos de formats
4 po x 6 po, 4 po x 7 po et 4 po x 11 ½ po (102 x 152, 102 x 178 et 102 x 292,7 mm).
Certains peuvent aussi proposer les formats 3 ½ po x 5 po, 3 ½ po x 6 po et
3 ½ po x 8 ½ po (88,9 x 127, 88,9 x 152 et 88,9 x 216 mm).
84
Page 90

Mémorisation de la mise
au point
L’appareil-photo effectue
automatiquement la mise au point
sur tout ce qui se trouve à
l’intérieur du cercle de mise au
point automatique de l’oculaire du
viseur. Pour obtenir une photo
bien nette, assurez-vous
d’orienter le cercle de mise au
point sur votre sujet principal. Si
vous désirez que le sujet
principal de la photo soit à
l’extérieur du cercle de mise au
point, utilisez la fonction de
mémorisation comme suit :
1. Centrez votre sujet principal à
l’intérieur du cercle de mise
au point.
CERCLE DE
MISE AU
POINT
VISEUR
2. Enfoncez partiellement le
DÉCLENCHEUR
maintenez-le en position pour
verrouiller la mise au point.
(3) et
85
Page 91

3. Toujours en maintenant le
N
O
E
O
W
P
R
F
F
O
/
déclencheur partiellement
enfoncé, déplacez l’appareil
jusqu’à ce que votre sujet se
trouve à l’endroit voulu dans
OCULAIRE DU VISEUR
l’
VISEUR
4. Enfoncez complètement le
déclencheur pour prendre
la photo.
(19).
86
Utilisation de l’objectif zoom
Doté d’un objectif zoom motorisé,
cet appareil-photo vous permet
de choisir la longueur focale de
l’objectif convenant le mieux à la
situation de prise de vue. Lorsque
vous mettez l’appareil sous
tension, la longueur focale est
réglée par défaut en position
grand-angulaire.
1. Appuyez sur
INTERRUPTEUR
l’
-
MARCHE
ARRÊT
(20)
pour mettre
l’appareil-photo sous tension
et découvrir l’
OBJECTIF
(16).
Page 92

2. Faites glisser le
(4) vers la droite en
ZOOM
position téléobjectif pour vous
rapprocher
glisser le barillet vers la
gauche en position grandangulaire pour vous
du sujet.
3. Cadrez ensuite votre sujet
dans L’
BARILLET DU
du sujet; ou faites
éloigner
EXP
LEFT
C
H
P
OCULAIRE DU VISEUR
(19).
4. Puis, appuyez sur le
DÉCLENCHEUR
la photo.
• Le barillet de l’objectif se
replace automatiquement en
position grand-angulaire après
environ 3 minutes.
Conseils pour prendre de
meilleures photos
• Approchez-vous suffisamment
de votre sujet pour qu’il
remplisse bien le viseur, sans
toutefois vous placer à moins
de 0,6 m (2 pi).
• Placez-vous au même niveau
que votre sujet. Quand vous
(3) pour prendre
87
Page 93

photographiez des enfants ou
N
O
E
O
W
P
R
F
F
O
/
des animaux, agenouillez-vous.
• Tenez votre appareil à la
verticale pour mettre en valeur
les sujets de forme allongée,
par exemple les chutes d’eau,
les gratte-ciel ou une
personne seule.
• Donnez de la dimension à vos
photos en les encadrant avec
une branche d’arbre, une
fenêtre ou encore, avec les
traverses d’une clôture.
• Placez-vous dos au soleil afin
d’offrir le meilleur éclairage
possible à votre sujet.
88
POUR PRENDRE DES PHOTOS
AU FLASH
Dans des conditions de lumière
faible, à l’intérieur, ou à l’extérieur
dans des lieux ombragés ou par
temps couvert, il vous faut
utiliser un flash. Votre appareilphoto est doté d’un flash
automatique qui s’actionne
au besoin.
1. Appuyez sur l’
MARCHE/ARRÊT
INTERRUPTEUR
(20) pour mettre
Page 94

l’appareil-photo sous tension
et découvrir l’
• Le témoin du flash « clignote »
lorsque le flash n’est pas prêt.
2. Cadrez votre sujet en
regardant dans
VISEUR
3. Enfoncez partiellement le
DÉCLENCHEUR
TÉMOIN DU FLASH
vert, enfoncez complètement
le déclencheur pour prendre
la photo.
(19).
(3). Lorsque le
OBJECTIF
(16).
L’OCULAIRE DU
(18) passe au
EXP
LEFT
4. Assurez-vous que votre sujet
se trouve à une distance qui
soit appropriée pour la
sensibilité du film chargé dans
votre appareil (voir Distances
entre le flash et le sujet). Ne
vous éloignez pas au-delà de
la distance maximum
recommandée, sinon vos
photos seront sombres.
89
Page 95

Distances entre le sujet
et le flash
Sensibilité Grand-angulaire Téléobjectif
ISO du film (30 mm) (60 mm)
50 0,6 m à 3,9 m (2 pi à 13 pi) 0,6 m à 2,1 m (2 pi à 7 pi)
10 0 0,6 m à 5,5 m (2 pi à 18 pi) 0,6 m à 2,9 m (2 pi à 10 pi)
20 0 0,6 m à 7,7 m (2 pi à 25 pi) 0,6 m à 4,1 m (2 pi à 14 pi)
40 0 0,6 m à 11 m (2 pi à 36 pi) 0,6 m à 5,8 m (2 pi à 19 pi)
80 0 0,6 m à 15,5 m (2 pi à 51 pi) 0,6 m à 8,2 m (2 pi à 27 pi)
1600 0,6 m à 21,9 m (2 pi à 72 pi) 0,6 m à 11,6 m (2 pi à 38 pi)
90
Page 96

SÉLECTION DES MODES
AUTO
FLASH ET MISE AU POINT
À L’INFINI
Outre le mode flash automatique
avec réduction des yeux rouges,
vous pouvez choisir les modes
flash automatique sans réduction
des yeux rouges, flash d’appoint,
flash désactivé, mise au point à
l’infini et vue nocturne.
Appuyez sur
BOUTON DE
le
SÉLECTION
MODE
FLASH
jusqu’à ce
que l’indicateur du mode
(11)
DU
recherché apparaisse sur
PANNEAU ACL
le
Une fois la photo prise, les
modes flash demeureront actifs.
Pour modifier le mode flash, il
suffit d’appuyer sur le bouton de
sélection du mode flash, ou de
fermer, puis rouvrir l’appareilphoto pour réinitialiser le flash au
mode par défaut.
Réduction des
yeux rouges
DATE
SELECT
SET
Les yeux de certaines personnes
(et de certains animaux) peuvent
réfléchir le flash et ainsi produire
un éclat rouge sur les photos. Cet
(6).
91
Page 97

appareil-photo est doté d’un flash
automatique avec option de
réduction des yeux rouges par
défaut. Vous pouvez minimiser le
phénomène des yeux rouges
dans les photos prises avec flash
en allumant toutes les lumières
de la pièce où vous vous
trouvez et en respectant les
directives suivantes :
1. Appuyez sur l’
MARCHE/ARRÊT
l’appareil-photo sous tension
et découvrir l’
2. Appuyez sur le
SÉLECTION DU MODE FLASH
successivement jusqu’à ce
INTERRUPTEUR
(20) pour mettre
OBJECTIF
(16).
BOUTON DE
(11)
92
que l’
INDICATEUR DE FLASH
AUTOMATIQUE
l’
INDICATEUR DE RÉDUCTION DES
YEUX
sur le
• Passez l’étape 2 si l’appareilphoto est déjà réglé par défaut
à « réduction des yeux
rouges ».
3. Cadrez bien votre sujet dans
L’OCULAIRE DU VISEUR
4. Demandez ensuite à votre
sujet de regarder bien en face
TÉMOIN DE RÉDUCTION DES
le
YEUX ROUGES
(34) et
ROUGES
PANNEAU ACL
(26) s’affichent
(6).
(19).
(17).
5. Enfoncez alors partiellement le
Page 98

DÉCLENCHEUR
TÉMOIN DU FLASH
vert, appuyez complètement
sur le déclencheur pour
prendre la photo.
• Ce mode causera un bref
retard dans le déclenchement
de l’obturateur.
Flash automatique
sans réduction des yeux rouges
Utilisez ce mode pour prendre
des photos sans personnage.
Vous pouvez changer le réglage
par défaut à flash automatique
sans réduction des yeux rouges
(3). Lorsque le
(18) passe au
AUTO
de la façon suivante :
1. Appuyez sur l’
MARCHE/ARRÊT
l’appareil-photo sous tension
et découvrir l’
2. Appuyez sur le
SÉLECTION
successivement jusqu’à ce
que l’
AUTOMATIQUE
PANNEAU ACL
le
3. Cadrez bien votre sujet dans
L’OCULAIRE DU VISEUR
4. Enfoncez ensuite partiellement
DÉCLENCHEUR
le
INTERRUPTEUR
(20) pour mettre
OBJECTIF
(16).
BOUTON DE
DU
MODE FLASH
INDICATEUR DE FLASH
(34) s’affiche sur
(6).
(19).
(3). Lorsque le
(11)
93
Page 99

TÉMOIN DU FLASH
vert, appuyez complètement
sur le déclencheur pour
prendre la photo.
• L’appareil-photo est maintenant
réglé par défaut au mode flash
automatique sans réduction
des yeux rouges.
(18) passe au
Flash d’appoint
À l’intérieur ou à l’extérieur, la
lumière vive projetée sur des
sujets éclairés à contre-jour peut
créer des ombres marquées (en
particulier sur les visages). Pour
adoucir ces ombres, il suffit
d’utiliser le flash d’appoint.
1. Appuyez sur l’
94
INTERRUPTEUR
MARCHE/ARRÊT
l’appareil-photo sous tension
et découvrir l’
2. Appuyez à plusieurs reprises
sur le
MODE
que l’
’
APPOINT
D
le
PANNEAU ACL
3. Cadrez bien votre sujet dans
OCULAIRE DU VISEUR
l’
4. Enfoncez partiellement le
DÉCLENCHEUR
TÉMOIN DU FLASH
vert, enfoncez complètement
le déclencheur pour prendre
la photo.
(20) pour mettre
OBJECTIF
(16).
BOUTON DE SÉLECTION DU
FLASH
(11) jusqu’à ce
INDICATEUR DU FLASH
(32) soit affiché sur
(6).
(19).
(3). Lorsque le
(18) passe au
Page 100

Flash désactivé
OFF
Lorsque vous ne voulez pas
utiliser le flash, notamment à
l’intérieur dans les endroits où on
l’interdit (comme les musées et
les théâtres), pour photographier
des scènes au crépuscule ou des
sujets éloignés situés au-delà de
la portée du flash, ou encore pour
saisir l’atmosphère créée par la
lumière ambiante, utilisez la
fonction de flash désactivé.
Servez-vous d’un trépied ou
placez l’appareil sur une surface
stable, et utilisez un film de
sensibilité élevée parce que la
vitesse d’obturation sera
vraisemblablement plus lente
dans ces situations.
1. Appuyez sur l’
MARCHE
l’appareil-photo sous tension
et découvrir l’
2. Appuyez sur le
SÉLECTION DU MODE FLASH
à plusieurs reprises jusqu’à ce
que l’
DÉSACTIVÉ
le
PANNEAU ACL
3. Cadrez bien votre sujet dans
l’
OCULAIRE DU VISEUR
4. Enfoncez le
pour prendre la photo.
INTERRUPTEUR
/
ARRÊT
(20) pour mettre
OBJECTIF
(16).
BOUTON DE
INDICATEUR DE FLASH
(35) soit affiché sur
(6).
(19).
DÉCLENCHEUR
(11)
(3)
95
 Loading...