

Page 1
Kodak
Eastman Kodak Company
Rochester, NY
© Eastman Kodak Company, 2010.
MC/MR/TM:
14650
Kodak, EasyShare.
U.s.A.
4H7077
Page 2
1 Bouton de I'obturateur
12
Bouton Supprimer
2 Bouton de flash
13
OK
....
~
j.
T
3
Bouton
Mode
14 Emplacement pour
4 Bouton marche/arret dragonne
5 Objectif/couvre-objectif
15
Port
USB
6 Microphone
16
Bouton Info
7 Voyant du retardateur/
17
Bouton Partager
d'enregistrement video
18
Bouton Visualiser
8 Flash
19
Compartiment des piles,
9 Grand angle/teleobjectif lecteur de carte
10 Ecran ACL SD/SDHC
11
Bouton Menu 20 Support pour trepied
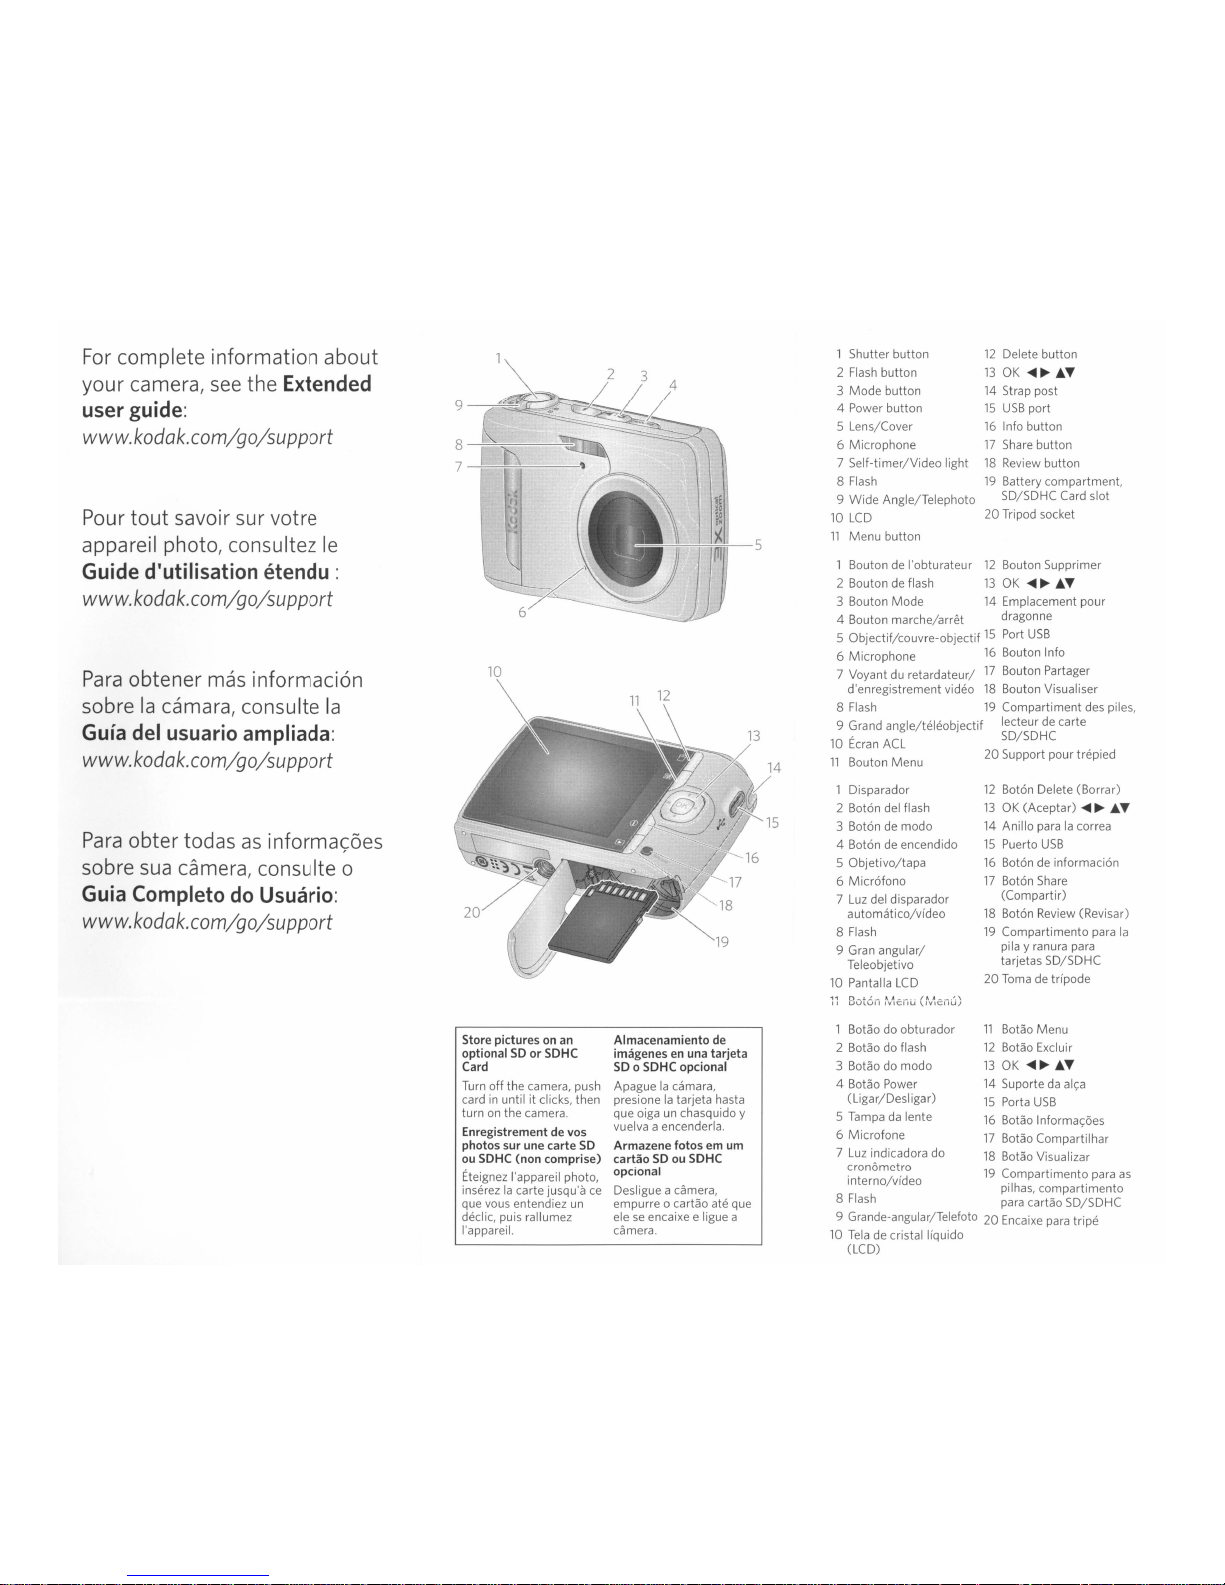
For
complete information about
your
camera,
see
the
Extended
user
guide:
www.kodak.com/go/support
Pour
tout
savoir
sur
votre
appareil
photo,
consultez
Ie
Guide
d'utilisation
etendu
:
www.kodak.com/go/support
Para
obtener
mas
informacion
sobrelacamara,
consulte
la
Guia
del
usuario
ampliada:
www.kodak.com/go/support
Para
obter
todasasinformac;6es
sobre
sua
camera,
consulte
0
Guia
CompletodoUsuario:
www.kodak.com/go/support
8~~,..,."...----~~
7--,;;:-----~,..,."...----
5
10
1 Shutter button
2 Flash button
3
Mode
button
4 Power button
5 Lens/Cover
6 Microphone
7 Self-timer/Video light
8 Flash
9
Wide
Angle/Telephoto
10
LCD
11
Menu
button
1 Disparador
2 Boton del flash
3 Boton de modo
4 Boton de encendido
5
Objetivo/tapa
6
Microfono
7
Luz
del disparador
automatico/vfdeo
8 Flash
9 Gran angular/
Teleobjetivo
10 Pantalla
LCD
12
Delete button
13
OK
....
~j.T
14
Strap post
15
USB
port
16
Info button
17
Share button
18
Review button
19
Battery compartment,
SD/SDHC Card slot
20
Tripod socket
12
Boton Delete (Borrar)
13
OK(Aceptar)
....
~j.T
14 Anillo para
la
correa
15
Puerto
USB
16
Boton de informacion
17
Boton Share
(Compartir)
18
Boton Review (Revisar)
19
Compartimento para
la
pila y ranura para
tarjetas SD/SDHC
20
Toma
de trfpode
Store picturesonan
optional
SO
or SOHC
Card
Turn off the camera, push
card
in
untilitclicks, then
turn
on
the camera.
Enregistrement de vos
photos sur une carte
SO
ou
SOHC (non comprise)
Eteignez I'appareil photo,
inserez
la
carte jusqu'a
ce
que vous entendiez un
declic, puis rallumez
I'apparei!.
Almacenamiento de
imagenes en una tarjeta
SO
0 SOHC opcional
Apaguelacamara,
presione
la
tarjeta hasta
que oiga
un
chasquido y
vuelva a encenderla.
Armazene fotos em um
cartao
SOouSOHC
opcional
Desligue a camera,
empurre
0 cartao ate que
ele
se
encaixe e ligue a
camera.
1 Botao do obturador
11
Botao Menu
2 Botao do flash
12
Botao Excluir
3 Botao do modo
13
OK
....
~
j.
T
4
Botao Power 14 Suportedaal<;:a
(Ligar/Desligar)
15
Porta
USB
5 Tampa
da
lente
16
Botao Informa<;:6es
6 Microfone
17
Botao Compartilhar
7
Luz
indicadora do
18
Botao Visualizar
cronometro
interno/video
19
Compartimento para
as
pilhas, compartimento
8 Flash para cartao SD/SDHC
9 Grande-angular/Telefoto
20
Encaixe para tripe
10
Teladecristalliquido
(LCD)
Page 3
•
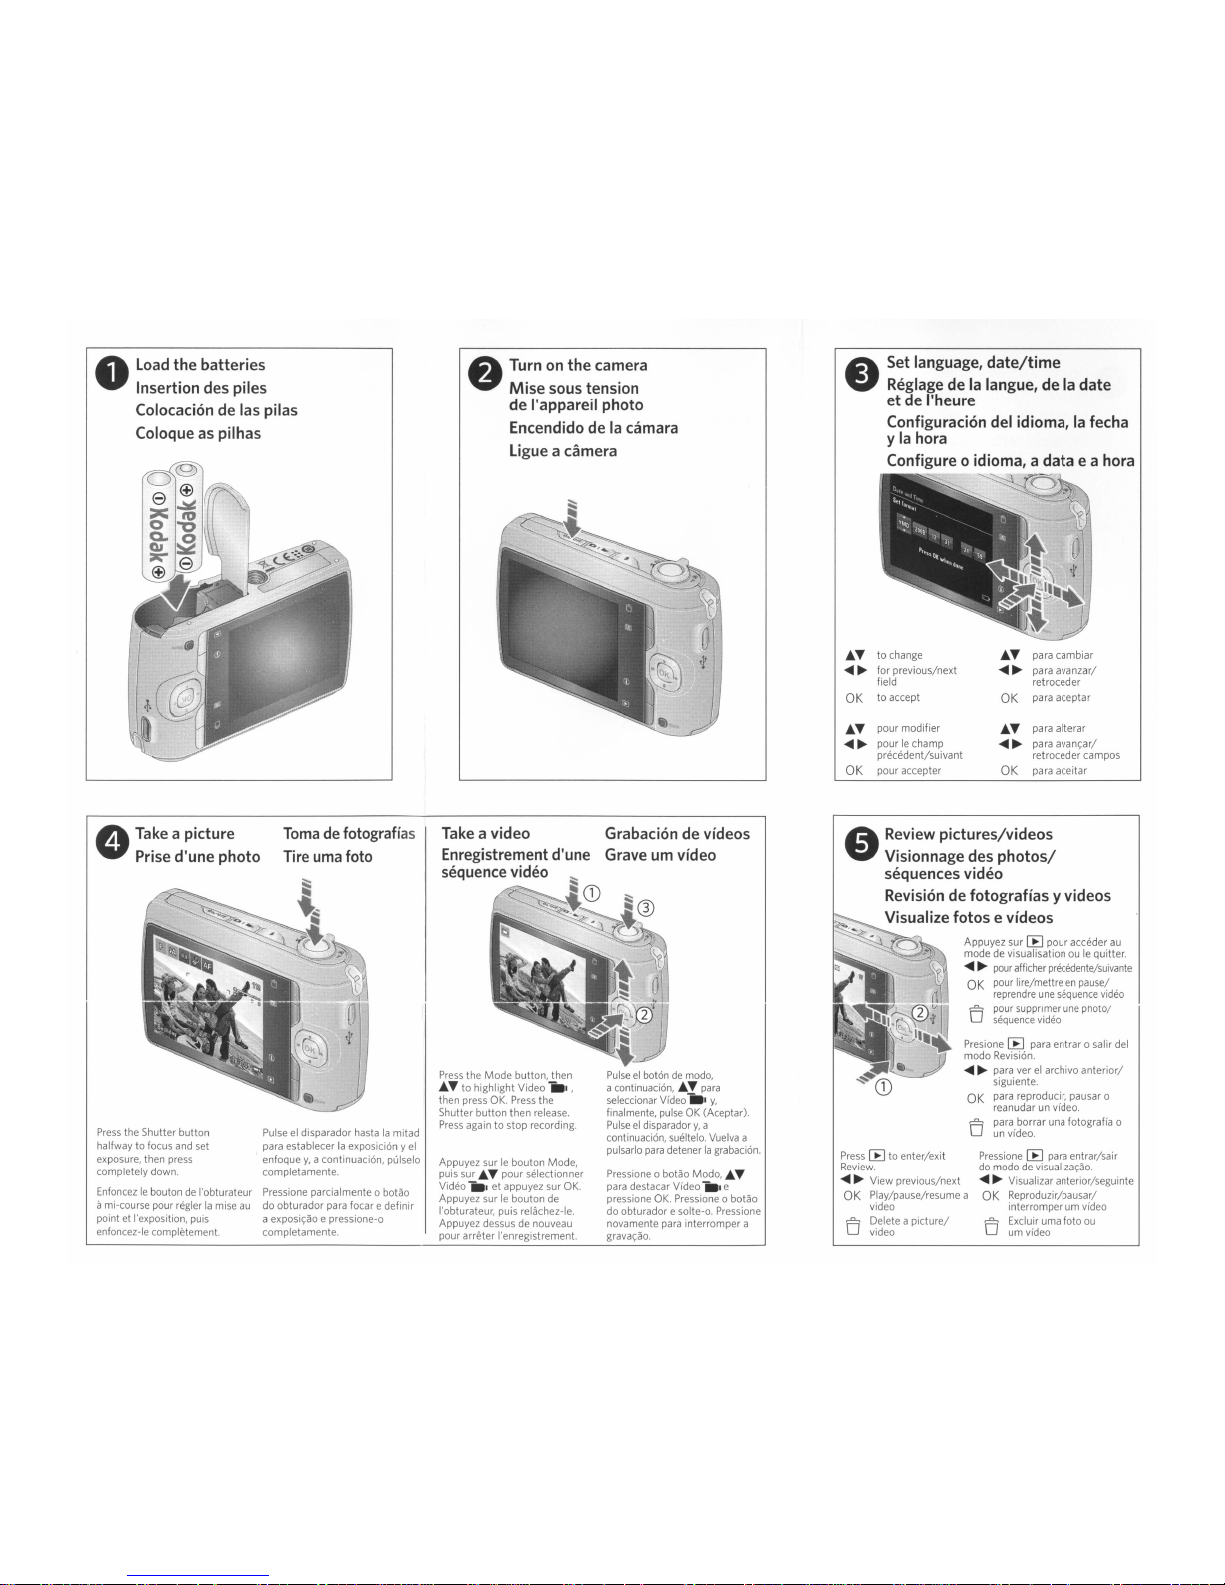
Load
the batteries
Insertion
des
piles
Colocaciondelas
pilas
Coloqueaspilhas
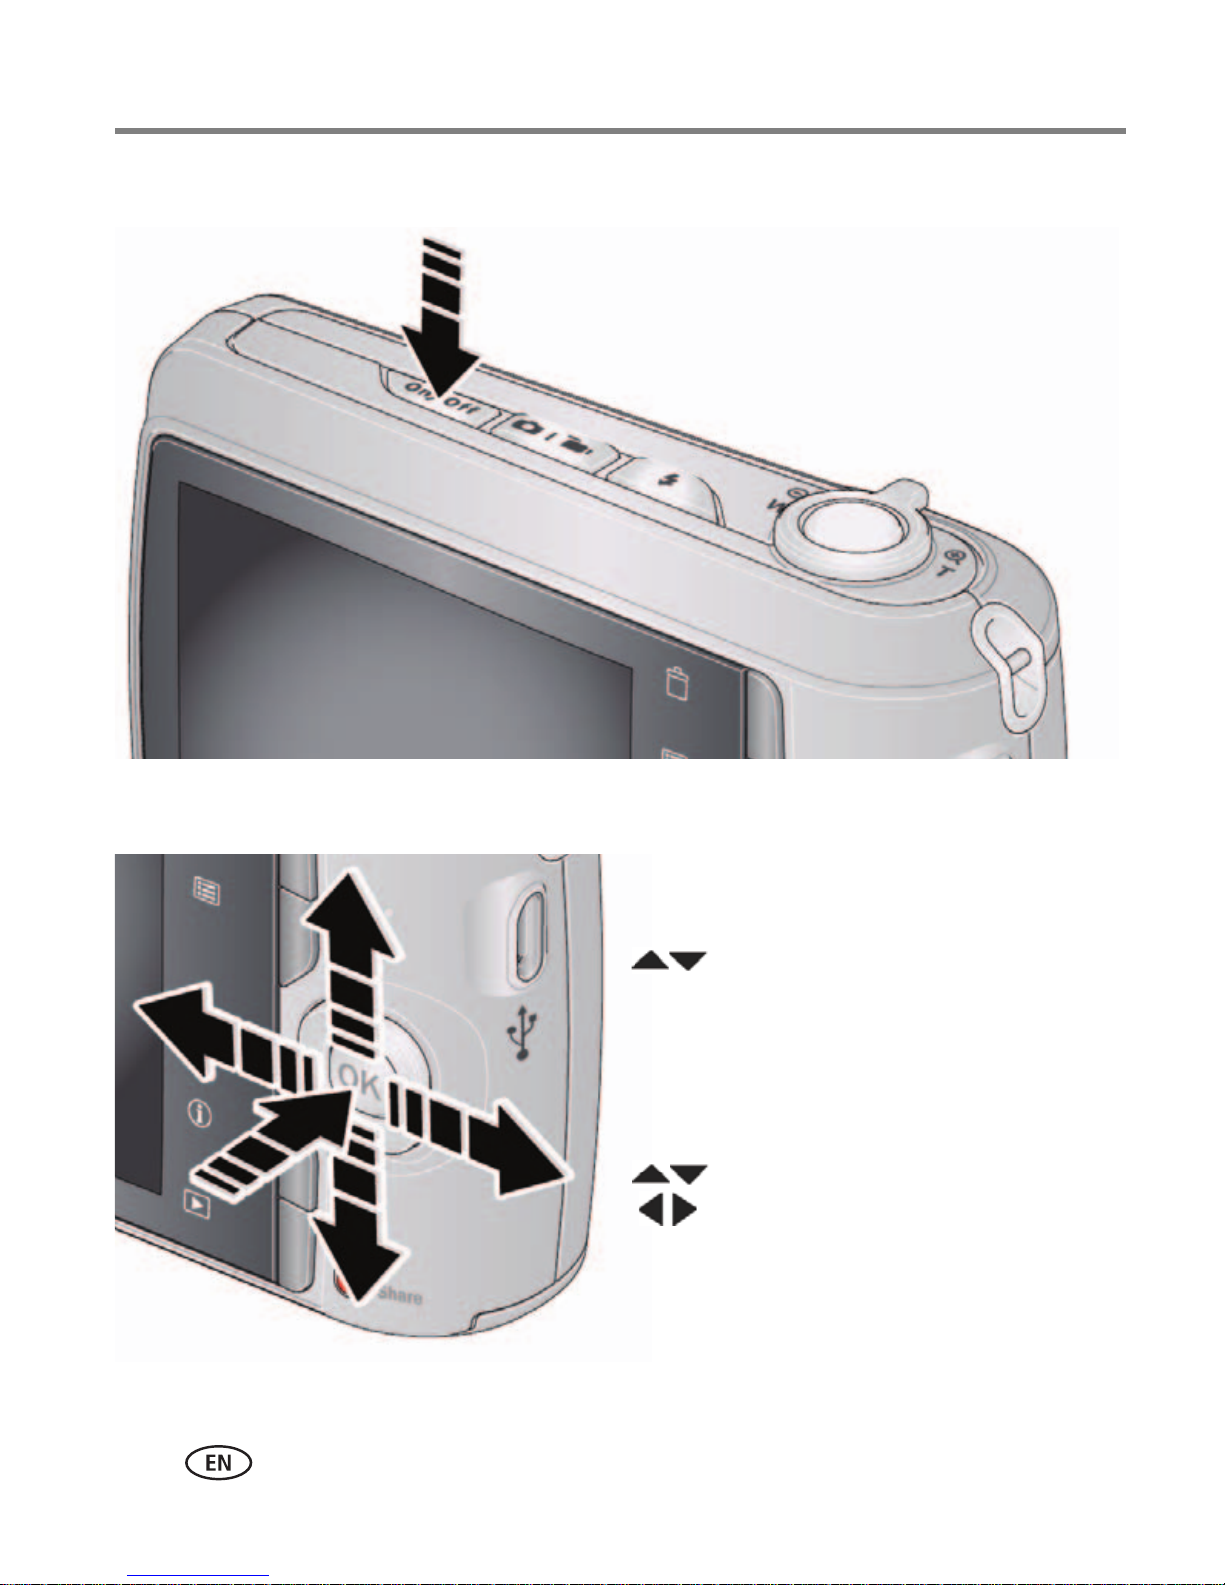
Turnonthe
camera
Mise
sous
tension
de
I'appareil
photo
Encendidodela
camara
Ligue
a camera
AT
to change
AT
para cambiar
~~
for previous/next
~~
para avanzar/
field retroceder
OK
to accept
OK
para aceptar
AT
pour modifier
AT
para alterar
~~
pourIechamp
~~
para
avan~ar/
precedent/suivant
retroceder
ca
mpos
OK
pour accepter
OK
para aceitar
Pressione
[E
para entrar/sair
do modo
de
visualiza~ao.
~
~ Visualizar anterior/seguinte
OK
Reproduzir/pausar/
interromper um video
~O
Excluir uma foto
ou
um video
Press[Eto enter/exit
Review.
~ ~
View previous/next
OK
Play/pause/resume a
video
~O
Delete a
picture/
video
Presione
[E
para entrar 0 salir del
modo Revision.
~
~
para verelarchivo
anterior/
siguiente.
OK
para reproducir, pausar 0
reanudarunvideo.
~O
para borrar una fotografia 0
un video.
~
Review
pictures/videos
~
Visionnage
des
photos/
sequences
video
Revisiondefotograffas y
videos
. Visualize
fotosevideos
~
0 Appuyez sur
[E
pour acceder
au
;0
mode de visualisationouIe
quitter.
~
~
pour
afficher precedente/suivante
OK
pour lire/mettreenpause/
reprendre
une
sequence video
~
pour supprlmer
une
pnolOl
o sequence video
Pressione
0 botao Modo,
AT
para destacar Video
111.
e
pressione
OK.
Pressione 0 botao
do obturador e solte-o. Pressione
novamente para interromper a
grava~ao.
Grabaciondevideos
Grave
urn
video
Take
a video
Enregistrement
d'une
sequence
video
Press
the
Mode
button, then
AT
to highlight Video
111.
,
then press
OK.
Press
the
Shutter button then release.
Press
againtostop recording.
Appuyez sur
Ie
bouton Mode,
puis sur
AT
pour selectionner
Video
111.
et appuyez sur
OK.
Appuyez surIebouton de
I'obturateur, puis relachez-Ie.
Appuyez dessus de nouveau
pour arreter I'enregistrement.
Tomadefotografias
Tire
uma
foto
Pulseeldisparador hastalamitad
para establecer
la
exposicion y
el
enfoquey,a continuacion, pulselo
completamente.
Pressione parcial mente
0 botao
do obturador para focar edefinir
a
exposi~ao
e pressione-o
completamente.
Press
the Shutter button
halfway to focus and set
exposure, then press
completely down.
Enfoncez
Ie
boutondeI'obturateur
ami-course pour regler
la
mise
au
point et I'exposition, puis
enfoncez-Ie completement.
..
Take
a picture
~
Prise
d'une photo
Page 4
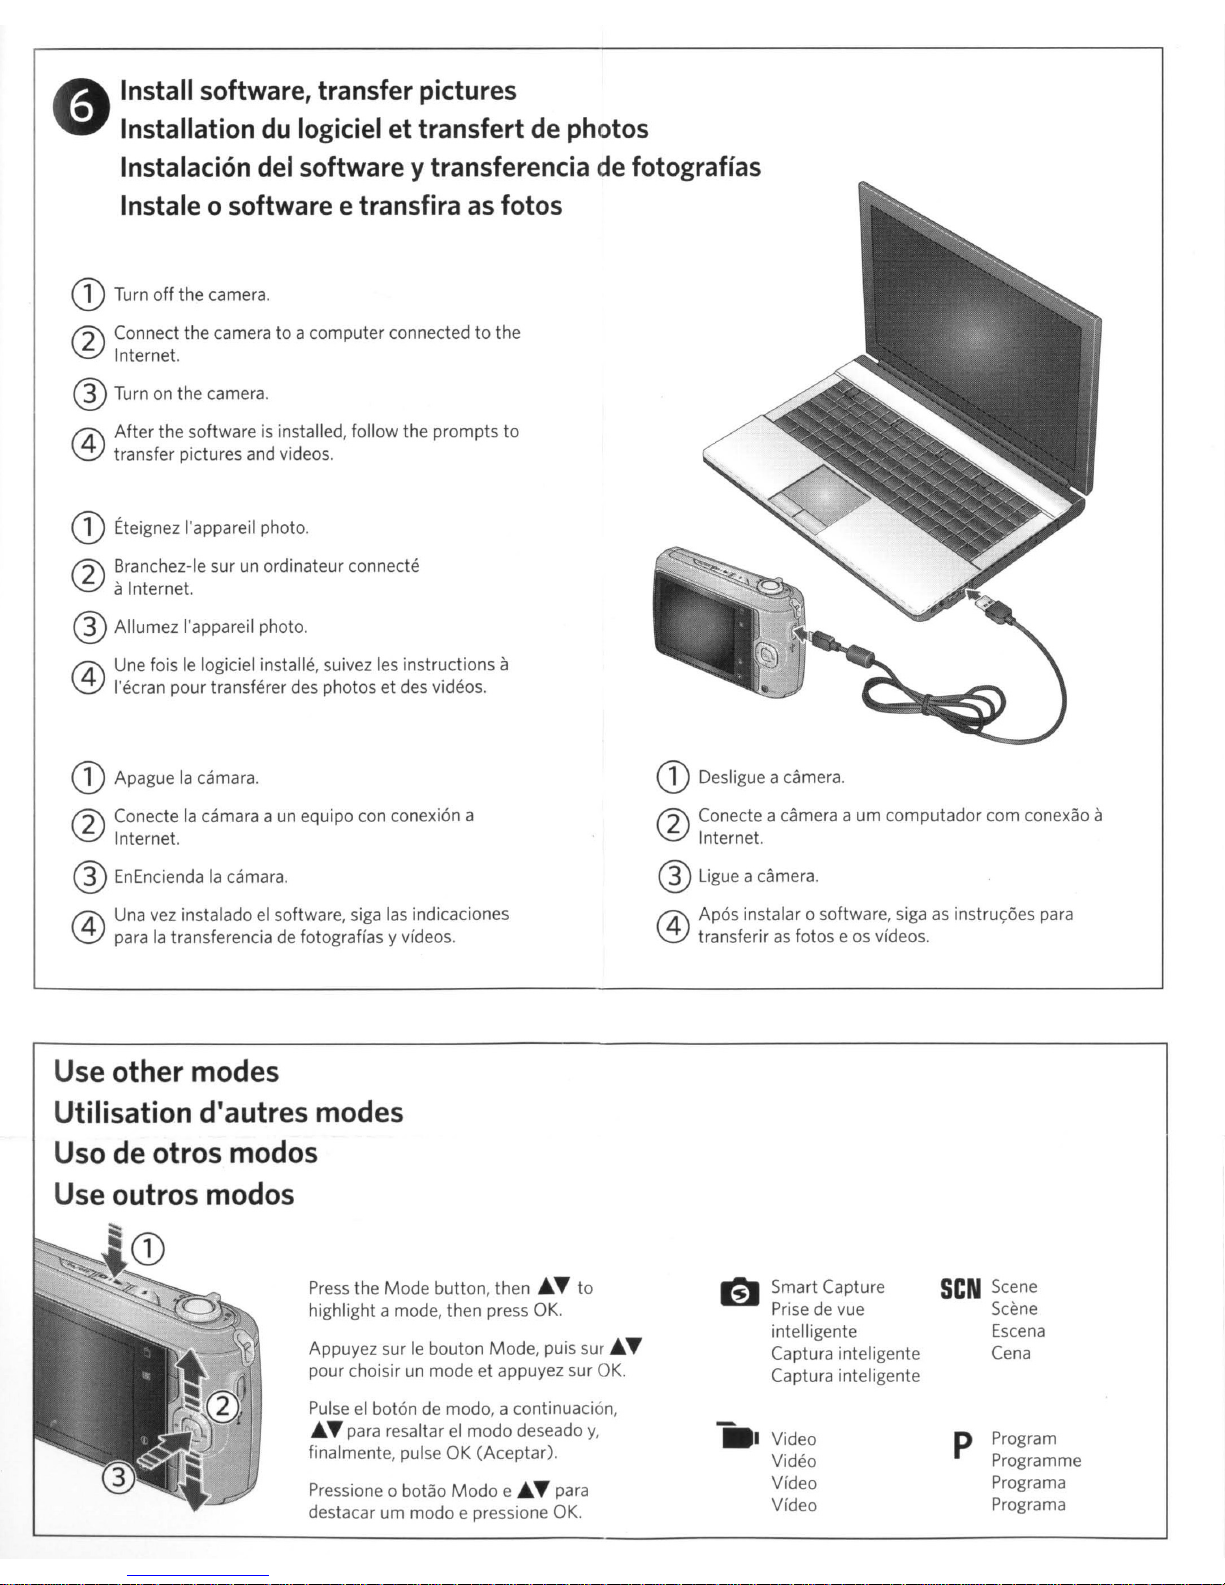
Install software, transfer pictures
du
Installation
logiciel et transfert de photos
Instalaci6n del software
Instale
G)
Turn
f2\
Connect the camera to a computer connectedtothe
\f:.)
Internet.
®Turn
After
@
transfer pictures and videos,
G)
Eteignez I'appareil photo,
f2\
Branchez-Ie surunordinateur connecte
\f:.)
aInternet.
0 software e transfira as fotos
off
the camera,
on
the camera,
the softwareisinstalled, follow the prompts
y transferencia de fotografias
®Allumez I'appareil photo,
Une fois
@
I'ecran pour transferer des photos et des videos,
Ie
logiciel installe, suivez les instructions a
to
G)
Apaguelacamara,
f2\
Conectelacamara aunequipo con conexion a
\f:.)
Internet.
®EnEncienda
Una vez instaladoelsoftware, siga
@
para
la
camara,
las
la
transferencia de fotografias y videos,
Use other modes
Utilisation d'autres modes
Uso de otros modos
Use outros modos
Press
the
Mode
highlight a mode, then press
Appuyez sur
pour choisirunmode et appuyez sur
Pulseelboton de modo, a continuacion,
• T para resaltar
finalmente, pulse OK (Aceptar),
Pressione
destacar um modo e pressione
0 botao
indicaciones
button, then • T to
OK.
Ie
bouton Mode, puis sur • T
el
modo deseado
Modo
e • T para
OK,
y,
OK,
G)
Desligue a camera,
f2\
Conecte a camera a um computador com conexao a
\f:.)
Internet.
® Ligue acamera,
Apos instalar 0 software, sigaasinstru<;:6es
@
transferir
as
Smart Capture
Prise de vue
intelligente
Captura inteligente
Captura inteligente
ii-
Video
Video
Video
Video
fotos eosvideos,
seN
Scene
Scene
Escena
Cena
P Program
Programme
Programa
Programa
para
Page 5

Tag
your
pictures
Marquagedevos
photos
Como
marcar fotograflas
Marque
suas
fotos
Tag
pictures by Keyword, Favorites, or People
(face recognition) to easily find them later.
See
the Extended user guide.
Marquez vos photos
en
utilisant des mots
c1es,
mettez lesenfavorisouidentifiez leurs sujets
(detection des visages) pour pouvoir les retrouver
facilement. Consultez
Ie
Guide d'utilisation
etendu.
Marque fotograffas por Palabra clave, Favoritos
0
Personas (reconocimiento de rostros) para
localizarlas facilmente cuando
10
necesite.
Consulte
la
Guia del usuario ampliada.
Marque
as
fotos por palavras-chave, favoritos
ou
pessoas (reconhecimento de rosto) para
encontra-Ias facilmente. Con suite
0 Guia
Completo do Usuario.
Date
Date
Fecha
Data
People
Sujets
Personas
Pessoas
Favorites
Favoris
Favoritos
Favoritos
Keywords
Mots
c1es
Palabras clave
Palavras-chave
Use
on-camera Help
Utilisation
de
I'aide
sur
I'appareil
Usodela
ayudadela
camara
Use
a Ajuda integradanacamera
f1\
Press
the Menu button~, highlight a menu choice,
\.!}
then press the Info button
CD.
@ J;.'" Scroll through a Help topic.
f1\
Appuyez surIebouton Menu~,choisissez une
\.!}
option de menu, puis appuyez surIebouton Info
CD.
@J;.'" Faites defiler I'ecran jusqu'a une rubrique d'aide.
CD
Pressione 0 botao Menu~,destaque uma
op~ao
e
pressione
0 botao I
nforma~6es
CD
.
@ J;..., Percorra 0
topico
de Ajuda.
This equipment
has
been tested and found to comply
with
the
limits for a Class B digital device, pursuant to Part
15
of the
FCC
Rules.
These limits are designedtoprovide reasonable protection
against harmful interference
in
a residential installation.
Canadian DOC statement
DOC Class B
Compliance-This
Class Bdigital apparatus
complies
with
Canadian ICES-003.
Observation des normes-Classe
B-Cet
appareil numerique de
la
c1asse
Best
conforme alanorme
NMB-003
du Canada.
CE
Hereby, Eastman Kodak Company declares that this KODAK
Product
is
in compliance with the essential requirements and
other relevant provisions of Directive
1999/5/E.
f1\
Pulseelboton Menu
(Menu)~,seleccione
una
opcion
y,
\.!}
a continuacion, pulseelboton Info (Informacion)
CD
.
@J;.'" Desplazarse por los temas de
la
ayuda.
FCC
compliance and advisory
Vous pouvez partager des photos sur vos sites de reseaux
sociaux preferes.
Comparta fotograffas
en
sus sitios de redes sociales
favoritos.
Share
your
pictures
Partagedevos
photos
Como
com
partir
fotograflas
Compartilhe
suas
fotos
Compartilhe suas fotos em seus sites de rede social
favoritos.
IMPORTANTE:
Para
usufruirosrecursosderede
social
do
camero,
sera
necessario
fazer
0 download
do
software
KODAK.
Consufte0Guia
CompletodoUsuario.
IMPORTANT: pour utiliser
les
fanctionsdereseau
social
de
/'appareil
photo,
vous
devez
telechargerIelogiciel
KODAK.
ConsultezIeGuide
d'utilisation
etendu.
Share picturesonyour favorite social networkingsites.
IMPORTANT:Touse
the
comera's
social networking
features,
you
must
download
KODAK
Software.
See
the Extended
user
guide.
IMPORTANTE:
pora
utilizar
las
funcionesderedes
sociales
de
10
camaro,esnecesario
descorgarelsoftwaredeKODAK.
Consufte
10
Gufa
del
usuario
ompliada.
Off
Desactive
Apagado
Desativado
Red
Eye
Yeux
rouges
Ojos rojos
Olhos vermelhos
Uso
del
flash
Use0flash
~
Fill (Flash
on)
Appoint
(flash active)
De relleno (flash encendido)
Preencher (Flash Iigado)
;:L
Press$:repeatedlytoscroll through Flash modes.
Appuyez sur
$:
de
fa<;:on
repetee pour faire defiler
les modes de flash.
Pulse"
varias veces para desplazarse por los modos
de flash.
Pressione
$:
varias vezes para percorrerosmodos
de flash.
LA
Auto
#
Auto
Automatico
Automatico
Use
the
flash
Utilisationduflash
Page 6
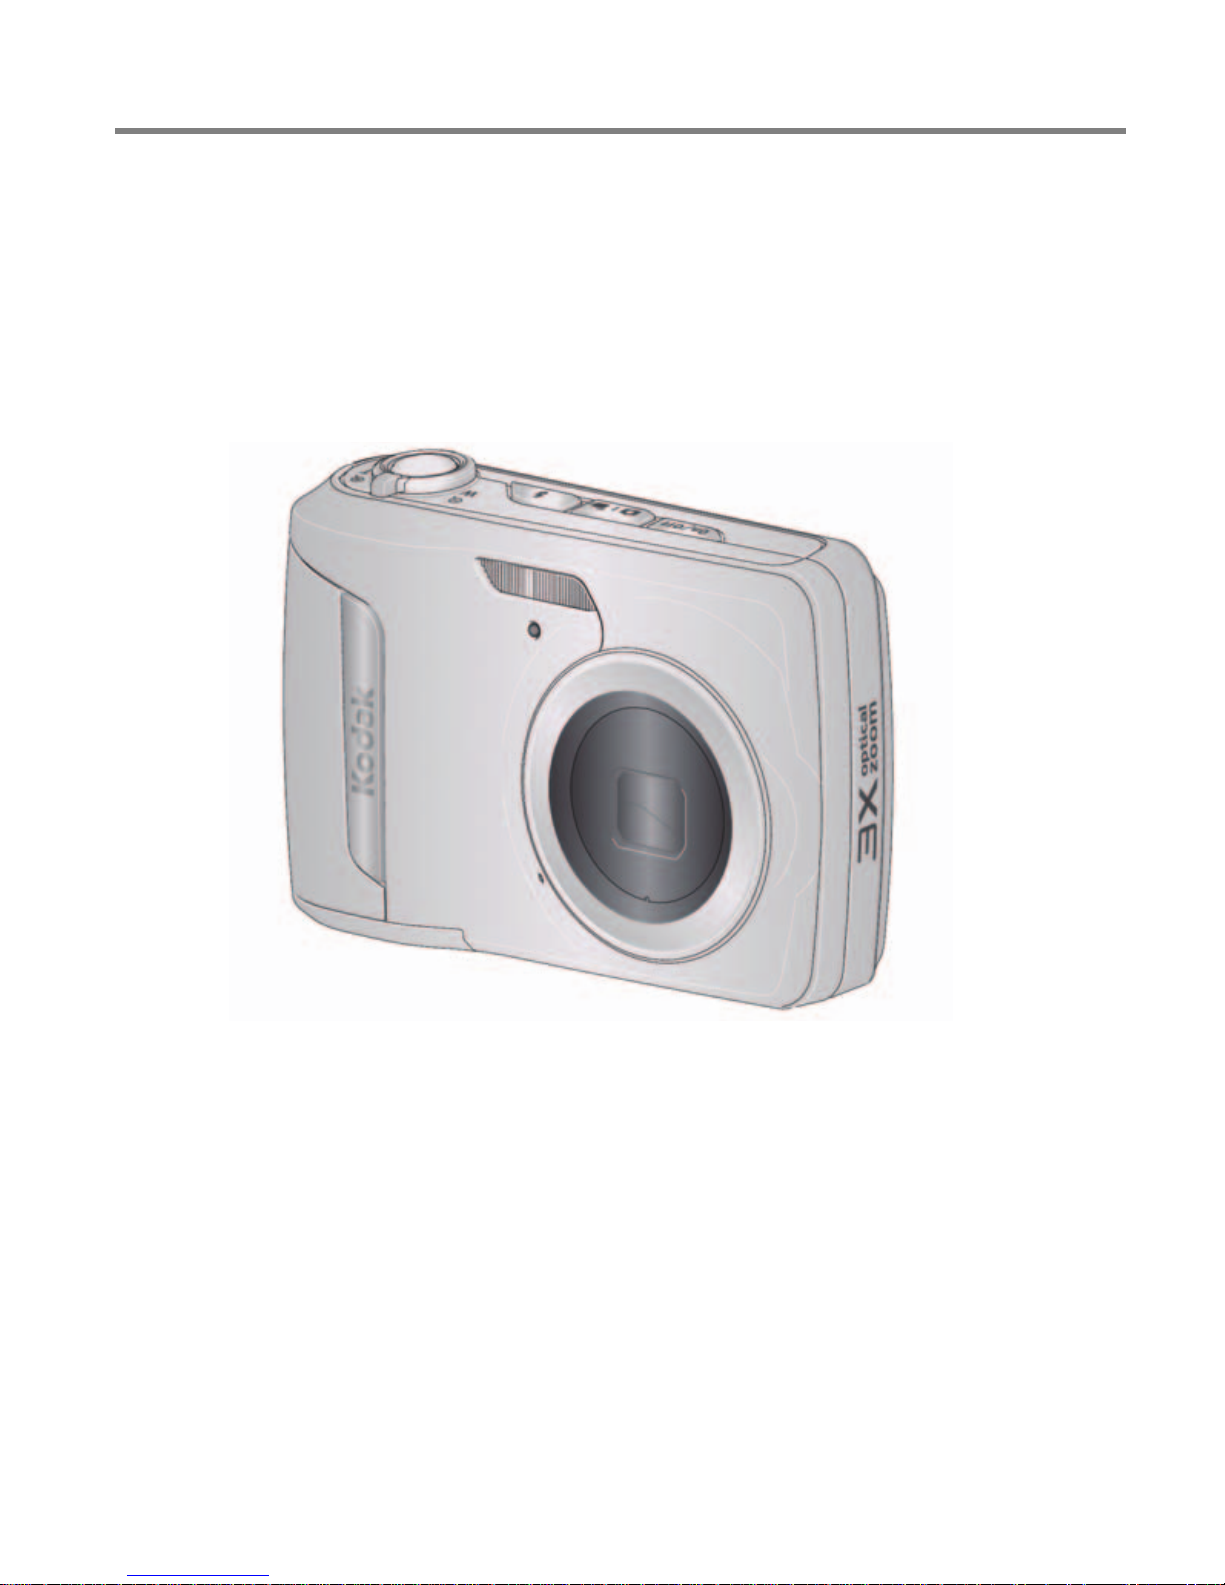
KODAK EASYSHARE C143
Digital Camera
Extended user guide
www.kodak.com
For interactive tutorials:
www.kodak.com/go/howto
For help with your camera:
www.kodak.com/go/c143support
Page 7

Eastman Kodak Company
Rochester, New York 14650
© Eastman Kodak Company, 2010
All screen images are simulated.
Kodak, EasyShare, Max, and Pulse are trademarks of Eastman Kodak Company.
4H7076_en
Page 8
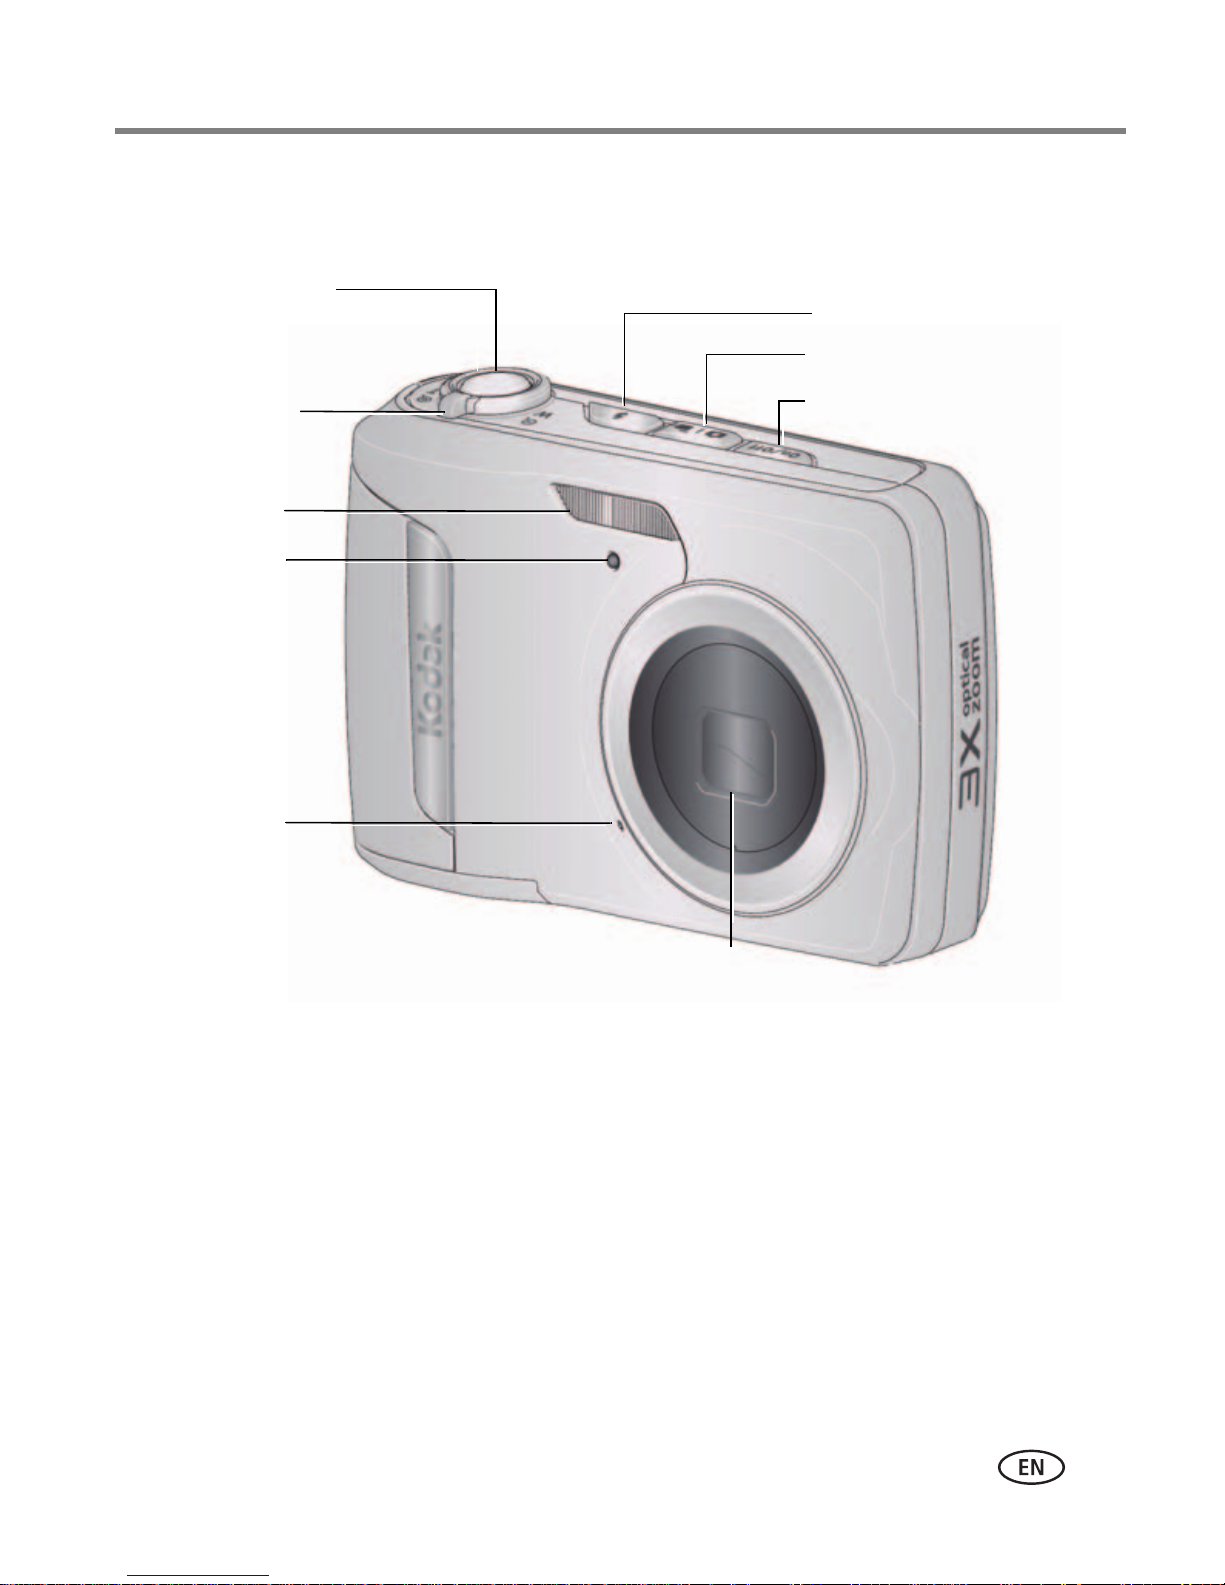
Front view
Lens
Microphone
Flash
Self-timer/
Video light
Zoom (Wide
Angle/Telephoto)
lever
Power button
Flash button
Mode button
Shutter button
Product features
NOTE:
Your camera offers a built-in Help system. See page 40.
www.kodak.com/go/support
i
Page 9
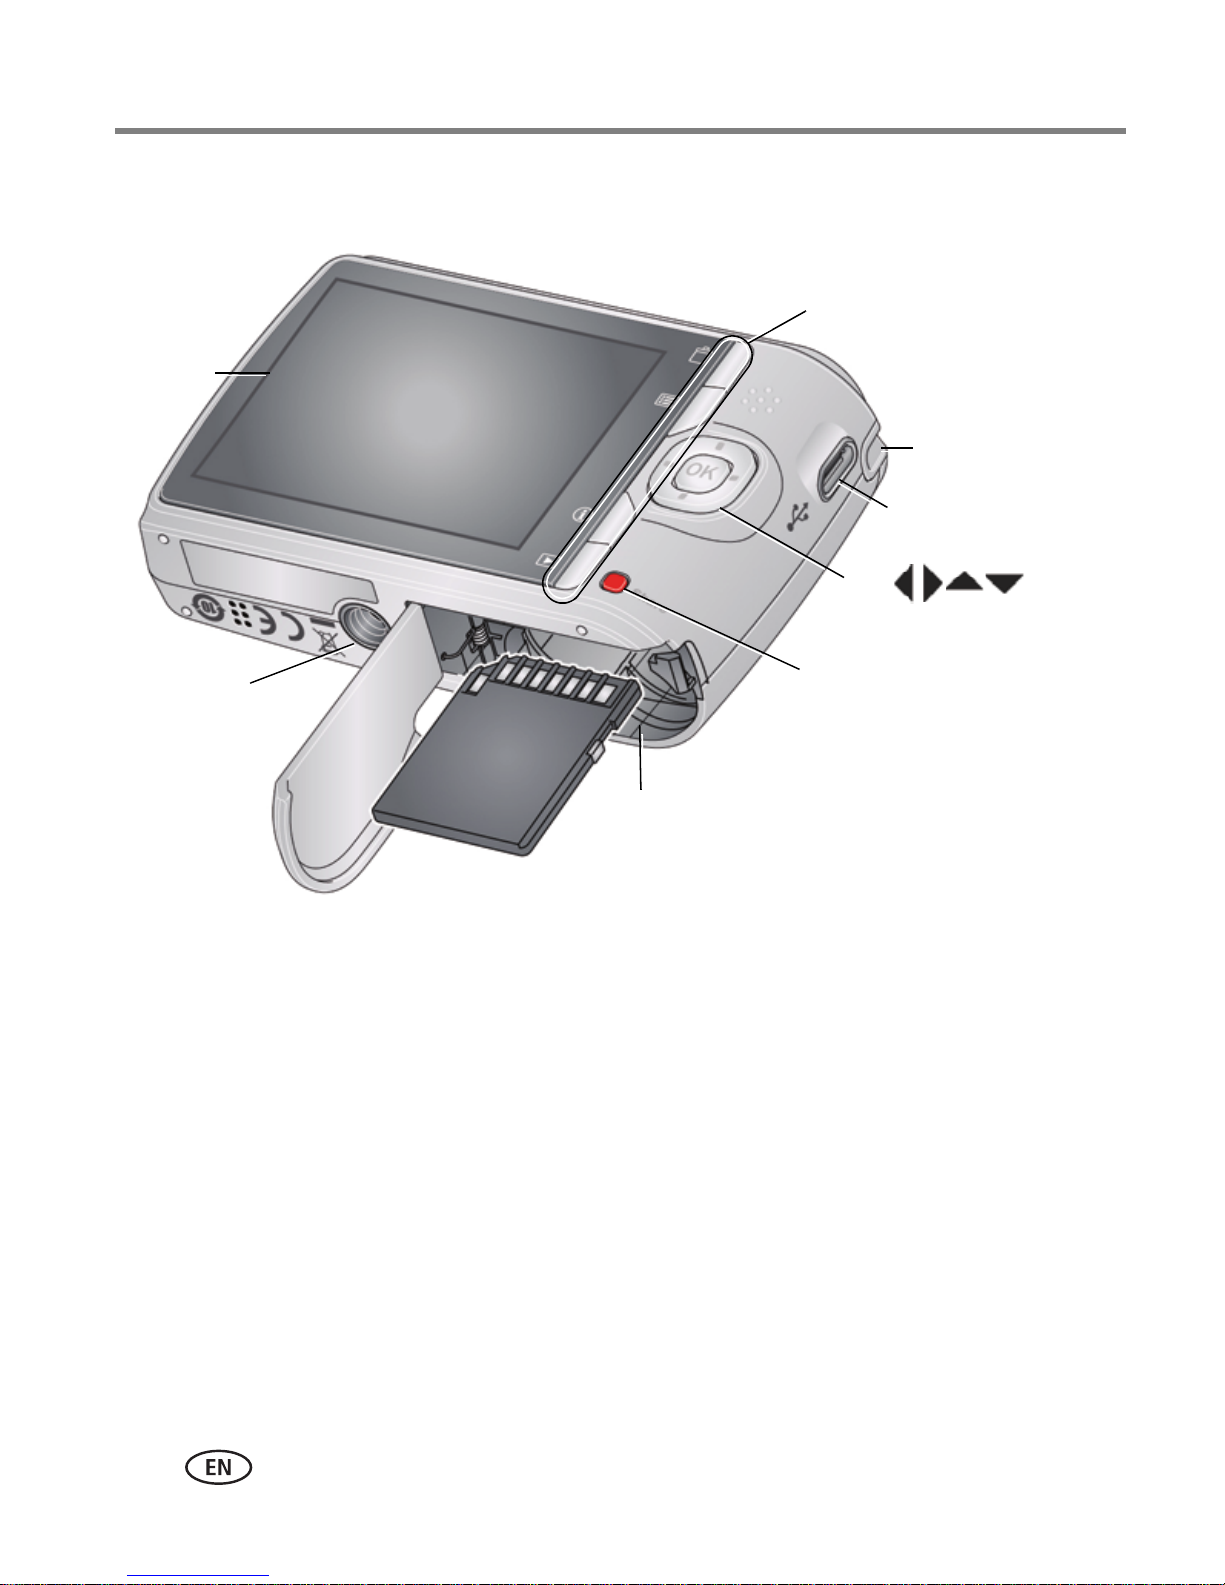
Product features
OK
Battery compartment,
SD/SDHC Card slot
LCD
Share button
USB port
Delete, Menu, Info,
Review buttons
Strap post
Tripod
socket
Back view
NOTE:
Your camera offers a built-in Help system. See page 40.
ii www.kodak.com/go/support
Page 10

Table of contents 1
1 Setting up your camera .........................................................................1
Attaching the strap .......................................................................................1
Loading the AA batteries............................................................................... 1
Turning on the camera ..................................................................................2
Setting the language and date/time...............................................................2
Storing pictures on an optional SD or SDHC Card...........................................3
2 Taking pictures/videos ...........................................................................4
Taking pictures.............................................................................................. 4
Taking a video .............................................................................................. 5
Understanding the picture-taking icons..........................................................6
Know when your batteries need attention......................................................6
Using the optical zoom..................................................................................7
Using the flash.............................................................................................. 8
Using different modes ...................................................................................9
Using shortcuts ...........................................................................................11
Using the self-timer..................................................................................... 12
Using burst .................................................................................................12
Taking panoramic pictures...........................................................................13
3 Sharing and tagging pictures ..............................................................14
Sharing through social networks..................................................................14
Tagging pictures .........................................................................................16
Marking pictures/videos for emailing ...........................................................18
4 Reviewing and editing .........................................................................19
Reviewing pictures/videos ........................................................................... 19
Deleting pictures/videos ..............................................................................20
Viewing pictures/videos in different ways..................................................... 21
A smarter way to find and enjoy your pictures..............................................22
Understanding the review icons................................................................... 23
www.kodak.com/go/support iii
Page 11

Table of contents
Creating a slide show.................................................................................. 24
Displaying pictures/videos on a television.....................................................25
Using the menu button in review.................................................................26
Cropping pictures........................................................................................26
Rotating pictures.........................................................................................27
Editing videos .............................................................................................28
Selecting multiple pictures/videos ................................................................29
Copying pictures/videos...............................................................................29
5 Doing more with your camera .............................................................30
Using the menu button to change settings...................................................30
Using the Setup menu.................................................................................33
6 Transferring, printing pictures .............................................................36
Download software, transferring pictures.....................................................36
Printing pictures.......................................................................................... 37
Marking your pictures for printing................................................................39
7 Troubleshooting ..................................................................................40
Getting help from your camera.................................................................... 40
Troubleshooting..........................................................................................41
Getting help on the Web.............................................................................44
8 Appendix .............................................................................................45
Specifications.............................................................................................. 45
Care and maintenance ................................................................................47
Upgrading your software and firmware........................................................47
Storage capacities.......................................................................................48
Important safety instructions .......................................................................48
Battery replacement, battery life.................................................................. 49
Limited warranty .........................................................................................50
Regulatory compliance ................................................................................51
iv www.kodak.com/go/support
Page 12
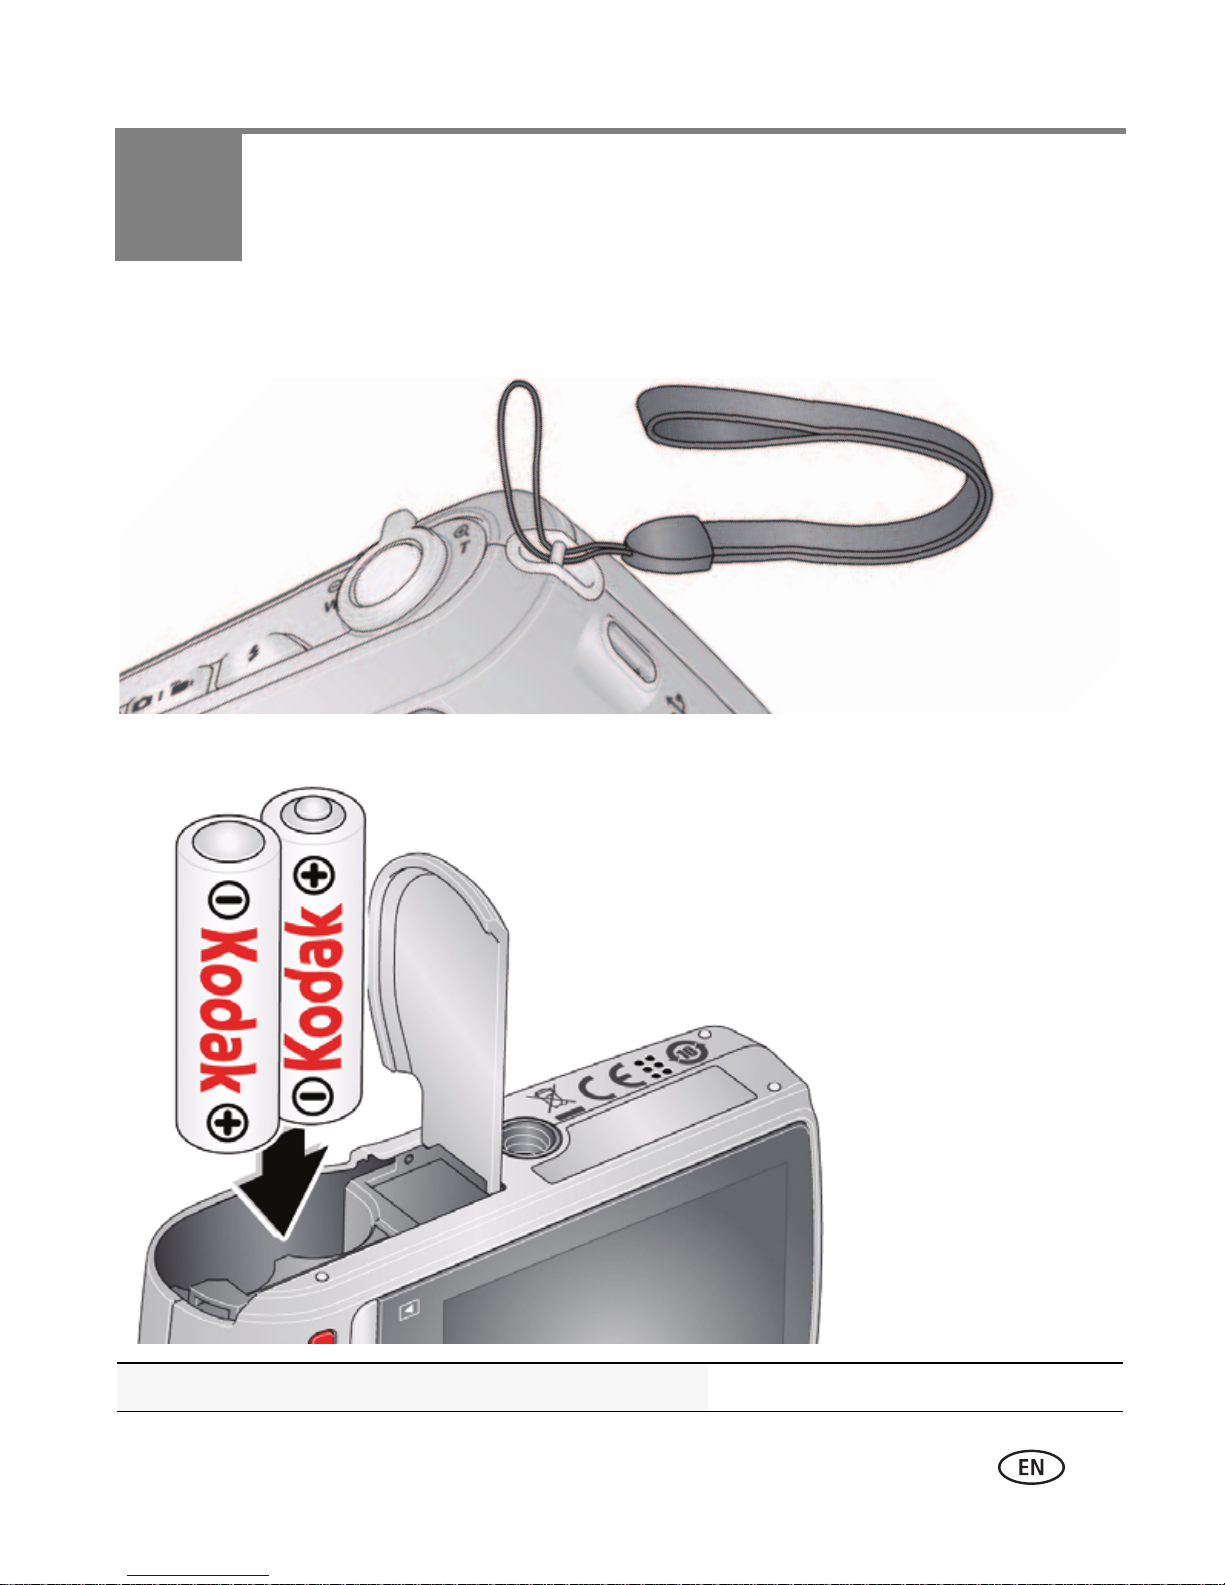
1 Setting up your camera
Attaching the strap
Loading the AA batteries
Purchase extra batteries for your special event www.kodak.com/go/c143accessories
www.kodak.com/go/support 1
Page 13
Setting up your camera
to change current field.
for previous/next field.
OK
to accept.
At the prompt, press OK.
to change.
OK
to accept.
Language:
Date/Time:
Turning on the camera
Setting the language and date/time
NOTE: To change language in the future, use the Setup Menu (see page 33).
2 www.kodak.com/go/support
Page 14
Setting up your camera
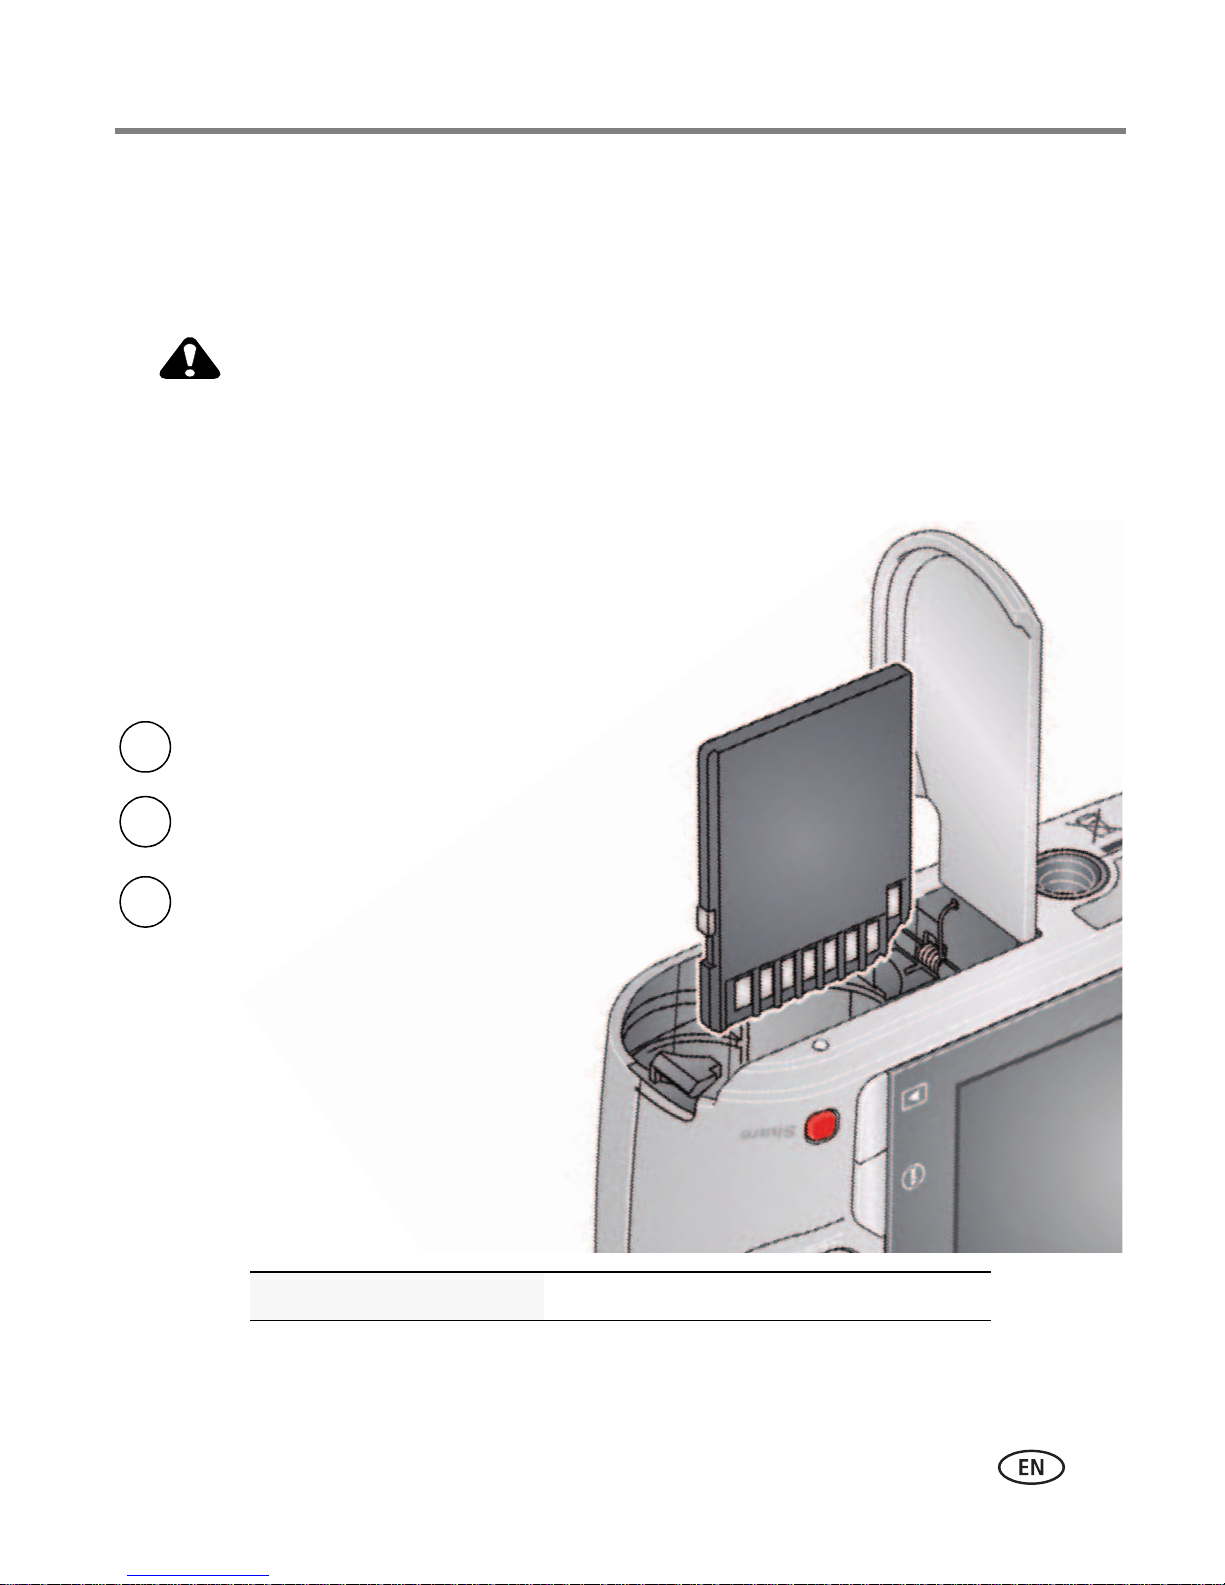
CAUTION:
1
Turn off the camera.
2
3
Turn on the camera.
Insert the card.
Push it until it clicks.
Storing pictures on an optional SD or SDHC Card
Your camera has internal memory. We recommend purchasing an SD or SDHC Card to
conveniently store more pictures/videos.
A card can only be inserted one way; forcing it may cause
damage. Inserting or removing a card while the camera is on may
damage the pictures, the card, or the camera.
Purchase accessories www.kodak.com/go/c143accessories
www.kodak.com/go/support
3
Page 15

2 Taking pictures/videos
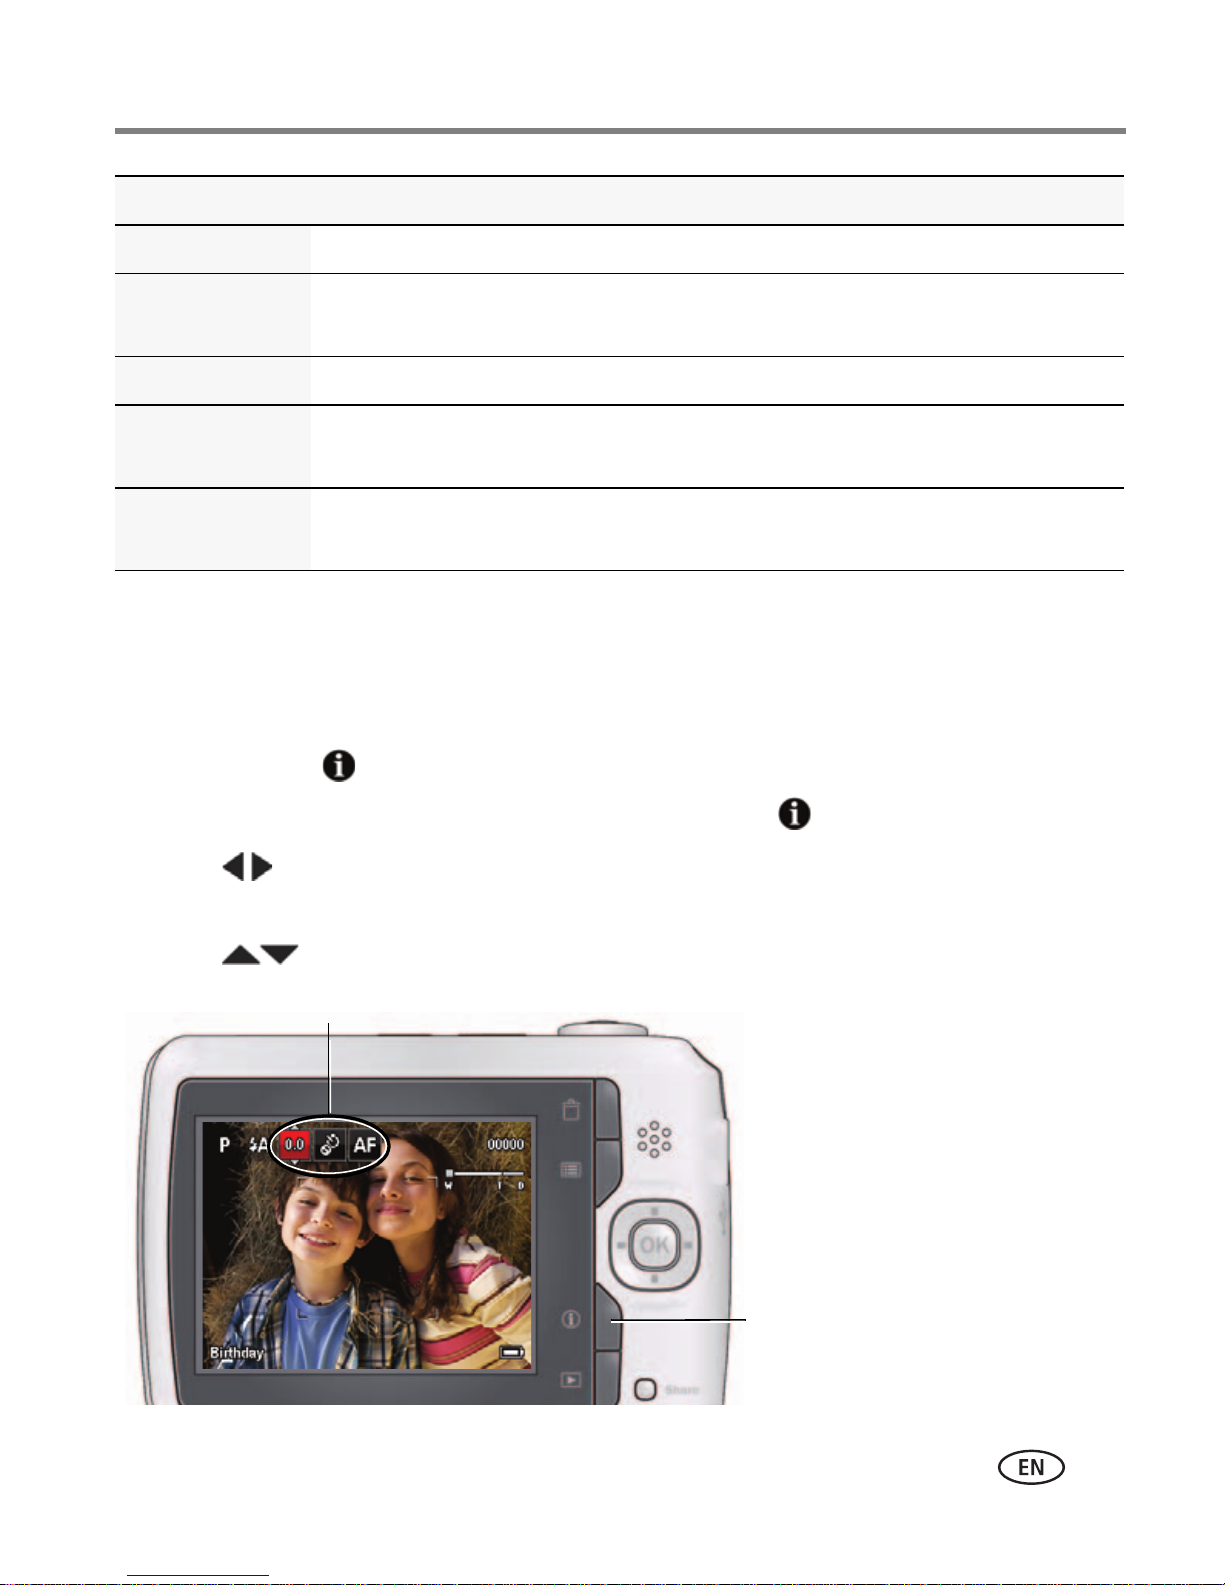
Framing marks
Taking pictures
To get clear, focused pictures:
1 The camera turns on in Smart Capture mode.
(If it’s in a different mode, press the Mode
button, then until the LCD displays
Smart Capture mode , then press OK.)
2 Compose the picture.
3 Press the Shutter button halfway to focus and
set exposure. When the framing marks turn green,
press the Shutter button completely down.
Using the framing marks
NOTE:
Your camera offers a built-in Help system. See page 40.
Framing marks indicate the camera focus area.
1 Press the Shutter button halfway.
If the camera is not focusing on the desired subject,
release the Shutter button and recompose the scene.
2 Press the Shutter button completely down to
take the picture.
NOTE: Multiple framing marks may appear when faces are detected.
4 www.kodak.com/go/support
Page 16
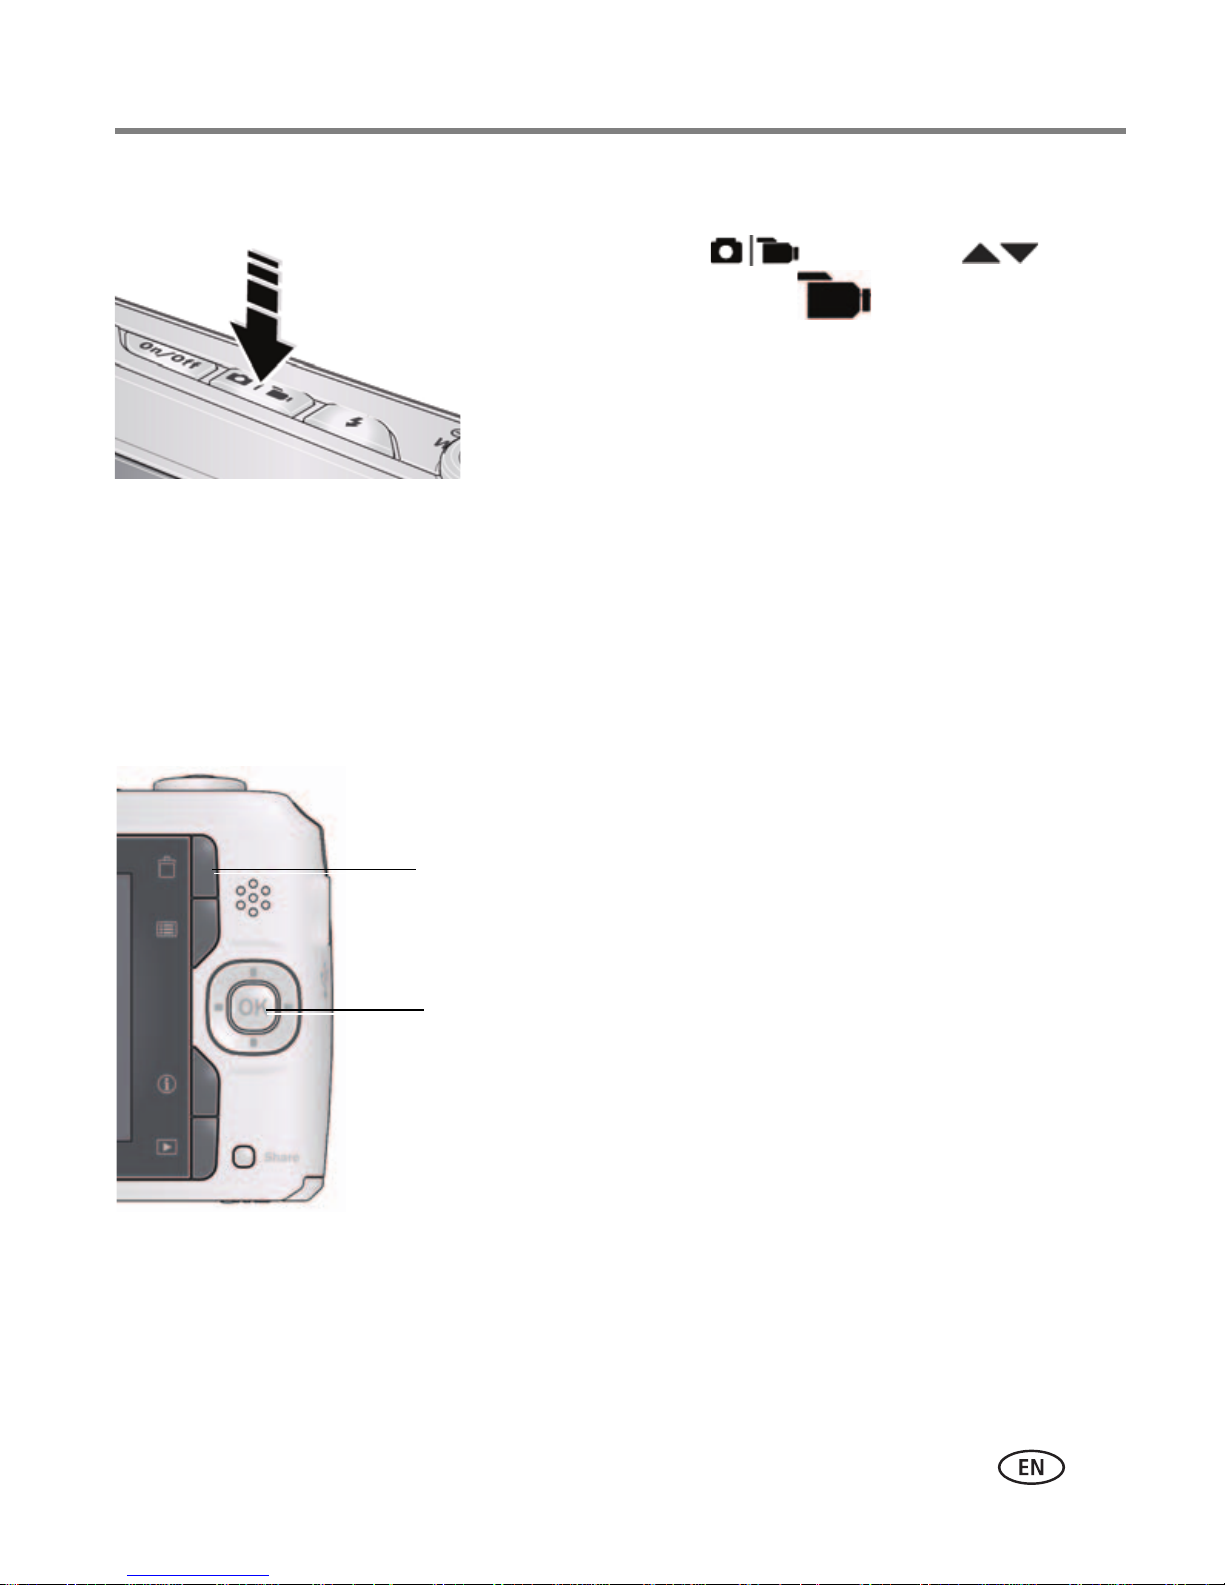
Taking a video
Delete the current picture/video
OK Play/pause a video
While a picture/video is displayed,
you may:
Taking pictures/videos
1 Press the Mode button, then until
the LCD displays
2 Press the Shutter button completely down,
then release it. To stop recording, press and release
the Shutter button again.
To review and work with videos, see page 19.
Video , then press OK.
Reviewing the picture/video just taken
After you take a picture/video, the LCD briefly displays the picture or the first frame of
a video. (To take new pictures/videos sooner, press the Shutter button halfway.)
NOTE: Audio is captured during video recording. Audio can be heard when the video is played on a
computer or when the camera is connected to a TV (page 25).
NOTE: To review pictures/videos anytime, see page 19.
www.kodak.com/go/support
5
Page 17
Taking pictures/videos
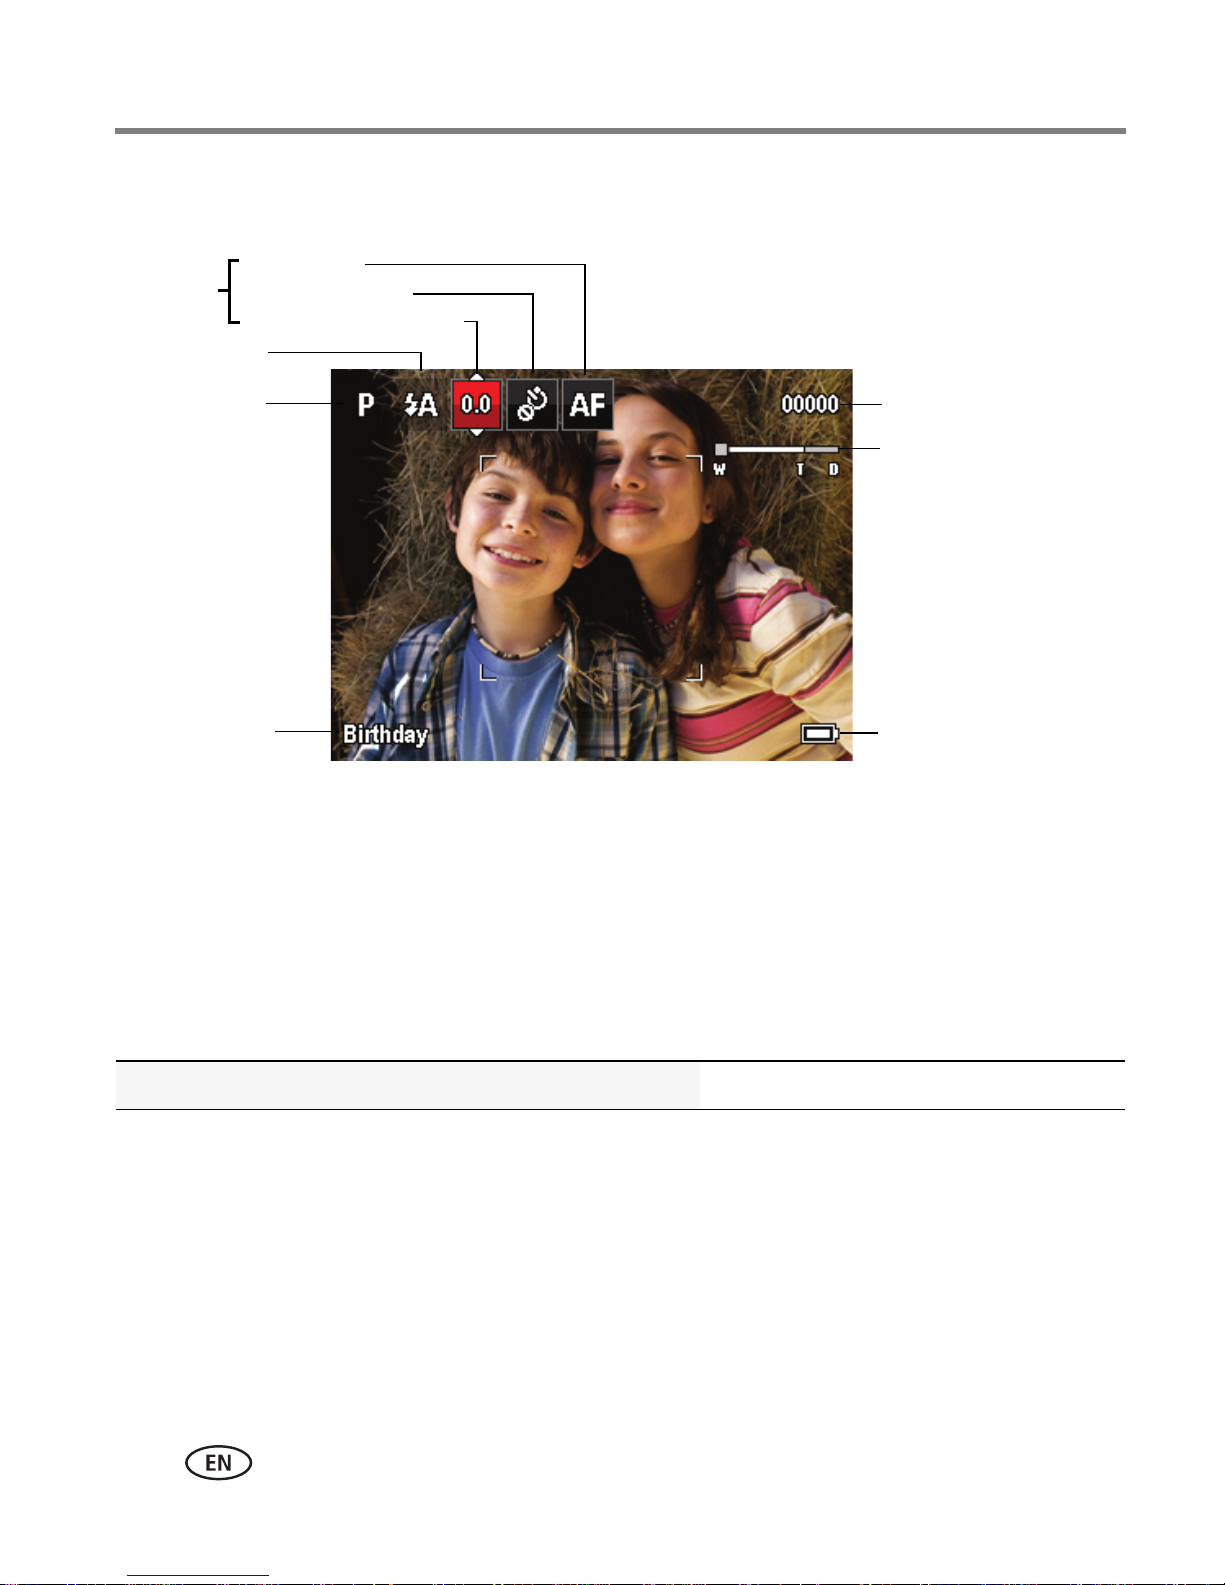
Battery level
Capture mode
Pictures/time remaining
Zoom indicator
Keyword tag
Self timer/Burst
Flash mode
Focus mode
Exposure compensation
Shortcuts*
Understanding the picture-taking icons
* For more about shortcuts, see page 11.
Know when your batteries need attention
The battery level icon works like the gas gauge in your car, but appears only when the
battery requires your attention. (If you’re viewing shortcuts, the battery level is always
displayed. See page 11.)
Purchase extra batteries for your special event www.kodak.com/go/c143accessories
6 www.kodak.com/go/support
Page 18
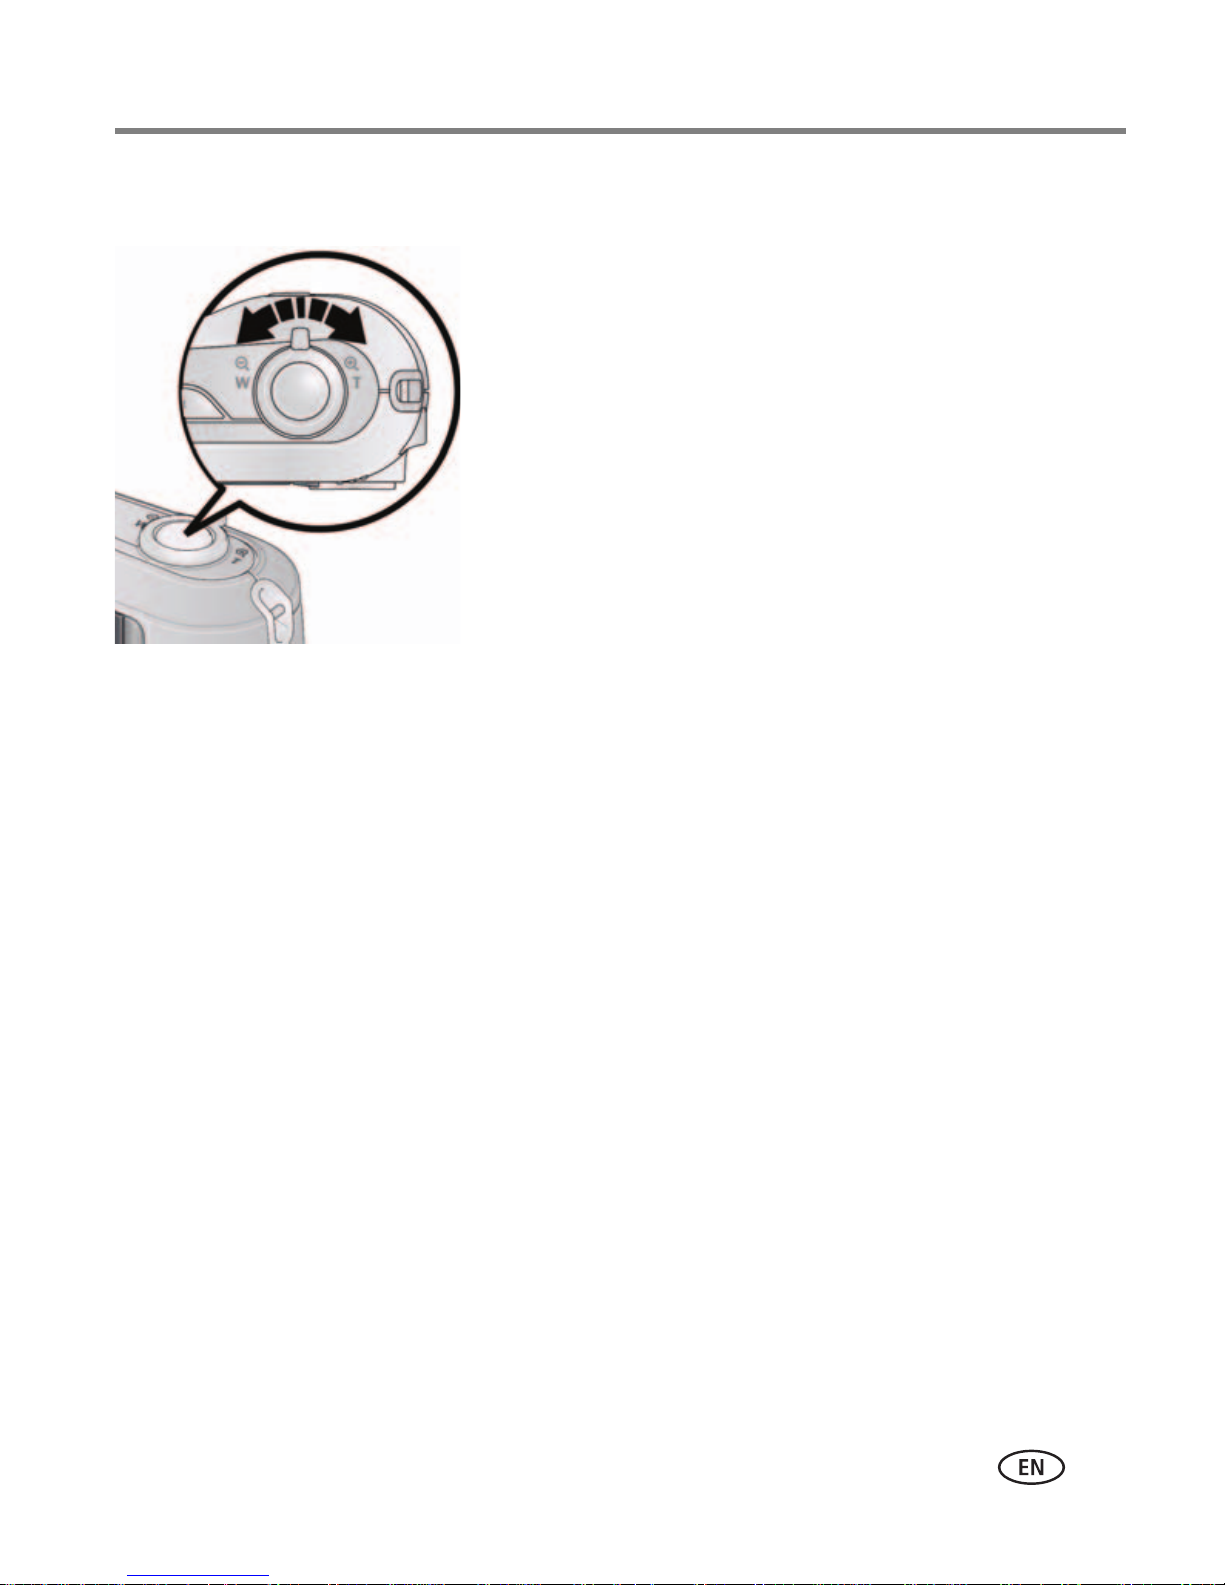
Using the optical zoom
1 Use the LCD to frame your subject.
2 To zoom in, turn the Zoom lever toward Telephoto
(T). To zoom out, turn it toward Wide Angle (W).
3 Take the picture.
NOTE: For focus distances, see Specifications starting on page 45.
Taking pictures/videos
Using digital zoom
Use digital zoom to get up to 5X magnification beyond optical zoom. (Digital zoom is
not available in Smart Capture mode.) Turn the Zoom lever toward Telephoto (T) until
the slider on the LCD is at the end of the optical zoom range. Release Telephoto (T),
then turn it again.
NOTE: You may notice decreased image quality when using digital zoom.
www.kodak.com/go/support
7
Page 19
Taking pictures/videos
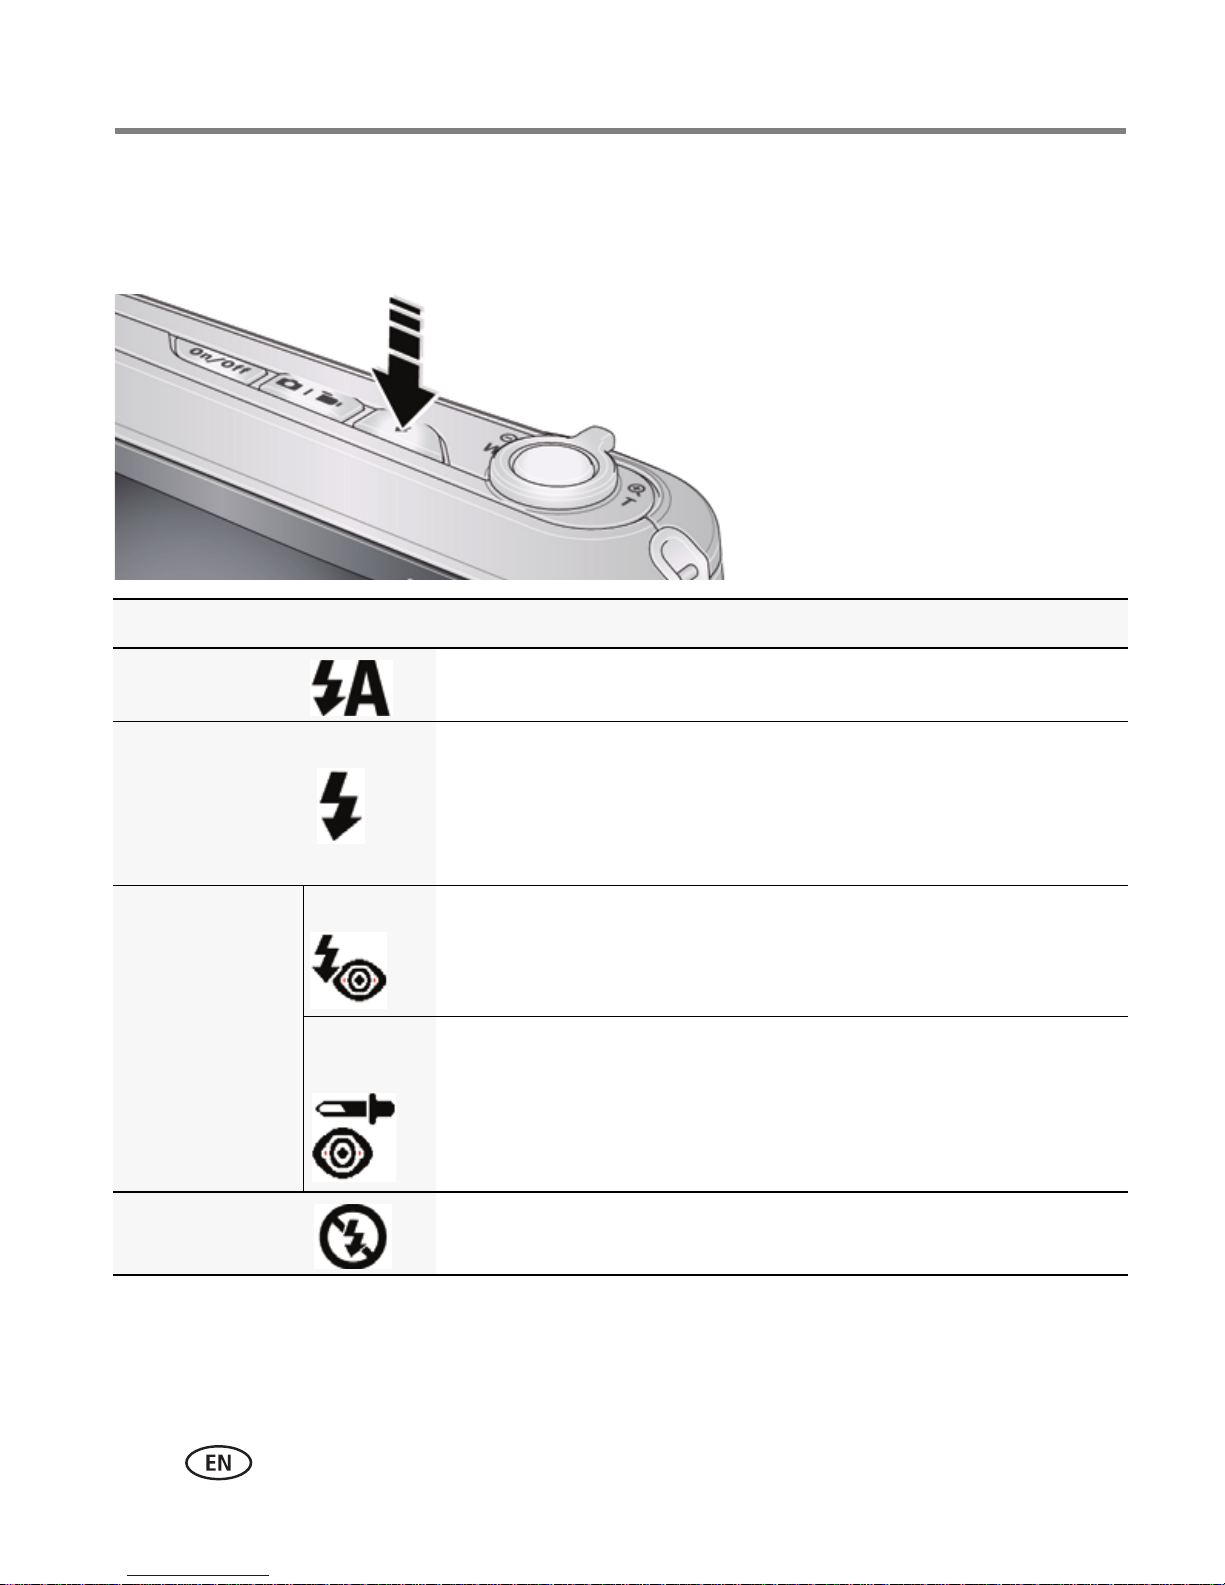
Using the flash
Press the Flash button repeatedly until the LCD displays the desired flash mode.
Flash modes Flash fires
Auto When the lighting conditions require it.
Fill (Flash On) Every time you take a picture, regardless of the lighting
conditions. Use when the subject is in shadow or is “backlit”
(when the light is behind the subject).
NOTE: Not available in Smart Capture mode.
Red-eye
Reduction
Choose a setting
in the Setup
menu, page 34.
Preflash The flash fires before the picture is taken to reduce the chance
of red-eye.
Digital
Correction
The camera digitally corrects red-eye after a picture is taken.
NOTE: When using digital correction, image processing takes longer
than when using preflash.
Off Never
8 www.kodak.com/go/support
Page 20
Taking pictures/videos
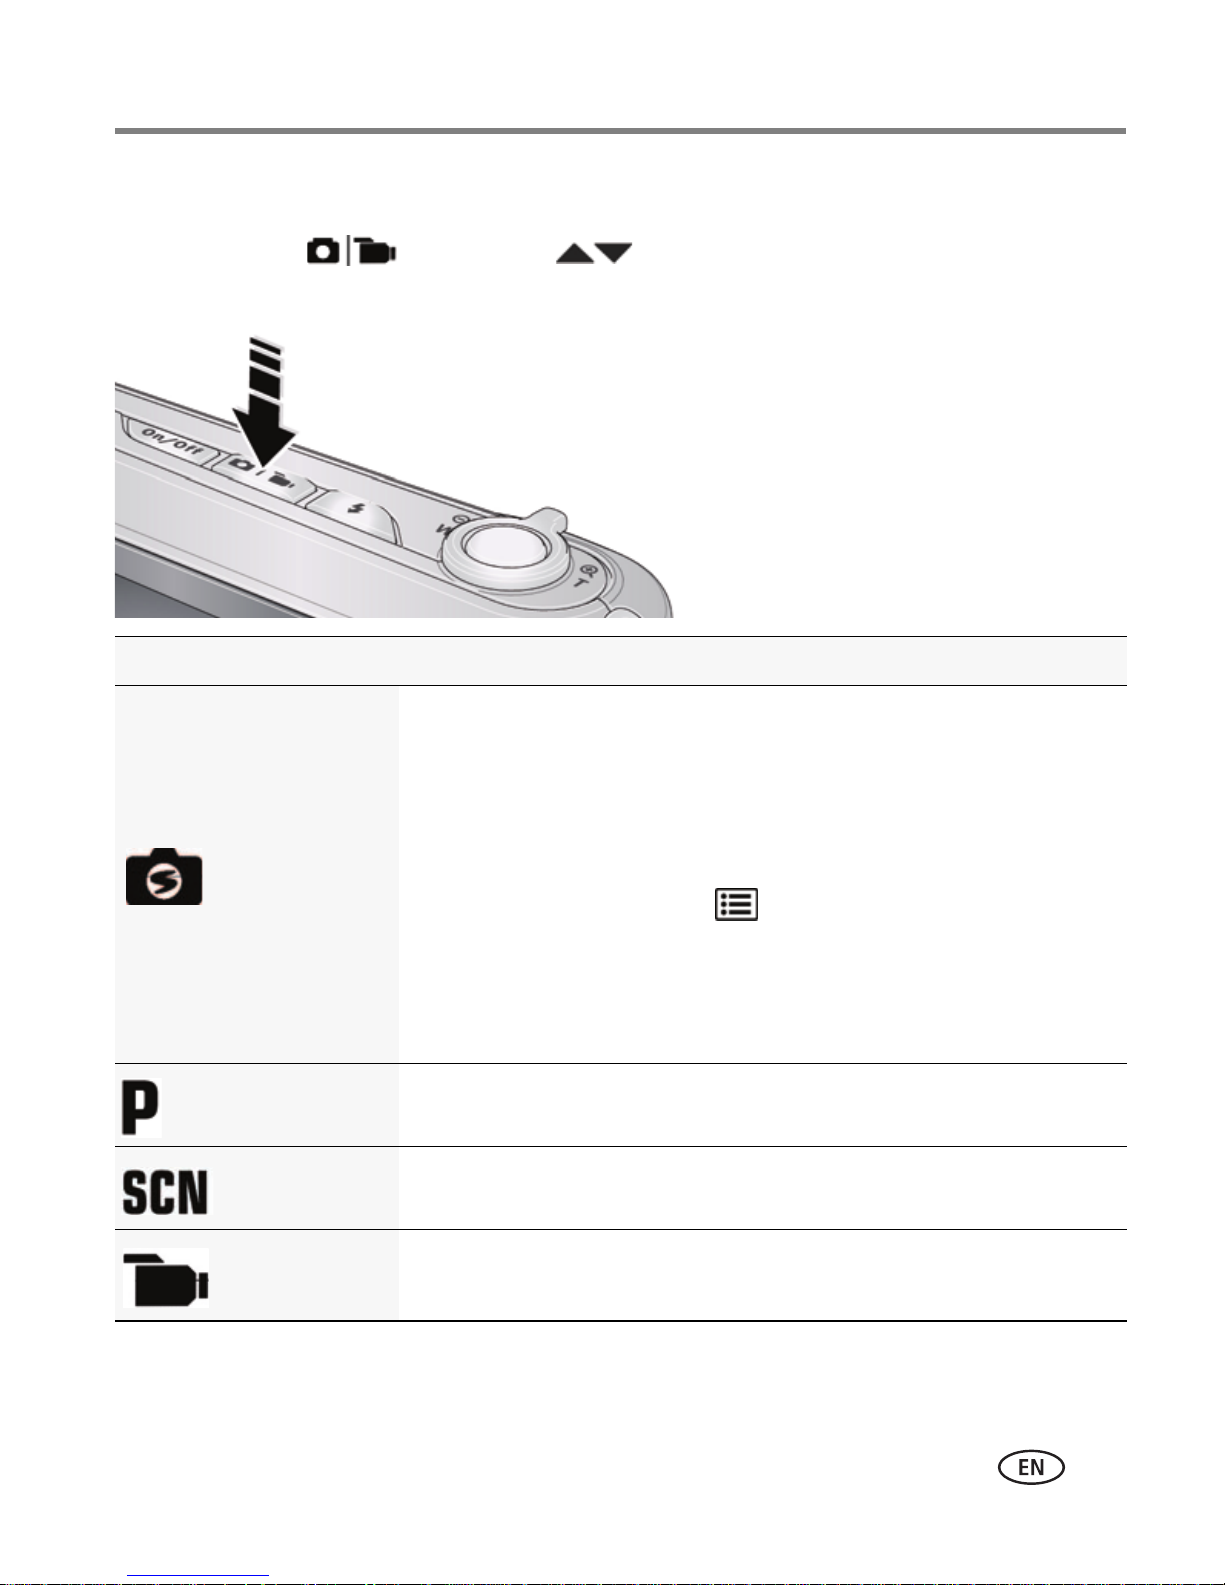
Using different modes
Press the Mode button, then until the LCD displays the mode that best
suits your subjects and surroundings,
Use this mode For
General picture taking—it offers excellent image quality and ease
of use.
■ Faces get focus and exposure priority.
■ The scene is analyzed for other content and for lighting.
Smart
You can choose the best picture size and aspect ratio for your
Capture
needs—just press the Menu button and choose Picture Size.
then press OK.
■ 3:2 (the best choice when making 4 x 6 prints)
■ 16:9 (wide screen)
■ 4:3 (the default setting)
Program
Scene
Video
Advanced picture taking—allows more access to manual settings
than Smart Capture.
Point-and-shoot simplicity when taking pictures in practically any
situation. (See page 10.)
Capturing video with sound.
www.kodak.com/go/support
9
Page 21
Taking pictures/videos
Using Scene (SCN) modes
Choose a Scene mode—for great pictures in practically any situation.
1 Press the Mode button, then until the LCD displays SCN,
press OK
.
2 Press to view scene mode descriptions.
If the mode description turns off before you finish reading it, press OK.
3 Press OK to choose a Scene mode.
SCN mode For
Portrait Full-frame portraits of people.
Sport Action pictures.
Landscape Distant scenes.
High ISO People indoors, in low-light scenes.
Close-up Close range. Use available light instead of flash, if possible.
Flower Close-ups of flowers or other small subjects in bright light.
then
Sunset Subjects at dusk.
Backlight Subjects that are in shadow or “backlit.”
Candle Light Subjects illuminated by candle light.
Children Action pictures of children in bright light.
Manner/
Museum
Text Documents. For best results, place the camera on a steady surface or tripod.
Beach Bright beach scenes.
Snow Bright snow scenes.
Fireworks Fireworks. For best results, place the camera on a steady surface or tripod.
Self-Portrait Close-ups of yourself. Assures proper focus and minimizes red eye.
Quiet occasions, like a wedding or lecture. Flash is off. For best results, place
the camera on a steady surface or tripod.
10 www.kodak.com/go/support
Page 22
Taking pictures/videos
Press to
show/hide
shortcuts.
Shortcuts
SCN mode For
Night Portrait Reduces red eye of people in night scenes or low-light conditions.
Night
Landscape
Blur Reduction Reducing blur caused by camera shake or subject motion.
Panorama R-L,
L-R
Panning Shot Emphasizing horizontal motion, with a sharp subject and blurred
Distant scenery at night. Flash does not fire.
“Stitching” 2 or 3 pictures into 1 panoramic scene. See page 13.
background.
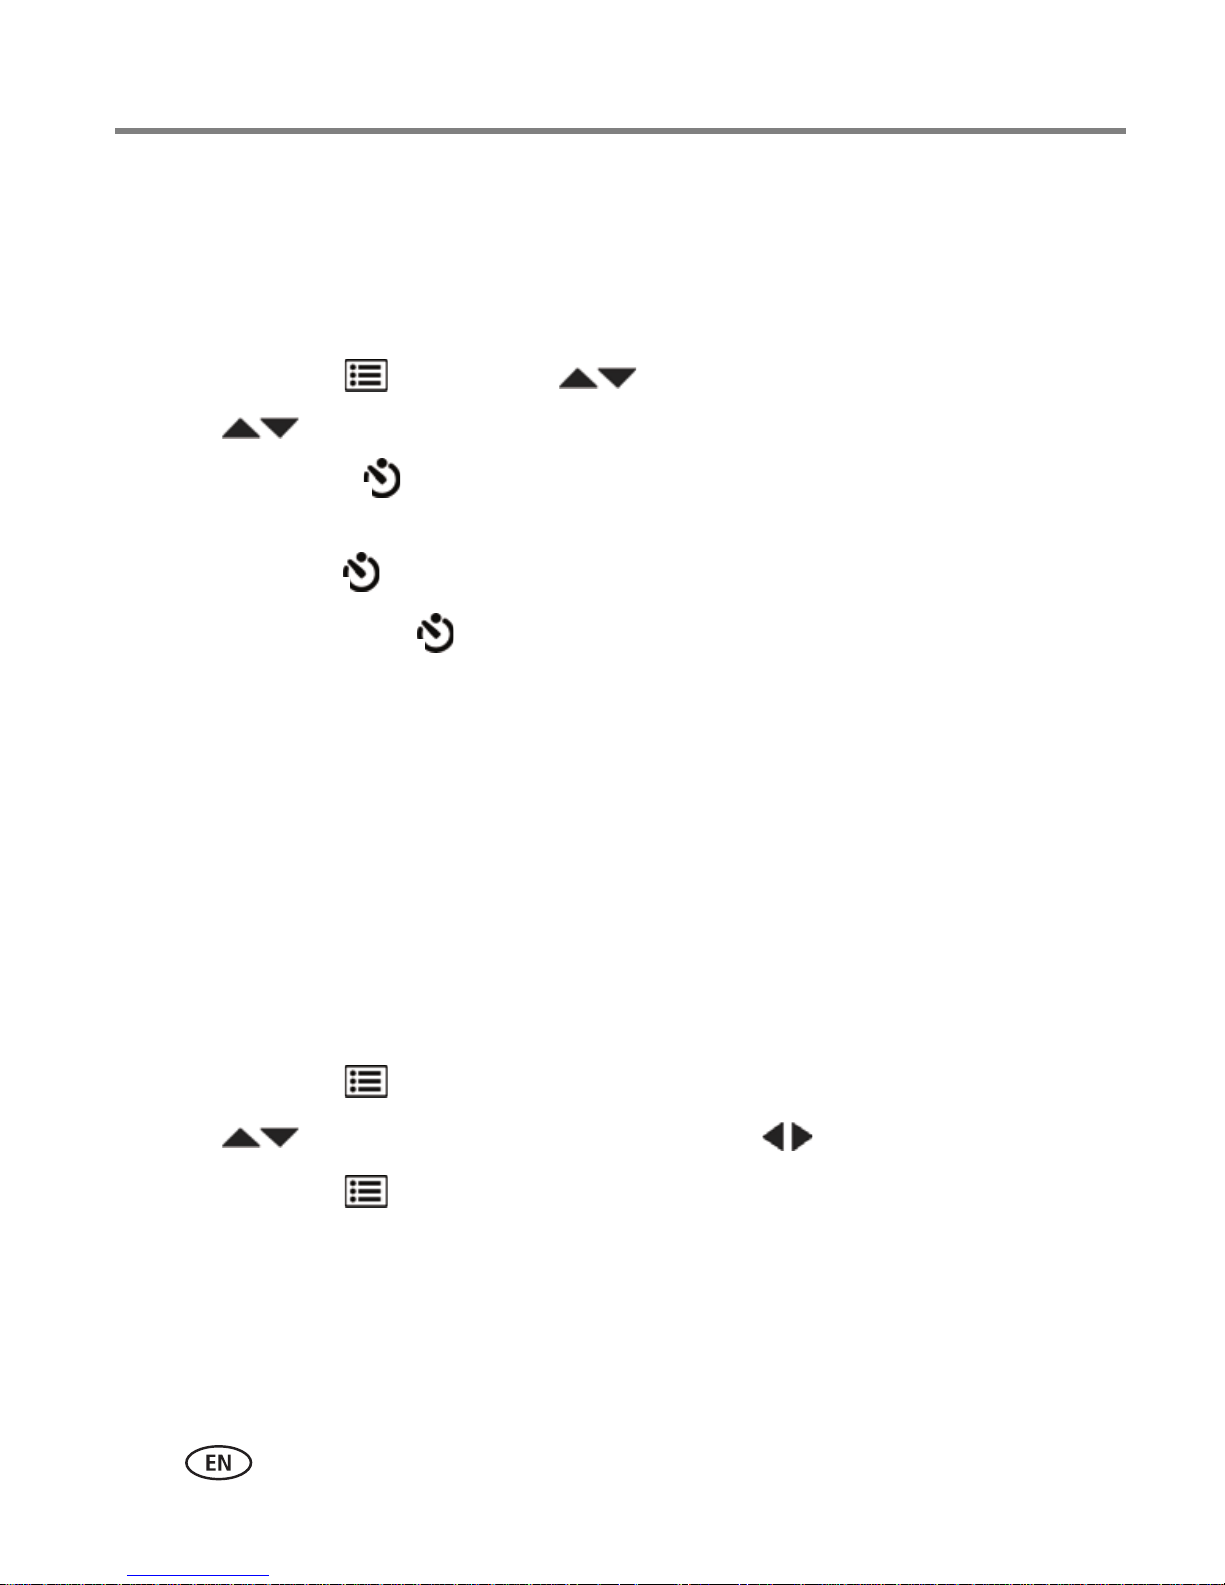
Using shortcuts
Your camera has a clean, uncluttered interface. For quick access to the most popular
capture and review functions:
1 Press the Info button.
The shortcuts appear. To hide the shortcuts again, press .
2 Press to access functions like Exposure Compensation, Self-timer, and Auto
focus. (You’ll see different functions in different modes.)
3 Press to choose a setting.
www.kodak.com/go/support
11
Page 23
Taking pictures/videos
10
2
2x
Using the self-timer
Use the self-timer when you want to be included in a picture, or to ensure a steady
Shutter button press. For best results, place the camera on a tripod or steady surface.
You can turn on the self-timer using a shortcut (see page 11) or these steps:
1 Press the Menu button. Press to choose Self-timer, then press OK.
2 Press to choose a Self-timer setting:
10 Seconds— A picture is taken after a 10-second delay (so you have time
to get into the scene).
2 Seconds— A picture is taken after a 2-second delay.
2 Picture Timer— The first picture is taken after a 10-second delay. A
second picture is taken 8 seconds later.
3 Compose the scene. Press the Shutter button halfway, then completely down.
The camera takes the picture/pictures after the delay.
To take a video after a 2- or 10-second delay, use the same procedure but press the
Shutter button completely down.
Using burst
Use the burst feature to take up to 3 pictures in rapid succession. You can turn on
burst using a shortcut (see page 11) or these steps:
1 Press the Menu button.
2 Press to choose Self-timer/Burst, then press to choose Burst On.
3 Press the Menu button.
4 Compose the scene. Press the Shutter button halfway, then completely down
and hold it.
The camera stops taking pictures when you release the Shutter button, when pictures
are taken, or when there is no more storage space. Burst is unavailable in some modes.
12 www.kodak.com/go/support
Page 24

Taking pictures/videos
Take
2 or 3
pictures.
Get 1
panoramic
picture.
Taking panoramic pictures
Use panorama to “stitch” up to 3 pictures into a panoramic scene.
NOTE: For best results, use a tripod. Only the panoramic picture is saved; individual pictures are not.
(Exposure and white balance are set with the first picture. The flash is set to Off.)
1 Press the Mode button, then until the LCD displays SCN, then
press OK
2 Press to choose Panorama Left-Right or Panorama Right-Left
(depending on the direction you want to pan), then press OK.
3 Take the first picture.
After a quickview, the LCD displays the liveview and an “overlay” from the first picture.
4 Compose the second picture. Make the overlay from the first picture cover the
same portion in the new picture.
5 If you are taking/stitching only 2 pictures, press OK to stitch them together.
After you take 3 pictures, the pictures are automatically stitched together.
.
NOTE: To use the self-timer 10-second or 2-second setting, see page 12.
www.kodak.com/go/support
13
Page 25

3 Sharing and tagging pictures
Sharing through social networks
It’s never been easier to share pictures on your favorite social networking sites.
IMPORTANT:
1 Press the Share button, then to find a picture.
If it’s your first time, a Help screen appears.
2 Press to choose a social networking site, then press OK.
A check mark appears. Repeat this step to choose more sites. (Press OK again to clear a
check mark.)
3 Press to choose Done, then press OK.
The picture is displayed with the Share icon. When you transfer the picture to your
computer, it will be sent to the networking site(s) that you chose.
Tip: Do you send pictures to the same sites each time?
Find a picture, then press and hold the Share button for about 1 second.
The camera applies the settings that you used previously and adds the Share icon to the
To use the camera’s social networking features, you must download
KODAK Software. (See page 36.)
picture.
14 www.kodak.com/go/support
Page 26

Sharing and tagging pictures
Choose which social networking sites to display on your camera
You can show/hide networking sites on your camera so that only your favorite sites
appear.
1 In Review, press the Menu button.
2 Press to choose the Setup tab, then to choose Share Button Settings,
then press OK.
3 Press to choose a social networking site, then press to choose Show or
Hide. Repeat this step until you have chosen Show/Hide for each social network.
4 When finished, press to choose Done, then press OK.
To return to picture-taking mode, press the Shutter button halfway down. When you
are in Review and press the Share button, only chosen sites are shown.
Manage email addresses and KODAK PULSE Digital Frames
You can add, edit, or delete email addresses and KODAK PULSE Digital Frames on
your camera.
1 Press the Share button, then to choose Manage Email Addresses (or
Manage Frames), then press OK.
2 To add an email address or frame, press to choose Add Email or Add Frame,
then press OK. Use the on-screen keyboard to make the addition.
(Example: JohnDoe@domain.com)
To edit an email address or a KODAK PULSE Digital Frame, press to choose
the address’s nickname or the frame, then press OK. Use the on-screen keyboard
to make edits.
To delete an email address or frame, choose Delete Email or Delete Frame, then
press OK. Press to choose the address or frame, then press OK so that a
check mark appears. Press to choose Delete, then press OK.
3 When finished, press to choose Done, then press OK.
To return to picture-taking mode, press the Shutter button halfway down.
www.kodak.com/go/support
15
Page 27

Sharing and tagging pictures
Tagging pictures
Tag pictures to make them easy to find, later. You can tag pictures in 2 ways:
■ People, and then find all pictures of “Mary.”
■ Keywords, and then find all pictures from “Dad’s 60th Birthday.”
Tagging people
When you tag faces, you’re helping your camera to recognize people by name. Then it
and
matches names and faces in pictures you’ve taken—
1 Press the Review button, then to find a picture that contains faces.
2 Press the Menu button. Press to choose Tag People, then press OK.
3 Press to choose Apply Tags, then press OK.
those you take in the future!
4 Press to choose an existing name, or New Name to add a new one (see
Using the keyboard, page 18), then press OK.
If more than one face is detected, a name or question mark is assigned to each detected
face. To resolve an incorrect name or a question mark, press to select a face,
then press OK.
5 If prompted to Update People Tags, press to choose Yes, then press OK.
Other pictures are scanned and updated with the name(s) you applied here.
Press to add names to other pictures. When finished, press to choose
Done, then press OK. To return to picture-taking mode, press the Shutter button
halfway down.
Tip: Are faces not always detected?
If a face is turned sideways, is too distant, or if the contrast between face and
background is insufficient, then the camera might not detect the face.
16 www.kodak.com/go/support
Page 28

Sharing and tagging pictures
Need to update a name?
If you meet a new friend—James—but you already have pictures tagged with your
old friend, James, you can:
■ Tag the new James with “James Smith” and/or
■ Update the old James to “James Monroe”
Here’s how:
1 Press the Review button.
2 Press the Menu button. Press to choose Tag People, then press OK.
3 Press to choose Modify Names List, then press OK.
4 Press to choose the name you want to modify, then press OK.
5 Edit the name, press to choose OK, then press OK. (If prompted to Update
People Tags, press to choose Yes, then press OK.)
To return to picture-taking mode, press the Shutter button halfway down.
NOTE: You can have up to 20 active names.
Tagging with keywords
1 Press the Review button, then to find a picture to tag.
2 Press the Menu button. Press to choose Keyword Tag, then press OK.
3 Press to choose an existing keyword, or New Keyword (See Using the
keyboard, page 18) to add a new one.
4 Press to add keywords to other pictures. When finished, press to
choose Done, then press OK.
To return to picture-taking mode, press the Shutter button halfway down.
Tip: You can pre-choose a tag so that new pictures are assigned that tag (see
page 33).
www.kodak.com/go/support
17
Page 29

Sharing and tagging pictures
Using the keyboard
The keyboard appears when you need to enter text.
1 Press to choose a letter, then press OK.
2 When finished, press to choose OK, then press OK.
Marking pictures/videos for emailing
It’s simple to mark pictures so that they’re ready to email when you transfer them to
your computer. First, create a new email address. (See Using the keyboard.)
1 Press the Share button. Press to find a picture.
2 Press to choose Email, then press OK.
3 Press to find an email address, then press OK.
To mark other pictures/videos with the same address, press , then press OK.
To send the pictures/videos to more than one address, repeat step 4.
To return to picture-taking mode, press the Shutter button halfway down.
When you transfer the marked pictures/videos to your computer, the software prompts
you to send the pictures/videos.
NOTE:
Your camera offers a built-in Help system. See page 40.
18 www.kodak.com/go/support
Page 30

4 Reviewing and editing
4X
4X
1X2X 2X
Playback speed
Reviewing pictures/videos
1 Press the Review button.
2 Press for previous/next picture/video.
■ To exit, press the Review button or press the
Shutter button halfway down.
■ To view pictures/videos as thumbnails, press the
Wide Angle (W) button. (For more information,
see page 21.)
Find your pictures like a pro...
See “A smarter way to find and enjoy your pictures” on page 22.
Playing a video
Press OK to play a video. Press OK to pause/resume.
During playback:
■ Press to play at 2X speed; press again for 4X.
■ Press to reverse at 2X speed; press again for 4X.
www.kodak.com/go/support 19
Page 31

Reviewing and editing
CAUTION:
Deleting pictures/videos
1 Press the Review button.
2 Press for previous/next picture/video.
3 Press the Delete button.
4 Follow the screen prompts.
NOTE: To delete protected pictures/videos, remove protection before deleting. (See Protecting
pictures/videos from deletion.)
Using the undo delete picture feature
If you accidentally delete a picture, you may be able to use Undo Delete to retrieve it.
This feature is only available immediately after you delete a picture.
Protecting pictures/videos from deletion
1 Press the Review button.
2 Press for previous/next picture/video.
3 Press the Menu button.
4 Press to choose Protect, then press OK.
5 Press to choose Protect, then press OK.
A check mark indicates that the picture/video is protected. Clicking OK again removes
the check mark. Press to protect other pictures/videos, or press to choose
Done, then press OK.
■ Press the Menu button to exit the menu.
Formatting internal memory or an SD or SDHC Card deletes all (including
protected) pictures/videos. (Formatting internal memory also deletes
email addresses and keyword tags.)
20 www.kodak.com/go/support
Page 32

Reviewing and editing
Viewing pictures/videos in different ways
Magnifying a picture
1 Turn the Zoom lever toward Telephoto (T) to
magnify 1X–8X.
2 Press to view other parts of a picture.
■ Press OK to return to 1X.
Viewing as thumbnails (multi-up)
1 Press the Review button.
The camera shows the last picture that was taken.
2 Turn the Zoom lever toward Wide Angle (W) to view pictures/videos as thumbnails.
(Turn it again to see more, smaller thumbnails.)
To view all pictures/videos, choose the All tab.
To sort by favorites, date, or tagged pictures/videos, press and choose the
appropriate tab.
3 To see a single picture/video, press to choose it. Then turn the Zoom
lever toward Telephoto (T).
■ To select multiple pictures/videos, see page 29.
■ Press the Review button to exit Review.
www.kodak.com/go/support
21
Page 33

Reviewing and editing
Keywords
Favorites
Date
All
People
A smarter way to find and enjoy your pictures
Tag pictures—by people or keywords—to make them easy to find, later. For example,
the camera can find all pictures that contain “Mary” or “Dad’s 60th Birthday.” (See
Tagging people, page 16 or Tagging with keywords, page 17.)
1 Press the Review button.
2 Turn the Zoom lever toward Wide Angle (W) to view pictures by thumbnail (or
choose View Thumbnails shortcut).
3 Press to choose a tab and sort pictures by All, Date, People, Favorite, or
Keyword.
4 Press to choose a face or keyword, then press OK.
Pictures tagged with that name or keyword are displayed. Press to view all
pictures.
To return to picture-taking mode, press the Shutter button halfway down.
Tip: For best results, make sure the camera’s date/time is current (see page 33).
22 www.kodak.com/go/support
Page 34

Understanding the review icons
Email
Favorite
Print/number of prints
Protected
Picture/Video number
Video duration
Select
picture/video
Battery level
Text tag
Add text tag
View thumbnails
Play video
Shortcuts*
Reviewing and editing
* For more about shortcuts, see page 11.
Know when your batteries need attention
The battery level icon works like the gas gauge in your car, but appears only when the
battery requires your attention. (If you’re viewing shortcuts, the battery level is always
displayed. See page 11.)
Purchase extra batteries for your special event www.kodak.com/go/c143accessories
www.kodak.com/go/support
23
Page 35

Reviewing and editing
Creating a slide show
Use Slide Show to display your pictures/videos on the LCD. You can play all
pictures/videos, or choose pictures to include in the slide show.
Make a slide show
1 Press the Review button. Select pictures (see page 29). If you don’t select any,
then all pictures will be shown.
2 Press the Menu button.
3 Press to choose Slide Show, then press OK.
Each picture/video is displayed once. To interrupt the slide show, press OK.
NOTE:
Your camera offers a built-in Help system. See page 40.
Play a slide show loop
When you turn on Loop, the slide show is continuously repeated.
1 On the Slide Show menu, press to choose Loop, then press OK.
2 Press to choose On, then press OK.
3 Press to choose Preview Slide Show, then press OK.
The slide show repeats until you press OK or until the batteries are exhausted.
24 www.kodak.com/go/support
Page 36

Reviewing and editing
Displaying pictures/videos on a television
You can display pictures/videos on a television, computer monitor, or any device
equipped with a video input. To connect the camera directly to a television, use an
A/V cable (may be sold separately).
Purchase accessories www.kodak.com/go/c143accessories
NOTE: To control the audio portion of a video, use the TV (or TV remote control) volume controls. Ensure
that the Video Out setting (NTSC or PAL) is correct (see page 34). The slide show stops if you
connect or disconnect the cable while the slide show is running. (Image quality on a television
screen may not be as good as on a computer monitor or when printed.)
www.kodak.com/go/support
25
Page 37

Reviewing and editing
Picture
Cropped picture
Using the menu button in review
1 Press the Review button, then the Menu button.
2 Press to choose a tab:
■ Review
■ Edit
■ Setup
3 Press to choose a setting, then press OK.
4 Choose an option, then press OK.
NOTE:
Your camera offers a built-in Help system. See page 40.
Cropping pictures
You can crop a picture so that only the desired portion of the picture remains.
1 Press the Review button, then to find a
picture to crop.
2 Press the Menu button, then to choose the
Edit tab. Choose Crop, then press OK.
3 Turn the Zoom lever toward Telephoto (T) to shrink the crop area or Wide (W) to
stretch it. Press to move the crop box. When satisfied with the crop
box, press OK.
4 Follow the screen prompts.
The picture is cropped. (The original is saved.) Cropped pictures cannot be cropped
again on the camera.
Press the Shutter button halfway down to return to Capture mode.
NOTE:
Your camera offers a built-in Help system. See page 40.
26 www.kodak.com/go/support
Page 38

Reviewing and editing
Rotating pictures
You can rotate a picture to portrait or landscape orientation.
1 Press the Review button, then to find the previous/next picture.
2 Press the Menu button. then to choose the Edit tab.
3 Press to highlight Rotate Picture, then press OK.
4 Press to highlight an option:
■ Rotate Right—rotates the picture 90 degrees clockwise.
■ Rotate Left—rotates the picture 90 degrees counterclockwise.
5 Press OK. Follow the screen prompts to replace the original picture or to save the
rotated picture as a new one.
Press the Shutter button halfway down to return to Capture mode.
NOTE:
Your camera offers a built-in Help system. See page 40.
www.kodak.com/go/support
27
Page 39

Reviewing and editing
Video
Picture
Video
Trimmed video
Editing videos
You can do incredible things with your videos.
Making a picture from a video
You can choose a single frame from a video, then make a picture suitable for a
4 x 6-inch (10 x 15 cm) print.
1 Press the Review button, then to find a
video.
2 Press the Menu button, then to choose the
Edit tab. Choose Make Picture, then press OK.
3 Follow the screen prompts.
A picture is created. (The original video is saved.) Press
the Shutter button halfway down to return to Capture
mode.
NOTE:
Your camera offers a built-in Help system. See page 40.
Trimming a video
You can remove an unwanted start or end from a video, saving only the desired
portion.
1 Press the Review button, then to find a
video.
2 Press the Menu button, then to choose the
Edit tab. Choose Trim, then press OK.
3 Follow the screen prompts.
The video is trimmed. (You can save it as a new video
28 www.kodak.com/go/support
or replace the original.) Press the Shutter button
halfway down to return to Capture mode.
Page 40

Reviewing and editing
Selected
pictures
Selecting multiple pictures/videos
Use the multi-select feature when you have two or more pictures/videos to print,
transfer, delete, etc. Multi-select is used most effectively in Multi-Up mode. See
Viewing as thumbnails (multi-up), page 21.
1 Press the Review button, then (and
if you’re in multi-up mode) to find a picture/video.
2 Press OK to select pictures/videos.
A check mark appears on the picture. (Press OK again
to remove a check mark.) You can now print, transfer,
delete, etc. the selected pictures.
Copying pictures/videos
You can copy pictures/videos from a card to internal memory or from internal memory
to a card.
Copy pictures/videos:
1 Press the Review button, then to find a picture. (You can also use
multi-select. See Selecting multiple pictures/videos.)
2 Press the Menu button, then to choose the Edit tab.
3 Press to choose Copy, then press OK. Make a choice, then press OK.
NOTE: Pictures/videos are copied, not moved. To remove pictures/videos from the original location after
copying, delete them (see page 20).
NOTE:
Your camera offers a built-in Help system. See page 40.
www.kodak.com/go/support
29
Page 41

5 Doing more with your camera
NOTE:
Your camera offers a built-in Help system. See page 40.
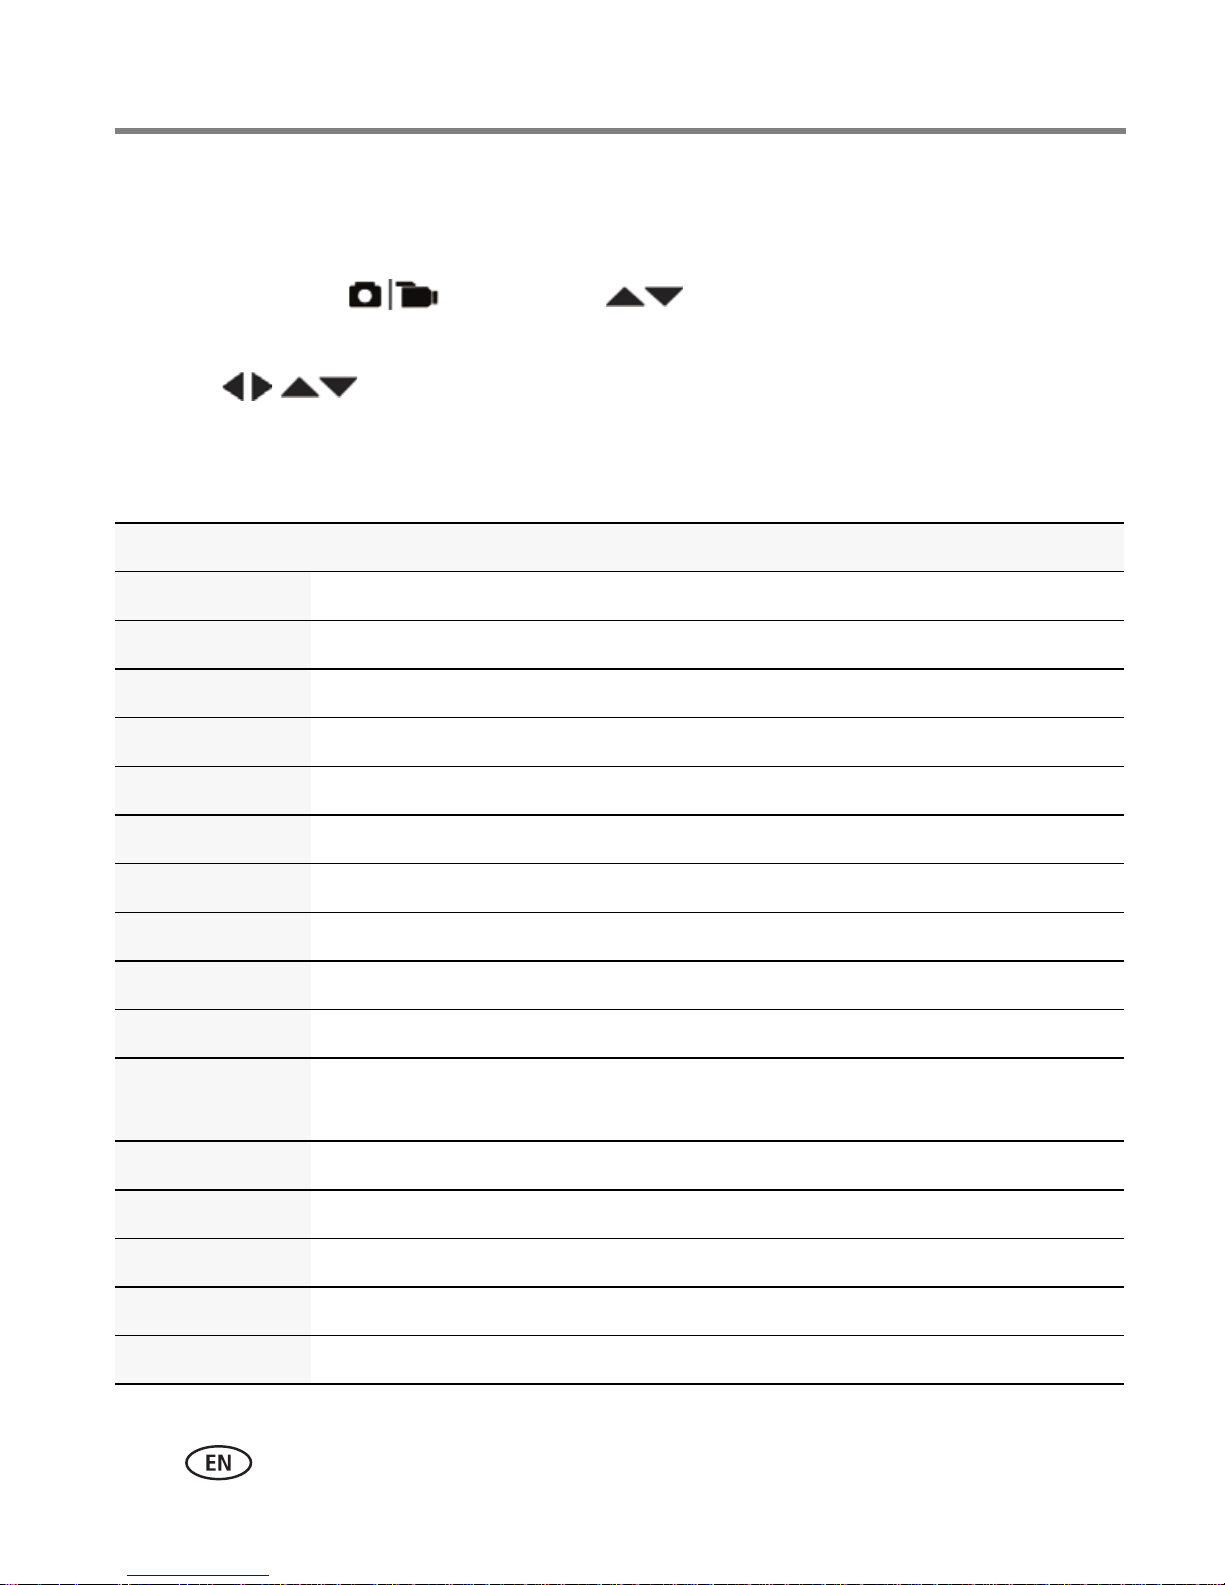
Using the menu button to change settings
You can change settings to get the best results from your camera.
NOTE: Some modes offer limited settings. Some settings remain until you change them; others, until you
change modes or turn off the camera.
1 Press the Menu button.
2 Press to choose a tab:
■ Capture/Video for the most common picture- and video-taking settings
■ Setup for other camera settings
3 Press to choose a setting, then press OK.
4 Choose an option, then press OK.
Using the capture tab
Settings More information
Picture Size
Choose a picture resolution.
Self-timer/Burst
Choose Self-timer or Burst
feature.
See Specifications, starting on page 45.
Off
10 Seconds
2 Seconds
2 Picture Timer
Burst On—Press the Shutter button halfway to focus and
set exposure. Press the Shutter button completely down
and hold it to take up to 3 pictures.
30 www.kodak.com/go/support
Page 42

Settings More information
Doing more with your camera
Exposure Compensation
Make a picture lighter or
darker. (Available in Program
mode.) To access this feature
with a shortcut, see page 11.
ISO Speed
Control the sensitivity of the
camera to light.
Long Time Exposure
Choose how long the shutter
stays open (normally in
low-light conditions). For best
results, place the camera on a
tripod or steady surface.
Color Mode
Choose color tones.
See Specifications, starting on page 45.
Auto—For general picture taking.
For manual settings, see Specifications, starting on page 45.
None
0.5, 1.0, 2.0, 4.0, 8.0 seconds
Vivid Color—For increased saturation and exaggerated
color.
Unavailable in Video and
Smart Capture modes.
White Balance
Choose your lighting
condition. (Available only in
Program mode.)
Full Color—For rich, balanced color.
Basic Color—For accurate color.
Black & White—For black and white.
Sepia—For a reddish-brown, antique look.
Auto—Automatically corrects white balance. Ideal for general
picture taking.
Daylight—For pictures in natural lighting.
Tungsten—Corrects the orange cast of incandescent light
bulbs. Ideal for indoor pictures under tungsten or halogen
lighting without flash.
Fluorescent—Corrects the green cast of fluorescent lighting.
Ideal for indoor pictures under fluorescent lighting without
flash.
Open Shade—For pictures in shade in natural lighting.
www.kodak.com/go/support
31
Page 43

Doing more with your camera
Settings More information
Focus Mode
Choose a focus distance.
Focus/Exposure Zone
Choose how the camera
assesses the scene for
exposure and focus.
AF Control (Still)
Choose an auto-focus setting.
Auto—For general picture-taking.
Macro—For sharpness and detail in pictures at close range.
Use available light instead of flash, if possible. The camera
automatically sets the focus distance depending on the zoom
position.
Infinity—For distant subjects; auto-focus framing marks are
unavailable.
Face Priority—If faces are detected, they receive
focus/exposure priority. (If faces are not detected, the camera
switches to Multi-Zone.)
Multi-Zone—Evaluates 5 zones to give an even picture
focus. Ideal for general picture taking.
Center-Zone—Evaluates the small area centered in the lens.
Ideal for focusing on a precise area.
Continuous AF—Because the camera is always focusing,
there is no need to press the Shutter button halfway down to
focus.
Single AF—Focuses when the Shutter button is pressed
halfway down. (This setting uses less battery power.)
Sharpness
Control picture sharpness or
softness.
See Specifications, starting on page 45.
Video settings
NOTE:
Self-timer
Choose Self-timer feature.
Your camera offers a built-in Help system. See page 40.
Settings More information
See Specifications, starting on page 45.
32 www.kodak.com/go/support
Page 44

Using the Setup menu
Use Setup to customize other camera settings.
Doing more with your camera
NOTE:
Date & Time Set date and time.
Auto Time Setting Date and time are set when camera is connected
Preset Keyword Tag
Create keywords and assign them to
pictures/videos. See page 17.
Camera Sounds
Choose sound effects for individual
functions.
Your camera offers a built-in Help system. See page 40.
Settings More information
to a computer.
New Keyword
Delete Keyword
Exit
Focus Lock: On/Off
Shutter: On/Off
Self-timer: On/Off
Error: On/Off
Power On: On/Off
LCD Brightness
Choose LCD brightness during
picture/video capture. (During Review, the
LCD is set to High Power.)
Share Button Settings
Choose what is displayed when the Share
button is pressed in Review.
www.kodak.com/go/support
Auto—LCD brightness is automatically adjusted
according to environment.
High Power—Brighter LCD; uses more battery
power.
Power Save—Dimmer LCD; uses less power.
Show or hide:
■ Individual social networking sites
■ E-mail addresses (all or none)
■ KODAK Digital Frames (all or none)
33
Page 45

Doing more with your camera
Settings More information
Red-eye Reduction
The Red-eye flash fires automatically
before a picture is taken.
Video Out
Choose the regional setting that lets you
connect the camera to a television or other
external device.
Image Storage
Choose a storage location for
pictures/videos.
Language Choose your language.
Preflash—The flash fires before the picture is
taken to reduce the chance of red-eye.
Digital correction—The camera digitally
corrects red-eye after a picture is taken.
(Processing time after taking a picture may
increase.)
NTSC—Used in North America and Japan; most
common format.
PAL—Used in Europe and China.
Auto—The camera uses the card if one is in the
camera. If not, the camera uses internal memory.
Internal Memory—The camera always uses
internal memory, even if a card is installed.
Reset All Camera Settings Reset settings to their default.
Computer Connection
Choose which application is downloaded
or launched when you connect the camera
to the computer.
IMPORTANT:
To use the camera’s social
KODAK Software
Other Application (APPLE IPHOTO, etc.)
networking features, you must
download KODAK Software (page 36).
34 www.kodak.com/go/support
Page 46

Doing more with your camera
CAUTION:
Settings More information
Format
Formatting deletes all
pictures/videos, including those
that are protected. Removing a
Memory Card—Deletes everything on the card;
formats the card.
Cancel—Exits without making a change.
Internal Memory—Deletes everything in
internal memory including email addresses and
keyword tags; formats the internal memory.
card during formatting may
damage the card.
KODAK Camera Software View the URL to download KODAK Software.
About View camera information.
www.kodak.com/go/support
35
Page 47

6 Transferring, printing pictures
Download software, transferring pictures
Download KODAK Software—so it’s easy to transfer and share pictures and videos.
IMPORTANT:
Software.
Make sure the computer is connected to the Internet. When you connect the camera
to the computer, the KODAK Software Downloader automatically runs. Follow the
prompts to download and install KODAK Software.*
To use the camera’s social networking features, you must download KODAK
1 Turn off the camera.
2 Use the KODAK Camera USB Cable, Micro B / 5-Pin
to connect the camera to the computer. (Use only
the cable included with this camera!)
3 Turn on the camera.
4 After the software is installed, follow the prompts
to transfer pictures and videos to your computer.
* If the downloader does not run, find it here and
NOTE: You can also use a card reader to transfer your pictures/videos.
Download KODAK Software later www.kodak.com/go/camerasw
Get Software help www.kodak.com/go/support
36 www.kodak.com/go/support
launch it:
■ WINDOWS OS: in My Computer
■ MAC OS: on your Desktop
Page 48

Transferring, printing pictures
Printing pictures
Direct printing with a KODAK All-in-One Printer
IMPORTANT:
You need a camera, a PICTBRIDGE enabled Printer, and a USB cable.
Connecting the camera to a KODAK All-in-One Printer
1 Turn off the camera and printer.
2 Connect the USB cable from the camera to the printer.
Printing from a KODAK All-in-One Printer
1 Turn on the printer. Turn on the camera.
The PictBridge logo is displayed, followed by the current picture and menu. (If no
pictures are found, a message is displayed.) If the menu turns off, press any button to
redisplay it.
2 Choose a printing option, then press OK.
Current Picture—Press to choose a picture.
To print using PICTBRIDGE Technology, you must change the Computer
Connection setting (in the Setup menu) to Other Application (see page 34).
Tagged Pictures—If your printer is capable, print pictures that you marked for
printing.
Index Print—Print thumbnails of all pictures. (This option requires one or more
sheets of paper.)
All Pictures—Print all pictures in internal memory or on a card.
Image Storage—Access Auto or Internal Memory.
NOTE: During direct printing, pictures are not permanently transferred or saved to the printer. To transfer
pictures to your computer, see page 36.
www.kodak.com/go/support
37
Page 49

Transferring, printing pictures
Disconnecting the camera from a KODAK All-in-One Printer
1 Turn off the camera and printer.
2 Disconnect the USB cable from the camera and the printer.
Ordering prints online
KODAK Gallery (www.kodakgallery.com) makes it easy to:
■ Upload your pictures.
■ Edit, enhance, and add borders to your pictures.
■ Store pictures, and share them with family and friends.
■ Have prints, photo greeting cards, frames, and albums delivered to your door.
Printing from an optional SD or SDHC Card
■ Automatically print tagged pictures when you insert your card into a printer with
an SD/SDHC Card slot. See your printer user’s guide for details.
■ Make prints at an SD/SDHC Card-capable KODAK Picture Kiosk. Go to
www.kodak.com/go/picturemaker.
■ Take the card to your local photo retailer for professional printing.
38 www.kodak.com/go/support
Page 50

Transferring, printing pictures
Marking your pictures for printing
1 Press the Review button. Press to find a picture.
2 Press the Menu button.
3 Press to choose Print, then press OK.
4 Press to choose the number of copies.
Optional: You can apply a print quantity to other pictures. Press for
previous/next. Repeat this step until the desired print quantity is applied to each
picture.
5 Press OK.
Press the Shutter button halfway down to return to Capture mode.
NOTE:
Your camera offers a built-in Help system. See page 40.
www.kodak.com/go/support
39
Page 51

7 Troubleshooting
Scroll through a Help topic.
Press the Menu
highlight a menu choice.
Press the Info
1
button.
2
button, then
Getting help from your camera
Your camera offers a built-in Help system. It describes every setting for every menu
choice. If you learn nothing else about your camera, learn how to use on-camera Help.
Turning on camera Help
40 www.kodak.com/go/support
Page 52

Troubleshooting
Camera problems
Status Solution
Troubleshooting
Camera does not
turn on
Camera does not turn
off
Camera buttons and
controls do not
function
In Review, a blue or
black screen is
displayed instead of
a picture
Pictures remaining
number does not
decrease after taking a
picture
■ Make sure the batteries are installed correctly (see page 1).
■ Make sure batteries are new. If batteries are rechargeable, make
sure they are fully charged (see charger documentation).
■ Transfer
■ Take another picture.
■ Continue taking pictures. The camera is operating normally.
all
pictures to the computer (see page 36).
(The camera estimates the number of pictures remaining after each
picture is taken, based on picture size and content.)
Flash does not fire ■ Check the flash setting, and change as needed (see page 8).
NOTE: The flash does not fire in all modes.
Memory card is almost
or entirely full
Battery life is short ■ Make sure the correct battery type is installed (see page 49).
Cannot find the
desired picture/video
■ Transfer the pictures to the computer (see page 36).
■ Delete pictures from the card (see page 20) or insert a new card.
■ Wipe the contacts with a pencil eraser before inserting batteries
in the camera.
■ Insert new/charged batteries (see page 1).
■ To view pictures on a card or in internal memory, see page 19.
www.kodak.com/go/support
41
Page 53

Troubleshooting
Status Solution
You cannot take a
picture
■ Turn the camera off, then on again.
■ Depress the Shutter button all the way (see page 4).
■ Insert new/charged batteries in the correct orientation (see
page 1).
■ When inserting a memory card, push it in until it clicks (see
page 3).
■ Memory is full. Transfer pictures to the computer (see page 36),
delete pictures (see page 20), or insert another card.
Memory card not
recognized or camera
freezes with card
■ Use a card reader to check the card on a computer. If it’s
corrupted, format the card in the camera (see page 35).
■ Try another SD or SDHC Card.
Computer/connectivity problems
Status Solution
Slide Show does not
run on an external
■ Adjust the camera Video Out setting to NTSC or PAL (see
page 34).
video device
■ Make sure the external device settings are correct. (See the
device’s user guide).
Computer does not
communicate with
■ Turn off the camera, then turn it back on.
■ Make sure fresh batteries are installed correctly (see page 1).
the camera
■ Make sure the KODAK Camera USB Cable, Micro B / 5-Pin is
connected to the camera and the computer (see page 36). Then
turn on the camera.
■ See KODAK Software Help at www.kodak.com/go/camerasw.
Direct printing (PICTBRIDGE enabled Printer) problems
Status Solution
Cannot print to a
PICTBRIDGE Printer
■ In the Setup menu, change the Computer Connection setting to
Other Application (see page 34).
42 www.kodak.com/go/support
Page 54

Troubleshooting
Picture quality problems
Status Solution
Picture is not clear ■ To automatically set exposure and focus, press the Shutter button
halfway. When the framing marks turn green, press the Shutter
button completely down to take the picture.
■ Clean the lens (see page 47).
■ Make sure the camera is not in Macro mode (see page 32).
■ Place the camera on a flat, steady surface or use a tripod (especially
in high-zoom settings or in low light).
■ Use a larger picture size (see page 30).
■ If you’re manually adjusting the ISO speed, realize that a high ISO
setting may cause grainy pictures (see page 31).
Picture is too dark ■ Reposition the camera for more available light.
■ Use Fill flash (see page 8) or change your position so light is not
behind the subject.
■ Move so that the distance between you and the subject is within the
effective flash range. (See Specifications starting on page 45.)
■ To automatically set exposure and focus, press the Shutter button
halfway. When the framing marks turn green, press the Shutter
button completely down to take the picture.
■ In Program mode, adjust the Exposure Compensation (see page 31).
Picture is too light ■ Reposition the camera to reduce the amount of available light.
■ Turn the flash off (see page 8).
■ Move so that the distance between you and the subject is within the
effective flash range. (See Specifications starting on page 45.)
■ To automatically set exposure and focus, press the Shutter button
halfway. When the framing marks turn green, press the Shutter
button completely down to take the picture.
■ In Program mode, adjust the Exposure Compensation (see page 31).
www.kodak.com/go/support
43
Page 55

Troubleshooting
Getting help on the Web
Camera
Get support for your product (FAQs, troubleshooting
information, arrange for repairs, etc.)
See Step-by-Step Solutions & Repair www.kodak.com/go/stepbystep
Purchase camera accessories www.kodak.com/go/c143accessories
Download the latest camera firmware and software www.kodak.com/go/c143downloads
See online demonstrations of your camera www.kodak.com/go/howto
Register your camera www.kodak.com/go/register
Chat, email, write, or phone Kodak
(Chat not available in all languages)
www.kodak.com/go/c143support
www.kodak.com/go/contact
Software
Download and get Help with KODAK Software www.kodak.com/go/camerasw
Other
Get support for cameras, software, accessories, more www.kodak.com/go/support
Get information on KODAK All-in-One Printers www.kodak.com/go/inkjet
44 www.kodak.com/go/support
Page 56

8 Appendix
Specifications
CCD—1/2.3-type
Effective pixels—12.2 MP (4026 x 3026)
LCD—2.7 in. (6.9 cm) LCD; 230K pixels; 4:3 aspect ratio
Image storage—Optional SD/SDHC Card (The SD logo is a trademark of the
SD Card Association.) Maximum supported card size: 32 GB
Internal storage capacity—32 MB internal memory (19 MB available for image
storage. 1 MB equals one million bytes.)
Taking lens—3X optical zoom; f/2.9–f/5.2; 35 mm equivalent: 32–96 mm
Lens protection—Built-in
Digital zoom—5X continuous
Focus system—TTL-AF (through-the-lens auto focus); Multi-Zone, Center-Zone,
Face Priority. Working range:
0.1 m (0.3 ft)–infinity @ wide, normal
0.35 m (1.1 ft)–infinity @ telephoto, normal
10–80 cm (3.9–31.5 in.) @ wide, Macro mode
35–100 cm (13.8–39.4 in.) @ telephoto, Macro mode
Auto focus control—Continuous and Single AF
Face detection—Yes
Face recognition—Yes
Shutter speed—8–1/1400 seconds
Long time exposure—0.5–8 seconds
ISO speed—Smart Capture mode: Auto 80–400
www.kodak.com/go/support 45
Page 57

Appendix
Program mode: Auto 80-400; manual 80, 100, 200, 400, 800, 1600
Exposure metering—TTL-AE; Face Priority, Multi-Zone, Center-Zone
Exposure compensation—+/-2.0 EV with 1/3 EV step
White Balance—Auto, Daylight, Tungsten, Fluorescent, Open Shade
Electronic Flash—Auto flash; Auto, Fill, Red Eye, Off; Guide No. 6.4 (m) @ ISO
100; working range @ ISO 400: 0.3–4.0 m (1–13.1 ft) @ wide; 0.5–2.0 m (1.6–6.6
ft) @ telephoto
Self-timer mode—10 Second, 2 Second, 2 Picture Timer
Burst mode—Maximum 3 pictures @ 1.5 fps
Capture modes—Smart Capture, Program, Scene modes, Video
Image file format—
Still: EXIF 2.21 (JPEG compression); file organization DCF
Video: .AVI (CODEC Motion JPEG; audio: -Law)
Picture size—12 MP (4:3): 4000 x 3000 pixels
10 MP (3:2): 4000 x 2664 pixels
9 MP (16:9): 4000 x 2248 pixels
6 MP (4:3): 2880 x 2160 pixels
3 MP (4:3): 2048 x 1536 pixels
2 MP (16:9): 1920 x 1080 pixels
1 MP (4:3): 1280 x 960 pixels
Color modes—Vivi d Colo r, Full Color, B asic C olor, Bl ack & White, Sep ia
Sharpness modes—High, Normal, Low
Video capture—4 GB maximum; VGA (640 x 480 @ 30 fps)
Communication with computer—USB 2.0 full speed (PIMA 15740 protocol); via
KODAK Camera USB Cable, Micro B / 5-Pin
Video output—NTSC or PAL
Microphone—Yes
46 www.kodak.com/go/support
Page 58

Appendix
PICTBRIDGE support—Yes
Power—KODAK MAX Alkaline Batteries AA; KODAK Ni-MH Rechargeable Digital
Camera Batteries AA (Pre-Charged); KODAK Ni-MH Rechargeable Digital Camera
Batteries AA; AA lithium batteries
Tripod mount—1/4 inch
Size—93.8 x 62 x 30.1 mm (3.7 x 2.4 x 1.2 in.) @ power off
Weight—172 g (6.1 oz) with card and batteries
Operating temperature—0–40
° C (32–104° F)
Care and maintenance
■ If you suspect water has gotten inside the camera, remove the batteries and card.
Allow all components to air-dry for at least 24 hours before using the camera.
■ Blow gently on the lens or LCD to remove dust and dirt. Wipe gently with a soft,
lint-free cloth or an untreated lens-cleaning tissue. Do not use cleaning solutions
unless designed specifically for camera lenses. Do not allow chemicals, such as
suntan lotion, to contact painted surfaces.
■ Service agreements may be available in your country. Contact a dealer of KODAK
Products for more information.
■ For digital camera disposal or recycling information, contact your local authorities.
In the US, go to the Electronics Industry Alliance site at www.eiae.org or Kodak at
www.kodak.com/go/c143support.
Upgrading your software and firmware
Occasionally check for the latest versions of the KODAK Software and camera
firmware (the software that runs on the camera). Go to
www.kodak.com/go/c143downloads.
www.kodak.com/go/support
47
Page 59

Appendix
CAUTION:
Storage capacities
The LCD displays the approximate number of pictures (or minutes/seconds of video)
remaining. Actual storage capacity varies depending on subject composition, card
size, and other factors. You may be able to store more or fewer pictures and videos.
Important safety instructions
Do not disassemble this product; there are no user-serviceable
parts inside. Refer servicing to qualified service personnel.
KODAK AC Adapters and Battery Chargers are intended for indoor
use only. The use of controls, adjustments, or procedures other
than those specified herein may result in exposure to shock
and/or electrical or mechanical hazards. If the LCD breaks, do not
touch the glass or liquid. Contact Kodak customer support.
■ The use of an accessory that is not recommended by Kodak may cause fire, electric
shock, or injury. For approved accessories, go to www.kodak/go/accessories.
■ Use only a USB-certified computer equipped with a current-limiting motherboard.
Contact your computer manufacturer if you have questions.
■ If using this product in an airplane, observe all instructions of the airline.
■ When removing the batteries, allow them to cool; they may be hot.
■ Follow all warnings and instructions supplied by the battery manufacturer.
■ Use only batteries approved for this product to avoid risk of explosion.
■ Keep batteries out of the reach of children.
■ Do not allow batteries to touch metal objects, including coins. Otherwise, a battery
may short circuit, discharge energy, become hot, or leak.
■ Do not disassemble, install backward, or expose batteries to liquid, moisture, fire,
or extreme temperature.
48 www.kodak.com/go/support
Page 60

Appendix
■ Remove the batteries when the product is stored for an extended period of time. In
the unlikely event that battery fluid leaks inside the product, contact Kodak
customer support.
■ In the unlikely event that battery fluid leaks onto your skin, wash immediately with
water and contact your local health provider. For additional health-related
information, contact your local Kodak customer support.
■ Go to www.kodak.com/go/reach for information about the presence of substances
included on the candidate list according to article 59(1) of Regulation (EC) No.
1907/2006 (REACH).
■ Dispose of batteries according to local and national regulations. Go to
www.kodak.com/go/kes.
■ Do not charge non-rechargeable batteries.
For more information on batteries, go to www.kodak.com/go/batterychart.
Battery replacement, battery life
KODAK MAX Alkaline Batteries AA: 180 pictures per charge. Battery life per CIPA
testing method. (Approx. number of pictures in Smart Capture mode, using an SD
Card.) Actual life may vary based on usage. For other compatible batteries, see the
Power section in Specifications, page 45.
Extending battery life
■ Use power-saving features (see LCD Brightness, page 33).
■ Charge Ni-MH batteries when they are nearly depleted.
■ Dirt on the battery contacts can affect battery life. Wipe the contacts with a pencil
eraser before loading batteries in the camera.
■ Battery performance is reduced at temperatures below 41° F (5° C). When using
your camera in cold weather, carry spare batteries and keep them warm. Do not
discard cold batteries that do not work; when they return to room temperature,
they may be usable.
www.kodak.com/go/support
49
Page 61

Appendix
Limited warranty
Kodak warrants its digital cameras and accessories (excluding batteries) to be free
from malfunctions and defects in both materials and workmanship for the warranty
period specified on your KODAK Product packaging. Retain the original dated sales
receipt. Proof of purchase date is required with any request for warranty repair.
Limited warranty coverage
Warranty service is only available from within the country where the Products were
originally purchased. You may be required to ship Products, at your expense, to the
authorized service facility for the country where the Products were purchased. Kodak
will repair or replace Products if they fail to function properly during the warranty
period, subject to any conditions and/or limitations stated herein. Warranty service
will include all labor as well as any necessary adjustments and/or replacement parts. If
Kodak is unable to repair or replace a Product, Kodak will, at its option, refund the
purchase price paid for the Product provided the Product has been returned to Kodak
along with proof of the purchase price paid. Repair, replacement, or refund of the
purchase price are the sole remedies under the warranty. If replacement parts are
used in making repairs, those parts may be remanufactured, or may contain
remanufactured materials. If it is necessary to replace the entire Product, it may be
replaced with a remanufactured Product. Remanufactured Products, parts and
materials are warranted for the remaining warranty term of the original Product, or 90
days after the date of repair or replacement, whichever is longer.
Limitations
This warranty does not cover circumstances beyond Kodak's control. This warranty
does not apply when failure is due to shipping damage, accident, alteration,
modification, unauthorized service, misuse, abuse, use with incompatible accessories
or attachments (such as third party ink or ink tanks), failure to follow Kodak's
operation, maintenance or repacking instructions, failure to use items supplied by
Kodak (such as adapters and cables), or claims made after the duration of this
warranty. Kodak makes no other express or implied warranty for this product. In the
event that the exclusion of any implied warranty is ineffective under the law, the
duration of the implied warranty will be the length of the express warranty period
50 www.kodak.com/go/support
Page 62

Appendix
specified on your Kodak product packaging. The option of repair, replacement, or
refund is Kodak's only obligation. Kodak will not be responsible for any special,
consequential or incidental damages resulting from the sale, purchase, or use of this
product regardless of the cause. Liability for any special, consequential or incidental
damages (including but not limited to loss of revenue or profit, downtime costs, loss
of the use of the equipment, cost of substitute equipment, facilities or services, or
claims of your customers for such damages resulting from the purchase, use, or failure
of the Product), regardless of cause or for breach of any written or implied warranty is
expressly disclaimed. The limitations and exclusions of liability set forth herein apply
to both Kodak and its suppliers.
Your rights
Some states or jurisdictions do not allow exclusion or limitation of incidental or
consequential damages, so the above limitation or exclusion may not apply to you.
Some states or jurisdictions do not allow limitations on how long an implied warranty
lasts, so the above limitation may not apply to you. This warranty gives you specific
rights, and you may have other rights which vary from state to state or by jurisdiction.
Outside the United States and Canada
In countries other than the United States and Canada, the terms and conditions of
this warranty may be different. Unless a specific Kodak warranty is communicated to
the purchaser in writing by a Kodak company, no warranty or liability exists beyond
any minimum requirements imposed by law, even though defect, damage, or loss may
be by negligence or other act.
Regulatory compliance
FCC compliance and advisory
This equipment has been tested and found to comply with the limits for a Class B
digital device, pursuant to Part 15 of the FCC Rules. These limits are designed to
provide reasonable protection against harmful interference in a residential
installation. This equipment generates, uses, and can radiate radio frequency energy
and, if not installed or used in accordance with the instructions, may cause harmful
interference to radio communications. However, there is no guarantee that
www.kodak.com/go/support
51
Page 63

Appendix
interference will not occur in a particular installation. If this equipment does cause
harmful interference to radio or television reception, which can be determined by
turning the equipment off and on, the user is encouraged to try to correct the
interference by one or more of the following measures: 1) reorient or relocate the
receiving antenna; 2) increase the separation between the equipment and the
receiver; 3) connect the equipment to an outlet on a circuit different from that to
which the receiver is connected; 4) consult the dealer or an experienced radio/TV
technician for additional suggestions. Any changes or modifications not expressly
approved by the party responsible for compliance could void the user’s authority to
operate the equipment. Where shielded interface cables have been provided with the
product or specified additional components or accessories elsewhere defined to be
used with the installation of the product, they must be used in order to ensure
compliance with FCC regulation. The KODAK High Performance USB AC Adapter
K20-AM complies with part 15 of the FCC Rules. Operation is subject to the following
two conditions: (1) This device may not cause harmful interference, and (2) this device
must accept any interference received, including interference that may cause
undesired operation.
Waste Electrical and Electronic Equipment/Battery disposal
In Europe: For human/environmental protection, it is your responsibility to
dispose of this equipment and batteries at a collection facility established for
this purpose (separate from municipal waste.) For more information, contact
your retailer, collection facility, or appropriate local authorities; or go to
www.kodak.com/go/recycle. Product weight: 172 g (6.1 oz) with card and
batteries.
Canadian DOC statement
DOC Class B Compliance—This Class B digital apparatus complies with Canadian
ICES-003.
Observation des normes-Classe B—Cet appareil numérique de la classe B est
conforme à la norme NMB-003 du Canada.
52 www.kodak.com/go/support
Page 64

Appendix
N137
Eastman Kodak Company
Rochester, NY 14650
CE
Hereby, Eastman Kodak Company declares that this KODAK Product is in compliance
with the essential requirements and other relevant provisions of Directive 1999/5/EC.
Australian C-Tick
VCCI Class B ITE
Russian GOST-R
www.kodak.com/go/support
53
Page 65

Appendix
China RoHS
Korean Class B ITE
54 www.kodak.com/go/support
Page 66

Index 1
A
A/V out, 25
about this camera, 35
accessories
battery, 49
buying, 44
SD/SDHC Card, 3
add keywords, 16, 18
AF control (Still), 32
AF zone, 32
auto, 9
focus control, 32
focus framing marks, 4
auto focus (AF)
zone, 32
B
backlight, 10
audio/video, 25
camera sounds, 33
Canadian compliance, 52
care and maintenance, 47
children, 10
clock, setting, 2
color mode, 31
computer
connect camera, 36
transfer to, 36
connector, USB / A/V, 25
copy pictures
card to memory, 29
memory to card, 29
to computer, 36
cropping pictures, 26
customize camera, 33
battery
expected life, 49
loading, 1
purchase, 6, 23
status,6,23
types, 49
beach, 10
burst, 12
button
delete, 5
telephoto/zoom, 7
C
cable
www.kodak.com/go/support 55
D
date setting, 2
deleting
during quickview, 5
from internal memory, 20
from SD/SDHC Card, 20
protecting pictures, videos, 20
digital zoom, 7
displaying slide show, 24
disposal, recycling, 47
download
KODAK Software, 36
download pictures, 36
Page 67

Index
E
edit videos, 28
emailing pictures, videos, 18
expected battery life, 49
exposure
long time, 31, 33
exposure compensation, 31
external video device
viewing pictures, videos, 25
F
faces, tagging, recognition, 16
FCC compliance, 51
find pictures, 22
fireworks, 10
firmware, upgrading, 47
flash, using, 8
flower, 10
focus framing marks, 4
focus mode, 32
format, 35
framing marks, 4
installing
battery, 1
SD/SDHC Card, 3
ISO speed, 31
K
keyboard, 16, 18
KODAK Software
upgrading, 47
KODAK Software, download, 36
Kodak Web sites, 40
L
language, 34
LCD
brightness, 33
reviewing pictures, 19
reviewing videos, 19
LCD brightness, 33
lens
cleaning lens, 47
loading
battery, 1
G
guidelines, battery, 49
H
help
camera help, 40
Web links, 40
high ISO, 10
I
icons, modes, 9
image storage, 34
56 www.kodak.com/go/support
SD/SDHC Card, 3
locate pictures, 22
long time exposure, 31, 33
M
magnify a picture, 21
maintenance, camera, 47
make picture from video, 28
manner/museum, 10
marking
for email, 18
memory
Page 68

Index
inserting card, 3
menu settings, 30
modes, 9
auto, 9
backlight, 10
beach, 10
children, 10
fireworks, 10
flower, 10
high ISO, 10
manner/museum, 10
night landscape, 11
night portrait, 11
scene (SCN), 10
self-portrait, 10
snow, 10
text, 10
pictures
copying, 29
cropping, 26
emailing marked, 18
marking, 39
protecting, 20
review icons, 23
reviewing, 19
taking, modes, 9
transfer to computer, 36
pictures/video
deleting, 20
playing a video, 19
power
camera, 2
printing
from a card, 38
modes, capture
smart capture, 9
multiple selections, 29
multi-up, 21
N
night landscape, 11
night portrait, 11
O
online prints, ordering, 38
optical zoom, 7
P
panoramic pictures, 13
people, tagging, 16
PICTBRIDGE enabled printer, 37
picture size, 30, 31
optimizing printer, 40
order online, 38
PICTBRIDGE, 37
tagged pictures, 38
protecting pictures, videos, 20
Q
quickview, using, 5
R
recycling, disposal, 47
regulatory information, 51
repair, 44
reset camera, 34
reviewing pictures/video
as you take them, 5
deleting, 20
www.kodak.com/go/support 57
Page 69

Index
LCD, 19
protecting, 20
slide show, 24
running slide show, 24
S
safety, 48
scene modes (SCN), 10
SD/SDHC Card
inserting, 3
printing from, 38
search pictures, 22
select multiple pictures/videos, 29
self-portrait, 10
self-timer, 12
set tag, 33
setting
AF zone, 32
auto-focus, 32
camera sounds, 33
setup menu, 33
Share button, 33
sharpness, 32
shutter
problems, 42
self-timer delay, 12
slide show
continuous loop, 24
running, 24
smart capture, 9
smart display, 33
smart find, 22
snow, 10
software
upgrading, 47
software downloader, 36
sounds, 33
specifications, camera, 45
strap, 1
color mode, 31
date and time, 2
image storage, 34
ISO, 31
language, 34
LCD brightness, 33
long time exposure, 31, 33
picture size, 30, 31
picture-taking mode, 9
self-timer, 12
sharpness, 32
video out, 34
white balance, 31
setting up the camera, 1
T
tagging
people, faces, 16
taking pictures, videos, 4
television, slide show, 25
text, 10
text, entering, 16
time, setting, 2
timer, shutter delay, 12
tips
battery guidelines, 49
care & maintenance, 47
transfer pictures, 36
trash can, deleting, 5
58 www.kodak.com/go/support
Page 70

Index
trimming a video, 28
troubleshooting, 40
turning camera on and off, 2
typing, 16, 18
U
undelete, undo, 20
upgrading software, firmware, 47
URLs, Kodak Web sites, 40
USB
transfer pictures, 36
V
VCCI compliance, 53
video
copying, 29
edit, 28
digital, 7
optical, 7
emailing marked, 18
out, 34
playback, 19
protecting, 20
review icons, 23
transfer to computer, 36
viewing, 19
video out, 34
viewing
by multi-up, 21
picture, after taking, 5, 19
W
warranty, 50
white balance, 31
Z
zoom
www.kodak.com/go/support 59
Page 71

Page 72

Page 73

4H7156
WARRANTY
Limited
Warranty
Kodak
warrants
Kodak
consumer
electronic
batteries,
10
be
free
year
from
Retain
request
Limited
Warranty
purchased.
lacility
Kodak
SUbject
as
wellasany
or
replaceaProduct,
provided
Repair,
II
replacement
contain
replaced
warranted
repairorreplacement,
Limitations
This
warranty
apply
service,
inkorink
lailuretouse
durationofthis
KODAK
AND
DISCLAIMS
FORAPARTICULAR
is
ineffective
purchase
The
option
responsible
purchase,oruse01this
or
incidental
lossofthe
of
your
regardlessofcauseorfor
limitations
Your
Some
damages,sothe
jurisdictionsdonot
limitation
Th~
warranty
stateorby
Outside
In
countries
maybedifferent.
from
the
dateofpurchase.
the
original
dated
for
warranty
repair.
Warranty
selV""isonty
You
mayberequiredtoShip
lor
the
country
will
repairorreplace
to
any
conditions
necessary
the
Product
has
replacement,orrefundofthe
parts
are
remanufactured
witharemanufactured
lor
the
remaining
does
not
when
failureisduetoshipping
misuse,
abuse,
tanks),
failure10fo'low
items
suppliedbyKodak
warranty.
MAKESNOOTHER
THE
under
the
dateorsuch
of
repair,
replacement,orrefundisKodak's
lor
any
special,
damages
useofthe
equipment,
customers
for
and
exclusions01liability
Rights
statesorjurisdictionsdonot
above
allow
may
not
applytoyou.
gives
you
jurisdiction.
the
United
other
than
Unlessaspecific
malfunctions
sales
Coverage
available
where
the
Productsrithey
andlor
adjustments
Kodak
will,atits
been
usedinmaking
malerials.If•isnecessarytoreplace
warranty
whicheverislonger.
cover
circumstances
use
wnh
EXPRESSORIMPLIED
IMPLIED
PURPOSE.Inthe
law,
the
longer
consequentialorincidental
Product
(including
such
damages
breachofany
limitationorexclusion
lim'ationsonhow
specriic
States
the
Un'ed
products
and
detects
in
receipt.
Proof01the
from
within
the
country
Products,alyour
Products
were
purchased.
fail10lunction
~mitations
staled
herein.
and/or
replacemenl
option,
refund
returnedtoKodak
Product.
incompatible
Kodak's
WARRANTIESOFMERCHANTABILITY
durationofthe
period
regardlessofthe
but
costofsubstitule
allow
rights,
States
Kodak
along
purchase
price
repairs,
those
Remanufactured
tenn01the
or~inal
beyond
damage,
accident,
accessoriesorattachments
operation,
(suchasadapters
evant
that
implied
as
requiredbylaw.
cause.
not
limitedtolossofrevenueorprofit,
equipment,
resulting
from
writtenorimplied
set
IOfth
herein
exclusionorlimitationofincidentalorconsequential
may
not
longanimplied
and
you
may
and
Canada
and
Canada,
warranty~communicatedtothe
GARANTIE
Garantie
IImitee
Kodak
garanm
que
les
produits
electroniques
al'axceptton
des
fabrication
ConselVez
de
Couverturedela
La
initialement
pays
Kodak
periodedegarantie,
comprenclIamain-d'aeuvre
Si
a
son
Iorsdurenvoi
produil
Les
remisesaneufaucontenir
il
peut
neuf
90
Limitations
Cede
presente
I'exped~ion,
a
un
compatibles,aunon-respect
Kodak,aIa
ou
KODAK
CE
UN
n'est
date
la
contractees
consOcutifoufortuit
so,
compris,
Ie
perte
remplacemerrt
de
de
exclusionsderespoosabime
VOS
Cenains
des
ne
surIaduree
etre
pilesJbatteries,
pendantunana.compterdela
I'original
datedeta
toute
demandedereparation
garantie
est
valable
achetes.
dans
lequel
repareraouremplacera
Kodaksetrouve
initiative,
rembourserIeprixduProduit
dud.
const~uenlles
piecesderemplacement
eire
remplace
soot
sous
garantie
jours
apreslareparation
garanlienecouvre
garanttenes'applique
a
un
usage
inadapte,aun
non-utilisation
aW<
demandes
N'EMET
PRODUITETDECLINE
BUT
SPECIFIQUE
pas
applicable
d'achatouegaleatoute
reparation.IeremplaeementauIe
par
Kodak.
la
cause.
Toute
mais
sans
d'utilisationdel'Oquipement,
ouitdes
I'utilisationaudelapanneduProduil),
toule
garantie
droits
Etatsoujuridictionsnereconnaissenl
dommages
consecutifsoufortuitsetles
pas
vous
etre
des
applicables.
preuve
garantie
uniquement
Vous
devrez
ies
Produits
ont
les
sous
reserve
ainsi
dans
I'impossibil~e
Produ'aKodak.Lareparation,ieremplacementouIe
seuls
recours
eventuellement
des
parunProduit
pourIaduree
quelle
pas
les
accident,aune
abus,aune
des
des
articles
eftectue.s
apresIadate
AUCUNE
AUTRE
TOUTE
IMPUCITE.
selonIaloi,ladure.dela
dure.
Kodaknepourra
resultantdeIa
responsabilRe
s'y
lim~er,
aux
demandesdevos
ecmeouimplicite,
definies
applicables.
Cer1ains
garanties
implic~es
grand
sont
exemptsdetout
date
d'achat.
d'achat.
Une
sous
garantie.
IImitee
dans
les
frontiinesdupays
envoyer
les
Produitsitvas
ele
achetes.
Produits
s'ilsnelonctionnenl
des
conditions
que
materiaux
circonstances
pas
alteration,aune
consignes
vente,deI'achatoude
relativeatout
pertesderevenus
at/ou
les
reglages
n8cessaires
de
rOpereroude
sous
reserve
dansIecadredecede
utili
...slors
remisaneuf.SiIe
remisaneuf.
Les
restantedela
que
soitladureelaplus
independantesdela
lorsquaIapanne
modification,aune
utilisation
avec
d'utilisalion,
foumis
par
Kodak
d'expi,a"ondela
GARANTIE
EXPRESSEOUIMPLICITEAL'EGARD
GARANTIE
COMMERCIALEETD'
Dans
I'eventual.e
garantie
superieure
lixee
remboursement
etre
tenu
responsable
dOfnmage
aux
couts
d'Oquipements,
clients
pourdetels
quelle
qu'en
est
expressemenl
ici
s'appliquentitKodak,
pas
limitationsouexclusions
Batsoujuridictionsnereconnaissent
et
les
limitations
and
accessories
both
dateofpurchase
the
are
parts
Kodak's
maintenanceorrepacking
WARRANTY
the
exclusionofany
warranty
only
damages
the
purchase,
apply10beth
applytoyou.
have
the
public
defautdefonctionnement
preuvedeIa
limitations
Produits,
garantie
est
des
oil
parIaIoi.
representent
oudeprofit,
so~
declinee
Ies
exclusionsouIes
susmentionnees
rProducts"),
malerials
and
workmanship
willberequired
where
the
Products
expense,tothe
property
Warranty
parts.IfKodakisunabletorepair
purchase
with
the
Products,
Product,or90
alteration,
and
obligation.
Liability
warrantyisexpressly
warranty
other
tenns
etles
remplacerunProduit.
qu'une
garentie.
das
dueades
accessoiresoudes
d'entrettenoud'emballage
(tels
I'exclusiondetoute
implic'e
I'utilisationdace
partieulier,
la
authorized
during
the
service
win
price
paid
proof01the
purchase
sole
remedies
mayberemanufactured,ormay
the
entire
Product,•may
parts
and
days
control.
This
warranty
modification,
(suchasthird·party
cables),orclaims
FOR
THIS
AND
implied
willbeone
year
Kodak
resutting
from
lor
any
special,
downtime
facilitiesorservices,orclaims
useorfailure
Kodak
and'ssUppliers.
Some
states
lasts,sothe
rights
which
and
cond.ions01this
accessoires
date
d'achat
dans
lequelles
frais,auservice
pas
correctement
enoncees
et/ou
les
piecesderechange.
preuve
d'achal
remboursement
reparations
peuvent
Produit
complet
piecesaumateriaux
originaleoupour
longue.
voIontedeKodak.
dommages
reparation
que
les
adaptaleursetles
presenle
garantie.
ADAPTATION
sera
d'un
anacompterdala
les
seules
d'aucun
dommage
Produ',
con"'utrioulortu'
aux
coUts
d'installationoude
dommages
resultantdeI'achal,
causeouen
raison
parlapresente.
ainsi
qU'a
ses
limnationsaI'egard
susmentionnees
peuventnepas
excluding
for
one
with
any
were
originally
service
werrenty
period,
include
all
labor
lor
the
Product
price paid.
under
this
warranty,
be
materials
are
after
the
date
01
does
not
unauthorized
instructions,
made
after
the
PRODUCT,
FITNESS
warranty
from
the
will
not
be
the
sale,
consequential
costs,
of
the
Product).
disclaimed.
or
abeve
vary
Irom
state
warranty
purchaserinwriting
(<<
Produits
"),
au
vice
de
sera
requise
lors
Produits
ont
agree
pour
Ie
pendant
la
ici.
La
garantie
Kodak
pourra,
soit
foumie
du
avoir
ete
doit
etre
remplace,
remis
it
une
periods
La
subis
lars
de
non
autorisee,
appareils
non
foumies
cables)
DE
DANS
garanlie
implic'e
obligations
particulier,
quelle
qu'en
(y
d'immobilisation,
selV"'"
da
de
la
violation
Les
lim~es
et
foumisseurs.
peuvent
pas
les
limitations
vous
byaKodak
company,nowarrantyorliability
by
law,
even
though
defect,
damage,orloss
exists
beyond
maybeby
any
minimum
negligenceorother
Save These Important Safety Instructions
Using
the
•
-
-If
&.
.t.
Using
•
•
-
-Donot
•
•
•Inthe
•
•IIthe
,£r,
The
UsingaBattery
•Donot
to
Cette
droits,
En
Les
Uniseldu
I'acquereur
au-delil
perteaete
Conservez precieusement ces consignes
ete
Utilisationduprodult
•
•
-
.t.
.t.
de
Utilisation
-
-
par
•
-Nedesassemblez
•
-Sivous
a
-Encasdefuile
•
•Nemettez
Utilisation
•Netentez
Product
Read
and
follow
these
instructions
procedures.
The
useofan
accessory
adapter,
may
cause
using
this
productinan
CAUTION:Donot
lnalda.
Reier
IOfVlclng
WARNING:Donol
KODAK
AC
edapIets
01
control.,
adjustments,
In
exposure10shock
the
Batteries
Read
and
lollow
Use
Guide
Keep
extreme
Replace
not
baneries
to
Remove
event
representative.
contact
Kodak
When
Kodak
programs.
become
CAUTION:
all
only
batteries
lor
supported
baneries
outofthe
disassemble,
temperature.
all
baneriesofa
mix
rechargeable
together.Donot
observe
this
precaution
baneries
thai
banery
unlikely
event
your
local
Customer
SeMce
disposingofbatteries,
encourages
Contact
banery
contacts
hot,orleak.
When
charge
non·rechargeable
garantie
vous
qui
peuvent
dehors
des
tennesetconditionsdeIa
Canada.Amoins
par
ecrit
des
exigonces
provoque(e)
wamings
that
when
ftuid
health
cuslomerstotake
your
removing
donne
varier,
par
belore
attachment
fire,
electric
shock,orinjury.
airplane,
observe
dlsanemble thl.
toquaillied aervtet
expoae
thl. product10liqUid,
end
_",
0'
procedure. other
end/or
etectrIcelormeehl/nlcel
and
instructions
are
approvad
banery
types
lor
reachofchik1ren.
install
backward,orexpose
setatthe
same
and
non-rechargeable
mix
baneriesofdifferent
may
cause
the
productisstored
leaks
inside
the
that
battery
fluid
provider.
For
representative.
follow
local
waste
touch
metal
objects,
betterl..,
Charger
baneries.
des
droits
selon
les
Etatsoules
Etats-Unisetdu
presente
qU'une
garantie
une
entreprise
mlnimales
imposees
par
une
negl~ence
de securite
Avant
d'utiliser
tes
produits
Respectez
toujours
L'utilisationdetout
secteur,
pourrait
Avant
d'utiliser
instructions
spOcifieesabordo
AVERTISSEMENT:ne
pI8ces
Intamean'..tr<iparableourempl'98bla
personnes
AVERTISSEMENT
I'exposez
e(
leo
chergeurs
Leo
commendes,
provoquer
Usez
atlentivement
Utilisez
uniquement
d'explosion.
ConsultezIeguide
cornpatilies
avec
GardezIapileJbanerie
du
liquide,aI'humid.e,auleuoua
Remplacez
toutes
d'autres
batteries
N'utilisez
pasdepileslbatteriesaulithium
pasdepileslbaneriesdecomposRions
loute
fu~e
delapilelbatterie,
n'utilisez
vous
constatez
plus
proche.
contaC1ez
volre
client
KodakIeplus
Reportezovous
la
miseaurebutdace
de
recyclagedebatteries
recyclagedadolchetsauniveau
pas
chauffer,
fuir,sed8chargerouprovoqueruncourt-circuit.
,£r,
AVERTISSEMENT
refroldlsaent
pasderecharger
KODAK,
les
masuresdesecurite
autre
accessoire
provoquer
des
votre
quallflees.
pstiI'humldlte
da.tlsques
des
une
des
medecin.
aux
les
d'un
risques
preduit
dansunavion,
tantez
:
ne
mattez
au,
de
benerte
KODAK
t8g1eges
ou
mkanlques,
plies
tous
las
avertissementsettoutes
des
pileslbatteries
d'utilisation
votre
produ'.
horsdeporte.
pas
las
pileslbatteries,neles
les
batteriesenmeme
deja
usagees.
N'utilisez
prenez
pas
volre
produil
fuite
des
banenas
batteriesetde
Pour
obtenir
proche.
instructionsdufabricant
produ'.
Kodak
locaux.
Contactez
local
pileSibatteriesencontact
:sllea
benariea
avant
de
lei retire, de
chargeurdebatteries
des
piles
pendantuncertain
contact
using
KODAK
products.
thatisnot
recommendedbyKodak,
all
instructionsofthe
product;
thefe
arenouae,-aenrtceable
personnel.
ere
suppliedbythe
producttoavoid
product.
time.Donot
batteries.Donot
chem~try
loranextended
contact
onto
your
heatth-relaled
the
banery
allow
themtocool
moisture,orextreme
InI8fldad
/hen
those.pecffled herein
batteriestoliquid,
mix
your
skin,
instructions
local
for
may
chergets
for
th~
your
leakage.
product,
leaks
add'ional
the
manufacturer's
advantageofany
removerorrecycler
Kodak
Eastman Kodak
Rochester,
©
Kodak.
speeifiquesat1I
garantie
Kodak,
veuillez
non
recommande
d'incendie,
pes
de
Jemel.1e
de.
tempBrature.
peuvenl
Instrucllon.
compatibles
des
des
tempe,atures
temps.
avec
chimiques,
las
precautions
dansIeproduit,
des
encourage
pour
aont
volre
non
rechargeables.
Company
NY
14650
2010. MC/MR/TM:
se
peut
juridictions.
Canada
peuvent
etre
spOcifiquedeKodakneso.
aucune
autre
parlaIoi,
mMle
ou
tout
autre
acte.
lireetsuivre
les
elementaires.
par
d'electrocutionoude
vous
devez
imperativement
dOmontarIeprodult
par
produltencon_eweduIlqulde.
~mes.
unlquement
non
.p8cill4.lci
Mecttlquesoud'tIectrocullon.
las
instructionsdufabricant.
avec
votre
pour
savoir
quels
enlants.
inserez
pas
extremes.
N'utilisez
pasdebatteries
des
plleslbaneries
classesoumarques
mantionnees
temps,
contactezIeservice
avecIapeau,
rineez
informations
supptementaires,
ainsi
qu'aux
r9glementationsenvigueur
ses
clientsafaire
I'entreprise
responsabledela
piUSdedOtails.
avec
des
objets
choudaa,
pallantezunmoment
prodult.
Always
airline.
lor
Indoor
hazetds.
banery
risk01explosion.
new
batteries
mix
lithium,
types,
gradas,orbronds.
periodof"me.
local
Kodak
wash
immediately
information,
and
community
details.
short..ircuit,
flrat;
bette,les
U.S.A.
que
VOU$
differentsendehors
garantieauresponsabime
siIedelaut,IedommageouIa
instructions
Kodak,
tel
voua-mOme.
I'utlilsatau,.
Leo
lire utili
sonl.u
produit
typesdepilOSlbaneries
al'enversetne
pasdenouvelles
avec
des
Ni-MhouNi-Cd.
ci-apres.
retirez
las
imm8<fiatemenlaI'eau
appel
metalliques;elles
requirements
act.
follow
basic
suchasan
temperelures.
use
only.1Muae
manufacturer.
See
moisture,
fire,
with
used
Ni-MH,
and
In
the
Customer
with
water
contact
applicable
regulations.
banery
recycling
discharge
energy,
m.ybehot
Kodak
poss8diez
d'autres
des
communique.
indiquees.
qU'un
adaptaleur
blessures.
verifier
toutes
Aucuned..
Faltas
oppel
edepIateurs
en
IlItI!rIeur.
pIjbIes de
pour
eviter
tout
las
exposez
baneries
piles
non
rechargeables.
dillerenles.
batteries.Sijamais
client
Kodak
contactezIeservice
aux
programmes
coIlecteetdu
pourraient
alln
imposed
salety
AC
parts
mey
re.ult
the
Users
or
ones.
Ni-Cd
Failure
unlikely
SeIV""
and
your
4H7156
Etats-
a
n'existe
las
i d
Ne
sectaur
risque
sont
avec
N'utilisez
Pour
et
pour
qU'ell
Do
local
..
pas
eviter
Ie
a
..
Page 74

GARANTIA
Garantfa
Iimitacla
Kodak
garanti,a
qua
los
accasoriosyequipos
lt
·Productos
),
sin
incluir
las
sus
materialesyfabricacion
Guardaalracibodacompra
'echadaen91
Is
garanlia.
Coberturadela
las
reparaciones
Productosseadquirieron
cargo,alservieio
Sera
responsebilidaddeKodak
funcionen
correctamenta
y/a
limitaciones
incluiranlamanadeobraycualesquier
reparar0reemplazarunProducto,
pagade
poralProducto, siempraycuandc
comprobanta
dendaseindiquaalpreciodecompra
reembolso
seran
Si
durantelareparaciOnS8utilizan
retabricadas0que
reemplazar
lodoelProducto.
Productos
y
los
vigenla
anIegaranlia
reparacion0raemplazo
Limitaciones
La
presente
garantianocubre
garantianolendra
acddentes,
aJleraciones,
accesoriosydispositivosnocompatibles
seguimientodelas
no
tJlilizaciOndearticulos
casodequejas
PORLAPRESENTE.
PRODUCTOYDECLINASURESPONSABILIDAD
IMPUCITASDECOMERCIABILIDADEIDONEIDAD
casodequeIeexclusiondauna
vigentes,Ieduraciond.dicha
compra
del
producto0el
La
opci6ndereparaci6n,
Kodaknosera
Ie
venta,
compra0utilizaciOn
Ie
presenla.
Kodak
dafios
indirectos,
incumplimientodecualasquief
de
ut~idades,
cosios
coslos
porelreemplazo
c1ientes
par
dichos
Las
presentes
a
sus
proveedores.
Derechos
En
algunos
estados0jurisdiccionesnosa
danos
indirectos0emergentes.Entales
apIk:able.
En
algunos
de
coberturadegarantias
pilas.
duranteunano
momentodesolicitsr
responsable
limitaciones0exclusionesderesponsabilidadseaptican
del
original
Garantfa
cubiertas
porIagarantia
originalmente.Esposible
lecnico
autorizado
reparar0reemplazar
durantaalperiodo
estipuladasenla
los
repuestos
presentadas
emergentesysecundarios,
presente.
unicos
recursos
incluyan
metariales
podria
refabricados
original
del
(el
que
sea
circunstancias
validez
cuandoelproblemasedebaadanos
modificaciones,
instruccionesdefuncionamiento,
suministrades
con
posterioridadala
KODAKNOGARANTIZA,DEFORMA
garantia
garanlia
perlodo
que
reemplazo0reembolso
ante
dafios
dal
Producto,
ranunciayexcluye
garantias
por
tiampodeinactlvidad,
del
equipo,
dailos
productodeIa
usuario
estades0jurisdiccionesnose
implicitas.Entales
alec1ronicos
funcionsrs"
correctsmenteyno
a
contar
dal
produclo.
cualquier
del
reembolsara,asu
dispuestosenvirtuddeesta
repuestos,
raempiazalSO
Producto,0bien
meyor).
instaleciones0sarvicios,0bien
Dabera
reparacion
limitada
5010
S8
encuentran
que
pais
dendeselos
cubiarto
Las
reparaciones
ajustes
y/a
repuestos
asIa
uhimosedevuelvaaKodak
pagadc.l.a
estos
ultimos
retabricades.
por
estaran
garanlizades
novanta
que
estan
selVicionoautorizado,
(como
tintasycartuchosdeotros
por
Kodak
(como
facha
ANTE
implicilanolanga
implicita
seradeun
asi10estipulale
constituyela(mica
indirectos,
emergentesnisecundarios
indapendientemenladela
deIepresent.
independientementedela
aseritas0implicitas,
pardida
compra,
utilizaci6n0malfuncionamiento
pennitelaexclusi6n0limitadOndegarantias
casas,lalimitaci6n0exclusiOn
casos,lalimitaci6n
GARANTIA
Garantia
limitacla
A
Kodak
garanla
excluindoaspilhas,
da
Guards0recibodevenda
datadecampra
durante0perlododegaranlia.
Coberturadagarantia
Os
Talve,
autorizadonopals
A
Kodak
durante
se~
elau~de
a
seu
enviedeaKodak
substitu~o
Sa
recondicionadasaucanter
ProdtJIo,
~s
ProdtJIo,oupor90dias
Limita~oes
Esta
valida
serviyo
cartuchosetintasdeoutros
manutenttaoouacandicionamentonaembalagamdaKodak,
tomecides
periododevalid
A
KODAK
ESTE
ADEQUACAOAUMA
implicila
de
A"","0dereparo,
sera
vanda,
par
recefIa
substituto,
resuhantesdacompra,
quebfadequalquer
exclusaodaresponsabiltdade
Seus
Alguns
censeqiJenciais;
estadesoujurisdiQ6es
portanto,
Esta
de
queosprodutos
datadecompra.
caso
sefViCosdegarantia
seja
necessario
ondeosProdutos
repararaausubstijuiraosProdutos
a
periodo
de
de
garantia
substilu~o.
cnterio,
reemboisara0valor
acompanhadedecomprovante
au
reeni>olsodovalor
forem
usadas
PElftCIsdesubstituitta0
asIa
podera
e
materiais
recondicionados
garantia
nao
abfange
quandoafalha
nio
autorizado,
pete
Kodak
ada
NAo
OFERECE
PRODUTOEISENT
nlio
tanha
compraoucanfonne
responsavel
par
compraauutili,ll\'iio
qualquer
dana
especial,
au
luera,
custosdeinatividade,
instala¢es
direitos
estadosaujurisdiooes
portanto,atimit"l'iioouexclusao
a
limfIa~o
garantia
concedeavoce
estado
para
_do
elelrOn~os
ao
estarao
livresdedefeitosdemateriais
datade
soja
te~a
alguma
Iimitada
estao
disponiveis
enviarosProdtJIos
garantia,deacordo
incluirito
todaamao-de-obra,
Coso
a
materiais
sar
substiluido
apOsadatadoreparoouda
circunst4ncias
ocorrer
deviOOadanosdeenvio,
usa
incorreto,
labricanles),
(como
adapladorasacabos),ouse
desta
garantia.
NENHUMA
A·SEDEGARANTIAS
FINALIDADE
elario
legal,
adura"odagarantia
perlodo
detenninado
5Obstilu~o
ou
nenhum
dano
dasta
conseqliencialou
tfsicasouserviyos,oureivinclK:a¢esdeseus
uti~o
au
garantia
escritaauimplicita,
descrita
nao
nao
penn~am
aeima
pede
naoseaplicaravoce.
direitos
oudeacorda
con5Omkloraos
original.
sera
necessario
solicita~o
da
apenasnopais
(daspesas
loram
adquiridos.
que
nao
comascondt¢es
Kodak
pago
pago
permaneceemvigor
reembolsoeaunice
especial,
Produlo,
pennitem
assim
nao
posse
pelo
Produto
de
ccmpra
saoosunicos
duranteasreparos,
recondicionados.
porumProduto
alemdocomroledaKodak.
abuso.
usa
com
nao
obsarvancia
OUTRA
GARANTIA
IMPUCITASDE
ESPECiFiCA.
talhadeProdtJIo),
com
Cosoaaxclusaodaqualquar
par
lei.
consequencialouincidental
indapendentemenladacausa.Aresponsabilidada
incidental
perda
do
usadoequipamento,
esta
aquisaaplicamaKodakeaos
exclusioaulimitattaodedanos
acime
limita"o
relarente
especificos,evoce
sua
jUrisd~o.
Kodak
(an
adalanta,
presentsrs"
delateehadecompra
presentar
durante81periodo
disponiblesen81
debe
enviar
los
adquiriO.
los
Productosancasodaque
porIegarantla.
propia
En
mantantmientoyembalajedeKodak,aIa
PARAUNFIN
cuaiasquier
pennrien
repara
pagas
apresentarem
rapararausubstltuir0Produto,aKodak,
adquirido,
recondieionade.Agarantia
sUbstilu~o,
expressamente
sujatoalas
cubiertas
necesarios.SiKodaknopudiera
di5crecion,alpreciodacompra
reparacion,elreemplazo0el
garantla.
pueden
corresponderapiezas
coso
de
que
uno
ralabricade.
par
el
periodo
(90)
dias
daspuesdela
fuera
del
controldeKodak.Lapresente
causados
uso
indebido,
adaptadorasycables),0biananal
cubierta
par
EXPRESA0IMPUCITA,
CUAlESQUIER
DETERMINADO.Enel
valida,
cenfonna
(1)
aiio
a
lay.
obligaciOndeKodak.
responsebilidades
inciuidos,
raspectodela
quejas
limitaciones
anteriornosera
acessOrios
e
de
fabrica~o
apresantarumcomprovanle
ondeosProdutos
por
voce)aum
funcionamento
elau
lim~al(6es
como
quaisquer
Produto
com0valor
recursos
sob
esta
essas~spoderao
Caso
seja
necessario
sob
os
termosdagarantia
0
que
aeidente,
alterattao,
acess6rios
incompativeis
das
insl"'l'Oos
nao
utilizattao
a
reivindice~o
EXPRESSAOUIMPUCITA
COMERCIALIZACAo
implicita
sera
de
obrigs"odaKodak.AKodak
(incluindo,
entre
clientes
independenlemantadacausaouda
pode
""0seapliceravoce.
adura"o
de
pode
ter
outros
los
defectos
del
producto.
una
pruebadacompra
cubierto
por
pais
dande
Produclos,a50
por
fuera
Los
esta
partirdela
causadeestos.
causadeestos,0par
entre
utilization
tantoaKodak
anteriornosera
essa
descrimlnade.
tor
Esta
de
um
outros,
custodoequipamento
negada.
seus
uma
direitos
propio
no
cendieiones
esta
garantia
junto
cen
un
necesario
maleriales,
los
que
aun
siga
techa
duranteeIerwio,
abuso,
usa
fabricantes),afno
garantia.
ESTE
GARANTiAS
con
las
leyes
techa
de
produc1o
de
Por
por
otros,
perdidas
del
equipo,
por
parte
de
del
Producto.
como
ante
respecto
del
plaza
aplicable.
("ProdtJIos").
porumaooapartir
da
foram
adquiridos.
ravendader
adequado
aqui
descritas.
ajustes
necessarios
que
dava
ser
Reparo,
garantia.
ser
substituir
todo
des
ProdtJIos,
original
mais
longo.
garantia
nao
sera
modmca~o,
(par
exemplo,
~o,
dos
itens
for
teria
apOs
0
PARA
garantia
anoapartirdadata
nao
resultante
da
perda
de
por
danos
A
limita~o
fornecedores.
incidentais
ou
Alguns
garantia
implicita;
que
variern
de
con
E
e
La
presenta
garantialaotorgealusuario
confierelaley,
Fueradelos
los
en
UnidosyCanada.Amenos
de
o
negligenciauotros.
los
Usa
•
•EIusodeaccesoriosnorecomendados
•Siutiliza
.&.
.&.
Usadelas
a
•
•
•
•Nodesmonte,
•
•
•Enal
•AIdesechar
•Silos
,&;
Usa
•Nointente
Fora
Fora
ser
emitida
minimos
negligenciaoude
los
cuales
pueden
por
partedeuna
Estados
minimas
tenninosycondicionesdela
Kodak
responsabilidades
Guarde estas importantes instrucciones
del
producto
Lea
y
siga
las
instrucciones
procedimiantosdeseguridad
incendios,
descargas
el9ctricas0lesiones.
este
produeto
delalinea
PRECAUOON:nodesmonta
repararalUluariO.
ADVERTENCIA:noaxpongealproductoaliquidos,
extremaa.
pare
utlUzaraeanIntertores.EIUIOdemandos,
alos
meeanicolyahlctricos.
Leaysiga
Utilice
5610
del
usuario
Mantenga
temperaluras
Cambia
todas
vez.Noutilice
y
pilas
Ni-Cd
sigue
estas
Retire
las
de
queseproduzca
comuniquese
casodequemIiquido
cuerpo
afectadayacudaalcentrodeatencion
informaciOn
departamenlodeservieioalclientedeKodak.
pais.
Kodak
disponiblesensu
recolecci6ndedesechos
contaetosdela
enIapila,0bienlapila
PRECAUCI6N:alretlrar
del
dos
des
Estades
diferentes.Amenos
por
impastos
enatinteriordeun
aerea.
Solicile
Los
adaptadcresdeCA
indicadosaneate
pilas
todas
las
advertenciaseinstrucciones
pilas
aprobadas
encontrara
una
las
pilas
fuera
del
inslalealreyeSniexponga
extremas.
las
pilasdeun
pilas
recargablasyno
alavez.Noutilice
precauciones
pilassiguardaralacamara
una
fuga
canunrepresernante
sobre
aspec1:OS
pilas,
siga
las
recomiendaasus
comunidad0regiOn.
para
pila
podria
cargadordepilas
cargar
pilas
quenoson
Estados
Unidcsede
queacomprador
uma
empresa
Kodak,
par
tei,
mesmo
outros
atos.
Guarde estas importantes
derechos
variardeun
UnidosyCanada
presente
quealusuario
empresa
exigidas
aspacificos
estado0jurisdicci6naotro.
garantia
seran
se
te
otorgue
Kodak,lacompania
por
ley,
aunqueeldefecto,
por
de seguridad
antesdeutilizar
bSsicos.
documento
para
listadelos
alcancedelos
juegoalmismo
padria
delliquido
entraraencontacto
relacionados
instrucciones
tocaran
las
Unidosedo
Canada,oslennoseas
cualquier
produeto
por
Kodak,
como
aviOn,
siga
todas
este
produCIO;
ayuda
este
pilasdediferente
causar
c1ienles
solicitar
objetos
descargar
piles,
recargables.
nao
que0defeito,
nlnguna
a
lecnicos
callflcadol.
y
cargadoras
de
ojUI'es0proctdlmlentoa
podrian
causar
entregadas
produetoyasi
recargables
duranteunperiodo
del
existe
evitaralriesgodeexplosiOn.Enla
tiposdepUas
compatibles.
ninos.
las
pilasaliQuidos,
tiempo.Nouti
juntas.Noutilice
ltpo,
grado0maresalmismo
una
fugadeliquidodeIa
delapila
mientras
departamentodeseMcioalc1ienledeKodak.
conlapiel,
medica
mas
conlasalud,
comuniquese
del
fabricanle
usaryaprovechar
Comuniquese
mas
dele
ademasdelas
con
informaci6n.
metalicos,sepodria
energla0volverse
qua..anlrian,yaque
Canada
condil'5es
receba
uma
garantia
garantiaouresponsabilidade
danoouparda
ademas
d~erentes
escrito
solo
sera
adaptadoresdeCA,
las
pIeza
hu"-d
plla
Kodakaehan
deacargas
parelfabricantedeIa
lice
pilas
largo.
esla
lavedeinmediatolaparte
cercano.
los
programasdereciclajedepilas
empresas
produciruncortocircuito0fuga
caliente,
Kodak
sejam
instru~oes
seguran~a
Utiliza~lio
·leiaesiga
·0
Os
•Aousar
.dl.
.dl.
0
do
Utiliza~o
·leiaesiga
•
•
•
•
•
•
•Aodescartaraspilhas,
• Sa
,&;
Utiliza~lio
•
do
produto
estas
instp.1';Oes
procedimentos
usadeurn
acess6rio
pode
causar
incandio,
este
produtonoaviao,
ATENC;Ao:
manuten~io
p<ocura
pessoal
AVISO:
Nio
Os
adaptMJotea
somente
em
diler8ntea
rJanos
eIfllrlcos
lodasasmensagenseinstru¢es
Use
apenas
pilhas
o
guiadousuario
o
prodtJIo.
Mantenhaaspilhas
Nao
des
monte,
temperaturas
Substitua
todasaspilhasdeurn
pilhas
usadas.
de
litio,
Ni-MHeNi-Cd.
obselVancia
desta
Removaaspilhasse0
pilha
vazar
dentrodoproduto,
T
ecnica
Kodak.
No
casode0
f1uidodapilha
imediatamente
a
sauete,
entreemcantato
A
Kodak
incentiva
reciclagememsuas
obter
detalhes
os
contatos
descarregar-se,
ATENC;Ao:Aoremovaralpllhas,
estar
quan'es).
Nao
recarregue
antesdeusarosprodutos
oosicoodeseguran.;:a.
que
nao
choque
Nio
desmonle
poua
ser
felta
quellficado.
axpon'"
este
ACaos
a_I
daqueles
das
extremas.
do
techados.
equ/alpeclllcados
au
mec~nlcos.
pilhas
aprovadas
para
obter
foradoalcancedecriant;as.
inverta
nem
exponhaaspilhasaliquidos,
Nao
misture
pilhas
Nao
misture
precau~o
produto
vazareentraremcontato
com
aguaeconsune
com0representante
siga
as
seus
clienteseconsumidoresaparticiparem
comunidades.
sobre
reclclagem.
eta
pilha
locarem
superaquecerauvazar.
recarregadordepilhas
pilhas
nao-recarregaveis.
seja
recomendado
eletricoouferimentos.
observe
este
produlo.
pelo
pRlduio
,...,-,.gad""'"
para
este
informa«joes
conjunloaomesmo
recarregavE»s
pilhas
pode
causar
lor
armazenado
entreemcantata
seu
instru¢esdofabricanteeas
Entreemcontato
objetos
pels
todasasinstrueoesdacompanhia
Ele
,,"0
usuario.seprecisardeservi«jos
./iqu/dios.
umldade
de
pi/has de
0
UIO
t»
controles,
porIe
resulta,
'omecidas
produto
para
sobre
tiposdepilhaesua
tempo.
com
de
d~erentes
vazamento.
por
Iongos
com
urn
medico.
Para
localdaAssistenciaTecnica
metalicos,apilhs
aguarde
ale
queaerellrlem
KODAK.
Kodak,
conlem
au
KODAK
ajustea
em
pelo
fabricantedapilha,
evitar
riscodeexplosao.
umidade,
Nao
nao-recarregaveis.
tipos,
categoriasoumarcas.Anao-
perlodos.Nocasode0
representanle
comapele,
abler
outras
regulamenta¢es
com0departamentodecoteta
podera
de
los
queyaIe
fuersdelos
Estados
una
garantia
especifica
responsable
por
dana0perdidasedeba
Kodak.
instruccionesdeseguridad
en
humedad,
pilasdelitio,
pila.
Enelcaso
instaladaenla
dasta
garantias
Siga
siempre
puede
provocar
au
interiorlapuede
0 temperalural
diaeiiado
dUarenlas
electrleas0peUgros
pila.
fuego
0
nuevasyusadasaIa
pilas
Ni-MH
liempo.Sino
poco
probable
camara,
solicitar
viganlasansu
estar
podem
par
alem
dos
del
mas
calientel.
aseMto
requisitos
de
Para
conunrepresentante
layes
localesdereciclaje0de
pueden
garantia
especifica
decorrentes
de
Siga
sempre
os
como
urn
adaptador
AC,
aerea.
nanhume_cuja
de
manuten~o,
lemperaruraa
choques
misture
dos
devern
au
procedlmenlos
eIou
compatibilidade
fogo
ou
pilhas
Nao
local
laveaarea
informal;6es
programas
sofrer
curto-circuito,
(as
pUhal
axtremal.
lerU..
riscol
Consulte
novas
misture
Iluido
cia
Assistencia
afetada
relacionadas
Kodak.
aplicaveis.
locais
poderao
dol
local
de
com
com
pilhas
de
a
1010
guia
del
da
para
 Loading...