

Page 1

Kodak
C300 Auto/
C400 Auto Focus
Camera
ENGLISH/ESPAÑOL/PORTUGUÊS
Page 2

Camera Identification
1
10
9
2
3
4
5
6
7
8
Page 3

12
11
13
14
15
16
17
18
19
Page 4

LCD Panel
20
21
22
AUTO
26
2728
23
24
25
Page 5

Look for this logo to be certain that the film
you buy is made for this camera.
Look for this logo to select a certified
photofinisher for developing your film and to
assure that you get all the features of the
Advanced Photo System.
Film Status Indicator (FSI)
A highlighted indicator advances
from one symbol to another to
identify the status of the film
inside the cassette.
1
4
3
PROCESSED NEGATIVES
2
UNEXPOSED
PARTIALLY
EXPOSED
FULLY
EXPOSED
Page 6

This device complies with part 15 of the FCC Rules. Operation is subject to the following two
conditions: (1) this device may not cause harmful interference, and (2) this device must
accept any interference received, including interference that may cause undesired
operation.
NOTE: Your model camera has been tested and found to comply with the limits for a Class B
digital device, pursuant to Part 15 of the FCC Rules. These limits provide reasonable protection
against interference in residential use. The camera generates, uses and can radiate radio
frequency energy and, if not used in accordance with the instructions, may cause interference
to radio communications. There is no guarantee that interference will not occur. If this camera
does cause interference to radio or television reception, which can be determined by turning
the camera off and on, you may reduce the interference by the following:
— Reorient or relocate the receiving antenna.
— Increase the separation between the camera and the receiver.
— Consult the dealer or an experienced radio/television technician for help.
Changes or modifications not approved by the party responsible for compliance could void the
user’s authority to operate the equipment.
Page 7

KODAK ADV ANTIX
C300 Auto/C400 AutoFOCUS Camera
Welcome to the innovative world of the Advanced Photo System!
And thank you for buying this KODAK ADVANTIX Camera.
NEED HELP WITH YOUR CAMERA?
Go to our web site at http://www.kodak.com or call:
Kodak in your country.
When you call, please have your camera available.
For warranty purposes, please keep your sales receipt
as proof of the date of purchase.
ENGLISH
1
Page 8

CONTENTS
CAMERA IDENTIFICA TION.................. 3
ATT ACHING THE STRAP ..................... 4
LOADING THE BATTERIES .................4
Low-battery indicator....................... 5
Battery tips...................................... 5
Power shut-off ................................. 6
LOADING THE FILM ............................ 6
TAKING PICTURES .............................8
Typical print sizes (formats) ............. 9
Using the focus lock (C400
Tips for better pictures .................. 11
TAKING FLASH PICTURES ............... 12
Flash-to-subject distance ..............13
2
AF
) ........9
SELECTING THE FLASH AND
SELF-TIMER MODES ..................... 14
Fill flash ........................................ 14
Flash off ........................................ 15
Self-timer with auto flash ............... 16
Nighttime-view with flash ............... 17
Nighttime-view without flash .......... 18
UNLOADING THE FILM ..................... 19
Automatic rewind........................... 19
Manual rewind............................... 20
CARING FOR YOUR CAMERA ..........21
TROUBLESHOOTING ........................ 22
SPECIFICATIONS .............................. 24
Page 9

CAMERA IDENTIFICATION
1 SHUTTER BUTTON
2 LENS COVER/FLASH
3 PRINT-SIZE SELECTOR
4 AF SENSORS (
SELF-TIMER LAMP
5
6 VIEWFINDER
7 LENS
8 METER-CELL WINDOW
9 STRAP POST
10 FILM-DOOR LEVER
11 VIEWFINDER EYEPIECE
12 FLASH/CAMERA-READY LAMP
13 LCD PANEL
14 MODE-SELECTOR BUTTON
15 FILM-REWIND BUTTON
MODEL C
400
AF
(
see inside cover flaps for camera diagrams
16 FILM CHAMBER
17 TRIPOD SOCKET
)
18 FILM DOOR
19 BATTERY DOOR
LCD Panel
20 FRAME COUNTER
21 AUTO-FLASH INDICATOR
22 FLASH-OFF INDICATOR
23 FILL-FLASH INDICATOR
24 BATTERY SYMBOL
25 NIGHTTIME-VIEW INDICATOR
26 SELF-TIMER INDICATOR
27 FILM-MOTION INDICATOR
28 FILM-PRESENCE INDICATOR
)
3
Page 10

ATTACHING THE STRAP
Thread the short loop of the strap
STRAP POST
under the
long loop through the short loop
and pull it tight.
4
(9); pull the
LOADING THE BATTERIES
This camera uses 2 AAA-size
alkaline KODAK K3A (or
equivalent) Batteries that supply
power for all camera operations.
1.Open the
2.Insert the
BATTERY
DOOR
(19).
• Y ou can
remove and
replace
batteries with
the camera on
or off.
batteries into the
chamber as shown.
Page 11

3.Snap the battery door closed.
NOTE: Insert the batteries into the
camera before you load the film.
Low-battery indicator
It’s time to replace the batteries
when the
BATTERY SYMBOL
appears on the
NOTE: Remove the old batteries
within 30 seconds after you open
the battery door when there is film
in the camera or the frame counter
will reset to “1.”
LCD PANEL
(24)
(13).
Battery tips
• Remember to keep spare
batteries with you at all times.
• Read and follow all warnings and
instructions supplied by the
battery manufacturer.
• Keep batteries away from
children.
• Do not try to take apart, recharge
or short circuit the batteries, or
subject them to high temperature
or fire.
• Store batteries in their original
packaging prior to use.
5
Page 12

Power shut-off
T o save battery power, the camera
will automatically go into a sleep
mode if it is not operated for more
than 4 minutes. Y ou can press the
SHUTTER BUTTON
reopen the
to awaken the camera.
(1) or close and
LENS COVER/FLASH
(2)
6
LOADING THE FILM
You can load film into the camera
with the camera ON or OFF . Insert
the batteries into the camera
before you load the film.
1.Move the
FILM
(18).
-
(10)
FILM
DOOR LEVER
to open the
DOOR
• The film door
will open only
when the film
chamber is
empty or the
film in the camera is
completely rewound into the
film cassette.
Page 13

2.Insert the film
cassette
completely into
FILM
the
CHAMBER
(16).
• Make sure the
Film Status
Indicator (FSI) on the film
cassette is at ● (#1 position)
for a new cassette.
• Do not force the film
cassette into the film
chamber.
3.Close the film door to start the
auto-film advance. The
COUNTER
(20) on the
(13) will display “1.”
PANEL
• After you close the safetyinterlocked film door, you
cannot open the door until the
film is completely rewound into
the film cassette.
LCD
FRAME
7
Page 14

TAKING PICTURES
C
H
P
P
C
H
You can take Classic (C), Group/
HDTV (H)*, and Panoramic (P)
pictures on the same film cassette.
Your photo-processing cost may be
based on the format size(s) that
you use to expose the film.
1.Open the
* High Definition Television (HDTV)
8
LENS
COVER
/
FLASH
(2) to
raise the flash
and to turn the
camera ON.
prints are the same aspect ratio as
the TV for CD interface capabilities.
2.Move the
PRINT-SIZE
SELECTOR
(3)
to select
desired format
(C, H, or P).
The viewfinder
will change to show the selected
field of view.
Model C400 AF:
3.
Frame your subject within the
VIEWFINDER EYEPIECE
sharp picture, stand at least
0.8 m from your subject.
Model C300
Frame your subject within the
VIEWFINDER EYEPIECE
AUTO
(11). For a
:
(11). For a
Page 15

sharp picture, stand at least
1.0 m from your subject.
4.Press the
SHUTTER
BUTTON
(1) to
take the
picture.
Typical print sizes (formats)
CH P
P
H
C
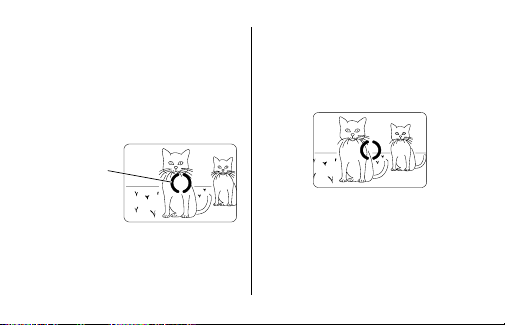
Using the focus lock (
The
C400 AF
cally focuses on whatever is
within the auto-focus (AF) circle
of the viewfinder eyepiece. To get
a sharp picture, make sure the
AF circle is on your main subject.
model C400
AF
)
camera automati-
Classic Group (HDTV Panoramic
88.9 x 127 mm or 88.9 x 152 mm or 88.9 x 216 mm to
102 x 152 mm 102 x 178 mm 102 x 292.7 mm
NOTE: Your photofinisher will generally provide 102 x 152, 102 x 178, and 102 x 292.7 mm
sizes. Some local printers may offer 88.9 x 127, 88.9 x 152, and 88.9 x 216 mm sizes.
9
Page 16

If you want to take a picture with
the subject positioned outside of
the AF circle, use the focus lock
as follows:
1.Place the AF circle on the
subject that you want focused
in the picture.
AF Circle
3.While still partially depressing
the shutter button, move the
camera until your subject is
where you want it within the
VIEWFINDER EYEPIECE
(11)
.
VIEWFINDER
2.Partially depress and hold the
SHUTTER BUTTON
focus position.
(1) to lock the
10
VIEWFINDER
4.Press the shutter button
completely down to take
the picture.
Page 17

Tips for better pictures
• Keep your pictures simple.
Move close enough to your
subject so it fills the viewfinder
but not closer than 0.8 m with
C400
AF
the
C300
• Take pictures at the subject’s
level. Kneel down to take pictures
of children and pets.
• Hold your camera vertically to
capture tall, narrow subjects,
such as a waterfall, skyscraper,
or a single person.
and 1.0 m with the
AUTO
.
• Add interest to your picture by
framing it with a tree branch,
a window, or even the rails of
a fence.
• Keep the sun behind you. This
provides the best subject
illumination.
11
Page 18

TAKING FLASH PICTURES
In dim light, such as indoors or
outdoors in heavy shade, or on
dark overcast days, you need flash.
Your camera features an automatic
flash that fires when you need it.
The flip-up flash also helps to
minimize red eyes in flash pictures
and to prevent hand obstruction in
front of the lens. When you partially
depress the shutter button and the
flash/camera-ready lamp turns off
and the fill-flash indicator stops
blinking, the flash is fully charged
and ready for picture-taking.
12
1.Open the
2.Frame your subject within the
3.Partially
LENS COVER/FLASH
to raise the flash and to turn the
camera ON.
VIEWFINDER EYEPIECE
depress the
SHUTTER
(1).
BUTTON
When the
FLASH
/
CAMERA
-
READY LAMP
FILL-FLASH INDICATOR
LCD PANEL
fully depress the shutter button to
take the picture.
(12) turns off and the
(13) stops blinking,
(2)
(11).
(23) on the
Page 19

4.Keep the subject within the
distance range for the speed of
film in your camera (see
subject distance
pictures beyond the maximum
distance or your pictures will
be dark.
Flash-to-
). Don’t take
Flash-to-subject distance
C400
AF
C300
ISO film Flash-to-subject Flash-to-subject
speed distance distance
5 0 0.8 to 2.1 m 1.0 to 2.1 m
10 0 0.8 t o 3.1 m 1.0 to 3.1 m
20 0 0.8 to 4.0 m 1.0 to 4.0 m
40 0 0.8 to 5.5 m 1.0 to 5.5 m
80 0 0.8 to 8.5 m 1.0 to 8.5 m
AUTO
13
Page 20

SELECTING THE FLASH AND
SELF-TIMER MODES
Besides the auto-flash mode, you
can select fill flash, flash off, selftimer, and nighttime-view with or
without flash.
Press the
MODE
(14) until
LCD
(13).
-
MODE
SELECTOR
BUTTON
the desired
indicator appears
on the
PANEL
14
Fill flash and flash off modes remain
selected after you take the picture. T o
cancel the selection, press the modeselection button or close and reopen
the lens cover/flash to return to the
auto-flash mode.
Fill flash
When bright light indoors or
outdoors comes from behind the
subject (backlighting), dark
shadows (especially on faces) may
occur. Use fill flash to lighten these
shadows.
1.Open the
LENS COVER/FLASH
to raise the flash and to turn the
camera ON.
(2)
Page 21

2.Press the
3.Frame your subject within the
4.Partially depress the
MODE-SELECTOR
(14) repeatedly until the
BUTTON
FILL-FLASH INDICATOR
appears on the
VIEWFINDER EYEPIECE
BUTTON
(1). When the
CAMERA-READY LAMP
off and the fill-flash indicator on
the LCD panel stops blinking,
fully depress the shutter button to
take the picture.
(23)
LCD PANEL
(11).
SHUTTER
FLASH
(12) turns
(13).
/
Flash off
When you do not want to use the
flash, especially indoors where
flash is prohibited, such as in
theaters and museums, or when
you want to take twilight scenes or
distant subjects that are beyond
the flash range, or capture the
ambiance of existing light, use the
flash-off feature. Use a tripod or
place the camera on another firm
support, and use high-speed film
because the shutter speed at night
will most likely be slow.
15
Page 22

1.Open the
AUTO
2.Press the
3.Frame your subject within the
4.Press the
16
LENS COVER/FLASH
to raise the flash and to turn the
camera ON.
MODE-SELECTOR
BUTTON
(14) repeatedly until the
FLASH-OFF INDICATOR
appears on the
VIEWFINDER EYEPIECE
take the picture.
LCD PANEL
SHUTTER BUTTON
(22)
(11).
(2)
(13).
(1) to
Self-timer with
auto flash
Use this feature to include yourself
in pictures.
1.Use the
2.Open the
3.Press the
TRIPOD SOCKET
attach the camera to a tripod or
place it on another firm support.
LENS COVER/FLASH
to raise the flash and to turn the
camera ON.
BUTTON
SELF-TIMER INDICATOR
appears on the
MODE-SELECTOR
(14) repeatedly until the
(17) to
(26)
LCD PANEL
(2)
(13).
Page 23

4.Frame your picture in the
VIEWFINDER EYEPIECE
5.Press the
SHUTTER BUTTON
SELF-TIMER LAMP
The
front of the camera will glow and
then blink during the last three
seconds of countdown.
• To cancel the self-timer
selection before the shutter
releases, close the flash.
• The self-timer automatically
turns off after the shutter
releases.
(11).
(5) on the
(1).
Nighttime-view
with flash
In this mode, the camera balances
the flash and existing light
exposure so you can take beautiful
pictures of people at sunset or at
night. Use a tripod or place the
camera on another firm support,
and use high-speed film because
the shutter speed at night will most
likely be slow.
1.Open the
2.Press the
LENS COVER/FLASH
to raise the flash and to turn the
camera ON.
BUTTON
MODE-SELECTOR
(14) repeatedly until the
(2)
17
Page 24

NIGHTTIME-VIEW INDICATOR
with flash appears on the
LCD PANEL
3.Frame your picture in the
4.Press and hold the
NOTE: If you remove your finger
from the shutter button before
12 seconds, the shutter will time
out immediately.
5.Release the shutter button after
(13).
VIEWFINDER EYEPIECE
(1) for 12 seconds
BUTTON
without lifting your finger.
12 seconds to take the picture.
(25)
(11).
SHUTTER
18
Nighttime-view
without flash
In this mode, you can capture the
natural existing light of city-night
scenes or fireworks at night. Use a
tripod or place the camera on
another firm support, and use highspeed film because the shutter
speed at night will most likely
be slow.
1. Open the
2. Press the
LENS COVER/FLASH
to raise the flash and to turn the
camera ON.
BUTTON
NIGHTTIME-VIEW INDICATOR
MODE-SELECTOR
(14) repeatedly until the
(2)
(25)
Page 25

without flash appears on the
LCD PANEL
3.Frame your picture in the
4.Press and hold the
NOTE: If you remove your finger
from the shutter button before
12 seconds, the shutter will time
out immediately.
5.Release the shutter button after
(13).
VIEWFINDER EYEPIECE
BUTTON
(1) for 12 seconds
without lifting your finger.
(11).
SHUTTER
12 seconds to take the picture.
UNLOADING THE FILM
Automatic rewind
The camera automatically rewinds
the film into the cassette after the
last exposure.
1.Wait for the film to completely
rewind into the film cassette.
FILM-MOTION
• The
INDICATOR
(27) on the
(13) will “blink” as the
PANEL
film is rewinding.
2.Move the
FILM-DOOR LEVER
to open the
to partway eject the film.
FILM DOOR
LCD
(10)
(18) and
19
Page 26

3.Remove the
MODE
film cassette
from the
camera and
reload with new
KODAK
ADVANTIX
Film.
• The FSI on the fully-exposed
film cassette will be at ✖
(#3 position).
Manual rewind
If you don’t want to take pictures on
the entire film, you can manually
activate the automatic rewind.
20
1.Press the
FILM-REWIND
BUTTON
(15)
to start the
auto-film
rewind.
2.See Automatic rewind,
steps 1–3.
NOTE: You cannot reload
partially exposed film into this
camera for continuous picturetaking.
Page 27

CARING FOR YOUR CAMERA
1.Protect the camera from dust,
moisture, sudden impact, and
excessive heat.
CAUTION: Do not use solvents
or harsh or abrasive cleaners on
the camera body.
2.If the lens appears dirty, breathe
on it to form a mist and wipe the
surface gently with a soft, lintless
cloth or camera lens-cleaning
tissue. Never wipe a dry lens.
CAUTION: Do not use solvents
or solutions not designed for
cleaning camera lenses. Do not
use chemically treated tissues
intended for cleaning eyeglasses.
3.Remove the batteries when
you store the camera for an
extended time.
CAUTION: To prevent possible
damage and electrical shock, do
not attempt to disassemble or
repair the camera or flash unit
by yourself.
21
Page 28

TROUBLESHOOTING
What happened Probable cause Solution
Camera will There are no more Rewind film and
not operate pictures remaining remove from camera
Film does not Batteries weak, Replace or reload the
advance or dead, missing, or batteries
rewind improperly inserted
LCD panel Batteries weak, Replace or reload the
is blank dead, missing, or batteries
22
Batteries weak, Replace or reload the
dead, missing, or batteries
improperly inserted
improperly inserted
Page 29

What happened Probable cause Solution
LCD panel is Camera in sleep mode Press shutter button or
blank (continued) close and reopen lens
Flash/camera Flash not fully charged Wait for lamp to turn off
ready lamp
“blinks” red
Film cassette does Loaded exposed (
not fit completely or processed film (■) into the camera
into film chamber; into the camera
film door does
not close
Lens cover/flash closed Open lens cover/flash
cover/flash
✖
), Load only new film (●)
23
Page 30

SPECIFICATIONS
Film Type: KODAK ADVANTIX Film for color and
black-and-white pictures
Lens: KODAK EKTANAR Lens; 3 elements, all-
glass
C400 AF:
25 mm Auto Focus (AF)
C300
AUTO
:
Focus System:
Focus Range (Daylight):
Viewfinder: Reverse galilean with C, H, & P
24
25 mm fixed focus
C400 AF:
C300
C400 AF:
C300
AUTO
AUTO
0.8 m to infinity
AF, 2 zones, infrared
:
Fixed focus
:
1.0 m to infinity
format display
Kodak, Advantix, Ektanar, and the Advanced Photo System
symbol and logotype are trademarks.
LCD: Camera-status information
Film-Speed: DXIX (ISO) 50–800
Flash Unit: Built-in, flip-up
Flash Range (ISO 200):
C400 AF:
C300
0.8–4.0 m
AUTO
:
1.0–4.0 m
f
/5.6–f/12.6
Apertures:
Shutter: 1/90–1/250 seconds
Power Source: 2 AAA alkaline batteries
Dimensions: 111 mm x 39.6 mm x
62.7 mm
Weight (without batteries and film):
C400 AF:
170 g
C300
AUTO
:
161 g
Page 31

KODAK ADV ANTIX
Cámara
C300 Automática / C400 Auto Focus
¡Bienvenidos al mundo innovador del Advanced Photo System!
Y gracias por comprar esta cámara KODAK ADVANTIX.
¿NECESITA A YUDA CON SU CÁMARA?
Visite nuestro sitio en la red mundial electrónica (worldwide web)
a la dirección http://www.kodak.com o llame, en su país, a Kodak.
Cuando llame, por favor aseg
cámara disponible.
Para hacer válida la garantía, sírvase guardar el recibo de
venta como prueba de la fecha de compra.
ú
rese de tener la
ESPAÑOL
25
Page 32

Este dispositivo cumple con la parte 15 de las reglamentaciones de la FCC. El
manejo está supeditado a las siguientes dos condiciones: (1) Este dispositivo
puede no causar interferencia dañina, y (2) este dispositivo debe aceptar cualquier
interferencia recibida, incluyendo interferencia la cual pudiese causar un
funcionamiento indeseable.
NOTA: El modelo de su cámara ha sido aprobado y cumple con las limitaciones
establecidas para un dispositivo digital Clase B, de acuerdo con la Parte 15 de las
reglamentaciones de la FCC. Estas limitaciones proveen una protección razonable en
contra de la interferencia que se encuentra en uso residencial. La cámara genera, usa,
y puede emitir energía de frecuencia radial y si no es usada de acuerdo con las
nstrucciones, puede causar interferencia a comunicaciones de radio. No se puede
garantizar que esta interferencia no ocurra. En caso de que ésta cámara cause
interferencia a la recepción de radio o televisión, lo cual puede ser determinado
encendiendo y apagando la cámara, puede reducir la interferencia haciendo lo siguiente:
– Vuelva a orientar o situar la antena de recepción
– Aumente la distancia entre la cámara y el receptor
– Para recibir ayuda consulte con el distribuidor o un técnico especializado
en radio/televisión
Cambios o modificaciones no aprobadas por el contratante responsable de acatar estas
regulaciones podría anular la autoridad del consumidor para operar éste equipo.
26
Page 33

Busque este logotipo para asegurarse que la película
que usted compre esté hecha para esta cámara.
Busque este logotipo para seleccionar un servicio de
fotoacabado certificado para revelar su rollo y para
asegurarse de aprovechar todos los beneficios del
Advanced Photo System.
Indicador del estado de la
película (FSI)
El indicador realzado avanzará de
una posición a otra para identificar
el estado de la película dentro del
cartucho.
1
2
4
3
NEGATIVOS PROCESADOS
NO EXPUESTA
PARCIALMENTE
EXPUESTA
COMPLETAMENTE
EXPUESTA
27
Page 34

CONTENTS
IDENTIFICACIÓN DE LA CÁMARA............. 29
COMO AJUSTAR LA CORREA
DE LA CÁMARA ....................................... 30
COMO CARGAR LAS BATERÍAS................ 30
Indicador de baterías débiles ................ 31
Consejos para usar las baterías ............ 31
Apagado automático .............................. 32
COMO CARGAR LA PELÍCULA .................. 32
COMO TOMAR FOTOGRAFÍAS .................. 34
Tamaños típicos de impresión de
fotografías (formatos) ......................... 35
Como usar el cerrojo de enfoque .......... 36
Consejos útiles para obtener
mejores fotografías ............................. 37
COMO TOMAR FOTOGRAFÍAS
CON FLASH .............................................. 38
28
Distancia del sujeto al flash ................... 39
COMO SELECCIONAR LOS MODOS DE
FLASH Y DISPARADOR AUTOMÁTICO .. 40
Flash de relleno ..................................... 40
Flash apagado ....................................... 41
Disparador automático
con flash automático .......................... 42
Modo de vista de noche con flash ......... 43
Modo de vista de noche sin flash .......... 44
COMO DESCARGAR LA PELÍCULA .......... 45
Rebobinado automático ......................... 45
Rebobinado manual ............................... 46
CUIDADO DE LA CÁMARA ......................... 47
PROBLEMAS Y SOLUCIONES ................... 48
ESPECIFICACIONES .................................. 50
Page 35

IDENTIFICACIÓN DE LA CÁMARA
(Abra la cubierta del frente y la de atrás del manual para ver los diagramas de la cámara.)
1
DISPARADOR
2
CUBIERTA DEL LENTE/FLASH
3
SELECTOR DE TAMAÑO DE IMPRESIÓN
4
SENSORES AF
5
LÁMPARA DE DISPARADOR AUTOMÁTICO
6
VISOR
7
LENTE
8
VENTANA DE MEDIDOR DE CÉLULA
FOTOELÉCTRICA
9
PRESILLA DE LA CORREA
10
PALANCA DEL COMPARTIMIENTO
DE
11
OCULAR DEL VISOR
12
LÁMPARA DE FLASH/CÁMARA LISTA
13
PANEL LCD
14
BOTÓN SELECTOR DE MODO
15
BOTÓN DE REBOBINADO DE PELÍCULA
16
COMPARTIMIENTO DE PELÍCULA
PELÍCULA
(
MODELO
C400
AF
)
17
MONTAJE PARA TRÍPODE
18
PUERTA DEL COMPARTIMIENTO
DE
PELÍCULA
19
PUERTA DEL COMPARTIMIENTO
DE
BATERÍA
Panel LCD
20
CONTADOR DE CUADROS
21
INDICADOR DE FLASH AUTOMÁTICO
22
INDICADOR DE FLASH APAGADO
23
INDICADOR DE FLASH DE RELLENO
24
SÍMBOLO DE BATERÍA
25
INDICADOR DE VISTA DE NOCHE
26
INDICADOR DE DISPARADOR
AUTOMÁTICO
27
INDICADOR DEL MOVIMIENTO DE
PELÍCULA
28
INDICADOR DE LA PRESENCIA
DE
PELÍCULA
29
Page 36

COMO AJUSTAR LA CORREA
DE LA CÁMARA
Pase el extremo corto de la correa
debajo de la
CORREA
a través del corto y tire de el hasta
que quede ajustado.
30
PRESILLA DE LA
(9). Ponga el extremo largo
COMO CARGAR
LAS BATERÍAS
Esta cámara utiliza 2 baterías
alcalinas tamaño AAA KODAK K3A
(o su equivalente) que
proporcionan la energía necesaria
para todas las funciones de
la cámara.
PUERTA DEL
1.Abra la
COMPARTIMIENTO DE
(19).
BATERÍA
• Usted puede
retirar y
reemplazar las
baterías con la
cámara
encendida o apagada.
Page 37

2.Coloque las baterías en su
compartimiento como aquí
se indica.
3.Cierre la puerta a presión.
NOTA: Ponga las baterías en la
cámara antes de cargar la película.
Indicador de baterías débiles
Debe cambiar las baterías cuando
SÍMBOLO DE LAS BATERÍAS
el
aparece en el
NOTA: Cuando haya película en la
cámara, después que abra la puerta
del compartimiento de baterías,
retire las baterías usadas en
30 segundos o el contador de
cuadros volverá al “1”.
PANEL LCD
(13).
(24)
Consejos para usar las baterías
• Acuérdese de llevar baterías de
repuesto con usted en todo
momento.
• Lea y siga todas las
advertencias e instrucciones del
fabricante de la batería.
• Mantenga las baterías fuera del
alcance de los niños.
• No intente desarmar , recargar o
causar un cortocircuito en las
baterías o exponerlas a altas
temperaturas o fuego.
• Antes de usarlas, guarde las
baterías en su empaque
original.
31
Page 38

Apagado automático
Cuando la cámara no se usa por
más de 4 minutos, se apagará
automáticamente para conservar
la energía de las baterías. Para
encender la cámara, puede
DISPARADOR
oprimir el
y cerrar la
FLASH
CUBIERTA DEL LENTE
(2).
(1) o abrir
/
32
COMO CARGAR LA PELÍCULA
Puede cargar película en la cámara
cuando la cámara esté ENCENDIDA
o APAGADA. Ponga las baterías en
la cámara antes de cargar la
película.
1.Deslice la
PALANCA DEL
COMPARTIMIENTO DE
(10) para
PELÍCULA
abrir la
PUERTA DEL
(18).
DE
COMPARTIMIENTO
PELÍCULA
• La puerta del compartimiento de
película se abrirá solamente
cuando el compartimiento de
película esté vacío o la película
Page 39

en la cámara está completamente rebobinada dentro del
cartucho de la película.
2.Ponga el
cartucho de
película
completamente
en el
COMPARTIMIENT O
PELÍCULA
DE
• Asegúrese que el Indicador del
• No fuerce el cartucho de
(16).
estado de película (FSI) en el
cartucho de la película está en
● (posición #1) para un
cartucho nuevo.
película en el compartimiento
de película.
3.Cierre la puerta del
compartimiento de película para
comenzar el avance automático
de la misma. El
CUADROS
(13) demostrará “1”.
LCD
• Después que cierre la puerta
de seguridad del
compartimiento de película, no
puede abrir la puerta hasta
que la película esté totalmente
rebobinada en el cartucho de
la película.
CONTADOR DE
(20) en el
PANEL
33
Page 40

COMO TOMAR FOTOGRAFÍAS
C
H
P
P
C
H
Puede tomar fotografías Clásicas (C),
Grupo/HDTV (H)*, y Panorámicas (P)
usando el mismo cartucho de
película. El costo del revelado de sus
fotografías puede estar basado en el/
los tamaño(s) del formato que usó
cuando expuso la película.
1.Abra la
LENTE
DEL
FLASH
alzar el flash y
ENCENDER la
cámara.
CUBIERTA
/
(2) para
* Impresiones de Televisión de Alta Definición (HDTV) son del mismo aspecto
proporcional como las capacidades interfaciales de la TV para CD.
34
2.Mueva el
SELECTOR DE
TAMAÑO DE
IMPRESIÓN
al formato
deseado (C, H,
o P). El visor
cambiará y demostrará el campo
de vista seleccionado.
Modelo C400 AF:
3.
Encuadre a su sujeto dentro del
OCULAR DEL VISOR
fotografía nítida, manténgase a
una distancia mínima de 0,8 m
de su sujeto.
(3)
(11). Para una
Page 41

Modelo C300
H
C
P
Encuadre a su sujeto dentro del
OCULAR DEL VISOR
fotografía nítida, manténgase a
una distancia mínima de 1,0 m
de su sujeto.
Tamaños típicos de impresión de fotografías (formatos)
AUTOMÁTICO
:
(11). Para una
4.Oprima el
DISPARADOR
para tomar la
fotografía.
(1)
CH P
Regular Grupo (HDTV) Panorámico
88,9 x 127 mm o 88,9 x 152 mm o 88,9 x 216 mm hasta
102 x 152 mm 102 x 178 mm 102 x 292,7 mm
NOTA: Su laboratorio de fotoacabado usualmente provee impresiones en los tamaños de
102 x 152, 102 x 178 y 102 x 292,7 mm. Algunos laboratorios locales de fotoacabado
pueden ofrecer impresiones en los tamaños 88,9 x 127, 88,9 x 152 y 88,9 x 216 mm.
35
Page 42

Como usar el cerrojo de enfoque
modelo C400
(
La cámara C400
automáticamente en cualquier objeto
que aparezca en el círculo de
enfoque automático (AF) del ocular
del visor. Para obtener una fotografía
nítida, asegúrese que el sujeto a
fotografiar esté dentro del círculo de
enfoque automático (AF). Si desea
tomar una fotografía con el sujeto
fuera del círculo de enfoque
automático (AF), use el cerrojo de
enfoque de la siguiente manera:
AF
)
AF
se enfoca
36
1.Coloque el círculo de enfoque
automático (AF) sobre el sujeto
que quiera enfocar en la
fotografía.
CÍRCULO DE
ENFOQUE
AUTOMÁTICO
2.Oprima parcialmente y
mantenga oprimido el
DISPARADOR
posición enfocada.
3.Con el disparador parcialmente
oprimido, mueva la cámara hasta
que el sujeto se encuentre en la
VISOR
(1) para asegurar la
Page 43

posición que
usted desee
dentro del
OCULAR DEL
VISOR
(11).
4.Oprima completamente el
disparador para tomar la
fotografía.
Consejos útiles para obtener
mejores fotografías
• Haga las tomas sencillas.
Acérquese lo suficiente al sujeto
a fotografiar de modo que éste
ocupe todo el visor, pero no más
cerca de 0,8 m con el modelo
VISOR
C400
AF
y 1,0 m con el modelo
C300
AUTOMÁTICO
• Tome fotografías al nivel del
sujeto. Arrodíllese para
fotografiar niños y animales.
• Haga tomas verticales de sujetos
altos y angostos, como
cascadas, rascacielos o una
persona sola.
• Agregue interés a sus fotografías
incluyendo una rama, una
ventana o una cerca.
• Manténgase de espalda al sol.
Así se logra mejor iluminación.
.
37
Page 44

COMO TOMAR FOTOGRAFÍAS
CON FLASH
A poca luz, ya sea en interiores, en
exteriores donde hay mucha
sombra o en días oscuros o
nublados, necesitará usar el flash.
Su cámara incluye un flash
automático el cual se dispara
cuando es necesario. El flash que
se levanta automáticamente
también ayuda a reducir al mínimo
los ojos rojos en fotografías con
flash y prevenir que el lente sea
obstruido por su mano. Cuando
oprima parcialmente el disparador y
la lámpara de flash/cámara lista se
apague y el indicador de flash de
38
relleno deje de parpadear, el flash
está completamente cargado y listo
para tomar la fotografía.
1.Abra la
2.Encuadre su sujeto dentro del
3.Oprima parcialmente el
CUBIERTA DEL LENTE
FLASH
(2) para levantar el flash y
para ENCENDER la cámara.
OCULAR DEL VISOR
DISPARADOR
LÁMPARA DE
FLASH/CÁMARA
LISTA
apague y el
INDICADOR DE
FLASH DE
RELLENO
(1). Cuando la
(12) se
(23)
/
(11).
Page 45

en el
PANEL LCD
parpadear, oprima
completamente el disparador
para tomar la fotografía.
4.Mantenga el sujeto a fotografiar
dentro del alcance indicado para
(13) deje de
la sensibilidad de la película en
su cámara (vea Distancia del
sujeto al flash). No tome
fotografías a más distancia de la
indicada o sus fotografías
saldrán oscuras.
Distancia del sujeto al flash
C400
Sensibilidad ISO Distancia del sujeto Distancia del sujeto
de la película al flash al flash
5 0 0,8 a 2,1 m 1,0 a 2,1 m
10 0 0,8 a 3,1 m 1,0 a 3,1 m
20 0 0,8 a 4,0 m 1,0 a 4,0 m
40 0 0,8 a 5,5 m 1,0 a 5,5 m
80 0 0,8 a 8,5 m 1,0 a 8,5 m
AF
C300
AUTOMÁTICA
39
Page 46

COMO SELECCIONAR LOS
MODOS DE FLASH Y
DISPARADOR AUTOMÁTICO
Además del modo de flash
automático, puede seleccionar el
flash de relleno, el flash apagado,
disparador automático, y la vista de
noche (con o sin flash).
Oprima el
SELECTOR DE
MODO
que el indicador
que usted desee
aparezca en el
PANEL LCD
40
BOTÓN
(14) hasta
MODE
(13).
Los modos de flash de relleno y flash
apagado se mantendrán encendidos
después que se tome la fotografía.
Para cancelar esta selección, oprima
el botón selector de modo o cierre y
vuelva a abrir la cubierta del lente/
flash para regresar al modo de flash
automático.
Flash de relleno
En escenas interiores o exteriores
de mucho contraste, sombras
(especialmente en las caras)
pueden ser causadas cuando los
sujetos tienen como iluminación de
fondo una luz brillante. Use el flash
de relleno para aclarar estas
sombras.
Page 47

1.Abra la
FLASH
CUBIERTA DEL LENTE
(2) para levantar el flash y
para ENCENDER la cámara.
2.Oprima repetidamente el
3.Encuadre su sujeto dentro del
4.Oprima parcialmente el
DE
SELECTOR
que el
RELLENO
PANEL LCD
OCULAR DEL VISOR
DISPARADOR
FLASH/CÁMARA LISTA
DE
apague y el indicador de flash de
relleno en el panel LCD deje de
parpadear, oprima completamente
el disparador para tomar la
fotografía.
MODO
INDICADOR DE FLASH DE
(23) aparezca en el
(13).
(1)
. Cuando la
(14) hasta
(11).
(12)
/
BOTÓN
LÁMPARA
se
Flash apagado
Cuando no quiera usar el flash,
especialmente en interiores donde
el uso del flash está prohibido,
come en teatros y museos, o
cuando quiera fotografiar escenas
en penumbras, o sujetos que se
encuentran fuera del alcance del
flash, o capturar el ambiente con la
luz existente, use la función de
flash apagado. Use un tripié o
coloque la cámara sobre otra base
firme, y use película de alta
sensibilidad de ISO porque la
mayor probabilidad es que, por la
noche, la abertura del diafragma
será lenta.
41
Page 48

1.Abra la
FLASH
CUBIERTA DEL LENTE
(2) para levantar el flash y
para ENCENDER la cámara.
2.Oprima repetidamente el
SELECTOR DE MODO
INDICADOR DE FLASH
que el
APAGADO
(22) aparezca en el
PANEL LCD
(13).
OCULAR DEL VISOR
tomar la fotografía.
DISPARADOR
3.Encuadre su sujeto dentro del
4.Oprima el
(14) hasta
(11).
(1) para
/
BOTÓN
42
Disparador automático
con flash automático
Use esta función para incluirse en
fotografías.
MONTAJE PARA
1.Use el
2.Abra la
3.Oprima repetidamente el
(17) para colocar la
TRÍPODE
cámara en el tripié o coloque la
cámara sobre otra base firme.
CUBIERTA DEL LENTE
FLASH
(2) para levantar el flash y
para ENCENDER la cámara.
DE
SELECTOR
que el
AUTOMÁTICO
PANEL LCD
MODO
INDICADOR DE DISPARADOR
(26) aparezca en el
(13).
AUTO
BOTÓN
(14) hasta
/
Page 49

4.Encuadre su sujeto dentro del
OCULAR DEL VISOR
5.Oprima el
LÁMPARA DE DISPARADOR
AUTOMÁTICO
la cámara brillará y entonces
parpadeará durante los tres
últimos segundos de la cuenta
regresiva.
• Para cancelar la función de
disparador automático antes
de que se dispare la cámara,
cierre el flash.
• El disparador automático se
apaga automáticamente
después que se dispara la
cámara.
(11).
DISPARADOR
(1). La
(5) en el frente de
Modo de vista de
noche con flash
Para que usted pueda tomar
fotografías bellas de personas a la
puesta del sol o por la noche, en este
modo la cámara crea un balance
entre el flash y la luz presente. Use un
tripié o que coloque la cámara sobre
otra base firme y use película de alta
sensibilidad de ISO porque la mayor
probabilidad es que, por la noche, la
abertura del diafragma será lenta.
CUBIERTA DEL LENTE/FLASH
1.Abra la
(2) para levantar el flash y para
ENCENDER la cámara.
2.Oprima repetidamente el
SELECTOR
DE
MODO
BOTÓN
(14) hasta que
43
Page 50

el
INDICADOR DE VISTA DE
(25) con flash aparezca
NOCHE
en el
PANEL LCD
3.Encuadre su sujeto dentro del
OCULAR DEL VISOR
4.Oprima y mantenga oprimido el
DISPARADOR
sin levantar el dedo con que
está oprimiendo el disparador.
NOTA: Si quita el dedo del
disparador antes de los
12 segundos, el disparador se
cancelará inmediatamente.
5.Deje de oprimir el disparador
después de 12 segundos para
tomar la fotografía.
(13).
(11).
(1) por 12 segundos
44
Modo de vista de
noche sin flash
En este modo, usted puede
capturar la luz natural que existe
en escenas de la ciudad durante la
noche o fuegos artificiales. Use un
tripié o que coloque la cámara
sobre otra base firme y use
película de alta sensibilidad de ISO
porque la mayor probabilidad es
que, por la noche, la abertura del
diafragma será lenta.
CUBIERTA DEL LENTE
1. Abra la
FLASH
(2) para levantar el flash y
para ENCENDER la cámara.
2. Oprima repetidamente el
SELECTOR
DE
MODO
/
BOTÓN
(14) hasta
Page 51

que el
INDICADOR DE VISTA DE
(25) sin flash aparezca en
NOCHE
el
PANEL LCD
3.Encuadre su sujeto dentro del
OCULAR DEL VISOR
4.Oprima y mantenga oprimido el
DISPARADOR
sin levantar el dedo con que
está oprimiendo el disparador.
NOTA: Si quita el dedo del
disparador antes de los
12 segundos, el disparador se
cancelará inmediatamente.
5.Deje de oprimir el disparador
después de 12 segundos para
tomar la fotografía.
(13).
(11).
(1) por 12 segundos
COMO DESCARGAR
LA PELÍCULA
Rebobinado automático
Esta cámara automáticamente
rebobina la película una vez que se
haya tomado la última fotografía.
1.Espere a que la película se
rebobine completamente dentro
del cartucho.
INDICADOR DEL MOVIMIENTO
• El
DE PELÍCULA
LCD
la película se rebobina.
2.Deslice la
COMPARTIMIENTO DE PELÍCULA
para abrir la
(27) en el
(13) “parpadeará” mientras
PALANCA DEL
PUERTA DEL
PANEL
(10)
45
Page 52

COMPARTIMIENTO DE PELÍCULA
MODE
y desplazar parcialmente la
película.
3.Retire el
cartucho de
película de la
cámara y vuelva
a cargarla con
un rollo nuevo
de película KODAK ADV ANTIX.
• El FSI en el cartucho de
película completamente
expuesto estará en 6
(posición #3).
(18)
Rebobinado manual
Si no desea tomar el rollo completo
de fotografías, usted puede
46
manualmente activar el proceso de
rebobinado automático.
1.Oprima el
BOTÓN DE
REBOBINADO
DE
(15)
PELÍCULA
para
comenzar el
rebobinado automático de la
película.
2.Vea los pasos 1–3 del
Rebobinado automático.
NOTA: Para la toma continua de
fotografías, no puede volver a
cargar película parcialmente
expuesta en esta cámara.
Page 53

CUIDADO DE LA CÁMARA
1.Proteja la cámara del polvo,
humedad, golpe repentino, y
calor excesivo.
PRECAUCIÓN: No use solventes o
soluciones ásperas o abrasivas
en el cuerpo de la cámara.
2.Si el lente se ve sucio, cúbralo
con su aliento para empañarlo y
limpie la superficie
cuidadosamente con un paño
suave que no tenga pelusas o
con un pañuelo especialmente
diseñado para la limpieza de
lentes. Nunca limpie el lente
en seco.
PRECAUCIÓN: No use solventes o
soluciones que no hayan sido
diseñadas para la limpieza de
lentes de cámaras. No use
pañuelos con químicos
diseñados para la limpieza
de gafas.
3.Remueva la batería cuando vaya
a guardar la cámara por un
largo período.
PRECAUCIÓN: Para prevenir la
posibilidad de daño y choque
eléctrico, no trate, usted mismo,
de desarmar o reparar la cámara
o la unidad del flash.
47
Page 54

PROBLEMAS Y SOLUCIONES
Problema Causa probable Solución
La cámara no No quedan más fotografías Retire la película
funciona
La película no Las baterías están débiles, Reemplace o vuelva a
avanza o se descargadas, mal cargar las baterías
rebobina colocadas, o falta colocarlas
El Panel LCD Las baterías están débiles, Reemplace o vuelva a
está en blanco descargadas, mal cargar las baterías
48
Las baterías están débiles, Reemplace o vuelva a
descargadas, mal cargar las baterías
colocadas, o falta colocarlas
colocadas, o falta colocarlas
La cámara está apagada Oprima el disparador o
cierre y vuelva a abrir la
cubierta del lente/flash
Page 55

Problema Causa probable Solución
El Panel LCD está La cubierta del lente/flash Abra la cubierta del
en blanco está cerrada lente/ flash
La lámpara de El flash no está Espere a que la lámpara
flash/cámara lista completamente cargado se apague
“parpadea” rojo
El cartucho de la La cámara ha sido cargada Solamente cargue la
película no cabe con película expuesta ( 6w) cámara con película
completamente o procesada (n) nueva (l )
dentro del
compartimiento de
película; la puerta
del compartimiento
de película
no cierra
49
Page 56

ESPECIFICACIONES
Tipo de película: Película KODAK ADV ANTIX
para fotografías a color y blanco y negro
Lente: Lente KODAK EKT ANAR; de 3 elementos,
todo de vidrio
C400 AF:
25 mm Enfoque automático (AF)
C300
AUTOMÁTICO
:
Sistema de enfoque:
C400 AF:
C300
AUTOMÁTICO
Enfoque (Luz de día):
C400 AF:
C300
AUTOMÁTICO
Visor: Galileo-Reverso con formato C, H, & P
LCD: Información del estado de la cámara
50
25 mm enfoque fijo
AF, 2 zonas, infrarrojo
:
Enfoque fijo
0,8 m a infinito
:
1,0 m a infinito
El símbolo y logotipo de Kodak, Advantix, Ektanar,
y el Advanced Photo System son marcas registradas
Sensibilidad de película: DXIX (ISO)
50–800
Unidad del flash:
Integrado, se levanta solo
Alcance del flash (ISO 200):
C400 AF:
0,8–4,0 m
C300
AUTOMÁTICO
:
Abertura de diafragma: ƒ/5,6–
Velocidad del disparador:
1/90–1/250 segundos
Fuente de energía:
2 baterías alcalinas tamaño AAA
1,0 –4,0 m
f/
12,6
Dimensiones: 111 x 39,6 x 62,7 mm
Peso (sin película y baterías):
C400 AF:
170 g
C300
AUTOMÁTICO
:
161 g
Page 57

Manual da Câmara
KODAK ADVANTIX
C300 Auto / C400 Auto Focus
Seja bem vindo ao mundo inovativo do Sistema Avançado de
Fotografia! Obrigado por comprar uma câmara KODAK ADV ANTIX.
VOCÊ PRECISA DE AJUDA COM SUA CÂMARA?
Visite o nosso site na Internet, http://www.kodak.com.br o
telefone a: Kodak Brasileira, chamada gratuita, no horário das
8:00 às 17:00hs, de segunda à sexta-feira no número
0800-150000 (Válido somente no território nacional). Quando você
ligar, por favor tenha sua câmara desponível.
Guarde o recibo de compra como comprovante da data de
aquisição da câmara para efeito de garantia.
PORTUGUÊS
51
Page 58

Procure por esse símbolo para ter certeza de que você
está comprando o filme correto para esta câmara.
Procure por esse símbolo para indentificar um
laboratório certificado para obter todos os benefícios
oferecidos pelo Sistema Avançado de Fotografia.
Indicador do Estado do Filme
(IEF)
O indicador luminoso avança de
um símbolo ao outro para indicar o
estado do filme dentro do cassete.
52
1
2
4
3
NEGATIVOS PROCESSADOS
VIRGEM
PARCIALMENTE
EXPOSTO
TOTALMENTE
EXPOSTO
Page 59

CONTEÚDO
IDENTICAÇÃO DA CÂMARA ................ 54
COLOCANDO A ALÇA NA CÂMARA .... 55
COLOCANDO AS PILHAS ..................... 55
Indicador de pilha fraca ................... 56
Dicas para o uso das pilhas ........... 5 6
Desligamento automático ............... 57
COLOCANDO O FILME .......................... 57
TIRANDO FOTOGRAFIAS ......................59
Tamanhos típicos das
fotos (formatos) ............................. 60
Usando a trava de foco
modelo C400
(
Dicas para tirar melhores fotos ....... 6 2
TIRANDO FOTOGRAFIAS COM FLASH
Distância entre o assunto e o flash 64
AF
) ......................... 60
SELECIONANDO O MODO DO
RETIRANDO O FILME DA CÂMARA ..... 70
CUIDANDO DA SUA CÂMARA ............. 72
PROBLEMAS E SOLUÇÕES ................ 73
ESPECIFICAÇÕES ............................... 75
63
FLASH E O MODO DO TIMER ............ 65
Flash de enchimento ....................... 65
Flash desligado ............................... 66
Timer com flash automático ............ 67
Visão noturna com flash ................. 6 8
Visão noturna sem flash ................. 6 9
Rebobinamento automático ............ 70
Usando o rebobinamento manual ... 7 1
53
Page 60

IDENTICAÇÃO DA CÂMARA
1
BOTÃO DISPARADOR
2
PROTETOR DA LENTE/FLASH
3
BOTÃO DE SELEÇÃO DO FORMATO
4
SENSOR DO AF
5
LUZ DO TIMER
6
VISOR
7
LENTE
8
JANELA DO FOTÔMETRO
9
POSTE PARA FIXAÇÃO DA ALÇA
10
TRAVA DA TAMPA DO COMPARTIMENTO
DO
11
JANELA DO VISOR
12
LUZ DO FLASH/CÂMARA
13
PAINEL DE CRISTAL LÍQUIDO
14
BOTÃO DE SELEÇÃO DO MODO
15
BOTÃO DE REBOBINAMENTO DO FILME
54
FILME
(
MODELO
C400
AF
Procure no lado de dentro da capa do
manual para os diagramas da câmara.
16
COMPARTIMENTO DO FILME
17
ENCAIXE DO TRIPÉ
18
)
TAMPA DO COMPARTIMENTO DO FILME
19
TAMPA DO COMPARTIMENTO DA PILHA
Painel de Cristal Líquido
20
CONTADOR DE FOTOS
21
INDICADOR DO FLASH AUTOMÁTICO
22
INDICADOR DO FLASH DESLIGADO
23
INDICADOR DO FLASH DE ENCHIMENTO
24
SÍMBOLO DA PILHA
25
INDICADOR DA VISÃO NOTURNA
26
INDICADOR DO TIMER
27
INDICADOR DO FILME EM MOVIMENTO
28
INDICADOR DA PRESENÇA DE FILME
Page 61

COLOCANDO A ALÇA
NA CÂMARA
Passe o laço curto da alça por
debaixo do
ALÇA
laço curto e aperte firme.
POSTE PARA FIXAÇÃO DA
(9). Passe o laço longo pelo
COLOCANDO AS PILHAS
Essa câmara usa 2 pilhas tamanho
AAA KODAK K3A(ou equivalente)
que alimentam todas as funções da
câmara.
TAMP A DO
1.Abra a
COMPARTIMENTO DA
(19).
PILHA
• V ocê pode tirar e
colocar as pilhas
com a câmara
ligada ou
desligada.
2.Coloque as pilhas
no compartimento das pilhas
como é mostrado.
55
Page 62

3.Feche a tampa do
compartimento da pilha.
NOTA: Coloque as pilhas na
câmara antes de colocar o filme.
Indicador de pilha fraca
Substitua as pilhas em uso quando
SÍMBOLO DA PILHA
o
no
PAINEL DE CRISTAL LÍQUIDO
NOTA: Retire as pilhas velhas em
30 segundos após você abrir a
tampa do compartimento das
pilhas se a câmara estiver com
filme ou o contador de fotos voltará
a “1”.
(24) aparecer
(13).
56
Dicas para o uso das pilhas
• Lembre-se de ter sempre pilhas
de reserva com você.
• Leia e siga todas as instruções
do fabricante das pilhas.
• Mantenha as pilhas fora do
alcance de crianças.
• Não tente desmontar,
recarregar, dar curto-circuito
nas pilhas ou expô-las à alta
temperatura ou ao fogo.
• Mantenha as pilhas em sua
embalagem original até o
momento de usá-las.
Page 63

Desligamento automático
Esta câmara desliga
automaticamente
aproximadamente após
4 minutos para conservar a pilha.
Para religar a câmara pressione
BOTÃO DISPARADOR
o
PROTETOR DA LENTE
e abra o
FLASH
(2).
(1) ou feche
/
COLOCANDO O FILME
Você pode colocar o filme na câmara
LIGADA ou DESLIGADA. Coloque as
pilhas na câmara antes de colocar
o filme.
1.Deslize a
TRAVA DA
TAMPA DO
COMPARTIMENTO
FILME
(10) para
abrir a
COMPARTIMENTO
FILME
DO
• A tampa do compartimento do
filme só vai abrir quando o
compartimento do filme estiver
vazio ou o filme estiver
completamente rebobinado.
TAMPA DO
(18).
DO
57
Page 64

2.Coloque o
cassete por
inteiro no
COMPARTIMENT O
DO FILME
(16).
• Certifíque-se
que o
indicador do estado do
filme (IEF) indica ● (posição
#1) para um filme novo.
• Não force o filme para dentro
do compartimento do filme.
58
3.Feche a tampa do
compartimento do filme para
iniciar o avanço automático do
CONTADOR DE FOTOS
filme. O
no
PAINEL DE CRISTAL LÍQUIDO
vai indicar “1”.
• A câmara possui um
mecanismo de segurança que
não permite que a tampa do
compartimento do filme se
abra até que o filme esteja
completamente rebobinado.
(20)
(13)
Page 65

TIRANDO FOTOGRAFIAS
C
H
P
P
C
H
Você pode tirar fotos de tamanho
Clássico(C), Grupo/HDTV(H)* e
Panorâmico(P) com o mesmo filme
cassete. O custo do processamento
do seu filme será baseado nos
tamanhos escolhidos.
PROTETOR
1.Abra o
DA LENTE
/
FLASH
(2) para
levantar o flash
e ligar a câmara.
* Fotos no Formato de Televisão de
Alta Definição (HDTV) têm a
mesma proporção do que a
interface CD para televisão.
BOTÃO
2.Mova o
SELEÇÃO DO
DE
FORMATO
(3)
para
selecionar o
tamanho
desejado(C, H,
ou P). O visor muda para mostrar
o campo de visão selecionado.
Modelo C400 AF:
3.
Enquadre o assunto na
DO VISOR
(11). Para melhor
nitidez fique pelo menos a 0,8 m
de distância do assunto a ser
fotografado.
JANELA
59
Page 66

Modelo C300
Enquadre o assunto na
DO VISOR
nitidez fique pelo menos a 1,0 m
de distância do assunto a ser
fotografado.
4.Pressione
BOTÃO
o
DISPARADOR
para tirar a foto.
Tamanhos típicos das fotos (formatos)
AUTO
:
(11). Para melhor
(1)
JANELA
P
H
C
Usando a trava de foco
modelo C400
(
A câmara C400
automaticamente o que estiver
dentro do círculo de foco
automático (AF) da janela do visor.
Para tirar uma foto com nitidez,
certifique-se que o círculo de foco
automático (AF) está na parte
principal do assunto a ser
AF
)
AF
focaliza
CH P
Clássico Grupo ( HDTV) Panorâmico
10 x 15 cm 10 x 18 cm 10 x 25 cm ou 10 x 29 cm
NOTA: O laboratório de processamento oferece geralmente fotos no tamanho 10 x 15 cm
e 10 x 29 cm. Alguns laboratórios oferecem fotos nos tamanhos 9 x 12 cm e 10 x 25 cm.
60
Page 67
fotografado. Se você desejar tirar
uma foto com o cenário principal
fora do círculo de foco automático,
use a trava de foco dessa maneira:
1.Enquadre o assunto que você
deseja focar com o círculo de
foco automático (AF).
CÍRCULO DO
FOCO
AUTOMÁTICO
JANELA DO VISOR
2.Pressione parcialmente o
DISPARADOR
pressionado para travar o foco.
(1) e mantenha-o
BOTÃO
3.Continuando a pressionar o
botão disparador parcialmente,
mova a câmara para posicionar o
cenário na posição desejada na
JANELA DO VISOR
JANELA DO VISOR
4.Pressione o botão disparador
completamente para tirar a foto.
(11).
61
Page 68

Dicas para tirar melhores fotos
• Tire fotos simples. Posicione-se
de tal forma a encher o visor
com o assunto a ser fotografado,
mantendo-se a uma distância
mínima de 0,8 m com a câmara
C400
AF
e 1,0 m a câmara
C300
AUTO
• Tire fotos na mesma altura do
assunto a ser fotografado.
Agache-se para tirar fotos de
crianças e animais de estimação.
• Segure a câmara verticalmente
para capturar cenários ou
motivos altos e estreitos, como
cachoeiras, prédios ou uma
pessoa só.
.
62
• Use um galho de árvore, janela
ou cerca como uma moldura
natural para destacar o assunto
a ser fotografado.
• Mantenha o sol nas suas costas
para melhor iluminação do
assunto a ser fotografado.
Page 69

TIRANDO FOTOGRAFIAS
COM FLASH
Em áreas de baixa luminosidade,
como ambientes internos ou em dias
nublados, você precisa usar o flash.
Esta câmara tem um flash automático,
que é ativado toda vez que for
necessário. O flash cobra ajuda a
minimizar olhos vermelhos em fotos
tiradas com flash e prevenir a
obstrução da lente pelas mãos.
Quando você pressionar parcialmente
o botão disparador e a luz do flash/
câmara desligar e o indicador do flash
de enchimento parar de piscar o flash
está completamente carregado e
pronto para fotografar.
PROTETOR DA LENTE
1.Abra o
FLASH
(2) para levantar o flash e
LIGAR a câmara.
2.Enquadre o assunto a ser
fotografado através da
VISOR
(11).
DO
3.Pressione parcialmente o
DISPARADOR
DO
o
ENCHIMENTO
CRISTAL
LÍQUIDO
parar de
piscar,
pressione
(1). Quando a
FLASH/CÂMARA
INDICADOR DO FLASH DE
(23) no
(13)
JANELA
(12) desligar e
PAINEL DE
/
BOTÃO
LUZ
63
Page 70

completamente o botão
disparador para tirar a foto.
4.Mantenha o motivo a ser
fotogrado dentro dos limites de
distância da sensibilidade do
filme na sua câmara (veja
Distância entre o assunto e
flash). Não tire fotos além da
distância máxima indicada, caso
contrário as fotos sairão escuras.
Distância entre o assunto e o flash
C400
Filme de Distância entre Distância entre
sensibilidade ISO o assunto e o flash o assunto e o flash
5 0 0,8 até 2,1 m 1,0 até 2,1 m
10 0 0,8 até 3,1 m 1,0 até 3,1 m
20 0 0,8 até 4,0 m 1,0 até 4,0 m
40 0 0,8 até 5,5 m 1,0 até 5,5 m
80 0 0,8 até 8,5 m 1,0 até 8,5 m
AF
C300
AUTO
64
Page 71

SELECIONANDO O MODO DO
FLASH E O MODO DO TIMER
Além do flash automático, você
pode selecionar o flash de
enchimento, o flash desligado, o
timer e a visão noturna(com ou
sem flash).
Pressione o
BOTÃO DE
SELEÇÃO DO
(14) até
MODO
que o modo
desejado apareça no
CRISTAL LÍQUIDO
(13).
MODE
PAINEL DE
Os modos flash de enchimento e
flash desligado vão continuar
selecionados após tirar a foto. Para
cancelar a seleção, pressione o
botão de seleção do modo ou feche e
abra a tampa do protetor da lente/
flash para retornar ao flash
automático.
Flash de enchimento
Motivos iluminados por trás com
luzes fortes em ambientes internos
ou externos podem criar sombras
escuras (especialmente na face
das pessoas). Use o flash
de enchimento para clarear
as sombras.
65
Page 72

1.Abra o
PROTETOR DA LENTE
FLASH
(2) para levantar o flash e
ligar a câmara.
2.Pressione repetidamente o
BOTÃO DE SELEÇÃO DO MODO
INDICADOR DO FLASH DE
até que o
ENCHIMENTO
PAINEL DE CRISTAL LÍQUIDO
3.Enquadre o assunto a ser
fotografado através da
VISOR
4.Pressione parcialmente o
DISPARADOR
DO FLASH/CÂMARA
o
ENCHIMENTO
CRISTAL
(23) apareça no
(11).
(1). Quando a
LÍQUIDO
(12) desligar e
(23) no
(13) parar de
PAINEL DE
INDICADOR DO FLASH DE
(13).
JANELA DO
66
/
(14)
BOTÃO
LUZ
piscar, pressione completamente o
botão disparador para tirar a foto.
Flash desligado
Quando você não desejar usar o
flash, especialmente em ambientes
internos onde seu uso é proibido,
como teatros, museus ou em
situações de baixa luminosidade, ou
o assunto a ser fotografado estiver
longe além da capacidade do flash,
ou se você quiser capturar a luz
ambiente, use o flash desligado. Use
um tripé ou coloque a câmara em
um suporte firme, use filme de alta
sensibilidade pois a velocidade do
obturador a noite provavelmente
será baixa.
Page 73

1.Abra o
PROTETOR DA LENTE
FLASH
(2) para levantar o flash e
LIGAR a câmara.
2.Pressione repetidamente o
BOTÃO DE SELEÇÃO DO MODO
INDICADOR DO FLASH
até que o
DESLIGADO
PAINEL DE CRISTAL LÍQUIDO
3.Enquadre o assunto a ser
fotografado através da
VISOR
4.Pressione o
DISPARADOR
(22) apareça no
(11).
BOTÃO
(1) para tirar a foto.
(13).
JANELA DO
/
Timer com flash
automático
Você pode se incluir nas fotos
usando o timer.
(14)
1.Use o
colocar um tripé na câmara ou
coloque a câmara em outro
suporte firme.
2.Abra o
FLASH
(2) para levantar o flash e
LIGAR a câmara.
3.Pressione repetidamente o
BOTÃO DE SELEÇÃO DO MODO
até que o
(26) apareça no
TIMER
CRISTAL LÍQUIDO
AUTO
ENCAIXE DO TRIPÉ
PROTETOR DA LENTE
INDICADOR DO
(13).
PAINEL DE
(17) para
/
(14)
67
Page 74

4.Enquadre o assunto a ser
fotografado através da
DO VISOR
5.Pressione o
(11).
DISPARADOR
TIMER
ligar e durante os últimos três
segundos irá piscar.
• Se você quiser interromper o
timer antes da foto ser tirada,
feche o flash.
• O timer voltará para a posição
desligado após a foto ser
tirada.
BOTÃO
(1). A
(5) na frente da câmara vai
JANELA
LUZ DO
68
Visão noturna
com flash
Neste modo, a câmara equilibra o
flash e a luz ambiente para você
tirar fotos bonitas de pessoas ao
entardecer ou a noite. Use um tripé
ou coloque a câmara em um
suporte firme, use filme de alta
sensibilidade pois a velocidade do
obturador a noite provavelmente
será baixa.
PROTETOR DA LENTE
1.Abra o
FLASH
(2) para levantar o flash e
LIGAR a câmara.
2.Pressione repetidamente o
BOTÃO DE SELEÇÃO DO MODO
INDICADOR DA VISÃO
até que o
/
(14)
Page 75

NOTURNA
(25) com flash apareça
PAINEL DE CRISTAL
no
LÍQUIDO
(13).
3.Enquadre o assunto a ser
fotografado através da
VISOR
(11).
DO
4.Pressione e segure o
DISPARADOR
segundos sem retirar o dedo.
NOTA: Se você retirar o dedo do
botão disparador antes de
12 segundos, o obturador vai
disparar imediatamente.
5.Solte o botão disparador após
12 segundos para tirar a foto.
(1) por 12
JANELA
BOTÃO
Visão noturna
sem flash
Neste modo, você pode capturar a
luz natural de cenas noturnas ou
fogos de artifícios à noite. Use um
tripé ou coloque a câmara em um
suporte firme, use filme de alta
sensibilidade pois a velocidade do
obturador a noite provavelmente
será baixa.
PROTETOR DA LENTE
1.Abra o
FLASH
(2) para levantar o flash e
ligar a câmara.
2.Pressione repetidamente o
BOTÃO DE SELEÇÃO DO MODO
até que o
INDICADOR DA VISÃO
(25) sem flash apareça
NOTURNA
/
(14)
69
Page 76

no
PAINEL DE CRISTAL
(13).
LÍQUIDO
3.Enquadre o assunto a ser
fotografado através da
DO VISOR
4.Pressione e segure o
NOTA: Se você retirar o dedo do
botão disparador antes de
12 segundos, o obturador vai
disparar imediatamente.
5.Solte o botão disparador após
(11).
DISPARADOR
sem retirar o dedo.
(1) pôr 12 segundos
12 segundos para tirar a foto.
JANELA
BOTÃO
70
RETIRANDO O FILME
DA CÂMARA
Rebobinamento automático
A câmara rebobina o filme
automaticamente após a ultima foto
ser tirada.
1.Espere até que o filme esteja
completamente rebobinado.
INDICADOR DO FILME EM
•O
MOVIMENTO
CRISTAL LÍQUIDO
“piscar” enquanto o filme
estiver rebobinando.
2.Deslize a
COMPARTIMENTO DO FILME
para abrir a
(27) no
PAINEL DE
(13) vai
TRAVA DA TAMPA DO
TAMP A DO
(10)
Page 77

COMPARTIMENTO DO FILME
MODE
ejetar parcialmente o filme.
3.Retire o filme
cassete da
câmara e
coloque um
filme KODAK
ADVANTIX
novo.
• O indicador do estado do
filme (IEF) vai indicar ✖
(posição #3).
(18) e
Usando o rebobinamento manual
Se você não desejar usar todas as
fotos de um rolo de filme, você
pode rebobinar o filme
manualmente.
1.Pressione o
REBOBINAMENTO
para
começar o
rebobinamento
do filme.
2.Siga as
instruções
de 1 a 3 do
Rebobinamento automático.
NOTA: V ocê não poderá
recarregar filme parcialmente
exposto nesta câmara para
continuar a tirar fotos.
BOTÃO DE
DO
FILME
(15)
71
Page 78

CUIDANDO DA SUA CÂMARA
1.Proteja a câmara do pó,
umidade, queda e calor
excessivo.
CUIDADO: Não use solventes ou
líquidos abrasivos de limpeza
para limpar a câmara.
2.Se o vidro do protetor da lente
estiver sujo, expire perto pela
boca para umedecê-la e limpe-a
gentilmente com uma flanela ou
um pano apropriado para
limpeza de lentes. Não ponha
pressão no vidro do protetor da
lente pois você poderá arranhá-
72
la. Nunca limpe uma lente que
estiver seca.
CUIDADO: Não use solventes ou
soluções que não forem
apropriadas para limpeza de
lentes. Não use produtos
químicos designados para
limpeza de óculos.
3.Retire as pilhas quando você não
for usar a câmara por um tempo
prolongado.
CUIDADO: Para prevenir
possíveis estragos ou choque
elétrico, não tente desmontar ou
consertar a câmara ou o flash.
Page 79

PROBLEMAS E SOLUÇÕES
O que aconteceu Causa provável Solução
A câmara não Não há mais fotos disponíveis Retire o filme
funciona
O filme não Pilhas fracas ou descarregadas, Troque ou coloque as
avança nem colocadas incorretamente pilhas corretamente
rebobina ou não colocadas
O painel de Cristal Pilhas fracas ou descarregadas, Troque ou coloque as
Líquido não colocadas incorretamente pilhas corretamente
acende ou não colocadas
Pilhas fracas ou descarregadas, Troque ou coloque as
colocadas incorretamente pilhas corretamente
ou não colocadas
Câmara no modo
desligamento automático ou feche e abra a tampa do
Pressione o botão disparador
protetor da lente/flash
73
Page 80

O que aconteceu Causa provável Solução
O painel de Cristal T ampa do protetor da lente/ Abra a tampa do
Líquido (continuação)
Indicador do flash/ Flash não está Espere que a luz desligue
câmara piscando completamente carregado
vermelho
O filme cassete O filme já foi exposto (6 ) Só coloque filme virgem (l )
não cabe completamente ou já na câmara
completamente processado (n )
no seu
compartimento
ou a tampa do
compartimento do
filme não fecha
74
flash fechada protetor da lente/flash
Page 81

ESPECIFICAÇÕES
Tipo de filme: Filme
fotografias coloridas e preto e branco
Objetiva:
totalmente de vidro
C400 AF:
Automático (AF)
C300
Sistema do foco:
C400 AF:
C300
Raio de foco (Luz do dia):
C400 AF:
C300
Visor: Tipo reverso galileu, com vista para
formato C, H e P
KODAK ADVANTIX
KODAK EKTANAR
de 3 elementos
25 mm Foco
AUTO
:
25 mm Foco Fixo
AF, 2 zonas, infravermelho
AUTO
:
Foco Fixo
0,8 m ao infinito
AUTO
:
1,0 m ao infinito
Painel de cristal líquido:
para
Sensibilidade do Filme:
Unidade de flash: Flash embutido
Raio do flash (ISO200):
Abertura:
Sensibilidade do obturador:
Alimentação:
Dimensões:
Peso (sem as dilhas eofilme):
Informação do status da câmara
DXIX (ISO) 50–800
C400 AF:
C300
AUTO
:
1,0–4,0 m
f
/5.6–f/12.6
0,8–4,0 m
1/90–1/250 segundos
2 pilhas alcalinas tamanho AAA
111 mm x 39,6 mm x 62,7 mm
C400 AF:
170 g
C300
AUTO
:
161g
75
Page 82

O símbolo e logotipo Kodak,
Ektanar, Advantix, e Sistema
Avançado de Fotografia são marcas registradas.
 Loading...