

Page 1

KODAK
Self-Teaching Guide to
Using an Adjustable
35 mm Camera
Page 2

Contents
INTRODUCTION .......................................................................................................................... 3
EXERCISES ................................................................................................................................. 3
MORE INFORMATION................................................................................................................. 3
SOME CAMERA BASICS ............................................................................................................ 3
THE SHUTTER ............................................................................................................................ 6
THE LENS OPENING .................................................................................................................. 7
FOCUSING...................................................................................................................................7
THE LIGHT METER ..................................................................................................................... 8
EXERCISE #1 .............................................................................................................................. 9
EXERCISE #2 ............................................................................................................................ 11
EXERCISE #3 ............................................................................................................................ 12
EXERCISE #4 ............................................................................................................................ 14
EXERCISE #5 ............................................................................................................................ 16
EXERCISE #6 ............................................................................................................................ 19
EXERCISE #7 ............................................................................................................................ 20
EXERCISE #8 ............................................................................................................................ 21
EXERCISE #9 ............................................................................................................................ 23
EXERCISE #10 .......................................................................................................................... 24
MORE INFORMATION............................................................................................................... 26
Page 3

INTRODUCTION
You have a 35 mm camera and want to take clear, colorful, snappy pictures. That’s easy. In
addition to the camera, all you will need is the camera’s instruction book, this guide, some film
and . . . practice.
EXERCISES
The exercises were designed to let you see how the various camera settings are used in
taking different types of pictures. Try each exercise, make a copy of the page and paste your
pictures with each exercise. When you are finished, this book of pictures will be a handy reminder of the things you can do with your camera.
NOTE: These exercises are designed for manually adjustable 35 mm cameras loaded with
KODAK ROYAL GOLD 200 Film. Some of the suggested exposures are for the purposes of
that exercise only.
MORE INFORMATION
If you need additional information or have questions, contact Kodak in your country.
SOME CAMERA BASICS
Does your camera have a built-in light meter (sometimes called an electric eye, or exposure
meter)? If you’re not sure, check the camera instruction book.
Does your camera need a battery? Many light meters require batteries to operate. Check on
that in the camera instruction book. Also, be sure the battery is fresh. If the battery is dead, the
meter won’t work and your pictures won’t be good. If your battery is weak your meter may work
incorrectly. Most batteries last only about one year.
Does your camera have settings for “manual” (non automatic) operation? If you’re not sure,
check the camera instruction book.
Does your camera have a setting for “automatic” operation? If you’re not sure, check the
camera instruction book.
If you want to take pictures under all kinds of different conditions, you’ll have to adjust the
camera settings. That is what this guide is all about, so read on.
The most important part of taking a picture is the film. Film is very sensitive to light. A tiny bit
of light will make the film change. It darkens at the spots where light touches it. That is why 35
mm film comes in a metal container that keeps light away from the film until it is in your camera.
When you put 35 mm film in your camera and close it, it is okay to start winding the film out of
the metal container because the camera seals out light. When you take a picture, all you do is
let just enough light in to record a nice, sharp picture on the film. You have to set the camera
properly to control the way the light gets into the camera.
Kodak and Royal Gold are trademarks.
Page 4

KODAK Self-Teaching Guide to Using an Adjustable 35 mm Camera
All cameras have three basic settings. They are:
Shutter Speed
Lens Opening
Focus
To get a good picture, you need to adjust the shutter speed and the lens opening settings to
control the amount of light entering your camera.
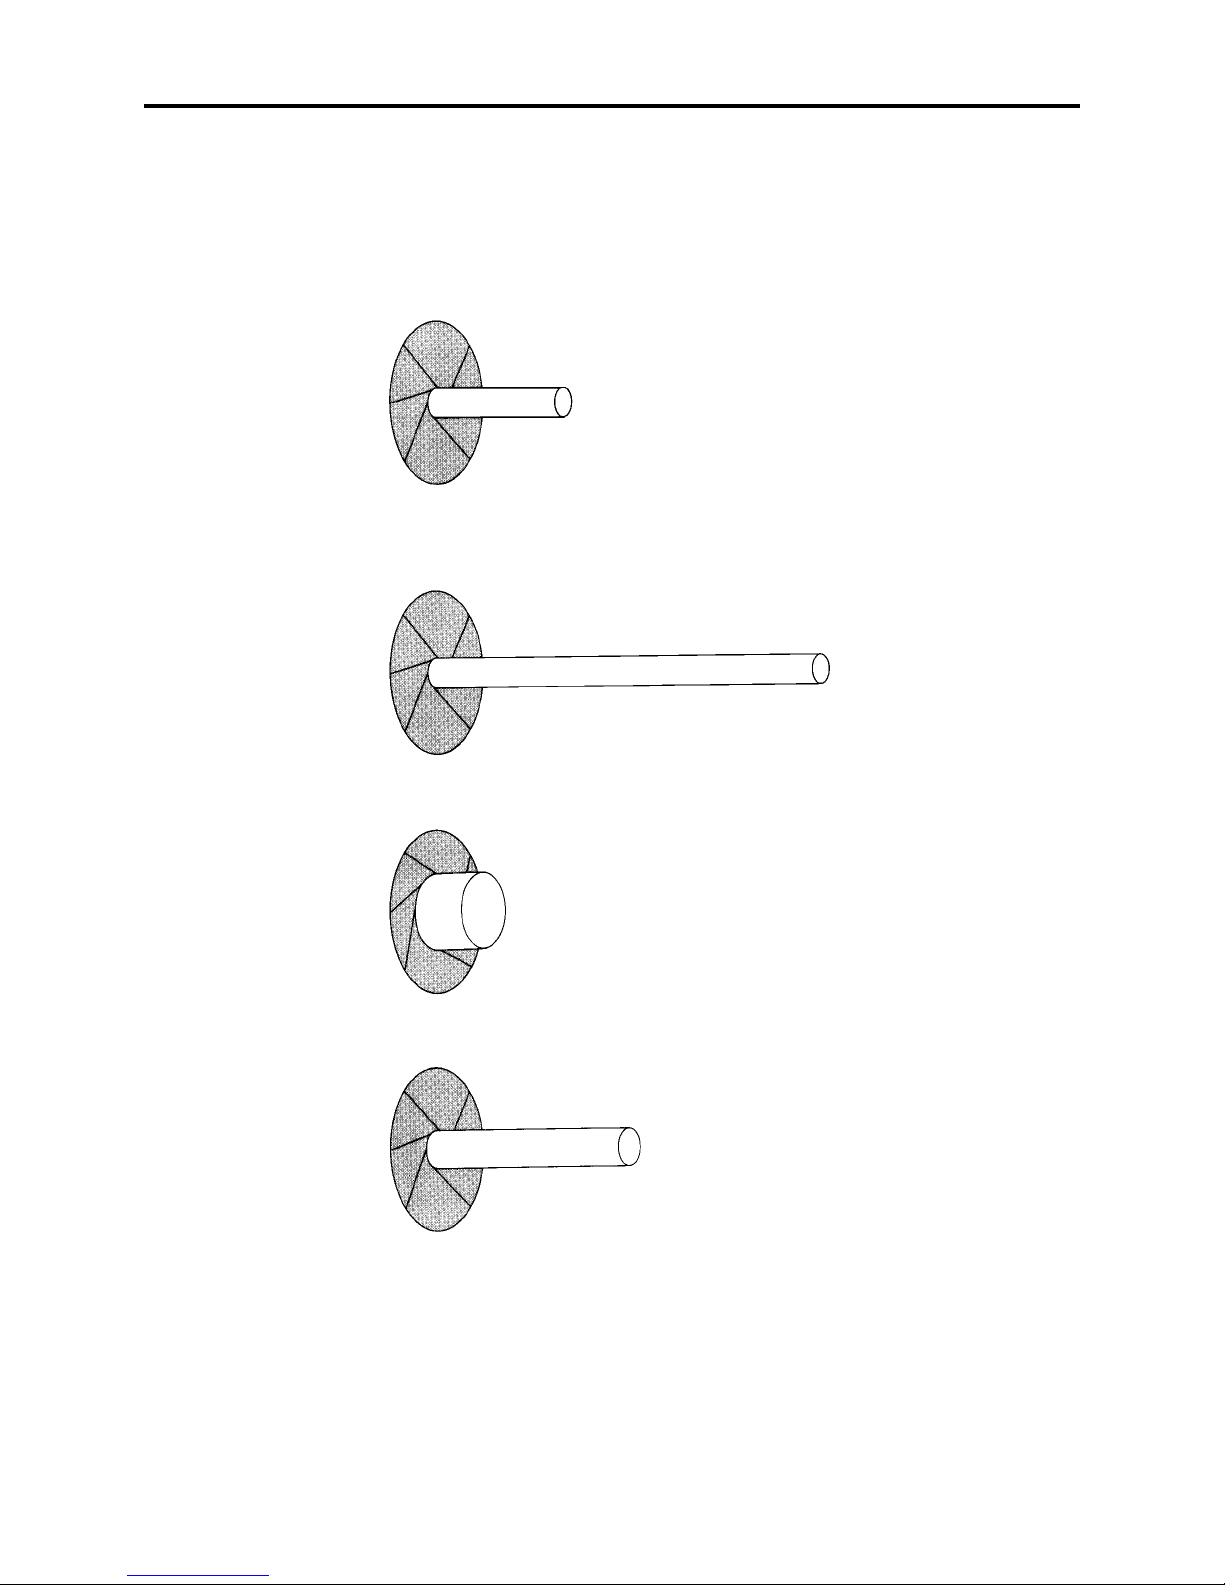
The shutter speed controls the length of time the shutter will stay open to allow light to reach
the film.
A slow shutter speed lets light in to expose the film for a long time.
1/125 sec, f/11
A fast shutter speed lets light in to expose the film for a short time.
1/1OOO sec, f/11
The lens opening controls how much light will enter the camera while the shutter is open. A
large lens opening lets in a lot of light.
f/4
A small lens opening lets in a small amount of light.
f/16
4
Page 5
KODAK Self-Teaching Guide to Using an Adjustable 35 mm Camera
To get good pictures, the film in your camera needs to be exposed to the same quantity of
light for every picture.
On a normal sunny day, you will use a fairly fast shutter speed and a medium lens opening so
that the correct amount of light will reach the film and you will get a properly exposed picture.
1/250 sec, f/11
On a cloudy day, the light isn’t as bright and you need to either let light into the camera for a
long time,
1/30sec, f/11
or let in a lot of light for a shorter time.
1/500 sec, f/2.8
Or possibly both—a lot of light for a long time.
1/60 sec, f/8
5
Page 6
KODAK Self-Teaching Guide to Using an Adjustable 35 mm Camera
Find the shutter speed settings on your camera and learn how to change them. Your camera
instruction book will explain how to do this. Shutter speed settings are usually numbered 30,
60,125, 250, 500—or on older cameras 25, 50, 100, 200. The numbers refer to fractions of a
second, such as 1/30 or 1/500. All further reference will use only the settings for newer camera
(30, 60, etc). If you have an older camera, just remember that 30 is about the same as 25; 250
is about the same as 200.
Find the lens opening settings (f/22, 16, 11, 8, 5.6, 4, 2.8) on your camera and learn how to
change them (see your camera instruction book).
THE SHUTTER
Set the lens opening on your camera at its largest opening (f/3.5 or f/2.8). Set the shutter at 30.
Now open the back of your camera. Be very careful not to get your fingerprints on the inside of
the camera or on the lens. Touch only the outside parts of the camera. Never touch the lens or
the inside parts of the camera. Hold the camera up and look into the lens through the back of
the camera. Press the shutter release and see how long light is let through the lens. The shutter was open for only 1/30 of a second. Now advance the camera once and set the shutter
speed at 250. Hold the camera up and look through the back as you did before. Press the
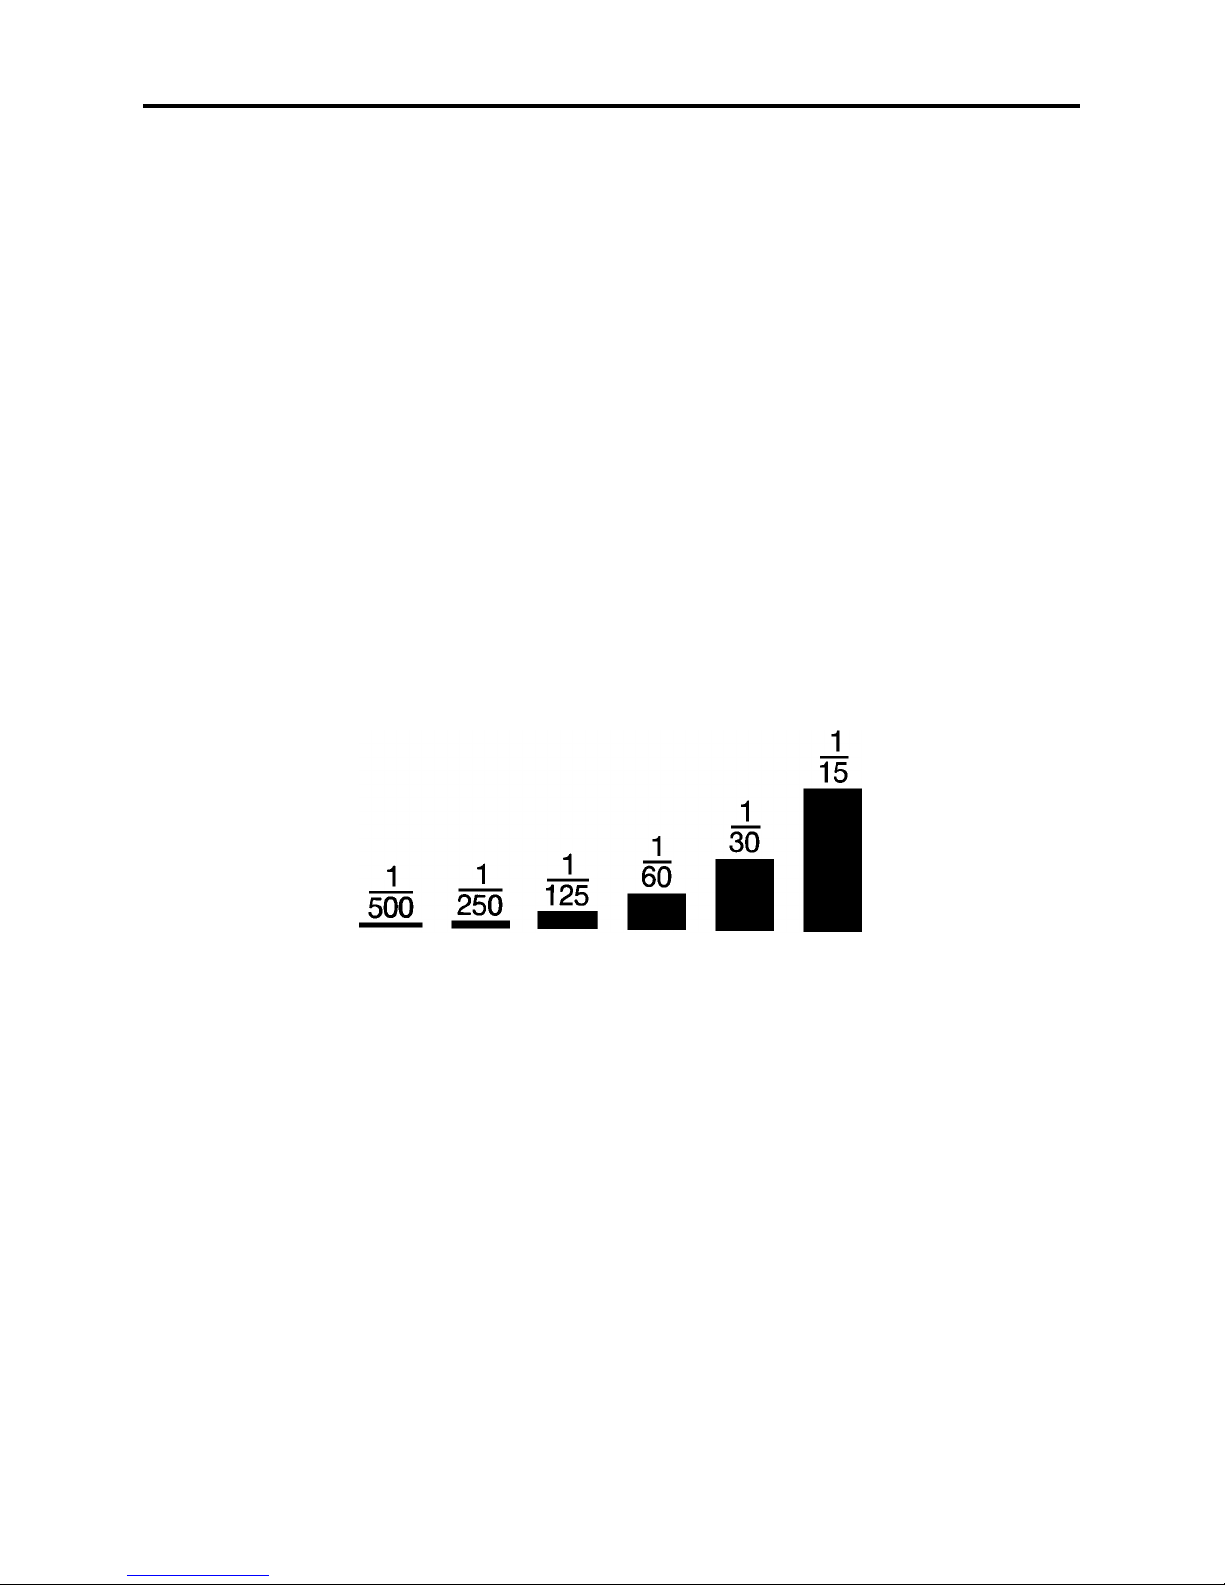
shutter release. The shutter was open for only 1/250 of a second. Compare several different
shutter settings to get an idea of how they relate to each other. Starting at the fastest shutter
setting, each smaller setting lets light in twice as long as the one before it.
6
Page 7
KODAK Self-Teaching Guide to Using an Adjustable 35 mm Camera
THE LENS OPENING
Set the shutter at its lowest speed. Use the B setting if your camera has one. Set the lens
opening at its largest opening. Open the camera back and hold the camera up as you did
before. Press the shutter release and notice how big the opening is when light comes through
the lens.
Now set the lens at the smallest opening, advance the camera once and repeat the exercise.
Notice how small the opening is when light comes through the lens this time. Compare several
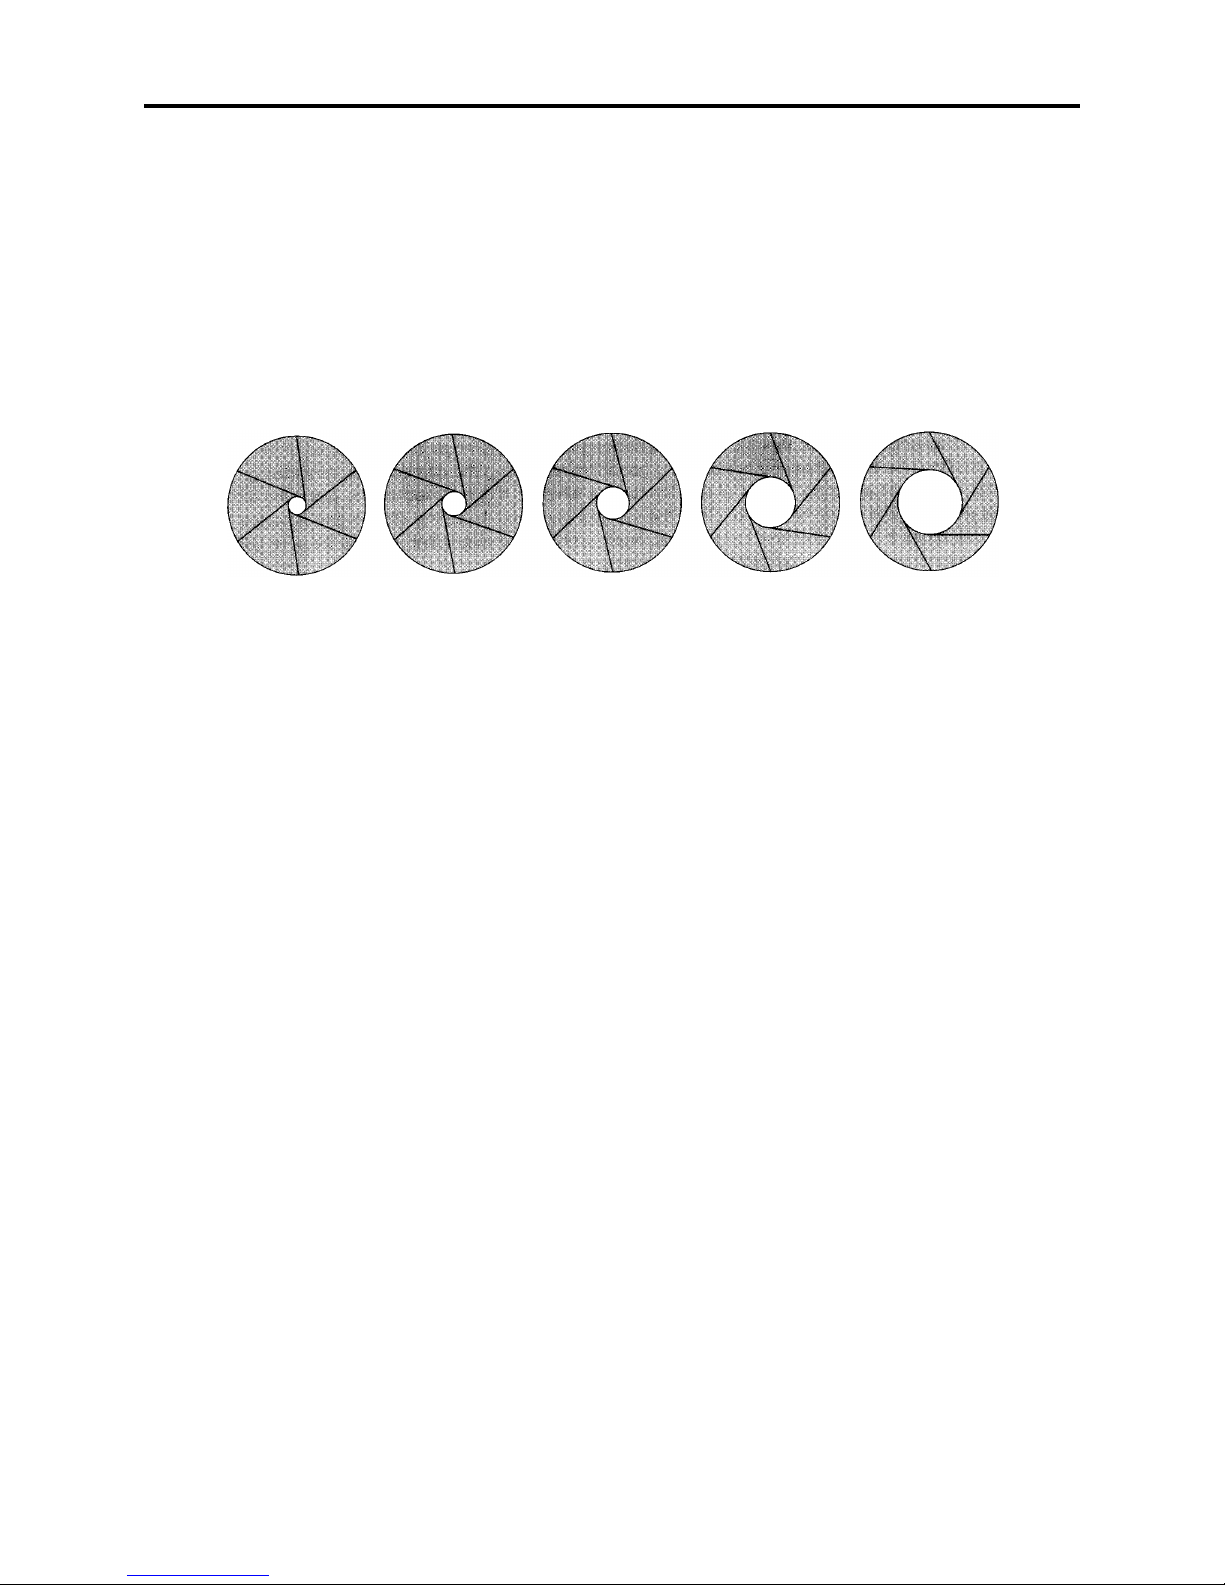
different lens-opening settings so that you get an idea of how they relate to each other. Just like
the shutter settings, starting with the smallest lens opening (f/16 or
f/11), each larger opening lets twice as much light into the camera as the setting before it.
f/16 f/11 f/8 f/5.6 f/4
In this exercise you have just kept the back of your camera open in order to see how it works.
The inside parts of a camera are easily broken. Therefore, it is normally best to keep the camera back closed. Open it only when you are loading or unloading film.
FOCUSING
The next setting to master is the focus. Whenever you look through a lens, a magnifying glass
for instance, you have to move it back and forth until the subject looks sharp and in focus. The
same is true of your camera lens. As you turn the focus ring on your camera, the lens moves
back and forth bringing the subject in focus. If you are taking a picture of something ten feet
away from you, set the camera focus for ten feet and take the picture. If the subject you are
photographing is 25 feet away, set the focus for 25 feet. If you are taking a picture of a scene,
or a building, or anything that is more than 25 feet away from you, set the camera on infinity
(∞). At this setting, everything in the distance is in focus.
These are the three basic camera adjustments: Shutter speed, lens opening, focus. Some
cameras have lots of other things to set and gadgets to fiddle with. They are all helpful and fun
to use after you have mastered the basics. For now, you should stick to practicing these three.
The following exercises will help you learn more about these adjustments and get some practice in using them.
Now it is time to load film in your camera. Get a roll of KODAK ROYAL GOLD 200 Film. It
comes in two lengths—one for 24 pictures and a longer length for 36 pictures. Either will do. If
you are undecided, get the 24-picture length to start with.
All 35 mm cameras use 135-size film. To load the film in your camera, read and follow the
instructions in your camera instruction book.
Film is loaded into most 35 mm cameras about the same way. The film comes in a metal
container to keep out the light. The metal container is put in one side of the camera (usually the
left side). Film is wound over to the other side as you take pictures. Then after you have taken
all of the pictures on the roll, and before you open the camera, the film must be rewound back
into the metal container.
7
Page 8

KODAK Self-Teaching Guide to Using an Adjustable 35 mm Camera
Here’s how to load film in a camera step-by-step. Open the cardboard film carton. Inside you
will find a plastic can that protects the film from humidity. Remove the metal container of film. A
piece of film sticks out of the metal container as though the film is sticking out its tongue. Put
the metal container into the camera so that the small spool sticking out of one end of the film
container is pointing to the bottom of the camera. In most cameras you have to pull up on the
rewind knob before the film container will fit. The tongue of film will stick out across to the other
side of the camera. Then clamp the metal container into place. Since each camera does this a
little differently, check your camera’s instruction book or get your camera dealer to help you.
Usually, pressing the rewind knob down will do it. Now slip the tongue in the take-up spool
found on the right-hand side of the camera (you will have to pull a little more film out of the
metal container to do this). Be sure that the teeth on the take-up sprocket (near where you
fastened the tongue) fit into the holes along both edges of the film. Wind up enough film so that
the teeth are sticking through the holes on both edges of the film. Don’t be afraid that you are
spoiling good film in loading the camera. The processing lab will cut off about six inches of the
film tongue whether it is exposed or not. Once the film is attached and properly wound, close
the camera back and press the shutter and advance three times to get to the first frame. Here,
again, check your instruction book to be sure you do everything right for your camera. Now you
are ready to go.
THE LIGHT METER
You now know about the two basic camera settings that control light entering the camera—
shutter speed and lens opening—but if your camera has a light meter there is a third setting
you must make every time you put film in the camera. There are different types of film made for
35 mm cameras. Each has a different sensitivity to light. Some need less light than others for a
good picture. You have to set the film speed to tell the light meter in your camera what type of
film you are using so that it will know how much light is needed to produce a good picture. Film
speed settings are referred to as ISO. All 35 mm films have an ISO number printed on the film
box and on the metal container holding the film. Be sure that the setting for ISO on your camera
matches the ISO number marked on your film container. The higher the number, the more
sensitive the film.* With KODAK ROYAL GOLD 200 Film, set the meter for 200.
ISO numbers are commonly referred to as the film’s “speed.” Very sensitive films are called
“high-speed” films and less sensitive films are called “slow” films. Sometimes you’ll hear people
talking about the “film-speed setting” on a camera. They are probably referring to the ISO
setting. It has nothing to do with how quickly the film moves through the camera.
*ISO Refers to the International Standards Organization which is the organization that assigns numbers to different
films. ASA used to refer to the American Standards Association, which has now changed its name, but the initials
are sometimes still used. ISO and ASA mean the same thing.
8
Page 9

KODAK Self-Teaching Guide to Using an Adjustable 35 mm Camera
EXERCISE #1
The one most important thing to remember about taking a picture is to hold the camera
steady.
Pick a subject in bright sunlight. Set your shutter at 125, your lens opening at f/16 and the
focus at 10 feet.
Set the camera on a solid, flat surface and take a picture of a solid subject that has some
detail in it. Be sure that everything shown in the picture is at least 5 feet away from the camera.
Try to avoid anything that might move, such as tree branches, people, or animals. You want
both camera and subject to be absolutely still. Be sure that you do not move the camera in any
way when taking the picture.
(Put your example here.)
Results: This picture should be clear and sharp with good detail. This will show the sharpness
you can get with your camera when it is held steady.
9
Page 10

KODAK Self-Teaching Guide to Using an Adjustable 35 mm Camera
Now take a picture of the same scene holding the camera in your hands. Stand with your feet
firmly on the floor or ground and your weight distributed evenly so that you’re not balancing on
one foot. Now press the shutter release as smoothly as possible—don’t jab at it. A firm grip on
the camera is important. If possible, brace your camera against your face to help keep it steady.
Many cameras can be held so that one finger of your right hand is on the shutter release and
your right thumb is on the bottom of the camera. When you press the shutter release with this
grip, you will be making a smooth, pinching motion with your right hand. Remember: ALWAYS
HOLD THE CAMERA ROCK-STEADY AND PRESS THE SHUTTER SMOOTHLY.
(Put your example here.)
Is this picture as sharp as the one before?
Holding the camera steady is the most important thing for you to learn and remember.
10
Page 11

KODAK Self-Teaching Guide to Using an Adjustable 35 mm Camera
EXERCISE #2
We adjust the size of the lens opening to control how much light goes into the camera. The size
of the lens opening also controls how much of the picture is sharp. A small lens opening makes
more of the space in the picture appear sharp. A large lens opening makes a smaller portion of
the space in the picture appear sharp.
Let’s demonstrate this. Your eye usually has a medium lens opening. Take a piece of paper
and punch a small hole in it about the size of the lead in your pencil. Twirl the pencil around a
few times so that the edges of the small hole are smooth and you can see through it when you
hold it up to your eye.
First, look toward a wall across the room from you and hold a finger up about a foot in front of
you. Close one eye. With the open eye, can you focus on both the finger and the wall at the
same time? The answer is prpbably not. The lens opening of your eye is too large and you
have to focus on either the finger or the wall.
Now hold the paper as close to your eye as possible so that you can see through it and use
the hole you punched in the paper to reduce the lens opening your eye sees through. Look
through the hole in the paper at your finger and the wall. Are both in focus now? Yes. The
smaller lens opening increased the area in the scene that is sharp.
The camera works the same way. The smaller the lens opening, the more area of the picture
that will be in focus. The larger the lens opening, the less area of the picture that will be in
focus. This area of sharpness is called the “depth of field.” With large lens openings, the depth
of field is short; with small lens openings, the depth of field is long.
11
Page 12

KODAK Self-Teaching Guide to Using an Adjustable 35 mm Camera
EXERCISE #3
Select a scene to photograph that has something near the camera as well as far away. For
instance, a tree branch or a person 5 or 6 feet away from the camera and a house or other
scene in the distance. Be sure that you can see both in your viewfinder. Use a large lens
opening to take the picture. For this exercise set the lens opening at f/2.8, the camera shutter at
250 (or as fast as your camera will allow) and the focus at infinity (oo).
(Put your example here.)
Result: The object near the camera should be out of focus (fuzzy) and the distant scene should
be sharp. (A large lens opening gave you a short depth of field.)
12
Page 13

KODAK Self-Teaching Guide to Using an Adjustable 35 mm Camera
Using the same scene take the same picture but this time use a small lens opening. For this
exercise set the lens opening at f/16 or f/22, the shutter at 60, and the focus at infinity.
(Put your example here.)
Result: Everything in the picture near the camera and in the distance will appear sharp. (A
small lens opening gives you a long depth of field.)
13
Page 14

KODAK Self-Teaching Guide to Using an Adjustable 35 mm Camera
EXERCISE #4
Sometimes it is nice to have the background out of focus. For instance, take a picture of a
flower blossom that stands high enough off the ground so that you can see both the blossom
and a background scene when you look through the camera. Take the picture about two feet
from the blossom. For this exercise set the lens opening at f/2.8 and the shutter speed at 250
(or as fast a shutter speed as your camera will allow). Set your focus for the exact distance
between the flower and your camera. Measure the distance.
(Put your example here.)
Result: The flower blossom will be sharp but the background will be fuzzy, making the
blossom stand out.
14
Page 15

KODAK Self-Teaching Guide to Using an Adjustable 35 mm Camera
Now take the same picture but set your lens opening at f/16 and your shutter speed at 125.
(Put your example here.)
Result: Both the blossom and the background will be sharp. The background probably takes
your eye away from the flower.
15
Page 16

KODAK Self-Teaching Guide to Using an Adjustable 35 mm Camera
EXERCISE #5
Take a picture in full sunlight. Avoid all shadows, shade, or dark backgrounds. Have someone
doing something about 10-12 feet away from you with the sun shining on him or her. The basic
exposure settings should be set at about 250 with a lens opening of f/11 focused at 10-12 feet.
If you have a meter in your camera, use it.
(Put your example here.)
16
Page 17

KODAK Self-Teaching Guide to Using an Adjustable 35 mm Camera
Now take a picture of someone in the shade. There is not as much light in the shade so you’ll
have to let more light in to the film. The setting will probably be set at about 250 with a lens
opening of f/5.6, or wider if it is really dark, focused on the subject 1-12 feet away. If you have a
light meter, use it.
(Put your example here.)
17
Page 18

KODAK Self-Teaching Guide to Using an Adjustable 35 mm Camera
Now take a picture with a combination of sunlight and shade. Here is where a light meter is
really handy. If your camera has a light meter, use it. If you do not have a meter, you want to let
enough light into the film to see things in the shaded part of the picture. Open the lens up by
one stop more than you would use for sunshine. The general setting would be 250 at f/8,
focused on your subject.
(Put your example here.)
18
Page 19

KODAK Self-Teaching Guide to Using an Adjustable 35 mm Camera
EXERCISE #6
One of the advantages of being able to adjust your own camera settings is that you can use
very fast shutter speeds to get sharp pictures of moving subjects. Try this by taking a picture of
someone running in a sports game, or a pet running or jumping in the air, or someone bouncing
a ball, or a car passing by on the road. Set your camera at the fastest shutter setting it has and
adjust the lens opening accordingly. (Basic sunlight exposure is 250 at f/11. For each faster
shutter speed you use, you have to open the lens one “stop” wider; 500 at f/8, 1000 at f/5.6.)
Focus on your subject and take the picture.
(Put your example here.)
19
Page 20

KODAK Self-Teaching Guide to Using an Adjustable 35 mm Camera
EXERCISE #7
Just to prove to yourself how nice it is to be able to use a fast shutter speed, try taking the
same type of picture (as in Exercise #6) but using a shutter speed of 30. Your subject should be
in the shade, so you can use this shutter speed and a small lens opening on your camera.
Remember to focus properly and if you have a light meter use it. Hold steady—this is a very
slow shutter speed.*
(Put your example here.)
*30 is the slowest shutter speed you can use and still take sharp pictures while holding the camera in your hand. If
you need a slower shutter speed, use a tripod or set the camera on something firm and solid.
20
Page 21

KODAK Self-Teaching Guide to Using an Adjustable 35 mm Camera
EXERCISE #8
When the light is shining from in back of your subject, it’s called backlighting. With a normal
sunlight setting, your subject will turn out very dark—just a silhouette against the bright background. This can make a beautiful, dramatic picture. Try it.
(Put your example here.)
21
Page 22

KODAK Self-Teaching Guide to Using an Adjustable 35 mm Camera
Now take the same picture with the camera set to properly expose the shaded front of your
subject. If you have a light meter, move up very close to your subject and use the setting that
the meter gives you. Once the camera is set, you can move back and take the picture. If you
don’t have a meter, you probably should set your shutter at 250 and the lens opening at f/5.6.
Remember to focus.
(Put your example here.)
22
Page 23

KODAK Self-Teaching Guide to Using an Adjustable 35 mm Camera
EXERCISE #9
With an adjustable camera you can even take pictures at night. Try a picture of your house after
dark with all the lights on. Your meter won’t help you here. It will see too much darkness. Set
your shutter at 30 and open the lens to its widest setting. Remember to focus carefully and hold
the camera very steady.
(Put your example here.)
23
Page 24

KODAK Self-Teaching Guide to Using an Adjustable 35 mm Camera
EXERCISE #10
Most adjustable cameras have a shutter setting for time exposures. This means that the shutter
will stay open as long as you press the shutter release down. If your camera has a shutter
setting of “B,” try a time exposure at night. Put your camera on a tripod or set it on a firm, solid
surface so it won’t wobble, shake, or move. Set the shutter at “B” and the lens at its largest
opening. Now have someone stand about 15 feet away, and with a flashlight pointing at the
camera, make patterns in the air or write his or her initials or nickname (backwards) while you
are holding the button down. A locking cable release will be helpful with this exercise.
(Put your example here.)
24
Page 25

KODAK Self-Teaching Guide to Using an Adjustable 35 mm Camera
Typical Existing-Light Exposures for KODAK ROYAL GOLD 200 Film
Picture Subject & Lighting Shutter Speed Lens Opening
Bright or hazy sun on light sand or snow 1/250 f/16
Bright or hazy sun (distinct shadows) 1/250 f/11
Weak hazy sun (soft shadows) 1/250 f/8
Backlighted close-ups in bright sun
Cloudy bright (no shadows) 1/250 f/5.6
Open shade
Heavy overcast 1/250 f/4
Dull, rainy day 1/250 f/4
Neon and other signs at night 1/60 f/4
Interiors with bright fluorescent lights 1/30 f/4
Brightly lighted streets at night 1/30 f/2.8
Bright home interiors at night 1/30 f/2
25
Page 26

KODAK Self-Teaching Guide to Using an Adjustable 35 mm Camera
More Information
For more information, contact Kodak in your Country.
Kodak and Royal Gold are trademark.
26
 Loading...