


Instruction
Manual
TONEcube &
PROBEplus
VDV500-051 &
VDV500-060
ENGLISH
Español pg. 9
Português pg. 17
Français p. 25
www.kleintools.com
ENGLISH
TONEcube & PROBEplus
Instruction Manual
TONEcube FEATURES
The Klein Tools TONEcube is a professional series tone generator for wire tracing. It features several tone frequencies and strong power output to assist in tracing wire.
•Five different tone sounds selectable by tone switch.
•Constant output level over useful battery life.
•Tone auto-off after 1.5 hours.
•No battery drain in continuity mode with leads open.
•Separate status LEDs for normal and reverse line polarity.
•Tone operates in either continuity or status modes.
•Modular plug for direct connection to phone jacks.
•Alligator clips for wire connection.
•Sliding momentary tone switch prevents accidental activation.
•Battery low indication.
•Lanyard attachment loop.
TONEcube General Specifications
•Dimensions: 2.75" x 2.5" x 1.42" (6.99 x 6.35 x 3.61 cm)
•Weight: 7.0 oz. (200 grams) with battery
•Operating Temperature: 0°C to 50°C / 32°F to 122°F
•Storage Temperature: -20°C to 60°C / -4°F to 140°F
•Humidity: 10% to 90%, non-condensing
•Altitude: 10,000 feet (3,000 meters) maximum
•Battery Life: 9V alkaline battery - typical
•Standby: 4 years
•Active: 120 hours
•Tone Sounds: high-warble, low-warble, mono, ascending, descending
•Continuity Indication: less than 10kΩ
•Voltage Protection:
•Status Mode: 60 Volts
•Continiuity Mode: 20 Volts through external 600Ω
•Tone Power: 8dBm (into 600Ω until battery low)
PROBEplus FEATURES
The Klein Tools PROBEplus is a professional series tone tracer for wire tracing and cable identification. It features digital volume control and a loud built-in speaker to assist you in tracing and identifying wire.
•Tap power button to toggle on/off: continuously holding down the power button is optional.
•Hold on/off button to power on; release to power off.
•Digital volume control.
•Tone detection LED.
•Amplifier overload LED.
•Battery Low Indication.
•External tip replacement.
•Lanyard attachment loop.
PROBEplus General Specifications
•Dimensions: 9.85" x 2.00" x 1.14" (25.02 x 5.08 x 2.90 cm)
•Weight: 6.0 oz. (170 grams) with battery
•Operating Temperature: 0°C to 50°C / 32°F to 122°F
•Storage Temperature: -20°C to 60°C / -4°F to 140°F
•Humidity: 10% to 90%, non-condensing
•Altitude: 10,000 feet (3,000 meters) maximum
•Battery Life: 9V alkaline battery - typical
•Standby: 4 years
•Active: 25 hours
 WARNINGS
To ensure safe operation and service of the instruments, follow these instructions. Failure to observe these warnings can result in severe injury or death.
•The TONEcube and PROBEplus are designed for use on extra low voltage cabling systems (less than 60 volts).
•The maximum voltage across the test leads of the TONEcube is 60 volts in status (STAT) mode and 20 volts in the continuity (CONT) mode. Connecting the TONEcube to live mains AC power may damage it and pose a safety hazard for the user.
•These instruments are not designed to be used outdoors.
•Do not use instruments if they are wet, as this could pose a shock hazard.
•Turn off instruments before attempting to replace batteries, and disconnect all test leads from the TONEcube.
•Do not use instruments if they are damaged in any way.
 WARNINGS:
Always wear approved eye protection.
Do NOT use on energized circuits.
2 |
3 |
ENGLISH
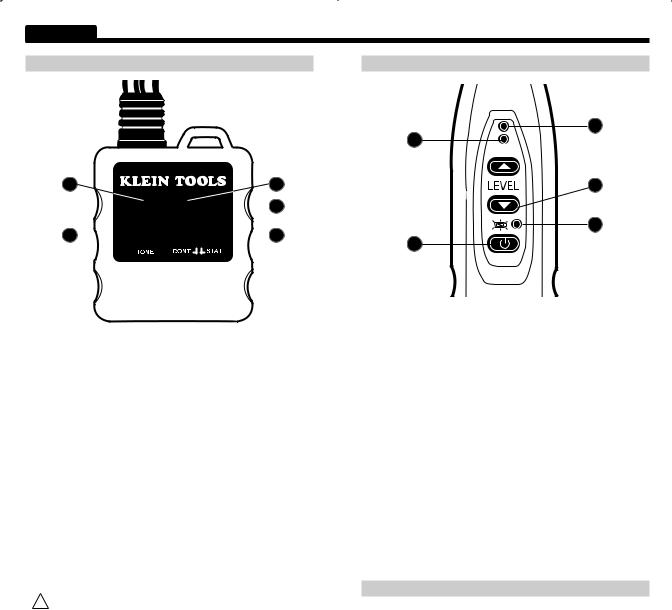
TONEcube Front panel
1 |
2 |


 3 4
3 4 


 5
5
•LEDs
1.Tone LED: Flashes once per second when tone is on. Flashes rapidly when battery is low. Toggles one second on and one second off when tone cadence is changing.
2.NRM (Normal): Green LED is on when a DC voltage is present with normal polarity of a phone line in status mode. Both LEDs are on if AC voltage.
3.REV (Reverse): Red LED is on when DC voltage is present with reverse polarity of a phone line in status mode. REV lights with low resistance across clips in continuity mode. Both LEDs are on if AC Voltage.
•Switches
4.TONE: This switch is a momentary slide switch. When slid to the left for a short duration, it toggles between tone on and off. If held on, it begins to send different tone sounds in sequence until the switch is released, setting the tone style.
5.CONT-STAT: This slide switch configures the status LEDs (NRM and REV) to indicate voltage and polarity, the STATUS position, or continuity on the REV LED, the CONT position. When the TONEcube is not in use the switch should be left in the STAT position to prevent draining the battery.
 CAUTION: Continuity (CONT) mode should NOT be used when toning live wires. This may cause damage to the TONEcube.
4
PROBEplus Front panel
 5
5
• LEDs
1.Tone Detected LED: The green LED above the level buttons will illuminate when the detected signal exceeds the set threshold. The threshold is set with the level buttons.
2.Overload LED: The red LED above the detect LED will illuminate when the amplifier is overloaded. The volume should be reduced so changes in signal strength can be heard.
3.Power-On/Battery Low LED: This LED will illuminate when the probe is active. It will flash rapidly when the battery needs to be replaced.
•Buttons
4.On/Off Button: The On/Off button operates in two modes:
•Toggle Mode: When the tracer is turned on with a short tap (less than 0.5 seconds) of the button, the tester will turn on and stay on until the button is tapped again or after approximately 5 minutes.
•Normal On/Off: If the button is pressed and held down, the unit will be on for only as long as the button is depressed.
5.Level Buttons: The up and down buttons are used to adjust the sensitivity/volume and the detection threshold of the LED. They can be tapped or pressed and held.
Tone Tracing
Note:If using a different tone generator than the TONEcube, refer to its manual for steps 1-4.
If using a different amplifier probe than the PROBEplus, refer to its manual for steps 5-8.
1. Move CONT-STAT switch on the TONEcube to the STAT (status) position, particularly when toning powered phone lines. CONT (continuity) position may be used on unpowered pairs.
2. Connect a lead or leads to wire, cable or terminal to be traced. See Connection Variations section for common configurations.
3. Slide TONE momentary switch to the left. The LED above the switch will begin blinking. Select a different signal type if desired as described in Setting Tone Sounds section.
4. To turn off the signal, slide TONE switch to the left briefly. LED will turn off.
5. On the PROBEplus, press or tap the On/Off button.
5

ENGLISH
6.Adjust the volume to a comfortable level using the up and down buttons. If the signal is very loud when near the cable, the volume may need to be reduced to keep from overloading. When the amplifier is overloaded, small increases or decreases in the signal at the tip cannot be heard.
7.To use the green detect LED on a run of cable, start at the tone generator end of the cable and hold the probe at the distance you want to detect the tone. Adjust the volume until the detect LED just turns on or off. This sets the sensitivity of the detect LED.
8.Hold the tip of the PROBEplus near the cables to be identified. The signal will be loudest on the wire or cable with the generator
attached to it. Separating the wires or cables may help in identifying the correct one. The probe contacting a terminal or bare wire carrying the tone will be substantially louder.
Note:The tone LED of the TONEcube and the power-on LED of the PROBEplus flash rapidly if the battery is low. See Battery Replacement section for new battery installation.
On the TONEcube, The NRM and REV LEDs will be on at low intensity with test leads disconnected to visually show the output tone cadence.
CONNECTION VARIATIONS
There are several ways to connect the generator to the cable to be traced. The connection method can greatly change the signal strength detected by the tone probe or limit coupling to surrounding wires and cables. Too much signal strength can make it difficult to determine the exact cable or wire carrying tone.
•Single generator lead: Often just one lead of the TONEcube needs to be connected to the wire or terminal. This is best for tracing along a cable or wire run including wires behind dry wall. Connect to the shield of a coaxial cable, not the center lead.
•Both generator leads connected to a cable: Connecting both generator leads to wires in a cable reduces the radiated signal, especially when connected to both wires of a twisted pair, due to signal field cancellation. This can be useful for finding the desired wire or cable in a dense wiring environment such as a patch panel or a telephone punch-down block. The wires carrying tone must be very close to the probe tip to be detected. Place the tip in a patch panel connector or touch a terminal on a block to find the signal.
•Both generator leads, one to ground: With one lead connected to the wire or cable to trace and the other connected to earth ground, the signal strength is greatly enhanced. Try a single lead connection first for tracing along a cable because the ground connection method can yield too much signal causing poor discrimination between cables or wires.
•RJ plug connection: The RJ plug can be directly connected to a phone jack and should be the same connection as both generator leads connected to a pair in a cable, usually line 1 or the center two pins of the jack.
Note: The wire to be traced cannot be at earth or safety ground potential. The generator signal is shorted out in this instance.
Correct Pair Verification
When both generator leads are connected to a pair, shorting the two leads together will cause the tone signal to be shorted out. If the tone probe is on and nearby, you should hear the tone being lost while the pair is shorted, verifying the correct pair has been found.
If the CONT-STAT switch is in CONT (continuity) position, the red LED will light on the generator when the cable is shorted. This could tell an assistant that the pair was found and to move on to the next pair.
6
TONEcube Setting Tone Sounds
The tone cadence or style can be changed using the TONE switch. Slide the TONE switch to the left and hold on. With a tone probe, you will hear each of the five tone sounds for a few seconds. The tone being heard when the switch is released is now selected.
TONEcube Polarity & Voltage Presence Testing
The STAT (status) switch position is used to determine if voltage is present and what polarity or type it is. The NRM (normal), green LED and REV (reverse), red LED are referenced to the POTS (Plain Old Telephone Service) conventions. If the red clip is connected to the tip signal and the black clip (green phone wire) is connected to the ring signal, the polarity is that of a 'normal' phone line and line voltage is present.
•Green LED is on: the black lead is more positive than the red lead.
•Red LED is on: the red lead is more positive than the black lead.
•Both LEDs are on: the voltage is an AC voltage.
•When the RJ plug is used: a correctly wired and powered POTS phone jack will light the NRM, green LED.
Note: The POTS color code convention (black/positive, red/negative) is the opposite of the multimeter color code convention (red/positive, black/ negative).
TONEcube Continuity Testing
The continuity mode is used to determine if a low resistance path exists between two points.
 CAUTION: If connecting to unknown wires, use the STAT switch position first to verify no voltage is present. The TONEcube could be damaged by a voltage being present or cause erroneous results.
1.Move CONT-STAT slide switch to the CONT position.
2.Connect the leads to the two locations to be tested. If the resistance of the circuit is less than about 10,000Ω, the REV, red LED will light.
3.Return slide switch to STAT position when finished. The TONEcube draws no power from the battery when the leads are open, but the leads could touch during storage, draining the battery.
PROBEplus Replacing the Probe Tip
The probe tip can be replaced if it is worn out or damaged with PROBEplus Probe Replacement Tip Cat. no. VDV999-065
1.Loosen the screw on the back of the probe nearest to the probe tip using a #1 Phillips screwdriver.
2.Pull the old tip out of the probe.
3.Push the new tip into the probe. The probe body has a keying slot so the probe can only be inserted completely in one orientation.
4.Tighten the screw, being careful not to over-tighten. Make sure the probe tip is firmly held in place by pulling gently on it. If not, tighten the screw slightly.
TONEcube Battery Replacement
1.Remove single screw on the bottom back of the TONEcube with a #0 Phillips head screwdriver. Remove battery door.
2.Recycle exhausted battery.
3.Acquire a 9 volt alkaline battery (IEC 6LR61, ANSI/NEDA 1640A).
4.Connect battery cable to new battery observing polarity and place into battery compartment.
5.Replace battery door and screw, taking care not to over-tighten it. 7

ENGLISH
pROBEplus BATTERy REpLAcEMENT
1.Remove screw at the speaker end on the rear of the PROBEplus with a #1 Phillips head screwdriver. Remove battery door.
2.Recycle exhausted battery.
3.Acquire a 9 volt alkaline battery (IEC 6LR61, ANSI/NEDA 1640A).
4.Connect battery cable to new battery observing polarity and place into battery compartment.
5.Replace battery door and screw, taking care not to over-tighten it.
WARRANTy www.kleintools.com/warranty cLEANING
Turn instrument off and disconnect test leads. Clean the instrument by using a damp cloth. Do not use abrasive cleaners or solvents.
STORAGE
Remove the batteries when instrument is not in use for a prolonged period of time. Do not expose to high temperatures or humidity. After a period
of storage in extreme conditions exceeding the limits mentioned in the Specifications section, allow the instrument to return to normal operating conditions before using it.
DISpOSAL / REcycLE
|
caution: This symbol indicates that equipment and its |
|
accessories shall be subject to a separate collection and |
||
|
||
|
correct disposal. |
cUSTOMER SERVIcE
KLEIN TOOLS, INc.
450 Bond Street
Lincolnshire, IL 60069
1-800-553-4676
www.kleintools.com
Manual de instrucciones
TONEcube y PROBEplusENGLISH
VDV500-051 y VDV500-060
ESpAÑOL
Español pg. 9
Português pg. 17
Français p. 25
8 |
www.kleintools.com |
ESPAÑOL
TONEcube y PROBEplus
Manual de instrucciones
CARACTERÍSTICAS de TONEcube
Klein Tools TONEcube es un generador de tonos de serie profesional para trazado de conductores. Ofrece varias frecuencias de tono y una salida de gran potencia para ayudar en el trazado de conductores.
•Cinco sonidos distintos de tono, seleccionables mediante un interruptor de tono.
•Nivel de salida constante durante la vida útil de la batería.
•Apagado automático después de 1,5 horas.
•No consume batería en el modo de continuidad, con los conductores abiertos.
•Distintos indicadores de estado LED para polaridad de línea normal e inversa.
•El tono funciona en el modo de continuidad o de estado.
•Conector modular para conexión directa en conectores telefónicos.
•Pinzas tipo cocodrilo para conexión de alambres.
•Interruptor de tono deslizante momentáneo que impide la activación accidental.
•Indicación de batería baja.
•Lazo de amarre para cuerda.
Especificaciones generales TONEcube
•Dimensiones: 2,75" × 2,5" × 1,42" (6,99 cm × 6,35 cm × 3,61 cm)
•Peso: 7,0 oz (200 g) con batería
•Temperatura de operación: 0 °C a 50 °C / 32 °F a 122 °F
•Temperatura de almacenamiento: -20 °C a 60 °C / -4 °F a 140 °F
•Humedad: 10 % a 90 %, sin condensación
•Altitud: 10 000 pies (3 000 metros) como máximo
•Vida útil de la batería: Batería alcalina de 9 V - común
•Modo en espera: 4 años
•En actividad: 120 horas
•Sonidos de tono: vibrante alto, vibrante bajo, monofónico, ascendente, descendente
•Indicación de continuidad: menos de 10.000 Ω
•Protección de voltaje:
•Modo de estado: 60 voltios
•Modo de continuidad: 20 voltios hasta 600 Ω externos
•Potencia del tono: 8 dBm (a 600 Ω hasta que la batería esté baja)
CARACTERÍSTICAS de PROBEplus
Klein Tools PROBEplus es un rastreador de tono de serie profesional para trazado de conductores e identificación de cables. Ofrece control de volumen digital y un potente altavoz integrado que lo ayudarán en el trazado y la identificación del cable.
•Pulse el botón de encendido para alternar entre encendido y apagado. Mantener presionado continuamente el botón de encendido es optativo.
•Mantenga presionado el botón de encendido y apagado para encender el equipo y suelte el botón para apagarlo.
•Control digital de volumen.
•LED de detección de tono.
•LED de sobrecarga del amplificador.
•Indicación de batería baja.
•Reemplazo de la punta externa.
•Lazo de enganche para cuerda.
Especificaciones generales de PROBEplus
•Dimensiones: 9,85" × 2,00" × 1,14" (25,02 cm × 5,08 cm × 2,90 cm)
•Peso: 6,0 oz (170 g) con batería
•Temperatura de operación: 0 °C a 50 °C / 32 °F a 122 °F
•Temperatura de almacenamiento: -20 °C a 60 °C / -4 °F a 140 °F
•Humedad: 10 % a 90 %, sin condensación
•Altitud: 10 000 pies (3 000 metros) como máximo
•Vida útil de la batería: Batería alcalina de 9 V - común
•Modo en espera: 4 años
•En actividad: 25 horas
 ADVERTENCIAS
Para garantizar un funcionamiento y servicio seguros de los instrumentos, siga estas instrucciones. El incumplimiento de estas advertencias puede provocar lesiones graves o la muerte.
•TONEcube y PROBEplus están diseñados para ser utilizados en sistemas de cableado de tensión extra baja (menos de 60 voltios).
•La tensión máxima entre los conductores de prueba del TONEcube es de 60 voltios en el modo de estado (STAT) y de 20 voltios en el modo de continuidad (CONT). Conectar el dispositivo TONEcube a una fuente de alimentación de CA activa no solo puede dañar la unidad, también puede implicar un riesgo de seguridad para el usuario.
•Estos instrumentos no están diseñados para ser utilizados en exteriores.
•No utilice los instrumentos si están húmedos dado que podrían dar lugar a una descarga eléctrica.
•Apague los instrumentos antes de intentar reemplazar las baterías, y desconecte todos los conductores de prueba del dispositivo TONEcube.
•No utilice los instrumentos si están dañados.
 ADVERTENCIAS:
Siempre debe usar protección para ojos aprobada.
NO utilizar en circuitos con corriente.
10 |
11 |
 Loading...