

Quick Start Guide
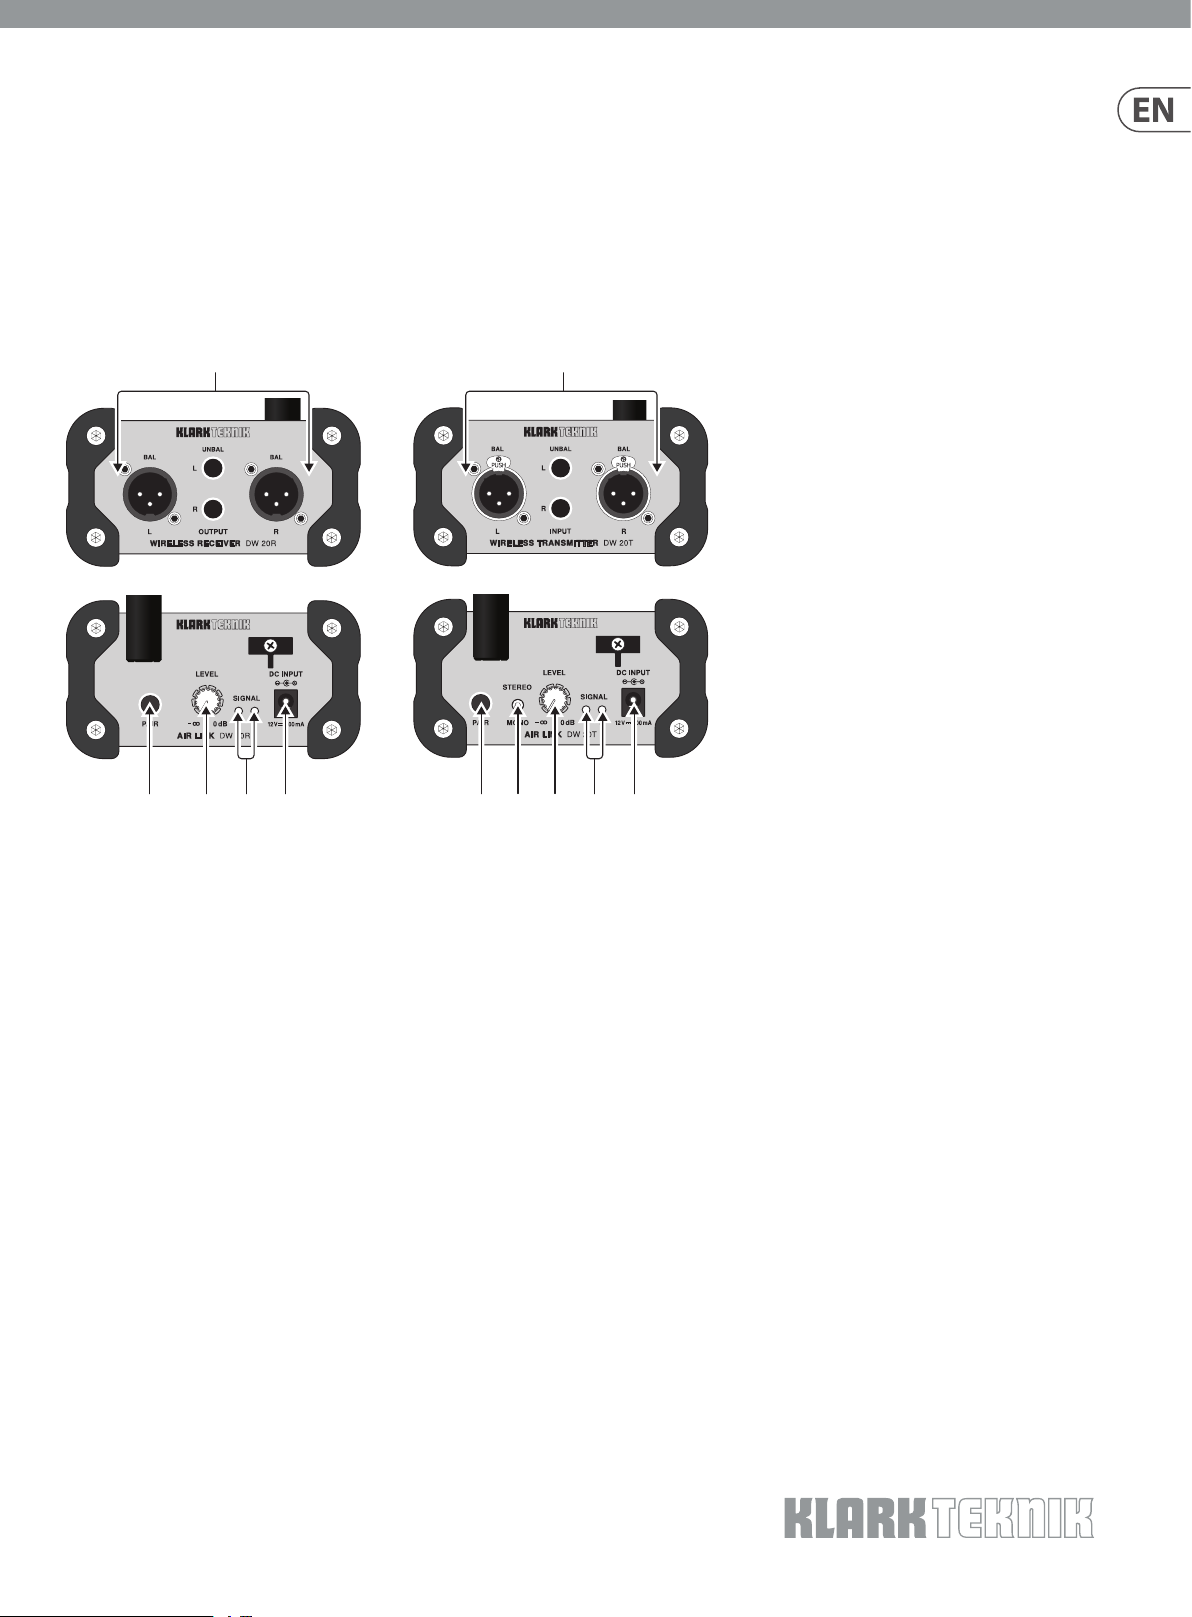
(1) (2) (4)(3)
(1) (6) (4)(7)(5)
AIR LINK DW 20R/DW 20T
2.4 GHz Wireless Stereo Receiver/Transmitter
for High-Performance Stereo Audio Broadcasting
(8) (9)
(1) PAIR button enables the unit to become available
for pairing by pressing and holding for 4 seconds.
The LED ring will indicate the current status.
See the Getting Started sec tion for details.
(2) LEVEL knob adjusts the volume of the signal sent
to the output jacks.
(3) SIGNAL LEDs light when the DW 20R receives
an audio signal from the DW 20T.
(4) DC INPUT socket accepts the included power
adapter.
(5) STEREO/MONO switch determines whether the
outgoing wireless audio signal is stereo or mono.
(6) LEVEL knob adjusts the sensitivity of the inputs.
(7) SIGNAL LEDs light green when signal is present
at the inputs. The LEDs light red when the incoming
audio signal clips the inputs. If this happens, lower
the output level of the source audio.
(8) OUTPUT jacks send a line-level audio signal to
another audio device (mixer, amplier, etc.) via
balanced XLR or unbalanced ¼" TS cables.
(9) INPUT jacks accept audio signals via balanced XLR
or unbalanced ¼" TS cables.
Getting Started
1. Connect the DW 20T inputs to an original audio s ource such as a mixer or media player, then connect the outputs of the DW 20R to a destination such as a mixer, amplier,
or active speaker. Leave the amp or speaker s turned o for now.
2. Connect the power adapters to each unit. They will power on automatic ally and their PAIR buttons will blink slowly to indic ate standby mode.
3. Press and hold the PAIR but ton on the DW 20T for 4 seconds. The LED ring will ash rapidly to indicate that it is tr ying to pair, and will continue tr ying for up to 30 seconds.
4. Within 30 seconds of initiating the DW 20T for pairing, press and hold the PAIR button on the DW 20R for 4 seconds as well. Its LED ring will ash rapidly.
5. When successfully paired, the LED rings on both the 20T and 20R will light solid (not ashing). If either unit ’s LED ring ashes slowly, this indicates that pairing was unsuccessful.
Make sure both units are fre e of obstructions and are within 100 feet / 30 meter s of each other.
6. After all audio and power connections have been made, power on the amplier or active speakers.
Pairing multiple DW 20R units with a DW 20T
1. Connect the DW 20T and the rst DW 20R as described in ‘Get ting Started’ (hold each PAIR button for 4 seconds).
2. On the second DW 20R unit, hold the PAIR button for 4 seconds to activate p airing, then let it search for 30 seconds. The pairing f unction will time out af ter 30 seconds
and the LED will blink slowly.
3. Press the DW 20T PAIR button for 4 seconds, and then press the second DW 20R unit’s PAIR button for 4 s econds. Both DW 20R units will now be connec ted to the same DW 20T.
4. Note - holding the PAIR button f or 10 seconds on the DW 20T will clear the memory of connected DW 20R units.
V 1.0
2 AIR LINK DW 20R/DW 20T Quick Start Guide 3
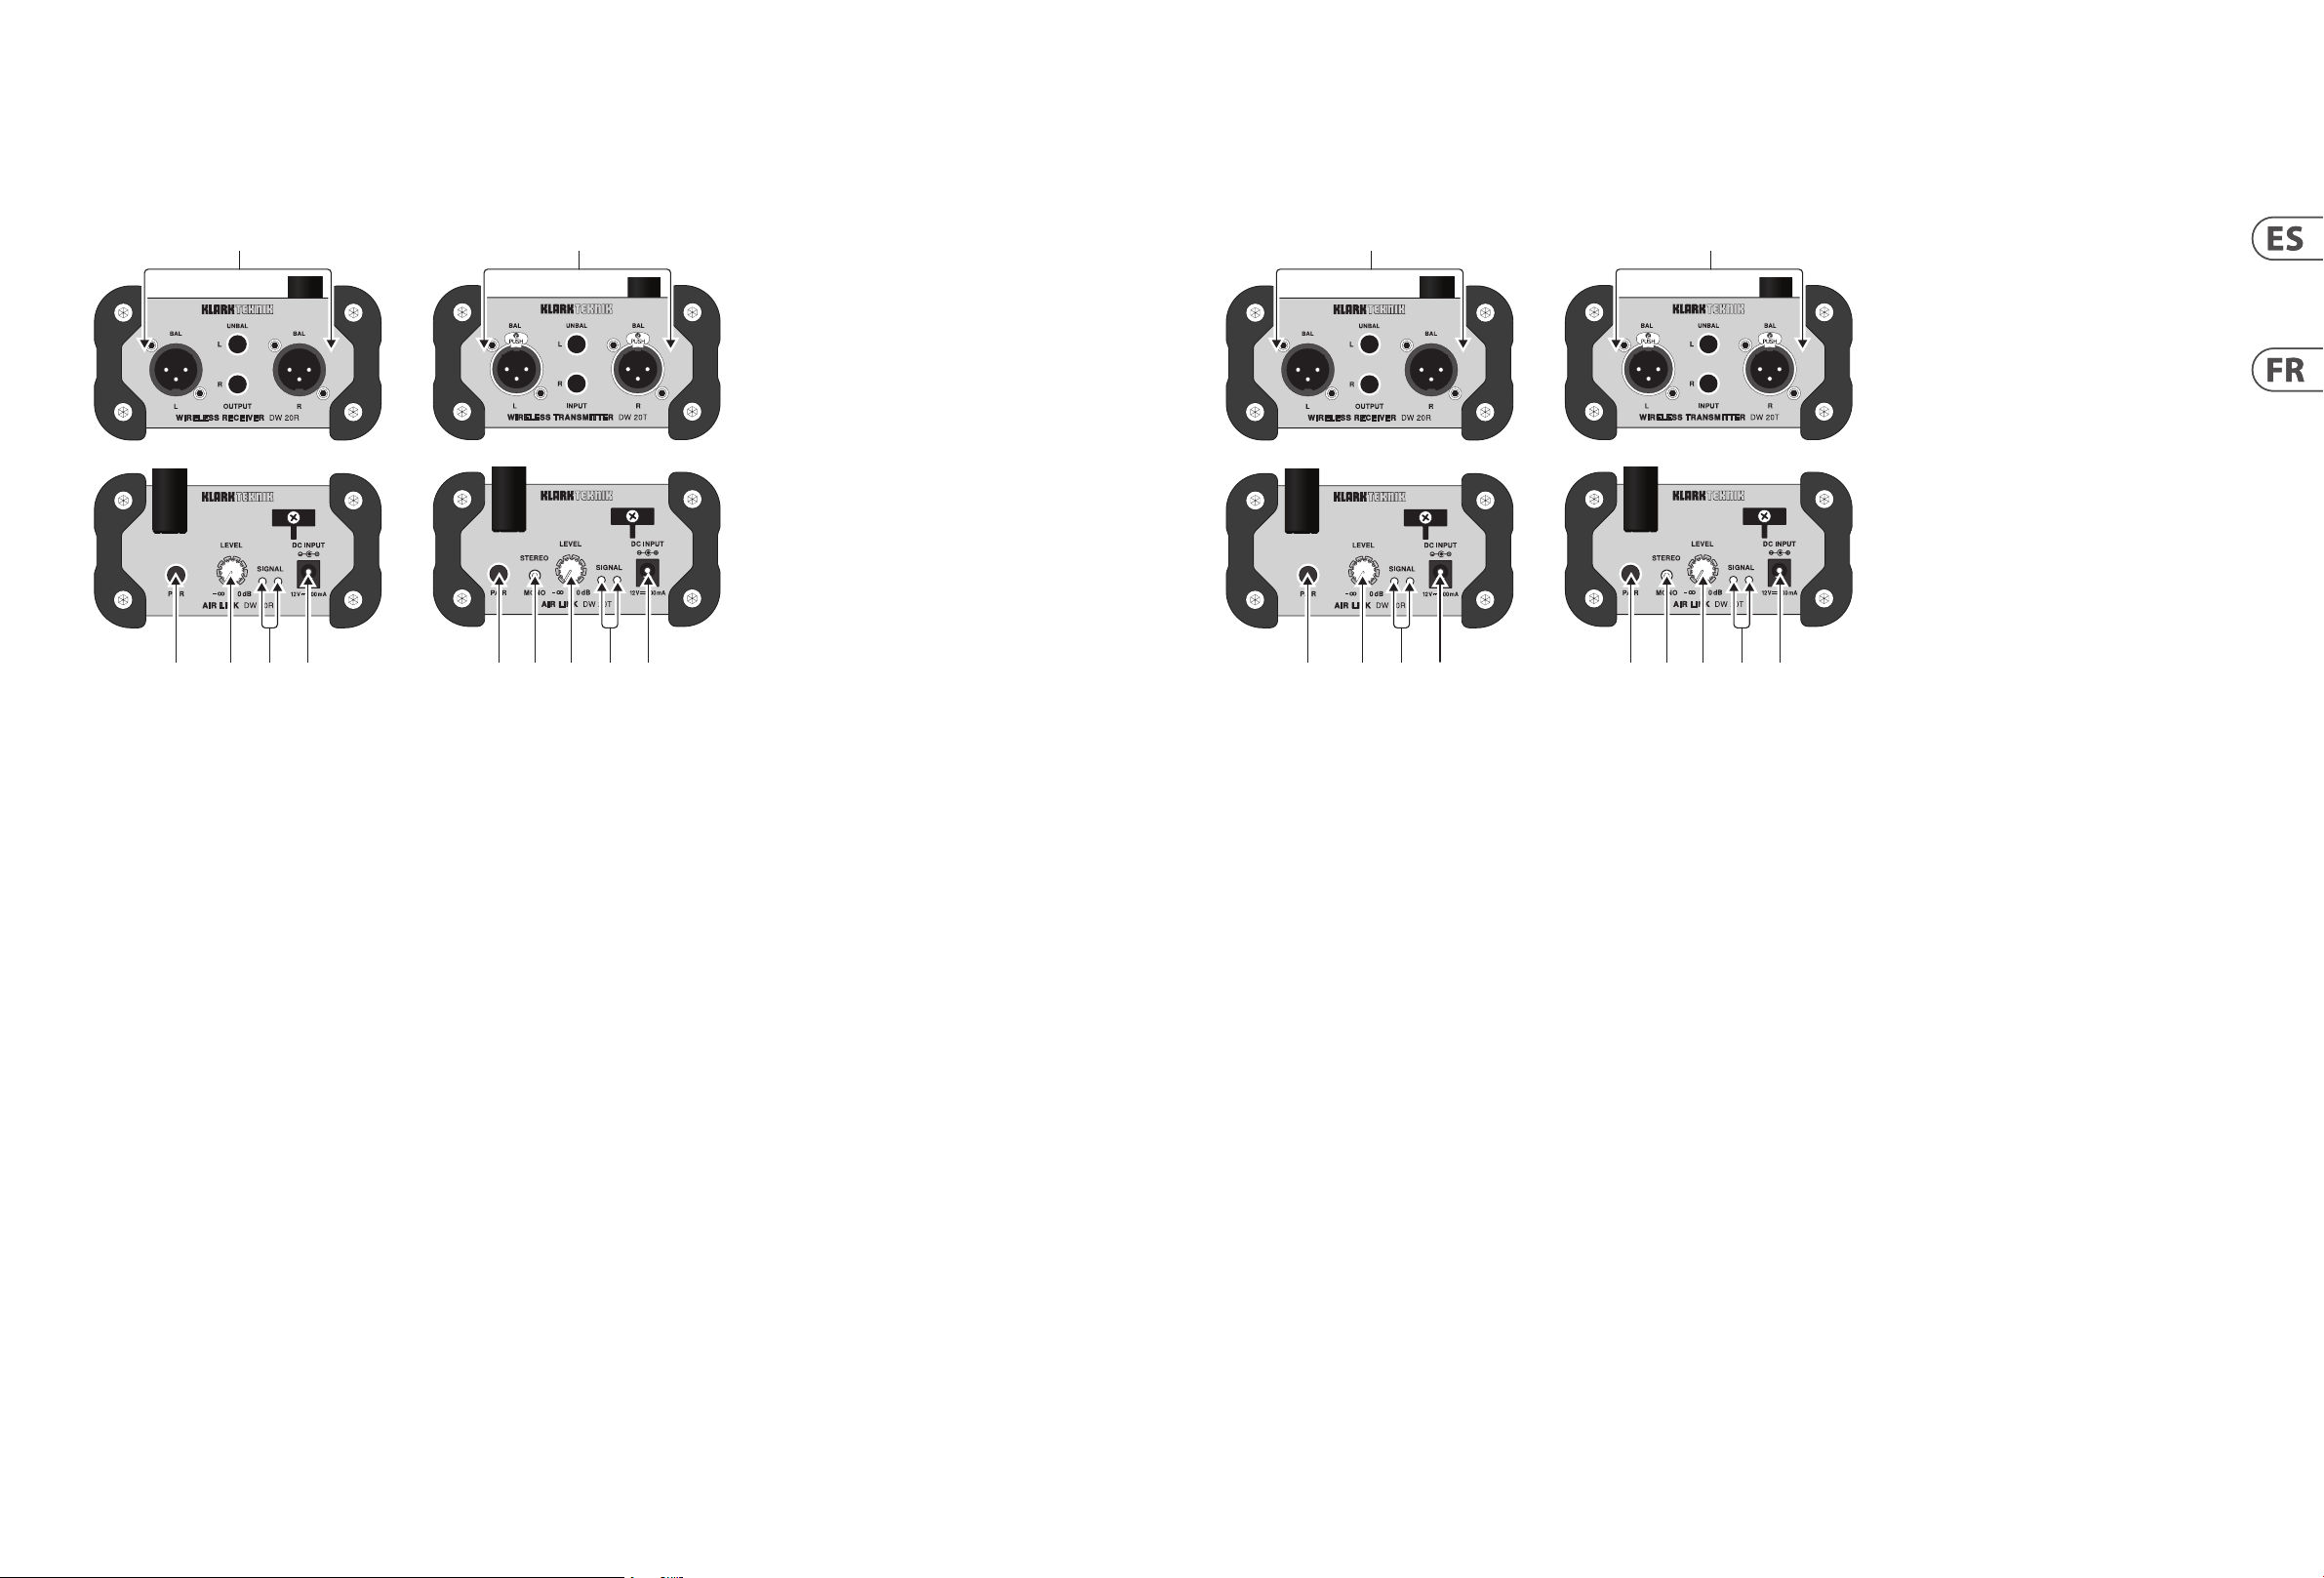
(1) (2) (4)(3)
(1) (6) (4)(7)(5)
(1) (2) (4)(3)
(1) (6) (4)(7)(5)
Controles
(ES)
(8) (9)
(1) PAR El botón permite que la unidad esté
disponible para emparejar presionando y
manteniendo presionado durante 4 segundos.
El anillo LED indicará el estado actual.
Consulte la sección Introducción para obtener
más detalles.
(2) NIVEL La perilla ajusta el volumen de la señal
enviada a las tomas de salida.
(3) SEÑAL Los LED se encienden cuando el DW
20R recibe una señal de audio del DW 20T.
(4) ENTRADA DC toma acepta el adaptador de
corriente incluido.
(5) ESTÉREO / MONO El interruptor determina
si la señal de audio inalámbrica saliente es
estéreo o mono.
(6) NIVEL La perilla ajusta la sensibilidad
de las entradas.
(7) SEÑAL Los LED se iluminan en verde cuando
hay señal en las entradas. Los LED se iluminan
en rojo cuando la señal de audio entrante
corta las entradas. Si esto sucede, reduzca el
nivel de salida de la fuente de audio.
(8) PRODUCCIÓN Las tomas envían una señal
de audio de nivel de línea a otro dispositivo
de audio (mezclador, amplicador, etc.) a
través de cables XLR balanceados o TS de
¼" no balanceados.
Etape 2 : Réglages
(FR)
(8) (9)
(1) PAIRE Le bouton permet à l'appareil d'être disponible
pour l'appairage en appuyant et en maintenant
enfoncé pendant 4 seconde s. L'anneau LED indiquera
l'état actuel. Consultez la sec tion Mise en route pour
plus de détails.
(2) NIVEAU Le bouton règle le volume du signal envoyé
aux prises de sortie.
(3) SIGNAL Les LED s'allument lorsque le DW 20R re çoit un
signal audio du DW 20T.
(4) ENTRÉE DC prise accepte l'adaptateur secteur inclus.
(5) STÉRÉO / MONO Le commutateur détermine si le
signal audio sans l sortant est stéréo ou mono.
(6) NIVEAU Le bouton règle la sensibilité des entrées.
(7) SIGNAL Les LED s'allument en vert lorsqu'un signal
est présent aux entrées. Les LED s'allument en rouge
lorsque le signal audio entrant coupe les entrées.
Si cela se produit, réduisez le niveau de sortie de
l'audio source.
(8) PRODUCTION Les prises envoient un signal audio
de niveau ligne à un autre appareil audio (table
de mixage, amplicateur, etc.) via des câbles
XLR symétriques ou TS asymétriques ¼".
(9) SAISIR Les prises acceptent les signaux audio
via des câbles XLR symétriques ou TS asymétrique s ¼".
(9) APORTE Las tomas aceptan señales de audio
a través de XLR balanceado o cables TS de
¼ "no balanceados.
Puesta en marcha
1. Conecte las entradas del DW 20T a una fuente de audio original, como un mezclador o reproduc tor multimedia, luego conecte las salidas del DW 20R a un des tino como un
mezclador, amplic ador o altavoz activo. Deje el amplicador o los altavoces apagados por ahora.
2. Conec te los adaptadores de corriente a cada unidad. Se encenderán automáticamente y sus botones PAIR parpadearán lentamente para indicar el modo de espera.
3. Mantenga pulsado el botón PAIR del DW 20T durante 4 se gundos. El anillo de
LED parpadeará rápidamente para indicar que está intentando emparejarse y seguirá intentándolo durante 30 segundos.
4. Dentr o de los 30 segundos de haber iniciado el emparejamiento del DW 20T, mantenga presionado el botón PAIR del DW 20R durante 4 segundos también.
Su anillo LED parpadeará rápidamente.
5. Cuando se empareja correctamente, los anillos LED tanto en el 20T como en el 20R se iluminarán de for ma sólida (sin parpadear). Si el anillo LED de cualquiera de las unidades
parpadea lentamente, esto indica que el emparejamiento no se realizó correct amente. Asegúrese de que ambas unidades estén libre s de obstrucciones y que e stén a menos de
100 pies / 30 metros entre sí.
6. Una vez realizadas todas las conexiones de audio y alimentación, encienda el ampli cador o los altavoces activos.
Emparejamiento de varias unidades DW 20R con un DW 20T
1. Conecte el DW 20T y el primer DW 20R como s e describe en 'Introducción' (mantenga presionado cada botón PAIR durante 4 segundos).
2. En la segunda unidad DW 20R, mantenga presionado el botón PAIR durante 4 segundos p ara activar el emparejamiento, luego déjelo buscar durante 30 segundos. La función de
emparejamiento expirará después de 30 segundos y el LED parpadear á lentamente.
3. Presione el botón PAIR del DW 20T dur ante 4 segundos y luego presione el botón PAIR de la segunda unidad DW 20R durante 4 segundos. Ambas unidades DW 20R ahora estarán
conectadas al mismo DW 20T.
4. Nota: si mantiene pulsado el botón PAIR durante 10 segundos en el DW 20T, se borrar á la memoria de las unidades DW 20R conectadas.
Mise en oeuvre
1. Connectez les entrée s du DW 20T à une source audio originale telle qu'une table de mixage ou un lec teur multimédia, puis connectez les s orties du DW 20R à une destination telle
qu'une table de mixage, un amplicateur ou un haut-parleur act if. Laissez l'ampli ou les enceintes é teints pour le moment.
2. Connectez les adaptateurs d'alimentation à chaque unité. Ils s'allumeront automatiquement et leurs boutons PAIR clignoteront lentement pour indiquer le mode veille.
3. Appuyez sur le bouton PAIR du DW 20T et maintenez-le enfoncé pendant 4 secondes. L'anneau LED clignotera rapidement pour indiquer qu'il essaie de se coupler et continuera
d'essayer pendant 30 secondes maximum.
4. Dans les 30 s econdes suivant le lancement du DW 20T pour l'appairage, ap puyez sur le bouton PAIR du DW 20R et maintenez- le enfoncé pendant 4 secondes également. Son
anneau LED clignotera rapidement.
5. Une f ois le couplage réussi, les anneau x LED des 20T et 20R s'allument en continu (ne clignotent pas). Si l'anneau LED de l'une ou l'autre des unités clignote lentement, cela indique
que l'appairage a échoué. Assurez-vous que les deux unités ne s ont pas obstruées et s e trouvent à moins de 30 mètres l'une de l'autre.
6. Une fois que toutes les connexions audio et d'alimentation ont été eectué es, allumez l'amplicateur ou les haut-parleur s actifs.
Couplage de plusieurs unités DW 20R avec un DW 20T
1. Connectez le DW 20T et le premier DW 20R comme décrit dans «Mise en route» (maintenez chaque bouton PAIR pendant 4 secondes).
2. Sur la deuxième unité DW 20R, maintenez le bouton PAIR pendant 4 secondes pour ac tiver l'appairage, puis laissez-le chercher pendant 30 se condes. La fonction d'appairage
expirera au bout de 30 secondes et la LED clignotera lentement.
3. Appuyez sur le bouton PAIR DW 20T pendant 4 secondes, puis appuyez sur le bouton PAIR de la deuxième unité DW 20R pendant 4 secondes. Les deux unités DW 20R seront
désormais connecté es au même DW 20T.
4. Remarque - maintenir le bouton PAIR pendant 10 secondes sur le DW 20T eacera la mémoire des unités DW 20R connectée s.
4 AIR LINK DW 20R/DW 20T Quick Start Guide 5
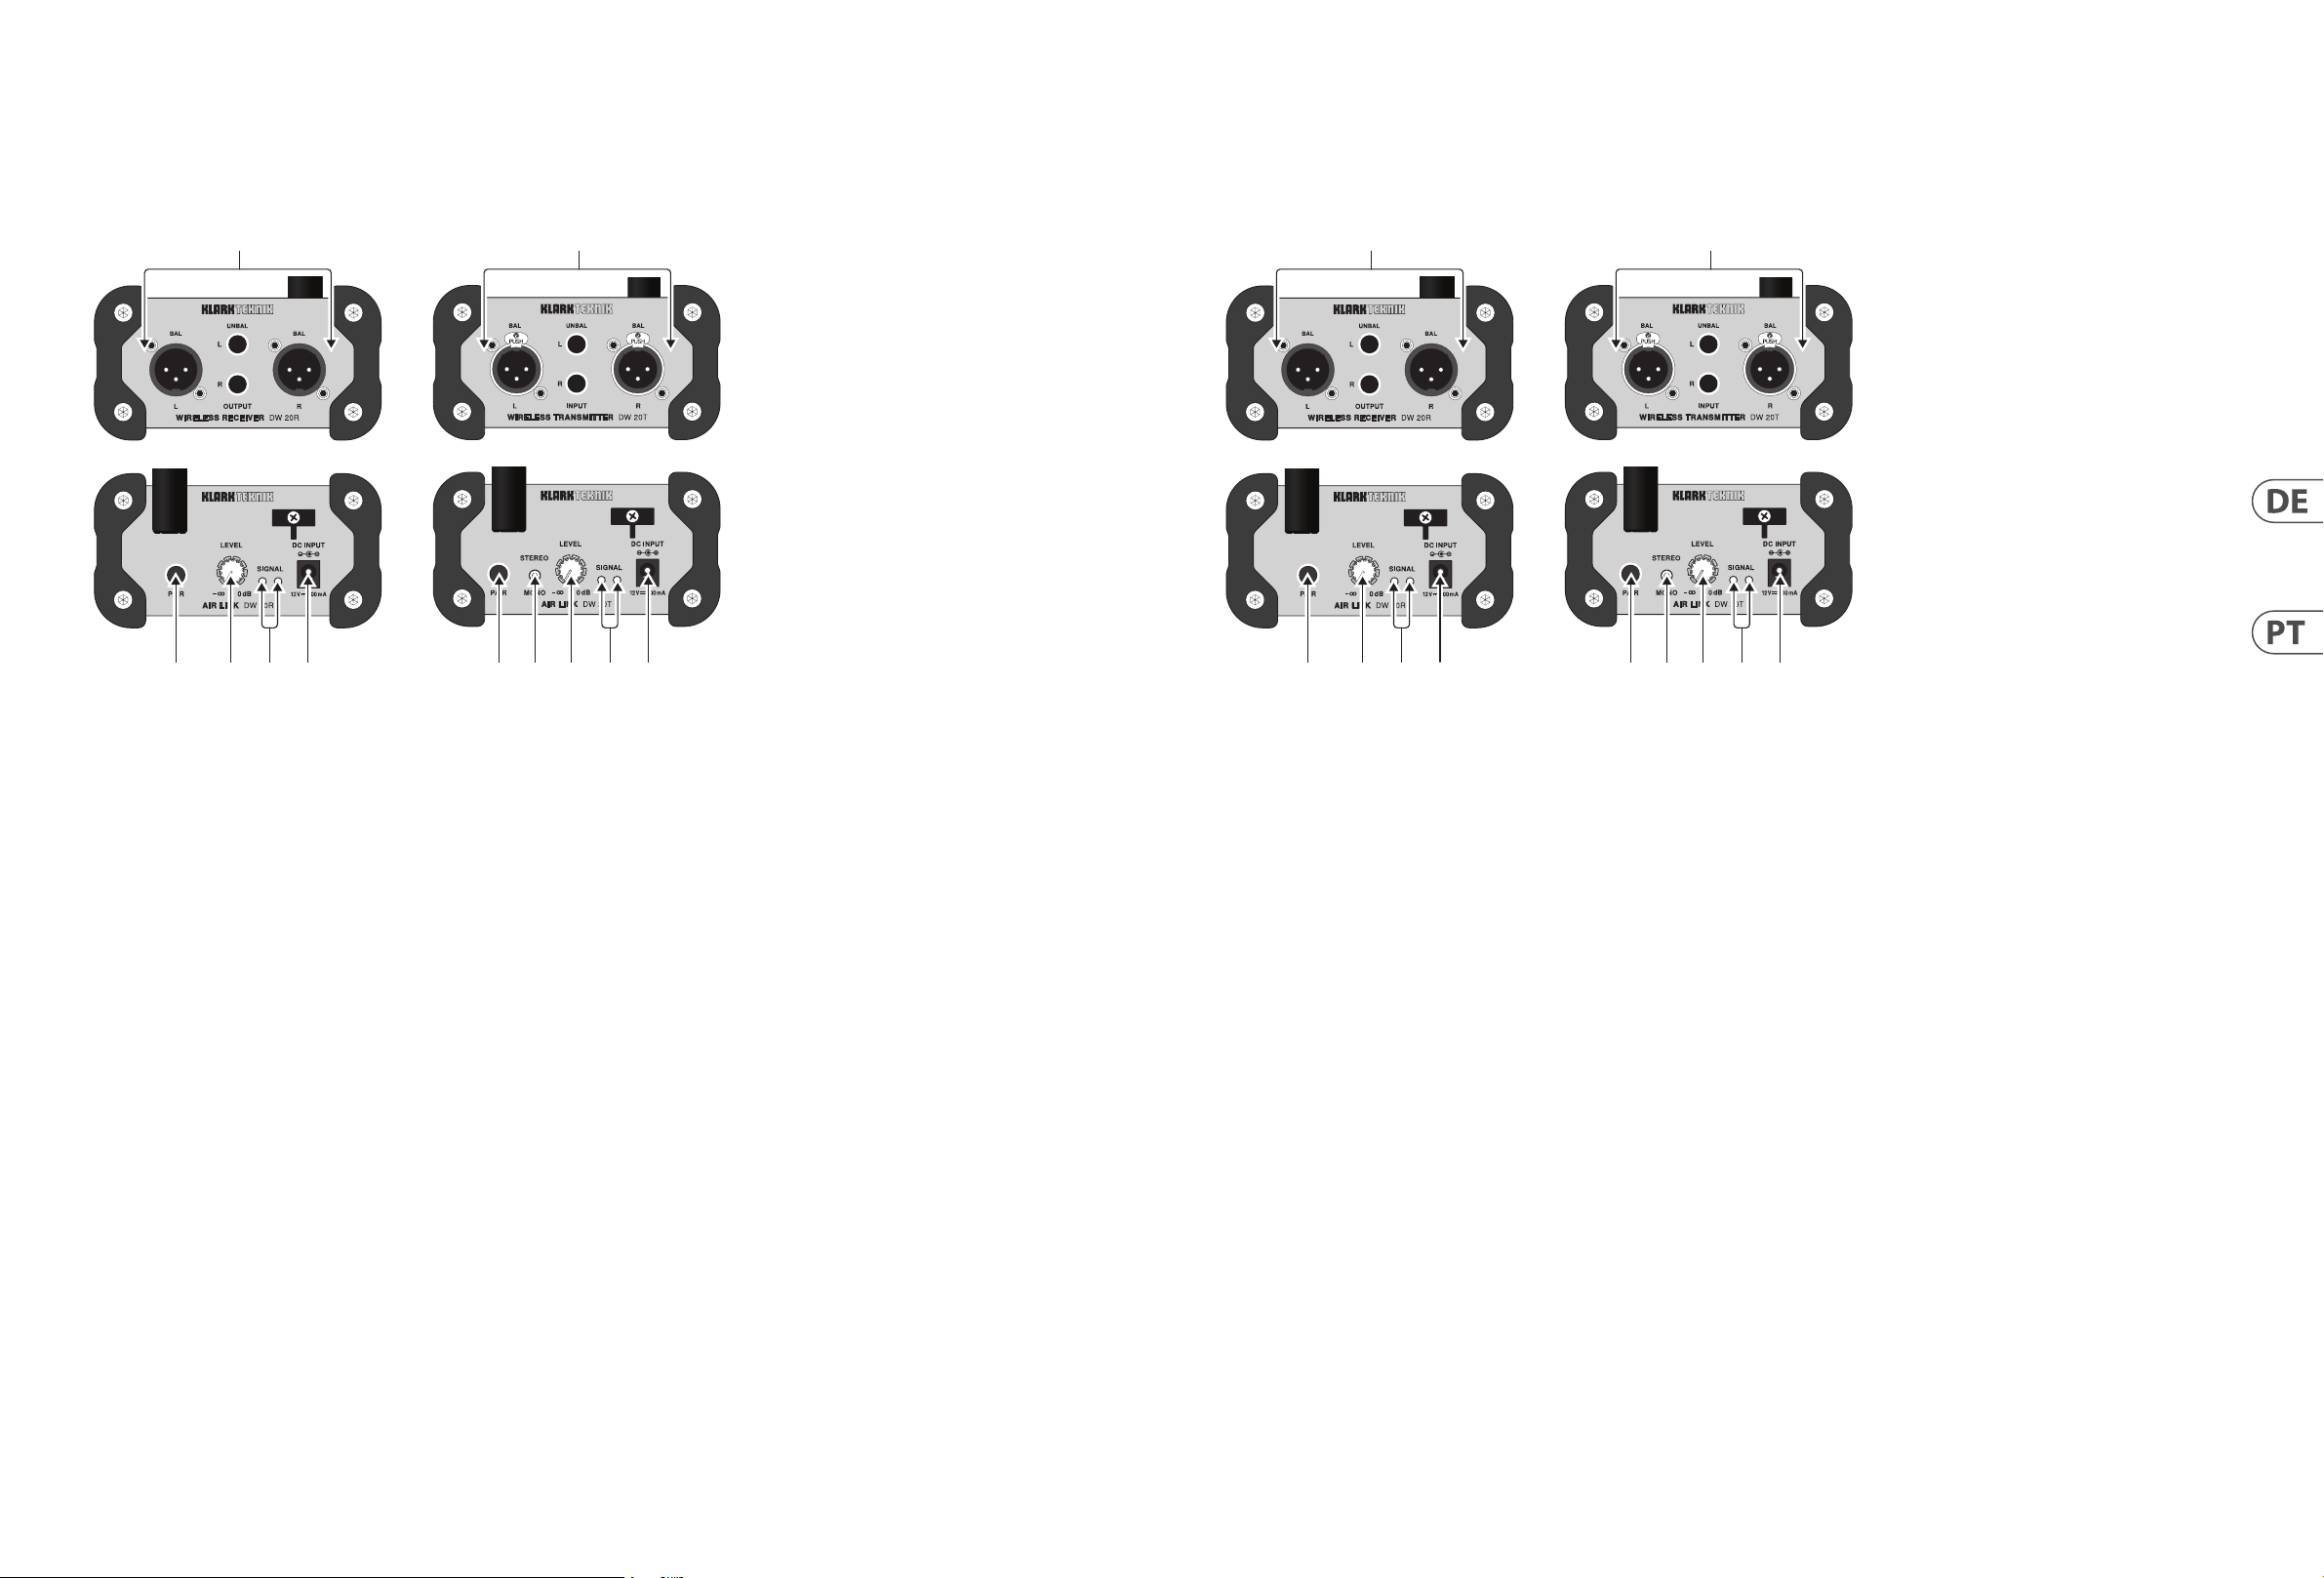
(1) (2) (4)(3)
(1) (6) (4)(7)(5)
(1) (2) (4)(3)
(1) (6) (4)(7)(5)
Erste Schritte
(DE)
(8) (9)
(1) PAAR Mit der Taste kann das Gerät zum
Koppeln verfügbar werden, indem Sie es
4 Sekunden lang gedrückt halten. Der LEDRing zeigt den aktuellen Status an. Weitere
Informationen nden Sie im Abschnitt
Erste Schritte.
(2) NIVEAU Mit dem Regler können Sie die
Lautstärke des an die Ausgangsbuchsen
gesendeten Signals einstellen.
(3) SIGNAL LEDs leuchten, wenn der DW 20R
ein Audiosignal vom DW 20T empfängt.
(4) DC-EINGANG Die Buchse akzeptier t das
mitgelieferte Netzteil.
(5) STEREO / MONO Der Schalter bestimmt,
ob das ausgehende drahtlose Audiosignal
Stereo oder Mono ist.
(6) NIVEAU Knopf stellt die Empndlichkeit
der Eingänge ein.
(7) SIGNAL LEDs leuchten grün, wenn an den
Eingängen ein Signal vorhanden ist. Die LEDs
leuchten rot, wenn das eingehende Audiosignal
die Eing änge abschneidet. Verringern Sie in
diesem Fall den Ausgangspegel des Quell-Audios.
(8) AUSGABE Buchsen senden ein Audiosignal
mit Line-Pegel über symmetrische XLR- oder
unsymmetrische ¼ "TS-Kabel an ein anderes
Audiogerät (Mischpult, Verstärker usw.).
Primeiros Passos
(PT)
(8) (9)
(1) PAR O botão permite que a unidade que disponível
para emparelhamento pressionando e segurando
por 4 segundos. O anel de LED indicará o status
atual. Consulte a seção Primeiros passos para
obter detalhes.
(2) NÍVEL botão giratório ajusta o volume do sinal
enviado para os conectores de saída.
(3) SINAL Os LEDs acendem quando o DW 20R recebe
um sinal de áudio do DW 20T.
(4) DC INPUT soquete aceita o adaptador de
alimentação incluído.
(5) ESTÉREO / MONO switch determina se o sinal de
áudio sem o de saída é estéreo ou mono.
(6) NÍVEL botão ajusta a sensibilidade das entradas.
(7) SINAL Os LEDs acendem em verde quando há
sinal nas entradas. Os LEDs acendem em vermelho
quando o sinal de áudio de entrada cor ta as
entradas. Se isso acontecer, diminua o nível de saída
do áudio de origem.
(8) RESULTADO Os conectores enviam um sinal de
áudio de nível de linha para outro dispositivo de
áudio (mixer, amplicador, etc.) por meio de cabos
XLR balanceados ou TS não balanceados de ¼".
(9) ENTRADA os conectores aceitam sinais de áudio
por meio de cabos XLR balanceados ou TS não
balanceados de ¼ ".
(9) EINGANG Buchsen akzeptieren Audiosignale
über symmetrische XLR- oder unsymmetrische
¼ "TS-Kabel.
Erste Schritte
1. Verbinden Sie die DW 20T-Eingänge mit einer Original-Audioquelle wie einem Mixer oder Media Player und verbinden Sie dann die Ausgänge des DW 20R mit einem Ziel wie
einem Mixer, einem Verstärker oder einem aktiven Lautsprecher. Lassen Sie den Verstärker oder die Lautsprecher vorerst ausgeschaltet.
2. Schließen Sie die Netzteile an jedes Gerät an. Sie werden automatisch eingeschaltet und ihre PAIR-Tasten blinken langsam, um den Standby-Modus anzuzeigen.
3. Halten Sie die PAIR-Taste am DW 20T 4 Sekunden lang gedrückt. Der LED-Ring blinkt sc hnell, um anzuzeigen, dass versucht wird, eine Verbindung herzustellen, und versucht es bis
zu 30 Sekunden lang.
4. Halten Sie innerhalb von 30 Sekunden nach dem Starten des DW 20T zum Pairing die PAIR-Taste am DW 20R ebenfalls 4 Sekunden lang gedr ückt. Der LED-Ring blinkt schnell.
5. Nach erfolgreicher Kopplung leuchten die LED-Klingeltöne sowohl am 20T als auch am 20R dauerhaft (blinken nicht). Wenn der LED-Ring eines Geräts langsam blinkt, zeigt dies
an, dass das Pairing nicht erfolgreich war. Stellen Sie sicher, dass beide Einheiten frei von Hindernissen sind und sich nicht weiter als 30 Meter voneinander benden.
6. Nachdem alle Audio- und Stromanschlüsse hergestellt wurden, schalten Sie den Verstärker oder die Aktivlautsprecher ein.
Koppeln mehrerer DW 20R-Einheiten mit einem DW 20T
1. Schließen Sie den DW 20T und den ers ten DW 20R wie unter „Erste Schritte“ beschrieben an (halten Sie jede PAIR-Taste 4 Sekunden lang gedrückt).
2. Halten Sie auf der zweiten DW 20R-Einheit die PAIR-Taste 4 Sekunden lang gedrückt, um das Pairing zu aktivieren, und lassen Sie sie dann 30 Sekunden lang suchen. Die PairingFunktion läu ft nach 30 Sekunden ab und die LED blinkt langsam.
3. Drücken Sie die DW 20T PAIR-Taste 4 Sekunden lang und dann die PAIR-Taste der zweiten DW 20R-Einheit 4 Sekunden lang. Beide DW 20R-Einheiten werden jetzt mit demselben
DW 20T verbunden.
4. Hinweis : Wenn Sie die PAIR-Taste am DW 20T 10 Sekunden lang g edrückt halte n, wird der Speicher d er angeschloss enen DW 20R-Einheite n gelöscht.
Primeiros Passos
1. Verbind de DW 20T inputs met een originele audiobron zoals een mixer of mediaspeler, en sluit vervolgens de outputs van de DW 20R aan op een bestemming zoals een mixer,
versterker of actieve sp eaker. Laat de versterker of luidsprekers voorlopig uitgeschakeld.
2. Sluit de voedingsadapters aan op elke unit. Ze worden automatisch ingeschakeld en hun PAIR-knoppen knipperen langzaam om de st and-bymodus aan te geven.
3. Houd de PAIR-knop op de DW 20T 4 seconden ingedrukt. De LED-ring zal snel knipperen om aan te geven dat hij probeer t te koppelen, en zal tot 30 seconden blijven proberen.
4. Bin nen 30 seconden nadat de DW 20T is gest art om te koppelen, houdt u o ok de PAIR-knop o p de DW 20R gedurende 4 seconde n ingedrukt. De LED- ring zal snel knippere n.
5. Als het koppelen is gelukt, zullen de LED-ringen op zowel de 20T als de 20R continu oplichten (niet knipperend). Als de LED- ring van een van de units langzaam knippert, gee ft dit
aan dat het koppelen niet is geluk t. Zorg ervoor dat beide units vrij zijn van obstakels en zich binnen 30 meter van elkaar bevinden.
6. Nadat alle audio- en stroomaansluitingen zijn gemaakt, schakelt u de versterker of actieve luidsprekers in.
Emparelhar várias unidades DW 20R com um DW 20T
1. Conecte o DW 20T e o primeiro DW 20R conf orme descrito em 'Primeiros passos' (segure cada botão PAIR por 4 segundos).
2. Na segunda unidade DW 20R, s egure o botão PAIR por 4 segundos para ativar o emp arelhamento e, em seguida, deixe -o pesquisar por 30 segundos. A função de emparelhamento
expirará após 30 segundos e o LED piscar á lentamente.
3. Pressione o botão PAIR do DW 20T por 4 segundos e, em s eguida, pressione o botão PAIR da segunda unidade DW 20R por 4 segundos. Ambas as unidades DW 20R agora serão
conectadas ao mesmo DW 20T.
4. Observação - segurar o botão PAIR por 10 segundos no DW 20T limpará a memór ia das unidades DW 20R conectadas.

6 AIR LINK DW 20R/DW 20T Quick Start Guide 7
(1) (2) (4)(3)
(1) (6) (4)(7)(5)
(1) (2) (4)(3)
(1) (6) (4)(7)(5)
Controlli
(IT)
(8) (9)
(1) PAIO il pulsante consente all'unità di render si
disponibile per l'accoppiamento pre mendo e
tenendo premuto per 4 secondi. L'anello LED
indicherà lo stato corrente. Vedere la sezione
Guida introduttiva per i dettagli.
(2) LIVELLO la manopola regola il volume del
segnale inviato alle prese di uscita.
(3) SEGNALE I LED si accendono quando il DW
20R riceve un segnale audio
dal DW 20T.
(4) INGRESSO DC presa accetta l'adattatore di
alimentazione incluso.
(5) STEREO / MONO interruttore determina se il
segnale audio wireless
in uscita è stereo o mono.
(6) LIVELLO la manopola regola la sensibilità
degli ingressi.
(7) SEGNALEI LED si illuminano di verde quando
il segnale è presente agli ingressi. I LED si
accendono in rosso quando il segnale audio
in ingresso taglia gli ingressi. In tal caso,
abbassare il livello di uscita dell'audio sorgente.
(8) PRODUZIONE i jack inviano un segnale audio
a livello di linea a un altro dispositivo audio
(mixer, amplicatore, ecc.) tramite cavi XLR
bilanciati o cavi TS da ¼ "non bilanciati.
(9) INGRESSO i jack accet tano segnali audio
tramite cavi XLR bilanciati o cavi
TS da ¼ "non bilanciati.
Besturing
(NL)
(8) (9)
(1) PAAR -toets stelt het apparaat beschikbaar voor
koppelen door 4 seconden ingedrukt te houden.
De LED-ring geeft de huidige status aan. Zie het
gedeelte Aan de slag voor details.
(2) NIVEAU regelaar regelt het volume van het signaal
dat naar de uitgangsjacks wordt gestuurd.
(3) SIGNAAL LED's lichten op wanneer de DW 20R een
audiosignaal ontvangt van de DW 20T.
(4) DC-INGANG stopcontact accepteert de
meegeleverde voedingsadapter.
(5) STEREO / MONO schakelaar bepaalt of het
uitgaande draadloze audiosignaal stereo of mono is.
(6) NIVEAU knop past de gevoeligheid van de
ingangen aan.
(7) SIGNAAL LED's lichten groen op als er signaal
aanwezig is op de ingangen. De LED's lichten rood
op wanneer het binnenkomende audiosignaal de
ingangen afknipt. Als dit gebeurt, verlaagt u het
uitgangsniveau van de bronaudio.
(8) UITGANG -aansluitingen sturen een audiosignaal
op lijnniveau naar een ander audioapparaat
(mixer, versterker, enz.) via gebalanceerde XLR of
ongebalanceerde ¼ "TS-kabels.
(9) INVOER aansluitingen accepteren audiosignalen
via gebalanceerde XLR of ongebalanceerde ¼
"TS-kabels.
Iniziare
1. Collegare gli ingressi del DW 20T a una sorgente audio originale come un mixer o un let tore multimediale, quindi collegare le usc ite del DW 20R a una destinazione come un mixer,
un amplicatore o un altopar lante attivo. Lascia l'amplicatore o gli altoparlanti spenti per ora.
2. Collegare gli adattatori di alimentazione a ciascuna unità. Si accenderanno automaticamente ei loro pulsanti PAIR lampeggeranno lentamente per indicare la modalità standby.
3. Tenere premuto il pulsante PAIR sul DW 20T per 4 secondi. L'anello LED lampeggerà rapidamente per indicare che sta tentando di accoppiarsi e continuerà a provare per un
massimo di 30 secondi.
4. Entro 30 secondi dall'avv io del DW 20T per l'accoppiamento, tenere premuto anche il puls ante PAIR sul DW 20R per 4 secondi. Il suo anello LED lampeggerà rapidamente.
5. Una volta accoppiato con successo, gli anelli LED su entrambi i 20T e 20R si accenderanno in modo sso (non lampeggiante). Se l'anello LED di una delle unità lampeggia
lentamente, signica che l'asso ciazione non è riuscita. Assicurarsi che entrambe le unit à siano libere da ostacoli e che si trovino entro 100 piedi / 30 metri l'una dall'altra.
6. Dopo aver e ettuato tutti i collegamenti audio e di alimentazione, accendere l'amplicatore o gli altoparlanti atti vi.
Abbinamento di più unità DW 20R con un DW 20T
1. Collegare il DW 20T e il primo DW 20R come descritto in "Guida introduttiva" (tenere premuto ciascun pulsante PAIR per 4 secondi).
2. Sulla seconda unità DW 20R , tenere premuto il pulsante PAIR per 4 secondi per at tivare l'associazione, quindi lasciarlo cercare per 30 secondi. La f unzione di associazione scadrà
dopo 30 secondi e il LED lampeggerà lentamente.
3. Premere il pulsante PAIR DW 20T per 4 secondi, quindi premere il pulsante PAIR della seconda unità DW 20R per 4 secondi. Entrambe le unit à DW 20R saranno ora collegate allo
stesso DW 20T.
4. Nota: tenendo premuto il pulsante PAIR per 10 secondi sul DW 20T si cancellerà la memoria delle unità DW 20R collegate.
Aan de slag
1. Verbind de DW 20T inputs met een originele audiobron zoals een mixer of mediaspeler, en sluit vervolgens de outputs van de DW 20R aan op een bestemming zoals een mixer,
versterker of actieve sp eaker. Laat de versterker of luidsprekers voorlopig uitgeschakeld.
2. Sluit de voedingsadapters aan op elke unit. Ze worden automatisch ingeschakeld en hun PAIR-knoppen knipperen langzaam om de st and-bymodus aan te geven.
3. Houd de PAIR-knop op de DW 20T 4 seconden ingedrukt. De LED-ring zal snel knipperen om aan te geven dat hij probeer t te koppelen, en zal tot 30 seconden blijven proberen.
4. Binnen 30 seconden nadat de DW 20T is gestar t om te koppelen, houdt u ook
de PAIR-knop op de DW 20R gedurende 4 seconden ingedrukt. De LED-ring
zal snel knipperen.
5. Als het koppelen is gelukt, zullen de LED-ringen op zowel de 20T als de 20R continu oplichten (niet knipperend). Als de LED- ring van een van de units langzaam knippert, gee ft dit
aan dat het koppelen niet is geluk t. Zorg ervoor dat beide units vrij zijn van obstakels en zich binnen 30 meter van elkaar bevinden.
6. Nadat alle audio- en stroomaansluitingen zijn gemaakt, schakelt u de versterker
of actieve luidsprekers in.
Meerdere DW 20R-units koppelen met een DW 20T
1. Sluit de DW 20T en de eerste DW 20R aan zoals beschreven in 'Aan de slag' (houd elke PAIR-knop 4 seconden ingedrukt).
2. Houd op de tweede DW 20R-eenheid de PAIR-knop gedurende 4 seconden ingedruk t om het koppelen te activeren, en laat hem ver volgens 30 seconden zoeken.
De koppelings functie stopt na 30 se conden en de LED knippert langzaam.
3. Druk gedurende 4 seconden op de DW 20T PAIR-knop en druk ver volgens gedurende 4 seconden op de PAIR-knop van de tweede DW 20R. Beide DW 20R-units worden nu op
dezelfde DW 20T aangesloten.
4. Opmerking - door de PAIR-knop 10 seconden ingedruk t te houden op de DW 20T, wordt het geheugen van de aangesloten DW 20R-units gewist.

8 AIR LINK DW 20R/DW 20T Quick Start Guide 9
(1) (2) (4)(3)
(1) (6) (4)(7)(5)
(1) (2) (4)(3)
(1) (6) (4)(7)(5)
Kontroller
(SE)
(8) (9)
(1) PAR -knappen gör att enheten blir tillgänglig
för ihopparning genom att hålla ned i 4 sekunder.
LED-ringen indikerar ak tuell status. Se avsnittet
Komma igång för mer information.
(2) NIVÅ ratten justerar volymen på signalen som
skickas till utgångarna.
(3) SIGNAL Lysdioder tänds när DW 20R tar emot
en ljudsignal från DW 20T.
(4) DC-INGÅNG uttaget accepterar den
medföljande nätadaptern.
(5) STEREO / MONO avgör om den utgående
trådlösa ljudsignalen är stereo eller mono.
(6) NIVÅ ratten justerar ingångarnas känslighet.
(7) SIGNAL Lysdioderna lyser grönt när signalen
nns på ingångarna. Lysdioderna lyser
rött när den inkommande ljudsignalen
klippar ingångarna. Om detta händer, sänk
utgångsnivån för källljudet.
(8) PRODUK TION uttag skickar en ljudsignal
på linjenivå till en annan ljudenhet (mixer,
förstärkare, etc.) via balanserade XLR eller
obalanserade ¼ "TS-kablar.
(9) INMATNING uttag accepterar ljudsignaler
via balanserade XLR eller obalanserade ¼"
TS-kablar.
Sterownica
(PL)
(8) (9)
(1) PARA Przycisk umożliwia udostępnienie urządzenia
do parowania poprzez naciśnięcie i przytrzymanie
przez 4 sekundy. Pierścień LED wskaże aktualny
stan. Szczegółowe informacje można znaleźć w
sekcji Pierwsze kroki.
(2) POZIOM Pokrętło reguluje głośność sygnału
wysyłanego do gniazd wyjściowych.
(3) S YGNAŁ Diody LED świecą się, gdy DW 20R odbiera
sygnał audio z DW 20T.
(4) WEJŚCIE DC gniazdo akceptuje dołączony zasilacz.
(5) STEREO / MONO przełącznik określa, czy
wychodzący bezprzewodowy sygnał audio jest
stereo czy mono.
(6) POZIOM Pokrętło reguluje czułość wejść.
(7) S YGNAŁDiody LED świecą się na zielono, gdy na
wejściach jest sygnał. Diody LED świecą się na
czerwono, gdy przychodzący sygnał audio obcina
wejścia. Jeśli tak się stanie, zmniejsz poziom
wyjściowy źródła dźwięku.
(8) W YNIK gniazda wysyłają sygnał audio na poziomie
liniowym do innego urządzenia audio (mikser,
wzmacniacz itp.) za pomocą zbalansowanych kabli
XLR lub niezbalansowanych ¼" TS.
(9) WEJŚCIE gniazda akceptują sygnał audio przez
symetryczne XLR lub niesymetryczne kable ¼" TS.
Komma igång
1. Anslut DW 20T-ingångarna till en original ljudkälla som en mixer eller mediaspelare och anslut sedan DW 20R-utgångarna till en destination som en mixer, först ärkare eller aktiv
högtalare. Låt förstärkaren eller högtalarna vara avstängda för tillfället.
2. Anslut nätadaptrar na till varje enhet. De slås på automatiskt o ch deras PAIR-knappar blinkar långsamt för at t indikera standby-läge.
3. Håll ne d PAIR-knappen på DW 20T i 4 sekunder. LED-ringen blinkar snabbt för att indiker a att den försöker par a ihop och fortsät ter att försöka i upp till 30 sekunder.
4. Inom 30 sekunder ef ter att DW 20T har initierats för ihopparning, tr yck och håll ned PAIR-knappen på DW 20R i 4 sekunder. LED-ringen blinkar snabbt.
5. När de är parade lyckas lysdioden på både 20T och 20R lysa fast (blinkar inte). Om endera enhetens LED-ring blinkar långsamt, indikerar detta att parningen misslyckades. Se till
att båda enheterna är fr ia från hinder och ligger inom 30 meter från varandra.
6. När alla ljud- och strömanslutningar har gjor ts slår du på förstärkaren eller aktiva högtalare.
Para ihop era DW 20R-enheter med en DW 20T
1. Anslut DW 20T och den f örsta DW 20R enligt beskrivningen i 'Komma igång' (håll var je PAIR-knapp i 4 sekunder).
2. På den andr a DW 20R-enheten, håll ned PAIR-knappen i 4 sekunder för att aktivera parning och låt den sedan söka i 30 sekunder. Parkopplingsf unktionen
avbryts ef ter 30 sekunder och lysdioden blinkar långsamt.
3. Tryck på DW 20T PAIR-knappen i 4 sekunder och tr yck sedan på den andra DW 20R-enhetens PAIR-knapp i 4 sekunder. Båda DW 20R- enheterna kommer nu att anslutas
till samma DW 20T.
4. Obs! Om du håller ned PAIR-knappen i 10 sekunder på DW 20T rensas minnet för anslutna DW 20R-enheter.
Pierwsze kroki
1. Podłącz wejścia DW 20T do oryginalnego źródła dź więku, takiego jak mik serlub odtwarzacz multimedialny, a następnie podłąc z wyjścia DW 20R do miejsca docelowego, takiego
jak mikser, wzmacniacz lub akty wny głośnik. Zostaw na raziewyłączony w zmacniacz lub głośnik i.
2. Podłącz zasilacze do każdego urząd zenia. Włączą się automat ycznie, a ich przyciski PAIR będą powoli migać, wskazując t ryb czuwania.
3. Naciśnij i przytrz ymaj przycisk PAIR na DW 20T przez 4 sekundy. Pierścień LED zacznie szybko migać, wskazując, że próbuje się sparować, i będzie kontynuowa ł próby przez
maksymalnie 30 sekund.
4. W ciągu 30 sekund od zainicjowania parowania DW 20T, również naciśnij i przy trzymaj prz ycisk PAIR na DW 20R przez 4 sekundy. Jego pierścień LED zacznie szybko migać.
5. Po pomyślnym sparowaniu pierścienie LED na obu 20T i 20R będą świecić w sposób c iągły (nie migać). Jeśli pier ścień LED któregokolwiek z urządzeń miga powoli, oznacza to, że
parowanie nie powiodło się. Upewnij się, że obie jednostk i są wolne od przeszkód i znajdują się w odleg łości do 30 metrów od siebie.
6. Po wykonaniu wszystkich połąc zeń audio i zasilania włącz wzmacniacz lub aktywne głośniki.
Parowanie wielu jednostek DW 20R z DW 20T
1. Połącz DW 20T i pierwsz y DW 20R zgodnie z opisem w rozdziale „Pierwsze kroki” (prz ytrzymaj każdy przycisk PAIR przez 4 sekundy).
2. Na drugim urządzeniu DW 20R prz ytrzymaj prz ycisk PAIR przez 4 sekundy, aby akt ywować parowanie, a następnie pozwól mu w yszukiwać przez 30 s ekund. Funkcja parowania
wygaśnie po 30 s ekundach, a dioda LED zacznie powoli migać .
3. Naciśnij przycisk DW 20T PAIR przez 4 sekundy, a następnie naciśnij prz ycisk PAIR drugiego urządzenia DW 20R przez 4 sekundy. Obie jednostki DW 20R zostaną teraz podłączone
do tego samego DW 20T.
4. Uwaga - przytrzymanie prz ycisku PAIR przez 10 sekund na DW 20T spowoduje w yczyszczenie p amięci podłączonych DW 20R.

10 AIR LINK DW 20R/DW 20T Quick Start Guide 11
Table for Filed Antenna:
1 Equipment has 2 group antennas, group 1 and group 2 are same type antenna, only dier in
brand model name. Only transmitter and Receiver spurious emissions recorded the test result for
two group antennas.
Specications
DW 20R DW 20T
Inputs
Connector s —
Impedance —
Max. input level — 10 dBu
Outputs
Connector s
Impedance
Max. output level 15 dB u —
Wireless
Channels 24
Transmission frequency 2.406 - 2.475 GHz
Wireless range Up to 30 m (100 ft)
Sensitivity -81 dBm @ 1% PER —
Transmission power — 12 dBm
System
Frequency response 20 Hz to 20 kHz (±1 dB)
THD + N (distor tion) 0.1% @ 1 kHz
Signal-to-noise ratio >90 dB
Power adaptor 12 V DC, 400 mA, ce nter positive
Physical
Dimensions (H x W x D)
Without bumpers or antenna 54 x 108 x 103 mm (2.1 x 4.3 x 4.1")
With bumpers, without antenna 63 x 118 x 112 mm (2.5 x 4.6 x 4.4")
With bumpers, upright antenna 212 x 118 x 126 mm (8.3 x 4.6 x 5.0")
Weight (incl. bumpers and antenna) 0.6 kg (1.3 lbs)
Balanced XLR,
unbalanced ¼"
240 Ω balanced ,
120 Ω unbalanced
Balanced XLR,
unbalanced ¼"
10 kΩ balance d,
15 kΩ unbalanced
—
—
Antenna Information
(EN)
below, specied as a dipole Yagi antenna, 50 Ω impedance and maximum gain of
5.0 dBi. End users should not change the antenna to a dierent type.
(ES)
enumeradas a continuación, especicadas como antena Yagi dipolo, impedancia
de 50 Ω y ganancia máxima de 5.0 dBi. Los usuarios nales no deben cambiar la
antena a un tipo diferente.
(FR)
énumérées ci-dessous, spéciées comme antenne dipôle Yagi, impédance de 50
Ω et gain maximum de 5,0 dBi. Les utilisateurs naux ne doivent pas changer
l'antenne pour un type diérent.
(DE)
aufgeführten Antennen zu bestehen, die als Dipol-Yagi-Antenne, 50 Ω Impedanz
und maximale Verstärkung von 5,0 dBi speziziert sind. Endbenutzer sollten die
Antenne nicht gegen einen anderen Typ austauschen.
(PT)
especicadas como uma antena dipolo Yagi, impedância de 50 Ω e ganho máximo
de 5,0 dBi. Os usuários nais não devem mudar a antena para um tipo diferente.
(IT)
elencate di seguito, specicate come antenna Yagi a dipolo, impedenza di 50 Ω
e guadagno massimo di 5,0 dBi. Gli utenti nali non devono cambiare l'antenna
con un tipo diverso.
The DW 20T has been designed to pass certication with the antennas listed
El DW 20T ha sido diseñado para pasar la certicación con las antenas
Le DW 20T a été conçu pour passer la certication avec les antennes
Der DW 20T wurde entwickelt, um die Zertizierung mit den unten
O DW 20T foi projetado para passar na cer ticação com as antenas listadas abaixo,
Il DW 20T è stato progettato per superare la certicazione con le antenne
De DW 20T is ontworpen om te voldoen aan de certicering met de
(NL)
onderstaande antennes, gespeciceerd als een dipool Yagi-antenne, 50 Ω
impedantie en maximale versterking van 5,0 dBi. Eindgebruikers mogen de
antenne niet veranderen in een ander type.
DW 20T har utformats för att klara certiering med antennerna nedan,
(SE)
specicerade som en dipol Yagi-antenn, 50 Ω impedans och maximal
förstärkning på 5,0 dBi. Slutanvändare bör inte byta antenn till en annan typ.
DW 20T został zaprojektowany, aby przejść cert ykację z antenami
(PL)
wymienionymi poniżej, określonymi jako dipolowa antena Yagi, o impedancji 50
Ω i maksymalnym wzmocnieniu 5,0 dBi. Użytkownicy końcowi nie powinni
zmieniać anteny na inny typ.
Group 1
Ant. Brand Model Name Antenna Type Connector Gain (dBi)
1
Zhigaoda 323032-25532-1R Dipole N/A 5
Group 2
Ant. Mic Brand Model Name Antenna Type Connector
Note:
1
AT-02-5-A80617H
1-190
Dipole
N/A 5
Gain
(dBi)

12 AIR LINK DW 20R/DW 20T Quick Start Guide 13
LEGAL DISCLAIMER
Music Tribe accepts no liability for any loss which
may be suered by any person who relies either
wholly or in part upon any description, photograph,
or statement containe d herein. Technical specic ations,
appearances and other information are subject
to change without notice. All trademarks are
the property of their respective owners. Midas,
Klark Teknik, Lab Gruppen, Lake, Tannoy,
Turbosound, TC Electronic, TC Helicon, Behringer,
Bugera, Oberheim, Auratone, Aston Microphones
and Coolaudio are trademarks or registered
trademarks of Music Tribe Global Brands Ltd.
© Music Tribe Global Brands Ltd. 2021
All rights reserved.
LIMITED WARRANTY
For the applicable warranty terms and conditions
and additional information regarding Music Tribe’s
Limited Warranty, please see complete details online
at musictribe.com/warranty.
NEGACIÓN LEGAL
Music Tribe no admite ningún tipo de responsabilidad
por cualquier daño o pérdida que pudiera sufrir
cualquier persona por conar total o parcialmente en
la descripciones, fotografías o armaciones contenidas
en este documento. Las especicaciones técnicas,
imágenes y otras informaciones contenidas en este
documento están sujetas a modicaciones sin previo
aviso. Todas las marcas comerciales que aparecen aquí
son propiedad de sus respectivos dueños. Midas,
Klark Teknik, Lab Gruppen, Lake, Tannoy, Turbosound,
TC Electronic, TC Helicon, Behringer, Bugera, Oberheim,
Auratone, Aston Microphones y Coolaudio son marcas
comerciales o marcas registradas de Music Tribe
Global Brands Ltd. © Music Tribe Global Brands Ltd.
2021 Reservados todos los derechos.
GARANTÍA LIMITADA
Si quiere conocer los detalles y condiciones
aplicables de la garantía así como información
adicional sobre la Garantía limitada de Music Tribe,
consulte online toda la información en la web
musictribe.com/warranty.
DÉNI LÉGAL
Music Tribe ne peut être tenu pour responsable
pour toute perte pouvant être subie par toute
personne se ant en partie ou en totalité à toute
description, photographie ou armation contenue
dans ce document. Les caractéristiques, l’apparence
et d’autres informations peuvent faire l’objet de
modications sans notication. Toutes les marques
appartiennent à leurs propriétaires respectifs.
Midas, Klark Teknik, Lab Gruppen, Lake, Tannoy,
Turbosound, TC Electronic, TC Helicon, Behringer,
Bugera, Oberheim, Auratone, Aston Microphones et
Coolaudio sont des marques ou marques déposées
de Music Tribe Global Brands Ltd. © Music Tribe
Global Brands Ltd. 2021 Tous droits réservés.
GARANTIE LIMITÉE
Pour connaître les termes et conditions de garantie
applicables, ainsi que les informations supplémentaires
et détaillées sur la Garantie Limitée de Music Tribe,
consultez le site Internet music tribe.com/warranty.
HAFTUNGSAUSSCHLUSS
Music Tribe übernimmt keine Haftung für Verluste,
die Personen entstanden sind, die sich ganz oder
teilweise auf hier enthaltene Beschreibungen, Fotos
oder Aussagen verlassen haben. Technische Daten,
Erscheinungsbild und andere Informationen können
ohne vorherige Ankündigung geändert werden. Alle
Warenzeichen sind Eigentum der jeweiligen Inhaber.
Midas, Klark Teknik, Lab Gruppen, Lake, Tannoy,
Turbosound, TC Electronic, TC Helicon, Behringer,
Bugera, Oberheim, Auratone, Aston Microphones
und Coolaudio sind Warenzeichen oder eingetragene
Warenzeichen der Music Tribe Global Brands Ltd.
© Music Tribe Global Brands Ltd. 2021
Alle Rechte vorbehalten.
BESCHRÄNKTE GARANTIE
Die geltenden Garantiebedingungen und zusätzliche
Informationen bezüglich der von Music Tribe
gewährten beschränkten Garantie nden Sie online
unter musictribe.com/warranty.
LEGAL RENUNCIANTE
O Music Tribe não se responsabiliza por perda
alguma que possa ser sofrida por qualquer pessoa
que dependa, seja de maneira completa ou parcial,
de qualquer descrição, fotograa, ou declaração
aqui contidas. Dados técnicos, aparências e outras
informações estão sujeitas a modicações sem aviso
prévio. Todas as marcas são propriedade de seus
respectivos donos. Midas, Klark Teknik, Lab Gruppen,
Lake, Tannoy, Turbosound, TC Electronic, TC Helicon,
Behringer, Bugera, Oberheim, Auratone,
Aston Microphones e Coolaudio são marcas ou
marcas registradas do Music Tribe Global Brands Ltd.
© Music Tribe Global Brands Ltd. 2021 Todos
direitos reservados.
GARANTIA LIMITADA
Para obter os termos de garantia aplicáveis e
condições e informações adicionais a respeito da
garantia limitada do Music Tribe, favor vericar
detalhes na íntegra através do website
musictribe.com/warranty.
DISCLAIMER LEGALE
Music Tribe non si assume alcuna responsabilità
per eventuali danni che possono essere subiti da
chiunque si adi in tutto o in parte a qualsiasi
descrizione, fotograa o dichiarazione contenuta
qui. Speciche tecniche, aspetti e altre informazioni
sono soggette a modiche senza preavviso. Tutti
i marchi sono di proprietà dei rispettivi titolari.
Midas, Klark Teknik, Lab Gruppen, Lake, Tannoy,
Turbosound, TC Electronic, TC Helicon, Behringer,
Bugera, Oberheim, Auratone, Aston Microphones
e Coolaudio sono marchi o marchi registrati
di Music Tribe Global Brands Ltd. © Music Tribe
Global Brands Ltd. 2021 Tutti i diritti riservati.
GARANZIA LIMITATA
Per i termini e le condizioni di garanzia applicabili
e le informazioni aggiuntive relative alla garanzia
limitata di Music Tribe, consultare online i det tagli
completi su musictribe.com/warranty.
WETTELIJKE ONTKENNING
Music Tribe aanvaardt geen aansprakelijkheid
voor enig verlies dat kan worden geleden door
een persoon die geheel of gedeeltelijk vertrouwt
op enige beschrijving, foto of verklaring hierin.
Technische specicaties, verschijningen en
andere informatie kunnen zonder voorafgaande
kennisgeving worden gewijzigd. Alle handelsmerken
zijn eigendom van hun respectievelijke eigenaren.
Midas, Klark Teknik, Lab Gruppen, Lake, Tannoy,
Turbosound, TC Electronic, TC Helicon, Behringer,
Bugera, Oberheim, Auratone, Aston Microphones
en Coolaudio zijn handelsmerken of gedeponeerde
handelsmerken van Music Tribe Global Brands Ltd.
© Music Tribe Global Brands Ltd. 2021
Alle rechten voorbehouden.
BEPERKTE GARANTIE
Voor de toepasselijke garantievoorwaarden en
aanvullende informatie met betrekking tot de
beperkte garantie van Music Tribe, zie de volledige
details online op musictribe.com/warranty.
FRISKRIVNINGSKLAUSUL
Music Tribe tar inget ansvar för någ on förlust som kan
drabbas av någon person som helt eller delvis f örlitar
sig på någon beskriv ning, fotogra eller uttalande som
nns här. Tekniska specikationer, utseenden och annan
information kan ändras utan föregående meddelande.
Alla varumärken tillhör respek tive ägare. Midas,
Klark Teknik, Lab Gruppen, Lake, Tannoy, Turbosound,
TC Electronic, TC Helicon, Behringer, Bugera, Oberheim,
Auratone, Aston Microphones och Coolaudio är
varumärken eller registrerade varumärken som tillhör
Music Tribe Global Brands Ltd. © Music Tribe Global
Brands Ltd. 2021 Alla Rättigheter reser verade.
BEGRÄNSAD GARANTI
För tillämpliga garantivillkor och ytterligare
information om Music Tribes begränsade garanti,
se fullständig information online på
musictribe.com/warranty.
ZASTRZEŻENIA PRAWNE
Music Tribe nie ponosi odpowiedzialności za
jakiekolwiek straty, które mogą ponieść osoby,
które polegają w całości lub w części na
jakimkolwiek opisie, fotograi lub oświadczeniu
zawartym w niniejszym dokumencie. Specykacje
techniczne, wygląd i inne informacje mogą ulec
zmianie bez powiadomienia. Wszystkie znaki
towarowe są własnością ich odpowiednich
właścicieli. Midas, Klark Teknik, Lab Gruppen,
Lake, Tannoy, Turbosound, TC Electronic,
TC Helicon, Behringer, Bugera, Oberheim, Auratone,
Aston Microphones i Coolaudio są znakami
towarowymi lub zastrzeżonymi znakami
towarowymi rmy Music Tribe Global Brands Ltd.
© Music Tribe Global Brands Ltd. 2021
Wszystkie prawa zastrzeżone.
OGRANICZONA GWARANCJA
Aby zapoznać się z obowiązującymi warunkami
gwarancji i dodatkowymi informacjami dotyczącymi
ograniczonej gwarancji Music Tribe, zapoznaj się
ze wszystkimi szczegółami w trybie online pod
adresem musictribe.com/warranty.

14 AIR LINK DW 20R/DW 20T Quick Start Guide 15
FEDERAL COMMUNICATIONS COMMISSION
COMPLIANCE INFORMATION
Klark Teknik
AIR LINK DW 20R/DW 20T
Responsible Party Name: Music Tribe Commercial NV Inc.
Address: 5270 Procyon Street,
Las Vegas NV 89118,
United States
Phone Number: +1 702 800 8290
FCC ID: QWHDW20R, QWHDW20T
AIR LINK DW 20R/DW 20T
This equipment has been tested and found to comply with the limits for a Class B digital device, pursuant to part
15 of the FCC Rules. These limits are designed to provide reasonable protection against harmful interference in a
residential installation. This equipment generates, uses and can radiate radio frequency energy and, if not installed
and used in accordance with the instructions, may cause harmful interference to radio communications. However,
there is no guarantee that interference will not occur in a particular installation. If this equipment does cause
harmful interference to radio or television reception, which can be determined by turning the equipment o
and on, the user is encouraged to try to correct the interference by one or more of the following measures:
• • Reorient or relocate the receiving antenna.
• • Increase the separation between the equipment and receiver.
• • Connect the equipment into an outlet on a circuit dierent from that to which the receiver is connec ted.
• • Consult the dealer or an experienced radio/TV technician for help.
This device complies with Part 15 of the FCC rules. Operation is subject to the following two conditions:
(1) this device may not cause harmful interference, and
(2) this device must accept any interference received, including interference that may cause undesired operation.
Important information:
Changes or modications to the equipment not expressly approved by Music Tribe can void the user’s authority
to use the equipment.
Operation Ambient Temperature up to 45°.
Caution!
The manufacturer is not responsible for any radio or TV inter ference caused by unauthorized modication
to this equipment. Such modications could void the user authority to operate the equipment.
FCC RF Radiation Exposure Statement:
1. This Transmitter must not be co-located or operating in conjunction with any other antenna or transmitter.
2. This equipment complies with FCC RF radiation exposure limits set forth for an uncontrolled environment.
This equipment should be installed and operated with minimum distance of 20 centimeters between
the radiator and your body.
Hereby, Music Tribe declares that this product is in compliance with Directive 2014/53/EU, Directive 2014/30/EU,
Directive 2014/35/EU, Directive 2011/65/EU
and Amendment 2015/863/EU, Directive 2012/19/EU, Regulation 519/2012
REACH SVHC and Direc tive 1907/2006/EC.
Full text of EU DoC is available at https://community.musictribe.com/
EU Representative: Music Tribe Brands DK A/S
Address: Ib Spang Olsens Gade 17, DK - 8200 Aarhus N, Denmark

 Loading...