


HD DASH CAMERA
User Manual
All trad emar ks are ac knowl edged as the pro per ty of the ir resp ectiv e owner s.
Unles s other wise s tated th eir use d oes not i mply th at the tra demar k owner is
aliate d with Ki tvis ion or en dorse s the prod ucts he rein.
Please recycle this packaging responsibly.
JB. 4714 / Made in Chin a. © Kitvision 2016. Chri stchurch, Dorset, BH23 4FL, UK
1 1
Box contents
• Kitvision Observe r Dash Camera
• 8 GB memor y card
• Carry pouch
• In-car charger with USB port
• Window suction mount
• User manual
91410
MIC RESET
USB
REC
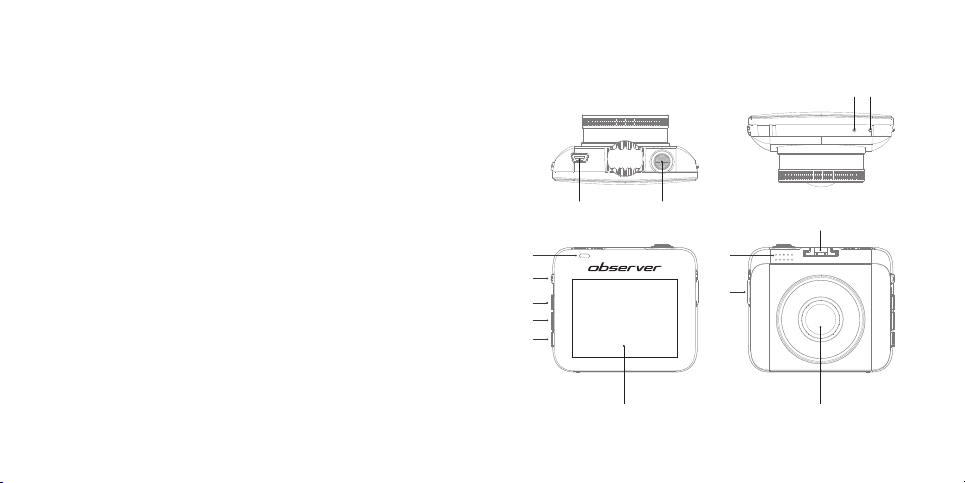
Functions
1. Micro USB input
2. LCD screen
3. LED indicator
4. Power on/o
5. Up (Toggle microphone on/
o during recording)
6. Menu button
7. Down (Save vide o loop
8. Record star t/stop/OK
9. Microphone
1 0 . R es et
11. Speaker
12. Micro SD card input
13. Camera lens
14. Window suction
mount socket
1
3 11
4
5
6
7
8
12
during recording)
2 13
2 3

Instructions for use
Warning
For your safety and the safety of others around you, the menu
and setting choices of the camera must not be used whilst
operating a vehicle.
The camera will be setup and ready to use with the optimum
settings for most situations. The camera will switch on and start
recording when the power is connected and switch o when the
power is disconnected. During this time it will record on a loop of
3 minutes and will only save the video clip to the SD card when the
following happens.
• If you press the Power on/o button (4) once whilst recording
• There is an accident signicant enough to trigger the built-in
G sensor
• The camera is turned o whilst recording
Note: you will see a key icon in the top left of the screen to indicate
the video clip has been s aved.
Setting up the camera
1. Inser t a micro SD card into the Micro SD card input (12) and
connect the camera to your car’s 12 V/24 V cigarette lighter
using the included car charger USB cable with the other end
plugged into the Micro USB input (1).
2. If required, assemble the suction mount by loosening the nut
on the mount. Do not remove it entirely; instead, rmly push the
ball joint adaptor into the socket, and then screw the bolt back
to tighten.
3. Ax the camera to the windscreen using the now assemble d
suction mount, being careful not to obstruct your view of the road.
4. When car ignition is turned on, the camera will automatically
start recording. When the car power is turned o the camera
will automatically turn o and the chosen length of video will be
saved to the micro SD card. (default set ting 3 minutes)
4 5
[continue d...]

[...con tin ue d] Set ting up the came ra
Note: the camera will only operate when connected to power using
the USB cable included.
Note: in some vehicles, if you already have the car running when you
plug the camera in then it may not start. You will need to turn o the
ignition of your car and turn it back on again to start the camera.
• To stop/start the video recording whilst you are driving, press the
Record start /stop/OK button (8)
• When the camera is recording in the ‘Loop function’ and the micro
SD card is full, the camera will overwr ite previous recordings
• You can press and hold the Power on/o button (4) to switch the
unit o manually whilst the car power is on
Changing the mode of the camera
There are three modes of the camera: video recording, still photo
capture, and playback le viewer. To change mode, press and hold
the Menu bu tton (6) to cycle through the modes. The icon in the top
left hand corner of the LCD screen (2) will change to show the
chosen mode:
Video Mode For reco rding vi deo clips
Photo Mod e For taki ng still photos
Video Playbac k Viewing recor ded vid eos
6 7
[continue d...]

[...con tin ue d] Changing the mode of the camera
• When the camera is set to video recording mode you can manually
start or stop the recording by pressing the Record star t/stop
button (8) on the top of the camera
• When recording, the timer in the top right corner of the LCD
screen (2) will be red and a red circle is visible on the top lef t.
Menu and settings
With the camera powered, you enter the menu by pressing the
Menu but ton (6).
• The menu can then be navigated using the Up (5) and Down (7)
buttons, using the Record star t/stop/OK button (8) to conrm
any sele ctions, and the Menu button (6) to go back a step.
As default, the came ra will be gin recording automatically when
it is connected to power through the USB cable, unless there is
no micro SD card inserted into the camera
• When in still capture mode, it will allow you to press the Record
start/stop but ton (8) at any time to capture a 12 megapixel
photograph
• When in playback le viewer mode, press the Up (5) and Down (7)
buttons to choose a video clip, and the Record star t/stop button (8)
to view the selecte d video. You can delete the selected clip by
pressing the Menu button (6) and choosing the delete option by
pressing the Record star t/stop button (8)
8 9

Video mode settings
Setting Information
Resolution
Loop recording
Exposure
10 11
1080i oer s highe r detail, the 720p oer s
smoother video.
[1080i] / [720p]
The cam era wil l only save 1 video l e per journey,
saving signicant sp ace on the m icro SD ca rd. If the
G Senso r featur e is enab led you w ill noti ce a key logo
appea rs on the LCD sc reen (2) wh en there i s any
signi cant i mpact /jol t to the vide o. The cam era wil l
save this le unde r a diere nt name, an d the reco rding
will be p rotected from the l oop recordin g feature.
[1 min] / [3 min] / [5 min]
The expo sure val ue can be raised or lowered to
increase or decrease the brightness levels of the
recordings.
[+0.0] / [-1/3] / [-2/3] / [-1.0] / [-4/3] / [-5/3] / [-2.0] /
[+2.0] / [+5/3] / [+4/3] / [+1.0] / [+2/3] / [+1/3]
Motion detection
Record audio
Date stamp
G Sensor
Turn this feature on to us e the das h came ra as a
secur ity de vice. W hen tur ned on th e came ra will s tart
record ing as soon as it d etects a ny motio n and for
10 seconds after the motion ha s nish ed.
Activate or disable the microphone
[On] / [O ]
When on, th e came ra will im print th e date and ti me
on to the video le so it is v isibl e when pl ayed bac k,
provid ing a sec ure way of pr oviding date an d time
evide nce. Whe n o, the came ra will s ave the date an d
time into th e inform ation l e of the recording.
[On] / [O ]
When on t he camera wil l automatically ‘protec t’ the
curre nt recor ding in th e event of a sig nica nt impact.
You can choo se how strong the impact mu st be
before th e feature is active. 2G is the most se nsiti ve
setting. You may nee d to adjust this to sui t your st yle
of driving or the road conditions.
[O] / [2G] / [4G] / [8G]

Photo mode settings
Setting Information
Resolution
Sequence
Quality
Sharpness
White balance
12 13
Chang e the size of the imag e depe nding o n use
intend ed. 12 megapi xel is the best quality an d is the
large st les size; VGA is the lo west qua lity a nd is the
small est le si ze.
[12M] / [10M] / [8M] / [5M] / [3M] / [2M] / [1.3M] / [VGA]
When on, th e came ra will ta ke 3 photogr aphs in qu ick
succe ssio n after a s ingle p ress of t he Reco rd star t/
stop/OK bu tton (8).
[On] / [O ]
Adjust the photo det ail and le sizes.
[Fine] / [N orma l] / [Econ omy]
Adjust t he shar pnes s of the images.
[Strong ] / [Norma l] / [Sof t]
When on the camera will correct colours under
dierent lighting conditions.
[Auto] / [Day light] / [Cl oudy] / [Incand esce nt] /
[Fluorescent]
ISO
Exposure
Stabilisation
Quick review
Date/time stamp
Highe r ISO setti ngs woul d be used in dar ker situ ations .
[Auto] / [100] / [200]
The expo sure val ue can be raised or lowered to
incre ase or de creas e the brightne ss of the p hotos.
[+0.0] / [-1/3] / [-2/3] / [-1.0] / [-4/3] / [-5/3] / [-2.0] /
[+2.0] / [+5/3] / [+4/3] / [+1.0] / [+2/3] / [+1/3]
The sta bilis er will try to co mpens ate for unw anted
motion blur.
[On] / [O ]
Choos e a lengt h of time fo r your photograp h to displ ay
on the LCD scre en after it has be en taken.
[2Seconds] / [5Seconds]
When on, th e came ra will im print th e date and ti me
on to the video le so it is v isibl e when pl ayed bac k,
provid ing a sec ure way of pr oviding date an d time
evide nce. Whe n o, the came ra will s ave the date
and time i nto the info rmation le of the re cordi ng.
[O] / [D ate] / [Date/ Time]

Playback mode settings
You can use the Delete option to delete the current image displayed
in the background or de lete all of the images on the micro SD card.
Setting Information
Date/time
Screen saver
Beep sound
Language
Date, time a nd forma ts can be adjusted.
Selec t the amount of time be fore the LCD tu rns o.
The camera wi ll conti nue to record.
[O] / [3 Mi nutes] / [5 Mi nutes] / [10 Minute s]
Turns on or o the aud io bee p soun d upon
key presses.
[On] / [O ]
Choose your language.
[Engli sh] / [Span ish] / [Chi nese Traditional]
Frequency
Format
Default setting
Version
Typicall y UK/ Europe wo uld be 50 Hz, wh ereas
America woul d typi cally b e 60 Hz.
[50Hz] / [60 Hz]
Use this o ption to fo rmat your memo ry ca rd.
Format ting th e memor y card is recomm ende d for rst
use in the camer a. Plea se note tha t formatting w ill
erase a ll previous data from th e card.
Choos e OK to reset the menu opti ons bac k to their
original defaults.
View the s oftware vers ion on the c amera .
File download
To download the les to a compute r, simply remove the micro SD
card from the camera’s Micro SD card input (12) and plug it into a
laptop, computer, or tablet card reader. Video and photo les should
be available to view on most media playback software.
14 15

Care for your Observer Dash Camera
Please don’t:
• Drop or throw the Observer Dash Camera
• Subject the Obser ver Dash Camera to strong magnetic elds
• Dismantle the Observer Dash Camera
• Get the Observer Dash Camera wet
• Drop the Observer Dash Camera as this will invalidate your warranty
• Open up the Observer Dash Camera. There are no user
serviceable parts inside
• Expose the Observer Dash Camera to extreme temperatures
or rapid changes of hot to cold or vice versa
16 17
Specication
Video resolutions (.MOV) 1280 x 720 @ 30fps
Photo ima ge 12 MP JPEG
Video Format AVI
G-Sensor Yes
Motion detection Yes
Microphone Yes
Display 2.4" TFT LCD
Storage Micro SD c ard up to 32 GB (Re comme nd class
Batter y Bui lt-in rech arge able 3.7 V 95 mAh Li-Po ly
Power consumption 250 mA
Operating conditions –10 to 60 degrees
Input/output Micro USB port
Dimensions (mm) H67 x W58 x D34
Weight 60 g +/– 5g
Accessories W indow su ction mount, cha rger, USB
1920 x 1080i @ 30fps
4 speed and 8 GB or above i n size)
connection cable, user manual

Troubleshooting
Please insert SD
Card/Card error
Blank screen/no
response
Check th e micro SD c ard compatibi lity, as we
recom mend for matting a micro SD card for use
only in the came ra.
Check your power supply connection. Without power
there wi ll be no LED in dicato r (3), or the LCD scre en (2)
will not o perate f or ver y long. Try a new connectio n
with the car charg er and wi th a PC USB con necti on,
and then try hol ding the Power on/o button (4) to see
if the Obs erve r dash ca mera pow ers up and operate s
correctly again.
Pleas e do not attempt to open this p roduct. There a re no use r servicea ble
part s inside, in part icula r if your pro duct ha s an embe dded, no n-rep lacea ble
batter y, do not atte mpt to acce ss or remove the battery as th is may cau se
perso nal inj ury a nd will d amage t he prod uct.
Makin g any attempt to ope n the pro duct or c arr y out rep air voi ds any an d
all warranties
We hope you’ve now got all the infor mation you need to get started,
but if you’re having problems with anything, please feel free to
contact us at: support@kitvision.co.uk or visit www.kitvision.co.uk
We apologise for any inconvenience caused by minor inconsistencies in
these in struc tions, which may o ccur as a re sult of pro duct im provem ent
18 19
and development.
 Loading...