

Page 1

kitvision.co.uk
Product s showing the “Cros sed Through” whe elie bin symbol m ust be recycled se parately from ho usehold waste at th e
end of thei r useful life. Ple ase DO NOT dispose of t his appliance i n normal househ old waste. Your local ap pliance retai ler
may opera te a “take-back” s cheme when you ar e ready to purchase a r eplacement pr oduct, alternati vely contact you r
local go vernment autho rity for furt her help and advi ce on where to take you r appliance for re cycling.
All trad emarks a re acknowledg ed as the proper ty of their respe ctive owners. Unl ess otherwis e stated their use d oes not
imply tha t the trade mark own er is alia ted with Ki tvisi on or endorses the pr oducts h erein.
Please recycle this packaging responsibly.
ACTION CAMERA | 4K
USER MANUAL
© Kitvi sion is a tradema rk of Kondor Limite d, 2018. Christc hurch, Dorset, BH 23 4FL, UK
JB. 6402-a/KVVEN4KW/REG00/Made in China.
Page 2

Please read this manual carefully before use.
Warning
You are advised to test the waterproof cas e empty by subme rging i t in water to ensure th at it
does not malfunction.
You must ensure there a re no fore ign objects around th e rubber seal or conn ectin g terminals
on the waterproof c ase. It is easy for s and or dust to bec ome stuck afte r opening the c ase
which may resul t in the im pairment of the waterproof per form ance.
Be extre mely c arefu l since it may result in ma lfunction. If foreig n objects adhere to the in ner
side of the side door, wipe them o with a dry, lint-free cloth. If any li quid adheres to the
camer a or inner side of the si de door, wipe o with a soft dry cloth. Do not ope n or close the
side door near the water, when under water, using wet han ds, or when the ca mera is wet, as
this may cause wate r leakage.
Main features
• 4K video at 30 fps
• 16 Meg apixel photo mode
• Wate rproof up to 30 m
Box contents
• Venture 4K Acti on Camera
• 30 m waterproof case
• Rechargeable battery
• Camera clip
• 2 x Adhesive mounts
• Security leash
• Right angle adaptor
• Micro USB c able
• Bicycle mount
• 2 x Ad hesive pads
• Micro bre lens cloth
• Vented helm et strap
• User manual
• Tripo d adaptor (male)
• Tripo d adaptor (femal e)
• E xtended right angle adaptor
• Raised camera clip
• Straight adaptor
• 4 x cable ties
32
Page 3
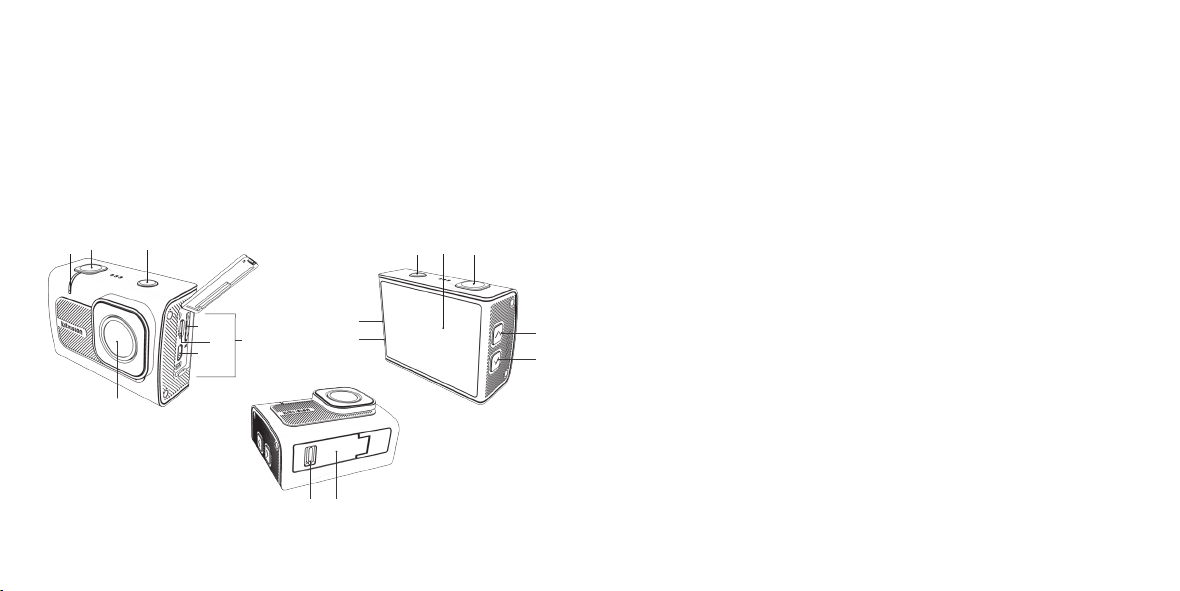
Functions
1. Lens
2. Wi-Fi/Function Indicator
3. Output/Charging Panel
4. Up
5. Down
6. Battery Door Latch
7. Battery Door
8. Power Indicator
11 12
2
9. Charging Indicator
10. Touch Screen
11. Shu tt er/O K
12. Power/Mode
13. Micro SD Card Slot
14. Micro HDMI Output
15. Micro USB Port
Instructions
Turning the power on/o
Long pre ss Power/Mode (12) to turn on /o the camera.
Battery
The camera has a built-in recha rgeable Lithium-i on battery. Please ful ly charge the batter y
before use.
1. Conne ct the US B cable to the camera and the other end to a power source
2. Charging Indicator (9) is red whilst charging
10
1112
3. The Charging Indicator (9) will turn o to indic ate a full ch arge wh en connected to a
charging point
Note: The camera body may b e warm af ter ex tended use. This is nor mal.
Open the Battery door (7) and pull the battery tab to remove the rechargeab le battery.
13
3
15
14
8
9
4
5
Memor y card
The Kitvision Action Camera doe sn’t have any intern al memory. To be able to record video or
capture photos using the c amera, you must have your micro SD card inserted
(minimum Class 10 recommended, 128 GB max. Not in cluded).
1
1. Ensure th e camera is turned o
2. Open the Output/Charging Panel (3)
3. Inser t your memor y card into the Mic ro SD Card S lot (13)
4. You may need to format you r SD card w hen inserted into the c amera; you can d o this from
the Settings menu
6 7
54
Page 4

Camera Modes
Press Powe r/Mode (12) to cycle th rough modes.
1. Once powered on, press Power/M ode (12) quickly once to ski p to the next mode.
The cor responding icon will display in the top lef t of the screen to indicate th e sele cted mode.
Video Mode Record video c lips
Photo Mode Take still photos
Playback Mode View photos and videos
Settings Change settings
Video mode
The camera will star t in Video Mode. Press Shutter/OK (11) to start /stop rec ordin g.
When recording the Touch Scre en (10) will show a ashing re d video dot next to the video ic on
in the top left-hand corn er and will dis play how l ong it has been record ing for in the top
right-hand cor ner of the Touch Screen (10).
There are 3 preset vide o options available in V ideo M ode: Loop, Lapse, & Slow Motion.
Tap the centra l bottom of the Touch Screen (10) to access the shortcu ts to these option s.
Note: The camera w ill stop recording and s ave autom atically when the memory remaining or
batter y power is empt y.
Audio
Using th e camera with th e waterp roof case will re cord less aud ible sound. For b est audio
quality, use without the case, and make sure it doe s not get wet.
Photo Mode
1. Turn on the camera and press Power/Mode (12) once to selec t Photo Mod e
2. Press Shutter/Ok (11) to take a photo
There are 3 preset options available in Photo Mode: Timer, Auto & Burst. Tap the central
bottom of the Touch Scre en (10) to access the shortcut to these options.
Playback Mode
1. Press Power/Mode (12) to cycle to Pl ayback Mode. (Alternatively, you can press the
playback icon in the bottom left corner of the Touch Screen.)
2. Use Up (4) and Dow n (5) to navigate through your les or alter native ly use the Touch f unction
by swipin g swipe left to access the nex t saved item or right to acces s the previous le
3. When vi ewing a v ideo, press Shutter/OK (11) to play and pause, or alternatively, press the
play ico n displayed in the middle of the Touch Screen (10)
76
Page 5

Deleting les
1. To delete les, press the bin icon di splaye d in the bot tom right of the Touch Screen (10), and
then tap “C onrm”.
2. Press the anti-clockwise arrow icon in the bottom left of the Touch Screen (10) or the
Power/Mod e (12) button to retur n to the prev ious record screen.
WARNING: Selecting delete perman ently delete s the le s.
Settings
1. Press th e Set Up ic on in the b ottom right of the Touch Scree n (10)
2. Select either mode menu o r main camera settin gs menu by press ing the relevant icon on
the lef t hand side of the Touch Screen (10)
3. Use Up (4) and Down (5) to navigate
4. Use Shu tter/OK (11) to enter a sub-menu for the h ighli ghted setting and Up (4) and Down (5)
to navigate through the options
5. Press Sh utter/OK (11) to select the highlighted o ption
Settings and features explained
Main Camera Settings
Exposure
In-Housing Mode
White Balance
This fu nctio n will change how light o r dark your media will
appear [+3]/[+2]/[+1]/[+0]/[-1]/[-2]/[-3]
Enable the in-h ousin g mode by selecting thi s option – allows
for easier men u control when e nabled (Follow on screen
instructions when activated). [On]/[Close]
Selec t this fu nctio n to change the white bala nce of your
camera. [Auto]/[Sunny]/[Cloudy]/[Incandescent]/[Fluorescent]
Image Rotation
Driving Mode
Frequency
LED Indi cator Light
Auto Screensaver
Auto Shutdown
Time Watermark
Boot Guide
Language
Da te -T im e
Format
Enable image rotation by selecting this option. Images will be
rotated by 180 de grees.
Enable the driving mo de (loop reco rd func tion) by se lecting
this opti on. The footage w ill auto matically be set to loop every
2 minutes.
Changes the T V output between 50Hz (PAL) and 60Hz (NTSC)
[50Hz]/[60Hz]/[Auto]
Enable or disable the LED indicator light by selecting
this option.
This fu nctio n can be used to turn the display o af ter a
speci ed tim e frame of inactivit y [Close]/[10 s]/[20 s]/[30 s]
This fu nctio n can be used to powe r o afte r a specied time of
inactivity [1 min]/[3 min]/[5 min]/[Close]
This fu nctio n can be used to add a v isibl e time and date sta mp
to the media les. Please note you must also manual ly set this
using the “Date/Time” setting [OFF]/[ON]
Quick g uide on how to use you r came ra
Change the lan guage of the camera [English] /[Simplie d
Chinese]/[Traditional Chinese]/[Japanese]/[Russian]/[German]/
[Korean]/[French]/[Italian]/[Polish]/[Spanish]/[Dutch]/
[Portuguese]/[Thai]
Change the date/ time on the camera. Use U p 11) and Down
(12) to alter the number and Shutter/OK (1) to proceed to the
next option. [Year/Month/Day/Hour/Minute]
Format d eletes all the data on the SD card an d ensures the SD
card is setup cor rectl y for this camer a. CAUTION: THIS WILL
DELET E ALL DATA AND MEDIA [Cancel]/[Conrmation]
98
Page 6

Settings and features explained
Reset to Factor y
Firmware Version
This fu nctio n can be used to reset the camera back to its
defaul t factor y settings. T his will not delete any me dia
[Cancel]/[Conrmation]
Selec t this option to view your model num ber and rmware
version. Press Power/Mod e (12) to exit this screen.
Video Settings
Video resolution
Recording Sound
Time Lapse
Loop Recording
Slow Motion
Change the resolution when i n Vide o Mode. Higher resolutions
will record in better qu alit y but will take up more mem ory
[4K @ 30fps] /[2.7k @ 30fps] /[1080p @ 60fps]/[1080p @ 30fps]/
[720p @ 120fps]/[720 @ 60 fps]/[720p @ 30 fps]
This fu nctio n can be used to mute the microphon e [OFF]/[ON]
Create a Time Lapse video by combining one fra me from each
[Close], [0.5s], [1s], [2s], [5s], [10s], [30s], [1min] interval
This fu nctio n can be used to break up video le s. When this
option is turne d on and th e came ra is rec ording, a video will
automaticall y be split into smaller les based on the chose n
time frame [Close]/[2Min]/[3Min]/[5Min]
Selec t this fu nctio n to record videos in slow motion. Ava ilable
resolutions are [1080p @ 60 fp s]/[720 p @ 120 fps]
1110
Page 7

Settings and features explained
Photo Settings
Photo Resolution
Timer
Auto
Burst
Change the resolution when i n Photo Mode. High er reso lutions
will take better quality images but will take up more memor y
[2MP]/[5MP]/[8MP]/[12MP]/[16MP]
Selec t this fu nctio n to enable a countdown tim er for your
photos. [Close]/[3s]/[5s] /[10s]/[20s]
Selec t this fu nctio n to enable automated photos with a
countdown timer betwe en each shot [Close]/[3s]/[10s]/[15s]/
[20s]/[30s]
Selec t this fu nctio n to enable a burst of photos in one sec ond.
The number of photos taken in one se cond can be the
following: [3]/[5]/[10]/[Close]
Using Wi-Fi
With the Venture’s 4K’s built-in W i-Fi, you can use your sma rt device as a c amera remote,
viewnder, and download les to yo ur phone.
Download the Wi-Fi App
Instal l the “XDV” App from the Apple App Store™ or Goo gle Play Store™.
Pairing camera to Wi-Fi device & App
1. Press Up (4).
2. The Touch Screen (10) will displ ay the Wi-Fi connection deta ils inc luding SSID and
Wi-Fi password.
3. Open the Wi-Fi settings on your device, searc h for cam era’s SSID (displayed on the ca mera)
and sel ect, the n enter the password displayed on your camera to proceed.
4. Once connected, keep the Wi-Fi connection details screen open on the camera.
5. Open the “XDV” a pplication o n your device; the app hom e scree n will open.
6. Press the green c amera icon to connec t to camera.
Additional connections
Connecting the camera to a HDT V
1. Conne ct the mi cro HDMI end of a micro HDMI to H DMI cable (not in cluded) to the camera’s
Micro HD MI Outp ut (14), and the other end to the HDT V’s HDMI po rt.
2. Turn on the HDT V and select the appropriate HDMI source.
3. Follow the above Play back Mode instr uctions for playing bac k les.
4. When viewing is nished, turn o th e camera and HDT V before re moving the HDMI cable.
Note: The screen will mirror the information on the camera screen.
1312
Page 8

Connecting to a PC
There a re two ways to do this:
• In serting the micro SD i nto a card re ader.
• Connec ting to a co mputer using the supplied mi cro USB cable.
1. Conne ct the US B cable to the camera’s Micro USB port (15) and to the PC and turn the
camera on.
2. Open [My Computer] or [Windows E xplorer®] on your PC. “Removable Disk” wil l be in the
drive li st. Double-c lick th e “Removable Disk” icon to view its contents.
Waterproof case
The Venture Action Came ra includes a c ase that is waterproof up to 30 metres.
1. Open by rst movin g the unlo ck mechanism to the right a nd then li ft the case
catch upwards.
2. Inse rt the c amer a corre ctly so that the case closes easily an d provides a tight seal.
3. Snap the top clip shut to ensure the case is wate rproof.
4. To operate the c amera, use the waterproof case’s external spring buttons
Specication
Display
Viewing Angle
Wi-Fi enabled
Video resolution
Video format
Photo resolution
Storage
Photo modes
Frequency
USB interfac e
Battery
Compatibility
Waterproof case
Dimensions (mm)
Weight
1.8” Touchscreen
170 ° ultra-wide angle le ns
Yes
4k @ 30 fps/2.7k @ 30 fps/1080p @ 60 fps/1080p @ 3 0 fps/
720p @ 120 fps/720p @ 60 fps/720p @ 30 fps
.MOV
2MP/ 5M P/8 MP/ 12MP/16M P
TF Supported (Up to 64 GB)
Single shot/Timer/Time lapse/Burst
50 Hz/60 Hz
USB 2.0
Li-ion, 900 mA h
Windows XP®/Vista/ Windows 7®/Windows 8/Windows 10/Mac OS™
Up to 30 m
H46 x W61 x D28
70 g
1514
Page 9

Troubleshooting
No power Remove th e battery and SD card from the camera a nd wait for
ve minu tes. Insert th e batte ry, leave th e came ra o and charge
the camera for 1 hour. Then turn the camera on while still
conne cted to the p ower source.
No SD card Check that there is a comp atible and formatted SD card in the
camer a’s Micro SD card slot (13).
SD card error Save les you want to keep onto a PC and then format th e SD
card. (Fo rmatting will perm anently del ete all l es on the S D card.)
Camera won’t turn on Check the batte ry is i nstal led correctly with th e Batte ry door (7)
closed and the Batter y Door Latch (6) secure. Charge the camera
using a mains power adaptor.
Blurry photos Ensure that you always hol d the camera sti ll or use a tripod (not
included) whilst taking still photos.
We hope you’ve n ow got all the infor matio n you nee d to get sta rted, but if you’re having
proble ms with anyth ing, please feel free to contac t us at: [email protected] or visi t
www.kitvision.co.uk
Care for your Venture 4K Action Camera
Please DON’T
• Get the camera wet, unless seale d in the in cluded waterproof ca se
• Drop the ca mera as this will invalidate you r warra nty
• Open up the camera. The re are no user servic eabl e parts inside
• E xpose the cam era to extreme temperatures or r apid change s of hot to col d or vice versa
Please DO
• Clean the camera with a soft dr y cloth a nd no dete rgents
• Clean the waterproof case after it has be en in water (salt especi ally) w ith fre sh tap water
• Us e a soft d ry cloth to wipe the sur face of th e came ra, then leave in a c ool, ventilated place
to dry
1716
Page 10

Please d o not attem pt to open this produ ct. There a re no user servi ceable parts i nside, in parti cular if y our prod uct has
an embed ded, non-repla ceabl e batter y, do not atte mpt to acce ss or remo ve the bat tery as th is may cause perso nal
injur y and will damage th e product.
This doe s not aect your statu tory rights.
Making a ny attempt to open the p roduct or carr y out repair voids a ny and all warranti es.
We apolog ise for any inconve nience cause d by minor inconsi stencies in thes e instruction s, which may occur a s a result of
product improvement and development.
1918
 Loading...