

Page 1

All trad emark s are acknowledged as the p roper ty of the ir respe ctive ow ners. Un less oth erwi se stated their
use doe s not imply th at the trade mark own er is ali ated with Kitvis ion or end orses th e products herein.
Please recycle this packaging responsibly.
JB. 5216 / KVIM3 60BK / Mad e in China. © K itvis ion 2016. Christchurch, Dorset, BH23 4F L, UK
360º CAMERA
User Manual
Page 2
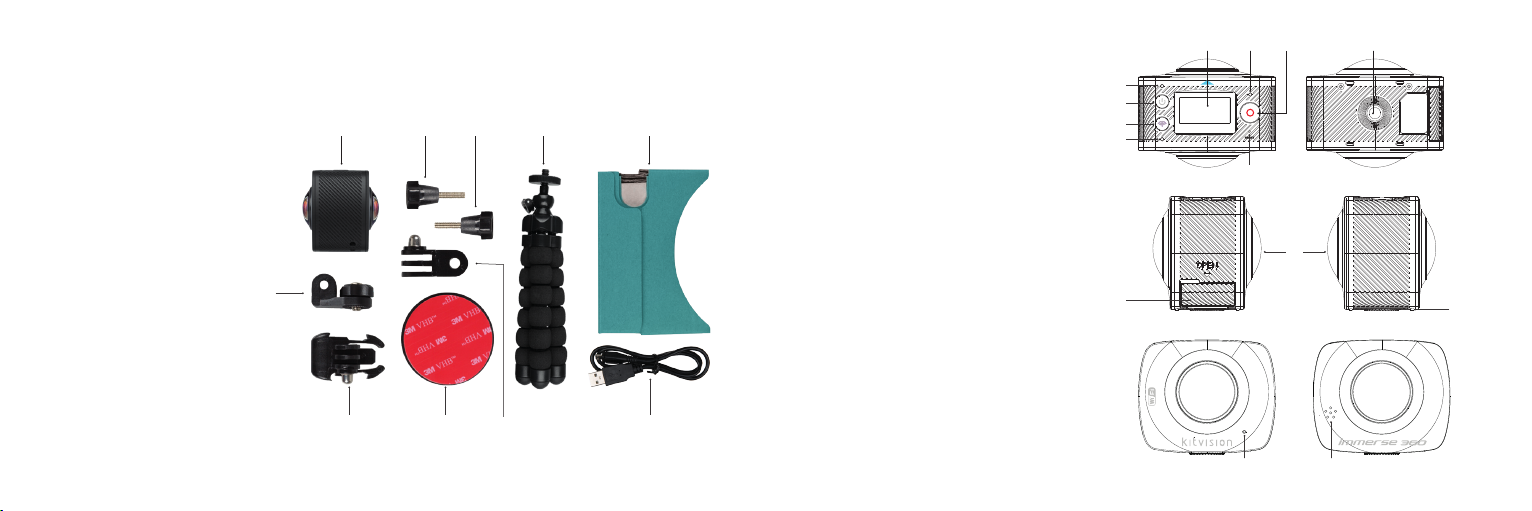
Box contents
1. Immerse 360 Duo Camera
2. VR Cardboard Headset
3. Flexible Tripod
4. USB Charging Cable
5. Screw (x2)
6. Camera Clip Mount
7. Adhesive Mount
8. 90° Adaptor
9. ¼" Tripod Screw Adaptor
10. User Manual
1 96 7
14
1 235 5
Functions
1. LCD Screen
2. Power/Mode
3. Wi-Fi LED (red)
4. Power LED (red)/Charging LED (blue)
5. Wi-Fi /Menu
4
2
5
3
6. Ope ration LED (red)
7. S h ut te r /O K
8. Lens (x2)
8
9. ¼" Tripod Thread Connector
9
10. USB/Micro SD Card Por t
11. Speaker
10
13
12. Microphone
13. Leash Hole
14 . Re s e t
8
46 7
12
11
3
Page 3

Instructions for use
Charging the camera
The camera has a built-in rechargeable Lithium-Ion battery. Please fully charge the camera before use.
1. Ensure that the camera is turned o.
2. Open the USB/ Micro SD Card Port (10) and conne ct the micro USB connector of the USB cable
to the camera USB port and the other end to a PC/mains charger USB port.
3. The Power LED/Charging LED (4) will be solid blue whilst charging.
4. Once fully charged, the Power LED/Charging LED (4) will turn o.
Note: The camera body will be warm when charging and after extended use. This is normal.
Memory storage card
The Imme rse 360 Duo doesn’t have any internal memory. To be able to record video or capture photos,
you must have your micro SD card inser ted.
1. Ensure the came ra is turne d OFF.
2. Ope n the USB/ Micro SD Card Port (10) and insert your memor y card into the micro SD card slot.
You will need to format your micro SD card to FAT32 with a default le size allocation.
We recommend using a Class 10 micro SD memory card between a minimum of 8 GB
and a maximum of 32 GB.
Note: Always turn o the camera when removing or inserting a micro SD card.
4 5
Turning power ON/OFF
1. To turn ON, press and hold Power/Mode (2) for about 2 seconds, until the camera beeps. The Power LED (4)
will turn red, and the LCD Screen (1) will illuminate to show the ‘Welcome’ screen. This will then change to the
home screen.
2. To turn OFF, press and hold Power/Mode (2) for about 3 seconds and release when the camera beeps.
The LCD Screen (1) will show the ‘Goodbye’ screen and then turn o.
Power saving mode
1. If the camera isn’t used for 1 min (default setting), the camera will enter Power Save mode. The LCD Screen (1)
will turn o automatic ally. The camera can be re-activated by pressing any button.
2. If the camera isn’t used for 3 mins in Power Save mode, the camera will automatically turn o.
Page 4

Using video mode
1. Turn on the camera, and it will start in Video Mode. If in another mode, press Power/Mode (2) until you reach
Mode display Recording display
Video resolution
Video Mode.
2. To start recording, press Shutter/OK (7) and the camera will begin lming. The camera will beep and the
Operation LED (6) will ash red.
3. To stop recording, press Shutter/OK (7). The video will automatically be saved on to your memory storage card.
Note: The camera will stop recording and save automatically whe n the memory capacity is full or it has run out of
Video mode icon
Record ing time
left on SD c ard
Batter y
level
Length of
recording
battery power.
Using photo mode
Date Time
1. Turn on the ca mera and press Power/Mode (2) to change to Photo Mode.
2. To take a photo, press Shutter/OK (7). The camera will beep and the Operation LED (6) will ash to
indicate a photo has been taken.
6 7
Photo display
Photo mode icon
Remaining photo
space on SD c ard
Photo resolution
Date Time
Batter y
level
Page 5

Using Wi-Fi and the app
To utilise all of the Wi-Fi features, you will need to have downloaded and installed the “SYVR360” app.
This app can be used on iOS and Android, smar tphones and tablets. Once connected, you can use
the app to control the camera to take videos and photos, playback your footage and manage your les.
App instructions
Our apps are constantly being updated to provide you with the best user experience, so our instructions are
online to make sure they’re always up to date. Please visit www.kitvision.co.uk/apps for app instructions,
or follow the in-app tutorials.
QR codes for the free app
Follow these QR code s to download the ‘SYVR360’ application to your smart device:
SYVR360
Apple devices Android devices
8 9
Connecting the camera to your device
1. Turn on the camera and press Wi-Fi/Menu (5). The display will r st show “WI-FI ON” and then the Wi-Fi name
and password screen.
2. Search for the camera’s Wi-Fi using your smartphone/tablet, connect to the ‘P3600_ xx xxxx’ network, and
you will be prompted to enter a password: enter 1234567890.
3. The LCD Screen (1) will display the Wi-Fi sy mbol to indicate that the camera is now connected to your device.
4. Open up the SY VR360 app and press the Camera Connect Button in the top right corner to load your
connected camera.
Page 6
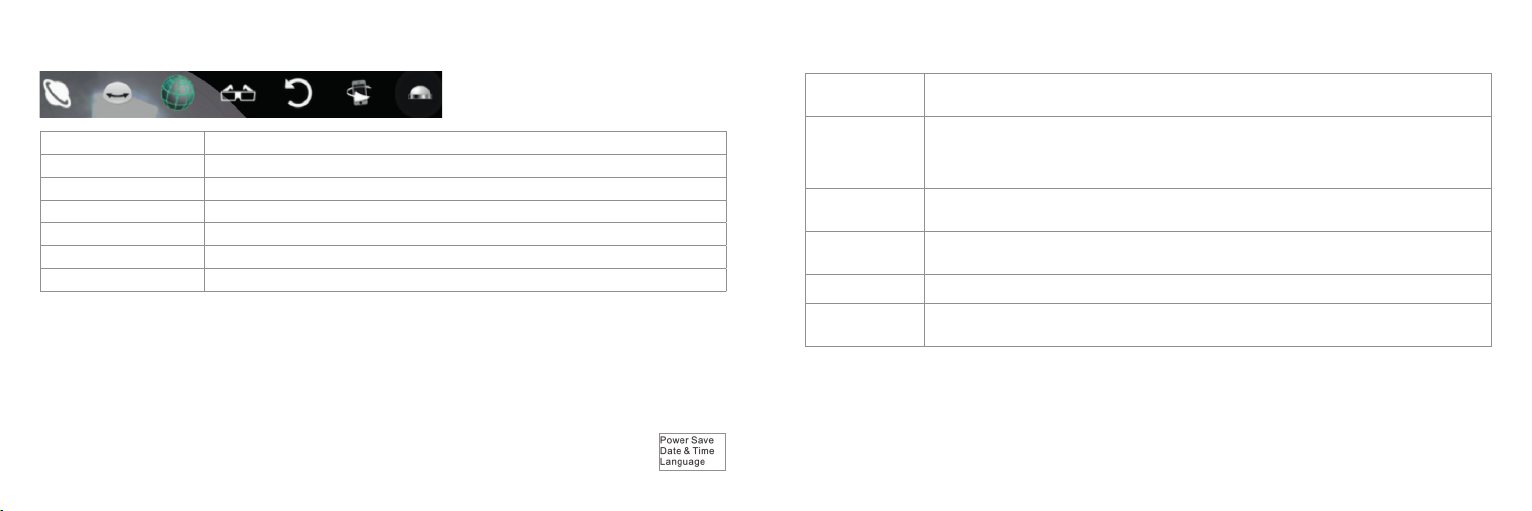
Viewing eects
Menu settings
Power Save
Planet
Dome a xis
Globe
VR
Collaboration reset
Phone gyroscope
Lens ip
Large d istort ion
Allows the image to rotate on a horizo ntal ax is
Image ca n be rotated within a sph ere
Creates a split scre en eect to v iew the footage in a VR Headset
Resets the view to the front of the recording / ph oto
Activates your sma rt devi ce’s gyrosco pe to allow you to use your device to look ar ound your les
Flips your video/photo upsi de down for up side- down mounting
Camera settings
1. To access the Menu, press and hold Wi-Fi /Menu (5) for 2 seconds and you will se e gure 1 scre en.
2. To scroll through the options, press Wi-Fi/Menu (5). Once you have highlighted the camera setting
you wish to access, press Shutter/OK (7).
3. Press and hold Wi-Fi/Menu (5) to move back to the previous menu. When on the menu home
screen, hold down Wi-Fi/Menu (5) to exit the camera set tings me nu.
10 11
gure 1
Date & Tim e
Language
Factory Reset
System
Format
Note: When formatting your memory storage card, all existing data will be erased. Please ensure you have
backed-up and saved any content on the card before formatting.
Set Power S ave mode. You can set the ca mera to ente r Power Save m ode after a cer tain per iod of time
[1min / 3min / 5min / OFF]
Manua lly set the d ate and time fo r the came ra. To select the n umber to ch ange, pre ss Power/Mo de (2) to
move the highligh ter. To scroll through th e number s, press Wi -Fi/M enu (5) unti l you reach th e number
required. To save the chan ges you have made, pres s Shutter/OK (7). If you don’t wan t to save any
chang es you have made, hold dow n Wi-Fi/ Menu (5) to return to the Men u Screen
Set the system langu age for the c amera. English is set as defau lt.
[Engli sh / Chinese/ French / Span ish / Italian / Por tugue se / Germ an / Russ ian]
Restore factory d efault setting s
[Yes / No]
Check sy stem (sof tware ver sion number) and storage ca rd (capac ity and ava ilabl e space) information
Format yo ur storag e memor y card. Thi s will cre ate an FAT32 storage li ng system
[Yes / No]
Page 7

Connecting to a PC
There are two ways to do this:
• Inserting the micro SD into a card reader
• Connecting to a computer using the supplied micro USB cable
1. Connect the USB cable to the camera’s USB/ Micro SD Card Port (10) and to the PC and turn the camera on.
2. ‘Connecting’ will appear on the LCD screen.
3. Open [My Computer] or [Windows Explorer®] on your PC. ‘Removable Disk’ will be in the drive list.
Double-click the ‘Removable Disk’ icon to view its contents. Files stored on the camera are located in the
folder named ‘DCIM’.
12 13
Specications
Display 0.96" LCD
Lens 2x 220°
Video resolution 1920 x 960p @ 30 fps
Video format MOV
Photo resolution 3008 x 1504
Video format JPEG
Storage Micro SD, 8 GB – 32 GB, Class 6-10
Input po rts Micro US B
Wi-Fi Integrate d
Speaker Integrate d
Microphone Integrate d
Batter y type 1500 mAh L ithium-ion (built-in)
Recor ding time Aroun d 1 hour (bas ed on vide o record ing)
Dimensions W 60 x H49 x D46 (mm)
Weight 105 g
Page 8

Care for your Immerse 360 Duo Action camera
Please DON’T:
• Get the camera wet
• Drop the camera as this will invalidate your warranty
• Open up the camera. There are no user serviceable parts inside
• Expose the camera to extreme temperatures or rapid changes of hot to cold or vice versa
Please DO:
• Clean the camera with a sof t dry cloth and no detergents
Troubleshooting
No power
No SD car d
SD card e rror
Camer a won’t turn on
Blurry photos
Turn o the came ra, remove S D card from th e camer a and wait for ve minute s. Charge th e
camer a for 1 hour. Then tu rn on the camera while still co nnecte d to the power sou rce.
Check th at there is a co mpatib le and form atted SD card in the cam era.
Save les you want to keep on to a PC and then fo rmat the SD card.
Charge the camera using a mains power ad aptor for 1 hou r and then tr y to turn on ag ain.
You need to hold th e camera still whil st press ing the Shutter/OK (7) button.
We hope you’ve now got all the information you need to get star ted, but if you’re having problems with anything,
please feel free to contact us at: [email protected] or visit www.kitvision.co.uk
Pleas e do not attem pt to open this p roduct. T here are no u ser ser vicea ble par ts insid e, in part icular if your prod uct has an
embed ded, non-replaceable b atter y, do not attempt to ac cess or re move the bat tery as th is may caus e personal injur y and
will damage the product.
Makin g any attem pt to open the pr oduct or carry ou t repair vo ids any and a ll warra nties
We apologise for any i nconvenience c aused by mi nor inco nsiste ncies in th ese inst ructio ns, whic h may occur as a result of pro duct
improvement and development.
14 15
 Loading...