


kitvision.co.uk
All trad emarks a re acknowledge d as the propert y of their respec tive owne rs.
Unless o therw ise stated their us e does not imply tha t the trade mark owner
is aliate d with Kitvisi on or endorses th e products herei n.
Product s showin g the ‘Cross ed Through’ whee lie bin sy mbol must be recycl ed
separa tely from h ousehold waste at t he end of the ir useful life. Pl ease DO NOT d ispose
of this appliance in normal household waste. Your local appliance retailer may
operate a ‘ take-back’ sche me when you are read y to purchase a repla cement product,
alternatively contact your local government authority for further help and advice
on where to t ake your ap pliance for recyc ling.
Please recycle this packaging responsibly.
HD5W ACTION CAMERA
User Manual
© Kitvi sion is a tradema rk of Kondo r Limite d, 2019. Christchu rch, Dorset, BH23 4FL, U K
JB. 6406 -a-online / KV ESCAPE5WC / REG02 / Made i n China

Warning
You are advised to test the waterproof case empty by subme rging it
in water to ensure that it does not malf uncti on.
You must ensure there a re no fore ign objects around th e rubber seal
or connecting terminals on the waterp roof case. It is ea sy for sand or
dust to become stuck after opening the c ase which may re sult in the
impairment of the waterproof performance.
Be extre mely c arefu l since i t may result in malfunction. If foreign
objects adhere to the inn er side of the sid e door, wipe them o with
a dry, lint-free cloth. If any liquid adheres to the c amera or inne r side
of the side door, wipe o w ith a sof t dry cloth. Do not open or close
the side door ne ar the wate r, when underwater, using wet ha nds,
or when the came ra is wet, as this may cause wate r leakage.
Box contents
• Kitvision Escape HD5 Action Camera
• 30 m waterproof case
• Bicycle mount
• Vented helm et straps
• Adhesive mount
• 2 x ad hesive pads
• 90° mount adaptor
• Camera mount clip
• Tripod adaptor
• Camera accessories
• Micro USB c able
• Quick Start Guide
• Rechargeable battery
2 3
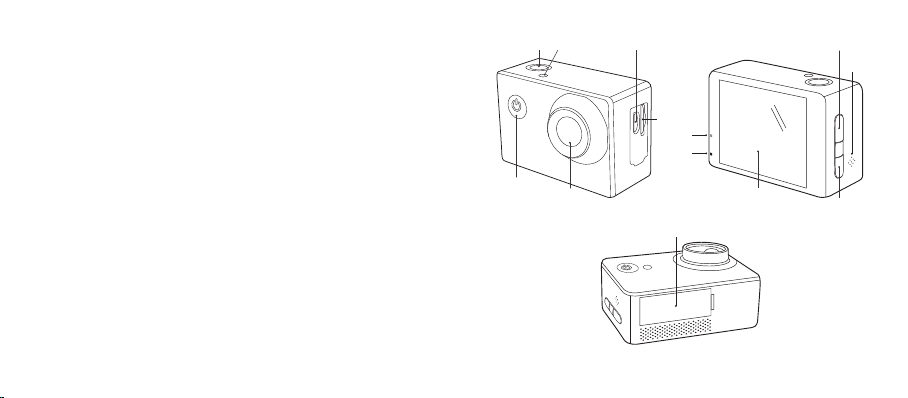
Functions
1. S hut t er/O k
2
12
6/7
1 5
2. Top Operation Indicator
3. Power/Mode
4. Micro SD Card Slot
5. Micro USB Input
6. Built-in Speaker
7. Built-in Microphone
8. Lens
9. Built-in LCD
10. Charging Indicator
3
8
4
11
10
9
14
13
11. Rear Operation Indicator
12. Up/Wi-Fi
13. Down/Mute microphone
14. Battery Cove r
4 5

Instructions
Long Press Power/Mode (3) to tur n on/o the camera.
Battery
The camera has a built-in rechargeable lithium-ion battery. Please fully
charge the battery before use.
1. Conne ct the USB cable to the camera and the other e nd to a
power source
2. Charging Indicator (10) is red whilst charging
3. The LCD (9) wi ll disp lay a battery icon which will be full w hen
fully charged
Note: The c amera body may b e warm af ter extended use.
This is normal.
Lift the Battery Cover (14) and pull the batter y tab to re move the
rechargeable battery.
6 7
Memor y card
To be able to reco rd vide o or capture photos using the came ra,
you must have your mi cro SD ca rd inserted. (A Class 10 SD card
is recommended for best performance).
1. Ensure the camer a is turn ed o
2. Insert your memory card into the Micro SD Card Sl ot (4)
3. You may need to format your SD card whe n inserted into
the camera; you can do this from the settings menu

Mode
Press the Power/Mode (3) to select mod e.
Video Mode Record video c lips
Photo Mode Take still photos
Playback Mode View photos and videos
Settings Mode Change settings
Audio
Using th e camera with th e waterp roof case will re cord le ss audible
sound. Fo r best audio quality, use without the case, and ma ke sure
it does n ot get wet.
Photo Mode
1. Turn on the cam era and press the Power/Mode But ton (3) once to
select Photo Mode
Video Mode
• The camera will star t in Video Mode
• Press Shu tter/Ok (1) to star t/stop re cordi ng
• Wh en recording, the LCD (9) will show a timer ico n and will display
2. Press Shutter/Ok (1) to take a picture
how long i t has been reco rding for
Note: The camera w ill stop recording and s ave autom atically whe n
the memory re maini ng or bat tery power is e mpty.
8 9

Playback Mode
1. Turn on the cam era and press the Power/Mode But ton (3) until you
have navigated to the Playback Mode
2. Press th e Up (12) and Down (13) to selec t the item you want to vi ew
3. If it is a video, press the Shutter/Ok (1) Button to play/stop the le,
and hold the Up (12) and Down (13) Buttons for 1 se cond o r more
to fast for ward and rewind
Note: To delete a le please access the camera through a PC, or a
mobile device using the Wi-Fi app.
10 11
Settings
1. Press the Power/Mode Button (3) to navigate to the setting s scree n
2. Use Up (12) and Down (13) to navig ate and the Shutter/Ok (1) to
enter a sub-menu and select an o ption
3. Press Power/Mode (3) to exit
Advanced Video and Photo Modes
Motion Detection
Cyclic Record Records vide o segments in set inter vals
Video Lapse
Capture Mode Capture s a photo af ter a set ti me interval
Star ts to record vide o when motion
is detected
Captures multiple photos at set time
intervals and creates a video
[con tinued...]

Advanc ed video and photo mode s will allow more control over your
Kitv ision action c amera. These mode s can be selected from th e
settings mode:
1. Turn on the cam era and press the Power/Mode But ton (3) until you
have navigated to the settings mod e
2. Use the UP (12), DOWN (13) and Shut ter/OK (1) Buttons to selec t
your required advanced mode f rom the menu and s elect the
required option
3. Exit the settings me nu. Now when you use the photo or video
mode, the selec ted adva nced mode wil l be activated
4. To deactivate the advan ced mode, repe at the pro cess s hown
above, but chang e the set ting back to the default option
12 13
Download the Wi-Fi App
Downlo ad ‘GOPLUS CA M’ from th e Apple App Store™ or
Google Play Store™.
Pairing
1. Press Up/Wi-Fi (12)
2. The Built-in LCD (9) will display the W i-Fi co nnection det ails sc reen
3. Go to the set tings of your mobile dev ice, an d select the Wi-Fi name
that is displaye d on the Built-in LCD (9), and input the Wi-F i
password displayed on the Built-in LCD (9)
4. Once co nnected, rema in on the W i-Fi co nnection details screen on
the camera
5. Open the ‘GOPLUS CAM’ application and press the button on
screen to conne ct to the ca mera

Connecting to a PC
There a re two ways to do this:
• In serting the m icro SD into a card re ader
• Co nnecting to a computer using the supplied micro USB ca ble
To use this option:
1. Conne ct the ca mera to a PC using a USB cable and the c amera’s
Micro USB Input (5)
2. Turn the camera on
Waterproof case
1. Open by lifting the front of the case catch upwards
2. Inser t the ca mera correctly so that the case close s easily and
provides a tight seal
3. Snap the top clip shut to ens ure the case is wate rproof
4. To operate the camera, use the waterproof case’s external
spring buttons
3. Use your computer’s le explorer to locate and sele ct the cam era
14 15

Specication
Display 2"
Lens 140 ° ultra wide-angle lens
Wi-Fi Frequency 2400 – 2500 MHz
Wi-Fi transmission power 10 dB M
Wi-Fi Enabled Yes
Language options [English] [German] [Italian] [Spanish]
[Portuguese] [Dutch] [French] [Polish]
[Danish] [Finnish] [Swedish] [Norwegian]
Video resolution 720p/3 0 fps
WVGA 480p/30 fps
16 17
Photo resolution 12M/8M/5M/2M
Storage Micro SD (Recommended Class 10
memor y card between 4 GB and 32 GB)
Battery capacity 900 mAh
Recording time per
charge
Compatibility
up to 60 minutes (actual recording time
will vary dependent on settings)
Windows XP®/Vista/ Windows 7®/
Windows 8/Windows 10/Mac OS
Waterproof case up to 30 m
Weight 59 g
™

Troubleshooting
No power Remove the batter y and SD card fro m the
camer a and wait fo r ve minutes. Inse rt the
batter y only, and charg e the cam era for
1 hour. Then tu rn on the camer a while still
conne cted to the p ower sou rce.
No SD card Check that there is a comp atible and
format ted SD ca rd in the camera .
SD card error Save les you wa nt to keep onto a PC an d
then for mat the SD card.
Camera won’t turn on Check th e battery is rm ly push ed into the
batter y compartment. Ch arge the camera
Care for your Escape HD5W Action Camera
Please DON’T:
• Get the camera wet, unless seale d in the in clude d waterp roof case
• Drop the ca mera as this will invalidate your warranty
• Open up the camera. The re are no user ser vic eable parts insid e
• E xpose the camera to extreme temperatures or ra pid changes of
hot to cold o r vice ve rsa
Please DO:
• Clean the camera with a soft dr y cloth and no dete rgents
• Cl ean the c amera case af ter it has been in water (sa lt especially)
with fre sh tap water
• Use a soft dry cloth to wipe th e surface the n leave in a cool,
ventilated place to dry
using a mains power adapto r.
Blurry photos You need to hold the came ra still whilst
pressing the photo mode button.
18 19
We hope you’ve n ow got all the infor mation you nee d to get started, but
if you’re having problems wi th anything, please feel fre e to contact us
at: support@kitvision.co.uk or visit www.kitvision.co.uk

‘Hereby, Kond or Ltd dec lares that the radio equipment type,
KVESCAPE5WC, is in c ompli ance with Directive 2014/53/EU.
The ful l text of the EU declaratio n of confo rmit y is available
at the following i nternet address:
http://kondor.co.uk/product-documents.’
This de vice compli es with Part 15 of the FC C Rules. Operation is s ubje ct
to the following two conditions:
(1) this devic e may not ca use har mful i nterf erenc e, and
(2) this device must accept any interference received, including interference
that may cause undesired operation.
Warning: Changes or modi cations not expressl y approved by the
party responsible for compliance could void the user's authority to
operate the equipment.
NOTE: Thi s equip ment has been tested an d found to c ompl y with the
limits f or a Clas s B digi tal dev ice, pursuan t to part 15 of th e FCC Rules.
These limits are designed to provide reasonable protection against
harmf ul inter fere nce in a re side ntial i nstal latio n. This e quipm ent generate s,
20 21
uses an d can rad iate rad io freq uenc y energ y and, if n ot insta lled a nd used
in acco rdanc e with th e instructio ns, may ca use har mful interferenc e to
radio commun ications. Howe ver, there is n o guarantee that inter fere nce
will not o ccur in a particula r insta llati on. If thi s equip ment do es cau se
harmf ul inter fere nce to radio or tel evisi on rec eption, which c an be
determ ined by turnin g the equ ipment o and on, the use r is enco uraged
to try to co rrect t he inter fere nce by on e or more of the foll owing m easures
- Reori ent or re locate the receivin g anten na.
- Increase the separation bet ween t he equi pment a nd rec eiver.
- Conne ct the equipm ent into a n outlet on a circu it die rent fr om that
to which the receiver is connected.
- Consult the dealer or an experienced radio/TV technician for help.
This de vice compli es with Part 18 of the FC C Rules.
US Responsible Party Information
Name: Stampede Presentation Products, Inc.
Addres s: Stam pede HQ, 55 Woodridge Dr, Amherst N Y, 14228
Telephone: 800-398-5652
Logistics@Stampedeglobal.com

IC
This device complies with Industry Canada’s licence-exempt RSSs.
Operation is subject to the foll owing t wo cond ition s: (1) This devic e
may not cau se interfere nce; and (2) This device must acce pt any
interference, including interference that may cause undesired
operation of the device.
Le prése nt appareil est confor me aux CNR d’Industrie Canada applicables
aux appa reils radio exempt de licence. L’exploitation est autorisée
aux deux c onditions su ivantes : 1) l’appareil ne d oit pas p rodui re de
The use an d operation of thi s Action Camera is b eyond our control. Wa rranty of the
Kitvi sion Action Cam era is limited to defe cts caused by faul ty manufactur e or defects
in materi als only. No warrant y whatsoever is gi ven or implied fo r damage caused by t he
user under any circumstances.
This doe s not aect yo ur statuto ry righ ts.
Please d o not attempt to open th is product. Ther e are no user serv iceable par ts inside,
in part icular if your pro duct has an embed ded, non-repla ceable batter y, do not atte mpt
to access o r remove the batter y as this may cause p ersona l injury and wil l damage
the product.
Making a ny attempt to open th e product or carr y out repair void s any and all warra nties.
brouillage ; 2) l’appareil doit accepter tout brouillage radioélectrique
subi, mê me si le brouillage est su sceptible d’en co mpromettre le
fonctionnement.
We sorry for any inconvenience caused by minor inconsistencies in these instructions,
which may occur as a result of product improvement and development.
22 23
 Loading...